

Page 1

ST-EC1179
FOOD STEAMER
ПАРОВАРКА
ПАРОВАРКА
Page 2
2
3
GB
FOOD STEAMER
Dear Buyer!
We congratulate you on having bought the device under trade name “Saturn”. We
are sure that our devices will become faithful and reliable assistance in your
housekeeping.
Avoid extreme temperature changes. Rapid temperature change (e.g. when the unit is
moved from freezing temperature to a warm room) may cause condensation inside the
unit and a malfunction when it is switched on. In this case leave the unit at room
temperature for at least 1.5 hours before switching it on.
If the unit has been in transit, leave it indoors for at least 1.5 hours before starting
operation.
Read this instruction carefully before using the appliance.
Important safeguards
l
For safety reasons children should be kept away from the appliance. Check whether
the voltage of the appliance corresponds with the voltage printed on the appliance.
l
This appliance is designed for household use processing household quantities (see the
processing tables.)
l
Use the steam basket only together with the drip pan.
l
Always use the insert when steaming food with color (e.g. carrots, paprika, tomatoes,
etc.), in order to minimize permanent coloring of the white steam basket.
l
The insert only together with the steam basket from the drip pan.
l
Always unplug the appliance before cleaning. Never immerse the base into water.
l
Never touch the appliance without potholders or kitchen gloves and do not use the
appliance without the cover. When lifting the cover, always hold it so that you do not
come in touch with escaping steam or dripping hot water. Be careful with hot liquids
in the drip pan.
Page 3
4
l
5
Always pull the plug when you have finished using the appliance.
l
When using the appliance ensure sufficient room over and beside the appliance, in
order to prevent damage to e.g. cabinets or other objects.
l
When using the appliance place it on a dry, level, heat-resistant surface.
l
Never place the appliance on a hot surface or over an open flame.
l
Repairs on electric appliances must only be done by authorized service personnel.
Faulty, unqualified repair work may cause accidents or injury to the user.
l
The cord of the appliance may only be replaced by an authorized service centre as a
special tool is required.
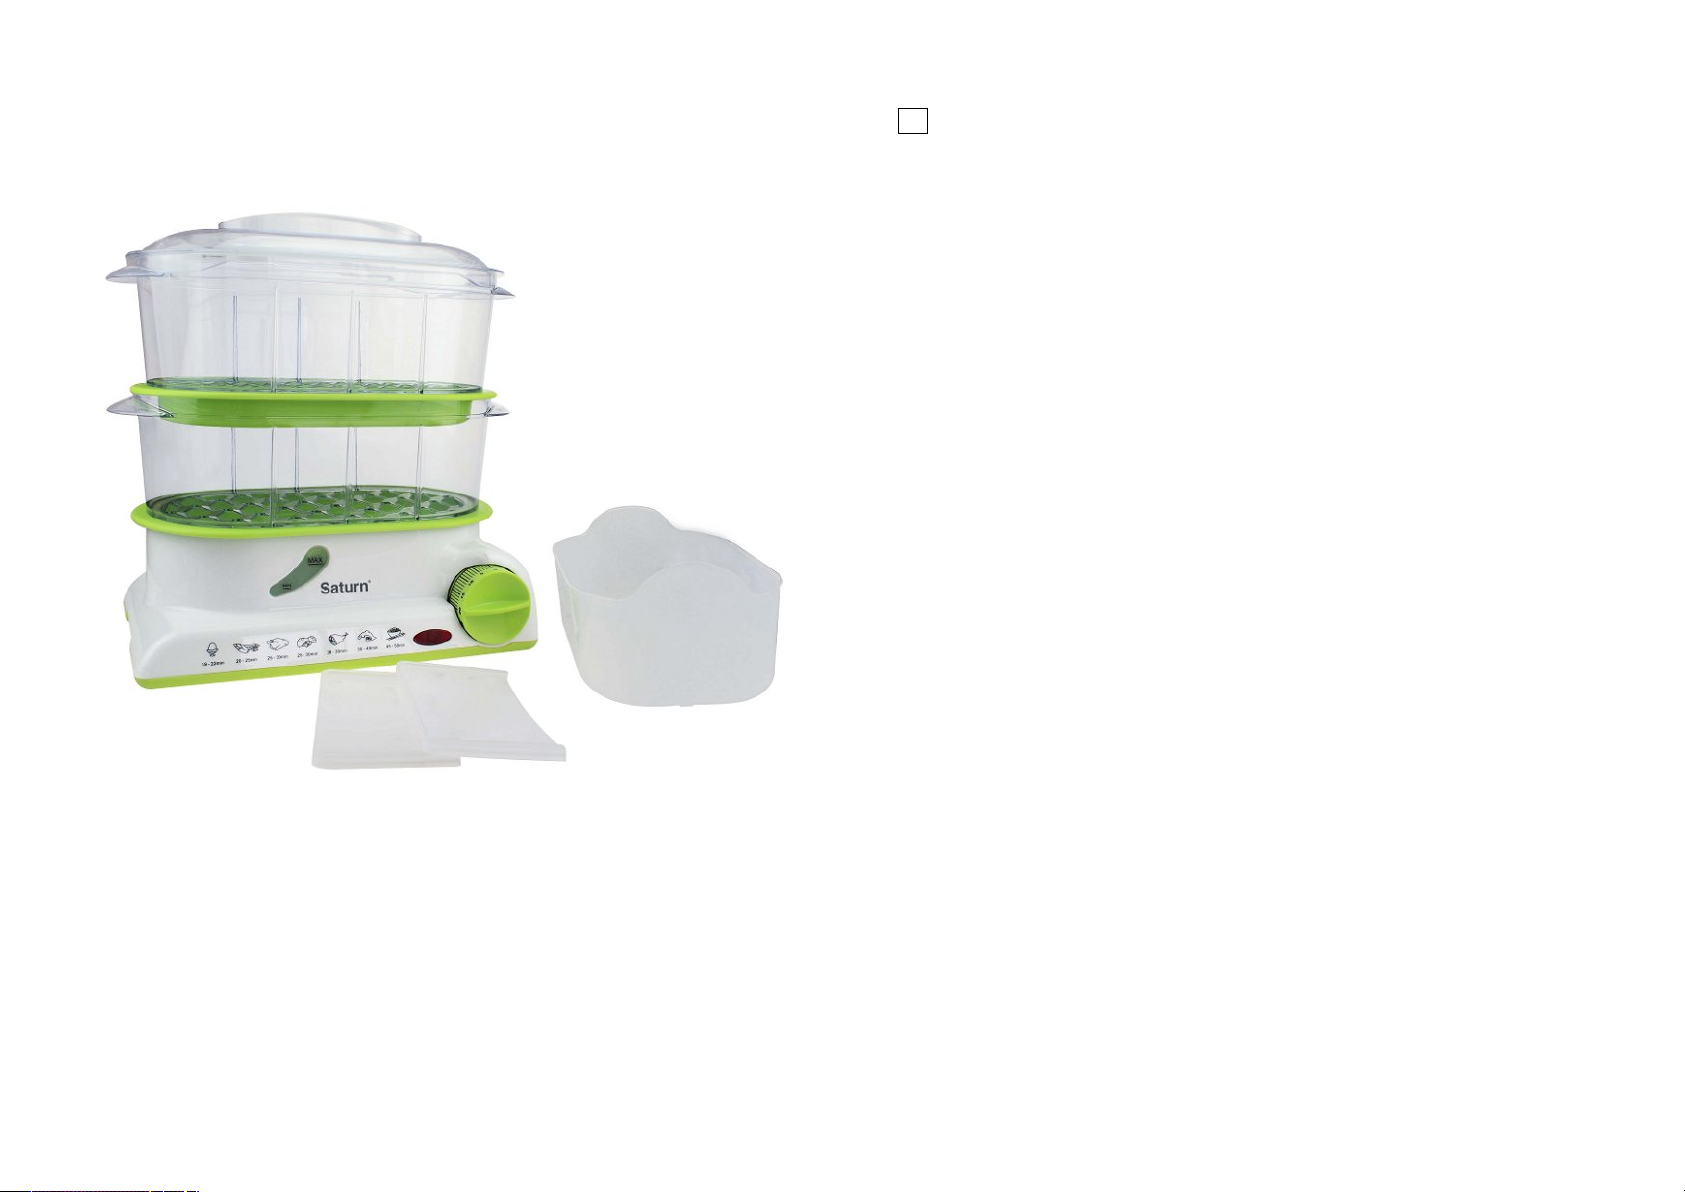
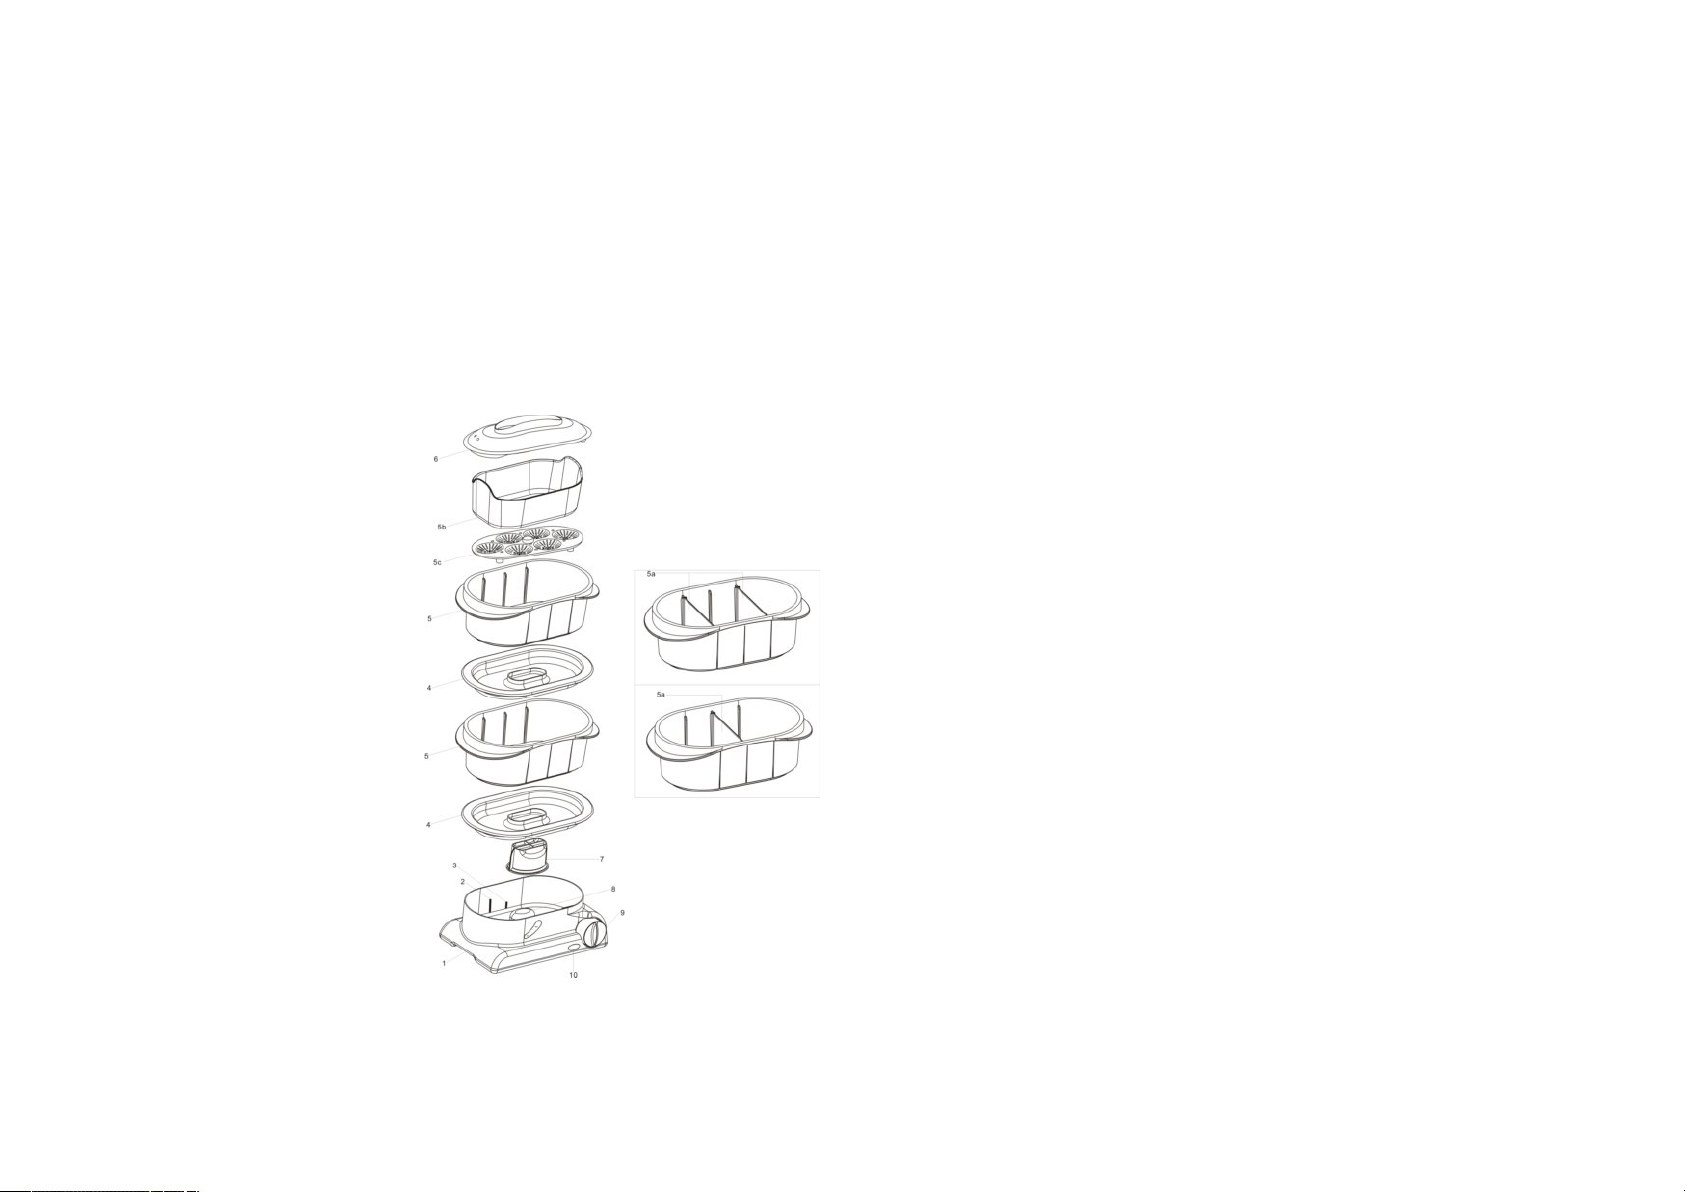
Description
1. Base.
2. Maximum water fill line
(for long steaming times)
3. Minimum water fill line
(for short steaming times)
4. Drip pan
5. Steam basket with slots
5a 2 dividers for steam basket (option)
5b Rice container
5c Slot for 6 eggs
6. Cover (transparent)
7. Steam accelerator (removable, used to
guide the steam)
8. Heating element
9. On/off switch with timer (60 minutes)
10. Pilot light for switch
Notice: Clean all parts before the first use as
described under “Cleaning”.
Steaming
1. Fill the base with cold tap water and put the steam accelerator in place. Do not add
any spices, sauces, wine etc. to the water. The water fill line) depends on the selected
steaming time.
2. Place the filled steam basket onto the drip pan in the base and set the cover onto the
steam basket. Without the cover in place, the consumption of electrical power would
be higher and the steaming time longer. When using both steam baskets, place the
second steam basket with its drip pan on the lower steam basket.
3. When using the steamer ensure sufficient vertical and horizontal space to other
objects (shelves etc.)
4. Plug the cord into a mains socket.
5. Set the timer. To do this first turn the knob to 60 minutes and then back to the desired
steaming time. The pilot light illuminates and steaming begins.
6. After the selected steaming time is over, the appliance switches off automatically and
the pilot light goes out.
7. Check whether the food is cooked. Put on long kitchen gloves. Switch the appliance
off. Lift the cover being careful of escaping steam. Do not touch any hot parts. Check
the food using a long fork.
If you want to continue steaming put on the cover and switches the appliance on again.
When using both steam baskets:
To check whether the food is cooked in the lower steam basket proceed as follow.
Switch the appliance off and remove the cover. Carefully lift off the upper steam
basket (with the insert) and place it on the reverse side of the cover. Then, using
kitchen gloves carefully remove the drip pan from the lower steam basket and check
whether the food is cooked.
If you want to continue steaming in both steam baskets. First place the drip pan onto
the lower steam basket and the put on the upper steam basket with the cover. Switch
on the appliance again.
8. When the appliance switches itself off and the food is sufficiently cooked pull the
plug and let and appliance cool off slightly. Then remove the steam basket the rice
bowl or the insert together with the steam basket, using kitchen gloves. The reverse
Page 4

6
side of the cover serves as stand for the steam of the cover serves as stand for the
7
steam basket. Remove the food from the steam basket or the rice bowl and spice it as
desired.
9. The liquids which have dripped into the drip pan can be used for sauces or soup.
10. Before you pour out remaining water from the base, disassemble or clean the
appliance always let it cool off. Pull the plug.
Water quantities
The water quantity needed depends on the steaming time. When steaming up to 18
minutes fill the base up to the minimum water fill line. When you are steaming longer than
18 minutes, fill to the maximum water fill line. Ensure a sufficient water level, especially
if the steaming time was extended. Should no more steam develop, please check the water
level. To do so, pull the plug and let the appliance cool off somewhat. Lift the steam
basket and the drip pan carefully then add water.
Steaming in the steam basket
Notice: the quantities and processing times are approximates for steaming in one steam
basket.
The steaming times listed in the charts also apply when steaming smaller quantities. When
steaming larger quantities the steaming times may be somewhat longer if there is not
enough space to permit sufficient steam circulation.
Tips for steaming with the model. The steaming times in the upper steam basket are
longer.
Therefore
l
Steam larger pieces or food with longer steaming times in the lower steam basket.
l
When steaming different kinds of food with different steaming times: steam food
with a longer steaming time in the lower steam basket. After some time place the
steam basket containing food with s shorter steaming time on top of the lower steam
basket for steaming.
Vegetables and fruits
l
Cut off thick stems from cauliflower, broccoli and cabbage.
l
Steam leafy, green vegetables for the shortest possible time as they lose color easily.
l
Frozen vegetables should not be thawed before steaming.
Food Type Quantity Steam time
Artichokes Fresh 4 (medium) 40—45 min
Asparagus Fresh 500 g 30—40 min
Beans, runner Fresh, whole or
sliced
Broccoli Fresh, florets 500 g 15—20 min
Brussels sprouts Fresh 500 g 20—25 min
Cabbage Fresh, sliced 500 g 25—30 min
Carrots Fresh, sliced 500 g 20—25 min
Cauliflower Fresh, sliced 500 g 20—25 min
Courgettes Fresh, florets 500 g 15—20 min
Fennel Fresh, sliced 500 g 15—20 min
Kohlrabi Fresh, in cubes 500 g 20—25 min
Leeks Fresh, cut 500 g 15—20 min
Mushrooms,
button
Potatoes Sliced 500 g 30—40 min
Potatoes Unpeeled 500 g 30—40 min
Sweet corn Fresh 2 pieces
Apples Fresh, 1/8
Pears Fresh, 1/6
Fresh, whole or
sliced
pieces
pieces
500 g 25—35 min
500 g 20—25 min
55—60(turn frequently)
500g 10—15 min
500g 10—15min
Page 5

8
Fish and Seafood
9
l
Frozen fish may be steamed without defrosting if separated before steaming, and the
steaming time is extended by approximately 10%.
Food Type Quantity Steam times
Trout Fresh 2 pieces, each 150 g 18—25 min
Tuna steaks Fresh 2 pieces, each 200 g 25—30 min
Rosefish fillets Fresh 2 pieces, each 200 g 15—18 min
Pollack fillets Fresh 2 pieces, each 140 g 15—18 min
Shrimps Fresh, sliced 450 g 15—20 min
Mussels In the shells 1.000 g 18—25 min
Squid Frozen 600 g 20—25 min
Lobsters In the shells 2 pieces 30—35 min
Meat, Poultry and Eggs
l
Tender meat with a little fat is suited best.
l
The meat should be well washed and dabbed dry, so that as little juice as possible
drips out.
Food Type Qantity Steam times
Turkey cutlets Fresh 2 pieces, each 150 g 18—25 min
Chicken legs Fresh 2 pieces, each 150 g 25—30 min
Veal cutlets Fresh 2 pieces, each 150 g 25—30 min
Lamb chops Fresh 2 pieces, each 150 g 30—35 min
Frankfurter
sausages
Beef sausages Fresh 2 – 8 (pierce skins) 8—10 min
Beef sausages Fresh 2 – 8 (pierce skins) 8—13 min
Eggs soft-boiled In the
Fresh 2 pieces, each 150 g 25—30 min
2 – 10 medium size 10—13 min
eggshell
Eggs hard-boiled In the
eggshell
Cleaning
Always pull the plug before you clean the appliance. Except the base, all parts can be
cleaned in the dishwater or by hand with a commercially available detergent. The steam
accelerator can be removed for cleaning. Wipe the base with a damp cloth.
Decalcifying
After you have used your steamer several times (depending on the water hardness in your
housing area). The heater in the base is covered by a layer. The appliance should now be
decalcified. Fill the base with white household vinegar (5%) so that the heating element is
just covered. Put steam accelerator in place. Close the appliance, connect it to 15 minutes.
Should there still be a layer visible after the 15 minutes are over, repeat the procedure.
After the vinegar and the appliance have sufficiently cooled off empty the base, rinse the
base 3 to 4 times with warm water.
Any remaining calcium can be removed from the steam accelerator with a brush.
Warning
1. This appliance is not intended for use by persons (including children) with reduced
physical, sensory or mental capabilities, or lack of experience and knowledge, unless they
have been given supervision or instruction concerning use of the appliance by a person
responsible for their safety.
2. Children should be supervised to ensure that they do not play with the appliance.
2 – 10 medium size 15—20 min
Technical Data:
Power Consumption: 850 W
Rated Voltage: 220-230 V
Rated Frequency: 50 Hz
Rated Current: 3.86 А
Page 6

10
Set
11
Food Steamer ………..................1
Rice Container………..................1
Slot for eggs. ………...................1
Dividers for steam basket. ……...2
Instruction manual………….…...1
Warranty book…………………..1
Package….………………….......1
RU
ПАРОВАРКА
Уважаемый покупатель!
Поздравляем Вас с приобретением изделия торговой марки “Saturn”. Мы
уверены, что наши изделия будут верными и надежными помощниками в
Вашем домашнем хозяйстве.
ENVIRONMENT FRIENDLY DISPOSAL
You can help protect the environment!
Please remember to respect the local regulations: hand in the
non-working electrical equipments to an appropriate waste disposal
center.
The manufacturer reserves the right to change the specification and design of goods.
Не подвергайте устройство резким перепадам температур. Резкая смена
температуры (например, внесение устройства с мороза в теплое помещение)
может вызвать конденсацию влаги внутри устройства и нарушить его
работоспособность при включении. Устройство должно отстояться в теплом
помещении не менее 1,5 часов.
Ввод устройства в эксплуатацию после транспортировки производить не ранее,
чем через 1,5 часа после внесения его в помещение.
Внимательно прочитайте данную инструкцию по эксплуатации перед тем, как
использовать устройство.
Важные меры предосторожности
l
Дети должны находиться под присмотром для уверенности в том, что они не
играют с устройством. Проверьте, чтобы напряжение, указанное на заводской
табличке устройства, соответствовало напряжению сети.
l
Устройство предназначено только для использования в быту (см. таблицу
приготовления продуктов).
l
Используйте контейнер для продуктов только вместе с поддоном для капель.
l
Вставляйте разделители в контейнер для продуктов при приготовлении
продуктов, который выделяют пигмент цвета (например, морковь, паприка,
помидоры и т.д.), чтобы они не окрасили другие ингредиенты.
l
Разделители устанавливаются в контейнер для продуктов.
Page 7

12
l
13
Отсоедините прибор от сети перед чисткой. Погружать основание в воду
запрещено!
l
Не касайтесь пароварки руками - используйте прихватки или кухонные
рукавицы. Не включайте пароварку без крышки. При открывании крышки
держите ее таким образом, чтобы на вас не попал горячий пар или собравшийся
конденсат на крышке. Внимание: внутри поддона для капель находится горячая
жидкость. Обращайтесь с ним осторожно.
l
После окончания работы с пароваркой отключайте ее от сети.
l
Во избежание повреждения кухни или других предметов рядом с пароваркой
должно быть достаточно свободного места.
l
Устанавливайте пароварку на сухую, ровную, устойчивую к температурам
поверхность.
l
Не ставьте пароварку на горячую поверхность или газовую плиту.
l
Ремонт пароварки должен осуществляться только в авторизированном
сервисном центре. Самостоятельный ремонт прибора может привести к
травмированию пользователя.
l
Не эксплуатируйте устройство с поврежденным шнуром или вилкой или после
выявления неисправностей и повреждений. Для ремонта и настройки
пароварки передайте ее в ближайший авторизированный сервисный центр.
Описание
1. Основание.
2. Максимальный
уровень воды (для длительного
приготовления на пару).
3. Минимальный уровень
воды (для быстрого
приготовления на пару).
4. Поддон для капель.
5. Контейнер для продуктов
со слотами.
5a 2 разделители контейнера
для продуктов (опция).
5b Контейнер для риса
5c Слот на 6 яиц.
6. Крышка (прозрачная).
7. Крышка нагревательного
элемента (съемная).
8. Нагревательный элемент.
9. Переключатель "Вкл-выкл" с
таймером на 60 минут.
10. Индикатор питания переключателя
"Вкл-выкл".
Page 8

14
Примечание: перед первым использованием промойте все части пароварки
15
согласно раздела «Чистка».
Приготовление на пару
1. Наполните резервуар основания холодной водой и установите крышку
нагревательного элемента. Запрещено добавлять специи, соус, вино в воду.
В зависимости от времени приготовления на пару налейте воду в резервуар.
2. Установите контейнер для продуктов на поддон для сбора капель и закройте
сверху крышкой. Без крышки увеличится время приготовления и
потребление электричества. При использовании обоих контейнеров
расположите второй контейнер с поддоном для капель на первый контейнер.
3. Для работы пароварки вокруг должно быть много свободного места.
4. Вставьте вилку шнура питания в розетку.
5. Настройте таймер. Поверните регулятор таймера на 60 минут, после чего
установите необходимое время. Загорится индикатор питания и пароварка
начнет работу.
6. По истечению заданного времени выключение происходит автоматически,
таймер подает сигналы, и индикатор питания гаснет.
7. Проверьте блюдо на готовность. Наденьте кухонные рукавицы. Выключите
устройство. Осторожно снимите крышку. Не обожгитесь паром. Не
касайтесь горячих поверхностей. С помощью длинной вилки проверьте,
готово ли блюдо. Если необходимо продолжить приготовление на пару,
закройте крышку и повторно включите пароварку. При использовании
обоих контейнеров для продуктов: для проверки блюда на готовность в
нижнем контейнере для продуктов выполните следующее: выключите
устройство и откройте крышку. Аккуратно снимите верхний контейнер для
продуктов и поставьте его на перевернутую крышку. Затем при помощи
кухонных рукавиц снимите поддон для сбора капель с нижнего контейнера
для продуктов и проверьте, готово ли блюдо. Если необходимо продолжить
приготовление на пару в обоих контейнерах: сначала поставьте поддон для
сбора капель на нижний контейнер, затем установите верхний контейнер
для продуктов и закройте крышку. Повторно включите устройство.
8. Когда таймер выключится, блюдо готово - выключите прибор и отсоедините
сетевой шнур от электросети.
9. Затем, надев кухонные рукавицы, снимите контейнер для риса и контейнер
для продуктов вместе или по отдельности. Обратная сторона крышки
служит подставкой для контейнера для продуктов. Разложите продукты из
контейнера для продуктов или контейнера для риса по тарелкам.
10. Сок продуктов, собранный в поддоне для капель, можно использовать как
основу для приготовления супов и соусов.
11. Перед тем, как сливать сок с поддона для капель, перед разборкой или
очисткой пароварки, дождитесь ее полного остывания.
12. Отключите сетевой шнур от электросети.
Количество воды
Количество заливаемой воды зависит от времени приготовления. Для приготовления
на пару до 18 минут налейте воды до минимального уровня. Для приготовления на
пару свыше 18 минут налейте воды до максимального уровня. Убедитесь в
достаточном количестве воды, если увеличено время приготовления. Чтобы не
образовывался пар, проверьте уровень воды. Для этого отключите шнур питания
от электросети и дайте пароварке остыть некоторое время. Снимите контейнер для
продуктов, поддон для капель и добавьте воды.
Примечание: количество и время приготовления на пару - приблизительные.
Время, указанное в таблице, применимо для меньшего количества продуктов. Для
приготовления больших количеств продуктов время приготовления следует
увеличить.
Советы для приготовления на пару
Время приготовления на пару в верхнем контейнере больше, чем в нижнем
контейнере. Поэтому большие куски или продукты кладите в нижний контейнер, а
небольшие - в верхний контейнер.
Page 9

16
При приготовлении продуктов с разным временем: кладите продукты с большим
Свежая, нарезанная
17
временем приготовления в нижний контейнер для приготовления. Через некоторое
время поставьте контейнер с небольшим временем приготовления на нижний
контейнер.
Овощи и фрукты
Удалите стебли цветной капусты, брокколи и т.д.
Из-за окрашивания от пигментов цвета обрабатывайте овощи и зелень минимально
короткое время.
Перед приготовлением на пару замороженные продукты размораживать не надо.
Продукт Состояние
продукта
Приблизитель
ное
Время приготовления
количество
Артишок Свежий 4 (Средний) 40-45 минут
Спаржа Свежая 500 г 30-40 минут
Бобы Свежие, целые 500 г 25-35 минут
Брокколи Свежие, цветочки 500 г. 15-20 минут
Побеги
Свежие 500 г 20-25 минут
брюссельской
капусты
Капуста Свежая, нарезанная 500 г. 25-30 минут
Морковь Свежая, нарезанная 500 г. 20-25 минут
Цветная
Свежая, нарезанная 500 г. 20-25 минут
капуста
Молодой
Свежий 500 г. 15-20 минут
кабачок
Фенхель Свежий,
500 г. 15-20 минут
нарезанный
Кольраби
500 г. 20-25 минут
кубиками
Лук-порей Свежий,
500 г. 15-20 минут
нарезанный
Грибы, шляпка Свежие, целые или
500 г. 20-25 минут
нарезанные
Картофель Порезанный на
500 г. 30-40 минут
куски
Картофель "В мундирах" 500 г. 30-40 минут
Столовая
кукуруза
Яблоко Свежее, порезанное
Свежая 2 шт. 55-60 минут
(часто переворачивать)
500 г. 10-15 минут
на 8 кусков
Груша Свежая, порезанная
500 г. 10-15 минут
на 6 кусков
Рыба и морепродукты
Перед приготовлением на пару мороженную рыбы размораживать не надо, время
приготовления увеличивается приблизительное на 10%.
Продукт Состояние
продукта
Форель Свежая 2 куска, каждый
Приблизительно
е количество
Время приготовления
18-25 минут
по 150 грамм.
Стэйк тунца Свежий 2 шт., каждый по
25-30 минут
200 грамм.
Морской
окунь
Филе сайды Свежее 2 шт. каждый по
Свежий 2 шт., каждый
200 грамм.
15-18 минут
15-18 минут
140 г.
Креветки Свежие,
450 г. 15-20 минут
порезанные
Page 10

Мидии В скорлупе 1,000 г. 18-25 минут
Кальмар Мороженный 600 г. 20-25 минут
Омар В оболочке 2 шт. 30-35 минут
основания, все остальные части можно мыть либо в посудомоечной машине, либо
под проточной водой с добавлением моющего средства. При очистке крышку
нагревательного элемента можно снимать. Протирайте основание пароварки
влажной тканью.
Мясо, мясо птицы и яйца
Лучше всего подходит нежное мясо с минимальным количеством жира.
Продукт Состояние
продукта
Отбивные
Свежие 2 шт., каждая 150
котлеты из
Приблизительное
количество
грамм.
Время приготовления
18-25 минут
индейки
Окорочка Свежие 2 шт., каждая 150
25-30 минут
грамм
Отбивные
котлеты из
Свежие 2 шт., каждая 150
грамм
25-30 минут
телятины
Небольшие
куски ягненка
Сосиски Свежие 2 шт., каждая 150
Свежие 2 шт., каждая 150
грамм
30-35 минут
25-30 минут
грамм
Говяжьи
Свежие 2-8 8-10 минут
сосиски
Говяжьи
Свежие 2-8 8-13 минут
сосиски
Яйца всмятку В скорлупе 2-10 среднего
10-13 минут
размера
Яйца вкрутую В скорлупе В скорлупе 15-20 минут
Чистка
Перед очисткой дайте пароварке остыть и отключите от сети. За исключением
Удаление накипи
После нескольких использований (в зависимости от жесткости воды)
нагревательный элемент пароварки покрывается накипью. Пароварку следует
периодически очищать от накипи. Налейте в резервуар 5% раствор уксуса, чтобы он
покрывал нагревательный элемент. Установите пароварку на место. Закройте
крышку, включите на 15 минут. Если через пятнадцать минут налет не исчезнет,
повторите процедуру очистки от накипи еще раз. После полного остывания уксуса
слейте его. Промойте чистой водой 3-4 раза. Остатки налета с крышки
нагревательного элемента можно удалить щеткой.
Внимание!
Данное устройство не предназначено для использования лицами (включая детей) с
ограниченными физическими, сенсорными или умственными способностями, а
также лицами, не имеющими опыта и знаний, если они не находятся под
наблюдением или не получили инструкции по использованию устройства от лица,
ответственного за их безопасность.
Дети должны находиться под присмотром для уверенности в том, что они не
играют с устройством.
Технические характеристики
Потребляемая мощность: 850 Вт
Номинальное напряжение: 220-230 В
Номинальная частота: 50 Гц
Номинальная сила тока: 3,86 A
18
19
Page 11

Комплектация
UА
Пароварка………………………1 шт.
Контейнер для риса……………1 шт.
Слот для яиц……………………1 шт.
Разделитель контейнера
для продуктов…………………2 шт.
Инструкция по эксплуатации…1 шт.
Гарантийный талон.....................1 шт.
Упаковка ......................................1 шт.
БЕЗОПАСНАЯ ДЛЯ ОКРУЖАЮЩЕЙ СРЕДЫ УТИЛИЗАЦИЯ
Вы можете помочь в охране окружающей среды!
Будьте любезны, соблюдайте местные правила: передавайте
неработающее электрическое оборудование в соответствующий
центр утилизации отходов.
Производитель оставляет за собой право вносить изменения в
технические характеристики и дизайн изделий
ПАРОВАРКА
Шановний покупець!
Вітаємо Вас з придбанням виробу торгової марки "Saturn". Ми впевнені, що
наші вироби будуть вірними і надійними помічниками у Вашому домашньому
господарстві.
Не піддавайте пристрій різким перепадам температур. Різка зміна температури
(наприклад, внесення пристрої з морозу в тепле приміщення) може викликати
конденсацію вологи всередині пристрою та порушити його працездатність при
вмиканні. Пристрій повинен відстоятися в теплому приміщенні не менше 1,5
годин.
Введення пристрою в експлуатацію після транспортування проводити не
раніше, ніж через 1,5 години після внесення його в приміщення.
Уважно прочитайте інструкцію з експлуатації перед тим, як використовувати
пристрій.
Важливі заходи безпеки
Діти повинні знаходитися під наглядом для впевненості в тому, що вони не
l
грають з пристроєм. Перевірте, щоб напруга, яка вказана на заводській табличці
пристрою, відповідала напрузі мережі.
Пристрій призначений тільки для використання в побуті (див. таблицю
l
приготування продуктів).
Використовуйте контейнер для продуктів тільки разом з піддоном для крапель.
l
Вставляйте роздільники в контейнер для продуктів при приготуванні продуктів,
l
який виділяють пігмент кольору (наприклад, морква, паприка, помідори і т.д.),
щоб вони не фарбували інші інгредієнти.
l
Роздільники встановлюються в контейнері для продуктів.
20
21
Page 12

22
l
23
Від'єднайте прилад від мережі перед чищенням. Занурювати основу у воду
заборонено!
l
Не торкайтеся пароварки руками - використовуйте прихватки або кухонні
рукавиці. Не вмикайте пароварку без кришки. При відкриванні кришки
тримайте її таким чином, щоб на вас не потрапив гарячий пар або конденсат, що
зібрався на кришці. Увага: всередині піддону для крапель знаходиться гаряча
рідина. Поводьтеся з ним обережно.
l
Після закінчення роботи з пароваркою відключайте її від мережі.
l
Щоб уникнути пошкодження кухні або інших предметів поряд з пароваркою
повинно бути достатньо вільного місця.
l
Встановлюйте пароварку на суху, рівну, стійку до температур поверхню.
l
Не ставте пароварку на гарячу поверхню або газову плиту.
l
Ремонт пароварки повинен здійснюватися тільки в авторизованому сервісному
центрі. Самостійний ремонт приладу може привести до травмування
користувача.
l
Не експлуатуйте пристрій з пошкодженим шнуром або вилкою або після
виявлення несправностей і пошкоджень. Для ремонту і настройки пароварки
передайте її в найближчий авторизований сервісний центр.
Опис
1. Основа .
2. Максимальний рівень води
(для тривалого приготування на парі).
3. Мінімальний рівень води (для
швидкого приготування на парі).
4. Піддон для крапель.
5. Контейнер для продуктів зі слотами.
5a 2 роздільники контейнера для
продуктів (опція).
5b Контейнер для
5c Слот для 6 яєць.
6. Кришка (прозора).
7. Кришка нагрівального елемента
(знімна).
8. Нагрівальний елемент.
9. Перемикач "Увімк-вимк" з таймером
на 60 хвилин.
10. Індикатор живлення перемикача
"Увімк-вимк".
Примітка: перед першим використанням промийте всі частини пароварки згідно
розділу «Чищення».
Приготування на парі
1. Наповніть резервуар основи холодною водою і встановіть кришку нагрівального
елементу. Заборонено додавати спеції, соус, вино у воду. Залежно від часу
приготування на пару налийте воду в резервуар.
2. Встановіть контейнер для продуктів на піддон для збирання крапель і закрийте
зверху кришкою. Без кришки збільшиться час приготування і споживання електрики.
При використанні обох контейнерів розташуйте другий контейнер з піддоном для
Page 13

24
крапель на перший контейнер.
25
3. Для роботи пароварки навколо повинне бути багато вільного місця.
4. Вставте вилку шнура живлення в розетку.
5. Налаштуйте таймер. Поверніть регулятор таймера на 60 хвилин, після чого
встановіть необхідний час. Загориться індикатор живлення і пароварка почне роботу.
6. По закінченню заданого часу вимкнення відбувається автоматично, таймер подає
сигнали, і індикатор живлення гасне.
7. Перевірте страву на готовність. Одягніть кухонні рукавиці. Вимкніть пристрій.
Обережно зніміть кришку. Не обпечіться парою. Не торкайтесь гарячих поверхонь.
За допомогою довгої вилки перевірте, чи готова страва. Якщо необхідно продовжити
приготування на парі, закрийте кришку і повторно увімкніть пароварку. При
використанні обох контейнерів для продуктів: для перевірки страви на готовність у
нижньому контейнері для продуктів виконайте наступне: вимкніть пристрій і
відкрийте кришку. Акуратно зніміть верхній контейнер для продуктів і поставте його
на перевернену кришку. Потім за допомогою кухонних рукавиць зніміть піддон для
збирання крапель з нижнього контейнера для продуктів і перевірте, чи готова страва.
Якщо необхідно продовжити приготування на парі в обох контейнерах: спочатку
поставте піддон для збору крапель на нижній контейнер, потім встановіть верхній
контейнер для продуктів і закрийте кришку. Повторно увімкніть пристрій.
8. Коли таймер вимикається, страва готова - вимкніть прилад і від'єднайте шнур
живлення від електромережі.
9. Потім, надівши кухонні рукавиці, зніміть контейнер для рису і контейнер для
продуктів разом або окремо. Зворотний бік кришки служить підставкою для
контейнера для продуктів. Розкладіть продукти з контейнера для продуктів або
контейнера для рису по тарілках.
10. Сік продуктів, зібраний у піддоні для крапель, можна використовувати як основу
для приготування супів і соусів.
11. Перед тим, як зливати сік з піддону для крапель, перед розбиранням або
очищенням пароварки, дочекайтеся її повного охолодження.
12. Вимкніть мережевий шнур від електромережі.
Кількість води
Кількість води, що заливається, залежить від часу приготування. Для приготування
на парі до 18 хвилин, налийте води до мінімального рівня. Для приготування на парі
понад 18 хвилин, налийте води до максимального рівня. Переконайтесь в достатній
кількості води, якщо збільшений час приготування. Щоб не утворювалась пара,
перевірте рівень води. Для цього відключіть шнур живлення від електромережі і
дайте пароварці охолонути деякий час. Зніміть контейнер для продуктів, піддон для
крапель і долийте води.
Примітка: кількість і час приготування на парі - приблизні.
Час, вказаний у таблиці, використовується для меншої кількості продуктів. Для
приготування великої кількості продуктів час приготування слід збільшити.
Поради для приготування на пару
Час приготування на парі у верхньому контейнері більший, ніж у нижньому
контейнері. Тому великі шматки або продукти кладіть у нижній контейнер, а
невеликі - у верхній контейнер.
При приготуванні продуктів з різним часом: кладіть продукти з великим часом
приготування в нижній контейнер для приготування. Через деякий час поставте
контейнер з коротким часом приготування на нижній контейнер.
Овочі та фрукти
Видаліть стебла цвітної капусти, броколі і т.д.
Через фарбування від пігментів кольору обробляйте овочі та зелень мінімально
короткий час.
Перед приготуванням на парі заморожені продукти розморожувати не треба.
Продукт Стан продукту Приблизна
Час готування
кількість
Артишок Свіжий 4 (Середній) 40-45 хвилин
Спаржа Свіжа 500 г 30-40 хвилин
Page 14

26
Боби Свіжі, цілі 500 г 25-35 хвилин
27
Броколі Свіжі, квіточки 500 г. 15-20 хвилин
Пагіння
Свіжі 500 г 20-25 хвилин
брюссельської
капусти
Капуста Свіжа, нарізана 500 г. 25-30 хвилин
Морква Свіжа, нарізана 500 г. 20-25 хвилин
Кольорова
Свіжа, нарізана 500 г. 20-25 хвилин
капуста
Молодий
Свіжий 500 г. 15-20 хвилин
кабачок
Фенхель Свіжий, нарізаний 500 г. 15-20 хвилин
Кольрабі Свіжі, нарізані
500 г. 20-25 хвилин
кубиками
Цибуля-порей Свіжа, нарізана 500 г. 15-20 хвилин
Гриби,
шапочка
Картопля Нарізана на
Свіжі, цілі або
нарізані
500 г. 20-25 хвилин
500 г. 30-40 хвилин
шматки
Картопля "В мундирах" 500 г. 30-40 хвилин
Столова
кукурудза
Яблуко Свіже, нарізане на
Свіжа 2 шт. 55-60 хвилин
(часто перевертати)
500 г. 10-15 хвилин
8 шматків
Груша Свіжа, нарізана на
500 г. 10-15 хвилин
6 шматків
Риба і морепродукти
Перед готуванням на парі морожену риби розморожувати не потрібно, час готування
збільшується приблизне на 10%.
Продукт Стан продукту Приблизна кількість Час готування
Форель Свіжа 2 шматки, кожний по
18-25 хвилин
150 грам.
Стейк тунця Свіжий 2 шт., кожний по 200
25-30 хвилин
грам.
Морський
окунь
Свіжий 2 шт., кожний 200
грам.
15-18 хвилин
Філе сайди Свіже 2 шт. кожний по 140 г. 15-18 хвилин
Креветки Свіжі, порізані 450 г. 15-20 хвилин
Мідії У шкарлупі 1,000 г. 18-25 хвилин
Кальмар Морожений 600 г. 20-25 хвилин
Омар В оболонці 2 шт. 30-35 хвилин
М'ясо, м'ясо птиці і яйця
Найкраще підходить ніжне м'ясо з мінімальною кількістю жиру.
Продукт Стан продукту Приблизна кількість Час готування
Відбивні
Свіжі 2 шт., кожна 150 грам. 18-25 хвилин
котлети з
індички
Окорочка Свіжі 2 шт., кожна 150 грам 25-30 хвилин
Відбивні
Свіжі 2 шт., кожна 150 грам 25-30 хвилин
котлети з
телятини
Невеликі
Свіжі 2 шт., кожна 150 грам 30-35 хвилин
шматки
ягняти
Сосиски Свіжі 2 шт., кожна 150 грам 25-30 хвилин
Яловичі
Свіжі 2-8 8-10 хвилин
сосиски
Яловичі
Свіжі 2-8 8-13 хвилин
сосиски
Page 15

28
Яйця
29
некруто
Яйця
У шкарлупі 2-10 середнього
10-13 хвилин
розміру
У шкарлупі У шкарлупі 15-20 хвилин
вкруту
Чищення
Перед очищенням дайте пароварці охолонути і відключіть від мережі. За винятком
основи, всі інші частини можна мити або в посудомийній машині, або під
проточною водою з додаванням мийного засобу. При очищенні кришку
нагрівального елемента можна знімати. Протирайте основу пароварки вологою
тканиною.
Видалення накипу
Після декількох використань (залежно від твердості води) нагрівальний елемент
пароварки обкипає. Пароварку варто періодично очищати від накипу. Налийте в
резервуар 5% розчин оцту, щоб він покривал нагрівальний елемент. Установіть
пароварку на місце. Закрийте кришку, увімкніть на 15 хвилин. Якщо через
п'ятнадцять хвилин наліт не зникне, повторіть процедуру очищення від накипу ще
раз. Після повного остигання оцту злийте його. Промийте чистою водою 3-4 рази.
Залишки нальоту із кришки нагрівального елемента можна видалити щіткою.
Увага!
Даний пристрій не призначений для використання особами (включаючи дітей) з
обмеженими фізичними, сенсорними або розумовими здібностями, а також особами,
що не мають досвіду і знань, якщо вони не перебувають під спостереженням або не
отримали інструкції з використання пристрою від особи, відповідальної за їх
безпеку.
Діти повинні перебувати під доглядом для впевненості в тім, що вони не грають із
пристроєм.
Технічні характеристики
Споживча потужність: 850 Вт
Номінальна напруга: 220-230 В
Номінальна частота: 50 Гц
Номінальна сила струму: 3,86 А
Комплектація
Пароварка.......................................1 шт.
Контейнер для рису.......................1 шт.
Слот для яєць.................................1 шт.
Роздільники контейнера для
продуктів........................................2 шт.
Інструкція з експлуатації………. 1 шт.
Гарантійний талон........................ 1 шт.
Упаковка…..................................... 1 шт.
БЕЗПЕЧНА ДЛЯ НАВКОЛИШНЬОГО СЕРЕДОВИЩА УТИЛІЗАЦІЯ
Ви можете допомогти в охороні навколишнього середовища!
Будьте люб'язні, дотримуйтесь місцевих правил: передавайте
непрацююче електричне обладнання у відповідний центр утилізації
відходів.
Виробник залишає за собою право вносити зміни в технічні
характеристики й дизайн виробів.
 Loading...