

Page 1

ST-FP0098
MEAT GRINDER
МЯСОРУБКА
ﻢﺤﻠﻟا ﺔﻣﺮﻔﻣ
Page 2
GB
Dear Buyer!
We congratulate you on having
bought the device under trade
name «Saturn». We are sure that
our devices will become faithful
and reliable assistance in your
housekeeping.
Avoid extreme temperature
changes. Rapid temperature
change (e.g. when the unit is
moved from freezing temperature
to a warm room) may cause
condensation inside the unit and a
malfunction when it is switched
on. In this case leave the unit at
room temperature for at least 1.5
hours before switching it on.
If the unit has been in transit,
leave it indoors for at least 1.5
hours before starting operation.
MEAT GRINDER
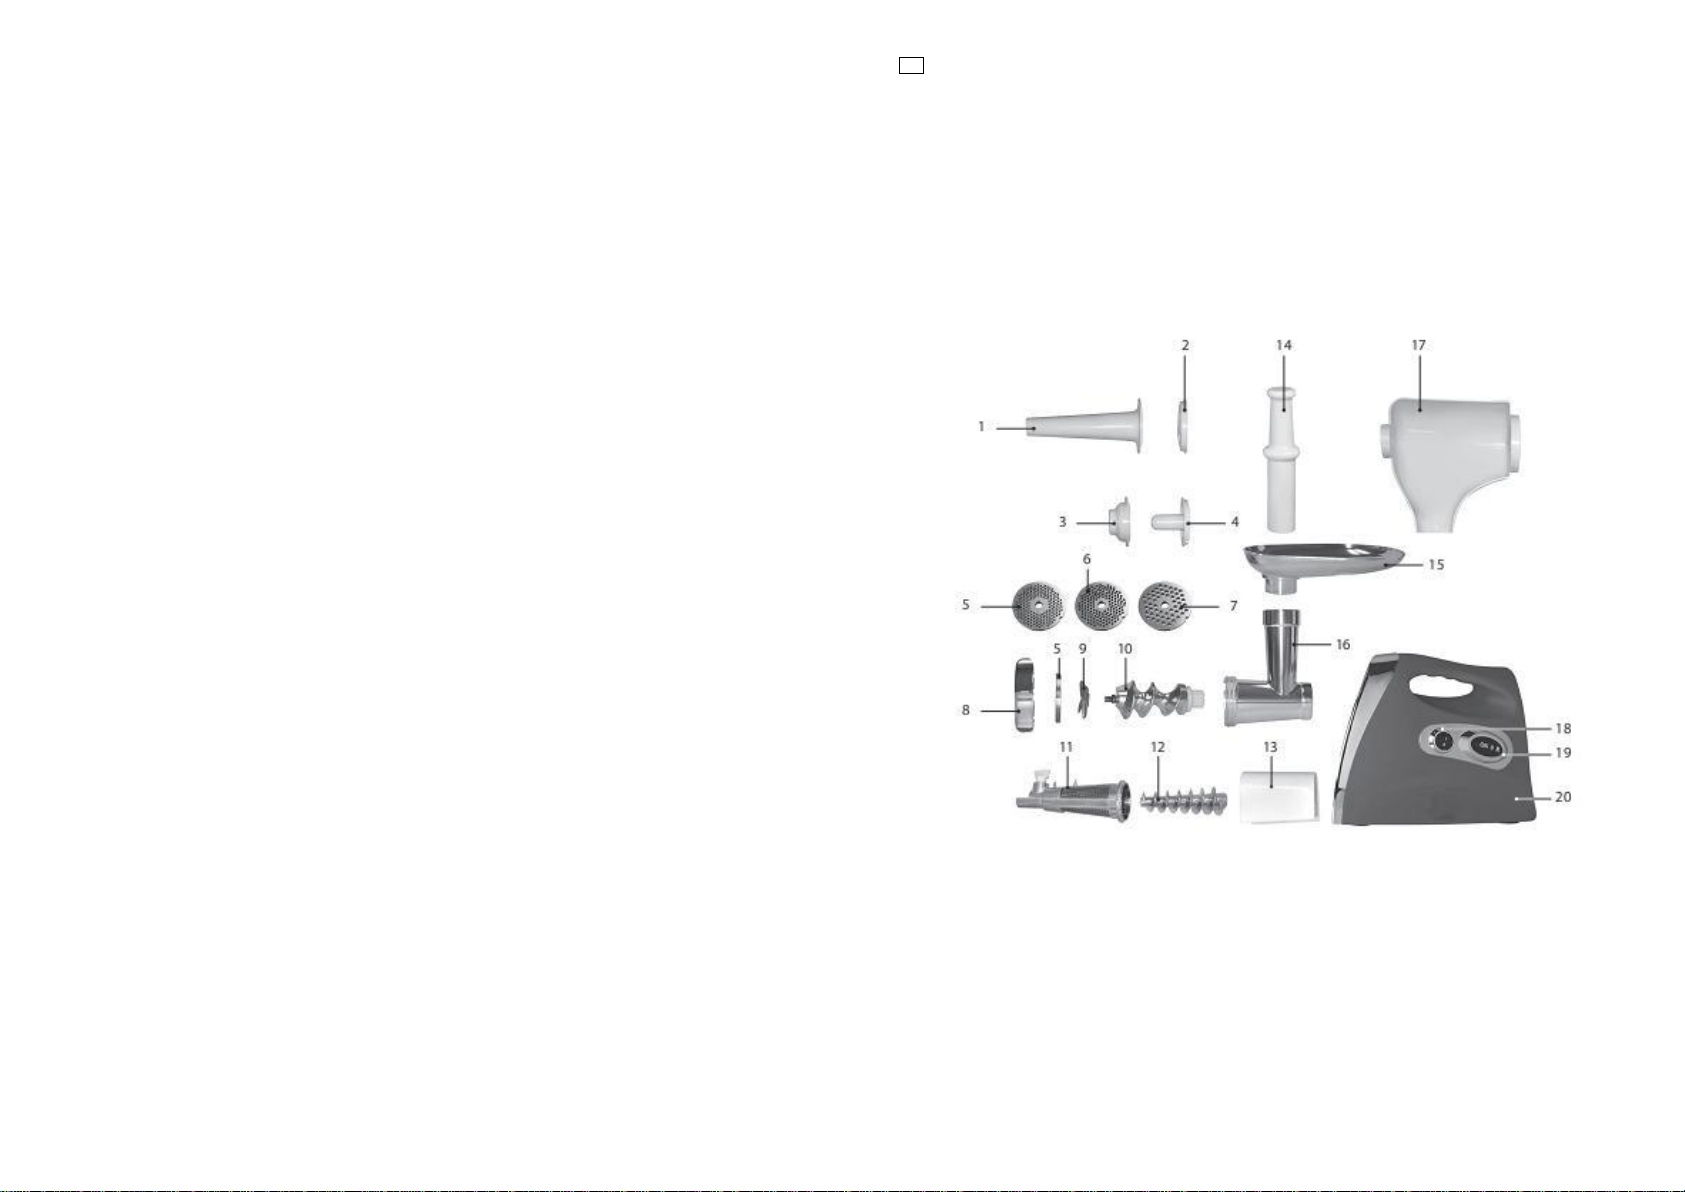
Description
1. Sausage adapter
2. Splitter
3. Kebbe adapter 1
4. Kebbe adapter 2
5. Cutting plate (fine)
6. Cutting plate (middle)
7. Cutting plate (coarse)
8. Fixing ring
9. Cross-type blade
10. Meat snake
11. Juicer adapter
12. Tomato snake
13. Plastic cover
14. Meat pusher
15. Plate
16. Head tube
17. Meat cup
18. Rotation speed switch
19. On/ Reverse switch
20. Meat grinder body
3
Page 3
4
IMPORTANT SAFEGUARDS
- Home use only. Do not use for
industrial purpose.
- Unplug when assembling and
disassembling the unit.
- Close supervision is necessary when
any appliance is used near children.
- When carrying the unit be sure to hold
the body with both hands. Do not carry
the unit by the hopper plate or head.
- Do not the cutting blade and cutting
plate when using kebbe attachment.
- Never push use food by hand. Use
food pusher.
- Do not grind hard food such as bones,
nuts, etc.
- Do not grind ginger and other
materials with hard fiber.
- Continuous running of meat grinder
should be not more than 10 minutes
with the following 10 minutes interval
for motor cooling.
- To avoid jamming, do not force to
operate the unit with excessive
pressure.
- When the circuit breaker activates, do
not switch on.
- Never try to replace the parts and
repair the unit by yourself.
FOR THE FIRST TIME
- Check that voltage indicated on the
rating label corresponds with the mains
voltage at your home.
- Wash all parts (except body) in warm
soapy water.
- Before plug in, ensure the «ON/0/R»
switch is in «0» position.
MINCING MEAT
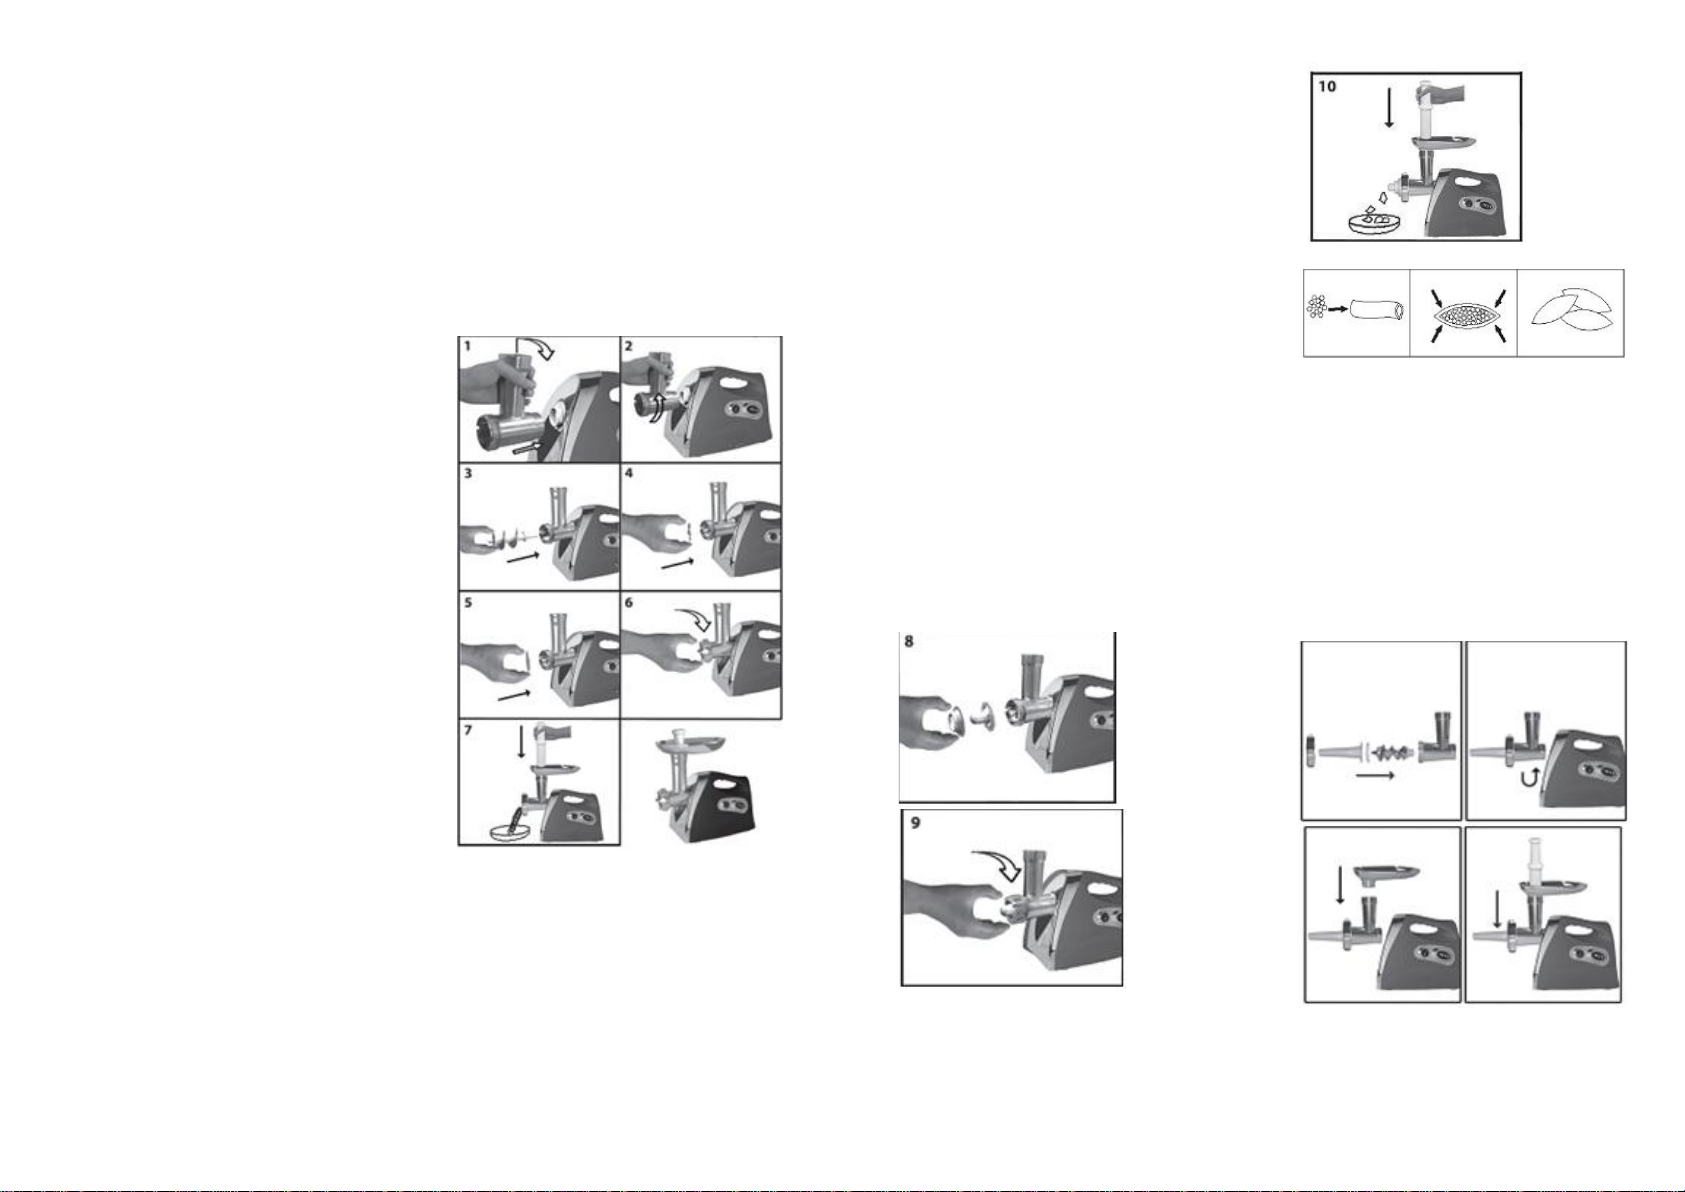
- Press the fasten button, hold the head
and insert it into the inlet (when
inserting, please pay attention the head
must be slanted as per arrow indicated
on the top, see fig. 1), then move the
head anticlockwise so that the head
being fastened tightly (fig. 2).
- Place the snake into the head, wide
end first, and turn to feed the screw
slightly until it is set into the motor
housing (fig.3).
- Place the cutting blade onto the snake
shaft with the blade facing the front as
illustrated (fig. 4).If it is not fitted
properly, meat will not be grinded.
- Place the desired cutting plate next to
the cutting blade, fitting protrusions in
the slot (fig. 5).
- Support or press the center of the
cutting plate with one finger then screw
the fixing ring tight with another hand
(fig. 6). Do not over tighten.
- Place the hopper plate on the head
and fix it into position.
- Locate the unit on a firm place.
- The air passage at the bottom and the
side of the motor housing should be
kept free and not blocked.
- Cut all foods into pieces (Sinewless,
boneless and fatless meat is
recommended, approximate size:
20x20x60 mm) so that they fit easily
into the hopper opening.
- Plug the unit on and switch «I/II»
knob to «I» or «II» position depending
of food you will grind, then switch
«On/0/R» knob to «ON» – grinder starts
to grind.
- Feed foods into the hopper plate. Use
for it only the food pusher (fig. 7).
- After use switch the unit off and
unplug it from the power supply.
REVERSE FUNCTION
- Snake will be rotating in the opposite
direction, and the head will get empty.
- If it doesn't work, switch off the unit
and clean it.
- Plug the unit on and switch «I/II»
knob to «I», then switch On/0/R knob to
«R» position. Grinder starts to rotating
in reverse direction.
MAKING KЕBBE
5
STUFFING:
Mutton 100g
Olive oil 1 tablespoon
Onion (cut finely) 1 tablespoon
Spices to your taste
Salt to your taste
Flour 1 tablespoon
- Mince mutton once or twice.
- Fry onion until brown and add minces
mutton, all spice, salt and flour.
OUTER COVER:
Lean meat 450 g
Flour 150-200 g
Spices to your taste
Nutmeg (cut finely) 1
Powdered red pepper to your taste
Pepper to your taste
- Mince meat three times and mix all
ingredients together in a bowl. More
meat and less flour for outer cover
create better consistency and taste.
- Grind the mixture three times.
- Disassemble by reversing the steps
from 5-3 to remove the cutting plate
and cutting blade.
- Place kebbe attachments onto the feed
screw shaft together, fitting protrusions
in the slots (fig. 8).
- Screw cap into place until tight. Do not
over tighten (fig. 9).
- Make the cylindrical outlet cover (fig.
10).
- Form kebbe as illustrated below and
deep fry.
MAKING SAUSAGE
- Switch off the appliance.
- Turn the cutter head clockwise to
remove it from the motor unit.
- Remove the screw ring by turning it
anti-clockwise.
- Remove the grinding disc.
- Fit separator, sausage horn on the
metal end of the worm shaft. Then fit
the screw ring on the cutter head by
turning the screw ring clockwise until it
is properly fastened.
Page 4
6
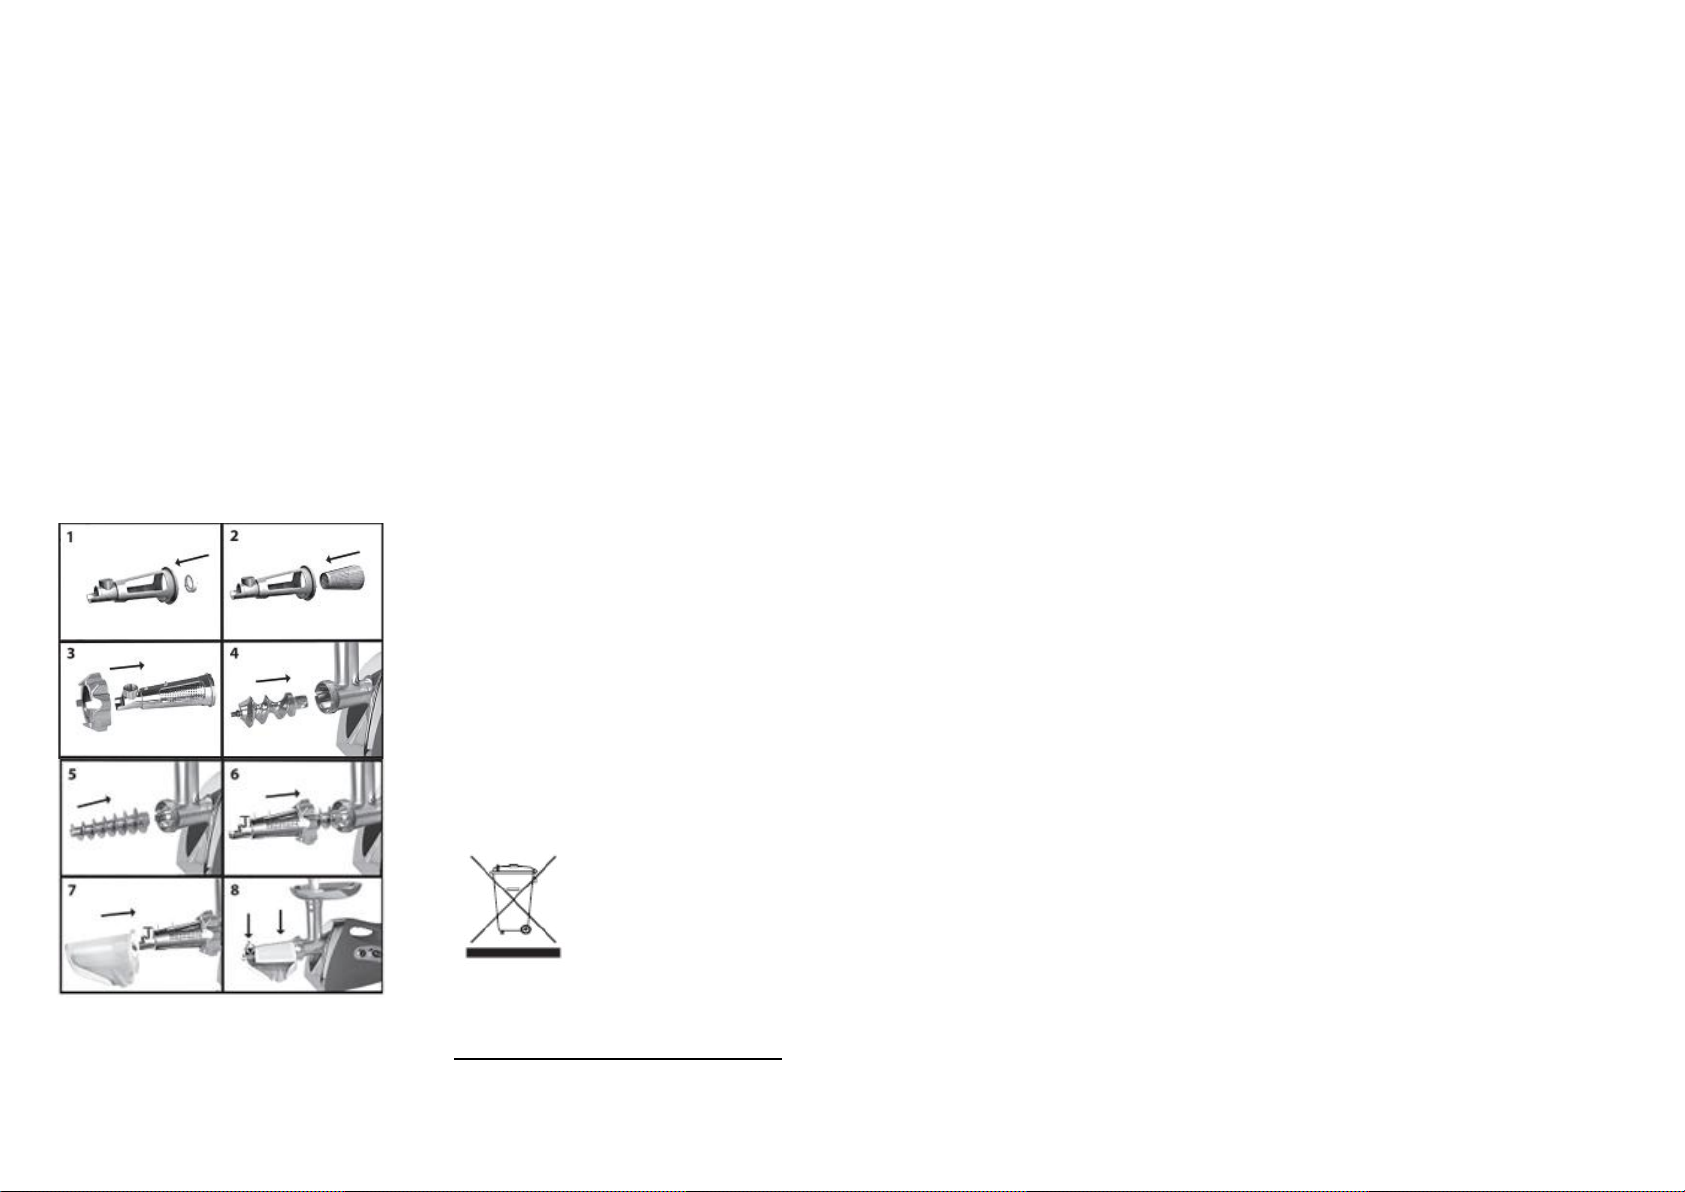
MAKING TOMATO JUICE
- Place the plastic screw locking ring
into the sleeve (fig. 1).
- Place the gauze into the sleeve next to
the plastic screw locking ring (fig. 2).
3.
Put the fixing ring through the sleeve
and make it at the end of the sleeve
(fig. 3).
- Place the snake into the head, long
end first, and turn to feed the snake
slightly until it is set into the motor
housing (fig. 4).
- Insert the shaft of the snake into the
central axis of the screw (fig.5).
- Put the whole sleeve along with the
fixing ring through the screw, then
move the fixing ring clockwise so that it
being fastened tightly (fig. 6).
- Put the plastic juice tray through the
sleeve and make it on the suitable
position (fig. 7).
- Insert the plastic screw into the hole
of the sleeve, then move it clockwise
until it is properly fastened. Then place
the plastic cover onto the sleeve (fig. 8)
- Now the appliance is ready for juicing.
CLEANING AND MAINTENACE
DISASSEMBLING
- Make sure that the motor has stopped
completely.
- Disconnect the plug from the power
outlet.
- Disassemble by reversing the steps
from 1-6 pictures.
- To remove the cutting plate easily,
place a screwdriver between the cutting
plate and the head as illustrated and lift
it up.
- Press the fasten knob, move the head,
then you can take out the head.
CLEANING
- Remove meat, etc. Wash each part in
warm soapy water.
- A bleaching solution containing
chlorine will discolor aluminum surfaces.
- Do not immerse the motor housing in
water, but only wipe it with a damp
cloth.
- Thinners and petrol will crack or
change the color of the unit.
- Wipe all the cutting parts by vegetable
oil -wet cloth.
TECHNICAL DATA
• Maximum power 1400 W
• Voltage 220-240 V
• Frequency 50 Hz
• Current 2.5 А
SET
Meat Grinder 1
Cutting plate 3
Cross knife 1
Kebbe attachment 1
Sausage attachment 1
Tomato juicer 1
Tray 1
Pusher 1
Instruction manual 1
Warranty book 1
Package 1
Environment friendly disposal:
You can help protect
the environment!
Please remember to
respect the local
regulations: hand in
the non-working
electrical equipment to
an appropriate waste
disposal centre.
The manufacturer reserves the
right to change the specification
and design of goods.
7
Page 5

8
RU
Уважаемый покупатель!
Поздравляем Вас с
приобретением изделия торговой
марки «Saturn». Уверены, что
наши изделия будут верными и
надежными помощниками в
Вашем домашнем хозяйстве.
Не подвергайте устройство
резким перепадам температур.
Резкая смена температуры
(например, внесение устройства
с мороза в теплое помещение)
может вызвать конденсацию
влаги внутри устройства и
нарушить его работоспособность
при включении. Устройство
должно отстояться в теплом
помещении не менее 1,5 часов.
Ввод устройства в эксплуатацию
после транспортировки
производить не ранее, чем через
1,5 часа после внесения его в
помещение.
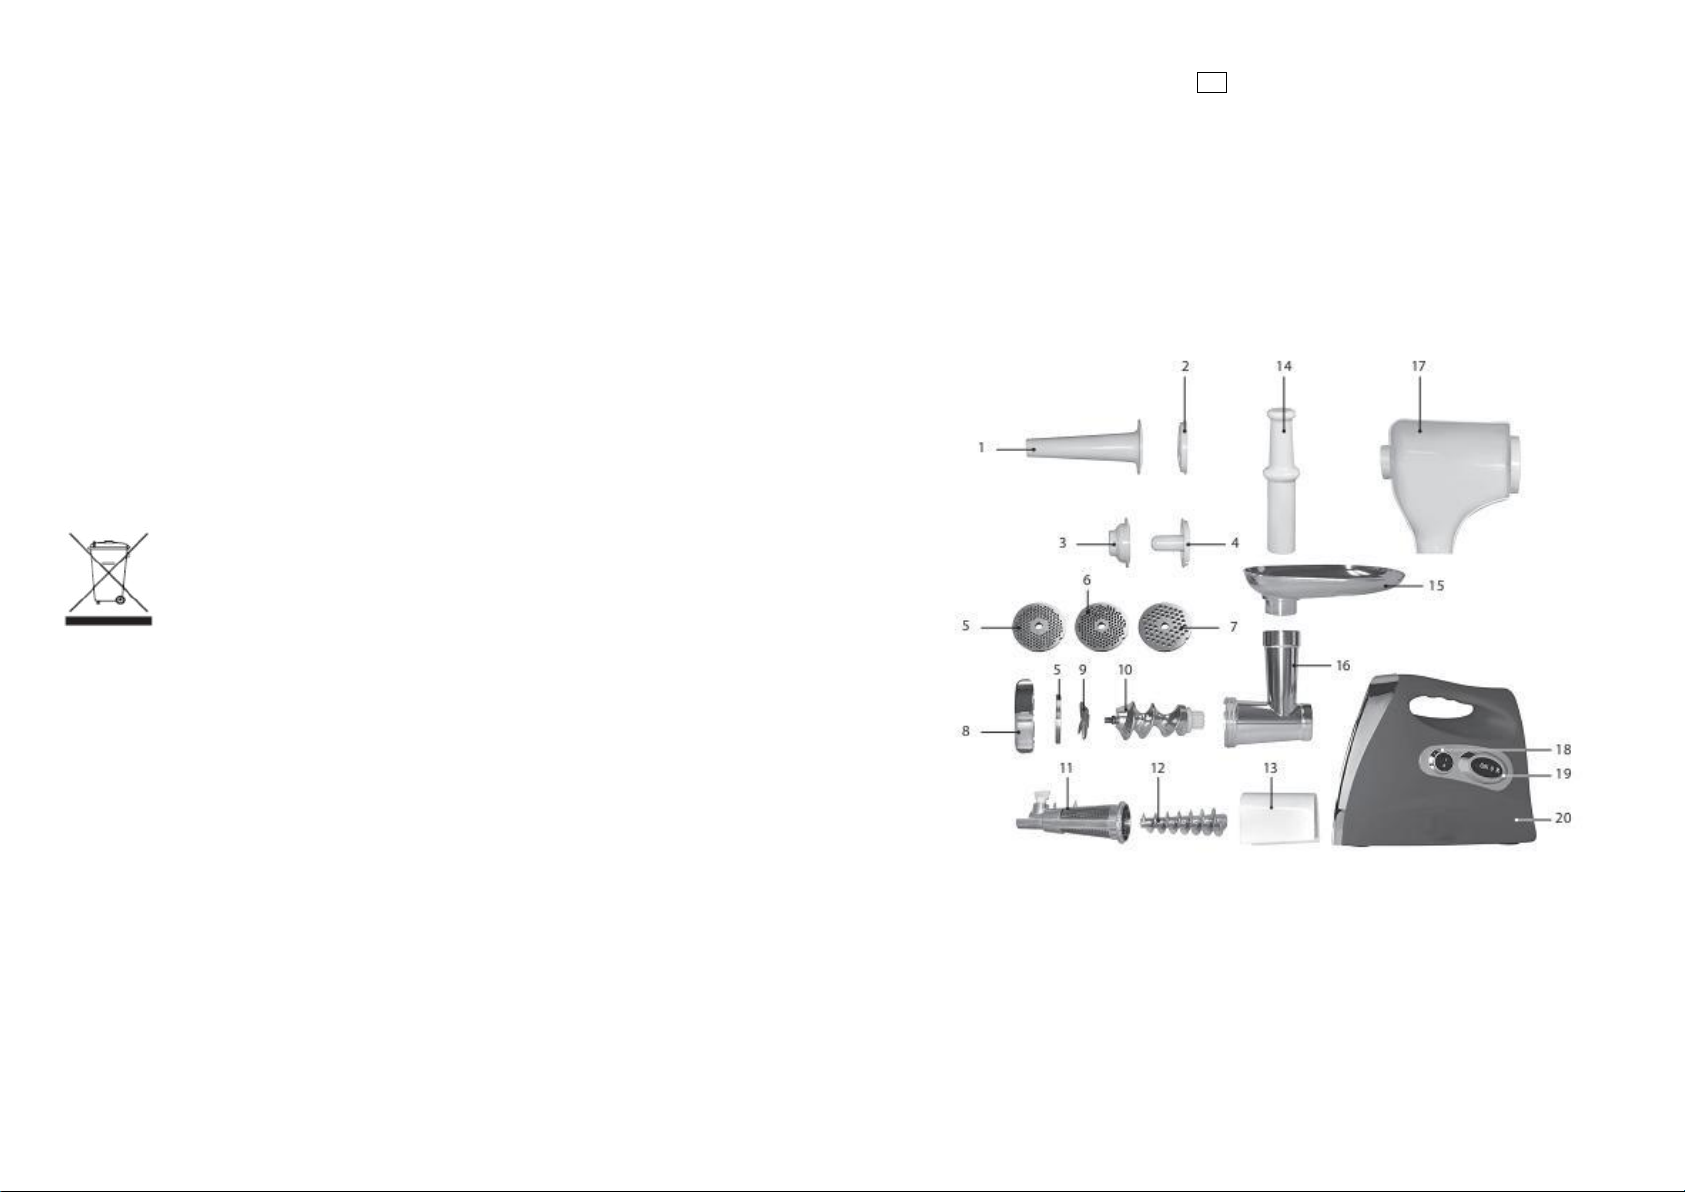
МЯСОРУБКА
Описание
1. Насадка для сосисок
2. Разделитель
3. Насадка для кеббе 1
4. Насадка для кеббе 2
5. Диск мелкозернистый
6. Диск среднезернистый
7. Диск крупнозернистый
8. Накатная гайка
9. Крестообразный нож
10. Шнек
11. Насадка для томатного сока
12. Шнек
13. Пластиковая крышка
14. Толкатель
15. Лоток
16. Горловина мясорубки
17. Пластиковый лоток
18. Кнопка переключения скоростей
19. Кнопка реверса
20. Корпус мясорубки
9
МЕРЫ ПРЕДОСТОРОЖНОСТИ
- Только для бытового использования,
не используйте изделие в
промышленных целях.
- Отключайте мясорубку из розетки,
перед тем как разобрать устройство.
- Будьте особенно внимательны, когда
рядом с работающим устройством
находятся дети.
- При перемещении мясорубки
держите ее за корпус двумя руками.
Не держите мясорубку за лоток для
продуктов или гайку.
- Используя насадку для кеббе, не
устанавливайте решетку и нож.
- Не проталкивайте продукты руками.
Используйте толкатель.
- Не перемалывайте такие твердые
продукты, как кости, орехи и т.д..
- Не обрабатывайте имбирь и прочие
продукты, богатые твердыми
волокнами (Они могут быть не
размолоты).
- Не эксплуатируйте мясорубку более
10 минут без остановки. Давайте
мотору остыть каждые 10 минут.
- Во избежание забивания мясорубки,
не оказывайте на нее слишком много
давления, когда опускаете в нее
продукты
- После выключения, не включайте
мясорубку сразу.
- Не пытайтесь отремонтировать или
менять запчасти мясорубки
самостоятельно.
ПЕРЕД ПЕРВЫМ ИСПОЛЬЗОВАНИЕМ
- Проверьте, чтобы напряжение,
обозначенное на этикетке с
техническими характеристиками,
соответствовало напряжению сети
вашего дома.
- Промойте все детали (за
исключением корпуса) в теплой
мыльной воде.
- Перед включением убедитесь, что
переключатель «On/0/R» находится в
положении «0» (выкл.)
ИСПОЛЬЗОВАНИЕ МЯСОРУБКИ
- Нажмите на ручку фиксации,
возьмите горловину мясорубки и
вставьте ее в отверстие
электропривода (вставляя ее,
обращайте внимание на то, чтобы
горловина мясорубки была наклонена
согласно стрелки, указанной сверху
(см. рис. 1), после чего поверните ее
против часовой стрелки, чтобы
горловина мясорубки была надежно
зафиксирована (рис. 2).
- Вставьте шнек в горловину
мясорубки длинным концом и немного
поверните его, пока он не станет в
корпус мясорубки (рис. 3).
- Наденьте режущий нож на шнек так,
как показано на рисунке 4:
закругленная сторона ножа должна
быть направлена в сторону шнека,
гладкая сторона должна
соприкасаться с решеткой мясорубки.
Мясорубка не будет работать, если
она собрана неправильно.
- Затем наденьте на ось одну из
решеток. Выступающие части диска
должны попасть в пазы горловины
(рис. 5).
- Удерживая режущий нож одной
рукой, другой рукой закрутите
накатную гайку (рис.6). Не
затягивайте чрезмерно накатную
гайку.
- Установите лоток для продуктов на
горловине мясорубки и зафиксируйте
его неподвижно.
- Расположите мясорубку на твердой
поверхности.
- Необходим беспрепятственный
доступ воздуха к нижней и боковой
части моторного отсека мясорубки.
- Подготовьте продукты, которые вы
собираетесь перерабатывать, и
поместите их на лоток.
- Если это мясо, то рекомендуется,
чтобы оно было нежирным, без
сухожилий и костей.
- Подключите мясорубку к сети и
включите ее переключатель I/II в
положение «I» или «II», в
зависимости от плотности продуктов,
которые вы собираетесь
перерабатывать, после чего
переведите переключатель ON/0/R в
положение «ON».
- Положите продукты в горловину
мясорубки.
- Для проталкивания продуктов в
горловину, используйте толкатель
(рис.7).
- После использования мясорубки
выключите ее и выньте вилку из
розетки.
Page 6

10
ФУНКЦИЯ РЕВЕРСИВНОЙ РАБОТЫ
- Если мясорубка забилась и шнек
перестал вращаться, остановите
мясорубку.
- Переключите выключатель «I/II» в
положение «I», и включите
переключатель «On/0/R» в положение
«R».
- Шнек будет вращаться в обратную
сторону и горловина мясорубки
очистится.
- Если это не сработает, выключите
мясорубку, отключите ее от сети,
разберите и почистите.
ПРИГОТОВЛЕНИЕ КЕБЕ
ФАРШ:
Баранина 100 г
Оливковое масло 1
Лук (мелко порезанный)1 ст.л
Специи по вкусу
Соль по вкусу
Мука 1 ст.л
- Пропустите баранину через
мясорубку один или два раза.
- Поджарьте лук до золотистой
корочки и добавьте в баранину, а
также специи, соль и муку.
НАЧИНКА КЕББЕ:
Нежирное мясо 450 г
Мука 150-200 г
Специи по вкусу
Мускатный орех (мелко натертый)
Молотый красный перец по вкусу
Перец по вкусу
- Пропустите мясо через мясорубку
три раза и перемешайте все
ингредиенты в миске. При большем
количестве мяса и меньшем
добавлением муки начинка кеббе
получается улучшенной консистенции
и вкуснее.
- Три раза пропустите смесь через
мясорубку.
- Разберите мясорубку, выполнив в
обратном порядке шаги 4-6, снимая по
очереди решетку и режущий нож.
- Вставьте насадки для кеббе на вал
шнека мясорубки, точно размещая их
на пазах (рис. 8).
- Завинтите накатную гайку. Не
затягивайте чрезмерно накатную
гайку (Рис. 9).
- Приготовьте начинку для кеббе
(рис.10).
- Сформируйте кеббе как показано на
рисунке выше и зажарьте.
11
ПРИГОТОВЛЕНИЕ СОСИСОК
- Измельчите мясо
- Выключите устройство.
- Открутите крепежную гайку,
поворачивая ее против часовой
стрелки.
- Снимите дисковый нож.
- Установите разделитель и насадку
для колбасок на металлический конец
шнека.
ПРИГОТОВЛЕНИЕ ТОМАТНОГО СОКА
- Вставьте пластиковое кольцо в
конусообразную насадку (рис.1).
- Установите металлическую сетку в
конусообразную насадку рядом с
пластиковым кольцом (рис. 2).
- Проденьте накатную гайку в конец
конусообразной насадки (рис. 3).
- Вставьте шнек широким концом в
корпус головки мясорубки и слегка
поверните его для того чтобы
соединить с корпусом мотора (рис. 4).
- Соедините второй шнек с первым
шнеком, подключенным к корпусу
мотора (рис. 5)
- Наденьте конусообразную насадку
вместе с накатной гайкой на шнек,
затем закрутите гайку до полной
фиксации (рис. 6).
- Прикрепите лоток для томатного
сока к конусообразной насадке (рис.
7).
- Вставьте пластиковый винт в
отверстие конусообразной насадки и
закрутите его по часовой стрелке.
Конусообразную насадку закройте
крышкой (рис. 8).
ЧИСТКА И ОБСЛУЖИВАНИЕ
РАЗБОРКА
- Убедитесь, что мотор мясорубки
полностью остановился.
- Отключите вилку от розетки.
- Разберите мясорубку, выполнив
шаги в обратном порядке, описанные
на картинках 1-6 (раздел
«Использование мясорубки»).
- Чтобы было легче открутить
режущий нож, вставьте отвертку
между решеткой и горловиной и затем
снимите его.
- Поверните горловину по часовой
стрелке, после чего снимите ее.
ЧИСТКА
- Удалите застрявшие части
продуктов. Промойте каждую деталь
(кроме корпуса) в теплой мыльной
воде.
- Отбеливающий раствор, содержащий
хлор, может обесцветить
алюминиевую поверхность.
- Не погружайте отсек с мотором в
воду, а протирайте его мягкой
влажной тряпочкой.
- Бензин и растворители могут
привести к трещинам в покрытии и
повреждению цвета мясорубки.
Page 7
12
- Протирайте режущие детали
мясорубки тряпочкой, смоченной в
растительном масле.
ТЕХНИЧЕСКИЕ ХАРАКТЕРИСТИКИ
• Максимальная мощность: 1400 Вт
• Напряжение: 220-240 В
• Номинальная частота: 50 Гц
• Сила тока: 2,5 А
КОМПЛЕКТНОСТЬ
Электромясорубка 1
Диски 3
Крестообразный нож 1
Насадки для кеббе 1
Насадки для сосисок 1
Насадка для томатного сока 1
Лоток 1
Толкатель 1
Инструкция по эксплуатации 1
Гарантийный талон 1
Упаковка 1
БЕЗОПАСНОСТЬ ОКРУЖАЮЩЕЙ
СРЕДЫ. УТИЛИЗАЦИЯ
Вы можете помочь в
охране
окружающей среды!
Пожалуйста,
соблюдайте местные
правила: передавайте
неработающее
электрическое оборудование в
соответствующий центр утилизации
отходов.
Производитель оставляет за
собой право вносить изменения в
технические характеристики и
дизайн изделий.
13
RА
يﺮﺘﺸﻤﻟا يﺰﯾﺰﻋ،
ﻢﻜﺌﻨﮭﻧﻰﻠﻋاوﺮﺘﺷا نأ ﺪﻌﺑزﺎﮭﺠﻟاﺖﺤﺗ ﻢﺳﻻا
يرﺎﺠﺘﻟا«Saturn».ﻦﻣ ﻦﯿﻘﯾ ﻰﻠﻋ ﻦﺤﻧنأ
ﺎﻨﺗﺰﮭﺟأﺢﺒﺼﺗ فﻮﺳةﺪﻋﺎﺴﻤﻟاﻦﯿﻨﻣﺆﻤﻟا
ﺎﮭﺑ قﻮﺛﻮﻣوﻲﻓﻲﻟﺰﻨﻤﻟا ﺮﯿﺑﺪﺘﻟاﻚﺑ صﺎﺨﻟا.
ﺐﻨﺠﺗةراﺮﺤﻟا تﺎﺟرد ﻲﻓ تاﺮﯿﻐﺘﻟاﺔﻓﺮﻄﺘﻤﻟا.
ﺮﯿﻐﺗﺟردةراﺮﺤﻟا ﺔﻊﯾﺮﺴﻟا)لﺎﺜﻤﻟا ﻞﯿﺒﺳ ﻰﻠﻋ
ﺎﻣﺪﻨﻋﻞﻘﻧ ﻢﺘﯾةﺪﺣوﻦﻣﺪﻤﺠﺘﻟا ةراﺮﺣ ﺔﺟرد
ﻟﺔﺌﻓاد ﺔﻓﺮﻐ(ﺐﺒﺴﯾ ﺪﻗﻒﯿﺜﻜﺘﻟاةﺪﺣو ﻞﺧادو دﻮﺟ
ﻞﻠﺧﺪﻨﻋﮫﻠﯿﻐﺸﺗ.ﻲﻓﺔﻟﺎﺤﻟا هﺬھةردﺎﻐﻣةﺪﺣو ﻲﻓ
ﺔﻓﺮﻐﻟا ةراﺮﺣ ﺔﺟرد ةﺪﻤﻟ1.5ﻞﻗﻷا ﻰﻠﻋ ﺔﻋﺎﺳ
ﻞﻘﺘﻨﯾ نأ ﻞﺒﻗﮫﯿﻠﻋ.
اذإﺖﻧﺎﻛةﺪﺣوﻲﻓرﻮﺒﻌﻟاﻷا كﺮﺗو ، ﺮﻣ ﻲﻓ
ﻞﺧاﺪﻟا ةﺪﻤﻟ1.5ﻞﻗﻷا ﻰﻠﻋ ﺔﻋﺎﺳءﺪﺑ ﻞﺒﻗ
ﺔﯿﻠﻤﻌﻟا.
ﻢﺤﻠﻟا ﺔﻣﺮﻔﻣ
ﻒﺻو
1.ﺔھﻮﻓﻻﻖﻧﺎﻘﻨﻟ
2.ﻞﺻﺎﻔﻟا
3.ﺔھﻮﻓﻟ ﻲﺒﯿﻜ1
4.ﺔھﻮﻓﻟ ﻲﺒﯿﻜ2
5.كﺮﺤﻣتﺎﺒﯿﺒﺤﻟا
6.صﺮﻘﻟاﺔﻄﺳﻮﺘﻤﻟا
7.صﺮﻘﻟاﺔﻨﺸﺨﻟا
8.زﻮﺠﻟاشﺮﺨﻣ
9.ﻦﯿﻜﺴﻟاﺐﯿﻠﺻ ﻞﻜﺷ ﻰﻠﻋ
10.ﺐﻘﺜﻣ
11.ﺔھﻮﻓﻟ ﺮﯿﺼﻌﺎﻤﻄﻟاﻢط
12.ﺐﻘﺜﻣ
13.ﻚﯿﺘﺳﻼﺒﻟا ﻦﻣ ءﺎﻄﻏ
14.يزﺎﮭﺘﻧا
15.ﺔﯿﻨﯿﺻ
16.ﺔﻧﻮﺣﺎطﻢﺤﻟﺔﺒﻗﺮﻟا
17.ﻚﯿﺘﺳﻼﺒﻟا ﻦﻣ ﺔﺒﻠﻋ
18.ﺔﻋﺮﺴﺑﻞﯾﺪﺒﺗرز
19.ﺲﻜﻋرز
20.ﺔﻧﻮﺣﺎطنﺎﻜﺳﻹا
Page 8

14
ﺔﻣﺎھ تﺎﻧﺎﻤﺿ
-ﺔﯿﺴﯿﺋﺮﻟا ﺔﺤﻔﺼﻟا ماﺪﺨﺘﺳاﻂﻘﻓ.مﺪﺨﺘﺴﺗ ﻻ
ﺔﯿﻋﺎﻨﺻ ضاﺮﻏﻷ.
-ﻞﺼﻓاﻊﯿﻤﺠﺗ ﺪﻨﻋو ﻚﯿﻜﻔﺗةﺪﺣو.
-فاﺮﺷﻹاﻖﯿﻗﺪﻟايروﺮﺿ ماﺪﺨﺘﺳا ﻢﺘﯾ ﺎﻣﺪﻨﻋ
يأزﺎﮭﺟﻦﻣ بﺮﻘﻟﺎﺑلﺎﻔطﻷا.
-ﻞﻤﺣ ﺪﻨﻋةﺪﺣﻮﻟاﻦﻣ ﺪﻛﺄﺗﻰﻠﻋ راﺮﻤﺘﺳﻻا
ﻢﺴﺠﻟاﮫﯾﺪﯾ ﺎﺘﻠﻜﺑ.ﻞﻤﺤﺗ ﻻﻖﯾﺮط ﻦﻋ ةﺪﺣوﺔﺣﻮﻟ
ﺮﺑﻮھوأسأﺮﻟا.
-ﻻةﺮﻔﺷﻊﻄﻘﻟاﻊﻄﻘﻟاوﺔﺣﻮﻟماﺪﺨﺘﺳا ﺪﻨﻋ
تﺎﻘﻓﺮﻤﻟاﺔﺒﻜﻟا.
-اﺪﺑأﻊﻓدماﺪﺨﺘﺳامﺎﻌﻄﻟاﺪﯿﻟﺎﺑ.ماﺪﺨﺘﺳاﻧايزﺎﮭﺘ
ءاﺬﻐﻟا.
-ﻻﺔﯿﺋاﺬﻐﻟا داﻮﻤﻟا ﻦﺤطﻞﺜﻣ ﺔﺒﻠﺼﻟامﺎﻈﻌﻟا ،
،تاﺮﺴﻜﻤﻟاوﺦﻟا
-ﻻﻦﺤطﻞﯿﺒﺠﻧﺰﻟاداﻮﻤﻟا ﻦﻣ ﺎھﺮﯿﻏو ﻊﻣ ،
فﺎﯿﻟﻷاﺖﺑﺎﺜﻟا.
-ﺮﻤﺘﺴﻣ ﻞﯿﻐﺸﺗﻦﻣﻢﺤﻠﻟا ﺔﻣﺮﻔﻣ نأ ﻲﻐﺒﻨﯾ ﻻ
نﻮﻜﺗﻦﻣ ﺮﺜﻛأ10ﻊﻣ ﺔﻘﯿﻗدﻞﺻﺎﻓ10ﻖﺋﺎﻗد
ﺔﯿﻟﺎﺘﻟاﺪﯾﺮﺒﺘﻠﻟتﺎﻛﺮﺤﻤﻟا.
-ﺐﻨﺠﺘﻟﺶﯾﻮﺸﺘﻟاﻮﻗ ﻻ ، ةﻞﯿﻐﺸﺘﻟةﺪﺣوﻊﻣ
طﺮﻔﻤﻟا ﻂﻐﻀﻟا.
-ﺎﻣﺪﻨﻋﻂﺸﻨﯾةﺮﺋاﺪﻟا ﻊطﺎﻗ ،ﻞﯾﺪﺒﺗ ﻻﻰﻠﻋ.
-ﺔﻟوﺎﺤﻣ اﺪﺑأءاﺰﺟأ ﻞﺤﻣ ﻞﺤﺘﻟو ةﺪﺣو حﻼﺻإ
ﻚﺴﻔﻧ ﻞﺒﻗ ﻦﻣ..
ﻞﺒﻗﻞﯿﻌﻔﺗلوأ
-نأ ﻦﻣ ﺪﻛﺄﺗﻲﺋﺎﺑﺮﮭﻜﻟا رﺎﯿﺘﻟا ﻰﻠﻋ ﺢﺿﻮﻤﻟا
ﻖﺼﻠﻤﻟاﻒﯿﻨﺼﺗﻖﻓاﻮﺘﯾﺪﮭﺠﻟا ﻊﻣﻲﺋﺎﺑﺮﮭﻜﻟا ﻲﻓ
ﻚﻟﺰﻨﻣ.
-ﻊﯿﻤﺟ ﻞﺴﻏءاﺰﺟأ)ﻨﺜﺘﺳﺎﺑ ءﺎﻢﺴﺠﻟا(ﻲﻓ ءﺎﻤﻟا
نﻮﺑﺎﺼﻟاو ﺊﻓاﺪﻟا.
-ﻞﺒﻗﻲﻓ ﺰﺠﻌﻟا ﺪﺳ نﺎﻤﺿو ،«ON/0/R»
ﻮھ لﻮﺤﺘﻟاﻲﻓ«0»ﻒﻗﻮﻤﻟا.
مﻮﺤﻠﻟاﻖﯿﻤﻨﺗ
-ﻰﻠﻋ ﻂﻐﺿارزﻂﺑر ،ﺲﯿﺋر ﺪﻘﻋو ﻲﻓ ﮫﻠﺧدأ
ﻞﺧﺪﻣ)جاردإ ﺪﻨﻋ هﺎﺒﺘﻧﻻا ﻰﺟﺮﯾ ،نأ ﺐﺠﯾﻞﯿﻤﯾ
ﮫﺳأرﺎﻤﻛﻢﮭﺳﺪﺣاﻮﻟاﻲﻓ رﻮﻛﺬﻤﻟاﻰﻠﻋﻷا ، ﺮﻈﻧا
ﻞﻜﺸﻟا(1 ،ﻢﺛﻚﯾﺮﺤﺗﻟاسأﺮ برﺎﻘﻋ هﺎﺠﺗا ﺲﻜﻋ
ﺔﻋﺎﺴﻟاﺚﯿﺤﺑسأﺮﻟاﻢﺘﯾﺎﮭﺘﯿﺒﺜﺗمﺎﻜﺣﺈﺑ) ﻞﻜﺸﻟا
2.(
- -ﻊﺿنﺎﺒﻌﺛو ،سأﺮﻟا ﻲﻓ ﺔﻌﺳاو ﺔﯾﺎﮭﻧﻰﻟوﻷا ،
و ﻰﻟإ ﻞﻘﺘﻧأﺔﯾﺬﻐﺗرﺎﻤﺴﻤﻟاﻼﯿﻠﻗﻰﺘﺣﺎﮭﻨﯿﯿﻌﺗ ﻢﺘﯾ
نﺎﻜﺳإ ﻲﻓكﺮﺤﻣ)ﻞﻜﺸﻟا.(3
-ﻊﺿﻊﻄﻘﻟا ةﺮﻔﺷﻰﻠﻋﺢﻣرنﺎﺒﻌﺛةﺮﻔﺷ ﻊﻣ
ﺔﮭﺒﺠﻟا ﮫﺟاﻮﺗ ﻲﺘﻟاﺢﺿﻮﻣ ﻮھ ﺎﻤﻛ)ﺸﻟاﻞﻜ(4 اذإ
ﻢﺘﯾ ﻢﻟﺎﮭﺒﯿﻛﺮﺗﺢﯿﺤﺻ ﻞﻜﺸﺑ ،ﻢﺘﯾ ﻦﻟﻦﺤط
مﻮﺤﻠﻟا.
-ﺔﺣﻮﻟ ﻊﺿوﻊﻄﻘﻟاﺔﺑﻮﻠﻄﻤﻟاﺐﻧﺎﺠﺑةﺮﻔﺷ
و ،ﻊﻄﻘﻟا تاءﻮﺘﻧﺐﺳﺎﻨﻤﻟاﺔﺤﺘﻔﻟا ﻲﻓ)ﻞﻜﺸﻟا.(5
-
ﻊﺒﺻإ ﻊﻣ ﻊﻄﻘﻟا ﺔﺣﻮﻟ ﻂﺳو ﻂﻐﺿا وأ ﻢﻋد
ﺔﮭﺟ ﻊﻣ ﻖﯿﺿ ﺖﯿﺒﺜﺗ ﺔﻘﻠﺣ رﺎﻤﺴﻤﻟا ﻢﺛ ﺪﺣاو
ﻞﻜﺸﻟا) ىﺮﺧأ6.ﻰﻠﻋ ﺪﯾﺪﺸﺗ ﻻ .(
-
ﻮھ ﺔﺣﻮﻟ ﻊﺿو ﻲﻓ ﺎﮭﺣﻼﺻاو ﮫﺳأر ﻰﻠﻋ ﺮﺑ
.ﻒﻗﻮﻤﻟا
-
.ﺖﺑﺎﺛ نﺎﻜﻣ ﻰﻠﻋ ةﺪﺣﻮﻟا ﻊﻗﻮﻣ ﺪﯾﺪﺤﺗ
-
ﺐﻧﺎﺟو ﻞﻔﺳأ ﻲﻓ ءاﻮﮭﻟا روﺮﻣ ﻰﻘﺒﺗ نأ ﺐﺠﯾ
.هﺮﻈﺣ ﻢﺘﯾو ﺎﻧﺎﺠﻣ تارﺎﯿﺴﻟا نﺎﻜﺳﻹا
-
مﻮﺤﻠﻟا ﺢﺼﻨﯾ) ﻊﻄﻗ ﻰﻟا ﺔﻤﻌطﻷا ﻞﻛ ﻊﻄﻗ
:ﻲﺒﯾﺮﻘﺗ ﻢﺠﺣ ،ﻢﺤﺷ نوﺪﺑو ﻢﻈﻌﻟا ﻦﻣ ﺔﯿﻟﺎﺨﻟا60
x20 x 20ﻲﻓ ﺔﻟﻮﮭﺴﺑ ﺐﺳﺎﻨﺗ ﺚﯿﺤﺑ (ﻢﻣ حﺎﺘﺘﻓا
.ﺮﺑﻮھ
-
ﻞﯾﺪﺒﺘﻟاو ﻰﻠﻋ ةﺪﺣو ﻞﯿﺻﻮﺘﺑ ﻢﻗ»I / II «
ل بﺎﺒﻟا ﺾﺒﻘﻣ»ﺎﻧأ « وأ»ﻲﻧﺎﺜﻟا « ادﺎﻤﺘﻋا ﻒﻗﻮﻣ
ﻞﯾﺪﺒﺘﻟا ﻢﺛ ،ﻦﺤﻄﺗ فﻮﺳ يﺬﻟا مﺎﻌﻄﻟا
»On/0/R «ل بﺎﺒﻟا ﺾﺒﻘﻣ»ON «
-
ﺔﻧﻮﺣﺎط
.أﺪﺒﯾ ﻦﺤﻄﻟ
-ﺔﯾﺬﻐﺗﺔﻤﻌطﻷاﺔﺣﻮﻟ ﻲﻓﺮﺑﻮھ.ماﺪﺨﺘﺳاﺎﮭﻧﻷ
ﻂﻘﻓيزﺎﮭﺘﻧاءاﺬﻐﻟا)ﻞﻜﺸﻟا.(7
-ا ﺪﻌﺑ رﺎﯿﺘﻟا ﻦﻣ ﮫﻠﺼﻓو ﺔﻟﺎﺒﻗ ةﺪﺣو ﻞﯾﺪﺒﺗ ماﺪﺨﺘﺳ
.ﻲﺋﺎﺑﺮﮭﻜﻟا
15
ﺔﯿﺴﻜﻋ ﺔﻔﯿظو
-ﻰﻌﻓﻷاﻢﺘﯿﺳبوﺎﻨﺗﺲﻛﺎﻌﻤﻟا هﺎﺠﺗﻻا ﻲﻓ ،
فﻮﺳوﻰﻠﻋ ﻞﺼﺤﺗﮫﺳأرغرﺎﻓ.
-اذإﻞﻤﻌﯾ ﻻ نﺎﻛ ،ﻞﯿﻐﺸﺗ فﺎﻘﯾإةﺪﺣوﮫﻔﯿﻈﻨﺗو.
-ﻞﯿﺻﻮﺘﺑ ﻢﻗةﺪﺣوﻰﻠﻋﻞﯾﺪﺒﺘﻟاو«I / II»
ل بﺎﺒﻟا ﺾﺒﻘﻣ«ﺎﻧأ» ،ﻞﯾﺪﺒﺘﻟا ﻢﺛﻘﻣبﺎﺒﻟا ﺾﺒ
On/0/Rﻰﻟإ«R»ﻒﻗﻮﻤﻟا.أﺪﺒﯾﺔﻧﻮﺣﺎط
ﻟ بوﺎﻨﺘﻲﻓﺲﻛﺎﻌﻤﻟا هﺎﺠﺗﻻا.
ﻊﻨﺻﻲﺒﯿﻜﻟ
ﻮﺸﺣ:
نﺄﻀﻟا ﻢﺤﻟ100G
نﻮﺘﯾﺰﻟا ﺖﯾز1مﺎﻌط ﺔﻘﻌﻠﻣ
ﻞﺼﺒﻟا)ﻊطﺎﻤﻋﺎﻧ1 (مﺎﻌط ﺔﻘﻌﻠﻣ
ﻞﺑاﻮﺘﻟاﻚﻗوﺬﻟ
ﺐﺴﺣ ﺢﻠﻤﻟاﻚﻗوذ
1ﻦﻣ مﺎﻌط ﺔﻘﻌﻠﻣﻖﯿﻗﺪﻟا
-موﺮﻔﻤﻟا ﻢﺤﻠﻟانﺄﻀﻟا ﻢﺤﻟةﺪﺣاو ةﺮﻣوأ
ﻦﯿﺗﺮﻣ.
-ﻞﺼﺒﻟا ﻰﻠﻘﯾﻰﺘﺣﻲﻨﺒﻟاﺔﻓﺎﺿإو مﻮﺤﻠﻟا
ﺔﻣوﺮﻔﻤﻟانﺄﻀﻟا ﻢﺤﻟ ﻊﯿﻤﺟو ،ﻞﺑاﻮﺘﻟا ﺢﻠﻤﻟاو
وﻖﯿﻗﺪﻟا.
ﻲﺟرﺎﺨﻟا ءﺎﻄﻐﻟا:
نﻮھﺪﻟا ﻦﻣ ﺔﯿﻟﺎﺨﻟا مﻮﺤﻠﻟا450ماﺮﻏ
ﻖﯿﻗد150-200ماﺮﻏ
ﻞﺑاﻮﺘﻟاﻚﻗوﺬﻟ
ﺐﯿﻄﻟا ةزﻮﺟ)ﻊﻄﻗﺎﻤﻋﺎﻧ1(
ﺮﻤﺣﻷا ﻞﻔﻠﻔﻟاﻒﻔﺠﻤﻟاﻚﻗوﺬﻟ
ﺐﺴﺣ ﻞﻔﻠﻔﻟاﻚﻗوذ
-موﺮﻔﻤﻟا ﻢﺤﻠﻟاﺛتاﺮﻣ ثﻼﻂﻠﺨﺗوﻊﯿﻤﺟ
ﺎﻌﻣ تﺎﻧﻮﻜﻤﻟاءﺎﻋو ﻲﻓ.و ﻢﺤﻠﻟا ﻦﻣ ﺪﯾﺰﻤﻟا ﻞﻗأ
ﻠﻟ ﻦﯿﺤﻄﻟا ﻦﻣ ءﺎﻄﻐﻲﺟرﺎﺨﻟاﻖﻠﺧﻞﻀﻓأﻖﺳﺎﻨﺘﻟا
قوﺬﻟاو.
-ﻦﺤطﻂﯿﻠﺨﻟاتاﺮﻣ ثﻼﺛ.
-ﻚﯿﻜﻔﺗﺲﻜﻋ ﻖﯾﺮط ﻦﻋتاﻮﻄﺨﻟا5-3ﺔﻟازﻹ
ﺔﺣﻮﻟﻊﻄﻘﻟاﻊﻄﻘﻟاوﻞﺼﻨﻟا.
-تﺎﻘﻓﺮﻤﻟانﺎﻜﻣﺔﺒﻜﻟاﻰﻠﻋﺢﻣررﺎﻤﺴﻤﻟاﺔﯾﺬﻐﺗ
ﺎﻌﻣ ،تاءﻮﺘﻧﺐﺳﺎﻨﻤﻟاتﺎﺤﺘﻓ ﻲﻓ)ﻞﻜﺸﻟا(8
-ءﺎﻄﻏﻲﻓ رﺎﻤﺴﻤﻟاﻰﺘﺣ ﮫﻧﺎﻜﻣﻖﯿﺿ. ﺮﺜﻛأ ﻻ
ﻦﻣﺪﯾﺪﺸﺗ)ﻞﻜﺸﻟا(9
-ﻞﻌﺟءﺎﻄﻏﺬﻔﻨﻣﻲﻧاﻮﻄﺳأ)ﻞﻜﺸﻟا(10
-ﺔﺒﻜﻟاﻞﻜﺸﻟاهﺎﻧدأ ﺢﺿﻮﻣ ﻮھ ﺎﻤﻛوﻰﻠﻘﺗ
.
ﻊﻨﺻﻖﺠﺴﻟا
-ﻞﯿﻐﺸﺗ ﻒﻗوأزﺎﮭﺠﻟا.
-ردأسأﺮﻟاﻊطﺎﻘﻟاﻹ ﺔﻋﺎﺴﻟا برﺎﻘﻋ هﺎﺠﺗا ﮫﺘﻟاز
ﻦﻣ ةﺪﺣوكﺮﺤﻤﻟا.
-ﺔﻟازإﻢﺗﺎﺧرﺎﻤﺴﻤﻟاﺎﮭﻠﯾﻮﺤﺘﺑ هﺎﺠﺗا ﺲﻜﻌﺑ
ﺔﻋﺎﺴﻟا برﺎﻘﻋ.
-ﺔﻟازإصﺮﻘﻟاﻦﺤط.
-ﻞﺻﺎﻓﺢﻟﺎﺻ ،نﺮﻘﻟاﻖﺠﺴﻟافﺮﻄﻟا ﻰﻠﻋ
ﻠﻟ ﻲﻧﺪﻌﻤﻟا ﺢﻣﺮةدود.ﻢﺛﺐﺳﺎﻨﺗﻢﺗﺎﺧرﺎﻤﺴﻤﻟا
ﮫﺳأر ﻰﻠﻋﻊطﺎﻘﻟاﻞﯾﻮﺤﺗ لﻼﺧ ﻦﻣﺔﺑﺎﺼﻋ
Page 9

16
رﺎﻤﺴﻤﻟاﺔﻋﺎﺴﻟا برﺎﻘﻋ هﺎﺠﺗا ﻲﻓﻢﺘﯾ ﻰﺘﺣﺎﮭﺘﯿﺒﺜﺗ
ﺢﯿﺤﺻ ﻞﻜﺸﺑ.
ﺮﯿﺼﻋ ﻊﻨﺻﻢطﺎﻤﻄﻟا
-ﻊﺿرﺎﻤﺴﻤﻟاﻚﯿﺘﺳﻼﺒﻟاﺔﻘﻠﺣﻞﻔﻗمﺎﻤﻛﻷا ﻲﻓ
) ﻞﻜﺸﻟا1(
-ﻊﺿشﺎﺸﻟامﺎﻤﻛﻷا ﻲﻓﺐﻧﺎﺠﺑرﺎﻤﺴﻤﻟا
ﻚﯿﺘﺳﻼﺒﻟاﺔﻘﻠﺣﻞﻔﻘﻟا) ﻞﻜﺸﻟا2(
3.
ﻊﺿوﺔﻘﻠﺣلﻼﺧ ﻦﻣﺪﯾﺪﺤﺗﻢﻛﺎﮭﻠﻌﺟوﻲﻓﺔﯾﺎﮭﻧ
مﺎﻤﻛﻷا)ﻞﻜﺸﻟا(3
-ﻊﺿنﺎﺒﻌﺛو ،سأﺮﻟا ﻲﻓ ﺔﻠﯾﻮط ةﺮﺘﻓ ﺔﯾﺎﮭﻧ
لوﻷا ،و ﻞﻘﺘﻧأ ﻰﻟإمﺎﻌطإنﺎﺒﻌﺛﻼﯿﻠﻗﻰﺘﺣ ﻢﺘﯾ
ﺎﮭﻨﯿﯿﻌﺗنﺎﻜﺳإ ﻲﻓكﺮﺤﻣ)ﻞﻜﺸﻟا4(
-جاردإﻦﻣ ﺢﻣرنﺎﺒﻌﺛﻲﻓيﺰﻛﺮﻤﻟا رﻮﺤﻤﻟا
رﺎﻤﺴﻤﻟا ﻦﻣ)ﻞﻜﺸﻟا(5
-ﻲﻌﺿﻢﻛﮫﻠﻛﻊﻣ ﺐﻨﺟ ﻰﻟإ ﺎﺒﻨﺟﺔﻘﻠﺣﺖﯿﺒﺜﺗ ﻦﻣ
لﻼﺧرﺎﻤﺴﻤﻟا ،كﺮﺣ ﻢﺛﺔﻘﻠﺣﺢﯿﺤﺼﺗ هﺎﺠﺗا
ﺔﻋﺎﺴﻟا برﺎﻘﻋﺚﯿﺤﺑﻢﺘﯾﺎﮭﺘﯿﺒﺜﺗمﺎﻜﺣﺈﺑ)ﻞﻜﺸﻟا
(6
-ﻲﻌﺿﺔﺒﻠﻋﺮﯿﺼﻋﺔﯿﻜﯿﺘﺳﻼﺑلﻼﺧ ﻦﻣﻢﻜﻟا
ﺎﮭﻠﻌﺟوﻲﻓﺐﺳﺎﻨﻣ ﻒﻗﻮﻣ)ﻞﻜﺸﻟا(7
-جاردإرﺎﻤﺴﻤﻟاﻲﻓ ﻚﯿﺘﺳﻼﺒﻟاﻲﻓ ﺐﻘﺛ،مﺎﻤﻛﻷا
ﻢﺛكﺮﺤﺗﺔﻋﺎﺴﻟا برﺎﻘﻋ هﺎﺠﺗا ﻲﻓﻢﺘﯾ ﻰﺘﺣ
ﺎﮭﺘﯿﺒﺜﺗﺢﯿﺤﺻ ﻞﻜﺸﺑ.ﻢﺛﻊﺿو ﻦﻣ ءﺎﻄﻏ
ﻚﯿﺘﺳﻼﺒﻟاﻰﻠﻋمﺎﻤﻛﻷا)ﻞﻜﺸﻟا(8
-نﻵاوزﺎﮭﺠﻟاﻟ ﺪﻌﺘﺴﻣﺮﯿﺼﻌﻟا ﺮﺼﻌ.
اﺔﻧﺎﯿﺼﻟاو ﻒﯿﻈﻨﺘﻟ
ﻚﯿﻜﻔﺗ
-ﻦﻣ ﺪﻛﺄﺗكﺮﺤﻤﻟا نأﺎﻣﺎﻤﺗ ﻒﻗﻮﺗ ﺪﻗ.
-ﻞﺼﻓاﻦﻣ ﺲﺑﺎﻘﻟاءﺎﺑﺮﮭﻜﻟا ﺬﺧﺄﻣ.
-ﻚﯿﻜﻔﺗﺲﻜﻋ ﻖﯾﺮط ﻦﻋتاﻮﻄﺨﻟا1-6
رﻮﺼﻟا.
-ﺔﻟازﻹﺔﺣﻮﻟﻊﻄﻘﻟاﺔﻟﻮﮭﺴﺑ ﻊﺿ ،ﻚﻔﻣ ﻦﯿﺑ
ﺔﺣﻮﻟﻊﻄﻗوﮫﺳأرﺢﺿﻮﻣ ﻮھ ﺎﻤﻛو ﻊﻓرﮫﻨﻋ.
-حﺎﺘﻔﻣ ﻰﻠﻋ ﻂﻐﺿاﻂﺑر كﺮﺣ ،،ﮫﺳأر ﻢﺛ
ﺬﺧﺄﺗ نأ ﻚﻨﻜﻤﯾﻦﻣسأﺮﻟا..
ﻒﯿﻈﻨﺗ
-ﺔﻟازإمﻮﺤﻠﻟا ،ﺦﻟاﻞﻛ ﻞﺴﻐﯾءﺰﺟﻲﻓ ءﺎﻤﻟا
نﻮﺑﺎﺼﻟاو ﺊﻓاﺪﻟا.
-ﻞﺣﺾﯿﯿﺒﺘﻟاﻰﻠﻋ يﻮﺘﺤﺗ ﻲﺘﻟارﻮﻠﻜﻟافﻮﺳ
ﺢﻄﺳﻷامﻮﯿﻨﻣﻮﻟﻷاﺦﯿﻄﻠﺗ.
-جﺰﺗ ﻻتارﺎﯿﺴﻟا نﺎﻜﺳﻹاﻲﻓﻦﻜﻟو ،ءﺎﻤﻟاﻂﻘﻓ
ﮫﺤﺴﻤﺑ ﻢﻗﺔﻠﻠﺒﻣ شﺎﻤﻗ ﺔﻌﻄﻘﺑ.
-ﺮﻨﺗﻦﯾﺰﻨﺒﻟاوتاءاﺮﺟا ﺬﺨﺘﺘﺳوأنﻮﻟ ﺮﯿﯿﻐﺗ
ةﺪﺣو.
-ﺢﺴﻣءاﺰﺟأ ﻊﯿﻤﺟﻊﻄﻘﻟاﺔﻄﺳاﻮﺑﺔﯿﺗﺎﺒﻨﻟا
شﺎﻤﻘﻟاﺐطﺮﻟاﻂﻔﻨﻟا.
17
ﺔﯿﻨﻘﺘﻟا تﺎﻧﺎﯿﺒﻟا
ﻰﺼﻗأةﻮﻗW 1400
ﺪﮭﺠﻟاV 240-220
ددﺮﺗ50Hz
ﻲﻟﺎﺤﻟاА 2.5
ﺔﻋﻮﻤﺠﻣ
ﻢﺤﻠﻟا ﺔﻣﺮﻔﻣ1
ﻊﻄﻗﺔﺣﻮﻟ3
ﺐﯿﻠﺼﻟاﻦﯿﻜﺳ1
ﻟﻲﺒﯿﻜتﺎﻘﻓﺮﻤﻟا1
ﻖﺠﺴﻟاتﺎﻘﻓﺮﻤﻟا1
ﻢطﺎﻤﻄﻟاةرﺎﺼﻋ1
ﺔﯿﻨﯿﺻ1
يزﺎﮭﺘﻧا1
تﺎﻤﯿﻠﻌﺘﻟا ﺐﯿﺘﻛ1
بﺎﺘﻛنﺎﻤﻀﻟا1
ﺔﻣﺰﺣ1
ﺺﻠﺨﺘﻟاﺔﺌﯿﺒﻠﻟ ﺔﻘﯾﺪﺼﻟا
ﺔﯾﺎﻤﺣ ﻲﻓ ةﺪﻋﺎﺴﻤﻟا ﻚﻨﻜﻤﯾ
ﺔﺌﯿﺒﻟا.
نأ ﺮﻛﺬﺗ ﻰﺟﺮﯾماﺮﺘﺣاﺔﯿﻠﺤﻤﻟا ﺢﺋاﻮﻠﻟا: ﺪﯿﻟاﻲﻓ
ﺔﯿﺋﺎﺑﺮﮭﻜﻟا تاﺪﻌﻤﻟاﻦﯿﻠﻣﺎﻌﻟا ﺮﯿﻏﺰﻛﺮﻣ ﻰﻟإ
تﺎﯾﺎﻔﻨﻟا ﻦﻣ ﺺﻠﺨﺘﻠﻟﺔﺒﺳﺎﻨﻤﻟا.
ﻔﺘﺤﺗﻆﺔﻌﻨﺼﻤﻟا ﺔﻛﺮﺸﻟاﺮﯿﯿﻐﺗ ﻖﺤﺑ ﺎﮭﺴﻔﻨﻟ
تﺎﻔﺻاﻮﻣﻢﯿﻤﺼﺗوﻊﻠﺴﻟا.
Page 10

INTERNATIONAL MANUFACTURER’S
WARRANTY
МЕЖДУНАРОДНЫЕ ГАРАНТИЙНЫЕ
ОБЯЗАТЕЛЬСТВА
ﻲﻟود نﺎﻣﺿﺔﻌﻧﺻﻣﻟا
Page 11

20
INTERNATIONAL MANUFACTURER’S WARRANTY
The Warranty is provided for the period of 2 years or more if the
Law on User Right of the country where the appliance was bought
provides for a greater minimum warranty period.
All terms of warranty comply with to the Law on Protection of the Consumer
Rights and are governed by the legislation of the country where the
product was bought.
The warranty and free of charge repair are provided in any country where
the product is delivered to by Saturn Home Appliances or authorized
representative thereof, and where no restriction of import or other legal
provisions interfere with rendering of warranty services and free of charge
repair.
Cases uncovered by the warranty and free of charge repair:
1. Guarantee coupon is filled in improperly.
2. The product has become inoperable because of the Buyer’s
nonobservance of the service regulations indicated in the instruction.
3. The product was used for professional, commercial or industrial purposes
(except for the models, specially intended for this purpose that is indicated
in the instruction).
4. The product has external mechanical damage or damage caused by
penetration of the liquid inside, dust, insects and other foreign objects.
5. The product has damages caused by non-observance of the rules of
power supply from batteries, mains or accumulators.
6. The product was exposed to opening, repair or modification of design by
the persons, unauthorized to repair; independent cleaning of internal
mechanisms etc. was made.
7. The product has natural wear of parts with limited service life,
expendables etc.
8. The product has deposits of scale inside or outside of fire-bar elements,
irrespective of used water quality.
9. The product has damages caused by effect of high (low) temperatures or
fire on non-heat resistant parts of the product.
10. The product has damages of accessories and nozzles which are included
into the complete set of product shipment (filters, grids, bags, flasks, cups,
covers, knifes, sealing rings, graters, disks, plates, tubes, hoses, brushes,
and also power cords, headphone cords etc.).
On the warranty service and repair, please contact the authorized
service centers of “Saturn Home Appliances”.
GB
21
МЕЖДУНАРОДНЫЕ ГАРАНТИЙНЫЕ ОБЯЗАТЕЛЬСТВА
Гарантия на изделие предоставляется на срок 2 года или более в случае,
если Законом о защите прав потребителей страны, в которой было
приобретено изделие, предусмотрен больший минимальный срок
гарантии.
Все условия гарантии соответствуют Закону о защите прав
потребителей и регулируются законодательством страны, в которой
приобретено изделие. Гарантия и бесплатный ремонт предоставляются в
любой стране, в которую изделие
поставляется компанией «Saturn Home Appliances» или ее
уполномоченным представителем, и где никакие ограничения по
импорту или другие правовые положения не препятствуют
предоставлению гарантийного обслуживания и бесплатного ремонта.
Случаи, на которые гарантия и бесплатный ремонт не
распространяются:
1. Гарантийный талон заполнен неправильно.
2. Изделие вышло из строя из-за несоблюдения Покупателем правил
эксплуатации, указанных в инструкции.
3. Изделие использовалось в профессиональных, коммерческих или
промышленных целях (кроме специально предназначенных для того
моделей, о чем указано в инструкции).
4. Изделие имеет внешние механические повреждения или
повреждения, вызванные попаданием внутрь жидкости, пыли,
насекомых и др. посторонних предметов.
5. Изделие имеет повреждения, вызванные несоблюдением правил
питания от батарей, сети или аккумуляторов.
6. Изделие подвергалось вскрытию, ремонту или изменению
конструкции лицами, не уполномоченными на ремонт;
производилась самостоятельная чистка внутренних механизмов и т.д.
7. Изделие имеет естественный износ частей с ограниченным сроком
службы, расходных материалов и т.д.
8. Изделие имеет отложение накипи внутри или снаружи ТЭНов,
независимо от качества используемой воды.
9. Изделие имеет повреждения, вызванные воздействием высоких
(низких) температур или огня на нетермостойкие части изделия.
10. Изделие имеет повреждения принадлежностей и насадок, входящих
в комплект поставки изделия (фильтров, сеток, мешков, колб, чаш,
крышек, ножей, венчиков, терок, дисков, тарелок, трубок, шлангов,
щеток, а также сетевых шнуров, шнуров наушников и т.д.).
По вопросам гарантийного обслуживания и ремонта обращайтесь
в специализированные сервисные центры фирмы «Saturn Home
Appliances».
RU
Page 12

22
ﻲﻟود نﺎﻣﺿﺔﻌﻧﺻﻣﻟا
رﯾﻓوﺗ مﺗﯾﻟ نﺎﻣﺿﻟا ةدﻣ2ﺔﻧﺳرﺛﻛأ وأنوﻧﺎﻘﻟا نﺎﻛ اذإﻰﻠﻋمدﺧﺗﺳﻣﻟا نﯾﻣﯾﻟاثﯾﺣ دﻼﺑﻟا نﻣءارﺷ مﺗزﺎﮭﺟرﻓوﯾ
ﻷا دﺣﻟاﻠﻟ ﻰﻧد ةدﺎﯾزةرﺗﻓنﺎﻣﺿﻟا.
لﻛطورﺷنﺎﻣﺿﻟالﺎﺛﺗﻣﻻانوﻧﺎﻘﻟقوﻘﺣ ﺔﯾﺎﻣﺣكﻠﮭﺗﺳﻣﻟاو ﺎﮭﻣﻛﺣﺗتﺎﻌﯾرﺷﺗيذﻟا دﻠﺑﻟاىرﺗﺷاﺞﺗﻧﻣﻟا.
رﯾﻓوﺗ مﺗﯾو نﺎﻣﺿﻟا حﻼﺻإ نﻣ ﺔﯾﻟﺎﺧﺔﻣﮭﺗدﻠﺑ يأ ﻲﻓثﯾﺣمﯾﻠﺳﺗ مﺗﯾﻰﻟإ ﺞﺗﻧﻣﻟالﺣزلﺑﻗ نﻣﺔﯾﻟزﻧﻣ ةزﮭﺟأوأ
لوﺧﻣﻟا ﮫﻠﺛﻣﻣ،ﮫﻟو ﺎﮭﯾﻓ دﺟوﯾ ﻻ ﻲﺗﻟاﻘﺗدﯾﯾدارﯾﺗﺳاوأىرﺧأ ﺔﯾﻧوﻧﺎﻗ مﺎﻛﺣأﻊﻣ لﺧادﺗﺗتﺎﻣدﺧ مﯾدﻘﺗ نﺎﻣﺿﻟا
و حﻼﺻإ نﻣ ﺔﯾﻟﺎﺧﺔﻣﮭﺗ.
تﻻﺎﺣﻟاﺎﮭﻧﻋ فﺷﻛ ﻲﺗﻟاو نﺎﻣﺿﻟا حﻼﺻإ نﻣ ﺔﯾﻟﺎﺧﺔﻣﮭﺗ.
1.ﺔﺋﺑﻌﺗ مﺗﯾنﺎﻣﺿﺔﻣﯾﺳﻘﻟاﻲﻓﺢﯾﺣﺻ رﯾﻏ.
2.تﺣﺑﺻألﻣﻌﻠﻟ ﺔﺣﻟﺎﺻ رﯾﻏﺞﺗﻧﻣﻟابﺑﺳﺑمازﺗﻟﻻا مدﻋنﻣ يرﺗﺷﻣﻟاﺔﻣدﺧﻟا مﺎظﻧرﺎﺷﻣﻟاﻲﻓ ﺎﮭﯾﻟإ
تﺎﻣﯾﻠﻌﺗﻟا.
3.مﺗﺞﺗﻧﻣﻟا اذھ مادﺧﺗﺳاﺔﯾﻧﮭﻣ ضارﻏﻷوأ ﺔﯾرﺎﺟﺗ وأﺔﯾﻋﺎﻧﺻ)ءﺎﻧﺛﺗﺳﺎﺑتﻼﯾدوﻣﻟا فدﮭﺗو ،ﺎﺻﯾﺻﺧ اذﮭﻟ
ضرﻐﻟاﮫﯾﻟإ رﺎﺷﻣﻟاتﺎﻣﯾﻠﻌﺗﻟا ﻲﻓ.(
4.ﺎﮭﯾدﻟ ﺞﺗﻧﻣﻟاﺔﯾﻛﯾﻧﺎﻛﯾﻣﻟا رارﺿﻷاﺔﯾﺟرﺎﺧﻟاوأنﻋ ﺔﻣﺟﺎﻧﻟا رارﺿﻷالﻐﻠﻐﺗلﺧادلﺋﺎﺳﻟارﺎﺑﻐﻟاو تارﺷﺣﻟاو
و ﺔﺑﯾرﻐﻟا مﺎﺳﺟﻷاىرﺧﻷا.
5.ﺎﮭﯾدﻟ ﺞﺗﻧﻣﻟانﻋ ﺔﻣﺟﺎﻧﻟا رارﺿﻷاةﺎﻋارﻣ مدﻋدﻋاوﻗﺔﻗﺎطﻟا تادادﻣإنﻣتﺎﯾرﺎطﺑﻟا ،بﯾﺑﺎﻧأوأتﺎﯾرﺎطﺑ.
6.ضرﻌﺗﻟ ﺞﺗﻧﻣﻟا حﻼﺻإو ،ﺢﺗﻔوألﯾدﻌﺗمﯾﻣﺻﺗصﺎﺧﺷﻷا بﻧﺎﺟ نﻣ ،ﻰﻟإ ﮫﺑ حرﺻﻣﻟا رﯾﻏحﻼﺻإ ؛فﯾظﻧﺗﻟا
نﻋ ﺔﻠﻘﺗﺳﻣﺔﯾﻠﺧادﻟا تﺎﯾﻟﻵاﺎﻣونﺎﻛ.
7.ﺎﮭﯾدﻟ ﺞﺗﻧﻣﻟاءادﺗراﺔﯾﻌﯾﺑطﻟاﻊﻣ ءازﺟأ نﻣةدودﺣﻣ ﺔﻣدﺧةﺎﯾﺣﻟا ،تﺎﻛﻠﮭﺗﺳﻣﻟاﺦﻟا
8.ﺎﮭﯾدﻟ ﺞﺗﻧﻣﻟاﻊﺋادولﺧادقﺎطﻧوأجرﺎﺧنﻣرﺻﺎﻧﻋطﯾرﺷرﺎﻧﻟا ،نﻋ رظﻧﻟا ضﻐﺑهﺎﯾﻣﻟا ﺔﯾﻋوﻧﺔﻣدﺧﺗﺳﻣﻟا.
9.ﺎﮭﯾدﻟ ﺞﺗﻧﻣﻟانﻋ ﺔﻣﺟﺎﻧﻟا رارﺿﻷارﯾﺛﺄﺗةرارﺣﻟا تﺎﺟرد عﺎﻔﺗرا)ﺔﺿﻔﺧﻧﻣ(وأﻠﻋ رﺎﻧﻟاﻰﺔﻣوﺎﻘﻣ ءازﺟأ
ةرارﺣﻠﻟرﯾﻏﺞﺗﻧﻣﻟا.
10.ﮫﯾدﻟ ﺞﺗﻧﻣﻟا نﺎﻛنﻣ رارﺿأتاراوﺳﺳﻛﻻاتﺎھوﻔﻟاوﻲﺗﻟاﺎﮭﻧﯾﻣﺿﺗ مﺗﻲﻓنﻣ ﺔﻠﻣﺎﻛ ﺔﻋوﻣﺟﻣتﺎﺟﺗﻧﻣﻟا
ﺔﻧﺣﺷ)رﺗﻼﻔﻟا رﯾراوﻗو ،سﺎﯾﻛأو ،تﺎﻛﺑﺷو ،باوﻛأو مﺗﺧو ،نﯾﻛﺎﻛﺳﻟاو ،ﺔﯾطﻏأو ،تﺎﻘﻠﺣتارﺷﺑﻣو ،صارﻗﻷاو ،
حاوﻟأومﯾطارﺧﻟاو بﯾﺑﺎﻧﻷاورﻓو ، ،شو ﺎﺿﯾأءﺎﺑرﮭﻛﻟا كﻼﺳأ كﻼﺳأو ،ﺔﻋﺎﻣﺳﺦﻟا.(
ﻰﻠﻋو نﺎﻣﺿﻟا ﺔﻣدﺧ لﺎﺻﺗﻻا ءﺎﺟرﻟا ،حﻼﺻإﻰﻠﻋﺔﻣدﺧﻟا زﻛارﻣنﯾدﻣﺗﻌﻣﻟانﻣ
“Saturn Home Appliances”.
AR
23
WARRANTY COUPON
When purchasing the product, please require its checking before you;
BE SURE
that the goods sold to you, are functional and complete
and that the warranty coupon is filled in correctly.
This warranty coupon confirms the absence of any defects in the product you
purchased and provides for free of charge repair of the product failed through the
fault of the manufacturer throughout the period of warranty service and free of charge
repair.
Failing the presentation of this coupon, in case of its improper filling in, infringement
of factory seals (if any),and also in cases indicated in the warranty obligations, the
claims are not accepted, and no warranty service and free of charge repair is made!
The warranty coupon is valid only in the original copy with the stamp of trading
organization, signature of the seller, date of sale and signature of the buyer.
ГАРАНТИЙНЫЙ ТАЛОН
При покупке изделия требуйте его проверки в Вашем присутствии,
УБЕДИТЕСЬ,что проданный Вам товар исправен и полностью
укомплектован,
гарантийный талон заполнен правильно.
Данный гарантийный талон подтверждает отсутствие каких-либо дефектов в
купленном Вами изделии и обеспечивает бесплатный ремонт вышедшего из строя
изделия по вине производителя в течение всего срока гарантийного
обслуживания и бесплатного ремонта.
Без предъявления данного талона, при его неправильном заполнении, нарушении
заводских пломб (если они имеются на изделии), а также в случаях, указанных в
гарантийных обязательствах, претензии не принимаются, а гарантийный и
бесплатный ремонт не производится!
Гарантийный талон действителен только в оригинале со штампом торгующей
организации, подписью продавца, датой продажи, подписью покупателя.
ﺔﻣﯾﺳﻘﻟاددﻋ ﻰﻠﻋﻼﻟ
ءارﺷ دﻧﻋﻰﺟرﯾ ،ﺞﺗﻧﻣﻟا اذھبﻠطﺗﺗقﯾﻗدﺗﻟاﺎﮭﯾﻓلﺑﻗكﻟ.
نأ نﻣ دﻛﺄﺗﺔﻋﺎﺑﻣﻟا ﺔﻋﺎﺿﺑﻟا،مﻛﻟﺔﯾﻔﯾظو ﻲھو ﺔﺋﺑﻌﺗ مﺗﯾ ﻲﺗﻟاو ﺔﻠﻣﺎﻛﺔﻣﯾﺳﻘﻟانﺎﻣﺿﻟاﺢﯾﺣﺻ لﻛﺷﺑ.
هذھﺔﻣﯾﺳﻘﻟانﺎﻣﺿﻟادوﺟو مدﻋ دﻛؤﺗيأﻲﻓ بوﯾﻋﮫﺗﯾرﺗﺷا يذﻟا ﺞﺗﻧﻣﻟا ﻰﻠﻋ صﻧﯾو ،حﻼﺻإ نﻣ ﺔﯾﻟﺎﺧنﻋ لوؤﺳﻣﻟا
لﺷﻓﺞﺗﻧﻣﻟالﻼﺧ نﻣنﻣ ﺄطﺧﺔﻌﻧﺻﻣﻟا ﺔﻛرﺷﻟاةرﺗﻔﻟا لﻼﺧنﻣو نﺎﻣﺿﻟا ﺔﻣدﺧ حﻼﺻإ نﻣ ﺔﯾﻟﺎﺧﺔﻣﮭﺗ.
مدﻋضرﻋﺔﻣﯾﺳﻘﻟا هذھ ،ﻲﻓﺔﻟﺎﺣﺔﺋﺑﻌﺗقﺋﻻ رﯾﻏﻲﻓ ،ﻰﻠﻋ يدﻌﺗﻟامﺎﺗﺧﻷاﺻﻣﻊﻧ(تدﺟو نإ) ،و ﺎﺿﯾأﻲﻓ تﻻﺎﺣﻟا
ﺎﮭﯾﻟإ رﺎﺷﻣﻟاﻲﻓتﺎﻣازﺗﻟانﺎﻣﺿﻟا ،لﺑﻘﺗ ﻻتﺎﺑﻟﺎطﻣﻟا ،ﺔﻣدﺧ سﯾﻟوو نﺎﻣﺿﻟا حﻼﺻإ نﻣ ﺔﯾﻟﺎﺧﻲھ ﺔﻣﮭﺗﻟازرﺣﻣﻟا.
ﺔﻣﯾﺳﻘﻟانﺎﻣﺿﻟاطﻘﻓ ﺔﺣﻟﺎﺻﻲﻓﺔﯾﻠﺻﻷا ﺔﺧﺳﻧﻟاﻊﻣمﺗﺧﺔﻣظﻧﻣةرﺎﺟﺗﻟا ﻊﯾﻗوﺗﻟاو ،،ﻊﺋﺎﺑﻟا لﺑﻗ نﻣﻊﯾﺑﻟا ﺦﯾرﺎﺗﻊﯾﻗوﺗو
يرﺗﺷﻣﻟا.
GB
RU
AR
Page 13

WARRANTY COUPON
ГАРАНТИЙНЫЙ ТАЛОН
ﺔﻣﯾﺳﻘﻟاددﻋ ﻰﻠﻋﻼﻟ
SATURN HOME APPLIANCES S.R.O. KONĚVOVA 141/2660
13083 PRAHA 3 – ŽIŽKOV, ČESKÁ REPUBLIKA, TEL: + 4202/ 67 108
392
Model/ Артикул/
جذوﻣﻧ
Production number/ Производственный номер
/
ددﻋجﺎﺗﻧﻹا
Date of sell/ Дата продажи/ ﺦﯾرﺎﺗﻊﯾﺑ
Shop stamp/ Штамп магазина/ رﺟﺗﻣﻊﺑاوطﻟا
Seller’s signature/ Подпись продавца/ ﻊﯾﻗوﺗﻊﺋﺎﺑﻟا
Buyer’s Signature confirming the acquaintance and consent with terms
of free of charge maintenance service of the product, and absence of the
complaints on appearance and colour of the product.
Подпись покупателя, подтверждающая ознакомление и согласие с
условиями бесплатного сервисно-технического обслуживания изделия,
а также отсутствие претензий к внешнему виду и цвету изделия.
ﻊﯾﻗوﺗيرﺗﺷﻣﻟانﻣ دﻛﺄﺗﻟافرﺎﻌﺗﻟاﺔﻘﻓاوﻣﻟاوطورﺷ ﻊﻣنﻣ ﺔﯾﻟﺎﺧﺔﻧﺎﯾﺻ
نﻋ لوؤﺳﻣﻟاتﺎﺟﺗﻧﻣﻟا ،و دوﺟو مدﻋىوﺎﻛﺷﻟاﻰﻠﻋنوﻟو رﮭظﻣﺞﺗﻧﻣﻟا.
Model / Артикул / جذوﻣﻧ
........................
Production number / Производственный
номер / ددﻋجﺎﺗﻧﻹا ........................
.........................................................
...............
Name of the Trade Company /
Наименование торговой организации/
مﺳاﺔﻛرﺷةرﺎﺟﺗﻟا
.........................................................
................
.........................................................
................
Stamp of the Trade Company/Место
печати торговой организации/
مﺗﺧﺔﯾرﺎﺟﺗﻟا ﺔﻛرﺷﻟا
.............................................................
............
.............................................................
............
Client address, phone#/ Aдрес, телефон
клиента/ لﯾﻣﻌﻟا ناوﻧﻋ ،فﺗﺎﮭﻟا مﻗر
.........................................................
.........................................................
................................
Dateof receiving/дата приема/مﻼﺗﺳا ﺦﯾرﺎﺗ
.........................................................
.........................................................
................................
Defect / дефект / لﻠﺧ
.........................................................
.........................................................
.........................................................
................................................
Signature, Stamp/ Подпись, печать /
ﻊﯾﻗوﺗﻟا ،مﺗﺧ
.........................................................
................
.........................................................
................
C O U P O N 3
Model / Артикул / جذوﻣﻧ........................
Production number / Производственный
номер / ددﻋﻹاجﺎﺗﻧ ........................
.........................................................
...............
Name of the Trade Company /
Наименование торговой организации/
مﺳاﺔﻛرﺷةرﺎﺟﺗﻟا
.........................................................
................
.........................................................
................
Stamp of the Trade Company/Место
печати торговой организации/
مﺗﺧﺔﯾرﺎﺟﺗﻟا ﺔﻛرﺷﻟا
.............................................................
............
.............................................................
............
Client address, phone#/ Aдрес, телефон
клиента/ لﯾﻣﻌﻟا ناوﻧﻋ ،فﺗﺎﮭﻟا مﻗر
.........................................................
.........................................................
................................
Dateof receiving/дата приема/مﻼﺗﺳا ﺦﯾرﺎﺗ
.........................................................
.........................................................
................................
Defect / дефект / لﻠﺧ
.........................................................
.........................................................
.........................................................
................................................
Signature, Stamp/ Подпись, печать /
ﻊﯾﻗوﺗﻟا ،مﺗﺧ
.........................................................
................
.........................................................
................
C O U P O N 2
Model / Артикул / جذوﻣﻧ........................
Production number / Производственный
номер / ددﻋجﺎﺗﻧﻹا ........................
.........................................................
...............
Name of the Trade Company/
Наименование торговой организации/
مﺳاﺔﻛرﺷةرﺎﺟﺗﻟا
.........................................................
................
.........................................................
................
Stamp of the Trade Company/Место
печати торговой организации/
مﺗﺧﺔﯾرﺎﺟﺗﻟا ﺔﻛرﺷﻟا
.............................................................
............
.............................................................
............
Client address, phone#/ Aдрес, телефон
клиента/ لﯾﻣﻌﻟا ناوﻧﻋ ،فﺗﺎﮭﻟا مﻗر
.........................................................
.........................................................
................................
Dateof receiving/дата приема/مﻼﺗﺳا ﺦﯾرﺎﺗ
.........................................................
.........................................................
................................
Defect/ дефект / لﻠﺧ
.........................................................
.........................................................
.........................................................
................................................
Signature, Stamp/ Подпись, печать/
ﻊﯾﻗوﺗﻟا ،مﺗﺧ
.........................................................
................
.........................................................
................
C O U P O N 1
 Loading...