


US ER ’S M AN UA L
WS- 6950
US ER’ S MANUA L

THE P ROF ESS ION AL EQU IPM ENT- --- --- ---- --- --- -|U SER ’S MA NUAL| THE P ROF ESS ION AL EQU IPM ENT- --- --- ---- --- --- -|U SER ’S MA NUAL|
Table of Content s
1.GUIDE.............................................................................................
1.1 Important Safety Instructions....................................
1.2 Unpacking..........................................................................
1.3 PRODUCT OVERVIEW & ILLUSTRATION..............
1.4 INSTALLATION OF METER.........................................
2.OUTLINE........................................................................................
3.THE MENU OSD INSTRUCTION.........................................
3.1 Search..................................................................................
3.1.1 Satellite....................................................................
3.1.2 LNB type..................................................................
3.1.3 ..................................
3.1.4 TP Num....................................................................
3.1.5 ................................................................
3.1.6 ..................................................................
3.1.7 .....................................................................
.................................................................
3.1.9 Longitude
3.1.10 My Longitude
3.1.11 My Latitude
3.1.0.1 Quick Search
3.2 Satellite Install
3.2.2 TP Manager............................................................
3.3 Multimedia.......................................................................
3.3.1 ........................................................................
3.3.2 .........................................................................
LOW FREQ / HIGH FREQ
Frequency
Symbrate
Polarity
3.1.8 22K Tone
................................................................
.....................................................
.........................................................
..............................................................
...............................................................
3.2.1 Sat Manager...........................................................
Photo
Music
01
01
02
02
05
06
06
07
07
07
07
08
08
08
08
08
08
08
08
08
10
10
15
16
16
17
3.4 System Setting.................................................................
3.4.1 OSD Language......................................................
3.4.2 KB-Back Light........................................................
SW Update
3.4.3 ..............................................................
3.4.4 ..............................................................
3.4.5 ............................................................
3.4.6 Time Zone...............................................................
3.4.7 ....................................................................
3.4.8 ...................................................................
3.5 Shortcut Buttons
.............................................................
.............................................................
...............................................................
................................................................
......................................................................
l................................................................
4. Technical Specification.......................................................
5. Trouble Shooting....................................................................
Set Default
GMT Usage
Set Date
Set Time
3.5.1 All Satellite
3.5.2 TELETEXT
3.5.3 SUBTITLE
3.5.4 TV List
3.5.5 TV Guide
17
18
18
18
18
19
19
19
19
19
19
19
20
20
20
21
23
THE P ROF ESS ION AL EQU IPM ENT- --- --- ---- --- --- -|U SER ’S MA NUAL| THE P ROF ESS ION AL EQU IPM ENT- --- --- ---- --- --- -|U SER ’S MA NUAL|
1 GUIDE
1.1 Important Safety Instructions
Thank you for choosing our product. Before installation,
we would like to remind you some notes, which is very
important for operating safely and properly, as follows:
Be sure to read this user manual before starting your
operation.
You must install the dish with correct direction and
angle. If the dish is not working properly, contact your
local dealer.
When the unit is suddenly moved to a hot area from a
cold area, it may cause some problems. In that case, turn
off the power, and turn on again after 1-2 hours.
Keep meter placed in clean space with sufficient ventilation.
Do not cover the meter with or place it on a unit that
emits heat.
Clean the case by a soft cloth with a little washing liquid.
Do not remove the cover.
Do not let the unit exposed to extreme heat, cold or
humid conditions.
No liquids or any other materials to come inside of the
unit.
01-Dig ita l Sat ell ite M ete r Digita l Sat ell ite M ete r-0 2
1.2 Unpacking Equipment
Open the package and make sure it includes all below items, if any is missing, please contact the reseller for replacement.
1.Digital Satellite Meter
2.User’s manual
3.AV cable
4.Car charger cable
5.Adaptor
6.F connector
7.Carrying bag
8.Strap of carrying bag
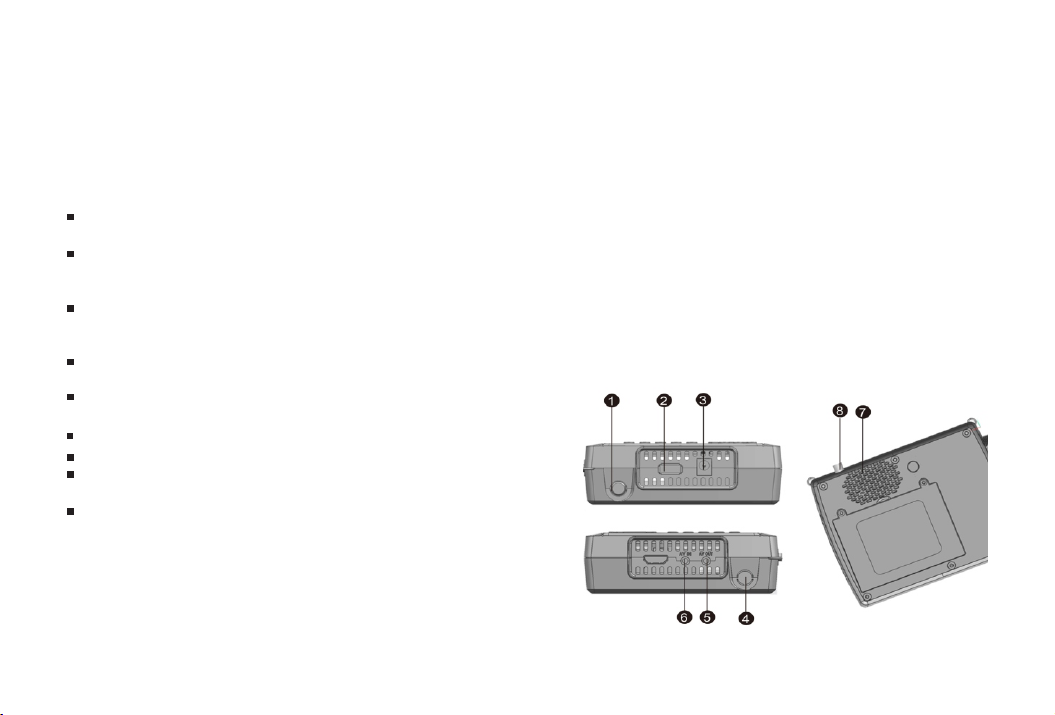
1.3 Product Overview & Illustration

THE P ROF ESS ION AL EQU IPM ENT- --- --- ---- --- --- -|U SER ’S MA NUAL| THE P ROF ESS ION AL EQU IPM ENT- --- --- ---- --- --- -|U SER ’S MA NUAL|
Cha rger (N ote1)
9
22K HZ
10
11
13V /18V
LOC K
12
Pow er
13
F1
14
15
F2
16
F3
F4
17
0-9
18
19
NEV IGATION KEY
20
EXI T
21
MEN U
Des cript ion
NO
LNB I N Connect t o sat ell ite antenna ca ble
1
2
USB P ort
DC Slot
3
DC 12V OUT PUT
4
5
AV OUT
AV IN
6
Spe aker
7
Pow er wi tch
8
03-Dig ita l Sat ell ite M ete r Digita l Sat ell ite M ete r-0 4
FUN CTION
Con nect to U SB memo ry
Con nect to A dapto r Input
DC 12 outp ut for ex tern eq uipme nt
Con nect to AV p ort for TV
Con nect to AV p ort for mete r
Spe aker In tegrated
Tur n on/ off meter
22
23
24
25
26
27
MUT E
INF O
TV/ RADIO
SCA N
(No te 2)
LCD S cre en
Cha rger in dicat or ligh t
22K hz indi cator l ight
Vert ical /Horiz onta l polarizat ion voltage
output lig ht
Sig nal lock ind icato r light
Pow er in dic ator light
1)S hows th e Subtitle m enu ;
2)T V/Rad io switch
1)S hows th e EPG men u;
2)A udi o sel ect
1)S hows th e Favor ite M ana ger menu;
2)l ock beep ala rm
1)S hows Ma nager C hanne l menu;
2)T V syste m switch
Sel ect cha nnels o r enter p rogrammi ng
Vol ume Control or m ove c ursor,
cha nnel or c hange , confi rm etc
Esc ape fro m prese nt menu a nd save
the s ettings
Sho w the mai n menu on t he scre en
or ju mp back t o previ ous men u in
sub -menu s etting con ditions
Ena ble or di sable t he audi o outpu t
To display channe l status or various
program inform ation of current cha nnel
Switch b etwee n TV and Ra dio mode
'Qu ick Sea rch' me nu shor tcut ke y
Whe n power o n the met er ,
dis plays t he batt ery lev el
Vid eo di spl ay
THE P ROF ESS ION AL EQU IPM ENT- --- --- ---- --- --- -|U SER ’S MA NUAL| THE P ROF ESS ION AL EQU IPM ENT- --- --- ---- --- --- -|U SER ’S MA NUAL|
Note1:When the adapter insert dc slot, Charg ing
indicator scint illat ion three times, then the indicator
is often bright, when the batteries charged sufficient,
the charge indicator is going out.
Note2:When the battery is on power failur e, a voice alarm,
please a timely charge, do not continue to be used to avoid
the internal bat tery runs out and sh orten the usage time.
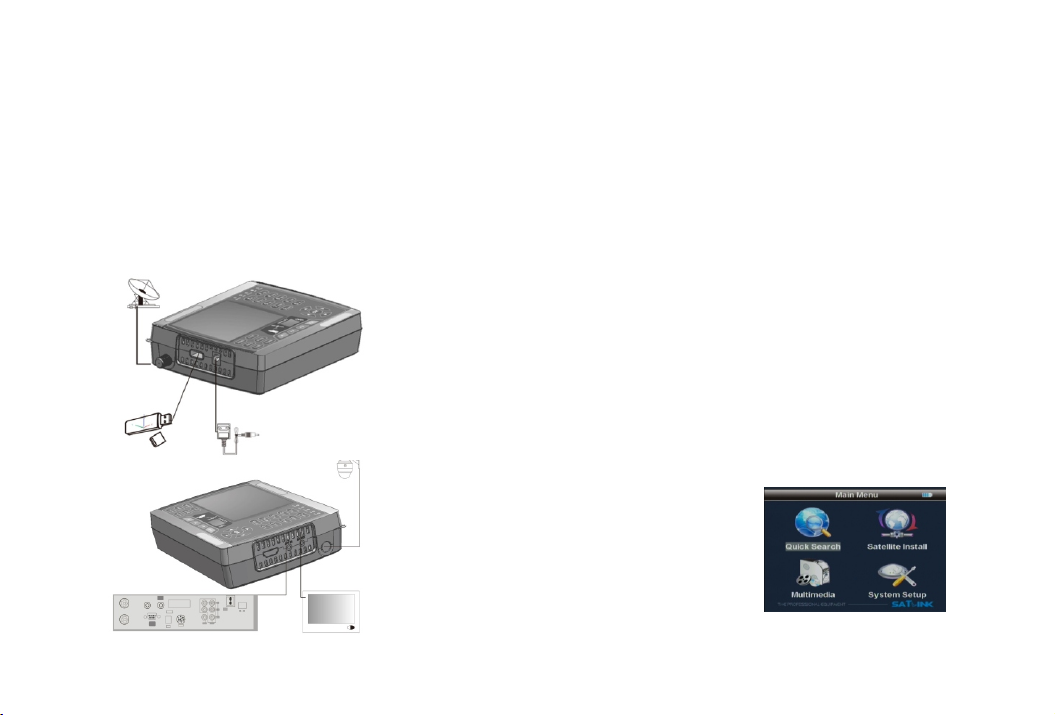
1.4 INSTALLATION OFMETER
2. OUTLINE
■ 3.5 Inch TFT LCD Screen Display
■ Input Frequency: 950~21 50MHz
■ Input Leve l: -65~ -25dBm
■ Input Impedance: 75 Ω
■ Measurement Type: signal strength, quality;
BER; S/N;PWR
■ Search Mode: Auto, Bl ind, Manual
■ Sound and Light Al arm for Loc king Signal
■ Auto Calculate Angle of AZ ,EL
■ Supporting D ISEQC 1.0,1.1,1.2 and 22khz Tone
■ LNB Power Su pply:18/13V(IMax 400mA)
■ DC 12 output for e xtern equipmen t,Imax(500mA)
■ Support both AV out and AV in
■ Speaker Integrated
■ Max Operatin g Time:4 hours
3. THE MENU OSD INSTRUCTION
If yo u h ave i nst all ed an d c onn ect ed th e c abl es of th e
meter , pressi ng MEN U key to di splay th e M ain M enu .
■ Search
■ Install
■ Multimedia
■ System
05-Dig ita l Sat ell ite M ete r Digita l Sat ell ite M ete r-0 6

THE P ROF ESS ION AL EQU IPM ENT- --- --- ---- --- --- -|U SER ’S MA NUAL| THE P ROF ESS ION AL EQU IPM ENT- --- --- ---- --- --- -|U SER ’S MA NUAL|
Press the keys of to move the cursor up or down
▲▼
in the menu inter fa ce, then use OK key to confirm a
selection.
3.1.4 TP Num:P ress key into the TP l ist. Use ▲▼key
to move the cursor then press OK k ey to select the
satellites tha t you want.
3.1 Search
3.1.5Frquency: Frequency of the current transp ort,
Input the value by u sing the numeric keys.
3.1.1Satel lite: P ress ►key enter the satellite list. Use
▲ ▼ key to move the cursor, then press OK key to
select the satel lite that you want.
3.1.6 Symbrate:Symbol rate of the current transpo rt,
Input the value by u sing the nu meric keys.
3.1.7 Polarity: Press key to change Vertical or horizontal of polar ization .
3.1.8 22K Tone: Press key to sel ect 22K Tone ON/OFF
3.1.9Longitude: Use the nume rical keys to input
Longitude of Satellite
3.1.10 My Long itude:Use the numerical keys to in put
Longitude of Local Region
3.1.2 LNB type : Press key, you can select single/Universal/Unicab leSCRetc, according to your physical LNB
type.
3.1.3LOW FREQ / HIGH FREQ:Using the numeric keys
3.1.11My Lat itude:Use the numerical keys to in put
Latitude of Local Region
3.1.0.1 Quic k Searc h
In the satellite s earch interface, pressing OK key will
into the quick sea rch.
or pressing keys enter the proper LNB fre quency referring to your LNB.
07-Dig ita l Sat ell ite M ete r Digita l Sat ell ite M ete r-0 8

THE P ROF ESS ION AL EQU IPM ENT- --- --- ---- --- --- -|U SER ’S MA NUAL| THE P ROF ESS ION AL EQU IPM ENT- --- --- ---- --- --- -|U SER ’S MA NUAL|
■ Zoom: Enlarge showing the strength and quality
If you set the My Long itude and M y Latitud e, the angle
of LNB, the orient ation and e levatio n of antenna, all will
display on the scr een.
3. 2 Satellit e lnsta ll
Press key to selec t Tp Scan, Auto Scan, Zoom, then
press OK key into fu nction.
■ TP Scan: According to the c urrent TP, sear ch channel
3.2.1 Sat Mana ger: Pr ess “OK” button to enter the
Sub-menu, and th en set the state of the dish
■ Auto : According to the user db of satellite, search
channel.
3.2.1.1Switch typ e:
provides N ONE, DiSEqC1. 0/1.1, DiS EqC 1.2/USAL S,let you have
exact i nformati on to dir ect your antenna to ward a sa tellite. P resskey to se lect switc h type.
1.DiSEqC 1.0/1.1
Press ▲ ▼ keys to se lect LNB1/LNB 2/LNB3/L NB4
Accordin g to your switch type, the met er
09-Dig ita l Sat ell ite M ete r Digita l Sat ell ite M ete r-1 0

THE P ROF ESS ION AL EQU IPM ENT- --- --- ---- --- --- -|U SER ’S MA NUAL| THE P ROF ESS ION AL EQU IPM ENT- --- --- ---- --- --- -|U SER ’S MA NUAL|
Press “OK” key to e nter the Sub -Me nu
2.DiSEqC 1.2/USAL S
Press ▲ ▼ keys to se lect Position 0 1/ Positio n 02/ Position
03/ Positi on 04
Press “F1” key to se lect the desired satellite.
Press “OK” key to e nter the Sub -Me nu
▲▼
Press key to selec t the desired sat ellite, an d pre ss “OK” key,
then you can s ee the informat ion of the sat ellite you s ele ct.
11-D igi tal S ate llite Met er Digita l Sat ell ite M ete r-1 2

THE P ROF ESS ION AL EQU IPM ENT- --- --- ---- --- --- -|U SER ’S MA NUAL| THE P ROF ESS ION AL EQU IPM ENT- --- --- ---- --- --- -|U SER ’S MA NUAL|
Press “F1” k ey to select the de sired sate lli te.
2. Sele ct Sw itch Type on Di SEq C 1.0/1.1, Tonebu rst m ode ON
Press ▲▼ key to select the desired satellite, and press “OK” key,
then you can see the information of the satellite you select.
3.2.1.2 Toneburst:Pres s button to choos e Ton eburst mod e
3. Sele ct Sw itch Type on Di SEq C 1.2/USAL S
■ Press F1 ke y to Set Limi t
OFF/ON
1. Select Sw itch Typ e on NONE, Tonebu rst m ode ON
13-Dig ita l Sat ell ite M ete r Digita l Sat ell ite M ete r-1 4

THE P ROF ESS ION AL EQU IPM ENT- --- --- ---- --- --- -|U SER ’S MA NUAL| THE P ROF ESS ION AL EQU IPM ENT- --- --- ---- --- --- -|U SER ’S MA NUAL|
■ Press F2 key to Set Lo cation
■ Press F1 key to add TP.
■ Press F2 /OK key to de lete the current TP .
■ Press F3 key to dele te the ALL TP.
■ Press F4 key to scan t he current TP
3.3 Multimedia
The meter interg rates USB p ort, which support the
following device:
■ Press F3 key to Set LN B.
lUSB portable harddisc
lUSB memory
It will appear “st orage device
is inserted ” when U SBdevice
is inserted to the U SB port.
the usb device has b een recognized and can be use.
3.2.2 TP Manag er
Otherwise will appear “ Device was rem oved”.
3.3.1Photo :Press ▲▼◄►key to select picture, then
press OK key to play.
Press ◄► key to chan ge satellite .Pr essing OK/▲▼
key, switch to T P select
15-Dig ita l Sat ell ite M ete r Digita l Sat ell ite M ete r-1 6

THE P ROF ESS ION AL EQU IPM ENT- --- --- ---- --- --- -|U SER ’S MA NUAL| THE P ROF ESS ION AL EQU IPM ENT- --- --- ---- --- --- -|U SER ’S MA NUAL|
Press ▲▼ key to select pict ure, then press OK key to play.
Press MENU key to ap pear play ing bar.
Press ◄►key to move the cur sor, then press OK key
to operate funct ion.
There are Rotate , Delay set, ZOOM, Play/Pause, Previous
Picture, Next pi cture, Stop.
3.3.2 Music
3.4.1 OSD Lang uage: P ress ◄►key to select language
3.4.2 KB-Bac k Light
3. 4.3 SW Updat e
Press ▲▼◄key to select son g, then press OK key to play.
Press F1 key to Play /Paus e music.
Press F2 key to retu rn music menu.
Press F3 key to set mu sic cycle mode
Press F4 key to set mu sic forward.
Press ◄► control volume
Press ▲▼ select the music you desire
key to
key to
3.4 System Setup
This menu consis ts of sub-menus as shown below:
To upgrade SW or Data throu gh USB port.
To store the upg rading fi le in the external memory, and
insert it into USB p ort, and then enter upgrade menu.
To select the fi le, it will a utomatically return back to the
previous menu af ter upgra de.
3.4.4 Set Default: The Set Default allo ws user to restore the factory-reset values, when you press OK key,
the system setup w ill be rest ored to the default values.
17-Dig ita l Sat ell ite M ete r Digita l Sat ell ite M ete r-1 8

THE P ROF ESS ION AL EQU IPM ENT- --- --- ---- --- --- -|U SER ’S MA NUAL| THE P ROF ESS ION AL EQU IPM ENT- --- --- ---- --- --- -|U SER ’S MA NUAL|
Warning: On selecting Set Default you will lost all of
data and informa tion, whi ch was previous installed.
3.4.5 GMT Usag e:Set the GMT parameter
3.5.3 SUBTIT LE:Pr ess F2 key to enter the SUBTITLE
interface when i t's playi ng programs, you can select
the Subtitle Language.
3.4.6 Time Zon e:Press ◄ ► Time Zone.key to set
3.4.7 Set Date :Press the nu meric key to set date
3.4.8 Set Time :Press the nu meric time. key to set
3.5 Shortcut B utton s
3.5.1 All Sate llite :Press “OK” key to enter th e All Sa-
tellite interf ace when it's playing programs.
3.5.4 TV List:Press F3 key to enter the TV List int erface
when it's playing programs, you can op erate according to
the screen promp ts
Press ▲▼ key to select the de sired satellite, and press
“OK” key.
3.5.2 TELET EXT:Pre ss F1 key to enter the TELETE XT
interface when i t's playi ng progra ms, you can select the
Teletext Lan guage.
19-Dig ita l Sat ell ite M ete r Digita l Sat ell ite M ete r-2 0
3.5.5 TV Guide : Press F4 key to ente r the TV Guide
interface when i t's playi ng progra ms

THE P ROF ESS ION AL EQU IPM ENT- --- --- ---- --- --- -|U SER ’S MA NUAL| THE P ROF ESS ION AL EQU IPM ENT- --- --- ---- --- --- -|U SER ’S MA NUAL|
4. Technical Specification
TRA NSMIS SION ST ANDARDS
DVB -S
SATELLITE IN PUT /DE MODULAT ION
Con necto r Type
Inp ut Freq uency
Sig nal Inp ut Leve l
Ban d Switch Con trol
LNB S upply
Dem odulation Typ e
Sym bol R ate
LCD F EATU RES
LCD Type
Num ber of Do ts
Act ive are a (WxH )
AV output i nte rfa ce
Con necto r Type
Vid eo Ou tpu t
Aud io ou tpu t
F Typ e
950 t o 2150 MH z
-65 t o -25dB m
22K Hz
13V /18V, Im ax 40 0mA
QPS K,8PS K
2<R s<45 M ba nd(SC PC/MC PC)
TFT T RANSM ISSIV E
320 (RGB) x 240
70. 08*52 .56 mm
2
3.5 m m Jack
CVB S
Ste reo Aud io L/ R out put
Aud io ou tpu t mod e
DATA S ERVICE PORT
Con necto r
Dat a proto col
Fil e manag ement s ystem
fil e forma t
DC OUTPU T
DC 12V Ima x:500 mA
MIC ROPRO CESSO R
Mic ropro cessor
Clo ck Frequen cy
SDR AM Memo ry
Pow er SU PPLY
Li_ Ion Bat tery
Ada pter
Pow er co nsu mpt ion
PHY SICAL C HARAC ERS TICS
Siz e (W x D x H)
Net W eig ht
Ste reo, Mo no,R/ L
USB
USB 2.0 int erfac e
NTF S,FAT3 2,FAT16
wma ,mp3, mp4,a vi,jp g,jpe g,bmp ,img
CT2 16S-T
133 MHz
16M bit
8.4 V/300 0mAh
OUT PUT :DC12V /1.5A ,
INT UPT :10 0-240 VAC 50/60Hz
Max . 10W
95* 155*4 5(mm )
3
0.5 KG
AV input in ter fac e
Con necto r Type
Vid eo in put
Aud io in put
AUD IO/ VIDEO PROCES SIN G
Res olvin g rate
Sig nal com patibili ty
Vid eo Fo rma t
3.5 m m Jack
CVB S
Ste reo Aud io L/ R inp ut
PAL-25 frame @72 0*5 76,NTSC-30
fra me@72 0*480 ,
Sup port co nvers ion f or different v ide o for mats
4:3 ,16:9 ,By Pan & S can a nd Le tter Box conve rsion
21-Dig ita l Sat ell ite M ete r Digita l Sat ell ite M ete r-2 2

THE P ROF ESS ION AL EQU IPM ENT- --- --- ---- --- --- -|U SER ’S MA NUAL|
6. Trouble Shooting
Pro blem
No di splay l ight up
No so und or pi cture ,but
the f ront pa nel pow er
lig ht is ON.
No so und or pi cture
Bad p ictur e
/Bl ockin g Error
Pos sib le Ca uses
Power swi tch is not on
Run out of batt eries
Black led is of f
AV IN ja ck inse rt,
but n o video i nput
The satell ite dish is not
pointi ng at the satelli te.
No signal or weak signal
The satellite dish in not
pointing at the satellite
Sig nal is to o stron g
Sat ellit e dish is t oo smal l
LNB n oise fa ctor to o high.
The L NB is fau lty. Ch ange th e LNB
The system is connec t-
AV out N o pictu re(V ideo)
The k ey is not w orkin g
ed by SCART cable and
TV is not in AV mode.
Out o f batte ry
Key b locks
Note: If you still c annot resolve the problem with the
above references. Please contact the local deal er or
their after-sales ser vice center.
Wha t To Do
Che ck to mak e sure po wer
on. E ven on ad apter . Pres s
B.l ight ke y
Pul l out AV IN ca ble
Adj ust the d ish. Ch eck
the S ignal L evel in t he
Ant enna Se tup men u
Check the cable connections.
LNB and other equipment
connected between the LNB
and the meter and adjust the
dish.
Adj ust the d ish.
Con nect a si gnal at tenua tor
to th e LNB inp ut
Cha nge to a la rger di sh
Cha nge to an L NB with
low er nois e facto r
ChecktheUHFchannel,
fixed in your system and
turn the UHF properly.
Eve n on adap ter
make sure no blocks
between the front panel
23-Dig ita l Sat ell ite M ete r
 Loading...