

Sartorius AZ214,AZ124,AZ313,AZ153,AZ3102,AZ64,AZ1502,AZ612,AZ212,AZ6101,AZ4101,AZ2101,AZ601 Operating Instructions Manual
98648-018-69
Operating Instructions
Sartorius M-power
Electronic Analytical and Precision Balances and Precious Metal Scales

2
Contents Warnings and
Safety Precautions
Contents ............... 2
Warnings and Safety Precautions . 2
Getting Started ........... 3
Operation .............. 7
Overview of Display
and Operating Elements ....... 7
Basic Weighing Function ...... 8
Calibration/Adjustment ....... 9
Application Programs........ 10
Net-Total Formulation/
Second Tare Memory ........ 10
Counting ............... 11
Weighing in Percent ......... 12
Weigh Averaging........... 13
Toggling Between Weight Units .. 14
Configuring the Balance (Menu Codes)
Setting the Parameters (Menu Codes) 15
Balance Operating Menu (Overview) 16
ISO/GLP-compliant Printout .... 18
Data Interface ............ 20
Error Codes ............. 21
Care and Maintenance ....... 22
Instructions for Recycling ..... 23
Overview
Specifications ............ 24
Accessories (Options) ........ 27
Declaration of Conformity...... 29
Safety
G To prevent damage to the equipment,
please read these operating instructions
carefully before using your balance.
!Do not use this balance in a hazardous
area/location.
!Make absolutely sure to unplug the balance
from AC power before you connect or disconnect a peripheral device.
!Exposure to excessive electromagnetic
disturbance can cause the readout value to
change. Once the disturbance has ceased, the
instrument can be used again in accordance
with its intended use.
Setting up the Balance
!Warning when using pre-wired RS-232
connecting cables: The pin assignments
in RS-232 cables purchased from other
manufacturers may be incompatible with
Sartorius balances. Be sure to check
the pin assignment against the chart
on page 19 before connecting the cable,
and disconnect any lines that do not match.
– Connect only Sartorius accessories and
options, as these are optimally designed for
use with your Sartorius balance.
Do not try to solve any problems on your own.
The operator shall be responsible for any modifications to Sartorius equipment and for any
connections of cables or equipment not
supplied by Sartorius and must check and,
if necessary, correct these modifications and
connections. On request, Sartorius will provide
information on the minimum operating specifications (in accordance with the standards
for defined immunity to interference).
– Do not open the balance housing.
If the seal is broken, this will result
in forfeiture of all claims under the
manufacturer’s warranty.

3
Getting Started
Storage and Shipping Conditions
– Do not expose the balance to extreme
temperatures, blows, shocks, vibration
or moisture.
Unpacking the Balance
G After unpacking the balance, check it
immediately for any visible damage
$ If you see any sign of damage, proceed
as directed in the chapter entitled “Care
and Maintenance,” under the section on
“Safety Inspection”
$ Save the box and all parts of the
packaging until you have successfully
installed your balance in case you need
to return it. Before packing your
balance, unplug all connected cables to
prevent damage.
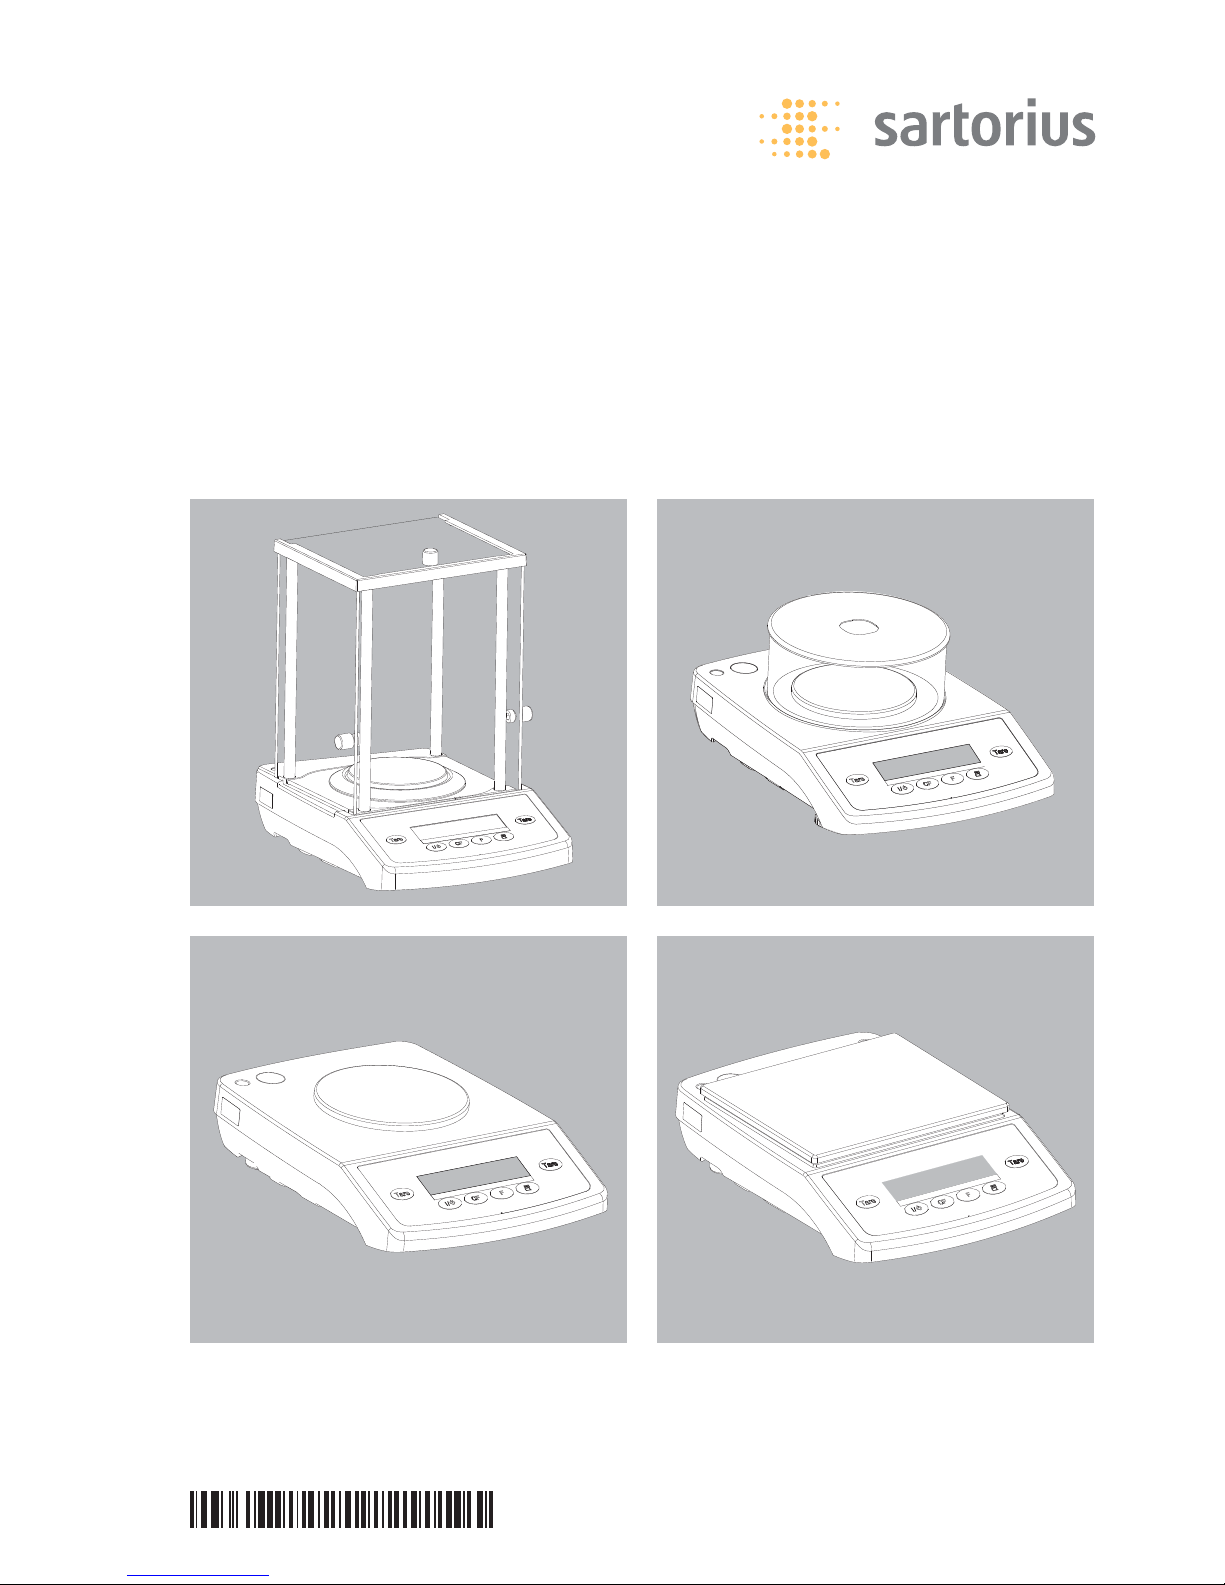
Equipment Supplied
– Balance
– Weighing pan
– Pan support (only on models with
a round weighing pan)
– AC adapter, plug type
Additionally supplied with AZ214,
AZ124, AZ64 models:
– Shield ring
– Shield plate
– Dust cover
Installation Instructions
When choosing a location to set up your
balance, observe the following:
– Avoid placing the balance in
close proximity to a heater or otherwise
exposing the balance to heat or
direct sunlight
– Protect the balance from drafts that
come from open windows or doors
– Avoid exposing the balance to extreme
vibrations during weighing
– Do not expose the balance to extreme
moisture over long periods
Conditioning the Balance
Moisture in the air can condense on the
surfaces of a cold balance whenever it is
brought into a substantially warmer
place.
If you transfer the balance to
a warmer area, make sure to condition it
for about 2 hours at room temperature,
leaving it unplugged from AC power.

4
Setting up the Balance
Balances with a draft shield chamber with sliding
doors
G Place the components listed below inside
the chamber in the order given:
– Shield plate
– Shield ring
– Pan support
– Weighing pan
Balances with a Glass Draft Shield
G Place the components listed below inside
the chamber in the order given:
– Draft shield base – place it on the balance
so that the edge for fitting the glass draft shield
faces upwards and turn it until it is firmly in place
– Pan support
– Weighing pan
– Glass draft shield
– Draft shield cover – place it on the balance
so that the edge faces downwards
Balances with a Round Weighing Pan
G Place the components listed below inside
the chamber in the order given:
– Pan support
– Weighing pan
Balances with a Rectangular Weighing Pan
G Place the weighing pan on the balance

5
Connecting the Balance to AC Power/
Safety Precautions
Use only original Sartorius AC adapters.
G Insert the right-angle plug into the jack
G Plug AC adapter into electrical outlet
The ground terminal is connected to the balance
housing,
which can be additionally grounded for
operation.
Selecting the Line Voltage (Mains Voltage)
(Optional)
Use the following original AC adapters for selecting
the line voltage:
– AC adapter TNG8 order no. 6971951 (universal)
or
– AC adapter TNG8 order no. 6971952 (for the U.K.)
G Use the switch to toggle between 230 V and 115 V

6
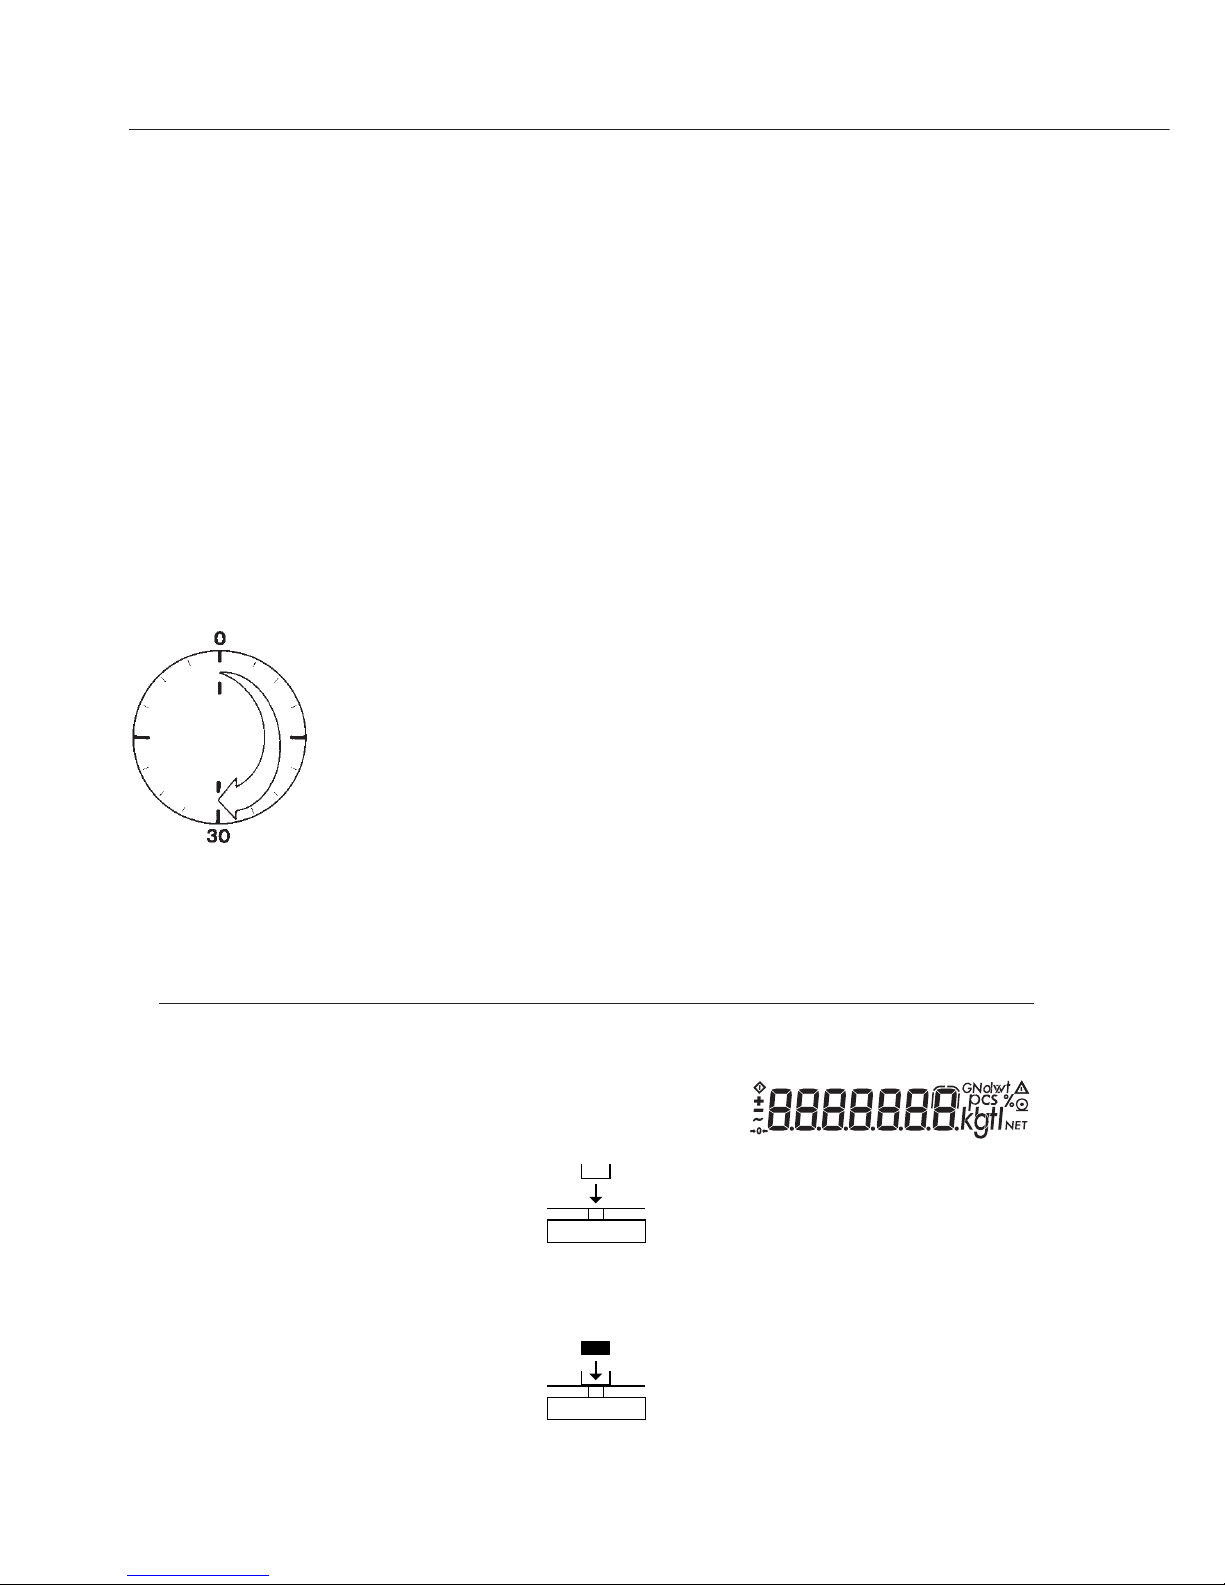
Leveling the Balance
Level the balance any time you set it up in
a new location. Use only the 2 front feet of the
balance for leveling.
G Turn the 2 rear feet until they are in position
(only on models AZ3102, AZ1502)
G Turn the 2 front feet as shown here in the illustration
until the air bubble is centered in the level indicator
> In most cases, this will require several adjustment steps
Anti-theft Locking Device
To protect against theft, use the mounting lug on
the rear panel of the balance.
G Secure the balance at the place of installation,
for example with a chain or a lock

7
Operation
Overview of Display and Operating Elements
Position Designation
1 Weight units
2 Calculated-value indicator
(i.e., not a weight value)
3 Taring
4 Symbol: “Printing mode active”
5 Symbol: Gross or net value
6 Data output:
Press this key to send readout
values to the built-in data
interface.
7 Start an application program
Position Designation
8 Delete (Clear Function)
This key is generally used to
cancel functions:
– Quit application program
– Cancel calibration/adjustment
routine | Exit the operating
menu
9 On/off
10 Symbols for zero range
(verified models only)
11 Weight value displayed
in selected weight unit
CF
Tare
Tare
F
10
11
3
9
8
1
6
4
3
2
7
5
8
Basic Weighing Function
Preparation
G Turn on the balance: Press e
G To change configurations: See the chapter entitled “Configuring the Balance”
$ To tare the balance: Press t
Additional Functions:
G To turn off the balance: Press e
Warmup Time
To ensure accurate results, the balance must warm up for 30 minutes
before operaion. Only after this time will the balance have reached
the required operating temperature.
Example
Basic weighing
Step Key (or instruction) Display/Printout
1. Turn on the balance e
Self-test is performed
2. Place container on balance
+ 52.0 g
(here: 52 g)
3. Tare the balance t
+ 0.0 g
4. Place sample in container
+ 150.2 g
on balance (here: 150.2 g)

9
Calibration/Adjustment
Available Features
Calibration/adjustment can only be performed when
– there is no load on the balance,
– the balance is tared,
– the internal signal is stable.
If these conditions are not met, an error message is displayed. Otherwise, the weight
required for calibration/adjustment is displayed (see “Accessories” for calibration weights).
You can use any of the following weight units to calibrate/adjust:
g, kg*, lb (menu code 1. 4. x)
You can block calibration/adjustment of the balance:
– Select menu code 1. 5. 3)
Example
Step Key (or instruction) Display/Printout
1. Tare the balance t
0.0 g
2. Begin calibration t >2 sec.
+ 1000.0
Calibration weight is displayed
without weight unit (here: 1000 g)
3. Place the indicated calibration
1000.0
weight on the balance
After calibration, the calibration
+ 1000.0 g
weight is displayed with wt. unit
4. Remove the calibration weight
0.0 g
* = not on models with a readability of 0.1 mg
 Loading...