

Page 1

85032-540-61 Vers. 03 | 2013
Operating Manual| Bedienungsanleitung
arium® Display Mounting Kit
arium
®
Displaymontagekit
Accessories | Zubehör
Page 2

2 Contents
Contents of this Manual|
Inhalt dieser Anleitung
Legal Notices|Impressum ...................................... Page 2 | Seite 2
English ............................................................ Page 3
Deutsch .......................................................... Seite 11
Sartorius Weighing Technology GmbH
Weender Landstrasse 94–108
D-37075 Goettingen
Germany | Deutschland
Internet: www.sartorius.com
E-mail: arium.technical-support@sartorius.com
Printed in Germany on chlorine-free bleached paper.
If you require mandatory information regarding specific properties of your display
mounting kit that goes beyond that which is described here, please contact us.
Reprinting, translation and copying in any form, even in excerpts, requires the written
permission of Sartorius Weighing Technology GmbH.
arium® is a registered trademark of Sartorius Weighing Technology GmbH.
Gedruckt in Deutschland auf chlorfrei gebleichtem Papier.
Wenn Sie verbindliche Informationen zu bestimmten Eigenschaften Ihres
Multifunktionsstativs benötigen, welche über die hier beschriebenen hinausgehen,
bitten wir um Ihre Anfrage.
Nachdruck, Übersetzung und Vervielfältigung in jeglicher Form, auch auszugsweise,
bedürfen der schriftlichen Genehmigung der Sartorius Weighing Technology GmbH.
arium® ist eingetragenes Warenzeichen der Sartorius Weighing Technology GmbH.
Page 3

Table of Contents
1. General Information ................................................. 4
1.1 Notes on Using this Manual ......................................... 4
1.2 Safety Precautions ................................................ 4
1.3 Terms|Abbreviations .............................................. 5
1.4 Proper Use ....................................................... 5
1.5 Functionality of the arium® Display Mounting Kit ....................... 5
2. Initial Startup|Installation ........................................... 6
2.1 Unpacking the Equipment .......................................... 6
2.2 Setup ........................................................... 6
Use with the Display| Dispense Unit .................................. 6
2.3 Connection ...................................................... 6
3. Operation .......................................................... 7
4. Appendix ........................................................... 9
4.1 Shipping Instructions .............................................. 9
4.2 Disposal Instructions .............................................. 9
Contents 3
Page 4

1. General Information
1.1 Notes on Using
this Manual
y Please read this entire manual carefully and completely before using the device.
y Read the safety precautions carefully.
y This manual is part of the product.
Keep it in a safe and easily accessible location.
y You can request a replacement copy if it is lost.
Symbols and Signs
The following symbols are used in this manual:
These notes identify hazards that can be expected with great probability and
can lead to serious injuries and possibly death.
These notes identify hazards that occur and may lead to moderate or mild
injuries.
These notes identify hazards associated with the risk of material damage.
This symbol identifies useful information and tips.
t This references additional sources
y Indicates steps to be performed
1.2 Safety Precautions
Organizational measures on the part of the operator:
y The operator must: point out the hazards to which personnel and the working
environment may be subjected during operation, provide suitable safety equipment, and enact the stipulated safety requirements.
y Service to the arium
®
display mounting kit and any connected arium® device may
only be performed by qualified personnel authorized by Sartorius.
y When using the arium® display mounting kit, you must take the weight of the
stand as well as the weight of the attached display|dispense unit into account.
The operator must take appropriate measures to ensure that the surface upon
which the stand rests can safely withstand a weight of approx. 6 kg.
Workplace Setup
1. Use only the components provided with or approved for the stand. Never make
any technical modifications, unless Sartorius Weighing Technology GmbH has
expressly confirmed that this modification does not affect safe use.
2. Check all components carefully for damage. Use only flawless parts.
4 General Information
Page 5

1.3 Terms|Abbreviations
Spare Parts A spare part is a component of the device that can be replaced by the user or
Sartorius Service.
1.4 Proper Use
The following points must be followed to ensure proper installation and operation
of your arium® display mounting kit:
– These operating instructions were developed according to regulations and legal
guidelines currently available at the time.
– It is structured so that it can be implemented and used by trained personnel.
– Activities that go beyond the scope of that which is described here are to be
carried out by Sartorius service personnel exclusively.
1.5 Functionality of the
arium
®
Stand for the
Display|Dispense Unit
The arium
®
display mounting kit (hereinafter reffered to as “height adjustable stand”)
enables you to position the arium® display|dispense unit independent of the arium®
pro XX and | or comfort System itself.
Only the length of tubing and | or the HDMI cable limits the distance to the the
ultrapure water system.
The arium® display mounting kit should only be used with the built-in (D) version of
the arium® pro XX and | or comfort systems.
Please note that the corresponding display|dispense unit is not supplied with the
height adjustable stand.
General Information 5
Page 6
2. Initial Setup|Installation
2.1 Unpacking the Equipment
Remove the arium
®
display mounting kit from its packaging and check for
completeness:
Version Number
Stand 1
Slide with the attachment for the display| dispense unit 1
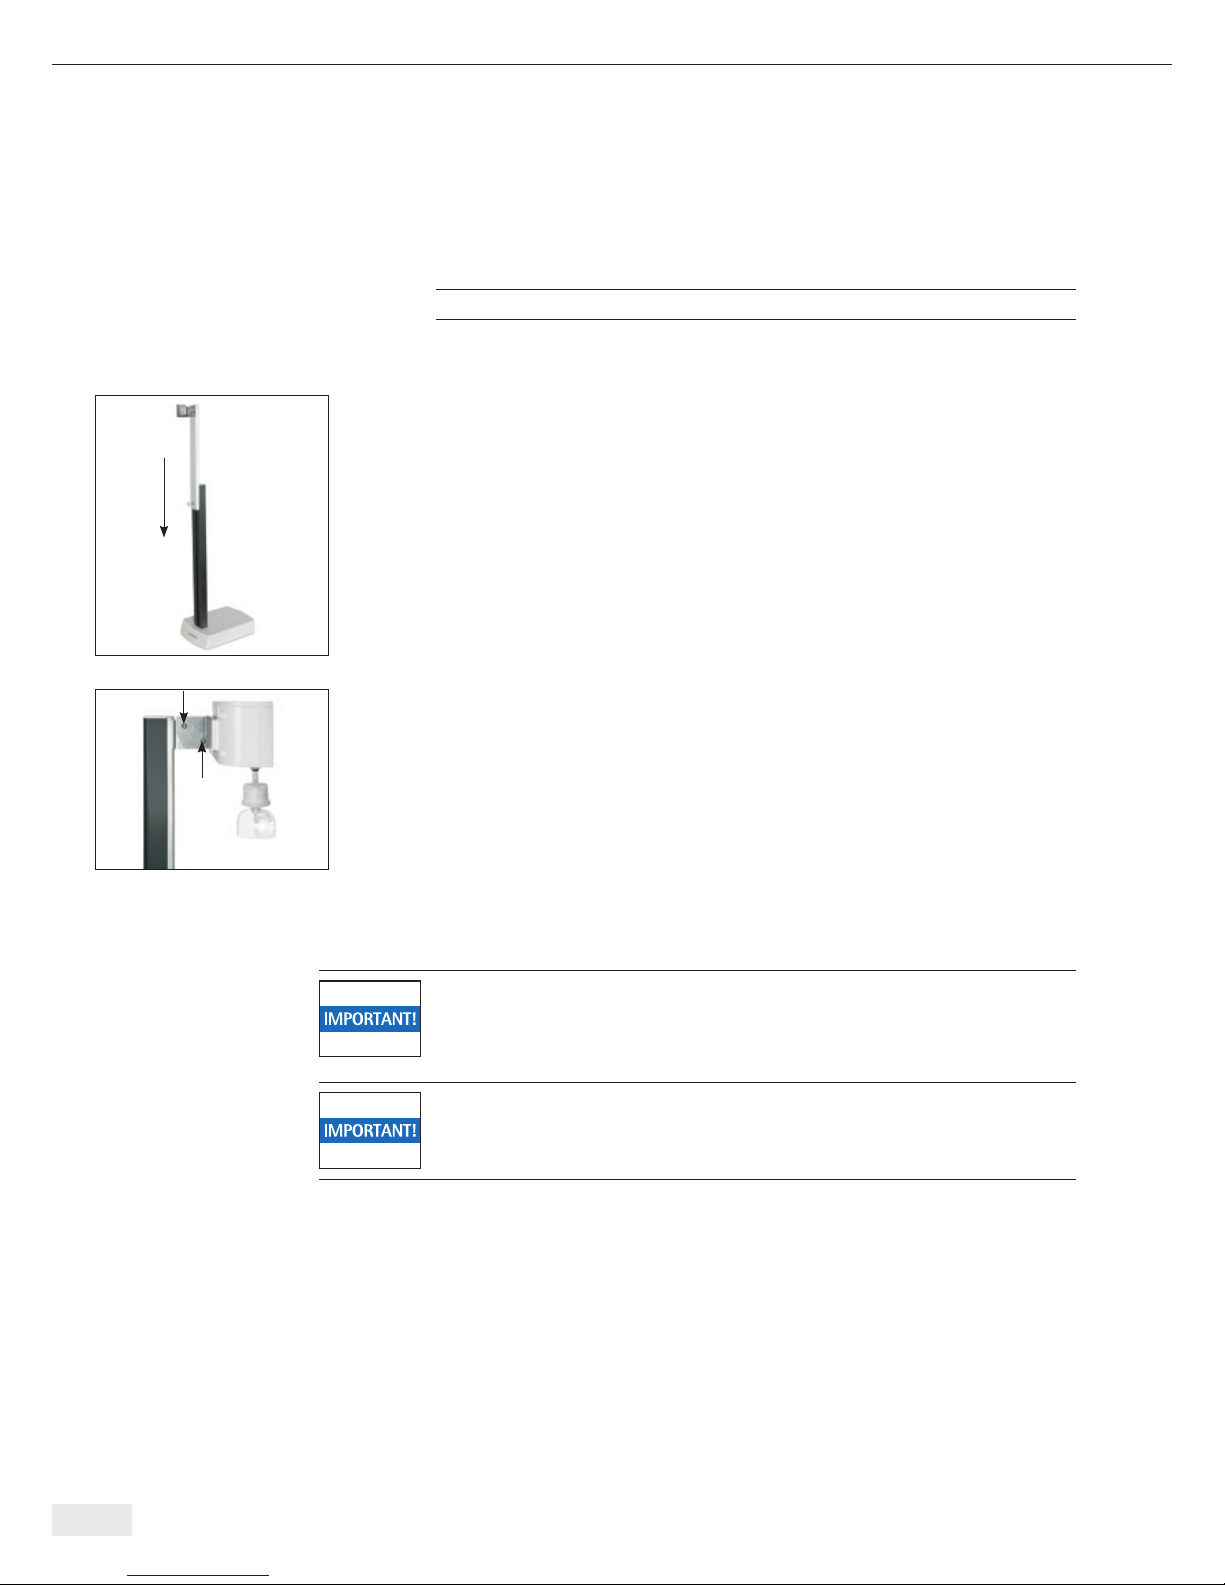
2.2 Setup
y Install the height adjustable stand as follows:
– Place the stand on a flat surface.
– Insert the slide into the stand from above.
y Install the display| dispense unit into the height adjustable stand as follows:
– Align the mounting bracket of the arium
®
display|dispense unit with the
mounting bracket of the slide of the display mounting kit.
– Secure the display|dispense unit to the mounting bracket from the outside
using two screws.
2.3 Connection
For the installation, make sure that you have a surface of approx. 19 + 26 + 56 cm
(W + D + H) that is level and can withstand a min. weight of 6 kg.
Improper surfaces can lead to injury to the operator and damage to the height
adjustable stand or display|dispense unit.
When connecting the arium® display|dispense unit to the arium® display
mounting kit, always note and follow the corresponding warning and safety
information in the corresponding t “arium® operating instructions.”
y Connect the HDMI cable and the two tubes to the display | dispense unit.
Make sure to observe the marking on the tubes.
6 Initial Setup| Installation
Page 7

3. Operation
The height adjustable stand slide can be moved vertically by hand.
To ensure that the slide remains in the desired position, the slide can be locked
by using the lock button (1).
y To adjust the slide when it is locked, proceed as follows:
– Turn and remove the lock button (1) on the stand slide.
– Move the stand slide to the desired position.
– Re-secure the lock button (1) in the desired position by turning it.
y You can leave the lock button (1) in the pulled-out position to make frequent
slide position changes easier.
If you have additional questions, please contact your local Sartorius Service.
Operation 7
(1)
Page 8

4. Appendix
4.1 Shipping Instructions
If you return the arium
®
display mounting kit to Sartorius, you must use the original
packaging.
We will be pleased to provide this on request.
4.2 Disposal Instructions
The packaging is to be taken to a local waste disposal site if no longer required.
The packaging is made of environmentally friendly materials that can be used as
secondary raw materials.
The equipment, including accessories, should not be disposed of as regular household
waste. EU legislation requires its Member States to collect electrical and electronic
equipment and dispose of it separately from other unsorted municipal waste so that it
may be recycled.
In Germany and many other countries, Sartorius AG takes care of the return and
legally compliant disposal of its electrical and electronic equipment. These products
may not be placed with household waste or brought to collection centers run by local
public disposal operations – not even by small commercial operators.
For disposal in Germany and in the other member nations of the European Economic
Area (EEA), please contact our local service technicians or our Service Center in
Goettingen, Germany:
Sartorius Weighing Technology GmbH
Service Center
Weender Landstrasse 94–108
37075 Goettingen, Germany
In countries that are not members of the European Economic Area (EEA) or where no
Sartorius subsidiaries or dealerships are located, please contact your local authorities
or a commercial disposal operator.
Sartorius will not take back equipment contaminated with hazardous materials (ABC
contamination) either for repair or disposal. Please refer to the package leaflet or visit
our website (www.sartorius.com) for comprehensive information that includes our
service addresses to contact if you plan to send your equipment in for repairs or proper
disposal.
8 Appendix
Page 9

For your notes:
Notes 9
Page 10

10
Page 11

Inhaltsverzeichnis
1. Allgemein .......................................................... 12
1.1 Hinweise zu dieser Anleitung ....................................... 12
1.2 Sicherheitshinweise ............................................... 12
1.3 Begriffe|Abkürzungen ............................................ 13
1.4 Bestimmungsgemäße Verwendung .................................. 13
1.5 Funktionalität des arium® Displaymontagekits ......................... 13
2. Erstinbetriebnahme| Installation ...................................... 14
2.1 Auspacken ....................................................... 14
2.2 Aufbau .......................................................... 14
2.3 Anschluss ........................................................ 14
3. Bedienung .......................................................... 15
4. Anhang . . . . . . . . . . . . . . . . . . . . . . . . . . . . . . . . . . . . . . . . . . . . . . . . . . . . . . . . . . . . . 17
4.1 Transporthinweise ................................................ 17
4.2 Entsorgungshinweise .............................................. 17
Inhaltsverzeichnis 11
Page 12

12 Allgemein
1. Allgemein
1.1 Hinweise zu dieser
Anleitung
y Lesen Sie diese Anleitung aufmerksam und voll ständig durch, bevor Sie mit dem
Gerät arbeiten.
y Lesen Sie die Sicherheitshinweise aufmerksam durch.
y Diese Anleitung ist Teil des Produktes.
Bewahren Sie sie gut erreichbar und sicher auf.
y Bei Verlust der Anleitung können Sie Ersatz anfordern.
Symbole und Zeichen
Folgende Symbole und Zeichen werden in dieser Anleitung verwendet:
Diese Hinweise kennzeichnen Gefahren, die mit hoher Wahrscheinlichkeit zu
erwarten sind und schwere Verletzungen, möglicherweise Tod, zur Folge haben!
Diese Hinweise kennzeichnen Gefahren, die eintreten und mittelschwere,
bzw. leichte Verletzungen nach sich ziehen können!
Diese Hinweise kennzeichnen Gefahren mit dem Risiko von Sachschaden!
Dieses Symbol kennzeichnet nützliche Informationen und Tipps.
t steht vor einer Referenz auf andere Quellen
y beschreibt unmittelbare Handlungsanweisungen
1.2 Allgemeine
Sicherheitshinweise
Organisatorische Maßnahmen des Betreibers:
y Der Betreiber muss auf Gefahren hinweisen, die während des Betriebes für
Personal und Arbeitsumfeld auftreten können, geeignete Sicherheitseinrichtungen
bereitstellen und erforderliche Sicherheitsbestimmungen erlassen.
y Der Service an dem arium
®
Displaymontagekits und dem gegebenenfalls
angeschlossenen arium® Gerät bleibt ausschließlich von Sartorius autorisierten
und qualifizierten Personen vorbehalten.
y Bei Verwendung des arium® Displaymontagekits ist das Eigengewicht des
Stativs und der montierten Display-|Entnahmeeinheit zu berücksichtigen.
Der Betreiber hat entsprechende Vorkehrungen zu treffen, dass die Standfläche
ein Gewicht von ca. 6 kg gefahrlos tragen kann.
Einrichtung am Arbeitsplatz
1. Verwenden Sie nur die mitgelieferten oder für das Stativ freigegebenen
Komponenten. Unterlassen Sie technische Änderungen, es sei denn, die Sartorius
Weighing Technology GmbH bestätigt ausdrücklich, dass diese Änderung eine
sichere Verwendung nicht beeinflusst.
2. Prüfen Sie alle Komponenten sorgfältig auf Schäden. Verwenden Sie nur
einwandfrei beschaffene Teile.
Page 13

1.3 Begriffe | Abkürzungen
Ersatzteil Ein Ersatzteil ist ein Bestandteil des Gerätes, welches durch den Anwender oder den
Sartorius Service ausgetauscht werden kann.
1.4 Bestimmungsgemäße
Verwendung
Zur sachgemäßen Installation und Bedienung Ihres arium® Displaymontagekit sind
folgende Punkte zu beachten:
– Diese Bedienungsanleitung wurde entsprechend der derzeit gängigen
gesetzlichen Vorschriften und Richtlinien erstellt.
– Sie ist so aufgebaut, dass sie von entsprechend eingewiesenem Personal
umgesetzt und angewandt werden kann.
– Tätigkeiten, welche über das beschriebene Maß hinausgehen, sind ausschließlich
dem (Service-) Personal der Firma Sartorius vorbehalten.
1.5 Funktionalität des
arium
®
Stativs für
Display-|Entnahmeeinheit
Das arium
®
Displaymontagekit (nachfolgend als Stativ bezeichnet) ermöglicht eine
Positionierung der arium® Display-|Entnahmeeinheit unabhängig vom arium® pro XX
bzw. comfort Gerät.
Der Abstand zum Reinstwassersystem wird dabei nur von den angeschlossenen
Schläuchen bzw. dem HDMI-Kabel begrenzt.
Das arium® Multifunktionsstativ ist nur für die Einbauvariante (-D) der arium® pro XX
bzw. comfort Systeme geeignet.
Bitte beachten Sie, dass die entsprechende Display-| Entnahmeeinheit nicht Bestandteil diese Stativs ist!
Allgemein 13
Page 14
2. Erstinbetriebnahme|Installation
2.1 Auspacken
Nehmen Sie die Komponenten des arium
®
Displaymontagekits aus der Verpackung
und überprüfen Sie den Lieferumfang:
Bezeichnung Anzahl
Stativ 1
Schlitten mit Aufnahme für Display-|Entnahmeeinheit 1
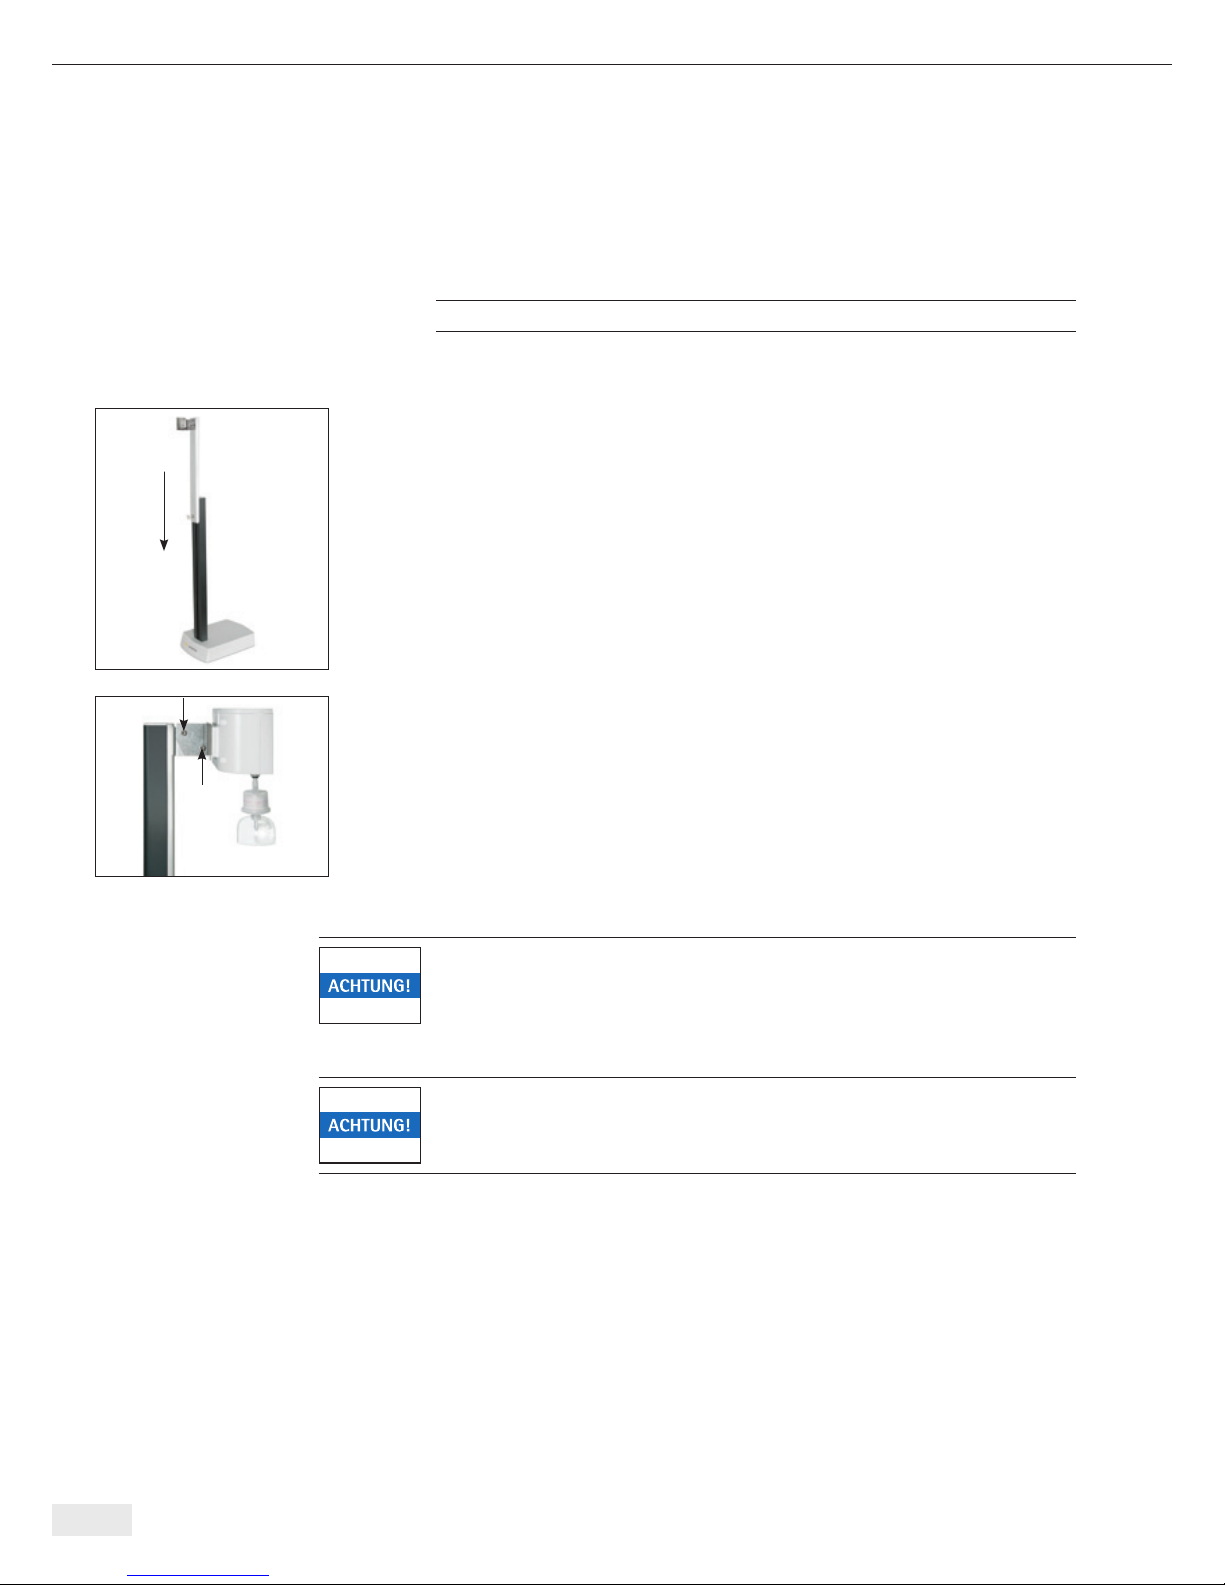
2.2 Aufbau
y Montieren Sie die das Stativ wie folgt:
– Stellen Sie das Stativ auf einen ebenen Untergrund.
– Führen Sie den Schlitten von oben in das Stativ ein.
y Installieren Sie die Display-| Entnahmeeinheit am Stativ wie folgt:
– Halten Sie den Haltewinkel der Display-|Entnahmeeinheit mit der Innenseite
vor den Haltewinkel des Schlittens
– Schrauben Sie die Display-| Entnahmeeinheit von Außen mit zwei Schrauben
an den Haltewinkel
2.3 Anschluss
Achten Sie bei der Montage darauf, dass Sie eine Standfläche von
ca. 19 + 26 + 56 cm (B + T + H) zur Verfügung haben, die für mindestens
6 kg Tragfähigkeit ausgelegt und eben ist.
Ungeeignete Standfläche kann zu Verletzungen des Bedieners und zu
Schäden am Stativ oder der Display-|Entnahmeeinheit führen!
Beachten und befolgen Sie beim Anschluss der arium® Display-|
Entnahmeeinheit am arium® Displaymontagekit immer die entsprechenden
Warn- und Sicherheits hinweise in der t „arium® Bedienungsanleitung“!
y Verbinden Sie das HDMI Kabel und die beiden Schläuche mit der Display-|
Entnahmeeinheit. Beachten Sie dabei die Kennzeichnung der Schläuche.
14 Erstinbetriebnahme|Installation
Page 15

3. Bedienung
Der Schlitten des Stativs kann mit einer Hand vertikal verschoben werden.
Um Sicherzustellen, dass der Schlitten dauerhaft in der gewünschten Position
verbleibt, lässt sich der Schlitten mit Hilfe des Arretierknopfs (1) fest arretieren.
y Um den Schlitten in diesem Fall zu verstellen, gehen Sie wie folgt vor:
– Lösen Sie den Arretierknopf (1) am Schlitten des Stativs durch eine Drehung
und Herausziehen.
– Verstellen Sie den Schlitten des Stativs nach Bedarf.
– Fixieren Sie den Schlitten anschließend wieder. Lassen Sie dazu den Arretier-
knopf (1) in der gewünschten Position durch Drehen einrasten.
y Bei häufigen Positionswechseln des Schlittens kann der Arretierknopf (1) in
der herausgezogenen Position belassen werden.
Bei weiteren Fragen wenden Sie sich bitte an den für Sie zuständigen Sartorius
Service.
Bedienung 15
(1)
Page 16

4. Anhang
4.1 Transporthinweis
Eine mögliche Rücksendungen des arium
®
Multifunktionsstativ hat ausschließlich in
der Originalverpackung zu erfolgen.
Auf Anfrage stellen wir Ihnen diese gerne zur Verfügung.
4.2 Entsorgungshinweise
Wird die Verpackung nicht mehr benötigt, ist diese der örtlichen Müllentsorgung
zuzuführen. Die Verpackung besteht aus umweltfreundlichen Materialien, die als
Sekundärrohstoffe dienen können.
Das Gerät inklusive Zubehör gehört nicht in den Hausmüll.
Die EU-Gesetzgebung fordert in ihren Mitgliedsstaaten, elektrische und elektronische
Geräte vom unsortierten Siedlungsabfall getrennt zu erfassen, um sie anschließend
wiederzuverwerten.
In Deutschland und einigen anderen Ländern fuhrt die Sartorius AG die Rücknahme
und gesetzeskonforme Entsorgung ihrer elektrischen und elektronischer Produkte
selbst durch. Diese Produkte dürfen nicht – auch nicht von Kleingewerbetreibenden
– in den Hausmüll oder an Sammelstellen der örtlichen öffentlichen Entsorgungsbetriebe abgegeben werden.
Hinsichtlich der Entsorgung wenden Sie sich daher in Deutschland wie auch in den
Mitgliedsstaaten des Europäischen Wirtschaftsraumes bitte an unsere ServiceMitarbeiter vor Ort oder an unsere Service-Zentrale in Göttingen:
Sartorius Weighing Technology GmbH
Servicezentrum
Weender Landstraße 94–108
37075 Göttingen
In Ländern, die keine Mitglieder des Europäischen Wirtschaftsraumes sind oder in
denen es keine Sartorius-Filialen gibt, sprechen Sie bitte die örtlichen Behörden oder
Ihr Entsorgungsunternehmen an.
Mit gefährlichen Stoffen kontaminierte Gerate (ABC-Kontamination) werden weder
zur Reparatur noch zur Entsorgung zurückgenommen. Ausführliche Informationen
mit Service-Adressen zur Reparaturannahme bzw. Entsorgung Ihres Gerätes finden
Sie in dem Beipackzettel sowie auf unserer Internetseite (www.sartorius.com).
16 Anhang
Page 17

Notizen 17
Für Ihre Notizen
Page 18

Page 19

Page 20

Printed in Germany on paper that has
been bleached without any use of chlorine
W_arium Stativ_Display- und Entnahmeeinheit · KT
Publication No.: SLG6111-a13034
Ver. 03 | 2013
Sartorius Weighing Technology GmbH
Weender Landstrasse 94–108
37075 Goettingen, Germany
Phone +49.551.308.0
Fax +49.551.308.3289
www.sartorius.com
Copyright by
Sartorius Weighing Technology GmbH,
Goettingen, Germany.
All rights reserved. No part of this
publication may be reprinted or translated
in any form or by any means without
the prior written permission of Sartorius.
The status of the information, specifications
and illustrations in this manual is indicated
by the date given below.
Sartorius reserves the right to make changes
to the technology, features, specifications
and design of the equipment without
notice.
Status:
March 2013,
Sartorius Weighing Technology GmbH,
Goettingen, Germany
 Loading...