

Page 1

TM 10–6670-277-13&P
TECHNICAL MANUAL
OPERATOR’S, UNIT AND
DIRECT SUPPORT MAINTENANCE MANUAL
(INCLUDING REPAIR PARTS AND SPECIAL TOOLS LIST)
FOR
SARTORIUS ANALYTIC BALANCE
MODEL A 200 S
This technical manual is an authentication of the manufacturer’s commercial literature and
does not conform with the format and the content requirements normally associated with
Army technical manuals.
information required to operate and maintain the equipment.
Approved for public release; distribution is unlimited.
This technical manual does, however, contain all essential
HEADQUARTERS, DEPARTMENT OF THE ARMY
10 OCTOBER 1990
Page 2

Page 3

TM 10–6670-277-13&P
This technical manual is an authentication of the manufacturer’s commercial literature and
does not conform with the format and the content requirements normally associated with
Army technical manuals.
This technical manual does, however, contain all essential
information required to operate and maintain the equipment.
Approved for public release; distribution is unlimited.
SUPPLEMENTARY INTRODUCTORY MATERIAL
1–1.
Maintenance Forms and Records.
Department of the Army forms and procedures used for equipment maintenance will be those described
by DA Pam 738–750, The Army Maintenance Management System.
1–2.
You can help improve this manual. If you find any mistakes or if you know of a way to
procedures, please let us know.
Publications and Blank Forms), or DA Form 2028–2 located in the back of
Commander, U.S. Army Troop Support Command, ATTN: AMSTR-MCTS,
Reporting Errors and Recommending Improvements.
Mail your letters, DA Form 2028 (Recommended
improve the
Changes to
this manual, directly to:
4300 Goodfellow Blvd.,
St. Louis, MO 63120-1798. A reply will be furnished to you.
1-3.
Destruction of Army Material to Prevent Enemy Use.
Refer to TM 750-244-3 for instructions covering the destruction of Army Material to prevent enemy use.
1-4. Administrative Storage of Equipment.
a. Placement of equipment in administrative storage should be for short periods of time when a
shortage of maintenance effort exists. Items should be in mission readiness within 24 hours or within the
time factors as determined by the directing authority. During the storage period appropriate maintenance
records will be kept.
b. Before placing equipment in administrative storage, current preventive maintenance checks and
services should be completed. Shortcomings and deficiencies should be corrected, and all modification
work orders (MWO’s) should be applied.
C. Storage site selection. Inside storage is preferred for items selected for administrative storage. If
inside storage is not available, trucks, vans, conex containers and other containers may be used.
i/(ii Blank)
Page 4

Page 5

Sartorius Analytic.
A 200
Electronic Analytic Balance
Installation and Operating
Instructions
Electronic analytical balance
Installation and operating instructions
S.
sartorius
Page 6

Page 7
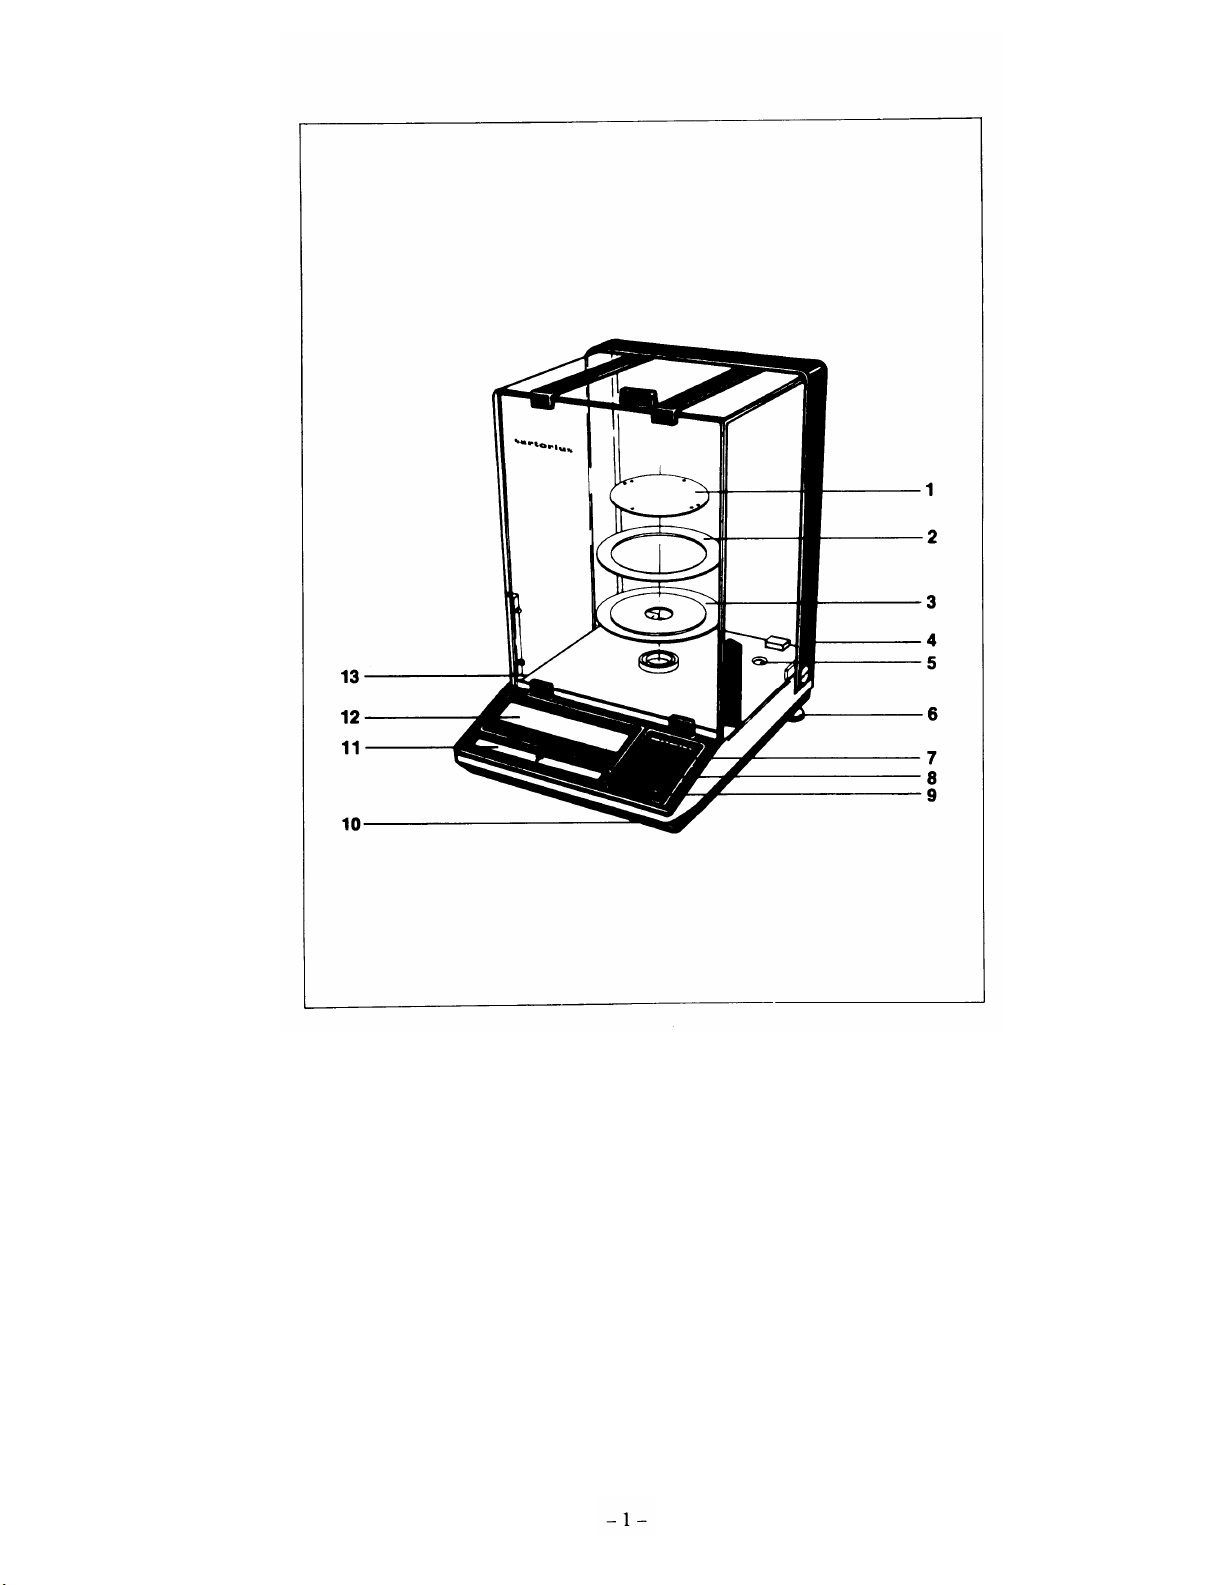
1 Pan
8 CAL button
2 Protective ring
3 Shield plate
4 Connection socket for power cable
5 Level indicator
6 Leveling screw
7 ON/OFF button
9 PRINT button (functions only in
conjunction with the optional data output)
10 Menu access switch
11 Tare bar
12 Weight display
13 Manufacturer’s label
-1-
Page 8

Sortorius analytic.
A 200 S.
With this Sartonus toploader
lighten your daily workload.
Please read these installation and operating instructions
you
have acquired a sophisticated, top-of-the-line electronic balance,
carefully before operating your new toploader.
Technical data.
Model . . . . . . . . . . . . . . . . . . . . . . . . . . . . . . . . . . . . . . . . . . . . . . . . . . .
Weighing range . . . . . . . . . . . . . . . . . . . . . . . . . . . . . . .
Readability . . . . . . . . . . . . . . . . . . . . . . . . . . . . . . . . . . .
Tare range (by subtraction) . . . . . . . . . . . . . . . . . . . . . .
Standard deviation . . . . . . . . . . . . . . . . . . . . . . . . . . . .
Max. linearity deviation . . . . . . . . . . . . . . . . . . . . . . . . .
Stabilization time (typical) . . . . . . . . . . . . . . . . . . . . . . .
Display update rate . . . . . . . . . . . . . . . . . . . . . . . . . . . .
Adaption to environment
and application
requirements . . . . . . . . . . . . . . . . . . . . . . . . . . . . . . . . .
Stability range . . . . . . . . . . . . . . . . . . . . . . . . . . . . . . . .
Ambient temperature range.... . . . . . . . . . . . . . . . . . .
Sensitivity drift within 283...303K . . . . . . . . . . . . . . . . .
Deviation from result
when tilted 1:1000 . . . . . . . . . . . . . . . . . . . . . . . . . . . . .
Calibration weight . . . . . . . . . . . . . . . . . . . . . . . . . . . . .
Pan dimension . . . . . . . . . . . . . . . . . . . . . . . . . . . . . . . .
Clearance above pan . . . . . . . . . . . . . . . . . . . . . . . . . . .
Weighing chamber
(WxDxH) . . . . . . . . . . . . . . . . . . . . . . . . . . . . . . . . . . . .
Balance housing
(WxDxH) . . . . . . . . . . . . . . . . . . . . . . . . . . . . . . . . . . . .
Net weight . . . . . . . . . . . . . . . . . . . . . . . . . . . . . . . . . . .
Line voltages,
frequencies 50–60 Hz....... . . . . . . . . . . . . . . . . . .
Consumption . . . . . . . . . . . . . . . . . . . . . . . . . . . . . . . . .
Interface . . . . . . . . . . . . . . . . . . . . . . . . . . . . . . . . . . . . .
g
g
g
g
g
s
s
. . . . . . . . . . . . . . . . .
d
K
. . . . . . . . . . . . . . . . .
/K . . . . . . . . . . . . . . . . .
. . . . . . . . . . . . . . . . .
g
. . . . . . . . . . . . . . . . . . . .
mm
mm
mm
mm
kg . . . . . . . . . . . . . . . .
VA . . . . . . . . . . . . . . . .
. . . . . . . . . . . . . . . . . . . .
which will help
A 200 S
202
0.0001
202
<+ 0.0001
<+ 0.0002
3
0.1 -0.8 (selectable)
by selection of one of
four digital filter levels
selectable from 0.25...64
283...313
<+ 2·10 –6
<+ 0.0001
built–in, standard
Ø 90
257
200 x 184 x 265
230 x 291 x 343
7.5
100/120V or 220/240 V,
depending on the power
supply (adapter) being used
9
RS 232 C/V24-V28,
RS 423/V10; 7-bit;
party: even, mark, odd,
space; transmission
rates 150...9600 Baud
-2-
Page 9
Installation
instructions.
Choose a suitable installation site largely free of
– heat radiation
– corrosive
– vibrations
- drafts.
Despite unfavorable operating conditions, your MP8 balance will deliver accurate weight results. Simply adapt it to
your requirements by programming the appropriate codes via the balance operating program. For this purpose,
please refer to the final pages of the English section.
After connection to line power, allow for >30 minutes warmup.
Important!
Pull out the power supply unit (AC/LDC adapter) prior to connecting or disconnecting peripherals.
substances
Accessories
Carrying case . . . . . . . . . . . . . . . . . . . . . . . . . . . . . . . . . YDB01 A
Theft prevention lock . . . . . . . . . . . . . . . . . . . . . . . . . . . 6087
Data output
Integratable keyboard
“Data Input”
with F for formulation . . . . . . . . . . . . . . . . . . . . . . . . . . . YDI 0 1 A- * *F
Printer ’’Data Print’’ . . . . . . . . . . . . . . . . . . . . . . . . . . . . . YDP 0 1
(optional)
. . . . . . . . . . . . . . . . . .
. . . . . . .
YDO 0 1 A
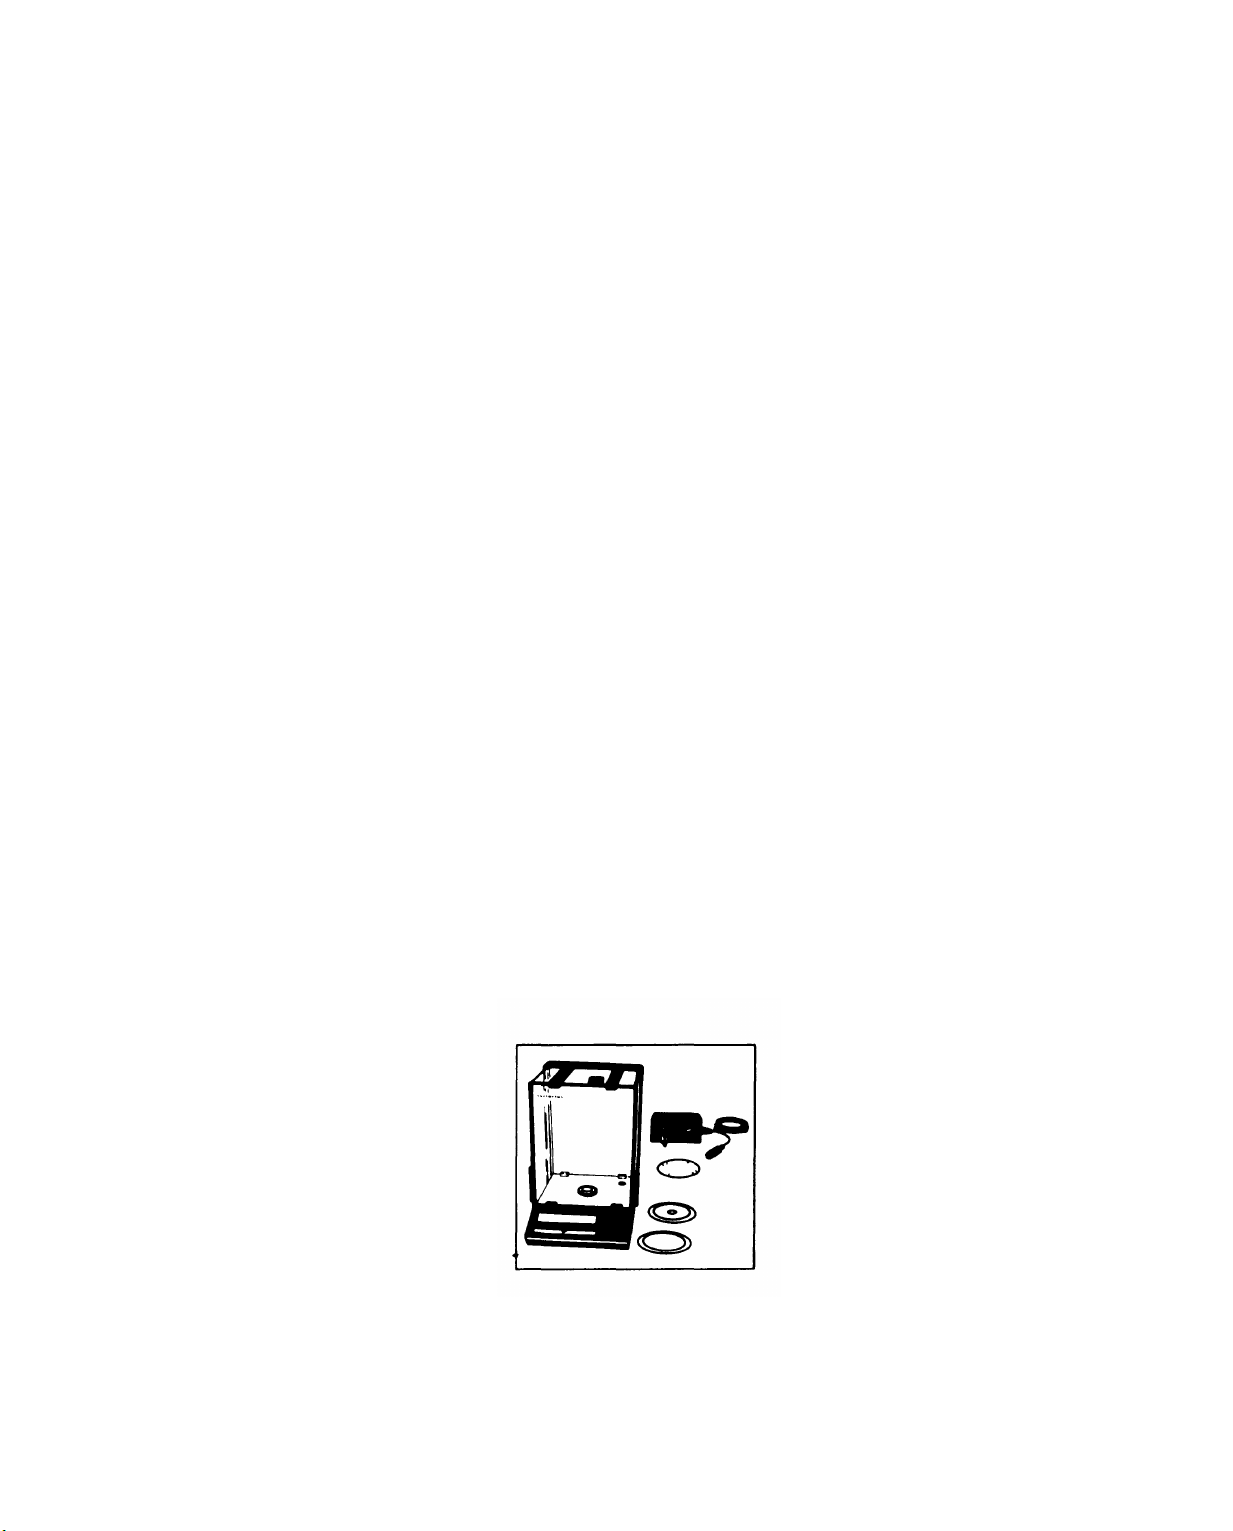
Complete
Consignment.
Please complete the guarantee card, indicating the installation date, and return the card
to your Sartonus dealer.
Complete consignment
A complete consignment consists of the illustrated components plus a dust cover.
-3-
Page 10
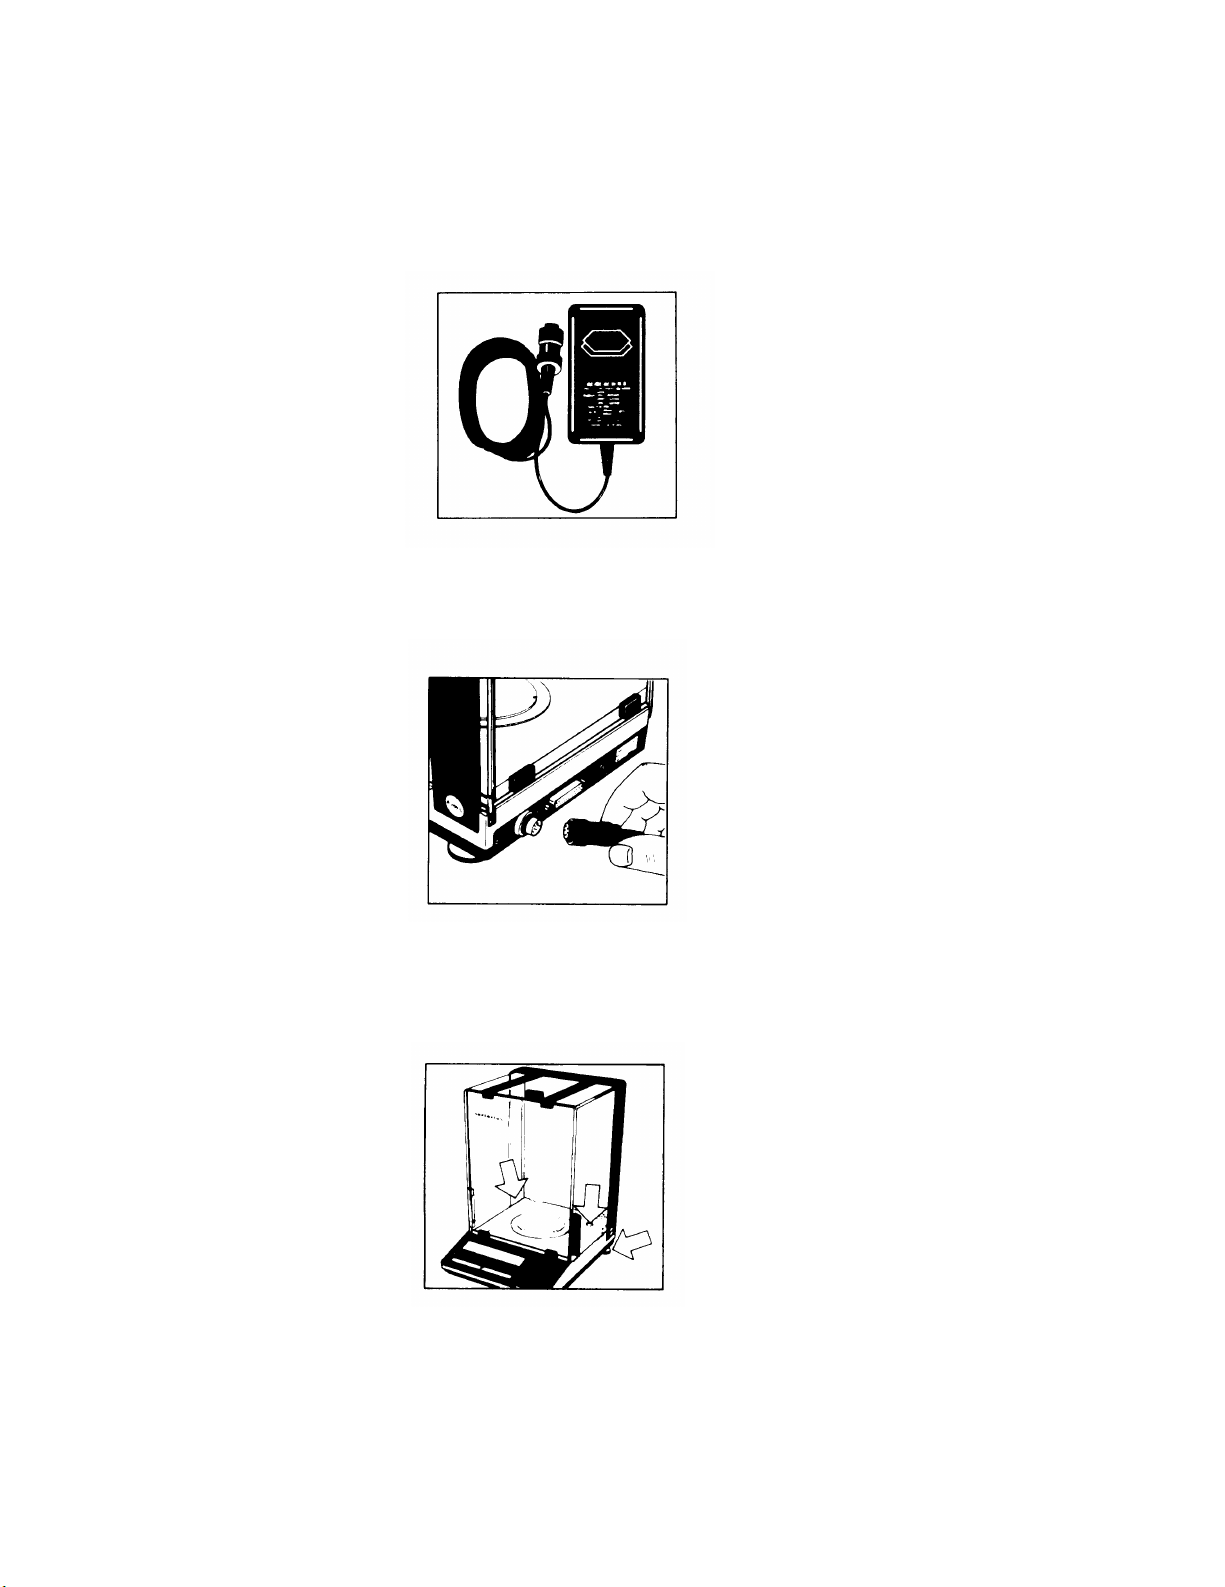
Startup.
Install components (3 – 1) in the weighing chamber one at a time in the indicated sequence.
Your balance is supplied via the
that of your local line voltage.
Make the power connection. Secure the connection with the threaded ring. Now connect the power supply unit to a
line outlet.
power supply unit. Please check if the voltage printed on this adapter is identical to
At the point of use, level the balance using the leveling screws
the
level indicator
(5).
-4-
(6)
such that the air bubble is centered in the circle of
Page 11
Operation.
The weight display provides the following special messages for your information:
BUSY
The processor is still busy processing other information and will not accept other functions at this time.
STANDBY
The balance was switched off with the ON/OFF function and is now in the STANDBY mode.
POWER OFF
The balance was separated from line power (fresh power connection, power failure).
CAL
The calibration function has been called.
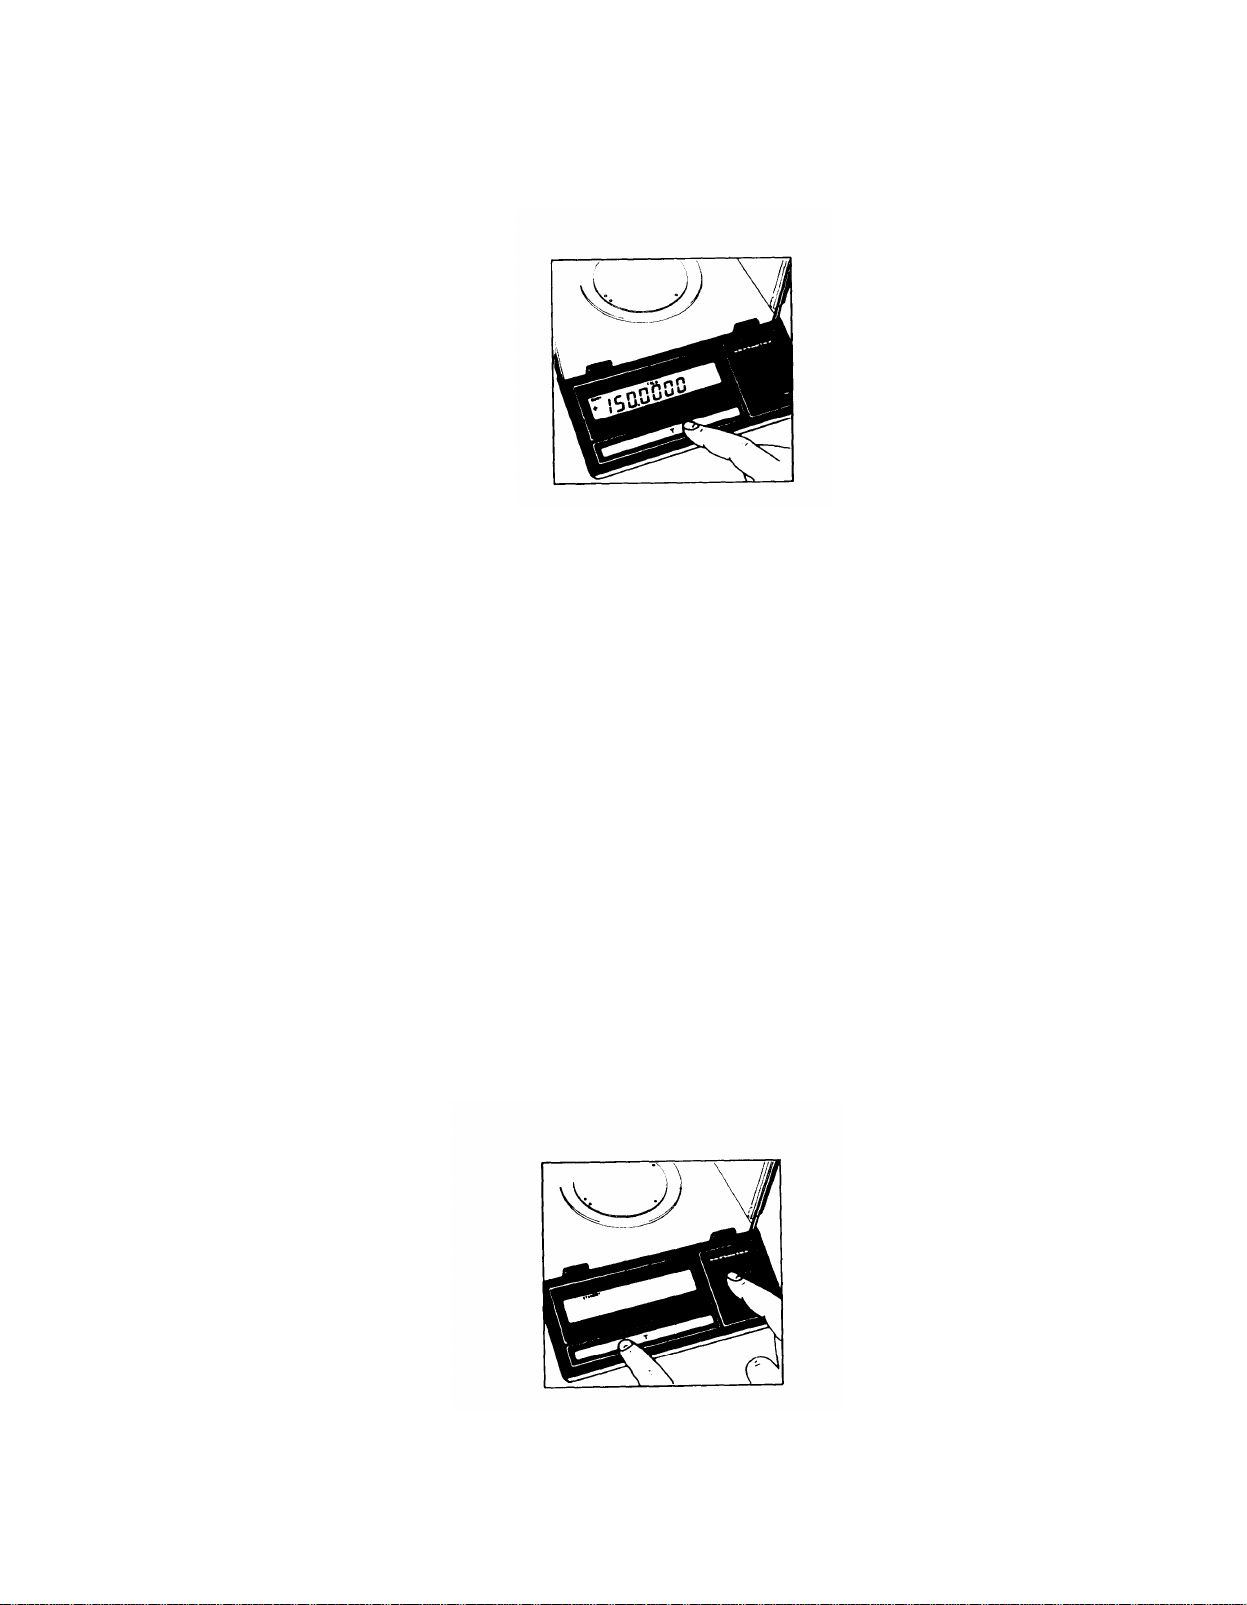
Use the ON/OFF button (7) for switching on or off. You can also switch on with the tare bar (11).
After connection to line power, only the weight display will go off whenever you switch the balance off. The electronic
circuits remain power-supplied (STANDBY). This feature provides for instant operability the moment you switch on,
without having to wait for warmup.
After power-on, there is an automatic test of all electronic functions. Successful completion of the test is signaled by
0.0000 g in the weight display.
-5-
Page 12

You must zero the display
g (or the equivalent with the weight unit of your choice).
prior to weighing, if you are using a container or if the weight display does not read 0.0000
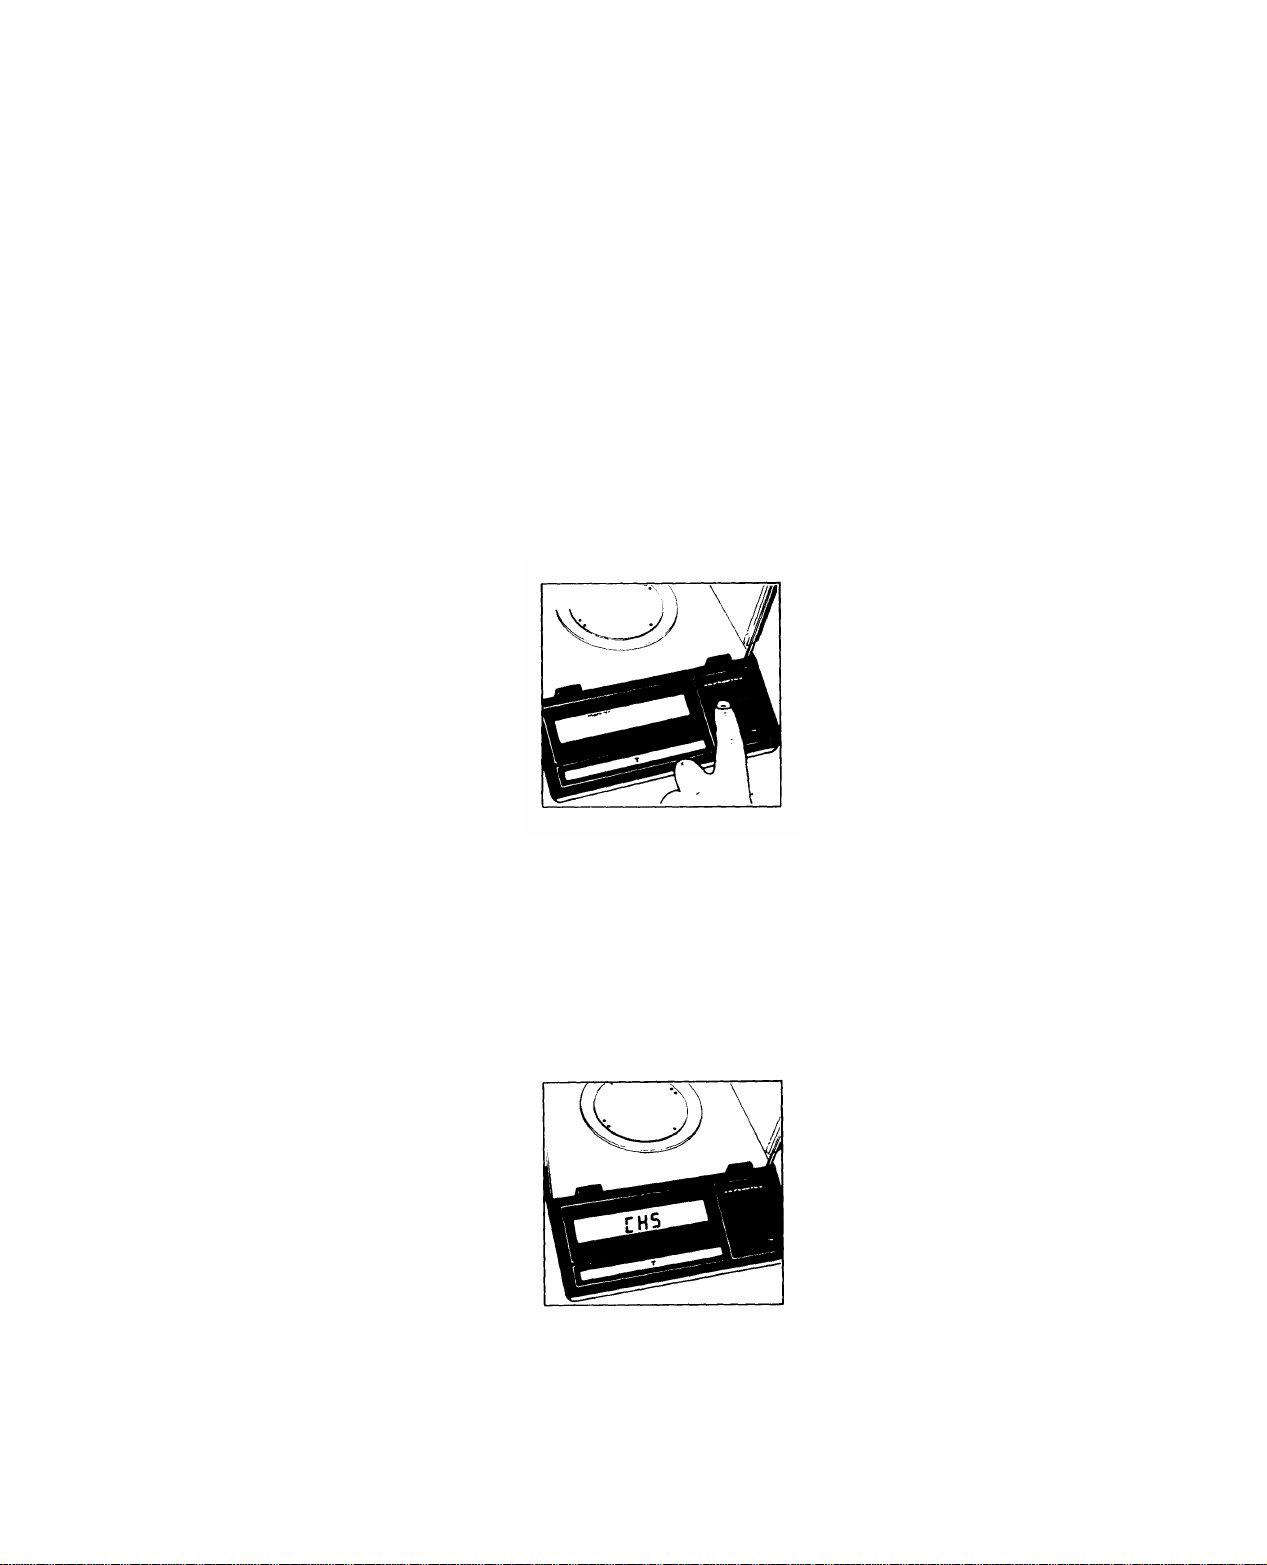
Calibration.
Internal Calibration:
Clear the pan and zero the display. Once the display reads 0.0000 g, push the CAL button (8). The display now
reads “C”. If
YOU get “CE”, zero the display and push the CAL button again.
After a few seconds, the display will read “CC”, followed by 0.0000 g. A beeper confirms successful completion of
calibration.
-6-
Page 13
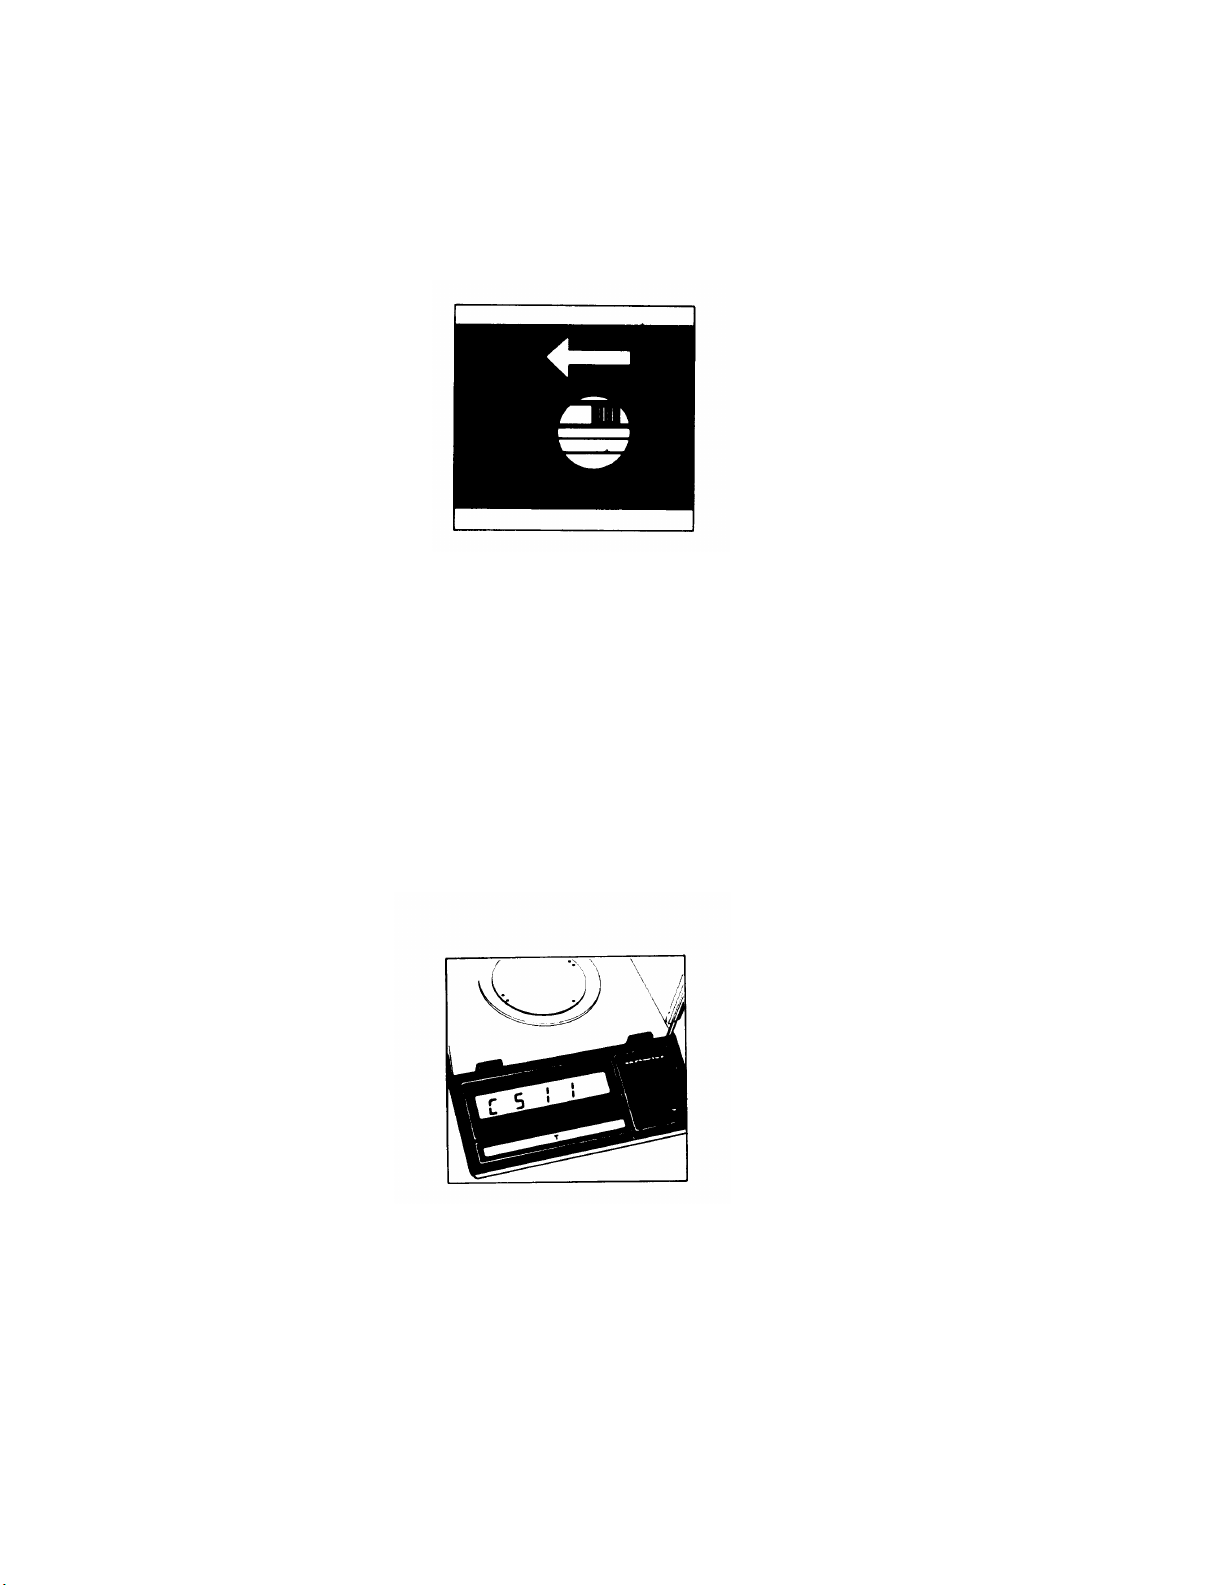
External calibration:
This requires an accurate calibration weight.
Clear the pan and depress the tare button for at least three seconds until the calibration weight appears in the
display.
Place the calibration weight on the pan.
Now the weight unit symbol appears and a beeper sounds to signal completion of calibration.
You can lock both the external and the internal calibration function – see “Balance operating program.” Both
functions are active whenever the balance operating program has been unlocked with the access switch.
In addition to grams, this balance gives you a variety of other international weight unit options to work with.
Select the weight unit you need from the table in the balance operating program, and set the appropriate code as
described in section “Balance operating program.”
Balance operating program.
The balance operating program permits adaption of your balance to ambient conditions at the point of use and
different weighing requirements, plus selection of various weight units. At the factory, we have set the codes for a
standard program, which is protected by a locking function to prevent accidental changes.
The
“code”
line and the word.
Access to the balance operating program:
is the information carrier of the operating program. It consists of three digits: one each for the page, the
Activate the ON/OFF button while at the
same time depressing the tare bar.
-7-
Page 14
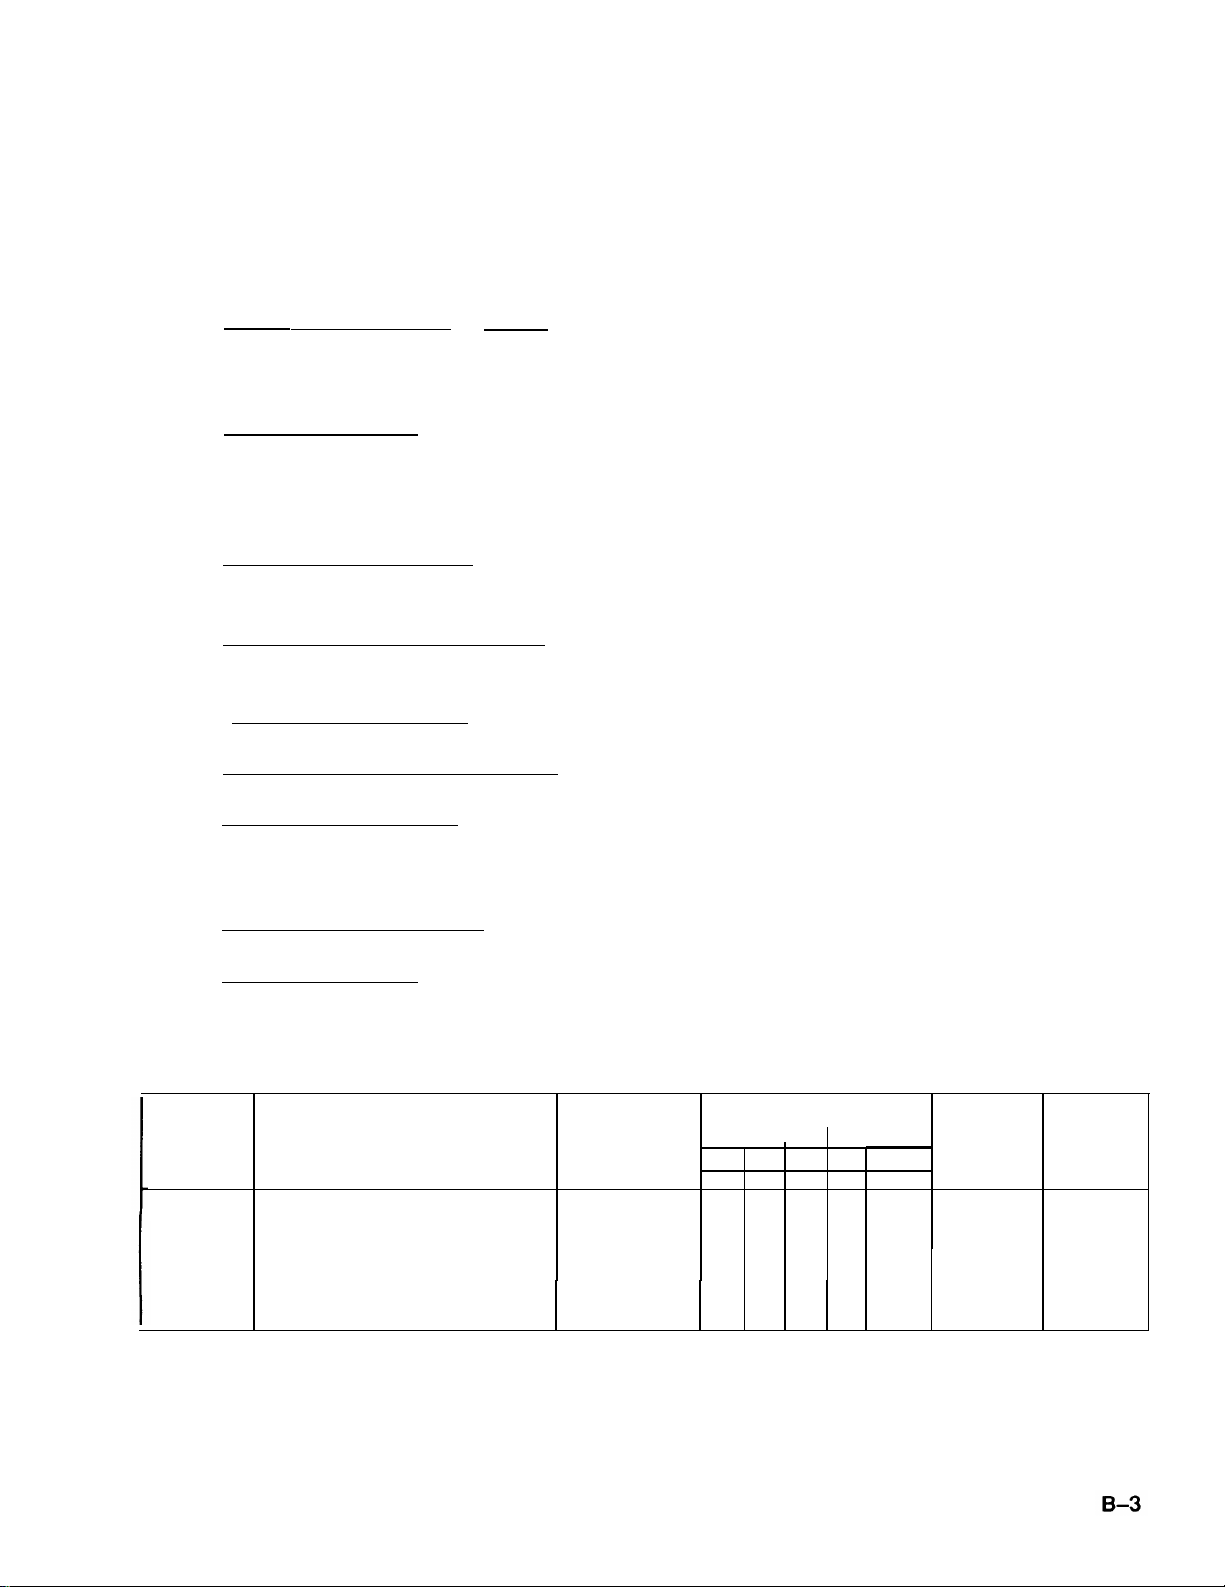
After completion of the automatic power-on test, the status of the balance operating program appears in the weight
display: “L” stands for the list mode. In this mode, you can only verify the code setting, but you cannot program new
codes. If you want to change a program code, you must first unlock the program access.
To do so, slide the unlocking switch (10) at the forward right of your balance in the arrow direction.
The display will signal “C” representing the change mode, and you can now proceed to make the necessary code
changes.
After the balance operating program has been called, the display will show a continuous numerical sequence from 0
to 5 representing the page selection, in addition to the status signal “L” or “C”.
“page” appears, push the tare bar.
starts. Again confirm your selected number with the tare bar, and your selection will be fixed. Next the “word” cycle
appears,
The “page” code number is now fixed in the display, and the cycle for the “line”
When your selected number for the
When the 0–symbol apears, this marks the actual setting.
To make changes (“C” mode), press the tare bar when the appropriate code appears.
Brief display of “BUSY” and the o–symbol confirms your selection, followed by return to the “zero” representing the
“line”.
To return to the weighing program:
push the tare bar each time a 0 appears in the numerical cycle (word, line, page). If you have made code changes,
your code entry is stored as soon as the display returns to the weighing mode. Lock the balance program with the
menu access switch (display “L”) and replace the protective cap.
-8-
Page 15

Auto-zero
This balance has an automatic zero tracking function. Any change off zero <2
digits per second
will be set to zero automatically.
Additional parameters for the data output format and for calculator programs are
available on request. – Please refer to “Accessories.”
-9-
Page 16

Page 17

ADDENDUM A
This addendum to the Sartorius Publication Number WA6002 m7/86 covers the Sartorius Analytic Balance
Model A 200 S and contains the following information:
Paragraph
1
2
3
4
Title
Preventive Maintenance Checks and Services
Troubleshooting
Maintenance Remove/Replace Procedures
List of Recommended Spare Parts
-1-
Page 18

1.
Preventive Maintenance Checks and Services for Sartorius Analytic Balance (
Model A 200 S).
Routine maintenance ensures trouble–free operation. Checks and services listed below should be conducted daily
and prior to each use.
Check/Service
Check that glass plates are not
Note
Remove glass to clean.
cracked, chipped, or dirty.
Check that interior of weighing
Remove weighing pan and wipe interior clean using a
compartment is clean. lint–free, dry cloth. Remove dust particles with camels
hair brush. Clean and replace weighing pan.
2.
Troubleshooting. Troubleshooting this equipment consists of observing results of normal operations and
results of running both the external and internal calibration checks. It also includes a thorough visual inspection of
the measuring cell and all electrical connections.
a.
If you detect the following problems:
- poor reproducibility
– display hysteresis
– nonreproducible corner load
– permanent “L” in the display
– skipping display
you are very likely dealing with a mechanical fault.
b.
If you find:
– error message in the display
– display dark or display segments missing
you are very likely dealing with an electronic error.
Maintenance – Remove/Replace Procedures.
3.
3.1 Remove/Replace the Display Panel.
Remove weighing pan, ring, shield plate, and base plate from the balance. Unscrew three screws (1) from
a.
the hood and carefully lift hood to the right and place next to balance.
The display panel includes the tare pcb, when the balance has basic equipment.
Remove the keyboard overlay
b.
(2) in the display panel (3). Remove screw (4) in the display panel.
NOTE
-2-
Page 19

CAUTION
Do not touch the screen with your fingers. It is coated with a protective film.
c. Unplug connection (5).
d. Remove the eight screws (6). Carefully take off display panel.
e. Replace display panel in reverse order.
Replace display panel in reverse sequence.
e.
3.2 Remove/Replac
a.
Open the balance (see paragraph 3.1 a).
e the Tare Kev O
verlay.
CAUTION
Do not touch the screen in the display with your fingers. It is coated with a
protective film.
b.
Remove three clamps (1). Remove overlay from the display panel.
Take off the protective cover from the new overlay with touchpad.
c.
Insert tare key overlay with the three ground connections in the display panel and fix it with glue. Place the
d.
three clamps for the contact of the ground connection tare key overlay-display panel. Check new tare key
overlay. Use perenator to seal the joint around the tare key overlay and allow for several hours drying time.
4.
Recommended Spare Parts for Analytic Balance Model A 200 S.
Part Number
69 13019
69 A20007-4
69 A20020–1
69 A20023-6
6970920
69709170-0
Description
Leveling Screw
Overlay with Switch
Front Glass Plate
Rear Glass Plate
AC/DC Adapter (115V) (US)
LC-Display (A 200 S)
Quantity
1 ea
1 ea
1 ea
1 ea
1 ea
1 ea
-3-
Page 20

Page 21

APPENDIX A
REFERENCES
TM 10-6670-277-13&P
A–1.
Scope.
This appendix contains all forms, pamphlets and technical manuals referenced in both
the Air mobile and Semitrailer mounted Laboratories.
A–2. Forms.
Recommended Changes to Publications . . . . . . . . . . . . . . . . . . . . . . . . . . . . . . . . . . . DA Form 2028
DA Form 2028–2
Quality Deficiency Report . . . .
. . . . . . . . .
Equipment Inspection and Maintenance Work Sheet
Hand Receipts . . . . . . . . . . . . . . . . . .
. .... . . .... . . . . . . . . . ....... . .
. . . . . . . . . . . . . . . . . . . . . . . . . . . . . . . . . . . . . . . .
. . . . . . . . . . .... .. . . . .
DA Form 2404
DA Form 2062
SF 368
A-3. Fieid Manuais.
Petroleum Testing Facilities:
Laboratories and Kits . . . . . . . . . . . . . . . . . . . . . . . . . . . . . . . . . . . . . . . . . . . . . . . . . . . . FM 10-72
Inspecting and Testing Petroleum Products . . . . . .
ASTM Test Method Supplement to . . . . . .
. . . . . . . . . . . . . . . . . . . . . . . . . . .
. . . . . . . . . . . . . . . . . . . . . . . . . . . . . . .
FM 10-92C1/C2
A-4. Technical Manuals.
Atlas-Copco Compressor . . . . . . . . . . . .
. . . . . . . . . . . . . . . . . . .
TM 10-4310-392-13&P
Alcor Jet Fuel Thermal Oxidation Tester Operating
and Maintenance Manual . . . . . . . . . . . . . . . . . . . . . . . . . . . . . . . . . . . . TM 10-6635-210-13&P
Bacharach Gas Alarm and Calibration Data . . . . . . . . . . . . . . . . . . . . . . . . . TM 10-6665-297-13&P
Brother Portable Typewriter . . . . . . . . . . . . . . . . . . . . . . . . . . . . . . . . . . . . . . TM 10–7430-218-13&P
Chemtrix Field Ph Meter . . . . . . . . . . . . . . . . . . . . . . . . . . . . . . . . . . . . . . . . TM 10-6630–237–13&P
Elkay Manufacturing 30 GPH Cooler
. . . . . . . . . . . . . . . . . . . . . . . . . . . . . .
TM 10-4130-240-13&P
Emcee Micro–Separometer . . . . . . . . . . . . . . . . . . . . . . . . . . . . . . . . . . . . . . TM 10-6640-222-13&P
Foxboro Pressure Recording Gauge . . . . . . . . . . . . . . . . . . . . . . . . . . . . . . . TM 10-6685-365-13&P
Gammon Aqua Glo Water Detector
. . . . . . . . . . . . . . . . . . . . . . . . . .
Gammon Mini Monitor Fuel Sampling Kit
. . . . . . . . . . . . . . . . . . . . . . . .
TM 10-6640-221-13&P
TM 10-6630-230-13&P
Jelrus Burn–Out Furnace . . . . . . . . . . . . . . . . . . . . . . . . . . . . . . . . . . . . . . . TM 10-6640-231-13&P
Koehler Cleveland Open Tester . . . . . . . . . . . . . . . . . . . . . . . . . . . . . . . . . . TM 10-6630-236-13&P
Koehler Cloud and
Koehler Copper Strip Corrosion Bomb Bath . . . . . . . . . . . . . . . . . . . . . . . . . TM 10-6640-220-13&P
Koehler Distillation Apparatus . . . . . . . . . . . . . . . . . . . . . . . . . . . . . . . . . . . .
Pour Point Chamber . . . . . . . . . . . . . . . . . . . . . . . . . . . . TM 10-6630-238-13&P
TM 10-6630–233–13&P
Koehler Dropping Point Apparatus . . . . . . . . . . . . . . . . . . . . . . . . . . . . . . . . TM 10-6635-211-13&P
Koehler Electric Pensky–Martins Tester . . . . . . . . . . . . . . . . . . . . . . . . . . . . TM 10-6630-231-13&P
Koehler Foaming Characteristics Determination Apparatus . . . . . . . . . . . . . TM 10-6640-228-13&P
Koehler Kinematic Viscosity Bath . . . . . . . . . . . . . . . . . . . . . . . . . . . . . . . . . TM 10-6630-239-13&P
Koehler Tag Closed Cup Flash Tester . . . . . . . . . . . . . . . . . . . . . . . . . . . . . TM 10-6630-235-13&P
Lab-Line Explosion Proof Refrigerator . . . . . . . . . . . . . . . . . . . . . . . . . . . . . TM 10-6640-219-13&P
Lily Freezer . . . . . . . . . . . . . . . . . . . . . . . . . . . . . . . . . . . . . . . . . . . . . . . . . . TM 10-6640-234-13&P
Millipore OM 39 Filter Holder
. . . . . . . . . . . . . . . . . . . . . . . . . . .
TM 10-6640-225-13&P
Millipore Vacuum Pump . . . . . . . . . . . . . . . . . . . . . . . . . . . . . . . . . . . . . . . . . TM 10-6640-217-13&P
Ohaus Harvard Trip Balance . . . . . . . . . . . . . . . . . . . . . . . . . . . . . . . . . . . . . TM 10-6670-278-13&P
Precision Gas-Oil Distillation Test Equipment . . . . . . . . . . . . . . . . . . . . . . . TM 10-6630-219-13&P
Precision General Purpose Water Bath . . . . . . . . . . . . . . . . . . . . . . . . . . . . TM 10-6640-229-13&P
FM 10-70
A-1
Page 22

TM 10-6670-277-13&P
Precision High Temperature Bronze Block Gum Bath . . . . . . . . . . . . . . . . TM 10-6630-234-13&P
Precision General Purpose Ovens . . . . . . . . . . . . . . . . . . . . . . . . . . . . . . . TM 10-6640-218-13&P
Precision Heater Instruction Manual and Parts List . . . . . . . . . . . . . . . . . . TM 10--6640-223-13&P
Precision Oxidation Stability Bath . . . . . . . . . . . . . . . . . . . . . . . . . . . . . . . . TM 10-6640-232-13&P
Precision Pensky–Martens FIash Testers . . . . . . . . . . . . . . . . . . . . . . . . . . TM 10-6630-231-13&P
Precision Reid Vapor Pressure Bath . . . . . . . . . . . . . . . . . . . . . . . . . . . . . . TM 10-6640-226-13&P
Precision Slo–Speed Stirrer . . . . . . . . . . . . . . . . . . . . . . . . . . . . . . . . . . . . TM 10-6640-224-13&P
Precision Universal Centrifuge . . . . . . . . . . . . . . . . . . . . . . . . . . . . . . . . . . TM 10-6640-230-13&P
Precision Universal Penetrometer . . . . . . . . . . . . . . . . . . . . . . . . . . . . . . . . TM 10-6640–228–13&P
Sargent–Welch Vacuum Pump . . . . . . . . . . . . . . . . . . . . . . . . . . . . . . . . . . TM 10-4310–391–13&P
Sartorious Analytical Balance. . . . . . . . . . . . . . . . . . . . . . . . . . . . . . . . . . . TM 10-6670–277–13&P
Scotsman Cuber . . . . . . . . . . . . . . . . . . . . . . . . . . . . . . . . . . . . . . . . . . . . . TM 10-6640-227-13&P
Soltec VOM–Multimeter . . . . . . . . . . . . . . . . . . . . . . . . . . . . . . . . . . . . . . . . TM 10–6625–3127–13&P
Teel Self–Priming Centrifugal Pump . . . . . . . . . . . . . . . . . . . . . . . . . . . . . . TM 10-6640-217-13&P
Teel Submersible Pump . . . . . . . . . . . . . . . . . . . . . . . . . . . . . . . . . . . . . . . TM 10-4320–320–13&P
Texas instrument TI–5030II Calculator . . . . . . . . . . . . . . . . . . . . . . . . . . . . TM 10–7420–210–13&P
A–5. Pamphlets.
The Army Maintenance Management System (TAMMS) . . . . . . . . . . . . . . . . . . . . . DA Pam 738–750
A--6.
The Army Integrated Publishing and Printing Program . . . . . . . . . . . . . . . . . . . . . . . . . . . . . AR 25–30
Miscellaneous Publications.
Laboratory, Airmobile, Aviation Fuel . . . . . . . . . . . . . . . . . . . . . . . . . . . . . . . . . . . MIL–L–52733A(ME)
Apparatus, instruments, Chemicals, Furniture, and Supplies for lndustrial,
Clinical, College and Government Laboratories . . . . . . . . .
Petroleum–Petrochemical Testing Equipment . . . . . . . . . . . . . . . . . . . . .
Fisher Scientific Laboratories Catalog
Precision Scientific Catalog
A-2
Page 23

APPENDIX B
MAINTENANCE ALLOCATION CHART
Section I. INTRODUCTION
TM 10–6670-277–13&P
B–1.
various maintenance categories.
responsibility for the performance of maintenance functions on the identified end item or component. The
application of the maintenance functions to the end item or component will be consistent with the
capacities and capabilities of the designated maintenance categories.
each maintenance function as referenced from Section Il.
function.
General.
a. This section provides a general explanation of all maintenance and repair functions authorized at
b. The Maintenance Allocation Chart (MAC) in Section II designates overall authority and
c. Section Ill lists the tools and test equipment (both special tools and common tool sets) required for
d. Section IV contains supplemental instructions and explanatory notes for a particular maintenance
B–2. Maintenance Functions. Maintenance functions will be limited to and defined as follows:
a. Inspect. To determine the serviceability of an item by comparing its physical, mechanical, and/or
electrical characteristics with established standards through examination (e.g., by sight, sound, or feel).
b. Test. To verify serviceability by measuring the mechanical, pneumatic, hydraulic, or electrical
characteristics of an item and comparing those characteristics with prescribed standards.
C. Service. Operations required periodically to keep an item in proper operating Condition i.e., to
clean (includes decontaminate, when required), to preserve, to drain, to paint, or to replenish fuel,
lubricants, chemical fluids, or gases.
d. Adjust. To maintain or regulate, within prescribed limits, by bringing into proper or exact position,
or by setting the operating characteristics to specified parameters.
e. Align. To adjust specified variable elements of an item to bring about optimum or desired
performance.
f. Galibrate. TO determine and cause corrections to be made or tO be adjusted on instruments Or
test, measuring, and diagnostic equipments used in precision measurement. Consists of comparisons of
two instruments, one of which is a certified standard of knob accuracy, to detect and adjust any
discrepancy in the accuracy of the instrument being compared.
g. Remove/Install To remove and install the same item when required to perform service or other
maintenance functions. Install maybe the act of emplacing, seating, or fixing into position a spare, repair
part, or module (component or assembly) in a manner to allow the proper functioning of an equipment or
system.
h. Replace. To remove an unserviceable item and install a serviceable counterpart in its place.
“Replace” is authorized by the MAC and is shown as the third position code of the SMR code.
B–1
Page 24

TM 10-6670-277-13&P
i. Repair. The application of maintenance services,
1
including fault location/troubleshooting,
2
removal/installation, and disassembly/assembly procedures3 and maintenance actions4 to identify
troubles and restore serviceability to an item by correcting specific damage, fault, malfunction, or failure
in a part, subassembly, module (component or assembly), end item, or system.
j. Overhaul. That maintenance effort (service/action) prescribed to restore an item to a completely
serviceable/operational condition as required by maintenance standards in appropriate technical
publications (i.e, DMWR). Overhaul is normally the highest degree of maintenance performed by the
Army. Overhaul does not normally return an item to like–new condition.
k. Rebuild. Consists of those services/actions necessary for the restoration of unserviceable
equipment to a like–new condition in accordance with original manufacturing standards. Rebuild is the
highest degree of materiel maintenance applied to Army equipment. The rebuild operation includes the
act of returning to zero those age measurements (hours/miles, etc.) considered in classifying Army
equipment/components.
B–3.
Explanation Of Columns In The MAC, Section II.
a.
Column 1. Group Number. Column 1 lists functional group code numbers, the purpose of which is
to identify maintenance significant components, assemblies, subassemblies, and modules with the next
higher assembly. End item group number shall be “00.”
b.
Column 2. C omponent/Assembly. Column 2 contains the names of components, assemblies,
subassemblies, and modules for which maintenance is authorized.
Co/umn 3. Maintenance Function. Column 3 lists the functions to be performed on the item listed
c.
in column 2. (For a detailed explanation of these functions, see paragraph B–2.)
d.
Column 4. Maintenance
Cateaory. Column 4 specifies, by the listing of a work time figure in the
appropriate subcolumn(s), the category of maintenance authorized to perform the function listed in
column 3. This figure represents the active time required to perform that maintenance function at the
indicated category of maintenance. If the number or complexity of the tasks within the listed maintenance
function vary at different maintenance categories, appropriate work time figures will be shown for each
category. The work time figure represents the average time required to restore an item (assembly,
subassembly, component, module, end item, or system) to a serviceable condition under typical field
operating conditions. This time includes preparation time (including any necessary disassembly/
assembly time), troubleshooting/fault location time, and quality assurance/quality control time in addition
to the time required to perform the specific tasks identified for the maintenance functions authorized in the
maintenance allocation chart. The symbol designations for the various maintenance categories are as
follows:
1
Services – inspect, test, service, adjust, align, calibrate, and/or replace.
2
Fault Iocate/troubleshoot – the process of investigating and detecting the cause of equipment malfunctioning; the act
of isolating a fault within a system or unit under test (UUT).
3
Disassemble/assemble – encompasses the step-by-step taking apart (or breakdown) of a spare/functional group
coded item to the/eve/of its/east componency identified as maintenance significant (i. e., assigned an SMR code) for
the category of maintenance under consideration.
4
Actions – welding, grinding, riveting, straightening, facing, remachining, and/or resurfacing.
B-2
Page 25
TM 10–6670-277–13&P
. . . . . . . . . . . . . . . . . . . . .
C
. . . . . . . . . . . . . . . . . . . .
O
F
. . . . . . . . . . . . . . . . . . . . .
H
. . . . . . . . . . . . . . . . . . . . .
D
. . . . . . . . . . . . . . . . . . . . .
e.
Column 5. Tools and Equipmen
individual tools) and special tools, TMDE, and support equipment required to perform the designated
function.
.
Operator/Crew
Unit Maintenance
Direct Support Maintenance
General Support Maintenance
Depot Maintenance
t. Column 5 specifies, by code, those common tool sets (not
.
f. Column 6. Remark. This
order, which shall be keyed to the
B-4. Explanation Of Columns
a.
Column 1. Reference Code. The tool and test equipment reference code correlates with a code
used in the MAC, section II, column 5.
Column 2. Maintenance Category.
b.
or test equipment.
c.
Column 3. Nomenclature. Name or identification of the tool or test equipment.
Column 4
d.
e.
Column 5, Too/ Number. The manufacturer’s part number.
B–5.
performed as indicated in the MAC, section Il.
Explanation Of Columns In Remarks, Section IV.
Column 1. Reference Code. The code recorded in column 6, Section Il.
a.
b.
Column 2. Remarks. This column lists information pertinent to the maintenance function being
. National St
column shall, when applicable, contain a letter code, in alphabetic
remarks contained in section IV.
In Tool And Test Equipment Requirements, Section Ill.
The lowest category of maintenance authorized to use the tool
ock Number. The National stock number of the tool or test equipment.
(1)
GROUP
NUMBER
01
Section Il. MAINTENANCE ALLOCATION CHART
(2) (3)
COMPONENT/
ASSEMBLY
ANALYTIC BALANCE
MAINTENANCE
FUNCTION
INSPECT
REPLACE
REPAIR
MAINlTENAN
IT
DS GS
O
0.5
1.0
UN
C
0.2
(4)
CE
F H
(5)
LEVEL
DEPOT EQUIPMENT
TOOLS AND
D
1,2
(6)
REMARKS
B-3
Page 26

TM10-6670-277-13&P
SECTION III. TOOL AND TEST EQUIPMENT REQUIREMENTS
MAINTENANCE ALLOCATION CHART
(1) (2) (3) (4) (5)
TOOL/TEST
EQUIP. MAINTENANCE NOMENCLATURE NSN TOOL
REF CODE CATEGORY NUMBER
1 F TOOL KIT, GENERAL AUTOMOTIVE 5180-00-177-7033 (50980)
SC5180-90-
CL-N26
2 F MULTIMETER, 0-500V 6625-00-691-2453
SECTION IV. REMARKS
NOT APPLICABLE
B-4
Page 27

TM 10-6670-277-13&P
APPENDIX C
COMPONENTS OF END ITEM AND BASIC ISSUE ITEMS LISTS
Section I. INTRODUCTION
C–1. Scope.
This appendix lists components of end item and basic issue items for the Analytic Balance to help you
inventory items required for safe and efficient operation.
C–2. General.
The Components of End Item and Basic Issue Items Lists are divided into the following sections:
a.
authority to requisition replacements.
separately packaged for transportation or shipment. As part of the end item, these items must be with the
end item whenever it is issued or transferred between property accounts. Illustrations are furnished to
assist you in identifying the items.
b.
Analytic Balance in operation, to operate it, and to perform emergency repairs. Although shipped
separately packaged, BII must be with the shelter during operation and whenever it is transferred
between property accounts. The illustrations will assist you with hard–to–identify items. This manual is
your authority to request/requisition replacement BIl, based on TOE/MTOE authorization of the end item.
tion Il. Co
Sec
ion Ill. Basic Issue Items. These are the minimum essential items required to place the
Sect
mponents
of End Item. This listing is for informational purposes only, and is not
These items are part of the end item, but are removed and
C–3. Explanation of Columns.
The following provides an explanation of columns found in
a.
Column (1
illustration in which the item is shown.
Column (2) – National S
b.
and will be used for requisitioning purposes.
) – Illustration Number (Illus Number).
tock Number.
Indicates the
the tabular listings:
This column indicates the number of the
National stock number assigned to the item
c.
Column
description to identify and locate the item.
parentheses) followed by the part number.
d.
Column (4) – Unit of Measure
operational/maintenance function. This measure is expressed by a two-character alphabetical
abbreviation (e.g., ea, in, pr).
e.
Column (5) – Quantity required (Q
used with/on the equipment.
– Description.
(3)
Indicates the Federal item name and, if required, a minimum
The last line for each item indicates the CAGEC (in
(U/M). Indicates the measure used in performing the actual
TY RQR).
Indicates the quantity of the item authorized to be
C-1
Page 28

TM10-6670-277-13&P
SECTION II. COMPONENTS OF END ITEM
(1) (2) (3) (4) (5)
NATIONAL STOCK DESCRIPTION USABLE
ILLUS NUMBER CAGEC AND PART NUMBER ON CODE U/M QTY
7920-00-205-0565 BRUSH, DUSTING, LENS AND PHOTOGRAPHIC EA 1
NEGATIVE; CAMEL HAIR, METAL FERRULE, 1 IN.
WIDE, 6 IN. LONG; BRISTLE, 1 IN. LONG WITH WOOD
HANDLE; H-B-1654
6670-00-803-9680 WEIGHT SET, BALANCE, 1 TO 1000GM; CLASS C; SE 1
BRASS; AAA-W-200
SECTION III. BASIC ISSUE ITEMS
NOT APPLICABLE
C-2
Page 29

APPENDIX D
ADDITIONAL AUTHORIZATION LIST
NOT APPLICABLE
TM 10–6670-277-13&P
D-1/(D-2 Blank)
Page 30

Page 31
TM 10-6670-277-13&P
APPENDIX E
EXPENDABLE/DURABLE SUPPLIES AND MATERIALS LIST
Section I. INTRODUCTION
E–1.
items. These items are authorized to you by
class V, repair parts, and heraldic items).
Scope.
This listing is for informational purposes only and is not authority to requisition the
CTA 50-970, Expendable/Durable Items (except medical,
listed
E-2. Explanation of Columns.
a.
Column (1) - Item Number. This number is assigned to the entry in the listing and is referenced in
the narrative instructions to identify the material (e.g., Use cleaning compound, item 5, appendix C).
b. Column (2)
– Leve/. This column identifies the lowest level of maintenance that requires the
listed
item.
COF
H–
Column (3)
c.
Operator/Crew
Unit Maintenance
– Direct Support Maintenance
General Support Maintenance
- National Stoc
k Number. This is the National stock number assigned to the item; use
it to request or requisition the item.
cf.
Column (4)
– Description. Indicates the Federal item name, and, if required, a description to
identify the item. The last line for each item indicates the Commercial and Government Entity Code
(CAGEC) in parentheses followed by the part number.
e.
Column (5
) – Unit of Measure (W/
M). Indicates the measure used in performing the actual
maintenance function. This measure is expressed by a two-character alphabetical abbreviation (e.g.,
EA, IN,
PR). If the unit of measure differs from the unit of issue, requisition the lowest unit of issue that will
satisfy your requirements.
Section II. EXPENDABLE/DURABLE SUPPLIES AND MATERIALS LIST
(1) (2)
Item
Number Level Number
c
6145-00-299-5186
(3)
National Stock
(4)
Description
WIRE, ELECTRICAL: COPPER ; SOFT
MATERIAL; SOLID CONDUCTOR; RED;
No. 16 AWG; UNCOATED; 875.20 OHMS
PER MILE - I LB.; 20°C; QQ-W-343, TYPES
(5)
U/M
LB
E-1/(E-2 Blank)
Page 32

Page 33

TM 10-6670-277-13&P
By Order of the Secretary of the Army:
CARL E. VUONO
General, United States Army
Chief of Staff
Official:
THOMAS F. SIKORA
Brigadier General, United States Army
The Adjutant General
DISTRIBUTION:
To be distributed in accordance with DA Form 12–21A, Operator, Unit and Direct Support
Maintenance requirements for Laboratory, Air Mobile, Aviation Fuel and Laboratory,
Petroleum, MTD
Page 34

Page 35

Page 36

Page 37

Page 38

Page 39
Page 40

Page 41

Page 42

Page 43

The Metric System and Equivalents
Approximate Conversion Factors
Temperature (Exact)
Page 44

PIN:046568-000
Page 45

This fine document...
Was brought to you by me:
Liberated Manuals -- free army and government manuals
Why do I do it? I am tired of sleazy CD-ROM sellers, who take publicly
available information, slap “watermarks” and other junk on it, and sell it.
Those masters of search engine manipulation make sure that their sites that
sell free information, come up first in search engines. They did not create it...
They did not even scan it... Why should they get your money? Why are not
letting you give those free manuals to your friends?
I am setting this document FREE. This document was made by the US
Government and is NOT protected by Copyright. Feel free to share,
republish, sell and so on.
I am not asking you for donations, fees or handouts. If you can, please
search engines:
– Sincerely
Igor Chudov
http://igor.chudov.com/
 Loading...