

Electronic Analytical Balances
1601 MP 8, 1602 MP 8 und 1612 MP 8
Installation and Operating Instructions

2
Electronic Analytical Balances
1601 MP 8, 1602 MP 8 and 1612 MP 8

3
Performance Data 1601 MP 8 1602 MP 8 1612 MP 8
Weighing range g 100 200 30/160
Readability mg 0,1 0,1 0,01/0,1
Taring range (By subtraction) g 100 200 30/160
Standard deviation mg
≤ ±
0,1
≤ ±
0,1
≤ ±
0,02/0,1
Linearity mg
≤ ±
0,2
≤ ±
0,2
≤ ±
0,03/0,2
Stabilization time s
3
3 5/3
Integration time four optimized digital filters
Display update
0,2...0,8 s adjustable from outside
Stability range
0,25...64 d adjustable from outside
Permissible ambient operating
temperature
+10 oC to +40 oC
Sensitivity drift in the
+10
o
C...+30oC range
≤ ±
2∙10
-6
/K
Deviation from result when
tilted 1:1000
mg
≤ ±
0,1
Calibration weight extern 100 g
(see
accessories)
built-in
150 g weight
standard feature
tol. ±0,1 mg
built-in
30 g + 100 g
standard feature
tol. ±0,002/±0,2
mg
Data output optional
Below-balance weighing device standard feature
Pan diameter
mm 90
clearance above pan mm 240
Weighing chamber (w x h x d) 186 x 248 x 170 mm
Balance housing (w x h x d) 203 x 363 x 318 mm
Net weight kg 13
Voltage supply 100 V/120 V 220 V 240 V
Permissible fluctuations voltage -15% … +10%
Frequency Hz 50/60
Consumption VA 13,5
4
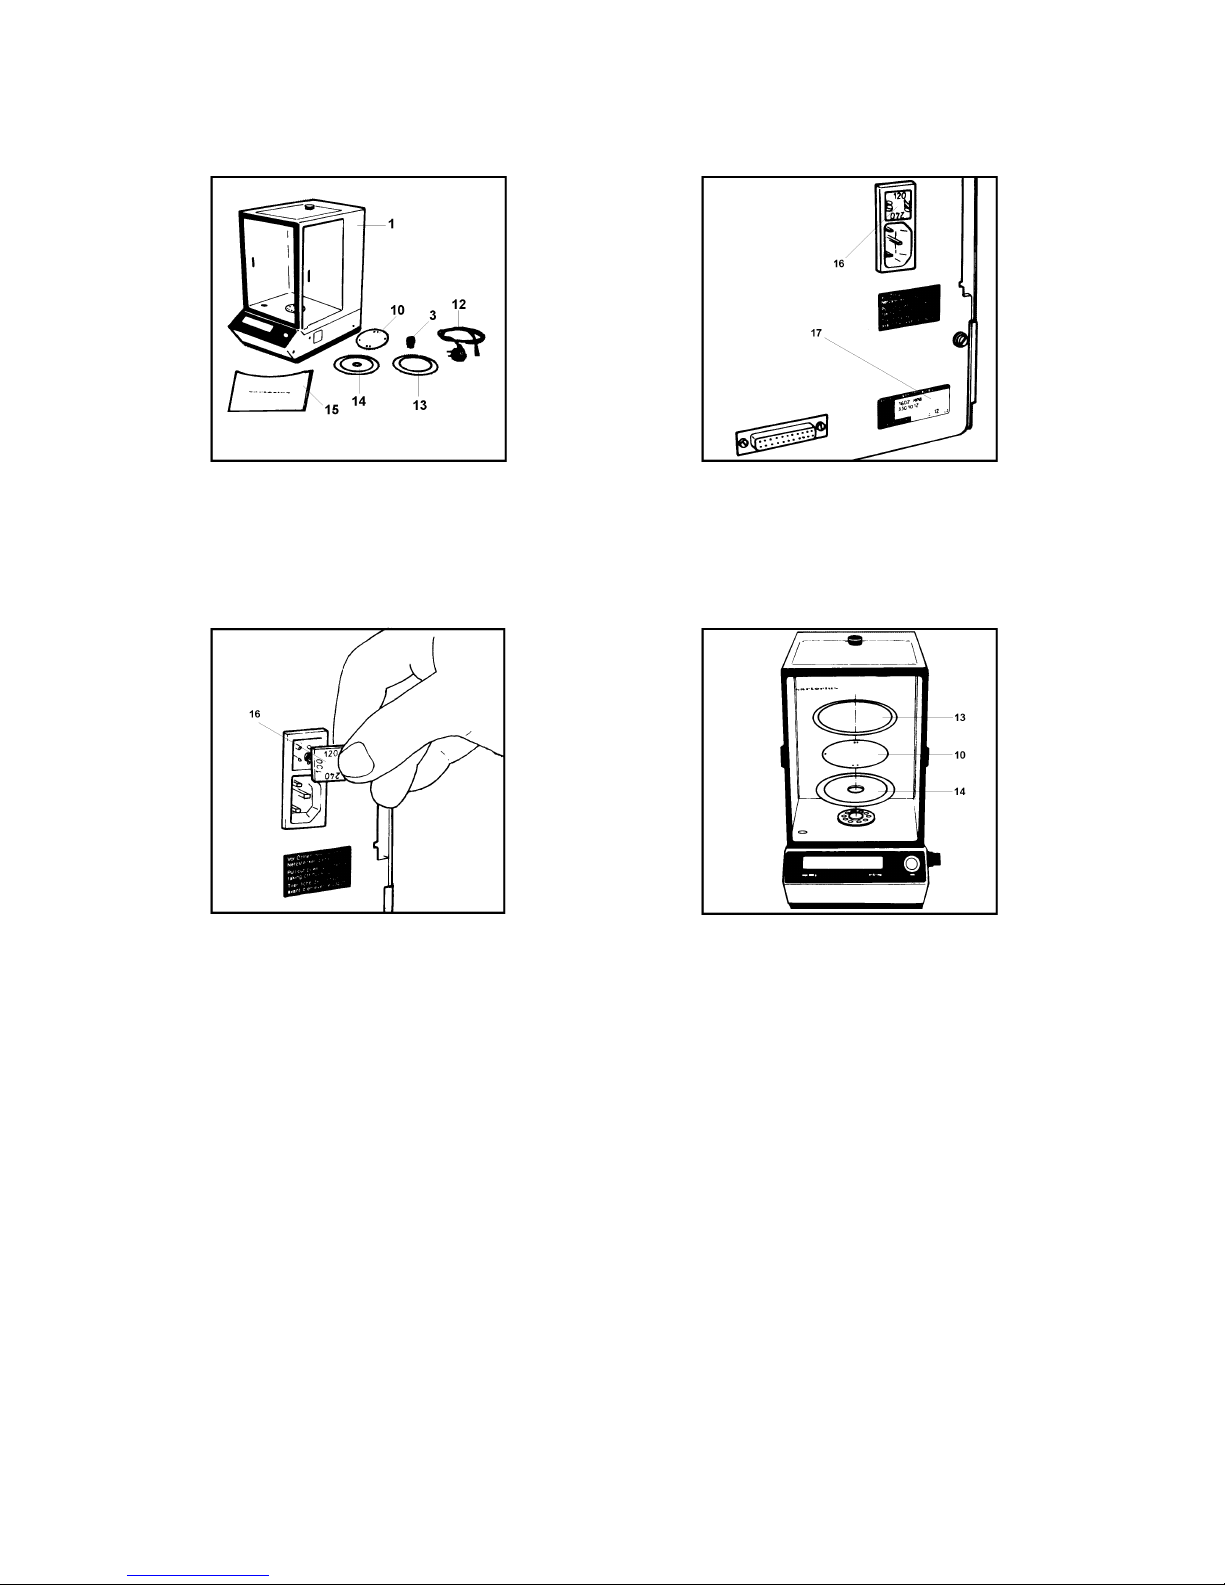
Consignment consists of:
electronic analytical balance
(1)
, protective ring
(13)
, line cable
(12)
, operating mode switch
(3)
,
pan
(10)
, shield plate
(14)
, dust cover
(15)
.
Resetting the line voltage
Pull out and turn the voltage selector
(16),
and
plug it in such that the desired voltage is aligned
with the arrow mark. Be sure to write the new
setting on the manufacturer’s label
(17)
.
Line voltage selector (20)
Compare factory-set voltage to avaible local line
voltage and reset, if necessary.
Installing the pan
Proper sequence:
-
shield plate
(14)
-
pan
(10)
-
protective ring
(13)
5
Balance competently assembled
Insert the operating mode switch
(3)
such that
“TA” is across from marker.
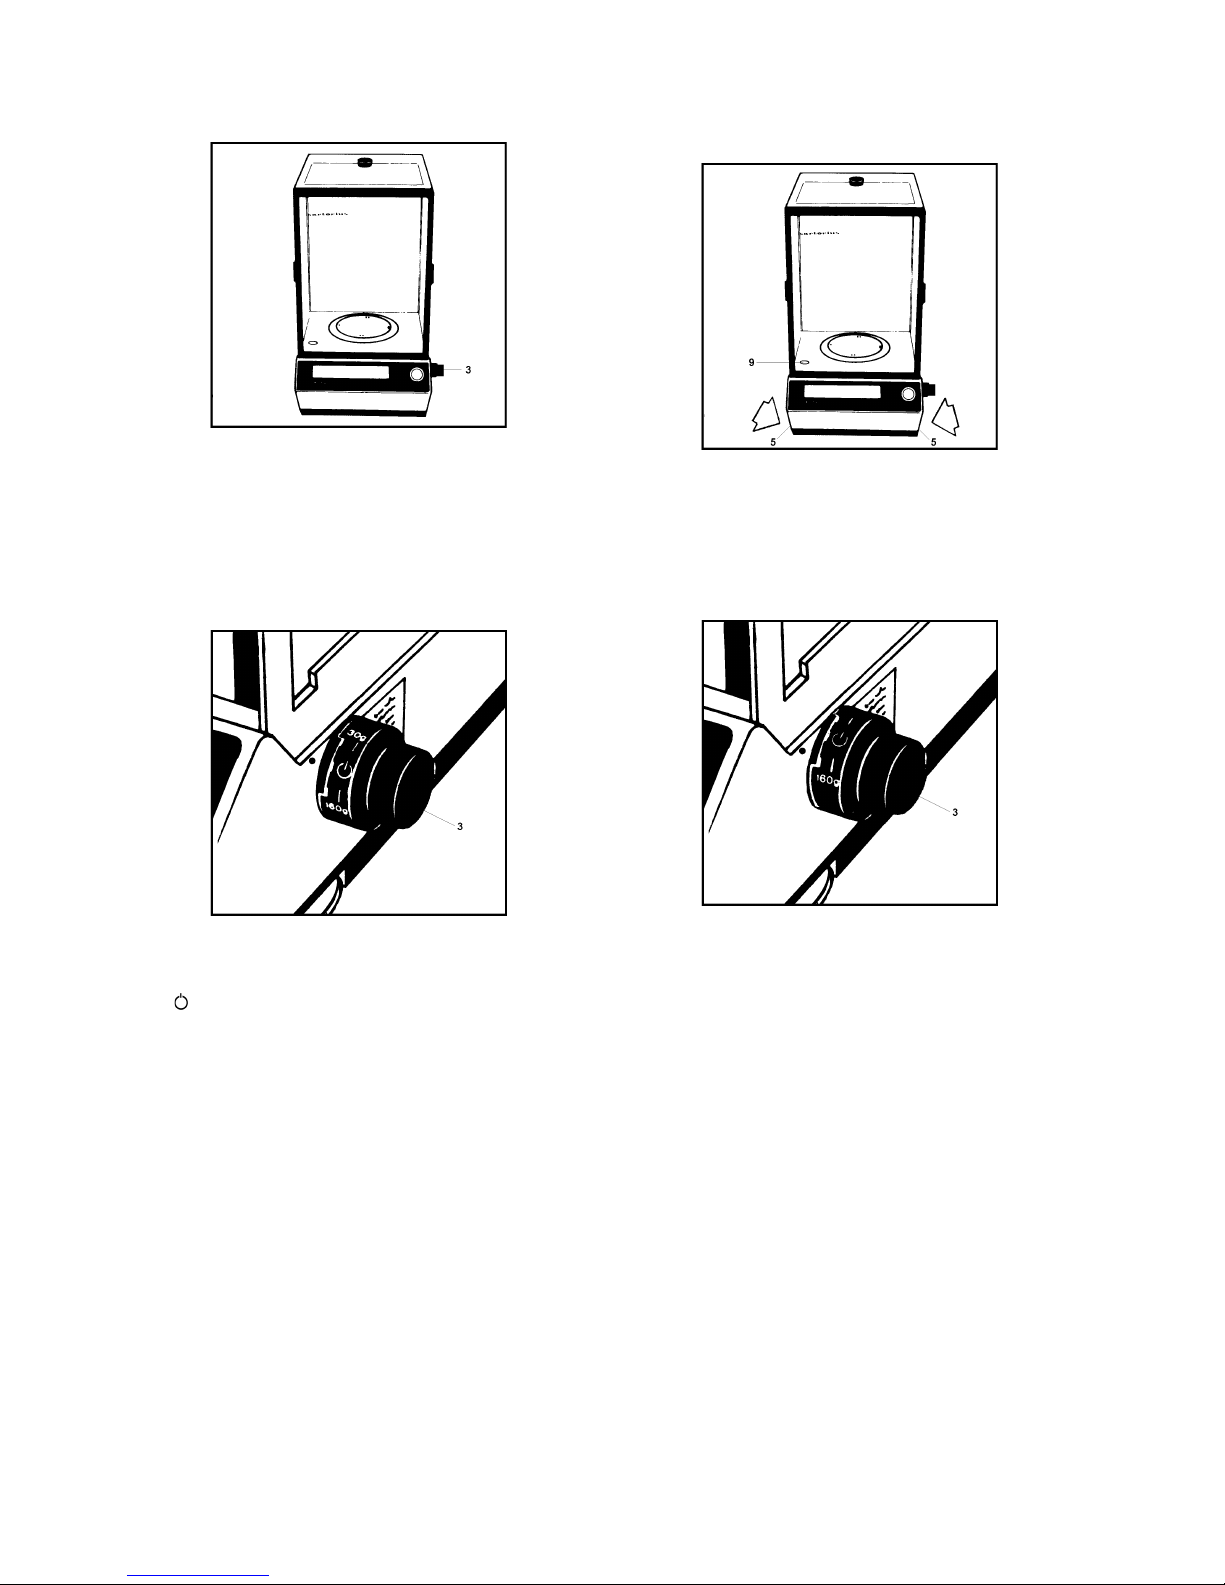
Operating mode switch (3)
1.
Stand-by/ON.
“ “ - all components subject to wear are
switched off (stand-by operation)
“ | “ - after the autocheck, balance is instantly
ready to operate..
Leveling
Level the balance using leveling screws
(5)
and
level indicator
(9)
(On model 1612 MP8, the level
indicator is to right of the pan).
2.
Rang switching
— on model 1612 MP8 only: —
macro range (160 g/0,1 mg) in pos. “| “ “160 g”.

6
Semimicro range (30 g/0,01 mg) in pos. »|« »30«
3b.
Position “CAL” application of internal
calibration weight on model
1602 MP8 (150 g)
and model 1612 MP 8 (30/100 g)
3a.
Position »CAL« application of internal
calibration weight on
1612 MP8 “CAL” can only
be reached via switch position “30 g”.
4.
Position “TA”
Before transporting 1612 MP8, make sure mode
switch is set to “TA”
(3)
.

7
Caution:
For balance shut-down and prior to
connection/disconnection of peripherals, pull
power plug!.
Autocheck
checks the balance for proper function. Defect
message appears.
Taring
Press tare button
(6)
—
display shows “0.0000 g”
as code number in display
(8).
It tells the service
technician where to troubleshoot
Stability control (7)
When stability symbol “g” appears, readout is
reliable

8
Busy-Symbol (21)
signals temporary power
failure (disappears when you push tare button
(6)
or indicates that microprocessor is completing
previous function and not ready for the new job..
Place 100 g calibration weight on pan.
Waitfordisplay"100.0000g"and the beeper signal.
Balance automatically returns into weighing
program.
Sensitivity adjustment 1601 MP 8
is done
with external calibration weight only
(see accessories 100g ± 0.15mg).
Remove cap from calibration button
(4)
clear pan,
tare
(6)
, and wait for stability
(7)
. Press calibration
button
(4)
. Display shows "C" and the busy
symbol
(21)
(if display shows "CE", repeat
calibration starting from tare.)
Sensitivity adjustment 1602MP8 using the
built-in calibration weight.
Tare
(6)
. At stability
(7)
, set operating mode
switch
(3)
to "CAL". Display shows "C" and the
"Busy Symbol" (21). (lf "CE" appears, restart
adjustment with the "Stand-by" position "0"-) Wait
for display to show CC and beeper Signal before
you set operating mode switch
(3)
back to
position "l".

9
Sensitivity adjustment 1602 MP 8 using an
external calibration weight.
Remove cap from
calibration button
(4)
. Tare
(6)
and wait for stability
before pressing calibration button
(4)
Display
shows "C" and the busy symbol
(21)
. Load
calibration weight (150 g, tolerance ±0.1 mg).
Wait for display to show "150.0000 g" and for
beeper. Balance returns to weighing mode
automatically.
Sensitivity adjustment 1612 MP 8 with the
built-in calibration weights
1. Semimicro range (30 g/0,1 mg)
Clear pan. Tare
(6)
.
Wait for stability
(7)
.
Slightly depress operating mode switch
(3)
and
carefully set it to "Cal 30 g" (see picture 7d).
Display shows "C" and the busy symbol
(21)
. lf
you get CE display, restart calibration from
tare(6). Place 30 g calibration weight (tol. ±0.02
mg) on pan. When CC is displayed, balance will
automatically return to weighing function.
2. Macro range (160 g/0.1 mg)
Tare
(6)
and wait for stability
(7)
.
Slightly depress operating mode switch and set it
carefully to "Cal 160 g" (see picture 7c). Display
shows "C" and the busy symbol
(21)
.
(lf CE is displayed, restart calibration from standby position
).
When CC appears in display, reset switch
(3)
to
position "l".

10
Sensitivity adjustment 1612 MP8 with external
calibration weights
1. Semimicro range (30 g/0.01 mg)
Remove cap from calibration switch
(4)
. Clear pan
and tare
(6)
. Wait for stability
(7)
. Press calibration
button
(3)
.
Display shows "C" and the busy symbol
(21)
. lf
you get CE display, restart calibration from tare
(g).
Place 30 g calibration weight (tol. ±0.02 mg on the
pan. When CC is displayed, balance automatically
returns to the weighing function.
2. Macro range (160 g/0.1 mg)
Remove cap from calibration switch.
Clear pan and tare
(6)
. Wait for stability
(7)
then
press calibration button. Display shows "C" and
the busy symbol
(21)
, lf you get CE display,
restart calibration from tare
(6)
.
Place 100 g calibration weight (tol. ±0.2 mg) on
pan. When CC appears in the display, balance
automatically returns to the weighing function.
Adaptation to application and environment
For Optimum adaption of the balance to your
specific application and operating environment, a
menu program provides selection of the ideal
combination from the following parameters:
1. digital filter
2. stability range
3. display format
4. tare condition
5. Auto zero
Additional Parameters for data Output format and
calculation programs with external keyboards are
available. Please refer to accessories list or
request our supplementary listing.
Access to the menu program
Remove protective cap
(23)
.
Unlock menu program by sliding switch
(23)
to the
right. Switch operating mode switch
(3)
from "
"
to "l" while pressing tare button
(6)
at the same
time.
Display shows "CO", numbers 0...4 appear in
sequence.
Push the tare button when the "page" number
appears, and the program will automatically go
into the "line" selection display. Again confirm
your chosen number with the tare button. Then
the “word“ numbers appear. Make your selection
again by confirming with the tare button.
For a listing of available program codes, please
refer to the program list on the last page.

11
C 1 3 1
page line word
Balance operating program
(active Parameters)
Code
Digital filter
C 1 1 1
filtration
normal
C 1 1 2
filtration
amplified
!
C 1 1 3
filtration
strong
C 1 1 4
filtration
extreme
Code
Stability range
C 1 2 1
0,25 digits
C 1 2 2
0,5 digits
C 1 2 3
1 digits
!
C 1 2 4
2 digits
C 1 2 5
4 digits
C 1 2 6
8 digits
C 1 2 7
16 digits
C 1 2 8
32 digits
C 1 2 9
64 digits
Code
Display format
C 1 3 1
last
decimal ON
!
C 1 3 2
last
decimal OFF
C 1 3 3
last
decimal at stability
C 1 3 4
all
decimal at stability
Code
Tare mode
C 1 4 1
without
stability
C 1 4 2
at
stability
!
Code
Auto zero
C 1 5 1
ON
!
C 1 5 2
OFF
Code
C 4 1 1
Program lock OFF
C 4 1 2
Program lock ON
!"
C 4 1 0
call program word
"
C 4 0
call program line
"
C 0
END of programming

12
Menu program locking
Slide switch
(23)
to the left, replace protective cap
on switch.
Below-balance weighing
Rotate cover disc
(20)
by ~180
o
and the weighing-
below hook becomes visible.
Accessories
Dust cover 696076
Carrying case 606703
vibration spatula 6025
weighing bowls
chrome-nickel 20 g 6003
chrome-nickel 50 g 6002
glass 20 g 6015
Balance table 6801
Kit for density determination 6080
External calibration weight for 1601 MP8 707219
Data output 735736
External tare button
(connects to data output) 7226
Printer Data Print 7279
External Keyboard Data Input 73432xxx
*
)
Combination Data Input/
Data Print 73802xxx
*
)
Converter from RS 232/V 24 S to:
JEC 725316
BCD parallel 725318
RS 422 725319
analog 7287
*
) Programmset: Programme auf Anfrage
Loading through top deck
Lift up the button on the top swivel deck
(19)
and
turn this button
(18)
.
Data output (22)
(optional refer to accessories).
4 wire voltage interface full duplex V 24 or RS 232
– specifications on request.


Sartorius AG
B 37070 Göttingen
P Weender Landstraße 94–108, 37075 Göttingen
T (0551) 308-0, F (0551) 308-3289
Internet: http://www.sartorius.com
Copyright by Sartorius AG, Göttingen, Deutschland.
All rights reserved. No part of this publication may be
printed or translated in any form or by any means without
the prior written permission of Sartorius AG.
Sartorius AG reserves the right to make change to the
technology, features, specification and design of the equipment
without notice.
 Loading...