

Sarotech DVP 260 User Manual
User Manual
DVP-260
- Before using the product, read carefully the user manual first.
- Carefully read the warning notes and use the product properly.
- Pictures in the user manual are for reference and can be different from the actual product.
- This user manual can be revised for upgrade without prior notice.
Sarotech Co., Ltd.

---- Contents ----
- Safety Warnings --- 4
- Application Warnings --- 5
1. Introduction --- 6
2. Main Features --- 6
3. Product Components --- 7
4. User Environment --- 7
5. Product Specifications --- 8
6. Name and Title of Each Part --- 9
6-1. Front --- 9
6-2. Rear Terminal --- 10
7. Method of Hard Disk Mountings --- 11
8. Connection to PC --- 14
8-1. Hard Disk FDISK and Format --- 14
8-2. During the use of Windows ME/2000/2003/XP --- 14
■ Connecting
■ Release of Connection
8-3. During the use of Windows 98/98SE --- 15
■ installation of Drive
■ Connecting, Releasing
2

9. Connection to Video/Audio Equipment --- 16
9-1. Connection of Video Cable --- 16
9-2. Connection of Audio Cable --- 18
9-3. Connection to TV in Stationary or Inslide Vehicles --- 19
10. Usage of Remote Control --- 22
11. Viewing MOVIE/MUSIC/PHOTO --- 23
11-1. File Browser --- 23
11-2. File Play (MOVIE/MUSIC/PHOTO) --- 24
11-3. Watching Movie --- 24
■ Menu during Movie Play
■ Convenient features for watching Movie
11-4. Listening Music --- 26
■ Background Image Change
■ Convenient features for Music Listening
11-5. Watching PHOTO --- 28
■ Menu during watching PHOTO
■ Convenient features for watching PHOTO
11-6. Usage of Play List --- 29
■ PLAY LIST
■ ADD/DEL
■ REMOVE
12. System Setup --- 30
12-1. Video Setup --- 30
12-2. Audio Setup --- 31
12-3. Caption Setup --- 31
12-4. System Setup --- 32
13. Before Service Request --- 34
- Guidance for Customer Registration --- 35
- Warranty -
3

※ User Information
B Class Equipment(Equipment for home use) : This apparatus is for home use and has a radio wave
acceptability registration, so it can be used in all areas.
Safety Warnings
Before using the product, read carefully the user manual first and use the product safely.
- Users may not arbitrarily disassemble or rebuild the product. This may damage the product.
- Do not disassemble the product while the power code is on. This may cause electric shock or fire.
- Do not touch the power plug with wet hands or use damaged power codes or loose outlet. This may
cause electric shock or fire.
- Do not move the product while it is activated. This may damage the hard disk. Only move the
product while the power code is off.
- If users drop the product or provide shock to it, the product and its hard disk can be damaged.
- Do not install the product in places with a lot of dust, direct ray of light, rain and wind, wetness or
high humidity because the product can be damaged.
- Do not install the product near products releasing a lot of heat. The product can break down if it is
stored or left alone at high temperature for a long time. Install the product in a well-ventilated area.
4

Application Warnings
Before using the product, read carefully the user manual first and use the product properly.
- Data in the hard disk can be damaged due to static electricity, awkward usage or defective products.
Therefore, please pay close attention in handling the product. Always back up important data.
Especially, be careful of losing the data as manufacturers have no responsibility on such damage.
- Connect to the outside cable only after turning off the power codes of the product and external
video/audio. This product activates by the multimedia player and external storage equipment that
cannot be activated simultaneously.
- The product activates by the external storage equipment if the USB cable is connected. However, the
product activates by the multimedia player equipment if the USB cable is not connected. To activate
the multimedia player in a stable manner after using the external storage equipment, take out the USB
cable and turn on the power code.
- When exchanging the hard disk, fully dissipate the heat and separate the product. Be careful not to
get burnt from the heat generated from the hard disk when the product is activating.
- The data in the hard disk can be damaged if it is close to magnetic materials such as speakers or
magnets.
- It is possible to repair the hard disk for free if the product has defects. However, the manufacturer is
not responsible for restoring or compensating for the damaged data in the hard disk.
- Pictures and titles in the user manual are prepared based on DVP-260.
5

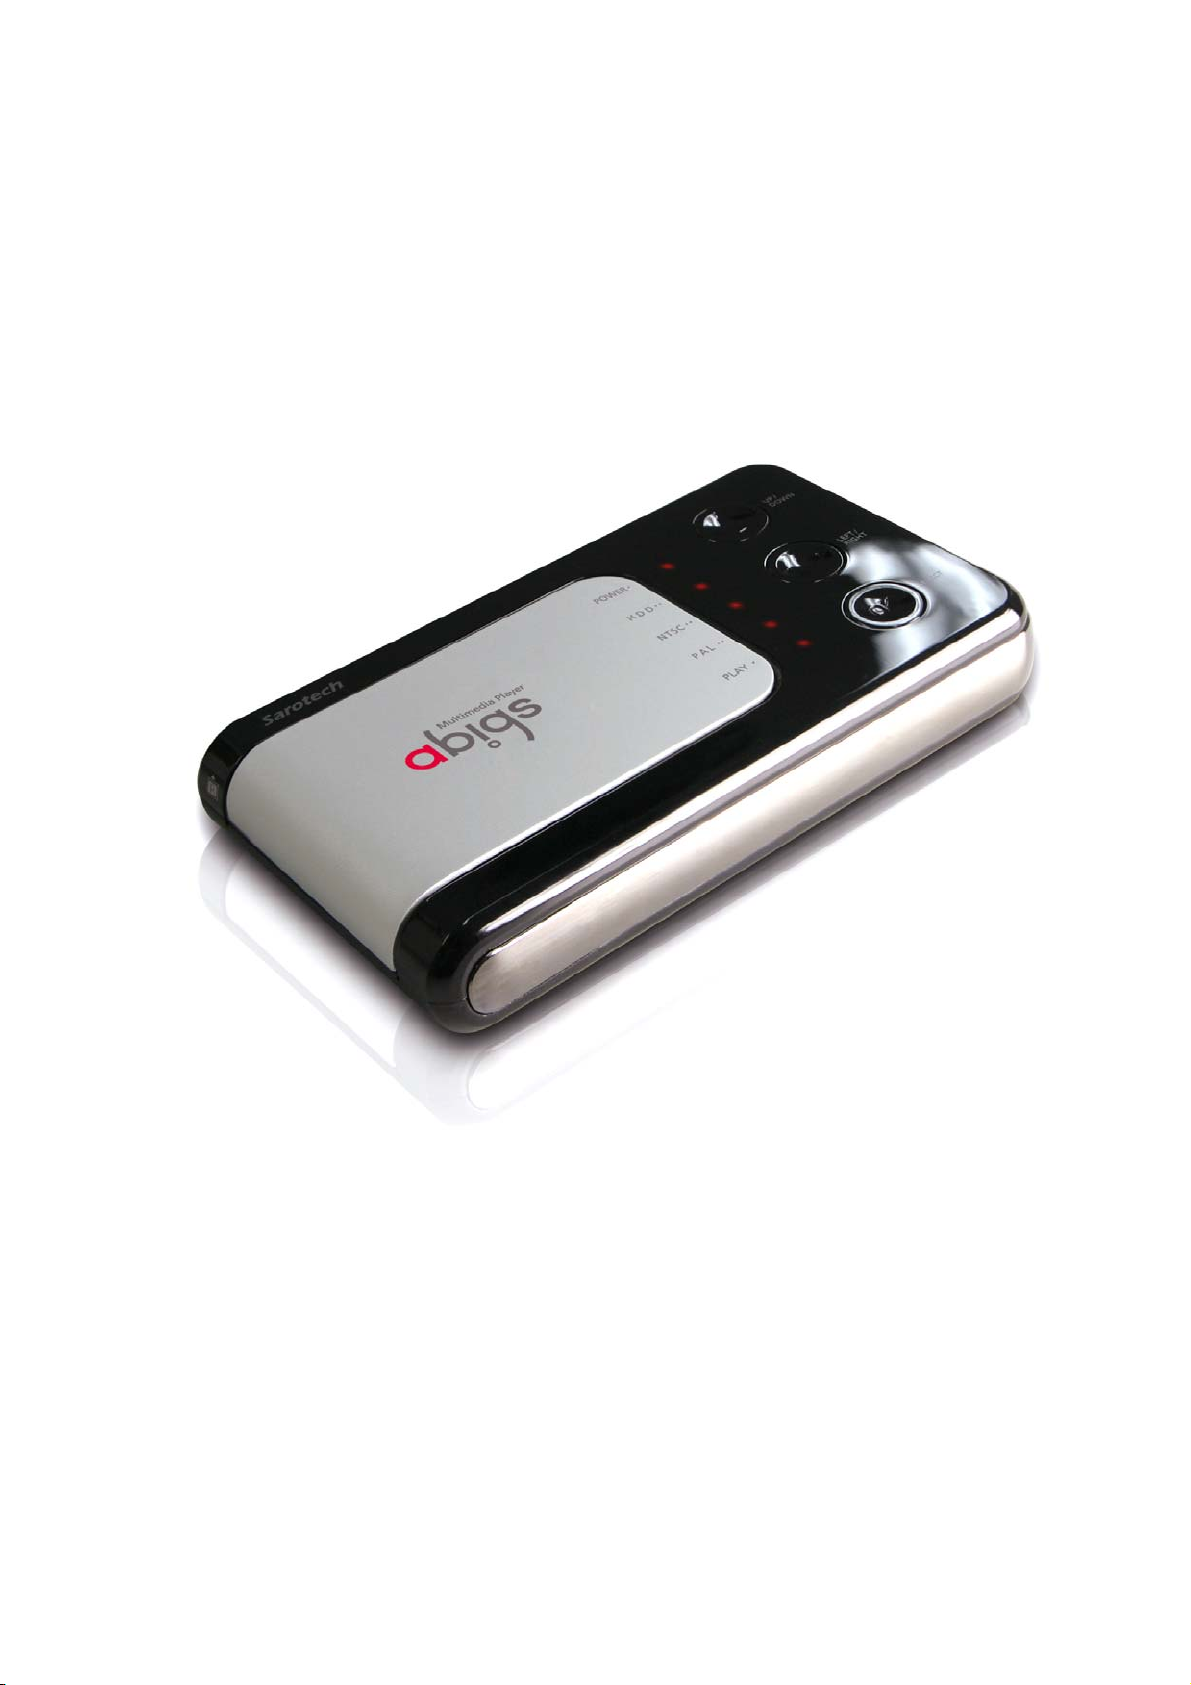
1. Introduction
DVP-260(hereinafter referred to as ‘abigs’) is a new concept of multimedia player equipment that
connects digital contents (movie, music, photo, etc.) files to external display equipment (household TV,
automobile TV, projector (external video supported), etc.) without a PC. Therefore, users with abigs
can enjoy digital contents from video file, music file and picture file.
Users can also conveniently use abigs as an USB 2.0 external storage in connection with the PC.
2. Main Features
- Users can play various movie/music/photo files downloaded from the PC on TV (HDTV).
- Users can easily listen to the audio by supporting the analogue 2ch stereo output or connect to
external audio equipment and enjoy live music by supporting digital audio output (optical/coaxial).
- Users can upgrade the firmware in a simple and convenient way.
- Users can listen to the audio without cable by supporting a FM transmitter.
- Users can use the product without a remote control by embedding the main switch.
- Users can see the operation status by embedding the main LED.
- Users can easily install the hard disk.
- Users can store the data at high-speed by supporting the USB2.0 external storage feature.
6

3. Product Components
1) abigs
2) Remote control (battery included)
3) AV cable (composite video, stereo sound)
4) S-Video cable
5) Component cable
6) DC adapter (DC +5V, 2A)
7) USB cable
8) User manual
9) Fixed bolt
10) CD (driver installation)
11) Coaxial adapter
12) Product stand
* Please check the components after purchasing the product. Components can be changed according
to their features.
* Users should pay extra for the external remote control receiver, vehicle power adapter, vehicle stereo
cable and optical/coaxial cable besides the basic components.
4. User Environment
1) PC or MAC of more than 586 Pentium 2
2) Equipment with USB port availability
- If the user connects the USB 2.0 product to the USB 1.1 Host Adapter, it will run at USB 1.1 speed/
(12Mbps).
- If user wants to use the speed of USB2.0(Max.:480Mbps), you should use a USB2.0 Host Adaptor in
Computer.
3) Using a 2.5” hard disk with a volume of more than 6GB is recommended.
7
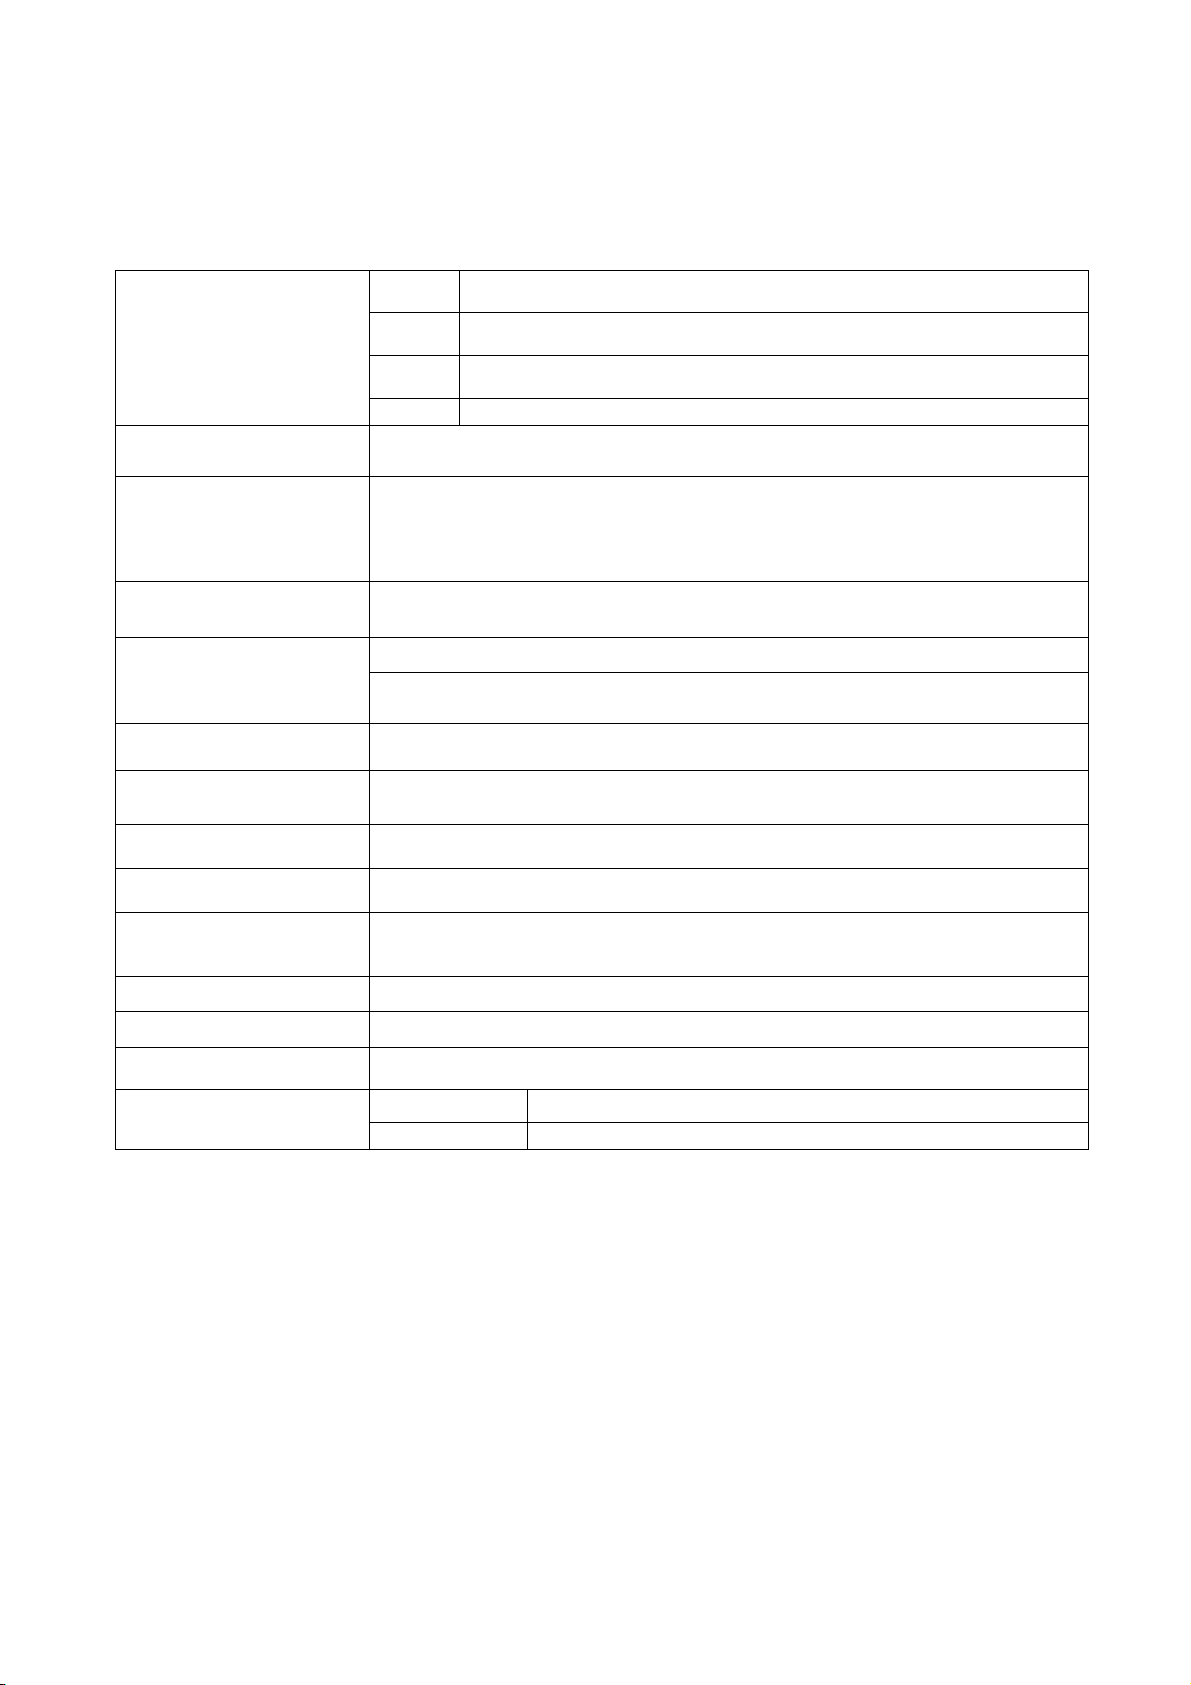
5. Product Specifications
Movie AVI(Divx 3.x/4.x/5.x, Xvid), ISO, IFO, DAT, MPG, VOB
Support file format
Main chip set
Video output
Audio output
FM transmission output
HDD Type
File format system
Interface
Transmission speed
Music MP3, OGG Vorbis, WMA, AC3, PCM(WAV)
Picture JPEG
Subtitle SMI, SRT, SUB
EM8511 (sigma design)
Composite
S-Video
HD Component (Progressive output support: 480i, 480p, 576i, 720p,
1080i)
Analogue 2ch
Digital audio output (Optical/Coaxial) (DTS pass though)
Usable frequency: 88.1/88.5/88.9MHz(400KHz, Number of channels: 3)
Communication method: one-way communication
2.5" IDE HDD (separate)
FAT32, NTFS
USB 2.0
480Mbps at maximum
Support OS
Size
Weight
Material Aluminum, ABS
* Reference
The product specifications can differ according to the built-in drive.
Windows 98/98SE/ME/2000/2003/XP
More than Mac OS 9.0 or more than Linux 2.4
135(W) X 80.3(L) X 22(H)
130g(HDD excluded)
DVP-260 Basic specifications Model
DVP-260Vx Basic specifications + Wireless AV transmitter
8

6. Name and Title of Each Part
6-1. Front
1. POWER LED: If users press the “I/O” switch from the main frame, power will be supplied and the
power lamp will be lightened up.
2. HDD LED: The hard disk lamp will lightened up when the hard disk activates.
3. NTSC LED: It will be lightened up when the TV method is set as NTSC state.
4. PAL LED: It will be lightened up when the TV method is set as PAL state.
5. PLAY LED: It will be lightened up when the movie, music or picture is played.
6. UP/DOWN SWITCH: Users can use this switch to move the subtitle location and menu item up and
down.
7. LEFT/RIGHT SWITCH: Users can use this switch to play the screen forward/backward rapidly or
move the menu item right and left.
8. SELECT SWITCH: If users press either the movie play button or the menu selection button, it will be
played. If users press it once again, it will go back to the menu item.
9. I/O SWITCH: This is a power on/off switch.
- ON: If users press the “I/O” switch one time with the switch off, power will be turned on.
- OFF: If users press the “I/O” switch for about two seconds with the switch on, power will be turned
off after about three seconds.
10. REMOTE CONTROL RECEIVER: This is a receiver of remote control signals. Remote control signals
will be received correctly if the remote control activates while facing the front side of abigs main frame.
9
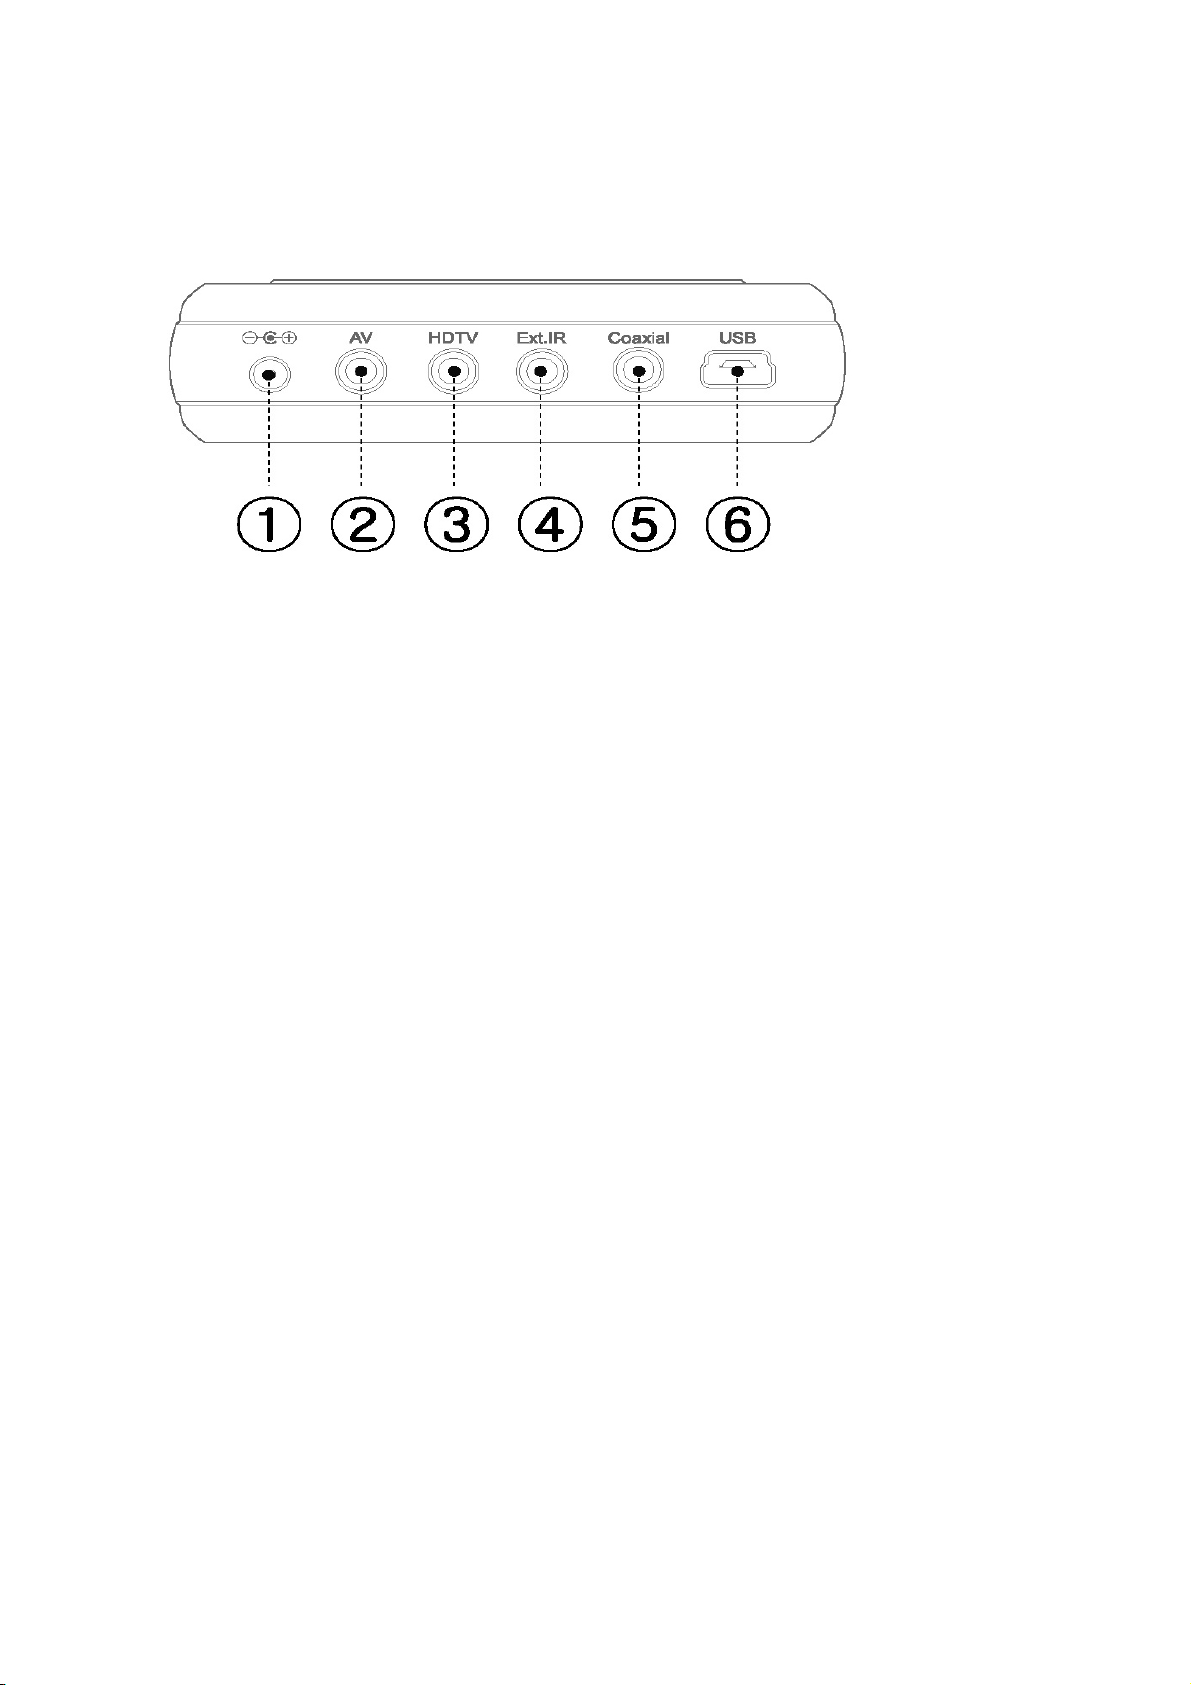
6-2. Rear Terminal
1. POWER TERMINAL: This is a terminal that inputs DC +5V. 2A power. (Dedicated AC power adapter
or dedicated vehicle power adapter is used.)
* Warnings
Press the “I/O” button with the power on. If the remote control doesn’t activate during play time or the
system goes out of service, turn off the power with the “I/O” switch (if users press the switch for two
seconds, the power will be turned off after three seconds.) from the main frame or turn off or remove
the power with the “POWER” button from the remote control and make connection again.
If users cannot solve the problem, please make inquiry to the customer service center.
2. AV TERMINAL: This is a terminal that connects the composite (CVBS) cable. AV terminal outputs the
composite video signal and stereo audio signal.
3. HDTV TERMINAL: This is a terminal that connects the composite video cable or S-Video image
cable. HDTV terminal is a terminal that outputs the composite (YPbPr) video signal or S-Video image
signal.
4. Ext.IR TERMINAL: This is a terminal that is connected to an external remote control receiver.
5. Coaxial TERMINAL: This is a terminal that connects the coaxial/optical cable. Coaxial terminal
outputs digital audio signals.
6. USB TERMINAL: This is used for PC and data transmission and reception.
10
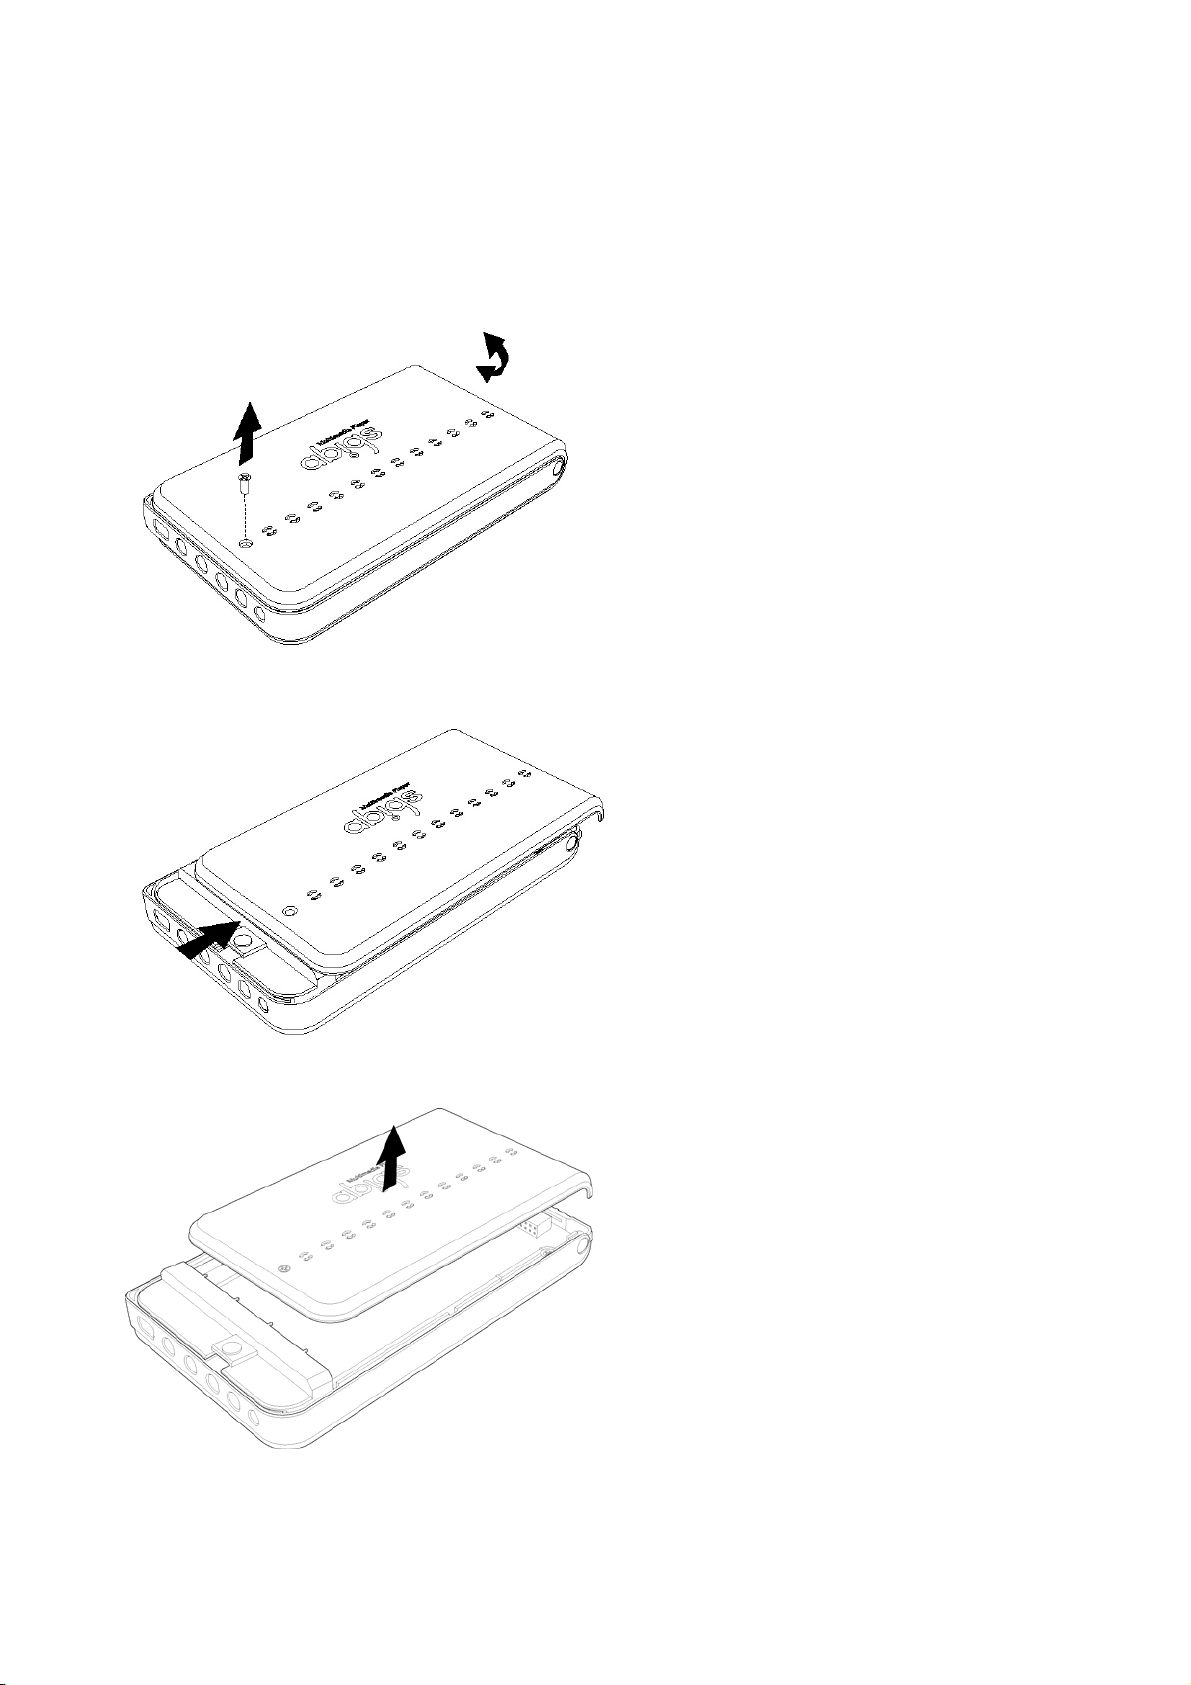
7. Method of Hard Disk Mountings
1. Remove the screw from the bottom in the arrow direction.
2. Push the bottom case to the side in the arrow direction.
3. Separate the bottom case upwards in the arrow direction.
11
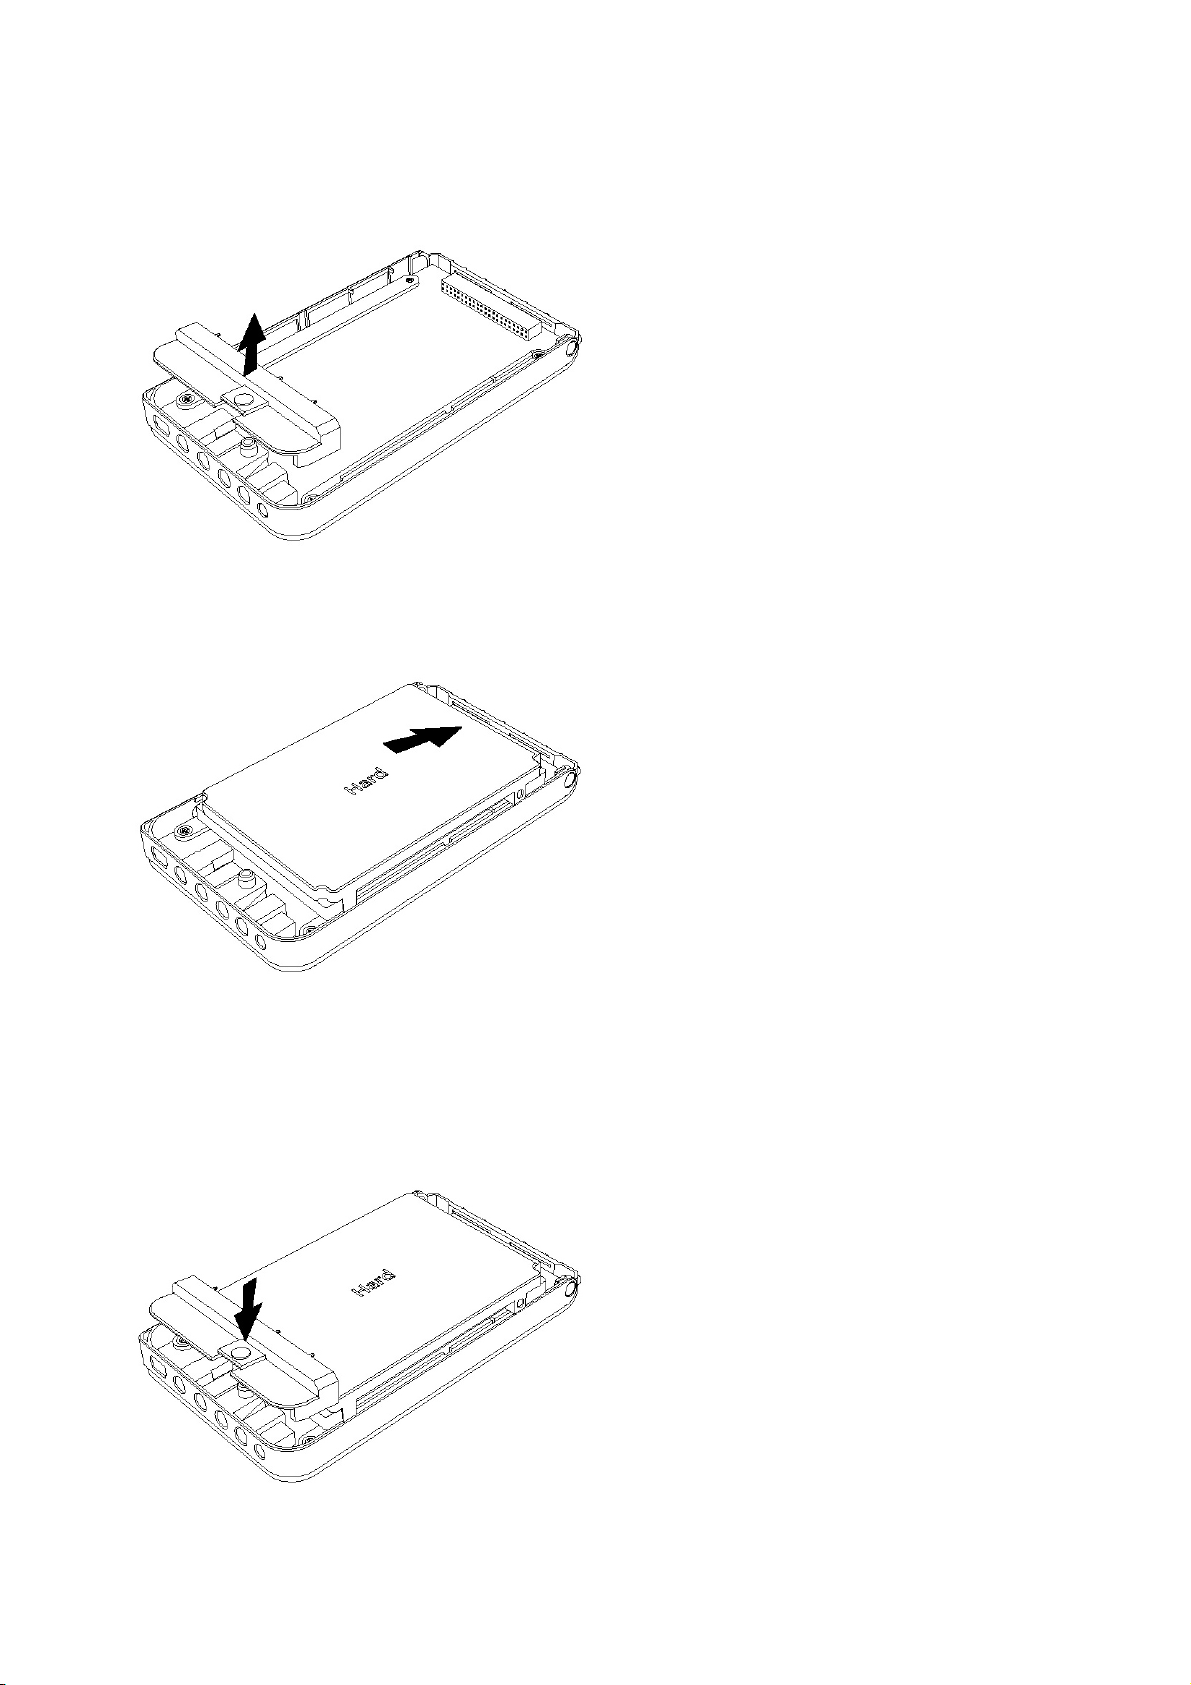
4. Separate the hard fixed fixture upwards in the arrow direction.
5. Connect the hard disk to the 44 pin connector in the arrow direction. Assemble the hard disk and
connector based on No. 1 pin.
* Warnings
The 4 remaining pins on the left of the hard disk is for setting Master/Slave. Therefore, these are not
connected to the product.
6. Assemble the hard fixed fixture to the combined hard disk and product as shown.
12
 Loading...