

Page 1

INSTRUCTION MANUAL
VPC-E6EX
VPC-E6
Digital Camera
Important note
This manual explains how to safely operate the VPC-E6EX, VPC-E6 and
VPC-E6GX.
Any information regarding only one of these products will be labeled as such.
Please read these instructions carefully before using the camera.
Make sure to read and understand the separate booklet “
Keep this manual in a safe place for later reference.
VPC-E6GX
SAFETY MANUAL”.
Page 2

Warning
TO PREVENT THE RISK OF FIRE OR ELECTRIC SHOCK, DO NOT
EXPOSE THIS APPLIANCE TO RAIN OR MOISTURE
FOR AMERICAN USERS
The following advisory is included in accordance with the laws of the State of
California (USA):
WARNING:
This product contains chemicals, including lead, known to the State of
California to cause cancer, and birth defects or other reproductive harm.
Wash hands after handling.
i This equipment has been tested and found to comply with the limits for a
Class B digital device, pursuant to Part 15 of the FCC Rules. These limits
are designed to provide reasonable protection against harmful interference
in a residential installation. This equipment generates, uses and can
radiate radio frequency energy and, if not installed and used in accordance
with the instructions, may cause harmful interference to radio
communications. However, there is no guarantee that interference will not
occur in a particular installation. If this equipment does cause harmful
interference to radio or television reception, which can be determined by
turning the equipment off and on, the user is encouraged to try to correct
the interference by one or more of the following measures:
h Reorient or relocate the receiving antenna.
h Increase the separation between the equipment and receiver.
h Connect the equipment into an outlet on a circuit different from that to
which the receiver is connected.
h Consult the dealer or an experienced radio/TV technician for help.
i Changes or modifications not expressly approved by the party responsible
for compliance could void the user’s authority to operate the equipment.
Declaration of Conformity
Model number: VPC-E6
Trade Name: SANYO
Responsible party: SANYO FISHER COMPANY
Address: 21605 Plummer Street, Chatsworth, California 91311
Telephone No.: (818) 998-7322
This device complies with Part 15 of the FCC Rules. Operation is subject
to the following two conditions:
(1) this device may not cause harmful interference, and
(2) this device must accept any interference received, including interfer-
ence that may cause undesired operation.
i English
Page 3

FOR CANADIAN USERS
i This Class B digital apparatus complies with Canadian ICES-003.
FOR EU USERS
Note:
iThis symbol mark and recycle system apply only to EU
countries and do not apply to the countries in the other
areas of the world.
Your SANYO product is designed and manufactured with
high quality materials and components which can be
recycled and reused.
This symbol means that electrical and electronic
equipment, at their end-of-life, should be disposed of
separately from your household waste.
Please dispose of this equipment at your local community
waste collection/recycling centre.
In the European Union there are separate collection
systems for used electrical and electronic products.
Please help us to conserve the environment we live in!
Symbols used in this manual
HINT Points giving some extended instructions or special points to pay
CAUTION Points that require special attention.
(page xx) Refer to the page indicated for detailed information.
You may find the answers to questions or problems concerning camera
operation in the sections “COMMONLY ASKED QUESTIONS” (page 150)
and “TROUBLESHOOTING” (page 157).
attention to.
English ii
Page 4
GETTING UP AND RUNNING
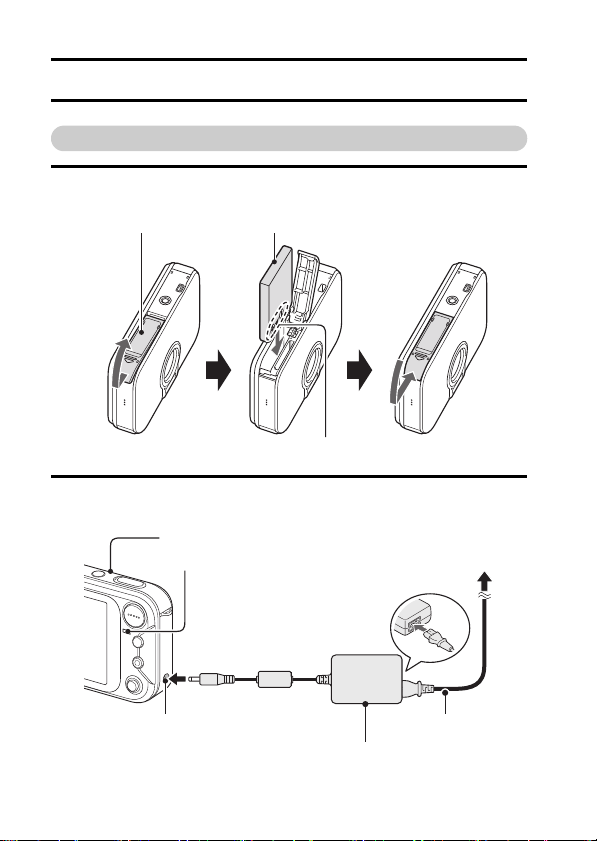
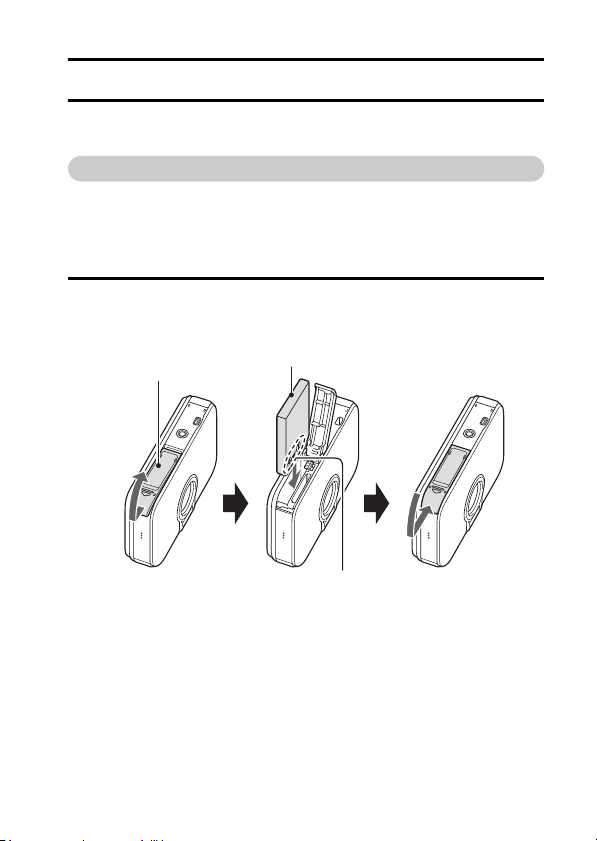
Install the battery pack
1 Open the battery slot cover, and insert the battery pack.
h The battery slot cover is located on the bottom of the camera.
Battery/card cover Battery pack
(+) (–) mark
2 Use the supplied AC adaptor to charge the battery pack.
h Charging will take approximately 90 minutes.
Camera
Multi-indicator
During recharging:
Lights red
Charging complete:
OFF
To power outlet
DC IN terminal
iii English
Supplied power cord
Supplied AC adaptor
Page 5

Page 6

Playback
kStill image playback
1 Press the playback button [H].
h The display switches to the
Playback Screen.
h To view other images, toggle the
SET button to the left or right.
h If the playback button [H] is
pressed, the display returns to the
Shooting Screen.
Playback button [H]
kVideo clip playback
1 Press the playback button [H].
h The display switches to the
Playback Screen.
h Toggle the SET button to the left
or right to display the video clip
you wish to play back.
h Video clips are indicated by a
video clip pattern along the top
and bottom of the screen.
2 Press the SET button.
h Playback of the selected video
clip begins.
h If the playback button [H] is
pressed again, the display
changes to the Shooting Screen.
Video clip pattern
<Video Clip Playback
When you are finished taking pictures...
Press the ON/OFF button to turn the camera off.
v English
SET button
Screen>
Page 7

QUICK SEARCH BY OPERATION
Your camera has an abundance of convenient features and functions. From
creating precisely the photo you want, to viewing images using various
techniques, you can locate the exact operation for your purposes in the
following table.
Basic operation
Getting started
shooting/recording
• “Recording a video clip”
on page 38
• “Shooting single shots”
on page 33
• “Shooting sequential
shots” on page 72
• “MAKE AN AUDIO
RECORDING” on
page 65
Shooting/recording
Optimize the photo
quality
• “RESOLUTION
SETTING” on page 64
Convenient
functions
Change the setting
to sequential shots
• “How to use the best
shot feature” on
page 51
Log the date and
time of your photos
• “DATE AND TIME
SETTING” on page 23
Zoom in on the
subject
• “USING THE ZOOM”
on page 42
Close-up
photography
• “FOCUS RANGE”
(supermacro mode) on
page 67
Reduce video clip flicker
• “FLICKER-REDUCTION SETTING” on page 81
Additional functions
For more accurate
focus
• “FOCUS RANGE”
(manual focus) page 68
Set the focus to a
narrow range
• “FOCUS AREA
SETTING” on page 76
Check the focus
status
• “ZOOM JUMP
PLAYBACK” on
page 92
1 English
Page 8

Basic operation
Capture fast-moving subjects
• “SCENE SELECT” (sports mode) on page 48
Shoot in bright conditions
• “EXPOSURE CORRECTION” on page 45
• “FLASH SETTING” on page 43
• “SCENE SELECT” (night view mode/fireworks mode/lamp mode) on page 48
Photographing people
• “SCENE SELECT” (portrait mode/night view mode) on page 48
• “SHUTTER OPERATION SETTING” (ID photos) on page 75
• “FILTERS” (cosmetic filter) on page 52
• “FLASH SETTING” (red-eye reduction) on page 43
Photographing landscapes
• “SCENE SELECT” (landscape mode/night view mode) on page 48
• “FOCUS RANGE” (telephoto mode) on page 67
Take a self-photo
• “SELF-TIMER” on page 69
Shooting/recording
Convenient
functions
Increase the camera’s sensitivity
• “ISO SENSITIVITY” on page 78
Make images lighter
or darker
• “EXPOSURE
CORRECTION” on
page 45
Additional functions
Measure the
brightness of a
specific area
• “LIGHT-MEASURING
MODE SETTING” on
page 77
Adjust the camera’s
sensitivity
• “ISO SENSITIVITY” on
page 78
English 2
Page 9
Basic operation
Shooting/recording
Getting started
viewing images
• “Playing back the video
clip” on page 39
• “Viewing still images”
on page 35
Playback
• “Playing back audio
recordings” on page 66
Slideshow playback
• “SLIDESHOW PLAYBACK” on page 111
Adjust the LCD monitor brightness
• “LCD MONITOR BRIGHTNESS” on page125
Playback on a TV
• “CONNECTING TO A TV” (for playback) on
page 140
Convenient
functions
Change the color of
the images
•“FILTERS”
(monochrome filter/
sepia filter) on page 52
Add an audio track to still image data
• “ADDING A VOICE MEMO” on page 82
• “ADDING/DELETING A VOICE MEMO” on page 97
Create a schedule from a captured still
image
• “Making a schedule shot” on page73
Adjust the speaker volume
• “PLAYBACK VOLUME” on page 91
Search for image/
audio data
• 9-image/36-image
display playback on
page 36
Magnify an image
• “Magnifying (zooming
in) the image” on
page 37
Adjust the speaker volume
• “PLAYBACK VOLUME” on page 91
Additional functions
Make white appear
natural
• “WHITE BALANCE” on
page 79
Check the focus
status
• “ZOOM JUMP
PLAYBACK” on
page 92
Change the angle of
view
• “ROTATE IMAGE” on
page 100
Set the TV system
• “TV SYSTEM
SETTING” on page 127
3 English
Page 10

Basic operation
Search for image/audio data
• “9-image/36-image display playback” on page 36
Delete data
• “ERASING DATA” on
page 89
Add an audio track to still image data
• “ADDING A VOICE MEMO” on page 82
• “ADDING/DELETING A VOICE MEMO” on page 97
Create a schedule from a captured still image
• “Making a schedule shot” on page 73
• “ENTER AN IMAGE IN THE SCHEDULE” on page 94
Specify the number of prints, index print, and date imprint
Data managing/processing
• “PRINT SETTINGS” on page 104
Convenient
functions
Protect images from accidental erasure
• “IMAGE PROTECT” on page 87
Format a card
• “INITIALIZING THE CARD MEMORY AND
INTERNAL MEMORY” on page 133
Additional functions
View the settings that were in effect when the image/audio data
was recorded
• “DISPLAYING IMAGE PROPERTIES (INFORMATION SCREEN)” on page 113
English 4
Page 11

CONTENTS
GETTING UP AND RUNNING ...............................................................iii
QUICK SEARCH BY OPERATION ........................................................ 1
CONTENTS ...........................................................................................5
CHECKING THE INCLUDED ACCESSORIES ...................................... 9
GETTING THE MOST OUT OF YOUR CAMERA ............................... 11
SYSTEM MAP ..................................................................................... 13
SETUP
PARTS NAMES ................................................................................... 14
INSTALLING THE CARD ..................................................................... 16
POWER FOR THE CAMERA .............................................................. 18
TURNING THE CAMERA ON AND OFF ............................................. 21
DATE AND TIME SETTING ................................................................. 23
BASIC OPERATION
ABOUT THE 2WAY SHOOTING GUIDE (Guidance display) .............. 26
BEFORE TAKING PICTURES ............................................................. 28
CAPTURING AND PLAYING BACK STILL IMAGES .......................... 33
VIDEO CLIP RECORDING AND PLAYBACK ..................................... 38
USING THE ZOOM .............................................................................. 42
FLASH SETTING ................................................................................. 43
EXPOSURE CORRECTION ................................................................ 45
SHOOTING (EASY SETTING MODE)
EASY SETTINGS SCREEN ................................................................ 46
OVERVIEW OF THE EASY SETTINGS SCREEN .............................. 47
SCENE SELECT .................................................................................. 48
FILTERS ..............................................................................................52
5 English
Page 12

SHOOTING (SHOOTING SETTING SCREEN)
ACCESSING THE SHOOTING SETTING SCREEN ............................53
TOUCH SENSOR (TOUCH FOCUS) SETTING ..................................63
RESOLUTION SETTING ......................................................................64
MAKE AN AUDIO RECORDING ..........................................................65
FOCUS RANGE ...................................................................................67
SELF-TIMER ........................................................................................69
SHUTTER OPERATION SETTING ......................................................71
FOCUS AREA SETTING ......................................................................76
LIGHT-MEASURING MODE SETTING ................................................77
ISO SENSITIVITY .................................................................................78
WHITE BALANCE ................................................................................79
FLICKER-REDUCTION SETTING .......................................................81
ADDING A VOICE MEMO ....................................................................82
PLAYBACK
DISPLAYING THE PLAYBACK SETTING SCREENS .........................83
IMAGE PROTECT ................................................................................87
ERASING DATA ...................................................................................89
PLAYBACK VOLUME ...........................................................................91
ZOOM JUMP PLAYBACK ....................................................................92
DISPLAYING THE SCHEDULE ...........................................................93
ENTER AN IMAGE IN THE SCHEDULE ..............................................94
ADDING/DELETING A VOICE MEMO .................................................97
CHANGING IMAGE SIZE (RESIZE) ....................................................99
ROTATE IMAGE .................................................................................100
EXTRACTING A STILL IMAGE FROM A VIDEO CLIP ......................101
COPY DATA .......................................................................................102
PRINT SETTINGS ..............................................................................104
SLIDESHOW PLAYBACK ..................................................................111
DISPLAYING IMAGE PROPERTIES (INFORMATION SCREEN) .....113
English 6
Page 13

OPTION SETTINGS
DISPLAYING THE OPTION SCREEN ............................................... 114
SET THE 2WAY SHOOTING GUIDE SETTING ................................ 117
SELECT THE STARTUP DISPLAY ................................................... 118
OPERATION SOUNDS ..................................................................... 119
HELP DISPLAY ................................................................................. 121
POST-VIEW SETTING ...................................................................... 122
ZOOM SETTINGS ............................................................................. 123
LCD MONITOR BRIGHTNESS .......................................................... 125
SCREEN LANGUAGE ....................................................................... 126
TV SYSTEM SETTING ......................................................................127
POWER SAVE FUNCTION ...............................................................128
FILE No. RESET FUNCTION ............................................................130
INITIALIZING THE CARD MEMORY AND INTERNAL MEMORY ....133
RESETTING THE CAMERA SETTINGS ........................................... 135
CHECKING THE REMAINING INTERNAL MEMORY AND
CARD MEMORY ........................................................................... 136
CHECKING THE REMAINING BATTERY PACK CHARGE .............. 138
7 English
Page 14

OTHER DEVICES AND CONNECTIONS
CONNECTING TO A TV .....................................................................140
DIRECT PRINTING ............................................................................141
APPENDICES
COMMONLY ASKED QUESTIONS ...................................................150
TROUBLESHOOTING ........................................................................157
SPECIFICATIONS ..............................................................................165
HINTS FOR TAKING PICTURES .......................................................175
English 8
Page 15

CHECKING THE INCLUDED ACCESSORIES
i Handstrap: 1 i SANYO Software Pack
i Li-ion battery pack: 1 i
i
Dedicated
cable: 1
USB interface
(CD-ROM): 1
Dedicated AV interface cable: 1
i
9 English
Page 16

Attaching the handstrap
Media cards that can be used with this camera
The types of card that can be inserted into and used with this camera are:
i SD Memory Card
i Multi Media Card
What “card” means in this manual
i In this manual, SD Memory Cards and Multi Media Cards that can be used
in this digital camera are referred to as “card”.
i The cards in the illustrations in this manual are SD Memory Cards, but all
installation, removal, and formatting procedures are the same for both SD
Memory Cards and Multi Media Cards.
English 10
Page 17
GETTING THE MOST OUT OF YOUR CAMERA
Your camera can not only take still photos, it can also record video clips and
make audio recordings.
It’s loaded with lots of functions that are possible only in a digital camera,
including a super-quick focus, an easy-to-understand guidance display on a
large screen, a schedule-making function that incorporates your captured
images, and more.
Never again miss a great shot, thanks to the quick
focus: Touch focus (see page 28)
Just touch the shutter button lightly, and the touch sensor automatically
focuses the image (touch focus).
F3.3
1/30
Complex operation made easy with the guidance
feature: Shooting Guide display (see page 26)
The current shooting settings are visible right on the Shooting Screen. When
the camera detects a possible problem—such as camera shake due to a
slower shutter speed or an underexposed subject due to light from behind—
the appropriate countermeasures are shown on the display. Use the
suggestions, or not, as you wish to get exactly the photo you want.
11 English
Page 18
Mode Select Screen
Switch between the still photo shooting and video clip recording modes with a
single on-screen action. Accessing the Shooting Setting Screen has never
been so fast.
SCENE
SETTING
Create a schedule from your photos: schedulemaking feature (see page 73)
Enter your photos in the calendar to create a custom image-based schedule.
For example, you could snap a photo of a movie poster and record it in the
calendar on the date of the movie’s premiere.
English 12
Page 19
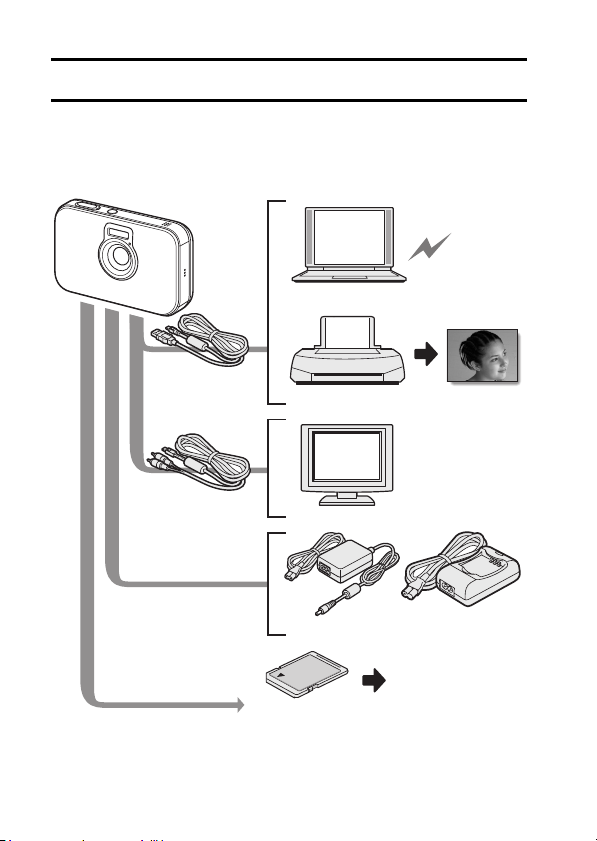
SYSTEM MAP
The included accessories can be used to connect your camera to a computer,
printer or TV. By connecting the camera to your computer, you can, for
example, copy your photos to the computer’s hard disk. You can connect it to
a printer for direct printing of your photos. Or take the card to a photo shop to
have your photos printed there.
Internet
Computer
Dedicated
USB interface
cable
Dedicated AV
interface cable
Printer
TV
13 English
AC adaptor
(Supplied)
Separately sold or
commercially available
SD Memory Card/
Multi Media Card
Battery charger
(Optional)
i Card reader
i DPOF-
compatible
printer
i Photo shop
Page 20

PARTS NAMES
Front
Shutter button (with touch sensor)
Touch sensor indicator
SETUP
ON/OFF button
Flash
Speaker
Microphone
Self-timer indicator
Lens
The lens barrier is closed
when the camera is turned off.
English 14
Page 21
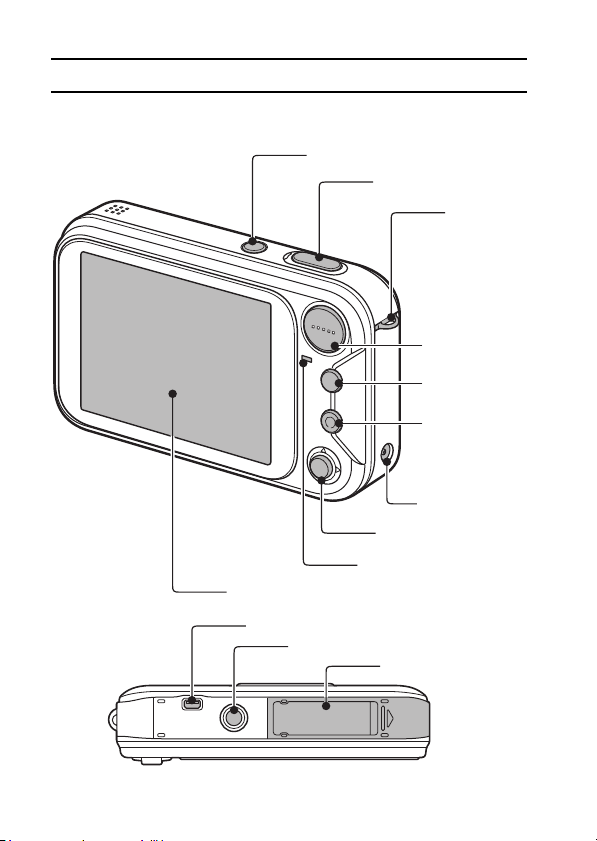
PARTS NAMES
Rear
Bottom
LCD monitor
USB/AV terminal
Tripod stand hole
ON/OFF button
Shutter button
SET button
Multi-indicator
Battery/card cover
Strap holder
Zoom switch
Playback
button [H]
MENU button
DC IN terminal
15 English
Page 22
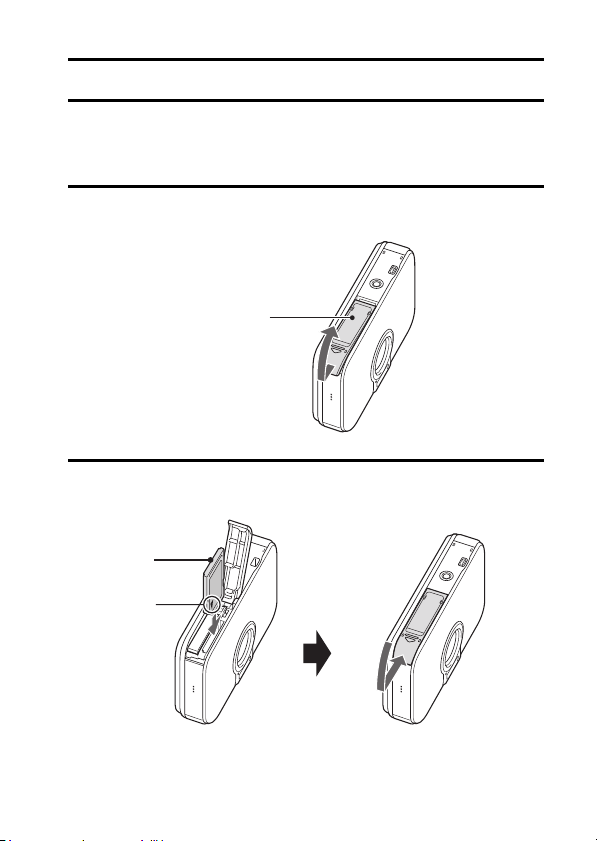
INSTALLING THE CARD
Your camera has an internal 16MB memory, when means that you can take
photos (record image data) even when no card is installed. By using a card,
however, you will be able to take many more photos.
The card can be used after it has been formatted with the camera (page 133).
1 Open the battery/card cover.
h While gently pressing the battery/card cover, slide it open.
Battery/card cover
(on the camera bottom)
2 Insert the card, and close the battery/card cover.
h Firmly insert the card until it clicks into place.
Card
J mark
English 16
Page 23
INSTALLING THE CARD
When removing the card...
h To remove the card, press it down, and then release. The card will
protrude slightly, and you can then pull it out.
1 Open
2 Press and release
3 Pull out
CAUTION
i Do not attempt to forcibly remove the card.
i Never remove the card when the multi-indicator is flashing red quickly. In
doing so, you risk losing the data stored in the card.
HINT
Shooting without a card installed
i The camera has a 16MB internal memory that lets you photograph and
playback images even when there is no card installed. When the camera is
turned on with no card installed, the internal memory icon is shown on
the LCD monitor to let you know that the images you capture will be saved
to the camera’s internal memory.
17 English
Page 24
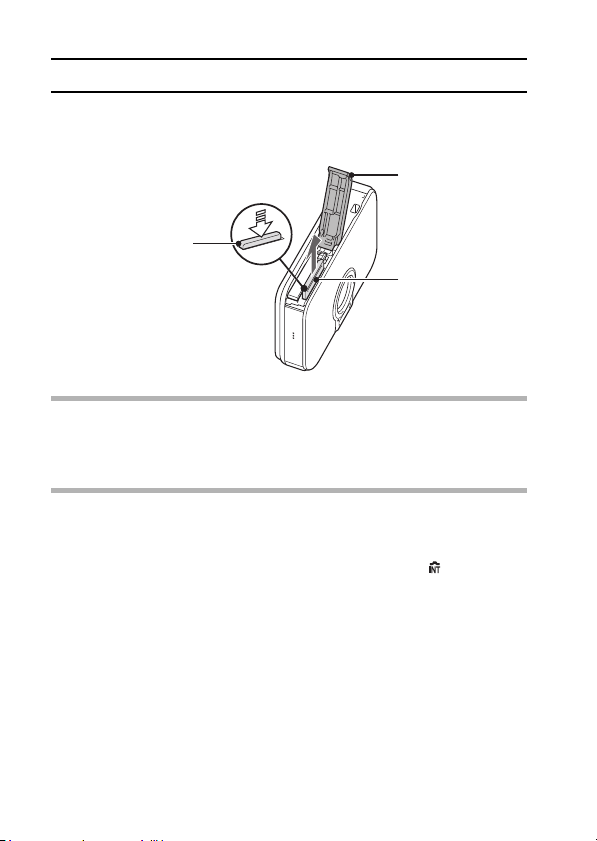
POWER FOR THE CAMERA
The supplied AC adaptor is used not only as the camera’s AC adaptor, but
also to charge the battery installed in the camera.
Using the battery pack
At the time of purchase, the battery pack is not charged. The battery pack
must be charged before it can be used in the camera. Also, if the battery
power becomes depleted when the camera is being used (see CHECKING
THE REMAINING BATTERY PACK CHARGE [page 138]), it should be
recharged as soon as possible.
1 Install the battery pack.
Battery/card cover
(on the camera bottom)
Battery pack
(+) (–) mark
English 18
Page 25
POWER FOR THE CAMERA
2 Turn the camera off, and connect the AC adaptor to the camera.
h Charging begins as soon as the AC adaptor is connected to the
camera. However, the camera does not charge when it is set to the
shooting mode.
h The camera’s multi-indicator lights red during charging.
h Charging will take approximately 90 minutes.
h The multi-indicator will turn off when the battery pack is fully charged.
ON/OFF button
i Turn the cam era o ff.
Camera
Multi-indicator
During recharging: Lights red
Charging complete: OFF
To power outlet
DC IN terminal
Supplied AC adaptor
Supplied power
cord
3 Disconnect the AC adaptor after charging is completed.
Using a power outlet
When the supplied AC adaptor is connected to the camera, power can be
supplied from a power outlet.
19 English
Page 26

HINT
About the internal backup battery
i This camera’s internal battery serves to maintain the date and time
settings, as well as the shooting settings. The backup battery will be fully
charged when the battery pack is kept in the camera continuously for about
2 days. In the fully charged state, the backup battery will maintain the
camera settings for about 7 days.
When not using the camera for a long time, remove the battery pack
i A small amount of power is still used even if the camera is turned off, and it
is therefore recommended that the battery pack be removed from the
camera if it is not going to be used for a long time. Note that when the
battery pack is removed for a long period, the time and date settings may
be cleared. Before using your camera again, be sure to confirm that the
camera settings are correct.
English 20
Page 27
TURNING THE CAMERA ON AND OFF
Turning on the camera
In the shooting mode
1 Press the ON/OFF button.
h The camera turns on.
h The camera turns on in the
shooting mode that was active
before it was last turned off.
ON/OFF button
In the playback mode
1 Press the playback button [H] for at
least one second.
h The Playback Screen appears on
the LCD monitor (page 35).
LCD monitor
Turning off the camera
1 Press the ON/OFF button.
h The camera turns off.
<If the camera was turned on by pressing the playback button [H]>
h When the playback button [H] or ON/OFF button is pressed, the
camera turns off.
Playback
button [H]
21 English
Page 28

Turning on the camera when the power save (sleep) function is active
In order to preserve battery pack power, the power save (sleep) function
will automatically turn off the camera after one minute of no use during
shooting, or five minutes of no use during playback (factory-preset
setting).
i When the power save function is active, you can restore the power by any
of the following methods:
h Press the playback button [H].
h Press the SET or MENU button.
h Press the shutter button.
h Press the ON/OFF button.
i When the AC adaptor is connected, the power save function will become
active about 10 minutes after the camera is turned on (factory-preset
setting).
i The user can specify the time elapsed before the power save function is
activated (page 128).
i When the camera is connected to a computer or printer using the
dedicated USB interface cable, the power save function is disabled, and
the camera turns off after about 12 hours.
HINT
If the K icon appears...
i When a picture is taken, the date and time it was captured is recorded with
it. When the date and time cannot be recorded with the image because the
date and time have not yet been set (page 23), the K icon appears. To
have the date and time recorded with images, please make this setting
before capturing images.
English 22
Page 29

DATE AND TIME SETTING
The camera will record the date and time an image or audio recording is
taken so that you can display them during playback. Therefore, before
capturing images, make sure the correct date and time are set.
Example: To set the clock to 7:30 p.m. on December 24, 2005
1 Press the ON/OFF button to turn the camera on, and press the MENU
button.
2 Toggle the SET button down.
h The Shooting Setting Screen appears (page 53).
3 Display the Option Screen
(page 114).
4 Toggle the SET button up or down
to select the clock set icon C, and
press the SET button.
h The Clock Set Screen appears.
h The current date and time settings
are shown.
h Follow the procedures below to
enable or disable the date display
during playback, to set the display
format for the date, and to set the
date and time.
h To return to the Option Screen,
press the MENU button, or select
“EXIT” and press the SET button.
23 English
Page 30
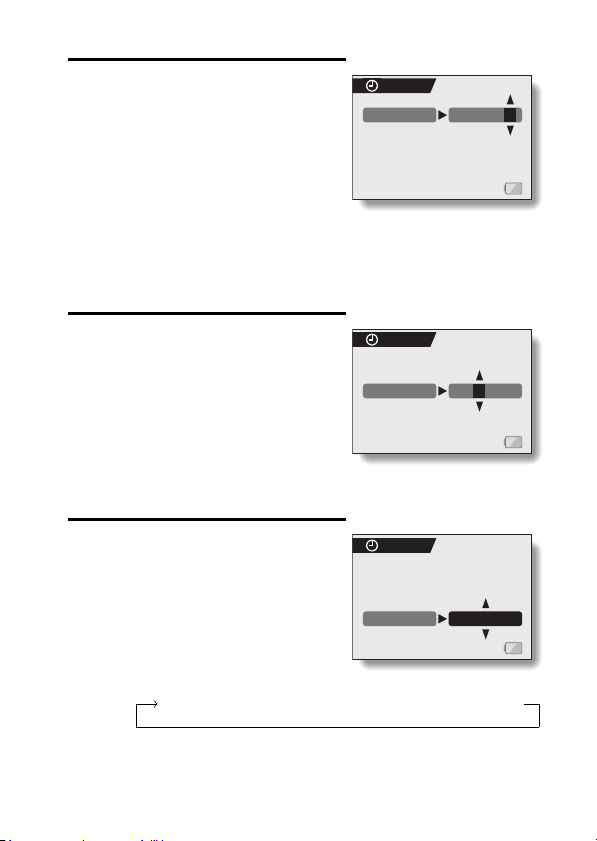
5 Set the date.
1 Select “DATE”.
2 Press the SET button.
h The Set Date Screen appears.
3 Set the date to “2005/12/24”.
h The date is set in the following
order: Set the year → Set the
month → Set the day.
h Toggle the SET button left or
right to select year, month or
day. Toggle the SET button up
or down to increase or decrease
the number.
4 Press the SET button.
CLOCK SET
DATE
2005/12/24
6 Set the time.
1 Select “TIME”.
2 Press the SET button.
h The Set Time Screen appears.
3 Set the time to “19:30”.
h The time is set in the following
order: Set the hour → Set the
minute.
h A 24-hour clock is used for the
time display.
4 Press the SET button.
7 Set the order in which the date is
displayed during playback.
1 Select “DISP”.
2 Press the SET button.
h The Set Date Format Screen
appears.
3 Toggle the SET button up or down.
h Toggle the SET button up to
change the displayed date order
as follows:
year/month/day → month/day/year → day/month/year → DISP OFF (no display)
Toggle the SET button down to change it in the reverse order.
CLOCK SET
TIME
CLOCK SET
DISP Y / M / D
19:30
English 24
Page 31

DATE AND TIME SETTING
h If “DISP OFF” is selected, the date the image was captured is not
shown during playback.
4 Press the SET button.
8 Select “EXIT”, and press the SET button.
h The date and time setting is completed, and you are returned to the
Option Screen.
h To return to the Shooting Screen, press the MENU button.
HINT
i Under normal conditions, while the battery pack is being replaced, an
internal battery will maintain the date and time settings. However, there is a
small chance the settings may be lost. (The backup will last for about 7
days.) It is recommended to check that the date and time settings are still
correct after replacing the battery pack and before shooting or recording of
any type (follow steps 1 and 4).
To correct the date and time settings
i After steps 1 and 4, select the line of the setting that you want to change,
press the SET button, and follow the steps in the respective paragraphs
above to change the setting.
25 English
Page 32

BASIC OPERATION
ABOUT THE 2WAY SHOOTING GUIDE
(Guidance display)
Your camera features a “2WAY Shooting Guide” by which the shooting
settings and a next-step guide are shown on the display.
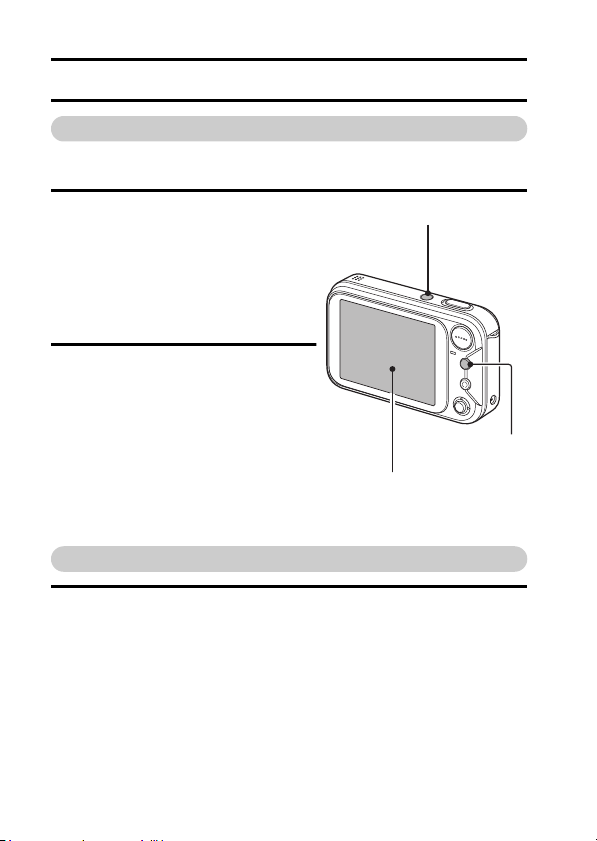
1 Shooting Screen
2 Remaining number of images
that can be captured (page 170)
3 Shooting mode and resolution
settings (page 64)
4 Focus range setting (page 67)
5 White balance setting (page 79)
6 Exposure correction (page 45)
7 Internal memory icon (page 16)
8 Flash operation setting
(page 43)
9 Scene select setting (page 48)
0 Filter setting (page 52)
A Guidance display
English 26
Page 33

ABOUT THE 2WAY SHOOTING GUIDE
(Guidance display)
To display the 2WAY Shooting Guide
i Toggle the SET button to the left, and the Shooting Screen will be
displayed full-screen. Toggle the SET button to the left again to display the
2WAY Shooting Guide.
i By selecting the 2WAY shooting guide icon * from the Option Screen,
you can set the camera to display the 2WAY Shooting Guide (page 117).
In this manual...
i For the purpose of clarity, the LCD monitor display examples are shown
with the 2WAY Shooting Guide turned off. Please note, however, that the
actual operation is the same even when the 2WAY Shooting Guide is
displayed.
27 English
Page 34

BEFORE TAKING PICTURES
How to hold the camera
Hold the camera securely, keeping your elbows close to your body and
making sure the camera is stable.
Correct hold Incorrect hold
A finger is blocking the
lens or flash.
Make sure that the lens and flash are not blocked by your fingers or the
handstrap.
HINT
i Images captured in the still image shooting mode can be rotated when
they are played back (page 100).
i When the optical zoom is used or when the autofocus is operating, the
image may appear to waver, but this is not a malfunction.
About the touch sensor (touch focus)
With the touch sensor, the image is focused simply by a light finger-touch on
the shutter button (focus lock). With the subject in focus, just gently press the
shutter button to take the picture for a perfectly focused image.
At the same time, the touch sensor is temporarily deactivated whenever the
Mode Select Screen (page 31) or Shooting Setting Screen is displayed,
thereby facilitating operation of these screens.
Furthermore, you can also deactivate the touch sensor so that the autofocus
operates only when you press the shutter button halfway (page 63).
English 28
Page 35

BEFORE TAKING PICTURES
Using the autofocus
The autofocus will work in almost all situations; however, there are
certain conditions that may cause the autofocus function to not work
properly. If the autofocus function is not working properly, set the focus
range to capture images (page 67).
k Conditions that may cause incorrect focus
The following examples are some of the situations where the autofocus
function may not work.
i Subjects with low contrast, very bright
subjects at the center of the image or
dark subjects or locations
Use the focus-lock function to lock the
focus on an object with contrast at the
same distance as the desired subject.
i Subjects without vertical lines
Use the focus-lock function to lock the
focus on the subject while holding the
camera vertically.
The following examples are some of the situations where the autofocus
function may work, but not as desired.
i When both near and far objects are
present
Use the focus-lock function to lock the
focus on an object at the same distance as
the desired subject, then reposition the
camera to compose the picture.
29 English
Page 36

i Fast-moving subjects
Use the focus-lock function to lock the
focus on an object at the same distance as
the desired subject, then reposition the
camera to compose the picture.
English 30
Page 37

BEFORE TAKING PICTURES
How to switch the shooting mode
Your camera can both capture still photos (still image shooting mode) and
record video clips (video clip recording mode). When shooting, you can
switch the shooting mode on the Mode Select Screen.
1 Press the ON/OFF button to turn the camera on, and press the MENU
button.
h The Mode Select Screen appears.
2 Toggle the SET button to the left or right.
h The shooting mode is switched.
SCENE
PHOTO
SETTING SETTING
<Still image shooting
mode>
3 Press the MENU button.
h The display changes to the Shooting Screen.
31 English
SCENE
MOVIE
<Video clip recording
mode>
Page 38

Hints for taking pictures
Muting the operation sounds
i The operation sounds that are generated, for example, when the shutter
button, MENU button or SET button is pressed, as well as the audio
guidance when you switch the mode, can be muted (page 119).
Where is the image and audio data saved?
i All the image and sound data is recorded in the camera’s internal memory
or on the card installed in the camera.
i When a card is installed in the camera, the data is recorded on the card. If
no card is installed, the data is recorded in the camera’s internal memory.
Taking pictures in backlight conditions...
i When taking pictures with the light coming from behind the subject, due to
the characteristics of the CCD, light lines or ghost patterns (flare
phenomenon) may appear in the captured image. In this situation, it is
recommended that you avoid taking pictures with the subject lit from
behind.
While the image data is being recorded...
i While the multi-indicator is flashing red quickly, the image data is being
written to the memory, during which time it is not possible to capture
another image. Another image can be captured after the flashing red
indicator turns off. However, even when the multi-indicator is flashing red,
depending on the camera’s internal memory remaining capacity, in some
cases the next image can be captured about 2 seconds after shooting.
English 32
Page 39

CAPTURING AND PLAYING BACK STILL IMAGES
F3.3
1/30
Your camera can both capture still images and record video clips. There are
two modes for capturing still images. In the normal still image mode, one
image is captured each time the shutter button is pressed. In the sequential
shots mode, when you press the shutter button, several successive images
are captured. For more information about taking sequential shots, please see
page 72.
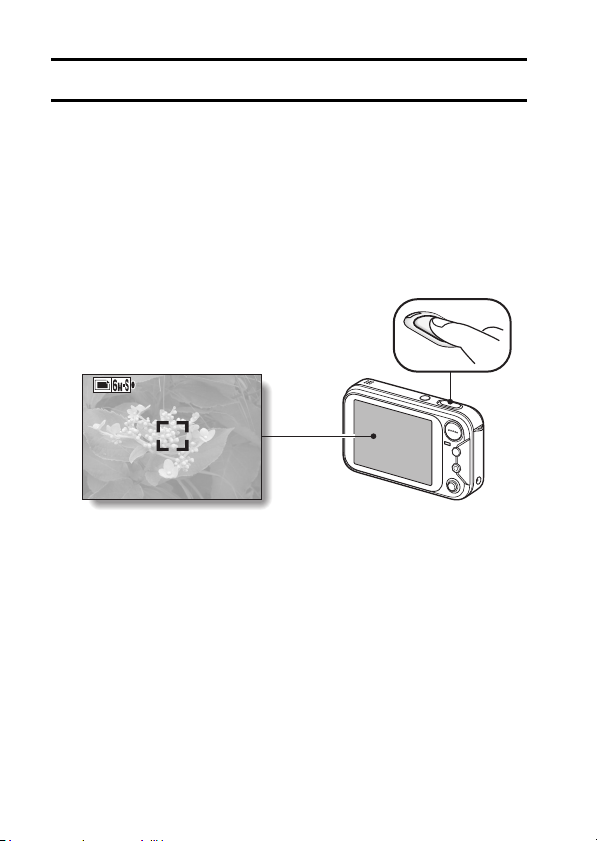
Shooting single shots
1 Press the ON/OFF button to
turn the camera on.
h The Still Image Shooting
Screen appears.
2 Rest your finger on the
shutter button.
h If the touch sensor (page 63)
has been set to ON, when
the shutter button is touched,
the autofocus operates and
the image is focused (focus
lock).
<If the touch sensor is set
to OFF>
h Engage the autofocus by
pressing the shutter button
halfway.
33 English
ON/OFF button
F3.3
F3.3
1/30
1/30
<Still Image Shooting Screen>
Shutter
button
MENU button
SET button
Page 40

3 Gently press the shutter button.
h Press the shutter button gently, taking care not to
move the camera.
h The image that was captured appears on LCD
monitor as long as the shutter button is kept
pressed (post view).
4 Release your finger from the shutter button.
h The captured image is recorded.
HINT
What is the camera focusing on?
A target mark & on the LCD monitor
i
shows the area the camera is focusing on.
i
The camera automatically determines the
correct focus by measuring from 9
different focus points within the shooting
area. If the target mark is at a position
that is different from the point you wish to
focus on, you can refocus, for example,
by changing the shooting angle.
i The large target mark appears when
the camera focuses on a wide area in
the center of the screen.
About the focus indicator
A green focus indicator appears when
i
the subject is successfully focussed, or a
red focus indicator when the camera
was not able to focus the subject.
The shutter speed and aperture are
displayed
When the camera focuses and the target
i
mark appears, at the same time, the
shutter speed and aperture settings are
also displayed. You can use them as a
reference when shooting.
If the motion alert icon appears...
i During still image shooting, if the shutter speed is slow and the possibility
that the image may be blurred due to camera shake becomes high, the
motion alert icon may appear on the LCD monitor. In this case, use a tripod
to stabilize the camera when shooting, or set the flash operation mode to
automatic (page 43).
i When shooting with the scene select function set to the fireworks 3
mode, the motion alert icon always appears, but this is normal.
Focus indicator
Target mark
Shutter speed
Aperture
Motion alert icon
English 34
Page 41

CAPTURING AND PLAYING BACK STILL IMAGES
Viewing still images
The steps for viewing both single shots and sequential shots are the same.
5 Press the playback button [H].
h The image most recently
captured appears on the LCD
monitor.
6 View other images.
h Toggle the SET button to the
left or right to display the
previous or next image.
To display the previous
image:
Toggle the SET button to
the left.
To display the next image:
Toggle the SET button to
the right.
h To return to Shooting Screen,
press the playback button
[H].
<If the camera was turned on by
pressing the playback button
[H]>
h When the playback button [H]
or ON/OFF button is pressed,
the camera turns off.
Playback button [H]
SET button
When you are finished viewing images...
i Press the ON/OFF button to turn the camera off.
HINT
For still images with voice memo (page 82 and 97)...
i When the shutter button is pressed, the voice memo is played back.
35 English
Page 42

9-image/36-image display playback
1 Press the playback button
[H].
2 Press [W] ([P]) on the zoom
switch.
h The 9-image display
appears.
h When [W] on the zoom
switch is pressed again, the
36-image display appears. To
return to the 9-image display,
press [T] on the zoom switch.
3 Select the image to play back.
h Toggle the SET button up,
down, left or right to move
the orange frame to the
desired image, and press the
SET button.
h When the 9-image display is
shown, instead of pressing
the SET button, you can
press [T] ([]]) on the zoom
switch to show the image full
screen.
ON/OFF button
Folder
number
Still
image
100
Image number
Zoom switch
Playback button
SET button
Video clip
Audio data
[H]
English 36
Page 43

CAPTURING AND PLAYING BACK STILL IMAGES
MOVE
100%
ZOOM I/O
PRESS SHUTTER TO SAVE
108%
Magnifying (zooming in) the image
1 Display the image that you want to magnify.
2 Press [T] ([]]) on the zoom
switch.
h Magnification is enabled.
h The image is magnified, and the
central portion of image is
displayed.
h Toggle the SET button to view
different parts of the magnified
image.
To magnify:
Magnification increases with each
press of [T] ([]]) on the zoom
switch.
To return to normal size:
Magnification decreases with each
press of [W] ([P]) on the zoom
switch.
h Press the SET button to return to
the normal (100%) view.
HINT
The magnified portion of the image can be saved as a separate image.
i Press the shutter button. The magnified portion is saved as a new still
image.
37 English
ZOOM
MOVE
MOVE
100%
100%
ZOOM I/O
ZOOM I/O
PRESS SHUTTER TO SAVE
PRESS SHUTTER TO SAVE
108%
108%
Page 44

VIDEO CLIP RECORDING AND PLAYBACK
English 38
Page 45

VIDEO CLIP RECORDING AND PLAYBACK
Playing back the video clip
6 Press the playback button
[H].
h The video clip just recorded
appears on the LCD monitor.
h Video clips are indicated by
a video clip pattern along the
top and bottom of the
screen.
7 Press the SET button.
h Video clip playback begins.
Playback button [H]
SET button
Video clip pattern
39 English
Page 46

Outline of playback operation
To do this... Do this
Pause During playback, press the SET button.
To play back
one image
at a time
(single-
frame step)
Slow
playback
accelerate
playback
Return to normal playback
Adjusting the volume
To
During forward
playback
During reverse
playback
During forward
playback
During reverse
playback
Forward
playback
Reverse
playback
speed
After pausing playback, toggle the SET button
to the right.
After pausing playback, toggle the SET button
to the left.
After pausing playback, press and hold the
SET button to the right.
After pausing playback, press and hold the
SET button to the left.
During forward playback, toggle the SET
button to the right.
* The playback speed changes each time the
SET button is toggled to the right, as follows:
Normal playback
Toggle the SET button to the left to resume
normal playback speed.
During forward playback, toggle the SET
button to the left.
* The playback speed changes each time the
SET button is toggled to the left, as follows:
10x ← 5x
Toggle the SET button to the right to resume
normal playback speed.
Press the SET button.
Louder: During playback, press [T] on the
zoom switch.
Softer: During playback, press [W] on the
zoom switch.
→
2x → 5x → 10x
When you are finished viewing video clips...
i Press the ON/OFF button to turn the camera off.
English 40
Page 47

VIDEO CLIP RECORDING AND PLAYBACK
HINT
Adjusting the LCD monitor brightness
i While the Shooting Screen is active, you can quickly access the screen for
adjusting the brightness of the LCD monitor by pressing the MENU button
for at least 1 second.
Display the video clip playback point
i During video clip playback, press the MENU button for at least 1 second to
display a bar showing the current playback point in the video clip.
i Press the MENU button for about 1 second to cancel the bar.
CAUTION
If no audio is heard...
i The audio is not played back when the video clip is played back in the
frame-by-frame playback or reverse playback mode.
During video clip playback, the sound of a motor is audible
i During recording, the sound of the optical zoom movement or autofocus
movement was recorded. This is not a malfunction.
The data for a video clip is very large.
i Therefore, be aware that if the video clip is uploaded to a computer to be
played back, the computer may not be able to play back the video fast
enough, making it appear jerky. (The video will always be displayed
properly on the LCD monitor or a television.)
When the remaining card memory becomes 10 percent or less of the
total card capacity...
i The remaining memory icon appears on the LCD monitor.
i Depending on the card, shooting may end even before the possible
shooting time indicated.
41 English
Page 48

USING THE ZOOM
Your camera has two zoom functions: optical zoom and digital zoom.
You can specify whether or not the digital zoom is enabled, and whether
or not the optical zoom during video clip recording is enabled (page 123).
1 Point the camera lens at the
subject.
2 Press [T] or [W] on the zoom
switch to compose the desired
image.
[T]: Zoom in on the subject.
[W]: Zoom out.
h When the zoom switch is
pressed, the zoom bar appears
on the LCD monitor.
h When the optical zoom factor is at
maximum, zooming stops
temporarily. When [T] on the
zoom switch is pressed again, the
mode changes to the digital zoom
mode and zooming continues.
3 Take the picture.
CAUTION
i If the optical zoom is used during video clip recording, the noise from the
movement of the lens may be audible in the recording.
LCD monitor
When both optical
and digital zoom are
enabled
Digital zoom (yellow)
When optical zoom
only is enabled
Zoom switch
Zoom bar
Pointe r
Optical zoom
English 42
Page 49

FLASH SETTING
The flash is used not only for taking pictures where there is insufficient light,
but also when the subject is in shade or in backlight conditions. Your camera’s
flash has four modes of operation (automatic flash mode, forced flash mode,
flash off mode, and red-eye reduction mode). Select the flash mode that is
appropriate for the surrounding conditions. The flash can be enabled only
when taking single-shot still images.
1 Display the Still Image Shooting
Screen (page 33).
2 Toggle the SET button up.
h The flash setting changes.
h The flash setting appears on the
LCD monitor.
h The flash setting can also be
changed from the Shooting Screen
(page 56).
No flash indication:
The camera will detect the subject
brightness and use the flash only
when required. In a backlight
situation, if only the center of the
image is very dark, the flash will
operate to compensate (auto
flash).
m: The flash will operate with every
image captured regardless of the
conditions. Use this setting under
backlight conditions, when the
subject is in shade, under
fluorescent lighting conditions, etc.
(forced flash).
l: The flash will not operate even in dark situations. Use this setting
when capturing an image in a location where flash photography is
prohibited, or when shooting a night landscape scene (flash off).
J: The digital camera will detect the subject brightness and use the
flash only when required. At this time the flash will operate in a
manner that reduces the red reflection (“red-eye”) in the subject’s
eyes (red-eye reduction).
Flash mode icon
SET button
43 English
Page 50

3 Toggle the SET button up to set the flash mode.
h Each time the SET button is toggled up, the flash mode changes.
h Display the icon for the desired flash mode.
4 Press the shutter button.
h The picture is snapped and the flash operates according to the
selected mode.
HINT
In the automatic flash mode...
i In the automatic flash mode using the LCD monitor, when the shutter
button is depressed halfway, a k icon appearing on the LCD monitor
indicates that the flash will operate.
English 44
Page 51

EXPOSURE CORRECTION
When capturing images, you can make the image lighter or darker.
1 Point the camera lens at the
subject.
h If the Mode Select Screen or a
menu screen (Shooting Setting
Screen) is active, press the MENU
button to exit it.
MENU button
2 With the Shooting Setting Screen
not shown, toggle the SET button to
the right.
h The exposure correction bar
appears.
3 Toggle the SET button to the left or
right to adjust the exposure.
h The exposure setting numerical
value is shown at the left end of the
exposure bar. The exposure can be
set to a value from –1.8EV to
+1.8EV.
h To cancel the exposure correction
bar, press the MENU button.
h The exposure correction setting
can also be accessed from the
Shooting Setting Screen (page 58).
HINT
The exposure correction setting is canceled in the following cases:
i When the pointer is set to the center position.
i When the Option Screen is accessed.
i Press the playback button [H].
i After the power is turned off.
Exposure correction bar
SET button
Poin ter
45 English
Page 52

SHOOTING (EASY SETTING MODE)
EASY SETTINGS SCREEN
With the Easy Settings Screen, it’s a cinch to get beautiful photos every time,
simply by selecting the setting that matches your shooting conditions.
1 Press the ON/OFF button to turn the
camera on, and press the MENU
button.
h The Mode Select Screen appears.
2 Toggle the SET button to the left or
right to select the desired shooting
mode.
3 Toggle the SET button up.
h The Easy Settings Screen
appears.
h Toggle the SET button up or down
to choose either the scene select
menu or the filter menu.
ON/OFF button
MENU button
SET button
SCENE:FULL AUTO
USE AUTO SETTINGS
To exit the Easy Settings Screen
Press the MENU button to return to the Mode Select Screen. Press the
MENU button again to return to the Shooting Screen.
English 46
Page 53

OVERVIEW OF THE EASY SETTINGS SCREEN
SCENE: FULL AUTO
USE AUTO SETTINGS
1 Scene select menu (page 48) 2 Filter menu (page 52)
.: Full auto photography
/: Sports photography
0: Portrait photography
1: Landscape photography
2: Night view photography
(Available only when
shooting single shots)
3: Fireworks photography
(Available only when
shooting single shots)
4: Lamp photography
(Available only when
shooting single shots)
5: Best shot photography
6: No filter
7: Cosmetic filter selected
8:Monochrome filter selected
9: Sepia filter selected
?: Sharpness filter selected
>: Contrast filter selected
@: Color filter selected
3 Remaining battery power
(page 138)
4 HELP display (page 121)
47 English
Page 54

SCENE SELECT
You can select from various preset settings (aperture, shutter speed, etc.) for
specific shooting conditions.
1 Display the Easy Settings Screen (page 46).
2 Select the scene select menu.
.: The camera automatically makes
the optimum settings suitable for
the surrounding conditions (full
auto).
/: Capture a split-second image of a
fast-moving subject (sports mode).
0: Enhance the 3D feeling of the
subject by blurring the background
(portrait mode).
1: For beautiful shots of distant
scenery (landscape mode).
2: Photograph the subject while
keeping the background night
scenery (night view mode).
3: For capturing fireworks at night
(fireworks mode).
4: Photograph in low-light conditions
(lamp mode).
5: When the shutter button is
pressed, you can capture
successive still images as the
settings change (best shot mode).
SCENE:FULL AUTO
USE AUTO SETTINGS
English 48
Page 55

SCENE SELECT
3 Select the desired icon from the scene select menu, and press the
SET button.
h This completes the scene select setting.
4 Take the picture.
For video clip recording, see page 38.
For still image shooting, see page 33.
h To return to normal photography, select . from the scene select
menu, and press the SET button.
49 English
Page 56

Scene select and operation mode
The scene select functions that are available depend on the active operation
mode (page 71).
Operation mode
Single shots
c
Still images with
voice memo %
Auto . O OOO
Sports / OOO
Portrait 0 O OOO
Landscape
1
Night view
2
Fireworks
3
Lamp 4 O
Best shot
5
O: Available —: Not available
*: Not available for composite photos.
**: Not available for still images with voice memo.
CAUTION
i When capturing images using the lamp 4,fireworks 3 or night view
2 setting, use a tripod or other method to stabilize the camera.
i A table showing the limitations for settings corresponding to scene select
icons other than . is on page 163.
OOO
O
O
O**
Sequential shots
P
Schedule shot
&
Composite
photo -
—O—
—O—
—O*—
— — —
ID photo
.
—
—
English 50
Page 57

SCENE SELECT
How to use the best shot feature
1 Set the camera to the still image shooting mode, select the best shot
icon 5 from the scene select menu, and press the SET button.
2 Press the shutter button.
h While the settings change, four still
images are shot in sequence.
h If the resolution is set to k, the
setting changes automatically to
y and the images are captured.
h After the images are captured, the
four still images are displayed on
the LCD monitor.
3 Toggle the SET button up, down, left and right to move the orange
frame to the image you wish to save.
h For a full-size view of the selected image, press the SET button.
h With the full-size view active, you can toggle the SET button to the left
or right to view the previous or next image.
<To save all four images>
With all four images showing on the LCD monitor, press the MENU button.
h
4 With the full-size view of the image
you wish to save, select “YES”, and
press the SET button.
h The image currently displayed is
saved, and the other images are
deleted.
51 English
Page 58

FILTERS
The filter feature changes image characteristics such as color tones, to apply
unique effects to the photographed image.
1 Display the Easy Settings Screen (page 46).
2 Select the filter menu.
6: No filter is used (normal
photography).
7: Skin tones are enhanced in close-
up shots (cosmetic filter).
8: Snap black-and-white photos
(monochrome filter).
9: Create a sepia-tone photo (sepia
filter).
?: Accentuates the outlines in the image (sharpness filter).
>: Accentuates the light and dark areas in the image (contrast filter).
@: Accentuates the colors in the image (color filter).
3 Select the desired icon from the filter menu, and press the SET
button.
h This completes the filter setting.
4 Take the picture.
For video clip recording, see page 38.
For still image shooting, see page 33.
h To return to normal photography, select 6 from the filter menu, and
press the SET button.
HINT
i A table showing the limitations for settings corresponding to filter icons
other than 6 is on page 163.
FILTER: NO
SHOOT WITHOUT
FILTERS
English 52
Page 59

SHOOTING (
SHOOTING SETTING SCREEN
)
ACCESSING THE SHOOTING SETTING SCREEN
The Shooting Setting Screen is used to adjust the focus range and self-timer
settings; to select the single-shot, sequential shots, schedule shot, composite
photo, or ID photo operation mode; and to manage various settings such as
turning the shutter button touch sensor ON/OFF. This mode is also used to
create audio recordings.
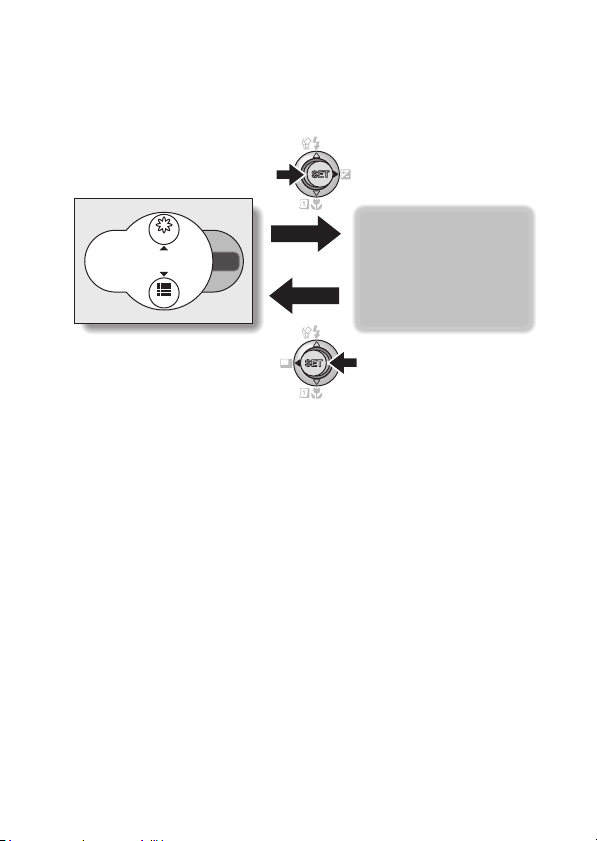
1 Press the ON/OFF button to turn
the camera on, and press the
MENU button.
h The Mode Select Screen
appears.
2 Toggle the SET button to the left
or right to select the desired
shooting mode.
3 Toggle the SET button down.
h The Shooting Setting Screen
appears.
To cancel the Shooting Setting Screen
Press the MENU button once to return to the Mode Select Screen. Press the
MENU button again to return to the Shooting Screen.
53 English
Page 60

Switching the page
The Shooting Setting Screen consists of two pages: PAGE 1 and PAGE 2.
1 Display the Shooting Setting Screen.
2 Toggle the SET button to the left.
h The Shooting Setting Screen PAGE
changes.
h Each time the SET button is toggled
to the left, the PAGE changes.
English 54
Page 61

ACCESSING THE SHOOTING SETTING SCREEN
Overview of the Shooting Setting Screen (still images)
PAG E 1
TOUCH SENSOR
ON
55 English
Page 62

1 Touch sensor menu (page 63)
#: Set the shutter button
touch sensor to ON.
$: Set the shutter button
touch sensor to OFF.
2 Resolution menu (page 64)
y: Shoot at 2,816 × 2,112
pixels, low compression
k: Shoot image at 3,680 ×
2,760 resolution
x: Shoot at 2,816 × 2,112
pixels, standard
compression
z: Shoot image at 2,288 ×
1,712 resolution
t: Shoot image at 1,600 ×
1,200 resolution
[: Shoot image at 640 × 480
resolution
3 Focus range menu (page 67)
*: Shoot using the autofocus.
+: Close-up photography
): Distant focus
-: Manual focus
L: Continuous AF
4 Flash menu (page 43)
k: Automatic flash mode
m: Forced flash mode
l: Flash off mode
n: Red-eye reduction
5 Self-timer menu (page 69)
N: Self-timer off
y: Shooting begins 2 seconds
after the shutter button is
pressed.
x: Shooting begins 10
seconds after the shutter
button is pressed.
6 Operation mode menu
(page 71)
c: Shoot single images.
%: Shoot single images with
an accompanying audio
track (voice memo).
P: Shoot sequential images.
&: Enter the captured image
in the schedule.
-: Create a composite photo.
.: Create ID photos.
7 PAGE display (page 54)
8 Option icon (page 114)
h Displays the Option Screen.
9 Help display (page 121)
0 Remaining battery power
(page 138)
i When you specify multiple functions that cannot be simultaneously
enabled, the function which was last set becomes the active setting, and
the other settings accordingly change automatically.
English 56
Page 63

ACCESSING THE SHOOTING SETTING SCREEN
PAG E 2
57 English
Page 64

1 Focus mode menu (page 76)
B: 9-point focus mode
C: Spot focus mode
2 Light-measuring mode (EXP
MEASURE) menu (page 77)
n: Multi-section light-
measuring setting
W: Center-weighted light-
measuring setting
Y: Spot light-measuring
setting
3 ISO sensitivity menu
(page 78)
t: Sets the ISO sensitivity
automatically (corresponds
to ISO50 to 200).
*: Corresponds to ISO50
u: Corresponds to ISO100
v: Corresponds to ISO200
w: Corresponds to ISO400
4 White balance menu (page 79)
>: The camera will determine
the setting automatically.
r: For photography in fair
weather (sunny) conditions
o: In overcast conditions
p: Under fluorescent lighting
q: Under incandescent
lighting
]: For setting the most
accurate white balance
5 Exposure correction icon
(page 45)
h Change the brightness of the
image.
6 PAGE display (page 54)
7 Option icon (page 114)
h Displays the Option Screen.
8 Help display (page 121)
9 Remaining battery power
(page 138)
i When you specify multiple functions that cannot be simultaneously
enabled, the function which was last set becomes the active setting, and
the other settings accordingly change automatically.
English 58
Page 65

ACCESSING THE SHOOTING SETTING SCREEN
Overview of the Shooting Setting Screen (video clips)
PAG E 1
TOUCH SENSOR
ON
59 English
Page 66

1 Touch sensor menu (page 63)
#: Set the shutter button
touch sensor to ON.
$: Set the shutter button
touch sensor to OFF.
2 Video clip mode menu
(page 64)
,: Shoot at 640 × 480 pixels
(30 frames/second, low
compression)
=: Shoot at 640 × 480 pixels
(30 frames/second,
standard compression)
-: Shoot at 320 × 240 pixels
(30 frames/second, low
compression)
0: Shoot at 320 × 240 pixels
(15 frames/second,
standard compression)
,: Shoot at 160 × 120 pixels
(15 frames/second,
standard compression)
<: Make an audio recording
(page 65)
3 Focus range menu (page 67)
*: Shoot using the autofocus.
+: Close-up photography
): Distant focus
-: Manual focus
4 Self-timer menu (page 69)
N: Self-timer off
y: Shooting begins 2 seconds
after the shutter button is
pressed.
x: Shooting begins 10
seconds after the shutter
button is pressed.
5 Focus mode menu (page 76)
B: 9-point focus mode
C: Spot focus mode
6 Light-measuring mode (EXP
MEASURE) menu (page 77)
n: Multi-section light-
measuring setting
W: Center-weighted light-
measuring setting
Y: Spot light-measuring
setting
7 PAGE display (page 54)
8 Option icon (page 114)
h Displays the Option Screen.
9 Help display (page 121)
0 Remaining battery power
(page 138)
i When you specify multiple functions that cannot be simultaneously
enabled, the function which was last set becomes the active setting, and
the other settings accordingly change automatically.
English 60
Page 67

ACCESSING THE SHOOTING SETTING SCREEN
PAG E 2
FLICKER REDUCT
OFF
61 English
Page 68

1 Flicker-reduction menu
(page 81)
*: Set the flicker-reduction
function to OFF.
o: Set the flicker-reduction
function to ON.
2 ISO sensitivity menu
(page 78)
t: Sets the ISO sensitivity
automatically (corresponds
to ISO450 to 1800).
*: Corresponds to ISO450
u: Corresponds to ISO900
v: Corresponds to ISO1800
w: Corresponds to ISO3600
3 White balance menu (page 79)
>: White balance is
automatically adjusted
depending on ambient
lighting
r: For photography in fair
weather (sunny) conditions
o: In overcast conditions
p: Under fluorescent lighting
q: Under incandescent
lighting
]: For setting the most
accurate white balance
4 Exposure correction icon
(page 45)
h Change the brightness of the
image.
5 PAGE display (page 54)
6 Option icon (page 114)
h Displays the Option Screen.
7 Help display (page 121)
8 Remaining battery power
(page 138)
i When you specify multiple functions that cannot be simultaneously
enabled, the function which was last set becomes the active setting, and
the other settings accordingly change automatically.
English 62
Page 69

TOUCH SENSOR (TOUCH FOCUS)
SETTING
The touch sensor function, by which the autofocus is activated by a fingertouch on the shutter button, can be set to ON or OFF. When the touch sensor
function is set to OFF, the autofocus is activated when you press the shutter
button halfway; then gently press the shutter button to snap the picture.
1 Display PAGE 1 of the Shooting Setting Screen (page 53).
2 Select the touch sensor menu.
h The sensor menu appears.
#: The touch sensor function is set to
ON.
$: The touch sensor function is set to
OFF.
3 Select the desired icon, and press the SET button.
h The selected touch sensor function is set.
CAUTION
i When the camera is attached to a tripod, the touch sensor sensibility may
be diminished. This happens because the touch sensor works by detecting
changes in the capacitance when the camera is touched with bare hands.
The touch sensor sensibility will also be diminished, for example, if you
hold the camera with gloved hands.
TOUCH SENSOR
ON
63 English
Page 70

RESOLUTION SETTING
By setting the image resolution (pixels) to a higher setting, image detail is
enhanced for a smoother, finer picture. However, the file size also becomes large
and uses more memory. Select the resolution setting that suits your purpose.
1 Display PAGE 1 of the Shooting Setting Screen (page 53).
2 In the still image shooting mode,
select the resolution menu; in the
video clip recording mode, select
the video clip mode menu.
h The resolution menu or video clip
mode menu appears.
<Still image shooting mode>
y: Shoot image at 2,816 × 2,112
resolution (low compression)
v: Shoot image at 3,680 × 2,760
resolution
x: Shoot image at 2,816 × 2,112
resolution (standard compression)
z: Shoot image at 2,288 × 1,712 resolution
t: Shoot image at 1,600 × 1,200 resolution
[: Shoot image at 640 × 480 resolution
<Video clip recording mode>
,: Shoot at 640 × 480 pixels (30 frames/second, low compression)
=: Shoot at 640 × 480 pixels (30 frames/second, standard
compression)
-: Shoot at 320 × 240 pixels (30 frames/second, low compression)
0: Shoot at 320 × 240 pixels (15 frames/second, standard
compression)
,: Shoot at 160 × 120 pixels (15 frames/second, standard
compression)
<: Make an audio recording (page 65)
3 Select the desired icon, and press the SET button.
h The selected resolution setting and video clip mode setting are set.
English 64
Page 71

MAKE AN AUDIO RECORDING
In the video clip recording mode, your camera can make audio recordings.
1 Display PAGE 1 of the Shooting Setting Screen for the video clip
recording mode (page 53).
2 Select the audio recording icon
< from the video clip mode
menu, and press the SET button.
h The recording mode is enabled.
h The menu display is canceled if
the MENU button is pressed.
3 Press the shutter button.
h Audio recording begins. It is not
necessary to continue pressing
the shutter button while recording.
h Take care not to cover the
microphone with your fingers.
h When the remaining recording
time becomes short, the time
remaining is indicated in red.
h The maximum time for recording
a continuous audio memo is
about 9 hours.
4 End the recording.
h Press the shutter button again to stop recording.
Remaining time
Recording time
01:12
65 English
Page 72

Playing back audio recordings
Listen to your audio recordings.
1 Display the desired audio data.
h A musical note graphic appears on
the screen.
2 Play back the recording.
Forward playback:
Press the SET button.
Pause:
While the audio memo is playing,
toggle the SET button up.
Stop playback:
While the audio recording is playing, toggle the SET button down.
Fast forward:
During playback, toggle the SET button to the right.
h The recording is played back at double speed.
h When the SET button is pressed, the recording is played back at
normal speed.
Begin reverse playback:
During playback, toggle the SET button to the left.
h The recording is played back in reverse at double speed.
h When the SET button is pressed, the audio is played at normal
forward speed.
English 66
Page 73

FOCUS RANGE
1 Display PAGE 1 of the Shooting Setting Screen (page 53).
2 Select the focus range menu.
h Display the focus menu.
*: The camera automatically
focuses on the subject within a
range of 20 cm (7.87 in.) to
infinity (autofocus).
+: You can focus on a subject within
a range of 1 cm (0.39 in.) (Wide
end) or 50 cm (19.69 in.) (Tele
end) to 60 cm (23.62 in.) (super
macro).
): You can focus on a subject in the
distance.
-: The focus can be manually set to
any distance from 1 cm (0.39 in.)
to 8 m (26.25 ft), as well as to
infinity (manual focus).
L: The camera continuously
focuses on the subject
(continuous AF: still image
shooting mode only).
3 Select the desired icon, and press the SET button.
h This completes the focus range setting.
HINT
i When the focus range is set to super macro +, the zoom is set to the
wide end.
i You can also change the focus range setting from the Shooting Screen by
toggling the SET button down.
FOCUS
AUTO
67 English
Page 74

How to use the manual focus
1 Display PAGE 1 of the Shooting Setting Screen (page 53).
2 Select the manual focus icon - from the focus menu, and press
the SET button.
3 Press the SET button.
h The focus distance adjustment bar
appears.
4 Toggle the SET button to the left or
right to adjust the focus distance,
and press the SET button.
h The focus distance is set, and you
are returned to the Shooting
Screen.
HINT
About the focus range
i The focus distance indication shows the distance between the lens surface
and the subject.
i In some cases there may be a slight variance between the distance
(numerical figure) you set in the manual focus mode and the actual
distance. Use the LCD monitor to confirm the focus and compose the
photo.
About zoom movement when using the manual focus
i If the focus distance is set to 30 cm (11.81 in.) or less, the zoom changes
to the largest setting that is suitable for that focus distance.
i When the focus distance is set to 30 cm (11.81 in.) or less, the zoom will
function only within the range at which the image is focused.
English 68
Page 75

SELF-TIMER
1 Display PAGE 1 of the Shooting Setting Screen (page 53).
2 Select the self-timer menu.
h The self-timer icons are shown.
N: Turns off the self-timer function.
y: The image is captured about
2 seconds after the shutter button
is pressed.
x: The image is captured about
10 seconds after the shutter button
is pressed.
3 Select the desired icon from the self-timer menu, and press the SET
button.
h This completes the self-timer setting.
69 English
Page 76

HINT
To pause or cancel the self-timer function...
i If the shutter button is pressed again before the shutter is released, the
self-timer countdown temporarily stops. Press the shutter button one more
time to restart the self-timer.
i To cancel self-timer photography, set the self-timer setting to off N.
When x is selected...
i When the shutter button is pressed,
the self-timer indicator flashes for
approximately 10 seconds, after
which shooting begins.
i About 3 seconds before shooting,
the self-timer indicator flashes
faster.
Self-timer indicator
English 70
Page 77

SHUTTER OPERATION SETTING
Select how the camera operates when the shutter button is pressed.
1 Set the camera to the still image shooting mode, and display PAGE
1 of the Shooting Setting Screen (page 53).
2 Select the operation mode menu.
c: When the shutter button is
pressed, a single still image is
captured (single shot).
%: A single still image is captured
with an accompanying audio
recording (still image with voice
memo shot).
P: When the shutter button is
pressed, several still images are
captured in succession
(sequential shots).
&: A single still image is captured and entered in the calendar
(schedule shot).
-: Capture a background image and a foreground image, and
combine them to create a single image (composite photo).
.: Take ID photos (ID photos).
3 Select the desired icon, and press the SET button.
h The selected shutter operation is set.
MODE
PHOTOGRAPH 1 IMAGE
71 English
Page 78

Shooting sequential shots
When the shutter button is pressed, three still images are captured in
succession.
1 Select the sequential shots icon P
from the operation mode menu, and
press the SET button.
h If the resolution is set to k, the
setting changes automatically to
y and the images are captured.
2 Press the shutter button to start
shooting.
h Sequential shots shooting begins.
Up to three still images can be
captured, but if the shutter button is
released during shooting, shooting
stops immediately.
English 72
Page 79

SHUTTER OPERATION SETTING
Making a schedule shot
You can enter a captured still image in the schedule.
1 Select the schedule photo icon & from the operation mode menu,
and press the SET button.
2 Press the SET button again.
h The calendar appears on the LCD
monitor.
3 Toggle the SET button left, right, up
and down to move the orange frame
to the date you wish to save the
image to.
4 Press the SET button.
h The Shooting Screen appears.
5 Compose the subject, and press the
shutter button to snap the picture.
h The captured image is saved to the
date you selected in step 3.
HINT
If the “SET DATE AND TIME” display appears...
i The date and time have not yet been set. Be sure to set the date and time
before capturing images (page 23).
10
OCT. 2005 05.10.11
SUN MON TUE WED THU FRI SAT
2
3
4
9
16
23
30
5
10
11
12
17
18
19
24
25
26
31
1
6
7
8
13
14
15
20
21
22
27
28
29
DATE: 2005 /10 / 11 (TUE)
73 English
Page 80

Composite photo
SELECT PATTERN
BACK TO MENU
PHOTOGRAPH OUTER
Shoot two separate still images, and combine them to create a composite still
image.
1 Select the composite icon - from the operation mode menu, and
press the SET button.
2 Press the SET button again.
h The frame selection display appears.
3 Toggle the SET button left or right to
select a composite pattern, and
press the SET button.
h The select frame shape fills the
display.
4 Capture the image for the
background (frame).
h Point the lens at the background
subject, and snap the picture.
5 Next, capture the image that will be
superimposed in the frame.
h Take the photo of the image inside
the frame.
COMPOSITE
SELECT PATTERN
SELECT PATTERN
BACK TO MENU
BACK TO MENU
PHOTOGRAPH OUTER
PHOTOGRAPH OUTER
English 74
Page 81

SHUTTER OPERATION SETTING
ID photos
You can create ID photos to use in circulars, ads, and other publications, as
well as in identification documents.
1 Select the ID photo icon . from the operation mode menu, and
press the SET button.
2 Press the MENU button twice.
h The ID photo outline appears on
the LCD display.
3 Align the subject with the ID photo
outline, and snap the picture.
h After the preview screen for the
captured image appears, you are
returned to the Shooting Setting
Screen.
h Three images are shown in each of
two sizes on the Playback Screen.
<Playback Screen>
CAUTION
Restrictions regarding sequential shots, composite photos, and ID
photos
i The k resolution setting is not available for sequential shots. In addition,
the flash cannot be used.
i The k resolution setting is not available for composite photos. In
addition, the super macro + focus range is not available, and the selftimer cannot be used.
i The k resolution setting is not available for ID photos. In addition, the
super macro + and distant object ) focus ranges are not available.
75 English
Page 82

FOCUS AREA SETTING
You can choose from the following 2 types of autofocus (still image shooting
only):
9-point range finder focus: The correct focus is determined from 9 different
Spot focus: The camera focuses on the subject in the center
1 Display the Shooting Setting Screen (page 53).
2 Select the focus mode menu.
h The focus mode menu appears.
B:9-point range finder focus is selected.
C:Spot focus is selected.
h When the spot focus setting is
selected, the focus mark + appears
in the center of the LCD monitor.
3 Select the desired icon, and press
the SET button.
h The focus area is set.
focus points within the shooting area visible on the
LCD monitor. When the image is focused, a target
mark & appears.
of the LCD monitor.
Focus mark
English 76
Page 83

LIGHT-MEASURING MODE SETTING
You can select from 3 types of light-measuring modes.
Multi-section light-measuring:
The exposure is adjusted after sampling from multiple areas of the entire
shooting screen.
Center-weighted light-measuring:
The exposure is adjusted after light is measured from the entire image, but
with emphasis on the center area.
Spot light-measuring:
You can compose the picture and capture the image after first measuring the
light only at the center spot of the LCD monitor.
1 Display the Shooting Setting Screen (page 53).
2 Select the light-measuring mode (EXP MEASURE) menu.
h The light-measuring mode menu appears.
n: Multi-section light-measuring
W: Center light-measuring
Y: Spot light-measuring
3 Select the desired icon, and press
the SET button.
h This completes the light-measuring
mode setting.
h When spot light-measuring is
selected, the light-measuring spot
mark appears in the center of
the LCD monitor.
Spot mark
77 English
Page 84

ISO SENSITIVITY
With the initial settings, the ISO sensitivity is automatically set according to
the brightness of the subject. However, the ISO sensitivity can be set to a
fixed setting.
1 Display PAGE 2 of the Shooting Setting Screen (page 53).
2 Select the ISO sensitivity menu.
h The ISO sensitivity menu appears.
t: Sets the ISO sensitivity
automatically (equivalent to
ISO50 to 200 [video clip recording
mode: ISO450 to 1800]).
*: Sets the sensitivity to ISO50
equivalent (video clip recording
mode: ISO450).
u: Sets the sensitivity to ISO100 equivalent (video clip recording
mode: ISO900).
v: Sets the sensitivity to ISO200 equivalent (video clip recording
mode: ISO1800).
w: Sets the sensitivity to ISO400 equivalent (video clip recording
mode: ISO3600).
3 Select the desired icon, and press the SET button.
h This ISO sensitivity is set.
HINT
i By setting a higher ISO sensitivity, you can set higher shutter speeds and
capture images in darker locations, but noise in the captured images may
increase.
ISO
AUTO
English 78
Page 85

WHITE BALANCE
This camera automatically adjusts the white balance under most lighting
conditions. However, if you want to specify the lighting conditions or change
the overall tone of the image, the white balance can be manually set.
1 Display PAGE 2 of the Shooting Setting Screen (page 53).
2 Select the white balance menu.
h The white balance menu appears.
>: The camera will make the white
balance adjustment automatically
based on the natural and artificial
light conditions. This is the setting
used in the auto mode.
r: For shooting outside on a sunny
day.
o: For shooting outside on a cloudy day.
p: For shooting inside under fluorescent lighting.
q: For shooting inside under incandescent lighting.
]: For more accurate adjustment or when the light source cannot be
specified (one-push).
Setting procedure
1 Select the ] icon and press the SET button.
h The ] icon moves to the left end of the line.
2 Fill the entire screen with a plain white card (or piece of
paper, etc.), and press the SET button.
WHITE BALANCE
AUTO
79 English
Page 86

3 Select the desired icon, and press the SET button.
h This completes the white balance setting.
h Once the white balance setting is programmed for the ] icon, it is
retained even if another white balance setting (>, r, o, p, or
q) is selected. If you changed to another setting, whenever you
select the ] icon and press the SET button, the previously
programmed setting is recalled.
HINT
To cancel the white balance setting
i Perform step 1, select >, and then press the SET button.
English 80
Page 87

FLICKER-REDUCTION SETTING
The flicker-reduction setting reduces the flicker phenomenon that results
when filming video clips under fluorescent lights and the like where the
background lighting pulsates at the frequency of the power supply. The flickerreduction setting is set for a frequency of 50 Hz.
1 Set the camera to the video clip recording mode, and display PAGE
2 of the Shooting Setting Screen (page 53).
2 Select the flicker-reduction menu.
h The flicker-reduction menu
appears.
*: Turns off the flicker-reduction set-
ting.
o: Turns on the flicker-reduction set-
ting.
3 Select the desired icon, and press
the SET button.
h The flicker-reduction is set.
HINT
i Note that although the flicker-reduction setting decreases the image flicker
that occurs under fluorescent lighting, the image quality may deteriorate
slightly.
i If the flicker-reduction setting is used outdoors on a very bright day, a
halation effect may occur.
i If the flicker-reduction is set to o, then the ISO sensitivity setting
becomes fixed at t.
FLICKER REDUCT
OFF
81 English
Page 88

ADDING A VOICE MEMO
In the single-shot still image shooting mode, you can record up to
approximately 10 seconds of sound (called a “voice memo”) when capturing
the image. The voice memo is a monaural recording.
1 Set the camera to the still image shooting mode, and display PAGE
1 of the Shooting Setting Screen (page 53).
2 Select the capture still image with
voice memo icon % from the
operation mode menu, and press
the SET button.
3 Press the shutter button to capture
the image, and then talk into the
microphone.
h During recording, RECORDING
appears in the upper right area of
the LCD monitor.
h Take care not to cover the
microphone with your fingers.
h A voice memo of up to about 10
seconds can be recorded.
h To end the recording before 10
seconds has elapsed, press the
shutter button.
English 82
Page 89

PLAYBACK
PAGE 1 (BASIC SETTINGS)
DISPLAYING THE PLAYBACK SETTING SCREENS
The Playback Setting Screens are used to adjust your camera’s playback
settings.
1 Press the playback button [H].
h The display changes to the
Playback Screen.
2 Press the MENU button.
h The Playback Setting Screen
appears.
Playback button
MENU button
PROTECT
Change image
protect setting
[H]
To cancel the Playback Setting Screen
When the MENU button is pressed, you are returned to the Playback Screen.
83 English
Page 90

Switching the page
The Playback Setting Screen consists of two pages: PAGE 1 and PAGE 2.
1 Display a Playback Setting Screen.
2 Toggle the SET button to the left.
h The Playback Setting Screen
changes to the other PAGE.
h Each time the SET button is
toggled to the left, the PAGE
changes.
English 84
Page 91

DISPLAYING THE PLAYBACK SETTING SCREENS
Overview of the Playback Setting Screens
PAG E 1
PROTECT
Change image
protect setting
1 Protect (page 87)
h Protect data from accidental
erasure (write protect).
2 Erase (page 89)
h Delete images from the card
memory.
3 Playback volume control
(page 91)
h Adjust the playback volume for
video clips and audio data.
4 Zoom jump playback
(page 92)
h Magnify the image for a better
view of the details.
85 English
5 Enter in schedule (page 94)
6 Add audio track (page 97)
h Add a voice memo to a
captured still image.
7 PAGE display (page 84)
8 Option icon (page 114)
h Display the Option Screen.
9 Help display (page 121)
0 Remaining battery power
(page 138)
Page 92

PAG E 2
ROTATE
Rotate image
1 Rotate image (page 100)
h Rotate still images.
2 Resize (page 99)
h Reduce the resolution of a still
image.
3 Extract still image (page 101)
h Extract a still image from a
video clip.
4 Copy image (page 102)
5 Print settings (page 104)
h Specify the print settings.
6 Slideshow (page 111)
h Play back the images in a
slideshow format.
7 PAGE display (page 84)
8 Option icon (page 114)
h Display the Option Screen.
9 Help display (page 121)
0 Remaining battery power
(page 138)
English 86
Page 93

IMAGE PROTECT
Prevent accidental erasure of image and audio data.
1 Display the data that you want to protect from accidental erasure,
and display PAGE 1 of the Playback Setting Screen (page 83).
2 Select the protect icon A, and
press the SET button.
h “LOCK?” appears.
h If the protect mode has already
been enabled for the data, then
“UNLOCK?” appears.
3 Toggle the SET button up or down
to select “YES”, and press the SET
button.
h The protect mode is set for the
data.
h The protect mark B indicates that
the data is locked.
h To return to the Playback Setting
Screen, press the MENU button.
PROTECT
LOCK?
YES
EXIT
PROTECT
UNLOCK?
YES
EXIT
87 English
Page 94

CAUTION
i Even if the protect mode is set for certain data files, they will be erased if
the card is reformatted (page 133).
HINT
To select a different image in steps 2 and 3...
i Toggle the SET button to the left or right.
To cancel the protect mode for an image...
i Display the desired data and repeat steps 1 to 3. The protect mark B will
disappear and the protect mode is canceled.
English 88
Page 95

ERASING DATA
You can erase data that is stored on the card if you no longer need it. You can
erase the data one at a time, or all at once.
1 Display PAGE 1 of the Playback Setting Screen (page 83).
2 Select the erase icon c, and press
the SET button.
h The Erase Mode Screen appears.
ONE ERASE: Erases one data at a
ERASE ALL: Erases all the data.
EXIT: Returns to the
3 Toggle the SET button up or down the select the erase mode, and
press the SET button.
h The Erase Confirmation Screen appears.
<ONE ERASE>
h Toggle the SET button to the left or right to select the data you wish to
erase.
<ERASE ALL>
h Toggle the SET button to the left or right confirm that all data is to be
erased.
time.
All images assigned
to the schedule are
also erased.
Playback Setting Screen.
ERASE
ONE ERASE
ERASE ALL
EXIT
89 English
Page 96

4 Toggle the SET button up to select “YES”, and press the SET button.
<ONE ERASE>
h The currently displayed image is deleted.
h To erase other data, select the data, and press the SET button.
<ERASE ALL>
h The Erase Confirmation Screen again appears. To erase the data,
select “YES”, and press the SET button. When data erase is
completed, “NO IMAGE” is shown.
CAUTION
About protected images
i Data which is protected from accidental erase cannot be erased. To erase
protected data, set the protect setting for the data to off (page 87), and
then follow the data erase procedure.
The schedule shot is also erased.
i If captured still images were entered in the schedule, the images will also
be deleted from the schedule when the image data is erased. Please take
note of this especially when choosing the “ERASE ALL” mode.
i You can also access the One Erase Confirmation Screen from the
Playback Screen by toggling the SET button up.
English 90
Page 97

PLAYBACK VOLUME
Adjust the playback volume for video clips and audio data.
1 Display PAGE 1 of the Playback Setting Screen (page 83).
2 Select the playback volume icon
Z, and press the SET button.
h The volume control bar appears.
3 Toggle the SET button left or right to
adjust the volume, and press the
SET button.
h The playback volume is set, and
you are returned to the Playback
Setting Screen.
PLAY VOLUME
VOLUME SETTING
91 English
Page 98

ZOOM JUMP PLAYBACK
You can magnify a portion of a still image to check the accuracy of the focus.
1 Display a still image to view using
zoom jump playback.
2 Press the SET button.
h The image is magnified.
h If the magnified view appears to
be in focus, then the overall
image will be in focus.
3 Toggle the SET button up, down,
left and right to move to the part
you wish to magnify, and press [T]
([<]) on the zoom switch.
h The displayed area is further
magnified.
To magnify further: Magnification
increases with each press of [T]
([<]) on the zoom switch.
To go back: Magnification
decreases with each press of [W]
([.]) on the zoom switch.
h Press the SET button again to
return to the normal size (100%)
screen.
HINT
i Zoom jump playback can also be accessed from the Playback Setting
Screen.
ZOOM
MOVE
100%
ZOOM I/O
PRESS SHUTTER TO SAVE
English 92
Page 99

DISPLAYING THE SCHEDULE
Photos that were captured as schedule shots can be viewed in a calendarformat schedule.
Previously captured images can also be entered in the schedule, and images
can be removed from the schedule as desired (page 94).
1 Make a schedule shot (page 73).
2 Display a still image (page 35), and
toggle the SET button down.
h The calendar appears.
h You can press the MENU button to
return to the Playback Screen.
10
OCT. 2005 05.10.11
SUN MON TUE WED THU FRI SAT
2
3
4
9
16
23
30
5
10
11
12
17
18
19
24
25
26
31
1
6
7
8
13
14
15
20
21
22
27
28
29
3 Toggle the SET button up, down, left
and right to select the desired date,
and press the SET button.
h The image that was entered for the
selected date is displayed fullscreen.
h Toggle the SET button to the left or
right to display the previous or next
image that was entered in the
schedule.
h Toggle the SET button down to
display the schedule.
h When the MENU button is pressed,
the Save To Calender Screen
(page 94) appears.
CAUTION
If the schedule does not appear...
i The calendar will not appear in step 1 if no image has been entered in the
schedule. Follow the procedure to make a schedule shot (page 73), or
enter an image in the schedule (page 94), and then display the calendar.
93 English
Page 100

ENTER AN IMAGE IN THE SCHEDULE
You can enter a previously captured still image in the schedule, as well as
remove images from the schedule.
Display the Save To Calender Screen
1 Display the image you wish to enter
in the schedule, and access PAGE 1
of the Playback Setting Screen
(page 83).
2 Select the save to calendar icon
H, and press the SET button.
h The Save To Calendar Screen
appears.
SPECIFY DATE:
Specify the date and enter the
image in the schedule.
DELETE FROM CALENDAR:
Remove an image from the
schedule (if one has already
been entered).
EXIT: Return to the Playback Setting
Screen.
SAVE TO CALENDAR
SPECIFY DATE
DELETE FROM CALENDAR
EXIT
English 94
 Loading...