

Page 1
INSTRUCTION MANUAL
TRC-970C
Compact Cassette Recorder
SANYO’S HELP-LINE
Call the toll-free number below if you have any difficulties
operating this product.
1-877-999-1840 (Weekdays: 8:00 AM - 5:00 PM, Pacific
Time)
LINEA DE CONSULTA SANYO
Llame gratis al número indicado a continuación si tiene
dificultades al utilizar este producto.
1-877-999-1840 (días laborables de 8:00 AM a 5:00 PM,
hora del Pacífíco)
1AD6P1P0718-U
TRC-970C, Issue Number 1
Printed in China
ENGLISH
ESPAÑOL
TRC-970C_US 25/03/2004, 12:051
Page 2
ENGLISH
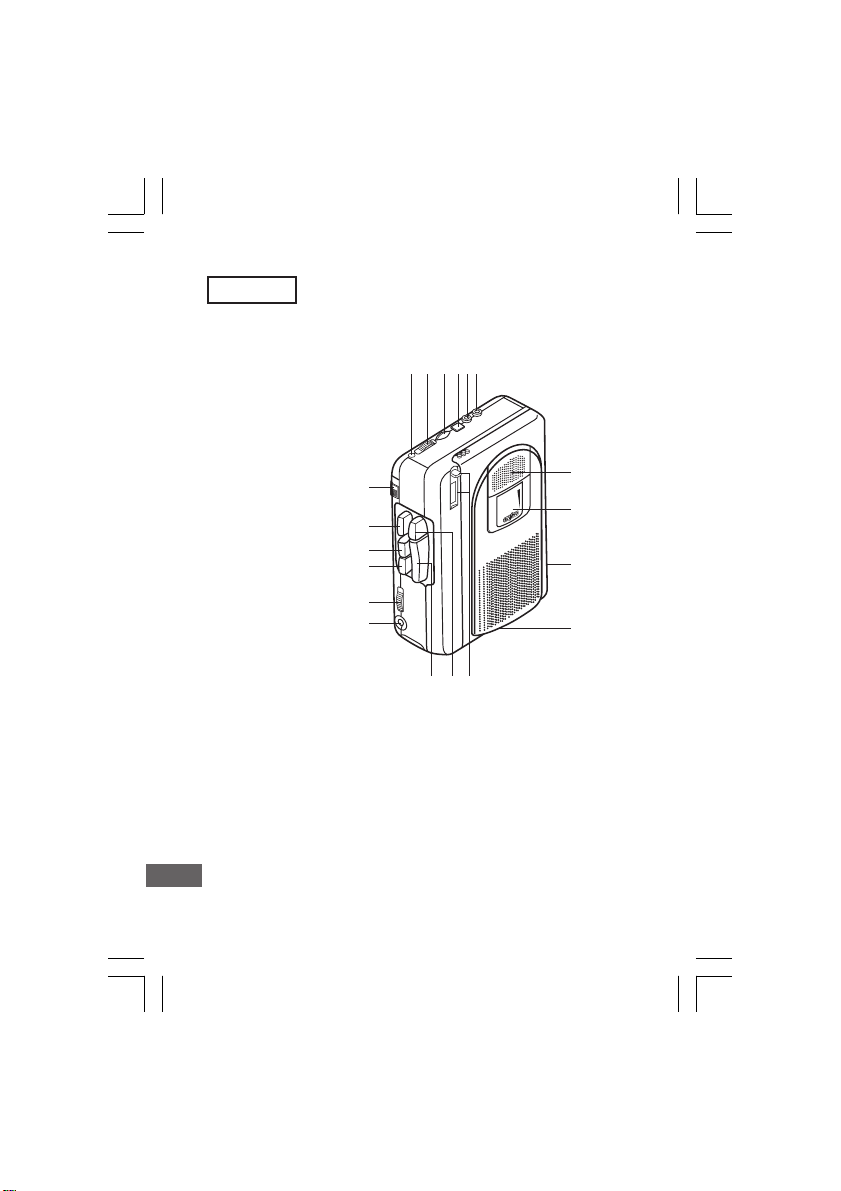
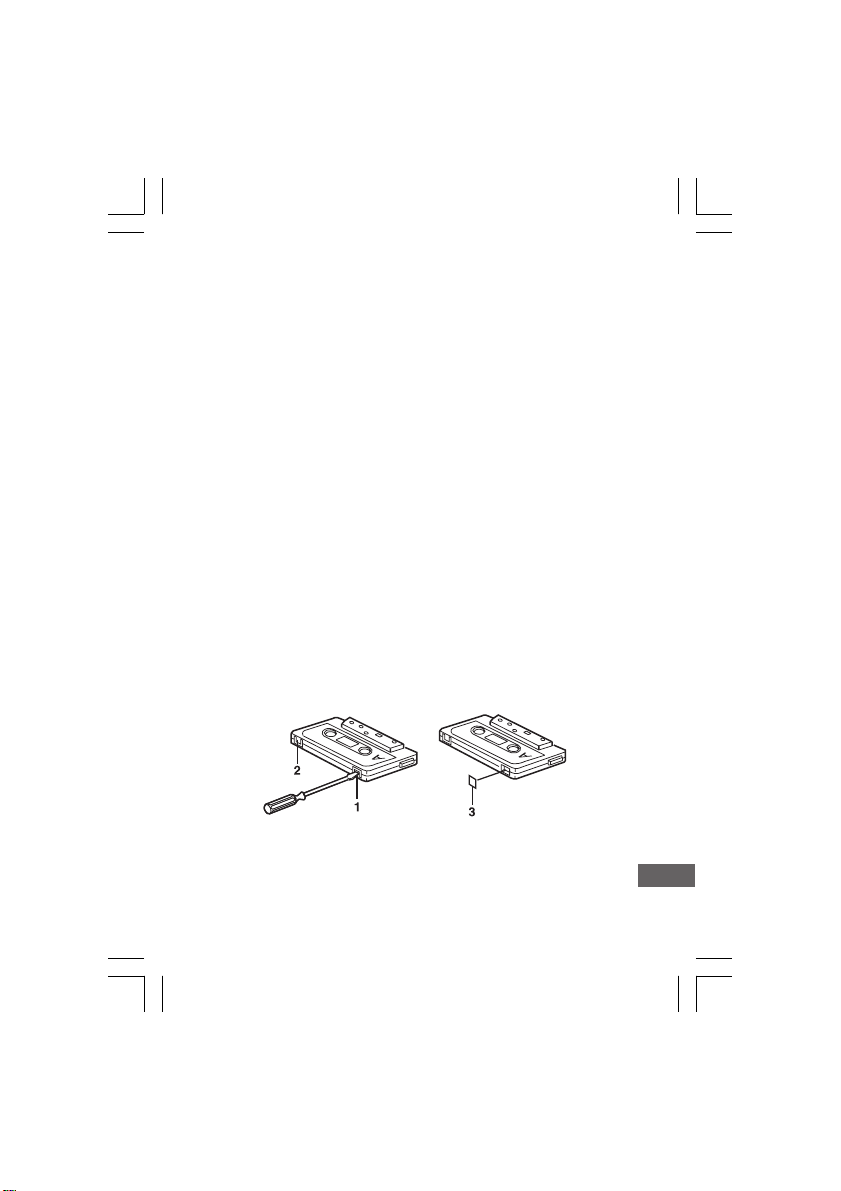
CONTROLS (Fig. 1)
123456
19
18
17
16
15
14
111213
1. Battery/Operation indicator (BATT/OPR)
2. Voice activated system switch (VAS)
3. Volume control (VOLUME)
4. Cue index button (CUE INDEX)
5. Microphone jack (MIC)
6. Earphone jack (EAR)
7. Built-in microphone
8. Cassette compartment
9. Battery compartment (back panel)
10. Tape speed switch (TAPE SPEED) (bottom)
-E1-
7
8
9
10
Fig. 1
TRC-970C_US 25/03/2004, 12:052
Page 3
11. Tape counter and reset button
12. Record button (REC)
13. Play button (PLAY)
14. External DC 3V jack (EXT DC 3V)
15. Dictation/Conferene switch (DICT/CONF)
16. Fast forward/Cue button (FFWD/CUE)
17. Rewind/Review button (REW/REV)
18. Stop button (STOP)
19. Pause switch (PAUSE)
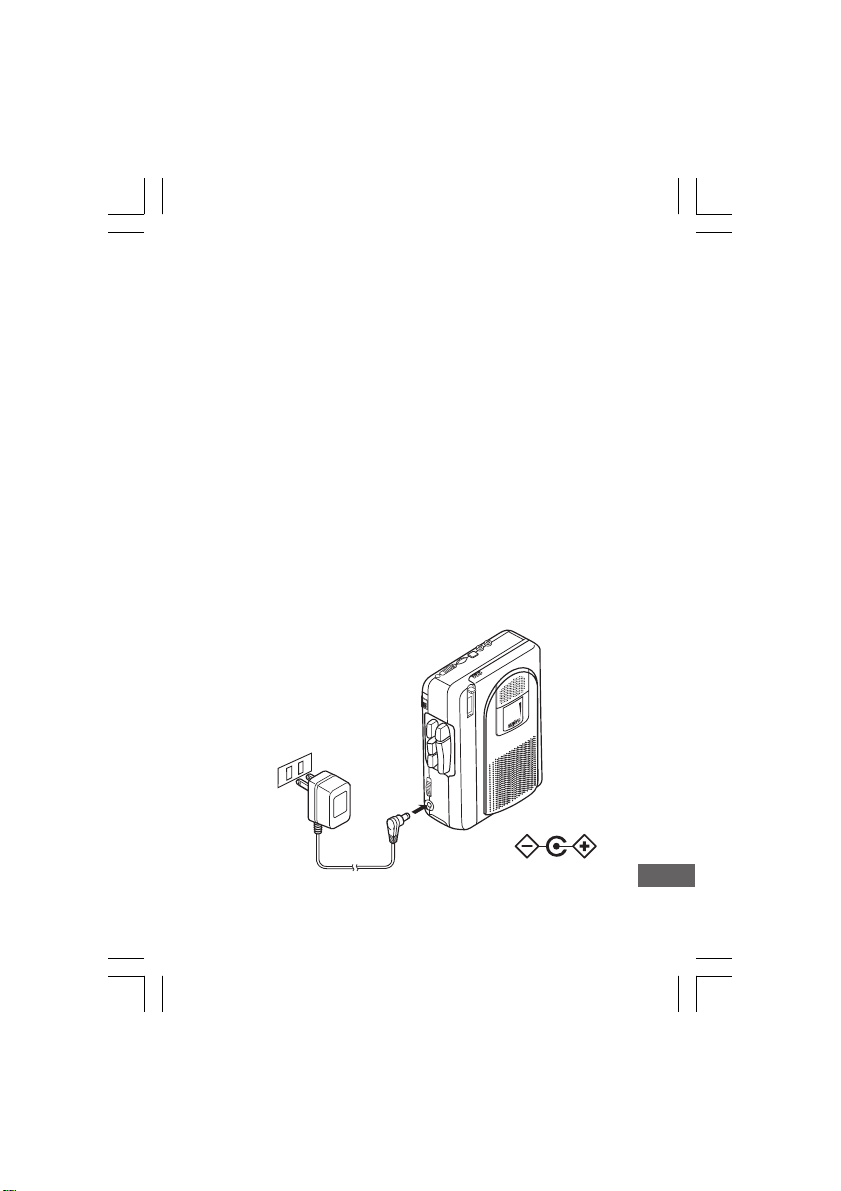
POWER
AC adaptor
Connect the included AC adaptor (Sanyo Model No.
3CV230XE or NT-3CV ) to the EXT DC 3V jack (Fig. 2).
(The batteries are automatically disconnected.)
• The centre pin of the EXT DC 3V jack is positive (+).
AC 120V
EXT DC3V
TRC-970C_US 25/03/2004, 12:053
Fig. 2
-E2-
Page 4
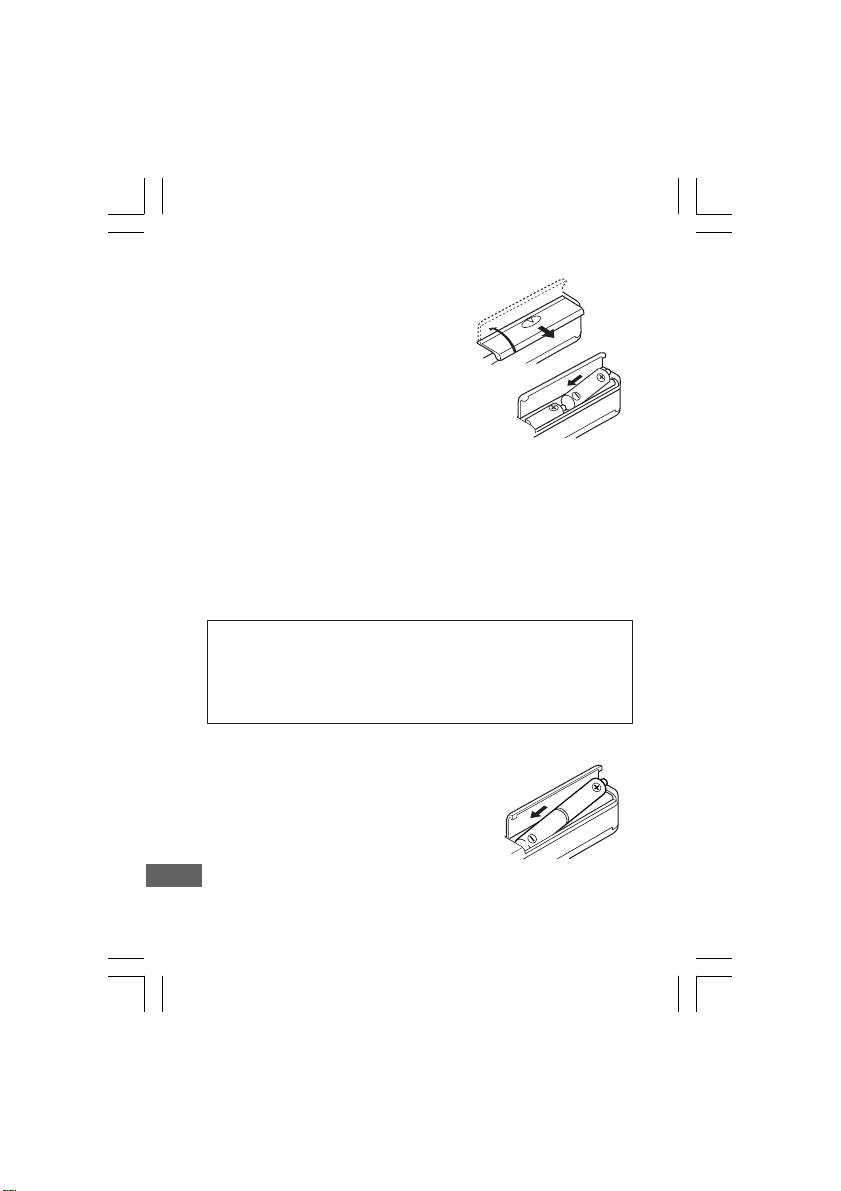
Battery
Install two “AA” batteries (not supplied)
as shown in Fig. 3. Observe proper
polarity.
• If you are not going to use the unit
with batteries for one month or
more, remove the batteries.
Fig. 3
Battery replacement
When the BATT/OPR indicator does not light during operation or is lit dimly, replace the batteries.
• When replacing the batteries, use two new batteries of
the same type. Do not mix a used battery with a new
one or mix different types of batteries.
IMPORTANT NOTE:
SPENT OR DISCHARGED BATTERIES MUST BE RECYCLED OR DISPOSED OF PROPERLY IN COMPLIANCE WITH ALL APPLICABLE LAWS.
FOR DETAILED INFORMATION, CONTACT YOUR LOCAL COUNTY SOLID WASTE AUTHORITY.
Rechargeable battery
Install the rechargeable battery (SANYO
NBP-30B, not supplied) as shown in Fig.
4. Connect the AC adaptor. The battery
fully charged approximately 8 hours after the AC adaptor is connected.
• Do not charged continuously for 24
hours or more.
-E3-
Fig. 4
TRC-970C_US 25/03/2004, 12:054
Page 5
IMPORTANT NOTE:
SPENT NICKEL-CADMIUM RECHARGEABLE BATTERY MUST BE RECYCLED OR
DISPOSED OF PROPERLY IN COMPLIANCE
WITH ALL APPLICABLE LAWS.
CONNECTIONS
External microphone
Connect an external microphone (not supplied) to the MIC
jack. (The built-in microphone is automatically disconnected.)
Earphone
Connect an earphone (not supplied) to the EAR jack for private listening. (The speaker is automatically disconnected.)
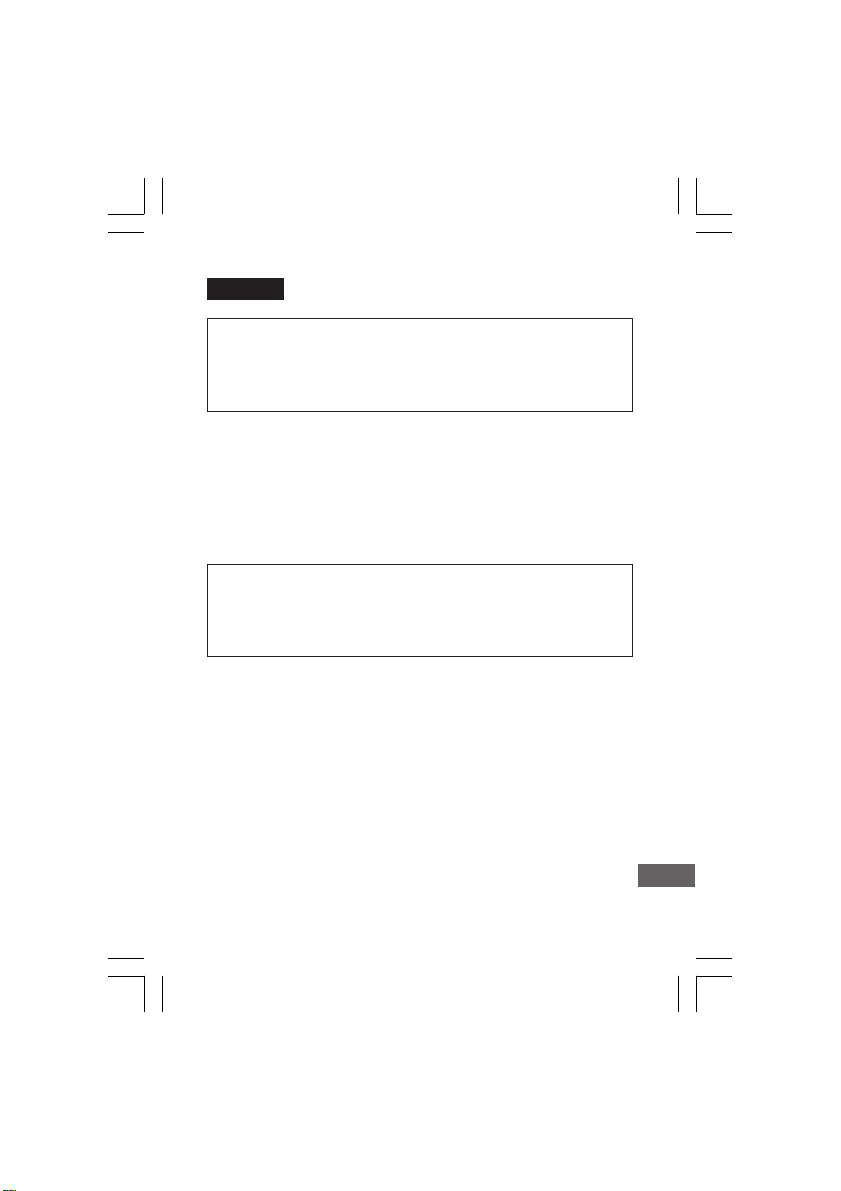
RECORDING (Fig. 5)
NOTE: Do not use C-120 or endless cassettes.
456
2
7
5
3
TRC-970C_US 25/03/2004, 12:055
Built-in microphone
1
Fig. 5
-E4-
Page 6

1. Load a cassette as shown in Fig. 6.
2. Press the reset button to set the counter
to “000”. The counter shows relative
tape position.
3. Use the DICT/CONF switch to select
the recording mode.
DICT: Recording dictation
CONF: Recording conferences
4. Set the VAS switch to ON or OFF.
5. Press the REC button. (The PLAY button is engaged simultaneously.)
VAS ON: Voice activated recording
Fig. 6
When you talk, the unit will start recording. When you
stop talking for as long as 4 to 8 seconds, the unit will
stop recording (variations in voice level do not stop
recording).
Use the VOLUME control to adjust the microphone sensitivity to your voice. If voices are not activating recording,
increase the volume. If recording does not stop when
talking stops, decrease volume.
NOTE: If the first few words you speak activate recording but are not recorded, say an extra word to start recording before you dictate. (For important recordings,
set the VAS switch to OFF.)
VAS OFF: Standard recording
Recording will continue until the STOP button is pressed.
6. Press and hold the CUE INDEX button for at least 3 seconds to mark important segments of the recording. The
unit records an index tone on the tape. Release the CUE
INDEX butto to resume recording.
• An index tone can heard when the tape is played back.
7. Press the STOP button to stop recording.
-E5-
TRC-970C_US 25/03/2004, 12:056
Page 7
Fast forwarding or rewinding
In the stop mode, press the FFWD/CUE or REW/REV button.
Press the STOP button when the desired point or end of the
tape is reached.
Temporarily stopping operation (all modes)
Slide the PAUSE switch right. Slide it left to resume operation.
Quick reviewing and recording
While recording, press and hold the REW/REV button (the
REC button is released) until the tape has rewound to the
desired point. Release the REW/REV button to play back
your recording. Press the REC button to resume recording.
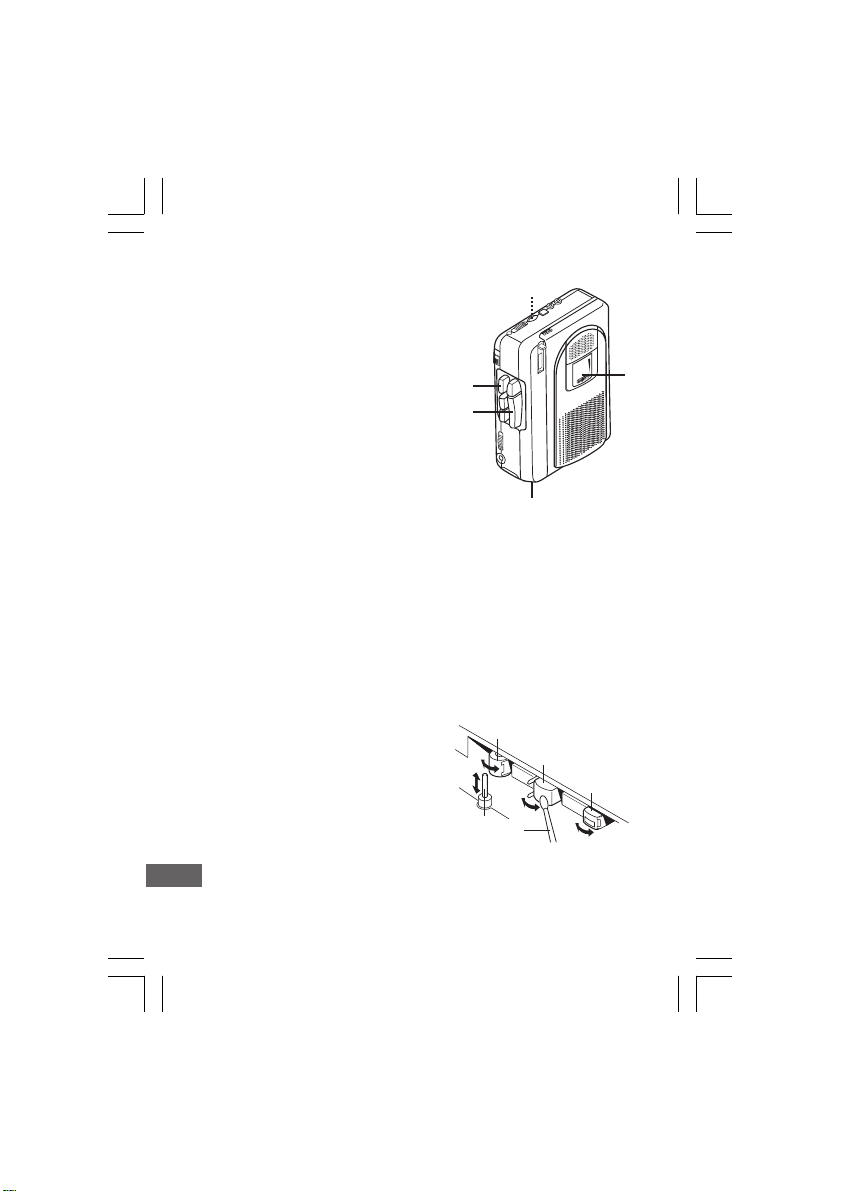
Safeguards against accidental erasure (Fig. 7)
To protect side A, break out tab (1). To protect side B, break
out tab (2).
• To erase or record a protected cassette, cover the tab
openings with adhesive tape (3).
NOTE: The REC button cannot be depressed when using a
protected cassette.
Fig. 7
TRC-970C_US 25/03/2004, 12:057
-E6-
Page 8
PLAYBACK (Fig. 8)
1. Load the cassette as shown in
Fig. 6.
2. Press the PLAY button and
adjust the VOLUME control.
3. Use the TAPE SPEED switch
to select a playback speed.
(This switch does not affect
recording.)
SLOW: Slow speed
NOR: Normal speed
FAST: Fast speed
4. Press the STOP button to stop playback.
Cue and reviewing
While playback, press and hold the FFWD/CUE or REW/
REV button. Release the button when the desired point is
reached. Playback continues.
4
2
2
Fig. 8
3
MAINTENANCE
To ensure continued high
performance, use cotton swab (1)
moistened with head cleaner to
clean the heads (4, 5), pinch roller
(3) and capstan (2) after about
every 10 hours of use (Fig. 9).
3
4
5
2
1
Fig. 9
1
TRC-970C_US 25/03/2004, 12:058
-E7-
Page 9
For USA
SANYO SERVICE PLUS
LIMITED WARRANTY
DICTATION PRODUCTS ONLY
In order to obtain factory warranty service for Sanyo Dictation Products, call the toll-free number below. The unit must
be packed in the original carton or a well-padded sturdy carton in order to avoid shipping damage.
Note: Do not return this unit to the retail store for service.
To obtain Service Plus Warranty service, product operation information or for problem resolution, call
OBLIGATIONS
Toll Free 1-877-999-1840
Weekdays 8:00 AM - 5:00 PM Pacific Time
THIS WARRANTY IS VALID ONLY ON SANYO DICTATION
PRODUCTS PURCHASED AND USED IN THE UNITED
STATES OF AMERICA, EXCLUDING ALL U.S. TERRITORIES AND PROTECTORATES. THIS WARRANTY APPLIES
ONLY TO THE ORIGINAL RETAIL USER, AND DOES NOT
APPLY TO PRODUCTS USED FOR ANY INDUSTRIAL,
PROFESSIONAL, OR COMMERCIAL PURPOSE. THE
ORIGINAL DATED BILL OF SALE OR SALES SLIP MUST
BE SUBMITTED AT THE TIME WARRANTY SERVICE IS
REQUESTED.
-E8-
TRC-970C_US 25/03/2004, 12:059
Page 10
Subject to the OBLIGATIONS above and EXCLUSIONS below ,
SANYO FISHER COMPANY (SFC) warrants this SANYO
Dictation product against defects in materials and workmanship
for the periods of LABOR and PARTS specified below. SFC
will, at its option, within two business days after its receipt of
any dictation product that fails to conform to this warranty at
SFC’s designated facility, either (a) repair such product or
any of its parts which fail to conform to this warranty or (b)
ship a replacement product. The warranty period commences
on the date the product was first purchased at retail.
LABOR PARTS
1 YEAR 1 YEAR
This warranty does not cover (A) the adjustment of customeroperated controls as explained in the appropriate model’s
instruction manual, or (B) the repair of any product, whose
serial number has been altered, defaced or removed. This
warranty shall not apply to the cabinet or cosmetic parts,
knobs or routine maintenance.
This warranty does not apply to repairs or replacements necessitated by any cause beyond the control of SFC including,
but not limited to, any malfunction, defect, or failure caused
by or resulting from unauthorized service or parts, improper
maintenance, operation contrary to furnished instructions,
shipping or transit accidents, modification or repair by the
user, abuse, misuse, neglect, accident, incorrect line voltage,
fire, flood, or other Acts of God, or normal wear and tear.
TRC-970C_US 25/03/2004, 12:0510
EXCLUSIONS
-E9-
Page 11

The foregoing is in lieu of all other expressed warranties
and SFC does not assume or authorize any party to assume
for it any other obligation or liability.
THE DURATION OF ANY WARRANTIES WHICH MAY BE
IMPLIED BY LAW (INCLUDING THE W ARRANTIES OF MERCHANTABILITY AND FITNESS) IS LIMITED TO THE TERM
OF THIS WARRANTY. IN NO EVENT SHALL SFC BE LIABLE FOR SPECIAL, INCIDENTAL OR CONSEQUENTIAL
DAMAGES ARISING FROM OWNERSHIP OR USE OF THIS
PRODUCT, OR FOR ANY DELAY IN THE PERFORMANCE
OF ITS OBLIGATIONS UNDER THIS WARRANTY DUE TO
CAUSES BEYOND ITS CONTROL. SOME STATES DO NOT
ALLOW LIMITATIONS ON HOW LONG AN IMPLIED WARRANTY LASTS AND/OR DO NOT ALLOW THE EXCLUSION
OR LIMITATION OF CONSEQUENTIAL DAMAGES, SO THE
ABOVE LIMITATIONS AND EXCLUSIONS MAY NOT APPLY TO YOU. THIS WARRANTY GIVES YOU SPECIFIC
LEGAL RIGHTS. YOU MAY HA VE OTHER RIGHTS, WHICH
VARY FROM STATE TO STATE.
S/D R2
For your protection in the event of theft or loss of this product,
please fill in the information below for your own personal
records.
Model No.
Serial No.
(Located on back or bottom side of unit)
Date of Purchase
Purchase Price
Where Purchased
TRC-970C_US 25/03/2004, 12:0511
-E10-
21605 Plummer Street
Chatsworth, CA 91311
Page 12

For Canada
THE SANYO COMFORT WARRANTY
BUSINESS SYSTEMS - DICTA RECORDERS
WARRANTY APPLICATION
New, unused Sanyo Dicta Recorder products purchased in
Canada are warranted against manufacturing defects in materials and workmanship for ONE YEAR for parts and NINETY
DAYS for labour, from the date of purchase by the original
retail purchaser. This warranty only applies in favour of the
original retail purchaser of the warranted product.
SANYO CANADA INC.’S RESPONSIBILITY
During the warranty period, SANYO Canada Inc. will repair,
or at our option, replace a Sanyo Dicta Recorder product
which shows evidence of a manufacturing defect in materials or workmanship.
Replacement PARTS are warranted for the remaining portion of the warranty period.
WHAT IS NOT COVERED
(a). Dicta Recorder products purchased outside Canada.
(b). Dicta Recorder products purchased in a used condition.
(c). Problems due to product set-up and installation.
(d). Adjustments that are outlined in the Operating Manual.
(e). Accessory items including carrying cases, cassette tapes
and cables.
(f). Damage in or due to transportation.
(g). Damage due to improper maintenance, accident, abuse,
misuse or negligence.
TRC-970C_US 25/03/2004, 12:0512
-E11-
Page 13

ORIGINAL RETAIL PURCHASER’S RESPONSIBILITY
Y ou, the original retail purchaser, must present your original,
dated bill-of-sale together with this warranty to SANYO Canada
Inc. or to an authorized Sanyo Service Depot when you make
a claim under this Warranty.
You, the original retail purchaser, are responsible for any
costs of TRANSPORTING the product to and from SANYO
Canada Inc. or an authorized Sanyo Service Depot. You
also are responsible for the cost of any MAINTENANCE
necessary in respect of the product.
WARRANTY BECOMES VOID
This warranty becomes void if the product’s serial numbers
are altered or removed or if any repair to the product is made
other than by SANYO Canada Inc. or by an authorized Sanyo
Service Depot.
LIMITATIONS
(a) SANYO Canada Inc. reserves the right to change or im-
prove the design of the model of the product warranted
hereunder without incurring any obligation to make any
modifications to or to install any improvement in or on
the product.
(b) In no event shall SANYO Canada Inc. or any of its Au-
thorized Dealers be liable for special or consequential
damage arising from the use of this product.
TRC-970C_US 25/03/2004, 12:0513
-E12-
Page 14

STATUTORY WARRANTIES
The above provisions do not preclude the operation of any
applicable provincial statute which in certain circumstances
may not allow some of the limitations and exclusions described in this Warranty. Where any terms of this Warranty
are prohibited by such a statute, they shall be deemed null
and void but the remainder of this warranty shall remain in
effect.
HOW TO OBTAIN WARRANTY SERVICE
Please contact the Sanyo Authorized Dealer from whom the
product was purchased, or contact us directly at:
SANYO Canada Inc.
1-300 Applewood Cresent
Concord, Ontario
L4K 5C7
(905) 760-9944
1-800-263-2244
http://www.sanyocanada.com
Model No.
Serial No.
(Located on back or bottom side of unit)
Date of Purchase
Purchase Price
Where Purchased
TRC-970C_US 25/03/2004, 12:0514
SDR 01/05 (R11)
SANYO Canada Inc.
Page 15

ESPAÑOL
19
18
17
16
15
14
123456
111213
7
8
9
10
Fig. 1
COMMANDES (Fig. 1)
1. Indicador de las pilas/operación (BATT/OPR)
2. Interruptor del sistema de voz activado (VAS)
3. Control de volumen (VOLUME)
4. Botón de índice de referencia (CUE INDEX)
5. Conección para el micrófono (MIC)
6. Conección para los audífonos (EAR)
7. Micrófono incorporado
8. Compartimiento de cintas
9. Compartimiento de las pilas (panel negro)
10. Interruptor de velocidad de cinta (TAPE SPEED) (fondo)
-S1-
TRC-970C_US 25/03/2004, 12:0515
Page 16

11. Botón de reajuste y contador de la cinta
12. Botón de grabación (REC)
13. Botón de reproducción (PLAY)
14. Enchufe externo CC 3 V (EXT DC 3V)
15. Interruptor de Dictado/Conferencia (DICT/CONF)
16. Botón de avance rápido/señal sonora (FFWD/CUE)
17. Botón de rebobinado/inspección (REW/REV)
18. Botón de detención (STOP)
19. Interruptor de pausa (PAUSE)
ENERGÍA
Adaptador CA
Conecte un adaptador CA (Modelo Sanyo No. 3CV230XE
or NT-3CV) al enchufe EXT DC 3V (Fig. 2). (Las pilas se
desconectan automáticamente.)
• El conector central del enchufe EXT DC 3V es positivo
(+).
AC 120V
EXT DC3V
TRC-970C_US 25/03/2004, 12:0516
Fig. 2
-S2-
Page 17

Pilas
Instale dos pilas “AA” (no incluidas)
como se indica en la Fig. 3. Fíjese
bien el la posición de la polaridad.
• Quite las pilas si no utiliza el
aparato con pilas por un período
prolongado de más de un mes.
Fig. 3
Reemplazo de las pilas
Reemplace las pilas cuando vea que el indicador BATT/OPR
no se ilumina o se ilumina tenuemente durante el
funcionamiento.
• Al reemplazar las pilas utilice dos pilas nuevas del mismo
tipo. No mezcle una pila usada con una nueva, ni mezcle
diferentes tipos de pilas.
NOTA IMPORTANTE
LAS PILAS QUE YA NO VALGAN O QUE SE HAYAN
AGOTADO, DEBERÁN SER RECICLADAS O
DESECHADAS DE FORMA APROPIADA EN
CUMPLIMIENTO CON TODAS LAS LEYES VIGENTES.
PARA INFORMACIÓN DETALLADA SOBRE CÓMO
HACERLO, PÓNGASE EN CONTACTO CON LA
AUTORIDAD LOCAL DE RECOLECCIÓN DE
DESECHOS SÓLIDOS.
TRC-970C_US 25/03/2004, 12:0517
-S3-
Page 18

Pila recargable
Instale la pila recargable (SANYO NBP30B, no incluida) como se indica en la
Fig. 4.
Conecte el adaptador CA. La pila se
recarga por completo en un espacio de
aproximadamente 8 horas desde que se
conecta el adaptador CA.
• No la recargue por más de 24 horas
de una misma vez.
NOTA IMPORTANTE:
PILA RECARGABLES DE NÍQUEL-CADMIO
DESGASTADAS DEBERAN SER
DESHECHADAS O RECICLADAS
APROPIADAMENTE CUMPLIENDO CON
LAS LEYES CORRESPONDIENTES.
Fig. 4
CONECCIONES
Micrófono
Conecte un micrófono externo (no incluido) al enchufe del
MIC. (El micrófono incorporado se desconecta
automáticamente.)
Audífono
Conecte un audífono (no incluido) al enchufe EAR para una
reproducción privada a través de su audífono. (Los altavoces
se desconectan automáticamente.)
TRC-970C_US 25/03/2004, 12:0518
-S4-
Page 19

GRABACIÓN (Fig. 5)
NOTA: No utilice C-120 o cintas sin fin.
456
2
7
5
3
1. Introduzca una cinta como se indica
en la Fig. 6.
2. Presione el botón del contador de la
cinta para adjustar el contadora “000”.
El contador muestra la posición relativa
de la cinta.
3. Para seleccionar el modo de grabación,
use el interruptor DICT/CONF.
DICT: Grabando dictado
CONF: Grabando conferencias
4. Ponga el interruptor VAS en ON u OFF.
5. Presione el botón REC. (El botón PLAY
se acoplará simultáneamente.)
VAS ON: Grabación de voces activada
Cuando comience a hablar, el aparato comenzará a
grabar. Cuando deje de hablar por más de 4 a 8 segundos,
el aparato detendrá la grabación (las variaciones de los
niveles de voz no detendrán la grabación).
Micrófono incorporado
1
Fig. 5
-S5-
Fig. 6
TRC-970C_US 25/03/2004, 12:0519
Page 20

Utilice el control VOLUME para ajustar la sensitividad
del micrófono a su voz. Si las voces no son grabadas
apropiadamente aumente el volumen. Si la grabación
no se detiene cuando usted deja de hablar, baje el
volumen.
NOTA: Si las primeras palabras que graba no aparecen
en la grabación, comience con alguna palabra extra para
comenzar la grabación y comprobar antes de comenzar
a grabar. (Para sus grabaciones importantes, ponga el
interruptor VAS en OFF.)
VAS OFF: Grabación normal
La grabación continuará hasta que se presione el botón
STOP.
6. Presione y mantenga, por lo menos 3 segundos, el botón
CUE INDEX para marcar los segmentos importantes de
la grabación. La unidad graba un tono de índice en la
cinta. Libere el botón CUE INDEX para reanudar la
grabación.
• Se puede escuchar un tono de índice cuando la cinta
se reproduce.
7. Presione el botón STOP para detener la grabación.
TRC-970C_US 25/03/2004, 12:0520
-S6-
Page 21

Avance rápido o rebobinado
Presione el botón FFWD/CUE o REW/REV cuando ningún
otro botón se encuentra presionado.
Presione el botón STOP cuando alcance el punto deseado
o el final de la cinta.
Funcionamiento de detención temporal (todos los modos)
Desplace el interruptor PAUSE hacia la derecha. Desplácelo
hacia la izquierda para reanudar la operación.
Inspección rápida y grabación
Mientras graba, presione y mantenga el botón REW/REV
(el botón REC se desconecta) hasta que la cinta se halla al
punto deseado. Suelte el botón REW/REV para reproducir
su grabación. Presione el botón REC para reanudar la
grabación.
Protección contra borrar accidentalmente (Fig. 7)
Para proteger el lado A. rompa la lengüeta (1). Para proteger
el lado B, rompa la lengüeta (2).
• Para borrar o grabar una cinta protegida, cubra el espacio
de la lengüeta con una cinta adhesiva (3).
NOTA: El botón REC no puede ser presionado cuando se
utiliza una cinta protegida.
Fig. 7
TRC-970C_US 25/03/2004, 12:0521
-S7-
Page 22

REPRODUCCIÓN (Fig. 8)
1. Ponga la cinta como se indica
en la Fig. 6.
2. Presione el botón PLAY y ajuste
el control VOLUME.
3. Use el interruptor TAPE SPEED
para seleccionar la velocidad
de reproducción. (Este
interruptor no afecta la
grabación).
SLOW: Velocidad lenta
NOR: Velocidad normal
FAST: Velocidad rápida
4. Presione el botón STOP para detener la reproducción.
Señal sonora e inspección
Mientras está reproduciendo, presione y mantenga el botón
FFWD/CUE o REW/REV. Suelte el botón cuando alcance
el punto deseado. La reproducción continua.
4
2
2
Fig. 8
3
1
MANTENIMIENTO
Para asegurarse de un buen
funcionamiento, utilice un bastón de
algodón (1) humedeciéndolo con
limpiador de cabezales para limpiar
los cabezales del aparato (4, 5),
rodillo presor (3) y cabrestante de
arrastre (2) después de cada 10
horas de uso (Fig. 9).
TRC-970C_US 25/03/2004, 12:0522
-S8-
3
4
5
2
1
Fig. 9
Page 23

Para EE, UU
GARANTÍA LIMITADA SERVICE
PLUS DE SANYO
SÓLO PARA PRODUCTOS DE
DICTADO
Para obtener servicio de garantía de fábrica para productos
de dictado Sanyo, llame gratis al número que se indica más
abajo. Para evitar daños durante el transporte, asegúrese
de embalar el producto en la caja de cartón original o en un
cartón resistente y bien acolchado.
Nota: Cuando necesite servicio, no devuelva este producto
a la tienda donde lo adquirió.
Para obtener servicio de garantía Service Plus, Información
sobre el funcionamiento del producto o información sobre
cómo soluionar problemas, llame
Días laborables 8:00 AM - 5:00 PM Tiempo Pacifico
ESTA GARANTÍA SÓLO ES VÁLIDA PARA PRODUCTOS
DE DICTADO SANYO ADQUIRIDOS Y USADOS EN LOS
ESTADOS UNIDOS DE AMÉRICA, EXCLUYENDO TODOS
LOS TERRITORIOS Y PROTECTORADOS DE EE. UU.
ESTA GARANTÍA SÓLO ES VÁLIDA PARA EL
COMPRADOR ORIGINAL AL DETALLE; NO ES VÁLIDA
PARA PRODUCTOS USADOS CON CUALQUIER FIN
INDUSTRIAL, PROFESIONAL O COMERCIAL. AL
OBLIGACIONES
gratis al 1-877-999-1840
TRC-970C_US 25/03/2004, 12:0523
-S9-
Page 24

MOMENTO DE SOLICITAR SERVICIO DE GARANTÍA
DEBERÁ PRESENTAR LA FACTURA ORIGINAL DE
COMPRA, DEBIDAMENTE FECHADA.
De acuerdo con las OBLIGACIONES establecidas
anteriormente y las EXCLUSIONES que se detallan más
abajo, SANYO FISHER COMPANY (SFC) garantiza este
producto de dictado SANYO contra defectos en los materiales
y defectos de fabricación durante los períodos de MANO
DE OBRA y PIEZAS que se especifican a continuación. SFC,
a su discreción, dentro de dos días hábiles después de recibir
cualquier producto de dictado que no cumpla con esta garantía
en un taller de servicio designado por SFC, (a) reparará dicho
producto o cualquiera de sus piezas que no cumpla con lo
que se establece en esta garantía o (b) sustituirá el producto
por otro.
El período de garantía comienza a regir desde la fecha de
compra inicial al detalle del producto.
MANO DE OBRA PIEZAS
1 AÑO 1 AÑO
Esta garantía no cubre (A) el ajuste de controles “accionados
por el cliente”, según se explica en el manual de instrucciones
del modelo correspondiente, ni (B) la reparación de cualquier
producto cuyo número de serie haya sido alterado, tachado
o quitado. Esta garantía no es válida para la cubierta o partes
ornamentales, botones o mantenimiento de rutina.
TRC-970C_US 25/03/2004, 12:0524
EXCLUSIONES
-S10-
Page 25

Esta garantía no es válida para reparaciones o cambios que
sea necesario realizar por cualquier causa que escape al
control de SFC, incluyendo, pero no limitándose a, cualquier
malfuncionamiento, defecto o fallo causado por o que sea
resultado de servicio no autorizado o uso de piezas no
autorizadas, mantenimiento indebido, uso que contravenga
las instrucciones incluidas, accidentes por transporte o tránsito,
modificación o reparación por el usuario, abuso, uso indebido,
negligencia, accidentes, tensión de linea incorrecta u otros
hechos fortuitos, o desgaste y deterioro normal.
Lo anterior reemplaza a todas las otras garantías expresas
y SFC no asume ninguna obligación o responsabilidad ni
autoriza a ningún tercero a asumir ninguna obligación o
responsabilidad en su nombre.
LA DURACIÓN DE CUALQUIER GARANTÍA IMPLÍCIT A POR
LA LEY (INCLUYENDO GARANTÍAS DE
COMERCIALIZACIÓN Y CONVENIENCIA) ESTÁ LIMIT ADA
A LA DURACIÓN DE ESTA GARANTÍA. SFC NO SERÁ,
EN NINGÚN CASO, RESPONSABLE POR DAÑOS
ESPECIALES, CASUALES O RESULTANTES QUE SURJAN
DE LA PROPIEDAD O USO DE ESTE PRODUCTO, O POR
CUALQUIER RETRASO EN EL CUMPLIMIENTO DE LAS
OBLIGACIONES ESTABLECIDAS EN ESTA GARANTÍA
DEBIDO A CAUSAS QUE ESCAPEN A SU CONTROL.
ALGUNOS ESTADOS NO PERMITEN LIMITACIONES A LA
DURACIÓN DE UNA GARANTÍA IMPLÍCITA Y/O NO
PERMITEN LA EXCLUSIÓN O LIMITACIÓN DE DAÑOS
RESULTANTES, POR LO QUE LAS LIMITACIONES
TRC-970C_US 25/03/2004, 12:0525
-S11-
Page 26

ANTERIORES PUEDEN NO SER APLICABLES EN SU
CASO. ESTA GARANTÍA LE DA DERECHOS LEGALES
ESPECÍFICOS. TAMBIÉN PUEDE TENER OTROS
DERECHOS QUE VARÍAN DE ESTADO EN ESTADO.
S/D R2
Para su protección en caso de robo o pérdida de este producto,
llene los siguientes espacios con la información
correspondiente; esto le servirá como un registro personal.
Núm. de modelo
Núm. de serie
(Se encuentra en la parte posterior o interior de la unidad)
Fecha de compra
Precio
Lugar de compra
21605 Plummer Street
-S12-
Chatsworth, CA 91311
TRC-970C_US 25/03/2004, 12:0526
Page 27

TRC-970C_US 25/03/2004, 12:0527
Page 28

F12
SANYO Canada Inc.
Lieu d’achat
Prix d’achat
Date d’achat
(Situé à l’arrière ou au bas de l’appareil)
N° de série
N° de modèle
vos propres registres personnels.
nous vous prions de remplir les informations ci-dessous pour
Pour votre protection en cas de vol ou de perte de ce produit,
TRC-970C_US 25/03/2004, 12:0528
Page 29

F11
SDR 01/05 (R11)
http://www.sanyocanada.com
1-800-263-2244
(905) 760-9944
L4K 5C7
Concord, Ontario
1-300 Applewood Crescent
SANYO Canada Inc.
vendu l’appareil ou joindre directement SANYO Canada Inc.:
Veuillez consulter le détaillant Sanyo autorisé qui vous a
COMMENT SE PRÉVALOIR DU RECOURS EN GARANTIE
garantie demeurera en vigueur.
seront nulles et non avenues, mais le reste de la présente
tel cas, les conditions ainsi interdites en vertu de ces lois
et exclusions figurant dans la présente garantie. Dans un
circonstances, peuvent interdire certaines des restrictions
l’application de lois provinciales qui, dans certaines
Les dispositions qui précèdent n’empêchent aucunement
GARANTIES STATUTAIRES
ou indirects résultant de l’utilisation de cet appareil.
en aucun cas tenus responsables des dommages spéciaux
b) SANYO Canada Inc. ou ses détaillants autorisés ne seront
TRC-970C_US 25/03/2004, 12:0529
Page 30

F10
l’acheteur.
amélioration que ce soit dans ou sur l’appareil de
modifier de quelque façon que ce soit ou d’installer quelque
l’objet de la présente garantie sans avoir l’obligation de
d’améliorer le concept du modèle de l’appareil faisant
a) SANYO Canada Inc. se réserve le droit de modifier ou
RESTRICTIONS
centre de service Sanyo autorisé.
réparé par quiconque autre que SANYO Canada Inc. ou un
de l’appareil sont modifiés ou effacés ou si l’appareil a été
La présente garantie devient invalide si les numéros de série
INVALIDATION DE LA GARANTIE
pourrait nécessiter.
assumez aussi tous les frais d’ENTRETIEN que l’appareil
centre de service Sanyo autorisé et par son retour. Vous
par l’expédition de l’appareil à SANYO Canada Inc. ou à un
Vous assumez tous les frais de TRANSPORT occasionnés
vous prévaloir du recours en garantie.
ou à un centre de service Sanyo autorisé lorsque vous désirez
ture originale datée et cette garantie à SANYO Canada Inc.
Vous, l’acheteur au détail initial, devez présenter votre fac-
OBLIGATIONS DE L’ACHETEUR AU DÉTAIL INITIAL
la négligence.
à un mauvais traitement, à un usage non approprié ou à
g) Les dommages dus à un entretien incorrect, à un accident,
attribuables.
TRC-970C_US 25/03/2004, 12:0530
Page 31

DICTAPHONES
F9
f) Les dommages subis durant le transport ou y étant
et cordons.
e) Les accessoires, y compris étuis de transport, cassettes
d) Les réglages décrits dans le manuel d’instructions.
c) Les problèmes résultant du déballage et de l’installation.
b) Les dictaphones achetés usagés.
a) Les dictaphones achetés à l’extérieur du Canada.
LA GARANTIE NE COUVRE PAS :
l’expiration de la garantie initiale de l’appareil.
Les PIÈCES de remplacement sont garanties jusqu’à
fabrication.
présentant effectivement un défaut de matériel ou de
ou, à sa discrétion, remplacera tout dictaphone Sanyo
Durant la période de garantie, SANYO Canada Inc. réparera
OBLIGATIONS DE SANYO CANADA INC.
initial de l’appareil garanti.
présente garantie s’applique uniquement à l’acheteur au détail
dant 90 JOURS pour ce qui est de la main-d’oeuvre. La
l’acheteur au détail initial pour ce qui est des pièces et penmatériaux pendant UN AN à partir de la date d’achat par
Canada sont garantis contre les défauts de fabrication et de
Les dictaphones Sanyo achetés neufs et non usagés au
APPLICATION DE LA GARANTIE
GARANTIE DE FIABILITÉ SANYO
TRC-970C_US 25/03/2004, 12:0531
Pour le CANADA
Page 32

F8
1
2
4
2
3
2
1
3
5
4
Fig. 9
Fig. 8
d’utilisation (Fig. 9).
(2) après environ 10 heures
galet presseur (3) et le cabestan
pour nettoyer les têtes (4, 5), le
humidifié avec du nettoyeur de tête
continu, utiliser un coton-tige (1)
Afin d’assurer un haut rendement
ENTRETIEN
vous avez atteint le point désiré. L'écoute continue.
FFWD/CUE ou REW/REVIEW. Relâchez la touche lorsque
Tandis que l’écoute, pressez et gardez enfoncée la touche
Repère et révision
4. Appuyer sur la touche STOP pour arrêter la lecture.
FAST: Vitesse rapide
NOR: Vitesse normale.
SLOW: Vitesse lente
n'affecte pas l'enregistrement.)
SPEED (Ce commutateur
ture avec le commutateur T APE
3. Sélectionner la vitesse de lec-
ajustez le contrôle du VOLUME.
2. Pressez la touche PLAY et
démontré dans la Fig. 6.
1. Chargez une cassette comme
LECTURE (Fig. 8)
TRC-970C_US 25/03/2004, 12:0632
Page 33

Fig. 7
F7
lorsqu’une cassette protégée est utlisée.
REMARQUE: La touche REC ne peut pas être enfoncée
(3).
les ouvertures de taquets avec de la bande adhésive
• Pour effacer ou enregister une cassette protégée, couvrir
la face B, casser le taquet (2).
Pour protéger la face A, casser le taquet (1). Pour protéger
Précautions contre l’effacement accidentel (Fig. 7)
l’enregistrement.
l’enregistrement. Pressez le bouton REC pour continuer
Relâchez la touche REW/REV pour l’écoute de
la bande magnétique soit rembobinée jusqu’au point désiré.
che REW/REV (la touche REC est relâchée)jusqu’à ce que
Durant l’enregistrement, pressez et gardez enfoncée la tou-
Repérage arrière rapide et enregistrement
la gauche pour continuer le fonctionnement.
Glissez l’interrupteur PAUSE vers la droite. Glissez-le vers
Arrêt temporaire de fonctionnement (tous les modes)
TRC-970C_US 25/03/2004, 12:0633
Page 34

F6
ou la fin de la bande magnétique est atteinte.
REV. Pressez la touche STOP lorsque qu’un point désiré
En mode d’arrêt, pressez la touche FFWD/CUE ou REW/
Avance rapide ou rembobinage
7. Appuyer sur la touche STOP pour arrêter l’enregistrement.
• L'index de tonalité peut être entendu durant l'écoute.
touche CUE INDEX pour continuer l'enregistrement.
index de tonalité sur la bande magnétique. Relâchez la
importants de l'enregistrement. L'appareil enregistre un
au moins 3 secondes afin de marquer les segments
6. Pressez et gardez pressé le bouton CUE INDEX pour
STOP soit pressée.
L'enregistrement continuera jusqu'à ce que la touche
VAS OFF: Enregistrement standard
importants, mettez l'interrupteur VAS à OFF.)
commencer la dictée. (Pour les enregistrements
autre mot pour commencer l'enregistrement avant de
l'enregistrement mais ne sont pas enregistrés, dites un
REMARQUE: Si les premiers mots dits activent
volume.
n'arrête pas lorsque vous cessez de parler, diminuez le
l'enregistrement, augmentez le volume. Si l'enregistrement
du microphone à votre voix. Si la voix ne démarre pas
Utilisez la commande VOLUME pour ajuster la sensibilité
l'enregistrement).
variations du niveau de la voix n'arrêteront pas
à 8 secondes, l'appareil arrêtera l'enregistrement (les
l'enregistrement. Lorsque vous arrêtez de parler pour 4
Lorsque vous parlez, l'appareil commencera
VAS ON: Enregistrement par commande vocale
TRC-970C_US 25/03/2004, 12:0634
Page 35

F5
1
3
7
2
5
4
5
6
Fig. 6
temps.)
che PLAY est enfoncée en même
5. Appuyer sur la touche REC. (La tou-
4. Mettez l’interrupteur VAS à ON ou OFF .
CONF: Enregistrement de conférences
DICT: Enregistrement de dictée
avec le commutateur DICT/CONF
3. Sélectionner le mode d'enregistrement
ruban.
compteur affiche la position relative du
mettre le compteur à "000". Le
2. Presser la touche de réinitialisation pour
démontré dans la Fig. 6.
1. Chargez une cassette comme
Fig. 5
Micro incorporé
(sans fin).
REMARQUE: N'utilisez pas de cassettes C-120 ou bouclées
ENREGISTREMENT (Fig. 5)
TRC-970C_US 25/03/2004, 12:0635
Page 36

F4
Fig. 4
automatiquement.)
l'écoute privée. (Le haut-parleur est déconnecté
Brancher un écouteur (non fourni) dans la prise EAR pour
Écouteurs
(Le microphone incorporé est déconnecté automatiquement.)
Connecter un microphone externe (non fourni) à la prise MIC.
Microphone externe
CONNEXIONS
APPLICABLES.
OU JETEES COMFORMEMENT AUX LOIS
DECHARGEES DOIVENT ETRE RECYCLEES
LES PILES NICKEL-CADMIUM EPUISEES OU
REMARQUE IMPORTANTE :
continuelle pour plus de 24 heures.
• Ne rechargez pas de façon
l'adaptateur est connecté.
approximativement 8 heures une fois que
pile se recharge complètement en
la fig. 4. Connecter l'adaptateur CA. La
NBP-30B, non fournie) conformément à
Installer la pile rechargeable (SANYO
Pile rechargeable
TRC-970C_US 25/03/2004, 12:0636
Page 37

Fig. 3
F3
TRAITEMENT DE DÉCHETS SOLIDES.
CONTACT AVEC VOTRE AGENCE LOCALE DE
POUR DES INFORMATIONS DÉTAILÉES, PRENEZ
CONFORMITÉ AVEC LES LOIS EN VIGUEUR.
RECYCLÉES OU ÉLIMINÉES CORRECTEMENT EN
LES PILES USÉES OU DÉCHARGÉES DOIVENT ÊTRE
REMARQUE IMPORTANTE:
une pile neuve ou de type différent.
piles du même type. Ne pas mettre de pile usagée avec
• ors du remplacement de piles, utilisez deux nouvelles
ou la lumière est faible, remplacez les piles.
Lorsque l'indicateur BATT/OPR n'allume pas durant l'écoute
Remplacement des piles
les piles.
pendant un mois ou plus, enlever
• Si l’appareil doit ne pas être utilisé
3. Respecter les polarités appropriées.
fournies) comme indiqué sur la Fig.
Placer deux piles de type “AA” (non
Pile
TRC-970C_US 25/03/2004, 12:0637
Page 38

F2
Fig. 2
EXT DC3V
AC 120V
(+).
• La broche centrale de la prise EXT DC 3V est positive
piles sont déconnectées automatiquement.)
3CV230XE ou NT-3CV) à la prise EXT DC3V(Fig. 2). (Les
Brancher l’adaptateur de courant alternatif (modèle no.
Adaptateur de courant alternatif (CA)
ALIMENTATION
19. Commutateur de pause (PAUSE)
18. Touche d’arrêt (STOP)
17. Rewind/Review button (REW/REV)
16. Touche d'avance rapide/Repérage (FFWD/CUE)
15. Commutateur de dictée/Conférence (DICT/CONF)
14. Prise externe DC 3V (EXT DC 3V)
13. Touche de lecture (PLAY)
12. Touche d’enregistrement (REC)
réinitialisation
11. Touche de compteur de bande magnétique et de
(partie inférieure)
10. Commutateur de vitesse de bande (TAPE SPEED)
TRC-970C_US 25/03/2004, 12:0638
Page 39

123456
7
8
9
10
111213
14
15
16
17
18
19
F1
9. Compartiment à piles (panneau arrière)
8. Compartiment à cassette
7. Micro incorporé
6. Prise pour écouteur (EAR)
5. Prise pour le microphone (MIC)
4. Bouton index de repère (CUE INDEX)
3. Commande du volume (VOLUME)
2. Interrupteur du système d'activation vocale (VAS)
1. Indicateur de fonctionnement/Pile (BATT/OPR)
Fig. 1
COMMANDES (Fig. 1)
TRC-970C_US 25/03/2004, 12:0639
FRANÇAIS
Page 40

FRANÇAIS
FRANÇAIS
Imprimé en Chine
TRC-970C, Issue Number 1
1AD6P1P0718-U
Magnétophone à cassettes Compact
TRC-970C_US 25/03/2004, 12:0640
TRC-970C
MODE D’EMPLOI
 Loading...