

Page 1
INSTRUCTION MANUAL
Manual de Instrucciones
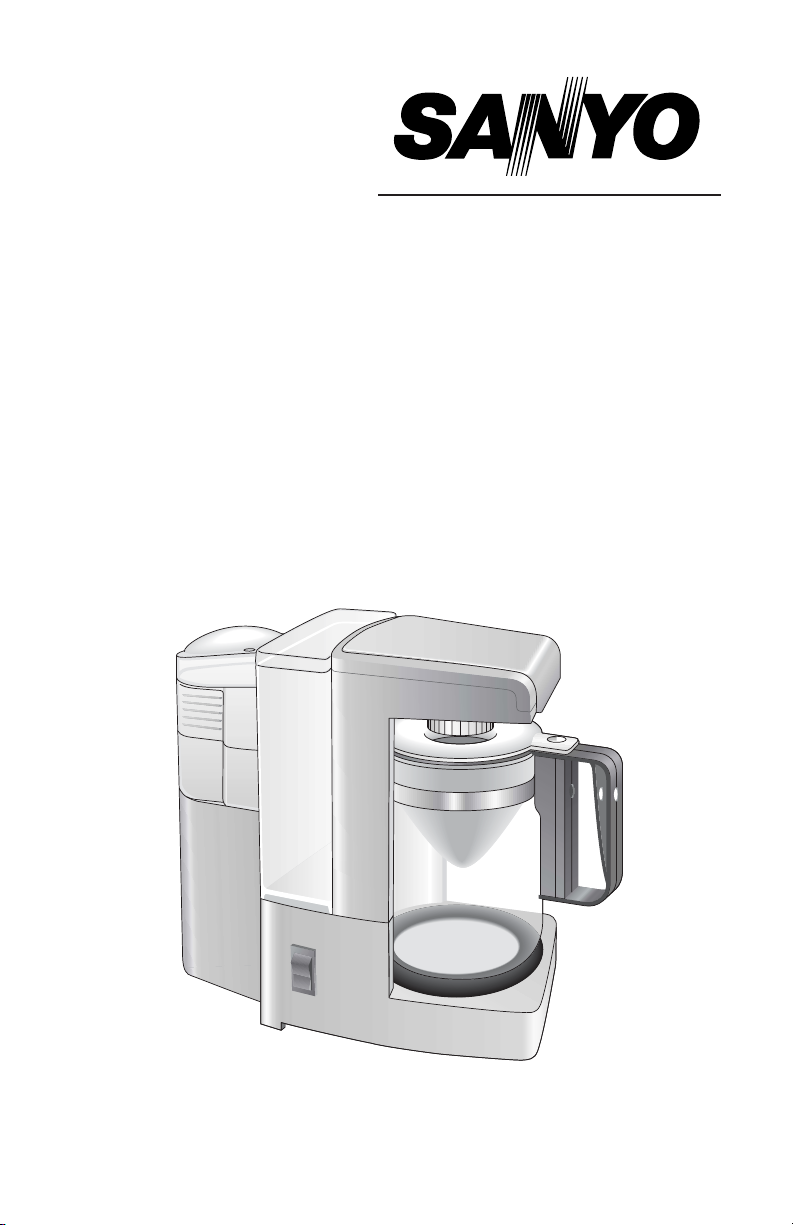
COFFEE AND TEA MAKER
WITH BUILT IN GRINDER
SAC-MST6
Page 2
Table of Contents
■ Important Safeguards .................................................2
■
Names of Parts ...........................................................3
■
Accessories ................................................................4
■
General Instructions ...................................................5
■ Operating Instructions/How to Make Coffee............6-8
■
Operating Instructions/How to Make Tea ..............9-10
■
Care and Maintenance .............................................11
■
Troubleshooting ........................................................12
■
Specifications ...........................................................12
■ Warranty...................................................................13
■
Spanish....................................................................14-
Thank you for your purchase of a
SANYO COFFEE AND TEA MAKER WITH BUILT IN GRINDER.
Please read these instructions carefully before use
and be sure to keep the manual in a safe place for
future reference.
1
Page 3

IMPORTANT SAFEGUARDS
When using electrical appliances, follow basic safety precautions to
reduce the risk of fire, electrical shock, and/or injury:
1. Read all instructions.
2. Do not touch hot surfaces. Use
handles or knobs.
3. To protect against fire, electrical
shock, and personal injury, do not
immerse cord, plugs, or
coffee-making unit in water or
other liquid.
4. Close supervision is necessary
when any appliance is used by or
near children.
5. Unplug unit from outlet when not in
use and before attaching or
removing parts, and before
cleaning.
6. Do not operate any appliance with
a damaged cord or plug after the
appliance malfunctions or has
been damaged in any manner.
Return appliance to an authorized
service facility for examination,
repair or adjustment.
7. To protect against risk of electrical
shock, do not force any foreign
objects, such as pins and wires,
into any openings.
8. The use of accessory attachments
is not recommended by the
appliance manufacturer and may
result in fire, electric shock or
personal injury.
9. Do not use outdoors.
10. Do not let cord hang over edge
of table or counter, or touch hot
surfaces.
11. Do not place on or near a hot
gas or electric burner, or in a
heated oven.
12. The carafe is designed for use
with this coffee maker. It must
never be used on a range top.
13. Do not set a hot carafe on a wet
or cold surface.
14. Do not use a cracked carafe or
a carafe that has a loose or
weakened handle.
15. Do not clean carafe with
cleansers, steel wool pads, or
other abrasive material.
16. To disconnect, set the switch to
its "Off" position, then
remove the plug from wall outlet.
17. Do not use appliance for other
than intended use.
This product is designed for
household use only.
SAVE THESE INSTRUCTIONS
Note:
A. A short power-supply cord is provided to reduce risks of becoming entangled
in or tripping over a longer cord.
B. Extension cords are available and may be used if care is exercised in their use.
C. If extension cord is used:
(1) The marked electrical rating of the extension cord should be at least
as great as the electrical rating of the appliance.
(2) The longer cord should be arranged so that it will not drape over the
countertop or tabletop where it can be pulled on by children or tripped over.
The appliance has a polarized plug (one blade is wider than the other is).
As a safety feature, this plug will fit in a polarized outlet only one way. If the
plug does not fit fully in the outlet, reverse the plug. If it still does not fit,
contact a qualified electrician.
Do not attempt to override this safety feature.
2
Page 4
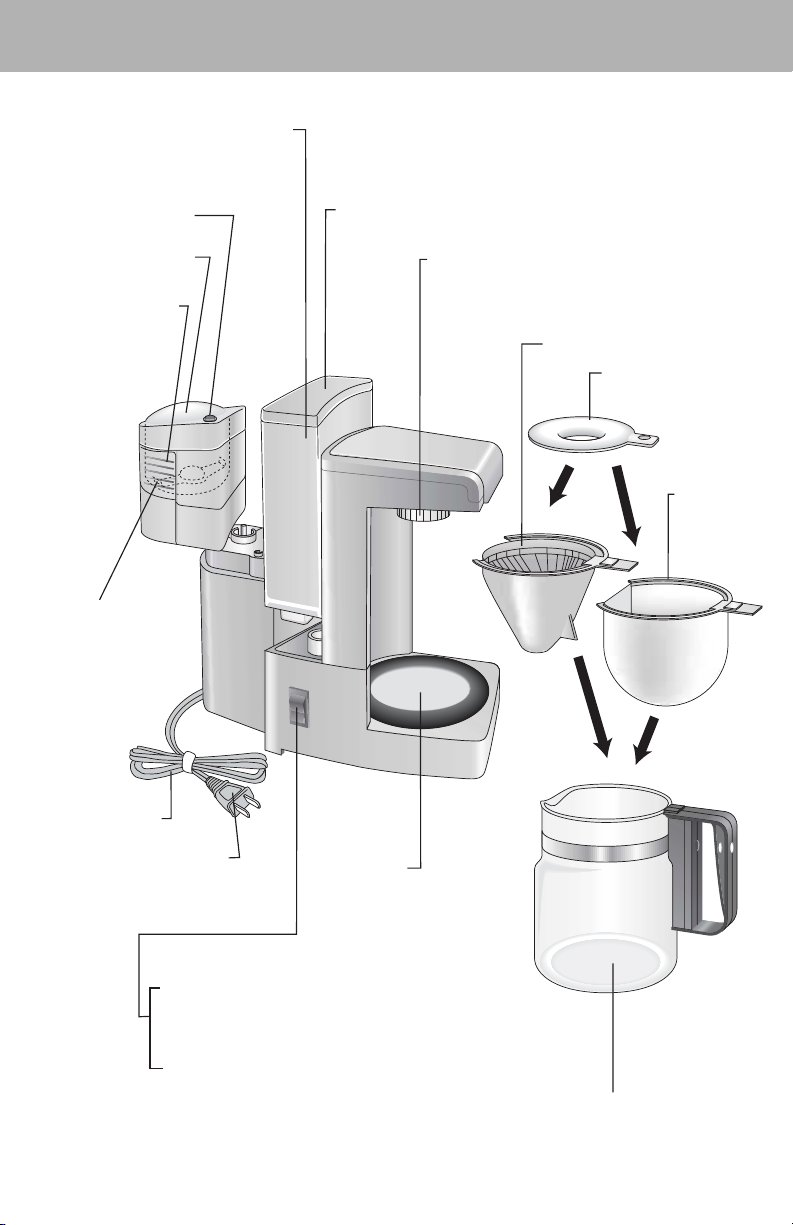
Water Tank Lid
Water Tank
(Removable, see Page 5 for
how to attach and remove)
Grind Button
Grinder Cover
Grinder Case
(Removable, see
Page 5 for how
to attach and
remove).
Cutter Blades
On/Keep Warm Switch
(Switch will light up when pressed and indicates
the unit is on.)
Off/Grind Switch
(Switch will not light up and indicates the unit
is off. Switch must be in this position to grind
coffee beans.)
Power Cord
Power Supply Plug
(For the use of 120V/15A
and above outlet only.)
Charcoal Filter
(Removable, see Page 5 for
how to attach and remove)
Keep
Warm Plate
Coffee Basket
Basket Cover
(for coffee and tea)
Tea
Basket
Glass Carafe
NAMES OF PARTS
3
Page 5
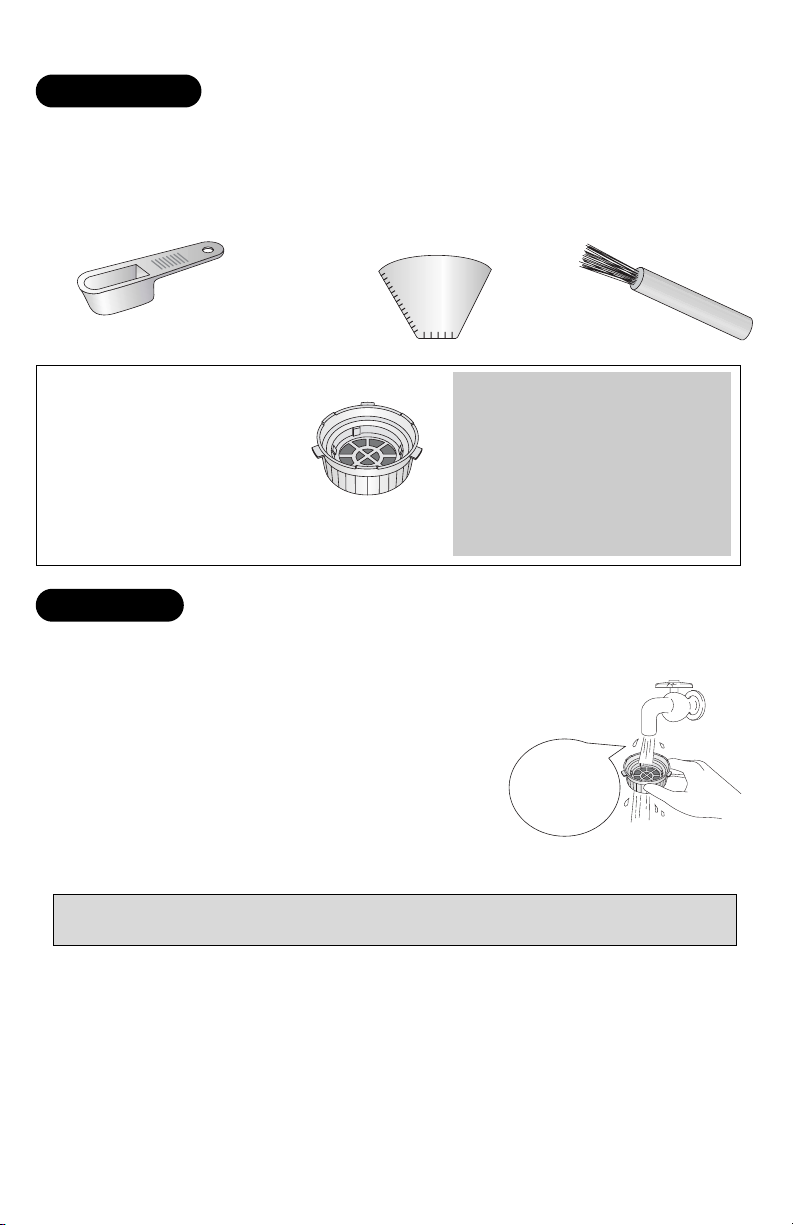
Measuring Spoon (1 each)
Level Spoonful =
Coffee : approx. 0.28 oz.
Tea : approx. 0.21 - 0.28 oz.
Paper Filter (3 each)
For making coffee only.
(Use filters like Melitta No. 2
once your initial supply is
exhausted).
Cleaning Brush
(1 each)
Use to clean grinder
case.
ACCESSORIES
4
The replacement standard varies
depending on frequency of use.
Replacement of the filter is
recommended once in two years, if
the unit is used daily.
A replacement charcoal filter can be
purchased at the store where your
unit was purchased or visit
www.sanyo.com
Follow cleaning instructions below before making coffee or tea for the first time
or after a prolonged period of storage.
1. Run tap water through the charcoal filter for at least
10 seconds before attaching it to the main body.
(See illustration)
2. Wash tank, tank lid, glass carafe, coffee basket
(or tea basket), and basket cover and assemble.
3. Fill water tank with water to "6 Cups" line.
4. Plug in and set switch to the "On" position.
Let the unit run through the brewing process once or twice.
*If there are black-colored fibers from the charcoal filter floating in the hot water,
wash the filter under running water again.
BEFORE USE
For
best results,
rinse the filter
before each
use.
Charcoal Filter (1 each)
Charcoal Filter reduces the
smell of chlorine.
Page 6

✱ How to attach:
Slide the grinder case down along
side of the water tank. Make sure the
grinder case is firmly attached.
✱
How to remove:
Grab hold of the sides of
the grinder case and pull
it up vertically.
✱
How to remove:
Support the main unit with one hand
and grasp the indented part of the
tank and lift it out vertically.
✱
How to attach:
Match the groove of the main unit with
the water tank and slide the water tank
all the way down to the bottom until the
tub of the main unit latches onto the slot
of the tank.
*Water tank must fit tightly on the bottom of the unit
or water may not be dispensed properly for brewing.
For your safety and to prevent damage to the glass carafe, please read and
follow these instructions.
●
Do not use it on stove or in microwave oven.
●
Do not drop or knock it against a hard surface.
●
Do not splash or immerse in water while the decanter is still hot.
●
Do not place a hot carafe on a wet surface.
●
Do not clean with a scouring powder, scouring sponge, steel wool, etc.
●
Do not fill with ice or stir with metal spoon.
●
Do not wash in a dishwasher.
✱ How to remove:
Turn the filter against the direction of
arrow, clockwise.
*If the glass carafe gets scratched, it is more susceptible to breakage. If glass carafe gets cracked
or broken, please discard it carefully.
✱ How to attach:
➀
Match tabs of the filter with cutout
of the body and push in.
➁ Tu rn the filter to the direction of the
arrow, counter-clockwise, until it stops.
*There may be hot water remaining inside
of the unit immediately after brewing. To
avoid injury, let the unit cool off completely
before replacing filter to avoid injury.
GENERAL INSTRUCTIONS
HOW TO REMOVE AND ATTACH CHARCOAL FILTER
HOW TO REMOVE AND ATTACH WATER TANK
HOW TO REMOVE AND ATTACH THE GRINDER CASE
CARE FOR THE GLASS CARAFE
5
Page 7

Set switch to "Off/Grind" position and plug in.
*If switch is set to the "On/Keep Warm" position,
the grinder will not function, but the "Keep
Warm" plate will heat up. Do not touch the plate
to avoid injury.
Add coffee beans to grinder case.
➀ Measure coffee beans with the measuring spoon that is provided as an
accessory. (see chart)
➁ Close the grinder cover.
*Do not run the grinder when empty or
filled with more than 6 measuring spoons
of coffee beans. Doing so may damage
the motor.
The inside of grinder
and grinder cover
should be completely
dry, or coffee grains
will stick.
1
6 cups 6
5 cups 5
4 cups 4
3 cups 3
2 cups 2
1 cup 1 + 2/5
4/5 (Top Line)
2/5 (Middle Line)
1/5 (Bottom Line)
NO. OF CUPS OF
HOT/ICE COFFEE
MEASURING
SPOON
Measuring Spoon Guide
HOW TO MAKE COFFEE
6
2
➀
➁
Suggested Coffee Bean Measurements
➁
Remove grinder case from main unit and
tap the lid lightly so that coffee grounds will
settle in the case and prevent any spillage
when the lid is opened.
*Do not press Grind button for more than 15 seconds.
Doing so may grind the beans too fine and may clog
paper filters, which may cause hot water to overflow
from coffee basket.
*Cutter blades may still be spinning for few seconds
after the Grind button is pressed. Always make
certain that the cutter blades come to a complete
stop prior to removing the grinder case from the
main body.
Make sure the tank lid is
closed while grinding.
Coffee grounds or beans
may fall in the tank and
may cause malfunction.
Press
Press Grind button to grind coffee beans.
3
➀ While pressing grinder cover, press Grind
button for 10 seconds. (It generally takes 10
seconds for medium ground coffee. Use a
shorter grind time for coarser ground.)
Keep Warm
Grind
Page 8

➀ Place coffee basket in glass carafe.
➁ Place a paper filter in coffee basket
and press lightly.
➂ Add coffee grounds from grinder
case to paper filter and level the
coffee grounds.
➃ Place basket cover on top of coffee
basket.
Fold a paper filter at the seam and open wide, as
illustrated.
HOW TO FOLD A PAPER FILTER
7
Place paper filter in coffee basket and add coffee grounds.
4
➀
➃
➂
➁
*Do not add more water than
"Cups 6" line. Doing so may
cause the water to overflow.
➀ Place carafe on Keep Warm plate.
➁ Fill water tank with desired amount
of water, using the water level guide.
(see illustration)
➂ Cover the water tank with tank lid.
Water tank
must be
attached
firmly to the
bottom of
the unit.
For best results,
flush charcoal
filter with
running water
prior to attaching
it to unit.
Fill the water tank with desired number of cups of water.
WATER TANK
MEASUREMENT
Hot Coffee/
Hot Tea
Water Level
Ice Coffee/
Ice Tea
Water Level
5
➀
➂
➁
Set switch to "On/Keep Warm"
position.
6
Keep Warm
Grind
Page 9

(When water temperature is 68°F)
Note:
●
Do not add water during brewing.
●
Brewing time varies depending on water and room temperature, voltage, etc.
●
One-cup water yields approximately 4 oz. for a coffee cup. The amount varies
depending on type, volume, and coarseness of coffee grounds.
Approximate Brewing Times
8
Number of Cups Hot Coffee Ice Coffee
6 Cups Approx. 7 minutes Approx. 4.5 minutes
5 Cups Approx. 6 minutes Approx. 4 minutes
4 Cups Approx. 5.5 minutes Approx. 3.5 minutes
3 Cups Approx. 4.5 minutes Approx. 3 minutes
2 Cups Approx. 3.5 minutes Approx. 2.5 minutes
1 Cup Approx. 2.5 minutes -
Fill a glass almost full with ice; pour freshly brewed coffee over ice.
Gently stir to cool coffee.
●
Add syrup or cream if desired.
●
Do not add ice to glass carafe. It may cause glass to break.
Use "Medium Grounds Paper Filters". Follow Suggested Coffee Bean Measurements on
page 6.
"Fine Grounds Paper Filters" may clog paper filters, which may cause hot water to
overflow from coffee basket.
Note:
●
Use the provided cleaning blush to remove coffee grounds completely from grinder case.
●
Do not use tea basket and coffee basket at the same time.
●
Cover carafe with basket lid and place it on the Keep Warm plate.
●
After brewing, the Keep Warm plate will turn on automatically and will remain on
if the switch is left in the "On" position.
●
Coffee loses flavor after 15 minutes. Drinking it as soon as possible is recommended.
When removing
coffee basket,
watch out for
dripping coffee.
Remove coffee basket and discard used filter and coffee grounds.
Pour coffee.
TO KEEP WARM
●
Set switch to the "Off" position and unplug. Follow cleaning instructions on page 11.
AFTER USE
HOW TO MAKE ICE COFFEE
HOW TO MAKE COFFEE USING COMMERCIALLY GROUND COFFEE
7
Place thumb on the
basket cover brim
and hold while
pouring tea. Hold
the basket lid while
pouring coffee.
Page 10

Place tea basket on top of glass carafe.
Measure the tea leaves with the
measuring spoon that is provided as an
accessory. (see chart)
Add them to the tea basket and level the
tea leaves.
Place basket cover on top of tea basket.
➀
➁
➂
If you are using the unit for the first time, or after a prolonged period of storage, follow the
instructions on Page 4, "Before Use"
Fill the water tank with the desired number of cups of water.
Add tea leaves to tea basket.
➀
➁
➂
HOW TO MAKE TEA
9
1
2
Set switch to "On/Keep Warm"
position.
3
6 cups 1 + 1/5 1 + 4/5
5 cups 1 1+ 2/5
4 cups 4/5 1+ 1/5
3 cups 2/5 1
2 cups 1/5 4/5
1 cup Half of 1/5 2/5
4/5 (Top Line)
2/5 (Middle Line)
1/5 (Bottom Line)
NO. OF CUPS OF
HOT/ICE TEA
Measuring Spoon Guide
Suggested Tea Leaves Measurements
MEASURING SPOON
FINE LEAVES LARGER LEAVES
*Do not add more water than
"Cups 6" line. Doing so may
cause the water to overflow.
➀ Place carafe on Keep Warm plate.
➁ Fill water tank with desired amount
of water, using the water level guide.
(see illustration)
➂ Cover the water tank with tank lid.
Water tank
must be
attached
firmly to the
bottom of
the unit.
For best results,
flush charcoal
filter with
running water
prior to attaching
it to unit.
WATER TANK
MEASUREMENT
Hot Coffee/
Hot Tea
Water Level
Ice Coffee/
Ice Tea
Water Level
➀
➂
➁
Keep Warm
Grind
Page 11

When removing
tea basket,
watch out for
dripping tea.
Place thumb on the
basket cover brim
and hold while
pouring tea. Hold
the basket lid while
pouring tea.
Remove tea basket and discard tea leaves. Pour tea.
Note:
●
Do not add water during brewing.
●
Brewing time varies depending on water and room temperature, voltage, etc.
●
One-cup water yields approximately 4 oz. for a tea cup. The amount varies depending
on types of tea leaves, etc.
●
The tea basket may have some tea leaves remaining for certain types of tea or larger
tea leaves.
●
Cover carafe with basket lid and place it on the Keep Warm plate.
●
After brewing, the Keep Warm plate will turn on automatically and will remain on
if the switch is left in the "On" position.
●
If the tea is kept warm longer than 15 minutes, it becomes bitter. Drink as soon as possible.
TO KEEP WARM
●
Set switch to the "Off" position and unplug. Follow cleaning instructions on page 11.
AFTER USE
Fill a glass almost full with ice; pour freshly brewed tea over ice. Gently stir to cool tea.
Do not add ice to glass carafe. It may cause glass to break.
HOW TO MAKE ICE TEA
●
Set switch to the "Off" position and let stand at least 5 minutes.
●
Repeat Operating Instructions for making coffee or tea.
*The unit remains very hot after coffee or tea is made. Use caution to avoid injury.
*If water is added or unit was moved while the unit is still hot, steam or hot water may
be dispensed form charcoal filter, and may cause injury.
HOW TO MAKE COFFEE OR TEA CONTINUOUSLY
●
Set switch to the "Off" position and unplug.
●
When the dripping has stopped, remove the glass carafe from the unit.
●
Empty any remaining water in the tank.
●
Wipe off water with a dry cloth from connecting mount base.
TO SUSPEND THE OPERATION
4
10
(When water temperature is 68°F)
Approximate Brewing Times
Number of Cups Hot Tea Ice Tea
6 Cups Approx. 8 minutes Approx. 5.5 minutes
5 Cups Approx. 7.5 minutes Approx. 5 minutes
4 Cups Approx. 6.5 minutes Approx. 4.5 minutes
3 Cups Approx. 5.5 minutes Approx. 3.5 minutes
2 Cups Approx. 4.5 minutes Approx. 3 minutes
1 Cup Approx. 3 minutes -
Page 12

●
Always unplug and let the entire unit cool off prior to cleaning.
●
Use a mild dishwashing soap and soft sponge or cloth.
●
Do not use scouring powder or scrubbing brush.
●
Do not put any parts in dishwasher. Doing so may cause the parts to deform.
●
Do not use boiling water. Doing so may cause parts to deform or crack.
ITEMS YOU CANNOT WASH:
●
Main unit and Keep Warm plate
-Wipe the unit with a damp sponge or dishcloth that has a small amount of
mild dishwashing soap. Then wipe it with a dry dishcloth.
●
Grinder lid and grinder case
-Remove coffee grounds with brush that is included and then wipe with a
damp dishcloth.
*To avoid injury, do not touch cutter blades.
*Warning! Do not soak the unit in water or splash it with water. Doing so may
cause the unit to short circuit or cause electric shock.
ITEMS YOU CAN WASH:
●
Glass Carafe
-Wash with a soft sponge and rinse well with water. Do not use scouring
powder, scouring pad, or steel wool. Scratches in the glass may cause
cracking.
●
Tank, Tank Lid, Basket Lid, Coffee Basket, Tea Basket
-Wash well with a soft sponge and rinse with water thoroughly.
●
Charcoal Filter
-Run water through the filter after each use to prevent filter from clogging.
Do not use soaps, bleach, or brushes.
-The color of the filter may change. This is not a malfunction.
Your coffee maker will need an occasional, special cleaning to remove mineral
buildup left by water. Follow the instruction below.
1. Remove charcoal filter. (This is to prevent the vinegar from adhering to filter).
2. Place carafe, coffee basket, with basket lid, on Keep Warm plate.
3. Attach water tank to main body and add water to "Cups 2" line.
Add 1.69 ounces vinegar, and stir well.
4. Set switch to the "On" position and allow the solution to drip until one cupful
is obtained. Set the switch to the "Off" position and wait approximately 10
minutes to allow the solution to settle.
5. After waiting 10 minutes, set the switch to the "On" position and allow the
remaining solution to drip. Once all the solution has dripped out, wait for at
least 5 minutes, pull out the carafe and discard the solution.
Turn the unit off.
6. Rinse the water tank and set the carafe in place. Pour cold tap water into the
tank to "Cups 6" line. Turn unit on and allow the water to drip.
Perform this procedure at least twice.
Repeat until the smell of vinegar disappears.
GENERAL CLEANING INSTRUCTIONS
SPECIAL CLEANING INSTRUCTIONS
CARE AND MAINTENANCE
11
Page 13

Check before requesting service
Symptom Possible Remedy
• Was power cord plugged in properly?
• Was water tank attached to the
Coffee/Tea is not brewing base properly?
• Was the switch in the "On/Keep
Warm" position, not "Off/Grind"?
• Was the switch in the "Off/Grind", not
Grinding does not start "On/Keep Warm"?
• Were grinder lid and grinder case
set properly?
• Was paper filter placed properly?
• Was it folded properly?
Coffee/Tea overflows • Was more than "Cups 6" water added?
• Were more than 6 measuring spoons
of coffee grounds used?
• Was coffee ground too fine?
Black fiber floats in coffee/tea
• Was charcoal filter washed well
prior to use? Wash again.
Oil floats in coffee/tea
• Coffee beans contain oil but are not
harmful to consume.
Brewing is very slow
• A residue in water is clogging inside pipe.
Follow special cleaning instructions.
If above troubleshooting did not solve problems, please stop using and contact
a qualified service person.
TROUBLESHOOTING
Power Source 120V 60Hz
Power
850W
Consumption
Dimensions
11 x 5 x 10
(w x d x h)
Weight 5.3 lbs.
Measuring Spoon,
Accessories Cleaning Brush,
Paper Filter (3 filters)
Power
850W
Consumption
Max. Water 27.4 oz.
Capacity
Power
140W
Consumption
Max. Capacity 1.62 oz.
Grinding Brewing
SPECIFICATIONS
12
3
⁄
16"
13
⁄
16"
7
⁄
8"
Page 14

WARRANTY
13
In order to obtain factory warranty service, call the toll-free number below. The unit must be packed in the
original carton or a well padded sturdy carton in order to avoid shipping damage.
Note: Do not return this unit to the retail store for service.
To obtain factory warranty service, product operation information or for problem resolution, call
1-800-421-5013
Weekdays 8:00 AM – 5:00 PM Pacific Time
Or visit our web site at www.sanyoservice.com
THIS WARRANTY IS VALID ONLY ON SANYO PRODUCTS PURCHASED AND USED IN THE UNITED STATES
OF AMERICA.
THIS WARRANTY APPLIES ONLY TO THE ORIGINAL RETAIL USER AND DOES NOT APPLY TO PRODUCTS
USED FOR ANY INDUSTRIAL, PROFESSIONAL OR COMMERCIAL PURPOSE. THE ORIGINAL DATED BILL OF
SALE OR SALES SLIP MUST BE SUBMITTED TO THE AUTHORIZED SANYO SERVICE CENTER AT THE TIME
WARRANTY SERVICE IS REQUESTED.
Subject to the OBLIGATIONS above and EXCLUSIONS below, SANYO FISHER COMPANY (SFC) warrants this
SANYO product against defects in materials and workmanship for the periods of LABOR and PARTS specified
below. SFC will repair or replace (at its option) the product and any of its parts which fail to conform to this
warranty. The warranty period commences on the date the product was first purchased at retail.
This warranty does not cover (A) the adjustment of customer-operated controls as explained in the appropriate model’s instruction manual, or (B) the repair of any product whose serial number has been altered,
defaced or removed.
This warranty shall not apply to setup, installation, removal or the product for repair or reinstallation of the
product after repair.
This warranty does not apply to repairs or replacements necessitated by any cause beyond the control of
SFC including, but not limited to, any malfunction, defect or failure caused by or resulting from unauthorized service or parts, improper maintenance, operation contrary to furnished instructions, shipping or
transit accidents, modification or repair by the user, abuse, misuse, neglect, accident, incorrect power line
voltage, fire, flood or other Acts of God, or normal wear and tear.
The foregoing is in lieu of all other expressed warranties and SFC does not assume or authorize any party
to assume for it any other obligation or liability.
THE DURATION OF ANY WARRANTIES WHICH MAY BE IMPLIED BY LAW (INCLUDING THE WARRANTIES
OF MERCHANTABILITY AND FITNESS) IS LIMITED TO THE TERM OF THIS WARRANTY. IN NO EVENT
SHALL SFC BE LIABLE FOR SPECIAL, INCIDENTAL OR CONSEQUENTIAL DAMAGES ARISING FROM
OWNERSHIP OR USE OF THIS PRODUCT, OR FOR ANY DELAY IN THE PERFORMANCE OF ITS OBLIGATIONS UNDER THIS WARRANTY DUE TO CAUSES BEYOND ITS CONTROL. SOME STATES DO NOT ALLOW
LIMITATIONS ON HOW LONG AN IMPLIED WARRANTY LASTS AND/OR DO NOT ALLOW THE EXCLUSION
OR LIMITATION OF CONSEQUENTIAL DAMAGES, SO THE ABOVE LIMITATIONS AND EXCLUSIONS MAY
NOT APPLY TO YOU.
THIS WARRANTY GIVES YOU SPECIFIC LEGAL RIGHTS. YOU MAY HAVE OTHER RIGHTS, WHICH VARY
FROM STATE TO STATE.
For your protection in the event of theft or loss of this product, please fill in the information below for your
own personal records.
SANYO COFFEE & TEA MAKER
SAC-MST6 LIMITED WARRANTY
OBLIGATIONS
EXCLUSIONS
LABOR PARTS
1 YEAR 1 YEAR
Model No. Serial No.
(Located on back or bottom side of unit)
Date of Purchase Purchase Price
Where Purchased
Page 15

21605 Plummer Street
Chatsworth, CA 91311
www.sanyo.com
Printed in China
0603
 Loading...