

Sanyo PLC-XU4000 - 4000 Lumens,PLC-XU4000 Owner's Manual
Wired Setting
Projector Set-up and Operation
Owner’s Manual
Network Set-up and Operation
This is the manual for the Network function.
Read this manual thoroughly to operate the Network function.
First, read the owner's manual of the projector to understand the basic
operation of the projector and the safety instructions.
The safety instructions in the owner's manuals should be followed strictly.

2
Compliance
Federal Communications Commission Notice
This equipment has been tested and found to comply with the limits for a Class B digital
device, pursuant to part 15 of the FCC Rules. These limits are designed to provide reasonable protection against harmful interference in a residential installation. This equipment
generates, uses and can radiate radio frequency energy and, if not installed and used
in accordance with the instructions, may cause harmful interference to radio communications. However, there is no guarantee that interference will not occur in a particular
installation. If this equipment causes harmful interference to radio or television reception
which can be determined by turning the equipment off and on, the user is encouraged
to try to correct the interference by one or more of the following measures:
- Reorient or relocate the receiving antenna.
- Increase the separation between the equipment and receiver.
- Connect the equipment into an outlet on a circuit different from that to which the
receiver is connected.
- Consult the dealer or an experienced radio/TV technician for help.
Use of shielded cable is required to comply with class B limits in Subpart B of Part 15 of
FCC Rules.
Do not make any changes or modifications to the equipment unless otherwise specified in the instructions. If such changes or modifications should be made, you could be
required to stop operation of the equipment.
Model Numbers : PLC-XU4000
Trade Name : Sanyo
Responsible party : SANYO NORTH AMERICA CORPORATION
Address : 21605 Plummer Street, Chatsworth, California 91311
Telephone No. : (818)998-7322
3
ENGLISH
Safety instructions
CAUTION IN USING THE PROJECTOR VIA NETWORKS
● When you find a problem with the projector, remove the power cable
immediately and inspect the unit. Using the projector with failure may cause
fire or other accidents.
● If you remotely use the projector via networks, carry out a safety check regularly
and take particular care to its environment. Incorrect installation may cause fire
or other accidents.
CAUTION IN USING NETWORK FUNCTION
● We assume no responsibility for the loss or damage of data, or damage of the
computer caused by using this projector. Making back-up copies of valuable
data in your computer is recommended.

4
Compliance ....................................................................................................................................................................................2
Safety instructions .....................................................................................................................................................................3
Table of contents ........................................................................................................................................................................4
Chapter 1 Preparation ................................................................................................5
Features...................................................................................................................................................................................6
Required operating environment for computers ........................................................................................7
Network specifications of the projector ............................................................................................................7
Flow of installation ...........................................................................................................................................................9
Chapter 2 Setup Procedures..................................................................................11
Connecting to the LAN line .................................................................................................................................... 12
Network configuration ............................................................................................................................................... 12
Network PIN code ......................................................................................................................................................... 14
Network information ................................................................................................................................................... 14
Network factory default ............................................................................................................................................15
Wired LAN factory default settings .................................................................................................................... 16
Chapter 3 Basic Setting and Operation .............................................................17
Login the setting page of the projector ......................................................................................................... 18
[1] Enter the IP address......................................................................................................................................18
[2] Login .....................................................................................................................................................................18
[3] Display of main setting page ................................................................................................................19
How to use the setting page .................................................................................................................................20
Initial setting .....................................................................................................................................................................22
Network PIN code setting ..............................................................................................................................23
PJLink and password setting.........................................................................................................................23
Network configuration ............................................................................................................................................... 24
E-mail setting ...................................................................................................................................................................25
Examples: Type and contents of alert mail ..........................................................................................28
SNMP setting ....................................................................................................................................................................29
Chapter 4 Controlling the Projector ...................................................................31
Power control and status check ........................................................................................................................... 32
Control ..................................................................................................................................................................................34
Input .............................................................................................................................................................................34
System .........................................................................................................................................................................35
Sound .........................................................................................................................................................................36
Image adjustment .............................................................................................................................................. 37
PC adjustment .................................................................................................................................................................38
Setting up the projector ...........................................................................................................................................39
Screen setting .......................................................................................................................................................39
Setting 1 .....................................................................................................................................................................40
Setting 2 .....................................................................................................................................................................40
Setting 3 ..................................................................................................................................................................... 41
Information ........................................................................................................................................................................42
Chapter 5 Appendix ................................................................................................45
Examples of connection ...........................................................................................................................................46
Use of telnet ......................................................................................................................................................................48
Web browser setting ................................................................................................................................................... 50
Examples: OS/Browsers .............................................................................................................................................51
Q&A ........................................................................................................................................................................................55
Table of contents

ENGLISH
5
ENGLISH
1
Chapter 1
Preparation
Describes features and operating environment of this projector.
6
Chapter 1 Preparation
Features
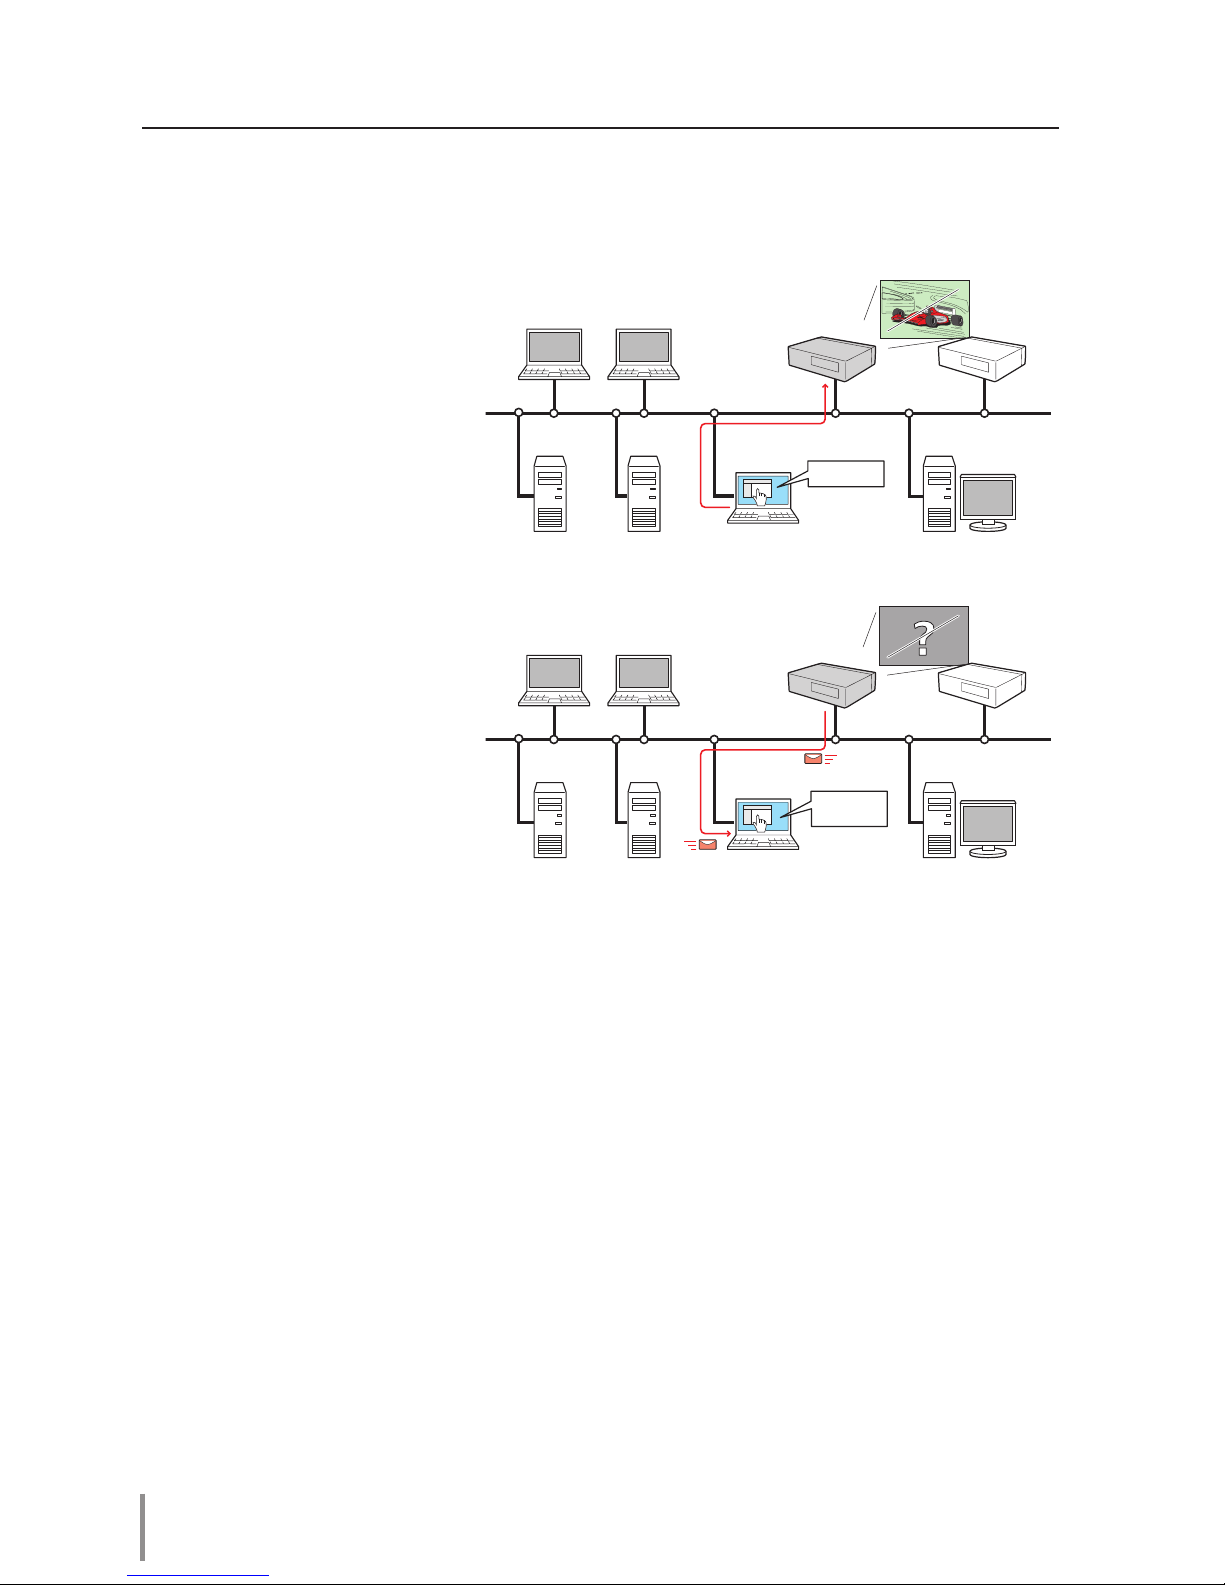
E-Mail Alert function (+p.25)
T he pro j e c to r se n ds m es sages to the registered e-mail
addresses when a lamp abnormality or power failure occurs
with the projector. This message describes how to solve the
cause of the problems. You can
take efficient action for quick
recovery.
Web Management function (+p.31)
With thi s fu ncti on, you can
monito r projector functions
such as po wer st at us, lamp
st at us , inp ut mo d e, sig na l
condition, lamp-use time, etc.
through the network by using
the web browser installed on
your computer.
PC4 PC3 PC6
PC5
PC1 PC2
You’ve got
Mail.
PJ2
PJ1
PC4 PC3 PC6
PC5
PC1 PC2
Turn ON PJ2
PJ2
PJ1

7
ENGLISH
Features
Operating System
Windows 2000, Windows XP (32bit version),
Windows Vista (32bit version), Windows 7 (32bit version)
Mac OS X v 10.4 or 10.5
Computer environment
Recommended CPU
Windows: Pentium III 900MHz or more
Macintosh : 800 MHz PowerPC G4 or faster,or 1.8GHz Intel Core
Processor or faster
Memory
Windows : 64MB (Minimum)/ 128MB or more (Recommended)
128MB or more for Windows XP
1GB or more for Windows Vista or Windows 7
Macintosh : 256MB or more (512MB is recommended)
Free disk space
100MB or more
Drive equipment
CD-ROM drive
Display settings
Support one of following resolutions;
VGA (640 x 480), SVGA(800 x 600), XGA(1,024 x 768) Number of col-
ors: Either of 16 bit (65,536 color 24/32 bit (16.77 million colors))
Network card
The computer must provide a 10Base-T or 100Base-TX network
card.
Web Browser*
Internet Explorer version 6.0, 7.0 or 8.0
Netscape Navigator version 7.1 or 9.0
Safari 3.1
* Used to control and set up the projector. The layout of pages in
the browser may slightly differ from each type of application or
operating system you use.
Internet Mailer*
- Microsoft Outlook - Microsoft Outlook Express
- Netscape Mail
* Required the internet e-mail application software to receive an
e-mail alert sent from this projector. If you do not use the function E-mail Alert, this application is not required.
Required operating environment for computers
When operating the projector via networks, computers should meet the operating environment below.
LAN Terminal
Data communication standards 10Base-T (10Mbps)/100Base-TX compatible
Protocol TCP/IP
Network specifications of the projector

8
Chapter 1 Preparation
Notice
Expression/Abbreviation
The OS of the computer and the Web browser described in this manual are Windows XP
Professional and Internet Explorer 6.0. In case of another OS or Web browser, some instruction procedures may differ from the actual operation depending on your computer environment.
Use of this manual
This manual does not provide the detailed description of basic operation and functions
for computer, web browser, projector and network. For instructions about each piece of
equipment or application software, please refer to the respective booklet.
Trademarks
Ethernet is a registered trademark of Xerox Corporation. Microsoft, Windows, Windows
NT, Windows XP, Windows Vista and Windows 7 are registered trademarks of Microsoft
Corporation in the United States and other countries. Internet Explorer is a registered
trademark of Microsoft Corporation. Netscape Navigator and Netscape Communicator are
trademarks or registered trademarks of Netscape Communications Corporation. JavaScript
is a registered trademark of Sun Microsystems, Inc.
Macintosh is a registered trademark of Apple, Inc. in the USA and other countries. PowerPC
is a registered trademark of IBM Corporation. Intel Core is a registered trademark of Intel
Corporation in the USA and other countries.
Other product or brand names in this manual are registered trademarks or trademarks of
their respective owners.
* Unauthorized use of a part or whole of the contents in this manual is prohibited.
* The contents of this manual are subject to change without notice.
Cabling Between the Projector and a Hub or computer*1
Use an appropriate cable when connecting the projector and a hub or computer.
Connection Ethernet cable type Max. cable length
Projector - Hub STP straight-through category 5 *2 cable 100m (328feet)
Projector - Computer STP crossover category 5*2 cable 100m (328feet)
*1 There may be other limitations depending on your network environment or LAN specification.
Please consult your network administrator for further details.
*2 Cable category indicates cable quality.

9
ENGLISH
Flow of installation
Flow of installation
To use the projector via the networks, follow the setup procedures below.
STEP 1
Connect the LAN and set the configuration.
STEP 2
Network Configuration has completed.
Decide depending on the LAN environment.
➔ “2. Setup Procedures” (pp.11–16).
Detailed LAN configurations need to be done with a browser later.
First, complete the Wired LAN connection between computers and projectors, then start browser configurations.
➔ “3. Basic setting and operation” (pp.17–30).
Follow each chapter to operate the projector.
■Operate and manage the projector ➔“4. Controlling the projector” (pp.31-43)
➔“Power Control and status check” (p.32)
➔“Control” (p.34)
➔“PC adjustment” (p.38)
➔“Setting up the projector” (p.39)
➔“Projector information” (p.42)

10
Chapter 1 Preparation

ENGLISH
11
ENGLISH
Chapter 2
Setup Procedures
2
Describes how to configure the network.
12
Chapter 2 Setup Procedures
Setting procedures and contents differ depending on the LAN installation location.
When installing, consult your system administrator to set up the LAN appropriately.
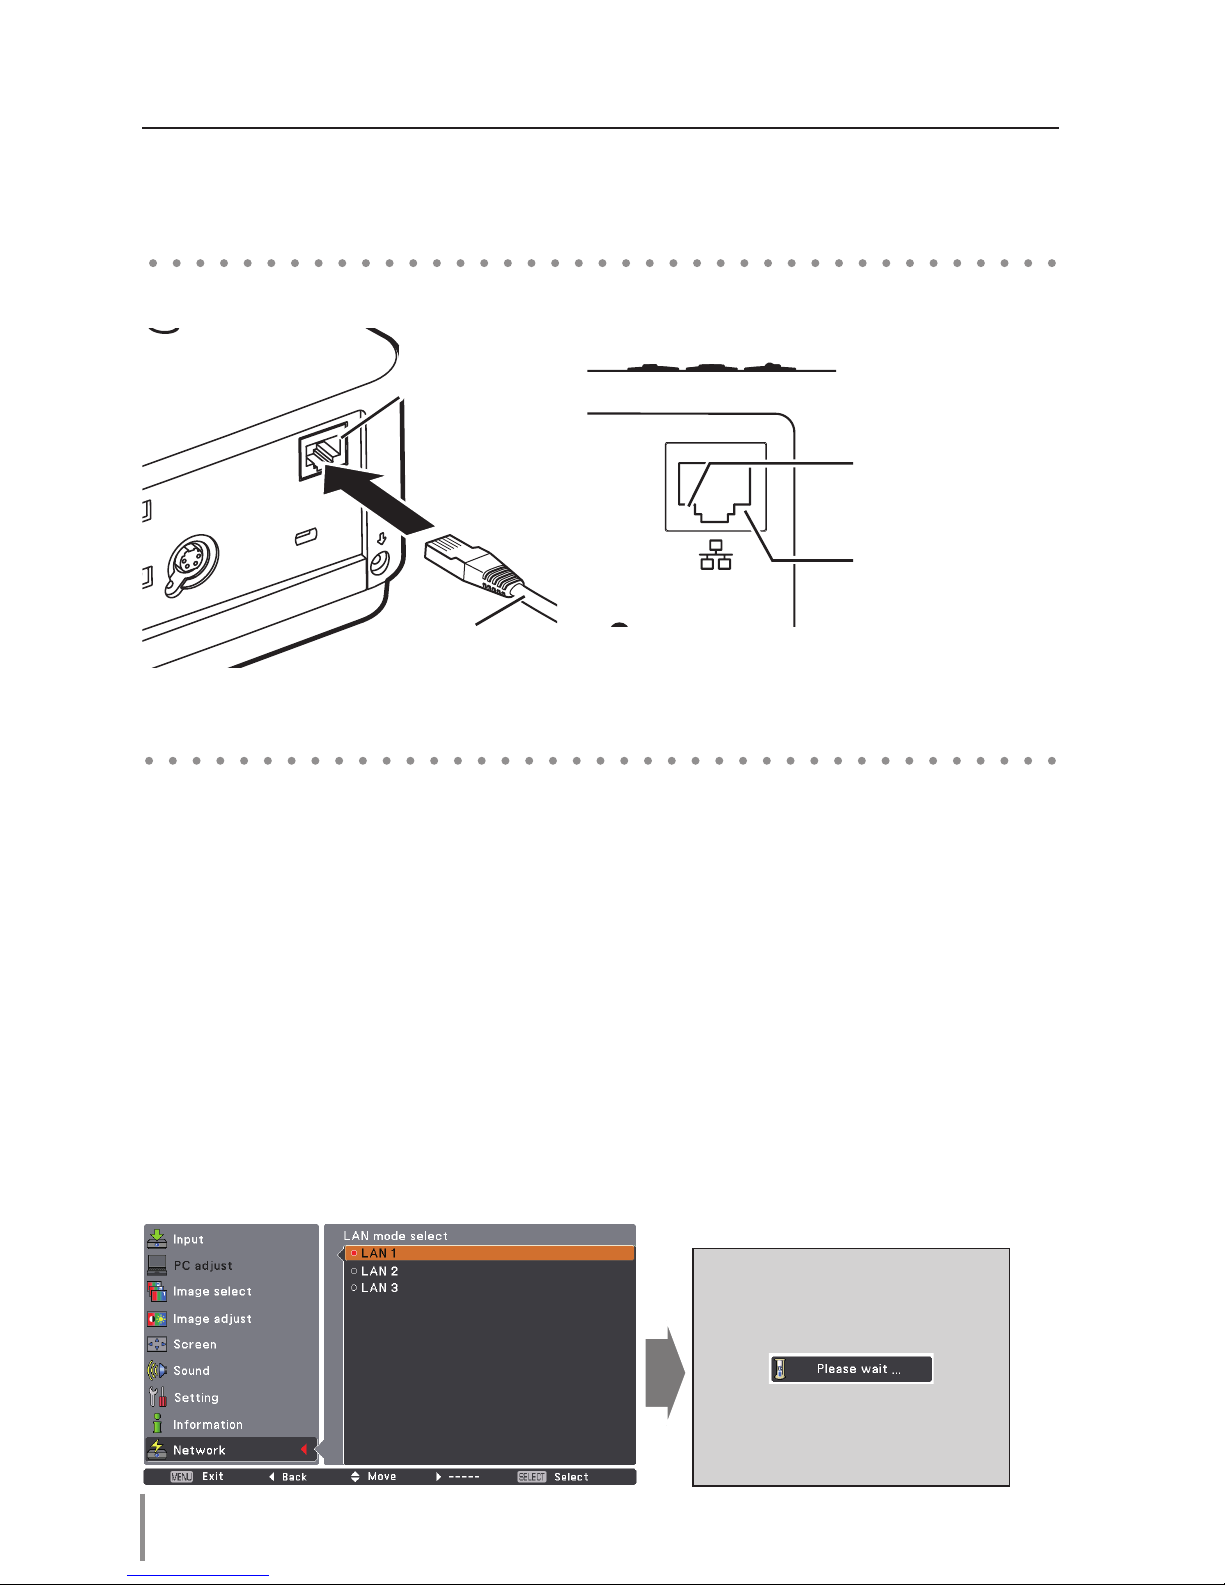
Connect the LAN cable to the LAN connection terminal of the projector.
Network configuration
Set the Wired LAN network through the projector menu. Detailed network settings will be
made with browser. Refer to “3. Basic setting and operation” (p.17-30). First, complete the
settings described in this chapter before performing steps in “3. Basic setting and operation.”
Connecting to the LAN line
Setting Procedure
1. Select “LAN mode select” in the Network menu, and press Point 8 or SELECT button.
2. Select similar LAN environment among LAN1, LAN2 and LAN3 with the Point ed but-
tons. Then the Menu will disappear, the “Please wait...” message will appear, and switching operation will start. Switching will take a while and the projector’s LINK/ACT Lamp
will be on or blink, and after completing the operation, the “Please wait...” message will
disappear.
LAN Cable
LAN Connection
Terminal
LINK Lamp (Green)
Light green when the
projector is connected to
the network correctly.
ACT Lamp (Orange)
Blink orange when the
projector is sending or
receiving the data.
* Please use a shielded LAN cable.

13
ENGLISH
Network configuration
*1 Set "On" only when the DHCP server is available on your network environment.
*2 Set [255.255.255.255] if the network does not provide the gateway (router).
*3 Set [255.255.255.255] if you do not use the function E-mail alert.
3. Select "Network setting" in the Network menu and press SELECT button, and then the
LAN setting screen will appear and selected LAN settings will be displayed. Adjust each
item to the setting environment. Consult your system administrator about the detailed
settings.
Press SELECT button in a row where you want to adjust, and adjust the figures with the
Point ed buttons and move among the items with the Point 7 8 buttons, and then
press SELECT button to fix. Move to the next row with the Point ed buttons to adjust.
4. After completing all the settings, select “Set” and press SELECT button. Now, all
procedures have been done. To cancel the adjusted settings, select "Cancel" and press
SELECT button.
You can confirm the LAN settings you have made from “Network information” (p.14). In
such cases that the LAN cannot be connected, see this screen.
DHCP: On
Item Description
DHCP .................... Sets DHCP function On or Off. When you setup the network setting manually, select
"Off". When it is set On, IP address, Subnet, Gateway and DNS are automatically set
according to your network environment *1.
IP address .............Sets IP address of the projector
Subnet ....................Sets Subnet mask. Normally sets 255.255.255.0
Gateway*2 .............Sets IP address of the default gateway (Router)
DNS*3 ....................... Sets IP address of the DNS server.
DHCP: Off
Network setting
* The numerical value is a setting example.
14
Chapter 2 Setup Procedures
The Network PIN code is to restrict the access to the projector through the network.
After setting the Network PIN code, you need to enter it to operate the projector via the
networks.
Network PIN code
Network information
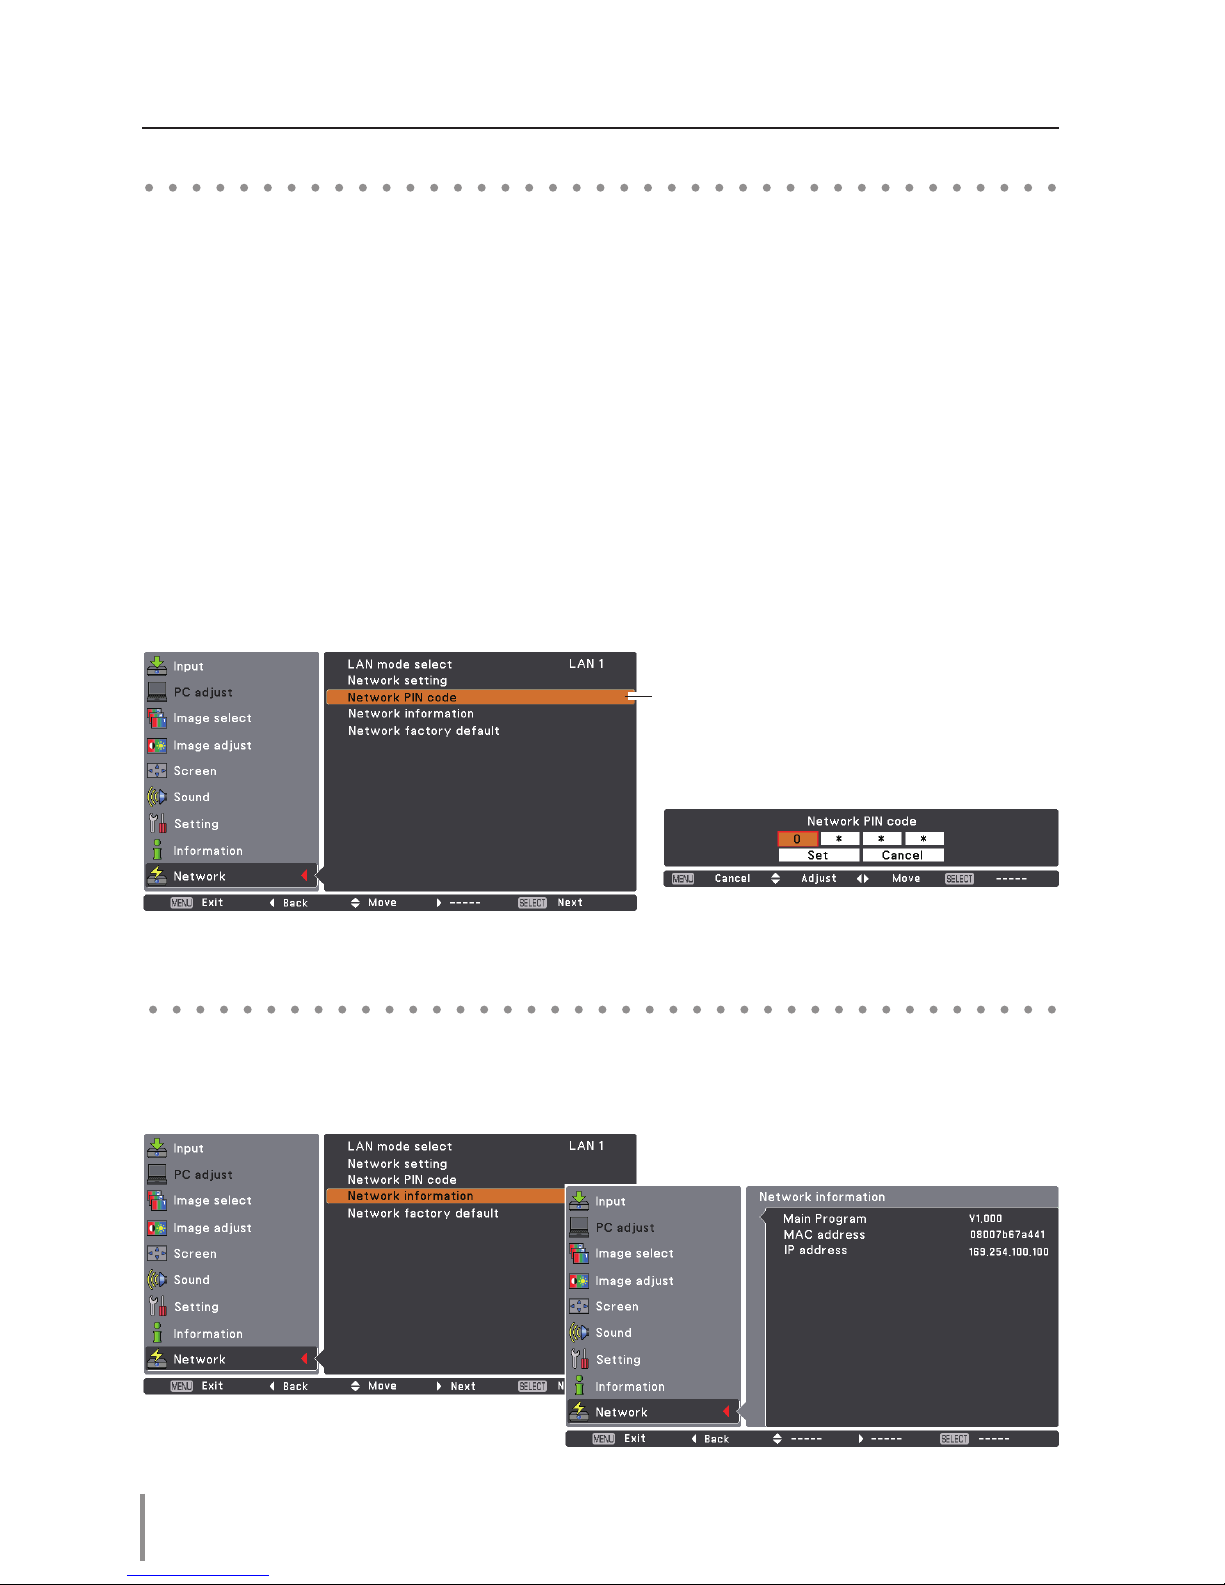
1. Select "Network PIN code" in the Network menu, and press SELECT button.
The Network PIN code screen will appear.
2. Set the Network PIN code.
Set the figures with the Point ed buttons and move to the next items with the Point 7
8 buttons. Select “Set” and press SELECT button to set. To cancel the preset Network PIN
code, select “Cancel”. When you do not want to set the Network PIN code, set "0000".
It is recommended to set the Network PIN code if you use the projector via the networks.
The Network PIN code can be set also through the networks. See “3. Basic setting and
operation” ➔“Initial setting” ➔“Network PIN code setting” (p.23).
Select "Network information" in the Network menu and press Point 8 or SELECT button
to show LAN setting environment of the currently selected projector. (The description
below is an example and different from what will be shown.)
Network PIN code
Network PIN code screen
* The numerical value is a setting example.
15
ENGLISH
Network factory default
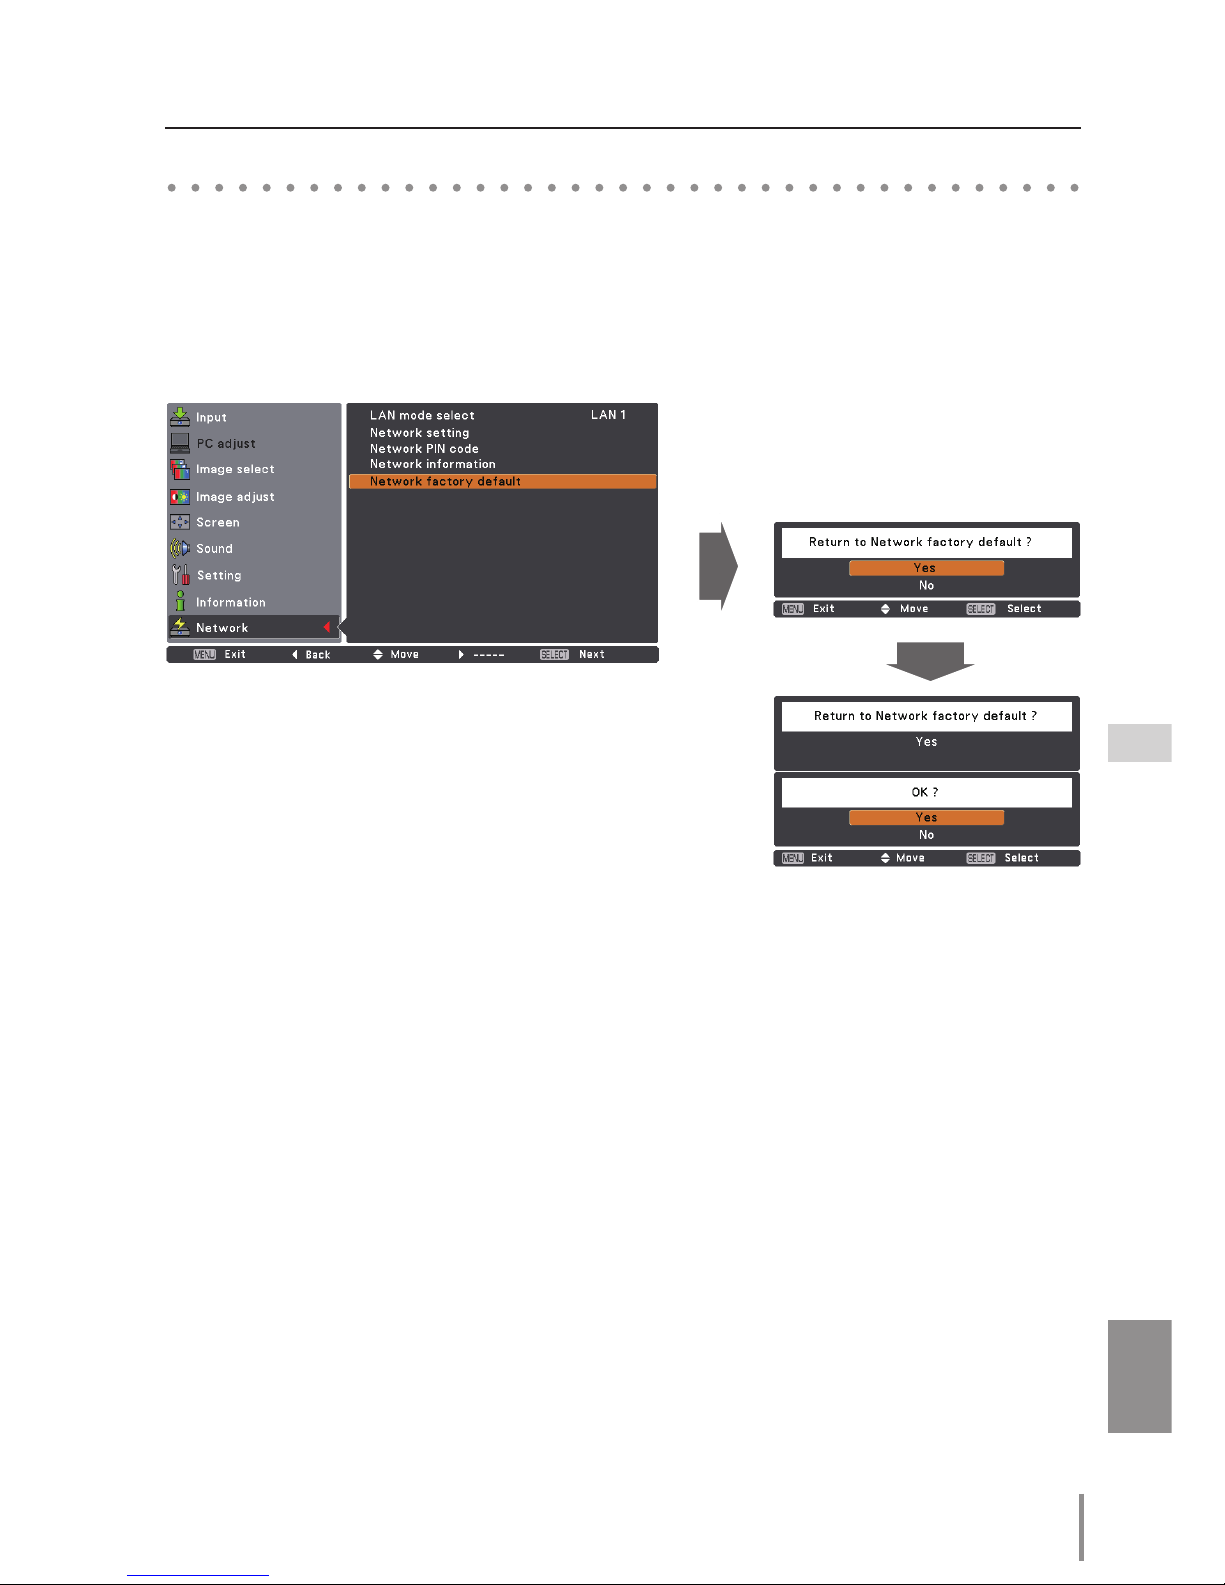
Network factory default
1. Select “Network factory default” in the Network menu and press SELECT button.
2. A confirmation box appears and select "Yes" and then press SELECT button.
3. Another confirmation box appears and select "Yes" and then press SELECT button.
4. All the wired LAN settings will go back to the factory default settings. For details, refer to
“Wired LAN factory default settings” (p.16).

16
Chapter 2 Setup Procedures
Wired LAN factory default settings
Parameter
SELECTED LAN
LAN 1 LAN 2 LAN 3
DHCP OFF ON OFF
IP ADDRESS 169.254.100.100 192.168.100.100 192.168.100.100
SUBNET MASK 255.255.0.0 255.255.255.0 255.255.255.0
GATEWAY ADDRESS 255.255.255.255 255.255.255.255 255.255.255.255
DNS ADDRESS 255.255.255.255 255.255.255.255 255.255.255.255

ENGLISH
17
ENGLISH
Chapter 3
Basic Setting and Operation
3
Describes basic operations and settings for controlling the projector by using the web browser. It is required that computer and
projector is connected to the network and the network address is
properly configured.
18
Chapter 3 Basic Setting and Operation
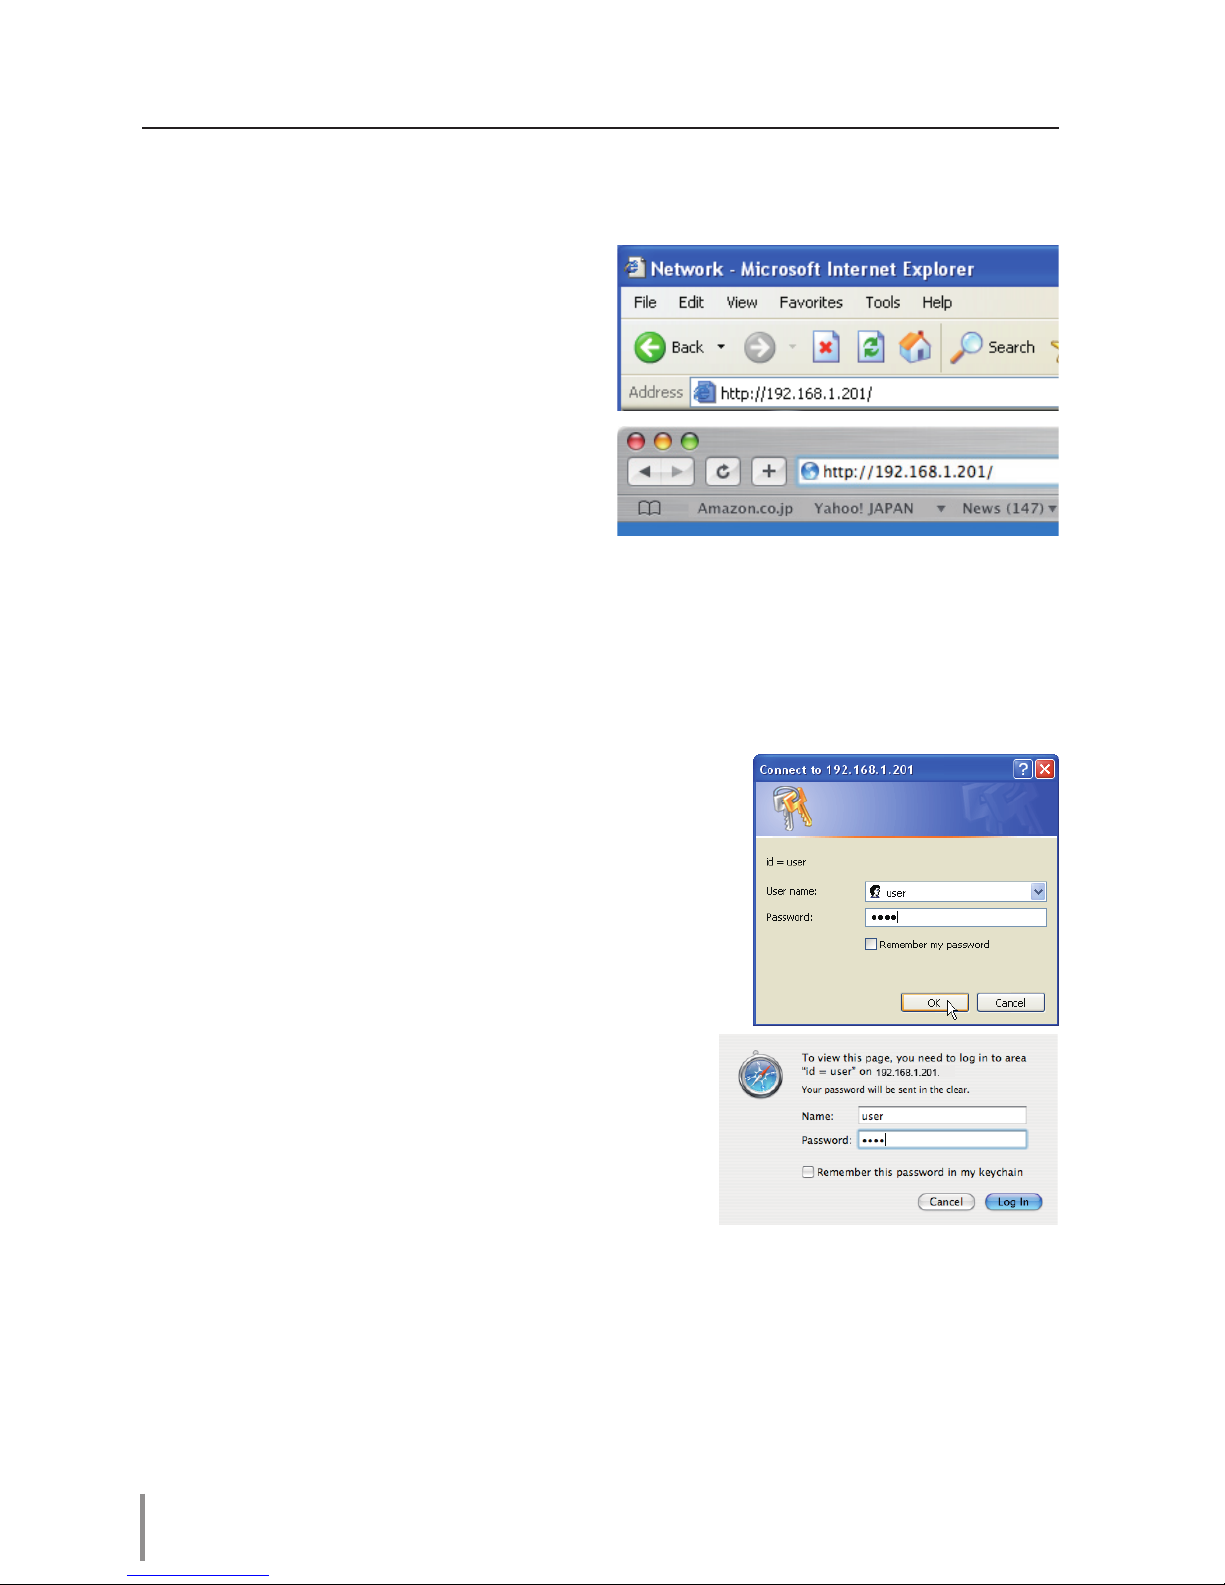
Login the setting page of the projector
[1] Enter the IP address
Launch the web browser installed in your
computer, enter the IP address into the
"Address" on the browser and then press
"Enter" key.
Enter the address that you configured in
item "Network configuration" (+ p.12).
[2] Login
If the setting page has set the password, the authentication window will appear. In this
case type "user" onto the User Name text area and the login Network PIN code onto
the Password text area and then click OK (Log in) button.
* The entering User Name must be "user" and it can not be changed.
[Note]
When accessing the projector for the first time or the Network
PIN code "0000" is set, the auto-login will be performed and
the next main setting page is displayed.
* The numerical value is a setting example.
 Loading...