

Page 1

Owner's Manual
Memory Viewer function
This is the manual for the Memory Viewer function.
Read this manual thoroughly to operate the Memory Viewer function.
First, read the owner's manual of the projector to understand the basic operation of the
projector and the safety instructions.
The safety instructions in the owner's manuals should be followed strictly.
Page 2

Memory viewer function
Memory Viewer function
The Memory Viewer function is to make a presentation or project an image without using computers
or some other external equipment. You do not have to carry a computer or other equipment to project
images.
Store images on a dedicated SD memor y card and insert it into the SD memory card slot of the
projector, then you can project those images.
This projector is also equipped with dedicated Network Viewer 4 software to edit the presentation
images to project with the Memory Viewer function. With this function, you can edit images, photo
data, or Power Point data into a more effective presentation data. For further information of the
Network Viewer software, see the chapter "9. Network viewer function" on the separated booklet of
"Network Owner's manual".
Which images can be projected with the Memory Viewer function?
With the Memory Viewer function, you can project images in these formats below.
• Bitmap data
• JPEG data converted with the Network Viewer 4 [File Converter 1 and 2] software.
• Text data
• Program file created with the Network Viewer 4 [Program Editor].
*Some data may not be projected even with these formats.
Text data used with Memory Viewer
Memory viewer supports the text file with the ASCII format for single byte. Other text formats cannot
be supported.
Back up the data
It is recommended that important data to edit with Network Viewer and store in SD memory card
should be stored in other media in advance. We are not responsible for any data losses or damages
resulting from use of the Memory Viewer function.
Trademarks
Microsoft, Windows, and PowerPoint are either registered trademarks or trademarks of Microsoft
Corporation in the United States and/or other countries. Each name of corporation or product in this
owner's manual is either a registered trademark or a trademark of its respective corporation.
• The On-Screen Menu and figures in this manual may differ slightly from the product.
• The contents of this manual are subject to change without notice.
2
Page 3
16
MB
LOCK
Memory card for the Memory Viewer function
SD
The memory card is not provided with this projector. The types of memory card which can be used
with the Memory Viewer function of this projector is "SD Memory Card". It may not be used with this
projector depending on the type of the SD memory card. A new SD memory card or a card formatted
by computer or camera must be formatted by this projector. The Memory Viewer function may not
operate properly with a card formatted by other equipment.
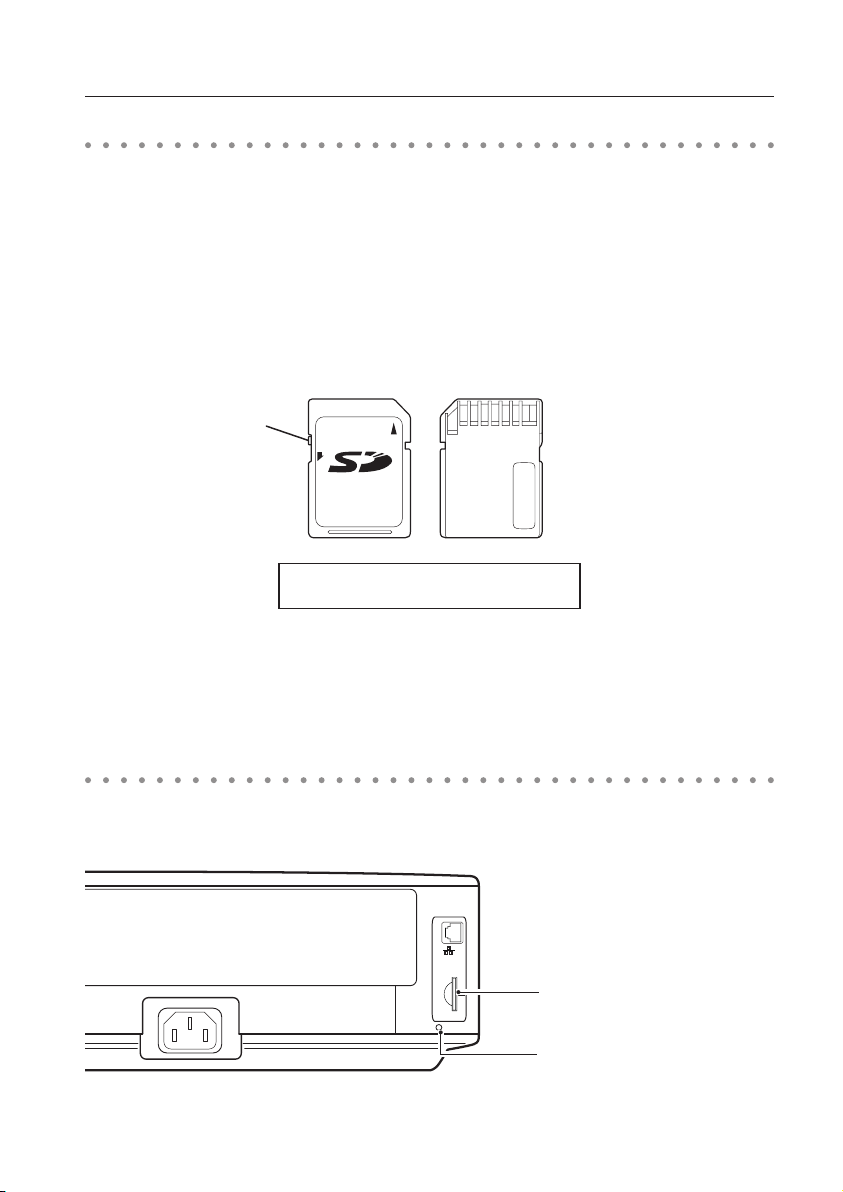
Shape of SD memory card
Top
Lock
Capacity of SD Memory Card: up to 8GB
* There may not be used with this projector depending
on the type or manufacturer of the SD memory card.
Bottom
SD memory card slot
The projector provides an SD memory card slot on the back side. The SD memory card indicator lights
up when the SD memory card is inserted rightly.
SD memor y card slot
SD memor y card indicator
3
Page 4
Memory viewer function
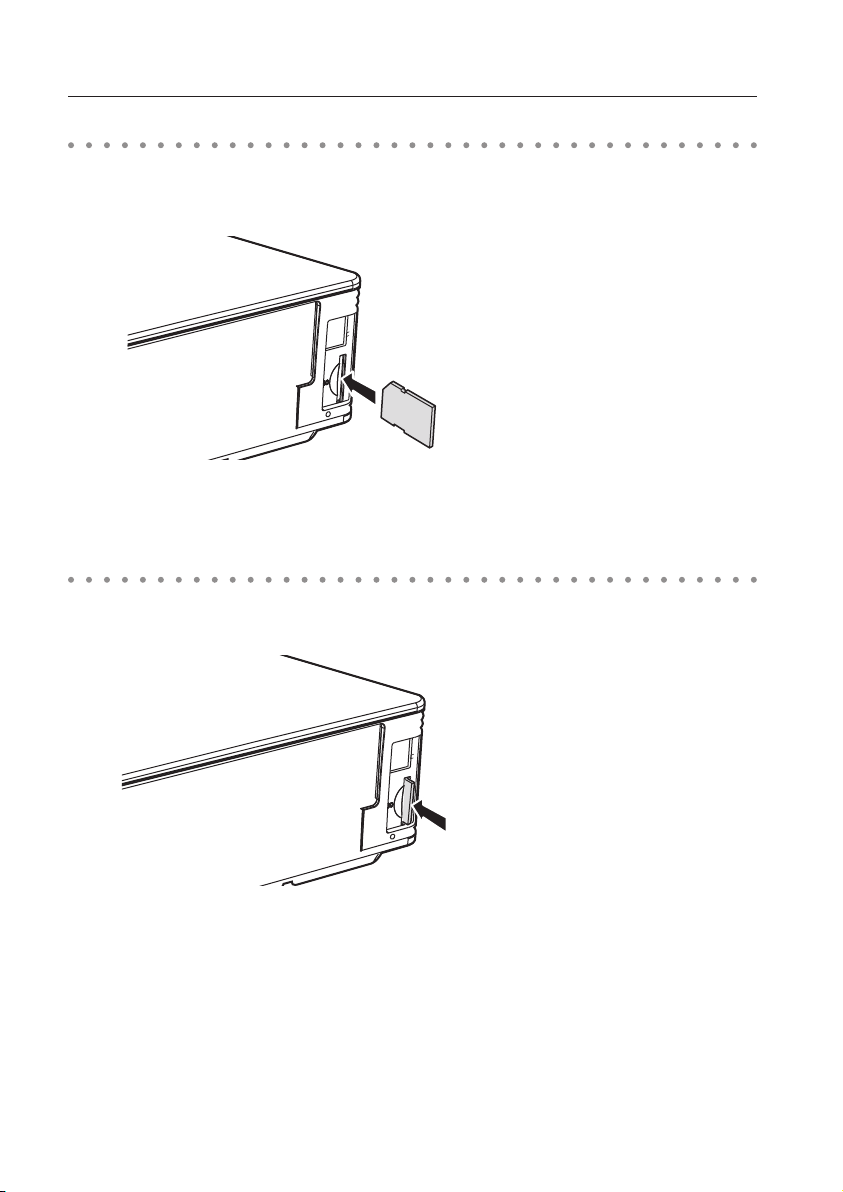
Inserting the SD memory card
Insert the SD memory card into the card slot on the back side of the projector as shown in the figure
below.
Insert a card with
cutting side up until
it clicks.
Removing the SD memory card
Push the SD memory card in the arrow direction gently to remove. The card comes out and you can
remove it.
Push the card until
it clicks. The card
comes out.
Note:
✐ During accessing to the SD memory card, do not turn off the power or eject the card because the
data in the card might get damaged. During accessing, the SD memory card indicator is blinking
✐ The SD memory card allows you to insert or remove regardless of the power status of the projector.
4
Page 5

Entering the memory viewer mode
1. Select “Wired” or "Wireless" from the input menu of the projector. The “Please wait...” message will be
displayed on the screen. After short time, the network connection standby display screen "Ready for
use" will appear.
2. Insert the SD memory card into the card slot on the back side of the projector. The card indicator
lights up.
3. Select “Wired setting” or "Wireless setting" in the projector menu, and press SELECT button.
Wireless setting
Wired setting
Memory viewer
4. Select "Memory Viewer" with the point ed button and press SELECT button. The "Enter/Exit" pallet
of the memory viewer appears.
5. Select "Enter" and press SELECT button. The memory viewer start-up image appears briefly and an
image stored in the SD memory card is displayed on the screen.
* If the image file is not available in the root directory of the SD memory card, the memory viewer
browser window appears.
5
Page 6

Memory viewer function
Displaying the memory viewer browser window
When you press AUTO SETUP/CANCEL button in the memory viewer mode, following browser window
"Thumbnail" or "Filename list" appears on the screen.
Thumbnail display
Menu
Filename list display
Menu
Moves
to upper
directory
Displays current directory path
Displays current directory path
* When you set up the custom screen size with the screen setting of the projector, a part of the browser
window of the memory viewer may get cut off from the custom screen size. In that case, readjust the
custom screen size.
6
Page 7

Menu tree
Menu Sub menu Description
Menu Manual mode Mode to select a playing file respectively
Available file types are JPEG(.jpg), Bitmap(.bmp), Text(.txt). Others are not
available.
Program mode Mode to select a program file (.dpf ) created by the program editor.
Format Formats the SD memory card
Display Thumbnail Displays files with the thumbnail on the browser window.
Filename list Displays files with the file name on the browser window.
Set English < > Selects display menu language, Japanese or English. Set with
7 8 button
3 sec. < > Sets display period of an image in the auto display mode. (3 to 240
0 times < > Sets the repeating times in the auto display mode. (0 to 255 times). 0
Exit Quits the Memory Viewer operation.
seconds) Set with point 7 8 button.
means endless play. Set with point 7 8 button.
Icon indication
Folder icon. Displays the contents of the selected folder with SELECT button
Top directory icon. Moves to upper directory with SELECT button
JPEG file icon
Bitmap file icon
Text file icon
Program file icon (Playback with the program mode)
Un-supported file icon
Selection of memu
1. To select the menu, press AUTO SETUP/CANCEL button in the memory viewer mode. The cursor
moves from file selection window to menu.
2. Select the sub-menu with point buttons and press SELECT button. To cancel the selection, press
AUTO SETUP/CANCEL button.
Note:
* The memory viewer does not support the resolution of image more than the panel resolution of the
projector.
* Text file can be displayed up to 15,000 rows with 110 characters per row.
7
Page 8

Memory viewer function
Image viewer in the manual mode
1. Select "Manual mode" from "Menu" on the browser window of the memory viewer and press SELECT
button.
2. Select a file to display with point buttons and press SELEC T button. The selec ted file image is
displayed on the screen.
3. During displaying the image, you can control the displayed image with control buttons as described
in the table below.
Point Operation
d Manual playback with next file
e Manual playback with previous file
8 Start auto-playback*
7 Stop auto-playback*
* The display time of the image and the number of repeat at the auto-playback mode are set up
from the "Set" menu on the browser window.
* Point 7 8 buttons operate as the scroll key during displaying the text file .
Note:
During operating the memory viewer, the Network Viewer and Network Capture function cannot be used.
The program file does not support in the manual mode. Use it in the program mode.
* To display the portrait documents such as tex t files, use the point 7 8 buttons to scroll up and down the page.
8
Page 9

Image viewer in the program mode
1. Select "Program" on "Menu" of the browser window of the memory viewer. And press SELECT button.
The program files (.dpf) in the DispParam folder under the top directory are displayed.
* If the DispParam folder is not placed in the top directory, the list of the folder name is displayed. Find
the DispParam folder which stores the program file manually to display the contents of the folder.
2. Select a program file with point buttons and press SELECT button. The dialogue window appears
and select "Yes" and press SELECT button to start the auto display. The images programmed by
program file are displayed on the screen. The display period of the image and the number of repeat
are set with the program file.
3. During displaying the image, you can control the displayed image with control buttons as described
in the table below.
Point Operation
d Manual playback with next file
e Manual playback with previous file
8 Start auto-playback
7 Stop auto-playback
Termination of memory viewer
To terminate the memory viewer function, take one of methods described below.
- Terminate with projector's on-screen menu.
1. Select “Wired” or "Wireless" from the input menu of the projector. Press SELECT button.
2. Select "Memory Viewer" with the point ed buttons and press SELECT button. The "Enter/Exit" pallet
of the memory viewer appears.
3. Select "Exit" and press the SELECT button.
- Terminate with memory viewer mode
1. During the image displaying, press AUTO SETUP/CANCEL button. The browser window appears on
the screen.
2. Press AUTO SETUP/CANCEL button again. The cursor moves to menu item.
3. Select "Exit" on the browser window with the point 7 8 buttons and press SELECT button.
While operating the memory viewer, the Network Viewer and Network Capture function cannot be used.
* The program file (.dpf ) is created with the program editor software. For further information, see the
item "Creating the program file [Program Editor]" (p.115) described on the separated booklet of
network owner's manual.
* The DispParam folder is automatically created when the program file with the program editor is
stored. For further information, see the item "Creating the program file [Program Editor]" (p.115)
described on the separated booklet of network owner's manual.
* When storing the program file into the SD memory card manually, create folder with the name of
"DispParam" and store the program file into this folder.
* In the program mode, the browser window lists the program files and folders only. Other files are
not listed.
9
Page 10

Memory viewer function
Duplicating the data into the SD memory card
It is described how to duplicate the data converted with the Network Viewer 4 [File Converter 1, File
Converter 2] into the SD memory card through the network.
1. Launch the explorer software of the computer and type the IP address of the network board which
has the SD memory card onto the address column. For example, "ftp://192.168.1.201".
The contents of the SD memory card appear on the explorer window as below.
2. Move the projection data from the computer into the SD memory card.
Note:
If the network PIN code is set for the projector, the authentication window appears as below. In that
case, enter "user" into the User Name column and the network PIN code of the projec tor into the
Password column. *User Name must be "user".
10
Page 11

* The data converted by the Network Viewer 4 [File Converter1] can be stored into the SD memory card
mounted on the projector directly. For further information, refer to chapter Network Viewer function,
"Setting of output destination and conversion mode" (p.113) described on the separated booklet of
Network Owner's manual.
* The program file created by the Program Editor can be stored into the SD memory card mounted on
the projector directly. For further information, refer to chapter Network Viewer function, "Creating the
program file" (p.115) described on the separated booklet of Network Owner's manual.
Formatting the SD memory card
A new SD memory card or a card formatted by computer or camera must be formatted by this product.
Memory Viewer function may not operate properly with a card formatted by other equipment.
* It cannot be formatted when the lock switch of the card is set to "LOCK" position.
1. In the memory viewer mode, press AUTO SETUP/CANCEL button. The browser window appears on
the screen.
2. Press AUTO SETUP/CANCEL button again. The cursor moves to menu item.
3. Sele ct "Format" fr om "Men u" wi th the poi nt buttons and pres s S ELEC T button. Th e forma t
confirmation window appears.
4. Select "Yes" with the point buttons and press SELECT button to start formatting. It takes about 1-2
seconds to complete the formatting.
Note:
✐ During formatting the SD memory card, do not turn off the power or eject the card because the data
in the card might get damaged. During formatting, the SD memory card indicator is blinking.
11
Page 12

MV-KB3AC
MEMORY VIEWER OWNER'S MANUAL
SANYO Electric Co., Ltd.
 Loading...