

Page 1
台灣三洋公司服務站一覽表
單 位 電 話 地 址
松江站 (02)25236104 台北市松江路 266 號 B1
三重站 (02)29719068 台北縣三重市自強路二段 30 號
永和站 (02)29223243 永和市福和路 303 號
板橋站 (02)29597112 板橋市永豐街 215 號
桃園站 (03)4355492 桃園縣中壢市內壢文化路 66 號
新竹站 (03)5343413 新竹市中正路 496 號
基隆站 (02)24651934 基隆市東明路 5 號
宜蘭站 (039)323154 宜蘭市民權新路 1 之 5 號
花蓮站 (038)234414 花蓮市美工六街 28 號
玉里站 (038)882096 花蓮縣玉里鎮新興街 55 號
台東站 (089)323141 台東市大同路 237 號
台中站 (04)22611009 台中市復興路一段 270 號
豐原站 (04)25224401 台中縣豐原市建成路 21 號
沙鹿站 (04)26355778 台中縣沙鹿鎮四平街 12 號
南投站 (049)2221248 南投市信義街 4 號
員林站 (04)8321634 彰化縣員林鎮日泰街 68 號
彰化站 (04)7224833 彰化市自強南路 89 號
嘉義站 (05)2364504 嘉義縣水上鄉三和村新和庄 120 號
虎尾站 (05)6330531 雲林縣虎尾鎮工專一街 7 號
台南站 (06)2541191 台南縣永康市中正南路 360 巷 19 號
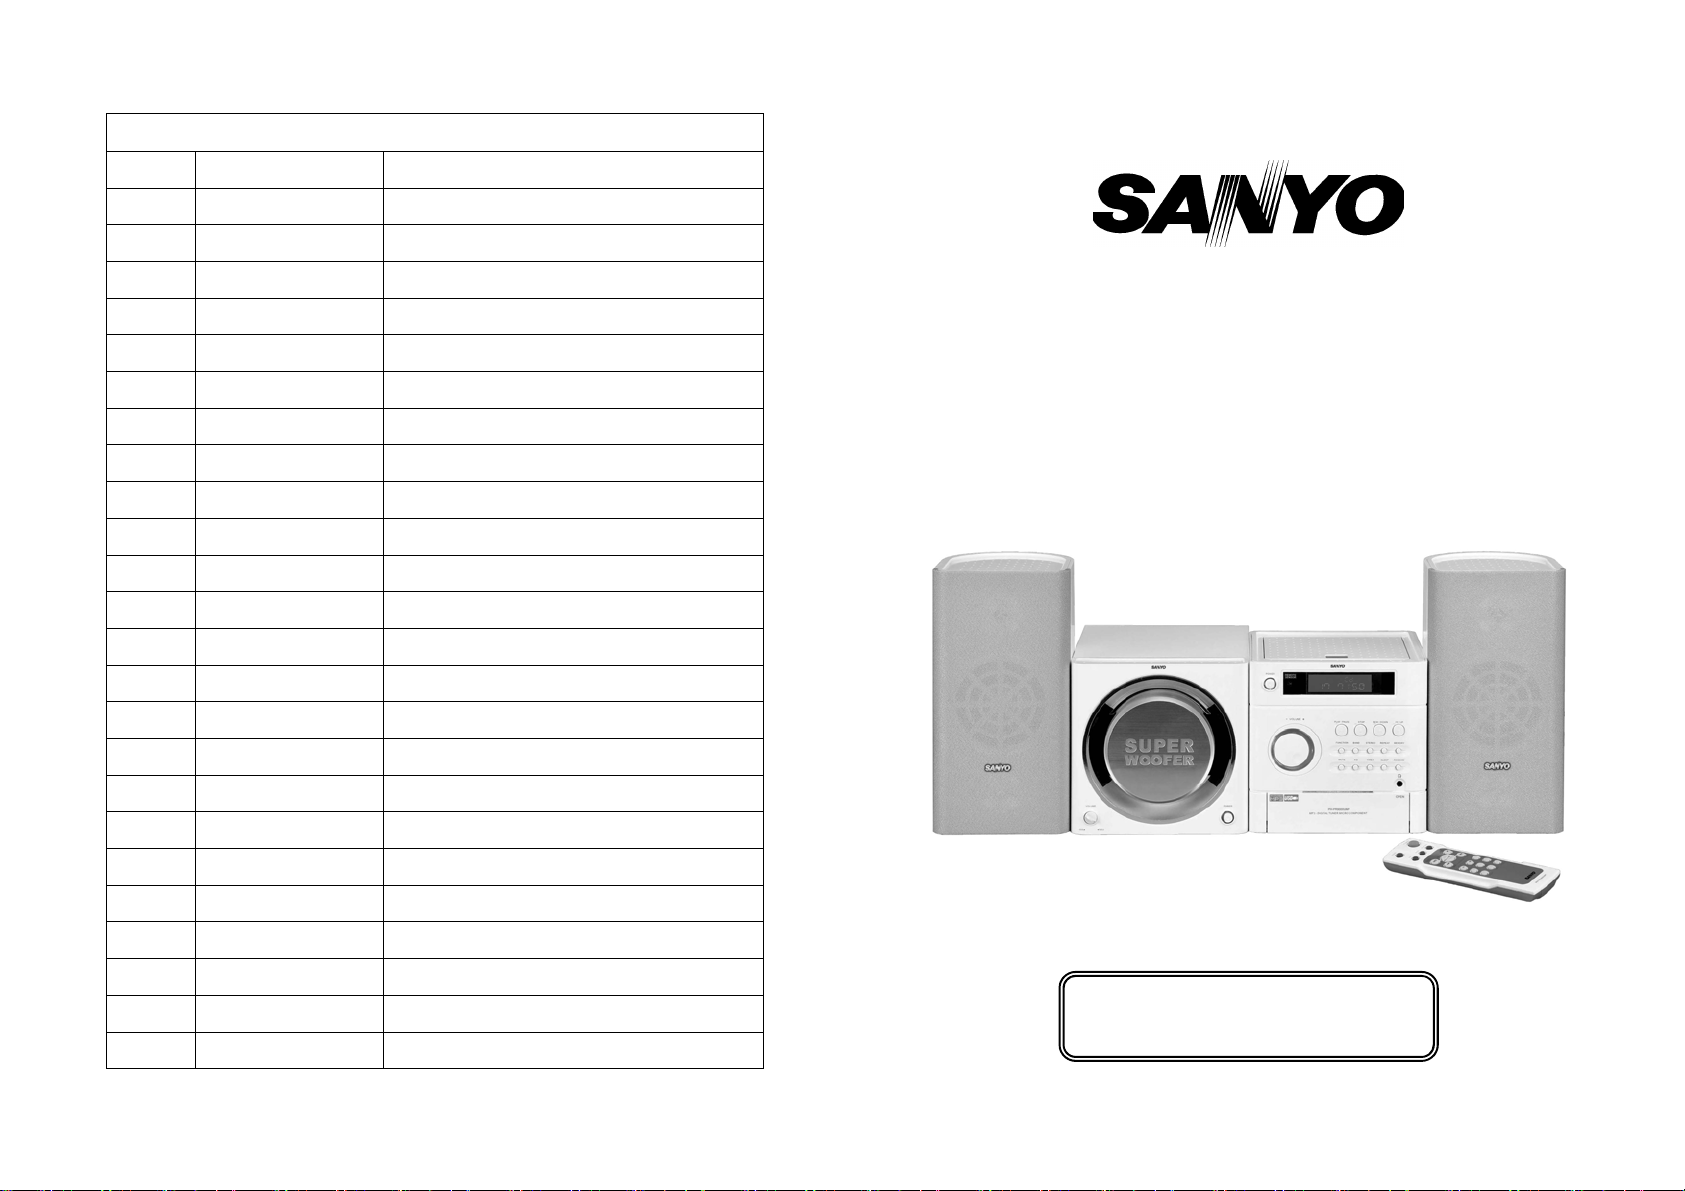
PH-PR9000UMP
迷你高傳真音響
高雄站 (07)3550096 高雄縣大社鄉三民路 539 號
澎湖站 (06)9211490 澎湖縣馬公市西文里 97 之 40 號
鳳山站 (07)7632869 高雄縣鳳山市五甲一路 632 號
屏東站 (08)7377446 屏東市大連路 60 之 19 號
使用說明書
使用本產品前,務必詳讀本說明書,
以避免不當使用造成的故障或危險。
Page 2
本產品限台灣區域使用
保 證 書
◎本公司之產品皆經過嚴密檢查與試驗,請安心使用。
◎承蒙選用本品不勝感激。自購買日期起一年內在正常使用下故障,本公司負
責免費維修。
◎雷射頭等消耗性部品,售出後三個月內若新品不良,本公司免費服務。
◎本產品內部之任何零件,如非本公司技術人員修裝而使機器故障,本公司不
負保證責任。
※保證期間內,如有下列之情形時,亦酌收材料費※
1.未依使用說明書或本公司人員所示正確之使用方法使用,不論故意或過失
等因素而發生之故障。
2.改造或變更原來構造時,所發生之故障。
3.因火災或其他天災、地變等因素所致之故障。
4.其他人為因素所發生之故障。
5.經查驗非本公司銷售之機器,無法提示保證書及經銷商蓋章印者。
6.若遺失本保證書,恕不補發。
7.遙控器、附件恕不免費保證。
三洋 迷你高傳真音響 PH-PR9000UMP
保證期間 自購買日起一年
For use in Taiwan only
購買日期
姓名 女士/先生
客
地址
戶
電話
店名、地址
經
銷
商
製造號碼單貼附處:
電話:(02)2521-0251
Page 3
SPECIFICATION
MAIN UNIT
POWER SUPPLY : AC 110V 60Hz
REMOTE CONTROL POWER SOURCE : DC 3V UM-4(AAA-SIZE) × 2
OUTPUT POWER : 200 WATTS (P.M.P.O.)
POWER CONSUMPTION : 30W
SPEAKER : 10 W / 4Ω (HIGH) , 10 W / 4Ω (LOW)
RADIO SECTION
FREQUENCY RANGE : MW 522 KHz~1620 KHz
FM 87.5 MHz~108 MHz
COMPACT DISC SECTION
FREQUENCY RESPONSE : 125 Hz~20000 Hz
S/N RATIO : 50dB
UNIT DIMENSION : 170(W) × 224(D) × 174(H)mm
SPEAKER BOX DIMENSION : 128(W) × 150(D) × 261(H)mm
N. W. : 4.4Kg
SUBWOOFER
POWER SUPPLY : AC 110V 60Hz
OUTPUT POWER : 300 W (P.M.P.O.)
POWER CONSUMPTION : 50 WATTS
SPEAKER : 30 W / 4Ω
FREQUENCY RESPONSE : 20 Hz~150 Hz
DIMENSION : 170(W) × 260(D) × 170(H)mm
N. W. : 3.4Kg
Continuous improvements are being made to our equipment both in quality and
performance, thus we reserve the right to alter specifications without notice.
ESD Remark:
In case of malfunction due to electrostatic discharge just reset the product (reconnect of
power source may be required) to resume normal operation.
16
Page 4
MAINTENANCE
• Only compact disc with p marked can be used on this unit.
• Do not write anything using a pencil or ball-point pen on the label side or stick paper or
labels on it.
• Handle disc carefully to keep it free from fingerprints or
scratches.
• To clean the shiny-side, use a damp cloth, and wipe it dry after
cleaning. Do not use record cleaners, solvents.
• If moisture is formed because the disc was brought suddenly into
a warm room from a cold environment, wipe the moisture off
using a soft dry cloth before using.
• Avoid storing discs in locations which are:
• Exposed to direct sunlight.
• Susceptible to high levels of humidity or dust.
• Directly exposed to heat (from a heating appliance).
TROUBLESHOOTING
If your system is not working properly, these suggestions might help you to eliminate the
problem. If you still have a problem, take it to your place of purchase for assistance.
Problem Solution
The set does not function
Confirm the connection of the AC power plug to a working AC outlet.
No Sound
1. Check the speaker connections.
2. Adjust the volume.
CD does not play
1. Reinstall the CD with its printed side (label side) facing out.
2. Clean or replace the CD.
3. Press CD to switch to CD mode.
Noisy or distorted radio reception
1. Tune the station in again.
2. Adjust the position of the stereo for best reception.
15
Page 5

PRESET EQUALIZER OPERATION
Press PRESET EQ to select the digital sound performance in the order of PASS,
CLASSIC, ROCK, POP, JAZZ and PASS.
MUTE OPERATION
Press MUTE to terminate the sound output. Press again to cancel this mode.
GENERAL
Set not reacting when any function button is pressed.
The normal function of the product may be disturbed by external interference, just reset
the product (reconnect of power source may be required) to resume normal operation.
14
Page 6
5
Before setting the timer, make sure the clock is correctly set.
TIMER ON SETTING
Select TUNER or CD mode and select the desired sound source.
For TUNER
1. If you select BAND, press REW/DOWN or FF/UP to select a preset station.
2. The display will show the selected preset station and frequency.
3. Press TIMER to confirm your selection.
4. “” Icon and “ON” will appear on the display.
5. The digit of hour segment will flash more than 2 second.
6. Press REW/DOWN or FF/UP to set the hour.
7. Press TIMER again, the digit of minute’s segment will flash on the display.
8. Press REW/DOWN or FF/UP to set the minutes.
9. Press TIMER again to store the start time.
10. Repeat steps 6~8 to set the timer off.
11. The display will show TUNER segment.
12. Press TIMER to store the sound source.
13. The volume level 15 will appear on the display.
14. Press REW/DOWN or FF/UP to set the desired sound level.
15. Press TIMER again to store the timer setting.
For CD
1. Insert a disc into the CD tray.
2. Press TIMER.
3. Repeat steps 4-11 under for tuner for Timer setting.
4. Press REW/DOWN or FF/UP to set the sound source to CD.
5. The volume level 15 will appear on the display.
6. Press REW/DOWN or FF/UP to set the desired sound level.
7. Press TIMER again to store the timer setting.
8. CD will be played.
TIMER OFF SETTING
1. Press the TIMER.
2. The “” icon will disappear.
1. Press SLEEP, “SLEEP” appears on the display.
2. Keep pressing SLEEP to adjust the sleep time in the order of 90>80>70...10 minutes.
3. To cancel the sleep mode, press SLEEP again.
TIMER OPERATION
SLEEP OPERATION
13
Page 7

USB/SD/MS/MMC OPERATION
INSERTING THE USB/SD/MS/MMC
Insert a USB or SD/MS/MMC in the USB socket or SD/MS/MMC socket.
SELECT USB OR SD/MS/MMC
1. Press FUNCTION repeat to select CARD-USB, if there’s a USB and a SD/MS/MMC,
the SD/MS/MMC indication lights, the total number of tracks, albums and MP3
appear on the display.
2. Press and hold STOP button for 2 seconds, the USB indication lights, the total
number of tracks, albums and MP3 appear on the display.
FIND BUTTON FUNCTION
Press FIND to access the search function.
FIND BY ALBUM NAME
1. Press FIND to access this search mode.
The display will show " ", “ALBUM” and the name of the folder. you can press
REW/DOWN or FF/UP to search the file name, eg: AAA, CCC etc.
2. Press PLAY/PAUSE key to start playing.
TEXT DISPLAY (ID3 DISPLAY)
During MP3 playing, press FIND key for 2 seconds to switch text display mode, it will
show the file name/title/artist/album of current track. Press FIND key for 2 seconds
again to return to the track playing time.
The other functions are the same as MP3.
12
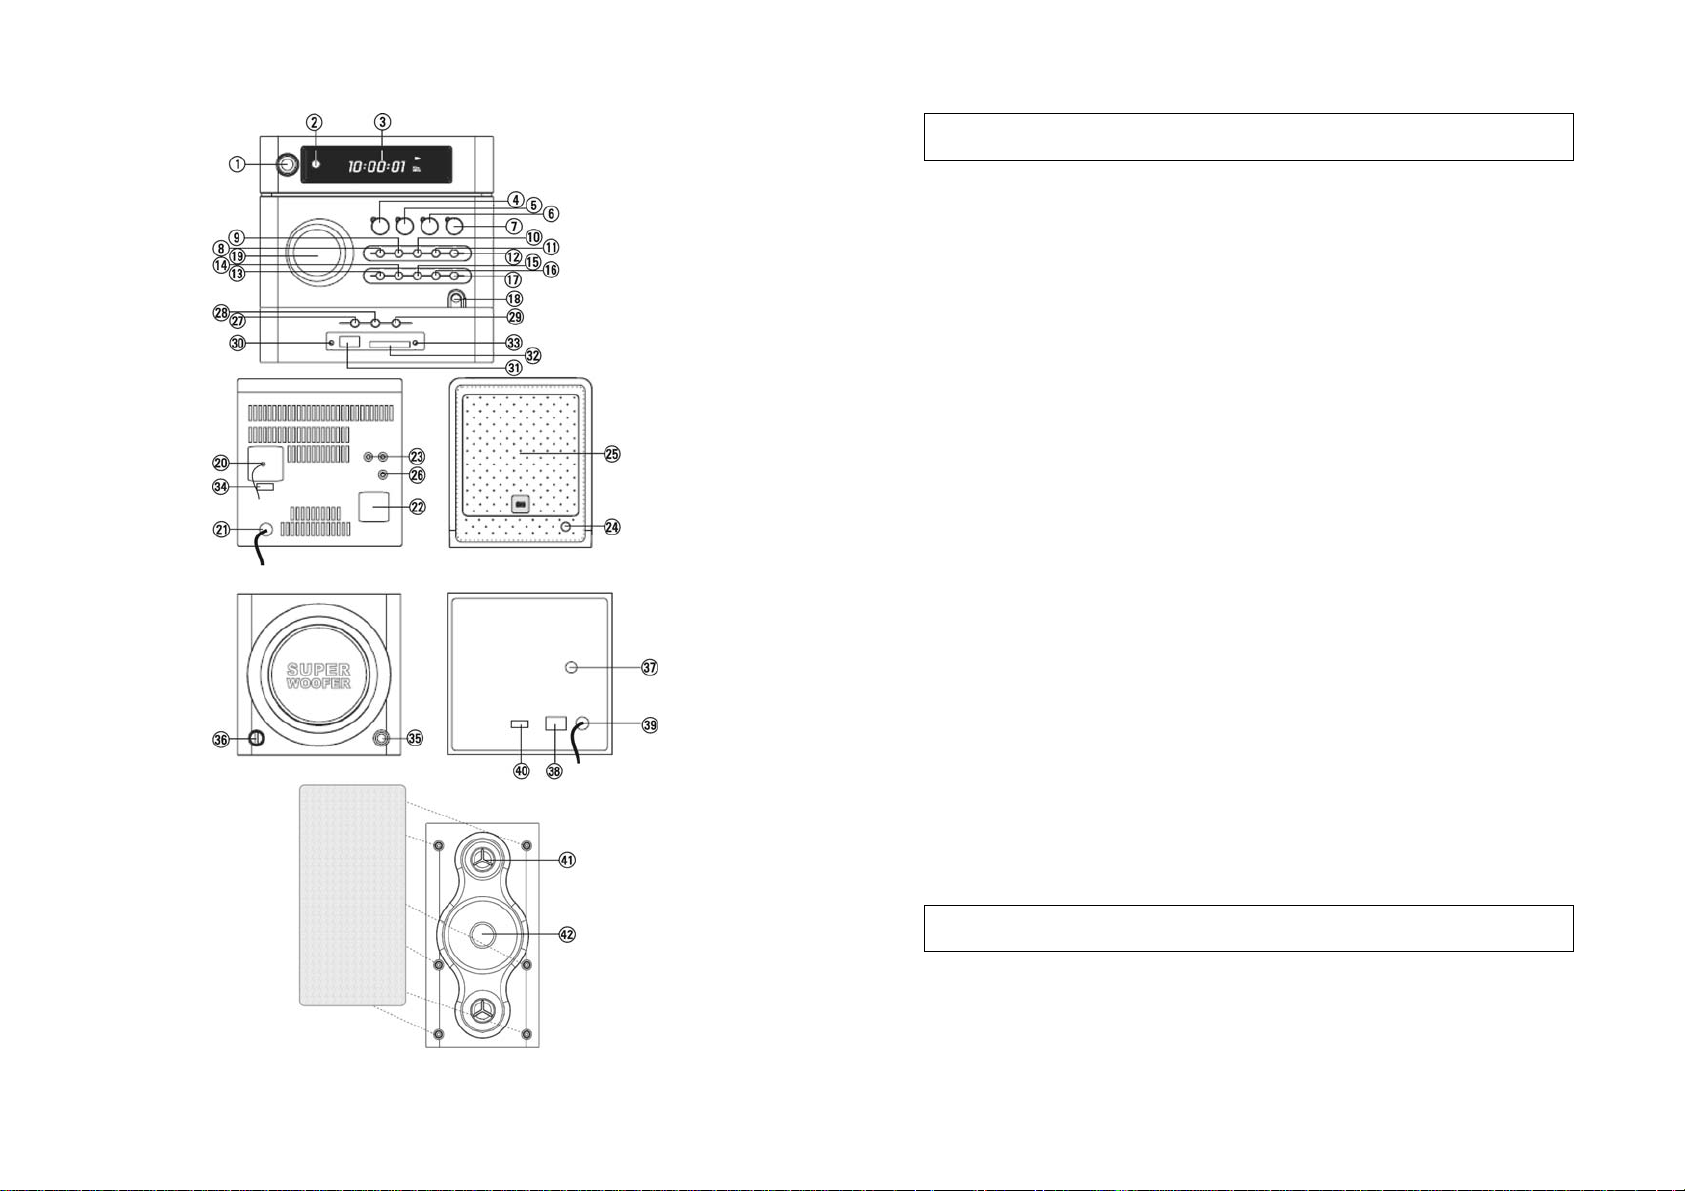
各部名稱
主機
電源/待機鍵(POWER)
遙控感應器(REMOTE SENSOR)
液晶顯示幕
CD 放音/暫停鍵(PLAY/PAUSE/)
CD 停止鍵(STOP)
CD 逆向選曲/向下選台/向下鍵
(REW/DOWN) (OPEN/CLOSE)
CD 順向選曲/向上選台/向上鍵
(FF/UP)
功能選擇鍵(FUNCTION)
波段選擇鍵(BAND)
FM 立體聲鍵(STEREO)
重覆放音鍵(REPEAT)
記憶鍵(MEMORY)
靜音鍵(MUTE)
預設音場鍵(EQ)
定時鍵(TIMER)
睡眠關機鍵(SLEEP) (SD/MS/MMC)
隨機選曲放音鍵(RANDOM)
耳機插座( )
超重低音音箱
電源/待機鍵(POWER)
音量旋鈕(VOLUME)
音源輸入插座(AUDIO IN)
主電源開關(POWER)
AC 電源線(AC~)
電壓切換開關
高音喇叭
全音域喇叭
音量旋鈕(-VOLUME+)
FM 軟質天線(ANT.)
AC 電源線(AC~)
喇叭輸出插座(SPEAKER)
音源輸入插座(AUX IN)
CD 匣門開啟/關閉鍵
CD 匣門
超重低音輸出插座(WOOFER OUT)
文字資訊鍵(FIND)
MP3 逆向章節/向下叫出記憶鍵
(ALBUM/PRESET-)
MP3 順向章節/向上叫出記憶鍵
(ALBUM/PRESET+)
USB 指示燈
USB 插槽
SD/MS/MMC 記憶卡插槽
SD/MS/MMC 記憶卡指示燈
電壓切換開關
6
Page 8

遙控器各部名稱
靜音鍵(MUTE)
預設音場鍵(EQ)
CD 放音/暫停鍵(PLAY/PAUSE/)
CD 逆向選曲/向下選台/向下鍵(SKIP)
MP3 逆向章節/向下叫出記憶鍵(ALBUM/PRESET-)
曲目介紹鍵(INTRO)
睡眠關機鍵(SLEEP)
定時鍵(TIMER)
重覆放音鍵(REPEAT)
隨機放音鍵(RAND.)
曲目編輯鍵(PROG.)
MP3 順向章節/向上叫出記憶鍵(ALBUM/PRESET+)
文字資訊/FM 立體聲鍵(FIND/ST.)
CD 順向選曲/向上選台/向上鍵(SKIP)
音量調整鍵(VOLUME)
CD 停止鍵(STOP)
波段選擇鍵(BAND)
功能選擇鍵(FUNCTION)
電源/待機鍵(POWER)
紅外線發射器
電池室
電池裝置
‧打開背面電池蓋,依標示極性正確放入 4 號電池 2 只後,再裝妥電池蓋。
※注意:
1.使用遙控器時,遙控器的紅外線發射器請勿超出主機遙控感應器的接收範
圍。
2.請勿使用其他類型的電池或新舊電池混合使用,以免操作失靈或無法操作。
3.為確保遙控器正常操作及壽命,請勿同時按下兩個或以上的按鍵。
7
FIND BY ALBUM NAME
• Press FIND twice to access this search mode. The display will show " " and "Album".
• Press FF/UP or REW/DOWN to search your desired album and press
PLAY/PAUSE/ to start playing.
TEXT DISPLAY (ID 3 DISPLAY)
During MP3-CD playing, press FIND key for 2 Sec to switch to text display mode, it
will show the file name / title / artist / album of the current track. Press FIND key for 2
seconds to return to the track playing time.
Remark: this unit is compatible with ID3 V1 only.
PROGRAMMING TRACKS
Up to 64 tracks can be stored in the memory.
1. Load a MP3-CD/CD as described previously.
2. Press MEMORY to start programming.
3. Press REW/DOWN or FF/UP to locate a particular track or album/track
(MP3-CD). Press MEMORY to store it in the memory.
4. Continue this process until you have selected all the tracks you require.
5. To stop programming at any time press STOP.
REVIEWING THE PROGRAM
1. Press MEMORY to review of the tracks currently programmed will begin. The tracks
will be displayed on the LCD.
2. Press MEMORY again for going to the next.
PLAYING A PROGRAM
1. Press PLAY/PAUSE/.
2. Play starts with the first track of the program.
3. When all tracks have been played, the MP3-CD/CD player stops.
CLEAR PROGRAM TRACKS
Opening and closing the CD tray will erase all programmed tracks.
REPEAT PLAY (For CD)
If at any time you wish to listen to a disc or program over and over again, the REPEAT
function will allow you to do so.
1. Press REPEAT once.
2. “REPEAT 1” will be displayed on the LCD.
3. Press REPEAT twice, “REPEAT ALL” will be displayed on the LCD.
4. Press REPEAT again to cancel the repeat function.
REPEAT PLAY (For MP3-CD)
1. Press REPEAT button once.
2. “REPEAT 1” will be displayed on the LCD.
3. Press REPEAT twice, “REPEAT ALL” will be displayed on the LCD.
4. Press REPEAT three times, “REPEAT ALBUM” will be displayed on the LCD.
5. Press REPEAT four times to cancel the repeat function.
RANDOM PLAY
Press RANDOM button once, “RAND” will be displayed on the LCD, press RANDOM
button twice to cancel the random function.
11
Page 9

COMPACT DISC/MP3 OPERATION
INSERTING THE MP3-CD/CD DISC
1. Press OPEN/CLOSE to open the CD door.
2. Insert a MP3-CD/CD in the tray.
3. Press OPEN/CLOSE again to close the CD door.
- The MP3-CD/CD-player starts and scans the contents list of the MP3-CD/CD.
FOR CD
After a few seconds, the total playing time and number of tracks appear on the display.
FOR MP3
After a few seconds, the total number of tracks, albums and MP3 appear on the display.
PLAYING THE ENTIRE DISC
1. Press PLAY/PAUSE/.
– Play starts with the first track.
– The display shows the current track number and its elapsed playing time.
– When all the tracks have been played, the MP3-CD/CD stops and returns pristine
display.
2. To stop play, press STOP.
3. To interrupt play, press PLAY/PAUSE/.
4. To resume play, press PLAY/PAUSE/ again.
SELECTING A DIFFERENT TRACK DURING PLAY
- Press REW/DOWN or FF/UP until the required track number appears in the
display.
- MP3-CD mode only:
Press ALBUM/PREST - or ALBUM/PRESET + once or more to find your desired
album.
STARTING AGAIN WITH THE TRACK THAT IS CURRENTLY PLAYING by
pressing REW/DOWN once. The track will be started again from the beginning.
SEARCHING FOR A PASSAGE DURING PLAY by holding FF/UP or
REW/DOWN to search for the required passage. If you release the button, play will
continue.
FIND FUNCTION
• For MP3 disc playback only: Press FIND to access the search function.
FIND BY FILE NAME
• Press FIND once to access this search mode.
The display will show " ", and letter "A". If any file name starts with letter "A", It
will appear on the display. You can Press FF/UP or REW/DOWN to search from
A-Z, 0-9.
• If any file name start with letter “A”, press and hold FF/UP or REW/DOWN, the
“ ” will stop flashing, then press FF/UP or REW/DOWN again, the display will
show the other song, eg: A-APPLE, A-ANGEL etc.
• Press PLAY/PAUSE/
key to start playing this track with your selected letter.
10
系統的連接
音箱揚聲器的連接
‧將左、右喇叭線插頭分別接於左右喇叭輸出插座(SPEAKER L/R)上,紅色喇叭線
接於紅色喇叭輸出插座,黑色喇叭線接於黑色喇叭輸出插座。
電源供給
1.將隨附的超重低音音箱連接線連接主機的超重低音輸出插座(WOOFER OUT)與
超重低音音箱上的音源輸入插座(AUDIO IN)。
2.將超重低音音箱的 AC 電源線(AC~)接於電源插座上,按下超重低音音箱的主電
源開關(POWER),按電源/待機鍵(POWER)開啟電源,電源/待機鍵(POWER)出
現藍色光,再按一次電源/待機鍵(POWER)即關閉電源,藍色光熄滅。
3.將主機的 AC 電源線(AC~)接於 AC 電源插座上,液晶顯示幕出現”-- --:-- --”字
樣,本機即處於待機狀態。
※使用前請先確定主機與超重低音音箱之電壓切換開關與電源插座的供電電壓
一致為 AC 110V。本機之 AC 電源線僅適用 AC 110V 電壓。
MW 調幅接收
‧收聽 MW 電台時,請轉動機身來調整接收狀況,以取得最佳的接收效果。
FM 調頻接收
‧調整 FM 軟質天線(ANT.)的方向和角度,可取得較佳的接收效果。
‧當接收立體聲節目時,如果訊號很弱有雜音出現時,按 FM 立體聲鍵(STEREO)
切換至”MONO”(此時液晶顯示幕((ST))消失),以改善收聽狀況。
音源輸入
‧將 RCA 連接線(非本機附屬品)一端接於本機的音源輸入插座(AUX IN),另一端
則接於電視、錄放影機、MD、錄放音機或其他音源的輸出插座,即可利用本機
揚聲器播放所連接的音源。
開/關機
開機
‧按電源/待機鍵(POWER),電源/待機鍵(POWER)、音量旋鈕(-VOLUME+)及
液晶顯示幕出現藍色背光及”HELLO”移動字樣,即開啟電源。
關機
‧再按電源/待機鍵(POWER),液晶顯示幕出現”GOOD BYE”移動字樣,隨後藍色
背光熄滅,電源/待機鍵(POWER)、音量旋鈕(-VOLUME+)藍色光亦熄滅,回
到現在時間顯示,本機即處於待機狀態。
8
Page 10

聲音的調整
音量控制
‧音量旋鈕(-VOLUME+)向右旋可增加音量,音量旋鈕(-VOLUME+)向左旋可
降低音量,液晶顯示幕會顯示音量級數(VOL 00~VOL 30),隨後即回到原來的
顯示狀態。
靜音
‧按下靜音鍵(MUTE),液晶顯示幕顯示資訊閃動,即關閉聲音,再按一次靜音鍵
(MUTE),液晶顯示幕顯示資訊停止閃動,即恢復原先的音量。
預設音場
本機內設五種音場(PASS、CLASSIC、ROCK、POP、JAZZ),可依喜好選擇適合
的音場。
‧按一次預設音場鍵(EQ),液晶顯示幕出現”PASS”字樣,即為原音音場。
‧按二次預設音場鍵(EQ),液晶顯示幕出現”CLASSIC”字樣,即為古典樂音場。
‧按三次預設音場鍵(EQ),液晶顯示幕出現”ROCK”字樣,即為搖滾樂音場。
‧按四次預設音場鍵(EQ),液晶顯示幕出現”POP”字樣,即為流行樂音場。
‧按五次預設音場鍵(EQ),液晶顯示幕出現”JAZZ”字樣,即為爵士樂音場。
使用耳機
‧欲使用耳機聆賞時,將 3.5mm 立體耳機插頭接於耳機插座( )中即可,此時揚
聲器與超重低音音箱的聲音將被中斷。
設定現在時間
※請在待機狀態下進行設定,設定中如果在 10 秒內沒有繼續下一步驟,液晶顯示
幕即回復到原來的顯示狀態。
1.按住記憶鍵(MEMORY),直到液晶顯示幕出現”24 HOUR”字樣。
2.按向上鍵(FF/UP)或向下鍵(REW/DOWN)選擇 12 時制或 24 時制。
3.按記憶鍵(MEMORY),液晶顯示幕的”時”閃動,按向上鍵(FF/UP)或向下鍵
(REW/DOWN),設定”時”。
4.再按一次記憶鍵(MEMORY),液晶顯示幕的”分”閃動,按向上鍵(FF/UP)或向下
鍵(REW/DOWN),設定”分”。
5.再按一次記憶鍵(MEMORY),即開始時鐘功能。
※當停電後再來電或 AC 電源線拔除再重新接上,時間顯示即會出現閃動,此時
請重新設定時間。
9
TUNER OPERATION
TUNING
1. Press POWER to switch on the unit or remote.
2. Press FUNCTION to select the tuner mode.
3. Select the tuning range with the BAND button.
4. Press REW/DOWN or FF/UP for few seconds, then release the button.
– The tuner will automatically search for the first transmitter of sufficient strength.
– Repeat this procedure if you wish to select another station.
5. To tune to weak stations, briefly depress REW/DOWN or FF/UP continuously
until you read the correct frequency or the reception is at its optimum.
6. Switch to MONO if there is interference noise during FM STEREO reception.
PROGRAMMING OF PRESET STATIONS
1. Select the tuning range with the BAND button.
2. Tune to the desired station as described under Tuning.
3. Press MEMORY. “01” will start to flash and “PROG” will display.
4. Press ALBUM/PRESET - or ALBUM/PRESET + to assign a number (FM 1-30 / AM
1-10) to the preset station.
5. Press MEMORY again. The frequency, preset number and stereo setting are now
entered in the memory.
6. Repeat this procedure to store other frequencies and preset in the memory.
TUNING TO PRESET STATIONS
Select a number between 1 and 30 (FM 1-30 / MW 1-10) by pressing:
ALBUM/PRESET - or ALBUM/PRESET + button
9
Page 11

SYSTEM CONNECTIONS
CONNECTIONS
A. Terminals for 2 loudspeakers (minimum speaker impedance 4 ohm.)
Attach loudspeaker cables to the unit.
Left speaker: connect the wire to terminal 'L'.
Right speaker: connect the wire to terminal 'R'.
B. Terminal for FM antenna.
The antenna wire supplied with the unit can be connected to terminal. Adjust the
position of FM antenna for optimum reception.
For good FM stereo reception, use an FM outdoor antenna or connect the supplied
antenna wire to your house distribution system.
C. Voltage selector (not on all version).
If your version has this selector, check that the setting corresponds with your local
mains voltage. If the selector must be reset, disconnect the AC power cord.
D. AUX input.
For connection of other sound sources. (e.g. TV or VCR audio output).
OPERATION
POWER STANDBY ON/OFF
When you first plug the unit into the mains, the unit will go into standby mode.
The display will show the time.
– You can press POWER to switch on the unit.
– The standby function of the unit remains on until the unit is switched on.
– Pull the main plug out of the wall socket if you want to switch off the main voltage
completely.
CLOCK SETTING
1. Under power standby mode, press MEMORY key for 2 seconds to access clock
setting.
2. Press and hold MEMORY, the first second digit of "24H" will flash, press or to set the
correct hour mode.
3. Press MEMORY to select the hour setting, the first second digit of “00” will flash,
press the REW/DOWN or FF/UP to set the correct hours.
4. Press MEMORY again to select the minutes setting, "00" will flash, press the
REW/DOWN or FF/UP to set the correct minutes.
5. Press MEMORY again to store in the memory.
8
定時開/關機
設定定時開/關機前,請先確定現在時間已設定正確,並請在待機狀態下進行設定,
如果在 10 秒內沒有繼續下一步驟,液晶顯示幕即回復到原來的顯示狀態。
1.按定時鍵(TIMER),直到液晶顯示幕出現”ON”、””字樣及”時”閃動。
2.按向上鍵(FF/UP)或向下鍵(REW/DOWN),設定定時開機的”時”。
3.再按定時鍵(TIMER),液晶顯示幕的”分”閃動,按向上鍵(FF/UP)或向下鍵
(REW/DOWN),設定定時開機的”分”。
4. 再按一次定時鍵(TIMER) ,即設定完成定時開機的時間,液晶顯示幕出
現”OFF”、””字樣及”時”閃動。
5.按向上鍵(FF/UP)或向下鍵(REW/DOWN),設定定時關機的”時”。
6.再按定時鍵(TIMER),液晶顯示幕的”分”閃動,按向上鍵(FF/UP)或向下鍵
(REW/DOWN),設定定時關機的”分”。
7.再按定時鍵(TIMER),即設定完成定時關機的時間,液晶顯示幕出現”TUNER”字樣。
8.按向上鍵(FF/UP)或向下鍵(REW/DOWN),選擇欲定時開機的音源(CD 或
TUNER)。
9.再按定時鍵(TIMER),液晶顯示幕出現”VOL 13”字樣,按向上鍵(FF/UP)或向下
鍵(REW/DOWN)調整定時開機時的音量。
10.設定完成後,液晶顯示幕會自動依序顯示:定時開機時間→定時關機時間→音
源→音量→現在時間顯示,且出現””符號,表示定時開關機功能開啟。當到達
定時開機的時間時,本機即自動開機;當到達定時關機的時間時,本機即自動
關機。
11. 定時開機後,可按電源/待機鍵(POWER)關機,當下一次到達定時開機的時間
時,本機會再由選定的音源自動開機。
12.按定時鍵(TIMER),液晶顯示幕””符號消失”,即關閉定時開關機功能。
13.再按定時鍵(TIMER),液晶顯示幕會出現””符號,並依序顯示定時開機時間→
定時關機時間→音源→音量→現在時間顯示,即開啟定時開關機功能。
睡眠關機
請在開機狀態下進行設定,設定中如果在 3 秒內沒有繼續下一步驟,液晶顯示幕即
回復到原來的顯示狀態。
1.按睡眠關機鍵(SLEEP),液晶顯示幕出現”SLEEP 90 SLEEP”字樣。
2.再按睡眠關機鍵(SLEEP)調整倒數計時的時間(90、80、…、20、10 分鐘)至所需
的分鐘數,如:30 分鐘。
3.約 3 秒後液晶顯示幕即回復到原來的顯示狀態,且液晶顯示幕出現”SLEEP”字
樣,即開始倒數計時,時間到即自動關機。
4.倒數計時中,按睡眠關機鍵(SLEEP)調整倒數計時的時間至液晶顯示幕回復到原
來的顯示狀態,”SLEEP”字樣消失,即取消睡眠關機功能。
10
Page 12

顯示幕選擇
˙在開機狀態下,按住記憶鍵(MEMORY),液晶顯示幕會顯示現在時間,數秒鐘後
回到原來狀態顯示,數秒鐘後再顯示現在時間。
˙再按一次記憶鍵(MEMORY),即回到原來狀態顯示。
收音機操作
A.收聽電台廣播
1. 按功能選擇鍵(FUNCTION) 選擇收音機功能(TUNER) ,液晶顯示幕先顯
示”TUNER”字樣,隨即顯示 MW 或 FM 及波段數。
2.按波段選擇鍵(BAND),選擇想聽的波段(MW 或 FM),液晶顯示幕會出現”MW”
或”FM”字樣。
3.選台
‧自動選台:按住向上選台鍵(FF/UP)或向下選台鍵(REW/DOWN)1~2 秒,
本機即開始自動搜尋電台,遇訊號良好的電台時,即自動停止。
‧手動選台:輕按向上選台鍵(FF/UP)或向下選台鍵(REW/DOWN),調整至
想要收聽的電台頻率。
※當接收到 FM 立體聲訊號的電台時,液晶顯示幕會顯示”((ST))”字樣。
※按 FM 立體聲鍵(STEREO)可切換 FM 立體聲或單聲,液晶顯示幕會先顯
示”STEREO”或”MONO”字樣,再回到原來顯示狀態。
4.調整音量旋鈕(VOLUME)至適當的聆賞程度。
5.按電源/待機鍵(POWER),液晶顯示幕出現”GOOD BYE”移動字樣,隨即藍色背
光熄滅,顯示現在時間,即關閉收音機。
B.電台記憶設定
設定中如果在 5 秒內沒有繼續下一步驟,液晶顯示幕即回復到原來的顯示狀態。
1.選擇想聽的電台。
2.按記憶鍵(MEMORY),液晶顯示幕出現”PROG”及”01”閃動字樣。
3.按向上叫出記憶鍵(ALBUM/PRESET+ )或向下叫出記憶鍵(ALBUM/PRESET
-),選擇想要記憶的電台代號,如選擇”10”。
4.再按一次記憶鍵(MEMORY),液晶顯示幕出現”10 PRESET”字樣,即設定完成。
5.重覆以上步驟,完成其他電台的記憶,MW、FM 共可記憶 40 組電台(MW 10 組、
FM 30 組)。
C.叫出記憶電台
按向上叫出記憶鍵(ALBUM/PRESET + )或向下叫出記憶鍵(ALBUM/PRESET
-),可叫出已記憶的電台。
11
REMOTE CONTROLS
INSTALLATION
• Unpack all parts and remove protective material.
• Insert the batteries (2×UM-4/SIZE "AAA") into the remote control transmitter as
shown in the battery compartment.
• Do not connect the unit to the mains before checking the main voltage and before all
other connections have been made.
• Do not cover any vents and make sure that there is a space of several centimeters
around the unit for ventilation.
1. MUTE Key
2. EQ Key
3. PLAY/PAUSE/ Key (CD MODE SELECTION)
4. R-SKIP key
5. ALBUM/PRESET - Key
6. INTRO Key
7. SLEEP Key
• Press button "SLEEP" mode will turn on.
8. TIMER Key
• Press and hold to set the "TIMER" mode on.
9. REPEAT key
10. RAND. key
11. PROG. Key
12. ALBUM/PRESET + Key
13. FIND/ST. Key
14. F-SKIP key
15. VOLUME Key
16. STOP key
17. BAND key
18. FUNCTION key
19. POWER Key
20. LIGHT TRANSMISSION
21. BATTERY COMPARTMENT DOOR
7
Page 13

20. FM ANTENNA
21. AC POWER CORD
22. SPEAKER TERMINAL
23. AUX INPUT socket
24. OPEN/CLOSE Key
25. CD TRAY
26. SUB-WOOFER out
27. FIND key
28. ALBUM/PRESET - key
• In the CD/MP3 mode, USB or SD/MS/MMC: selects previous album.
• In the Radio mode: selects the previous preset station.
29. ALBUM/PRESET + Key
• In the CD/MP3 mode, USB or SD/MS/MMC: selects next album.
• In the Radio mode: selects the next preset station.
30. USB indication
31. USB socket
32. SD/MS/MMC socket
33. SD/MS/MMC indication
34. VOLTAGE SWITCH
SUB-WOOFER
35. POWER key
• To turn the sub-woofer ON/OFF.
36. VOLUME CONTROL
• To adjust the volume level.
37. AUDIO IN
• Connect from main unit.
38. POWER SWITCH
• Press to turn the power ON/OFF.
• It’s not a mains disconnect switch, for disconnect from the mains, please unplug
the sub-woofer from the socket-outlet.
Warning: Due to the mains switch was located at the rear panel, the apparatus must
be located in the open area without any obstructions to access the mains
switch.
39. AC POWER CORD
• For sub-woofer only.
40. VOLTAGE SWITCH
41. HIGH SPEAKER
42. LOW SPEAKER
6
CD 碟盤操作
˙按功能選擇鍵(FUNCTION)選擇雷射碟盤(CD)功能,液晶顯示幕顯示”CD”字樣,
數秒後再出現”NO DISC”字樣。
˙按 CD 匣門開啟/關閉鍵(OPEN/CLOSE),液晶顯示幕顯示”OPEN”字樣,開啟
CD 匣門,將 CD 光碟片印刷面朝上放入 CD 匣座中,再按 CD 匣門開啟/關閉鍵
(OPEN/CLOSE),液晶顯示幕顯示”CLOSE”字樣,CD 匣門關閉,液晶顯示幕顯
示”CD READ”字樣,本機即自動偵測光碟片為一般 CD 光碟片或 MP3 光碟片。
※重要注意事項:
˙CD 匣門為電動式設計,絕對禁止用手直接開啟或關閉 CD 匣門,以免造成匣
門損壞。
˙CD 匣門上方請預留至少 15 公分的空間,以免匣門開啟時造成損壞。
※本機可播放 CD、CD-R、CD-RW 及 MP3 光碟片。
一、CD 光碟片
A.放音
1.一般 CD 光碟片放入 CD 匣座後,液晶顯示幕會顯示”Cd”字樣與 CD 的總曲目數、
總放音時間。
2.按 CD 放音/暫停鍵(PLAY/PAUSE/),即自第一首曲目開始放音,液晶顯示幕
會顯示被播放的曲目數字與已放音時間。
3.調整音量旋鈕(VOLUME)至適當的聆賞程度。
4.放音中按 CD 放音/暫停鍵(PLAY/PAUSE/)可暫停放音,此時液晶顯示幕的已
放音時間閃爍,再按一次 CD 放音/暫停鍵(PLAY/PAUSE/)則可恢復放音。
5.按 CD 停止鍵(STOP)可停止放音,液晶顯示幕會顯示 CD 光碟片的總曲目數與
總放音時間。
B.跳播選曲:可迅速選擇一般 CD 光碟片中您想要欣賞的曲目。
1.在放音停止狀態下,按 CD 逆向選曲鍵(REW/DOWN)或 CD 順向選曲鍵
(FF/UP),可逆向或順向選擇曲目,再按 CD 放音/暫停鍵(PLAY/PAUSE/)
即可放音。
2.放音中,輕按 CD 順向選曲鍵(FF/UP),可選下一首曲目。
3.放音中,輕 按 CD 逆向選曲鍵(REW/DOWN),可將正在放音的曲目從頭放音。
4.放音中,連續按 CD 逆向選曲鍵(REW/DOWN)二次,可選上一首曲目。
5.暫停放音中,輕按 CD 順向選曲鍵(FF/UP),可選下一首曲目,再按 CD 放音/
暫停(PLAY/PAUSE/)即可放音。
6.暫停放音中,連續按 CD 逆向選曲鍵(REW/DOWN)二次,可選上一首曲目,再
按 CD 放音/暫停鍵(PLAY/PAUSE/)即可放音。
C.快速尋曲:可快速於所在曲目中尋找您想要的曲段。
‧放 音 中,按 住 CD 逆向選曲鍵(REW/DOWN)或 CD 順向選曲鍵(FF/UP),可 逆
向或順向尋找曲段。
12
Page 14

D.編輯曲序:可依您個人喜好重新編輯 CD 播放順序,最多可記憶 64 首曲目;請
在停止放音狀態下進行設定。
1.按 CD 匣門開啟/關閉鍵(OPEN/CLOSE),開 啟 CD 匣門,在 CD 碟片匣中放入欲
編輯曲序的一般 CD 光碟片,再按 CD 匣門開啟/關閉鍵(OPEN/CLOSE)關閉 CD
匣門。
2.按記憶鍵(MEMORY),液晶顯示幕出現”PROG 00 P-01”字樣。
3.按順向選曲鍵(FF/UP)或逆向選曲鍵(REW/DOWN)選擇曲目。
4.再按一次記憶鍵(MEMORY),液晶顯示幕顯示”PROG 00 P-02”字樣,即設定完
成。
5.重覆上述步驟,直到所有曲目被記憶儲存,最多可記憶 64 首。
6.按記憶鍵(MEMORY),可檢視已編輯的曲目。
7.按 CD 放音/暫停鍵(PLAY/PAUSE/),液晶顯示幕顯示”PROG”,即開始編輯
曲序的放音。
8.按 CD 停止鍵(STOP)可停止放音。
9.按記憶鍵(MEMORY),再按 CD 放音/暫停鍵(PLAY/PAUSE/),可恢復編輯曲
序的放音。
※編輯途中按 CD 停止鍵(STOP)、按 CD 匣門開啟/關閉鍵(OPEN/CLOSE)打開
CD 匣門、切換其他功能或關閉電源時,編輯的曲序即取消。
E.重覆放音(本功能亦適用於編輯曲序的放音)
1.按重覆放音鍵(REPEAT)一次,液晶顯示幕出現”REPEAT 1”字樣,會重覆播放目
前所在的曲目。
2.再按重覆放音鍵(REPEAT)一次,液晶顯示幕”REPEAT ALL”字樣,則不斷重覆播
放 CD 光碟片上所有的曲目。
3.再按重覆放音鍵(REPEAT)一次,液晶顯示幕”REPEAT ALL”字樣消失,即取消重
覆放音模式。
※停止放音中,按 CD 匣門開啟/關閉鍵(OPEN/CLOSE)打開 CD 匣門、切換其他
功能或關閉電源時,重覆放音功能即取消。
F. 隨機選曲放音:本功能不依 CD 光碟片的曲目順序放音,而以隨機跳播方式播放。
1.按隨機選曲放音鍵(RANDOM),液晶顯示幕出現”RAND”字樣,即開始放音,所
有的曲目將不依原光碟片順序播放,而以隨機選曲的方式放音。
2.再按一次隨機選曲放音鍵(RANDOM),或放音中按 CD 停止鍵(STOP),液晶
顯示幕”RAND”字樣消失,即取消隨機選曲放音。
G. 曲目介紹:本功能僅適用於遙控器
1.按遙控器上的曲目介紹鍵(INTRO),液晶顯示幕出現”INTRO”字樣,即開始自動
播出每首曲目的前 10 秒;當介紹完 CD 光碟片內的所有曲目時,液晶顯示幕會
顯示 CD 光碟片的總曲目數與總放音時間。
2.再按一次曲目介紹鍵(INTRO),或按 CD 停止鍵(STOP),液晶顯示幕”INTRO”
字樣消失,即取消曲目介紹功能。
13
CONTROL AND INDICATORS
MAIN UNIT
1. POWER Key
• Press to turn the power ON/Standby.
2. REMOTE SENSOR
• To receive signals from the remote control.
3. MULTI-DISPLAY
4. PLAY/PAUSE /Key
• In the CD/MP3 mode, USB or SD/MS/MMC: to start or interrupt play.
5. STOP Key
• To stop the compact disc or clear program.
• To select USB or SD/MS/MMC.
6. REW/DOWN Key
• In the Radio mode: for receiving frequency steps down.
• In the CD/MP3 mode, USB or SD/MS/MMC: to return to the start of a track, select a
previews track or search for a passage during play.
7. FF/UP Key
• In the Radio mode: for receiving frequency steps up.
• In the CD/MP3 mode, USB or SD/MS/MMC: select a next track or search for a
passage during play.
8. FUNCTION key
• To select the TURNER, CD, AUX or CARD-USB mode.
9. BAND Key
• To select the receiving band.
10. STEREO key
11. REPEAT key
• In the CD/MP3 mode, USB or SD/MS/MMC: to set or release the repeat mode.
12. MEMORY Key
• In the Radio mode: for memory preset.
• In the CD/MP3 mode, USB or SD/MS/MMC: for setting program.
• In the clock mode: for setting of the clock or timer adjustment.
13. MUTE Key
• To terminate the sound output
14. PRESET EQUALIZER Key (EQ)
• For selecting Digital Sound Control: PASS, CLASSIC, ROCK, POP & JAZZ.
15. TIMER key
16. SLEEP key
17. RANDOM Key
• In the CD/MP3 mode, USB or SD/MS/MMC: to set or release the random mode.
18. PHONES JACK
• Connection for headphones.
19. VOLUME CONTROL
• To adjust the volume level.
5
Page 15

MAIN UNIT & SUB-WOOFER CONTROLS
4
二、MP3 光碟片
A.放音
1.MP3 光碟片放入 CD 匣座後,液晶顯示幕會顯示”MP3”字樣與 MP3 的總章節數、
總曲目數。
2.按 CD 放音/暫停鍵(PLAY/PAUSE/),則自第一個章節的第一首曲目開始放
音,液晶顯示幕會顯示被播放的章節數字、曲目數字與放音時間。
3.調整音量旋鈕(VOLUME)至適當的聆賞程度。
4.放音中按 CD 放音/暫停鍵(PLAY/PAUSE/)可暫停放音,此時液晶顯示幕的已
放音時間閃爍,再按一次 CD 放音/暫停鍵(PLAY/PAUSE/)則可恢復放音。
5.按 CD 停止鍵(STOP)可停止放音,液晶顯示幕會顯示”MP3”字樣與總檔案數、
總曲目數。
B.跳播選曲:可迅速選擇 MP3 光碟片中您想要欣賞的曲目。
1.在放音停止狀態下,按 CD 逆向選曲鍵(REW/DOWN)或 CD 順向選曲鍵
(FF/UP),可逆向或順向選擇曲目,再按 CD 放音/暫停鍵(PLAY/PAUSE/)
即可放音。
2.放音中,輕按 CD 順向選曲鍵(FF/UP),可選下一首曲目。
3.放音中,輕 按 CD 逆向選曲鍵(REW/DOWN),可將正在放音的曲目從頭放音。
4.放音中,連續按 CD 逆向選曲鍵(REW/DOWN)二次,可選上一首曲目。
5.暫停放音中,輕按 CD 順向選曲鍵(FF/UP),可選下一首曲目,再按 CD 放音/
暫停(PLAY/PAUSE/)即可放音。
6.暫停放音中,連續按 CD 逆向選曲鍵(REW/DOWN)二次,可選上一首曲目,再
按 CD 放音/暫停鍵(PLAY/PAUSE/)即可放音。
C.快速尋曲:可快速於所在曲目中尋找您想要的曲段。
‧放 音 中,按 住 CD 逆向選曲鍵(REW/DOWN)或 CD 順向選曲鍵(FF/UP),可 逆
向或順向尋找曲段。
D.跳尋章節:可尋找 MP3 光碟片中您想要欣賞的章節。
1.在放音停止狀態下,按 MP3 逆向章節鍵(ALBUM/PRESET-)或 MP3 順向章節
鍵 (ALBUM/PRESET + ) ,可逆向或順向選擇章節,再按 CD 放音/ 暫停鍵
(PLAY/PAUSE/)即自該章節的第一首曲目開始放音。
2.放音中,輕按 MP3 順向章節鍵(ALBUM/PRESET+),可選下一章節,並從該章
節的第一首曲目開始放音。
3.放音中,輕按 MP3 逆向章節鍵(ALBUM/PRESET-),可選上一章節,並從該章
節的第一首曲目開始放音。
4.暫停放音中,輕按 MP3 順向章節鍵(ALBUM/PRESET+),可選下一章節,再按
CD 放音/暫停鍵(PLAY/PAUSE/),即從該章節的第一首曲目開始放音。
5.暫停放音中,輕按 MP3 逆向章節鍵(ALBUM/PRESET-),可選上一章節,
再按
CD 放音/暫停鍵(PLAY/PAUSE/),即從該章節的第一首曲目開始放音。
14
Page 16

E.快速尋找章節曲目:可快速於 MP3 光碟片章節中尋找您想要的曲目。
1.在放音停止狀態下,按住 MP3 逆向章節鍵(ALBUM/PRESET-)或 MP3 順向章
節鍵(ALBUM/PRESET+),可逆向或順向於 MP3 光碟片章節中尋找曲目,再按
CD 放音/暫停鍵(PLAY/PAUSE/)即可放音。
2.放音中,按住 MP3 逆向章節鍵(ALBUM/PRESET - ) 或 MP3 順向章節鍵
(ALBUM/PRESET+),可逆向或順向於 MP3 光碟片章節中尋找曲目。
F. 編輯曲序:可依您個人喜好重新編輯 CD 播放順序,最多可記憶 64 首曲目;請
在停止放音狀態下進行設定。
1.按 CD 匣門開啟/關閉鍵(OPEN/CLOSE),開啟 CD 匣門,在 CD 碟片匣中放入欲
編輯曲序的 MP3 光碟片,再按 CD 匣門開啟/關閉鍵(OPEN/CLOSE)關閉CD 匣門。
2.按記憶鍵(MEMORY),液晶顯示幕出現” PROG 00 000 P-01”字樣。
3.按順向選曲鍵(FF/UP)或逆向選曲鍵(REW/DOWN)選擇曲目章節,如:選擇
第 3 章節,按一次記憶鍵(MEMORY),液晶顯示幕顯示”PROG 03 000 P-01”字樣。
4.再按順向選曲鍵(FF/UP)或逆向選曲鍵(REW/DOWN)選擇第3 章節內的曲目。
5.再按一次記憶鍵(MEMORY),液晶顯示幕顯示”PROG 00 000 P-02”字樣,即設
定完成。
6.重覆上述步驟,直到所有曲目被記憶儲存,最多可記憶 64 首。
7.按記憶鍵(MEMORY),可檢視已編輯的曲目。
8.按 CD 放音/暫停鍵(PLAY/PAUSE/),液晶顯示幕顯示”PROG”,即開始編輯
曲序的放音。
9.按 CD 停止鍵(STOP)可停止放音。
10.按記憶鍵(MEMORY),再按 CD 放音/暫停鍵(PLAY/PAUSE/),可恢復編輯
曲序的放音。
※編輯途中按 CD 停止鍵(STOP)、按 CD 匣門開啟/關閉鍵(OPEN/CLOSE)打開
CD 匣門、切換其他功能或關閉電源時,編輯的曲序即取消。
G. 重覆放音
1.按重覆放音鍵(REPEAT)一次,液晶顯示幕出現”REPEAT 1”字樣,會重覆播放目
前所在的曲目(本功能亦適用於編輯曲序的放音)。
2.按重覆放音鍵(REPEAT)一次,液晶顯示幕”REPEAT ALL”字樣,則不斷重覆播放
MP3 光碟片上所有章節中所有的曲目(本功能亦適用於編輯曲序的放音)。
3.再按重覆放音鍵(REPEAT)一次,液晶顯示幕出現”REPEAT ALBUM”字樣,則重
覆播放 MP3 光碟片上目前章節的所有曲目。
4.再按一次重覆放音鍵(REPEAT),液晶顯示幕”REPEAT ALBUM”字樣消失,則取
消重覆放音模式。
※停止放音中,按 CD 匣門開啟/關閉鍵(OPEN/CLOSE)打開 CD 匣門、切換其他
功能或關閉電源時,重覆放音功能即取消。
H.隨機選曲放音:本功能不依 MP3 光碟片的曲目順序放音,而以隨機跳播方式播放
1.按隨機選曲放音鍵(RANDOM),液晶顯示幕出現”RAND”字樣,即開始放音,所
有的曲目將不依原光碟片順序播放,而以隨機選曲的方式放音。
15
WARNING:
This unit employs a laser. Only a qualified service person should remove the cover or
attempt to service this device, due to possible eye injury.
CAUTION:
• USE OF CONTROLS OR ADJUSTMENTS OR PERFORMANCE PROCEDURE
OTHER THAN SPECIFIED HEREIN MAY RESULT IN HAZARDOUS
RADIATION EXPOSURE.
• HAZARDOUS LASER RADIATION WHEN OPENED AND INTERLOCK
DEFEATED
DANGER
INVISIBLE LASER RADIATION WHEN OPENED AND INTERLOCK FAILED OR
DEFEATED. AVOID DIRECT EXPOSURE TO BEAM.
INTERFERENCE
Your system might cause TV or radio interference even when it is operating properly. To
determine whether your system is causing the interference, turn it off. If the interference
goes away, your system is causing it.
Try to eliminate the interference by:
• moving your radio away from the receiver
FEATURES
Electronic CD Door — lets you open and close the CD door easily and quickly.
Auto Power On-off —
time.
CD Function — play, pause, skip forward and backward, repeat one, repeat all, random
and program play.
MW/FM PLL Radio — lets you listen to 40 preset stations.
Digital Volume Control — lets you adjust to comfortable volume levels.
Remote Control — for convenient operation.
Sleep Timer — 10, 20, …, 80, 90 minutes of auto power off.
LCD with Backlight —
PREPARATION
You can place the main unit and its speakers directly on a flat table.
the main unit can be powered on/off automatically in the preset
for easy viewing in the dark.
3
Page 17

Power-Cord Protection— Route power-supply cords so they are not likely to be walked on or
pinched by items placed on or against them, paying particular attention to cords at plugs,
convenience receptacles, and the point where they exit from the product.
Lightning— For added protection for this product during a lightning storm, or when it is left
unattended and unused for long periods of time, unplug it from the wall outlet and disconnect the
antenna or cable system. This will prevent damage to the product due to lightning and power-line
surges.
Overloading— Do not overload wall outlets, extension cords, or integral convenience receptacles
as this can result in a risk of fire or electric shock.
Object and Liquid Entry— Never push objects of any kind into this product through openings,
as they may touch dangerous voltage points or short out parts that could result in a fire or electric
shock.
Never spill liquid of any kind on the product.
Servicing— Do not attempt to service this product yourself, as opening or removing covers may
expose you to dangerous voltage or other hazards. Refer all servicing to qualified service personnel.
Damage Requiring Service— Unplug this product from the wall outlet and refer servicing to
qualified service personnel under the following conditions:
• When the power-supply cord or plug is damaged.
• If liquid has been spilled or objects have fallen into the product.
• If the product has been exposed to rain or water.
• If the product does not operate normally by following the operating instructions. Adjust only those
controls that are covered by the operating instructions, as an improper adjustment of other controls
may result in damage and will often require extensive work by a qualified technician to restore the
product to normal operation.
• If the product has been dropped or damaged in any way.
• When the product exhibits a distinct change in performance.
Replacement Parts— When replacement parts are required, be sure the service technician uses
replacement parts specified by the manufacturer or having the same characteristics as the original
part. Unauthorized substitutions may result in fire, electric shock, or other hazards.
Safety Check— Upon completion of any service or repairs to this product, ask the service
technician to perform safety checks to determine that the product is in proper operating condition.
Heat— The product should be situated away from heat sources such as radiators, heat registers,
stoves, or other products (including amplifiers) that produce heat.
Power Lines— Locate an outdoor antenna away from power lines.
Non-Use Periods— Unplug the product’s power cord when you will not use it for extended
periods.
Outdoor Antenna Grounding — If an outside antenna or cable system is connected to the
product, ground the antenna or cable system so as to provide some protection against voltage surges
and built-up static charges. See the example below.
2
2.再按一次隨機選曲放音鍵(RANDOM),或放音中按 CD 停止鍵(STOP),液晶
顯示幕”RAND”字樣消失,即取消隨機選曲放音。
I.曲目介紹:本功能僅適用於遙控器
1.停止放音狀態下,按遙控器上的曲目介紹鍵(INTRO),液晶顯示幕出現”INTRO”
字樣,即開始從第一章節第一首曲目自動播出每首曲目的前 10 秒;當介紹完 MP3
碟片內的所有曲目時,液晶顯示幕會顯示 MP3 的總章節數、總曲目數。
2.放音中,按遙控器上的曲目介紹鍵(INTRO),液晶顯示幕出現”INTRO”字樣,即
從目前播放的曲目開始介紹。
3.再按一次曲目介紹鍵(INTRO),或按 CD 停止鍵(STOP),液晶顯示幕”INTRO”
字樣消失,即取消曲目介紹功能。
J.文字資訊:共有三種方式可顯示 MP3 光碟片中的英文及數字資訊(本機不適用於
顯示中文資訊)
a.第一種方式:
1.按文字資訊鍵(FIND)一次,液晶顯示幕顯示” “閃動圖樣。
2.每按一次向上鍵(FF/UP),本機即以 A~Z 及 0~9 的順序擷取 MP3 光碟片
中所有曲目的文字資訊,但液晶顯示幕僅會顯示所擷取到的第一首曲目文字資
訊;反之,每按一次向下鍵(REW/DOWN),則以 9~0 及 Z~A 的順序擷取
文字資訊,但液晶顯示幕僅顯示所擷取到的第一首曲目文字資訊。
※如為中文資訊,液晶顯示幕會顯示”NONE”字樣。
3.按 CD 停止鍵(STOP),即取消此功能,液晶顯示幕回到原來狀態顯示,同時
液晶顯示幕” ”圖樣消失。
4.按 CD 放音/暫停鍵(PLAY/PAUSE/)即開始播放液晶顯示幕所顯示的曲目。
b.第二種方式:
1.按文字資訊鍵(FIND)二次,液晶顯示幕顯示” ALBUM”字樣。
2.按向上鍵(FF/UP)或向下鍵(REW/DOWN)選擇章節,同時液晶顯示幕會顯
示該章節名稱。
※如為中文資訊,液晶顯示幕會顯示”UNKNOWN”字樣。
3.按 CD 放音/暫停鍵(PLAY/PAUSE/)即從該章節的第一首曲目開始放音,同
時液晶顯示幕” ALBUM”字樣消失。
4.按 CD 停止鍵(STOP)可停止放音,即取消此功能,液晶顯示幕會顯示 MP3
的總章節數及總曲目數。
c.第三種方式:
1.放音狀態下,按住文字資訊鍵(FIND)約 2 秒,液晶顯示幕會以跑馬燈方式顯示
目前曲目的文字資訊。
2.按住文字資訊鍵(FIND)約 2 秒,即取消此功能。
16
Page 18

USB 裝置與 SD/MS/MMC 記憶卡
※USB/SD/MS/MMC 僅適用於 MP3 格式。
※USB 僅可連接 USB 裝置之 MP3 隨身碟與記憶卡讀卡機。
※請注意 USB 裝置與 SD/MS/MMC 記憶卡插入插槽時之方向是否正確,以免造成
插槽的損壞。
1.按功能選擇鍵(FUNCTION)選擇記憶卡 USB 功能(CARD-USB),液晶顯示幕出
現”CARD-USB”字樣。
2.如果同時有 USB 裝置插入 USB 插槽與 SD/MS/MMC 記憶卡插入 SD/MS/MMC
記憶卡插槽(SD/MS/MMC)中,只有 SD/MS/MMC 記憶卡指示燈會亮,液晶顯示
幕會顯示”MP3”字樣與記憶卡內 MP3 的總章節數、總曲目數。
※若所插入之記憶卡內無資料或所鍵資料非 MP3 格式,液晶顯示幕會顯示”NO
FILE”字樣。
3.按住 CD 停止鍵(STOP)約 2 秒 鐘,則 USB 指示燈亮,液晶顯示幕會顯示”MP3”
字樣與 USB 裝置內 MP3 的總章節數、總曲目數。
4.文字資訊:共有二種方式可顯示 USB 或 SD/MS/MMC 記憶卡中 MP3 的英文及
數字資訊(本機不適用於顯示中文資訊)
a.第一種方式:
1.按文字資訊鍵(FIND)一次,液晶顯示幕顯示” ALBUM“字樣。
2.每按一次向上鍵(FF/UP),本機即以 A~Z 及 0~9 的順序擷取 USB 或
SD/MS/MMC 記憶卡中 MP3 所有曲目的文字資訊,但液晶顯示幕僅會顯示所
擷取到的第一首曲目文字資訊;反之,每按一次向下鍵(REW/DOWN),則
以 9~0 及 Z~A 的順序擷取文字資訊,但液晶顯示幕僅顯示所擷取到的第一
首曲目文字資訊。
※如為中文資訊,液晶顯示幕會顯示”UNKNOWN”字樣。
3.按 CD 停止鍵(STOP)即取消此功能,液晶顯示幕回到原來顯示,同時液晶顯
示幕” ALBUM”字樣消失。
4.按 CD 放音/暫停鍵(PLAY/PAUSE/)即開始播放液晶顯示幕所顯示的曲目。
b.第二種方式:
1.放音狀態下,按住文字資訊鍵(FIND)約 2 秒,液晶顯示幕會以跑馬燈方式顯示
目前曲目的文字資訊。
2.按住文字資訊鍵(FIND)約 2 秒,即取消此功能。
音源輸入
本機可連接其他音源,如:電視或錄放影機,接線方法請參考「系統的連接」中的”
音源輸入”。
1.按功能選擇鍵(FUNCTION)選擇音源輸入功能(AUX),液晶顯示幕出現”AUX”字樣。
2.其他機器的音源亦可藉由本機的揚聲器來進行播放。
17
WARNING: To reduce the risk of fire or shock hazard , do not expose this product to rain or
"WARNING:TO REDUCE THE RISK OF ELECTRIC
moisture.
SHOCK, DO NOT REMOVE COVER ( OR
BACK ). NO USERSERVICEABLE
PARTS INSIDE. REFER SERVICING TO
QUALIFIED SERVICE PERSONNEL."
The lightning flash with an arrowhead symbol, within the
equilateral triangle, is intended to alert the user to the
presence of uninsulated " dangerous voltage" within the
product's enclosure that may be of sufficient magnitude to
constitute an electric shock to persons.
The exclamation point within the equilateral triangle is
intended to alert the user to the presence of important
operating and maintenance (servicing) instructions in the
literature accompanying the appliance.
IMPORTANT SAFETY INSTRUCTIONS
Careful attention is devoted to quality standards in the manufacture of your product and safety is a
major factor in its design.
However safety is also your responsibility.
This section lists important information that will help you properly use and enjoy your product.
Read all the included safety and operating instructions before using your product. Follow them
closely, and retain them for future reference.
Heed Warnings— Follow all warnings on the product and in the operating instructions.
Cleaning— Unplug this product from the wall outlet before cleaning. Use only a damp cloth for
cleaning. Do not use liquid or aerosol cleaners.
Attachments— Do not use attachments/accessories not recommended by the product
manufacturer, as they might create a hazard.
Water and Moisture — Do not use this product near water (for example, near a bath tub, wash
bowl, kitchen sink, or laundry tub; in a wet basement; or near a swimming pool).
Accessories— Do not place this product on an unstable cart, stand, tripod, bracket, or table. The
product may fall, causing serious injury to a child or adult; and serious damage to the product.
Use only with a cart, stand, tripod, bracket, or table recommended by the manufacturer or sold with
the product. Follow the manufacturer’s instructions for mounting, and use a recommended
mounting accessory.
Carts— Move the product on a cart carefully. Quick stops, excessive force, and uneven surfaces
may cause the product /cart to overturn.
Ventilation— Slots and openings in the cabinet provide ventilation, ensure reliable operation, and
protect from overheating. Do not block or cover these openings, and do not place the product on a
bed, sofa, rug, or other similar surface. Do not place the product in a built-in installation such as a
bookcase or rack unless it provides proper ventilation as specified by the manufacturer.
Power Sources— Operate this product using only the power source indicated on its marking
label. If you are not sure of your home’s power type, consult your product dealer or local power
company.
Polarization— This product is equipped with a polarized AC line plug (a plug having one blade
wider than the other). This plug will fit in the power outlet only one way. This is a safety feature. If
you cannot insert the plug fully into the outlet, try reversing the plug. If the plug still doesn’t fit,
contact your electrician to replace your obsolete outlet. Do not defeat the safety purpose of the
polarized plug. If you need an extension, use a polarized cord.
1
Page 19

PH-PR9000UMP
MICRO HI-FI SYSTEM
with MP3 Playback Function
INSTRUCTION MANUAL
磁環安裝
為降低使用外接 USB 線(非本機附件)所產生之電磁波,請在 USB 線上安裝磁環。
安裝步驟如下:
˙打開磁環的開合處,置於 USB 線的中間位置後,繞一圈,再將開合處關上即可。
維護須知
※警告:清潔前請關掉電源並把電源線自電源插座中拔下,定期小心的保養可保持
機器的良好效果及延長使用壽命。
電源
長時間不使用本機時,請將電源線自電源插座中拔下,並將遙控器電池取出,以避
免產生腐蝕;如電池盒內有腐蝕現象或不潔時,請徹底地清潔電池室並更換新電池。
注意:送修前請先更換新電池試試,或許可解決問題。
機器外殼的清潔
本機外殼有灰塵及雜質時,以沾濕的抹布擦拭即可,不可使用刺激性的清潔劑、溶
劑或粗糙的清潔用品擦拭,以免對外殼的表面造成損傷或刮痕。
MP3/CD 光碟片
1.MP3/CD 光碟片使用完畢後應立即放回 CD 儲存盒中,可避
免遭嚴重刮傷。
2.擦拭 MP3/CD 光碟片時,請用柔軟的布由內向外擦或使用
CD 光碟片自動清潔器。
3.請勿將 MP3/CD 光碟片長時間曝露在陽光、重濕氣或高溫下,以免變形。
4.請勿在 MP3/CD 光碟片的表面黏貼紙或膠帶。
5.不可使用溶劑來清潔 MP3/CD 光碟片,如:輕油劑、酒精或防靜電的噴劑。
6.當雷射讀取頭有灰塵或指印時,可能會造成跳音現象,此時
請以吹氣刷或棉花棒輕輕拂拭即可,或使用雷射鏡頭清潔片
來清除。
18
Page 20

故障排除
使用中如有任何不正常的情況出現,請先檢查以下幾點:
1.無聲
a)檢查音量是否調至最小?
b)檢查揚聲器是否連接了?
c)檢查電源線是否接妥?
d)檢查是否按了靜音鍵?
2.CD 碟盤無法動作
a)檢查 CD 匣座內是否有 MP3/CD 光碟片,且印刷面朝上?
b)檢查 CD 匣門是否蓋妥?
c)檢查 MP3/CD 光碟片是否清潔,或有刮傷?
d)檢查 MP3/CD 光碟片是否為音樂片?
e)檢查電壓切換開關是否切於正確位置?
3. MP3/CD 放音有跳音現象
檢查 MP3/CD 光碟片是否清潔,或有刮傷?
4.液晶顯示幕出現”NO DISC”字樣
a)檢查 CD 匣座內是否有 MP3/CD 光碟片?
b)檢查 CD 匣座內的 MP3/CD 光碟片是否印刷面朝上?
c)檢查 MP3/CD 光碟片是否清潔,或有刮傷?
d)檢查 MP3/CD 光碟片是否為音樂片?
5.遙控器無法操作
a)檢查遙控器內的電池是否電力不足?極性是否裝置正確?
b)遙控器的遙控位置是否在有效距離、角度內?
19
規格
主機
‧使用電源:AC 110V 60Hz
‧遙控器使用電源:DC 3V UM-4(AAA-SIZE)×2
‧輸出功率:瞬間最大 200W(P.M.P.O.)
‧消耗功率:30W
‧喇叭:高音喇叭-10W/4Ω,全音域喇叭-10W/4Ω
‧調諧器
頻率範圍:MW 522KHz~1620KHz,FM 87.5MHz~108MHz
‧雷射碟盤
頻率響應:125Hz~20000Hz
信號/雜音比:50dB
取樣頻率:44.1KHz
‧主機尺寸:170(寬)×224(深)×174(高)mm
‧音箱揚聲器尺寸:128(寬)×150(深)×261(高)mm
‧重量:4.4Kg
‧附件:遙控器×1,連接線×1
超重低音音箱
‧使用電源:AC 110V 60Hz
‧輸出功率:瞬間最大 300W(P.M.P.O.)
‧消耗功率:50W
‧喇叭:30W/4Ω
‧頻率響應:20Hz~150Hz
‧尺寸:170(寬)×260(深)×170(高)mm
‧重量:3.4Kg
※產品、規格如有變更時,恕不另行通知。
製造年份:2005 年製
進 口 商:十全企業股份有限公司
地 址:台北市士林區大南路 361 號 5 樓
電 話:(02)2883-2435
製 造 商:Dong Guang Kinhill Electronic Product Co., Ltd
產 地:中國
20
 Loading...