

Page 1

MCD-UB575M
使用說明書
鐳射收綠機
CD
US
B
FOLDER/
MEMORY
REPEAT/
RANDOM
SKIP
/
SEARCH
U
B
M
5
14
ENGLISH
8 - 34
INSTRUCTION MANUAL
CD Portable
Radio Cassette Recorder
575PAcover.indd 1 2006.12.25 1:24:15 PM
Page 2
1
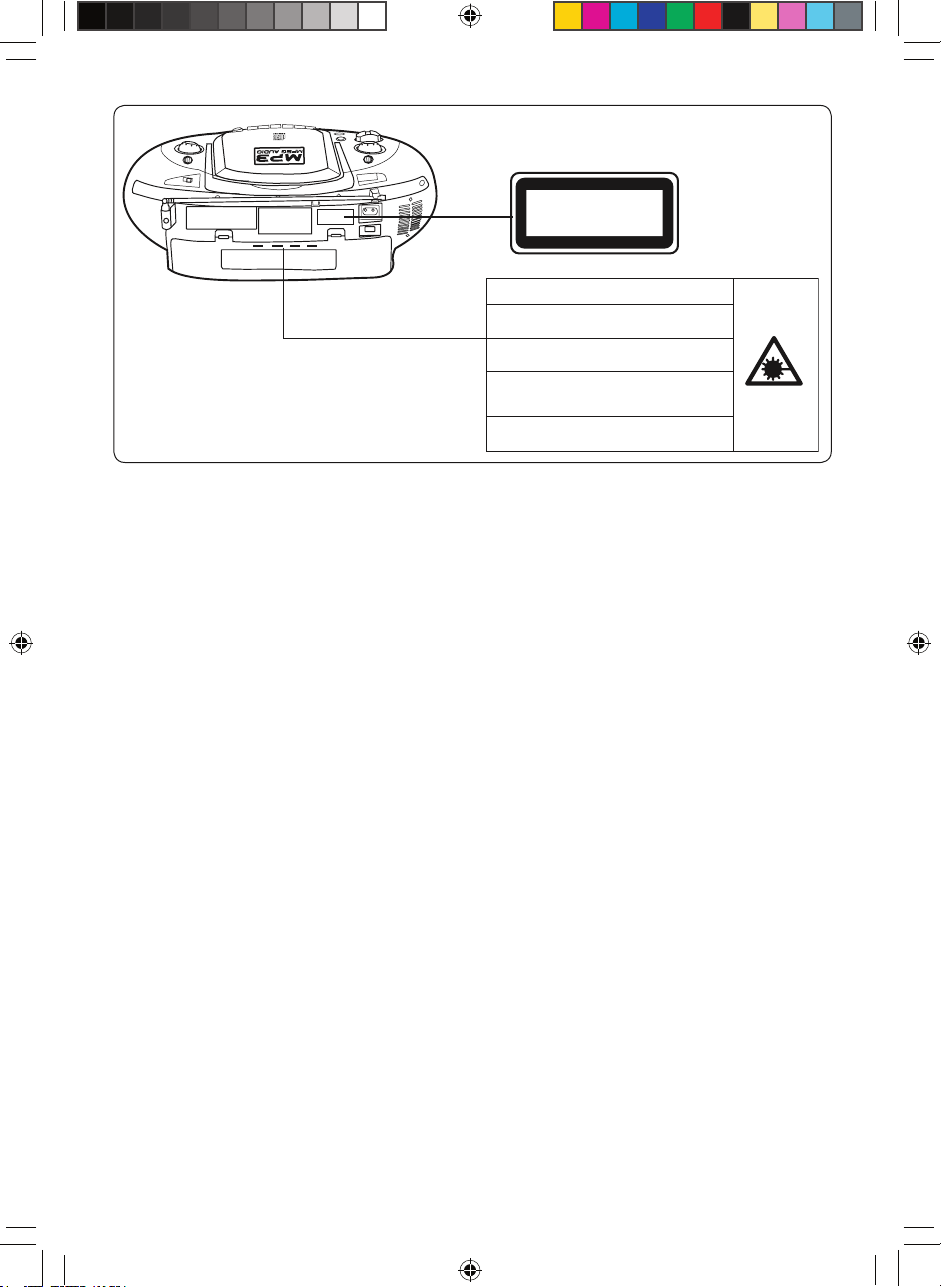
CLASS 1 LASER PRODUCT
LUOKAN 1 LASERLAITE
KLASS 1 LASERAPPARAT
CAUTION-INVISIBLE LASER RADIATION WHEN OPEN AND
INTERLOCKS DEFEATED. AVOID EXPOSURE TO BEAM.
ADVARSEL-USYNLIG LASER STRÅLING VED ÅBNING, NÅ
R
SIKKERHEDSAFBRYDERE ER UDE AF FUNKTION, UNDG
Å
UDS ÆTTELSE FOR STRÅLING.
VARNING-OSYNLIG LASER STRÅLNING NÄR DENNA DE
L
ÄR ÖPPNAD OCH SPÄRR ÄR URKOPPLAD. STRÅLEN ÄR
FARLIG.
VORSIC HT! -UNS ICHTBARE LASERSTRA HLUNG T RIT
T
AU S , WE N N DE C KE L G EÖ FF NE T U ND EN
N
SICHERHEITSVERRIEGELUNG ÜBERBRÜCKT IST. NICHT,
DEM STRAHL AUSSETZEN.
VARO !- AVATTAESSA JA SUOJALUKITUS OHITETTAESSA
OLET ALTTII NA NÄKYMÄTTÖMÄLLE LASERSÄTEILYLLE.
ÄlÄ KATSO SÄTEESEEN.
注意事項
如果不跟隨操作指南所指定的方法去使用操作裝置或調校性能,可能會導致暴露輻射的危險。本
機必須由符合正式資格的維修人員調校或修理
。
CAUTION
USE OF CONTROLS OR ADJUSTMENTS OR PERFORMANCE OF PROCEDURES OTHER
THAN THOSE SPECIFIED HEREIN MAY RESULT IN HAZARDOUS RADIATION EXPOSURE.
THIS PRODUCT SHOULD NOT BE ADJUSTED OR REPAIRED BY ANYONE EXCEPT PROPERLY QUALIFIED PERSONNEL.
575PA1-4.indd 1 2006.12.5 10:39:21 AM
Page 3
2
1 2 3
4
5
6
7
89
10
11
12
14
15
16
13
17 18 19 20 21
22
23
24
25
26
27
Fig./圖 1
1. 2. 3.
Fig./圖 2
28
29
31
30
575PA1-4.indd 2 2006.12.5 10:39:32 AM
Page 4
3
CD
US
B
FOLDER/
MEMORY
REPEAT/
RANDOM
SKIP
/
SEARCH
U
B
M
1
2
3
4
5
6
7
8
CD
US
B
FOLDER/
MEMORY
REPEAT/
RANDOM
SKIP
/
SEARCH
U
B
M
Remote sensor
遙控感應窗
Within approx.
7 meters
大約7米以內
Fig./圖 3
Fig./圖 4
Fig./圖 5
Fig./圖 6
Fig./圖 7
575PA1-4.indd 3 2006.12.5 10:39:35 AM
Page 5
4
1
2
Fig./圖 8
Fig./圖 9
Fig./圖 10
Fig./圖 11
575PA1-4.indd 4 2006.12.5 10:39:38 AM
Page 6
5
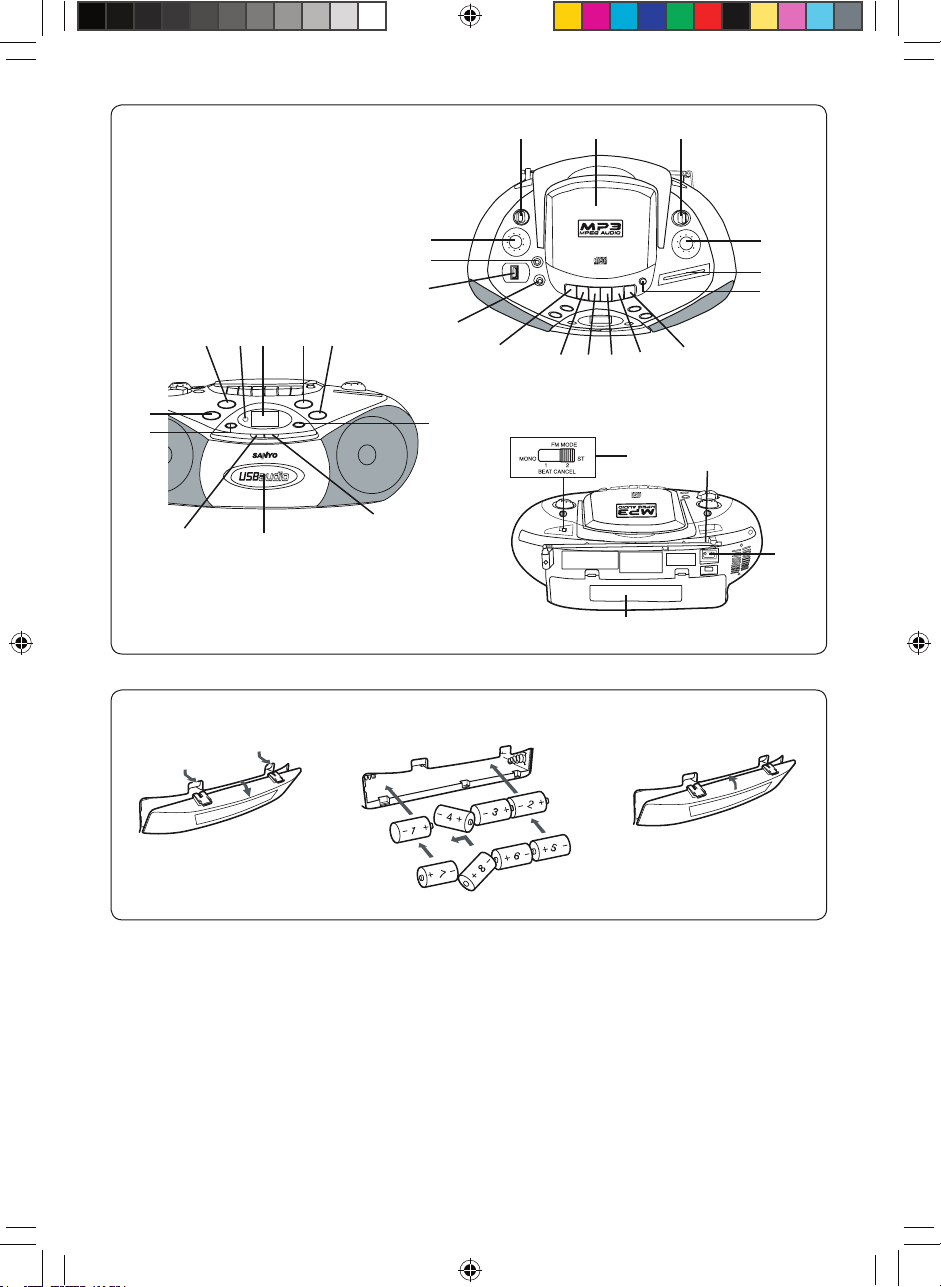
1. 功能開關 (RADIO, CD/USB, TAPE/OFF)
2. 鐳射唱片室
3. 收音機波段選擇開關 (BAND)
4. 調諧控制鈕 (TUNING)
5. 頻率顯示器
6. 鐳射唱片室開啟按鈕 (CD OPEN)
7. 錄音按鈕 (REC)
8. 播放按鈕 (PLAY)
9. 倒帶按鈕 (REW)
10. 快進按鈕 (F. FWD)
11. 停止 ∕退帶按鈕 (STOP/EJECT)
12. 暫停按鈕 (PAUSE)
13. 耳機插孔 (PHONES)
14. USB 端口 (USB AUDIO)
15. 低音擴展器按鈕 (BASSXPANDER)
16. 音量控制鈕 (VOLUME)
17. CD 功能按鈕 (CD)
18. 遙控感應窗 (IR)
19. 顯示器
20. 播放∕暫停按鈕 (PLAY/PAUSE i)
21. 停止播放按鈕 (STOP n)
22. 跳躍∕向上搜尋∕文件夾選擇按鈕
(FILE+/e)
23. 重復∕隨意播放按鈕
(REPEAT/RANDOM)
24. 卡式盒帶室
25. 記憶∕文件夾按鈕 (MEMORY/FOLDER)
26. 跳躍∕向下搜尋∕文件夾選擇按鈕
(f/FILE-)
27. USB功能按鈕 (USB)
28. 伸縮式天線
29. 交流電輸入插孔 (AC INPUT~)
30. 電池室蓋子
31. 調諧(FM)模式∕拍音取消開關
(FM MODE/BEAT CANCEL)
注意事項
- 請不要 將 本 機放 在 有 滴水 或 會 被 淺濕 的地
方
。
- 不要將盛滿液體的物品 (如花瓶) 放在本机
上
。
- 不要在溫度過低或過高 (攝氏5度以下或攝氏
35度以上) 的地方使用本機
。
- 因為 鐳 射 唱機 極 低 噪 音和 廣 闊 而多 變 的音
域
,
可能令擴音器的音量提高到不必要的水
平。 如此可能造成擴音器輸出過大,損壞你
的揚聲器
。
- 環境溫度突然轉變,可能令機內光學鏡頭上結
露。如果發生這種現象,拿出唱片,等候大
約一小時
。
- 使用電源插頭或電源耦和器作為斷電裝置的
地方,斷電裝置必須保持可即時操作狀態。
- 要想完全切斷電源輸入,主電源插頭必須從電
源插座斷開。
- 不要將機器安裝在密封的地方, 例如書架或內
置式廚櫃
。
- 機器規格標牌在機背部
。
緊急處理方法
萬一本機發生故障,請先關掉電源,再將電源插
頭拔起,請立刻聯絡各服務站,本公司將熱誠地
為您服務
。
中 文
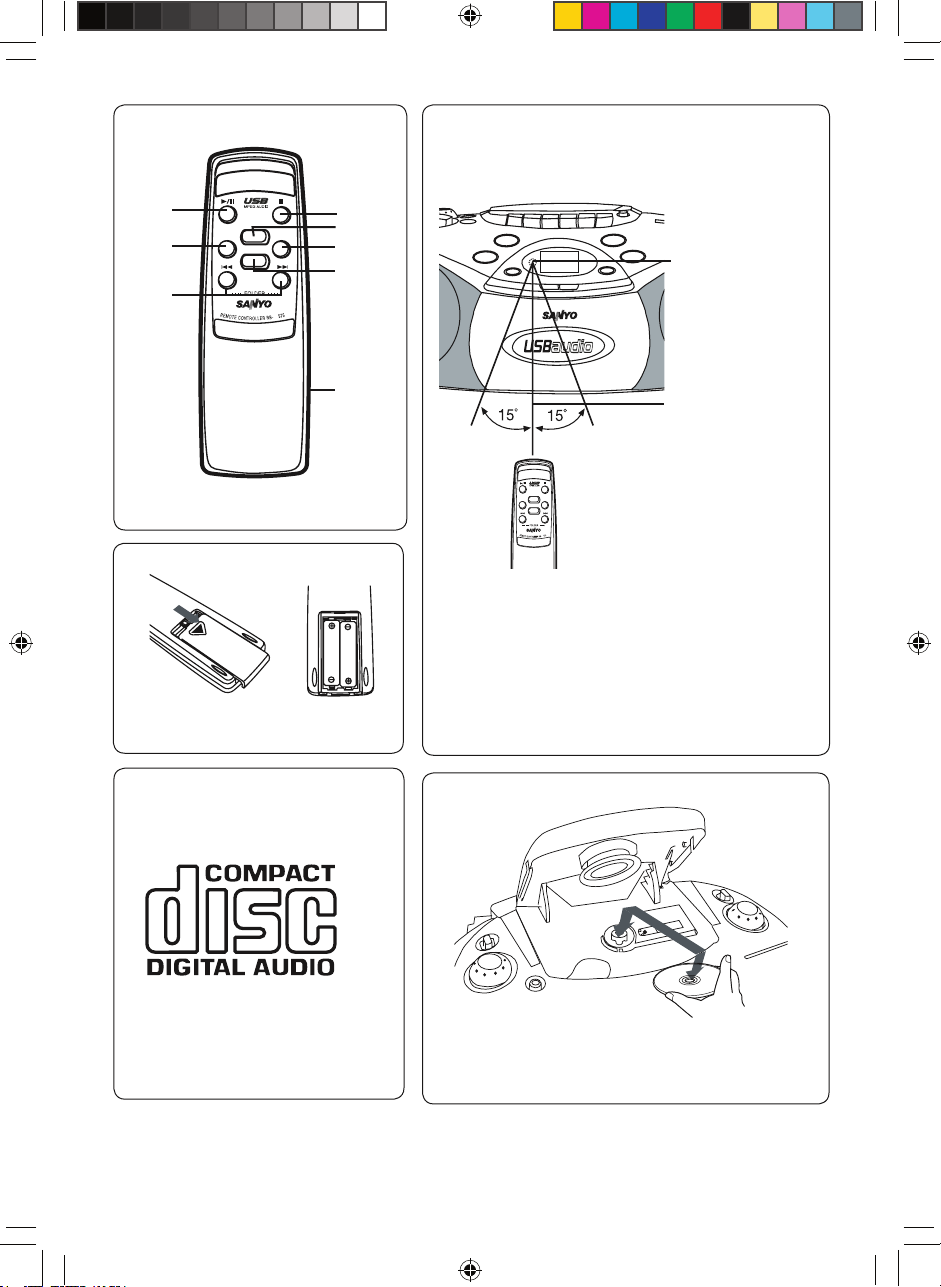
控制器(圖1)
遙控器
控制器(圖 3)
1. 播放∕暫停按鈕 (i)
2. 停止按鈕 (n)
3. CD 功能按鈕 (CD)
4. 重復∕隨意播放按鈕
(REPEAT/RANDOM)
5. USB 功能按鈕 (USB)
6. 電池室 (本裝置背後)
7. 跳躍∕搜尋∕文件夾選擇按鈕
(f, e, - FOLDER+, SKIP/SEARCH)
8. 文件夾∕記意按鈕
(FOLDER/MEMORY)
安裝電池(圖 4)
按照圖5所示裝入兩個“AAA/HP16/R03”的電池
(非附件)
。
注:
如果一個月或更長時間內不使用遙控器,請將電
池取出。長時間不取出電池可能導致電池電解液
洩漏,從而造成損壞
。
遙控範圍(圖 5)
遙控器上按鈕的功能,與機前板上有相同符號的
按鈕功能相同
。
575PACh.indd 5 2006.12.25 1:12:00 PM
Page 7
6
交流電電源
把電 源 引線 一 端插 在 機器 的 交流 電 輸入 ( A C
INPUT ~) 插孔上,另一端插在交流電電源插座
上
。
注:
- 當電源引線與本機連接時, 安裝在內的電池
即自動切斷電源
。
- FUNCTION 按鈕被設在次級。即使已關機,
本機仍未完全斷電
。
電池
安裝電池
按照圖2所示裝入八個 “D/HP2/R20” 的電池(非附
件)
。
有關電池注意事項
為了防止電池漏出電解液,導致身體受傷及機件
或其它物件損壞,請遵守下列預防措施:
1. 所有電池必須按正確的電極裝好(請參照機身背
面的附圖)
。
2. 請勿將新舊電池並用
。
3. 請使用同一纇型及牌子的電池
。
4. 長期不用時,請取出電池
。
5. 當電池用完,必須遵守有關的法律,將它安全
棄置
。
調較音量
轉動VOLUME控制鈕
。
低音擴展器按鈕
把 低 音擴 展 器按 鈕 ( B AS S XPA N D E R) 按到
ZON,以增強低音音效
。
耳機
將立體聲耳機(非附件)連接到 PHONES 插
孔。 監聽或作個人收聽之用。當使用耳機時,揚
聲器會自動切斷
。
電源供應 一般操作
575PACh.indd 6 2006.12.25 1:12:00 PM
Page 8
7
播放鐳射唱片
使用有如圖6所示符號的鐳射唱片。除了一般1 2
厘米鐳射唱片外,本機不用安裝轉換器,也能播
放8 厘米鐳射唱片
。
1. 將功能開關 FUNCTION調較至 CD/USB
。
2. 按鐳射唱片室開啟按鈕 (CD OPEN) , 鐳射唱
片室打開。 “OP” 出現在顯示器上
。
3. 將鐳射唱片的標簽面向上放在唱盤上(圖7)。
(每次只可放一張唱片。)
4. 按鐳射唱片室蓋 (PUSH TO CLOSE部份)關
閉鐳射唱片室。唱片歌曲總數將在顯示器上
出現
。
5. 按 PLAY/PAUSE i 按鈕
。
當前播放 的歌曲 編號出現, 開始從第一首歌曲
播放
。
- 要播放想收聽的歌曲時,利用 f/FILE- 或
FILE+/e 按鈕選擇歌曲,然後按下 PLAY/
PAUSE i 按鈕
。
備注:
如果把唱片反放,或沒有放入唱片, “no” 字樣會
出現,鐳射唱機不會播放歌曲。如果發生這種情
況請正確放入唱片或替換被損壞的唱片
。
處理鐳射唱片的要點
- 不要長時間把唱片放在直接暴露於陽光,高濕
度或高溫的地方
。
- 使用後應該把唱片放回原來的盒內
。
- 不要在唱片表面貼上紙張或書寫
。
- 處理唱片時要拿著唱片邊緣, 不要觸摸放音面
(光亮面)
。
- 使用軟布把放音面上的指紋和塵埃小心抹掉,
從唱片中心以直線往外抹
。
- 切勿使用唱片清潔噴霧,防靜電噴霧或溶液,
苯或稀釋濟等化學品去清潔鐳射唱片
。
暫停播放
按 PLAY/PAUSE i 按鈕,“k” 出現在顯示器
上, 再按一下該按鈕便可恢復播放
。
歌曲跳越
例如:
如果在播放第三首歌曲時打算跳到第六首歌曲,
重複按 FILE+/e 按鈕,直到 “06”顯示。如果
希望在播放第六首歌曲時打算跳到第三首歌曲,
重複按 f/FILE- 按鈕, 直到 “03” 顯示
。
搜尋(前進/倒後)
如果在播放時按著FILE+/e 或 f/FILE- 按
鈕,唱機將以高速進行向前或逆向搜尋。在放開
按鈕時便會繼續正常的放音
。
6. 按 STOP n 按鈕停止播放唱片
。
當播完最後一首歌曲時,唱機會自動停止
。
7. 要關掉鐳射唱機,將功能開關FUNCTION 調
較至 TAPE/OFF
。
注:
當播放鐳射唱片時,不要打開鐳射唱片室。必須
先按 STOP n 按鈕,等唱片停止轉動,才能打開
鐳射唱片室
。
本機亦可播放 CD-R/RW 光碟。 但無法播放一些
CD-R/RW 光碟,這視其綠音情況而定
。
575PACh.indd 7 2006.12.25 1:12:03 PM
Page 9

8
各種播放模式
重複按 REPEAT/RANDOM 按鈕以選擇本機提供
的不同播放模式,每按一次這個按鈕,顯示屏會
出現如下改變:
播放預先編排的歌曲
你可預先編排一張唱片最多32首歌曲,按任何次
序播放
。
- 開始預先編排前,首先將功能開關撥至 “CD/
USB”
。
- 同一首歌曲可預先編排多過一次
。
- 進行預先編排前,把想要編排的唱片放進唱
片室內
。
1. 需要時按下STOP n 按鈕
。
2. 按下 MEMORY/FOLDER 按鈕, “P01” 和
“MEMORY” 字樣簡短出現,然後 “ ” 字樣
出現并且 “MEMORY” 字樣 閃爍。
3. 利用 f
/FILE-
或 FILE+/ e 按鈕還擇歌
曲
。
4. 按 MEMORY/FOLDER 按鈕
。
5. 重複步驟 3 至 4 增編歌曲
。
6. 按 PLAY/PAUSE i 按鈕開始播放歌曲,
“MEMORY”字樣保持亮著
。
當所有預先編排的歌曲播放完畢,唱機會自
動停下來
。
- 預先編排的歌曲會儲存在記憶系統中
。
- 若試圖編程超過32首樂曲, “FUL” 字樣將會
顯示,編程將會停止
。
- 要取消預先編排的歌曲,請在播放過程中按下
STOP n 按鈕兩次
。
撿查預先編排的歌曲
在停止模式下, 當MEMORY字樣保持亮著時重
複按 ME M O RY/FOLDER 按鈕,預先編排的項
目會相繼在顯示屏上出現
。
更改預先編程
要為編程增加一首新樂曲:
1. 在停止狀態下,重復按下MEMORY/FOL DER按鈕直到最後的編程號碼出現
。
2. 如上述所說選擇樂曲
。
3. 按下MEMORY/FOLDER 按鈕
。
改變樂曲
1. 在停止狀態下,重復按下MEMORY/FOL DER按鈕直到顯示出所要更換的曲目為止
。
2. 如上述所說選擇樂曲
。
3. 按下MEMORY/FOLDER 按鈕
。
注:
已預先編程的內容不能被部分刪除或從中插入
。
遇上下列情況應怎麼辦...
假如 顯 示 屏 有 不 正 常 的 情形或出現操作上的問
題,請即拔掉電源引線及取出所有電池。在等候
最少五秒鐘後,可重新接上電源及放回電池。恢
復操作
。
CD光碟
“REPEAT 1” 字樣出現 “REPEAT ALL”
(重播一首歌曲) 字樣出現
(重複所有歌曲)
“RANDOM” 字樣出現
(鐳 射唱片內 的所有曲
目會隨機抽播。)
鬆開
(正常播放)
[MP3 CD] [USB]
“REPEAT 1”字樣出現
(重播一首歌曲)
“REPEAT FOLDER”
字樣出現
(重復播放文件夾內的
所有歌曲)
“REPEAT ALL ”
字樣出現
(重複所有歌曲)
“RANDOM” 字樣出現
(鐳 射唱片內 的所有曲
目會隨機抽播。)
鬆開
(正常播放)
注:
在播放預設的歌曲時不能使用隨機播放功能
。
MEMORY
MEMORY
MEMORY
575PACh.indd 8 2006.12.25 1:12:06 PM
Page 10

9
本機可播放刻錄有音樂數据,MP3/WMA (Win-
dow Media Audio) 文件的CD-R/RW。播放 MP3/
WMA CD前,請閱讀以下內容
。
MP3/WMA CD 信息
- MP3/WMA CD 由ISO9660標準化,文件名必
須有“.MP3” 或 “.mp3”/ “.WMA” 或 “.wma”後
綴
。
- 標準、取樣頻率和比特率:
MP3 文件:
MPEG-1 音頻
32 kHz, 44.1 kHz, 48 kHz
32 kbps ~ 320 kbps (恆速或變速比特率)
WMA 文件:
WMA 版本 7, 8 和 9
32 kHz, 48 kbps ~ 64 kbps
44.1 kHz, 48 kbps ~ 192 kbps
48 kHz, 128 kbps ~ 192 kbps
不可播放WMA9專業文件,WMA 9無損文件
或DRM (版權保頀)文件
。
- MP3/WMA CD的目錄和文件名稱必須符合
ISO的標準文件
。
- 可以播放單次寫入的光碟。多次寫入的光碟
也只能播放第一次寫入的內容
。
- 本機可以辨別每張光碟上多達500個文件夾或
999個文件。載有501個文件夾或1000個文件
或以上的光碟不適於本機
。
- 本機可辨別每張光碟上多達8個目錄
。
- MP3/WMA CD可能並非以灌錄的次序播放
。
- “CD Extra”中的音樂部份可以播放,但數據部
份不能播放
。
- 不能播放“Mixed CD”
。
- 本機不能播放利用“封包式寫入” (Packet
Writing)方法燒錄的音樂文件。
MP3光碟目錄網域舉例:
播放次序: 歌曲01 v 歌曲02 v ... v歌
曲14
注:
- 有些MP3/WMA唱片無法播放,這視其錄音情
況
。
- 沒有音樂數據的CD-R/RW或非MP3/WMA文件
不能播放
。
- 不要建立空的文件夾,因為它可能無法正常操
作
。
- 本型號所建議的錄音設定為128 kbps固定位
元速率。假如文件是以其他位元速率灌錄的
,
(例如:320 kbps) 或以可變位元速率灌錄的
話,這視其錄音情況而定,可能出現跳線的
情況
。
歌集F01
F01
歌曲01.mp3
歌曲02.mp3
歌曲03.mp3
歌曲04.mp3
歌曲05.mp3
資料夾編號F01
沒有 M P 3 檔 案,本機
會跳過
。
歌曲06.mp3
歌曲07.mp3
歌曲08.mp3
歌曲09.mp3
歌曲10.mp3
歌集F02
歌曲11.mp3
歌曲12.mp3
F02
歌曲13.mp3
歌曲14.mp3
歌集F04
F04
歌集F03
F03
MP3 CD
MP3/WMA CD 操作情況
燒 錄 光 碟 有 三 種 基 本 方 法 : “ 碟 軌 一 次 寫
入”(Track-at-Once)、“碟片一次寫入”(Disc-
at-Once)、“封包式寫入”(Packet Writing)
。
利用“碟 軌一次寫入”(Tra ck-at-O nce )或“ 碟
片一 次 寫 入”(Disc-at-O n c e ) 方 法 燒錄的音樂
文件 能 在 本 機 上 播 放。(注 意 : 本 機 不 能 播 放
加入“碟 軌一寫入”(Track-at -On ce) 的音樂 文
件。)
本 機 不能 播 放利 用“ 封包 式寫 入” ( P ac k e t
Writing) 方法燒錄的音樂文件
。
575PACh.indd 9 2006.12.25 1:12:07 PM
Page 11

10
MP3/WMA光碟播放
1. 放入MP3/WMA光碟。(參考第7頁)
MP3/WMA光碟的文件總數便會顯示出來
。
2. 按下PLAY/PAUSE i 按鈕,開始播放歌
曲
。
3. 按下MEMORY/FOLDER按鈕, “FOLDER”
在顯示器上閃爍,然後按下 f
/FIL E-
或
FILE+/e 按鈕 ( 或遙控器上的FOLDER- 或
FOLDER +) 以選擇理想的文件夾
。
4. 當被選擇的文件夾的第一首曲目號出現時按下
f
/FILE-
或 FILE+/e 按鈕以選擇理想的文
件
。
5. 按PLAY/PAUSE i 按鈕開始播放歌曲
。
6. 在任何時候可按下STOP n按鈕以停止播放
。
注:
- 如果沒有音樂數據,“no”的字樣便會顯示
出來
。
- 只有在播放過程中才可選擇文件夾
。
播放預先編排的歌曲
你可預先編排一張唱片最多32首歌曲,按任何次
序播放
。
- 開始預先編排前,首先將功能開關撥至 “CD/
USB”
。
- 同一首歌曲可預先編排多過一次
。
- 進行預先編排前,把想要編排的唱片放進唱
片室內
。
1. 需要時按下STOP n 按鈕
。
2. 按下 MEMORY/FOLDER 按鈕, “P01” 和
“MEMORY” 字樣簡短出現,然後 “ ” 字樣
出現并且“MEMORY”字樣 閃爍
。
3. 通過使用 f
/FILE-
或 FILE+/e 按鈕(或遙
控器上的FOLDER- 或 FOLDER+ 按鈕)來選
擇文件
。
4. 按下 MEMORY/FOLDER 按鈕, “P02” 和
“MEMORY” 字樣簡短出現,然後 “ ” 字樣
出現并且“MEMORY”字樣 閃爍
。
5. 重複步驟3至4增編歌曲.
6. 按下 PLAY/PAUSE i 按鈕開始播放歌
曲,“P01”字樣簡短出現, 然後第一個編排
的歌 曲 號 出 現,并且 “ M E M O R Y ” 字 樣 保持
亮著
。
7. 在任何時候可按下STOP n 按鈕以停止編程
播放
。
想要停止編程播放,在播放過程中按下 STOP n
按鈕兩次即可
。
檢查預先編排
在停止模式,當MEM ORY字樣保 持亮著時,重
複按下 M E M O R Y / F O L D E R 按鈕,預先編排的
詳情將按次序顯示
。
更改預先編排
要為編程增加一首新樂曲:
1. 在停止狀態時重複按下 MEMORY/FOLDER
按鈕,直至最後編排的號碼出現
。
2. 按上述所說選擇一首歌曲
。
3. 按下 MEMORY/FOLDER按鈕
。
改變樂曲:
1. 在停止狀態時重複按下 MEMORY/FOLDER
按鈕,直至顯示出要更換的曲目為止
。
2. 按上述所說選擇一首歌曲
。
3. 按下 MEMORY/FOLDER按鈕
。
注:
已預先編排的內容不能被部分刪除或從中插入
。
MP3
MEMORY
MEMORY
MEMORY
MP3
575PACh.indd 10 2006.12.25 1:12:09 PM
Page 12

11
USB 記憶設備操作
重要信息:
- 無法播放版權保護文件
。
- 播放USB 時,將自動跳過受版權保護的文
件.
- 推荐使用:
閃存型USB記憶播放器
不推荐使用:
硬盤記憶型USB播放器
- 某些閃存播放器無法在本機上正常使用
。
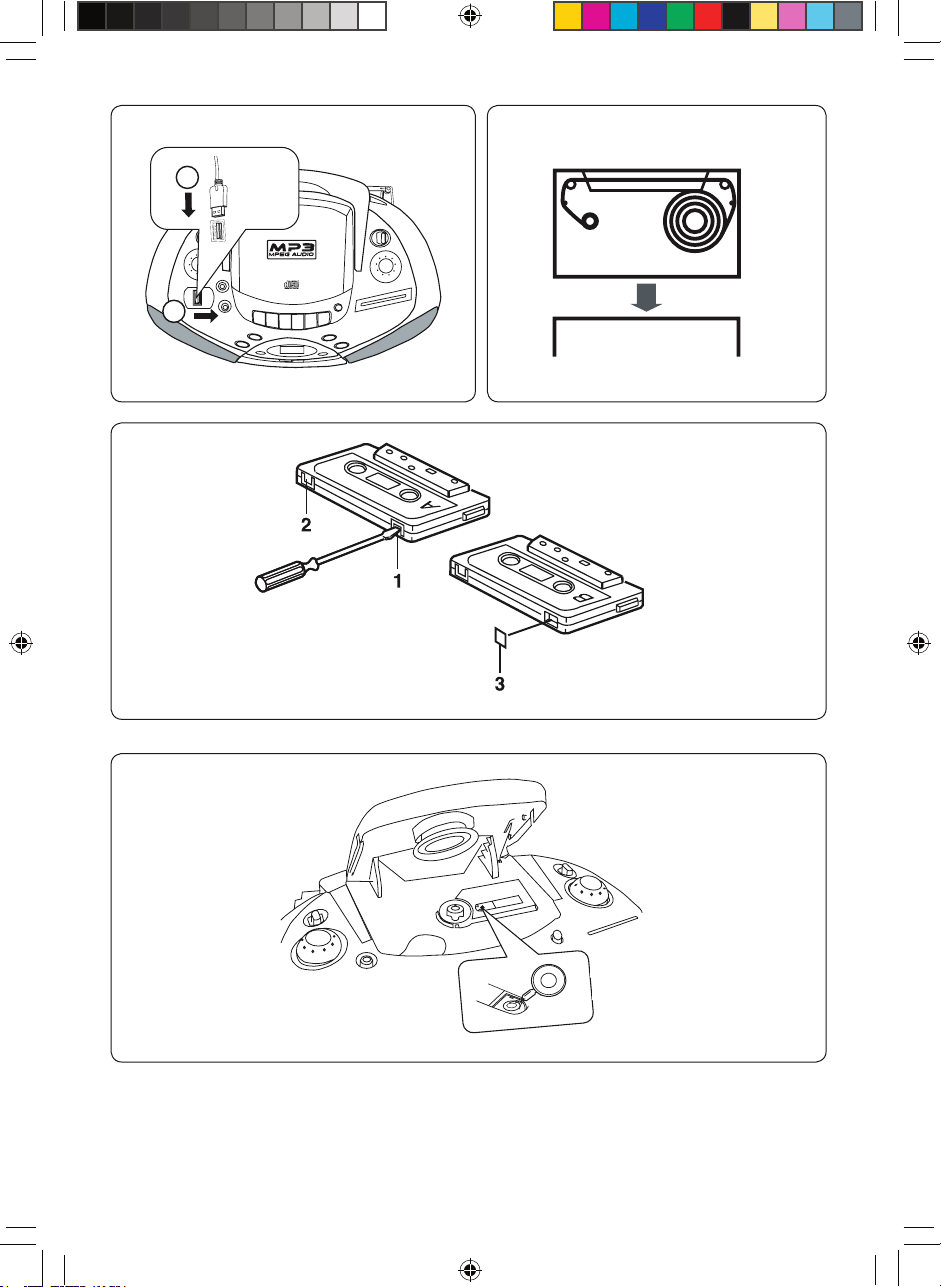
使用前
先將USB AUDIO端口蓋推向右邊,將USB記憶
設備正確連接至USB AUDIO端口。如圖8所示
。
- 某些USB記憶設備無法使用
。
- 本機只能識別MP3或WMA (Window Media
Audio)文件
。
- 本機可識別USB記憶設備中多達1999個文件
或文件夾。
但因文件夾結構的原因,也存在不能識別的可
能性
。
- 因為刻錄條件不同,讀取操作的時間可能較
長.
- 請參考第9頁“MP3/WMA CD 信息”
。
基本播放
1. 按USB按鈕,選擇USB功能。
USB記憶設備中所有的文件數出現
。
- 如果USB記憶設備連接失敗,或本機無法識別
USB記憶設備, “no”字樣出現
。
- 如果USB記憶設備中沒有文件或只有一些空文
件夾, “no”字樣出現
。
2. 按下PLAY/PAUSE i 按鈕,開始播放歌
曲
。
3. 按下MEMORY/FOLDER按鈕, “FOLDER”
在顯示器上閃爍,然後按下 f
/FIL E-
或
FILE+/e 按鈕 ( 或遙控器上的FOLDER- 或
FOLDER +) 以選擇理想的文件夾。
4. 當被選擇的文件夾的第一首曲目號出現時按下
f
/FILE-
或 FILE+/e 按鈕以選擇理想的文
件
。
5. 按PLAY/PAUSE i 按鈕開始播放歌曲
。
6. 在任何時候可按下STOP n按鈕以停止播放
。
當最後一個文件播放完畢,唱機會自動停下
來
。
7. 要想關閉USB播放,將FUNCTION開關調校
至 TAPE/OFF
。
注:
只有在播放過程中才可選擇文件夾
。
暫停播放
請參考第7頁“播放鐳射唱片”中的相關描述
。
播放預先編排的歌曲
請參考第10頁中的相關描述
。
USB
USB
MP3
575PACh.indd 11 2006.12.25 1:12:11 PM
Page 13

12
1. 將功能開關 FUNCTION 撥到TAPE/OFF
。
2. 按 STOP/EJECT 按鈕,卡式盒帶室便會打
開
。
3. 把卡式錄音帶放進卡式盒帶室 (圖9)
。
然後將卡式盒帶室推回原來位置
。
4. 按下 PLAY 按鈕,開始播放卡式錄音帶
。
5. 按下 STOP/EJECT 按鈕可以隨時停止播放
,
再按一次退出卡式錄音帶
。
錄音帶播放完畢,便會自動停止
。
注:
- 使用普型號 (TYPE 1) 的卡式錄音帶
。
- 不能使用沒有末端的卡式錄音帶
。
- 避免使用 C-100 型 (或更長) 的錄音帶,否則
可能會出現卡帶
。
暫停
按 PAUSE 按鈕,暫時停止播放或錄音,再按此
按鈕便恢復操作
。
快進和倒帶
按 F.FWD 或 REW 按鈕,當到達所需部份時或到達
卡式錄音帶盡頭,按下 STOP/EJECT 按鈕
。
1. 將功能開關 FUNCTION 撥到 RADIO
。
2. 使用 BAND 開關選擇所需的收音機波段
。
3. 轉動調諧控制鈕 TUNING,收聽所選擇的電
台
。
4. 如要關上收音機,將 FUNCTION 開關撥到
TAPE/OFF 或 CD/USB
。
收聽FM立體聲廣播
請將 FM MODE 開關(機身背面)撥到 ST 位
置
。
- 如果FM 立體聲廣播電台發出的信號較弱,導
致接收效果不佳,可將FM MODE 開關調較至
MONO。這樣接收效果將有所改進,但聲音只
能以單聲道的模式播放
。
改善接收
調頻(FM)廣播﹕拉出伸縮天線, 調較角度
。
調幅(AM)廣播﹕轉動本機
。
收听卡式錄音帶
收聽收音機
卸除USB記憶設備
做下列動作之一後即可卸除USB記憶設備:
- 按下STOP n按鈕 (或遙控器上的 n按鈕 )
。
- 切換到其它功能
。
- 切斷電源
。
在播放,錄制過程中切勿斷開USB記憶設備,否
則會損壞數據
。
自動停止系統
當卡式錄音帶在錄音或播放完畢後,卡式錄音帶
室和按鈕分別會自動停止及放開
。
此系統不適用於快進和倒帶操作。當卡式盒帶已
到達盡頭,務必要按下STOP/EJECT按鈕
。
例如 (當使用C-60卡式錄音帶時):
在進行近乎2 分鐘的快進和快 退的情況下,按下
STOP/EJECT按鈕
。
575PACh.indd 12 2006.12.25 1:12:12 PM
Page 14

13
綠音
未經版權持有人許可擅自錄製有版權的材料,可
能會侵犯版權。如果你想重錄有版權的材料,必
須經版權持有人的許可。SANYO不允許任何使用
本機的非法行為,也不為此承擔責任
。
從USB記憶設備錄音 (同步錄音)
1. 放入空白卡式錄音帶
。
2. 選擇 “USB” 功能
。
3. 連接USB記憶設備至本機.
- 如有必要請選擇所要錄音的文件號碼
。
- 若要進行編程錄音,將文 件 播 放程序預
先輸入
。
4. 按 REC 按鈕,同時啟動 PLAY 按鈕,開始錄
音
。
5. 按 STOP/EJECT 按鈕,停止錄音。 當錄音帶
達到末端時,卡座自動停止,USB播放進入暫
停模式
。
從鐳射唱片錄音 (同步錄音)
1. 放入空白卡式錄音帶
。
2. 選擇 “CD” 功能
。
3. 放入所要錄音的鐳射唱片
。
- 如有需要,選擇所要錄音的歌曲號碼
。
- 若要進行編程錄音,將歌曲播放程序預先
輸入(如在 “播放預 先編排 的歌曲” 所
述)
。
4. 按 REC 按鈕,同時啟動 PLAY 按鈕,開始鐳
射唱片錄音
。
5. 按 STOP/EJECT 按鈕,停止錄音。 當錄音
帶達到末端時,卡座自動停止,CD播放進入
暫停模式
。
從內置收音機錄音
1. 放入空白卡式錄音帶
。
2. 調較到所要錄音的電台
。
3. 按 REC 按鈕開始錄音
。
4. 按 STOP/EJECT 按鈕,停止錄音
。
如果聽到“拍音”聲
有時 在 綠 制 電 台 廣 播 時 會聽到一種尖銳的“拍
音”聲(音調高的聲響),遇到這種情況時,把
BEAT CANCEL開關(唱機背面)調至1或2以減
低“拍音”聲水平的位置
。
預防不慎抹去綠音內容
保存錄音帶A面內容,除去防誤抹擋舌(1)。保存錄
音帶B面內容,除去防誤抹擋舌(2) (圖10)
。
- 如要在除去了防誤抹擋舌的錄音帶上再次錄
音,或將內容抹去,只要在開孔處貼上膠帶
(3)便可
。
注﹕
錄音帶的防誤抹擋舌除去後,就無法按下REC按
鈕
。
保養
清潔磁頭
使用錄音機約十小時後,用清潔盒帶(購自音響
店)清潔卡式錄音盒的磁頭,確保本機長期發揮
高度性能
。
清潔鐳射唱片機的鏡片
絕對不要接觸鏡片,如果有塵埃,使用照相機專用
吹塵器吹去塵埃(圖11)(請向經銷商查詢)
。
清潔本機
用溫水浸濕清潔軟布,清潔機身,不要用苯、稀釋
劑或酒精清潔,以免損壞機身表面
。
575PACh.indd 13 2006.12.25 1:12:12 PM
Page 15

14
1. Function switch (RADIO, CD/USB, TAPE/
OFF)
2. CD Compartment Lid
3. Band select switch (BAND)
4. Tuning control (TUNING)
5. Frequency indicator
6. CD compartment open button (CD OPEN)
7. Record button (REC)
8. Play button (PLAY)
9. Rewind button (REW)
10. Fast forward button (F. FWD)
11. Stop/Eject button (STOP/EJECT)
12. Pause button (PAUSE)
13. Headphones socket (PHONES)
14. USB port (USB AUDIO)
15. Bass expander button (BASSXPANDER)
16. Volume control (VOLUME)
17. CD function button (CD)
18. Remote sensor (IR)
19. Display
20. Play/Pause button (PLAY/PAUSE i)
21. Stop button (STOP n)
22. Skip/Search up/Folder select button
(FILE+/e)
23. Repeat/Random button
(REPEAT/RANDOM)
24. Cassette holder
25. Memory/Folder button (MEMORY/FOLDER)
26. Skip/Search down/Folder select button
(f/FILE-)
27. USB function button (USB)
28. Telescopic aerial
29. AC input socket (AC INPUT~)
30. Battery compartment lid
31. FM mode/Beat cancel switch
(FM MODE/BEAT CANCEL)
PRECAUTIONS
- The apparatus shall not be exposed to dripping
or splashing.
- No object filled with liquid, such as vase shall
be placed on the apparatus.
- Do n o t use wh e r e ther e a re ext r emes of
temperature (below 5 oC or exceeding
35 oC).
- Because of the CD playerʼs extremely low
noise and wide dynamic rang e, there
mig ht be a tendency to set the volume on
the amplifier unnecessarily high. Doing so
may produce an excessively large output
fro m the amplifier which could damage your
speakers.
- Sudden change in the ambient temperature
may cause condensation to form on the optical lens inside the unit. If this happens, take
out the disc, leave the unit for about 1 hour,
and then proceed to operate.
- Whe r e th e MAIN S plu g or an a p plianc e
coupler is used as the disconnect device,
the di s c o nn e c t devi c e sh a l l remain
readily operable.
- To be completely disconnect the power input,
the mains plug of apparatus shall be disconnected from the mains.
- Do not install this equ ipment in a confin ed space, such as a book case or built in
cabinet.
- The rating label is located on the back of
the unit.
Emergency measures
If this product has a problem, turn off the power,
disconnect the mains lead then contact our service station immediately.
An appropriate service will be offered by our service station.
ENGLISH
CONTROLS (Fig.1)
REMOTE CONTROLLER
Controls (Fig. 3)
1. Play/Pause button (i)
2. Stop button (n)
3. CD function button (CD)
4. Repeat/Random button
(REPEAT/RANDOM)
5. USB function button (USB)
6. Batteries compartment (back of the unit)
7. Skip/Search/Folder select buttons
(f, e, - FOLDER+, SKIP/SEARCH)
8. Folder/Memory button
(FOLDER/MEMORY)
Inserting batteries (Fig. 4)
Install two “AAA/HP16/R03” batteries (not supplied).
Note:
Always remove batteries if the remote controller
is not to be used for a month or more. Batteries
left in it may leak and cause damage.
Remote control range (Fig. 5)
The buttons on the remote controller perform
similar function to similarly marked buttons on
the main unit.
575PAEn.indd 14 2006.12.5 11:04:13 AM
Page 16

15
AC Power
Connect one end of the mains lead to the AC
INPUT ~ socket and the other end to an AC outlet.
Note:
- Th e ins t alle d bat t erie s are auto m ati ca lly disconnected when the mains lead is
connected to the unit.
- The F UNCTI ON switc h is mounted o n
the secondary side. The unit is not disconnected from mains, even switched off.
Battery power
Installing batteries
Install eight “D/HP2/R20” batteries (not supplied) as shown in Fig. 2.
Caution on batteries
To prevent battery electrolyte leakage, which may
result in injury and damage to the unit or other
objects, observe the following precautions:
1. All batteries must be installed with the proper polarity (see diagram on the back of the
unit).
2. Do not mix new with old or used batteries.
3. Only use batteries of the same type and
brand.
4. Remove the batteries when they are not to be
used for a long period time.
5. When the batteries have become discharged,
they must be disposed of in a safe manner
which complies with all applicable laws.
Adjusting the volume
Turn the VOLUME control.
Bass expander button
Press the BASSXPANDER button to Z ON to
enhance the bass sound.
Headphones
Connect stereo headphones (not supplied) to the
PHONES soc ket fo r monitorin g or for private
listeni n g . The spe a k e r s a r e a u t o m aticall y
disconnected when headphones are connected.
POWER SUPPLY GENERAL OPERATION
575PAEn.indd 15 2006.12.5 11:04:14 AM
Page 17

16
CD PLAY
Use compact discs bearing the symbol shown
in Fig. 6. In addition to conventional 12cm CDs,
this unit can be used to play 8cm CDs without
an adapter.
1. Set the FUNCTION switch to CD/USB.
2. Press the CD OPEN button to open the CD
compartment lid. “OP” appears on the dispaly.
3. Place the disc with the label facing up on the
turntable (Fig. 7). (Place only one disc at a
time.)
4. Press the CD compartment lid (PUSH TO
CLOSE portion) to close it.
The total number of tracks on the disc appears
on the display.
5. Press the PLAY/PAUSE i button.
The current track number appears. Play starts
from the first track.
- To start play from the desired track, select
the track by using the f/FILE- or FILE+/
e button, then press the PLAY/PAUSE
i button.
Note:
If no disc is loaded or the disc is located with the
label facing down, “no” appears. If these occur,
load the disc correctly or replace the damaged
disc.
Notes on handling compact discs
- Do not expose the disc to direct sunlight,
high humidity or high temperature for extended periods of time.
- Discs should be returned to their cases after
use.
- Do not apply paper or write anything on the
disc surface.
- Handle the disc by its edge. Do not touch
the playing surface (glossy side).
- Fingerprints and dust should be carefully
wiped off the playing surface of the disc
with a soft cloth.
Wipe in a straight motion from the center to
the outside of the disc.
- Never use chemicals such as record cleaning sprays, antistatic sprays or fluids, benzene or thinner to clean compact discs.
Temporarily stopping play
Press the PLAY/PAUSE i button, “k” appears on the display. To resume play, press the
button again.
Skip play
Example:
To skip to track 6 while track 3 is playing, press
the FILE+/e button repeatedly until “06” appears on the display. To skip back to track 3
while track 6 is playing, press the f/FILEbutton repeatedly until “03” appears.
Search (forward/reverse)
If the FILE+/e or f/FILE- button is pressed
during play, the player will search at high speed
in the forward o r reverse directio n while the
button is being pressed. When the button is released, normal play will continue.
6. Press the STOP n button to end disc play
back.
When the last track has been played, the player
stops automatically.
7. To turn the CD player off, set the FUNCTION
switch to TAPE/OFF.
Note:
Do not open the CD compartment during CD play.
Always press the STOP n button and wait for
the disc to stop rotating before opening the CD
compartment.
This unit can play back the CD-R/RW as well.
However, some CD-R/RW can not be played back
depending on the recording conditions.
575PAEn.indd 16 2006.12.5 11:04:15 AM
Page 18

17
Various playing mode
Press the REPEAT/RANDOM button repeatedly
to select a various play mode available. Each
time the button is pressed, the mode changes
as shown below:
PROGRAMMED PLAY
Up to 32 tracks on a disc can be programmed for
play in any order.
- To begin the programming procedure, set
FUNCTION switch to “CD/USB” first.
- The same tra ck can be progr ammed more
than once.
- Load a disc that you want to programme before starting programmed play.
1. Press the STOP n button if necessary.
2. Press the MEMORY/FOLDER button, the
“P01” and “MEMORY” appear briefly, then
“ ” appears and “MEMORY” blinks.
3. Select a track by using the f
/FILE-
or
FILE+/ e button.
4. Press the MEMORY/FOLDER button.
5. Repeat steps 3 - 4 to programme additional tracks.
6. Press the PLAY/PAUSE i button to start
playback. “MEMORY” remains lit.
Wh en all p rogr amme d t rac k s have b een
played, the player stops automatically.
- The programme contents are retained
in memory.
- Any attempt to programme more than 32
tracks will result in “FUL” appears and
discontinuous of the programming.
- To cancel programmed play, press the STOP
n button twice during play.
Checking the programme
In stop mode when MEMORY remains lit, press
the M E M O RY/FOLDER b u t t o n repeatedly,
the prog r a m m e d d e t a i l s sequentially appear
on the display.
Changing a programme
To add a new track to a programme:
1. In the stop mode, press the MEMORY/FOLDER button repeatedly until last programme
number is displayed.
2. Select a track as explained above.
3. Press the MEMORY/FOLDER button.
To change a track:
1. In the stop mode, press the MEMORY/FOLDER button repeatedly until the track number
to be replaced is displayed.
2. Select a track as explained above.
3. Press the MEMORY/FOLDER button.
Note:
Programmed details cannot be partially deleted
or inserted.
[CD]
“REPEAT 1” appears “REPEAT ALL”
(Repeat one track) appears
(Repeat all tracks)
“RANDOM” appears
(All tracks on the disc
are played back in
random order.)
Released
(Normal play)
[MP3 CD] [USB]
“REPEAT 1” appears
(Repeat one track)
“REPEAT FOLDER”
appears
(Repeat all tracks in
the folder)
“REPEAT ALL ”
appears
(Repeat all tracks)
“RANDOM” appears
(All tracks on the disc
are played back in
random order.)
Released
(Normal play)
Note:
Random play will not be selected during programmed playback.
MEMORY
MEMORY
MEMORY
575PAEn.indd 17 2006.12.5 11:04:18 AM
Page 19

18
WHAT TO DO IF...
If an abnormal display indication or an operating problem occurs, disconnect the mains lead
and remove all batteries. Wait at least 5 seconds,
then reconnect the mains lead and reinstall the batteries.Resume the operation.
This unit can play the CD-R/RW that has recorded music data, MP3 or WMA (Window Media Audio) files. Before playing MP3/WMA CD,
please read the following.
MP3/WMA CD information
- MP3/WMA CD is the disc that standardized
by ISO9660, its file name must have the extension letters, “.MP3” or “.mp3”/ “.WMA” or
“.wma”.
- Standard, sampling frequency, and the bit
rate:
MP3 files:
MPEG-1 Audio
32 kHz, 44.1 kHz, 48 kHz
32 kbps ~ 320 kbps (constant bit rate or vari-
able bit rate)
WMA files:
WMA version 7, 8 and 9
32 kHz, 48 kbps ~ 64 kbps
44.1 kHz, 48 kbps ~ 192 kbps
48 kHz, 128 kbps ~ 192 kbps
WMA9 professional files, WMA9 lossless
files or DRM (copyright protection) files can
not be played.
- The directory and file names of the MP3/
WMA CD must be corresponded to the ISO
standardized files.
- Single-session disc can be played back. As
for multi-session disc, only the first session
can be played back.
- This unit can recognize up to 500 folders or
999 files per disc. The CD with 501 folders
or 1000 files and over is not available to this
unit.
- This unit can recognize up to 8 directory trees
per disc.
- MP3/WMA CD may not be played in the recorded order.
- Music section in “CD Extra” can be played
back, not Data section.
- “Mixed CD” cannot be played back.
- Music files recorded by “Packet Writing” can
not be played back.
MP3 CD directory sample:
Playback order: song01 v song02 v ...
vsong14
Note:
- Some MP3/WMA CDs cannot be played back
depending on the recording conditions.
- The CD-R/RW that has no music data or nonMP3/WMA files cannot be played back.
- Do not make an empty folder. It may not work
correctly.
- In this model, recommend recording setting is
128 kbps of fixing bit rate. If files are recorded
in other bit rate (for example: 320 kbps) or in
variable bit rate, track-jump may sometimes
happen according to recording conditions.
albumF01
F01
song01.mp3
song02.mp3
song03.mp3
song04.mp3
song05.mp3
Folder number F01
There is no MP3 file.
The unit skips it.
song06.mp3
song07.mp3
song08.mp3
song09.mp3
song10.mp3
albumF02
song11.mp3
song12.mp3
F02
song13.mp3
song14.mp3
albumF04
F04
albumF03
F03
MP3 CD
MP3/WMA CD OPERATION
There are three basic methods for writing to
a CD: “Track-at-Once”, “Disc-at-Once”, and
“Packet Writing”. Music files recorded by “Trackat-Once” or “Disc-at-Once” can be played back
on this unit. (Note: The unit cannot play back
the music files added with “Track-at-Once”.) Music files recorded by “Packet Writing” cannot be
played back.
575PAEn.indd 18 2006.12.5 11:04:18 AM
Page 20

19
MP3 CD Play
1. Load the MP3 CD. (See page 16.)
The total number of files of the MP3 CD appears
on the display.
2. Press the PLAY/PAUSE i button to start
playback.
3. P ress th e M E M ORY/ F O LDER bu t t on,
“FOLDER” blinks on the display, then press
the f
/FILE-
or FILE+/e button (or the
FOLDER- or FOLDER + button on the remote
controller) to select the desired folder.
4. When the first file number of selected folder
appears, press the f
/FILE-
or FILE+/e
button to select a desired file.
5. Press the PLAY/PAUSE i button to start
playback.
6. Press the STOP n button at any time to stop
the playback.
Note:
- If there is no music data, “no” appears.
- Only select the folder in playing mode.
PROGRAMMED PLAY
Up to 32 files on a disc can be programmed for
play in any order.
- To begin the programming procedure, set
FUNCTION switch to “CD/USB” first.
- The same file can be programmed more than
once.
- Load a disc that you want to programme before
starting programmed play.
1. Press the STOP n button if necessary.
2. Press the MEMORY/FOLDER button, the “P01”
a n d “ M E M O R Y ” a p p e a r b r i e f l y th e n
“ ” appears and “MEMORY” blinks.
3. Select a file by using the f
/FILE-
or FILE+/e
button (or the FOLDER- or FOLDER + button
on the remote control).
4. Press the MEMORY/FOLDER button, the
“P02” and “MEMORY” appear briefly, then
“ ” appears and “MEMORY” blinks.
5. Repeat steps 3-4 to programme additional
tracks.
6. Press the PLAY/PAUSE i button to
start playback. “P01” appears briefly, then
first programmed file appears and “MEMORY” remains lit.
7. Press the STOP n button to stop programme
playback at any time.
To cancel programmed play, press the STOP n
button twice during play.
Checking the programme
In stop mode when MEMORY remains lit, press
the M E M O RY/FOLDER b u t t o n repeatedly,
the prog r a m m e d d e t a i l s sequentially appear
on the display.
Changing a programme
To add a new file to a programme:
1. In the stop mode, press the MEMORY/FOLDER button repeatedly until last programme
number is displayed.
2. Select a file as explained above.
3. Press the MEMORY/FOLDER button.
To change a file:
1. In the stop mode, press the MEMORY/FOLDER button repeatedly until the file number to
be replaced is displayed.
2. Select a file as explained above.
3. Press the MEMORY/FOLDER button.
Note:
Programmed details cannot be partially deleted
or inserted.
MP3
MEMORY
MEMORY
MEMORY
MP3
575PAEn.indd 19 2006.12.5 11:04:20 AM
Page 21

20
U S B M E MO RY D E VI CE
OPERATION
IMPORTANT INFORMATIONS:
- Copyright protection files cannot be played
back.
- Copyright protection files on the USB memory
device are skipped automatically when
played back.
- Recommended use:
Flash memory type USB memory player
Not recommended:
Hard Disc Memory type USB player
- Some flash memory player does not play
successfully with this unit.
Before use
Push the cover of USB AUDIO port to right first.
Connect the USB memory device to the USB
AUDIO port of the main unit correctly as shown
in Fig. 8.
- Some USB memory devices cannot be
used.
- This unit can recognize only MP3 or WMA
(Window Media Audio) files.
- This unit can recognize up to 1999 files or
folders in USB memory device.
However, s ome c ann ot b e rec ogn ize d
depending on the folder structure.
- It may take more time for the reading operation depending on the recording condition.
- Please refer to “MP3/WMA CD information”
on the page 18.
Basic playback
1. Press the USB button to select USB.
The last file number in the USB memory device
appears.
- If the connection of the USB memory device
is failed or the unit cannot recognize the USB
memory device, “no” appears.
- If thereʼs no file in the USB memory device, or
just some empty folders in the USB memory
device, “no” appears.
2. Press the PLAY/PAUSE i button to start
playback.
3. P ress t he M E M O RY/F O L D E R b u t t o n,
“FOLDER” blinks on the display, then press
the f
/FILE-
or FILE+/e button (or the
FOLDER- or FOLDER + button on the remote
controller) to select the desired folder.
4. When the first file number of selected folder
appears, press the f
/FILE-
or FILE+/e
button to select a desired file.
5. Press the PLAY/PAUSE i button to start
playback.
6. Press the STOP n button to end playback.
When the last file has been played, the player
stops automatically.
7. To turn the USB player off, set the FUNCTION switch to TAPE/OFF.
Note:
Only select the folder in playing mode.
Temporarily stopping playback
Refer to the same description of “CD PLAY” on
page 16.
PROGRAMMED PLAY
Refer to the description of “MP3/WMA CD OPERATION” on page 19.
USB
USB
MP3
575PAEn.indd 20 2006.12.5 11:04:22 AM
Page 22

21
1. Set the FUNCTION switch to TAPE/OFF.
2. Press the STOP/EJECT button. The cassette
holder opens.
3. Load the cassette into the cassette holder.
(Fig. 9)
After loading the cassette, push the cassette
holder back into position.
4. Press the PLAY button to begin playback.
5. Pr e s s t h e S TOP/EJE C T b u t ton to stop
playback at any time. Press it again to remove
the cassette.
When the end of the tape has been reached,
the tape stops automatically.
Note:
- Use the normal tape (TYPE 1).
- Endless tapes cannot be used.
- Do not use C-100 (or longer) tapes. They
may jam in the mechanism.
Pause
Pres s the PAUSE b utt on to temporaril y stop
playback or recording. Press it again to resume
operation.
Fast forward and rewind
Pres s th e F. FWD or REW button. When the
desired location has been reached, or the tape
has been wound to the end, press the STOP/
EJECT button.
1. Set the FUNCTION switch to RADIO.
2. Select the desired radio band with the BAND
switch.
3. Tu ne in a de sire d st ati on by tur ning the
TUNING control.
4. To turn the rad io off, set the FU NCTION
switch to TAPE/OFF or CD/USB.
To receive FM stereo broadcasts
Set the FM MODE select switch (the back of the
unit) to ST.
- If the signal from an FM stereo station is weak
and reception is poor, set the FM MODE
select switch to MONO. The reception may be
improved, but the sound will be monaural.
To improve reception
FM: Pull out the telescopic aerial and adjust
its position.
AM: Rotate the unit.
LISTENING TO TAPES
LISTENING TO THE RADIO
Removing the USB memory device
Do one of the followings:
- Press the STOP n button (or the n button on
the remote controller).
- To change to other functions.
- Turn off the power.
Note:
Do not disconnect the USB memory device during playback. If do, the data may be damaged.
Automatic stop system
At the end of the tape while recording or playing
back, the cassette deck stops automatically and
the buttons are released.
This system does not work in fast forward and
rewind operation. Be sure to press the STOP/
EJECT button when the end of the tape has been
reached.
Example (When using C-60 tape):
Press the STOP/EJECT button after approximatly 2 minutes have elapsed under fast forward and rewind operation.
575PAEn.indd 21 2006.12.5 11:04:23 AM
Page 23

22
RECORDING
Recording copyright material without permission
of the copyright owners is usually an infringement.
If you wis h to re-r e cord cop y rig h t ma teri a l,
permission from the copyright owner is necessary.
SANYO does not approve of, and cannot be held
responsible for, any unlawful use of this unit.
Recording from USB Memory
device (Synchronous recording)
1. Load a blank cassette.
2. Select the USB function.
3. Connect a USB memory device.
- Select the file number if required.
- For programmed recording, programme the material in advance.
4. Press the REC button. The PLAY button
is engaged simultaneously and recording
starts.
5. Press the STOP/EJECT button t o stop
recording at any time. When the end of the
tape is reached, the cassette deck stops
automatically and the playback of USB memory
device enters pause mode.
Recording compact d i s c s
(S ynch rono u s recording)
1. Load a blank cassette.
2. Select “CD” function.
3. Load the disc to be recorded.
- Select the track number if required.
- For programmed recording, programme
the mater ial in ad van ce (as described
under “PROGRAMMED PLAY”).
4. Press the REC button. The PLAY button is
engaged simultaneously and CD recording
starts.
5. Pr e s s t h e S TOP/EJE C T b u tton to sto p
recording. When the end of the tape is reached,
the cassette deck stops automatically and the
playback of CD enters pause mode.
Recording from the radio
1. Load a blank cassette.
2. Tune in the radio station to be recorded.
3. Press the REC button to start recording.
4. Pr e s s t h e S TOP/EJE C T b u tton to sto p
recording.
When beat is heard
Beat (a high-pitched noise) may sometimes be
heard during the recording of radio broadcasts.
If this occurs, set the BEAT CANCEL switch (the
back of the unit) to 1 or 2 position that reduces
the level of the beat noise.
Safeguards against accidental
erasure
To protect side A, break out tab (1). To protect
side B, break out tab (2) (Fig.10).
- To erase or record a protected cassette, cover
the tab openings with adhesive tape (3).
Note:
The REC button cannot be depressed when using
a protected cassette.
MAINTENANCE
Cleaning the tape heads
To ensure continued high performance, use a
cleaning tape (available from your local audio
dealer) to clean the head block of the deck after
about every 10 hours of use.
Cleaning the CD player lens
The lens should never be touched. If dust is on
the lens, blow it off using a camera lens blower.
(Consult your dealer.) (Fig.11)
Cleaning the unit
Clean the outside of the unit with a clean soft
cloth, moistened with lukewarm water. Do not
use benzene, thinners, or alcohol. Because they
may mar the finish of the surfaces.
575PAEn.indd 22 2006.12.5 11:04:23 AM
Page 24

23
CD 唱機
通道:
2 路立體聲
取樣頻率:
44.1 kHz
拾取:
半導體激光器
激光輸出:
0.6 mW (最大連續波)
波長:
790 nm
抖晃:
低於測量限定
收音
頻率範圍:
FM: 87.5 - 108 MHz
AM: 526.5 - 1606.5 kHz
卡座
磁道系統:
4 道, 2 路立體聲
抹音系統:
磁石
帶速:
4.75 cm/秒.
頻響:
80 - 12,000 Hz
快進∕退時間:
約110 秒 (C-60)
共用部分
輸出功率:
2 W/ch (DC max.)
1.5 W/ch (AC max.)
輸入:
USB: USB記憶設備
揚聲器:
10 cm x 2, 8 歐姆
端子:
耳機: 32 歐姆
電源:
AC: 110 V, 60 Hz
DC: 12V, 8 節“D/HP2/R20” 電池
尺寸:
410 (寬) x 167 (高) x 286 (深) mm
重量:
約 2.8 kg (不包括電池)
規格如有變更,恕不再另行通知
。
技術規格
575PAP23.indd 23 2006.12.6 9:46:32 AM
Page 25

CD player
Channels:
2-Channel stereo
Sampling frequency:
44.1 kHz
Pick-up:
Semiconductor laser
Laser output:
0.6 mW (Continuous wave max.)
Wave length:
790 nm
Wow/Flutter:
Below measurable limits
Radio
Reception frequency:
FM: 87.5 - 108 MHz
AM: 526.5 - 1606.5 kHz
Cassette deck
Track system:
4-track, 2-channel stereo
Erasing system:
Magnet erase
Tape speed:
4.75 cm/sec.
Frequency response:
80 - 12,000 Hz
Fast forward/rewind time:
Approx. 110 sec. (C-60)
General
Output power:
2 W/ch (DC max.)
1.5 W/ch (AC max.)
Input:
USB: For USB memory device
Speakers:
10 cm x 2, 8 ohms
Terminals:
PHONES: 32 ohms
Power source:
AC: 110 V, 60 Hz
DC: 12V, 8 “D/HP2/R20” batteries
Dimensions:
410 (W) x 167 (H) x 286 (D) mm
Weight:
Approx. 2.8 kg (not including batteries)
Specifications subject to change without notice.
(TW) 8601B57500060
SANYO Electric Co., Ltd
SPECIFICATIONS
575PABack.indd 1 2006.12.5 10:34:20 AM
 Loading...