

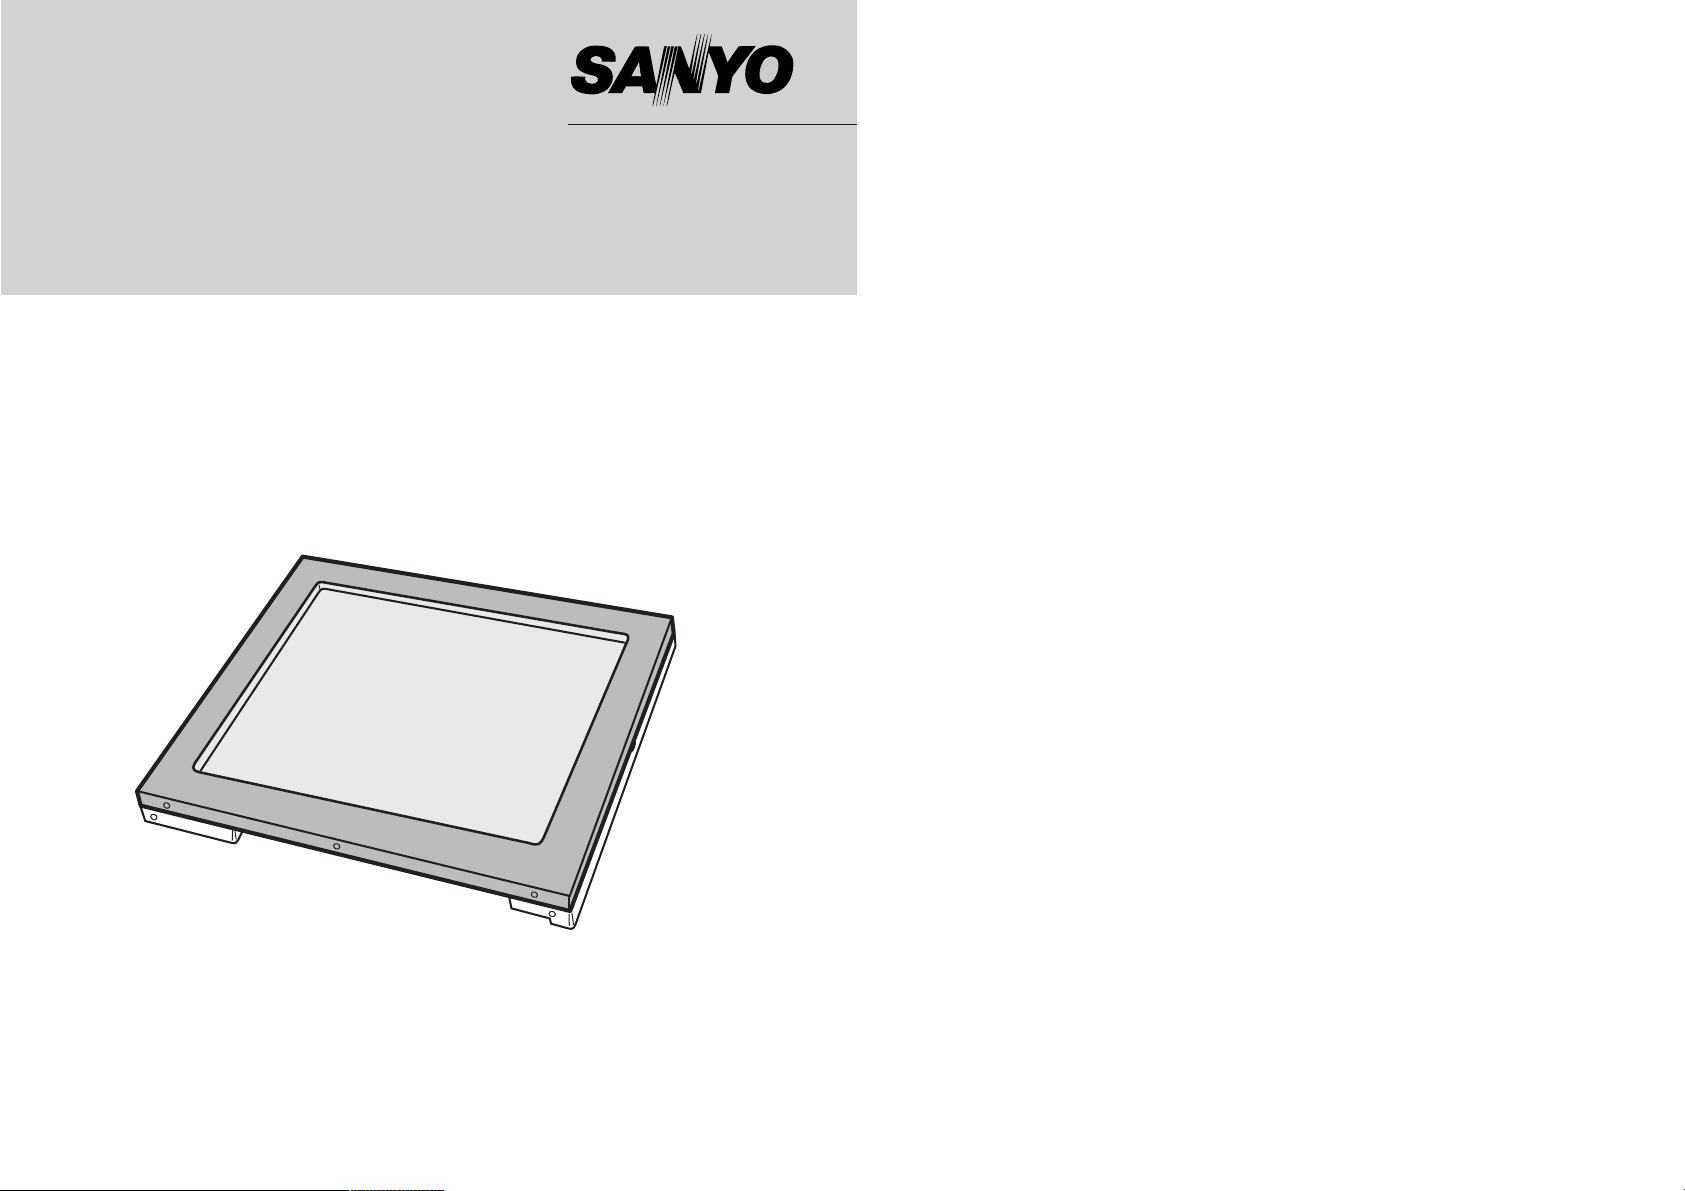
Industrial LCD Monitor
LMU-TK15A4
LMU-TK15A4C
LMU-TK15A4T
(With Touch Screen)
User's Guide

2
PrecautionsTable of contents
Precautions ....................................................................................... 2
1. Before First Use
Names and Functions................................................................. 3, 4
Check Accessories ......................................................................... 4
Outer Dimension ....................................................................... 5 - 8
Installation ...................................................................................... 9
2. LCD Monitor Instructions
Adjusting the Screen .................................................................... 10
Adjustment Procedure .................................................................. 11
Adjustment Procedure (Menu Screen) .................................. 12 - 14
Adjustment Procedure (Sub-menu Screen) .......................... 15 - 19
Additional Functions ............................................................... 20, 21
3. Maintenance................................................................................ 22
4. Troubleshooting
Fault Finding................................................................................. 23
Screen Display ............................................................................. 23
5. Specifications
Table of Preset Data..................................................................... 24
Monitor Specifications ............................................................ 25, 26
Placement precautions
• Avoid placing the unit in humid or dusty places, or where it will be exposed
to excessive heat (direct sunlight, heaters, etc.)
• Do not step on or set anything on the AC power cord. DAMAGE TO THE
AC POWER CORD IS A SAFETY RISK AND CAN CAUSE A FIRE.
• For use with specified AC adapter (GI40-US1225) only.
• Install the unit only on a stable and smooth surface.
• Do not connect the unit to the same AC as outlet with appliances that
generate large amounts of interference (such as heaters with thermostats,
appliances with motors, etc.). It is best to use a completely separate
electrical outlet.
• Keep the unit away from water. If water accidentally enters the unit, unplug
the AC power cord immediately. DO NOT PLUG IN THE UNIT AGAIN.
Handling precautions
• Avoid bending, kinking or damaging the AC power cord.
• Never insert or remove the power cord with wet hands. Also, be sure to
hold cord by the plug when removing it from the outlet.
• Do not remove any parts that are held in place with screws. (The unit does
not contain any user-serviceable items.)
• Maintain standard room temperature (5˚C to 35˚C, or 41˚F to 95˚F) during
use. Do not subject the unit to shock or vibration. Do not move the unit
while it is in use.
• A rapid increase in room temperature in cool weather can cause
condensation to form inside the unit. If this occurs, wait at least 15 minutes
after turning the unit on before attempting to operate it.
Microsoft and Windows are registered trademarks of Microsoft Corporation in
the U.S.A. and other countries.
1
European Norm Compatibility / CE (LMU-TK15A4 / LMU-TK15A4T)
This machine is provided with the CE-mark and therewith corresponding to the norms that are
valid for its operation at present. Thus the effective guidelines on the electromagnetic compatibility
89/336/EWG and safety regulations according to low voltage guideline 73/23/EWG and
93/68/EWG are guaranteed. Mutual disturbances with other electronic appliances are normally
excluded, if those also are in accordance with valid norms.
Sporadically disturbances cannot, however, be excluded. The product is in conformity with the
directives of the valid European guideline.
43
1
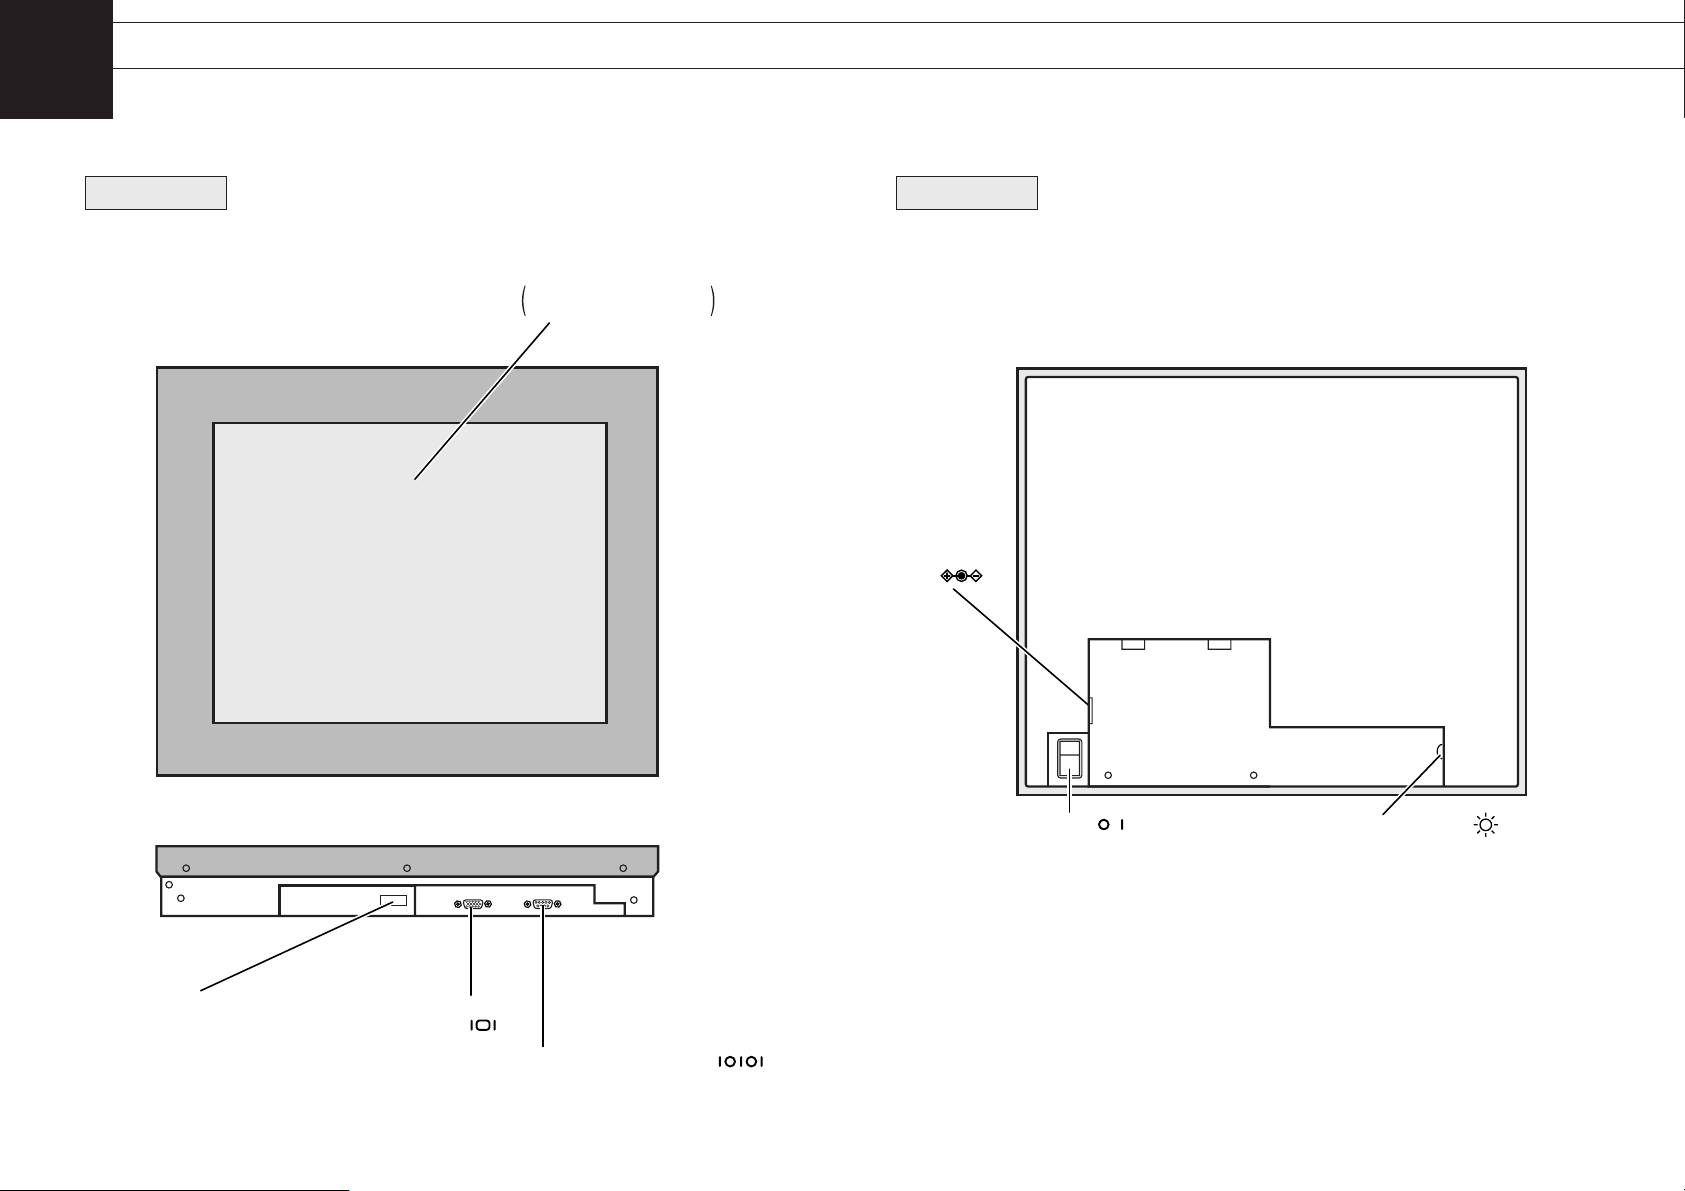
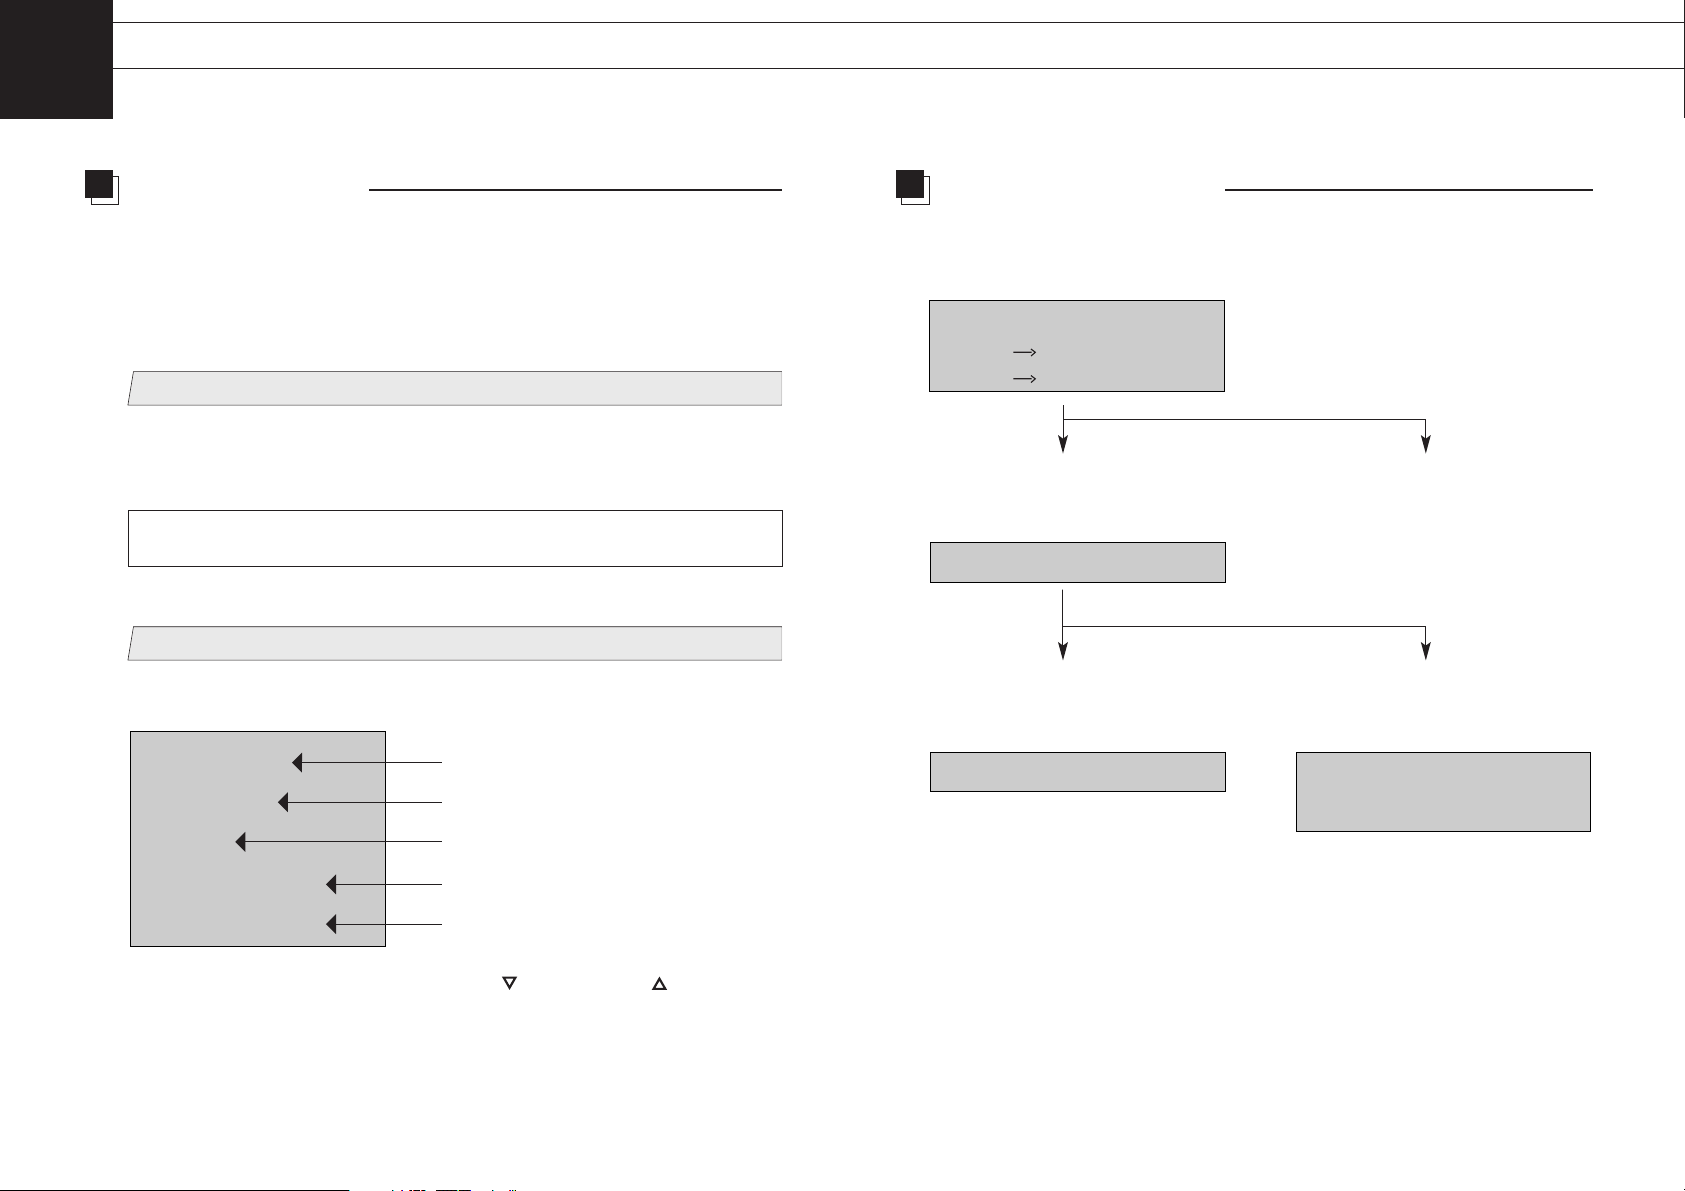
Power Switch ( )
Turns the power to the monitor on
and off. Pressing the front side
of the switch turns the power on.
Brightness Control ( )
Used to adjust the
brightness of the display.
DC IN
( )
Rear View
Check Accessories
Check that the main unit and all accessories are present.
¡¡
AC adapter (
×
1)
¡¡
AC power cord (
×
1)
¡¡
RGB Cable (
×
1)
¡¡
External OSD control box (
×
1)
¡¡
User's Guide (
×
1)
for LMU-TK15A4T only
¡¡
Serial Cable (
×
1)
¡¡
Touch Ware CD-ROM (
×
1)
Names and Functions
Before First Use
RGB Connector
( )
Serial Port Connector ( )
(for LMU-TK15A4T only)
External OSD Control
Connector
Display Screen
Touch Screen
in case of LMU-TK15A4T
Front View
6
Before First Use
5
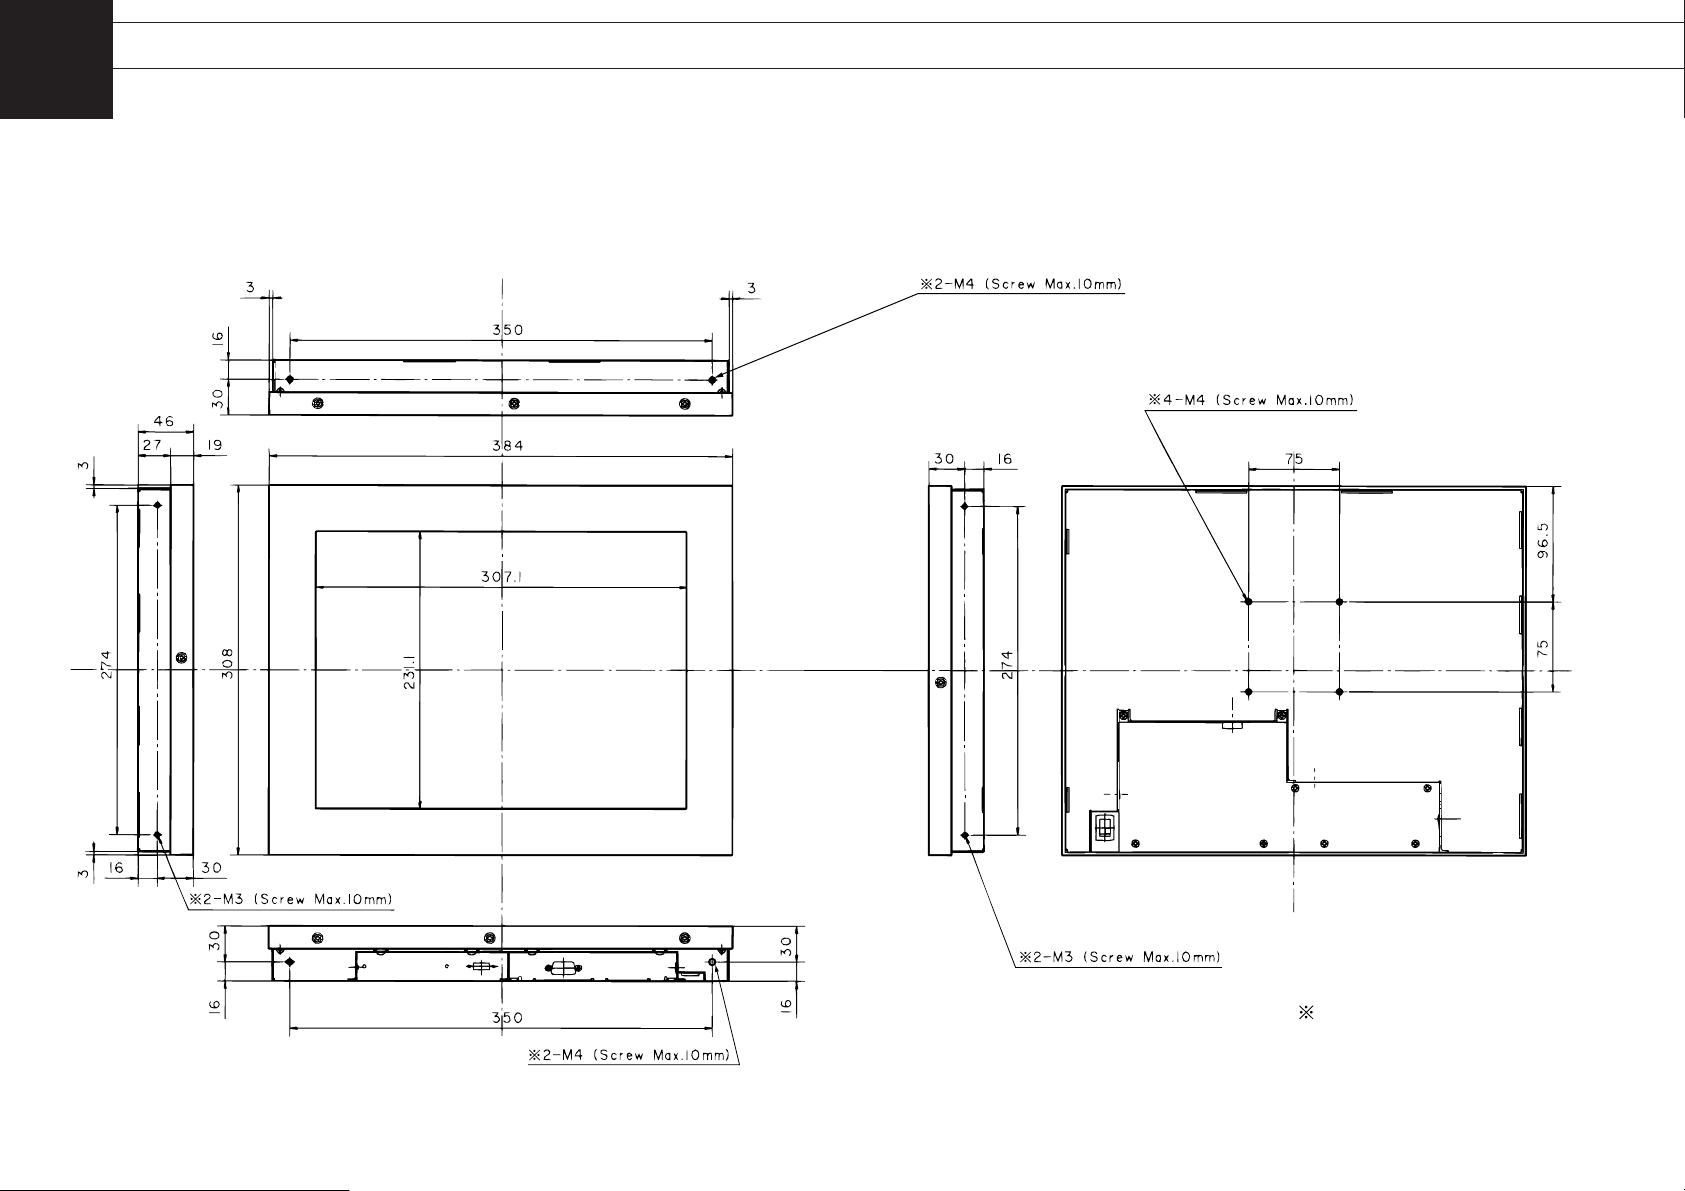
Outer Dimension
1
LMU-TK15A4
LMU-TK15A4C
Max. screw depth : 10mm
VESA Standard fixing holes
7 8
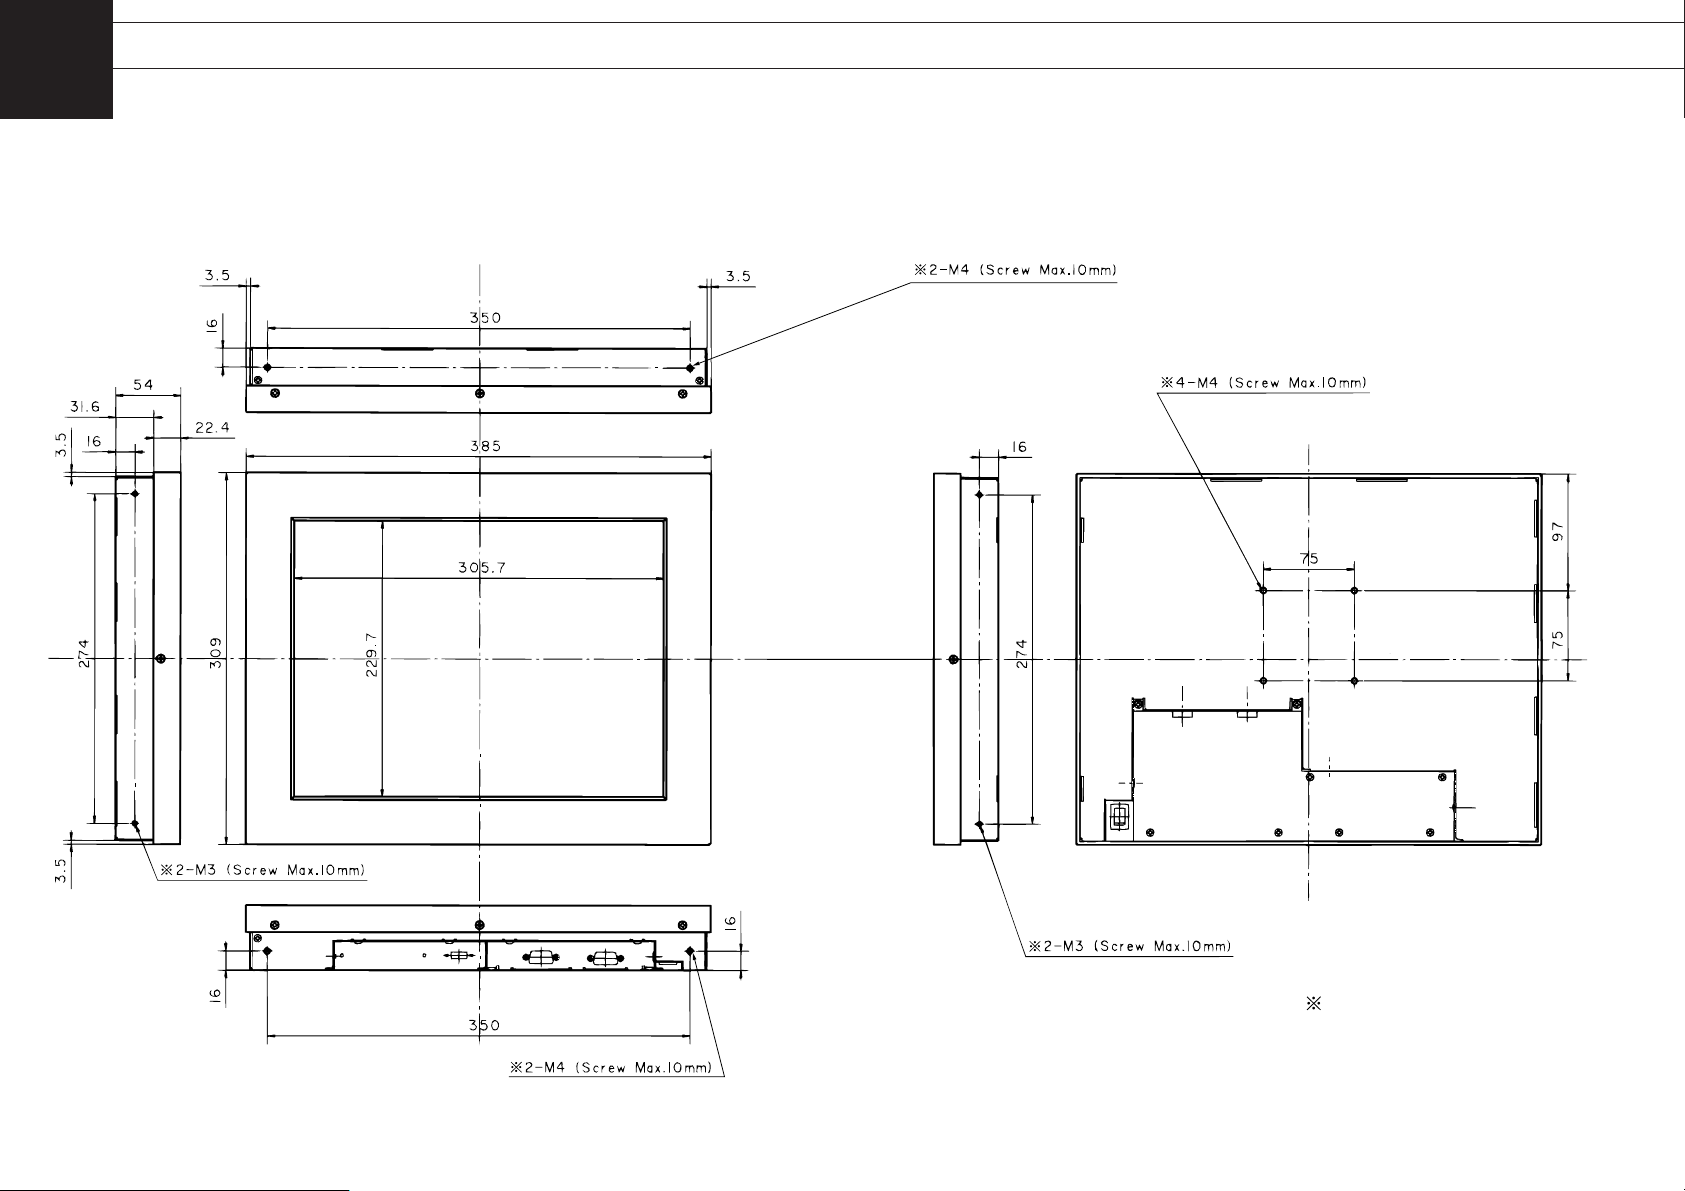
LMU-TK15A4T
Max. screw depth : 10mm
VESA Standard fixing holes
Before First Use
Outer Dimension
1

10
Adjusting the Screen
Before First Use
9
Installation
1
LCD Monitor Instructions
DC IN jack
3
11
6
Connect to the
computer's
connectors
AC adapter
4
5
2
2
Power plug
DC plug
RGB cable
Control box
Serial cable
(for LMU-TK15A4T only)
Connectors
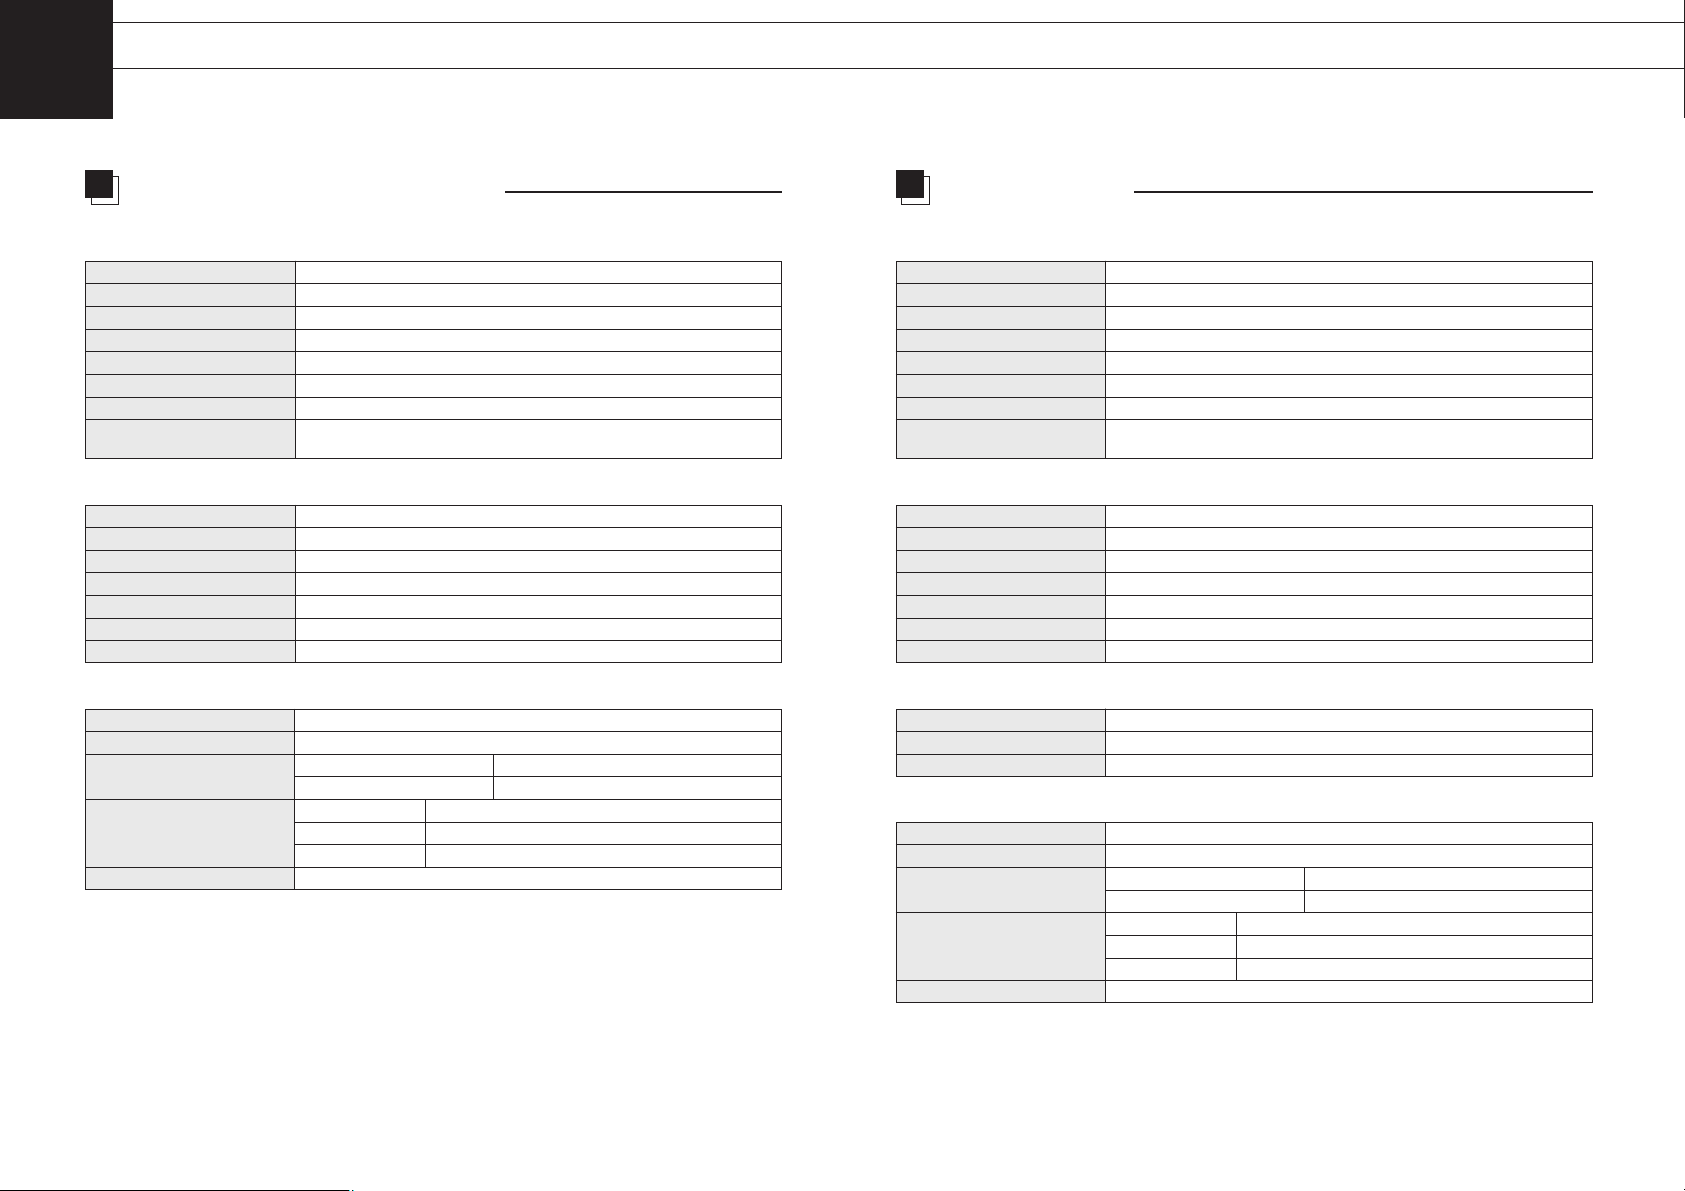
Connecting the Cables and Power Supply
Before doing anything, make sure the power switches on the monitor and the
computer it is going to be connected to are turned off.
1
Plug the cables into the connector on the monitor securely and fix
them in place with the two screws.
2
Plug the other end of the cables into the connector on the computer.
3
Plug the DC plug on the AC adapter into the DC IN jack on the
monitor.
4
Plug the AC power cord into the AC adapter.
5
Plug the power plug into an outlet.
6
Plug the external OSD control box if necessary.
• Do not plug the external OSD control box into the computer's USB port,
as this may cause malfunction of the computer.
Caution
A LCD Monitor decodes the signal from a computer automatically, and displays the
image on a screen in accordance with the preset mode. Unless a display mode has
been preset, the image is displayed in the similar mode to the one from computer. In
this case, the adjustment for a LCD moitor must be done in accordance with a
computer connected with. A LCD displays the information to be adjusted for screen on
OSD (On Screen Display) menu. The OSD is the great tool, which makes it possible to
adjust the screen easily and smoothly.
Please make touch screen adjustments after adjusting the screen settings.
Consult Touch Ware CD-ROM (included) for details.
Buttons and Functions
[MENU] Button To display the Menu Screen ON/OFF
[ENTER] Button To chose the item adjusted, and store the data
adjusted
[ ] [ ] Button To move the cursor between the items adjusted and
change the adjustment data
Menu Screen (Refer to Page 12 - 14)
Adjustment ltems
AUTO ADJUST
‥‥‥‥‥‥‥
Adjust the screen mode automatically
HOR. SIZE
‥‥‥‥‥‥‥‥‥
Adjust the width of screen Horizontally
FOCUS
‥‥‥‥‥‥‥‥‥‥‥
Adjust the focus of screen
HOR. POSITION
‥‥‥‥‥‥‥
Adjust the Horizontal position
VERT. POSITION
‥‥‥‥‥‥‥
Adjust the Vertical position
Sub - menu Screen (Refer to Page 15 - 19)
COLOR
‥‥‥‥‥‥‥‥‥‥‥
Adjust the level of color (RED / GREEN /
BLUE)
RECALL
‥‥‥‥‥‥‥‥‥‥
Set the data back to the original data
programmed by manufacturer
VIDEO MODE
‥‥‥‥‥‥‥‥
Display the input signal data
BLACK LEVEL
‥‥‥‥‥‥‥‥
Adjust the black level
LANGUAGE
‥‥‥‥‥‥‥‥‥
To change the language used on OSD (On
Screen Display)
2
1211
2
Adjustment Procedure
LCD Monitor Instructions
Adjustment Procedure (Menu Screen)
1
Display the Windows or other screen.
After a Computer is connected with a LCD Monitor, activate a Computer and then
shows a bright screen on a LCD Monitor. It might be possible not to adjust the
screen correctly for a dark screen.
2
Enter the Adjustment Mode.
Pressing the [MENU] button, the following menu is display.
For DOS mode, run an application that shows the edges of the screen
(edit, etc.) before beginning adjustment.
Before Adjustment
Move the cursor on the menu screen with the [ ] button and/or [ ] button to
select the item to be adjusted.
Upon pressing the [ENTER] button, the adjustment screen for the selected item is
displayed.
Adjust the screen automatically
Adjust the size of screen Horizontally
Adjust the focus of screen
Adjust the Horizontal position
Adjust the Vertical position
AUTO ADJUST
HOR. SIZE
FOCUS
HOR. POSITION
VERT. POSITION
The signal timing for a computer which this LCD monitor supports is listed in "Table of
Preset Data" on Page 24, the recommended value of Vertical Frequency for this model
is 60Hz. (Unlike CRT Monitors, the display becomes stable when Vertical Frequency is
low.) It is recommend to set Vertical Frequency of a computer connected at 60Hz by
"refresh rate setting". before starting adjustment procedure.
Adjusted by the following steps :
1. To select "AUTO ADJUST" on the Menu screen
2. Press the [ENTER] button to
start the Auto Adjustment
2. Press the [MENU] button to
cancel this procedure, then be
back to the Menu screen
automatically.
3. Automatic Adjustment
successfully completed.
To save the data set in Auto
Adjustment and disappear the Menu
screen
By pressing the [MENU] button, step
back to the Menu screen.
3. Automatic Adjustment
unsuccessfully completed.
AUTO ADJUST
ENTER EXECUTE
MENU CANCEL
FAILED
RETRY OR SEE USER'S GUIDE
AUTO ADJUST
COMPLETE
Automatic Adjustment

1413
LCD Monitor Instructions
Adjustment Procedure (Menu Screen)
2
Manual Adjustment
In case the result adjusted by Auto adjust sequence is not sufficient enough, adjust the
screen by manually.
1
Adjusting the Horizontal Width of a display
1. To select HOR. SIZE (Horizontal Size) on the Menu screen.
2. Use the [ ] and [ ] buttons to perform adjustment.
By pressing the [ ] button, the Horizontal Width becomes Wider.
By pressing the [ ] button, the Horizontal Width becomes narrower.
3. Press the [ENTER] button, to save the preset data and be back to
the Menu screen.
Press the [MENU] button, to cancel this procedure and be back to the Menu
screen. In this case, the preset data is not saved.
HOR. SIZE NARROW WIDE
1344
(Ex.)
ba
2
Adjust the Focus
1. To select FOCUS on the Menu screen.
2. By using [ ] and/or [ ] button, adjust the screen to be able to
display the small characters clearly.
3. Press the [ENTER] button, to save the preset data and be back to
the Menu screen.
Press the [MENU] button, to cancel this procedure and be back to the Menu
screen. In this case, the preset data is not saved.
FOCUS |-------------- 0000
(Ex.)
1. To select HOR. POSITION on the Menu screen.
2. Use the [ ] and [ ] buttons to perform adjustment.
Press the [ ] button to shift the screen to the left.
Press the [ ] button to shift the screen to the right.
3. Press the [ENTER] button, to save the preset data and be back to
the Menu screen.
Press the [MENU] button, to cancel this procedure and be back to the Menu
screen. In this case, the preset data is not saved.
ba
HOR. POSITION LEFT RIGHT
4
Adjust the Vertical Position
1. To select VERT. POSITION on the Menu screen.
5
Disappearance of Menu Screen
By pressing [MENU] button twice while the Menu screen is displayed, the Menu
screen is disappeared.
2. Use the [ ] and [ ] buttons to perform adjustment.
Pressing the [ ] button, shift the screen to the buttom.
Pressing the [ ] button, shift the screen to the top.
3. Press the [ENTER] button, to save the preset data and be back to
the Menu screen.
Press the [MENU] button, to cancel this procedure and be back to the Menu
screen. In this case, the preset data is not saved.
VERT. POSITION DOWN UP
c
d
3
Adjust the Horizontal Position

1615
LCD Monitor Instructions
Adjustment Procedure (Sub-menu Screen)
2
The adjustment flow is described in below:
1
Display the Sub-Menu Screen
By pressing the [MENU] button while the Menu screen is displayed, the Sub-menu
is displayed on screen.
2
Select the item to be adjusted
Select the item to be adjusted by moving the cursor on the Sub-menu screen with
the [ ] button and/or [ ] button.
3
Adjustment or Setting
For each item selected, the adjustment/ setting has been made by pressing the
[ ] button and/or [ ] button. Press the [ENTER] button to save the data.
(The detail steps for each item are described at the page 16 - 19)
4
Disappearance of Sub-menu Screen
By pressing the [MENU] button while the Sub-menu screen displayed, the Submenu screen is disappeared. No key entry has been for more than 20 second, the
Sub-menu screen is also disappeared.
Adjust the level of color (RED/GREEN/BLUE)
Cancel all data adjusted/saved and set the
data back to default data
Display the input signal data
Adjust the black level
To change the language used in OSD (On
Screen Display)
COLOR
RECALL
VIDEO MODE
BLACK LEVEL
LANGUAGE ENGLISH
Adjust the color level (RED / GREEN / BLUE)
A LCD Monitor is shipped from manufacturer with all the color settings at a standard
level. In most cases no further adjustments are necessary. However, depending on the
computer connected to the monitor, some colors may not appear correctly. If this
happens, please make adjustments in the following way. The value set in this section
is applied to all display mode available on a LCD Monitor.
1. To select COLOR on the Sub-menu screen.
Return to the color setting to
default
Adjust the Color Level in RED
Adjust the Color Level in GREEN
Adjust the Color Level in BLUE
COLOR
DEFAULT
USER R -----------|----
USER G -----------|----
USER B -----------|----
(Ex.)
2. Move the cursor on this screen with the [ ] button and/or the [ ]
button, select the color you wish to adjust, and then press the
[ENTER] button.
In case the DEFAULT is selected, after the screen shows at the standard color, be
back to the Sub-menu screen.
In case that one of USER is selected, the color of screen is switching to user mode.
3. Adjust the Color Level with the [ ] button and/or the [ ] button,
and then press the [ENTER] button. By depression of the [ENTER]
button, adjusted data is saved.
4. Pressing the [MENU] button to return the Sub-menu screen.
(Ex.)
USER R -----------|--- 0022

18
LCD Monitor Instructions
17
2
Adjustment Procedure (Sub-menu Screen)
Delete the data saved at the current display mode
Delete the entire saved data / reload the data
progammed by manufacture
It is possible to delete the data saved at the current display mode, and load the data
programmed by manufacturer.
1. To select RECALL on the Sub-menu screen.
2. Press the [MENU] or [ENTER] button.
By pressing of the [ENTER] button, all data adjusted/saved has been deleted, the
data programmed by manufacturer has been reloaded, and then be back to the
Sub-Menu screen.
By pressing of the [MENU] button instead of [ENTER] button, return the Sub-menu
screen without affecting any adjusted/set data.
RECALL
ENTER EXECUTE
MENU CANCEL
2. To select 'CLEAR' or 'ABORT' with the [ ] button or the [ ]
button, and then press the [ENTER.] button.
In case the 'CLEAR' is selected, all saved data are cleared for all mode (VGA /
SVGA / XGA).
In case the 'ABORT' is selected, to terminate this sequence without affecting any to
the saved data.
Delete the adjusted/saved data for all mode(VGA / SVGA / XGA) at one time and load
the data programmed by manufacturer.
1. On the Menu screen, press [MENU] button and [ENTER] button
simultaneously. The following message is displayed on screen
CLEAR PARAMETERS
CLEAR
ABORT
note P: Polarity (+)
N: Polarity (-)
Displays information on the current mode.
1. To select VIDEO MODE on the Sub-menu screen.
2. Press the [ENTER] or [MENU] button and be back to the Sub-menu
screen.
Vertical Synchronizing Signal Frequency
Horizontal Synchronizing Signal Frequency
Vertical Synchronizing Signal Polarity
Horizontal Synchronizing Signal Polarity
Resolution
VERT. SYNC 60.0Hz
HOR. SYNC 64.0kHz
VERT. POLARITY P
note
HOR. POLARITY P
RESOLUTION 1024x768
(Ex.)
Display the information of input signal

20
Additional Functions
LCD Monitor Instructions
19
Adjustment Procedure (Sub-menu Screen)
2
Adjust the Black Level
Select Language used in OSD (On Screen Display)
The Black Level is adjusted for full screen basis. The value set in this section is applies
to entire mode available on this LCD Monitor.
1. To select BLACK LEVEL on the Sub-menu screen.
2. The Black Level is adjusted by pressing the [ ] button and/or the
[ ] button.
3. Press the [ENTER] button to save the content of adjustment, and be
back to the Sub-menu screen.
Press the [MENU] button and be back to the Sub-menu screen. The content of
adjustment has not been saved.
2. To select the language with the [ ] button and/or the [ ] button.
3. By depression of the [ENTER] button, the data is saved.
The LANGUAGE appeared on OSD screen has been changed, and
then OSD screen is disappeared.
Press the [MENU] button and return the Sub-menu screen. In this case, the
language information selected has not been saved.
1. To select LANGUAGE on the Sub-menu screen
ENGLISH
DEUTSCH
FRANCAIS
ESPANOL
OSD Key Lock (Lock and Unlock Screen Adjustment Buttons)
Adjust the contrast
It is possible to lock the operation to prevent unauthorized or unintentional changes.
1. Turn the power 'OFF'. And turn 'ON', while pressing the [MENU], [ ]
and [ ] buttons simultaneously.
The following message is displayed.
After this setting, all of button entries related to adjustment are prohibited.
This setting remains the same, even if the power "OFF"
• In order to unlock this mode, turn the power 'OFF' then on again while pressing
the [MENU], [ ] and [ ] buttons, simultaneously.
By pressing the [ ] button, the contrast on screen becomes darker.
By Pressing the with [ ] button, the contrast on screen becomes lighter.
1. When the OSD (On Screen Display) is not displayed, it is possible to
adjust contrast on screen with [ ] and [ ] buttons.
2. Press the [ENTER] button to save the content of adjustment.
Press the [MENU] button, to display the value before adjustment and disappeare
the OSD Screen. By this operation, the value adjusted is not saved.
In the cycle of adjustment, if no key depression has been continuing for more than 10
seconds, the OSD screen is disappeared without storing any figures on a display.
(Ex.)
BLACK LEVEL |-------------- 0000
OSD KEY LOCKED
CONTRAST -----------|----
(Ex.)
0022

2221
Additional Functions
2
MaintenanceLCD Monitor Instructions
This is the function to reduce the monitor's power consumption, when a Computer has
not been used for long, even when the power to a LCD Monitor is "ON". In order to
activate this system, it must be connected and used with a computer that conforms to
DPMS (Display Power Management Signaling) Standard of the VESA (Video
Electronics Standards Association).
This Monitor conforms to DDC1(Display Data Channel 1) standard as well as DDC2B
(Display Data Channel 2B) standard of VESA. (DDC stands for display channel and is a
registered trade mark of VESA)
Plug and Play
Power Management System
Always unplug the AC power plug from the outlet when performing maintenance.
Also unplug the cables from the computer.
Cabinet
Soak a soft cloth in water or neutral detergent,
wring well, and wipe the cabinet gently. Never use
solvents such as paint thinner or benzene as they
will damage the surface of the cabinet. Follow the
manufacturer’s directions when using chemically
treated cloths.
Display Screen
LMU-TK15A4 / LMU-TK15A4C
Gently blow away any dust that has adhered to the
display screen. Apply a small amount of ethyl
alcohol or isopropyl alcohol to a soft cloth and wipe
gently. Do not wipe with plain water. Do not use
organic solvents such as acetone or toluene. Do
not rub with pointy objects such as a pen or
screwdriver.
LMU-TK15A4T
Gently sweep away any dust with a dried cloth,
when the dust is on the surface of a Touch Screen.
In case that a Touch Screen is dirty enough, gently
wipe the surface of a Touch Screen with a soft,
clean cloth dampened with a small amount of water
or applicable cleaner.
Don't rub with pointry objects such as a balled point
pen or screwdriver.
Applicable Cleaner:
• Isopropyl Alcohol
• Neutral Detergent (water down)
• Glass Cleaner without containing polisher
• Glass Cleaner (Non-ammonium type)
★Never use solvents such as thinner, benzene or
acid detergent as they will damage the surface of
a Touch Screen.
3

2423
4
Specifications
Table of Preset Data
• This monitor conforms to the XGA mode (1,024 x 768 dots).
• Display is not possible even when the computer’s display mode is set to be
larger than the XGA mode (1,024 x 768 dots). Use a mode that is smaller
than XGA.
• Displaying the same screen for an extended period of time may leave a
residual image; this does not indicate a broken or defective display. The
display will return to normal after the power is turned off and the unit stands
for a while. Use of a screen saver is recommended.
• Bright dots (dots that remain lit) or black dots (unlit dots) on the LCD
monitor’s display are normal; they do not indicate a broken or defective
display.
Troubleshooting
Check the following items before requesting repair. When the monitor still
does not function properly after checking these items, stop using it, turn off the
power switch, unplug the power plug from the outlet, and contact the store
where it was purchased.
Problem Check Item Treatment
Page No.
No picture (with Is a computer's signal Check a computer manual and
'Signal Frequency timing (horizontal or Vertical set the signal timing so that it
Out of Range change synchronous signals) over falls within the range for this 25, 26
Input Signal Timing' the range specified for this monitor's specification.
message) monitor
Screen's display Is the computer's screen Reset the screen size.
–
range is incorrect. size set correctly ?
Part of screen is Is the adjustment for screen Adjust the screen.
10
missing. correctly ?
Picture is distorted. Is the RGB cable connected Check the RGB cable
9
securely ? connection.
Is the screen adjusted Adjust the screen correctly.
10
correctly ?
The computer's signal timing Check the computer’s
may not match the monitor's specifications. –
specifications.
5
The 18 signal timing patterns indicated in the tables below are preset when the monitor is
shipped from the factory. Up to 8 additional timing pattern can also be stored. The timing
pattern is automatically determined and displayed according to the synchronous signals of
the computer being used. The monitor will use the closest timing pattern for display when a
perfectly matched one is not available.
No. Resolution Vertical Frequency Horizontal Frequency
1 640 x 350 dots 70 Hz 31.4 kHz
2 640 x 400 dots 56 Hz 24.8 kHz
3 640 x 400 dots 70 Hz 31.4 kHz
4 640 x 480 dots 60 Hz 31.5 kHz
5 640 x 480 dots 66 Hz 35.0 kHz
6 640 x 480 dots 70 Hz 37.1 kHz
7 640 x 480 dots 73 Hz 37.8 kHz
8 640 x 480 dots 75 Hz 37.5 kHz
9 800 x 600 dots 56 Hz 35.1 kHz
10 800 x 600 dots 60 Hz 37.9 kHz
11 800 x 600 dots 70 Hz 47.8 kHz
12 800 x 600 dots 72 Hz 48.1 kHz
13 800 x 600 dots 75 Hz 46.9 kHz
14 832 x 624 dots 75 Hz 49.6 kHz
15 1024 x 768 dots 60 Hz 48.4 kHz
16 1024 x 768 dots 70 Hz 56.5 kHz
17 1024 x 768 dots 72 Hz 58.1 kHz
18 1024 x 768 dots 75 Hz 60.2 kHz
Cable Pin Arrangement (male)
Cable Pin Arrangement
No. Signal name No. Signal name No. Signal name
1 R 6 R GND 11 ––
2 G 7 G GND 12 DDC data line*
3 B 8 B GND 13 Hor. Sync.
4 –– 9 –– 14 Vert. Sync.
5 DDC GND* 10 GND 15 DDC clock line*
Video Input : mini D-Sub (15pin)
* DDC Standard (VESA)
Fault Finding
Screen Display
1 5
6 10
11 15
Dimensions 384 (W) x 308 (H) x 46 (D) mm
Weight 3.7kg
Operating Conditions Operating Temperature: 5°C to 35°C
Humidity: 30% to 85% RH (no condensation)
Power Supply/AC Adapter Model Name: GI40-US1225
Input: 115-240VAC 1.0A-0.55A, 50-60Hz
Output: DC 12V 2.5A
Power Consumption 28W (5W in Energy Saving mode)
Liquid Crystal Panel TFT
Display Size 15.0''
Pixel Configuration 1,024 x 768
Pixel Pitch 0.297x 0.297 mm
Brightness 250 cd/m
2
Response Time 40 ms
Contrast 350 : 1 typ.
Angle of Visibility Up 55, Down 65, Right 70, Left 70 degrees
(contrast ratio of lessthan 5)
2625
5
Monitor specifications
Specifications
note : To improve this LCD monitor’s performance level, its specifications and
appearance are subject to change without notice.
LCD
Video
Physical
Horizontal signal 24.8 - 60.2kHz
Vertical signal 56 - 75Hz
Video Signal Analog RGB 75ohm 0.7Vp-p
No. of Colors 16.77 million
OSD Language English, German, French, Spanish
Plug & Play VESA DDC1, DDC2B
Power Management VESA DPMS
Dimensions 385 (W) x 309 (H) x 54 (D) mm
Weight 4.2kg
Operating Conditions Operating Temperature: 5°C to 35°C
Humidity: 30% to 85% RH (no condensation)
Power Supply/AC Adapter Model Name: GI40-US1225
Input: 115-240VAC 1.0A-0.55A, 50-60Hz
Output: DC 12V 2.5A
Power Consumption 30W (5W in Energy Saving mode)
Liquid Crystal Panel TFT
Display Size 15.0''
Pixel Configuration 1,024 x 768
Pixel Pitch 0.297x 0.297 mm
Brightness 250 cd/m
2
Response Time 40 ms
Contrast 350 : 1 typ.
Angle of Visibility Up 55, Down 65, Right 70, Left 70 degrees
(contrast ratio of lessthan 5)
note : To improve this LCD monitor’s performance level, its specifications and
appearance are subject to change without notice.
LCD
Video
Physical
Horizontal signal 24.8 - 60.2kHz
Vertical signal 56 - 75Hz
Video Signal Analog RGB 75ohm 0.7Vp-p
No. of Colors 16.77 million
OSD Language English, German, French, Spanish
Plug & Play VESA DDC1, DDC2B
Power Management VESA DPMS
Touch Screen
Type Capacitive
Electrical Resolution 10bit (1,024 x 1,024)
Communication Bi-directional asynchronous RS-232C serial communication
LMU-TK15A4 / LMU-TK15A4C LMU-TK15A4T

SANYO Electric Co., Ltd.
Printed in Japan
3RE6P11004860B
 Loading...