

Sanyo LMU-TK12AS2, LMU-TK12AS2TC, LMU-TK12AS2TR Instruction Manual
Industrial LCD Monitor
LMU-TK12AS2 LMU-TK12AS2TC LMU-TK12AS2TR
User's Guide
(With Capacitive Touch Screen)
(With Resistive Touch Screen)
Table of contents |
Precautions |
|
|
Precautions ....................................................................................... |
2 |
|
1. |
Before First Use |
|
|
Names and Functions ................................................................. |
3-6 |
|
Check Accessories ......................................................................... |
7 |
|
Installation ................................................................................. |
7-10 |
|
Outer Dimension...................................................................... |
11,12 |
2. |
LCD Monitor Instructions |
|
|
Adjusting the Screen .................................................................... |
13 |
|
Adjustment Procedure .................................................................. |
14 |
|
Adjustment Procedure (Menu Screen) .................................. |
15 - 17 |
|
Adjustment Procedure (Sub-menu Screen) .......................... |
18 - 23 |
|
Additional Functions ............................................................... |
23, 24 |
3. |
Maintenance ................................................................................ |
25 |
4. |
Troubleshooting |
|
|
Fault Finding................................................................................. |
26 |
|
Screen Display ............................................................................. |
27 |
5. |
Specifications |
|
|
Table of Preset Data..................................................................... |
28 |
|
Monitor Specifications ............................................................ |
29, 30 |
European Norm Compatibility / CE
This machine is provided with the CE-mark and therewith corresponding to the norms that are valid for its operation at present. Thus the effective guidelines on the electromagnetic compatibility 89/336/EWG and safety regulations according to low voltage guideline 73/23/EWG and
93/68/EWG are guaranteed. Mutual disturbances with other electronic appliances are normally excluded, if those also are in accordance with valid norms.
Sporadically disturbances cannot, however, be excluded. The product is in conformity with the directives of the valid European guideline.
Placement precautions
•Avoid placing the unit in humid or dusty places, or where it will be exposed to excessive heat (direct sunlight, heaters, etc.)
•Do not step on or set anything on the AC power cord. DAMAGE TO THE AC POWER CORD IS A SAFETY RISK AND CAN CAUSE A FIRE.
•For use with specified AC adapter (GI40-US1225) only.
•Install the unit only on a stable and smooth surface.
•Do not connect the unit to the same AC as outlet with appliances that generate large amounts of interference (such as heaters with thermostats, appliances with motors, etc.). It is best to use a completely separate electrical outlet.
•Keep the unit away from water. If water accidentally enters the unit, unplug the AC power cord immediately. DO NOT PLUG IN THE UNIT AGAIN.
Handling precautions
•Avoid bending, kinking or damaging the AC power cord.
•Never insert or remove the power cord with wet hands. Also, be sure to hold cord by the plug when removing it from the outlet.
•Do not remove any parts that are held in place with screws. (The unit does not contain any user-serviceable items.)
•Maintain standard room temperature (5˚C to 35˚C, or 41˚F to 95˚F) during use. Do not subject the unit to shock or vibration. Do not move the unit while it is in use.
•A rapid increase in room temperature in cool weather can cause condensation to form inside the unit. If this occurs, wait at least 15 minutes after turning the unit on before attempting to operate it.
Microsoft and Windows are registered trademarks of Microsoft Corporation in the U.S.A. and other countries.
1 |
2 |

1 |
Before First Use |
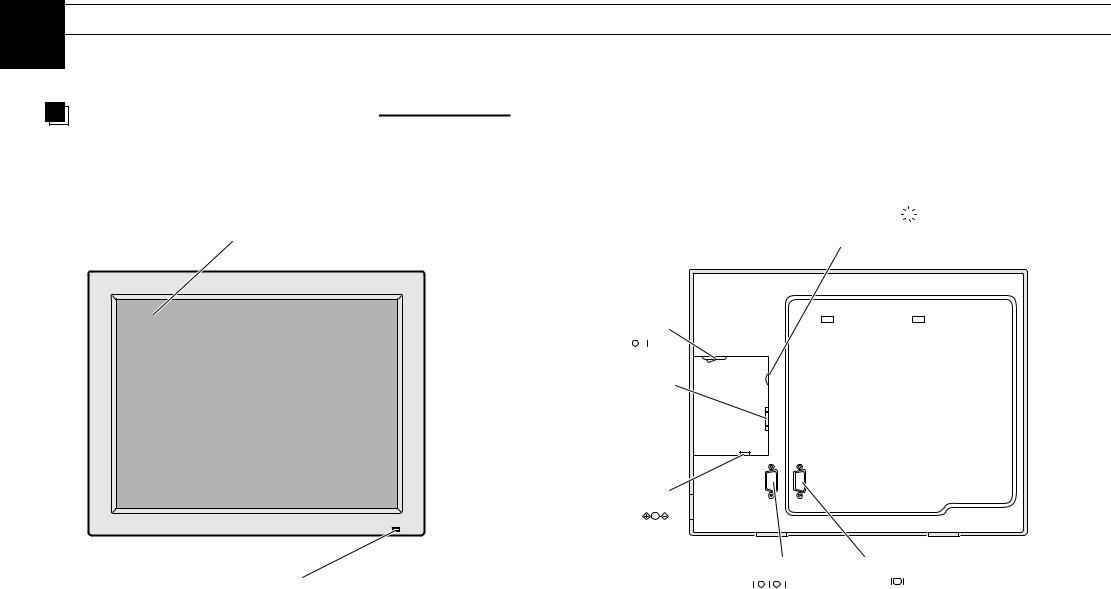
Names and Functions |
LMU-TK12AS2
Front View |
|
Rear View |
Brightness Control 
Display Screen Used to adjust the brightness of the display.
DC IN jack


Power Switch 
OSD Control
Connector
RGB Connector
Power Indicator |
|
Light either green or orange when the power is turned on(See page 24)
3 |
4 |
1 |
Before First Use |
Names and Functions |
LMU-TK12AS2TC, LMU-TK12AS2TR
Front View |
|
Rear View |
Touch Screen
Power Indicator
Brightness Control 
Used to adjust the brightness of the display.
Power Switch
OSD Control
Connector
DC IN jack

Serial port Connector |
RGB Connector |
Light either green or orange when the power is turned on(See page 24)
5 |
6 |

1 |
|
|
|
Before First Use |
|
|
|
|
|
|
|
Check Accessories |
|
|
|
Check that the main unit and all accessories are present. |
2. Place the monitor on the stand's hooks. |
||
¡AC adapter ( x 1) |
for LMU-TK12AS2TC |
|
|
¡AC power cord ( x 1) |
LMU-TK12AS2TR |
|
¡Serial Cable ( x 1) |
||
¡RGB Cable ( x 1) |
||
¡Touch Ware CD-ROM ( x 1) |
||
¡External OSD control box ( x 1) |
||
|
||
¡User's Guide ( x 1) |
|
Installation

 Setting Up the Stand
Used as a desktop monitor by turnishing a stand (included).
1. Remove the labels from the back of the monitor.
3. Fix firmly using the two screw supplied.
You can adjust the angle of the monitor to get the best position for viewing.
7 |
8 |

1 |
|
Befor First Use |
|
|
|
Installation |
LMU-TK12AS2
Power plug
4 5
AC adapter |
DC IN jack |
1 Plug the cables into the connector on the monitor securely and fix |
|
3 |
|
them in place with the two screws. |
DC plug |
6 |
OSD Control |
|
|
|
|
2 Plug the other end of the cables into the connector on the computer. |
|
|
Connector |
OSD Control BOX |
1 |
RGB Connector |
|
|
|||
3 Plug the DC plug on the AC adapter into the DC IN jack on the monitor. |
|
|
|
4 Plug the AC power cord into the AC adapter. |
RGB cable |
|
|
|
|
|
|
5 Plug the power plug into an outlet. |
2 |
|
|
Connect to the computer's connector |
|
||
6 Plug the external OSD control box if necessary. |
|
||
LMU-TK12AS2TC |
|
|
|
|
LMU-TK12AS2TR |
|
|
OSD control Connector
OSD control BOX
6 Serial Port Connector
RGB Connector
|
|
|
3 |
|
|
DC plug |
1 |
|
|
|
|
|
AC adapter |
DC IN jack |
1 |
|
Serial |
||
|
|
|
|
|
4 |
5 |
|
Caution |
|
RGB cable |
|
|
|
||
Power plug |
|
|
|
the computer's USB port, |
|
|
|
|
2 |
2 |
|
may cause malfunction of the computer. |
|
||
|
|
|
Connect to the computer's connectors
9 |
10 |
 Loading...