

Page 1
Instruction manual
Manuel de l’utilisateur
LCD55L4
55” Stereo HDTV LCD television with
LED edge-lighting and USB socket
Téléviseur ACL stéréo haute définition de 55 po
avec panneau lumineux à DEL et connecteur USB
Help line / Ligne d’assistance : 1-800-263-2244
Monday to Friday 9am to 5pm (Eastern)
Du lundi au vendredi, de 9 h à 17 h (heure de l’Est)
http://ca.sanyo.com
1080p HDTV LCD
TVHD 1080p ACL
po
Page 2
CAUTION
RISK OF ELECTRIC SHOCK DO NOT OPEN!
AUTION: TO REDUCE THE RISK OF ELECTRIC SHOCK, DO NOT REMOVE COVER (OR
C
BACK). NO USER-SERVICEABLE PARTS INSIDE. REFER SERVICING TOQUALIFIED SERVICE PERSONNEL.
THIS SYMBOL INDICATES THAT DANGEROUS VOLTAGE CONSTITUTING A
ISK OF ELECTRIC SHOCK IS PRESENT WITHIN THIS UNIT.
R
THIS SYMBOL INDICATES THAT THERE ARE IMPORTANT OPERATING AND
AINTENANCE INSTRUCTIONS IN THE LITERATURE ACCOMPANYING THIS
M
UNIT.
WARNING: TO REDUCE THE RISK OF FIRE OR ELECTRIC SHOCK, DO NOT EXPOSE THIS APPLIANCE TO
RAIN OR MOISTURE.
IMPORTANT SAFETY INSTRUCTIONS
1. Read these instructions.
2. Keep these instructions.
3. Heed all warnings.
4. Follow all instructions.
5. Do not use this apparatus near water.
6. Clean only with dry cloth.
7. Do not block any ventilation openings. Install in
accordance with the manufacturer’s instructions.
8. Do not install near any heat sources such as radiators,
heat registers, stoves, or other apparatus (including
amplifiers) that produce heat.
9. Do not defeat the safety purpose of the polarized or
grounding-typeplug.A polarized plughas two bladeswith
one wider than the other. A grounding-type plug has two
blades and athird grounding prong. The wide blade orthe
third prong are provided for your safety. If the provided
plug does not fit fully into your outlet, consult an electrician for replacement of the obsolete outlet.
10. Protect the power cord from being walked on or
pinched particularly at plugs, convenience receptacles,
and the point where they exit from the apparatus.
11. Only use attachments/accessories specified by the
manufacturer.
12. Use only with the cart, stand, tripod,
bracket, or table specified by the manufacturer, or sold with the apparatus.
When a cart is used, use caution when
moving the cart/apparatus combination
to avoid injury from tip-over.
13. Unplug this apparatus during lightning storms or when
unused for long periods of time.
14. Refer all servicing to qualified service personnel.
Servicing is required when the apparatus has been
damaged in anyway, such aspower-supply cord or plug
is damaged, liquid has been spilled or objects have fallen into the apparatus, the apparatus has been exposed
to rain or moisture, does not operate normally, or has
been dropped.
2
Need help? http://ca.sanyo.com 1-800-263-2244
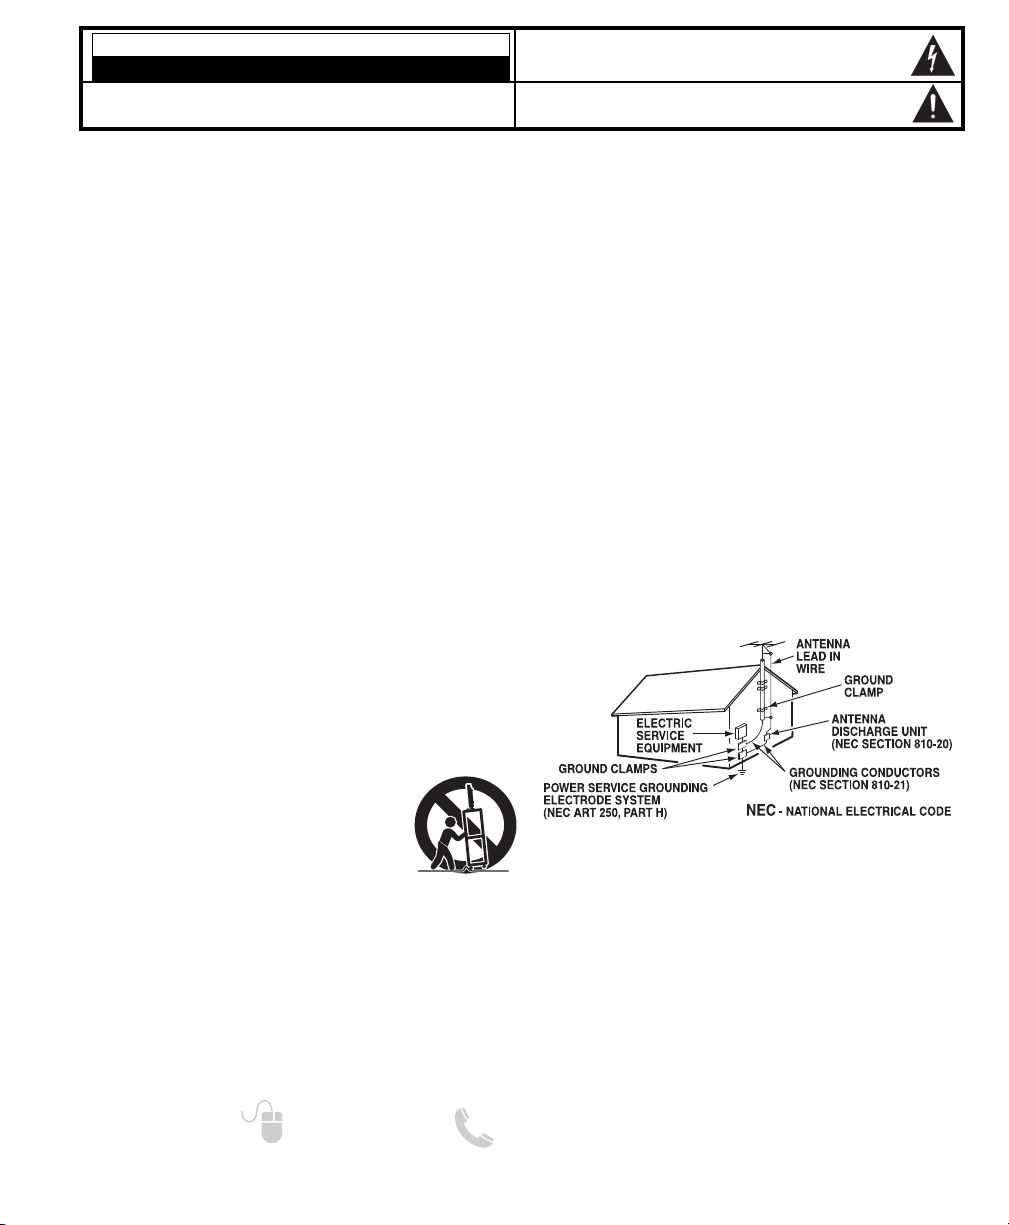
15. If an outside antenna is connected to the television
equipment, be sure the antenna system is grounded so
as to provide some protection against voltage surges
and built up static charges. In the U.S. Selection 810-21
of the National Electrical Code provides information with
respect to proper grounding of the mast and supporting
structure, grounding of the lead-in wire to an antenna
discharge unit, size of grounding conductors, location of
antenna discharge unit, connection to grounding electrodes, and requirements for the grounding electrodes.
16. An outside antenna system should not be located in the
vicinity of overhead power lines or other electrical light
or power circuits, or where it can fall into such power
lines or circuits. When installing an outside antenna
system, extreme care should be taken to keep from
touching such power lines or circuits as contact with
them might be fatal.
EXAMPLE OF ANTENNA GROUNDING ACCORDING
TO NATIONAL ELECTRICAL CODE, ANSI/NFPA 70
“Note to CATV system installer:
This reminder is provided to call the CATV system installer’s
attention to Article 820-40 of the NEC that provides guidelines for
proper grounding and, in particular, specifies that the cable
ground shall be connected to the grounding system of the building, as close to the point of cable entry as practical.”
17. Wall or Ceiling Mounting—The product should be
mounted to a wall or ceiling only as recommended by
the manufacturer.
18. Apparatus shall not be exposed to dripping or splashing
and no objectsfilled with liquids, such asvases, shall be
placed on the apparatus.
19. When the MAINSplug is used asthe disconnect device,
the disconnect device shall remain readily operable.
Page 3
FCC INFORMATION
ENERGY STAR
This equipment has been tested and found to comply with the limits for a Class B digital device, pursuant to Part 15
of the FCC Rules. These limits are designed to provide reasonable protection against harmful interference in a
residential installation. This equipment generates, uses and can radiate radio frequency energy and, if not installed
and used in accordance with the instructions, may cause harmful interference to radio communications. However,
there is no guarantee that interference will not occur in a particular installation. If this equipment does cause
harmful interference to radio or television reception, which can be determined by turning the equipment off and on,
the user is encouraged to try to correct the interference by one or more of the following measures:
– Reorient or relocate the receiving antenna.
– Increase the separation between the equipment and receiver.
– Connect the equipment into an outlet on a circuit different from that to which the receiver is connected.
– Consult the dealer or an experienced radio/TV technician for help.
CAUTION: FCC Regulations state that improper modifications or unauthorized changes to this unit may void
the user’s authority to operate the unit.
TRADEMARKS
Manufactured under license from Dolby Laboratories.
“Dolby” is a trademark of Dolby Laboratories.
HDMI, the HDMI Logo and HighDefinition Multimedia Interface are
trademarks or registered trademarks
of HDMI Licensing LLC in the United
States and other countries.
As an Energy Star
Manufacturing Corporation has determined that this product meets the
Energy Star®guidelines for energy
efficiency.
This symbol on the nameplate means
the product is Listed by Underwriter’s
Laboratories Inc. It is designed and
manufactured to meet rigid U.L. safety
standards against risk of fire, casualty
and electrical hazards.
This Class B digital apparatus complies with Canadian
ICES-003.
®
Partner, SANYO
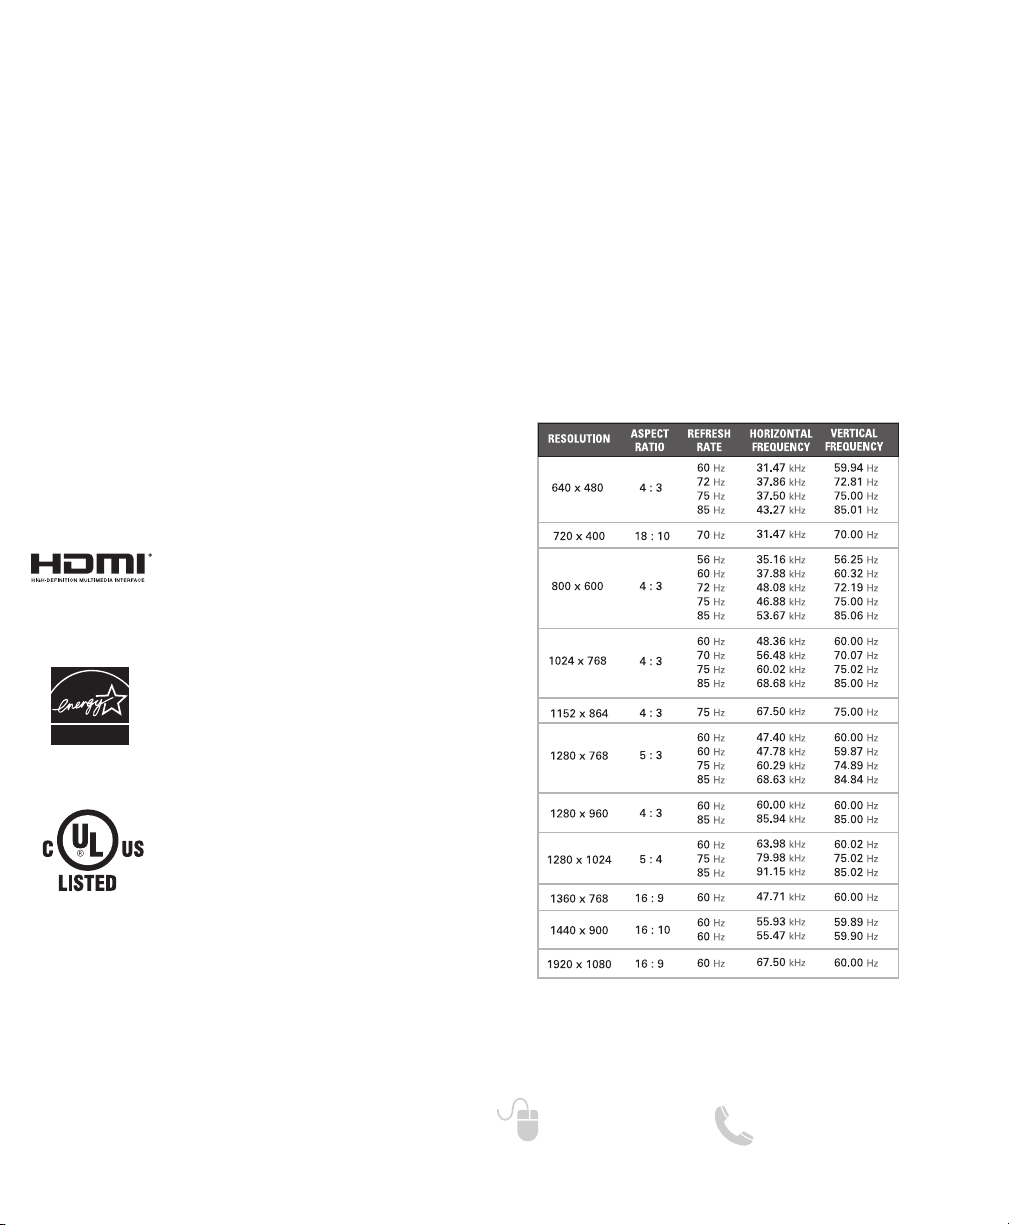
PC RESOLUTION CHART
Need help? http://ca.sanyo.com 1-800-263-2244
3
Page 4
Thankyou for choosingSANYO.
Please read allinstructionstoobtain
maximum benefit of yourproduct.
CONTENTS
IMPORTANT SAFETY INSTRUCTIONS . . . . . . . . . . . . . . . 2
FCC INFORMATION . . . . . . . . . . . . . . . . . . . . . . . . . . . . . . . .3
TRADEMARKS . . . . . . . . . . . . . . . . . . . . . . . . . . . . . . . . . . . .3
PC RESOLUTIONS . . . . . . . . . . . .. . . . . . . . . . . . .. . . . . . . . .3
CONTENTS . . . . . . . . . . . . . . . . . . . . . . . . . . . . . . . . . . . . . . .4
SPECIFICATIONS . . . . . . . . . . . . . . . . . . . . . . . . . . . . . . . . . .4
PROTECTING THE SCREEN . . . . . . . . . . . . . . . . . . . . . . . . .4
POSITIONING THE HDTV . . . . . . . . . . . . . . . . . . . . . . . . . . .5
STAND REMOVAL / WALL MOUNTING . . . . . . . . . . . . . . .5
GETTING STARTED—
Remote Control Battery Installation . . . . . . . . . . . . . . . .5
Antenna Connections for off-air or cable . . . . . . . . . . .5
HDTV INPUT/OUTPUT REFERENCE . . . . . . . . . . . . . . . . . . .6
A/V CONNECTIONS (SIDE PANEL) . . . . . . . . . . . . . . . . . . .7
A/V CONNECTIONS (BACK PANEL) . . . . . . . . . . . . . . . . . .8
POWER CONNECTION / INITIAL CHANNEL SEARCH . . .9
REMOTE CONTROL OPERATION . . . . . . . . . . . . . . . . . . . .10
ON-SCREEN MENU OPERATION—
Channel / Input . . . . . . . . . . . . . . . . . . . . . . . . . . . . . . . . .11
Channel Search . . . . . . . . . . . . . . . . . . . . . . . . . . . . .11
Channel Scan Memory . . . . . . . . . . . . . . . . . . . . . . .11
Input Setting . . . . . . . . . . . . . . . . . . . . . . . . . . . . . . . .11
Video3 Setting . . . . . . . . . . . . . . . . . . . . . . . . . . . . . . .12
HDMI Linking . . . . . . . . . . . . . . . . . . . . . . . . . . . . . . .12
Setup . . . . . . . . . . . . . . . . . . . . . . . . . . . . . . . . . . . . . . . . .13
Menu Language . . . . . . . . . . . . . . . . . . . . . . . . . . . . . . .
13
Digital Caption . . . . . . . . . . . . . . . . . . . . . . . . . . . . . .13
Energy Setting . . . . . . . . . . . . . . . . . . . . . . . . . . . . . .13
Clock Timer . . . . . . . . . . . . . . . . . . . . . . . . . . . . . . . . .14
Motion Sync . . . . . . . . . . . . . . . . . . . . . . . . . . . . . . . .14
V-Chip . . . . . . . . . . . . . . . . . . . . . . . . . . . . . . . . . . . . . .15
Picture . . . . . . . . . . . . . . . . . . . . . . . . . . . . . . . . . . . . . . . .16
Sound . . . . . . . . . . . . . . . . . . . . . . . . . . . . . . . . . . . . . . . . .17
PC CONNECTIONS & MENU OPERATION . . . . . . . . . . . .18
PHOTO VIEWER . . . . . . . . . . . . . . . . . . . . . . . . . . . . . . . . . .19
WARRANTY . . . . . . . . . . . . . . . . . . . . . . . . . . . . . . . . . . . . . .20
“The Amercian Academy of Pediatrics discourages
television viewing for children younger than two
years of age”
SPECIFICATIONS
Power Requirement: Source: AC 120V, 60Hz
AC Power Consumption: Weight:
195 watts 75 lbs.
Dimensions:
MODEL WIDTH HEIGHT DEPTH
LCD55L4 51.2 34.5 10.9
w/o stand 32.3 2.4
NOTE: Dimensions are in inches
Please read before
operating your HDTV!
PROTECTING THE SCREEN
CAUTION: The screen can be damaged if it is not
maintained properly.
Do not use hard objects such as hard cloth or
•
paper to clean the screen.
Do not use excessive pressure when cleaning
•
the screen; excessive pressure can cause
permanent discoloration or dark spots.
NEVER spray liquids on the screen.
•
HANDLING PRECAUTIONS
Handle by the cabinet only.
•
Never touch the screen when handling.
•
Handling damage is not covered under warranty.
•
POSITIONING THE HDTV
Always use a firm and flat surface when
•
positioning your HDTV.
Do not position the unit in a confined area.
•
Allow adequate space for proper ventilation.
•
4
Need help? http://ca.sanyo.com 1-800-263-2244
Page 5
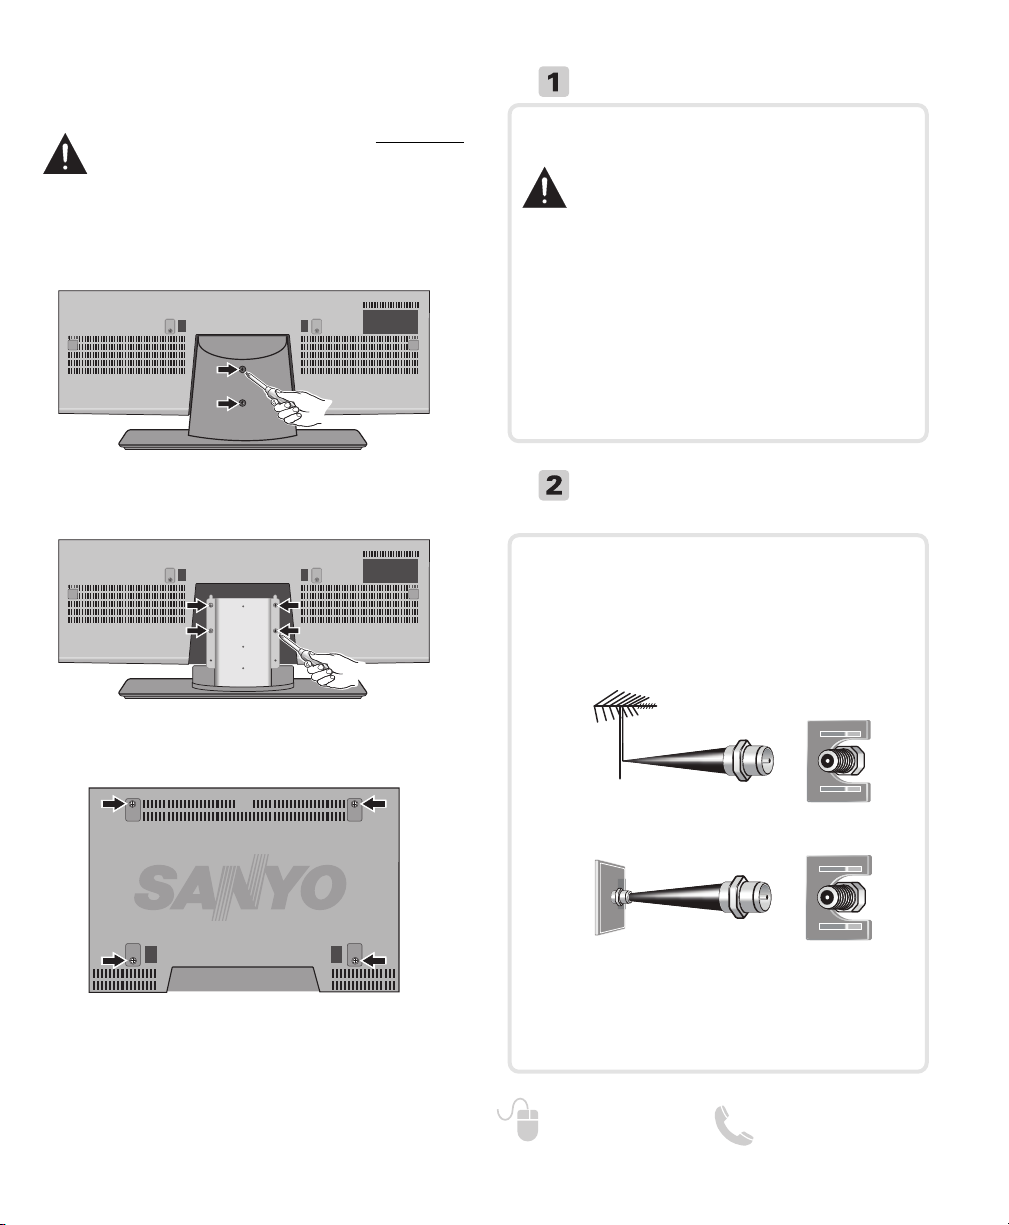
STAND REMOVAL AND WALL
MOUNTING (OPTIONAL)
Tools Needed: Phillips screwdriver
IMPORTANT NOTE: Place HDTV face down
on a padded or cushioned flat surface to
protect the screen and finish.
Wall mounting of the HDTV must be performed
by a skilled person.
Remove the two (2) screws holding the stand
1
base cover and carefully dislodge.
GETTING STARTED
BATTERY INSTALLATION
Install two (2) “AAA” batteries in the remote
control. (Not included)
To ensure safe operation, please observe the
following precautions:
• Replace both batteries at the same time. Do not use a
new battery with a used battery.
• There’s a risk of explosion if a battery is replaced by
an incorrect type.
• Do not expose the Remote Control unit to moisture
or heat.
• Be sure to match the “+” and “
batteries with marks inside the remote control.
–” signs on the
Remove the four (4) screws securing the
2
stand base to the HDTV. CAUTION: Hold the
stand firmly as you remove the last screw.
Use the screws that are threaded into the four
3
(4) inserts on the back of your HDTV to secure
it to an appropriate wall mounting kit.
VESA standard interface: 400 x 400
Mounting screws measurements:
M6 (6mm) Diameter, Length—12mm (maximum)
NOTE: Wall mounting kit is not included.
Need help? http://ca.sanyo.com 1-800-263-2244
ANTENNA CONNECTION FOR
OFF-AIR SIGNALS OR CABLE
Hook up your antenna or your cable service to
the HDTV’s ANT terminal with the use of a 75
OHM coaxial cable.
NOTE: Keep your indoor antenna at least 3 ft. away
from the television set and any other electronic
equipment.
ANTENNA
ANALOG / DIGITAL
ANTENNA IN
CABLE
The tuner in this HDTV can receive:
• Digital and Analog off air signals from an antenna
• Analog or ClearQAM cable channels from a direct
Cable TV connection.
5
Page 6
GETTING STARTED
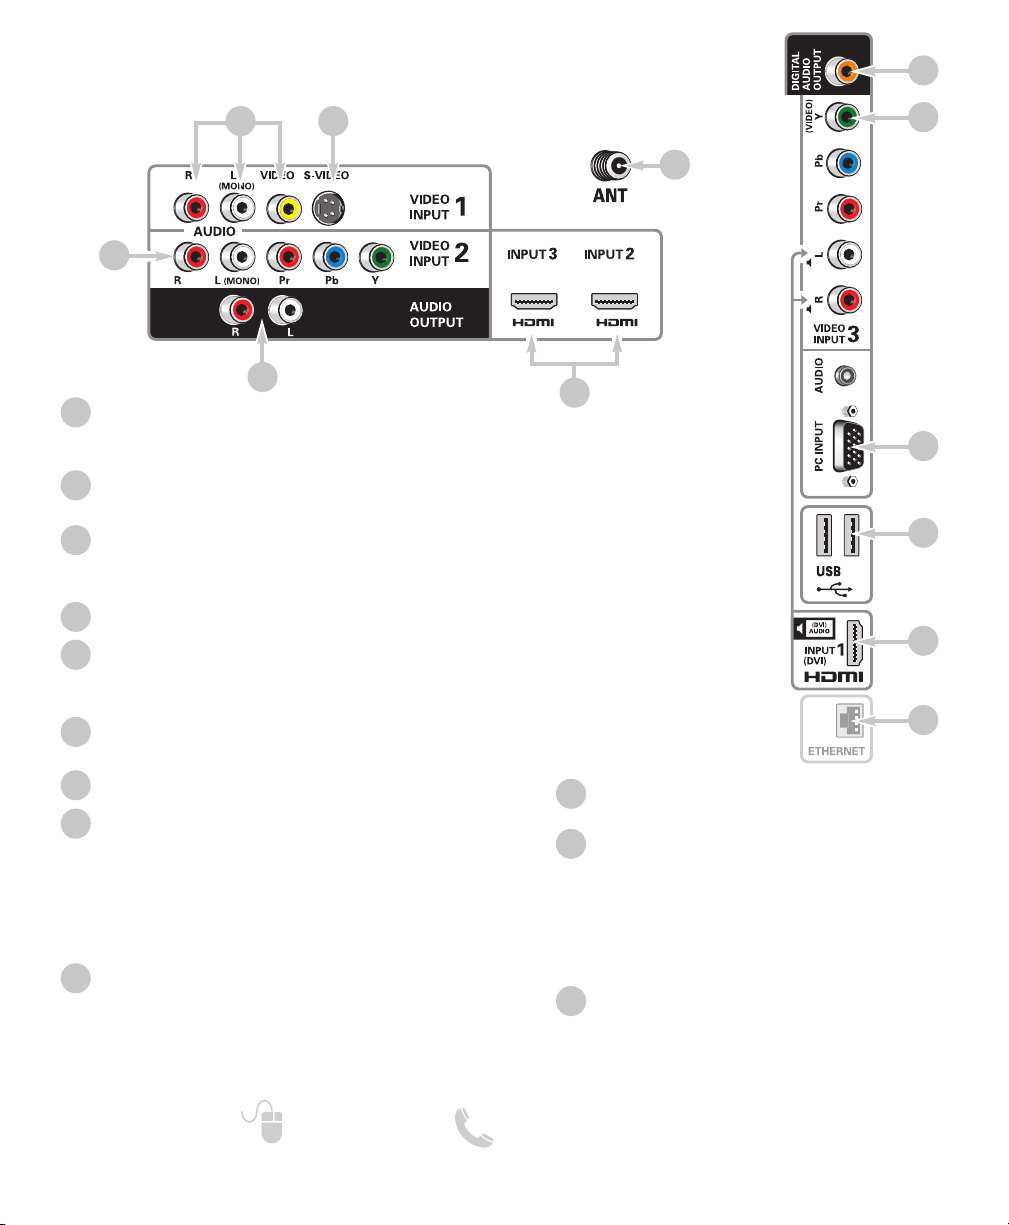
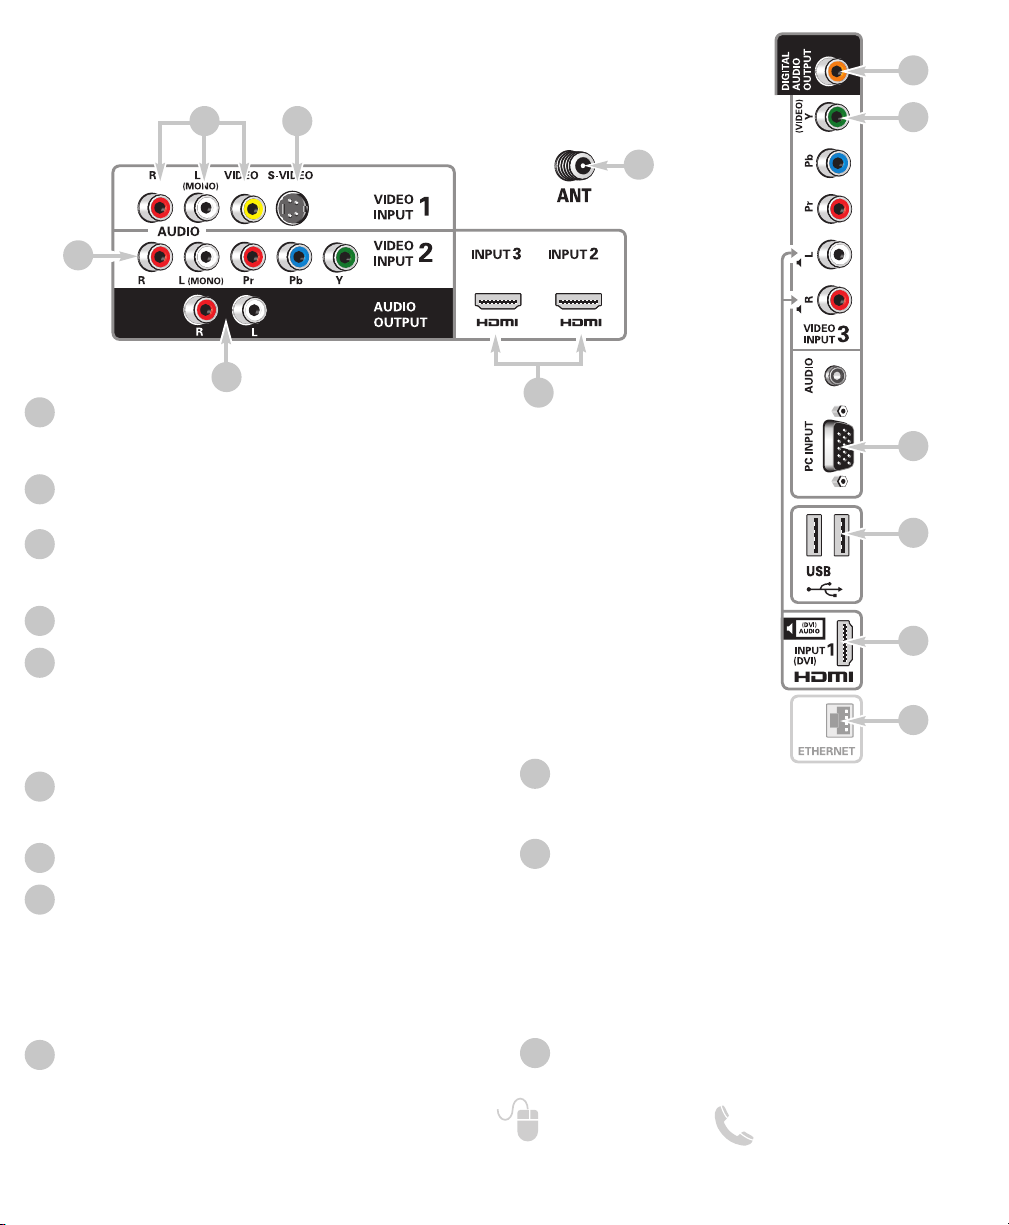
HDTV INPUT/OUTPUT REFERENCE
2
3
1
HDTV BACK PANEL
7
8
6
4
S-Video Input (VIDEO1)
1
NOTE: An S-Video connection will override a connection to
the Video1 (yellow) input jack.
2
Composite AV Input (VIDEO1) – Yellow (Video),
plus white and red (Audio) input jacks.
Component AV Input (VIDEO2) – Green (Y), blue
3
(Pb), and red (Pr) Video inputs plus the white and
red Audio inputs.
4
Stereo Audio Out (L/R) Jacks
5
HDMI (INPUT2 & 3) – An all digital AV interface
accepting uncompressed video signals up to
1080p for the best picture possible.
Analog / Digital Antenna Input – Connect a 75 OHM
6
cable from an antenna or direct Cable service.
Digital Audio Output (Coaxial)
7
AV Component Input (VIDEO3) – Green (Y), blue
8
(Pb), and red (Pr) Video inputs plus the white and
red Audio inputs.
NOTE: A Composite connection is possible via VIDEO
INPUT3 using the Y (VIDEO) jack and the L/R audio
jacks. (See Video 3 Setting on page 12.)
PC Input and Stereo Audio (Mini)
9
• MONITOR RGB (D-SUB)
• AUDIO R/L (Stereo Mini Jack)
NOTE: See page 18 for proper PC hookup and setup.
5
HDTV
SIDE PANEL
USB Input
10
View pictures stored in a USB flash drive.
11
HDMI (INPUT1)
An all digital AV interface that can accept
uncompressed video signals up to 1080p
for the very best picture possible.
NOTE: A DVI connection is possible via the HDMI
INPUT1 (DVI) using an appropriate adapter
and the VIDEO3 Audio jacks for sound output.
12
ETHERNET Port
For Service use only.
9
10
11
12
6
Need help? http://ca.sanyo.com 1-800-263-2244
Page 7
GETTING STARTED
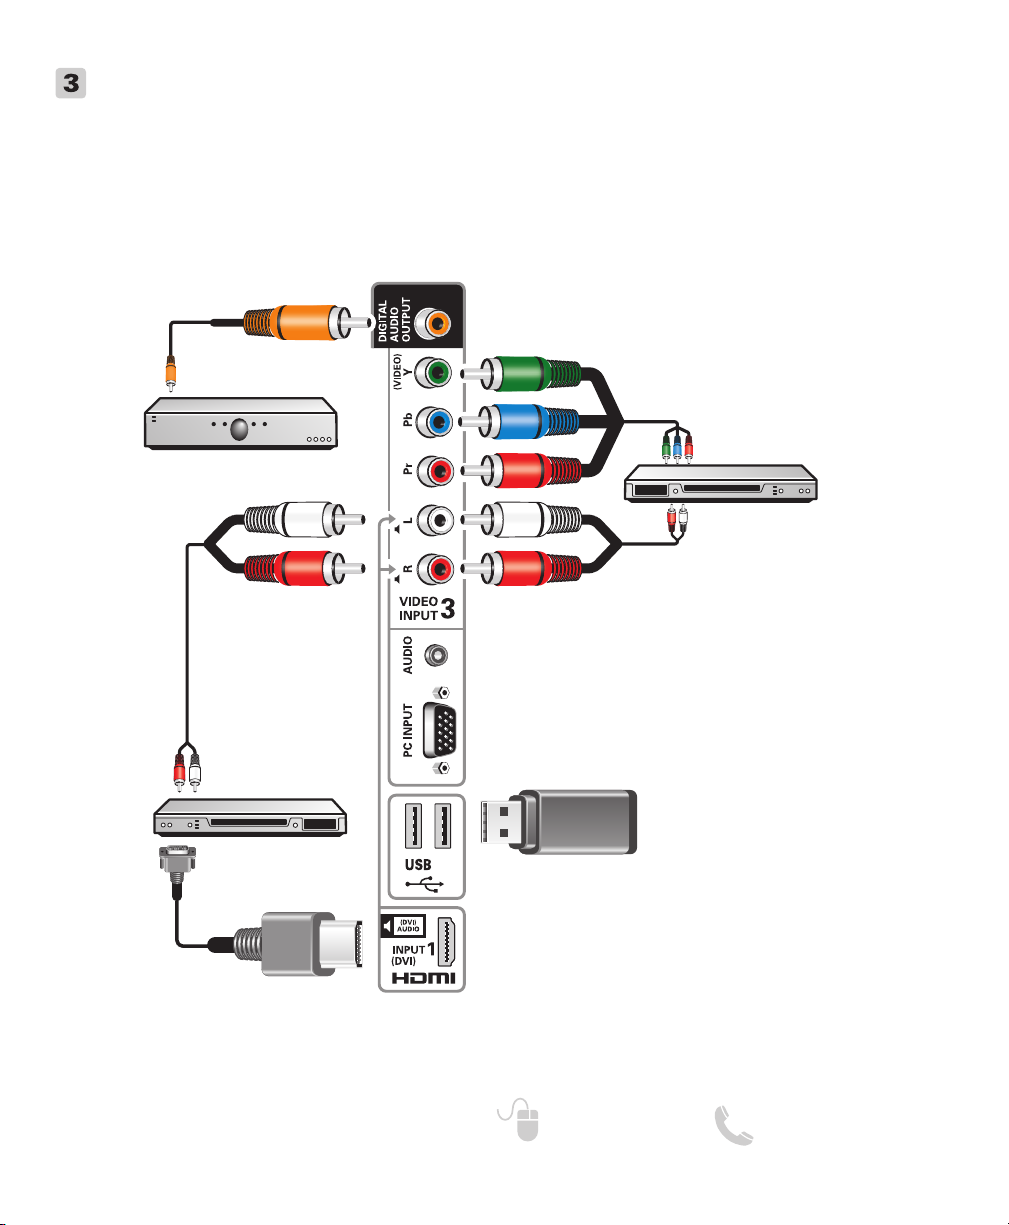
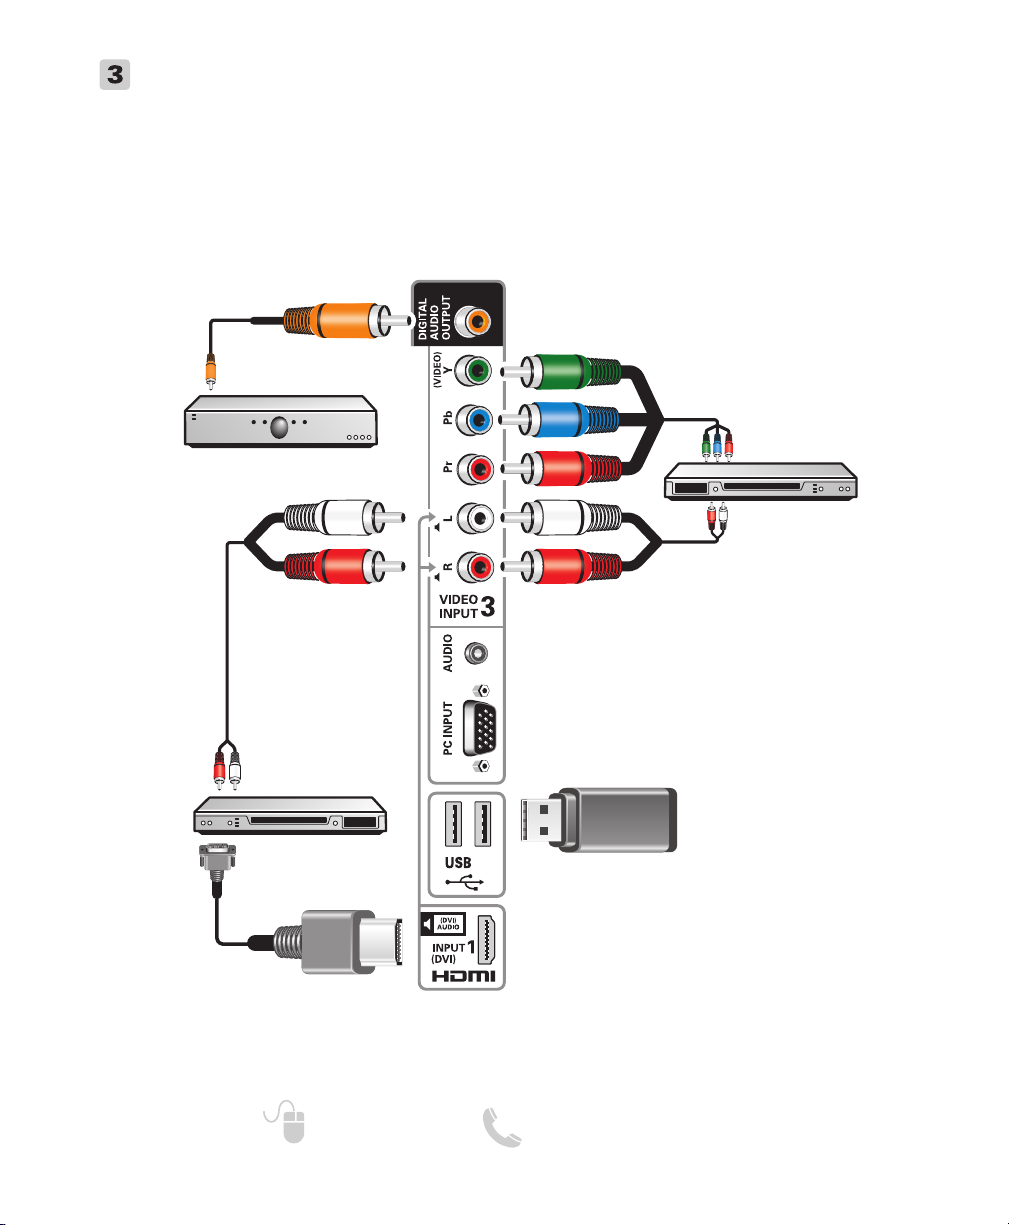
AUDIO / VIDEO CONNECTIONS (SIDE PANEL)
Digital Audio Output is used to output the HDTV’s
Audio through your home theater system.
Hook up the HDTV’s Digital Audio Output to your
home theater system’s input with the use of a
phono-type Digital Audio cable.
MULTICHANNEL RECEIVER
(or home theater system)
COMPONENT connections will accept SDTV,
EDTV and HDTV video signals. Use them for great
image quality from digital devices such as a DVD
player or Video Game system.
Match your digital device’s Component output jacks
to either of the two (2) Component input jack sets
(VIDEO2 or VIDEO3) on your HDTV.
DVD PLAYER
(or similar device)
DVD PLAYER
(or similar device)
DVI
NOTE: Audio/Video cables
are not supplied
USB FLASH DRIVE
HDMI (DVI) INPUT1 can be used to hookup a DVI
device with the use of an appropriate DVI to HDMI
cable or adapter. VIDEO3 Audio in L/R jacks need to
be hooked up to the DVI device as well
NOTE: HDMI INPUT1 may also be used to hookup any digital
device with an HDMI output, without the use of the L/R
audio jacks.
Need help? http://ca.sanyo.com 1-800-263-2244
USB input jack is used to connect a USB mass storage device
to display digital images on
your HDTV. (JPEG format only.)
7
Page 8
GETTING STARTED
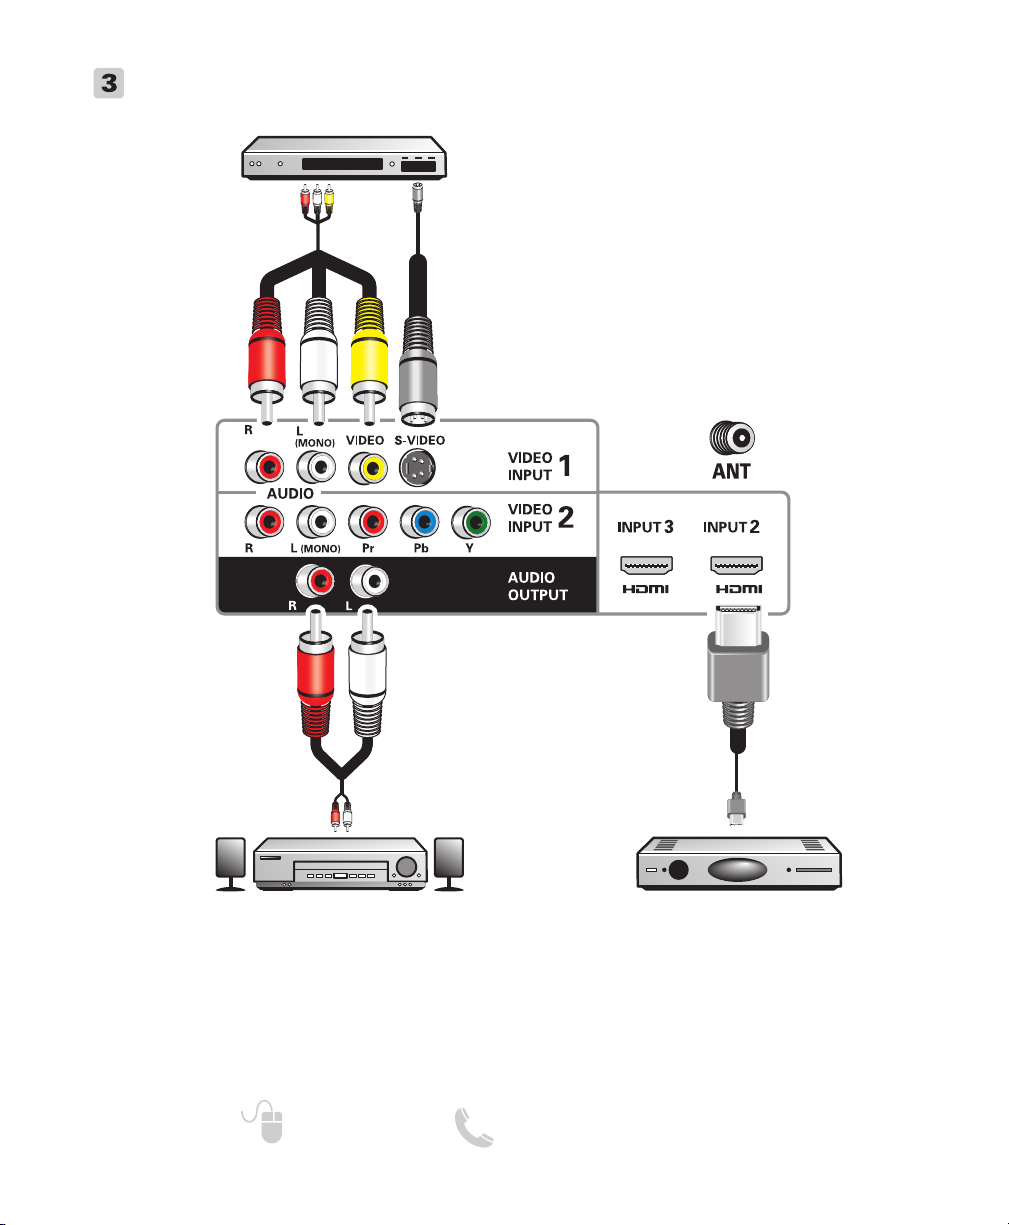
AUDIO / VIDEO CONNECTIONS (BACK PANEL)
COMPOSITE connections are used to hookup
your analog equipment such as a VCR or an older
DVD player.
VCR
(or analog device)
Hook up you analog device’s yellow video output
jack and corresponding audio output jacks to the
HDTV’s Video Input 1 composite jacks.
NOTE: Always match the color of your device’s output jack,
the connector and the HDTV’s input jack.
S-Video jack may be used instead of the yellow
Composite video input with the use of an S-Video
cable connected from your device’s S-Video output to the HDTV’s S-Video input.
STEREO AMPLIFIER
Audio Output L/R are used to hookup an external
stereo Amplifier. Connect your home stereo’s
input jacks to the HDTV’s Audio Output jacks with
a pair of audio red and white connectors.
NOTE: Do not connect external speakers directly to the
HDTV.
8
Need help? http://ca.sanyo.com 1-800-263-2244
HDMI
Use HDMI INPUT1, 2 & 3 to hookup HD digital
devices such as a Blu-ray player, HD Cable Box,
HD Satellite Receiver or Video-game System.
Connect your digital device’s HDMI output to any
of the three (3) HDMI inputs on your HDTV with
the use of an HDMI cable.
SATELLITE RECEIVER
(or similar device)
Page 9
GETTING STARTED (CONTINUED)
INITIAL CHANNEL SEARCH
Before proceeding, please make sure to hook up
your antenna or cable connection and all AV
equipment correctly to your HDTV.
PLUG IN AC POWER CORD
120V AC, 60Hz
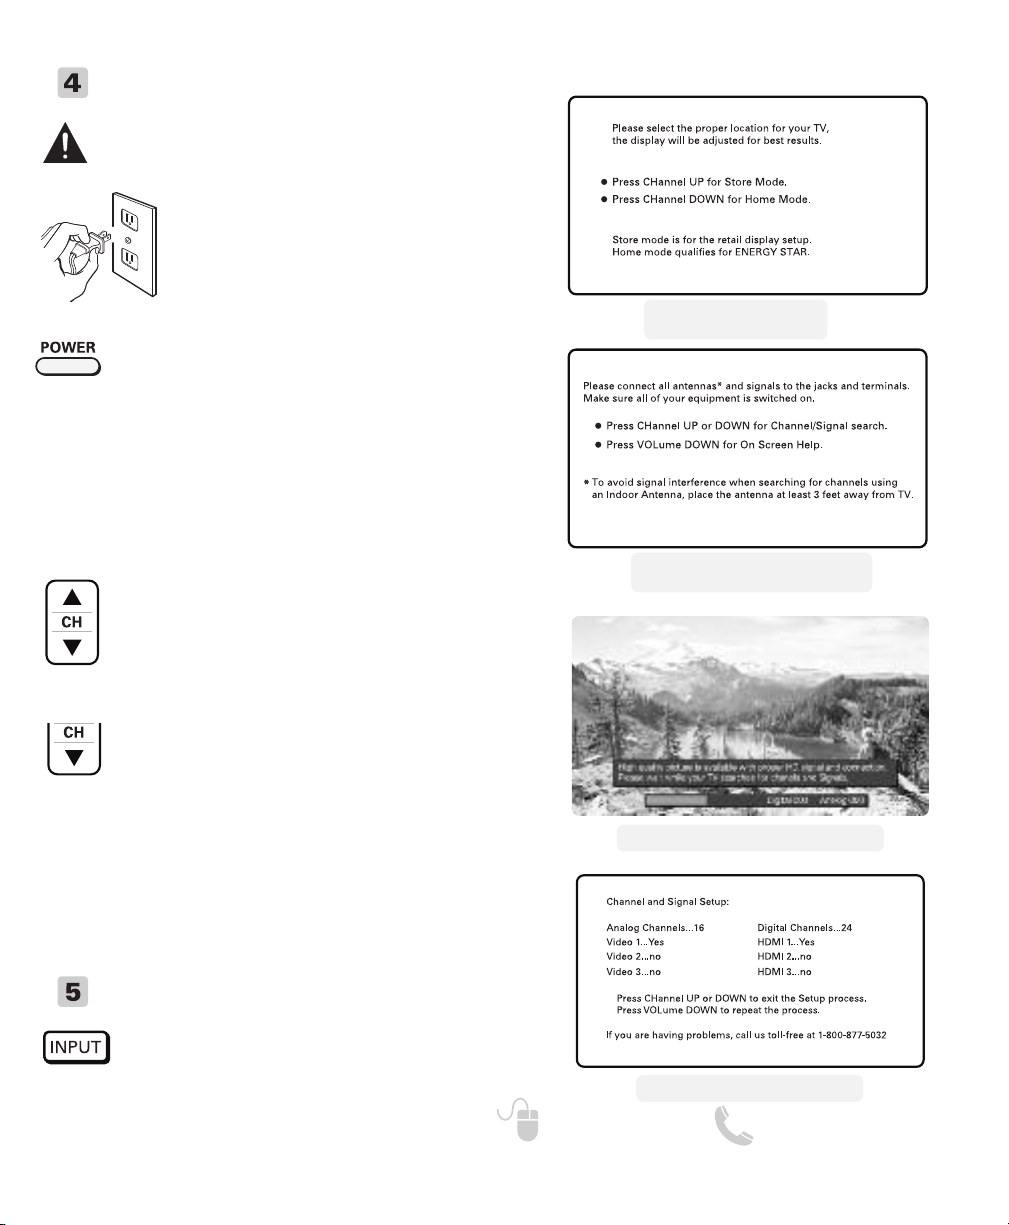
TURN ON TV (PRESS POWER BUTTON)
Wait for on-screen instructions to set an
Initial Energy Saving Mode, and perform an
Initial Channel/Signal Search.
TV SET LOCATION SELECTION:
Select “Home Mode” by pressing the CH key to set
the HDTV’s backlight to an Energy Star qualified level,
or select “Store Mode” by pressing CH to set the
backlight to a retail display level.
CHANNEL AND AV SIGNAL SEARCH:
Press the CH key to perform a channel
search from an Antenna or a direct Cable
connection, and a signal search from devices
hooked up to the HDTV’s AV input jacks.
ON SCREEN HELP (OPTIONAL)
Press the CH key if you wish to access an
on screen trouble shooting guide.
NOTE: On screen help is also accessible via the
main menu.
CHANNEL AND SIGNAL SETUP SCREEN
The final setup screen displays analog and digital
channels found as well as AV inputs detected. Pressing
the CH key finalizes the setup process.
NOTE: To repeat the initial setup process press VOL .
INITIAL ENERGY SAVING
MODE SCREEN
INITIAL CHANNEL/SIGNAL SEARCH
SETUP SCREEN
CHANNEL SEARCH PROGRESS SCREEN
AV INPUT SELECTION
Press the INPUT key to select the correct AV
input for the video source you wish to watch.
Need help? http://ca.sanyo.com 1-800-263-2244
CHANNEL/SIGNAL LIST SCREEN
9
Page 10

REMOTE CONTROL OPERATION
• POWER Key—Turns your HDTV On or Off.
• ECO Key—Modifies the Energy Saver level (see
page 13.)
• AUDIO Key—Selects the desired Audio mode.
Stereo, Mono, or SAP (when available.)
• ON TIMER Key—Displays the current switch on
time (see Clock Timer on page 14.)
• CAPTION Key—Cycles through the available
Caption modes.
• RESET Key—Pressing it twice restores your
HDTV to its factory settings. All user customized
settings will be cleared.
• SLEEP Key—Displays the “Off” Timer. While Off
Timer is on-screen, press the “0” key to Set the
amount of time (in 30 minute increments) at
which the HDTV will turn off.
• PICTURE Key—Cycle through the picture modes.
• SOUND Key—Cycle through the sound modes.
• NUMERICAL Keys—Select channels directly.
NOTE: For channels 100 and up, press and hold the
first number, then enter the remaining two numbers.
––
• “
” (sub ch) key —Allows for the direct selec-
tion of digital subchannels. For example: to
––
3, 9,
select channel 39.1 press the
• INPUT Key—Selects the video source to view.
Holding down the key displays the Input List.
––
• Volume
audio level.
• Channel keys—Scan through the channels
in the memory database.
• MUTE Key—Mute or restore the sound.
• RECALL Key—Switch between current channel
and last selected channel.
• DYN VOL Key—Select sound enhancement
feature.
• USB Key—Selects the USB input directly.
keys—Increases or decreases the
++
, and 1 keys.
• PIX SHAPE Key—Cycles through the available
aspect ratios. The different settings either
stretch, zoom, or fill the image on your screen.
Bars may appear on top and bottom of your
screen (or on left and right sides) depending on
the broadcasted signal or program.
NOTE: Pix6-7 are setup as Pix1-2 in PC mode. Use of
Pix6-7 in TV mode is not recommended.
• MENU—Displays or hides the on-screen menu.
• HELP—Displays on-screen Help menu.
• INFO Key—Displays the Channel Information
banner.
• EXIT Key—Exits the on-screen menu.
• Cursor (UP) (DOWN) keys—Move the onscreen cursor up and down.
• Cursor t (LEFT) u (RIGHT) keys—Move the onscreen cursor left and right.
• ENTER Key—Set or select the highlighted option
on the screen.
The PLAY, PAUSE, STOP, REW, FF, W, T, CAMERA,
and XACTI MENU keys control playback features
on a SANYO Xacti digital camera when the HDMICEC feature has been activated on both the HDTV
and the Xacti camera (see HDMI Linking feature
on page 12.)
NOTE: These playback keys may or may not react with
other devices other than the Xacti camera.
10
Need help? http://ca.sanyo.com 1-800-263-2244
Page 11
ON-SCREEN MENU OPERATION
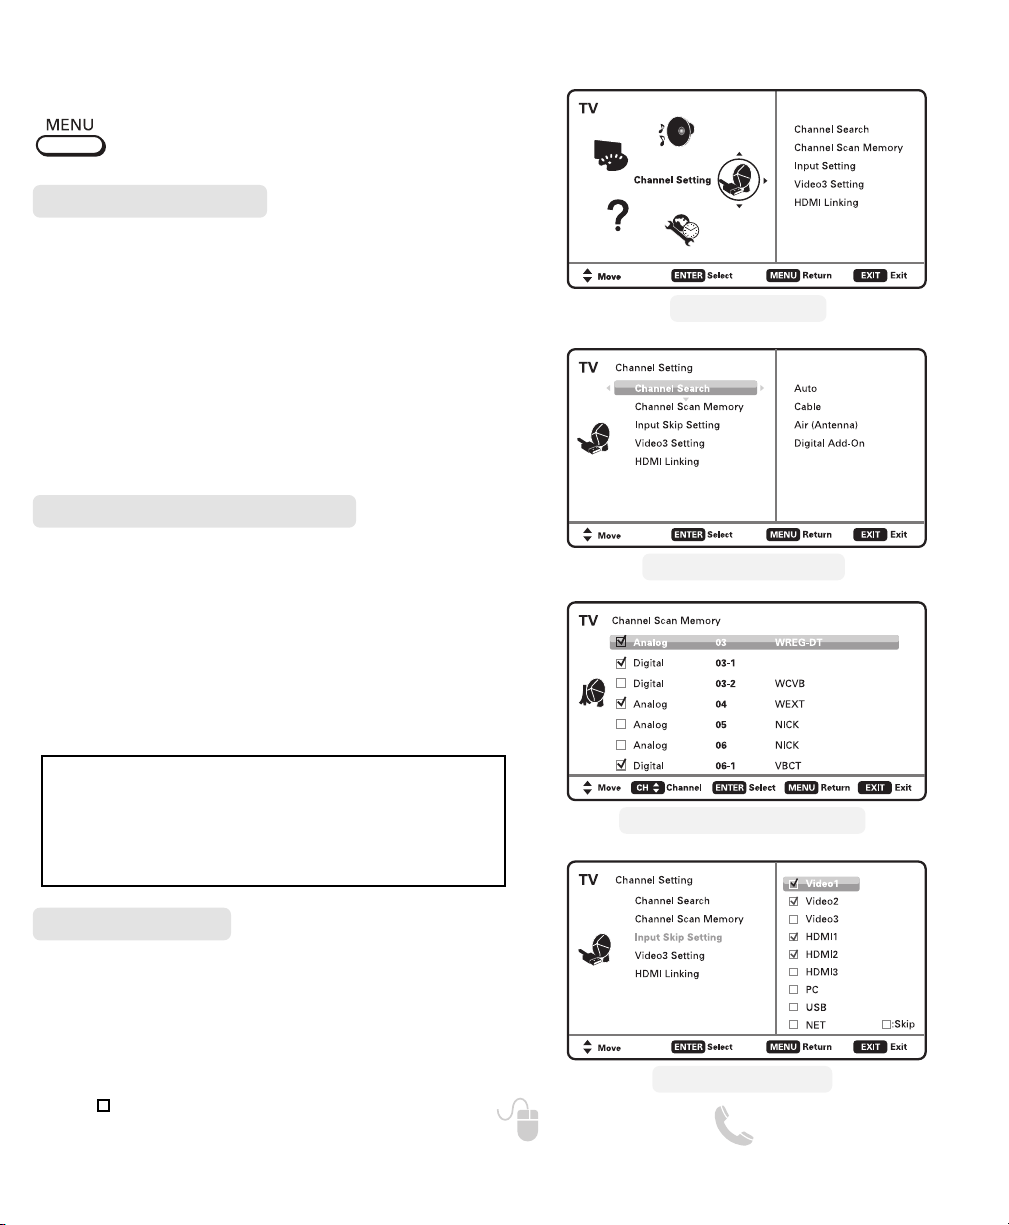
CHANNEL / INPUT ____________
Display the On Screen menu and use the
CURSOR keys to select Channel / Input.
Press ENTER.
Channel Search
Auto – Searches the detected mode, Cable or Air.
Cable – Searches for analog and unscrambled
(ClearQAM) digital cable channels.
Air (Antenna) – Searches for analog and digital off-air
channels.
Digital Add-On – Searches digital off-air channels
adding newly found digital channels to the channel
map database.
NOTE: Digital Add-On option is not available when the cur-
rent mode is Cable.
Channel Scan Memory
Channel Scan Memory lists all Analog and Digital
channels found. It also lists Analog channels that were
not found, which can be added.
Use the CURSOR keys to move the channel select
bar through all enabled and disabled channels, or use
the CH keys to skip all disabled channels.
Press ENTER to enable or disable the selected channel.
MAIN MENU SCREEN
CHANNEL SETTING SCREEN
IMPORTANT FACT: This HDTV maintains only one database of
digital channels. Therefore, when you search for cable channels, the database of antenna digital channels will be deleted.
You will only be able to receive those ClearQAM channels your
cable company provides.
Input Setting
Input Setting feature allows the removal of unused
inputs from the AV input loop.
Use the CURSOR keys to select an AV input. Press
ENTER to disable (uncheck) or enable (check) the highlighted input.
NOTE: At least one input must and will remain enabled.
:Skip is for reference only.
Need help? http://ca.sanyo.com 1-800-263-2244
CHANNEL SCAN MEMORY SCREEN
INPUT SETTING SCREEN
11
Page 12
ON-SCREEN MENU OPERATION
CHANNEL SETTING ___________
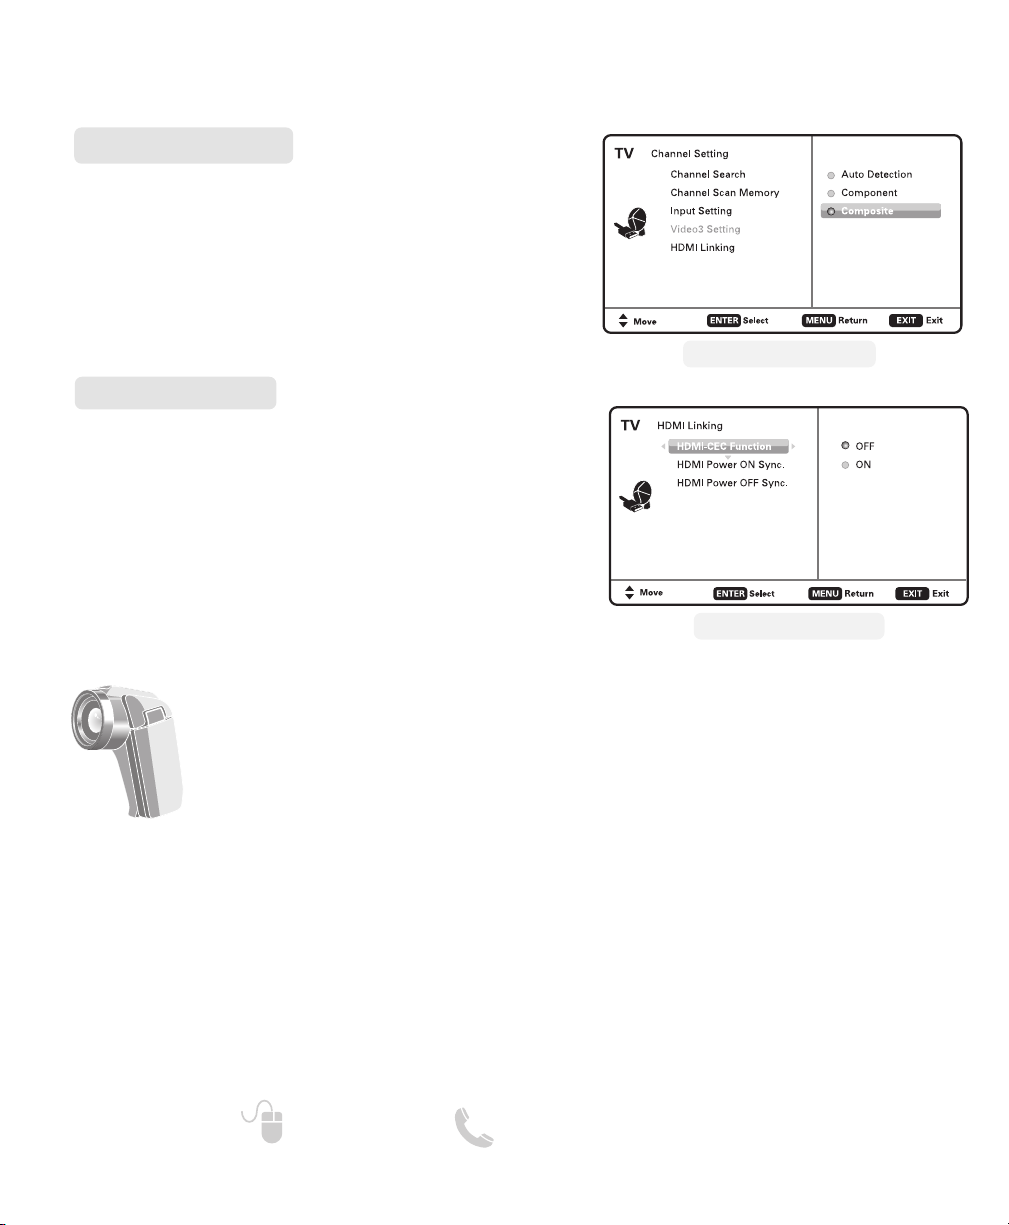
Video3 Setting
Use this feature to establish either a Component or
Composite connection to the VIDEO INPUT 3 jacks on
your HDTV.
Use the CURSOR keys to select the type of hook up
that will be used in the Video3 input.
Press ENTER, a blue mark will appear next to the
selected option.
HDMI Linking
NOTE: Designed for use with a SANYO Xacti Digital
Video/Movie Camera, and may not support all HDMICEC functions of other equipment.
Use the HDMI-CEC Function to enable or disable all
available CEC functions.
HDMI Power ON Sync and Power OFF Sync enable
specific features including the automatic power ON
process and power OFF process.
VIDEO3 SETTING SCREEN
HDMI LINKING SCREEN
Xacti-LINK
With a SANYO Xacti Digital
Video/Movie Camera hooked up to your
HDTV’s HDMI input, setting the HDMI-
CEC Function to ON enables you the use
of keys on your GXEA remote to operate
your Xacti camera.
NOTE: The HDMI-CEC function of the Xacti must also be
turned ON to enable the Xacti-Link.
12
Need help? http://ca.sanyo.com 1-800-263-2244
Page 13

ON-SCREEN MENU OPERATION
SETUP _________________________
Display the On Screen menu and use the
CURSOR keys to select Setup.
Press ENTER.
Menu Language
Choose the language in which you On Screen menus
will be displayed.
• English
• Español
• Français
Press ENTER on the desired language.
Digital Caption
Captioning is textual information transmitted along
with the picture and sound. Turning Captioning ON (by
pressing the CAPTION key during normal TV viewing)
causes the HDTV to open these captions (digital or
analog) and superimpose them on the screen.
NOTE: Local broadcasters decide which caption signals to
transmit.
Use the CURSOR and tu keys to modify Font,
Background, and Foreground of digital caption text.
MAIN MENU SCREEN
MENU LANGUAGE SCREEN
Energy Setting
Use the Energy Saver and Light Sensor features found
under Energy Setting to lower power comsumption by
controlling the LED backlight brightness levels.
Energy Saver – This settings control the LCD backlight
brightness to reduce power consumption.
• Level 1: Energy Saver feature is off.
• Level 2: Low power consumption.
• Level 3: Lowest power consumption.
Press ENTER on the desired level.
NOTE: ECO key may also be used as a shortcut to modify the
Energy Saver settings.
Need help? http://ca.sanyo.com 1-800-263-2244
DIGITAL CAPTION SCREEN
ENERGY SAVER SCREEN
13
Page 14

ON-SCREEN MENU OPERATION
Light Sensor – Detects ambient room light brightness
and uses that reading to control the panel brightness
level and picture parameters to reduce the HDTV’s
power consumption.
NOTE: When room lighting is dark, the panel brightness
and/or the picture setting parameters such as brightness and cotrast are lowered. When room lighting is
bright, parameters are affected opposite.
Clock Timer
This feature allows you to set a Current Time for your
HDTV and enable a Switch On Time for the HDTV to
turn on at a specific time of day.
When On Timer Function is set to ON, the TV will
automatically turn on at the previously set Switch on
Time.
LIGHT SENSOR SCREEN
Motion Sync
Your HDTV has a refresh rate of 120
Hz, it basically means that it “redraws”
the image on the screen twice as often
than a common 60 Hz refresh rate TV
would, allowing for less blur in scenes
with fast motion.
• On – Takes full advantage of your TV’s refresh rate
capabilities for the best picture quality.
• Off – Disables the Motion Sync. feature.
NOTE: Even with Motion Sync set to Off, your HDTV still
displays all images at a 120 Hz refesh rate.
14
Need help? http://ca.sanyo.com 1-800-263-2244
CLOCK TIMER SCREEN
MOTION SYNC SCREEN
Page 15

ON-SCREEN MENU OPERATION
SETUP ________________________
V – Chip (Parental Control)
Use this feature to automatically block programs with
content you deem as inappropriate for viewing by
your children.
NOTE: This feature is designed to comply with the United
States of America’s FCC V-Chip regulations. Therefore,
it may not function with broadcasts that originate in
other countries.
ADJUSTING THE V-CHIP RATINGS
Select ON and press ENTER.
Select Adjust (Standard) and press ENTER.
Use the CURSOR and tu keys to navigate and
the ENTER key to Block or Unblock a selected rating. A
lock symbol will appear beside the selected rating
option indicating that it is blocked
NOTE: Blocking a rating will automatically block all higher
ratings. Unblocking a rating automatically unblocks
all lower ratings.
ADVANCED V-CHIP SYSTEM (RRT5)
RRT5 (V-Chip Regional Ratings 5) is an advanced V-Chip
ratings system for digital channels that are received
with an antenna.
When the HDTV detects compatible RRT5 data, it’s
downloaded & stored in memory, and the Setup
V-Chip screen is then modified to show the Adjust
(Advanced) option.
Use the CURSOR and tu keys to highlight the
different options, and use the ENTER key to block or
unblock the selected rating.
NOTE:There may be more ratings than can be displayed on
one screen. When vertical scroll bars appear, press
CURSOR to gain access to the additional ratings.
.
V-CHIP SETUP SCREEN
ADJUST (STANDARD) SCREEN
V-CHIP SETUP SCREEN WITH ADJUST
(ADVANCED) OPTION
MORE INFORMATION
Additional information about MPAA (Motion Picture
Association of America) and V-Chip rating can be
found at: www.mpaa.org and www.v-chip.org,
respectively.
Need help? http://ca.sanyo.com 1-800-263-2244
ADJUST (ADVANCED) SCREEN
15
Page 16

ON-SCREEN MENU OPERATION
PICTURE ____________________
Display the On Screen menu and use the
CURSOR keys to select Picture. Press ENTER.
You may choose between Vivid, Mild, , and Standard,
which have predetermined fixed picture parameter
values, or choose the Manual option for customized
personal settings.
NOTE: Each AV input can have its own picture mode (pre-
determined or manual.) Current input’s selected
option is indicated by a blue marker.
MANUAL PICTURE SETTINGS
Manual parameters to adjust include:
Color
•
Brightness
•
The Detailed Setting option allows for the adjustment
of 7 additional parameters such as:
Signal Balancer
•
White Balance
•
Edge Enhancer
•
V-Size
•
NOTE: Default Picture option returns all picture parameters to
their original factory settings.
ADJUSTING A PICTURE SETTING
Use the CURSOR keys to highlight the picture
parameter you wish to adjust. Press the ENTER key to
enter the value adjustment screen. Modify the selected
parameter’s value by pressing the CURSOR tu keys.
NOTE: CURSOR keys select the next/previous parame-
ter without returning to the previous menu screen.
Once adjustments are complete, press the EXIT key to
return to normal TV viewing.
Tint
•
Sharpness
•
Contrast
•
Dynamic Contrast
•
Noise Reduction
•
Vertical Sharpness
•
H-Size
•
MAIN MENU SCREEN
PICTURE SCREEN (MANUAL)
PARAMETER SELECTION SCREEN
16
VALUE ADJUSTMENT SCREEN EXAMPLES
Need help? http://ca.sanyo.com 1-800-263-2244
Page 17

ON-SCREEN MENU OPERATION
SOUND _____________________
Display the On Screen menu and use the
CURSOR keys to select Sound. Press ENTER.
Choose an option for your sound settings:
Auto – Sound settings are linked to the current Picture
option and parameters are adjusted accordingly.
Dynamic, Mild, Standard – 3 different predetermined
sound parameters not linked with any Picture option.
MANUAL SOUND SETTINGS
The Manual option provides different parameters that
can be personally adjusted:
Bass
•
Treble
•
Detailed Setting
•
– 4-Band Equalizer: Personalize audio highs and lows.
NOTE: Default Sound option returns all sound parameters to
their original factory settings.
ADJUSTING A SOUND SETTING
Use the CURSOR keys to highlight the sound
parameter you wish to adjust. Press the ENTER key to
enter the value adjustment screen. Modify the selected
parameter’s value by pressing the CURSOR tu keys.
NOTE:
CURSOR keys select the next/previous parame-
ter without returning to the previous menu screen.
Once adjustments are complete, press the EXIT key to
return to normal TV viewing.
MAIN MENU SCREEN
MANUAL PARAMETER SCREEN
DETAILED SETTING SCREEN
VALUE ADJUSTMENT SCREEN EXAMPLES
Need help? http://ca.sanyo.com 1-800-263-2244
17
Page 18

PC INPUT
Use your HDTV as a computer monitor by hooking
up your PC or Laptop to the TV with the use of an
appropriate monitor cable (not included.)
Before connecting any cables, disconnect the
AC power cords of both the HDTV and PC from
the AC outlets.
Power on the HDTV and any other peripheral
equipment before powering on the computer.
To avoid an “Out of Range” condition please set
your PC’s output resolution to one compatible with
your HDTV. See PC Resolution chart on page 3.
NOTE: If computer has only DVI Output, a DVI to RGB
adapter will be required, or, a DVI to HDMI cable
and RCA audio cables (see HDMI (DVI) INPUT1 on
page 7.)
RGB OUTPUT
JACK
HDTV SIDE PANEL
Stereo mini
audio cable
DVI OUTPUT
JACK
PC Setting
Auto Adjustment – Automatically adjusts display
position, dot clock and phase.
Dot Clock – Adjust the Dot frequency to match
your computer’s Dot frequency.
Phase – Adjust this parameter when the picture
appears to flicker or is blurred.
H-Position – Move the image horizontally
V-Position – Move the image vertically
Power Saving – Enable the HDTV to turn to
Standby Mode when computer is not in use.
PC SETTING SCREEN
PC OR LAPTOP
RGB Monitor
cable
SANYO recommends using
a monitor cable that
includes a Ferrite Core.
Laptop Display
When using your SANYO HDTV to display a
Laptop’s screen display, holding down the Fn (or
FN) key while pressing the appropriate function
key (F5, F7, F8, etc) should cycle through different
display modes between the laptop and the HDTV.
Modes may include displaying only on the laptop
screen, on both the laptop and the HDTV, or
displaying only on the HDTV.
Hold down and press
NOTE: Fn key and function key symbols on the laptop’s
keyboard may vary from one brand to another.
18
Need help? http://ca.sanyo.com 1-800-263-2244
PC Picture and Sound
Standard – Sets predetermined values to the
Picture or Sound parameters.
Manual – Adjust Contrast, Brightness, and Color
Temperature screen settings, and the Bass and
Treble audio settings.
PC PICTURE AND SOUND SCREENS
NOTE: These settings do not affect normal TV viewing.
Page 19
USB INPUT
PHOTO VIEWER __________________
View pictures on your HDTV with the use of a USB
mass storage device (not included.)
Any of the two USB inputs on your HDTV may be used.
NOTE: When two devices are hooked up, only the first one is
recognized and available as an input.
USB FLASH
DRIVE
NOTE: The HDTV switches to USB
Input when a USB flash drive is
detected.
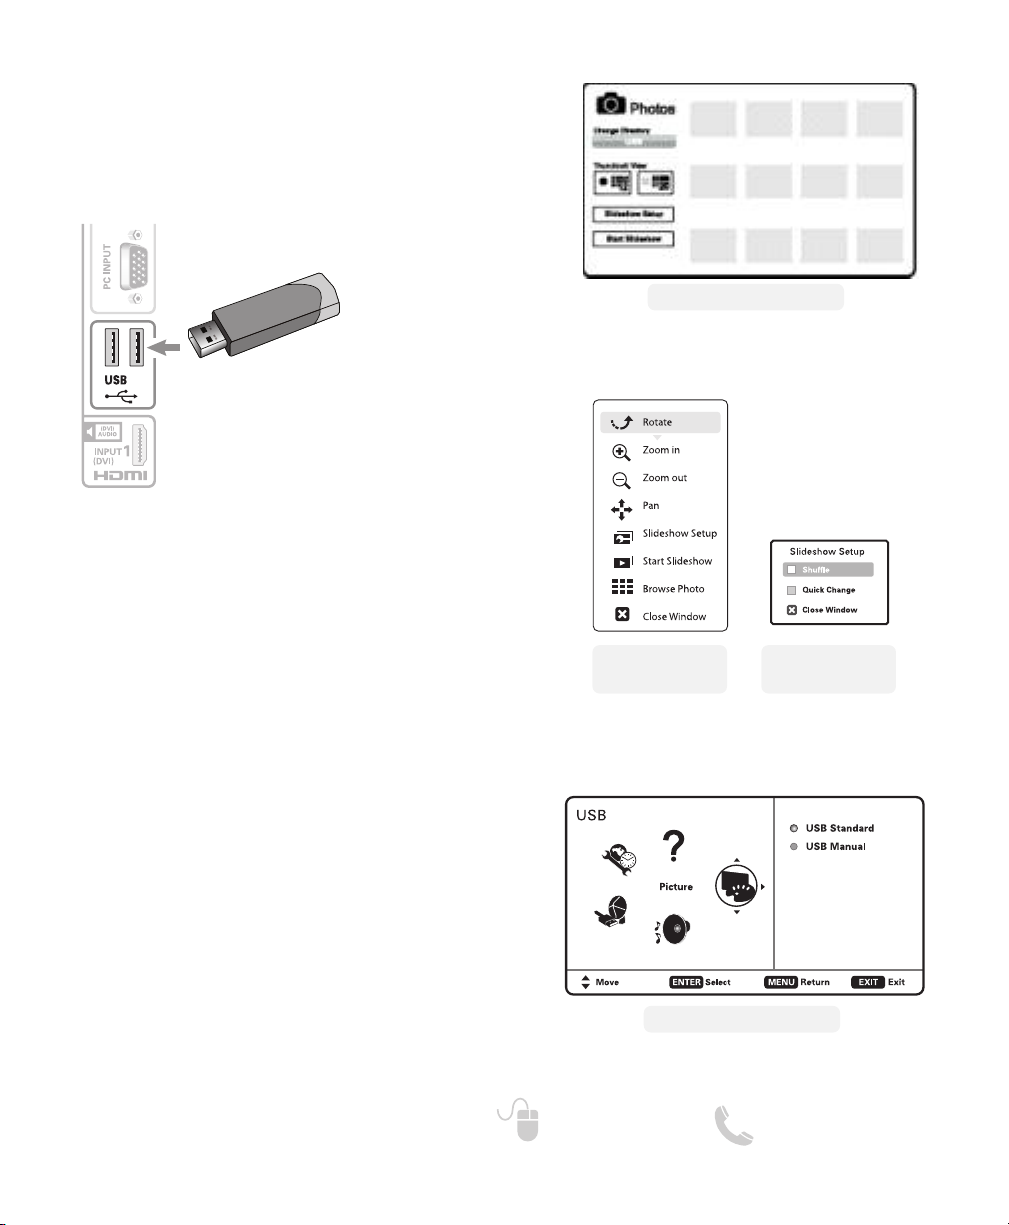
USING THE PHOTO VIEWER
Press ENTER on a thumbnail photo to enable the
Rotate, Full View and Start Slideshow functions.
Once in Full View mode:
Use the CURSOR tu keys to change picture.
Press ENTER to show the full view options menu.
SLIDE SHOW
In the Slideshow Setup menu you may turn the Shuffle
and Quick Change options ON or OFF.
Press ENTER on Start Slideshow from the Thumbnail
View Screen or from the full view options menu to start
the slideshow from the current picture.
THUMBNAIL VIEW SCREEN
NOTE: A thumbnail hide icon will appear if a
picture cannot be decoded or if no
thumbnail data is available.
FULL VIEW
OPTIONS MENU
SLIDE SHOW
SETUP MENU
JPEG VIEWER USB MENU
Press MENU when in Full View or Slideshow mode to
display the USB On screen menu.
Picture Setting – Adjust Color, Tint, Contrast,
Brightness, Sharpness and Dynamic Contrast.
NOTE: Picture Settings are separate configurations from the
settings in TV and AV inputs.
Need help? http://ca.sanyo.com 1-800-263-2244
USB MAIN MENU SCREEN
19
Page 20

SANYO COMFORT WARRANTY
WARRANTY APPLICATION
New, unused SANYO Color Television products purchased in
Canada through a SANYO authorized dealer are warranted
against manufacturing defects in materials and workmanship
for ONE YEAR for parts and labor, from the date of purchase
by the original retail purchaser for non-commercial use. This
warranty only applies in favor of the original retail purchaser of
the warranted product.
SANYO CANADA INC.'S RESPONSIBILITY
During the warranty period, SANYO Canada Inc. will repair, or
at our option, replace a Color Television product which shows
evidence of a manufacturing defect in materials or workmanship.
Replacement PARTS are warranted for the remaining portion
of the warranty period.
WHAT IS NOT COVERED
(a) Color Television products purchased outside Canada.
(b) Color Television products purchased in a used condition.
(c) Problems due to product set-up and installation.
(d) Adjustments that are outlined in the Operating Manual.
(e) Accessory items including antenna, batteries and
connecting cables.
(f) Damage in or due to transportation.
(g) Damage due to improper maintenance, accident, abuse,
misuse or negligence.
(h) Damage caused by lightning and power surges.
ORIGINAL RETAIL PURCHASER'S RESPONSIBILITY
You, the original retail purchaser, must present your original,
dated bill-of-sale together with this warranty to SANYO Canada
Inc. or to an authorized SANYO Service Depot* when you
make a claim under this warranty.
WARRANTY BECOMES VOID This warranty becomes void if
the product's serial numbers are altered or removed or if any
repair to the product is made other than by SANYO Canada Inc.
or by an authorized SANYO Service Depot.
LIMITATIONS
(a) SANYO Canada Inc. reserves the right to change or
improve the design of the model of the product warranted
hereunder without incurring any obligation to make any
modifications to or to install any improvement in or on the
product.
(b) In no event shall SANYO Canada Inc. or any of its
Authorized Dealers be liable for special or consequential
damage arising from the use of this product.
STATUTORY WARRANTIES
The above provisions do not preclude the operation of any
applicable provincial statute which in certain
circumstances may not allow some of the limitations and
exclusions described in this Warranty. Where any terms
of this Warranty are prohibited by such a statute, they shall be
deemed null and void but the remainder of this
warranty shall remain in effect.
HOW TO OBTAIN WARRANTY SERVICE
Please contact the SANYO Authorized Dealer from whom the
product was purchased or contact us directly at:
SANYO Canada Inc.
201 Creditview Road
Woodbridge Ont. L4L 9T1
(905) 265-4100
1-800-263-2244
You, the original retail purchaser, are responsible for any costs
of TRANSPORTING the product to and from SANYO Canada
Inc. or an authorized SANYO Service Depot. You also are
responsible for the cost of any MAINTENANCE necessary in
respect of the product.
*In-home service is only available to the units whose screen
size is 46 inches or over, and limited to the locations within a
30-km radius of any authorized SANYO Service Depot,
throughout Canada.
20
Need help? http://ca.sanyo.com 1-800-263-2244
Page 21

ATTENTION : AFIN DE RÉDUIRE LES RISQUES DE CHOC ÉLECTRIQUE, NE RETIREZ PAS
CÂBLE DE CONNEXION DE L’ANTENNE
COLLIER DE MISE À LA TERRE
COLLIERS DE MISE À LA TERRE
ÉQUIPEMENT DU
SERVICE ÉLECTRIQUE
SYSTÈME D’ÉLECTRODES DE
MISE À LA TERRE DE L’ALIMENTATION
ÉLECTRIQUE (NEC, ART. 250, PARTIE H)
CONDUCTEURS DE MISE
À LA TERRE (NEC, SECTION 810-21)
UNITÉ DE DÉCHARGE DE
L’ANTENNE (NEC, SECTION 810-20)
LE COUVERCLE (OU L’ENDOS). CET APPAREIL NE CONTIENT AUCUNE PIÈCE POUVANT
ÊTRE RÉPARÉE PAR L’UTILISATEUR. FAITES APPEL À UN TECHNICIEN COMPÉTENT
POUR TOUS LES TRAVAUX D’ENTRETIEN OU DE RÉPARATION.
AVERTISSEMENT : AFIN DE RÉDUIRE LES RISQUES D’INCENDIE OU DE CHOC ÉLECTRIQUE,
N’EXPOSEZ PAS L’APPAREIL À LA PLUIE OU À L’HUMIDITÉ.
CONSIGNES DE SÉCURITÉ IMPORTANTES
1. Lisez ces instructions.
2. Conservez ces instructions.
3. Respectez tous les avertissements.
4. Suivez toutes les instructions.
5. N’utilisez pas cet appareil près de l’eau.
6. Nettoyez l’appareil avec un linge sec seulement.
7. Ne bloquez aucun orifice de ventilation. Conformez-vous aux
instructions d’installation du fabricant.
8. Cet appareil ne doit pas être installé à proximité de sources de
chaleur telles qu’un radiateur, un registre de chaleur, une
cuisinière ou tout autre appareil (y compris les amplificateurs)
qui dégage de la chaleur.
9. Ne désactivez pas la fonction de protection d’une fiche
polarisée ou d’une fiche avec mise à la terre. Une fiche
polarisée possède deux lames, dont l’une est plus large que
l’autre. Une fiche avec mise à la terre possède deux lames et
une troisième broche qui constitue la mise à la terre. La lame
large ou la troisième broche de mise à la terre sont des
dispositifs de sécurité. Si la fiche de l’appareil ne s’insère pas
dans la prise de courant, consultez un électricien afin de la
remplacer, car elle est désuète.
10.Les cordons d’alimentation doivent être disposés de manière
à ce que l’on ne marche pas dessus et à ce qu’ils ne soient
pas coincés par d’autres objets placés sur ou contre eux,
particulièrement au niveau des fiches, des prises et de
l’endroit où ils sortent de l’appareil.
11.N’utilisez que les accessoires recommandés par le fabricant.
12.Utilisez uniquement les chariots, les socles, les trépieds, les
supports ou les tables recommandés par le
fabricant ou vendus avec l’appareil. Lorsque
vous utilisez un chariot pour déplacer
l’appareil, faites attention de ne pas
renverser le chariot ou l’appareil. Cela peut
causer des blessures.
13.Débranchez l’appareil pendant les orages
électriques et lorsqu’il n’est pas utilisé pendant de longues
périodes.
14.Faites appel à un technicien compétent pour tous les travaux
d’entretien et de réparation. Il faut procéder à la réparation de
l’appareil s’il a été endommagé d’une façon ou d’une autre,
par exemple si la fiche ou le cordon d’alimentation est
endommagé, si un liquide a été renversé sur l’appareil, si des
objets l’ont heurté, si l’appareil a été exposé à la pluie ou à
l’humidité, s’il ne fonctionne pas normalement ou s’il est
tombé au sol.
15.Si vous branchez une antenne extérieure à l’appareil,
assurez-vous que l’antenne dispose d’une mise à la terre lui
ATTENTION
RISQUE DE CHOC ÉLECTRIQUE, NE PAS OUVRIR.
CE SYMBOLE INDIQUE LA PRÉSENCE D’UNE TENSION ÉLECTRIQUE D’UNE
INTENSITÉ SUF FISANTE POUR CONSTITUER UN RISQUE DE CHOC
ÉLECTRIQUE.
E SYMBOLE INDIQUE QUE LE MANUEL DE L’UTILISATEUR FOURNI AVEC CET
C
APPAREIL CONTIENT DES INSTRUCTIONS IMPORTANTES CONCERNANT SON
UTILISATION ET L’ENTRETIEN.
offrant une protection contre les surtensions et les accumulations d’électricité statique. Le document « U.S. Selection
810-21 » du National Electrical Code fournit l’information
nécessaire concernant la mise à la terre appropriée du mât et
de la structure de soutien, la mise à la terre du câble de
connexion sur l’unité de décharge, la taille des conducteurs
de mise à la terre, l’emplacement de l’unité de décharge de
l’antenne, la connexion des électrodes de mise à la terre et
les exigences liées aux électrodes de mise à la terre.
16.Un système d’antenne extérieure ne doit pas être installé
à proximité de lignes électriques surélevées ou d’autres
circuits d’éclairage ou d’alimentation ou à un endroit où il
peut tomber sur des lignes ou des circuits électriques. Lors de
l’installation d’un système d’antenne extérieure, prenez
toutes les mesures nécessaires afin d’éviter d’entrer en
contact avec des lignes ou des circuits électriques car cela
peut s’avérer fatal.
EXEMPLE DE MISE À LA TERRE D’UNE ANTENNE CONFORMÉMENT AU
NATIONAL ELECTRICAL CODE ET À LA NORME ANSI/NFPA 70
Remarque à l’attention de l’installateur du système de télédistribution : Ce rappel est fourni pour indiquer à l’installateur du système de télédistribution qu’il doit consulter l’article 820-40 du
NEC qui comprend les lignes directrices pour la mise à la terre
appropriée et, surtout, qui spécifient que le câble de mise à la
terre doit être branché au système de mise à la terre du bâtiment,
le plus près possible du point d’entrée du câble.
17.Installation au mur ou au plafond - L’appareil doit être installé
sur un mur ou un plafond selon les recommandations du
fabricant.
18.« L’appareil ne doit pas être exposé à un égouttement, à des
éclaboussures et il faut éviter de placer des objets remplis de
liquide, tels que des vases, sur l’appareil. »
19.Lorsque la prise MAINS est utilisée comme dispositif de
débranchement, le dispositif de débranchement demeure prêt
à l’emploi en permanence.
Besoin d’aide? http://ca.sanyo.com 1-800-263-2244
21
Page 22

ENERGY STAR
RENSEIGNEMENTS DE LA FCC
Cet appareil a été testé et respecte les limites d’un appareil numérique de Classe B, conformément à la Partie 15
des règlements de la FCC. Ces limites sont conçues pour permettre un niveau de protection raisonnable contre les
interférences nuisibles pour une installation en milieu résidentiel. Cet appareil génère, utilise et peut émettre des
fréquences radio ; il peut également produire des interférences nuisant à la radiocommunication s’il n’est pas
installé ou utilisé selon les instructions. Cependant, il est possible qu’il génère des interférences même s’il est
installé de façon appropriée. Si cet appareil produit des interférences nuisant à la réception des signaux de radio
ou de télévision, ce qui peut être vérifié en allumant et en éteignant l’appareil, il est recommandé que l’utilisateur
tente d’éliminer les interférences à l’aide d’une ou des mesures suivantes : Réorienter ou déplacer l’antenne de
réception; Augmenter la distance entre l’appareil et le récepteur ; Brancher l’appareil dans la prise d’un circuit autre
que celui auquel le récepteur est branché ; Consulter le détaillant ou un technicien expérimenté dans le domaine
des radios / téléviseurs afin d’obtenir de l’aide. ATTENTION : Les règlements de la FCC stipulent que les modifications inappropriées ou non autorisées apportées à l’appareil peuvent entraîner l’annulation des droits d’utilisation
de l’appareil par l’utilisateur.
MARQUES DE COMMERCE
Fabriqué sous licence de Dolby Laboratories. Dolby est
une marque de commerce de Dolby Laboratories.
HDMI, le logo HDMI et «High-Definition
Multimedia Interface» sont des marques déposées de HDMI Licensing LLC
aux États-Unis et dans d’autres pays.
MD
MD
.
NERGY STAR
En tant que partenaire d’E
SANYO Manufacturing Corporation a
déterminé que ce produit répond, pour
son rendement énergétique, aux
normes d’E
Ce symbole sur la plaque
d’identification indique que le produit
est approuvé par Underwriters
Laboratories Inc. Il a été conçu et
fabriqué selon les normes strictes de
sécurité UL contre les risques
d’incendie, de blessures et de chocs
électriques.
Cet appareil numérique de la classe B est conforme à la
norme NMB-003 du Canada.
NERGY STAR
RÉSOLUTIONS DE PC
,
22
Besoin d’aide? http://ca.sanyo.com 1-800-263-2244
Page 23

Merci d’avoir choisi SANYO. Veuillez lire
attentivement toutes les instructions contenues dans le présent manuel afin de bénéficier pleinement de votre téléviseur.
TABLE DES MATIÈRES
CONSIGNES DE SÉCURITÉ IMPORTANTES . . . . . . . . . .21
INFORMATION DE LA FCC . . . . . . . . . . . . . . . . . . . . . . . . .21
MARQUES DE COMMERCE . . . . . . . . . . . . . . . . . . . . . . . .22
FICHE TECHNIQUE . . . . . . . . . . . . . . . . . . . . . . . . . . . . . . . .22
RÉSOLUTIONS DE PC . . . . . . . . . . . . . . . . . . . . . . . . . . . . .22
TABLE DES MATIÈRES . . . . . . . . . . . . . . . . . . . . . . . . . . . .23
PRÉCAUTIONS DE MANIEMENT . . . . . . . . . . . . . . . . . . .23
PLACER LA TVHD . . . . . . . . . . . . . . . . . . . . . . . . . . . . . . . .23
ENLEVER LE SOCLE ET INSTALLER SUR LE MUR . . . . .24
POUR COMMENCER—
Insertion des piles . . . . . . . . . . . . . . . . . . . . . . . . . . . . .24
Branchement de l’antenne aérienne ou du câble . . .24
PANNEAU ARRIÈRE ET LATÉRAL . . . . . . . . . . . . . . . . . . .25
BRANCHEMENTS AUDIO / VIDÉO—
PANNEAU LATÉRAL . . . . . . . . . . . . . . . . . . . . . . . . . . . .26
PANNEAU ARRIÈRE . . . . . . . . . . . . . . . . . . . . . . . . . . . . .27
RECH. DE CHAÎNES INITIALE . . . . . . . . . . . . . . . . . . . . . . .28
UTILISATION DE LA TÉLÉCOMMANDE . . . . . . . . . . . . . .29
FONCTIONNEMENT DU MENU À L'ÉCRAN—
Chaîne / Entrée . . . . . . . . . . . . . . . . . . . . . . . . . . . . . . . . .30
Recherche de chaînes . . . . . . . . . . . . . . . . . . . . . . .30
Mémoire de chaînes . . . . . . . . . . . . . . . . . . . . . . . . .30
Configuration d’entrée . . . . . . . . . . . . . . . . . . . . . . .30
Configuration Vidéo3 . . . . . . . . . . . . . . . . . . . . . . . . .31
Liaison HDMI . . . . . . . . . . . . . . . . . . . . . . . . . . . . . . .31
Configuration . . . . . . . . . . . . . . . . . . . . . . . . . . . . . . . . . .32
Langue du menu . . . . . . . . . . . . . . . . . . . . . . . . . . . . .32
Sous-titrage numérique . . . . . . . . . . . . . . . . . . . . . .32
Configuration d’énergie . . . . . . . . . . . . . . . . . . . . . .32
Temporisateur d’horloge . . . . . . . . . . . . . . . . . . . . . .33
Motion Sync. . . . . . . . . . . . . . . . . . . . . . . . . . . . . . . . .33
Image . . . . . . . . . . . . . . . . . . . . . . . . . . . . . . . . . . . . . . . . .35
Son . . . . . . . . . . . . . . . . . . . . . . . . . . . . . . . . . . . . . . . . . . .36
LECTEUR DE PHOTOS . . . . . . . . . . . . . . . . . . . . . . . . . . . . .37
BRANCHEMENTS ET CONFIGURATION DU PC . . . . . . .38
GARANTIE . . . . . . . . . . . . . . . . . . . . . . . . . . . . . . . . . . . . . . .39
« L’Académie américaine de Pédiatres ne
recommande pas à des enfants plus âgés de
moins de 2 ans de regarder télévision. »
FICHE TECHNIQUE
Alimentation : CA 120 V, 60 Hz
Consommation : Poids :
195 watts 34 kg
Dimensions :
MODÈLE LARGEUR HAUTEUR PROFONDEUR
LCD55L4 1300 877 277
sans socle 820 60
REMARQUE : Toutes les dimensions sont en millimètres
(mm).
Veuillez lire avant
d’utiliser votre TVHD!
PROTECTION DE L’ÉCRAN
PRÉCAUTION : L'écran est susceptible d'être
endommagé s'il n'est pas
entretenu convenablement.
• N’utilisez pas d'objets durs tels qu'un chiffon
rugueux ou du papier rigide pour nettoyer
l’écran.
• N’appuyez pas trop fort en nettoyant l'écran ACL ;
une pression excessive peut causer une
décoloration permanente ou des taches d'ombre.
• Ne pulvérisez jamais de liquides sur l'écran.
PRÉCAUTIONS DE
MANIEMENT
• Manipulez par le coffret seulement.
• Ne touchez jamais l'écran pendant le
maniement.
• Les dommages par maniement ne sont pas
couverts par la garantie.
PLACER LA TVHD
Utilisez toujours une surface plane et ferme
•
pour installer votre TVHD.
Ne placez pas le téléviseur dans un endroit trop
•
exigu.
Laissez assez d’espace pour assurer une ventila-
•
tion appropriée.
Besoin d’aide? http://ca.sanyo.com 1-800-263-2244
23
Page 24

ENLEVER LE SOCLE ET
INSTALLER SUR LE MUR
(OPTIONEL)
Outils requis : tournevis à pointe cruciforme
REMARQUE IMPORTANTE : Placez le
téléviseur face en bas sur une surface
matelassée pour protéger l’écran et le fini
de l’appareil.
L’assemblage sur le mur doir être effectué par
une personne avec expérience.
Enlevez les deux (2) vis qui soutiennent la
1
couverture du socle et retirez avec soin.
Enlevez les quatre (4) vis qui maintiennent la
2
base du socle. PRÉCAUTION : Maintenez fermement le socle en enlevant la dernière vis.
POUR COMMENCER
INSERTION DES PILES
Insérez les piles dans la télécommande
( 2 piles AAA, non comprises).
Pour un fonctionnement sécuritaire, veuillez
observer les mesures de précaution suivantes :
• Remplacez les deux piles en même temps. N'utilisez
pas une pile neuve avec une pile usagée.
• Il y a risque d’explosion si une pile est remplacée par
un modèle incorrect.
• N'exposez pas la télécommande à l'humidité ou à la
chaleur.
• Les signes «+» et «
à ceux à intérieur de la télécommande.
BRANCHEMENT DE L’ANTENNE
AÉRIENNE OU DU CÂBLE
Branchez votre antenne ou service de câble, à
l'entrée ANT de votre TVHD en utilisant un
câble coaxial (75 OHMS).
REMARQUE : Maintenez votre antenne intérieure au
moins à un mètre de distance de votre TVHD ou de
tout autre appareil électronique.
–» des piles doivent correspondre
Utilisez les 4 vis qui sont insérées dans la par-
3
tie arrière de la TVHD, pour l'assurer au mur,
en utilisant un kit d'assemblage approprié.
Norme d'interface VESA : 400 x 400
Dimensions des vis de montage :
Diamètre M6 (6mm), longueur
24
Besoin d’aide? http://ca.sanyo.com 1-800-263-2244
—12 mm (max.)
ANTENNE RF
ENTRÉE D'ANTENNE
ANALOGIQUE ET NUMÉRIQUE
CÂBLE
Le syntoniseur de cette TVHD peut recevoir :
• Signaux numériques ou analogiques provenant d’une
antenne RF
• Chaînes analogiques ou de câble ClearQAM provenant
d'une connexion directe de télévision par câble.
Page 25
POUR COMMENCER
PANNEAU ARRIÈRE ET LATÉRAL
7
2
1
PANNEAU ARRIÈRE
3
4
Entrée S-vidéo (VIDEO1)
1
REMARQUE :
2
Entrée audio/vidéo composite (VIDEO1)
Jaune (vidéo), blanc et rouge (audio).
3
Entrée composant vidéo (VIDEO2)
Entrées vidéo verte (Y), bleue (Pb) et rouge (Pr)
ainsi que les fiches blanche et rouge de l’audio.
4
Sorties d'audio analogique (G/D)
Entrée HDMI (INPUT 2 & 3)
5
Interface complètement numérique qui accepte
des signaux vidéo sans compression, jusqu’à
1080p, pour obtenir la meilleure qualité d’image
possible.
6
Entrée pour antenne analogique ou numérique –
Reliez un câble de 75 ohms d'une antenne ou d'un
service de télévision par câble.
7
Sortie audio numérique (coaxial)
Entrée composant vidéo (VIDEO3)
8
Entrées vidéo verte (Y), bleue (Pb) et rouge (Pr)
ainsi que les fiches blanche et rouge de l’audio.
REMARQUE : Vous pouvez utiliser l’entrée VIDEO INPUT3
pour obtenir une connexion Composite vidéo, en utilisant
l’entré Y (VIDEO) et L/R Audio. (Voir Configuration Vidéo 3 à
la p. 31).
Entrée pour PC et audio stéréo (mini)
9
• MONITOR RGB (D-SUB)
• AUDIO R/L (mini prise stéréo)
Les connexions S-vidéo remplaceront celles
des prises d’entrée Video1 (jaune).
Besoin d’aide? http://ca.sanyo.com 1-800-263-2244
6
5
PANNEAU
LATÉRAL
Entrée USB
10
Pour voir des photos sauvegardées sur une
clé USB à mémoire flash.
Entrée HDMI 1 (DVI)
11
Interface entièrement numérique qui
accepte des signaux vidéo sans compression, jusqu’à 1080p, pour obtenir la
meilleure qualité d’image possible.
REMARQUE : Un branchement de DVI est possible
en utilisant l’entrée HDMI (DVI) INPUT1 avec un
adaptateur approprié et en utilisant l’entrée VIDEO3
pour l’audio.
12
Port ETHERNET
Pour l’usage de Service seulement.
8
9
10
11
12
25
Page 26
POUR COMMENCER
BRANCHEMENTS AUDIO / VIDÉO (PANNEAU LATÉRAL)
La sortie audio numérique est utilisée pour être
reliée à un système audio externe.
Reliez la sortie Digital Audio Output de votre
TVHD à votre système audio, en utilisant un câble
de type « phono ».
RÉCEPTEUR À
CANAUX MULTIPLES
(ou système audio)
LECTEUR DE DVD
(ou autre dispositif)
L’entrée Composant vidéo accepte les signaux
vidéo SDTV, EDTV et HDTV. Employez-les pour
obtenir une bonne qualité d'image provenant de
dispositifs numériques tels que lecteur de DVD ou
console de jeux vidéo.
Faites coïncider les sorties Composant de votre
appareil numérique avec l’une ou l’autre des
deux (2) entrées Composant (VIDEO2 ou
VIDEO3) de votre TVHD.
LECTEUR DE DVD
(ou autre dispositif)
L’entrée USB est utilisée pour brancher une
clé USB à mémoire flash pour regarder des
photos JPEG sur votre TVHD.
CLÉ USB
26
DVI
HDMI INPUT1 (DVI) peut être utilisée pour brancher
un dispositif DVI à l’aide d'un adaptateur ou câble
HDMI approprié. Il faut utiliser l’entrée audio G/D à travers le VIDEO3.
REMARQUE : L'entrée HDMI INPUT1 peut aussi être utilisée
REMARQUE : Câbles audio/vidéo non
fournis.
Besoin d’aide? http://ca.sanyo.com 1-800-263-2244
pour relier tout appareil avec sortie HDMI, sans
la nécessité d'utiliser les entrées audio G/D.
Page 27

POUR COMMENCER
BRANCHEMENTS AUDIO / VIDÉO (PANNEAU ARRIÈRE)
L’entrée Composite vidéo est utilisée pour
brancher des équipements analogiques comme un
magnétoscope ou un vieux lecteur de DVD.
(ou appareil analogique)
VCR
Reliez la sortie vidéo jaune et les sorties audio de
votre appareil analogique, à l'entrée VIDÉO
INPUT 1 de votre TVHD.
REMARQUE : Veuillez faire coïncider la couleur des sorties
de votre appareil avec les entrées de votre TVHD.
S-vidéo peut être utilisée au lieu de l’entrée composite vidéo jaune. Utilisez un câble S-vidéo pour
relier la sortie S-vidéo de votre appareil avec
l'entrée S-vidéo de la TVHD.
AMPLIFICATEUR
STÉRÉOPHONIQUE
Les sorties Audio G/D sont utilisés pour brancher
un amplificateur stéréo externe. Reliez les sorties
AUDIO OUTPUT de votre TVHD, aux entrées de
votre appareil stéréo en utilisant un câble audio
rouge/blanc.
REMARQUE : Ne branchez pas des haut-parleurs
externes directement à la TVHD.
Besoin d’aide? http://ca.sanyo.com 1-800-263-2244
RÉCEPTEUR
SATELLITE
HDMI
(ou autre dispositif)
HDMI INPUT1, 2 & 3 sont utilisées pour brancher
des dispositifs numériques HD comme un récepteur satellite Blu-ray, câblorécepteurs HD, récepteur satellite HD ou console de jeux vidéo.
Reliez la sortie numérique HDMI de votre appareil,
à chacune des trois (3) entrées HDMI de votre
TVHD, en utilisant un câble HDMI.
27
Page 28

POUR COMMENCER
RECH. DE CHAÎNES INITIALE
Avant de continuer, assurez-vous de brancher correctement votre antenne ou connexion TVHD par
câble, et tous les dispositifs audio/vidéo à votre TVHD.
BRANCHEZ LE CORDON D’ALIMENTATION
CA
CA 120 V, 60 Hz
ALLUMER LE TV
Suivez les instructions à l'écran pour
configurer le mode Économiseur d'énergie
initiale et effectuer la recherche initiale de
chaînes/signaux.
CHOISIR L’EMPLACEMENT LA TVHD
Choisissez «Home Mode» en appuyant sur la touche
CH pour établir le rétroéclairage à un niveau
d'Energy Star, ou choisissez «Store Mode» en
appuyant sur CH pour établir le rétroéclairage à un
niveau pour affichage.
RECHERCHE DE CHAÎNES ET SIGNAUX AV
Appuyez sur la touche CH pour effectuer
une recherche de chaînes provenant d'une
antenne ou d’une connexion directe par
câble, et une recherche de signaux provenant
de dispositifs reliés aux entrées de la TVHD.
ÉCRAN D’AIDE (OPTIONEL)
Appuyez sur la touche CH si vous souhaitez
accéder à l'écran d'aide.
REMARQUE : L'écran d'aide est aussi disponible
dans le menu principal.
ÉCRAN DE CONFIGURATION DE CHAÎNE ET SIGNAL
Le dernier écran de configuration montre les chaînes
analogiques et numériques trouvées, ainsi que les
entrées AV détectées. Appuyez sur la touche CH
pour finaliser le processus de configuration.
REMARQUE : Pour répéter la configuration initiale, appuyez
sur la touche VOL .
ÉCRAN INITIAL D'ÉCONOMISEUR
D'ÉNERGIE
ÉCRAN INITIAL DE RECHERCHE DE
CHAÎNES/SIGNAUX
ÉCRAN DE RECHERCHE DE CHAÎNES EN COURS
SÉLECTION D'ENTRÉE AV
Appuyez sur la touche INPUT pour choisir
l'entrée audio/vidéo que vous souhaitez voir.
28
Besoin d’aide? http://ca.sanyo.com 1-800-263-2244
ÉCRAN DE LISTES DE CHAÎNES/SIGNAUX
Page 29

UTILISATION DE LA TÉLÉCOMMANDE
• Touche POWER— Pour allumer ou éteindre la TVHD.
• Touche ECO—Pour modifier le niveau de l'Écono-
miseur d'énergie. (Voir p. 32)
• Touche AUDIO—Pour choisir le mode audio Stéréo,
Mono ou SAP (s'il est disponible).
• Touche ON TIMER—Pour afficher l’heure d’allumage
précédente (Voir Temporisateur d’horloge à la p. 33)
• Touche CAPTION—Pour défiler entre les différentes
sortes de sous-titrage.
• Touche RESET—Appuyez deux fois pour retourner la
TVHD aux valeurs établies à l’usine.
Toutes les modifications effectuées par l'utilisateur
seront éliminées.
• Touche SLEEP—Pour indiquer que la minuterie est
éteinte. Pendant que l’indication « Off » est à l’écran,
appuyez sur la touche « 0 » pour sélectionner l’heure
à laquelle la TVHD s’éteindra (par intervalles de 30
minutes à la fois).
• Touche PICTURE—Pour défiler entre les différents
modes d’image.
• Touche SOUND—Pour défiler entre les différents
modes de son.
• Touches NUMÉRIQUES—Pour entrer une chaîne
directement.
REMARQUE : Pour des chaînes 100 et plus, appuyez sur la
touche numérique du premier chiffre et maintenez-la enfoncée, puis entrez les deux autres chiffres.
• Touche ––(sub ch)—Permet de choisir directement
une sous-chaîne numérique. Par exemple : pour
choisir le canal 39.1, appuyez sur la touche 3, 9, –, et 1.
• Touche INPUT—Pour choisir l’entrée vidéo.
Maintenez enfoncée la touche pour afficher le menu
d'entrées.
––
• Touche de volume VOL
réduire le niveau sonore.
• Touches de chaîne CH —Pour balayer les
chaînes sauvegardées dans la mémoire.
—Pour augmenter ou
++
• Touche MUTE—Pour mettre en sourdine ou rétablir
le son.
• Touche RECALL—Pour passer de la chaîne actuelle à
la chaîne précédente choisie.
• Touche DYN VOL—Pour choisir la fonction
d’amélioration de son.
• Touche USB—Pour choisir l'entrée USB directement.
• Touche PIX SHAPE—Pour défiler parmi les différents
rapports hauteur/largeur. Ces rapports permettent
d’agrandir, de rapprocher et de remplir l’image à
l’écran. Des barres peuvent apparaître dans le haut ou
le bas de l’écran (ou à gauche, à droite de l’écran),
selon le signal ou le programme transmis.
REMARQUE : Au mode PC, les pixels 6-7 sont configurés
comme pixels 1-2. Il n’est pas recommandé d’utiliser les
pixels 6-7 au mode TV.
• Touche MENU—Pour afficher le menu à l’écran.
• Touche HELP—Pour afficher l’écran d'aide.
• Touche INFO—Pour afficher l’information de la
chaîne.
• Touche EXIT—Pour sortir du menu.
• Touches Cursor (vers le haut) (vers le bas)—Pour
déplacer le curseur vers le haut et vers le bas dans les
menus.
• Touches Cursor t(gauche) u (droite)—Pour déplacer
le curseur vers la gauche et la droite dans les menus.
• Touche ENTER—Pour exécuter ou sélectionner
l'option choisie.
Les touches PLAY, PAUSE, STOP, REW, FF, W, T, CAM-
ERA et XACTI MENU contrôlent les fonctions de lecture d'un appareil photo numérique Xacti de SANYO,
lorsque la fonction HDMI-CEC de la TVHD et de
l'appareil photo numérique (voir Liaison HDMI à la
p. 31) est activée.
REMARQUE : Ces touches de lecture peuvent ne pas fonctionner avec des appareils autres que les appareils Xacti.
Besoin d’aide? http://ca.sanyo.com 1-800-263-2244
29
Page 30
FONCTIONNEMENT DU MENU À L'ÉCRAN
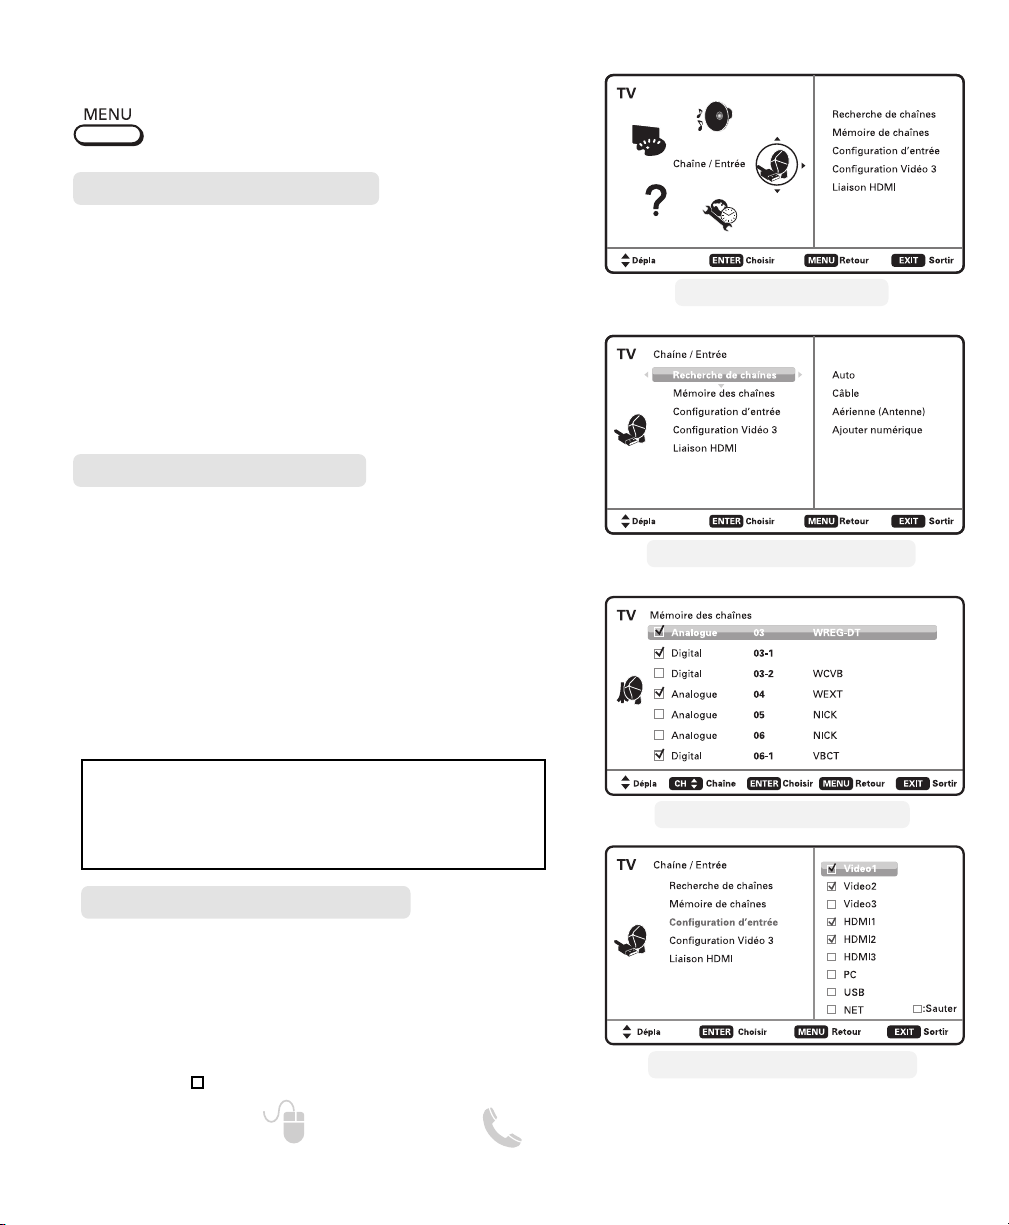
CHAÎNE / ENTRÉE ___________
Pour afficher le menu à l’écran. Utilisez les
touches CURSEUR pour choisir Chaîne /
Entrée. Appuyez sur ENTER.
Recherche de chaînes
Auto – Recherche le mode détecté : câble ou antenne.
Câble – Recherche les chaînes de télévision par câble
analogiques et numériques non brouillées (ClearQAM).
Aérienne (Antenne) – Recherche les chaînes analo-
giques et numériques hors antenne.
Ajouter chaîne numérique – Recherche les chaînes
numériques hors antenne et ajoute à la base de données
les nouvelles chaînes numériques trouvées.
REMARQUE : L'option Ajouter chaîne numérique ne sera pas
disponible si le mode actuel est Câble.
Mémoire de chaînes
La Mémoire de chaînesénumère toutes les chaînes analogiques
et numériques trouvées, ainsi que les chaînes analogiques qui
n'ont pas été trouvées, lesquelles peuvent être ajoutées.
Utilisez les touches CURSEUR pour déplacer la barre de
sélection à travers toutes les chaînes actives et non disponsibles,
ou utilisez la touche CH pour sauter toutes les chaînes non
disponibles.
Appuyez sur ENTER pour activer ou rendre non disponsible la
chaîne choisie.
REMARQUE : Pour des renseignements sur les chaînes
numériques locales, visitez le site www.antennaweb.org
ÉCRAN DE MENU PRINCIPAL
ÉCRAN DE RÉGLAGE DES CHAÎNES
FAIT IMPORTANT : Ce téléviseur HD ne conserve qu’une seule base de
données des chaînes numériques. Lorsque vous recherchez des
chaînes numériques par câble, la base de données de chaînes
numériques par antenne sera donc effacée. Vous ne pourrez recevoir
que les chaînes ClearQAM fournies par votre câblodiffuseur.
Configuration d’entrée
Cette fonction permet de supprimer les entrées AV non
utilisées du circuit d'entrée audio-vidéo.
Utilisez les touches CURSEUR pour choisir une
entrée AV. Appuyez sur ENTER pour activer (marquer)
ou rendre non disponible (démarquer) l'entrée choisie.
REMARQUE : Au moins une entrée doit être activée.
: Sauter est seulement pour référence.
30
Besoin d’aide? http://ca.sanyo.com 1-800-263-2244
ÉCRAN DE MÉMOIRE DES CHAÎNES
ÉCRAN DE CONFIGURATION D’ENTRÉE
Page 31

FONCTIONNEMENT DU MENU À L'ÉCRAN
CHAÎNE / ENTRÉE ___________
Configuration Vidéo 3
Utilisez cette fonction pour établir une connexion composant vidéo ou composite vidéo dans l’entrée VIDEO
INPUT3 de votre TVHD.
Utilisez les touches CURSEUR pour choisir le type
de connexion qui sera utilisé dans l'entrée Video3.
Appuyez sur ENTER, et une marque bleue apparaîtra à
côté de l'option choisie.
Liaison HDMI
REMARQUE : Elle est conçue pour être utilisée avec un appareil
photo numérique/caméra vidéo Xacti de SANYO. Quelques
fonctions HDMI-CEC d'autres équipements ne sont pas
soutenues.
Utilisez la fonction HDMI-CEC pour activer et
désactiver les fonctions CEC disponibles.
Les réglages HDMI Power ON Sync. et Power OFF
Sync. activent des fonctions spécifiques comme la
mise sous/hors tension automatique.
ÉCRAN DE CONFIGURATION VIDÉO3
Xacti-LINK
Si un appareil photo numérique/caméra
vidéo Xacti est branché à l'entrée HDMI de
la TVHD, vous pouvez activer la fonction
HDMI-CEC pour accéder aux touches de la
télécommande GXEA pour faire fonctionner l’appareil Xacti.
REMARQUE : La fonction HDMI-CEC doit être aussi activée
sur l’appareil photo numérique Xacti pour pouvoir utiliser Xacti-Link.
Besoin d’aide? http://ca.sanyo.com 1-800-263-2244
ÉCRAN DE LIAISON HDMI
31
Page 32

FONCTIONNEMENT DU MENU À L'ÉCRAN
CONFIGURATION _____________
Pour afficher le menu à l’écran. Utilisez les
touches CURSEUR pour choisir
Configuration. Appuyez sur ENTER.
Langue du menu
Choisissez la langue des menus à l’écran :
• English
• Español
• Français
Appuyez sur ENTER pour valider votre choix.
Sous-titrage numérique
Le sous-titrage est l'information textuelle cachée transmise avec l'image et le son. Si le sous-titrage est activé,
(appuyez sur la touche CAPTION tandis que vous
regardez la télé), la TVHD ouvre ces sous-titres
(numériques ou analogiques) et les superpose à l'écran.
REMARQUE : Les diffuseurs locaux décident des sous-titres à
transmettre.
Utilisez les touches CURSEUR et tu pour modifier
la police, l’arrière-plan et le premier plan des sous-titres
numériques.
ÉCRAN DE MENU PRINCIPAL
ÉCRAN DE LANGUE DU MENU
Configuration d’énergie
Utilisez les fonctions Économiseur d'énergie et Capteur
de luminosité, dans le menu de Configuration d'énergie,
pour contrôler la luminosité du rétroéclairage et pour
réduire la consommation d'énergie.
Économiseur d'énergie
rétroéclairage pour réduire la consommation d'énergie.
• Niveau 1 : Économiseur d'énergie éteint.
• Niveau 2 : Consommation d'énergie basse.
• Niveau 3 : Consommation d'énergie la plus basse.
Appuyez sur ENTER pour choisir le niveau souhaité.
REMARQUE : La touche ECO peut aussi être utilisée pour modifier l'économiseur d'énergie sans entrer dans le menu.
32
Besoin d’aide? http://ca.sanyo.com 1-800-263-2244
––
Contrôle la luminosité du
ÉCRAN DE SOUS-TITRAGE NUMÉRIQUE
ÉCRAN DE L’ÉCONOMISEUR D’ÉNERGIE
Page 33

FONCTIONNEMENT DU MENU À L'ÉCRAN
Capteur de luminosité - Détecte l'intensité de lumière
ambiante et contrôle les paramètres de luminosité et
d’image pour réduire la consommation d'énergie de
la TVHD.
REMARQUE : Lorsque l’éclairage de la pièce est foncé, les
paramètres de luminosité du panneau et (ou)
les paramètres d’image, tels que la luminosité et
le contraste, sont réduits. Lorsque l’éclairage est
brillant, ces paramètres sont augmentés.
ÉCRAN DE CAPTEUR DE LUMINOSITÉ
Temporisateur d'horloge
Permet de régler l’heure actuelle de la TVHD et d’activer
l’heure de mise sous tension de celle-ci qui s’allumera
à l’heure précisées.
Lorsque la fonction de mise sous tension du
temporisateur est activée, la TVHD s’allumera automatiquement à l’heure établie précédemment.
Motion Sync. (120 Hz)
Votre TVHD a une vitesse de régénération d’écran de
120 Hz ; cela signifie qu’elle « redessine » l’image à
l’écran deux fois plus souvent que ne le fait une
télévision dont la vitesse de régénération normale est
de 60 Hz. Cette vitesse de 120 Hz assure des images
moins floues lorsqu’il s’agit des scènes d’action rapides.
Plein – Utilise la vitesse de régénération maximale de
l’appareil pour obtenir la meilleure image possible.
Théâtre – Constitue la meilleure option pour des
films.
Éteint – Désactive le mode Plein.
REMARQUE : Même si la fonction Motion Sync. est désactivée, la TVHD continuera d’afficher les images à une vitesse
de 120 Hz.
Besoin d’aide? http://ca.sanyo.com 1-800-263-2244
ÉCRAN DE TEMPORISATEUR D’HORLOGE
ÉCRAN MOTION SYNC
33
Page 34

FONCTIONNEMENT DU MENU À L'ÉCRAN
CONFIGURATION______________
Puce V (Contrôle parental)
Cette fonction permet de bloquer automatiquement
les émissions dont le contenu est jugé inapproprié
pour les enfants.
REMARQUE : Cette fonction est conforme aux règlements américains de la FCC relatifs à la puce V. De ce fait, il se peut que cette
fonction ne puisse être utilisée pour des émissions provenant
d’autres pays.
RÉGLAGE DES COTES DE LA PUCE V
Sélectionnez ON et appuyez sur la touche ENTER.
Sélectionnez Adjust (Standard) et appuyez sur ENTER.
Utilisez les touches CURSEUR et tu pour
naviguer dans le menu et appuyez sur ENTER pour
bloquer ou débloquer la cote choisie. Le symbole de
blocage de cote apparaîtra à côté de la cote choisie,
indiquant ainsi que cette cote est bloquée.
REMARQUE : Le blocage d’une cote donnée s’applique automatiquement à toute autre cote au-dessus de celle-ci. Le déblocage
d’une cote s’applique automatiquement à toutes les cotes endessous de celle-ci.
SYSTÈME DE PUCE V ÉVOLUÉ (RRT5)
Le RRT5 est un système de puce V évolué destiné aux
canaux numériques reçus au moyen d’une antenne.
Lorsque la TVHD détecte des données RRT5 compatibles, ces données sont téléchargées et gardées en
mémoire. L’écran de configuration de la puce V est
alors modifié pour refléter l’option Adjust (Advanced).
Utilisez les touches CURSEUR et tu pour mettre
en surbrillance les différentes options et appuyez sur
ENTER pour bloquer ou débloquer la cote choisie.
REMARQUE : Il se peut que toutes les cotes ne soient pas
affichées à l’écran. Lorsque les barres de défilement vertical
apparaissent, appuyez sur les touches CURSEUR pour
accéder à ces cotes supplémentaires.
AUTRES RENSEIGNEMENTS
Pour obtenir de plus amples renseignements sur les
cotes de la MPAA (Motion Picture Association of
America) ou les cotes de la puce V, visitez
www.mpaa.org et www.v-chip.org.
ÉCRAN DE CONFIGURATION DE LA PUCE V
ÉCRAN D’AJUSTEMENT (STANDARD)
ÉCRAN DE CONFIGURATION DE LA PUCE V
AVEC OPTION D’AJUSTEMENT (ÉVOLUÉ)
ÉCRAN D’AJUSTEMENT (ÉVOLUÉ)
34
Besoin d’aide? http://ca.sanyo.com 1-800-263-2244
Page 35
FONCTIONNEMENT DU MENU À L'ÉCRAN
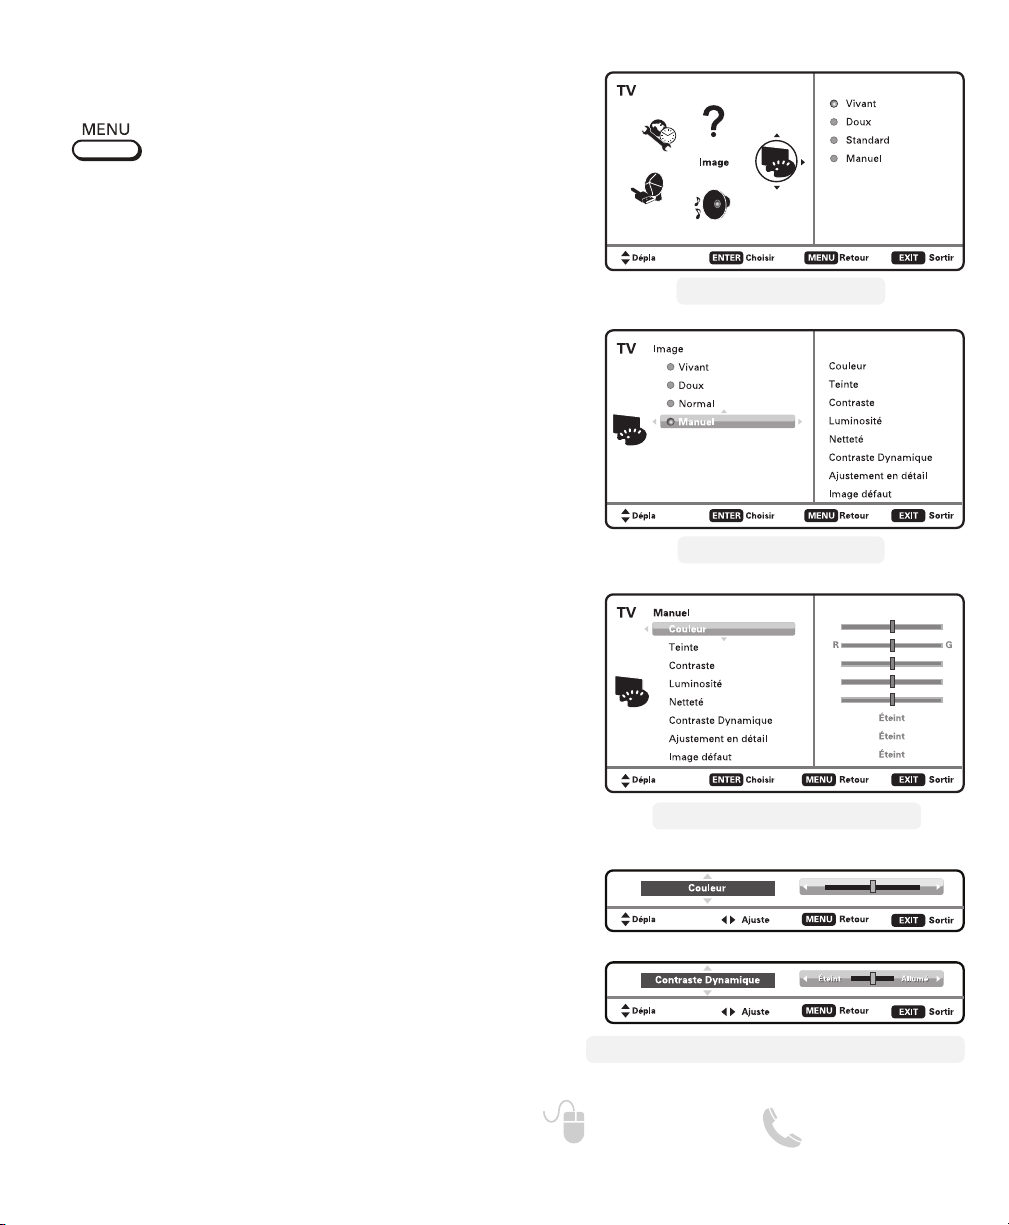
IMAGE _____________________
Pour afficher le menu à l’écran. Utilisez les
touches CURSEUR pour choisir Image.
Appuyez sur ENTER.
Vous pouvez choisir entre Vivant, Doux, et Standard,
lesquels ont des valeurs prédéterminées pour l'image.
Ou, vous pouvez choisir l’option Manuel pour des
valeurs personnalisées.
REMARQUE : Chaque entrée AV peut avoir son propre mode
d'image (prédéterminé ou manuel). Un marqueur bleu
indique l'option actuellement choisie.
RÉGLAGES MANUELS DE L’IMAGE
Paramètres d'ajustement manuel :
Couleur
•
Luminosité
•
L'option Configuration Détaillée permet d'ajuster 7
paramètres additionnels comme :
Équilibre du signal
•
Équilibre du blanc
•
Renforceur des bords• Taille H
•
Taille V
•
REMARQUE : L'option Image par défaut retourne tous les
paramètres d’image aux niveaux établis à l’usine.
Teinte
•
Netteté
•
Contraste
•
Contraste Dynamique
•
Réduction du bruit
•
Netteté verticale
•
ÉCRAN DE MENU PRINCIPAL
ÉCRAN D’IMAGE (MANUEL)
AJUSTEMENT DES PARAMÈTRES D’IMAGE
Utilisez les touches CURSEUR pour choisir le
paramètre à ajuster. Appuyez sur la touche ENTER pour
afficher l’écran d’ajustements. Modifiez les valeurs du
paramètre en utilisant les touches CURSEUR tu.
REMARQUE : Les touches
le paramètre suivant/précédent sans
retourner à l’écran du menu précédent.
Lorsque vous avez fini les ajustements, appuyez sur la
touche EXIT pour sortir du menu.
CURSEUR choisissent
Besoin d’aide? http://ca.sanyo.com 1-800-263-2244
ÉCRAN DE SÉLECTION DE PARAMÈTRES
ÉCRAN D’EXEMPLES D'AJUSTEMENTS DE PARAMÈTRES
35
Page 36

FONCTIONNEMENT DU MENU À L'ÉCRAN
SON ________________________
Pour afficher le menu à l’écran. Utilisez les
touches CURSEUR pour choisir Son.
Appuyez sur ENTER.
Choisissez une des deux options disponibles pour
l'ajustement du son.
Auto – Les valeurs de son sont ajustées et associées au
mode actuel d'image.
Dynamique, Doux, Standard – Les paramètres
prédéterminés de son ne sont pas associés aux
options d'image.
RÉGLAGES MANUELS DU SON
Paramètres d'ajustement manuel :
Bas et Aigus
•
Extension des basses
•
Ajustement en détail
•
– Égalisateur à 4 bandes : Pour personnaliser les
ajustements de son.
REMARQUE : L'option Son par défaut retourne tous les
paramètres de son aux niveaux établis à l’usine.
ÉCRAN DE MENU PRINCIPAL
ÉCRAN DE PARAMÈTRES MANUELS
AJUSTEMENT DES PARAMÈTRES DE SON
Utilisez les touches CURSEUR pour choisir le
paramètre à ajuster. Appuyez sur la touche ENTER pour
afficher l’écran d’ajustements. Modifiez les valeurs du
paramètre en utilisant les touches CURSEUR tu.
REMARQUE : Les touches
Lorsque vous avez fini les ajustements, appuyez sur la
touche EXIT pour sortir du menu.
36
paramètre suivant/précédent sans retourner à
l’écran du menu précédent.
Besoin d’aide? http://ca.sanyo.com 1-800-263-2244
CURSEUR choisissent le
ÉCRAN DE PARAMÈTRES EN DÉTAIL
ÉCRAN D’EXEMPLES D'AJUSTEMENTS DE PARAMÈTRES
Page 37

ENTRÉE USB
LECTEUR DE PHOTOS ________
Regardez des photos sur la TVHD en utilisant une clé USB
à mémoire flash.
Vous pouvez utiliser l’une ou l’autre des deux entrées USB.
REMARQUE : En reliant deux dispositifs, seul le premier sera
reconnu et utilisé comme entrée.
CLÉ USB
REMARQUE : La TVHD passera à l'entrée
USB quand elle détecte un
dispositif USB relié.
UTILISATION DU LECTEUR DE PHOTOS
Une fois sur une photo miniature, appuyez sur ENTER
pour activer les fonctions Tourner, Vue complète et Voir
présentation.
Au mode Vue complète : Utilisez les touches CURSEUR
tu pour changer de photo.
Appuyez sur ENTER pour afficher le menu des options
Vue complète.
AJUSTEMENT PRÉSENTATION
Dans le menu Configuration, vous pouvez activer ou
désactiver les fonctions Aléatoire et Changement rapide.
Appuyez sur ENTER dans Voir présentation à partir de
l'écran de photo miniature ou du menu d'options Vue
complète, pour commencer la présentation à partir de
la photo choisie.
ÉCRAN DE PHOTO MINIATURE
REMARQUE : Une icône de photo miniature appa-
MENU DES OPTIONS
raîtra si la photo ne peut pas être
décodée ou s’il n’existe aucune donnée de photo miniature.
DE VUE COMPLÈTE
CONFIGURATION
MENU DE
MENU DU REPRODUCTEUR
Pour afficher le menu USB, appuyez sur MENU au
mode Vue complète ou Voir présentation.
Ajustement d’image – Pour ajuster la Couleur, Teinte,
Contraste, Luminosité, Netteté et Contraste
dynamique.
REMARQUE : Les ajustements d'image sont indépendants des
ajustements des entrées TV et AV.
Besoin d’aide? http://ca.sanyo.com 1-800-263-2244
ÉCRAN DU MENU PRINCIPAL USB
37
Page 38
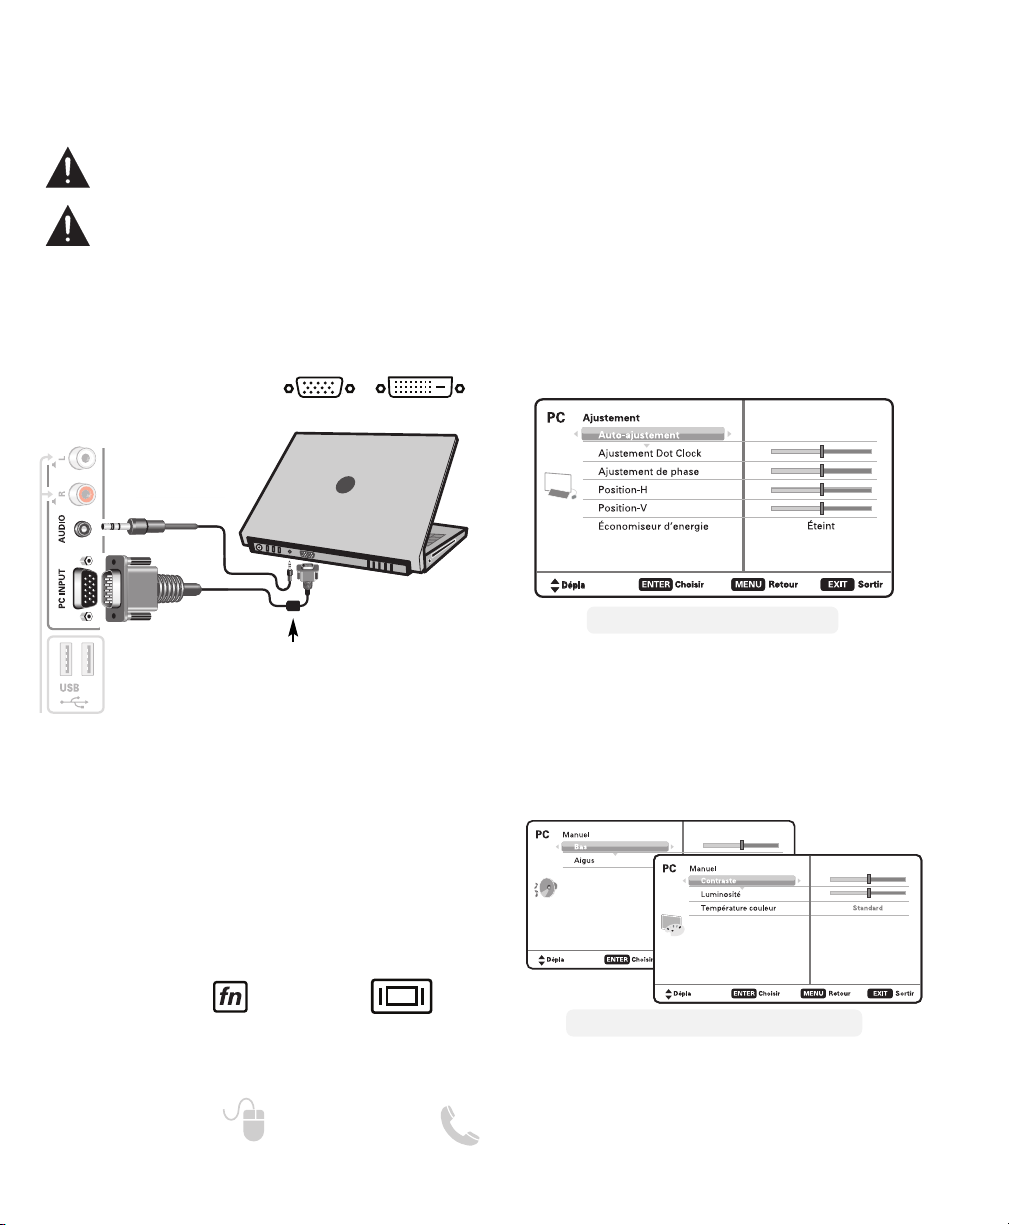
BRANCHEMENTS ET CONFIGURATION DU PC
Vous pouvez utiliser votre TVHD comme moniteur
d’ordinateur. Branchez l’ordinateur et le téléviseur en
utilisant un câble de moniteur approprié (non fourni).
Avant de brancher le moindre câble,
débranchez les prises de courant du téléviseur
HD et de l’ordinateur.
Allumez la TVHD et tout autre appareil externe
avant d’allumer l’ordinateur.
Pour éviter un état «Hors limite», veuillez changer
la résolution de votre PC pour qu’elle soit
compatible avec celle de votre TVHD. Reportezvous au tableau de la page 22.
REMARQUE : Si l’ordinateur a seulement une sortie DVI,
un adaptateur DVI à RGB sera requis ou un câble DVI à
HDMI et des câbles audio RCA.
Reportez-vous à la page 26.
PANNEAU LATÉRAL DE LA TVHD
mini câble
audio stéréo
Câble de
moniteur
RGB
SORTIE RGB
SANYO recommande
d’utiliser un câble à
noyau de ferrite.
SORTIE DVI
PC OU PORTABLE
Écran d’un PC portable
Si vous utilisez votre TVHD SANYO pour afficher
l’image d’un PC portable, appuyez sur la touche
Fn (ou FN) plus la touche de fonction appropriée
(F5, F7, F8, etc.) dans le portable. Ceci fera défiler
les différents modes d’écran entre le portable et la
TVHD.
Les modes peuvent être : image sur le PC portable,
image sur le PC portable et la TVHD ou image sur la
TVHD.
Configuration du PC
Auto-ajustement – Ajuste automatiquement la
position d'image, le dot clock et la phase.
Dot Clock – Ajuste la fréquence de balayage
pour la synchroniser avec celle du PC.
Phase – Règle la phase lorsque l’image devient
floue ou tremblante.
Position H – Déplace l’image horizontalement
Position V – Déplace l’image verticalement
Économie d’énergie – Permet à la TVHD de se
mettre au mode d’attente quand l'ordinateur n’est
pas utilisé.
ÉCRAN DE CONFIGURATION DU PC
Image et Son du PC
Standard – Règle les valeurs prédéterminées
d’Image et Son.
Manuel – Ajuste le Contraste, Luminosité,
Température de couleur de l'écran, ou Bas et
Aigus de la TVHD.
Maintenez enfoncéee et appuyez sur
REMARQUE : Les symboles des touches Fn et fonction
38
sur le clavier du PC portable peuvent
varier d’une marque à une autre.
Besoin d’aide? http://ca.sanyo.com 1-800-263-2244
ÉCRANS D’IMAGE ET SON DU PC (MANUEL)
REMARQUE : Ces réglages n'affectent pas le vision-
nement normal sur la TV.
Page 39

GARANTIE SANYO
APPLICATION
Les téléviseurs couleur neufs, inutilisés de Sanyo, achetés au
Canada chez un distributeur agréé de Sanyo sont garantis contre tout défaut de matériaux et de fabrication pendant une période d’UN AN pour les pièces et la main-d’oeuvre à partir de la
date d’achat par le consommateur original pour un usage non
commercial. Cette garantie est applicable uniquement à
l’acheteur original au détail du produit garanti.
RESPONSABILITÉS DE SANYO CANADA INC.
Pendant la période de garantie, SANYO Canada Inc. réparera,
ou, à notre discrétion, remplacera le téléviseur
couleur qui s’est avéré défectueux en termes de matériaux ou
de main-d’oeuvre.
Les PIÈCES de rechange sont garanties pour la période de
garantie qui reste.
CE QUI N’EST PAS COUVERT
(a) Les téléviseurs couleur achetés à l’extérieur du Canada.
(b) Les téléviseurs couleur achetés à l’état usé.
(c) Les problèmes causés par une mauvaise configuration ou
installation.
(d) Les ajustements décrits dans le manuel d’instructions.
(e) Les accessoires y compris l’antenne, les piles et les câbles
de raccordement.
(f) Les dommages subis au cours du transport.
(g) Les dommages entraînés par un entretien inapproprié, un
accident, un usage abusif, un mauvais usage ou la
négligence.
(h) Les dommages causés par les éclairs et les sautes de
puissance.
RESPONSABILITÉS DE L’ACHETEUR INITIAL
L’acheteur original au détail est tenu de présenter le reçu original daté, accompagné de cette garantie à SANYO Canada Inc.
ou à un Dépôt* de service autorisé de Sanyo pour présenter
une réclamation en vertu de cette garantie.
L’acheteur original au détail est tenu responsable de payer tous
les frais de TRANSPORT pour expédier le produit vers et à partir des lieux de SANYO Canada Inc. ou un dépôt de service de
Sanyo. Vous avez également la responsabilité de payer les frais
d’ENTRETIEN nécessaire du produit.
*Le service à domicile est disponible seulement pour les
appareils dont l’écran mesure au moins 46 po; il est limité
à des emplacements qui se trouvent dans un rayon de 30 km
d’un dépôt de service autorisé à travers le Canada.
LA GARANTIE DEVIENT NULLE ET SANS EFFET si le numéro
de série du produit est modifié ou enlevé ou si le produit est
soumis à des réparations par des personnes autres que
SANYO Canada Inc. ou un dépôt de service autorisé de
SANYO.
RESTRICTIONS
(a) SANYO Canada Inc. Se réserve le droit de changer ou
d’améliorer la conception du modèle du produit garanti aux
présentes sans être obligé d’effectuer des modifications au
produit ou d’installer des améliorations sur le produit.
(b) SANYO Canada Inc. et ses distributeurs autorisés ne seront
en aucune circonstance tenus responsables de dommages
spéciaux ou consécutifs découlant de l’utilisation de ce
produit.
GARANTIES RÉGLEMENTAIRES
Les dispositions précédentes n’empêchent pas l’exercice de
lois provinciales applicables qui, dans certaines circonstances,
peuvent ne pas permettre les restrictions et exclusions stipulées dans la présente garantie. Là où certaines dispositions de
cette garantie sont interdites par la loi, celles-ci seront réputées
nulles et sans effet, mais le reste de la garantie demeurera en
vigueur.
POUR OBTENIR LE SERVICE SOUS GARANTIE
Veuillez communiquer avec le distributeur chez qui vous avez
acheté le produit, ou veuillez communiquer avec nous :
SANYO Canada Inc.
201 Creditview Road
Woodbridge Ont. L4L 9T1
(905) 265-4100
1 800 263-2244
Besoin d’aide? http://ca.sanyo.com 1-800-263-2244
39
Page 40
Besoin d’aide?
Visitez notre site
http://ca.sanyo.com
ou composez notre numéro san frais
1-800-263-2244
 Loading...