

Page 1

INSTRUCTION MANUAL
ICR-B220
Digital Voice Recorder
SANYO'S HELP-LINE
Call the toll-free number below if you have any difficulties operating this
product.
1-877-999-1840 (Weekdays 7:30 AM - 5:00 PM, Pacific Time)
LlNEA DE CONSULTA SANYO
Llame gratis al número indicado a continuación si tiene dificultades al
utilizar este producto.
1-877-999-1840 (días laborables de 7:30 AM a 5:00 PM, hora del Pacífico)
ENGLISH
1AJ6P1P0003-ICR-B220, Issue Number 1, Printed in China
ESPAÑOL
Page 2

ENGLISH
CONTENTS
PRECAUTIONS ..................................................................................... 2
CONTROLS ........................................................................................... 3
POWER SUPPLY................................................................................... 5
SD CARD ...............................................................................................6
BEFORE OPERATION .......................................................................... 7
ADJUSTING THE DATE AND TIME ...................................................... 8
SELECTING THE FOLDER AND MENU ............................................... 9
RECORDING ....................................................................................... 13
EDITING THE RECORDED DATA....................................................... 15
PLAYBACK .......................................................................................... 17
SELECTING DISPLAY......................................................................... 19
ERASING .............................................................................................20
ERASE GUARD ...................................................................................24
ALARM TIMER..................................................................................... 25
BEFORE INSTALLING THE APPLICATION SOFTWARE................... 26
PLAYING BACK/EDITING A DATA FILE RECORDED WITH YOUR PC .........
PC CONNECTION ...............................................................................28
CLEANING THE CABINET .................................................................. 30
SPECIFICATIONS ............................................................................... 30
FCC INFORMATION............................................................................ 31
CANADIAN ICES-003 INFORMATION ................................................ 31
TROUBLESHOOTING GUIDE ............................................................ 32
USER LICENSE AGREEMENT ...........................................................34
WARRANTY (For USA) ....................................................................... 39
WARRANTY (For Canada) .................................................................. 42
26
Please read this manual before use.
Keep the manual in a safe place for future reference.
1
Page 3

PRECAUTIONS
• Never remove the SD Card while operating the unit. Otherwise, the SD
Card, recorded contents and the unit will be damaged.
• If the line of rectangles in the battery indicator ( ) disappear during
recording, stop the recording immediately and replace the batteries.
• Do not disconnect the AC adaptor or remove the batteries while operating
the unit.
• Before erasing, make sure that the battery indicator is full.
• The apparatus should not be exposed to dripping or splashing.
• Do not insert pins, etc., inside the unit.
• Do not drop the unit or subject it to strong shocks.
• Do not use where there are extremes of temperature (below 5°C or
exceeding 35°C).
• Set the write-protect switch to “Unlock” before
inserting to the unit.
• is registered trademark of SD Association.
• Other system and product names generally are the
registered trademarks or trademarks of the respective development
manufacturers. The symbols TM and ® are not shown in this manual.
Accessories
USB cable x 1
CD-ROM x 1
Case x 1
SD Card (Initialised) x 1
AAA Battery x 2
Foot control for PC (PC Transcription Kit:
SANYO Model No. FS-USB2, option)
Notes on clock setting
Be sure to set the date and time of the unit’s clock before use. (See Page 8.)
2
Page 4

CONTROLS
1
14
13
12
11
10
2
3
4
1. Earphone socket (EAR)
2. Recording indicator
3. External microphone socket
(MIC)
4. Built-in microphone
5. Operation switch
(DICT, STOP, PLAY, REV)
6. Control button
5
6
7
8
9
(VOLUME, TIME/SET, MENU/
FOLDER)
7. Fast forward/Rewind buttons
(F,E)
8. Create file/Pause button
(CREATE FILE)
9. Digital I/O terminal cover
(DIGITAL I/O)
10. Built-in speaker
11. Erasing button (ERASE)
12. Index/Cancel button
(INDEX/CANCEL)
13. SD Card compartment lid
14. Display
3
Page 5

15
REC DATE TIME HQSPLP
VAS
INSERT
FE
REC
13
456
7
9
10
8
2
16
17
18
19
15. Power switch (POWER)
16. Record mode switch
(REC MODE)
17. Playback speed control switch
(SPEED CONTROL)
18. Battery compartment lid
19. External DC
(EXT DC 3V, bottom of the
unit)
socket
Display
1. Record mode indicator
2. Erase guard indicator
3. Alarm indicator
4. Voice activated system
indicator
5. Insertion recording indicator
6. Battery indicator
7. Record indicator
8. Memory capacity indicator
9. Recorded date/time, and
recording time mode indicators
10. User, folder, recording time,
operation guides, etc.
4
Page 6
RESET
POWER SUPPLY
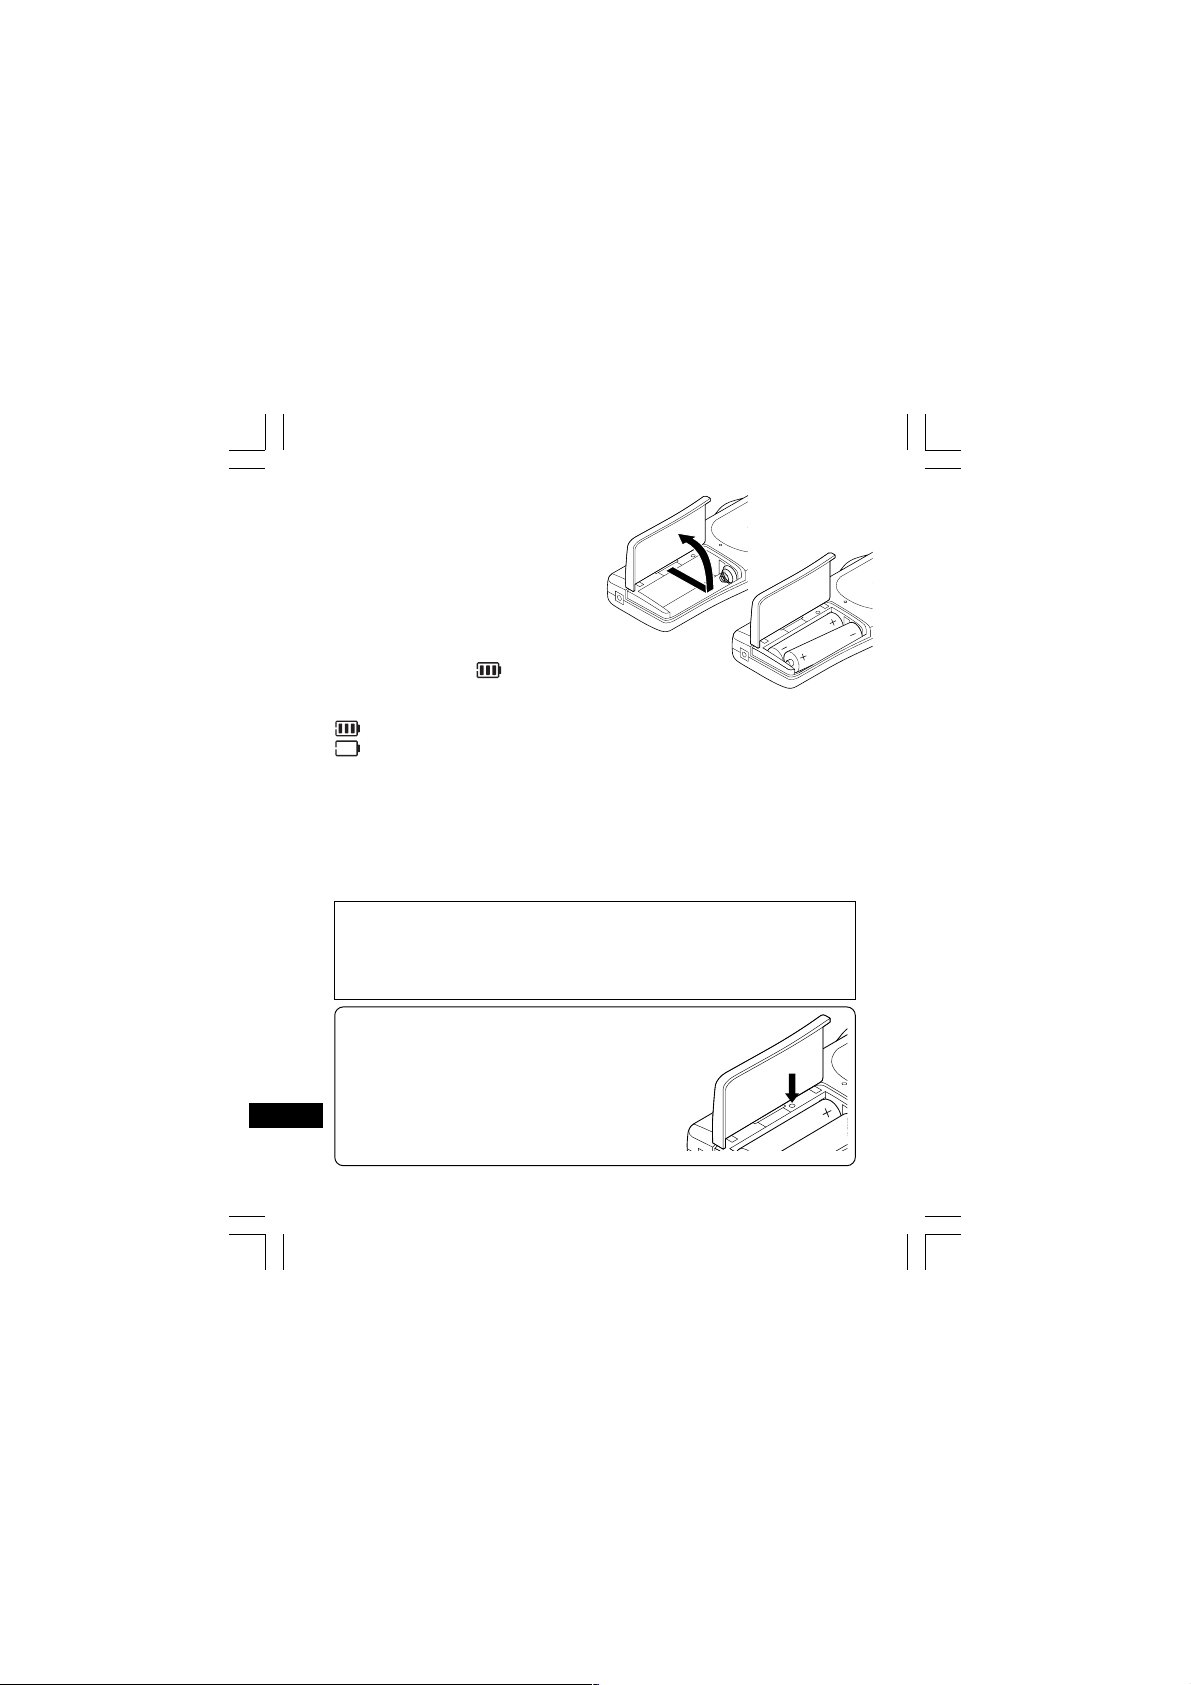
Batteries
1. Open the battery compartment lid.
2. Install two “AAA” batteries
(attached). Observe proper
polarity.
Battery indicator ( )
The line of rectangles is the battery gauge. Black
rectangles show the battery condition while the unit is operating.
: Full, good condition
(“LOW BATT” appears.): Weak or exhausted batteries, must be replaced.
CAUTION:
• Do not replace the battery while the power is on. It may cause the unit
malfumction.
• Remove the batteries if the unit will not be used for a month or longer.
• Dispose of all used batteries safely in accordance with all applicable
laws.
IMPORTANT NOTE:
SPENT OR DISCHARGED BATTERIES MUST BE RECYCLED OR DISPOSED OF PROPERLY IN COMPLIANCE WITH ALL APPLICABLE
LAWS.
FOR DETAILED INFORMATION, CONTACT YOUR LOCAL COUNTY
SOLID WASTE AUTHORITY.
WHAT TO DO IF...
If the operation of the unit or display is not
normal,
1. Open the battery compartment lid.
2. Press the RESET switch using a small ballpoint pen, etc.
3. Resume operation.
5
Page 7

SD CARD
• When using new SD Card, “ ERASE
ALL MEMORY” in advance. (See
Page 22.)
• Other SD Cards than formatted by this
unit can not be used.
Inserting the SD Card
1. Open the SD Card compartment lid.
2. Check the edge of the card and insert the card
as shown in the illustration.
3. Close the lid.
Removing the SD Card
1. Slide the POWER switch (rear of the unit) to OFF.
2. Open the SD Card compartment lid.
3. Push the card slightly into the slot to release.
4. Pull it out.
Note:
• Never remove the card while operating the unit.
• Do not place the card where it is exposed to static electricity or electric
noise.
• Recorded data on the card may not work correctly with a different Digital
Voice Recorder.
• If the card is not inserted, “NO CARD” appears when the power is turned
on.
• When a SD Card is loaded, the unit automatically creates a VoiceRec
folder, etc. Do not erase them.
• Do not use a MultiMediaCard.
• This unit supports the SD Card having 64MB to 2GB memory.
WARNING!
Keep the SD Card out of reach of young children who might swallow it. If
it is accidentally swallowed, call a doctor immediately.
6
Page 8

BEFORE OPERATION
Turning the power on and off
Slide the POWER switch (rear of the unit) to ON to turn on the power. The
unit is now in stand-by mode.
Example:
Folder name
Current file number
To turn off the power, slide the POWER switch to OFF in the stop mode.
Auto power off function
The power turns off automatically in about 10 minutes after entering the
stop mode.
Hold function
If the control switch or operating button is pressed while the POWER switch
is set to OFF, “POWER OFF” appears briefly on the display. It prevents
accidental playback or recording.
Earphone
Connect an earphone (not attached) to the EAR socket. (The speaker is
automatically disconnected.)
Note: Be sure to reduce the volume before connecting or disconnecting the
earphone.
External microphone
Connect an external microphone (not attached) to the MIC socket. (The
built-in microphone is automatically disconnected.)
USER-01
BU 1/ 1
NEW
Author name
Total file number
7
Page 9

ADJUSTING THE DATE AND TIME
1. Slide the operation switch to “STOP”.
2. Press and hold the MENU/FOLDER button down at least 2 seconds in
the stop mode. “AUTHOR” appears.
3. Press the MENU/FOLDER button repeatedly until the date and time
display appears.
Example:
0:00
2006
AUG.01
4. Press the TIME/SET button. The year display blinks.
5. Press the + or – VOLUME button repeatedly to select the year.
6. Press the TIME/SET button. The month display blinks.
7. Set the month, day, hour and minute by following steps 4 - 5 above.
• The time can be set accurately by
pressing the TIME/SET button when
a time signal is heard.
8. Press the INDEX/CANCEL button to return to the original display.
Changing the clock to the 12-hour (or 24-hour) display
1. Press and hold the MENU/FOLDER button down at least 2 seconds in
the stop mode.
2. Press the MENU/FOLDER button repeatedly until “12/24” appears.
3. Press the TIME/SET button. “24 HOUR” (or “12 HOUR”) blinks.
4. Press the + or – VOLUME button once. “12 HOUR” (or “24 HOUR”)
blinks.
5. Press the TIME/SET button again.
6. Press the INDEX/CANCEL button to return to the original display.
MENU/
FOLDER
Example: 10:35
+ VOLUME –
TIME/SET
2006
AUG.08
8
Page 10

SELECTING THE FOLDER AND MENU
Selecting the folder
Press the MENU/FOLDER button briefly in the stop mode. Each time the
button is pressed, the display changes as follows:
FOLDER
BUSI (Business) v LECT (Lecture) v OTHERS (Others)
Note:
After a few seconds, it returns to the stand-by mode on the selected folder
display. The abbreviation of the folder name appears.
Example:
The abbreviation of the folder name
Selecting the menu
1. Press and hold the MENU/FOLDER button down at least 2 seconds in
the stop mode.
Example:
2. Press the MENU/FOLDER button repeatedly to select the desired menu.
Each time the button is pressed, the display changes as follows:
USER-01
BU 1/ 1
NEW
AUTHOR
ID01 ID number
USER-01 Author name
AUTHOR v EDIT v Date and time v ALARM v VAS v REC
TIME v BEEP v ERASE GUARD v 12/24 v LCD LEVEL
VERSION
BUSI v BU
LECT v LE
OTHERS v OT
v
9
Page 11

3. To change the setting of a submenu in the selected menu, press the
TIME/SET button so that the display blinks.
4. Press the + or – VOLUME button to select a new submenu. (See “Various
menu modes” below.)
5. Press the TIME/SET button to set it.
6. Repeat steps 2 - 5 to change other settings.
7. Press the INDEX/CANCEL button to return to the original display.
Example:
Various menu modes
AUTHOR: Selecting ID number/Author name
ID01/USER-01 - ID99/USER-99
Note:
Author name is automatically created. You can change it by using the
PC software attached to the CD-ROM.
EDIT: Selecting edit mode
OVER WRITE: Overwirte recording
INSERT: Insertion recording (“INSERT” appears on the display.)
Date and time (See Page 8.)
ALARM: Selecting alarm mode
OFF: No alarm sound
ON: Alarm sound (“ ” appears on the display.)
After setting “ON”, the year display blinks. Use the TIME/SET, +
and – VOLUME buttons to set the alarm ON time. (Refer to Page
8.)
USER-01
BU 1/ 1
NEW
10
Page 12

VAS: Selecting Voice Activated System mode
OFF: To start and stop recording manually
ON: Recording begins when the microphone picks up sound, and stops
automatically after the sound stops. “VAS” appears.
Press the F or E button to set the microphone’s sensitivity
when recording begins. The VAS sensing level appears on the
display. “VAS 0” “VAS 10”
Low High
REC TIME: Selecting recording time mode
LP: For long time recording
SP: For standard recording
HQ: For high-quality recording (Initial Setting)
XHQ: For extra high-quality recording
REC
TIME
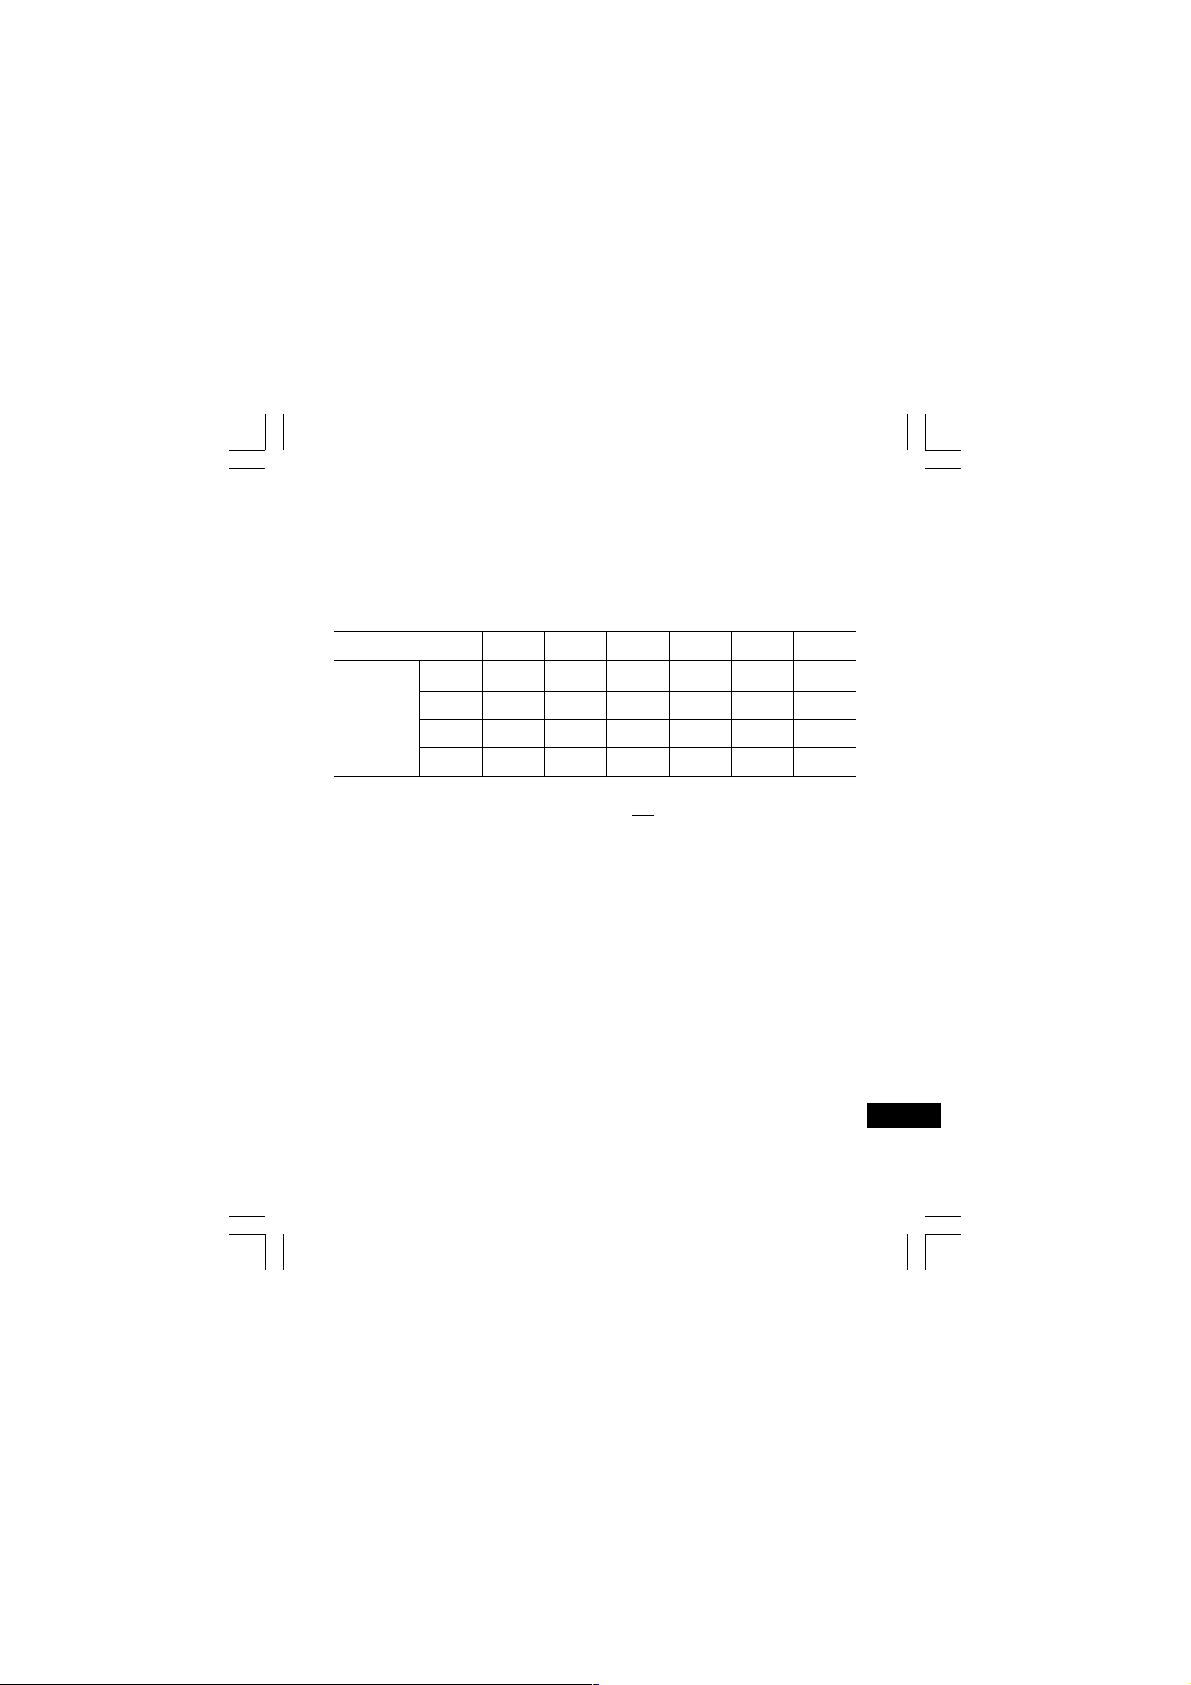
LP 8 hr. 20 min. 17 hr. 20 min. 34 hr. 40 min.
SP 4 hr. 10 min. 8 hr. 40 min. 17 hr. 20 min.
HQ 3 hr. 0 min. 6 hr. 15 min. 12 hr. 30 min.
XHQ 2 hr. 0 min. 4 hr. 15 min. 8 hr. 30 min.
Recording time in the table shows rough standard time. It will be different
somewhat depending on SD Card.
Note:
• Setting or changing recording time can be used for a new file recording.
When overwrite or insertion recording starts on the recorded file, it follows
the file’s recording time.
• When “XHQ” mode is selected, “XHQ” segment does not appear on the
display.
64MB 128MB 256MB
Recording Time (approx.)
11
Page 13

BEEP: Selecting beep mode
ON: Every time the operation buttons are pressed, a beep sound will
be heard.
OFF: No beep sound
ERASE GUARD: Selecting erase guard mode
OFF: You may erase the data.
ON: You cannot erase the data. (“ ” appears on the display.)
12/24 (See Page 8.)
LCD LEVEL: Selecting the LCD display brightness
“LEVEL 1” - “LEVEL 10” can be selected.
VERSION: Showing the current firmware version
12
Page 14

Operation
switch
RECORDING
1. Slide the REC MODE switch (rear of the unit) to the desired recording
mode.
DICT: Dictating
“REC MODE DICT” appears briefly and “ ” appears on the display.
CONF: Conference
“REC MODE CONF” appears briefly and “ ” appears on the
display.
LECT: Lecture
“REC MODE LECT” appears briefly and “ ” appears on the
display.
2.
If necessary, select AUTHOR, VAS, REC TIME, etc. (See Pages 10 - 11.)
3. Press the MENU/FOLDER button repeatedly to select the desired folder.
4. Slide the operation switch to DICT to start recording. The recording
indicator lights and “REC” appears on the display.
Example:
USER-01
LE 1/ 1
0m01s
5. Slide the operation switch to STOP
to stop recording at any time.
13
Page 15

Note:
• The unit can record up to file number 99 for each folder .
•“
FE
• When the recording time is full, “MEMORY FULL” appears briefly. In
this case, erase unnecessary files.
• If the INDEX/CANCEL button is pressed during recording, an index
mark is made (“INDEX” appears briefly) and recording continues.
Up to 32 index marks, for each file, can be made. If you try to enter
more index marks, “INDEX FULL” appears briefly. Index marks cannot
be deleted individually.
Caution:
Try not to record messages close to high field strength area or devices, e.g.
high power cable or mobile phone operation, unexpected noise may be
recorded.
Temporarily stopping recording (Recording pause)
Press the CREATE FILE button during recording. The elapsed recording
time and “REC” blink on the display. To resume recording, press the button
again.
Creating a new file number
Press the CREATE FILE button in the stop mode. The new file number
appears.
Example:
Note:
This unit can record up to approx. 6 hours in one file.
” shows the memory capacity of the card.
USER-01 USER-01
LE 1/ 1 x LE 2/ 2
END NEW
14
Page 16

Operation
switch
EDITING THE RECORDED DATA
Overwrite recording
Note:
Previous recorded material will be
erased.
1. Select the “OVER WRITE” edit
mode. (See Page 10.)
2. Play back the file. (See Page 17.)
3. Slide the operation switch to STOP (or press the CREATE FILE button
to set the pause mode) where you want to start overwriting.
4. Slide the operation switch to DICT. Overwrite recording starts.
Insertion recording
Note:
Previous recorded material will remain.
1. Select the “INSERT” edit mode. (See Page 10.)
2. Play back the file. (See Page 17.)
3. Slide the operation switch to STOP (or press the CREATE FILE button
to set the pause mode) where you want to start insertion.
4. Slide the operation switch to DICT. Insertion recording starts.
Caution:
• Overwrite and Insertion recording start from the stop position on the
file.
• In “END” display, the recording starts from the END position.
• If the INDEX/CANCEL button is pressed in the stop mode, “OVER
WRITE” or “INSERT” edit mode can be changed.
• In “Insertion Recording”, start position may shift somewhat.
15
Page 17
Note:
“Insertion Recording” and “Partial Erase” features of ICR-B220 may not
work properly on 512MB or greater SD Cards, due to the properties of larger
SD Cards. All other features of the recorder will work normally on all size
SD Cards...
Please refer to the following table.
SD Card
LP Yes Yes Yes No No No
Recording
Time
Yes : Insertion Recording / Partial Erase is supported.
No : Insertion Recording / Partial Erase is not supported.
SP Yes Yes Yes No No No
HQ Yes Yes Yes No No No
XHQ Yes Yes Yes Yes Yes No
64MB 128MB 256MB 512MB 1GB 2GB
16
Page 18

PLAYBACK
1. Slide the SPEED CONTROL switch (rear of the unit) to the desired
playback speed position.
SLOW: Slow-speed playback
NORMAL: Normal-speed playback
FAST: Fast-speed playback
2. Select the Author and Folder. (See Pages 9 - 10.)
3. Press the F or E button repeatedly to select the desired file.
4. Slide the operation switch to PLAY to start playback.
Example:
5. Press the + or – VOLUME button as desired.
• When playback stops, “END” appears on the display.
6. Slide the operation switch to STOP.
Temporarily stopping playback (Playback pause)
Press the CREATE FILE button during playback. The elapsed playing time
blinks.
To resume playback, press the button again.
File skip
Press the F or E button repeatedly to skip to the desired file in the
selected folder.
• In the stop mode, it skips to the beginning or end of the current, previous
or next file.
• During playback mode, it skips to the beginning of the file.
USER-01
BU 2/ 3
0m01s
17
Page 19

File search
If the F or E button is pressed during playback, the unit will search at
high speed in the forward or reverse direction while the button is being
pressed. When the button is released, playback will continue.
These buttons are also used in the stop mode.
Review
To review the recorded sound while playing back the selected file, slide and
hold the operation switch to REV. It works within the selected file.
To resume playback, release the switch.
Index search
If an index mark was made in the file, press the INDEX/CANCEL button
during playback. The unit will search for the next index point and playback
starts from that point.
18
Page 20

SELECTING DISPLAY
Press the TIME/SET button repeatedly during recording, playing and stop
mode. The display changes as follows:
In the recording mode:
Remaining recording time v Current day/time v Original display returns
Example of remaining recording time:
Author
Note:
• When the remaining recording time is more than one hour, it is displayed
as 1h24m.
When the remaining recording time is less than one hour, it is displayed
as 1m24s.
In the playback mode:
Recorded date/time v Current day/time v Remaining playing time
Original display returns
In the stop mode:
Remaining recording time v Current day/time v Original display returns
USER-01
REMAIN
1h24m
Remaining recording time
v
19
Page 21

ERASING
Important Note:
Before erasing, make sure that the battery indicator is full.
If the battery indicator does not show full, please replace the batteries.
Preparation
1. Slide the operation switch to STOP.
2. Select the Author and Folder. (See Pages 9 - 10.)
Note:
If you make a mistake while following steps, press the INDEX/CANCEL
button before pressing the TIME/SET button.
Erasing one file
1. Press the F or E button to select the file to be erased.
Example:
2. Press the ERASE button once. The file number blinks.
Example:
3. While the display is blinking, press the TIME/SET button. “ERASE”
appears briefly on the display.
The selected file is erased. All the file numbers after the erased file are
reduced by one.
USER-01
LE 3/ 5
0m09s
ERASE
FILE
LECT 3
20
Page 22

Erasing one folder
1. Press the ERASE button twice. The folder blinks.
Example:
ERASE
FOLDER
LECT
2. While the display is blinking, press the TIME/SET button. “ERASE”
appears briefly on the display. All memories in the selected folder are
erased. “NEW” appears.
Example:
Erasing Author ID
1. Press the ERASE button three times. The author blinks.
Example:
2. While the display is blinking, press the TIME/SET button. “ERASE”
appears briefly on the display. The Author ID is erased.
Example:
USER-01
LE 1/ 1
NEW
ERASE
ID
USER-03
USER-02
BU 1/ 1
NEW
21
Page 23

Erasing all memories
1. Press the ERASE button four times. “ERASE ALL MEMORY” blinks.
2. While “ERASE ALL MEMORY” is blinking, press the TIME/SET button.
“ERASE” appears briefly. All memories in all folders are erased.
Example:
USER-01
LE 1/ 1
NEW
Note:
The ERASE button will not function during recording or playback.
When “ERASE ALL MEMORY” is implemented, all memories in all
folders in the SD Card are erased.
“.” Blinks on the display while erasing.
Example:
ERASE.
22
Page 24

Partial erasing (A-B erasing)
1. Press the F or E button to select the file.
2. Slide the operation switch to PLAY to start playback.
3. Press the CREATE FILE button to pause at the starting point you want
to erase (Point A). The elapsed playing time blinks.
Example:
4. Press the ERASE button. “ERASE START” blinks.
5. While “ERASE START” is blinking, press the TIME/SET button. “ERASE”
blinks. Playback resumes from Point A automatically.
Example:
6. Press the ERASE button at the ending point you want to erase (Point
B). “ERASE END” blinks.
7. While “ERASE END” is blinking, press the TIME/SET button. “ERASE”
appears briefly.
The section between points A and B in the selected file is erased.
Playback pause is set automatically. (The elapsed playing time blinks.)
Press the CREATE FILE button again or stop playback.
Note:
• Some error may be produced to the time between A and B designated
in partial erasing.
•“Partial Erase” feature of ICR-B220 may not work properly on 512MB or
greater SD Cards, due to the properties of larger SD Cards. (Refer to
Page 16.)
23
USER-02
LE 1/ 5
0m08s
ERASE
LE 1/ 5
0m09s
Page 25

ERASE GUARD
Erase guard functions to prevent accidental erasure.
1. Press and hold the MENU/FOLDER button down at least 2 seconds in
the stop mode.
2. Press the MENU/FOLDER button repeatedly to select “ERASE
GUARD”.
3. Press the TIME/SET button. “OFF” blinks.
ERASE
GUARD
OFF
4. Press the + or – VOLUME button to select “ERASE GUARD ON”. “ ”
appears on the display.
5. Press the TIME/SET button to set it. “ ” remains lit.
Note:
If the ERASE button is pressed after setting Erase Guard, “GUARD” appears
briefly on the display.
24
Page 26

ALARM TIMER
When the alarm on time arrives, the alarm will be activated as shown below:
In the stop or power off mode:
• Beep for approx. 10 seconds.
During playback mode:
The operation is the same as “In the stop or power off mode” as above. And
it goes back to the previous point and resumes playback.
During recording mode:
No sound (“ ” blinks on the display.)
25
Page 27

BEFORE INSTALLING THE APPLICATION SOFTWARE
• Your PC must run Microsoft Windows Millennium Edition/2000
Professional/XP Professional/XP Home Edition operating system with
USB port.
• You must install Microsoft Windows Media Player Ver. 6.4 or later.
• Do not connect the unit to your PC yet.
PLAYING BACK/EDITING A DATA FILE RECORDED
WITH YOUR PC
Digital voice recordings can be transferred to the PC for playback or editing.
Before you start, install the “PC Memo Scriber” program on the PC as follows:
1. Load the PC Memo Scriber CD-ROM in the CD-ROM drive of the PC.
The setup program starts automatically.
Note:
If the setup program does not start…
1) Choose [Run] on the Start menu.
2) Type the following line:
D:\PCMEMO\setup.exe
“D” (the drive letter) should be replaced by the CD-ROM drive letter
on your PC.
3) Click [OK].
2. Follow the instructions on the screen.
3. After the installation is complete, you must restart Windows.
26
Page 28

Note:
If the screen below appears, click [Continue Anyway] or [Yes].
Windows XP Professional/XP Home Edition
Windows 2000 Professional
Windows is a registered trademark of Microsoft Corporation.
Other system names and product names generally are the registered
trademarks or trademarks of the respective development manufacturers.
The symbols TM and (R) are not shown in this manual.
27
Page 29

PC CONNECTION
1. Slide the POWER switch to OFF.
2. Connect the unit to the PC using the USB cable (attached) as shown in
the illustration.
USB port
USB cable
DIGITAL I/O terminal
Note:
• When the unit is connected to the PC, none of the operating buttons on
the unit work.
• When using a new SD Card, “ERASE ALL MEMORY” without connecting
the unit to PC. (See page 22.)
• Do not format the SD Card with PC.
28
Page 30

Selecting the action Windows is to take
After connection, the following screen will appear (Windows XP only).
- For Windows ME/2000, this operation is not needed.
The screen shots are of Windows XP.
Adjust your settings to match
your PC’s environment.
In this manual, [Take no action]
is selected, [Always do the
selected action] is checked, and
[OK] is clicked. This completes
the connection to the PC.
1) Select
2) Check
3) Click
Note:
Too many files or too large file may take much time to open the PC
application.
29
Page 31

In Regard to the Display with Windows Explorer
When the Digital Voice Recorder is connected to a PC by the USB
connection cable, the data recorded on the SD Card can be displayed by
Windows Explorer as data on a removable device.
The Digital Voice Recorder records the data into the folder “Voicerec” on
the SD Card. Do not use Explorer to edit the folder “Voicerec”.
CLEANING THE CABINET
Clean the outside of the unit with a clean soft cloth, moistened with lukewarm
water. Do not use benzene, thinner or alcohol since they will mar the finish
of the surfaces.
SPECIFICATIONS
Frequency response
200 Hz - 3,800 Hz
(Standard mode)
200 Hz - 1,900 Hz
(Long mode)
200 Hz - 5,300 Hz
(High-quality mode)
200 Hz - 7,500 Hz
(Extra high-quality mode)
Output power
Speaker:200 mW(8 Ω, DC 3V)
Headphones:
3 mW(16 Ω, DC 3V)
Power source
DC: DC 3V
(“AAA” x 2)
Output terminal
EAR
Loudspeaker
28 mm dia.
Dimensions (W x H x D)
Approx. 48 x 113 x 19 mm
Weight
Approx. 65 g (without batteries)
Important Information:
Because its products are subject to continuous improvement, SANYO
reserves the right to modify product designs and specifications without
notice and without incurring any obligation.
30
Page 32

FCC INFORMATION
FOR HOME OR OFFICE USE
Tested To Comply
With FCC Standards
Model Number: ICR-B220
Trade Name: Sanyo
Responsible Party: SANYO FISHER COMPANY
Address: 21605 Plummer Street
Telephone No.: (818) 998-7322
• This device complies with Part 15 of the FCC Rules.
Operation is subject to the following two conditions:
(1) this device may not cause harmful interference,
and
(2) this device must accept any interference received, including in-
terference that may cause undesired operation.
Declaration of Conformity
Chatsworth, California 91311
CANADIAN ICES-003 INFORMATION
THIS CLASS B DIGITAL APPARATUS COMPLIES WITH CANADIAN ICES-
003.
31
Page 33

TROUBLESHOOTING GUIDE
SYMPTOM
POSSIBLE CAUSE
CORRECTIVE ACTION
The unit does not operate.
The batteries are discharged or not installed.
Insert two new “AAA” batteries.
“ ” and “LOW BATT” appear.
The batteries are discharged.
Insert two new “AAA” batteries.
“POWER OFF” appears when the operation button is pressed.
Hold function is set.
Slide the POWER switch to ON.
No sound.
The earphone is plugged in.
Unplug the earphone.
The volume is turned down completely.
Press the + VOLUME button to adjust the sound level.
Cannot erase.
The erase guard is set. (“ ” appears.)
Cancel the erase guard. Refer to “ERASE GUARD”.(See Page 24.)
“CANNOT INSERT” appears.
Insertion recording is not available.
“MEMORY FULL” appears.
The memory capacity is full.
Erase unnecessary files. Refer to “ERASING”. (See Page 20.)
“FILE FULL” appears.
Frequent “Insertion Recording” and “Partial Erasing” have been made
on one file.
Connect to your PC then save the backup data.
32
Page 34

SYMPTOM
POSSIBLE CAUSE
CORRECTIVE ACTION
“NO CARD” appears.
The SD Card is not inserted.
Insert the SD Card.
“NO DATA” appears.
The file cannot be created.
Execute “ERASE ALL MEMORY”. (See Page 22.)
“CARD ERR” appears.
The data cannot be read correctly.
Remove the SD Card once, then insert it again. If it does not work,
“ERASE ALL MEMORY”. (See Page 22.)
“LIMITED TIME” appears.
Recording time is more than 6 hours.
Record on a new file.
“LOCKED CARD” appears.
The write-protect of SD Card is locked.
Set the write-protect switch to “Unlock”. (See page 2.)
Operation or display is not normal.
The unit must be reset.
See “WHAT TO DO IF…”. (See Page 5.)
33
Page 35

READ CAREFULLY BEFORE USE!!!
USER LICENSE AGREEMENT
IMPORTANT! — BY INSTALLING, COPYING, ACCESSING, DOWNLOADING,
AND/OR USING THIS THE SOFTWARE, YOU ARE CONSENTING TO BE
BOUND BY AND ARE BECOMING A PARTY TO THIS AGREEMENT AS A
LICENSEE. IF YOU DO NOT AGREE TO ALL OF THE TERMS OF THIS
AGREEMENT, TERMINATE THIS INSTALLATION PROCESS OR, IF THE
SOFTWARE IS ALREADY INSTALLED, IMMEDIATELY UNINSTALL IT.
THIS USER LICENSE AGREEMENT (“this Agreement”) shall serve as a
legally binding instrument between you (as “Licensee”, whether an individual
or a corporation, regardless) and SANYO Electric Co., Ltd. (“Licensor”)
concerning the Licensee’s use of a single SANYO SOFTWARE PRODUCT
(“the Software”) under the terms and conditions set forth herein. The Software
shall include, but without limitation, computer software and related media
materials, printed materials (documents such as user manuals), and
electronic documents whether or not retrieved by licensee “on-line”, and
shall include any updates and upgrades thereof supplied by Licensor having
additional features and functions.
Where a separate User License Agreement is attached to any the Software
supplied by Licensor, the terms and conditions of that User License
Agreement shall also apply in addition to the terms and conditions set forth
in this Agreement.
If you are unable to agree to any of the terms and conditions set forth herein,
Licensor is unable to grant you the license to install, use or copy the Software.
34
Page 36

The Software covered under this Agreement is protected under the
international conventions and treaties on copyright and the related laws
and regulations. This license shall constitute a grant of a license to Licensee
for a single use of the Software and may not be deemed under any
circumstances to constitute a sale of the Software itself.
1. Grant of License
Licensor shall grant Licensee a non-exclusive, non-sublicensable, nontransferable license for the use of the Software under the terms and
conditions set forth herein:
• System Software
Licensee may use the Software only in a single computer or on a
computer network (“the Computer”, including without limitation,
workstation, terminal, and/or other digital or electronic device) in binary
executable form.
2. Other rights and limitations
• Reverse engineering, etc.
Except as expressly provided herein, Licensee shall not copy, modify
reproduce, display, decompile, reverse engineer, reverse assemble,
store, translate, sell, lease or otherwise transfer, distribute the Software,
in whole or in part, nor may Licensee use the Software with the intent to
clone any proprietary product to Licensor.
• Separation or division of the Software prohibited
This license hereby is granted for a single use only. In no circumstances
shall Licensee separate, divide or compartmentalize any constituent
portion(s) of the Software into multiple parts, sections, or compartments
for use in multiple computers.
35
Page 37

• Rental, lease or loan prohibited
Licensee shall not lend, lease or loan the Software to any party(ies).
• User support service by Licensor
Licensor may choose to provide user support service in accordance
with the Licensor’s policy set out in User Manual, On-line documents,
or other printed matters made available by Licensor from time to time
(the “Support Service”). All additional software code made available to
Licensee as a part of the Support Service shall be deemed to constitute
a part of the Software hereof to which all the terms and conditions of
this Agreement shall apply. Licensor shall be entitled to use for
commercial purposes or otherwise any and all technical information
(the “Technical Information”) provided by Licensee to Licensor, provided,
however, that Licensor shall ensure that the identity of the Licensee
shall remain undisclosed in the Licensor’s use of all such Technical
Information.
3. Other Intellectual Proprietary Rights
Licensor or its supplier is the owner of all right, title and interest in and
to the Software and its documents such as user manual and any and all
copies thereof. The proprietary ownership of all data operated using
this Software shall remain with the respective owner(s) and shall be
protected by the international conventions and treaties and other
intellectual proprietary rights. Licensee shall not be deemed, by anything
contained in or done pursuant to this Agreement to acquire any right,
title, or interest in any trademark, copyright, patent or other intellectual
property of Licensor, and shall do nothing to prejudice the value or validity
of the respective owner’s rights therein or ownership thereof. Licensor
shall preserve the proprietary ownership of any and all rights and titles
in the Software not specifically provided herein.
36
Page 38

4. Backup copy
After having installed a copy of the Software pursuant to this Agreement,
Licensee may make a single copy of the Software for backup and archival
purposes only, provided that any copy must contain all proprietary notices
included in the original. If another original medium becomes necessary
to use the Software on a computer under this Agreement, Licensee
may make a single copy of the Software. Except as specifically provided
herein, Licensee shall refrain from making copy of the Software or its
incidental documents such as user manual in any manner whatsoever.
5. DISCLAIMER OF WARRANTY:
THE SOFTWARE IS DEEMED ACCEPTED BY LICENSEE UPON IT’S
USE BY LICENSEE.
THE SOFTWARE IS PROVIDED TO LICENSEE AS IS, WITHOUT
WARRANTY OF ANY KIND. TO THE MAXIMUM EXTENT PERMITTED
BY APPLICABLE LAW. LICENSOR FURTHER DISCLAIMS ALL
WARRANTIES, INCLUDING WITHOUT LIMITATION, ANY IMPLIED
WARRANTIES OF MERCHANTABILITY, FITNESS FOR A
PARTICULAR PURPOSE, AND NON INFRINGEMENT. THE ENTIRE
RISK ARISING OUT OF THE USE OR PERFORMANCE OF THE
PRODUCT AND DOCUMENTATION REMAINS WITH LICENSEE. IN
NO EVENT SHALL LICENSOR OR ITS SUPPLIERS BE LIABLE FOR
ANY CONSEQUENTIAL, INCIDENTAL, DIRECT, INDIRECT, SPECIAL,
PUNITIVE OR OTHER DAMAGES WHATSOEVER (INCLUDING
WITHOUT LIMITATION, DAMAGES FOR LOSS OF BUSINESS
PROFITS, BUSINESS INTERRUPTION, LOSS OF BUSINESS
INFORMATION, OR OTHER PECUNIARY LOSS) ARISING OUT OF
THIS AGREEMENT OR THE USE OF OR INABILITY TO USE THE
PRODUCT, EVEN IF LICENSOR HAS BEEN ADVISED OF THE
POSSIBILITY OF SUCH DAMAGES.LICENSOR DOES NOT
WARRANT THAT THE SOFTWARE DOES NOT INCLUDE ANY VIRUS
OR DEFECTS, THE SOFTWARE ROUTINE OR OTHER SOFTWARE
DESIGNED TO RESTRICT UNAUTHORIZED ACCESS; OR TO
DISABLE, ERASE OR OTHERWISE HARM THE SOFTWARE,
37
Page 39

HARDWARE, OR DATA; OR TO PERFORM ANY OTHER SUCH ACTIONS
AND LICENSOR HEREBY EXPRESSLY DISCLAIMS ANY AND ALL
LIABILITIES TO RESTORE ANY SUCH DEFECTS.
6. Indemnification:
Licensor will not have any liability to Licensee for, and Licensee will
defend and hold Licensor harmless against, any claim, expense,
judgment, liability, or loss (including attorneys’ fees and expert witnesses’
expenses) based on Licensee’s use of any content of the Software,
arising from any intellectual property claim (including patent, trademark,
copyright, or trade secret infringement), any right of publicity or privacy
claim, or any defamation or unfair competition claim.
7. Termination.
Without prejudice to any other rights, Licensor may terminate this
Agreement if Licensee fails to comply with the terms and conditions
herein. Licensee may also terminate this Agreement at any time by
destroying the Software and Documentation and all copies thereof. The
provisions of sections 2, 3, 4, 5, 6 and 7 shall survive any termination of
this Agreement.
38
Page 40

For USA
SANYO SERVICE PLUS LIMITTED
WARRANTY
DICTATION PRODUCTS ONLY
In order to obtain factory warranty service for Sanyo Dictation Products,
call the toll-free number below. The unit must be packed in the original
carton or a well-padded sturdy carton in order to avoid shipping damage.
Note: Do not return this unit to the retail store for service.
To obtain Service Plus Warranty service, product operation information
or for problem resolution, call
OBLIGATIONS
Toll Free 1-877-999-1840
Weekdays 7:30 AM – 5:00 PM Pacific Time
THIS WARRANTY IS VALID ONLY ON SANYO DICTATION PRODUCTS
PURCHASED AND USED IN THE UNITED STATES OF AMERICA,
EXCLUDING ALL U.S. TERRITORIES AND PROTECTORATES. THIS
WARRANTY APPLIES ONLY TO THE ORIGINAL RETAIL USER, AND
DOES NOT APPLY TO PRODUCTS USED FOR ANY INDUSTRIAL,
PROFESSIONAL, OR COMMERCIAL PURPOSE. THE ORIGINAL
DATED BILL OF SALE OR SALES SLIP MUST BE SUBMITTED AT THE
TIME WARRANTY SERVICE IS REQUESTED.
39
Page 41

Subject to the OBLIGATIONS above and EXCLUSIONS below, SANYO
FISHER COMPANY (SFC) warrants this SANYO Dictation product against
defects in materials and workmanship for the periods of LABOR and PARTS
specified below. SFC will, at its option, within two business days after its
receipt of any dictation product that fails to conform to this warranty at SFC’s
designated facility, either (a) repair such product or any of its parts which
fail to conform to this warranty or (b) ship a replacement product. The
warranty period commences on the date the product was first purchased at
retail.
LABOR PARTS
1 YEAR 1 YEAR
EXCLUSIONS
This warranty does not cover (A) the adjustment of customer-operated
controls as explained in the appropriate model’s instruction manual, or (B)
the repair of any product, whose serial number has been altered, defaced
or removed. This warranty shall not apply to the cabinet or cosmetic parts,
knobs or routine maintenance.
This warranty does not apply to repairs or replacements necessitated by
any cause beyond the control of SFC including, but not limited to, any
malfunction, defect, or failure caused by or resulting from unauthorized
service or parts, improper maintenance, operation contrary to furnished
instructions, shipping or transit accidents, modification or repair by the user,
abuse, misuse, neglect, accident, incorrect line voltage, fire, flood, or other
Acts of God, or normal wear and tear.
The foregoing is in lieu of all other expressed warranties and SFC does not
assume or authorize any party to assume for it any other obligation or liability.
40
Page 42

THE DURATION OF ANY WARRANTIES WHICH MAY BE IMPLIED BY
LAW (INCLUDING THE WARRANTIES OF MERCHANTABILITY AND
FITNESS) IS LIMITED TO THE TERM OF THIS WARRANTY. IN NO EVENT
SHALL SFC BE LIABLE FOR SPECIAL, INCIDENTAL OR
CONSEQUENTIAL DAMAGES ARISING FROM OWNERSHIP OR USE
OF THIS PRODUCT, OR FOR ANY DELAY IN THE PERFORMANCE OF
ITS OBLIGATIONS UNDER THIS WARRANTY DUE TO CAUSES BEYOND
ITS CONTROL. SOME STATES DO NOT ALLOW LIMITATIONS ON HOW
LONG AN IMPLIED WARRANTY LASTS AND/OR DO NOT ALLOW THE
EXCLUSION OR LIMITATION OF CONSEQUENTIAL DAMAGES, SO THE
ABOVE LIMITATIONS AND EXCLUSIONS MAY NOT APPLY TO YOU.
THIS WARRANTY GIVES YOU SPECIFIC LEGAL RIGHTS. YOU MAY
HAVE OTHER RIGHTS, WHICH VARY FROM STATE TO STATE.
For your protection in the event of theft or loss of this product, please fill in
the information below for your own personal records.
S/D R3
Model No.
Serial No.
(Located on back or bottom side of unit)
Date of Purchase
Purchase Price
Where Purchased
21605 Plummer Street
Chatsworth, CA 91311
41
Page 43

For Canada
THE SANYO COMFORT WARRANTY
BUSINESS SYSTEMS - DICTA RECORDERS
WARRANTY APPLICATION
New, unused Sanyo Dicta Recorder products purchased in Canada are
warranted against manufacturing defects in materials and workmanship for
ONE YEAR for parts and ONE YEAR for labour, from the date of purchase
by the original retail purchaser. This warranty only applies in favour of the
original retail purchaser of the warranted product.
SANYO CANADA INC.’S RESPONSIBILITY
During the warranty period, SANYO Canada Inc. will repair, or at our option,
replace a Sanyo Dicta Recorder product which shows evidence of a
manufacturing defect in materials or workmanship.
Replacement PARTS are warranted for the remaining portion of the warranty
period.
WHAT IS NOT COVERED
(a). Dicta Recorder products purchased outside Canada.
(b). Dicta Recorder products purchased in a used condition.
(c). Problems due to product set-up and installation.
(d). Adjustments that are outlined in the Operating Manual.
(e). Accessory items including carrying cases, cassette tapes and cables.
(f). Damage in or due to transportation.
(g). Damage due to improper maintenance, accident, abuse, misuse or
negligence.
42
Page 44

ORIGINAL RETAIL PURCHASER’S RESPONSIBILITY
You, the original retail purchaser, must present your original, dated bill-ofsale together with this warranty to SANYO Canada Inc. or to an authorized
Sanyo Service Depot when you make a claim under this Warranty.
You, the original retail purchaser, are responsible for any costs of
TRANSPORTING the product to and from SANYO Canada Inc. or an
authorized Sanyo Service Depot. You also are responsible for the cost of
any MAINTENANCE necessary in respect of the product.
WARRANTY BECOMES VOID
This warranty becomes void if the product’s serial numbers are altered or
removed or if any repair to the product is made other than by SANYO Canada
Inc. or by an authorized Sanyo Service Depot.
LIMITATIONS
(a) SANYO Canada Inc. reserves the right to change or improve the design
of the model of the product warranted hereunder without incurring any
obligation to make any modifications to or to install any improvement in
or on the product.
(b) In no event shall SANYO Canada Inc. or any of its Authorized Dealers
be liable for special or consequential damage arising from the use of
this product.
STATUTORY WARRANTIES
The above provisions do not preclude the operation of any applicable
provincial statute which in certain circumstances may not allow some of the
limitations and exclusions described in this Warranty. Where any terms of
this Warranty are prohibited by such a statute, they shall be deemed null
and void but the remainder of this warranty shall remain in effect.
43
Page 45

HOW TO OBTAIN WARRANTY SERVICE
Please contact the Sanyo Authorized Dealer from whom the product was
purchased, or contact us directly at:
SANYO Canada Inc.
1-300 Applewood Crescent
Concord, Ontario
L4K 5C7
(905) 760-9944
1-800-263-2244
http://www.sanyocanada.com
SDR 05/04 (R12)
Model No.
Serial No.
(Located on back or bottom side of unit)
Date of Purchase
Purchase Price
Where Purchased
SANYO Canada Inc.
44
Page 46

ESPAÑOL
CONTENIDO
PRECAUCIONES ................................................................................ 46
CONTROLES ....................................................................................... 47
ALIMENTACIÓN .................................................................................. 49
TARJETA SD ........................................................................................50
ANTES DEL FUNCIONAMIENTO ....................................................... 51
AJUSTE DE LA FECHA Y HORA ........................................................ 52
SELECCIÓN DE LA CARPETA Y EL MENÚ ....................................... 53
GRABACIÓN ....................................................................................... 57
EDICIÓN DE LOS DATOS GRABADOS ............................................. 59
REPRODUCCIÓN ............................................................................... 61
SELECCIÓN DE LA PANTALLA .......................................................... 63
BORRADO ........................................................................................... 64
PROTECCIÓN FRENTE A BORRADO ............................................... 68
TEMPORIZADOR DE ALARMA .......................................................... 69
ANTES DE INSTALAR EL SOFTWARE DE APLICACIÓN.................. 70
REPRODUCCIÓN/EDICIÓN DE UN FICHERO DE DATOS
GRABADO CON EL PC ....................................................................... 70
CONEXIÓN DEL PC ............................................................................ 72
LIMPIEZA DE LA CUBIERTA ............................................................... 74
ESPECIFICACIONES .......................................................................... 74
INFORMACIÓN ACERCA DE LA FCC ................................................ 75
INFORMACIÓN SOBRE LA NORMA CANADIENSE ICES-003 ......... 75
GUÍA DE SOLUCIÓN DE PROBLEMAS ............................................. 76
CONTRATO DE LICENCIA .................................................................. 78
GARANTÍA (Para EE.UU.) ................................................................... 83
Lea este manual antes de usar el producto.
Guarde el manual en un lugar seguro para poder consultarlo en el futuro.
45
Page 47

PRECAUCIONES
• No quite nunca la tarjeta SD mientras está utilizando la unidad. De otra
forma, la tarjeta SD, el contenido grabado y la unidad se estropearán.
• Si la línea de rectángulos del indicador de las pilas ( ) desaparece
durante la grabación, detenga la grabación inmediatamente y sustituya
las pilas.
• No desconecte el adaptador de CA ni retire las pilas mientras la unidad
esté funcionando.
• Antes de proceder al borrado, compruebe que el indicador de las pilas
presenta un nivel de carga máximo.
• El aparato no deberá exponerse ni a goteo ni a salpicaduras.
• No introduzca alfileres, etc. en el interior de la unidad.
• No deje caer la unidad ni la exponga a golpes fuertes.
• No la utilice en lugares donde las temperaturas sean extremas (inferiores
a 5°C o superiores a 35°C).
• Ponga el interruptor de protección contra escritura
en “Unlock” antes de insertar la unidad.
• es una marca comercial registrada de la SD
Association.
• Otros nombres de sistemas y de productos son generalmente marcas
comerciales registradas o marcas comerciales de sus respectivos
fabricantes y desarrolladores.Los símbolos ™ y ® no se muestran en
este manual.
Accesorios
Cable USB x 1
CD-ROM x 1
Funda x 1
Tarjeta SD (Inicializada) x 1
AAA Pilas x 2
Notas sobre el ajuste del reloj
Asegúrese de ajustar la fecha y hora en el reloj de la unidad antes de
comenzar a utilizarla. (Consulte la página 52).
Control de pie para PC
(Juego de transcripción para PC: SANYO
modelo núm. FS-USB2, opcional)
46
Page 48

CONTROLES
2
1
14
13
12
11
10
1. Toma de auriculares (EAR)
3
4
2. Indicador de grabación
3. Toma de micrófono externo
(MIC)
4. Micrófono interno
5. Interruptor de funcionamiento
(DICT, STOP, PLAY, REV)
6. Botón de control (VOLUME,
5
6
7
8
9
TIME/SET, MENU/FOLDER)
7. Botones de avance y retroceso
(F,E)
8. Botón de crear fichero/pausa
(CREATE FILE)
9. Tapa de terminales de entrada/
salida digital (DIGITAL I/O)
10. Altavoz interno
11. Botón de borrado (ERASE)
12. Botón de índice/cancelación
(INDEX/CANCEL)
13. Tapa del compartimiento de la
tarjeta SD
14. Pantalla de visualización
47
Page 49

15
REC DATE TIME HQSPLP
VAS
INSERT
FE
REC
13
456
7
9
10
8
2
16
17
18
19
15. Interruptor de encendido
(POWER)
16. Interruptor del modo de
grabación (REC MODE)
17. Interruptor de control de la
velocidad de reproducción
(SPEED CONTROL)
18. Tapa del compartimiento de
las pilas
19. Toma de CC externa (EXT DC
3V, parte inferior de la unidad)
Pantalla de visualización
1. Indicador del modo de registro
2. Indicador de protección frente
a borrado
3. Indicador de alarma
4. Indicador del sistema activado
por voz
5. Indicador de grabación de
inserción
6. Indicador de las pilas
7. Indicador de la grabación
8. Indicador de la capacidad de
memoria
9. Indicadores de la fecha/hora
grabada y del modo de tiempo
de grabación
10. Usuario, carpeta, tiempo de
grabación, pautas de
funcionamiento, etc.
48
Page 50

ALIMENTACIÓN
Pilas
1. Abra la tapa del compartimento de
las pilas.
2. Coloque dos pilas “AAA”
(suministrado). Observe que la
polaridad sea correcta.
Indicador de las pilas ( )
La línea de rectángulos es el indicador de las pilas. Los rectángulos negros
muestran el estado de las pilas durante el funcionamiento de la unidad.
: Indica que las pilas están cargadas y en buenas condiciones
(aparece “LOW BATT”): Indica que las pilas están descargadas o se
han agotado y deben sustituirse.
PRECAUCIÓN:
• No sustituya la pila mientras el aparato está encendido. Esto podría
causar mal funcionamiento.
• Retire las pilas si no va a utilizar la unidad durante un mes o un período
de tiempo superior.
• Deseche todas las pilas utilizadas de manera segura y de acuerdo con
la legislación aplicable.
NOTA IMPORTANTE:
LAS PILAS USADAS O DESCARGADAS DEBEN RECICLARSE O DESECHARSE
DE FORMA CORRECTA, DE ACUERDO CON TODAS LAS LEYES VIGENTES.
PARA OBTENER INFORMACIÓN MÁS DETALLADA, PÓNGASE EN CONTACTO
CON LA AUTORIDAD LOCAL DE DESECHOS SÓLIDOS.
CÓMO PROCEDER SI...
Si la unidad o la pantalla de visualización no
funcionan del modo habitual:
1. Abra la tapa del compartimento de las pilas.
2. Pulse el interruptor de reconexión RESET
con la punta de un bolígrafo o similar.
3. Reanude el funcionamiento.
49
RESET
Page 51

TARJETA SD
• Cuando utilice una Tarjeta SD nueva,
“BORRE TODA LA MEMORIA” de
antemano. (Consulte la página 66).
• Otras Tarjetas SD que no sean las
formateadas por esta unidad no se
podrán utilizar.
Introducción de la Tarjeta SD
1. Abra la tapa del compartimento de la Tarjeta SD.
2. Compruebe el borde de la tarjeta e introdúzcala
según se muestra en la ilustración.
3. Cierre la tapa.
Extracción de la Tarjeta SD
1. Sitúe el interruptor POWER (parte posterior de la unidad) en OFF.
2. Abra la tapa del compartimento de la Tarjeta SD.
3. Presione ligeramente la tarjeta hacia el interior de la ranura para soltarla.
4. Deslícela hacia fuera.
Nota:
• No retire la tarjeta mientras la unidad esté funcionando.
• No coloque la tarjeta en lugares expuestos a la electricidad estática o
ruido eléctrico.
• Los datos grabados en la tarjeta puede que no funcionen correctamente
con una grabadora digital distinta.
• Si la tarjeta no está introducida, aparece “NO CARD” cuando se conecta
la unidad.
• Cuando se carga una Tarjeta SD, la unidad crea auto-máticamente
una carpeta VoiceRec, etc. No las elimine.
• No utilice una MultiMediaCard.
• Esta unidad soporta la Tarjeta SD con una memoria de 64 MB a 2 GB.
¡ADVERTENCIA!
Mantenga la tarjeta SD Card fuera del alcance de niños pequeños que
pudieran metérsela en la boca. En caso de ingestión accidental, llame
inmediatamente a un médico.
50
Page 52

ANTES DEL FUNCIONAMIENTO
Encender y apagar la unidad
Sitúe el interruptor POWER (parte posterior de la unidad) en ON para
conectar la unidad. La unidad se encuentra ahora en el modo en espera.
Ejemplo:
Nombre de la carpeta
Número de fichero actual
Para desconectar la unidad, sitúe el interruptor POWER en OFF en el modo
de parada.
Funcionamiento de desconexión automático
La alimentación se desconecta automáticamente en unos 10 minutos
después de haber entrado en el modo de parada.
Función de retención
Si se pulsa el interruptor de control o el botón de funcionamiento mientras
el interruptor POWER está ajustado a OFF, “POWER OFF” aparece
brevemente en la pantalla. De este modo se evita una reproducción o
grabación accidental.
Auriculares
Conecte unos auriculares (no incluido) a la toma EAR. (El altavoz se
desconecta automáticamente).
Nota: No olvide reducir el volumen antes de conectar o desconectar los
auriculares.
Micrófono externo
Conecte un micrófono externo (no incluido) a la toma MIC. (El micrófono
interno se desconecta automáticamente).
USER-01
BU 1/ 1
NEW
Nombre del autor
Número total de ficheros
51
Page 53

AJUSTE DE LA FECHA Y HORA
1. Deslice el interruptor de funcionamiento hasta “STOP”.
2. Mantenga pulsado el botón MENU/FOLDER al menos durante 2
segundos en el modo de parada. Aparece “AUTHOR”.
3. Pulse el botón MENU/FOLDER repetidas veces hasta que aparezca la
pantalla de la fecha y hora.
Ejemplo:
0:00
2006
AUG.01
4. Pulse el botón TIME/SET. La pantalla del año parpadea.
5. Pulse el botón VOLUME + o – repetidas veces para seleccionar el año.
6. Pulse el botón TIME/SET. La pantalla del mes parpadea.
7. Defina el mes, día, hora y minutos siguiendo los pasos 4 y 5 anteriores.
• La hora se puede ajustar con
precisión pulsando el botón TIME/
SET cuando se oye la señal horaria.
8. Pulse el botón INDEX/CANCEL para volver a la pantalla principal.
Cambiar el reloj a la pantalla de 12 horas (o de 24 horas)
1. Mantenga pulsado el botón MENU/FOLDER al menos durante 2
segundos en el modo de parada.
2. Pulse el botón MENU/FOLDER repetidas veces hasta que aparezca
“12/24”.
3. Pulse el botón TIME/SET. “24 HOUR” (o “12 HOUR”) parpadea.
4. Pulse el botón VOLUME + o – una vez. “12 HOUR” (o “24 HOUR”)
parpadea.
5. Pulse de nuevo el botón TIME/SET.
6. Pulse el botón INDEX/CANCEL para volver a la pantalla principal.
MENU/
FOLDER
+ VOLUME –
TIME/SET
52
Page 54

SELECCIÓN DE LA CARPETA Y EL MENÚ
Selección de la carpeta
Pulse el botón MENU/FOLDER brevemente en el modo de parada. Cada
vez que pulse el botón, la pantalla de visualización cambiará según se
muestra a continuación:
FOLDER (CARPETA)
BUSI (Negocios) v LECT (Discurso) v OTHERS (Otros)
Nota:
Una vez transcurridos unos segundos, regresa al modo en espera en la
pantalla de la carpeta seleccionada. Aparece la abreviatura del nombre de
la carpeta.
Ejemplo:
La abreviatura del nombre de la carpeta
Selección del menú
1. Mantenga pulsado el botón MENU/FOLDER al menos durante 2
segundos en el modo de parada.
Ejemplo:
2. Pulse el botón MENU/FOLDER varias veces para seleccionar el menú
deseado. Cada vez que pulse el botón, la pantalla de visualización
cambiará según se muestra a continuación:
USER-01
BU 1/ 1
NEW
AUTHOR
ID01 Número de identificación
USER-01 Nombre del autor
AUTHOR v EDIT v Fecha y hora v ALARM v VAS v REC TIME
v
BEEP v ERASE GUARD v 12/24 v LCD LEVEL v VERSION
BUSI v BU
LECT v LE
OTHERS v OT
53
Page 55

3. Para cambiar el parámetro de un submenú en el menú seleccionado,
pulse el botón TIME/SET de manera que la pantalla parpadee.
4. Pulse el botón VOLUME + o – para seleccionar un nuevo submenú.
(Consulte el apartado “Varios modos de menú” que aparece a
continuación).
5. Pulse el botón TIME/SET para ajustarlo.
6. Repita los pasos del 2 al 5 para cambiar otros parámetros.
7. Pulse el botón INDEX/CANCEL para volver a la pantalla principal.
Ejemplo:
USER-01
BU 1/ 1
NEW
Varios modos de menú
AUTHOR: Seleccionar el número de identificación/nombre del autor
ID01/USER-01 - ID99/USER-99
Nota:
El nombre del autor se crea automáticamente. Puede cambiar esto
utilizando el software de PC incluido en el CD-ROM.
EDIT: Selección del modo de edición
OVER WRITE: Grabación de sobrescritura
INSERT: Grabación de inserción (“INSERT” aparece en la pantalla).
Fecha y hora (consulte la página 52).
ALARM: Selección del modo de alarma
OFF: Sin sonido de alarma
ON: Sonido de alarma (“ ” aparece en la pantalla).
Tras definir “ON”, la pantalla del año parpadea. Utilice los botones
TIME/SET y VOLUME + o – para definir la hora de conexión de la
alarma. (Consulte la página 52).
54
Page 56

VAS: Selección del modo del sistema activado por voz
OFF: Para iniciar y detener la grabación manualmente
ON: La grabación comienza cuando el micrófono capta el sonido y se
detiene automáticamente cuando el sonido cesa. Aparece “VAS ”.
Pulse el botón F o E para definir la sensibilidad del micrófono
cuando comienza la grabación. El nivel sensor de VAS aparece en
la pantalla. “VAS 0” “VAS 10”
REC TIME: Selección del modo de tiempo de grabación
LP: Para una grabación larga
SP: Para una grabación estándar
HQ: Para una grabación de primera calidad (Configuración inicial)
XHQ: Para una grabación de máxima calidad
Bajo Alto
REC
TIME
LP 8 h 20 min. 17 h 20 min. 34 h 40 min.
SP 4 h 10 min. 8 h 40 min. 17 h 20 min.
HQ 3 h 0 min. 6 h 15 min. 12 h 30 min.
XHQ 2 h 0 min. 4 h 15 min. 8 h 30 min.
El tiempo de grabación de la tabla muestra un tiempo aproximado. Éste
será un poco diferente dependiendo de la Tarjeta SD.
Nota:
• La definición o cambio del tiempo de grabación puede utilizarse para
una grabación en un fichero nuevo. Cuando comience la grabación de
sobrescritura o de inserción en el fichero grabado, seguirá el tiempo de
grabación del fichero.
• Cuando se seleccione el modo “XHQ”, el segmento “XHQ” no aparecerá
en la pantalla.
55
64MB 128MB 256MB
Tiempo de grabación (aproximado)
Page 57

BEEP: Selección del modo de pitido
ON: Cada vez que se pulsen los botones de funcionamiento, se oirá un
pitido.
OFF: No se oye ningún pitido
ERASE GUARD: Selección del modo de protección frente a borrado
OFF: Puede borrar los datos.
ON: No puede borrar los datos. (“ ” aparece en la pantalla).
12/24 (Consulte la página 52).
LCD LEVEL: Selección del brillo de la pantalla de cristal líquido
Puede seleccionar “LEVEL 1” - “LEVEL 10”.
VERSION: Muestra la versión de firmware actual
56
Page 58

GRABACIÓN
1. Sitúe el interruptor REC MODE (parte posterior de la unidad) en el
modo de grabación deseado.
DICT: Dictado
“REC MODE DICT” aparece brevemente y “ ” aparece en la
pantalla de visualización.
CONF: Conferencia
“REC MODE CONF” aparece brevemente y “ ” aparece en la
pantalla de visualización.
LECT: Discurso
“REC MODE LECT” aparece brevemente y “ ” aparece en la
pantalla de visualización.
2. En caso necesario, seleccione AUTHOR, VAS, REC TIME, etc.
(Consulte las páginas 54 y 55).
3. Pulse el botón MENU/FOLDER varias veces para seleccionar la carpeta
deseada.
4. Sitúe el interruptor de funcionamiento en la posición DICT para iniciar
la grabación. El indicador de grabación se ilumina y “REC” aparece en
la pantalla.
Ejemplo:
USER-01
LE 1/ 1
0m01s
5. Si túe el interruptor de
funcionamiento en la posición
STOP para detener la grabación
en cualquier momento.
Interruptor de
funcionamiento
57
Page 59

Nota:
• La unidad puede grabar hasta 99 ficheros en cada carpeta.
•“
FE
• Cuando el tiempo de grabación está lleno, aparece brevemente
“MEMORY FULL”. En este caso, borre los ficheros que no sean
necesarios.
• Si se pulsa el botón INDEX/CANCEL durante la grabación, se realiza
una marca de índice (aparece brevemente “INDEX”) y la grabación
continúa.
Pueden agregarse hasta 32 marcas de índice para cada fichero. Si
intenta introducir más marcas de índice, aparecerá brevemente “INDEX
FULL”. Las marcas de índice no pueden eliminarse individualmente.
Precaución:
Intente no grabar mensajes en la proximidad de zonas o dispositivos con
elevada intensidad de campo, por ejemplo, cableado de alta potencia o
funcionamiento de un teléfono móvil, ya que podrían grabarse ruidos
inesperados.
Parada temporal de la grabación (pausa de grabación)
Pulse el botón CREATE FILE durante la grabación. El tiempo de grabación
transcurrido y “REC” parpadean en la pantalla. Para continuar la grabación,
pulse de nuevo el botón.
Creación de un número de fichero nuevo
Pulse el botón CREATE FILE en el modo de parada. Aparece el número de
fichero nuevo.
Ejemplo:
” muestra la capacidad de memoria de la tarjeta.
USER-01 USER-01
LE 1/ 1 x LE 2/ 2
END NEW
Nota:
Esta unidad puede grabar un máximo de 6 horas en un archivo.
58
Page 60

EDICIÓN DE LOS DATOS GRABADOS
Grabación de sobrescritura
Nota:
Se borrará el material grabado
anteriormente.
1. Seleccione el modo de edición
“OVER WRITE”. (Consulte la
página 54).
2. Reproduzca el fichero. (Consulte
la página 61).
3. Sitúe el interruptor de funcionamiento en STOP (o pulse el botón
CREATE FILE para definir el modo de pausa) donde desee iniciar el
proceso de sobrescritura.
4. Sitúe el interruptor de funcionamiento en DICT. Comienza la grabación
de sobrescritura.
Grabación de inserción
Nota:
El material grabado anteriormente permanecerá intacto.
1. Seleccione el modo de edición “INSERT”. (Consulte la página 54).
2. Reproduzca el fichero. (Consulte la página 61).
3. Sitúe el interruptor de funcionamiento en STOP (o pulse el botón
CREATE FILE para definir el modo de pausa) cuando desee iniciar la
inserción.
4. Sitúe el interruptor de funcionamiento en DICT. Comienza la grabación
de inserción.
Precaución:
• La grabación de sobrescritura e inserción se inicia en la posición de
parada del fichero.
• En la pantalla “END”, la grabación comienza en la posición END.
• Si se pulsa el botón INDEX/CANCEL en el modo de parada, el modo
de edición “OVER WRITE” o “INSERT” puede cambiarse.
• En “Grabación de inserción”, la posición de inicio puede cambiar un
poco.
59
Interruptor de
funcionamiento
Page 61

Nota:
Las funciones “Grabación de inserción” y “Borrado parcial” del ICR-B220
puede que no funcionen correctamente con Tarjetas SD de 512 MB o más,
debido a las propiedades de las Tarjetas SD de mayor capacidad. Todas
las demás funciones de la grabadora funcionarán normalmente en las
Tarjetas SD de todas las capacidades...
Consulte la tabla siguiente.
Tarjeta SD
LP Sí Sí Sí No No No
Tiempo de
grabación
Sí = Se soporta el borrado de grabación de inserción/parcial.
No = No se soporta el borrado de grabación de inserción/parcial.
SP Sí Sí Sí No No No
HQ Sí Sí Sí No No No
XHQ Sí Sí Sí Sí Sí No
64MB 128MB 256MB 512MB 1GB 2GB
60
Page 62

REPRODUCCIÓN
1. Sitúe el interruptor SPEED CONTROL (parte posterior de la unidad) en
el modo de velocidad de reproducción deseado.
SLOW: Reproducción a velocidad lenta
NORMAL: Reproducción a velocidad normal
FAST: Reproducción a velocidad rápida
2. Seleccione el autor y la carpeta. (Consulte las páginas 53 y 54).
3. Pulse el botón F o E varias veces para seleccionar el fichero
deseado.
4. Sitúe el interruptor de funcionamiento en la posición PLAY para iniciar
la reproducción.
Ejemplo:
5. Pulse el botón VOLUME + o – según desee.
• Cuando se detiene la reproducción, aparece “END” en la pantalla.
6. Sitúe el interruptor de funcionamiento en STOP.
Parada temporal de la reproducción (pausa de reproducción)
Pulse el botón CREATE FILE durante la reproducción. El tiempo de
reproducción transcurrido parpadea.
Para reanudar la reproducción, pulse de nuevo el botón.
Saltar a un fichero
Pulse el botón F o E varias veces para saltar al fichero deseado en la
carpeta seleccionada.
• En el modo de parada, se salta al principio o al final del fichero actual,
anterior o siguiente.
• Durante el modo de reproducción, se salta al inicio del fichero.
USER-01
BU 2/ 3
0m01s
61
Page 63

Búsqueda de un fichero
Si se pulsa el botón F o E durante la reproducción, la unidad buscará
a alta velocidad en la dirección de avance o retroceso mientras el botón se
mantiene pulsado. Cuando se suelte el botón, continuará la reproducción.
Estos botones también se utilizan en el modo de parada.
Revisión
Para revisar el sonido grabado mientras se reproduce el fichero
seleccionado, sitúe y mantenga el interruptor de funcionamiento en REV.
Funciona dentro del fichero seleccionado.
Para reanudar la reproducción, suelte el interruptor.
Búsqueda de índices
Si se realizó una marca de índice en el fichero, pulse el botón INDEX/
CANCEL durante la reproducción. La unidad buscará el siguiente punto de
índice y la reproducción comenzará a partir de ese punto.
62
Page 64

SELECCIÓN DE LA PANTALLA
Pulse el botón TIME/SET varias veces durante la grabación, reproducción
y modo de parada. La pantalla cambia del siguiente modo:
En el modo de grabación:
Tiempo de grabación restante v Día/hora actual v Volver a la
pantalla principal
Ejemplo del tiempo de grabación restante:
Autor
Nota:
• Cuando el tiempo de grabación restante es superior a una hora, éste
se visualiza como 1h 24m.
Cuando el tiempo de grabación restante es inferior a una hora, éste se
visualiza como 1m 24s.
En el modo de reproducción:
Fecha/hora grabada v Día/hora actual v Tiempo de reproducción
restante v Volver a la pantalla principal
En el modo de parada:
Tiempo de grabación restante v Día/hora actual v Volver a la pantalla
principal
USER-01
REMAIN
1h24m
Tiempo de grabación restante
63
Page 65

BORRADO
Nota importante:
Antes de proceder al borrado, compruebe que el indicador de las pilas
presenta un nivel de carga máximo.
Cambie las pilas si el indicador de las mismas no se muestra completamente.
Preparación
1. Sitúe el interruptor de funcionamiento en STOP.
2. Seleccione el autor y la carpeta. (Consulte las páginas 53 y 54).
Nota:
Si comete un error mientras sigue los pasos, pulse el botón INDEX/
CANCEL antes de pulsar el botón TIME/SET.
Borrado de un fichero
1. Pulse el botón F o E para seleccionar el fichero que desea borrar.
Ejemplo:
2. Pulse el botón ERASE una vez. El número del fichero parpadea.
Ejemplo:
3. Mientras la pantalla parpadea, pulse el botón TIME/SET. En la pantalla
de visualización aparece brevemente “ERASE”.
El fichero seleccionado se borra. Todos los números de fichero
posteriores al fichero borrado se reducen en uno.
USER-01
LE 3/ 5
0m09s
ERASE
FILE
LECT 3
64
Page 66

Borrado de una carpeta
1. Pulse el botón ERASE dos veces. La carpeta parpadea.
Ejemplo:
ERASE
FOLDER
LECT
2. Mientras la pantalla parpadea, pulse el botón TIME/SET. En la pantalla
de visualización aparece brevemente “ERASE”. Se borran todas las
memorias de la carpeta seleccionada. Aparece “NEW”.
Ejemplo:
Borrado de la identificación del autor
1. Pulse el botón ERASE tres veces. El autor parpadea.
Ejemplo:
2. Mientras la pantalla parpadea, pulse el botón TIME/SET. En la pantalla
de visualización aparece brevemente “ERASE”. La identificación del
autor se borra.
Ejemplo:
USER-01
LE 1/ 1
NEW
ERASE
ID
USER-03
USER-02
BU 1/ 1
NEW
65
Page 67

Borrado de todas las memorias
1. Pulse el botón ERASE cuatro veces. “ERASE ALL MEMORY” parpadea.
2. Mientras la pantalla “ERASE ALL MEMORY” parpadea, pulse el botón
TIME/SET.
Aparecerá brevemente “ERASE”. Se borran todas las memorias de
todas las carpetas.
Ejemplo:
USER-01
LE 1/ 1
NEW
Nota:
El botón ERASE no funcionará durante la grabación o reproducción.
Cuando se realice el “BORRADO DE TODA LA MEMORIA”, todas las
memorias de todas las carpetas de la Tarjeta SD se borrarán.
“.” parpadea en la pantalla durante el borrado.
Ejemplo:
ERASE.
66
Page 68

Borrado parcial (borrado A-B)
1. Pulse el botón F o E para seleccionar el fichero.
2. Sitúe el interruptor de funcionamiento en la posición PLAY para iniciar
la reproducción.
3. Pulse el botón CREATE FILE para detener la reproducción en el punto
inicial a partir del cual desea borrar (punto A). El tiempo de reproducción
transcurrido parpadea.
Ejemplo:
4. Pulse el botón ERASE. “ERASE START” parpadea.
5. Mientras la pantalla “ERASE START” parpadea, pulse el botón TIME/
SET. “ERASE” parpadea. Se reanuda la reproducción automáticamente
desde el punto A.
Ejemplo:
6. Pulse el botón ERASE en el punto final que desea borrar (punto B).
“ERASE END” parpadea.
7. Mientras la pantalla “ERASE END” parpadea, pulse el botón TIME/
SET. Aparecerá brevemente “ERASE”.
La sección entre los puntos A y B en el fichero seleccionado se borra.
La pausa de reproducción se define automáticamente. (El tiempo de
reproducción transcurrido parpadea).
Pulse el botón CREATE FILE de nuevo o detenga la reproducción.
Nota:
• Puede producirse algo de error en el tiempo entre A y B designado en
el borrado parcial.
• La función “Borrado parcial” del ICR-B220 puede que no funcione
correctamente con Tarjetas SD de 512 MB o más, debido a las
propiedades de las Tarjetas SD de mayor capacidad. (Consulte la página
60).
67
USER-02
LE 1/ 5
0m08s
ERASE
LE 1/ 5
0m09s
Page 69

PROTECCIÓN FRENTE A BORRADO
Funciones de protección frente a borrado para evitar un borrado accidental.
1. Mantenga pulsado el botón MENU/FOLDER al menos durante 2
segundos en el modo de parada.
2. Pulse el botón MENU/FOLDER varias veces para seleccionar “ERASE
GUARD”.
3. Pulse el botón TIME/SET. “OFF” parpadea.
ERASE
GUARD
OFF
4. Pulse el botón VOLUME + o – para seleccionar “ERASE GUARD ON”.
“ ” aparece en la pantalla.
5. Pulse el botón TIME/SET para ajustarlo. “ ” permanece encendido.
Nota:
Si se pulsa el botón ERASE tras definir la función de protección frente al
borrado, aparece “GUARD” brevemente en la pantalla.
68
Page 70

TEMPORIZADOR DE ALARMA
Cuando se alcance la hora de conexión de alarma, la alarma se activará
según se muestra a continuación.
En el modo de parada o de desconexión:
• Pitido durante 10 segundos aproximadamente.
Durante el modo de reproducción:
El funcionamiento coincide con el descrito anteriormente en el apartado
“En el modo de parada o de desconexión”. Y retrocede al punto anterior y
reanuda la reproducción.
Durante el modo de reproducción:
Sin sonido (“ ” parpadea en la pantalla).
69
Page 71

ANTES DE INSTALAR EL SOFTWARE DE APLICACIÓN
• El PC deberá ejecutar el sistema operativo Microsoft Windows
Millennium Edition/2000 Professional/XP Professional/XP Home Edition
y disponer de un puerto USB.
• Deberá instalar el Reproductor de Windows Media versión 6.4 o
posterior.
• No conecte todavía la unidad al PC.
REPRODUCCIÓN/EDICIÓN DE UN FICHERO DE DATOS
GRABADO CON EL PC
Las grabaciones de voz digital pueden transferirse al PC para su
reproducción o edición. Antes de comenzar, instale el programa “PC Memo
Scriber” en el PC del siguiente modo:
1. Introduzca el CD-ROM de PC Memo Scriber en la unidad de CD-ROM
del PC. El programa de instalación se inicia automáticamente.
Nota:
Si el programa de instalación no se inicia...
1) Seleccione [Run] en el menú Inicio.
2) Escriba la siguiente línea:
D:\PCMEMO\setup.exe
“D” (la letra de la unidad) deberá sustituirse por la letra asignada a
la unidad de CD-ROM en su PC.
3) Haga clic en [OK].
2. Siga las instrucciones que aparecerán en pantalla.
3. Una vez finalizada la instalación, deberá reiniciar Windows.
70
Page 72

Nota:
Si aparece la pantalla mostrada a continuación, haga clic en [Continuar] o
[Si].
Windows XP Professional/XP Home Edition
Windows 2000 Professional
Windows es una marca comercial registrada de Microsoft Corporation.
Otros nombres de sistemas y productos son generalmente marcas
comerciales registradas o marcas comerciales de sus respectivos
fabricantes y desarrolladores.
Los símbolos TM y (R) no se muestran en este manual.
71
Page 73

CONEXIÓN DEL PC
1. Sitúe el interruptor POWER en OFF.
2. Conecte la unidad al PC utilizando el cable USB (suministrado) según
se muestra en la ilustración.
Puerto USB
Cable USB
Terminal DIGITAL I/O
Nota:
Cuando la unidad esté conectada al PC no funcionará ninguno de los
botones de operación de la unidad.
Cuando utilice una Tarjeta SD nueva, “BORRADO DE TODA LA MEMORIA”
sin conectar la unidad al PC. (Consulte la página 66).
No formatee la Tarjeta SD con el PC.
72
Page 74

Seleccionar la acción que Windows debe realizar
Tras la conexión aparecerá la siguiente pantalla (sólo en Windows XP).
- Este paso no es necesario en Windows ME/2000.
Las pantallas siguientes son de Windows XP.
Ajuste los parámetros para que
coincidan con el entorno de su
PC.
En este manual, se ha
seleccionado [No realizar
ninguna acción], se ha
marcado [Realizar siempre la
acción seleccionada] y se ha
hecho clic en [Aceptar]. Esto
completa la conexión con el
PC.
Nota:
Demasiados archivos o un archivo demasiado grande puede ser la causa
de que se tarde mucho tiempo en abrir la aplicación del PC.
1) Seleccione
2) Marque
3) Haga clic
73
Page 75

Acerca de la visualización en el Explorador de Windows
Cuando se conecta el grabador de voz digital a un PC a través del cable
USB, los datos grabados en la tarjeta SD Card pueden visualizarse en el
Explorador de Windows como datos de un dispositivo removible.
El grabador de voz digital graba los datos en la carpeta “Voicerec” de la
tarjeta SD Card. No use el Explorador para editar el contenido de la carpeta
“Voicerec”.
LIMPIEZA DE LA CUBIERTA
Limpie el exterior del aparato con un paño suave, humedecido con agua
tibia. No use benceno, diluyente ni alcohol, ya que estas sustancias dañarán
el acabado de las superficies.
ESPECIFICACIONES
Respuesta de frecuencia:
200 Hz - 3.800 Hz
(modo Estándar)
200 Hz - 1.900 Hz
(modo Larga duración)
200 Hz - 5.300 Hz
(modo Alta calidad)
200 Hz - 7.500 Hz
(modo Máxima calidad)
Potencia salida:
Altavoz: 200 mW (8 Ω, CC 3V)
Auriculares: 3 mW (16 Ω, CC 3V)
Información importante:
Debido a que este producto se mejora continuamente, SANYO se reserva
el derecho de modificar el diseño y las especificaciones del producto sin
previo aviso y sin asumir ninguna obligación por ello.
Fuente de alimentación:
CC: CC 3 V (2 pilas “AAA”)
Terminal de salida:
EAR
Altavoz
28 mm de diámetro
Dimensiones (ancho x alto x prof.):
Aprox. 48 x 113 x 19 mm
(1,9" x 4,4" x 0,7")
Peso:
Aprox. 65 gr. (2 oz.)
(sin pilas)
74
Page 76

INFORMACIÓN ACERCA DE LA FCC
Probado en conformidad
con las Normas de la FCC
PARA USO EN EL HOGAR O EN LA OFICINA
Número de modelo: ICR-B220
Marca comercial: Sanyo
Parte responsable: SANYO FISHER COMPANY
Dirección: 21605 Plummer Street
Te léfono: (818) 998-7322
• Este aparato cumple con la sección 15 del Reglamento de la FCC.
Su funcionamiento está sujeto a las dos condiciones siguientes:
(1) este aparato no debe causar interferencias perjudiciales,
y
(2) este aparato debe aceptar cualquier interferencia que reciba,
incluyendo aquellas interferencias que puedan ocasionar un
funcionamiento no deseado.
Declaración de conformidad
Chatsworth, California 91311
INFORMACIÓN SOBRE LA NORMA
CANADIENSE ICES-003
ESTE APARATO DIGITAL CLASE B CUMPLE CON LA NORMA
CANADIENSE ICES-003.
75
Page 77

GUÍA DE SOLUCIÓN DE PROBLEMAS
SÍNTOMA
POSIBLE CAUSA
ACCIÓN CORRECTORA
La unidad no se pone en funcionamiento.
Las pilas están descargadas o no están colocadas.
Coloque dos pilas “AAA” nuevas.
Aparecen “ ” y “LOW BATT”.
Las pilas están descargadas.
Coloque dos pilas “AAA” nuevas.
Aparece “POWER OFF” cuando se pulsa el botón de funcionamiento.
La función de retención está activada.
Sitúe el interruptor POWER en ON.
No hay sonido.
Los auriculares están conectados.
Desconecte los auriculares.
El volumen está ajustado al mínimo.
Pulse el botón VOLUME + o para ajustar el nivel del sonido.
No se puede borrar.
La protección frente a borrado está activada. (Aparece “ ” ).
Cancele la protección frente a borrado. Consulte el apartado sobre
“PROTECCIÓN FRENTE A BORRADO”. (Consulte la página 68).
Aparece “CANNOT INSERT”.
La grabación de inserción no está disponible.
Aparece “MEMORY FULL”.
La memoria está llena.
Borre los ficheros que no sean necesarios. Consulte el apartado
sobre “BORRADO”. (Consulte la página 64).
76
Page 78

SÍNTOMA
POSIBLE CAUSA
ACCIÓN CORRECTORA
Aparece “FILE FULL”.
Se ha hecho frecuentemente en un archivo la grabación de inserción y
el borrado parcial.
Conecte a su PC después de guardar los datos de la copia de
seguridad.
Aparece “NO CARD”.
La Tarjeta SD no está introducida.
Introduzca la Tarjeta SD.
Aparece “NO DATA”.
El fichero no puede crearse.
Ejecute el “BORRADO DE TODA LA MEMORIA”. (Consulte la
página 66).
Aparece “CARD ERR”.
Los datos no pueden leerse correctamente.
Retire una vez la Tarjeta SD y luego vuelva a insertarla. Si esto no
funciona, “BORRE TODA LA MEMORIA”. (Consulte la página 66).
3. Aparece “LIMITED TIME”.
El tiempo de grabación es superior a 6 horas.
Grabe en un archivo nuevo.
4. Aparece “LOCKED CARD”.
La protección contra escritura de la Tarjeta SD está bloqueada.
Ponga el interruptor de protección contra escritura en “Unlock”. (Vea
la página 46.)
El funcionamiento o la pantalla de visualización no es correcto.
La unidad debe reiniciarse.
Consulte “CÓMO PROCEDER SI...”. (Consulte la página 49).
77
Page 79

¡LEER ATENTAMENTE ANTES DE USAR EL APARATO!
CONTRATO DE LICENCIA
¡IMPORTANTE! — AL INSTALAR, COPIAR, ACCEDER A, DESCARGAR Y/O
USAR ESTE SOFTWARE, USTED ACEPTA LOS TÉRMINOS DE ESTE
CONTRATO Y SE CONVIERTE EN PARTE DEL MISMO. SI NO ACEPTA
TODOS LOS TÉRMINOS DE ESTE CONTRATO, INTERRUMPA ESTE
PROCESO DE INSTALACIÓN O, SI EL SOFTWARE YA ESTÁ INSTALADO,
DESINSTÁLELO INMEDIATAMENTE.
EL CONTRATO DE LICENCIA (“este Contrato”) es un instrumento
jurídicamente vinculante entre usted (como “Licenciatario”, independientemente
de si es un individuo o una corporación) y SANYO Electric Co., Ltd. (“Otorgante
de Licencia”) en lo que se refiere al uso por parte del Licenciatario de un solo
PRODUCTO DE SOFTWARE SANYO (“el Software”) de acuerdo con los
términos y condiciones establecidos en el presente Contrato. El Software
incluye, sin limitación, software de computadora y materiales en medios
relacionados, materiales impresos (documentos tales como manuales de
usuario) y documentos electrónicos, los que pueden o no haber sido
descargados “en línea” por el Licenciatario, así como las actualizaciones del
software, con características o funciones adicionales, proporcionadas por el
Otorgante de licencia.
En caso de que se incluya un Contrato de Licencia adicional con cualquiera
de los productos de Software proporcionados por el Otorgante de Licencia,
los términos y condiciones de dicho Contrato de Licencia también regirán de
forma adicional a los términos y condiciones establecidos en este Contrato.
Si no puede aceptar alguno de los términos y condiciones de este contrato, el
Otorgante de Licencia no podrá concederle la licencia para instalar, usar o
copiar el Software.
78
Page 80

El Software al que se refiere este Contrato está protegido por convenciones y
tratados internacionales sobre derechos de propiedad intelectual y demás leyes
y disposiciones relacionadas. Esta licencia constituye una concesión de licencia
al Licenciatario para usar una copia individual del Software y no debe
considerarse, bajo ninguna circunstancia, como una venta del Software.
1. Concesión de licencia
El Otorgante de Licencia concede al Licenciatario una licencia no exclusiva,
no “sublicenciable” y no transferible para usar el Software de acuerdo con
los términos y condiciones establecidos en el presente Contrato:
• Software de sistema
El Licenciatario puede usar el Software sólo en una computadora individual
o en una red de computadoras (“la Computadora”, incluyendo pero no
limitándose a una estación de trabajo, terminal y/u otro dispositivo digital
o electrónico) en forma binaria ejecutable.
2. Otros derechos y limitaciones
• Ingeniería inversa, etc.
Excepto cuando en el presente contrato se estipule expresamente lo
contrario, el Licenciatario no copiará, reproducirá de forma modificada,
desplegará, descompilará, realizará ingeniería inversa o montaje inverso,
almacenará, traducirá, venderá, alquilará o transferirá de cualquier otra
forma, ni distribuirá el Software, ya sea parcialmente o en su totalidad, y
tampoco utilizará el Software con la intención de “clonar” cualquier producto
patentado del Otorgante de Licencia.
• Se prohíbe la separación o división del Software
La presente licencia se otorga para un solo usuario. Bajo ninguna
circunstancia podrá el Licenciatario separar, dividir o compartimentar
cualquier parte(s) del Software en múltiples partes, secciones
o compartimientos para utilizarlos en varias computadoras.
79
Page 81

• Se prohíbe alquilar, arrendar o prestar el producto
El Licenciatario no alquilará, arrendará ni prestará el Software a ningún
tercero.
• Servicio de soporte prestado por el Otorgante de Licencia
El Otorgante de Licencia puede, a su discreción, ofrecer servicio de soporte
de acuerdo con la política del Otorgante de Licencia establecida en el
manual del usuario, documentos en línea u otros materiales impresos que
el Otorgante de Licencia hace públicos cada cierto tiempo (el “Servicio de
Soporte”). Todo el código de software adicional que se ponga a disposición
del Licenciatario como parte del Servicio de Soporte se considerará parte
de este Software y estará sujeto a los términos y condiciones de este
Contrato. El Otorgante de Licencia tendrá derecho a usar, con fines
comerciales o de otro tipo, parte o toda la información técnica (la
“Información Técnica”) proporcionada por el Licenciatario al Otorgante de
Licencia, siempre que, sin embargo, el Otorgante de Licencia garantice
que no revelará la identidad del Licenciatario cuando el Otorgante de
Licencia utilice dicha Información Técnica.
3. Otros derechos de propiedad intelectual
El Otorgante de Licencia o su distribuidor es el propietario de todos los
derechos, títulos e intereses relacionados con el Software y los documentos
asociados, tales como el manual del usuario, y de todas las copias de los
mismos. Todos los datos procesador con este Software seguirán siendo
propiedad de sus respectivos propietarios y estarán protegidos por las
convenciones y tratados internacionales y otros derechos de propiedad
intelectual. Nada de lo que se estipula en el presente Contrato o de lo que
pudiera realizarse de acuerdo con el mismo otorgará al Licenciatario ningún
derecho, título o interés sobre cualquier marca comercial, derecho de autor,
patente u otra propiedad intelectual del Otorgante de Licencia, y el
Licenciatario no hará nada para perjudicar el valor o validez de los derechos
del propietario respectivo ni la propiedad de éste. El Otorgante de Licencia
conservará la propiedad de todos los derechos y títulos relacionados con
el Software que no hayan sido especificados en el presente Contrato.
80
Page 82

4. Copia de seguridad
Después de instalar una copia del Software de acuerdo con este Contrato,
el Licenciatario podrá hacer una sola copia del Software para fines de
seguridad y archivo, siempre que la copia contenga todas las notas de
propiedad incluidas en el original. Si otro medio original se vuelve necesario
para poder usar el Software en una computadora de acuerdo con este
Contrato, el Licenciatario podrá hacer una copia única del Software.
Excepto cuando se especifique los contrario, el Licenciatario deberá
abstenerse de hacer copias del Software o de los documentos asociados,
tales como el manual de usuario, de cualquier forma posible.
5. RECHAZO DE GARANTÍAS:
EL SOFTWARE SE CONSIDERA ACEPTADO POR EL LICENCIATARIO
CUANDO ÉSTE HACE USO DEL MISMO.
SE ENTREGA EL SOFTWARE AL LICENCIATARIO EN EL ESTADO EN
QUE SE HALLA, SIN GARANTÍAS DE NINGÚN TIPO, HASTA EL PUNTO
MÁXIMO QUE LO PERMITE LA LEY. EL OTORGANTE DE LICENCIA
RECHAZA TODAS LAS GARANTÍAS, INCLUYENDO SIN LIMITACIONES
TODAS LAS GARANTÍAS IMPLÍCITAS DE COMERCIALIZACIÓN, DE
CONVENIENCIA PARA UN FIN EN PARTICULAR Y DE NO VIOLACIÓN
DE DERECHOS DE TERCEROS. EL LICENCIATARIO ASUME TODO
EL RIESGO ASOCIADO AL USO O FUNCIONAMIENTO DEL PRODUCTO
O DE LA DOCUMENTACIÓN DEL MISMO. EL OTORGANTE DE
LICENCIA O SUS DISTRIBUIDORES NO SERÁN, EN NINGÚN CASO,
RESPONSABLES POR DAÑOS RESULTANTES, FORTUITOS,
DIRECTOS, INDIRECTOS, ESPECIALES, PUNIBLES O DE CUALQUIER
OTRO TIPO (INCLUYENDO SIN LIMITACIONES DAÑOS POR PÉRDIDA
DE UTILIDADES, INTERRUPCIÓN DE ACTIVIDAD COMERCIAL,
PÉRDIDA DE INFORMACIÓN COMERCIAL U OTRA PÉRDIDA
PECUNIARIA) QUE SURJAN DE ESTE CONTRATO O DEL USO
O IMPOSIBILDIAD DE USAR EL PRODUCTO, AUN CUANDO EL
OTORGANTE DE LICENCIA HAYA SIDO ADVERTIDO DE LA
POSIBILIDAD DE DICHOS DAÑOS. EL OTORGANTE DE LICENCIA
NO GARANTIZA QUE EL SOFTWARE NO CONTIENE VIRUS
O DEFECTOS,
81
Page 83

LA RUTINA DE SOFTWARE Y OTRO SOFTWARE DISEÑADO PARA
RESTRINGIR EL ACCESO NO AUTORIZADO; O PARA INHABILITAR,
BORRAR O DE OTRA FORMA DAÑAR EL SOFTWARE, HARDWARE O
DATOS; O PARA REALIZAR CUALQUIER OTRA ACCIÓN DE ESTE TIPO,
POR LO CUAL EL OTORGANTE DE LICENCIA RECHAZA
EXPRESAMENTE TODA OBLIGACIÓN DE REPARAR DEFECTOS DE
ESTE TIPO.
6. Indemnización
El Otorgante de Licencia no tendrá ninguna obligación para con
el Licenciatario, y el Licenciatario defenderá y liberará de toda
responsabilidad al Otorgante de Licencia en caso de cualquier reclamación,
gasto, juicio, obligación o pérdida (incluyendo honorarios de abogados y
honorarios de testigos expertos) que surjan del uso que el Licenciatario
haga de cualquier parte del Software, que surjan de reclamaciones de
propiedad intelectual (incluyendo violación de patente, marca comercial,
derechos de autor o secreto comercial), cualquier reclamación de derechos
de publicidad o privacidad, o cualquier reclamación por difamación o
competencia desleal.
7. Término
Sin perjuicio de otros derechos, el Otorgante de Licencia podrá poner
término a este Contrato si el Licenciatario no cumple con los términos y
condiciones del mismo. El Licenciatario también podrá poner término a
este Contrato en cualquier momento destruyendo el Software y la
documentación y todas las copias de éstos. Las disposiciones de las
secciones 2, 3, 4, 5, 6 y 7 seguirán en vigor una vez que se haya puesto
término a este Contrato.
82
Page 84

Para EE.UU.
GARANTÍA LIMITADA SERVICE PLUS DE
SANYO
SÓLO PARA PRODUCTOS DE DICTADO
Para obtener servicio de garantía de fábrica para productos de dictado
Sanyo, llame gratis al número que se indica más abajo. Para evitar daños
durante el transporte, asegúrese de embalar el producto en la caja de cartón
original o en un cartón resistente y bien acolchado.
Nota: Cuando necesite servicio, no devuelva este producto a la tienda
donde lo adquirió.
Para obtener servicio de garantía Service Plus, información sobre el
funcionamiento del producto o información sobre cómo solucionar
problemas, llame
OBLIGACIONES
gratis al 1-877-999-1840
Días laborables 7:30 AM – 5:00 PM Tiempo Pacífico
ESTA GARANTÍA SÓLO ES VÁLIDA PARA PRODUCTOS DE DICTADO
SANYO ADQUIRIDOS Y USADOS EN LOS ESTADOS UNIDOS DE
AMÉRICA, EXCLUYENDO TODOS LOS TERRITORIOS Y
PROTECTORADOS DE EE.UU. ESTA GARANTÍA SÓLO ES VÁLIDA
PARA EL COMPRADOR ORIGINAL AL DETALLE; NO ES VÁLIDA PARA
PRODUCTOS USADOS CON CUALQUIER FIN INDUSTRIAL,
PROFESIONAL O COMERCIAL. AL MOMENTO DE SOLICITAR
SERVICIO DE GARANTÍA DEBERÁ PRESENTAR LA FACTURA
ORIGINAL DE COMPRA, DEBIDAMENTE FECHADA.
83
Page 85

De acuerdo con las OBLIGACIONES establecidas anteriormente y las
EXCLUSIONES que se detallan más abajo, SANYO FISHER COMPANY
(SFC) garantiza este producto de dictado SANYO contra defectos en los
materiales y defectos de fabricación durante los períodos de MANO DE
OBRA y PIEZAS que se especifican a continuación. SFC, a su discreción,
dentro de dos días hábiles después de recibir cualquier producto de dictado
que no cumpla con esta garantía en un taller de servicio designado por
SFC, (a) reparará dicho producto o cualquiera de sus piezas que no cumpla
con lo que se establece en esta garantía o (b) sustituirá el producto por
otro.
El período de garantía comienza a regir desde la fecha de compra inicial al
detalle del producto.
MANO DE OBRA
PIEZAS
1 AÑO
EXCLUSIONES
Esta garantía no cubre (A) el ajuste de controles “accionados por el cliente”,
según se explica en el manual de instrucciones del modelo correspondiente,
ni (B) la reparación de cualquier producto cuyo número de serie haya sido
alterado, tachado o quitado. Esta garantía no es válida para la cubierta o
partes ornamentales, botones o mantenimiento de rutina.
Esta garantía no es válida para reparaciones o cambios que sea necesario
realizar por cualquier causa que escape al control de SFC, incluyendo,
pero no limitándose a, cualquier malfuncionamiento, defecto o fallo causado
por o que sea resultado de servicio no autorizado o uso de piezas no
autorizadas, mantenimiento indebido, uso que contravenga las instrucciones
incluidas, accidentes por transporte o tránsito, modificación o reparación
por el usuario, abuso, uso indebido, negligencia, accidentes, tensión de
línea incorrecta u otros hechos fortuitos, o desgaste y deterioro normal.
Lo anterior reemplaza a todas las otras garantías expresas y SFC no asume
ninguna obligación o responsabilidad ni autoriza a ningún tercero a asumir
ninguna obligación o responsabilidad en su nombre.
1 AÑO
84
Page 86

LA DURACIÓN DE CUALQUIER GARANTÍA IMPLÍCITA POR LA LEY
(INCLUYENDO GARANTÍAS DE COMERCIALIZACIÓN Y
CONVENIENCIA) ESTÁ LIMITADA A LA DURACIÓN DE ESTA GARANTÍA.
SFC NO SERÁ, EN NINGÚN CASO, RESPONSABLE POR DAÑOS
ESPECIALES, CASUALES O RESULTANTES QUE SURJAN DE LA
PROPIEDAD O USO DE ESTE PRODUCTO, O POR CUALQUIER
RETRASO EN EL CUMPLIMIENTO DE LAS OBLIGACIONES
ESTABLECIDAS EN ESTA GARANTÍA DEBIDO A CAUSAS QUE
ESCAPEN A SU CONTROL. ALGUNOS ESTADOS NO PERMITEN
LIMITACIONES A LA DURACIÓN DE UNA GARANTÍA IMPLÍCITA Y/O NO
PERMITEN LA EXCLUSIÓN O LIMITACIÓN DE DAÑOS RESULTANTES,
POR LO QUE LAS LIMITACIONES ANTERIORES PUEDEN NO SER
APLICABLES EN SU CASO. ESTA GARANTÍA LE DA DERECHOS
LEGALES ESPECÍFICOS. TAMBIÉN PUEDE TENER OTROS DERECHOS
QUE VARÍAN DE ESTADO EN ESTADO.
S/D R3
Para su protección en caso de robo o pérdida de este producto, llene los
siguientes espacios con la información correspondiente; esto le servirá como
un registro personal.
Núm. de modelo
Núm. de serie
(Se encuentra en la parte posterior o inferior de la unidad)
Fecha de compra
Precio
Lugar de compra
85
21605 Plummer Street
Chatsworth, CA 91311
Page 87

868788
Page 88

Page 89

 Loading...