

Page 1
i
n
f
o
4.
Prepare
5.
Record(DVD)
Quick
After all the connections are complete,
1
connect the AC power cord.
Insert two Size AA (1.5V).
2
Press [y] to turn On the unit.
3
Turn On your TV.
4
Press the button on the T V’s remote
5
control that accesses the ex ternal input
channel repeatedly until you see "Initial
Setup" menu. (Please refer to your TV’s
owner's manual.)
Initial Setup
OSD Language
English
Français
Español
Select the language for Setup display.
If the TV is connected by an HDMI cable,
it may take a while for the "Initial Setup"
menu to come up.
Use [K/L] to select your desired
6
language, then press [OK].
Use [K/L] to select calendar or time,
7
then press [OK].
Clock Setting
- - - / - - / - - - - ( - - - )
- - : - - - -
This Recorder only record on DVD-RW/-R,
cannot record on DVD+RW/+R.
Press [DVD] first.
Insert a recordable disc (refer to page
1
24 in the Owner's Manual on how to
insert a disc).
Align the disc to
the disc tray guide.
Press [REC MODE] repeatedly to
2
select a recording mode.
Press [INPUT SELECT] to select the
3
appropriate external input position
(L1/L2) to which your external tuner is
connected.
Then select the desired channel to
record on the external tuner.
Press [REC] to start recording.
4
Press [ C] to Stop recording.
5
The title list will appear automatically after
writing to a disc is completed.
e.g.) DVD-R
Start
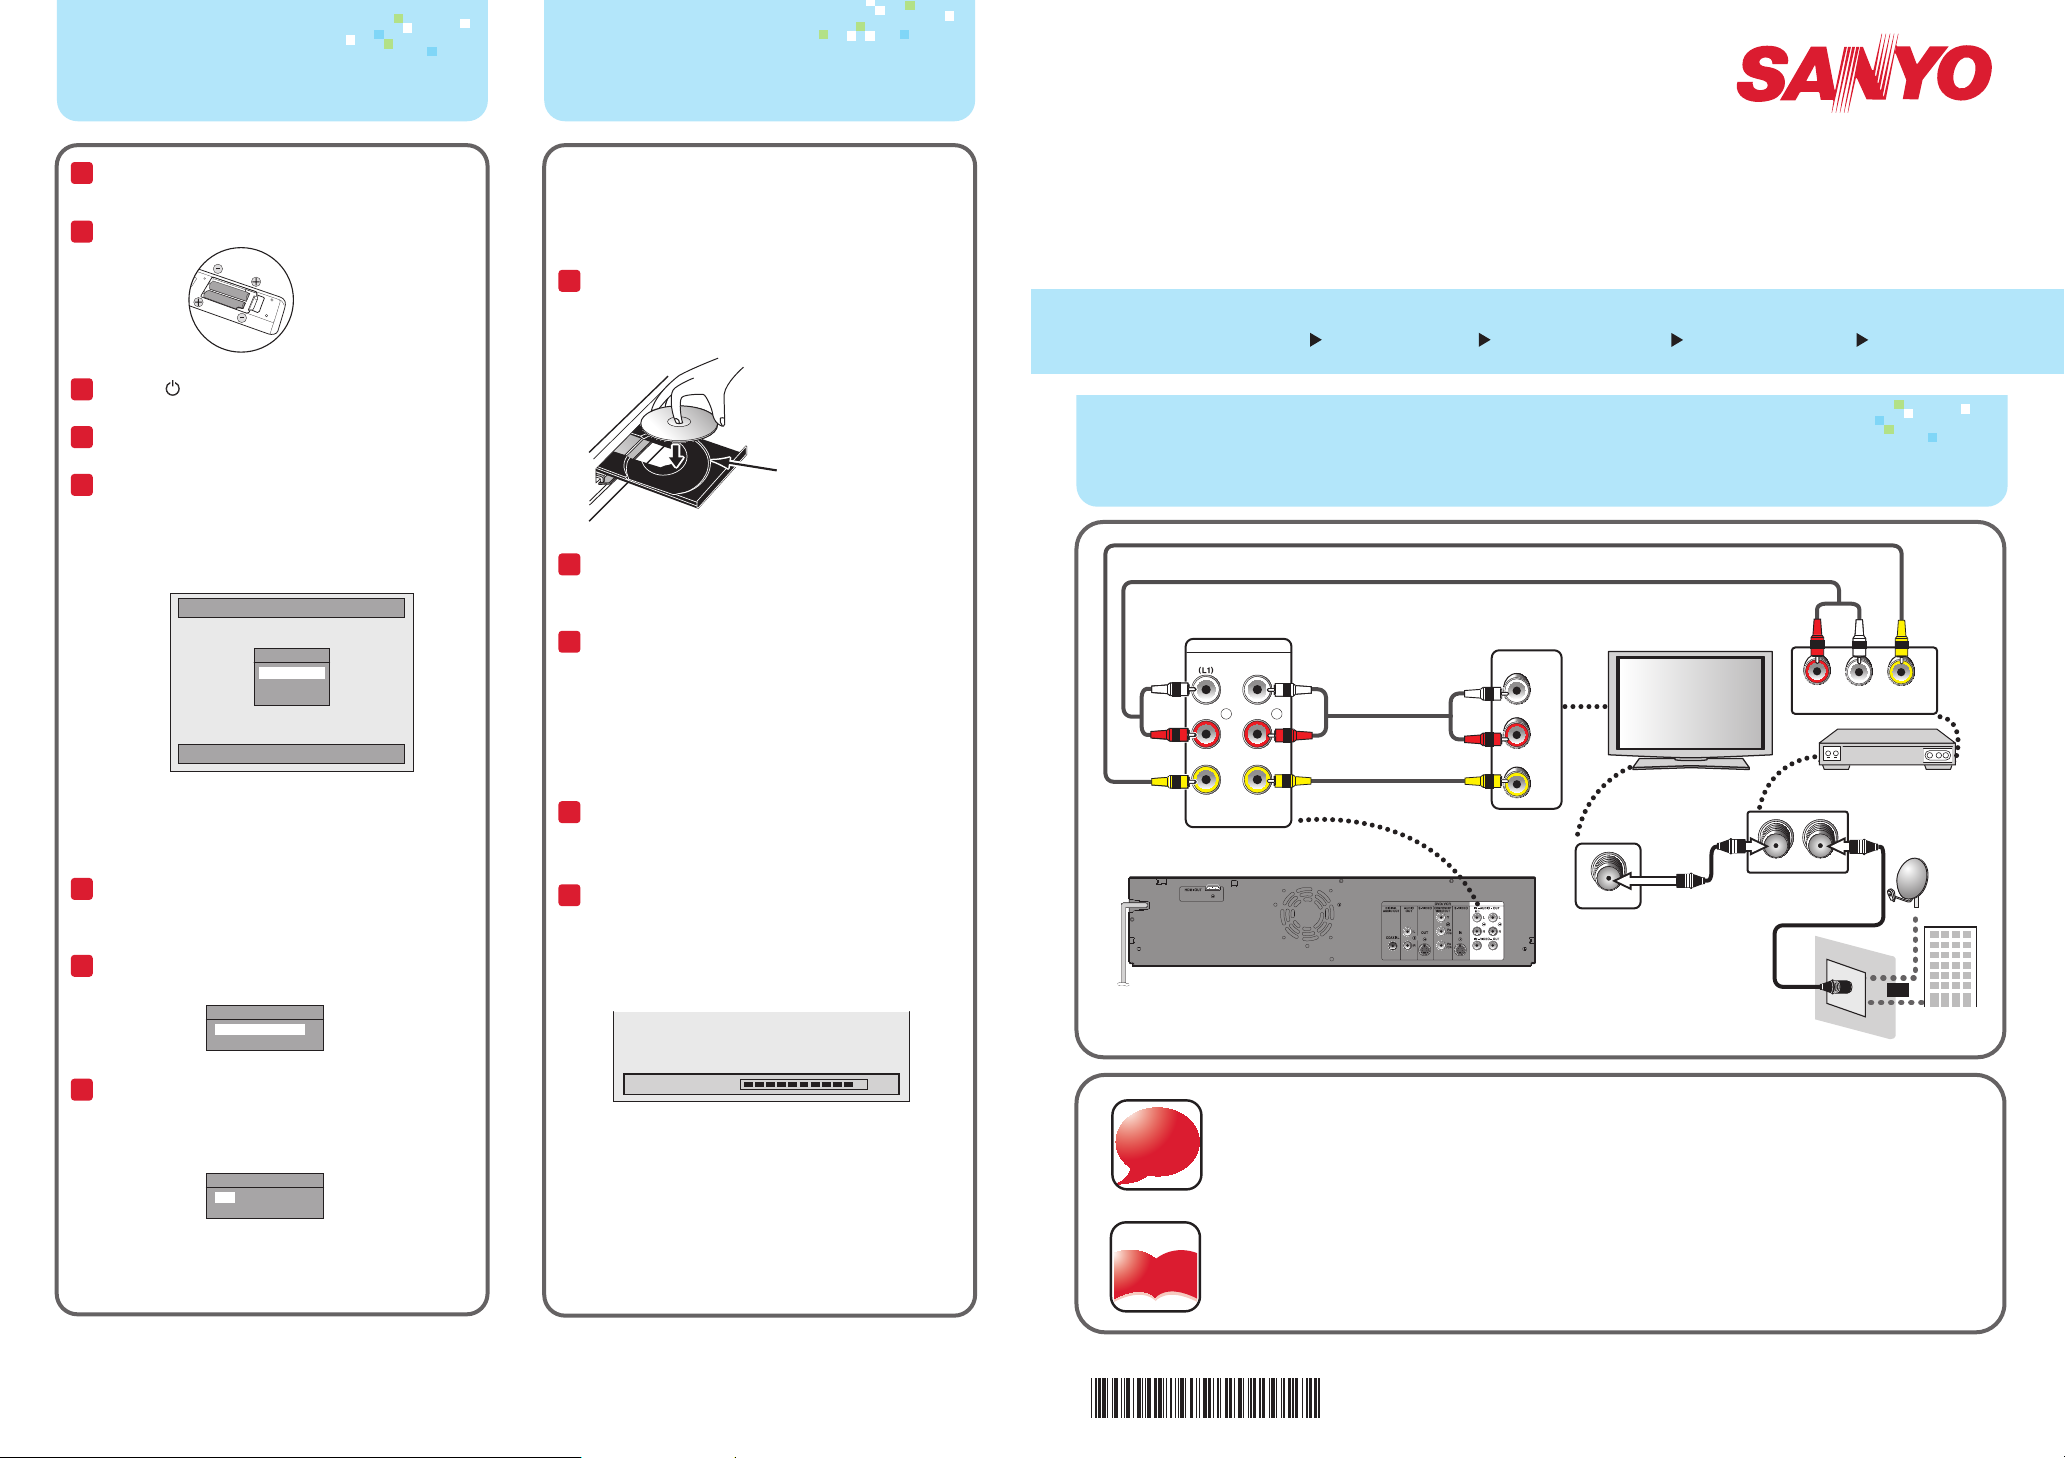
Connecting to an
External Tuner
1.
1.
rear of this unit
Connecting to an External Tuner
IN --- AUDIO --- OUT
L
R
IN --- VIDEO --- OUT
2.
Audio cable
Video cable
Select
FWZV475F
DVD Recorder/VCR LINE-IN RECORDING (No Tuner)
Record
3.
AUDIO IN
VIDEO IN
Connect
L
R
ANT. IN
Prepare
4.
Audio cable
Video cable
LR
external tuner
ANT. INANT.OUT
RF coaxial cable
5.
VIDEO OUTAUDIO OUT
or
(DVD)
satellite
dish
cable TV
company
Use [0/ / 1] to select an item to set, and
8
use [K/L] to select the contents to suit
your preference, then press [OK] when
you finish setting all the contents.
Clock Setting
JAN / 29 / 2015 ( THU )
12 : 00 AM
Your setting will be activated.
The clock starts counting when you press
[OK].
SANYO is a regis tered trademark of SANYO Electric Co., Ltd. and is used by Funai Electric Co., Ltd. and Funai Corporation, Inc . under license
from SA NYO Electric Co., Ltd.
Any liability related to SANYO products, including design and quali ty, is the sole responsibility of Funai Elec tric Co., Ltd. and Funai
Corporation, Inc.
Please contact Funai Cor poration, Inc. for any ques tions or claim s related to SANYO product s: 1 866 212 0436 sanyo-av.com
Writing to Disc 90%
• Press [C] to exit the title list.
You will need to finalize DVD-RW or DVD-R
to play them back on other DVD players.
Refer to page 42 in the Owner's Manual
on how to finalize a disc.
http: //www.sanyo -av.com/
For more info,
please contact 1-866-212-0436
or visit : sanyo-av.com
Manual
Please read the supplied Owner's Manual
for the detailed instructions.
* 2 V M N 0 0 1 9 4 *
http://www.sanyo-av.com/
Printed in China
E9P8GUH
2VMN00194 ★★★★★
Page 2
2.
Select
3.
Connect
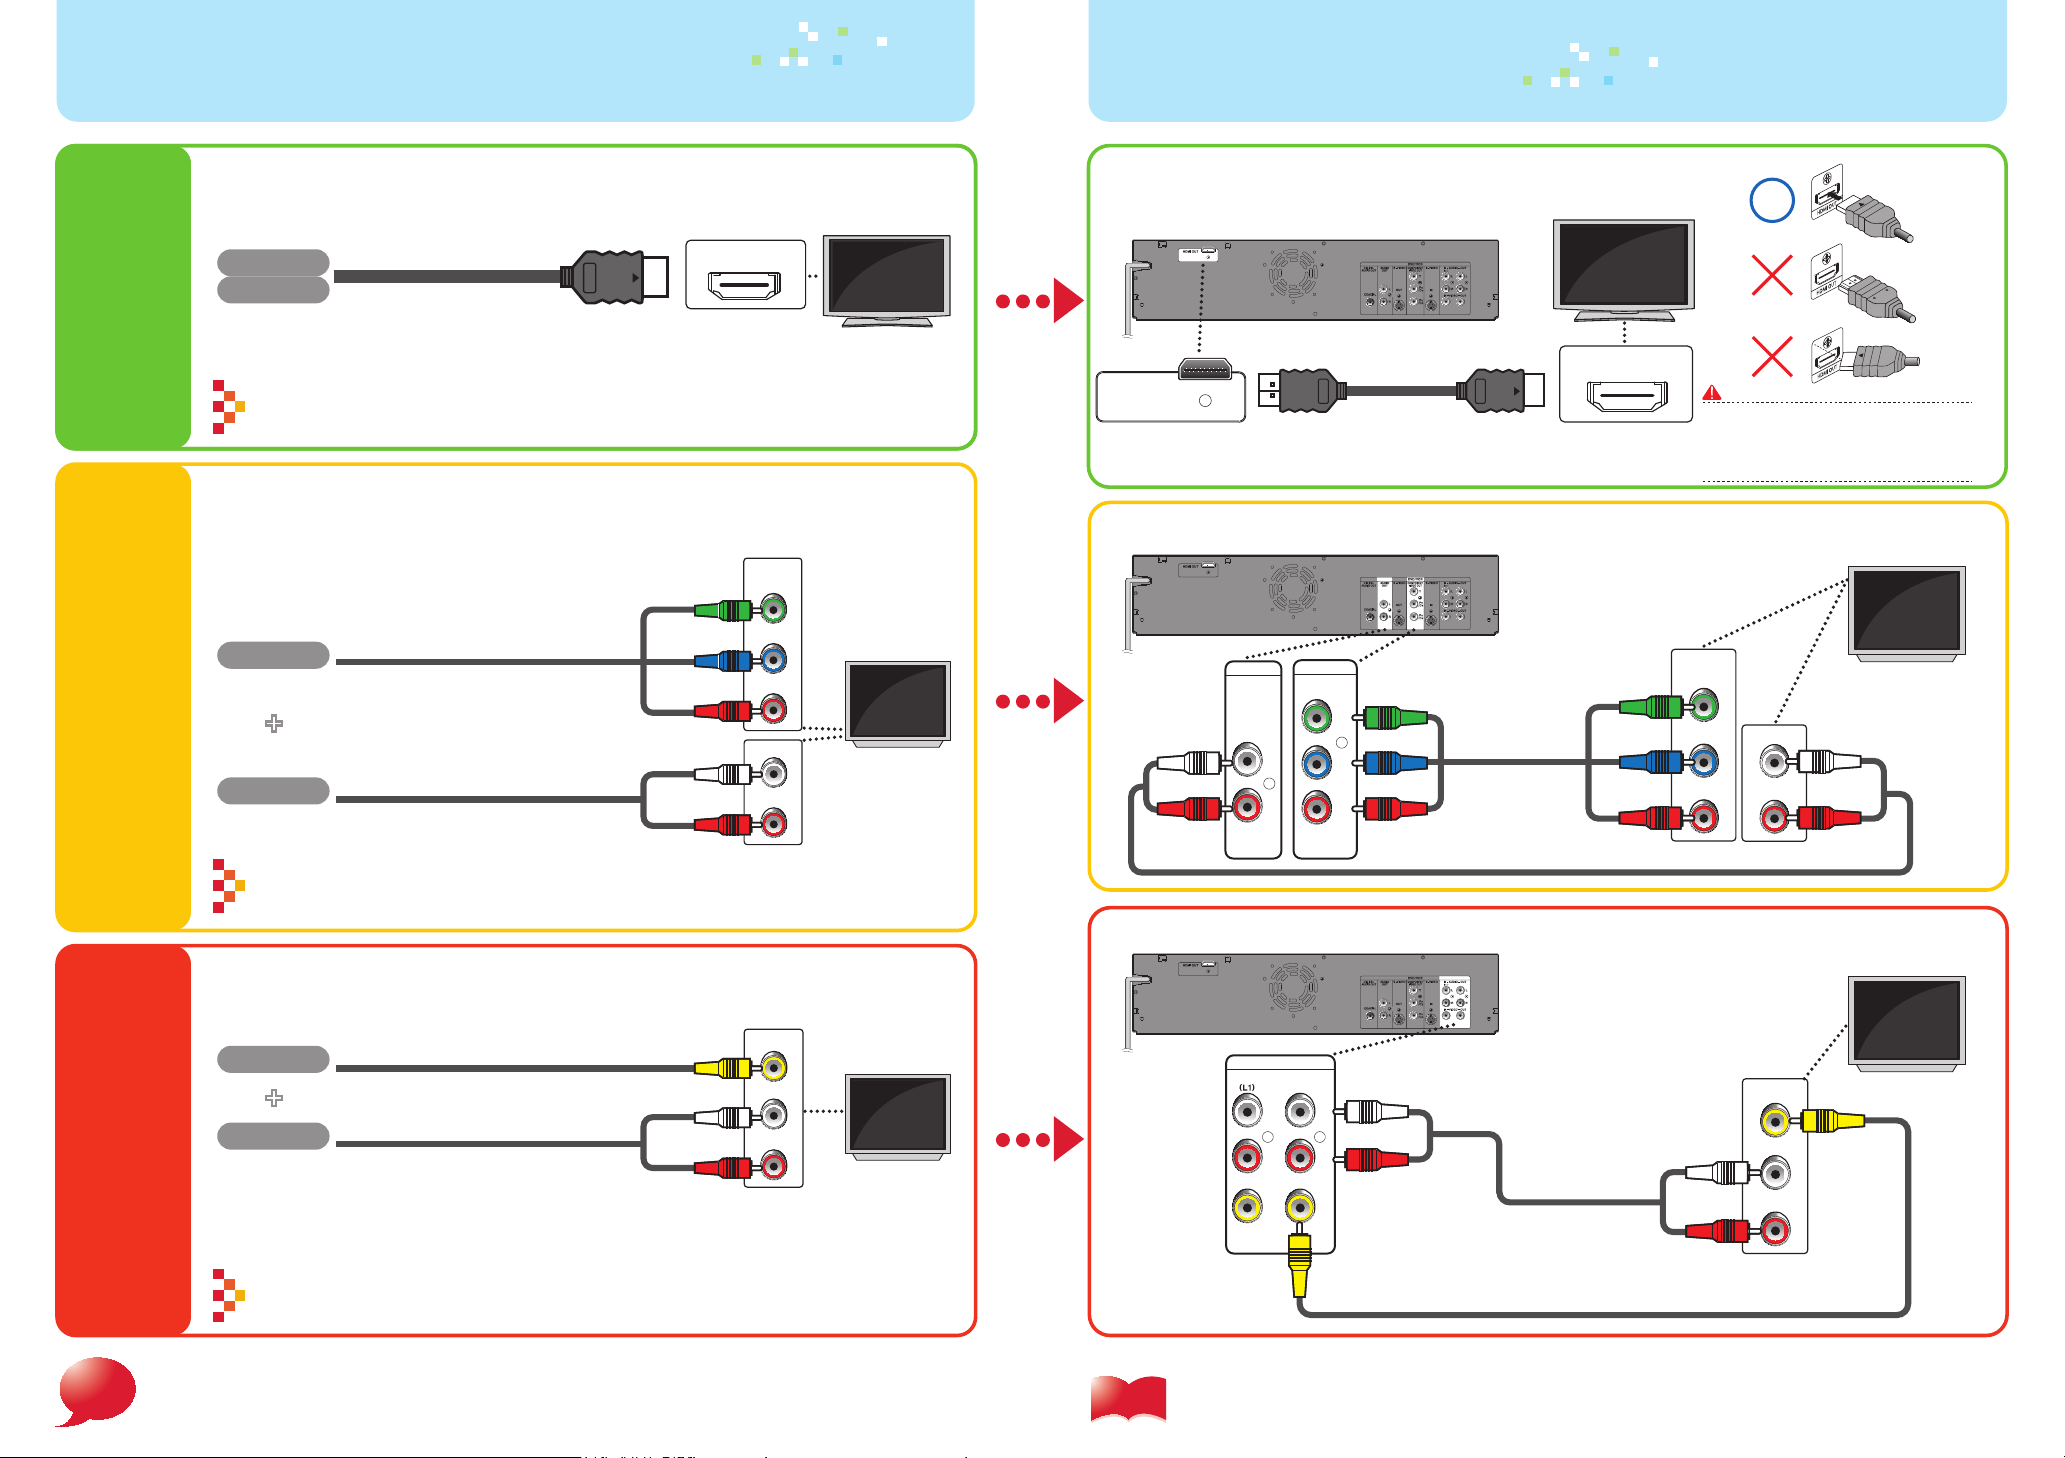
Best
Better
Progressive-compatible (1080p)
Video
HDMI cable
Audio
HDMI cable sends both audio and video digital signals.
(No additional audio connection is required.)
HDMI cable not included.
High Speed HDMI Cable (also known as HDMI category 2 cable) is
recommended for the better compatibility.
HDMI IN
Progressive-compatible(480p)
Video
Component video cable
+
Audio
Audio cable
COMPONENT
VIDEO IN
Y
PB/CB
PR/CR
L
AUDIO IN
R
You r T V
High
Definition
TV
You r T V
Standard
Definition
TV
HDMI Cable
HDMI OUT
HDMI cable
Component Video Cable and Audio Cable
DVD / VCR
COMPONENT
AUDIO
OUT
L
R
VIDEO OUT
Y
P
/CB
PR
/CR
Component
B
video cable
You r T V
HDMI IN
Do not tilt the connector when inserting
it into the HDMI jack, and make sure the
shapes of the jack and the connector are
matched.
COMPONENT
VIDEO IN
Y
PB/CB
PR/CR
L
AUDIO IN
R
You r T V
Good
For more info,
f
n
i
o
please contact 1-866-212-0436 or visit : sanyo-av.com
Cables used in this connection are as follows:
• Audio cable (L/R) x 1 (Included )
• Component video cable x 1 (Cable not included.)
Supports only 480i resolution.
Video
Video cable
+
Audio
Refer to “Connecting to a TV with an S-Video Input Jack” on page 17 in the
Owner’s Manual for the connection using an S-video cable.
Cables used in this connection are as follows:
• Audio cable (L/R) x1 (Included)
• Video cable x1(Included)
Audio cable
http://w ww.sanyo-av.com/
VIDEO IN
L
AUDIO IN
R
You r T V
Standard
Definition
TV
Video Cable and Audio Cable
IN --- AUDIO --- OUT
L
L
R
R
IN --- VIDEO --- OUT
Manual
Please read the supplied Owner's Manual for the detailed
instructions.
Audio cable
Audio cable
Video cable
VIDEO IN
L
AUDIO IN
R
You r T V
 Loading...