

Page 1
1
Connect to a TV
2
Plug the AC plug into an electrical outlet
3
Turn Soundbar on
For Bluetooth connections, refer to “BLUETOOTH SETTING”.
4
Select the source Lights up when you
switch to your connected source.
or
© 2015 Funai Electric Co., Ltd.
Printed in China
XHA00UH
★★★★★
Install 2 AAA (1.5V) batteries (supplied)
Button
Specification
ENGLISH ESPAÑOL
1
POWER
Press to Turn On the unit, or to switch
the unit into Standby mode.
(To completely Turn Off the unit, you
must unplug the AC power cord.)
Presione para encender la unidad, o para
cambiar la unidad en modo de Espera.
(Para apagar completamente la unidad,
debe desconectar el cable de energía
CA.)
2
VOL +/
-
Press to adjust volume up / down for
Soundbar.
Presione para subir / bajar el volumen
para Soundbar.
3
MUTE
Press to mute the sound and recover the
sound.
Presione para silenciar el sonido y
recuperar el sonido.
4
BASS K/
L
Press to adjust lower-pitched sounds.
Presione para ajustar sonidos de tono
bajo.
5
TREBLE K/
L
Press to adjust higher-pitched sounds. Presione para ajustar sonidos de tono
alto.
6
AUX
Press to select AUX of connected
devices to this Soundbar.
Presione para seleccionar AUX de
los dispositivos conectados a este
Soundbar.
7
LINE
Press to select Line of connected devices
to this Soundbar.
Presione para seleccionar Línea de
los dispositivos conectados a este
Soundbar.
8
OPTICAL
Press to select Optical of connected
devices to this Soundbar.
Presione para seleccionar Óptico de
los dispositivos conectados a este
Soundbar.
9
Bluetooth
Press to select Bluetooth of connected
devices to this Soundbar.
Presione para seleccionar Bluetooth
de los dispositivos conectados a este
Soundbar.
10
PAIR
Press to disconnect the currently
connected Bluetooth device and start
pairing mode to establish a new
connection to another Bluetooth device.
If no Bluetooth device is connected
within 2 minutes, press this button to
restart pairing mode. Pairing mode
can only be started when Bluetooth is
selected.
Presione para desconectar el dispositivo
Bluetooth conectado actualmente y
comenzar el modo de conexión para
establecer una nueva conexión a otro
dispositivo Bluetooth. Si no se conecta
un dispositivo Bluetooth dentro de
2 minutos, presione este botón para
reiniciar el modo de conexión. El modo
de conexión sólo puede iniciar cuando
se selecciona Bluetooth.
ENGLISH
Problem Tip
No Power
• Unplug the outlet once, and wait for 15-20 seconds and then
plug it in again.
No Sound
• Make sure both the TV or other devices and the Soundbar are
Turned On.
• Confirm the connections to the TV are made properly as shown
in CONNECTIONS.
• Press the source button on your Soundbar remote control for the
correct audio input.
• Confirm that the Soundbar is not muted. Press VOL +/- to
unmute the sound. (See ‘Adjust the volume’ on page* )
• For optical audio connection, select another audio signal on the
connected external device. (This product supports LPCM)
• Depending on the usage and usage environment, chatter sound
and distorted sound may be generated. To reduce such sounds,
lower the volume.
Distorted sound
• Adjust the sound settings of the connected device.
• Decrease the volume on the connected Bluetooth device.
No reaction to the
remote control.
• Check the batteries in the remote control, and make sure they
are inserted properly by + or - symbols.
• Aim the remote at the center of this unit.
• If the remote control does not work and all LED’s of the
Soundbar stay lit for over 30 seconds, there is a failure in the
electrical system. Unplug the AC power cord and contact the
service center.
An external device
cannot connect with
the Soundbar via
Bluetooth.
• Confirm that Bluetooth is enabled on the external device. See
the Owner’s Manual of the external device on how to enable
Bluetooth.
• If reconnecting the Bluetooth device to the Soundbar fails,
delete the registered profile of this Soundbar from the Bluetooth
device, then perform pairing again.
• Another Bluetooth device is already connected to the Soundbar.
Disconnect the connected device, then try again.
Unstable connection
between the
Bluetooth device and
the Soundbar.
Or
Poor sound quality
from the connected
Bluetooth device.
• The Bluetooth reception may be poor. Confirm that there is no
obstacle between the Bluetooth device and the Soundbar. If this
does not improve the sound quality, move the Bluetooth device
closer to the Soundbar.
SETUP MANUAL
Soundbar
CONNECTIONS
TROUBLESHOOTINGREMOTE CONTROL
See the Online Owner’s Manual for details:
sanyo-av.com
Step 1 Please visit website sanyo-av.com
Step 2 Select Download.
Step 3 Type in the Model # “FWSB405F”, and click “Search”.
Step 4 Select the Manual, and click on “Download”.
SANYO is a registered trademark of SANYO Electric Co., Ltd. and is used by Funai Electric Co., Ltd.
and Funai Corporation, Inc. under license from SANYO Electric Co., Ltd.
Any liability related to SANYO products, including design and quality, is the sole responsibility of
Funai Electric Co., Ltd. and Funai Corporation, Inc.
Please contact Funai Corporation, Inc. for any questions or claims related to SANYO products:
sanyo-av.com
FWSB405F
SUPPLIED ACCESSORIES
• Remote Control (NC300UH) • Setup Manual
• Batteries (AAA, 1.5V x 2) • Line-in Cable
INSERT BATTERIES
BLUETOOTH SETTING
1
Press on the remote control to switch the
Soundbar to Bluetooth mode.
2
Turn On the Bluetooth compatible device.
3
On the Bluetooth compatible device, search for and
select “SANYO FWSB405F” to pair (or register) your
Soundbar with the Bluetooth compatible device.
• If a Passcode is requested, enter “0000.”
• If the Soundbar name does not appear on the
Bluetooth compatible device, press
on the
remote control.
4
Play music on the connected Bluetooth compatible device.
5
To exit Bluetooth mode, press one of the other audio
input source buttons on the remote control.
If reconnecting the Bluetooth device to the Soundbar fails, delete the registered
profile of this Soundbar from the Bluetooth device, then perform pairing again.
This unit can store up to 4 device profiles.
Line-in Cable
OPTICAL Cable
(not supplied)
AUDIO OUTPUT
OPTICAL OUTPUT
DIGITAL AUDIO OUT
(OPTICAL)
HEADPHONE
or
or
If your TV does not have audio outputs shown
left, to connect the Soundbar directly to your
other devices (Blu-ray player, game system,
etc.) see your device’s user manual.
Use a Coaxial (RCA) to Optical Toslink
Digital Audio Converter (not supplied)
for our Soundbar which only has an
optical input.
BEST
GOOD
NOTE
• Make sure the unit is Turned Off when connecting.
• Check whether the connction for all cables are connected tightly.
• If you connect with a Line-in cable, make sure the volume for the
headphone output is appropriate for the Soundbar input. If the
Line-in volume is too soft, the Soundbar may not output sounds
with appropriate volume.
ESPAÑOL
Problema Solución
No hay energía
• Desconecte el tomacorriente una vez, y espere 15 -20 segundos, y
vuélvalo a conectar.
No hay sonido
• Asegúrese que tanto la TV como otros dispositivos y Soundbar
estén encendidos.
• Confirme que las conexiones a la TV estén realizadas correctamente
como se muestra en CONEXIONES.
• Presione el botón de fuente en el control remoto de Soundbar para
la entrada de audio correcta.
• Confirme que SoundBar no esté en silencio. Presione VOL +/- para
quitar el silencio al sonido. (Vea ‘Ajuste de volumen’ en la página* )
• Para la conexión óptica de audio, seleccione otra señal de audio en el
dispositivo externo conectado. (Este producto soporta LPCM)
• Dependiendo en el uso y el ambiente de uso, se puede generar
sonido de traqueteo o sonido distorsionado. Baje el volumen para
reducir tales sonidos.
Sonido distorsionado
• Ajuste los ajustes de sonido del dispositivo conectado.
• Disminuya el volumen en el dispositivo Bluetooth conectado.
No hay reacción al
control remoto.
• Revise las baterías en el control remoto, y asegúrese que estén
insertadas adecuadamente por los símbolos + o -.
• Apunte el remoto en el centro de esta unidad.
• Si el control remoto no funciona y todos los LED de Soundbar
permanecen iluminados durante más de 30 segundos, existe una
falla en el sistema eléctrico. Desconecte el cable de energía CA y
póngase en contacto con el centro de servicio.
Un dispositivo
externo no se
puede conectar con
Soundbar por medio
de Bluetooth.
• Confirme que Bluetooth esté activado en el dispositivo externo. Vea
el manual del propietario del dispositivo externo sobre cómo activar
Bluetooth.
• Si falla volver a conectar el dispositivo Bluetooth al Soundbar, borre
el perfil registrado de este Soundbar del dispositivo Bluetooth, y
después vuelva a realizar la conexión.
• Otro dispositivo Bluetooth ya está conectado al Soundbar. Desconecte
el dispositivo conectado y después intente de nuevo.
Conexión inestable
entre el dispositivo
Bluetooth y Soundbar
O
Calidad de sonido
deficiente desde el
dispositivo Bluetooth
conectado.
• La recepción de Bluetooth puede ser deficiente. Confirme que no
haya un obstáculo entre el dispositivo Bluetooth y Soundbar. Si esto
no mejora la calidad del sonido, mueva el dispositivo Bluetooth más
cerca del Soundbar.
WALL MOUNT THE SOUNDBAR
(OPTIONAL)
NEED HELP?
Please visit our website sanyo-av.com for the online Owner’s Manual and contact
form or call 1-866-212-0436.
If you do not find a solution above, please visit our website sanyo-av.
com for the Online Owner’s Manual. Please download it and then refer to
“TROUBLESHOOTING” section for more information.
*2VMN00215*
3.5~4mm/0.14’’~0.16’’
4mm/0.16’’
>25mm/0.98’’
~5mm/0.2’’
~9mm/0.35’’
190mm/7.5’’
Bluetooth
Available Devices
SANYO_FWSB405F
Pairing...
on
Passcode:
0000
1
4
3
6
7
1 2 3
2
5
8
9
10
Page 2

WARRANTY COVERAGE:
This warranty obligation is limited to the terms as set forth below.
WHO IS COVERED:
This product warranty is issued to the original purchaser or the person receiving the
product as a gift against defects in materials and workmanship as based on the date
of original purchase (“Warranty Period”) from an Authorized Dealer. The original
sales receipt showing the product name and the purchase date from an authorized
retailer is considered such proof.
WHAT IS COVERED:
This warranty covers new products if a defect in material or workmanship occurs
and a valid claim is received within the Warranty Period. At its option, the company
will either (1) repair the product at no charge, using new or refurbished replacement
parts, or (2) exchange the product with a new or refurbished product at company’s
option.
Replacement products or parts provided under this warranty are covered against
defects in materials and workmanship from the date of the replacement or repair
for ninety (90) days or for the remaining portion of the original product’s warranty,
whichever provides longer coverage for you. When a product or part is exchanged,
any replacement item becomes your property and the replaced item becomes
company property. When a refund is given, your product becomes company
property.
Note: Any product sold and identified as refurbished or renewed carries a ninety (90)
day limited warranty.
Replacement product can only be sent if all warranty requirements are met. Failure to
follow all requirements can result in delay.
WHAT IS NOT COVERED - EXCLUSIONS AND LIMITATIONS:
This Limited Warranty applies only to new company manufactured products that can
be identified by the trademark,
trade name, or logo affixed to it. This Limited Warranty does not apply to any
hardware product or any software, even if packaged or sold with the product, as
manufacturers, suppliers, or publishers may provide a separate warranty for their
own products packaged with the bundled product.
The company is not liable for any damage to or loss of any programs, data, or other
information stored on any media contained within the product, or other additional
product or part not covered by this warranty. Recovery or reinstallation of programs,
data or other information is not covered under this Limited Warranty.
This warranty does not apply (a) to damage caused by accident, abuse, misuse,
neglect, misapplication, or non-supplied product, (b) to damage caused by service
performed by anyone other than company approved Authorized Service Location, (c)
to a product or a part that has been modified without written company permission,
or (d) if any serial number has been removed or defaced, or (e) product, accessories
or consumables sold “AS IS” without warranty of any kind by including refurbished
product sold “AS IS” by some retailers.
This Limited Warranty does not cover:
• Shipping costs for returning defective product.
• Labor charges for installation or setup of the product, adjustment of customer
controls on the product, and installation or repair of antenna/signal source systems
outside of the product.
• Product repair and/or part replacement because of improper installation or
maintenance, connections to improper voltage supply, power line surge, lightning
damage, retained images or screen markings resulting from viewing fixed
stationary content for extended periods, product cosmetic appearance items due to
normal wear and tear, unauthorized repair or other cause not within the control of
the company.
• Damage or claims for products not being available for use, or for lost data or lost
software.
• Damage from mishandled shipments or transit accidents when returning product.
• A product that requires modification or adaptation to enable it to operate in any
country other than the country for which it was designed, manufactured, approved
and/or authorized, or repair of products damaged by these modifications.
• A product used for commercial or institutional purposes (including but not limited
to rental purposes).
• Product lost in shipment and no signature verification receipt can be provided.
• Failure to operate per Owner’s Manual.
TO OBTAIN ASSISTANCE…
Contact the Customer Care Center at: sanyo-av.com
1 866 212 0436
REPAIR OR REPLACEMENT AS PROVIDED UNDER THIS WARRANTY IS THE
EXCLUSIVE REMEDY FOR THECONSUMER, WITH THE ISSUING COMPANY NOT
LIABLE FOR ANY INCIDENTAL OR CONSEQUENTIAL DAMAGES FOR BREACH
OF ANY EXPRESS OR IMPLIED WARRANTY ON THIS PRODUCT. EXCEPT TO
THE EXTENT PROHIBITED BY APPLICABLE LAW, ANY IMPLIED WARRANTY OF
MERCHANTABILITY OR FITNESS FOR A PARTICULAR PURPOSE ON THIS PRODUCT
IS LIMITED IN DURATION TO THE DURATION OF THIS WARRANTY.
Some states do not allow the exclusions or limitation of incidental or consequential
damages, or allow limitations on how long an implied warranty lasts, so the above
limitations or exclusions may not apply to you.
This warranty gives you specific legal rights. You may have other rights which vary
from state/province to state/province.
See the Online Owner’s Manual for details: sanyo-av.comsanyo-av.com
The model and serial numbers of this unit may be found on the cabinet. You
should record and retain those numbers for future reference.
Model No.:
Serial No.:
WARNING:
TO REDUCE THE RISK OF FIRE OR ELECTRIC SHOCK, DO NOT EXPOSE THIS
APPARATUS TO RAIN OR MOISTURE. APPARATUS SHALL NOT BE EXPOSED TO
DRIPPING OR SPLASHING AND NO OBJECTS FILLED WITH LIQUIDS, SUCH AS
VASES, SHALL BE PLACED ON THE APPARATUS.
CAUTION
RISK OF ELECTRIC SHOCK
DO NOT OPEN
CAUTION:
TO REDUCE THE RISK OF ELECTRIC SHOCK, DO NOT REMOVE COVER
(OR BACK). NO USER SERVICEABLE PARTS INSIDE. REFER SERVICING TO
QUALIFIED SERVICE PERSONNEL.
The important note and rating are located on the rear or bottom of the cabinet.
The lightning flash with arrowhead symbol, within an equilateral
triangle, is intended to alert the user to the presence of uninsulated
“dangerous voltage” within the product’s enclosure that may be of
sufficient magnitude to constitute a risk of electric shock to persons.
The exclamation point within an equilateral triangle is intended
to alert the user to the presence of important operating and
maintenance (servicing) instructions in the literature accompanying
the appliance.
The symbol for CLASS ll (Double Insulation)
IMPORTANT SAFETY INSTRUCTIONS
1. Read these instructions.
2. Keep these instructions.
3. Heed all warnings.
4. Follow all instructions.
5. Do not use this apparatus near water.
6. Clean only with dry cloth.
7. Do not block any ventilation openings. Install in accordance with the
manufacturer’s instructions.
8. Do not install near any heat sources such as radiators, heat registers,
stoves, or other apparatus (including amplifiers) that produce heat.
9. Do not defeat the safety purpose of the polarized or grounding-type
plug. A polarized plug has two blades with one wider than the other.
A grounding type plug has two blades and a third grounding prong.
The wide blade or the third prong are provided for your safety. If the
provided plug does not fit into your outlet, consult an electrician for
replacement of the obsolete outlet.
10. Protect the power cord from being walked on or pinched particularly
at plugs, convenience receptacles, and the point where they exit
from the apparatus.
11. Only use attachments/accessories specified by the manufacturer.
12. Use only with the cart, stand, tripod, bracket, or table
specified by the manufacturer, or sold with the
apparatus. When a cart is used, use caution when
moving the cart / apparatus combination to avoid
injury from tip-over.
13. Unplug this apparatus during lightning storms or when
unused for long periods of time.
14. Refer all servicing to qualified service personnel. Servicing is required
when the apparatus has been damaged in any way, such as powersupply cord or plug is damaged, liquid has been spilled or objects
have fallen into the apparatus, the apparatus has been exposed to
rain or moisture, does not operate normally, or has been dropped.
FCC WARNING
This equipment may generate or use radio frequency energy. Changes or
modifications to this equipment may cause harmful interference unless the
modifications are expressly approved in the manual. The user could lose the authority
to operate this equipment if an unauthorized change or modification is made.
RADIO-TV INTERFERENCE
This equipment has been tested and found to comply with the limits for a Class
B digital device, pursuant to Part 15 of the FCC Rules. These limits are designed
to provide reasonable protection against harmful interference in a residential
installation. This equipment generates, uses, and can radiate radio frequency
energy and, if not installed and used in accordance with the instructions, may
cause harmful interference to radio communications. However, there is no
guarantee that interference will not occur in a particular installation. If this
equipment does cause harmful interference to radio or television reception, which
can be determined by turning the equipment off and on, the user is encouraged
to try to correct the interference by one or more of the following measures:
1. Reorient or relocate the receiving antenna.
2. Increase the separation between the equipment and receiver.
3. Connect the equipment into an outlet on a circuit different from that to which
the receiver is connected.
4. Consult the dealer or an experienced radio / TV technician for help.
Disconnect the mains (AC) plug to shut off when find trouble or not in use. The
mains (AC) plug shall remain readily operable.
El modelo y el número de serie de esta unidad se pueden encontrar en la caja.
Deberá anotar y guardar el modelo y el número de serie para consultarlos, si los
necesita, en el futuro.
Número de modelo:
Número de serie:
ADVERTENCIA:
PARA REDUCIR EL RIESGO DE QUE SE PRODUZCA UN INCENDIO O SE RECIBA
UNA DESCARGA ELÉCTRICA, NO EXPONGA ESTE APARATO A LA LLUVIA NI A
LA HUMEDAD.
NO SE DEBERÁ EXPONER EL APARATO NI A GOTERAS NI A SALPICADURAS, Y
NO DEBERÁ COLOCARSE NINGÚN OBJETO QUE CONTENGA LÍQUIDOS SOBRE
EL APARATO, COMO POR EJEMPLO JARRONES.
CAUTION
RISK OF ELECTRIC SHOCK
DO NOT OPEN
AVISO:
PARA REDUCIR EL RIESGO DE SUFRIR UNA DESCARGA ELÉCTRICA NO QUITE
LA CUBIERTA (O EL PANEL POSTERIOR). EN EL INTERIOR DEL APARATO NO
HAY PIEZAS QUE DEBA MANIPULAR EL USUARIO. SOLICITE EL SERVICIO DE
REPARACIONES AL PERSONAL DE SERVICIO CUALIFICADO.
Las notas importantes y la calificación se encuentran ubicadas en la parte
posterior o inferior del gabinete.
El símbolo del rayo con punta de flecha, en el interior de un
triángulo equilátero, tiene la finalidad de avisar al usuario de la
presencia de “tensión peligrosa” dentro de la caja del aparato que
podría ser de suficiente intensidad como para constituir un riesgo
para las personas en caso de que éstas recibiesen una descarga
eléctrica.
El signo de exclamación dentro de un triángulo equilátero tiene la
finalidad de avisar al usuario de la presencia de instrucciones de
utilización y mantenimiento (servicio) en el material impreso que
acompaña al aparato.
Símbolo de CLASE ll (doble aislamiento)
IMPORTANTES INSTRUCCIONES DE SEGURIDAD
1. Lea estas instrucciones.
2. Conserve estas instrucciones.
3. Preste atención a las advertencias.
4. Siga todas las instrucciones.
5. No utilice este aparato cerca del agua.
6. Limpie el aparato sólo con un paño seco.
7. No obstruya ninguna de las ranuras de ventilación. Realice la
instalación según las instrucciones del fabricante.
8. No instale el equipo cerca de elementos para calefaccionar tales
como radiadores, rejillas de calefacción, estufas eléctricas u otros
aparatos (incluidos amplificadores).
9. No desarme el dispositivo de seguridad del enchufe polarizado o con
conexión a tierra. Un enchufe polarizado contiene dos clavijas, una
más ancha que otra. Un enchufe con conexión a tierra contiene dos
clavijas y una tercera clavija con conexión a tierra. La clavija ancha
del enchufe polarizado o la clavija de conexión a tierra representan
dispositivos de seguridad. Si el enchufe del aparato no entra en
el tomacorriente, consulte con un electricista para reemplazar sus
antiguos tomacorrientes.
10. Asegúrese de proteger el cable de alimentación de las pisadas o
torsiones especialmente en la zona de la clavija, en el receptáculo y
en el punto donde el cable sale del aparato.
11. Utilice únicamente los accesorios que especifica el fabricante.
12. Utilice únicamente el carro, atril, trípode,soporte o
la mesa que especifica el fabricante o que se vendió
junto con el aparato. Cuando utilice un carro, sea
cuidadoso al trasladar el conjunto carro/aparato para
evitar daños por caídas de objetos.
13. Desenchufe este aparato si hay tormentas eléctricas o
durante largos períodos de inactividad.
14. Confíe el servicio técnico sólo a personal calificado. El servicio
técnico es necesario cuando el aparato sufre algún tipo de daño,
por ejemplo cuando se dañan los cables de suministro eléctrico
o la clavija, cuando se derrama líquido o se caen objetos sobre el
aparato, cuando se lo expone a la lluvia o a humedad, cuando no
funciona adecuadamente o cuando se cae.
No coloque la unidad sobre un mueble que pueda volcar si algún niño o adulto
lo inclina, empuja, se coloca encima o trepa por él. La caída de la unidad puede
provocar lesiones graves e incluso la muerte.
El aparato no debe colocarse en una instalación empotrada (por ejemplo:
una biblioteca o un estante) a menos que cuente con la adecuada ventilación.
Asegúrese de dejar un espacio de 3,9 pulgadas (10 cm), o más, alrededor del
aparato.
Nunca use un desempolvador a gas en esta unidad.
El gas del interior de la unidad puede inflamarse y explotar.
CAUTION: Danger of explosion if battery is incorrectly replaced. Replace
only with the same or equivalent type.
WARNING: Batteries (Battery pack or battery installed) shall not be exposed
to excessive heat such as sunshine, fire or the like.
Do not place the unit on the furniture that is capable of being tilted by a child and
an adult leaning, pulling, standing or climbing on it. A falling unit can cause serious
injury or even death.
This apparatus should not be placed in a built-in installation such as a bookcase or
rack unless proper ventilation is provided. Make sure to leave a space of 3.9 inches
(10cm) or more around this apparatus.
Never use a gas duster on this unit.
The gas trapped inside of this unit may cause ignition and explosion.
This transmitter must not be co-located or operated in conjunction with any other
antenna or transmitter.
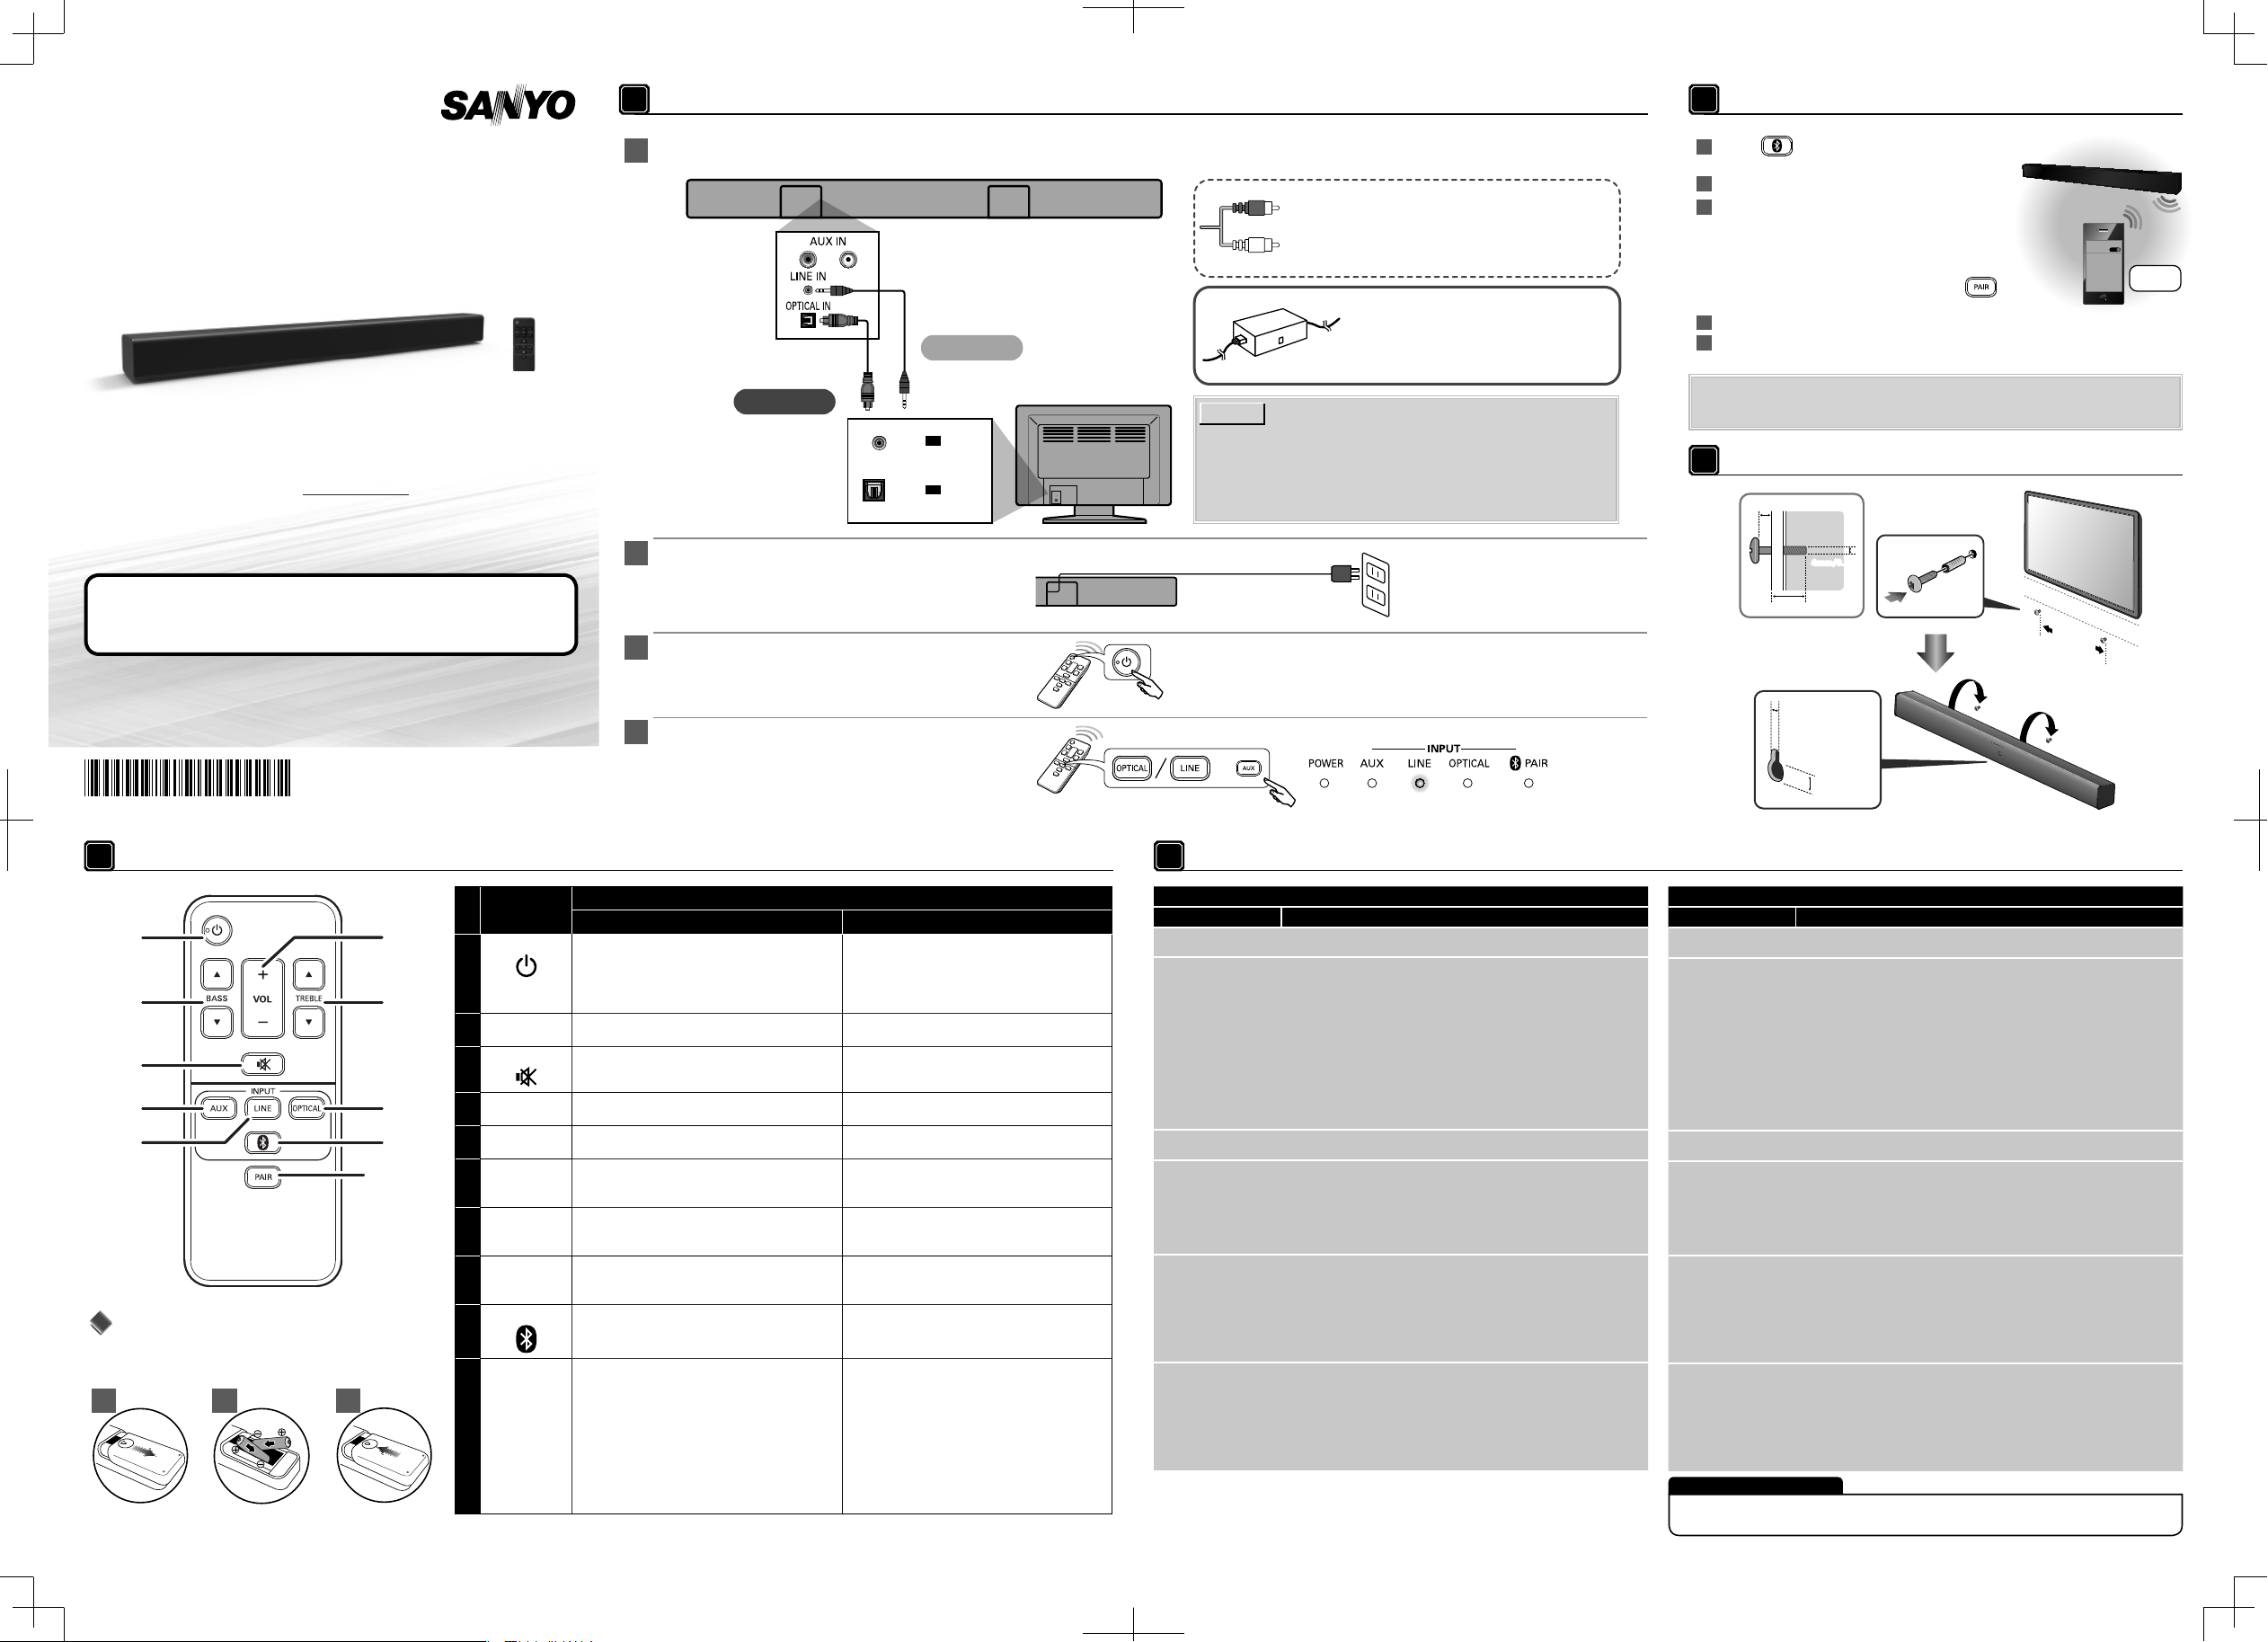
Wall mount the Soundbar
• The recommended screw (sold separately) allows the mounting of the Soundbar
on the wall.
• Funai is not liable for any accident, damage or injury due to any improper
installation, lack of strength of installation or improper use.
• Drill screw holes into the wall. Depending on the wall material, use nut inserts
to make sure the screws will not fall off. Although the Soundbar weighs
approximately 2 kg, it is recommended that the wall be able to support 6
kg (three times the weight of the Soundbar) for extra safety. Recommended
measurements are as follows: Wall thickness of 5 cm or more, Screw diameter
of 4 mm, Screw length of 25 mm or more.
• Screw is sold separately and is not supplied.
Funai is not liable for these types kinds of accidents or injury noted below.
• Install two screws on a steady vertical wall.
• If installed onto a ceiling or slanted wall, the Soundbar and screws may fall
which could result in a several injury.
• Do not use screws that are longer of shorter than their specified length. If
screws too long or short are used this may cause the Soundbar to fall.
• Do not fasten screws by excessive force, this may damage the wall or cause the
Soundbar to fall, leading to an injury.
• Do not mount the Soundbar onto screws while the Soundbar is plugged in or
turned on. It may result in an electrical shock injury.
When installing the Soundbar on the wall, allow this much space.
Top: 3.9 inches(10 cm)
Left and right sides: 3.9 inches(10 cm)
Bottom: 3.9 inches(10 cm)
General
Power requirements 120 V AC +/- 10 %, 60 Hz +/- 0.5 %
Output power 26 W
Dimensions
(width x height x depth)
39.3 x 3.1 x 3.1 inches
(999 x 77 x 77 mm)
Weight 4.41 lbs. (2.0 kg)
Bluetooth Bluetooth profile : A2DP
Bluetooth version : 4.1+EDR
Optical Input Linear PCM (LPCM) 96kHz 24bit Max
Note
• The specifications and design of this product are subject to change without
notice.
NINETY (90) DAY LABOR / ONE (1) YEAR PARTS
FUNAI CORPORATION, Inc. 19900 Van Ness Avenue, Torrance, CA 90501
For product recycling information, please visit - sanyo-av.com
Click on
ESPAÑOL
SAFETY INSTRUCTIONS
TRADEMARK INFORMATION
WARRANTY
INSTRUCCIONES DE SEGURIDAD
SPECIFICATIONS
The Bluetooth® word mark and logos are
registered trademarks owned by Bluetooth SIG,
Inc. and any use of such marks by Funai Electric
Co., Ltd. is under license. Other trademarks and
trade names are those of their respective owners.
If this unit becomes inoperative, do not try to correct the problem by
yourself. There are no user-serviceable parts inside.
Place the unit into standby mode, unplug the power plug, and then
please visit: sanyo-av.com
SERVICING
 Loading...