

Page 1
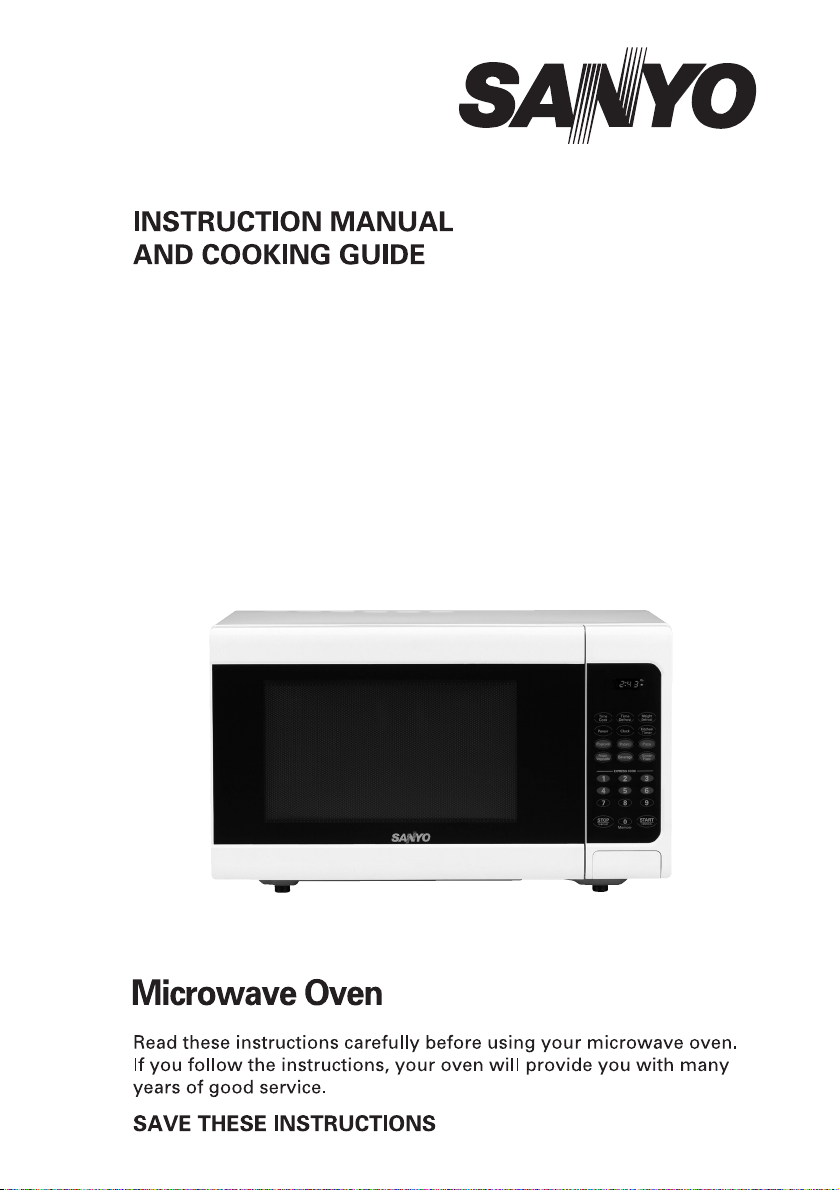
EM-S7560W
Page 2
120V~ 60Hz
1500W
1000W
Specifications
EM-S7560W
2
Handling the cord on this press or cords associated
with accessories sold with this product, will expose you
to lead a chemical known to the state of California to
cause cancer, and birth defects or other reproductive
harm. Wash hands after handle.
Model:
Rated Voltage:
Rated Input Power(Microwave):
Rated Output Power(Microwave):
Oven Capacity:
Turntable Diameter:
External Dimensions:
Net Weight:
Warning:
PRECAUTIONS TO AVOID POSSIBLE
EXPOSURE TO EXCESSIVE MICROWAVE
ENERGY
(a) Do not attempt to operate this oven with the door open since this can result in
harmful exposure to microwave energy. It is important not to defeat or tamper
with the safety interlocks.
(b) Do not place any object between the oven front face and the door or allow soil or
cleaner residue to accumulate on sealing surfaces.
(c) Do not operate the oven if it is damaged. It is particularly important that
the oven door closes properly and that there is no damage to the:
(1) DOOR (bent)
(2) HINGES AND LATCHES (broken or loose)
(3) DOOR SEALS AND SEALING
SURFACE
(d) The oven should not be adjusted or repaired by anyone except properly
qualified service personnel.
1.1 Cu.ft.
12.4 inch
20.2X15.9X12.0 inch
Approx. 31.5 Lbs
Page 3
■ Proper and Safe Use of Your Oven.........................................4
■ Important Safety Instructions.................................................5
■ Grounding Instructions..........................................................6
■ Utensils.................................................................................7-8
■ Names of Oven Parts and Accessories..................................9
■ Turntable Installation..............................................................9
■ Installation.............................................................................10
■ Control Panel and Features...................................................11
■ Power Level Setting Guide...................................................12
■ Setting Clock..........................................................................12
■ Kitchen Timer.........................................................................12
■ Microwave Time Cooking.....................................................12
■ Start/ +1 min..........................................................................13
■ Weight Defrost...................................................................... 13
■ Auto Menu Cooking.........................................................14-15
■ Multi-Stage Cooking.............................................................16
■ Cooking Principles and Techniques......................................17
■ Troubleshooting.............................................................18
■ Questions and Answers........................................................19
■ Cleaning................................................................................19
■ Warranty................................................................................20
■ OPERACION......................................................................21
■ GARANTÍA............................................................................32
Page 4

Page 5

IMPORTANT SAFETY INSTRUCTIONS
WARNING
To reduce the risk of burns, electric shock, fire,injury to
persons or exposure to excessive microwave oven energy
when using your appliance, follow basic safety precautions,
including the following:
1. Read all instructions before using the
appliance.
2. Read and follow the specific: "PRECAU-
TIONS TO AVOID POSSIBLE EXPOSURE
TO EXCESSIVE MICROWAVE ENERGY"
found on page 2.
3. As with most cooking appliances, close
supervision is necessary to reduce the risk
of a fire in the oven cavity.
4.To reduce the risk of fire in the oven
cavity:
i). Do not overcook food. Carefully attend
the appliance when paper, plastic, or
other combustible materials are placed
inside the oven to facilitate cooking.
ii).Remove wire twist-ties and metal
handles from paper or plastic
containers/bags before placing them in
the oven.
iii). If materials inside the oven ignite,
keep the oven door closed. Turn the
oven off, and unplug the appliance.
Disconnect the power cord, shut off
power at the fuse or circuit breaker panel.
iv). Do not use the oven cavity for storage
purposes. Do not leave paper products,
cooking utensils, or food in the cavity
when not in use.
5. This oven must be grounded. Connect
only to properly grounded outlet. See
"GROUNDING INSTRUCTIONS" found
on page 4.
6. Install or locate this oven only in
accordance with the installation
instructions provided.
7. Some products such as whole eggs
and sealed containers-for example,
closed glass jars-are able to explode
and should not be heated in the oven.
8. Use this appliance only for its intended
uses as described in this manual. Do
not use corrosive chemicals or vapors
in this appliance. This oven is
specifically designed to heat or cook
or dry food. It is not designed for
industrial or laboratory use.
9. As with any appliance, close
supervision is necessary when used
by children.
10. Do not operate this oven if it has a
damaged cord or plug, if it is not
working properly or if it has been
damaged or dropped.
11. This appliance should be serviced only
by qualified service technicians.
Contact the nearest authorized service
facility for examination, repair or
adjustment.
12. Do not cover or block any openings on
the oven.
13. Do not store or use this appliance
outdoors.
14. Do not use this oven near water, for
example, near a kitchen sink, in a wet
basement, near a swimming pool, or
similar locations.
15. Do not immerse cord or plug in water.
16. Keep cord away from heated surfaces.
17. Do not let cord hang over edge of
table or counter.
18. When cleaning surfaces of door and
oven that comes together on closing
the door, use only mild, nonabrasive
soaps or detergents applied with a
sponge or soft cloth.
5
Page 6

19. Liquids, such as water, coffee, or tea are able to be overheated beyond the boiling point
without appearing to be boiling. Visible bubbling or boiling when the container is
removed from the microwave oven is not always present. THIS COULD RESULT IN
VERY HOT LIQUIDS SUDDENLY BOILING OVER WHEN THE CONTAINER IS
DISTURBED OR A SPOON OR OTHER UTENSIL IS INSERTED INTO THE LIQUID.
i) Do not overheat the liquid.
ii) Stir the liquid both before and halfway through heating it.
iii) Do not use straight-sided containers with narrow necks.
iv) After heating, allow the container to stand in the microwave oven for a short time
before removing the container.
v) Use extreme care when inserting a spoon or other utensil into the container.
SAVE THESE INSTRUCTIONS
GROUNDING INSTRUCTIONS
DANGER
Electric Shock Hazard
Touching some of the internal
components can cause serious
personal injury or death. Do not
disassemble this appliance.
WARNING
Electric Shock Hazard
Improper use of the grounding
can result in electric shock. Do
not plug into an outlet until
appliance is properly installed
and grounded.
Three-pronged
(grounding) plug
This appliance must be grounded. In the event of
an electrical short circuit, grounding reduces the risk
of electric shock by providing an escape wire for the
electric current. This appliance is equipped with a
cord having grounding wire with a grounding plug.
The plug must be plugged into an outlet that is
properly installed and grounded.
Consult a qualified electrician or serviceman if the
grounding instructions are not completely understood
or if doubt exists as to whether the appliance is
properly grounded. If it is necessary to use an
extension cord, use only a 3-wire extension cord that
has a 3-pronged grounding plug, and a 3-slot
receptacle that will accept the plug on the appliance.
The marked rating of the extension cord shall be
equal to or greater than the electrical rating of the
appliance.
6
Page 7

1. A short power-supply cord is provided to reduce the risks resulting from becoming entangled in
or tripping over a longer cord.
2. Longer cord sets or extension cords are available and may be used if cared is exercised in
their use.
3. If a long cord sets or extension cord is used:
1) The marked electrical rating of the cord set or extension marked electrical rating of the cord
set or extension cord should be at least as great as the electrical rating of the appliance.
2) The extension cord must be a grounding-type 3-wire cord; and
3) The longer cord should be arranged so that it will not drape over the countertop or tabletop
where it can be pulled on by children or tripped over unintentionally.
Radio Interference
1. Operation of the microwave oven may cause interference to your radio, TV
or similar equipment.
2. When there is interference, it may be reduced or eliminated by taking the
following measures:
1) Clean door and sealing surface of the oven
2) Reorient the receiving antenna of radio or television.
3) Relocate the microwave oven with respect to the receiver.
4) Move the microwave oven away from the receiver.
5) Plug the microwave oven into a different outlet so that microwave oven
and receiver are on different branch circuits.
UTENSILS
CAUTION
Personal Injury Hazard
Tightly-closed utensils
could explode. Closed
containers should be opened
and plastic pouches should be
pierced before cooking.
See the instructions on "Materials you can use in
microwave oven or to be avoided in microwave oven."
There may be certain non-metallic utensils that are not
safe to use for microwaving. If in doubt, you can test the
utensil in question following the procedure below.
Utensil Test:
1. Fill a microwave-safe container with 1 cup of cold
water (250ml) along with the utensil in question.
2. Cook on maximum power for 1 minute.
3. Carefully feel the utensil. If the empty utensil is
warm, do not use it for microwave cooking.
4. Do not exceed 1 minute cooking time.
7
Page 8

Materials you can use in microwave oven
Utensils Remarks
Aluminum foil Shielding only. Small smooth pieces can be used to cover thin parts of
meat or poultry to prevent overcooking. Arcing can occur if foil is too
close to oven walls. The foil should be at least 1 inch (2.5cm) away from
oven walls.
Browning dish
Dinnerware
Glass jars
Glassware
Oven cooking
bags
Paper plates
and cups
Paper towels
Parchment
paper
Plastic
Plastic wrap
Thermometers Microwave-safe only (meat and candy thermometers).
Wax paper Use as a cover to prevent splattering and retain moisture.
Follow manufacturer’s instructions. The bottom of browning dish must be
at least 3/16 inch (5mm) above the turntable. Incorrect usage may cause
the turntable to break.
Microwave-safe only. Follow manufacturer's instructions. Do not use
cracked or chipped dishes.
Always remove lid. Use only to heat food until just warm. Most glass jars
are not heat resistant and may break.
Heat-resistant oven glassware only. Make sure there is no metallic trim.
Do not use cracked or chipped dishes.
Follow manufacturer’s instructions. Do not close with metal tie. Make
slits to allow steam to escape.
Use for short–term cooking/warming only. Do not leave oven unattended
while cooking.
Use to cover food for reheating and absorbing fat. Use with supervision
for a short-term cooking only.
Use as a cover to prevent splattering or a wrap for steaming.
Microwave-safe only. Follow the manufacturer’s instructions. Should be
labeled "Microwave Safe". Some plastic containers soften, as the food
inside gets hot. "Boiling bags" and tightly closed plastic bags should be
slit, pierced or vented as directed by package.
Microwave-safe only. Use to cover food during cooking to retain
moisture. Do not allow plastic wrap to touch food.
Materials to be avoided in microwave oven
Utensils Remarks
Aluminum tray
Food carton with
metal handle
Metal or metaltrimmed utensils
Metal twist ties
Paper bags
Plastic foam
Wood
May cause arcing. Transfer food into microwave-safe dish.
May cause arcing. Transfer food into microwave-safe dish.
Metal shields the food from microwave energy. Metal trim may
cause arcing.
May cause arcing and could cause a fire in the oven.
May cause a fire in the oven.
Plastic foam may melt or contaminate the liquid inside when exposed
to high temperature.
Wood will dry out when used in the microwave oven and may split
or crack.
8
Page 9
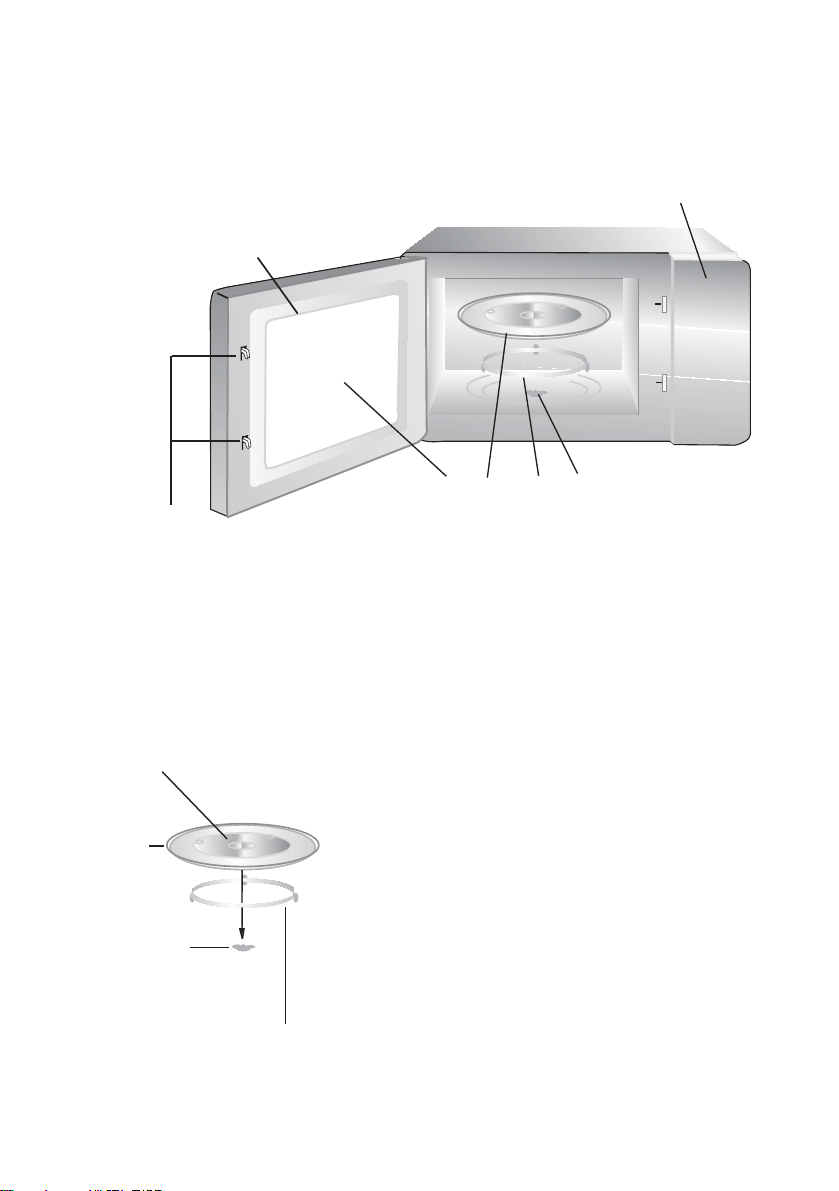
SETTING UP YOUR OVEN
Names of Oven Parts and Accessories
Remove the oven and all materials from the carton and oven cavity.
Your oven comes with the following accessories:
Glass tray 1
Turntable ring assembly 1
Instruction Manual 1
F
A
G
Turntable Installation
Hub (underside)
Glass tray
Turntable shaft
Turntable ring assembly
E
a. Never place the
tray should never be restricted.
b. Both
always be used during cooking.
c. All food and containers of food are always placed
on the
d. If
breaks, contact your nearest authorized service
center.
glass tray
glass tray
glass tray
or
turntable ring assembly
C B
D
A) Control panel
B) Turntable shaft
C) Turntable ring assembly
D) Glass tray
E) Observation window
F) Door assembly
G) Safety interlock system
glass tray
and
for cooking.
upside down. The glass
turntable ring assembly
cracks or
must
9
Page 10
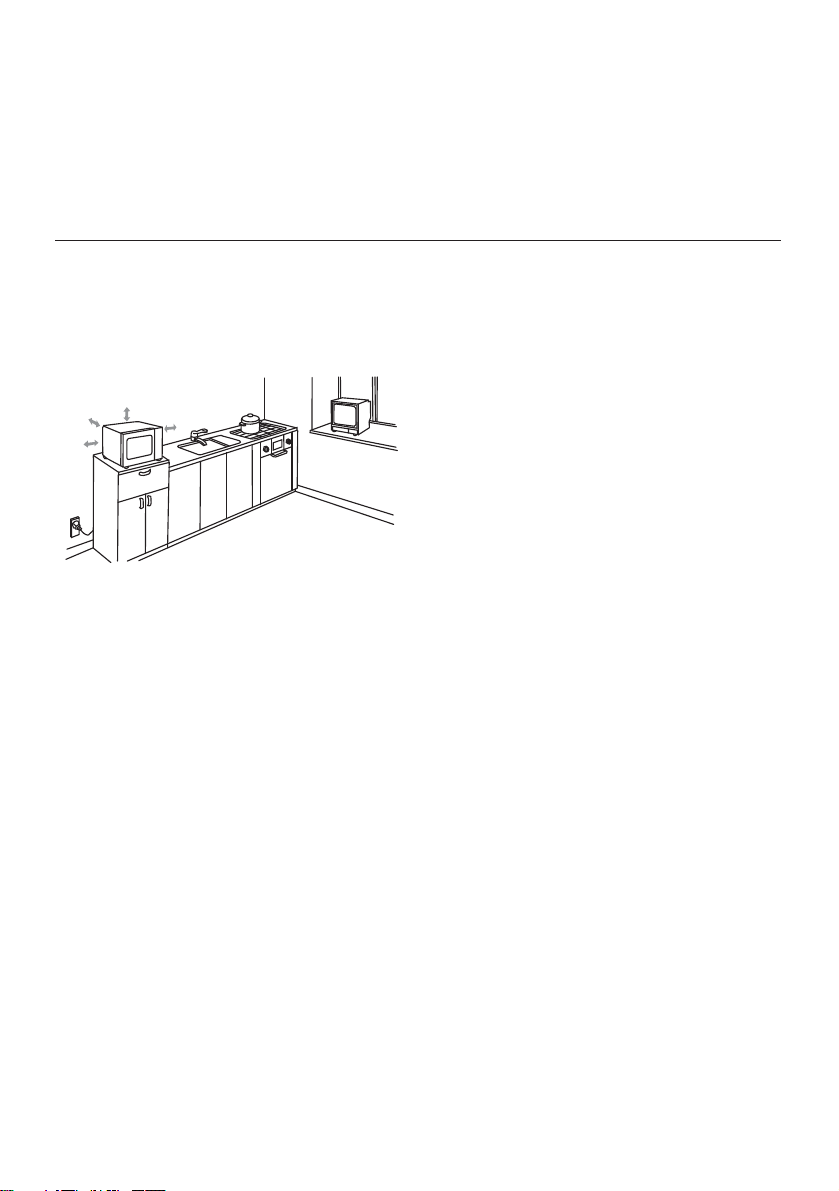
Countertop Installation
Remove all packing material and accessories.
Examine the oven for any damage such as
dents or broken door. Do not install if oven is
damaged.
Installation
1. Select a level surface that provide
enough open space for the intake
and/or outlet vents.
12 inch(30cm)
3.0 inch(7.5cm)
3.0 inch(7.5cm)
A minimum clearance of 3.0 inches
(7.5cm) is required between the oven and
any adjacent walls. One side must be open.
(1) Leave a minimum clearance of 12
inches (30cm) above the oven.
(2) Do not remove the legs from the
bottom of the oven.
OPEN
Cabinet: Remove any protective film found
on the microwave oven cabinet surface.
Do not remove the light brown Mica cover
that is attached to the oven cavity to
protect the magnetron.
(3) Blocking the intake and/or outlet openings
can damage the oven.
(4) Place the oven as far away from
radios and TV as possible.
Operation of microwave oven may
cause interference to your radio or TV
reception.
2. Plug your oven into a standard household
outlet. Be sure the voltage and the
frequency is the same as the voltage
and the frequency on the rating label.
WARNING: Do not install oven over a
range cooktop or other heat-producing
appliance. If installed near or over a heat
source, the oven could be damaged and
the warranty would be void.
10
Page 11

OPERATION
Control Panel and Features
(1)
(2)
(3)
(4)
(5)
(6)
(9)
(10)
(1) Time Cook
(2) Time Defrost
(3) Power
(4) Clock
(5) Auto menu: Popcorn,Potato,Pizza,Fresh vegetable,Beverage,Dinner plate
(6) Number Buttons:0-9
(7) Weight Defrost
(8) Kitchen Timer function
(9) Stop/Cancel: clears all previous setting pressed before cooking starts. During
cooking: press once to stop oven; twice to stop and clear all entries.
(10) Memory function
(11) Start/+30Sec.
(7)
(8)
(11)
11
Page 12

OPERATION
1. Power Level
11 power levels are available.
Level
Power
Display
2. Clock Setting
(1) Press " CLOCK ", "00:00" will display.
(2) Press the number keys and enter the current time. For example,
time is 12:10 now, please press "1,2,1,0" in turn.
(3) Press " CLOCK " to finish clock setting. ":" will flash and the clock will be lighted.
(4) If the numbers input are not within the range of 1:00--12:59, the setting will be invalid
until valid numbers are input.
Note: (1) In the process of clock setting, if the " STOP/Cancel " button is pressed or if
there is no operation within 1 minute, the oven will go back to the former setting
automatically.
(2)If the clock need to be reset, please repeat step 1 to step 3.
3. Kitchen Timer
(1) Press "KITCHEN TIMER ", LED will display 00:00, the first hour figure flash.
(2) Press the number keys and enter the timer time.(the maximum cooking time is
99 minutes and 99 seconds)
(3) Press " START/+30SEC. " to confirm setting.
(4) When the timer time arrives, the buzzer will ring 5 times.
If the clock be set (12-hour system), LED will display the current time.
Note: 1) The kitchen time is differ from 12-hour system,Kitchen Timer is a timer.
2) During kitchen timer, anny program cannot be set.
10
100%
PL10
9
90%
PL9
8
80%
PL8
7
70%
PL7
6
60%
PL6
5
50%
PL5
4
40%
PL4
3
30%
PL3
2
20%
PL2
1
10%
PL1
0%
PL0
0
4. Microwave cooking
(1) Press "TIME COOK" once, LED will display "00:00".
(2) Press number keys to input the cooking time; the maximum cooking time is 99
minutes and 99 seconds.
(3) Press " POWER " once, LED will display "PL10". The default power is 100% power.
Now you can press number keys to adjust the power level.
(4) Press " START/+30SEC." to start cooking.
12
Page 13

Example: to cook the food with 50% microwave power for 15 minutes.
a. Press "TIME COOK" once."00:00" displays.
b.Press "1","5","0","0" in order.
c.Press "POWER"once,then press "5" to select 50% microwave power.
d.Press "START/+30SEC." to start cooking.
Note:1) In the process of cooking, if the " STOP/CANCEL" button is pressed or if there is
no operation within 1 minute, the oven will go back to the former setting automatically.
2) If "PL0" selected, the oben will work with fan for no power.
3)During microwave cooking, "POWER" can be pressed to change the power you need.
After pressing "POWER",the current power flash for 3 seconds, now you can press number
button to change the power. The oven will work with the selected power for the rest time.
5. Speed Cooking
(1) In waiting state, instant cooking at 100% power level can be started by select a cooking
time from 1 to 6 minutes by pressing number pads1 to 6. Press " START/+30SEC." to
increase the cooking time; the maximum cooking time is 99 minutes and 99 seconds.
(2) In waiting state, instant cooking at 100% power level with 30 seconds' cooking time can
be started by pressing " START/+30SEC ". Each press on the same button will increase
cooking time by 30 seconds. the maximum cooking time is 99 minutes and 99 seconds.
Note: during microwave cooking and time defrost,time can be added by pressing
"START/30SEC." button.
6. Weight Defrost Function
(1) Press " WEIGHT DEFROST ", LED will display "dEF1".
(2) Press numerical buttons to input weight to be defrosted.
Input the weight ranged between 4~100 Oz.
(3) If the weight input is not within 4~100, the input will be invalid. A "beep" will be sound
and the unit will not work until valid numbers are input .
(4) Press " START/+30SEC. " to start defrosting and the cooking time remained will be
displayed.
7. Time Defrost Function
(1) Press " TIME DEFROST ", LED will display "dEF2".
(2) Press number pads to input defrosting time. The effective time range is 00:01~99:99
(3) The default microwave power is power level 3. If you want to change the power level,
press " POWER " once, and the LED will display "PL 3", then press the number pad
of the power level you wanted.
(4) Press " START/+30SEC. " to start defrosting. The remained cooking time will be
displayed.
13
Page 14

8.POPCORN
a) Press " POPCORN " repeatedly until the number you wish appears in the display,
"1.75","3.0","3.5" Oz will display in order.
For example, press "POPCORN" once , "1.75" appears.
b) Press " START/+30 SEC. " to cook, buzzer will sound five times and then turn back
to waiting state.
Note: When selecting 3.0-3.5 ounces of popcorn,
it is suggested that you fold down a triangle on
each corner of the bag before cooking. Refer to
the picture at right.
9.POTATO
a) Press " POTATO " repeatedly until the number you wish appears in the display,
"1","2","3" will display in order.
"1"SET : 1 potato (approximate 230 gram)
"2"SETS: 2 potatoes (approximate 460 gram)
"3"SETS: 3 potatoes (approximate 690 gram)
For example, press "POTATO" once , "1" appears.
b) Press " START/+30 SEC. " to cook, buzzer sounds once.When cooking finish,buzzer
sounds five times and then turn back to waiting state.
10.FROZEN VEGETABLE
a) Press " FROZEN VEGETABLE " repeatedly until the number you wish appears in the
display, "4.0","8.0","16.0" oz will display in order.
For example, press "FROZEN VEGETABLE" once , "4.0" appears.
b) Press " START/+30 SEC. " to cook, buzzer sounds once.When cooking finish,buzzer
sounds five times and then turn back to waiting state.
11.BEVERAGE
a) Press " BEVERAGE " repeatedly until the number you wish appears in the
display, "1","2","3" cup will display in order. One cup is about
120ml. For example, press "BEVERAGE" once , "1" appears.
b) Press " START/+30 SEC. " to cook, buzzer sounds once.When cooking finish,buzzer
sounds five times and then turn back to waiting state.
14
Page 15

12. DINNER PLATE
a) Press " DINNER PLATE " repeatedly until the number you wish appears in the
display, "9.0","12.0","18.0" oz will display in order.
For example, press "DINNER PLATE" once , "9.0" appears.
b) Press " START/+30 SEC. " to cook, buzzer sounds once.When cooking finish,buzzer
sounds five times and then turn back to waiting state.
13. PIZZA
a) Press " PIZZA " repeatedly until the number you wish appears in the
display, "4.0","8.0","14.0" oz will display in order.
For example, press "PIZZA" once , "4.0" appears.
b) Press " START/+30 SEC. " to cook, buzzer sounds once.When cooking finish,buzzer
sounds five times and then turn back to waiting state.
14. MEMORY FUNCTION
(1) Press "0/MEMORY" to choose memory 1-3 procedure. The LED will display 1,2,3.
(2) If the procedure has been set, press " START/ +30 SEC." to use it. If not, continue to
set the procedure. Only one or two stages can be set.
(3) After finishing the setting, press "START/ +30 SEC." once to save the procedure and
turn back to the waiting states.If press " START/ +30 SEC." again,it will start cooking.
Example: to set the following procedure as the second memory, that is memory 2.
to cook the food with 80% microwave power for 3minutes and 20 seconds.
The steps are as follow:
a. In waiting states, press "0/MEMORY" twice,stop pressing until the screen displays "2".
b.Press "TIME COOK" once,then press "3","2","0" in order.
c. Press "POWER" once,"PL10" display,then press "8" and "PL8" displays.
d. Press "START/ +30 SEC." to save the setting. Buzzer sounds once then turn back to
waiting states. If you press "START/+30SEC." again, the procedure will be saved as the
memory 2 and operated.
e. If the electricity is not cut off, the procedure will be saved all the time. If it is, the
procedure need to reset.
f. If you want to run the saved procedure, in waiting states, press "0/MEMORY" twice,
screen displays "2", then press "START/+30SEC." to run.
15
Page 16

15. Multi-stage cooking
At most 2 stages can be set for cooking. In multi-stage cooking, if one stage is
defrosting, then defrosting shall be placed at the first stage automatically.
Note: Auto cooking cannot work in the multi-stage cooking.
Example: if you want to cook with 80% microwave power for 5 minutes + 60% microwave
power for 10 minutes. The cooking steps are as following:
(1) Press "TIME COOK" once,then press "5","0","0" to set the cooking time;
(2) Press "POWER" once,then press "8" to select 80% microwave power.
(3) Press "TIME COOK" once,then press "1","0","0","0" to set the cooking time;
(4) Press "POWER" once,then press "6" to select 60% microwave power.
(5) Press "START/ +30 SEC." to start cooking.
16. INQUIRING FUNCTION
(1) In cooking state, press " CLOCK ", the LED will display clock for three seconds.
(2) In the microwave cooking state, press " POWER " to inquire microwave power level, and
the current microwave power will be displayed. After three seconds, the oven will turn back
to the previous state. In multi-stage state, the inquiring way can be done by the
same way as above.
17. LOCK FUNCTION FOR CHILDREN
Lock: In standby state, press " STOP/CANCEL " for 3 seconds, there will be a long "beep"
denoting the entering into the children-lock state; meanwhile, LED will display " "
Lock cancel: In locked state, press " STOP/CANCEL " for 3 seconds, there will be a long
denoting that lock is released.
"beep"
18. COOKING END REMINDING FUNCTION
When the cooking is over, the buzzer will sound 5 "beep" to alert user the cooking is finished.
19. OTHER SPECIFICATIONS
(1) In standby state , if the set clock digital tube displays current time, the icon " : " would
flash; otherwise, it shows " 0:00 ".
(2) In setting function state, LED displays corresponding setting.
(3) In working or pause state, LED displays surplus cooking time.
16
Page 17

Page 18

Maintenance
Troubleshooting
Check your problem by using the chart below and try the solutions for each problem. If the
microwave oven still does not work properly, contact the nearest authorized service center.
TROUBLE
Oven will not start
Arcing or sparking
Unevenly cooked
foods
Overcooked foods
Undercooked foods
POSSIBLE CAUSE POSSIBLE REMEDY
a. Electrical cord for oven is
not plugged in.
b. Door is open.
c. Wrong operation is set.
a. Materials to be avoided in
microwave oven were
used.
b. The oven is operated when
empty.
c. Spilled food remains in the
cavity.
a. Materials to be avoided in
microwave oven were
used.
b. Food is not defrosted
completely.
c. Cooking time, power level
is not suitble.
d. Food is not turned or stirred.
Cooking time, power level is
not suitable.
a. Materials to be avoided in
microwave oven were used.
b. Food is not defrosted
completely.
c. Oven ventilation ports are
restricted.
d. Cooking time, power level is
not suitable.
a. Plug into the outlet.
b. Close the door and try
again.
c. Check instructions.
a. Use microwave-safe
cookware only.
b. Do not operate with oven
empty.
c. Clean cavity with wet towel.
a. Use microwave-safe
cookware only.
b. Completely defrost food.
c. Use correct cooking time,
power level.
d. Turn or stir food.
Use correct cooking time,
power level.
a. Use microwave-safe
cookware only.
b. Completely defrost food.
c. Check to see that oven venti lation ports are not restricted.
d. Use correct cooking time,
power level.
Improper defrosting
a. Materials to be avoided in
microwave oven were used.
b. Cooking time, power level is
not suitable.
c. Food is not turned or stirred.
18
a. Use microwave-safe
cookware only.
b. Use correct cooking time,
power level.
c. Turn or stir food.
Page 19

19
Page 20

SANYO MICROWAVE OVEN
LIMITED WARRANTY
OBLIGATIONS
In order to obtain warranty service, the product must be delivered to and picked up from an authorized Sanyo
factory service center at the user’s expense, unless specifically stated otherwise in this warranty. The names and
addresses of Authorized Sanyo Service Centers may be obtained by calling the toll-free number listed below.
THIS WARRANTY IS VALID ONLY ON SANYO PRODUCTS PURCHASED OR RENTED AND USED IN CANADA OR IN MEXICO
OR IN THE UNITED STATES OF AMERICA, EXCLUDING ALL U.S. TERRITORIES AND PROTECTORATES. THIS WARRANTY IS
VALID ONLY IN THE COUNTRY IN WHICH THE PRODUCT WAS PURCHASED. THIS WARRANTY APPLIES TO THE ORIGINAL
RETAIL USER AND DOES NOT APPLY TO PRODUCTS USED FOR ANY INDUSTRIAL, PROFESSIONAL OR COMMERCIAL
PURPOSE. THE ORIGINAL DATED BILL OF SALE, SALES SLIP OR RENTAL AGREEMENT MUST BE SUBMITTED TO THE
AUTHORIZED SANYO SERVICE CENTER AT THE TIME WARRANTY SERVICE IS REQUESTED. For service in Mexico, in case
there is no service center in the city where the product was purchased, user shall send t he product, in accordance with the ins tructions
provided by SNA’s authorized servicer, to the nearest service center freight collect. Subject to the OBLIGATIONS above and
EXCLUSIONS below, SANYO North America Corporation, Consumer Solutions Division (SNA) warrants this SANYO product against
defects in material and workmanship for the periods of LABOR and PARTS specified below. SNA will repair or replace (at its option)
the product and any of its parts which fail to conform to this warranty. The warranty period commences on the dat e the product was
first purchased or rented at retail.
For product operation, authorized service center referral or service assistance, call
CUSTOMER INFORMATION: (USA 1-800-421-5013) (Mexico 001-800-726-9775)
Weekdays 7:30 A.M. – 5:00 P.M. Pacific Time
(Canada 1-800-263-2244 -- Weekdays 8:30 A.M. – 5:00 P.M. Eastern Time)
LABOR PARTS MAGNETRON TUBE
(Part only)
For Product Purchased in Canada: Please visit ca.sanyo.com for up-to-date-Warranty details.
This warranty does not cover (A) the adjustment of customer-operated controls as explained in the appropriate model’s instructi ons
manual, or (B) the repair of any product whose serial number has been altered, defaced or removed.
This warranty shall not apply to the temperature probe, bottom tray, shelf, stirrer cover and any damage initiated by spark fires caused
by using anything metal inside the oven, except those accessories approved by SNA. This warranty does not appl y to u ncrating, set up,
installation, removal of the product for repair or reinstallation of the product after repair. This warranty does not apply to repair
replacements necessitated by any use beyond the control of SNA including, but not limited to, any malfunction, defect or failure cause d
by or resulting from unauthorized service or parts, improper maintenance, operation contrary to furnished instructions, shipping or
transit accidents, modifications or repair by the user, abuse, misuse, neglect, accident, incorrect power line voltage, fir e, flood, or other
Acts of God, or normal wear and tear.
The foregoing is in lieu of all other warranties and SNA does not assume or authorize an y party to assume for it any other obli gation or
liability.
THE DURATION OF ANY WARRANTIES WHICH MAY BE IMPLIED BY LAW (INCLUDING THE WARRANTIES OF
MERCHANTIBILITY AND FITNESS) IS LIMITED TO THE TERM OF THIS WARRANTY. IN NO EVENT SNA SHALL BE LIABLE FOR
SPECIAL, INCIDENTAL OR CONSEQUENTIAL DAMAGES ARISING FROM OWNERSHIP OR USE OF THIS PRODUCT, OR FOR
ANY DELAY IN THE PERFORMANCE OF ITS OBLIGATIONS UNDER THIS WARRANTY DUE TO CAUSES BEYOND ITS
CONTROL.
IN THE UNITED STATES AND CANADA, SOME STATES AND PROVINCES, RESPECTIVELY, DO NOT ALLOW LIMITATION ON
HOW LONG AN IMPLIED WARRANTY LASTS AND/OR DO NOT ALLOW THE EXCLUSION OR LIMITATION OF CONSEQUENTIAL
DAMAGES, SO THE ABOVE LIMITATIONS AND EXCLUSIONS MAY NOT APPLY TO YOU.
THIS WARRANTY GIVES YOU SPECIFIC LEGAL RIGHTS. YOU MAY HAVE OTHER RIGHTS, WHICH VARY FROM STATE TO
STATE, FROM PROVINCE TO PROVINCE, AND FROM COUNTRY TO COUNTRY.
For your protection in the event of theft or loss of this product, please fill in the information below for your own personal records.
Model No. ______________________________ Serial No. __________________________________________
Date of Purchase ___________________
Where Purchased _________________________________________________________________
1 YEAR 1 YEAR 5 YEARS
EXCLUSIONS
(Located on back or bottom side of unit)
______ Purchase Price ______________________________________
______________________
20
Page 21

INSTALACIÓN DE SU HORNO DE MICROONDAS
Nombre de las partes y accesorios del horno
Retire el horno y todos los materiales de la caja y de la cavidad del horno.
Su horno incluye los siguientes accesorios:
Bandeja de vidrio 1
Anillo para la bandeja giratoria 1
Manual de instrucciones 1
F
A
G
Instalación bandeja giratoria
Centro (revés)
Bandeja de vidrio
Eje para la bandeja giratoria
Montaje del anillo para la bandeja giratoria
a. La bandeja de vidrio nunca debe colocarse del revés.
b. Tanto la bandeja de vidrio como el anillo para la
c. Siempre debe colocar los alimentos y los recipientes
d. En caso de que la bandeja de vidrio o el anillo para la
E
La bandeja de vidrio nunca debe estar atascada.
bandeja giratoria deben utilizarse siempre que se use
el microondas.
de alimentos sobre la bandeja de vidrio.
bandeja giratoria se agrieten o quiebren, contacte al
centro de servicio autorizado más cercano.
C B
D
A) Panel de control
B) Eje para la bandeja giratoria
C) Anillo para la bandeja giratoria
D) Bandeja de vidrio
E) Ventana de observación
F) Ensamblaje de la puerta
G) Sistema de cierre de seguridad
21
Page 22

Instalación sobre la cubierta
Retire todo el material de empaque y los
accesorios. Revise el horno por si existe
algún daño, como por ejemplo abolladuras o
que la puerta esté quebrada. No instale el
horno si éste está dañado.
Instalación
1. Seleccione una superficie nivelada que
proporcione suficiente espacio abierto para
las entradas y/o salidas de ventilación.
3.0 pulgadas (7.5cm)
3.0 pulgadas (7.5cm)
Se necesita un espacio libre por lo
menos 3.0 pulgadas (7.5 cm) entre el
horno y cualquier pared adyacente. Un
lado del horno debe permanecer libre.
(1) Deje un espacio libre de al menos 12
(2) No remueva los soportes de la parte
12 pulgadas (30cm)
ABIERTO
pulgadas (30 cm) sobre el horno.
inferior del horno.
Gabinete: Retire todo el papel protector
que se encuentra en la superficie del
gabinete del horno de microondas.
No retire la cubierta de Mica de color
café claro que protege el magnetrón
dentro de la cavidad del horno.
(3) El horno puede dañarse si se
bloquean las salidas y/o entradas
de ventilación.
(4) Coloque el horno lo más alejado
posible de aparatos de radio y
televisión. El funcionamiento del
horno de microondas puede causar
interferencia con la radio o la
televisión.
2. Enchufe el horno en una toma de
corriente estándar. Asegúrese de
que el voltaje y la frecuencia
coincidan con los valores voltaje y
frecuencia especificados en la
etiqueta de indicaciones.
ADVERTENCIA: No instale el horno
sobre las hornillas de la estufa u otro
dispositivo que produzca calor. Si lo
instala cerca o sobre una fuente de
calor, el horno podría dañarse y anular
la garantía.
22
Page 23

FUNCIONAMIENTO
Panel de control y funciones
(1)
(2)
(3)
(4)
(5)
(6)
(9)
(10)
(1) Time Cook (Tiempo de cocción)
(2) Time Defrost (Tiempo de descongelamiento)
(3) Power (Potencia)
(4) Clock (Reloj)
(5) Auto menu (Menú automático): Popcorn (Palomitas de maíz), Potato
(Papa), Pizza, Frozen Vegetables (Vegetales congelados), Beverage
(Bebidas), Dinner plate (Platos de cena)
(6) Botones numéricos: 0-9
(7) Weight Defrost (Descongelamiento por peso)
(8) Kitchen Timer function (Temporizador de cocción)
(9) Stop/Cancel (Pausar/cancelar): borra toda configuración previa antes de
comenzar la cocción. Durante la cocción: Presione una vez para detener el
horno, y dos veces para detener y borrar la configuración.
(10) Memory (Memoria)
(11) Start/+30Sec. (Comenzar/+30seg)
(7)
(8)
(11)
23
Page 24

FUNCIONAMIENTO
1. Nivel de potencia
Existen 11 niveles de potencia.
Nivel
Potencia
Visuali-zación
10
100%
PL10
9
90%
PL9
8
80%
PL8
7
70%
PL7
6
60%
PL6
5
50%
PL5
4
40%
PL4
3
30%
PL3
2
20%
PL2
2. Ajuste del reloj
(1) Presione “CLOCK (RELOJ)”; mostrará “00:00”.
(2) Presione las teclas numéricas para ingresar la hora actual. Por
ejemplo, si la hora es 12:10, presione “1,2,1,0” en ese orden.
(3) Presione “CLOCK (RELOJ)” para finalizar el ajuste del reloj. “:”
parpadeará y se iluminará la hora.
(4) Si los números ingresados no corresponden a una hora entre 1:00-
-12:59, no se efectuará el ajuste hasta que se ingresen números válidos.
Nota: (1) Si durante el ajuste el reloj se presiona el botón “STOP/Cancel”
(DETENER/Cancelar) o si transcurre un minuto de inactividad, el
horno retornará automáticamente a la configuración previa.
(2) En caso de necesitar reajustar el reloj, repita los pasos del 1 al 3.
3. Kitchen Timer (Temporizador de cocción)
(1) Presione “KITCHEN TIMER (TEMPORIZADOR DE COCCIÓN)”; el
visor LED mostrará 00:00 y la primera cifra de la hora parpadeará.
(2) Presione las teclas numéricas e ingrese el tiempo para el temporizador
(el tiempo máximo de cocción es 99 minutos y 99 segundos).
(3) Presione “START/+30SEC. (COMENZAR/+30seg)” para confirmar
la orden.
(4) Cuando se cumpla el tiempo, la alarma sonará 5 veces. Si el reloj se
encuentra configurado (dentro del sistema horario de 12 horas), el visor
LED mostrará la hora actual.
Nota: (1) El tiempo de cocción es distinto al del sistema horario de 12 horas;
el temporizador de cocción es un sistema de control de tiempo.
(2) Mientras el temporizador de cocción se encuentra en funcionamiento no se puede iniciar ningún otro programa.
1
10%
PL1
0
0%
PL0
4. Cocción con microondas
(1) Presione una vez “TIME COOK” (TIEMPO DE COCCIÓN); el visor
LED mostrará “00:00”.
(2) Presione las teclas numéricas para ingresar el tiempo de cocción; el
tiempo máximo de cocción es 99 minutos y 99 segundos.
(3) Presione una vez “POWER” (POTENCIA); el visor LED mostrará “PL10”.
La potencia predeterminada es del 100%. A continuación puede utilizar el
teclado numérico para ajustar el nivel de potencia.
(4) Presione “START/+30SEC.” (COMENZAR/+30seg) para comenzar la
cocción.
24
Page 25

Ejemplo: Para cocinar los alimentos con un potencia de microondas del 50% durante 15
minutos.
a. Presione una vez “TIME COOK” (TIEMPO DE COCCIÓN). En el visor
se mostrará “00:00”.
b. Ingrese “1”, “5”, “0”, “0” en ese orden.
c. Presione “POWER” (POTENCIA), después presione el número “5” para seleccionar el nivel
de potencia del 50%.
d. Presione “START/+30SEC.” (COMENZAR/+30seg) para comenzar la cocción.
Nota: 1) Si durante la cocción se presiona el botón “STOP/CANCEL” (DETENER/CANCELAR)
o si transcurre un minuto de inactividad, el horno retornará automáticamente a la configuración
previa.
2) Si selecciona el nivel de potencia “PL0”, el horno funcionará con ventilación y sin potencia.
3) Durante la cocción con microondas, puede cambiar el nivel de potencia que necesita
presionando “POWER” (POTENCIA). Después de presionar “POWER” (POTENCIA) la
potencia actual parpadeará durante 3 segundos y podrá presionar una tecla numérica para
cambiar la potencia. El horno funcionará con la potencia seleccionada por el resto del tiempo de
cocción.
5. Cocción rápida
(1) Cuando el horno se encuentra en estado de espera, puede iniciar la cocción con una
potencia del 100% seleccionando un tiempo de cocción de entre 1 y 6 minutos con el teclado
numérico de 1 a 6. Presione “START/+30SEC.” (COMENZAR/+30seg) para aumentar el
tiempo de cocción; el tiempo máximo de cocción es de 99 minutos y 99 segundos.
(2) Cuando el horno se encuentra en estado de espera, puede iniciar la cocción con una
potencia del 100% durante 30 segundos presionando “START/+30SEC.”
(COMENZAR/+30seg). Cada vez que se presione este botón se agregarán 30 segundos al
tiempo de cocción; el tiempo máximo de cocción es de 99 minutos y 99 segundos.
Nota: Durante la cocción con microondas y durante el descongelamiento, puede agregar tiempo
presionando el botón “START/30SEC” (COMENZAR/+30seg).
6. Descongelamiento por peso
(1) Presione “WEIGHT DEFROST” (DESCONGELAMIENTO POR PESO);
el visor LED mostrará “dEF1”.
(2) Use el teclado numérico para ingresar el peso de lo que descongelará.
Ingrese un peso entre 4 y 100 Oz (entre 113 y 2,835 g).
(3) Si el peso ingresado no se encuentra entre 4 y 100, la entrada se invalidará. Se escuchará
un “beep” y la unidad no funcionará hasta haber ingresado una cifra válida.
(4) Presione “START/+30SEC.” (COMENZAR/+30seg) para comenzar a descongelar; se
mostrará el tiempo de cocción restante.
7. Descongelamiento rápido
(1) Presione “TIME DEFROST” (DESCONGELAMIENTO RÁPIDO);
el visor LED mostrará “dEF2”.
(2) Ingrese el tiempo de descongelamiento con el teclado numérico. El rango de tiempo efectivo
es de 00:01~99:99.
(3) La potencia predeterminada es de nivel 3. En caso de querer cambiarla, presione
“POWER” (POTENCIA) una vez; el visor LED mostrará “PL3”. Después ingrese el nivel de
potencia deseado con el teclado numérico.
(4) Presione “START/+30SEC.” (COMENZAR/+30seg) para comenzar a descongelar. Se
mostrará el tiempo de cocción restante.
25
Page 26

8. PALOMITAS DE MAÍZ
a) Presione “POPCORN” (PALOMITAS DE MAÍZ) repetidamente hasta que aparezca en el
visor la cifra deseada; “1.75”, “3.0”, “3.5” Oz (49, 85 y 99.2 g, respectivamente) se
observarán en ese orden. Por ejemplo, presione “POPCORN” (PALOMITAS DE MAÍZ)
una vez; se observará “1.75”.
b) Presionar “START/+30 SEC.” (COMENZAR/+30seg) para cocinarlas;
la alarmasonará cinco veces y luego regresará al estado de espera.
Nota: Al seleccionar 3.0 – 3.5 onzas (85 - 99.2 g)
de palomitas, se recomienda doblar en triángulo
cada esquina del paquete antes de cocinarlas.
Observe la imagen a la derecha.
9. POTATO (PAPA)
a) Presione “POTATO” (PAPA) repetidamente hasta que aparezca en el visor la cifra
deseada; “1”, “2”, “3” se observarán en ese orden.
“1” INDICA: 1 papa (aproximadamente 230 g)
“2” INDICA: 2 papas (aproximadamente 460 g)
“3” INDICA: 3 papas (aproximadamente 690 g)
Por ejemplo, presione “POTATO” (PAPA) una vez; se mostrará “1”.
b) Presionar “START/+30 SEC.” (COMENZAR/+30seg) para cocinarlas; la alarma sonará
una vez. Al terminar la cocción, la alarma sonará cinco veces y luego regresará al estado
de espera.
10. VEGETALES CONGELADOS
a) Presione “FROZEN VEGETABLE” (VEGETALES CONGELADOS)
repetidamente hasta que aparezca en el visor la cifra deseada; “4.0”, “8.0”, “16.0” Oz
(113, 226 y 453 g, respectivamente) se observarán en ese orden. Por ejemplo, presione
“FROZEN VEGETABLE” (VEGETALES CONGELADOS) una vez y se observará “4.0”.
b) Presionar “START/+30 SEC.” (COMENZAR/+30seg) para cocinarlas; la alarma sonará
una vez. Al terminar la cocción, la alarma sonará cinco veces y luego regresará al estado
de espera.
11. BEBIDAS
a) Presione “BEVERAGE” (BEBIDAS) repetidamente hasta que
aparezca en el visor la cifra deseada; “1”, “2”, “3” tazas se observarán en ese orden. Una
taza son aproximadamente 120ml. Por ejemplo, presione “BEVERAGE” (BEBIDAS) una
vez; se observará “1”.
b) Presionar “START/+30 SEC.” (COMENZAR/+30seg) para cocinarlas; la alarma sonará
una vez. Al terminar la cocción, la alarma sonará cinco veces y luego regresará al estado
de espera.
26
Page 27

12. PLATO DE CENA
a) Presione “DINNER PLATE” (PLATO DE CENA) repetidamente hasta que aparezca
en el visor la cifra deseada; “9.0”, “12.0”, “18.0” Oz (255, 340 y 510 g,
aproximadamente) se observarán en ese orden. Por ejemplo, presione
“DINNER PLATE” (PLATO DE CENA) una vez y se observará “9.0”.
b) Presionar “START/+30 SEC.” (COMENZAR/+30seg) para cocinarlo; la alarma sonará una
vez. Al terminar la cocción, la alarma sonará cinco veces y luego regresará al estado de
espera.
13. PIZZA
a) Presione “PIZZA” repetidamente hasta que aparezca en el visor la cifra
deseada; “4.0”, “8.0”, “14.0” Oz (113, 226 y 396 g, aproximadamente) se
observarán en ese orden. Por ejemplo, presione “PIZZA” una vez; se
observará “4.0”.
b) Presionar “START/+30 SEC.” (COMENZAR/+30seg) para cocinarlas; la alarma sonará
una vez. Al terminar la cocción, la alarma sonará cinco veces y luego regresará al estado
de espera.
14. FUNCIÓN DE MEMORIA
(1) Presione “0/MEMORY” (MEMORIA) para elegir el programa de memoria 1-3. El visor LED
mostrará 1,2,3.
(2) Si ya se ha indicado el programa, presione “START/ +30 SEC.” (COMENZAR/+30seg)
para poder usarlo. De lo contrario, prosiga con la programación. Solo se pueden programar uno o dos ciclos.
(3) Al terminar la programación, presione “START/ +30 SEC.” (COMENZAR/+30seg) una vez
para guardar la acción y regresar al estado de espera. Si presiona “START/ +30 SEC.”
(COMENZAR/+30seg) de nuevo, se iniciará la cocción.
Ejemplo: Para programar la siguiente acción como segunda memoria, es decir memoria 2.
Para cocinar los alimentos con una potencia de microondas del 80% durante 3 minutos y 20
segundos.
Los pasos a seguir son los siguientes:
a. En el estado de espera, presione “0/MEMORY” (0/MEMORIA) dos veces, deje de presio-
nar cuando la pantalla muestre el número “2”.
b. Presione “TIME COOK” (TIEMPO DE COCCIÓN) una vez, después ingrese los números
“3”, “2”, “0” en ese orden.
c. Presione “POWER” (POTENCIA) una vez; se observará “PL10”, después presione “8” y se
observará “PL8”.
d. Presionar “START/ +30 SEC.” (COMENZAR/+30seg) para guardar la configuración. La
alarma sonará una vez y luego retornará al estado de espera. Si presiona “START/ +30
SEC.” (COMENZAR/+30seg) nuevamente, el procedimiento se guardará y funcionará
como la memoria 2.
e. Si no se produce un corte de energía, el procedimiento permanecerá guardado. En caso de
producirse un corte, la acción debe programarse nuevamente.
f. Si quiere utilizar el procedimiento guardado, en estado de espera presione “0/MEMORY”
(0/MEMORIA) dos veces y la pantalla mostrará “2”; después presione “START/+30SEC.”
(COMENZAR/+30seg) para comenzar
27
Page 28

15. Cocción de ciclos múltiples
Se pueden programar como máximo dos ciclos de cocción. En la cocción de ciclos
múltiples, si uno de los ciclos es descongelamiento, este constituirá automáticamente la
primera etapa de la cocción.
Nota: La cocción automática no funciona con la cocción de ciclos múltiples.
Ejemplo: Si quiere cocinar con una potencia de microondas del 80% durante 5 minutos y
una del 60% durante 10 minutos. Los pasos a seguir son los siguientes:
(1) Presione “TIME COOK” (TIEMPO DE COCCIÓN) una vez, luego presione “5”, “0”, “0”
para programar el tiempo de cocción;
(2) Presione “POWER” (POTENCIA) una vez, después presione el número “8” para
seleccionar el nivel de potencia del 80%.
(3) Presione “TIME COOK” (TIEMPO DE COCCIÓN) una vez, luego presione “1”, “0”, “0”,
“0” para programar el tiempo de cocción;
(4) Presione “POWER” (POTENCIA) una vez, después presione el número “6” para
seleccionar el nivel de potencia del 60%.
(5) Presionar “START/ +30 SEC.” (COMENZAR/+30seg) para comenzar la cocción.
16. FUNCIÓN DE CONSULTA
(1) Durante la cocción, presione “CLOCK” (RELOJ); el visor de LED mostrará el reloj por
tres segundos.
(2) Durante la cocción, presione “POWER” (POTENCIA) para consultar la potencia de
microondas y el nivel actual se mostrará en la pantalla. Después de tres segundos, el
horno volverá a su estado anterior. Durante la cocción de ciclos múltiples, la función de
consulta puede utilizarse de la misma forma.
17. FUNCIÓN DE BLOQUEO PARA NIÑOS
Bloqueo: En estado de espera, presione “STOP/CANCEL” (DETENER/CANCELAR)
durante 3 segundos, se producirá un “beep” prolongado que indica el inicio del estado de
bloqueo para niños; mientras tanto, el visor LED mostrará lo siguiente: “ ”
Desbloqueo: En estado de bloqueo, presione “STOP/CANCEL” (DETENER/CANCELAR)
durante 3 segundos; se producirá un “beep” prolongado que indica el desbloqueo.
18. FUNCIÓN DE RECORDATORIO DE TÉRMINO DE COCCIÓN
Cuando finalice la cocción, la alarma producirá un “beep” 5 veces para indicar el término
de la cocción.
19. OTRAS ESPECIFICACIONES
(1) En estado de espera, si la pantalla del reloj digital muestra la hora actual, parpadeará
el icono “:”; de lo contrario, se observará “0:00”.
(2) Durante la programación de alguna función, el visor LED mostrará la configuración
correspondiente.
(3) Durante la cocción o en estado de pausa, el visor LED mostrará el tiempo de cocción
restante.
28
Page 29

29
Page 30

Mantenimiento
Solución de problemas
Revise su problema utilizando el cuadro que se muestra a continuación e intente las
soluciones indicadas para cada problema. Si el horno microondas aún no funciona
adecuadamente, póngase en contacto con el servicio técnico autorizado más cercano.
PROBLEMA
El horno no
enciende
Formación de
arcos o chispas
Alimentos
cocinados de
forma no uniforme
Alimentos muy
cocidos
Alimentos poco
cocidos
POSIBLE CAUSA POSIBLE SOLUCIÓN
a. El cordón de alimentación
eléctrica del horno no está
conectado.
b. La puerta está abierta.
c. Se ha programado una
operación incorrecta.
a. Se utilizaron materiales
prohibidos para el horno de
microondas.
b. El horno se utiliza vacío.
c. La cavidad contiene alimen-
tos derramados.
a. Se utilizaron materiales
prohibidos para el horno de
microondas.
b. Los alimentos no se
descongelaron por completo.
c. El tiempo de cocción y la
potencia no son adecuados.
d. No se volteó o revolvió la
comida.
El tiempo de cocción y la
potencia no son adecuados.
a. Se utilizaron materiales
prohibidos para el horno de
microondas.
b. Los alimentos no se
descongelaron por completo.
c. Las salidas de ventilación no
están despejadas.
d. El tiempo de cocción y la
potencia no son adecuados.
a. Enchufarlo.
b. Cerrar la puerta e intentar de
nuevo.
c. Revisar las instrucciones.
a. Utilizar únicamente utensilios
apropiados para microondas.
b. No utilizar el horno vacío.
c. Limpiar la cavidad con un
paño húmedo.
a. Utilizar únicamente utensilios
apropiados para microondas.
b. Descongelar bien los
alimentos.
c. Utilizar el tiempo y la poten-
cia adecuada.
d. Voltear y revolver los
alimentos.
Utilizar el tiempo y la potencia
adecuada.
a. Utilizar únicamente utensilios
apropiados para microondas.
b. Descongelar bien los
alimentos.
c. Controlar que las salidas de
ventilación del horno estén
despejadas.
d. Utilizar el tiempo y la
potencia adecuada.
Descongelamiento
incorrecto
a. Se utilizaron materiales
prohibidos para el horno de
microondas.
b. El tiempo de cocción y la
potencia no son adecuados.
c. No se volteó o revolvió la
comida.
30
a. Utilizar únicamente utensilios
apropiados para microondas.
b. Utilizar el tiempo y la
potencia adecuada.
c. Voltear y revolver los
alimentos
Page 31

31
Page 32

Para poder obtener el servicio de garantía, el producto se debe entregar y recoger en un centro de servicio autorizado del fabricante de Sanyo por
cuenta y gasto del usuario, a menos que específicamente se mencione lo contrario en esta garantía. Los nombres y direcciones de los Centros de
Servicio Autorizados de Sanyo se pueden obtener llamando sin costo a la línea que se muestra a continuación.
Para obtener información del funcionamiento del producto, de centros de servicio autorizados o asistencia
INFORMACIÓN AL CLIENTE: (EUA 1-800-421-5013) (México 001-800-726-9775)
Días hábiles de 7:30 A. M. a 5:00 P. M. hora del Pacífico
(Canadá 1-800-263-2244 -- Días hábiles de 8:30 A. M. a 5:00 P. M. hora del Este)
LA PRESENTE GARANTÍA ES VÁLIDA ÚNICAMENTE EN LOS PRODUCTOS SANYO COMPRADOS O RENTADOS Y USADOS EN CANADÁ O EN
MÉXICO O EN LOS ESTADOS UNIDOS DE AMÉRICA, SIN INCLUIR TODOS LOS TERRITORIOS O PROTECTORADOS DE EUA. ESTA GARANTÍA
ES VÁLIDA ÚNICAMENTE EN EL PAÍS EN EL QUE SE COMPRÓ EL PRODUCTO. LA PRESENTE GARANTÍA SE APLICA AL USUARIO AL
MENUDEO ORIGINAL Y NO SE APLICA A LOS PRODUCTOS USADOS CON ALGÚN PROPÓSITO INDUSTRIAL, PROFESIONAL O C OMERCIAL.
SE DEBE ENVIAR LA FACTURA DE VENTA, EL RECIBO DE VENTA O EL CONTRATO DE RENTA ORIGINAL FECHADO AL CENTRO DE
SERVICIO AUTORIZADO DE SANYO EN EL MOMENTO EN QUE SE SOLICITE EL SERVICIO. Para obtener servicio en México, en caso de que no
haya un centro de servicio en la ciudad en donde se compró el producto, el usuario deberá enviar el producto, de acuerdo con las instrucciones que
brinde el prestador del servicio autorizado de SNA, al centro de servicio más cercano mediante envío por cobrar. Sujeto a las OBLIGACIONES que
preceden y las EXCLUSIONES que se muestran más adelante, Sanyo North America Corporation, División de Soluciones al Consumidor (SNA)
garantiza este producto SANYO contra defectos en material y mano de obra durante los periodos de MANO DE OBRA y REPUESTOS que se
especifican a continuación. SNA reparará o reemplazará (a su opción) el producto y cualquiera de sus partes que no cumplan con esta garantía. El
periodo de garantía comienza en la fecha en que se compró o rentó el producto por primera vez al menudeo.
Esta garantía no cubre (A) el ajuste de controles operados por el cliente como se explica en el manual de instrucciones correspondiente al modelo, o
(B) la reparación de un producto cuyo número de serie esté alterado, mutilado o ausente.
Esta garantía no se aplica a la sonda de temperatura, la bandeja inferior, la repisa, la cubierta del agitador ni a ningún daño iniciado por chispas de
fuego causadas por utilizar algo de metal dentro del horno, salvo por aquellos accesorios que aprueba SNA. Esta garantía no se aplica durante el
desempaque, configuración, instalación o remoción del producto para su reparación o reinstalación después de ser reparado. Esta garantía no se aplica
a los reemplazos de reparación que se necesiten para un uso que esté fuera del control de SNA, lo que incluye mas no se limita a una avería, defecto o
falla causada o que sea resultado del servicio o repuestos no autorizados, mantenimiento inadecuado, operación contraria a las instrucciones provistas,
accidentes durante el envío o tránsito, modificaciones o reparación por parte del usuario, abusos, mal uso, negligencia, accidentes, voltaje eléctrico
incorrecto, fuego, inundación u otro caso fortuito, así como el uso y desgaste normales.
Lo que antecede es en lugar de todas las demás garantías y SNA no asume ni autoriza a ninguna persona a que asuma por éste una obligación o
responsabilidad adicional.
LA DURACIÓN DE ALGUNA GARANTÍA QUE ESTÉ IMPLÍCITA POR LEY (INCLUIDAS LAS GARANTÍAS DE COMERCIABILIDAD E ID ONEIDAD)
ESTÁ LIMITADA AL PLAZO DE VIGENCIA DE ESTA GARANTÍA. EN NINGÚN CASO SNA SERÁ RESPONSABLE DE DAÑOS Y PERJUICIOS
ESPECIALES, INCIDENTALES O RESULTANTES QUE SURJAN DE LA PROPIEDAD O USO DE ESTE PRODUCTO, O DE ALGUNA DEMORA EN
LA EJECUCIÓN DE SUS OBLIGACIONES DERIVADAS DE ESTA GARANTÍA DEBIDO A CAUSAS QUE ESTÉN FUERA DE SU CONTROL.
EN LOS ESTADOS UNIDOS Y CANADÁ, ALGUNOS ESTADOS Y PROVINCIAS, RESPECTIVAMENTE, NO PERMITEN PONER UN LÍMITE EN EL
TIEMPO QUE DURA UNA GARANTÍA IMPLÍCITA O NO PERMITEN LA EXCLUSIÓN O LIMITACIÓN DE DAÑOS Y PERJUICIOS RESULTANTES, DE
MANERA QUE ES POSIBLE QUE LAS LIMITACIONES Y EXCLUSIONES QUE PRECEDEN NO SE APLIQUEN A SU CASO.
LA PRESENTE GARANTÍA LE OTORGA DERECHOS LEGALES ESPECÍFICOS. ES POSIBLE QUE CUENTE CON OTROS DERECHOS, LOS
CUALES VARÍAN EN CADA ESTADO, PROVINCIA Y PAÍS.
Para su protección en caso de ocurrir robo o pérdida de este producto, sírvase llenar la información que se le pide a continuación y guárdela en sus
archivos personales.
Modelo N.° _________________________________ N.° de serie ________________________________________________
(se localiza en la parte posterior o el lado inferior de la unidad)
Fecha de compra ____________________________ Precio de compra ____________________________________________
Lugar en donde efectuó la compra _______________________________________________________________________________________
En el caso de producto comprado en Canadá: Visite ca.sanyo.com
HORNO DE MICROONDAS SANYO
GARANTÍA LIMITADA
OBLIGACIONES
de servicio, llame a
MANO DE
OBRA
1 AÑO 1 AÑO 5 AÑOS
REPUESTOS TUBO MAGNETRÓN
EXCLUSIONES
(Únicamente el repuesto)
para obtener detalles de garantía actualizados.
32
Page 33

FOUR À MICRO-ONDES SANYO
(
)
GARANTIE LIMITÉE
Afin de bénéficier du service de garantie, l’appareil doit être livré et récupéré d’un Centre de service agréé de Sanyo aux frais de l’utilisateur, sauf
stipulation expresse contraire de cette garantie. Les noms et adresses des Centres de service agréés de Sanyo peuvent être obtenus en appelant le
numéro sans frais inscrit ci-dessous.
ENGAGEMENTS
Pour connaître le fonctionnement de l'appareil et obtenir les coordonnées d'un Centre de service agréé ou
INFORMATION CLIENTS : (États-Unis 1-800-421-5013) (Mexique 001-800-726-9775)
Jours ouvrables 7 h 30 – 17 h, Heure du Pacifique
Canada 1-800-263-2244 -- Jours ouvrables 8 h 30 –17 h Heure de l’Est
LA PRÉSENTE GARANTIE EST VALIDE UNIQUEMENT POUR LES PRODUITS SANYO ACHETÉS OU LOUÉS ET UTILISÉS AU CANADA, AU
MEXIQUE OU AUX ÉTATS-UNIS D’AMÉRIQUE, EXCEPTION FAITE DE TOUS LES TERRITOIRES ET PROTECTORATS AMÉRICAINS. CETTE
GARANTIE EST VALIDE UNIQUEMENT POUR LE PAYS DANS LEQUEL LE PRODUIT A ÉTÉ ACHETÉ. CETTE GARANTIE S’APPLIQUE À
L’UTILISATEUR INITIAL ET NE S'APPLIQUE PAS AUX PRODUITS UTILISÉS À DES FINS INDUSTRIELLES, PROFESSIONNELLES OU
COMMERCIALES. L’ACTE DE VENTE ORIGINAL DATE, LA FACTURE OU LE CONTRAT DE LOCATION DOIT ÊTRE SOUMI S AU CENTRE DE
SERVICE AGRÉÉ DE SANYO AU MOMENT OÙ LE SERVICE DE GARANTIE EST EXIGÉ. Pour l’entretien au Mexique, si aucun Centre de service
n’est disponible dans la ville où le produit a été acheté, l’utilisateur doit envoyer le produit conformément aux instructions fournies par le dépanneur
agréé de SNA, dans le Centre de service le plus proche, en port payable à l’arrivée. Sous réserve des ENGAGEMENTS ci-dessus et des EXCLUSIONS
ci-après, SANYO North America Corporation, Division des solutions pour le consommateur (SNA) garantit ce produit SANYO contre tout défaut de
matériel et de fabrication pour les périodes spécifiées ci-dessous concernant la MAIN-D’ŒUVRE et les PIÈCES . La SNA réparera ou remplacera (à sa
discrétion) le produit et n’importe laquelle de ses pièces qui ne se conforment pas à cette garantie. La période de garantie commence le jour de l’achat
initial ou de la location au détail du produit.
La présente garantie ne couvre pas (A) le réglage des commandes actionnées par le client, tel qu’expliqué dans le manuel d’utilisation du modèle
concerné ou (B) la réparation d’un produit dont le numéro de série a été modifié, déformé ou effacé.
Cette garantie ne s’applique pas à la sonde de température, l’étagère inférieure, la plaque, le couvercle de l'agitateur et tout dommage causé par un
incendie provoqué par l’utilisation d’un objet métallique à l’intérieur du four, exception faite des accessoires approuvés par SNA. Cette garantie ne
s’applique pas au déballage, au paramétrage, à l'installation, au déplacement de l’appareil pour réparation ou à sa réinstallation après réparation. Cette
garantie ne s’applique pas à un remplacement de pièces consécutif à une utilisation qui ne dépend pas du contrôle de la SNA, y compris, mais sans
limitation, un dysfonctionnement, un défaut ou une défaillance causés ou résultant d’un entretien ou d’un remplacement de pièces non autorisés, un
entretien inadéquat, un fonctionnement contraire aux instructions fournies, des accidents de transport ou de transit, une modification ou réparation par
l’utilisateur, un abus, un mauvais traitement, une négligence, un accident, une tension d’alimentation inappropriée, un incendie, des inondations ou
autres catastrophes naturelles ou une usure normale.
La garantie qui précède remplace toute autre garantie et SNA n’assume ni n’autorise aucune partie à se prévaloir d’une autre obligation ou
responsabilité.
LA DURÉE D’UNE GARANTIE QUI PEUT ÊTRE IMPLICITE PAR LA LOI (Y COMPRIS LES GARANTIES DE QUALITÉ MARCHANDE ET
D’ADÉQUATION) EST LIMITÉE AUX TERMES DE CETTE GARANTIE. SNA NE SERA EN AUCUN CAS RESPONSABLE POUR DES DOMMAGES
PARTICULIERS, ACCESSOIRES OU INDIRECTS DÉCOULANT DE LA PROPRIÉTÉ OU DE L’UTILISATION DE CET APPAREIL OU POUR UN
RETARD DANS LA PERFORMANCE DE SES ENGAGEMENTS DANS LE CADRE DE CETTE GARANTIE EN RAISON DE CAUSES
INDÉPENDANTES DE SA VOLONTÉ.
AUX ÉTATS-UNIS ET AU CANADA, CERTAINS ÉTATS ET CERTAINES PROVINCES, RESPECTIVEMENT, NE PERMETTENT PAS DE LIMITATION
DE DURÉE DE GARANTIE IMPLICITE ET/OU NE PERMETTENT PAS D’EXCLUSION OU DE LIMITATION DE DOMMAGES INDIRECTS. LES
LIMITATIONS ET EXCLUSIONS CI-DESSUS POURRAIENT NE PAS S’APPLIQUER À VOTRE CAS.
CETTE GARANTIE VOUS DONNE DES DROITS PRÉCIS. VOUS POUVEZ AVOIR D’AUTRES DROITS QUI VARIENT D’UN ÉTAT À UN AUTRE,
D’UNE PROVINCE À UNE AUTRE ET D’UN PAYS À UN AUTRE.
Pour votre protection en cas de vol ou de perte de ce produit, nous vous prions de remplir les informations ci-dessous pour vos registres personnels.
Nº du modèle ______________________________ Nº de série _______________________________________
(situé à l’arrière ou au bas de l’appareil)
Date d’achat ______________________________ Prix d’achat ______________________________________
Lieu d’achat ______________________________________________________________________________________________
Pour un produit acheté au Canada : Veuillez visiter le site ca.sanyo.com
d'un service d'assistance, appelez
MAIN-
D’ŒUVRE
1 AN 1 AN 5 ANS
PIÈCES TUBE MAGNÉTRON
EXCLUSIONS
(Pièce uniquement)
pour des informations actualisées sur la garantie.
 Loading...