

Page 1
OWNER'S
MANUAL
ECD-T1580DV
Vertical Adjustable And Horizontal Rotatable Panel
6.5 Inch Color TFT Monitor
DVD Player with AM/FM TV Tuner Box
Multi-subtitle Languages Function
Multi-audio Languages Function
Multi-angle Function
Parental Control
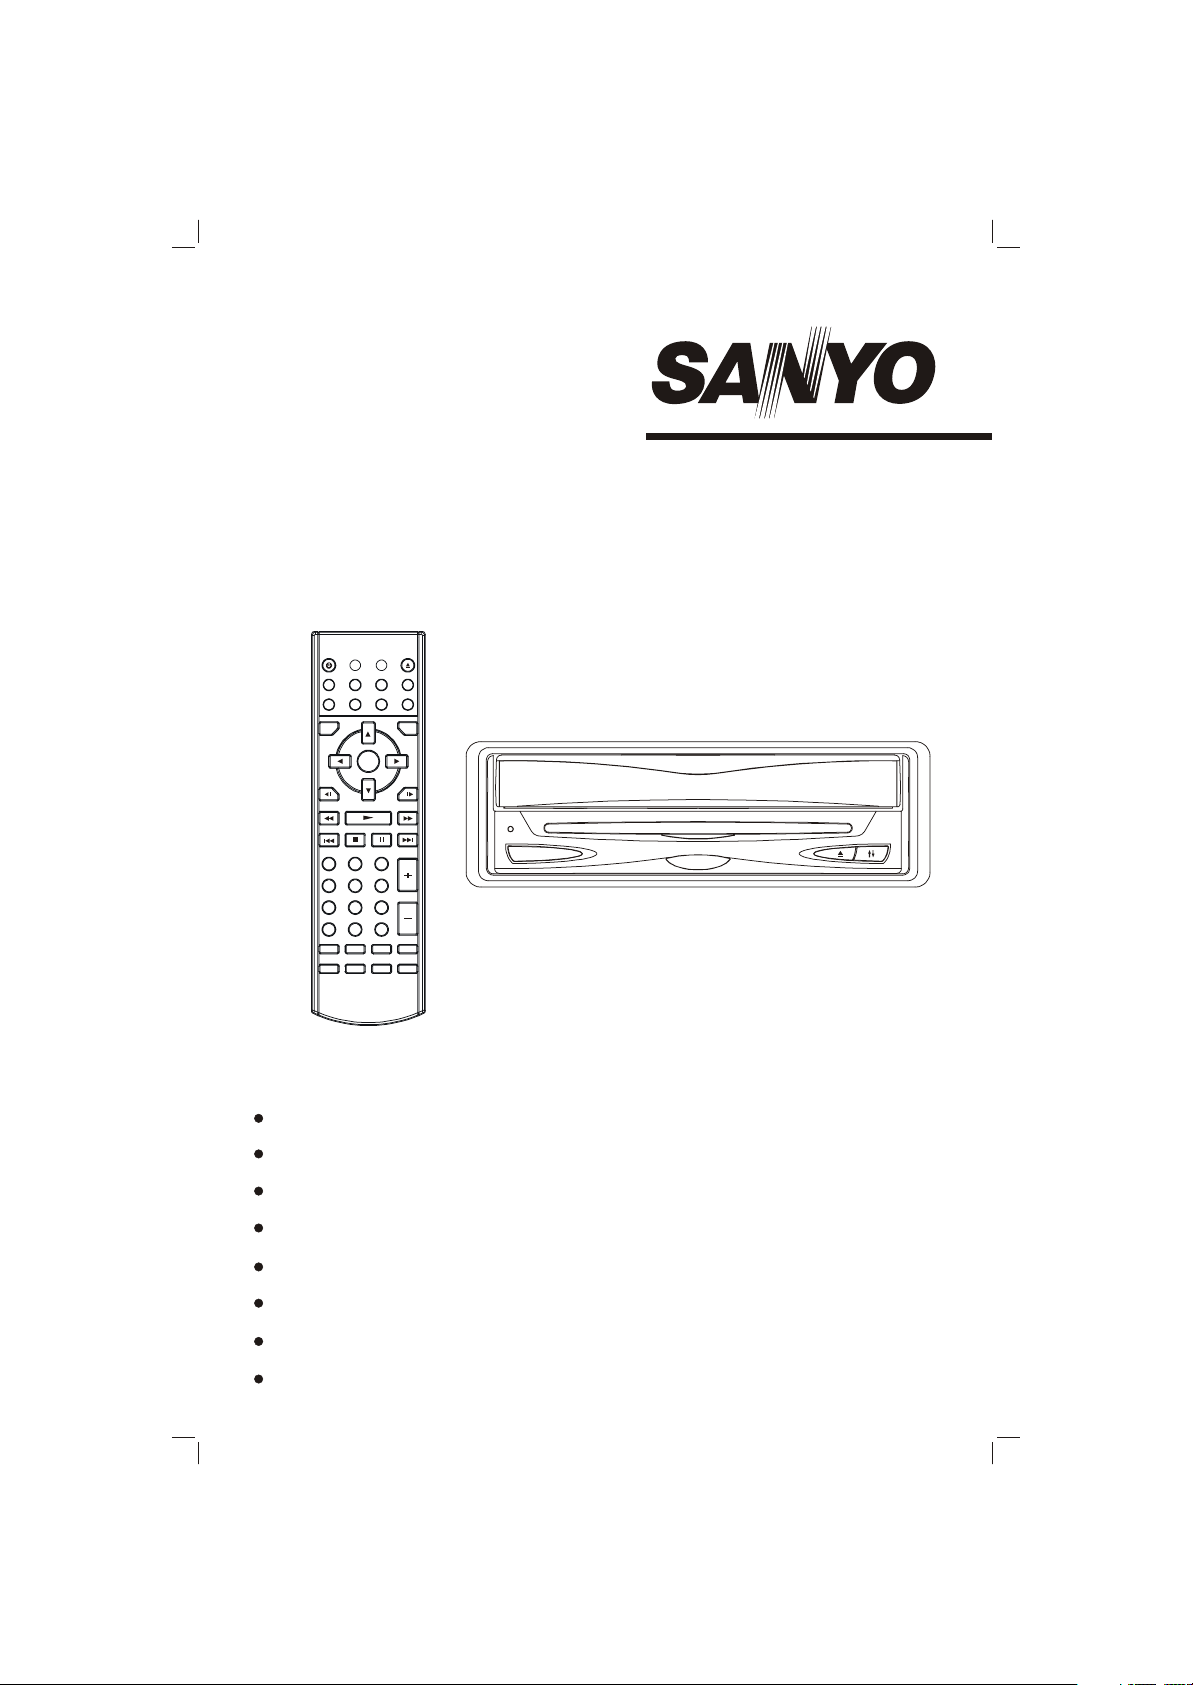
Remote Control
Page 2

CONTENTS
Safety Information ....................................................................................... 4
Disc Notes .................................................................................................... 5
Installation ....................................................................................................6
The Player..................................................................................................... 9
Front View ............................................................................................................ 9
Back View ...........................................................................................................10
The Radio Box .........................................................................................11
Electrical Connection ................................................................................12
Remote Control ..........................................................................................15
Location and Function of Keys .............................................................................15
Preparing the Remote Control ..............................................................................18
Loading/ Ejecting a disc ............................................................................18
Loading a disc ......................................................................................................18
Ejecting a Disc
Operation ....................................................................................................19
Basic Operation ................................................................................................... 19
Disc (DVD, VCD, CD, MP3) Operation
RADIO Operation
TV Operation
AV Operation
RGB Operation
Setup ...........................................................................................................28
Initial Setup ..........................................................................................................28
General Setup ......................................................................................................28
Speaker Setup .....................................................................................................30
Audio Setup..........................................................................................................30
Preferences Setup ...............................................................................................31
Defaults Table ......................................................................................................33
......................................................................................................
...............................................................
................................................................................................
......................................................................................................2526
.....................................................................................................
................................................................................................... 27
18
21
27
Trouble Shooting ........................................................................................35
Specifications..............................................................................................37
2
Page 3

FEATURES
Compatible with PAL DVD (Video
CD) and NTSC DVD (Video CD)
This player can play discs recorded in
either PAL or NTSC format.
A single LSI chip now integrates all
major DVD playback circuit functions
including MPEG2 decoder, video D/A
converter, and audio decoders.
L/R stereo analog audio outputs for
connection to existing head unit aux
inputs. Video output is composite
video.
Supplied remote handles multi-function
software (multi-language audiotrack/subtitle, multi-angle, multistory, etc.), plus all basic functions.
USE THIS PRODUCT SAFELY
This set has been designed and
manufactured to assure personal safety.
Improper use can result in electric shock
or fire hazard. The safeguards
incorporated in this unit protect you if
you observe the following procedures for
installation, use and servicing. This unit
doesn't contain any parts that can be
repaired by the user.
Protect the Disc Mechanism
Avoid inserting any foreign objects into
the slot of this player.
Failure to observe this may cause
malfunction due to the precise
mechanism of this unit.
Use Authorized Service Centres
Do not attempt to disassemble or adjust
this precision product. Please refer to
the Service Centre list included with this
product for service assistance.
For Installation
The unit should be installed in a
horizontal position with the front end up
at a convenient angle, but not more than
30 .
Protect the monitor mechanism
The monitor is operated automatically.
Do not draw the monitor out or turn it
upward or downward manually.
Otherwise, the mechanism
construction may be harmed to some
degree.
When you operate the monitor with the
remote handset, do not touch the
monitor by your hands. It may harm
your fingers.
When Driving
Keep the volume level low enough to be
aware of road and traffic conditions.
When Car Washing
Do not expose the product to water or
excessive moisture. This could cause
electrical shorts, fire or other damage.
When Parked
Parking in direct sunlight can produce
very high temperatures inside your
vehicle. Give the interior a chance to
cool down before starting playback.
Use the Proper Power Supply
This product is designed to operate with
a 12 volt DC, negative ground battery
system (the regular system in a North
American car).
3
Page 4

SAFETY INFORMATION
CAUTION:
MOBILE DVD PLAYER IS A CLASS I
LASER PRODUCT. HOWEVER THIS
MOBILE DVD PLAYER USES A
VISIBLE/INVISIBLE LASER BEAM
WHICH COULD CAUSE HAZARDOUS
RADIATION EXPOSURE IF DIRECTED.
BE SURE TO OPERATE THE MOBILE
DVD PLAYER CORRECTLY AS
INSTRUCTED.
USE OF CONTROLS OR
ADJUSTMENTS OR PERFORMANCE OF
PROCEDURES OTHER THAN THOSE
SPECIFIED HEREIN MAY RESULT IN
HAZARDOUS RADIATION EXPOSURE.
DO NOT OPEN COVERS AND - DO NOT
REPAIR YOURSELF. REFER SERVICING .
TO QUALIFIED PERSONNEL.
WARNING:
TO REDUCE THE RISK OF FIRE OR
ELECTRIC SHOCK, DO NOT EXPOSE
THIS EQUIPMENT TO RAIN OR
MOISTURE.
TO REDUCE THE RISK OF FIRE OR
ELECTRIC SHOCK, AND ANNOYING
INTERFERENCE, USE ONLY THE
RECOMMENDED ACCESSORIES.
REGION MANAGEMENT
INFORMATION
Region Management Information:
This Mobile DVD Player is designed and
manufactured to respond to the Region
Management Information that is recorded
on a DVD disc. If the Region number
described on the DVD disc does not
correspond to the Region number of this
Mobile DVD Player, this Mobile DVD
Player cannot play this disc.
THIS DEVICE IS INTENDED FOR
CONTINUOUS OPERATION.
This product incorporates copyright
protection technology that is protected
by method claims of certain U.S. patents
and other intellectual property rights
owned by Macrovision Corporation and
other rights owners. Use of this copyright
protection technology must be authorized
by Macrovision Corporation, and is
intended for home and other limited
viewing uses only unless otherwise
authorized by Macrovision Corporation.
Reverse engineering or disassembly is
prohibited.
4
Page 5
DISC NOTES
Disc formats supported by this player
DVD
12 cm disc
(Single-sided disc only)
VIDEO CD
12 cm disc
CD
12 cm disc
MP3
12 cm disc
Discs which cannot be played with this
player
DVD-ROM
DVD-R/DVD-RAM
CDV
CD-G
Handling and Cleaning
Dirt, dust, scratches and warping disc
will cause misoperation.
Do not place stickers or make
scratches on discs.
Do not warp discs.
A disc should always be kept in its
case when not in use to prevent from
damage.
Do not place discs in the following
places:
1. Direct sunlight
2. Dirty, dusty and damp areas
3. Near car heaters
4. On the seats or dashboard
Disc Cleaning
Use a dry soft cloth to wipe the surface.
If the disc is quite dirty , use a soft cloth
slightly moistured with isopropyl (rubbing)
alcohol. Never use solvents such as
benzine, thinner or conventional record
cleaners as they may mar the surface of
the disc.
unusable) depending on the way it is
handled conditions in the usage
environmet.
and
Note these scratches are not an
indication of any problem with the player.
Label side up
Do not touch
the underside
of the disc
Do not bend
Wipe the disc from center
toward the outside edge
Preparing New Discs with Rough Spots
A new disc may have rough edges on its
inside and outside edges. If a disc with
rough edges is used, the proper setting
will not be performed and the player will
not play the disc. Therefore, remove the
rough edges in advance by using a ball
point pen or pencil as shown on the right.
To r emove the rough edges, press the
side of the pen or pencil against the
inside and outside edges of the disc.
Rough spots on
outside edge
Ball point pen
or pencil
Note:
A disc may become somewhat scratched
(although not enough to make it
Rough spots
5
on inside edge
Page 6
INSTALLATION
Notes:
Choose the mounting location where
the unit will not interfere with the
normal driving function of the driver .
Before finally installing the unit,
connect the wiring temporarily and
make sure it is all connected up
properly and the unit and the system
work properly.
Use only the parts included with the
unit to ensure proper installation.
The use of unauthorized parts can
cause malfunctions.
Consult with your nearest dealer if
installation requires the drilling of holes
or other modifications of the vehicle.
Install the unit where it does not get in
the driver's way and cannot injure the
passenger if there is
stop.
an emergency
If installation angle exceeds 30 from
horizontal, the unit might not give its
optimum performance.
30
DIN FRONT-MOUNT (Method A)
Installation Opening
This unit can be installed in any dashboard
having an opening as shown below:
53 mm
182 mm
Installing the unit
Be sure you test all connections first, and
then follow these steps to install the unit.
1. Make sure the ignition is turned off,
and then disconnect the cable from
the vehicle battery's negative (-)
terminal.
2. Disconnect the wire harness and the
antenna.
3. Lift the top of the outer trim ring then
pull it out to remove it.
4. The two supplied keys release tabs
inside the unit's sleeve so you can
remove it. Insert the keys as far as they
will go (with the notches facing up) into
the appropriate slots at the middle left
and right sides of the unit. Then slide
the sleeve off the back of the unit.
Avoid installing the unit where it would
be subject to high temperature, such
as from direct sunlight, or from hot air ,
from the heater, or where it would be
subject to dust, dirt or excessive
vibration.
DIN FRONT/REAR-MOUNT
This unit can be properly installed either
from "Front" (conventional DIN Frontmount) or "Rear" (DIN Rear-mount
installation, utilizing threaded screw holes
at the sides of the unit chassis).
For details, refer to the following
illustrated installation methods.
Sleeve
L Key
Outer Trim Ring
R Key
by inserting the sleeve
5. Mount the sleeve by inserting the sleeve
into the opening of the dashboard and
bend open the tabs located around the
sleeve with a screwdriver. Not all tabs
will be able to make contact, so
examine which ones will be most
effective. Bending open the appropriate
tabs behind the dashboard to secure
the sleeve in place.
6
Page 7
INSTALLATION
Dashboard
Tabs
Screwdriver
Sleeve
6. Reconnect the wire harness and the
antenna and be careful not to pinch
any wires or cables.
7. Slide the unit into the sleeve until it
locks into place.
8. To further secure the unit, use the
supplied metal strap to secure the back
of the unit in place. Use the supplied
hardware (Hex Nut (M5mm) and Spring
Washer) to attach one end of the strap
to the mounting bolt on the back of
the unit. If necessary, bend the metal
strap to fit your vehicle's mounting
area. Then use the supplied hardware
(Tapping Screw (5x25mm) and Plain
Washer) to attach the other end of
metal strap to a solid metal part of the
vehicle under the dashboard. This strap
also helps ensure proper electrical
grounding of the unit.
Removing the unit
1. Make sure the ignition is turned off,
and then disconnect the cable from
the vehicle battery's negative (-)
terminal.
2. Remove the metal strap attached the
back of the unit (if attached).
3. Lift the top of the outer trim ring then
pull it out to remove it.
4. Insert both of the supplied keys into
the slots at the middle left and right
sides of the unit, then pull the unit out
of the dashboard.
Spring Washer
Metal Strap
Mounting Bolt
Hex Nut
Plain Washer
Tapping Screw
9. Reconnect the cable to the vehicle
battery's negative (-) terminal. Then
replace the outer trim ring.
7
Page 8
INSTALLATION
DIN FRONT-MOUNT (Method B)
3
5
1
2
4
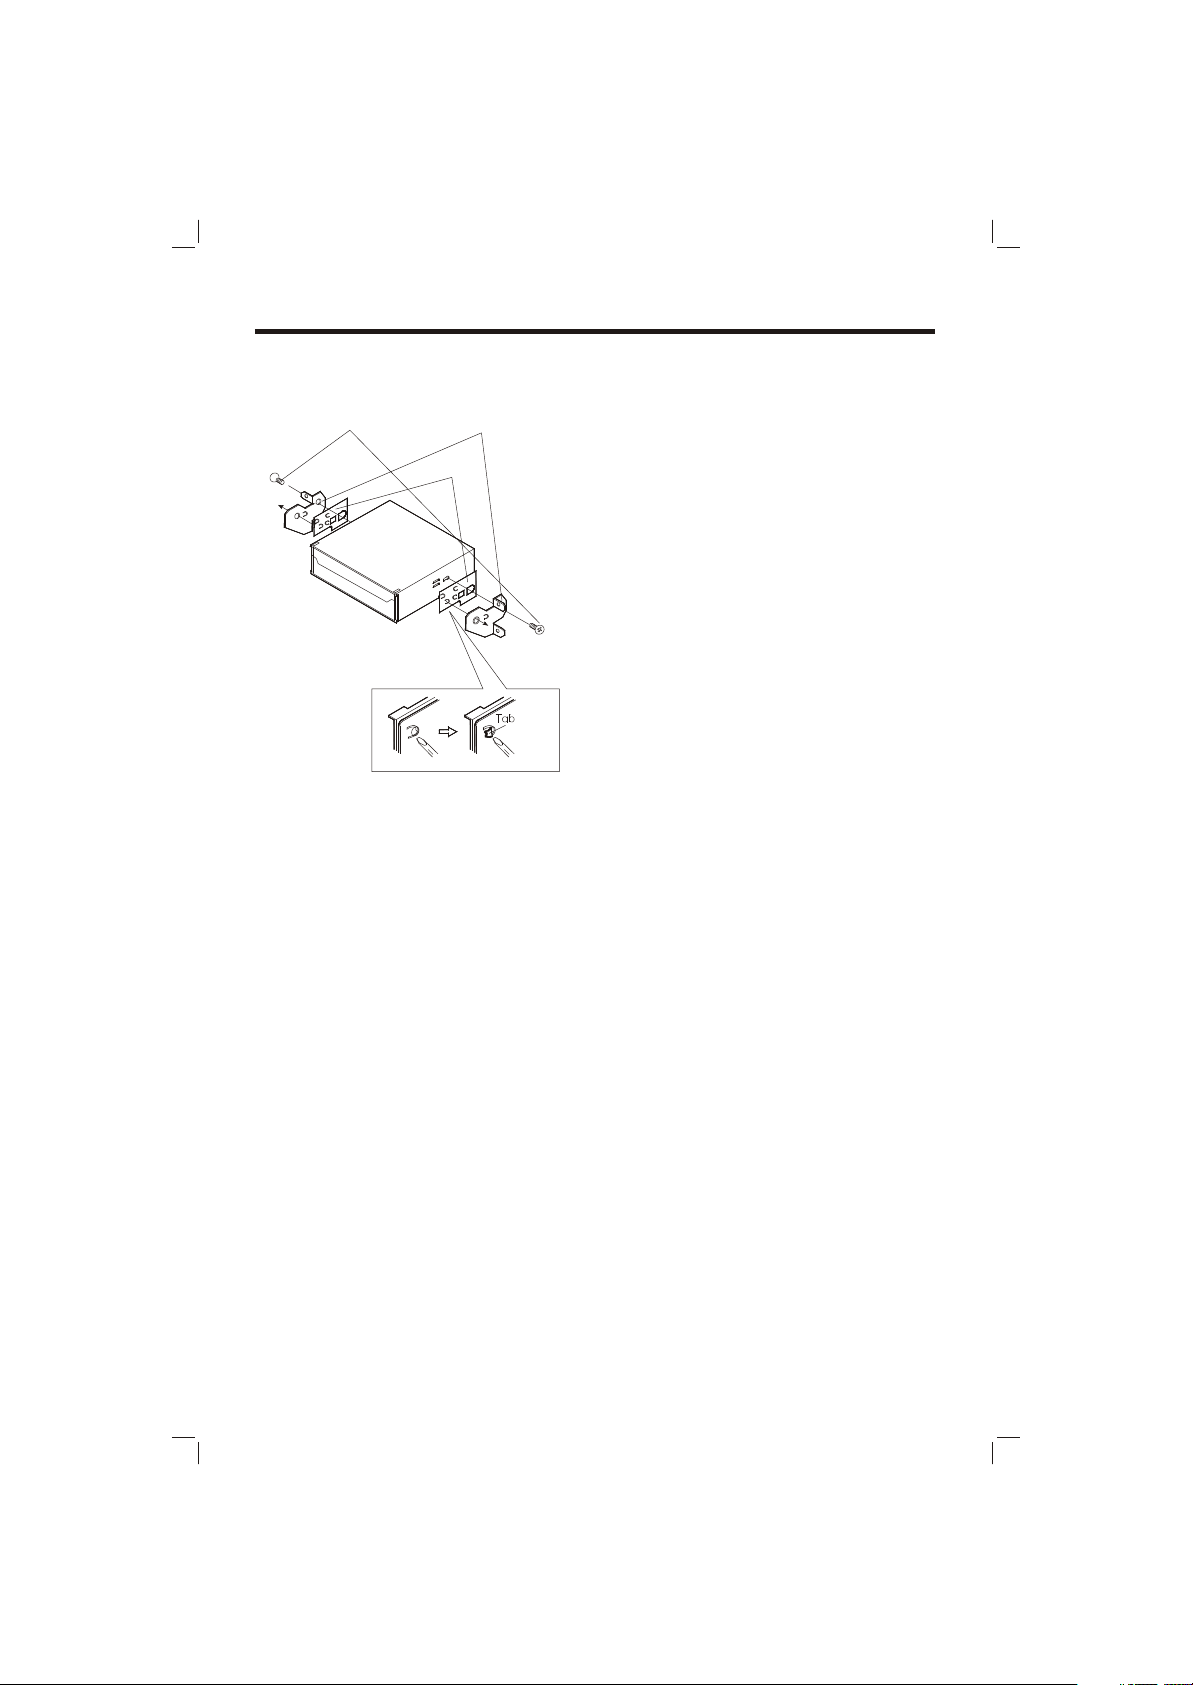
1. Factory radio mounting bracket
2. Car radio mounting bracket
3. Screw
4. After aligning the car radio mounting
bracket with the factory radio mounting
bracket, tighten the screws (5x5mm)
at 2 places on each side.
5. When fixing factory radio mounting
bracket with the screws, use a
standard-tipped screwdriver to bend
open the tabs of the car radio
mounting bracket to make them fit into
the holes in the factory radio mounting
bracket.
8
Page 9
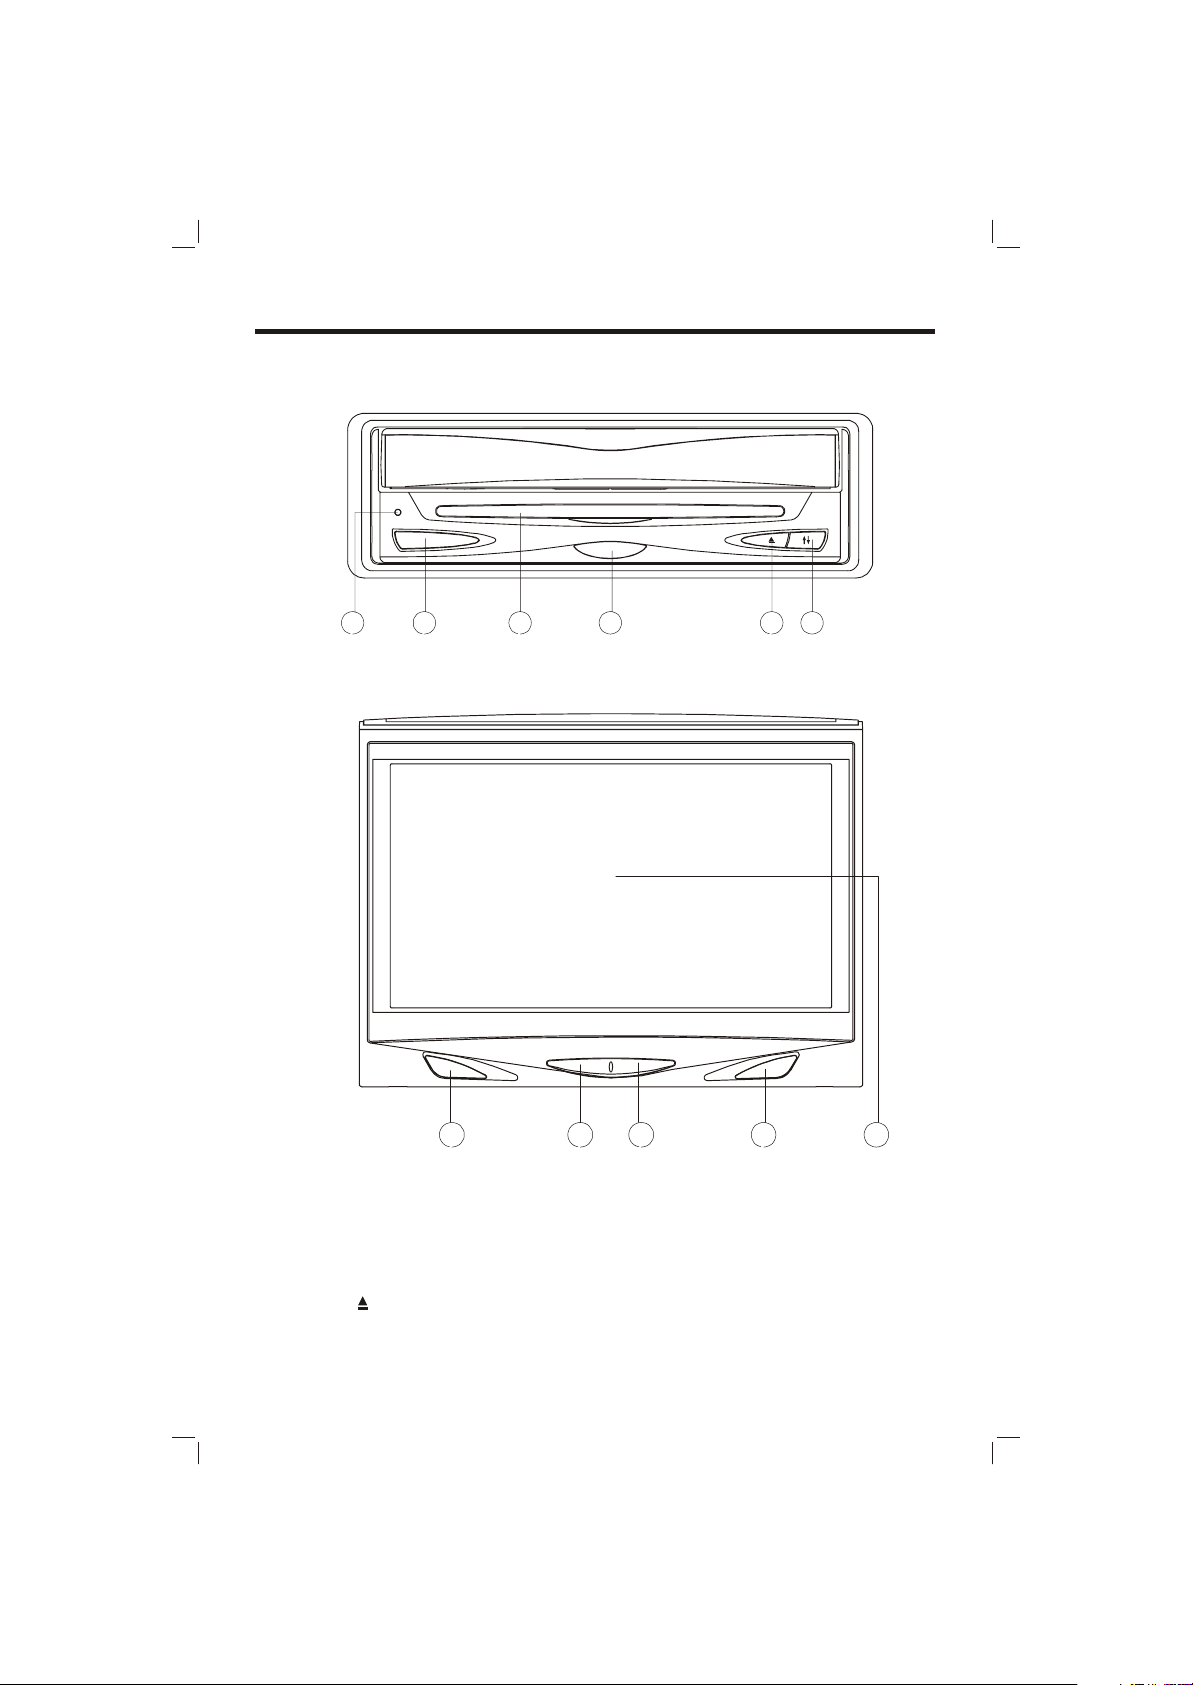
THE PLAYER
FRONT VIEW
Open Position
Closed Position
516 2 4 3
87 9 1 0 11
1. POWER 7. PICT
2. Remote sensor (on the front
panel)
3. OPEN/CLOSE
(EJECT)
4.
5. Disc Slot
6. Reset Button
8. Adjust (-)
9. Adjust (+)
10. Remote sensor (on the monitor
panel)
11. 6.5 INCH COLOR
TFT MONITOR
9
Page 10
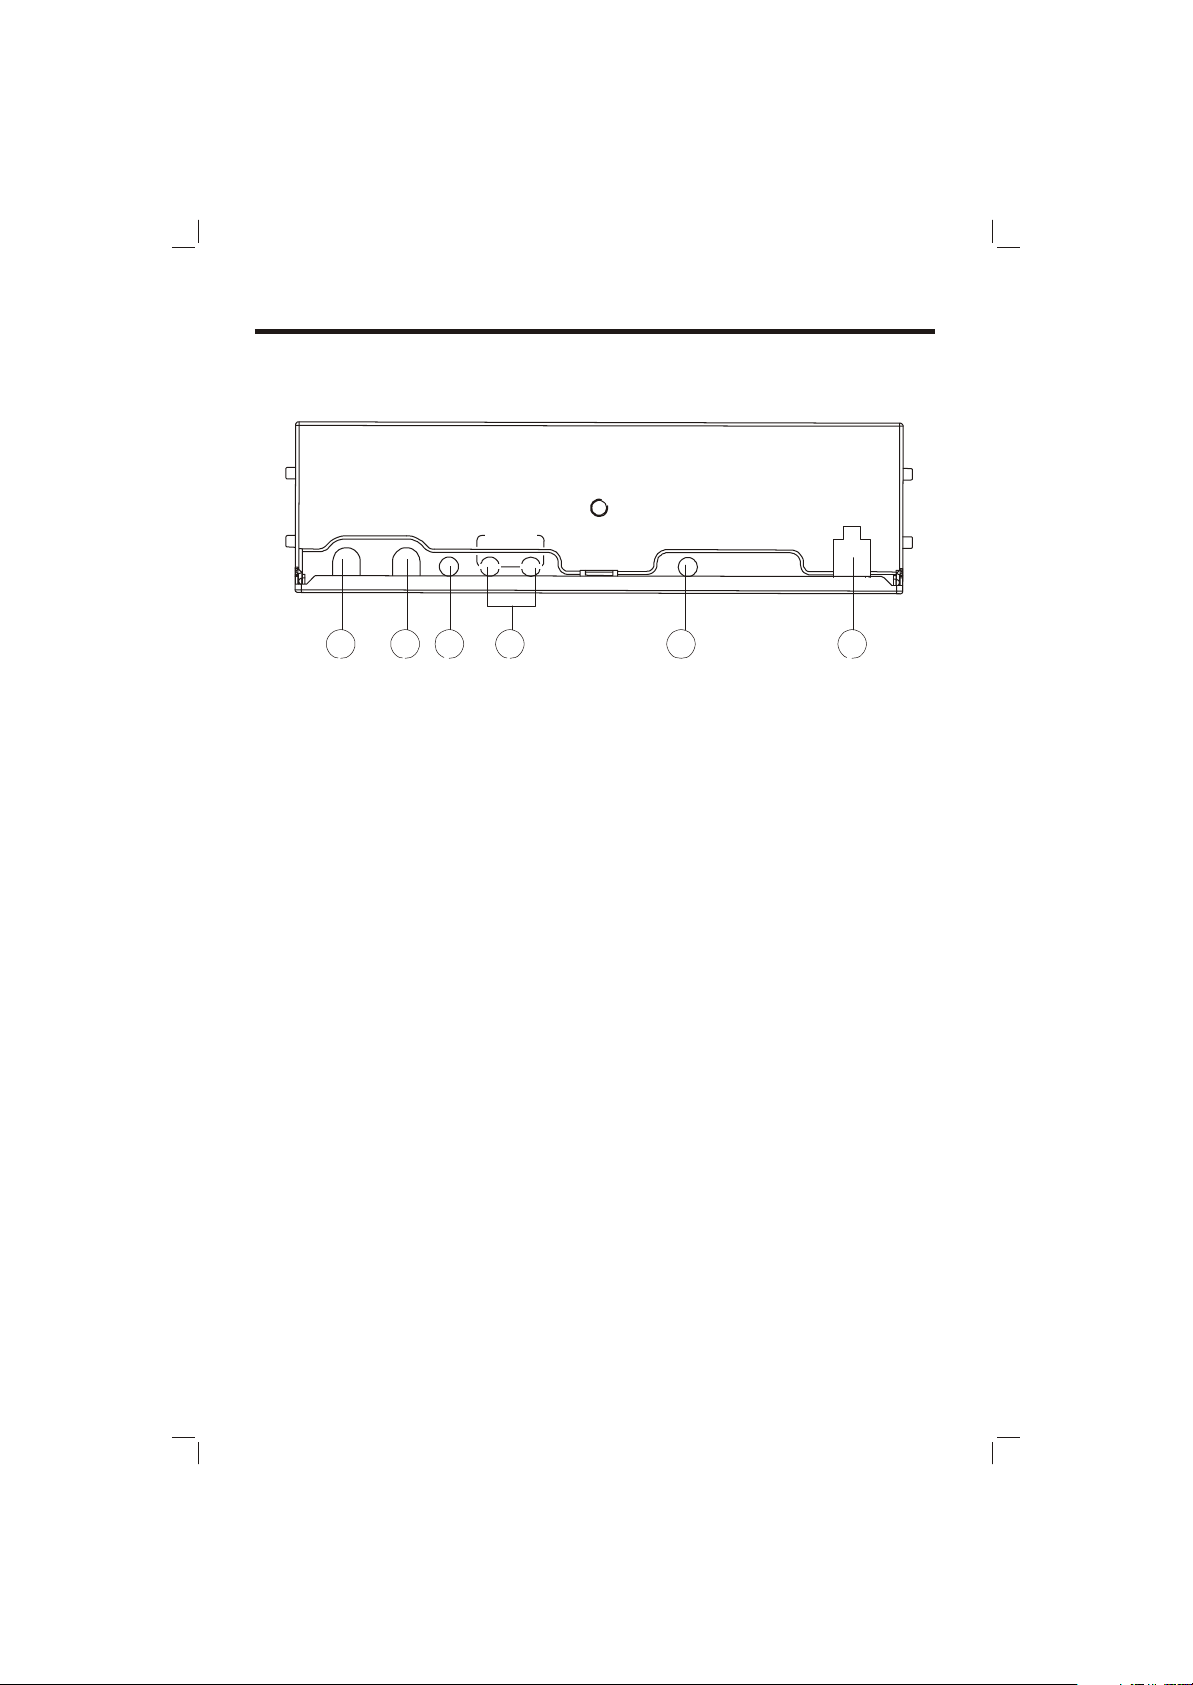
THE PLAYER
BACK VIEW
12 13 14 15 16 17
12. 13 PIN SOCKET
13. RGB SYSTEM
14. REMOTE SOCKET
15.
AUDIO/ VIDEO INPUT
16.
DIGIT
AL AUDIO
DC 12V IN
17.
10
Page 11
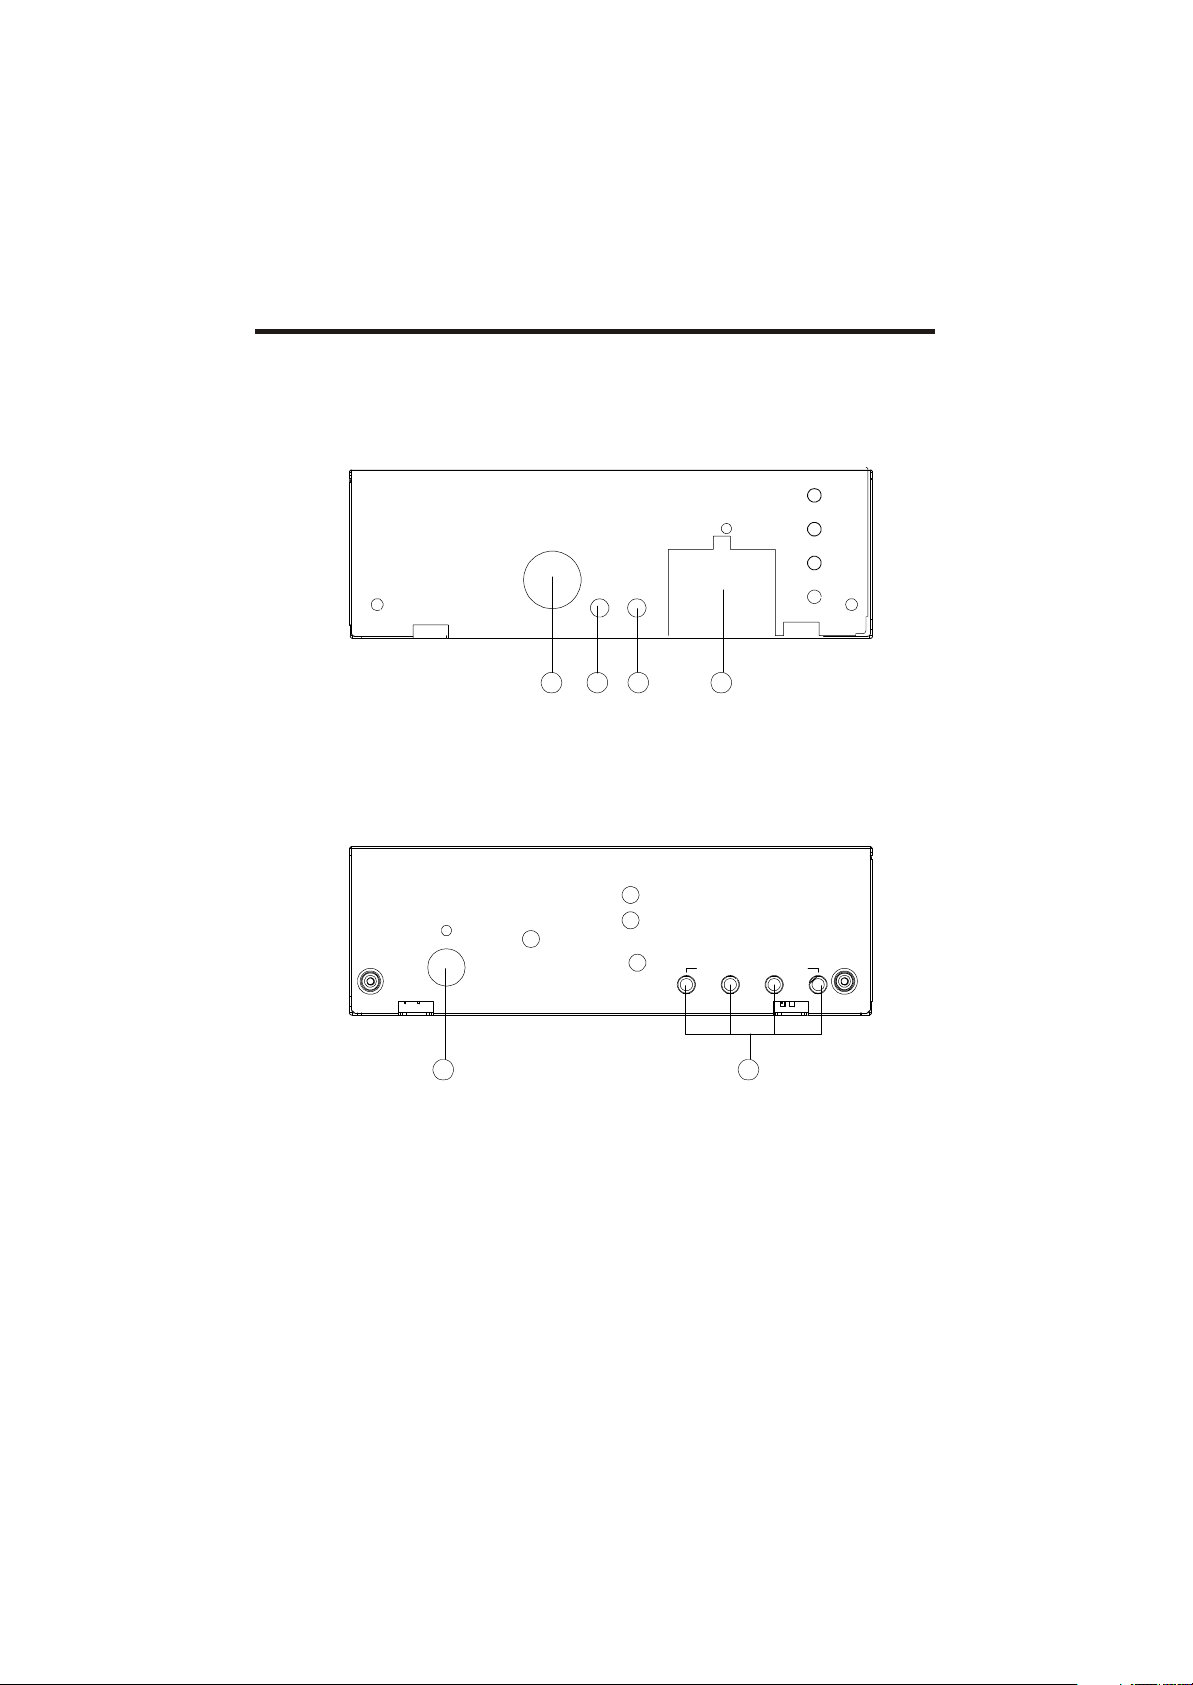
THE RADIO BOX
ONE SIDE
OTHER SIDE
1. 20-pin socket
2. TO MAIN UNIT
3. VIDEO OUTPUT
324
5 6
4. AUDIO OUTPUT
5. ANTENNA SOCKET
6.
1
DIVERSITY ANTENNA
11
Page 12
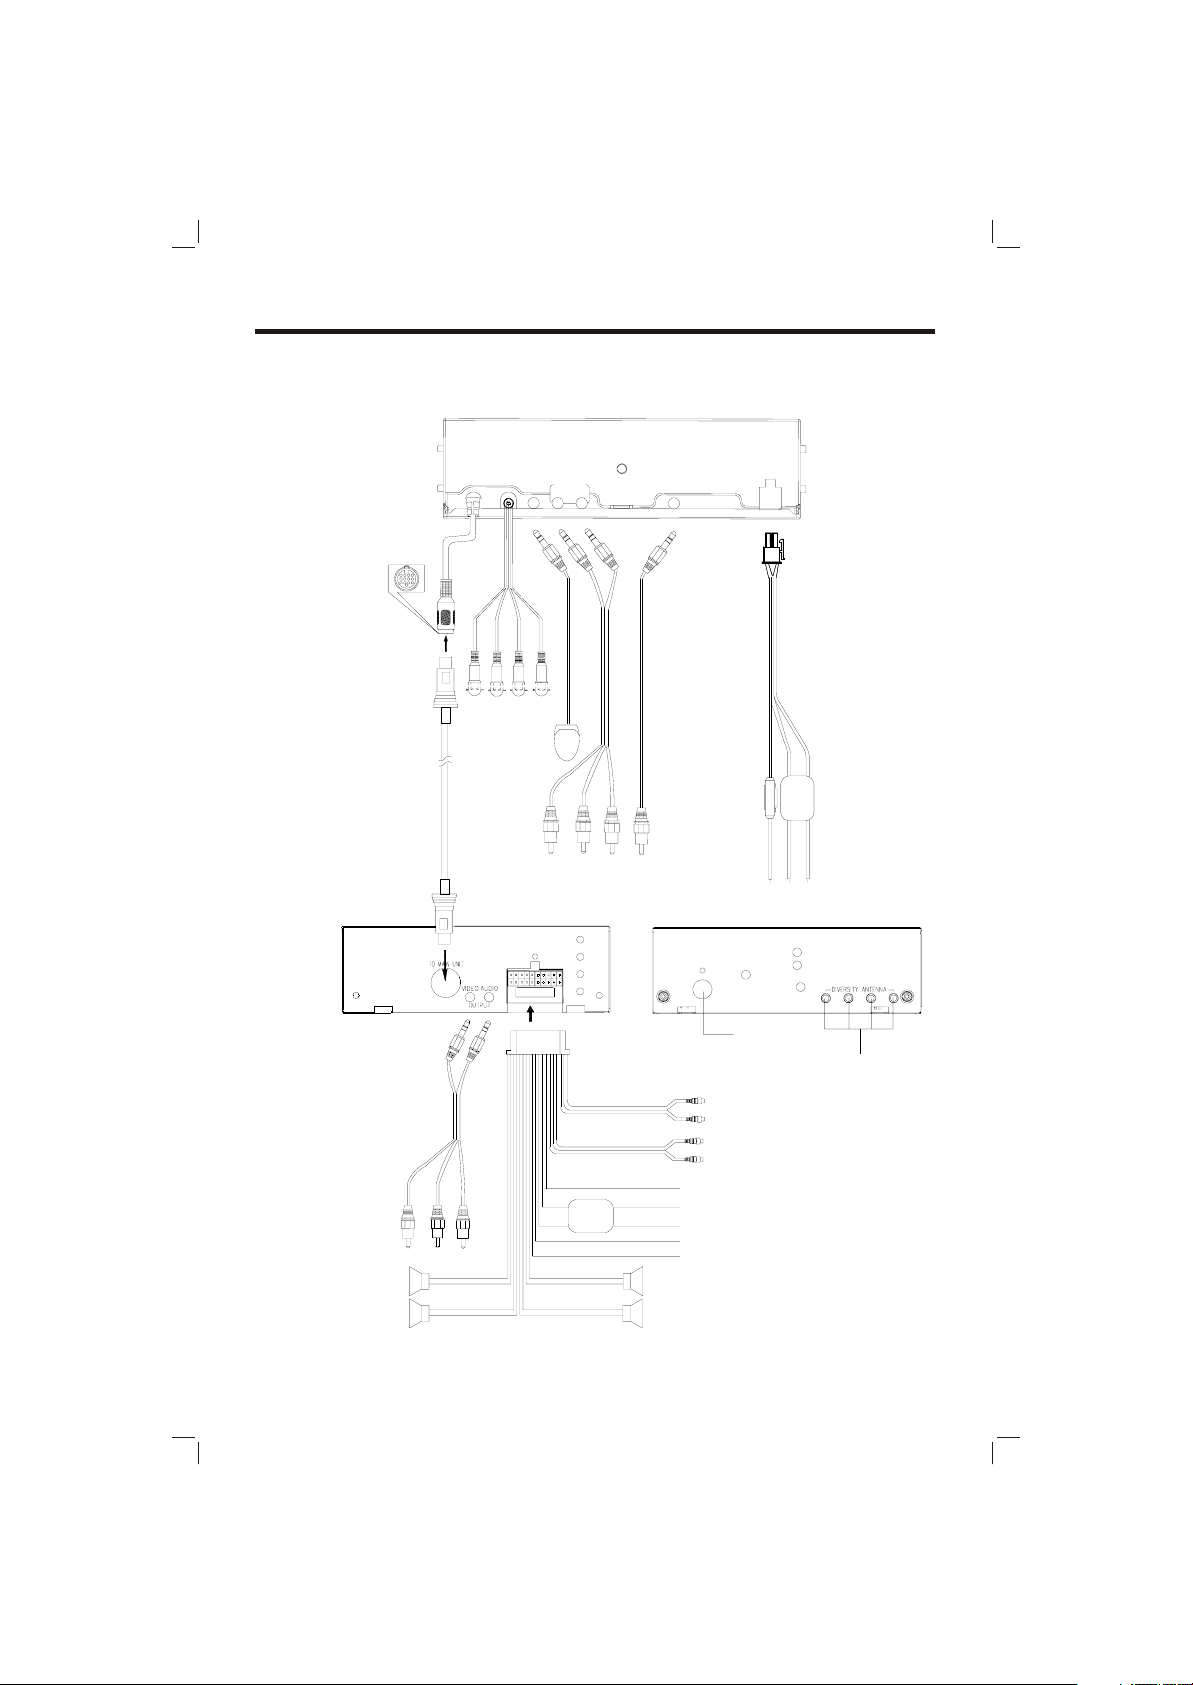
ELECTRICAL CONNECTION
METHOD A
AUDIO/VIDEO
REMOTE
(BLACK)
DVD UNIT
INPUT
DIGITAL
AUDIO
DC 12V IN
ONE SIDE
FRONT Lch
SPEAKER
REAR Lch
SPEAKER
RGB SYSTEM
RADIO BOX
VIDEO OUT
AUDIO L OUT
AUDIO R OUT
(WHITE)
(YELLOW)
(RED)
WHITE
+
WHITE/BLACK
GREEN
+
-
GREEN/BLACK
REMOTE CONTROL RECEIVER
WHITE
YELLOW
FUSE
RED
VIDEO IN
AUDIO L IN
FRONT RCA CABLE(BROWN)
REAR RCA CABLE(GREY)
(FOR RCA LINE OUT VERSION ONLY)
CHOKE
BOX
GREY
GREY/BLACK
VIOLET
VIOLET/BLACK
(OPTIONAL)
AUDIO R IN
BLUE
YELLOW
BLACK
ORANGE
PINK
+
-
+
-
(OPTIONAL)
DIGITAL AUDIO
OTHER SIDE
RED
WHITE
RED
WHITE
POWER
MEMORY/BATTERY
GROUND (B-)
TELPHONE MUTE (OPTIONAL)
BRAKE(OPTIONAL)
FRONT Rch
SPEAKER
REAR Rch
SPEAKER
Rch
Lch
Rch
Lch
ANTENNA
0.5A
RADIO BOX
ANTENNA SOCKET
ACC (RED)
BOX
CHOKE
MEMORY BACK-UP (YELLOW)
GND (BLACK)
DIVERSITY ANTENNA
12
Page 13

ELECTRICAL CONNECTION
METHOD B
AUDIO/VIDEO
REMOTE
INPUT
(BLACK)
DVD UNIT
DIGITAL
AUDIO
DC 12V IN
ONE SIDE
RGB SYSTEM
RADIO BOX
Part B
VIDEO OUT
(YELLOW)
Part A
AUDIO L OUT
AUDIO R OUT
FOR DETAILED CONNCTION,
PLEASE SEE THE FOLLOWING PAGE.
(WHITE)
(RED)
REMOTE CONTROL RECEIVER
WHITE
YELLOW
VIDEO IN
AUDIO L IN
FUSE
FRONT RCA CABLE(BROWN)
REAR RCA CABLE(GREY)
(FOR RCA LINE OUT VERSION ONLY)
BOX
CHOKE
FUSE (15A)
RED
ORANGE
PINK
(OPTIONAL)
AUDIO R IN
(OPTIONAL)
ANOTHER SIDE
DIGITAL AUDIO
TELPHONE MUTE (OPTIONAL)
BRAKE(OPTIONAL)
RED
WHITE
WHITE
RADIO BOX
Rch
Lch
RED
Rch
Lch
0.5A
ACC (RED)
ANTENNA SOCKET
BOX
CHOKE
MEMORY BACK-UP (YELLOW)
GND (BLACK)
DIVERSITY ANTENNA
13
Page 14

ELECTRICAL CONNECTION
METHOD B
ONE SIDE
RADIO BOX
FUSE
Part B
Part A
4-SPEAKER SYSTEM
(GREEN/BLACK)
(WHITE/BLACK)
(GRAY/BLACK)
(VIOLET/BLACK)
Ground Wire (Black)
Power Antenna/Amplifier Turn On (Blue)
+12V Constant Power Supply (Yellow)
(GREEN)
(WHITE)
(GRAY)
(VIOLET)
- -
+
-
+
- -
+
-
+ +
Rear Left
Speaker
+
Front Left
Speaker
+
Front Right
+
Speaker
Rear Right
Speaker
FRONT RCA CABLE(BROWN)
REAR RCA CABLE(GREY)
(FOR RCA LINE OUT VERSION ONLY)
BOX
CHOKE
FUSE (15A)
ORANGE
PINK
RED
Rch
WHITE
Lch
RED
Rch
WHITE
Lch
TELPHONE MUTE (OPTIONAL)
BRAKE(OPTIONAL)
14
Page 15

REMOTE CONTROL
LOCATION AND FUNCTION OF KEYS
35
11
14
15
19
18
33
23
25
29
21
30
4
1
3
7
8
5
36
2
6
10
9
12
13
16
17
20
24
22
34
28
27
32
31
26
15
Page 16

REMOTE CONTROL
1. POWER Press POWER to turn the unit ON or OFF.
2. EJECT in DVD/CD mode, press to eject the disc.
3. OPEN/CLOSE Press to open/close the monitor.
4. SUBTITLE Changing of the SUBTITLE language on multi-subtitle
language DVD disc.
5. ANGLE Changing of the view angle on multi-angle DVD disc.
6. DISPLAY Display statistical disc information during playback in the mode.
7. MODE
8. SETUP Display the SETUP menu in DVD mode.
9. PROGRAM Allows the track played in the order you programmed.
10. AUDIO Changing of the AUDIO soundtrack on multi-audio soundtrack
11. TITLE (DSP) Display the TITLE menu that is stored in DVD disc.
12. MENU Display the root menu that is stored on the DVD disc.
13.
/ , / In case of MENU mode, / , / , buttons served as cursor
14. ENTER Confirm the Track/Chapter selected with the numeric buttons or
15.
/
16.
17.
/ Press to search forward rapidly & to search reverse rapidly.
18.
/
19.
20.
21. 0 - 9 Numeric buttons
22. 10+(-/--) Tens digit select button, cooperatively used with numeric buttons.
23. SEL In DVD, RADIO, TV, AV mode, press SEL to display the
corresponding menu.
24. PANEL+/- Press to turn the monitor angle upward or downward in small steps.
25. CH In radio mode, press shortly to increase frequency by one
step of channel spacing. Hold longer for fast tuning.
In TV mode, press (CH+) shortly to select channel upward.
26. VOL+ Press VOL+ button to increase the volume level.
27. GOTO Disc search button, cooperatively used with numeric buttons.
(AS/PS) In radio mode, press several seconds to enter into automatic
memory storing function; press shortly to scan preset station.
(AUTO) In TV mode, press it for several seconds to start search
channel automatically, press (CH-) to stop it in the course
of searching.
Press to change between DVD, RADIO, TV, AV and RGB mode.
DVD disc. Changing of the sound mode of the VCD/CD disc.
In TV mode, press to display the TV channel in the screen
buttons to select item left/right, ahead/back.
selected with the cursor buttons on screen.
Changing for slow forward/ reverse playback motion on DVD disc.
Press to play the disc.
Press to skip to the next track & press to skip back one
track.
Press it to stop playback.
Press it to pause playback.
16
Page 17

REMOTE CONTROL
28. PBC Changing between PBC ON and PBC OFF on the VCD disc.
29. CH In radio mode, press shortly to decrease frequency by one
step of channel spacing. Hold longer for fast tuning.
In TV mode, press (CH-) shortly to select channel downward.
30. VOL- Press VOL- button to decrease the volume level.
31. REPEAT Switch the Repeat mode of discs.
32. A-B(MO/ST) A-B repeat allows a passage to be repeated continuously.
33. RADIO PRESET Six preset memory buttons.
34. BAND In radio mode, press it to select desired band.
35. MUTE In radio, DVD, TV or AV mode, press to mute the sound.
36. ZOOM Allows the picture to be increased in size.
17
Page 18

REMOTE CONTROL
Preparing the Remote Control
Inserting the Batteries
1. Open the battery compartment cover.
2. Insert the new batteries. Make sure
that the positive and negative
terminals of the batteries are oriented
as indicated.
3. Close the cover
Battery: Two AAA size battery.
Using the Remote Control
Point the remote contr ol towar ds the
remote control signal receiver on the
player front face.
Operation angle: About 30 degree in
each the direction of the front of the
remote sensor.
LOADING/EJECTING A DISC
Loading a Disc
1. Turn the ignition on the accessory
position.
2. Press the POWER button (1).
3. Insert the disc with printed side facing
up into the disc slot (2).
4. The player starts playback
automatically.
1
2
3
Ejecting a Disc
Only in DVD mode, press button (3)
to eject the disc.
18
Page 19

OPERATION
BASIC OPERATION
Tur ning the player on/off
Press the POWER button on the front
panel or
remote control to turn the player on or
off.
Open/Close the Monitor and Angle
Adjustment
Press OPEN/CLOSE button on the
front panel or point the remote control
to the remote sensor on the front panel
and press OPEN/CLOSE button on the
remote control, the monitor will draw out
automatically.
When the monitor draws out to a
certain location, it will turn upward
automatically and stop at vertical
position.
(POWER) button on the
OPEN/CLOSE button
Fig.1
Do not rotate the monitor forcibly to
avoid mechanical damage.
Fig.3
Return the monitor to the central
viewing position, then press
OPEN/CLOSE button on the front
panel or press OPEN/CLOSE button
on the remote control, the monitor will
turn downward automatically .
Fig.2
Adjusting the viewing angle.
When the monitor stops moving, you
can press PANEL+ or PANEL- button
on the remote control to turn the
monitor upward or downward at fine
steps to get a desired viewing angle.
And you can rotate the monitor left and
right from the central viewing position
at a certain angle range manually.
Fig.4
When the monitor turns downward to
a certain angle, it will draw in.
Fig.5
19
Page 20

OPERATION
Remote Sensor
There is a remote sensor on the front
panel. On the monitor, there is another
remote sensor to receive remote control
signal. You can point the remote control
handset to the remote sensor on the front
panel (when the monitor doesn't stretch
out) or the remote sensor on the monitor
panel (when the monitor stretches out)
and press function keys on the remote
control to control the DVD unit.
The unit is also connected to an external
remote receiver (See the electrical
connection diagram above), and the
function is the same with the remote
sensor on the front panel or on the
monitor panel.
Notes:
The external remote receiver is placed
near the monitor for the best to
reception of the remote signal..
If the angle of the monitor from vertical
exceeds (Especially the distance
exceeds 3m.), controlling the DVD unit
through the remote sensor on the front
panel may not be effective. You are
suggested to use the external remote
receiver.
6.5 Inch TFT Display
When the monitor stretches out, the 6.5
inch color TFT display can show the
current state of the unit.
Volume Level Adjustment
Press VOL+/- buttons on the remote
control to increase or decrease the
volume level.
Mode Selection
Press MODE button on the remote
control to select among DVD, RADIO TV,
AV and RGB mode.
30
.
wiring is completed.
- All the function buttons do not
operate.
- Error symbol on the display.
Picture mode Adjustment
Press PICT button on the monitor panel,
the picture mode will show on the
display, repeatedly press PICT button to
select among BRIGHT, CONTRAST,
COLOR, TINT (For the unit with NTSC
system) and SCREEN.
(For the unit with NTSC system):
PICTURE
BRIGHT 32
CONTRAST 32
COLOR 32
TINT 32
SCREEN 16:9
Press +/- buttons on the monitor
panel to adjust the selected item. The
corresponding value will show on the
display.
NOTE (FOR THE UNIT WITH
TEL-MUTE AND BRAKE FUNCTION):
When there is an incoming call, the
unit will be in mute state, and “TEL
MUTE” appears on the screen
display.
If you are driving the car (BRAKE
OFF), the picture will not be shown on
the screen in DVD/TV/AV mode for
safety purpose. Only the audio will be
heard.
Reset
Reset button is placed on the front panel
and must be activated with either a
ballpoint pen or thin metal object. The
reset button is to be activated for the
following reasons:
- Initial installation of the unit when all
20
Page 21

OPERATION
DISC (DVD, VCD, CD, MP3)
OPERATION
Switching to DVD mode
Press MODE button on remote control to
select DVD mode.
Stopping Play
- Briefly pr
stop the unit playback, when the
(Play) button is pressed, normal
playback will continue.
- Press
the playback and go back to initial
rack/Chapter.
T
Rapid Forward/Rapid Reverse
Press
button is pressed, the speed of rapid
forward/reverse changes according to
the disc as follow.
DVD:
VCD/CD:
MP3:
Skipping Track
Press button on the remote
control during playback.
Press
back one track.
Note: For some VCD2.0 discs (PBCplayback control),
be unavailable.
Slow Motion Play
Press / during play.
Each time the button is pressed, the
speed of slow forward /reverse changes
according to the disc as follow.
DVD:
Normal Playback 2X 4X 8X
ess the
(Stop) button to
(Stop) button twice to stop
& during play. Each time the
Normal Playback 2X 4X 6X 8X
Normal Playback 1X 2X 3X 4X
Normal Playback 2X 4X
/
to skip to next track, and to
/ buttons may
Pause (still picture)
Pressing
on the remote control during
playback will stop play temporary . To
return to normal playback, press
on
the remote control .
Mute
Will mute the sound, but the disc
continues playing. When you unmute
the sound (press MUTE again), sound
will resume.
Repeat Function
FOR DVD:
Press the REPEAT button to select
repeat mode as follow.
CHAPTER REPEATON TITLE REPEATON
REPEATOFF
FOR VCD/CD:
Press the REPEAT button to select
repeat mode as follow.
REP-ONE REP-ALL REPEAT OFF
1. Continuously repeat at the current
chapter/track, when selected REPONE mode.
2. Select REP-ALL mode to continuously
repeat all chapter/track on the current
disc.
3. When the player finishes playback of
the current disc last chapter/track, it
will stop and display the elapsed time.
When REPEAT OFF mode is
selected, REP-ONE & REP-ALL
disappears from screen display.
4. REPEAT feature does not support
VCD2.0 (with PBC ON).
A-B
A-B repeat allows a passage to be
repeated continuously. Press A-B button
at the start of the required passage, then
press A-B button again at the end of the
passage. To revert to normal playing,
press A-B button again. Each time the
button is pressed, the screen will display
as follows:
A TO B SET A A TO B SET B A TO B CANCELLED
21
Page 22

OPERATION
Disc Search (GOTO)
FOR DVD
Press GOTO
button twice, the screen will
display the following message:
TITLE 01/01 TIME -- : -- : --
00:00:25
ou can select the item you want to
Y
watch through TIME setting by using
numeric buttons and ENTER key.
FOR CD/VCD (WITH PBC OFF):
Press GOTO
button once, the screen will
display the following message:
GOTO -- : --
00:00:25
Use numeric buttons to input the time
directly.
Zoom
Allows the picture to be increased in size.
Press ZOOM to toggle among 1.5 scale,
2.0 scale and 3.0 scale.
During Zoom mode, press / , /
buttons to move pictures up, down, left or
right direction.
Program
For CD/VCD (WITH PBC OFF)/DVD
(WITH PBC OFF):
In stop mode, press PROGRAM button,
the screen will display "PROGRAM
P00:00" For example: press numeric
button 4 "PROGRAM
P01:04" appears,
it means track 4 will be played first, then
press numeric button 6 and "PROGRAM
P02:06" appears. Press the different
numeric button to select the corresponding
track, and then you can program tracks to
your need. If you want to complete
program setting, press button or ENTER
button to play tracks in programmed order.
For MP3:
In stop mode, press PROGRAM button,
the screen will display "PROGRAM
P00:0000" and the program method is the
same as described above. If you want to
complete program setting, press (Stop)
button first then press button to play
tracks in programmed order. In stop mode
press PROGRAM button to exit program
mode and "PROGRAM OFF" appears.
If you set WITH MENU in SMART NAV
item in PREFERENCES PAGE, you can
use / , / buttons to select
PROGRAM PXXX mode or track number
and press ENTER button to confirm it.
Menu Control operation in DVD mode
Press SEL button on remote control to
enter sound menu, then you can press
CH / buttons to select the item
upward or downward. Then press
VOL+/- buttons to adjust the selected
item. The corresponding value will show
on the display.
VOLUME 40
BASS -2
TREBLE -2
BALANCE L-R
FADER F-R
LOUD ON
EQ POP
On-Screen Display Function
Press the DISPLAY button during
playback to display the contents of the
current disc on the screen.
Example:
DVD:
(1) Press DISPLAY for the first time:
TITLE 01/03 CHAPTER 002/025
00:02:25
Title Number, Total Title Number, Chapter
Number, Total Chapter Number of this
Title of the disc currently being played
will be shown on the screen, along with
the elapsed time.
22
Page 23

OPERATION
(2) Press DISPLAY for the second time:
TITLE REMAIN
01:46:58
(3) Press DISPLAY for the third time:
CHAPTER ELAPSED
00:00:24
(4) Press DISPLAY for the fourth time:
CHAPTER REMAIN
00:01:39
(5) Press DISPLAY for the fifth time:
The message on the screen will be cleared.
VCD:
(1) Press DISPLAY for the first time:
SINGLE ELAPSED
00:00:25
(2) Press DISPLAY
for the second time:
(5) Press DISPLAY for the fifth time:
The message on the screen will be cleared.
CD:
(1) Press DISPLAY for the first time:
SINGLE ELASPED
00:00:25
TOTAL TRACK : 14
TRACK : - 01
(2) Press DISPLAY for the second time:
SINGLE REMAIN
00:03:15
TOTAL TRACK : 14
TRACK : - 01
(3) Press DISPLAY for the third time:
TOTAL ELASPED
00:00:25
TOTAL TRACK : 14
TRACK : - 01
(4) Press DISPLAY for the fourth time:
TOTAL REMAIN
00:40:35
SINGLE REMAIN
00:03:15
(3) Press DISPLAY for the third time:
TOTAL ELAPSED
00:00:25
(4) Press DISPLAY for the fourth time:
TOTAL REMAIN
00:40:35
TOTAL TRACK : 14
TRACK : - 01
(5) Press DISPLAY for the fifth time:
The message on the screen will be cleared.
MP3 (When set to NO MENU in SMART
NAV item):
(1) Press DISPLAY for the first time:
CHAPTER ELASPED 00:00:25
TOTAL TRACK : 123
TRACK : - 01
(2) Press DISPLAY for the second time:
23
Page 24

OPERATION
CHAPTER REMAIN 00:04:25
TOTAL TRACK : 123
TRACK : - 01
(3) Press DISPLAY for the third time:
The message on the screen will be cleared.
Multi-audio Language Function
For DVD:
Press AUDIO on the remote control
during playback. Each time the button
is pressed, the audio soundtrack
language changes on sequential order.
Notes:
- The language number is different
according to the disc.
- Some disc only contain one language
soundtrack.
- When no different language
soundtrack are recorded,
will be
displayed at screen left top corner.
For VCD/CD:
Press AUDIO during playback.
It is possible to switch the sound
between monaural and stereo sound.
MONO LEFT MONO RIGHT STEREO
MENU Function (For DVD Only)
Press MENU button while the disc is
playing and the disc root menu will be
displayed. You can navigate with the
remote control navigation keys and
select a feature with the ENTER key.
TITLE Menu Function (For DVD Only)
If the DVD has multiple titles recorded on
the disc. It can select preferred title from
the title menu to start playback.
- Press TITLE during playback.
The title menu is display.
- Press the cursor button shown in
screen diplay, select preferred title by
the cursor button and confirm by
ENTER key.
Multi-subtitle Language Function
(For DVD Only)
Press SUBTITLE during playback.
Each time the button is pressed, the
subtitle language changes in sequential
order.
Notes:
- The language number is different
according to the disc.
- Some discs only contain one subtitle
language.
- When no different subtitle language
are recorded,
will be displayed at
screen left top corner.
Multi-angle Function (For DVD Only)
Press ANGLE during playback.
Each time the button is pressed, the
angle changes in sequential order
Notes:
- The angle number is different
according to the disc.
- The function only works for discs
having scenes recorded at different
angles.
- When no different angle are recorded,
will be displayed at screen left top
corner.
Smart navigation MP3 Disc Play
(For DVD Only)
MP3 disc is playing as the format of
FOLDER.
For example:
ROOT
CD01
CD02
CD03
CD04
CD05
PLAY MODE
In stop mode, Use on the
remote control to select the item or folder
(such as CD01, CD02...) and press
ENTER button on the remote control to
confirm, then select the desired track
(such as 001 PLUMT, 002 RZID...) on the
current folder to play. Pressing REPEAT
24
SMART NAVI
MP3 001 PLUMT
MP3 002 RZID
MP3 003 ASCIS
MP3 004 DCYI
MP3 005 BFZ
DISC
/ , /
Page 25

OPERATION
button repeatedly can select three kinds
of repeat play modes.
REP-ONE:
Play the
FOLDER REP:
same song over and over again.
Play all songs in the current directory in
sequence, over and over again.
FOLDER:
Play all songs in the current directory
once.
When select PLAY MODE, press
/
to change between the following mode:
SINGLE
DISC SCAN
SHUFFLE ON
During playback, use
REP-ONE FOLDER FOLDER REP
DISC DISC REP RANDOM
PROGRAM PXXX
or
to skip an
item ahead or back.
: Rapid r
everse, : Rapid advance
Note: The FOLDER cannot be selected
during playing. It can be selected after
(Stop) button pressed.
RADIO OPERATION
Switching to radio mode
Press MODE button on remote
control to select radio mode.
In radio mode, the following
information will appear on the display.
FM1 98.1 MHz
MONO
VOLUME
BASS -2 M2 90.10
TREBLE -2 M3 98.10
BALANCE L-R M4 106.10
FADER F-R M5 108.00
LOUD OFF M6 87.50
EQ POP
40 M1 87.50
Selecting the frequency band
Press BAND on remote control to
select desired band. The reception
band will change in the following
order:
FM1 FM2 FM3 AM1 AM2
Selecting station
During radio mode, press CH button
on remote control to increase
frequency or CH button on remote
control to decrease frequency by one
step of channel spacing. Hold the
button longer for fast tuning. The
frequency is updated correspondingly
on display.
Setting memory
Press RADIO PRESET buttons (1~6)
on remote control to preset stations
at radio mode. With this system, a
total of 30 stations can be stored in
the memory of six buttons. Each
band stores up to six preset stations.
The stations might be FM1, FM2,
FM3, AM1 and AM2 band.
The operation is as below:
- Store in Memory
Press and hold desired
memory location button for
several seconds. The current
listening station will be stored
into the number button.
- Retrieve a Preset Station
Press any one of the RADIO
PRESET buttons (1~6) on
remote control to retrieve a
station which had been stored
in the memory in advance the
chosen number is shown on
display.
Automatic memory storing &
program scanning
- Automatic memory storing
Press GOTO (AS/PS) button
on remote control for several
seconds, the radio searches
from the current frequency and
checks the signal strength until
one cycle search is finished.
And then 6 strongest stations
are stored into the
corresponding preset number
button.
- Program scanning
Press GOTO (AS/PS) button
on remote control shortly to
scan preset station.
25
Page 26

OPERATION
Mono/stereo
Press A-B MO/ST button on remote
control to select mono or stereo
mode. You can sometimes improve
reception of distant stations by
selecting mono operation.
Mute
Press MUTE button on remote
control to cut down sound output.
Press it again to resume the previous
volume mode.
When in the default menu, the
“MUTE” will appear on the screen
display.
Menu Control operation in radio
mode
When you press MODE to select
radio mode, the menu appears,
Press SEL button on remote control
to select VOLUME, then you can
press CH / buttons to select the
item upward or downward to switch
between VOLUME, BASS, TREBLE,
BALANCE, FADER, LOUD and EQ
mode. Then press VOL+/- buttons
to adjust the selected item. The
corresponding value will show on
the display.
FM1 98.10 MHz
MONO
VOLUME
BASS -2 M2 90.10
TREBLE -2 M3 98.10
BALANCE L-R M4 106.10
FADER F-R M5 108.00
LOUD ON M6 87.50
EQ POP
40 M1 87.50
When you select EQ item, there are
four audio modes to be selected:
FLAT POP CLASSIC
ROCK
TV OPERATION
Switching to TV mode
Press MODE button on remote
control to select TV mode.
Auto searching TV channels
Press GOTO (AUTO) button for
several seconds on remote control
to start search channel
automatically.
In the course of searching, press
CH button to stop searching.
Selecting channel
- Press CH button on
remote control to choose
channel upward and press
CH button on remote control
to choose channel downward.
- The numeric buttons (0,1~9)
allow you to select the
corresponding channel directly.
- Press digital select button
10+(-/--) cooperatively used with
numeric buttons to select
channel desired.
For example, when you want
select 16 channel, press10+(-/--)
to switch between “-“ and “--“,
when the “--“ appears on the
display, you can press “1
“button then press “6” button to
select 16 channel.
Mute
Press MUTE button on remote
control to cut down sound output.
Press it again to resume the
previous volume mode.
Screen display
Press TITLE (DSP) button on
remote control to display the
current status such as TVch. If you
don’t operate over five seconds, the
information on the screen will
disappear.
Menu Control operation in TV
mode
Press SEL button on remote control
to enter sound menu, then you can
press CH / buttons to select the
26
Page 27

item upward or downward. Then
press VOL+/- buttons to adjust the
selected item. The corresponding
value will show on the display.
Mute
Press MUTE button on remote
control to cut down sound output.
Press it again to resume the
previous volume mode.
VOLUME
BASS
TREBLE
BALANCE
FADER
LOUD
EQ
40
-2
-2
L-R
F-R
ON
POP
AV OPERATION
Switching to AV mode
On the back of the unit, there is a
pair of AUDIO/VIDEO INPUT jacks.
When you connect an audio/video
system through these jacks, press
MODE button on the remote control
to select AV mode.
Menu Control operation in AV
mode
Press SEL button on remote control
to enter sound menu, then you can
press CH / buttons to select the
item upward or downward. Then
press VOL+/- buttons to adjust the
selected item. The corresponding
value will show on the display.
RGB OPERATION
Switching to RGB mode
When you connect the RGB terminals
on the back of the DVD unit to the
corresponding RGB system, then
Press MODE button on remote control
to select RGB mode, the RGB signal
will appear on the screen.
Note: When you press MODE button to
select RGB mode and there is no
any RGB signal input, then there is
nothing to display on the screen.
VOLUME
BASS
TREBLE
BALANCE
FADER
LOUD
EQ
40
-2
-2
L-R
F-R
ON
POP
27
Page 28

SETUP
INITIAL SETUP
SETUP MENU --- MAIN PAGE
GENERAL SETUP
SPEAKER SETUP
AUDIO SETUP
PREFERENCES
EXIT SETUP
1.Press SETUP on the remote control in
the STOP mode. (Press the button
twice to ensure that the player is in
STOP mode.)
2.The initial SETUP menu is displayed.
3.Select the preferred item by using the
/ buttons.
4.Press ENTER button.
a. GENERAL SETUP
This setup page includes all the
item of TV display & Audio output
feature. For details please refer to
GENERAL SETUP MENU.
b. SPEAKER SETUP
This is to activate the audio output
from DOLBY AC3 5.1 DOWNMIX
to 2 channel mode. Please refer to
SPEAKER SETUP MENU.
c. AUDIO SETUP
This setup page includes all the
items for AUDIO. Please refer to
AUDIO SETUP MENU.
d. PREFERENCES SETUP
This setup page includes all the
configuration of support feature
For details please refer to
PREFERENCES SETUP MENU.
GENERAL SETUP
--- GENERAL PAGE ---
TV DISPLAY
PIC MODE
ANGLE MARK
OSD LANG
CAPTIONS
SCR SAVER
MAIN PAGE
Video Material
4:3
16:9
Normal
TV display setup
This is to select the appropriate TV
aspect ratio (4:3 or 16:9) according to
the connected TV set.
Normal/PS (For 4:3 TV)
Played back in the PAN & SCAN style.
(If connected to wide-screen TV, the left
and right edges are cut off.)
Normal/LB (For 4:3 TV)
Played back in letterbox style.
(If connected to wide-screen TV, black
bands appear at top and bottom of the
screen.)
Wide (For 16:9 TV)
Select when a wide-scr een TV set is
connected.
NORMAL / PS
NORMAL / LB
WIDE
TV Screen
4:3 Wide (16:9)
Pan Scan Letter-box
28
Page 29

SETUP
--- GENERAL PAGE ---
TV DISPLAY
PIC MODE
ANGLE MARK
OSD LANG
CAPTIONS
SCR SAVER
MAIN PAGE
PIC mode setup
Select AUTO, the player PIC mode will
depend on DVD disc.
Select HI-RES format for best image
resolution.
Select N-FLICKER format on image or
picture with noise or distortion.
--- GENERAL PAGE ---
TV DISPLAY
PIC MODE
ANGLE MARK
OSD LANG
CAPTIONS
AUTO
HI-RES
N-FLICKER
ON
OFF
--- GENERAL PAGE ---
TV DISPLAY
PIC MODE
ANGLE MARK
OSD LANG
CAPTIONS
SCR SAVER
MAIN PAGE
OSD LANG type setup
Select the preferred OSD (On Screen
Display) language by using the
buttons.
--- GENERAL PAGE ---
TV DISPLAY
PIC MODE
ANGLE MARK
OSD LANG
CAPTIONS
SCR SAVER
ENGLISH
FRENCH
GERMAN
ITALIAN
SPANISH
/
ON
OFF
SCR SAVER
MAIN PAGE
ANGLE MARK display setup
If it is set to ON, when the multi-angle
DVD disc is playing," "“
will appear on the screen; if is set to
"OFF" the mark will not appear.
” (the angle mark)
MAIN PAGE
CAPTIONS setup
When playing DVD disc, activate the
CAPTIONS feature by selecting ON and
the captions (such as the actor dialogue)
appear on the screen; deactivate this
feature by selecting OFF and the captions
will not appear.
29
Page 30

SETUP
--- GENERAL PAGE ---
TV DISPLAY
PIC MODE
ANGLE MARK
OSD LANG
CAPTIONS
SCR SAVER
MAIN PAGE
SCR SAVER setup
Select the SCR SAVER ON/OFF.
ON
OFF
SPEAKER SETUP
--- SPEAKER SETUP PAGE ---
DOWNMIX
MAIN PAGE
LT/RT
STEREO
AUDIO SETUP
--- AUDIO SETUP ---
AUDIO OUT
OP MODE
DYNAMIC
LPCM OUTPUT
MAIN PAGE
AUDIO OUT
- Select ANALOG mode to activate
analog audio output.
- Select SPDIF/RAW mode to activate
raw digital audio output. And the digital
audio format depends on the disc
record format.
- Select SPDIF/PCM mode to activate
PCM digital audio output.
--- AUDIO SETUP ---
AUDIO OUT
OP MODE
DYNAMIC
LPCM OUTPUT
ANALOG
SPDIF/RAW
SPDIF/PCM
LINE OUT
RF REMOD
This is to activate the audio output from
DOLBY AC3 5.1 DOWNMIX to 2 channel
mode. Select the preferred SPEAKER
connection by using the cursor buttons.
Select the LT/RT to activate the Dolby
surround compatible output.
Select the STEREO to activate simple
stereo mode.
MAIN PAGE
OP MODE
- LINE OUT: Line out mode, with digital
dialog normalization.
- RF REMOD: RF remodulation mode,
with heavy compression and digital
dialog normalization.
It is recommended to select LINE OUT
mode.
30
Page 31

SETUP
--- AUDIO SETUP ---
AUDIO OUT
OP MODE
DYNAMIC
LPCM OUTPUT
MAIN PAGE
Dynamic Range Control
Select DYNAMIC and adjust the dynamic
range of a Do by Digital encodedl
program. There are 8 steps between full
compression and off compression.
--- AUDIO SETUP ---
AUDIO OUT
OP MODE
DYNAMIC
LPCM OUTPUT
MAIN PAGE
LPCM OUTPUT
Select the LPCM (Line Pause Code
Modulation) OUTPUT between LPCM
48K and LPCM 96K. The higher the
sampling frequency is, the better the
output audio quality is.
It is recommended to select LPCM 96K
LPCM 48K
LPCM 96K
FULL
6/8
4/8
2/8
OFF
PREFERENCES SETUP
--- PREFERENCES PAGE ---
TV TYPE
AUDIO
SUBTITLE
DISC MENU
PARENTAL
PASSWORD
DEFAULTS
SMART NAV
MAIN PAGE
TV type setup
This player can play discs recorded in
either NTSC format.
Select NTSC format, when the unit is
connected to NTSC TV
Select AUTO format, the player TV output
format will be according to the DVD disc
format.
--- PREFERENCES PAGE ---
TV TYPE
AUDIO
SUBTITLE
DISC MENU
PARENTAL
PASSWORD
DEFAULTS
SMART NAV
MAIN PAGE
AUDIO language setup
Select the preferred AUDIO soundtrack
by using the cursor buttons.
AUTO
NTSC
PAL
.
ENGLISH
FRENCH
SPANISH
CHINESE
JAPANESE
GERMAN
ITALIAN
31
Page 32

SETUP
--- PREFERENCES PAGE ---
TV TYPE
AUDIO
SUBTITLE
DISC MENU
PARENTAL
PASSWORD
DEFAULTS
SMART NAV
MAIN PAGE
SUBTITLE language setup
Select the preferred SUBTITLE language
by using the cursor buttons.
--- PREFERENCES PAGE ---
TV TYPE
AUDIO
SUBTITLE
DISC MENU
PARENTAL
PASSWORD
DEFAULTS
SMART NAV
MAIN PAGE
ENGLISH
FRENCH
SPANISH
CHINESE
JAPANESE
GERMAN
ITALIAN
OFF
ENGLISH
FRENCH
SPANISH
CHINESE
JAPANESE
GERMAN
ITALIAN
--- PREFERENCES PAGE ---
TV TYPE
AUDIO
SUBTITLE
DISC MENU
PARENTAL
PASSWORD
DEFAULTS
SMART NAV
MAIN PAGE
PARENTAL
Select suitable parental guidance by the
cursor buttons and confirm by pressing
ENTER button.
--- PREFERENCES PAGE ---
TV TYPE
AUDIO
SUBTITLE
DISC MENU
PARENTAL
PASSWORD
DEFAULTS
SMART NAV
MAIN PAGE
1 G
2
3 PG
4 PG 13
5
6 PG-R
7 NC-17
8 ADULT
NO_ PARENTAL
CHANGE
DISC MENU language setup
Select the preferred DISC MENU
language by using the cursor buttons.
PASSWORD
Select CHANGE and press ENTER
button. Type the old password (The initial
factory code is 3308) and key in 4
characters password now you want to
use, and retype again to confirm key in
correctly.
32
Page 33

SETUP
--- PREFERENCES PAGE ---
TV TYPE
AUDIO
SUBTITLE
DISC MENU
PARENTAL
PASSWORD
DEFAULTS
SMART NAV
MAIN PAGE
DEFAULTS
Select reset to revert to factory initial
settings.
RESET
--- PREFERENCES PAGE ---
TV TYPE
AUDIO
SUBTITLE
DISC MENU
PARENTAL
PASSWORD
DEFAULTS
SMART NAV
MAIN PAGE
SMART NAV
If selected WITH MENU mode, when
playing MP3 disc, the smart navigation
menu will appear on the screen, then the
user can select a track to play according to
the menu hint.
If selected NO MENU mode, when playing
an MP3 disc, there is no menu to display
and it starts to play directly.
The user can adjust this item according
to one's need.
an
NO MENU
WITH MENU
33
Page 34

SETUP
DEFAULTS TABLE
General Setup TV Display Normal/LB
PIC Mode AUTO
Angle Mark ON
OSD Language English
Captions ON
SCR Saver ON
Speaker Setup Downmix Stereo
Audio Setup Audio Out SPDIF/RAW
OP Mode Line Out
Dynamic FULL
LPCM Output LPCM 96K
Preferences TV Type AUTO
Audio English
Subtitle English
DISC Menu English
Parental NO_Parental
Password 3308
Smart NAV With Menu
34
Page 35

TROUBLE SHOOTING
If it appears that your DVD unit is faulty,
first consult this checklist. It may be that
something simple has been overlooked.
Under no circumstances should you
try to repair the player yourself, as this
will invalidate the warranty. Only
qualified service personnel can
remove the cover or service this
player.
NO POWER
Check if the on/off button on the front
of the player is set to on.
Check if AC or DC power plug of the
mains unit is properly connected.
Check if there is power at the AC or
DC outlet.
NO PICTURE
Check if the mode it set to proper
state, such as DVD mode, RADIO,
TV, AV and RGB mode.
Check the video connection.
DISTORTED PICTURE
Check the disc for fingerprints and
clean with soft cloth, wiping from
centre to edge.
Sometimes a small amount of picture
distortion may appear. This is not a
malfunction.
THE PICTURE IS OVER DARK, OVER
BRIGHT OR HAS NO COLOR
Press PICT button on the monitor
panel, then press + button - button
to increase or decrease the level of
the corresponding item (BRIGHT,
CONTRAST, COLOR or TINT) to
proper value, then you can get an
optimum picture effect.
COMPLETELY DISTORTED PICTURE
The disc format is not according to the
TV-set used (PAL/NTSC).
DISC DOES NOT PLAY
Ensure the disc label is upwards.
Clean the disc.
Check if the disc is defective by trying
another disc.
NO SOUND
Check audio connections.
If using a HIFI amplifier, try another
sound source.
Check if the volume is minimum, and
adjust the VOL+ to increase the
volume level.
NO RETURN TO START-UP SCREEN
WHEN DISC IS REMOVED
Press POWER to turn off the unit, then
press it again to tur n on the unit.
Press reset button on the front of the
DVD unit.
THE PLAYER DOES NOT RESPOND
TO THE REMOTE CONTROL
Aim the remote control directly at the
sensor on the front of the player.
Avoid all obstacles which may interfere
with the signal path.
Inspect or replace the remote control
batteries.
DISTORTED OR B/W PICTURE
The disc format is not according to the
TV-set used (PAL/NTSC).
NO AUDIO AT DIGITAL OUTPUT
Check the digital connections.
Check the Digital Audio menu to make
sure that the digital output is correctly
set.
Check if the audio format of the
selected audio language matches your
receiver's capabilities.
NO COLOR IN PICTURE
The disc format is not according to the
TV-set used (PAL/NTSC).
35
Page 36

TROUBLE SHOOTING
CAN’T RECEIVE TV SIGNAL OR THE
PICTURE QUALITY IS POOR IN TV
MODE
Please confirm if the antenna is
connected to the antenna socket of
the RADIO BOX that connected to
the DVD unit.
Perhaps the signal of your position
is too weak, and it can’t receive any
TV signal at all.
BUTTONS DO NOT WORK
Turn the player off and on with the
power on/off button on the front of the
player.
Press Reset button on the front of the
DVD unit.
36
Page 37

SPECIFICATIONS
GENERAL
Power Supply Requirements : DC 12 Volts, Negative Ground
Maximum Output Power : 4x40 watts
Current Drain : 15 Ampere (max.)
TV
TV Sensitivity : 45dB V@CH25 in average
RADIO
FM
Frequency Coverage 87.5 to 107.9 Mhz
Sensitivity (S/N=30dB) 4 V
Image Rejection 45 dB
Stereo Separation 25 dB
RD PSG 38 dB
AW
Frequency Coverage 520 to 1710 kHz
Sensitivity (S/N=20dB) 36 dBu
Image Rejection 45 dB
37
Page 38

SPECIFICATIONS
DVD
Supply voltage : 12V DC (11V-15V), test voltage 14.4V, negative ground
Current consumption : Less than 2A
Signal system : Compositive video 1.0Vp-p 75
Discs played : (1) DVD-VIDEO disc
Audio output level : 10k (2 ch 2.0 Vrms)
Monitor Screen Size : 6.5"TFT
Resolution : 1200x234 dots
Note:
Specifications and design are subject to modification, without notice, due to
improvements in technology.
5" (12 cm) single-sided, single-layer
5" (12 cm) single-sided, double-layer
(2) Compact disc (CD-DA/CD-R/CD-RW/MP3)
(3) 5" (12 cm) Video CD
This product incorporates copyright protection technology that is protected by
method claims of certain U.S. patents and other intellectual property rights
owned by Macrovision Corporation and other rights owners. Use of this
copyright protection technology must be authorized by Macrovision
Corporation, and is intended for home and other limited viewing uses only
unless otherwise authorized by Macrovision Corporation. Reverse engineering
or disassembly is prohibited.
38
Page 39

SANYO MOBILE AUDIO
MODEL ECD-T1580DV LIMITED WARRANTY
OBLIGATIONS
In order to obtain warranty service, the product must be delivered to and picked up from an Authorized
Sanyo Factory Service Center at the user’s expense, unless specifically stated otherwise in this warranty.
The names and addresses of Authorized Sanyo Service Centers may be obtained by calling the toll-free
number listed below.
For product operation, authorized service center referral, service assistance or problem resolution, call
FACTORY SERVICE 1-800-421-5013
Weekdays8:00AM-5:00PMPacificTime
THIS WARRANTY IS VALID ONLY ON SANYO PRODUCTS PURCHASED AND USED IN THE UNITED
STATES OF AMERICA.
THIS WARRANTY APPLIES ONLY TO THE ORIGINAL RETAIL USER, AND DOES NOT APPLY TO
PRODUCTS USED FOR ANY INDUSTRIAL, PROFESSIONAL OR COMMERCIAL PURPOSE. THE
ORIGINAL DATED BILL OF SALE OR SALES SLIP MUST BE SUBMITTED TO THE AUTHORIZED
SANYO SERVICE CENTER AT THE TIME WARRANTY SERVICE IS REQUESTED.
Subject to the OBLIGATIONS above and EXCLUSIONS below, SANYO FISHER COMPANY (SFC)
warrants this SANYO product against defects in materials and workmanship for the periods specified
below. SFC will repair or replace (at its option) the product and any of its parts which fail to conform to this
warranty with new or reconditioned products or parts. The warranty period commences on the date the
product was first purchased at retail.
LABOR: 1 YEAR
This warranty does not cover (A) the adjustment of customer-operated controls as explained in the
appropriate model’s instruction manual, or (B) the repair of any product whose serial number has been
altered, defaced or removed.
This warranty shall not apply to the cabinet or cosmetic parts, knobs, batteries or routine maintenance.
This warranty does not apply to uncrating, setup, installation, removal of the product for repair or
reinstallation of the product after repair.
This warranty does not apply to the elimination of car static or motor noise, correction of antenna problems,
or damage to compact discs, speakers, accessories or vehicle electrical systems. This warranty does not
apply to repairs or replacements necessitated by any cause beyond the control of SFC including, but not
limited to, any malfunction, defect or failure caused by or resulting from unauthorized service or parts,
improper maintenance, operation contrary to furnished instructions, shipping or transit accidents, modification
or repair by the user, abuse, misuse, neglect, accident, incorrect power line voltage, fire, flood or other Acts
of God, or normal wear and tear. The foregoing is in lieu of all other express warranties and SFC does not
assume or authorize any party to assume for it any other obligation or liability.
THE DURATION OF ANY WARRANTIES WHICH MAY BE IMPLIED BY LAW (INCLUDING THE
WARRANTIES OF MERCHANTABILITY AND FITNESS) IS LIMITED TO THE TERM OF THIS WARRANTY
IN NO EVENT SHALL SFC BE LIABLE FOR SPECIAL, INCIDENTAL OR CONSEQUENTIAL DAMAGES
ARISING FROM OWNERSHIP OR USE OF THIS PRODUCT, OR FOR ANY DELAY IN THE
PERFORMANCE OF ITS OBLIGATIONS UNDER THIS WARRANTY DUE TO CAUSES BEYOND ITS
CONTROL. SOME STATES DO NOT ALLOW LIMITATIONS ON HOW LONG AN IMPLIED WARRANTY
LASTS AND/OR DO NOT ALLOW THE EXCLUSION OR LIMITATION OF CONSEQUENTIAL DAMAGES,
SO THE ABOVE LIMITATIONS AND EXCLUSIONS MAY NOT APPLY TO YOU.
THIS WARRANTY GIVES YOU SPECIFIC LEGAL RIGHTS. YOU MAY HAVE OTHER RIGHTS, WHICH
VARY FROM STATE TO STATE.
For your protection in the event of theft or loss of this product, please fill in the information below for your
own personal records.
Model No.
Date of Purchase
Where Purchased
PARTS: 1 YEAR
Serial No.
(Located on back or bottom side of unit)
Purchase Price
39
Page 40

Printed in Hong Kong
21605 Plummer Street
Chatsworth, CA91311
ECD-T1580DV. Issue Number 1.
88-V1953-01
 Loading...