

Page 1
INSTRUCTION MANUAL
I
index
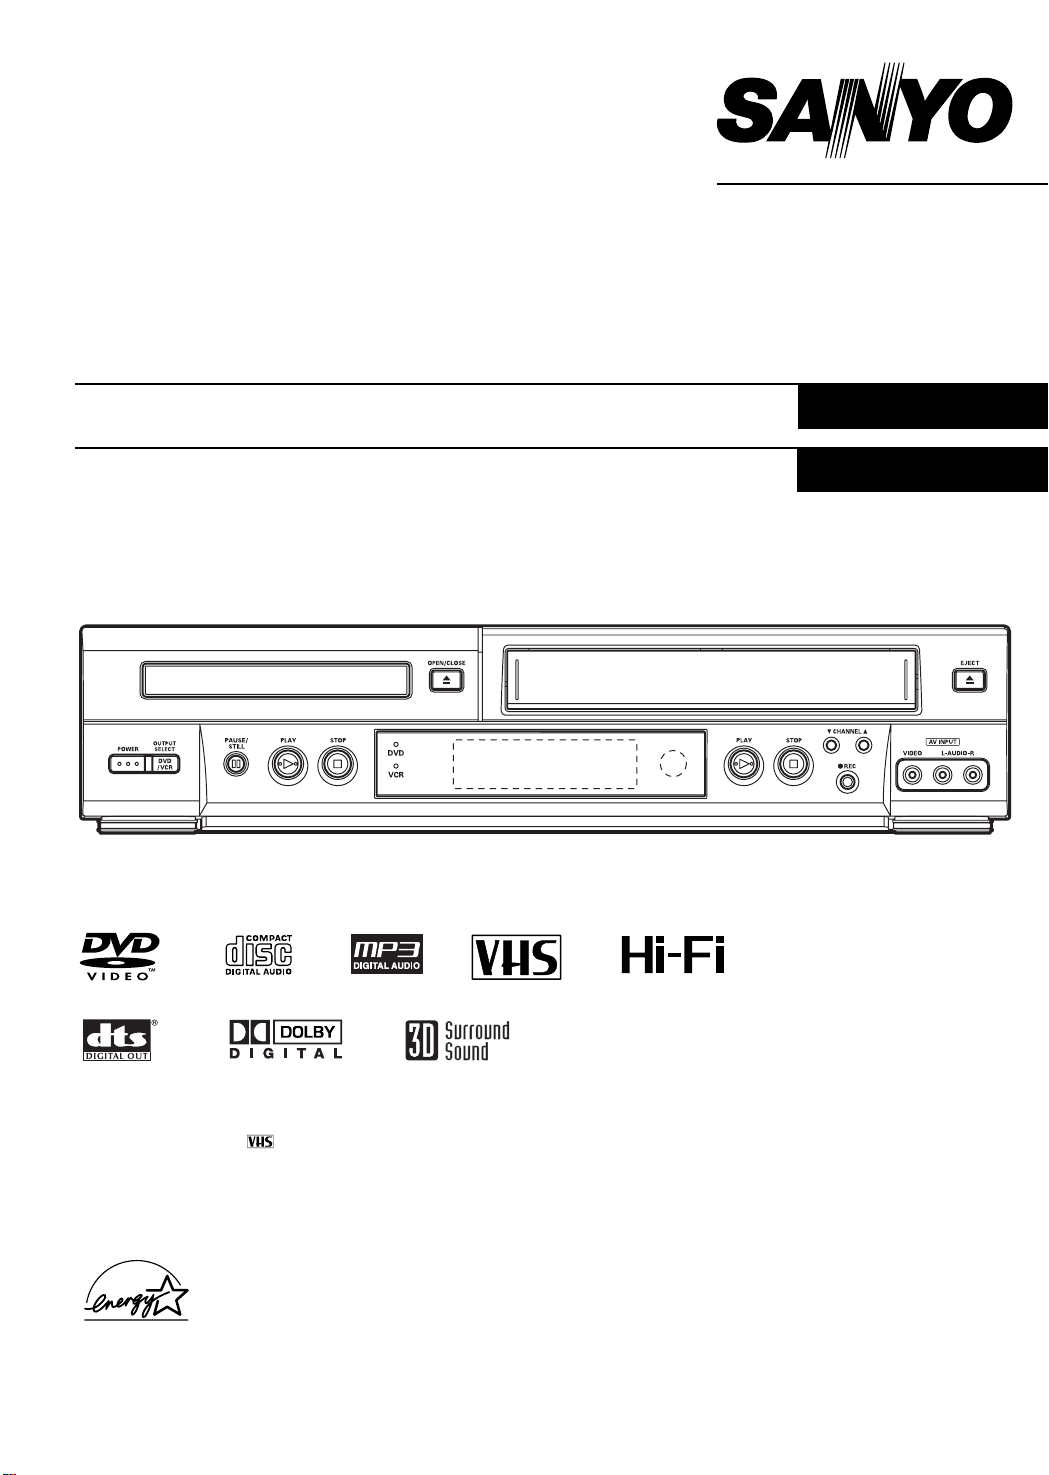
DVC-2500
DVD Player + Video Cassette Recorder
Lecteur DVD + Magnétoscope à cassette
English
Français
Only cassettes marked can be used with this video cassette recorder.
As an ENERGY STAR®Partner,
SANYO has determined that
this product or product model
meets the E
guidelines for energy efficiency.
Please read this manual carefully before connecting your DVD+VCR and operating it for the first time.
Keep the manual in a safe place for future reference.
NERGY STAR
®
Page 2
Safety Precautions
WARNING
RISK OF ELECTRIC SHOCK
DO NOT OPEN
WARNING: TO REDUCE THE RISK
OF ELECTRIC SHOCK
DO NOT REMOVE COVER (OR BACK)
NO USER-SERVICEABLE PARTS INSIDE
REFER SERVICING TO QUALIFIED SERVICE
This lightning flash with arrowhead symbol within an
equilateral triangle is intended to alert the user to
the presence of uninsulated dangerous voltage
within the product’s enclosure that may be of
sufficient magnitude to constitute a risk of electric
shock to persons.
The exclamation point within an equilateral triangle
is intended to alert the user to the presence of
important operating and maintenance (servicing)
instructions in the literature accompanying the
product.
WARNING: TO REDUCE THE RISK OF FIRE OR ELECTRIC SHOCK, DO NOT EXPOSE THIS APPARATUS TO
RAIN OR MOISTURE.
CAUTION: TO PREVENT ELECTRIC SHOCK, MATCH
WIDE BLADE OF PLUG TO WIDE SLOT, FULLY INSERT.
ATTENTION: POUR ÉVITER LES CHOC ÉLECTRIQUES,
INTRODUIRE LA LAME LA PLUS LARGE DE LA FICHE
DANS LA BORNE CORRESPONDANTE DE LA PRISE ET
POUSSER JUSQU’AU FOND.
WARNING: Do not install this equipment in a confined space
such as a book case or similar unit.
NOTE TO CABLE/TV INSTALLER: This reminder is provided to
call the cable TV system installer’s attention to Article 820-40 of
the National Electric Code (U.S.A.). The code provides guidelines
for proper grounding and, in particular, specifies that the cable
ground shall be connected to the grounding system of the
building, as close to the point of the cable entry as practical.
CAUTION:
This DVD+VCR employs a Laser System.
To ensure proper use of this product, please read this owner’s
manual carefully and retain for future reference should the unit
require maintenance, contact an authorized service location.
Use of controls, adjustments, or the performance of procedures other than those specified herein may result in hazardous radiation exposure.
To prevent direct exposure to laser beam, do not try to open
the enclosure. Visible laser radiation when open. DO NOT
STARE INTO BEAM.
PERSONNEL.
CAUTION: The apparatus should not be exposed to water
(dripping or splashing) and no objects filled with liquids, such
as vases, should be placed on the apparatus.
FCC WARNING: This equipment may generate or use radio
frequency energy. Changes or modifications to this
equipment may cause harmful interference unless the modifications are expressly approved in the instruction manual. The
user could lose the authority to operate this equipment if an
unauthorized change or modification is made.
REGULATORY INFORMATION: FCC Part 15
This product has been tested and found to comply with the
limits for a Class B digital device, pursuant to Part 15 of the
FCC Rules. These limits are designed to provide reasonable
protection against harmful interference when the product is
operated in a residential installation. This product generates,
uses, and can radiate radio frequency energy and, if not
installed and used in accordance with the instruction manual,
may cause harmful interference to radio communications.
However, there is no guarantee that interference will not occur
in a particular installation. If this product does cause harmful
interference to radio or television reception, which can be
determined by turning the product off and on, the user is
encouraged to try to correct the interference by one or more
of the following measures:
Reorient or relocate the receiving antenna.
Increase the separation between the product and
receiver.
Connect the product into an outlet on a circuit different
from that to which the receiver is connected.
Consult the dealer or an experienced radio/TV technician
for help.
NOTES ON COPYRIGHTS:
It is forbidden by law to copy, broadcast, show, broadcast
via cable, play in public, or rent copyrighted material without
permission.
This product features the copy protection function developed
by Macrovision. Copy protection signals are recorded on some
discs. When recording and playing the pictures of these discs
on a VCR, picture noise will appear.
This product incorporates copyright protection technology that
is protected by method claims of certain U.S. patents and other
intellectual property rights owned by Macrovision Corporation
and other rights owners. Use of this copyright protection technology must be authorized by Macrovision Corporation, and is
intended for home and other limited viewing uses only unless
otherwise authorized by Macrovision Corporation. Reverse
engineering or disassembly is prohibited.
SERIAL NUMBER: The serial number is found on the back of
this unit. This number is unique to this unit and not available to
others. You should record requested information here and
retain this guide as a permanent record of your purchase.
Model No. ___________________________________
Serial No. ___________________________________
2
Page 3
IMPORTANT SAFETY INSTRUCTIONS
CAUTION: PLEASE READ AND OBSERVE ALL WARNINGS AND INSTRUCTIONS IN THIS OWNER’S MANUAL AND THOSE
This set has been designed and manufactured to assure personal safety. Improper use can result in electric shock or fire hazard. The
safeguards incorporated in this unit will protect you if you observe the following procedures for installation, use, and servicing.
This unit does not contain any parts that can be repaired by the user.
DO NOT REMOVE THE CABINET COVER, OR YOU MAY BE EXPOSED TO DANGEROUS VOLTAGE. REFER SERVICING TO
QUALIFIED SERVICE PERSONNEL ONLY.
MARKED ON THE UNIT. RETAIN THIS BOOKLET FOR FUTURE REFERENCE.
1. Read These Instructions
All the safety and operating instructions should be read
before the product is operated.
2. Follow All Instructions
All operating and use instructions should be followed.
3. Keep These Instructions
The safety and operating instructions should be retained
for future reference.
4. Heed All Warnings
All warnings on the product and in the operating instructions should be adhered to.
5. Power Sources
This product should be operated only from the type of
power source indicated on the marking label. If you are not
sure of the type of power supply to your home, consult
your product dealer or local power company. For products
intended to operate from battery power, or other sources,
refer to the operating instructions.
6. Grounding or Polarization
Do not defeat the safety purpose of the polarized plug has
two blades with one wider than the other. A grounding-type
plug has two blades and a third grounding prong. The wide
blade or the prong are provided for your safety. If the provided plug does not fit into your outlet, consult an electrician for replacement of the obsolete outlet.
7. Ventilation
Slots and openings in the cabinet are provided for ventilation and to ensure reliable operation of the product and to
protect it from overheating. These openings must not be
blocked or covered. The openings should never be blocked
by placing the product on a bed, sofa, rug or other similar
surface. This product should not be placed in a built-in
installation such as a bookcase or rack unless proper ventilation is provided or the manufacturer’s instructions have
been adhered to.
8. Heat
The product should be situated away from heat sources
such as radiators, heat registers, stoves, or other products
(including amplifiers) that produce heat.
9. Water and Moisture
Do not use this product near water – for example, near a
bath tub, wash bowl, kitchen sink, or laundry tub, in a wet
basement, or near a swimming pool.
10. Cleaning
Unplug this product from the wall outlet before cleaning.
Do not use liquid cleaners or aerosol cleaners. Use a
damp cloth for cleaning.
11. Power-Cord Protection
Power-supply cords should be routed so that they are not
likely to be walked on or pinched by items placed upon or
against them, paying particular attention to cords at plugs,
convenience receptacles, and the point where they exit
from the product.
12. Overloading
Do not overload wall outlets, extension cords, or integral
convenience receptacles, this can result in a risk of fire or
electric shock.
13. Outdoor Antenna Grounding
If an outside antenna or cable system is connected to the
product, be sure the antenna or cable system is grounded
so as to provide some protection against voltage surges
and built-up static charges. Article 810 of the National
Electrical Code (U.S.A), ANSI/NFPA 70 provides information with regard to proper grounding of the mast and supporting structure, grounding of the lead-in wire to an antenna discharge unit, size of grounding conductors, location of
antenna-discharge unit, connection to grounding electrodes, and requirements for the grounding electrode.
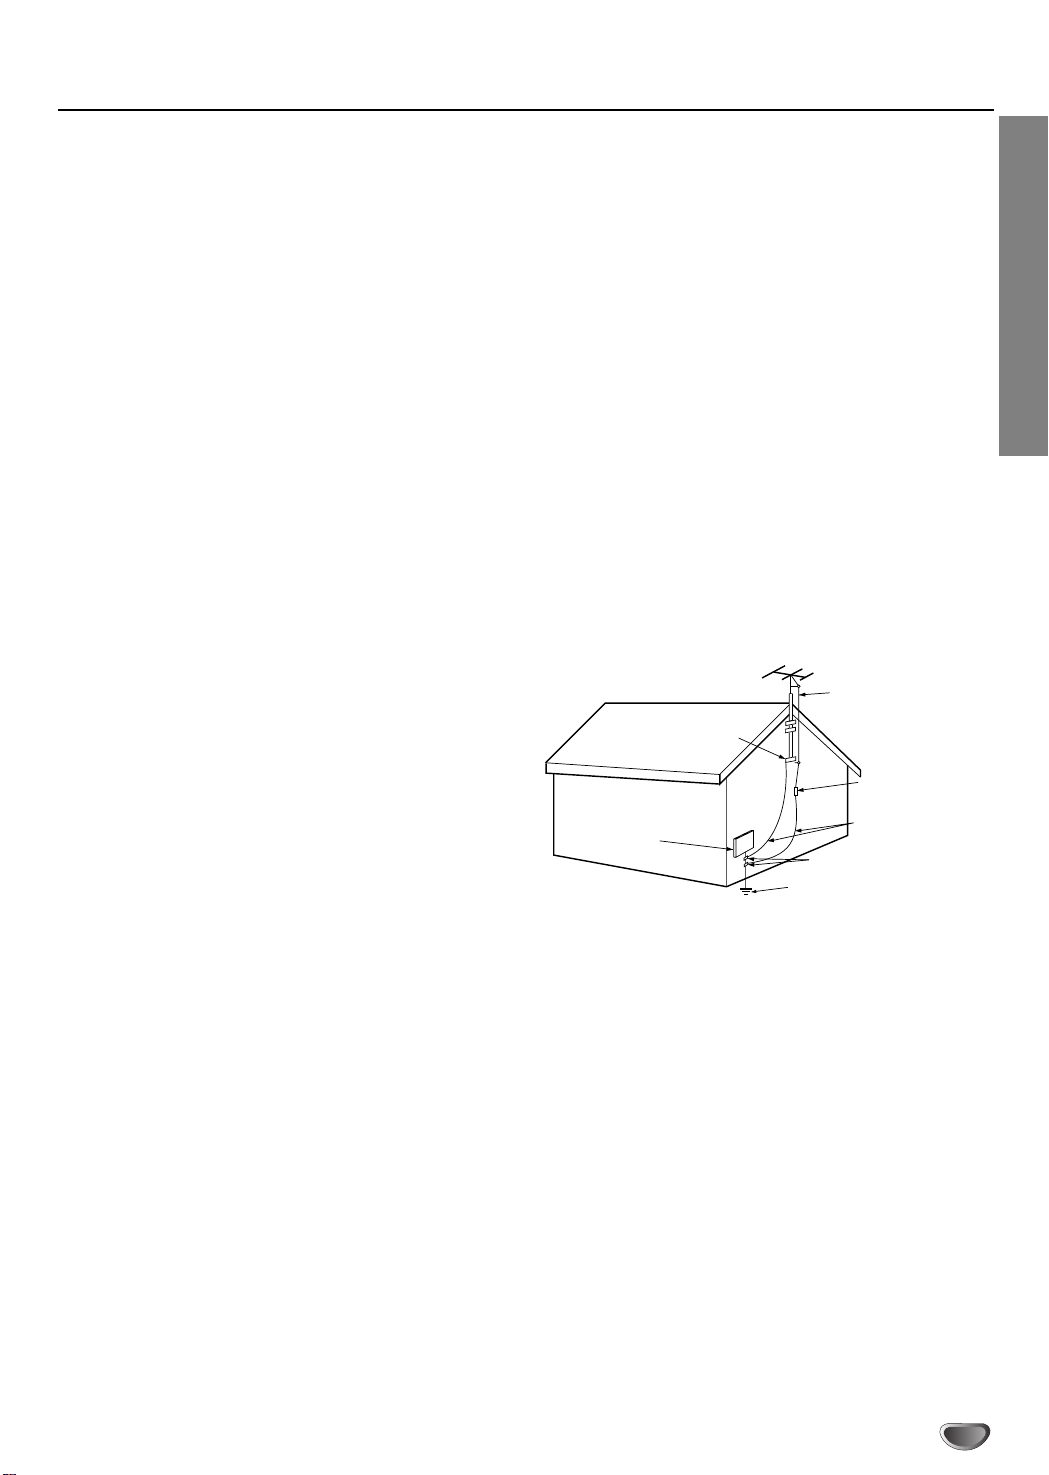
EXAMPLE OF GROUNDING ACCORDING TO
NATIONAL ELECTRICAL CODE INSTRUCTIONS
Antenna Lead in Wire
Ground
Clamp
Antenna Discharge Unit
(NEC Section 810-20)
Electric Service
Equipment
Power Service Grounding
NEC - NATIONAL ELECTRICAL CODE
Electrode System
(NEC Art 250, Part H)
14. Lightning
Unplug this apparatus apparatus during lightning storms or
when unused for long periods of time. This will prevent
damage to the product due to lightning and power-line
surges.
15. Power Lines
An outside antenna system should not be located in the
vicinity of overhead power lines or other electric light or
power circuits, or where it can fall into such power lines or
circuits. When installing an outside antenna system,
extreme care should be taken to keep from touching such
power lines or circuits as contact with them might be fatal.
16. Object and Liquid Entry
Never push objects of any kind into this product through
openings as they may touch dangerous voltage points or
short-out parts that could result in a fire or electric shock.
Never spill liquid of any kind on the product.
17. Attachments
Do not use attachments not recommended by the product
manufacturer as they may cause hazards.
Grounding Conductors
(NEC Section 810-21)
Ground Clamps
INTRODUCTION
3
Page 4

IMPORTANT SAFETY INSTRUCTIONS (Continued)
18. Accessories
Do not place this product on an unstable cart, stand, tripod, bracket, or table.
The product may fall, causing serious
injury to a child or adult, and serious
damage to the product. Use only with a
cart, stand, tripod, bracket, or table
recommended by the manufacturer, or
sold with the product. Any mounting of
the product should follow the manufacturer’s instructions,
and should use a mounting accessory recommended by
the manufacturer.
19. Damage Requiring Service
Unplug this product from the wall outlet and refer servicing
to qualified service personnel under the following conditions:
a. If the power-supply cord or plug is damaged.
b. If liquid has been spilled, or objects have fallen into the
product.
c. If the product has been exposed to rain or water.
d. If the product does not operate normally by following
the operating instructions. Adjust only those controls
that are covered by the operating instructions as an
improper adjustment of other controls may result in
damage and will often require extensive work by a
qualified technician to restore the product to its normal
operation.
e. If the product has been dropped or the cabinet has
been damaged.
f. If the product exhibits a distinct change in performance.
20. Servicing
Do not attempt to service this product yourself as opening
or removing the cover may expose you to dangerous voltage or other hazards. Refer all servicing to qualified service personnel.
21. Replacement parts
When replacement parts are required, be sure the service
technician has used replacement parts specified by the
manufacturer or have the same characteristics as the original part. Unauthorized substitutions may result in fire, electric shock, or other hazards.
22. Safety Check
Upon completion of any service or repairs to this product,
ask the service technician to perform safety checks to
determine that the product is in proper operating condition.
23. Disc Tray
Keep your fingers well clear of the disc tray as it is closing.
It can cause personal injury.
24. Burden
Do not place a heavy object on or step on the product. The
object may fall, causing serious personal injury and serious
damage to the product.
25. Connecting
When you connect the product to other equipment, turn off
the power and unplug all of the equipment from the wall
outlet. Failure to do so may cause an electric shock and
serious personal injury. Read the owner’s manual of the
other equipment carefully and follow the instructions when
making any connections.
26. Sound Volume
Reduce the volume to the minimum level before you turn
on the product. Otherwise, sudden high volume sound may
cause hearing or speaker damage.
27. Sound Distortion
Do not allow the product to output distorted sound for a
longtime. It may cause speaker overheating and fire.
28. Earphone
When you use the earphone, keep the volume at a moderate level. If you use the earphone continuously with high
volume sound, it may cause hearing damage.
29. Laser Beam
Do not look into the opening of the disc tray or ventilation
opening of the product to see the source of the laser
beam. It may cause sight damage.
30. Disc
Do not use a cracked, deformed, or repaired disc. These
discs are easily broken and may cause serious personal
injury and product malfunction.
4
Page 5
Table of Contents
Introduction
Safety Precautions . . . . . . . . . . . . . . . . . . . . . . . . . 2
IMPORTANT SAFETY INSTRUCTIONS. . . . . . . . . 3-4
Table of Contents . . . . . . . . . . . . . . . . . . . . . . . . . . 5
Before Use . . . . . . . . . . . . . . . . . . . . . . . . . . . . . . 6-7
Playable Discs . . . . . . . . . . . . . . . . . . . . . . . . . . . 6
Precautions . . . . . . . . . . . . . . . . . . . . . . . . . . . . . 7
Notes on Discs . . . . . . . . . . . . . . . . . . . . . . . . . . 7
About Symbols . . . . . . . . . . . . . . . . . . . . . . . . . . 7
Front Panel . . . . . . . . . . . . . . . . . . . . . . . . . . . . . . . 8
Display Window. . . . . . . . . . . . . . . . . . . . . . . . . . . . 9
Remote Control . . . . . . . . . . . . . . . . . . . . . . . . . . . 10
Rear Panel . . . . . . . . . . . . . . . . . . . . . . . . . . . . . . . 11
Preparation
Connections . . . . . . . . . . . . . . . . . . . . . . . . . . . 12-14
Connecting Antenna/Cable TV to a DVD+VCR . . 12
Basic TV Connections . . . . . . . . . . . . . . . . . . . . 13
Optional, Preferred TV Connections . . . . . . . 13-14
Before Operation - VCR Part . . . . . . . . . . . . . . 15-17
On-Screen Display. . . . . . . . . . . . . . . . . . . . . . . 15
Setting the On-Screen Display . . . . . . . . . . . . . . 15
Setting the VCR Setup Menu . . . . . . . . . . . . . . . 16
Channel Selection . . . . . . . . . . . . . . . . . . . . . . . 16
Setting the Clock . . . . . . . . . . . . . . . . . . . . . . . . 17
Before Operation - DVD Part . . . . . . . . . . . . . . 18-21
General Explanation. . . . . . . . . . . . . . . . . . . . . . 18
On-Screen Display. . . . . . . . . . . . . . . . . . . . . . . 18
Initial Settings . . . . . . . . . . . . . . . . . . . . . . . . 19-22
General Operation . . . . . . . . . . . . . . . . . . . . 19
Language . . . . . . . . . . . . . . . . . . . . . . . . . . 19
Picture . . . . . . . . . . . . . . . . . . . . . . . . . . . . . 19
Sound . . . . . . . . . . . . . . . . . . . . . . . . . . . . . 20
Others . . . . . . . . . . . . . . . . . . . . . . . . . . . . . 20
Parental Control. . . . . . . . . . . . . . . . . . . . . . 21
Operation
Operation with tape . . . . . . . . . . . . . . . . . . . . . 22-27
Normal Playback . . . . . . . . . . . . . . . . . . . . . . . . 22
Special Effect Playbacks . . . . . . . . . . . . . . . . . . 22
Search. . . . . . . . . . . . . . . . . . . . . . . . . . . . . 22
Still Picture and Frame-by-Frame Playback . 22
Slow Motion . . . . . . . . . . . . . . . . . . . . . . . . . 22
Ad JUMP (Advertisement Jump). . . . . . . . . . 22
Normal Recording . . . . . . . . . . . . . . . . . . . . . . . 23
Timer Recording . . . . . . . . . . . . . . . . . . . . . . 23-24
Instant Timer Recording . . . . . . . . . . . . . . . . . . . 25
Dubbing and Editing. . . . . . . . . . . . . . . . . . . . . . 25
Copying from DVD to VCR. . . . . . . . . . . . . . . . . 25
VHS Hi-Fi Stereo System/MTS Broadcast . . . . . 26
Tape Counter Memory Feature. . . . . . . . . . . . . . 27
Additional Information . . . . . . . . . . . . . . . . . . . . 27
Operation with DVD and Audio CD . . . . . . . . . 28-31
Playing DVD and Audio CD . . . . . . . . . . . . . . . . 28
General Features . . . . . . . . . . . . . . . . . . . . . . . . 28
Moving to another TITLE . . . . . . . . . . . . . . . 28
Moving to another CHAPTER/TRACK . . . . . 28
Slow Motion . . . . . . . . . . . . . . . . . . . . . . . . . 28
Still Picture and Frame-by-Frame Playback . 29
Search. . . . . . . . . . . . . . . . . . . . . . . . . . . . . 29
Random. . . . . . . . . . . . . . . . . . . . . . . . . . . . 29
Repeat. . . . . . . . . . . . . . . . . . . . . . . . . . . . . 29
Repeat A-B . . . . . . . . . . . . . . . . . . . . . . . . . 29
3D Surround . . . . . . . . . . . . . . . . . . . . . . . . 29
Changing the Audio Language . . . . . . . . . . . 29
Changing the Audio Channel . . . . . . . . . . . . 29
Time Search . . . . . . . . . . . . . . . . . . . . . . . . 30
Zoom . . . . . . . . . . . . . . . . . . . . . . . . . . . . . . 30
Marker Search . . . . . . . . . . . . . . . . . . . . . . . 30
Special DVD Features . . . . . . . . . . . . . . . . . . . . 31
Checking the contents of DVD Video discs: Menus
Title Menu . . . . . . . . . . . . . . . . . . . . . . . . . . 31
Disc Menu . . . . . . . . . . . . . . . . . . . . . . . . . . 31
Camera Angle . . . . . . . . . . . . . . . . . . . . . . . 31
Subtitle . . . . . . . . . . . . . . . . . . . . . . . . . . . . 31
. 31
Programmed Playback with Audio CD . . . . . . . . 31
Operation with MP3 Discs. . . . . . . . . . . . . . . . . . . 32
Notes on MP3 Discs . . . . . . . . . . . . . . . . . . . . . 32
Playing MP3 Discs . . . . . . . . . . . . . . . . . . . . . . . 32
Programmed Playback with MP3 Discs . . . . . . . 33
Reference
Troubleshooting . . . . . . . . . . . . . . . . . . . . . . . . 34-35
Language Code List . . . . . . . . . . . . . . . . . . . . . . . 36
Specifications . . . . . . . . . . . . . . . . . . . . . . . . . . . . 37
About the symbols for instructions
Indicates hazards likely to cause harm to the unit
itself or other material damage.
Indicates special operating features of this unit.
Indicates tips and hints for making the task easier.
Manufactured under license from Dolby Laboratories. Dolby
and the double-D symbol are trademarks of Dolby
Laboratories. Confidential unpublished works. Copyright
1992-1997 Dolby Laboratories. All rights reserved.
INTRODUCTION
DTS and DTS Digital Out are trademarks of Digital Theater
Systems, Inc.
5
Page 6
Before Use
Playable Discs
DVD
(8 cm/12 cm disc)
Audio CD
(8 cm/12 cm disc)
In addition, this unit can play a CD-R or CD-RW that
contains audio titles or MP3 files.
Notes
– Depending on the conditions of the recording equip-
ment or the CD-R/RW disc itself, some CD-R/RW
discs cannot be played on the unit.
– The unit cannot play discs that contain data other
than MP3 and CD-DA data.
– Do not attach any seal or label to either side (the
labeled side or the recorded side) of a disc.
– Do not use irregularly shaped CDs (e.g., heart-
shaped or octagonal). It may result in malfunctions.
Notes on DVDs
Some playback operations of DVDs may be intention
ally fixed by software manufacturers. As this unit plays
DVDs according to disc content designed by the software manufacturer, some playback features of the unit
may not be available or other functions may be added.
Refer also to the instructions supplied with the DVDs.
Some DVDs made for business purposes may not be
played on the unit.
Regional code of the DVD+VCR and DVDs
This DVD+VCR is designed and manufactured
for playback of region 1 encoded DVD software.
The region code on the labels of some DVD discs indicates which type of DVD+VCR can play those discs. This
unit can play only DVD discs labeled 1 or ALL. If you try
to play any other discs, the message “Check Regional
Code” will appear on the TV screen. Some DVD discs
may not have a region code label even though their playback is prohibited by area limits.
Note on DTS-encoded CDs
When playing DTS-encoded CDs, excessive noise may
be exhibited from the analog stereo output. To avoid
possible damage to the audio system, turn down the
volume before playing back such discs, adjust the volume gradually, and keep the volume level low. To enjoy
DTS Digital Surround
TM
playback, an external 5.1 channel DTS Digital SurroundTMdecoder system must be
connected to the digital output of the unit.
1
Disc-related terms
Title (DVD only)
The main film content or accompanying feature content
or music album.
Each title is assigned a title reference number enabling
you to locate it easily.
Chapter (DVD only)
Sections of a picture or a musical piece that are smaller
than titles. A title is composed of one or several chapters. Each chapter is assigned a chapter number to
enable you to locate the chapter you want. Depending
on the disc, chapters may not be recorded.
Track (audio CD only)
Sections of a musical piece on an audio CD. Each track
is assigned a track number, enabling you to locate the
track you want.
Remote control battery installation
Detach the battery cover on the rear of the
AAA
remote control, and insert two R03 (size
AAA
AAA) batteries with and aligned
correctly.
Caution
Do not mix old and new batteries. Never mix different
types of batteries (standard, alkaline, etc.).
Remote Control Operation Range
Point the remote control at the remote sensor and press
the buttons.
Distance: About 23 ft (7 m) from the front of the
remote sensor
Angle: About 30° in each direction of the front of the
remote sensor
IMPORTANT NOTE:
SPENT OR DISCHARGED BATTERIES MUST BE
RECYCLED OR DISPOSED OF IN A SAFE MANNER
IN COMPLIANCE WITH ALL APPLICABLE LAWS.
FOR DETAILED INFORMATION, CONTACT YOUR
LOCAL COUNTY SOLID WASTE AUTHORITY.
6
Page 7
Before Use (Continued)
Precautions
Handling the unit
When shipping the unit
The original shipping carton and packing materials
come in handy. For maximum protection, re-pack the
unit as it was originally packaged at the factory.
When setting up the unit
The picture and sound of a nearby TV, VCR, or radio
may be distorted during playback. In this case, position
the unit away from the TV, VCR, or radio, or turn off the
unit after removing the disc.
To keep the surface clean
Do not use volatile liquids, such as insecticide spray,
near the unit. Do not leave rubber or plastic products in
contact with the unit for a long period of time. They will
leave marks on the surface.
Cleaning the unit
To clean the cabinet
Use a soft, dry cloth. If the surfaces are extremely dirty,
use a soft cloth lightly moistened with a mild detergent
solution. Do not use strong solvents such as alcohol,
benzine, or thinner, as these might damage the surface
of the unit.
To obtain a clear picture
The DVD+VCR is a high-tech, precision device. If the
optical pick-up lens and disc drive parts are dirty or
worn, the picture quality will be poor.
Regular inspection and maintenance are recommended
after every 1,000 hours of use. (This depends on the
operating environment.)
For details, please contact your nearest dealer.
Notes on Discs
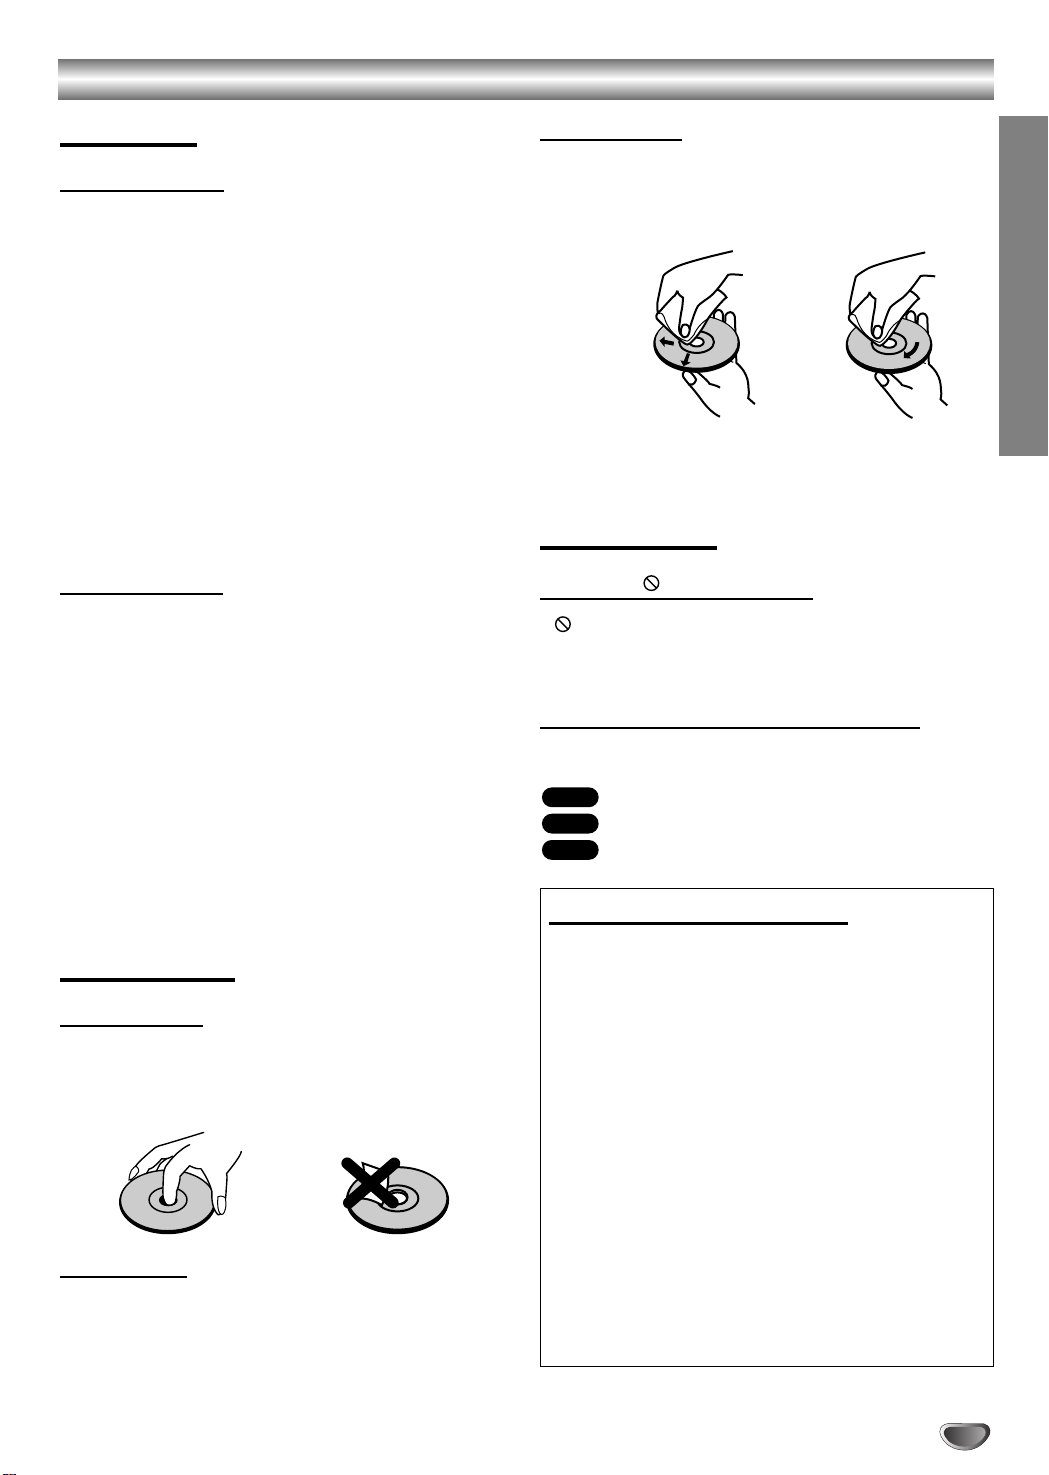
Handling discs
Do not touch the playback side of the disc.
Hold the disc by the edges so that fingerprints will not
get on the surface.
Do not stick paper or tape on the disc.
Storing discs
After playing, store the disc in its case.
Do not expose the disc to direct sunlight or sources of
heat, or leave it in a parked car exposed to direct sunlight, as there may be a considerable temperature
increase inside the car.
Cleaning discs
Fingerprints and dust on the disc can cause poor picture quality and sound distortion. Before playing, clean
the disc with a clean cloth. Wipe the disc from the center out.
Yes
Do not use strong solvents such as alcohol, benzine,
thinner, commercially available cleaners, or anti-static
spray intended for older vinyl records.
No
About Symbols
About the symbol display
“ ” may appear on the TV screen during operation.
This icon means the function explained in this owner’s
manual is not available on that specific DVD video disc.
About the disc symbols for instructions
A section whose title has one of the following symbols are
applicable only to those discs represented by the symbol.
DVD
DVD
CD
Audio CDs.
MP3
MP3 Discs.
Setting the Output Source
You must select one of your output sources (DVD or
VCR) to view on the TV screen.
• If you want to view output source of DVD deck:
Press DVD on the remote or DVD/VCR on the front panel
until DVD indicator on the front panel lights and output
source of DVD deck is viewed on the TV screen.
• If you want to view output source of VCR deck:
Press VCR on the remote or DVD/VCR on the front panel
until VCR indicator on the front panel lights and output
source of VCR deck is viewed on the TV screen.
• If you use OUTPUT SELECT button on the remote control to select output source:
Cycles through the 3 main output views: DVD, Tuner and VCR.
DVD: To view the current DVD deck status. (disc playback,
DVD menu or setup menu, etc)
Tuner: To view TV programs through TV tuner.
VCR: To view the current VCR deck status (tape playback,
VCR programming or viewing TV programs through
the VCR tuner, etc).
INTRODUCTION
7
Page 8

Front Panel
Disc Tray (DVD deck)
Insert a disc here.
To scan up or down through memorized channels.
Cassette Compartment (VCR deck)
Insert a video cassette here.
Point the DVD+VCR remote control here.
Display window
Shows the current status of the DVD+VCR.
OPEN/CLOSE (ZZ)
Opens or closes the disc tray.
EJECT(ZZ)
Ejects the tape in the VCR deck.
CHANNEL (vv/VV)
Remote Sensor
DVD/VCR indicator
Indicates the active deck.
STOP (xx)
Stops playback of disc.
PLAY (BB)
Starts playback of a disc
in the DVD deck.
PAUSE/STILL(XX)
Pause playback of a disc in the DVD
deck temporarily/press repeatedly
for frame-by-frame playback.
OUTPUT SELECT (DVD/VCR)
Select one of your output sources to
view on the TV screen between DVD
and VCR.
POWER
Switches the DVD+VCR ON and OFF.
PLAY (BB)
Starts playback of a tape in
the VCR deck.
STOP (xx)
Stops playback of tape.
REC (zz)
To record normally or to activate
Instant Timer Recording.
AV INPUT (VIDEO IN/AUDIO IN (Left/Right))
Connect the audio/video output of an
external source (Audio system,
TV/Monitor, Another VCR).
Child Lock
The control buttons on the front panel of the DVD+VCR
can be switched off so that your DVD+VCR can only be
operated using the remote control.
Press LOCK on the remote control to enable LOCK function, indicator appears in the display window.
To disable the LOCK function, press LOCK on the remote
control until indicator disappears in the display
window.
8
Page 9
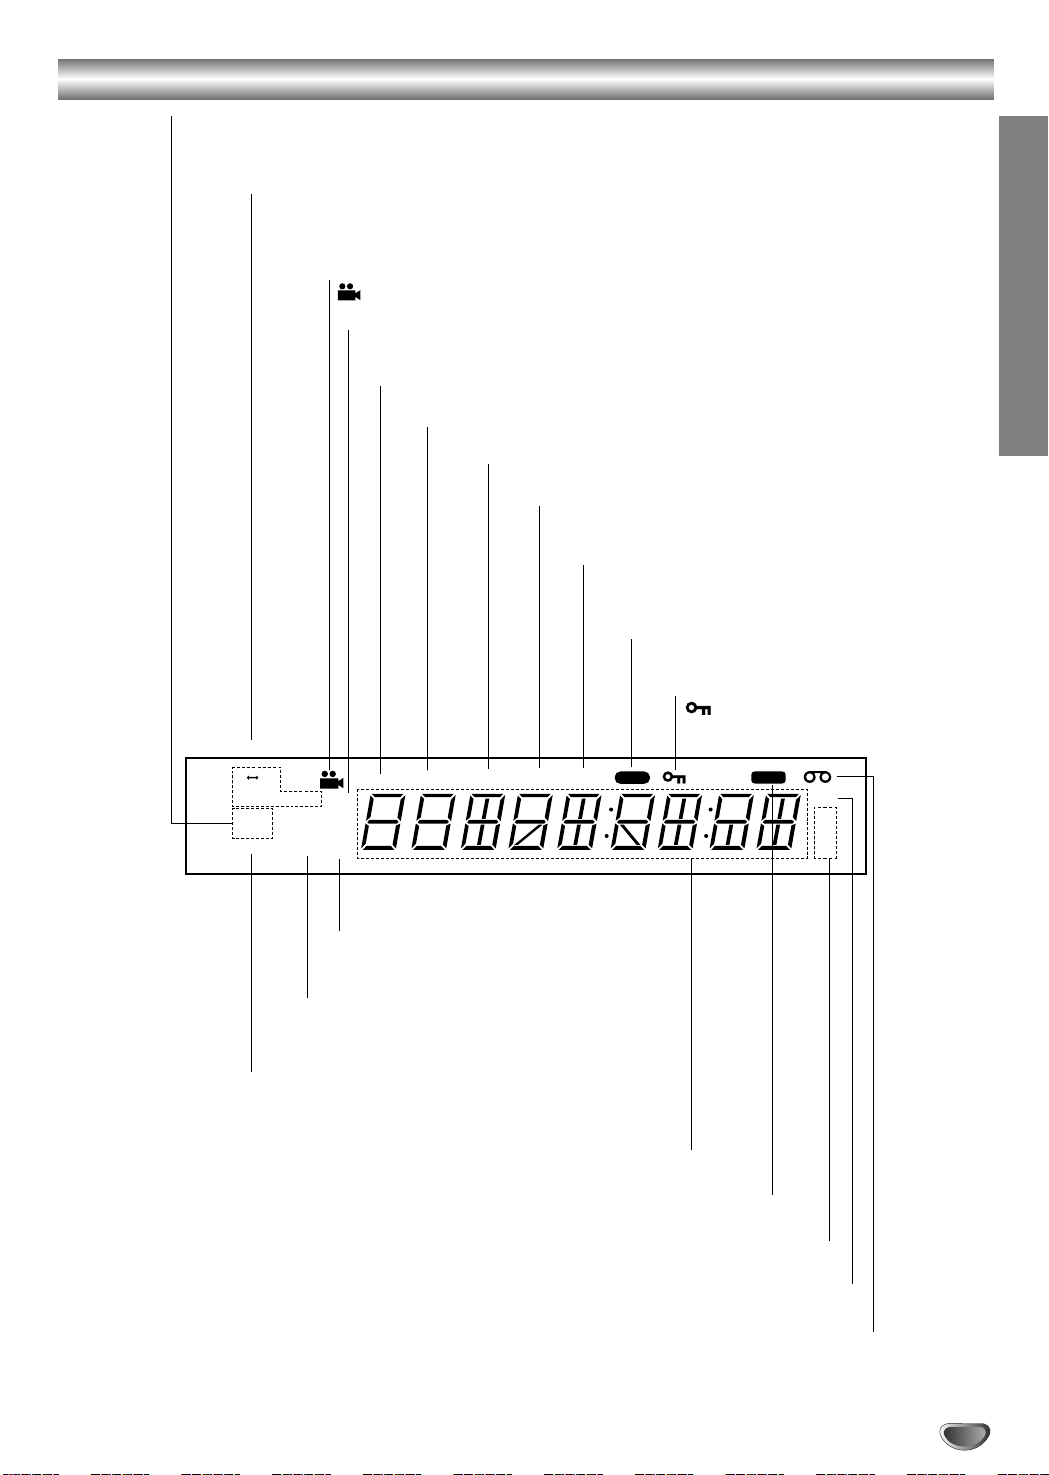
Display Window
DVD DVD inserted.
CD Audio CD inserted.
AyyB Indicates A-B repeat mode.
ALL Indicates repeat all mode.
ANGLE active.
MP3 MP3 disc inserted.
INTRODUCTION
PROG. Programmed playback active.
TITLE Indicates current title number.
CHP/TRK Indicates current chapter or track number.
VCR DVD+VCR functions are available and channels
are selected at DVD+VCR.
TIMER DVD+VCR is in timer recording or a timer
recording is programmed.
REC DVD+VCR is Recording.
AB
CD
DVD
ST
MP3ALL
CHSAP
TIMERVCRCHP/TRKTITLEPROG.
CH DVD+VCR is tuned to Channel XX.
SAP Indicates when a SAP BILINGUAL
broadcast is being received.
ST Indicates a stereo broadcast is
being received.
Indicates total playing time, elapsed time, remaining time or
current deck status (Playback, Pause, etc).
HI-FI Indicates the unit is playing back a tape recorded in Hi-Fi.
SP LP EP Displays the recording and playback speed.
AM Indicates AM time. (PM is not displayed.)
Front panel buttons are locked.
HI-FIREC
AM
SP
LP
EP
A cassette is in the VCR deck.
9
Page 10
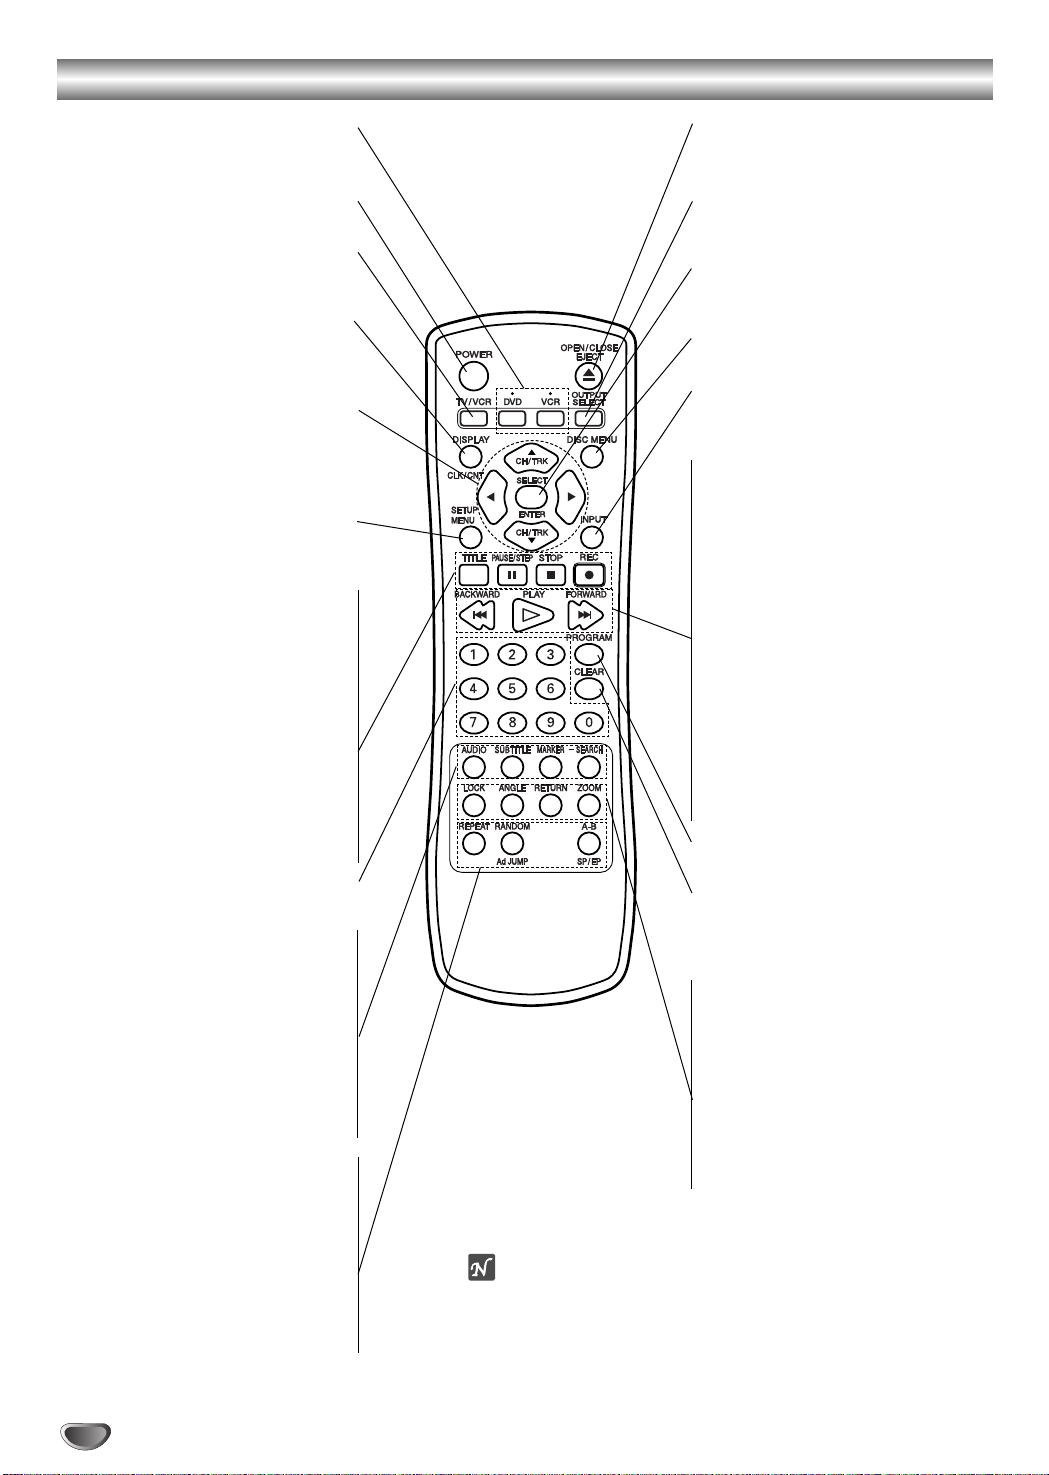
Remote Control
DVD/VCR select button
Select the output source (DVD or VCR)
to view on the TV screen.
POWER
Switches DVD+VCR ON and OFF.
TV/VCR
To view channels selected by the VCR
tuner or by the TV tuner.
DISPLAY, CLK/CNT
Switches among the clock, tape counter
and tape remaining modes on the display.
Accesses On-Screen display.
b/B/v/V (left/right/up/down)
- Selects an option in the menu
-
CH/TRK (v/V): Selects channel of VCR.
Adjusts manually the tape’s picture
onscreen.
SETUP, MENU
Accesses or removes DVD setup menu
and VCR menu.
TITLE
Displays the disc’s Title menu, if
available.
PAUSE/STEP (XX)
temporarily/press repeatedly for frame-
Pause playback or recording
by-frame playback.
STOP (xx)
Stops playback.
REC (zz)
Records normally or activates Instant
Timer Recording.
0-9 numerical buttons
Selects numbered options in a menu.
AUDIO
Selects an audio language (DVD) or an
audio channel (CD).
SUBTITLE
Selects a subtitle language.
MARKER
Marks any point during playback.
SEARCH
Displays MARKER SEARCH menu.
REPEAT
Repeat chapter, track, title, all.
RANDOM, Ad JUMP
- Plays tracks in random order.
- Fast forwards picture search through
30 seconds of recording.
A-B, SP/EP
- Repeats sequence.
- Selects recording speed
OPEN/CLOSE, EJECT (ZZ)
- Opens and closes the disc tray.
- Ejects the tape in the VCR deck.
OUTPUT SELECT
Cycles through the 3 main output views:
DVD, Tuner and VCR.
SELECT/ENTER
- Acknowledges menu selection.
- Displays functions on the TV screen.
DISC MENU
Accesses menu on a DVD disc.
INPUT
To select the VCR deck’s source (Tuner,
LINE 1, or LINE 2).
FORWARD (>>)
DVD; Search forward*/go to next chapter or track.
VCR; Advances the tape during the
STOP mode or for fast forward picture
search.
PLAY (HH)
Starts playback.
BACKWARD (..)
DVD; Search backward*/go to beginning
of current chapter or track or go to previous chapter or track.
VCR; Rewinds the tape during the
STOP mode or for fast reverse picture
search.
* Press and hold button for about two
seconds.
PROGRAM
Accesses or removes Program menu.
CLEAR
Removes a track number on the
program menu or a mark on the
MARKER SEARCH menu.
LOCK
Switch the Lock function on and off.
ANGLE
Selects a DVD camera angle if
available.
RETURN
Removes the setup menu.
ZOOM
Enlarges DVD video image.
Note
This remote control use the same buttons for VCR and DVD
functions (ex. PLAY).
When using a VCR, first press the VCR button.
When using a DVD, first press the DVD button.
10
Page 11
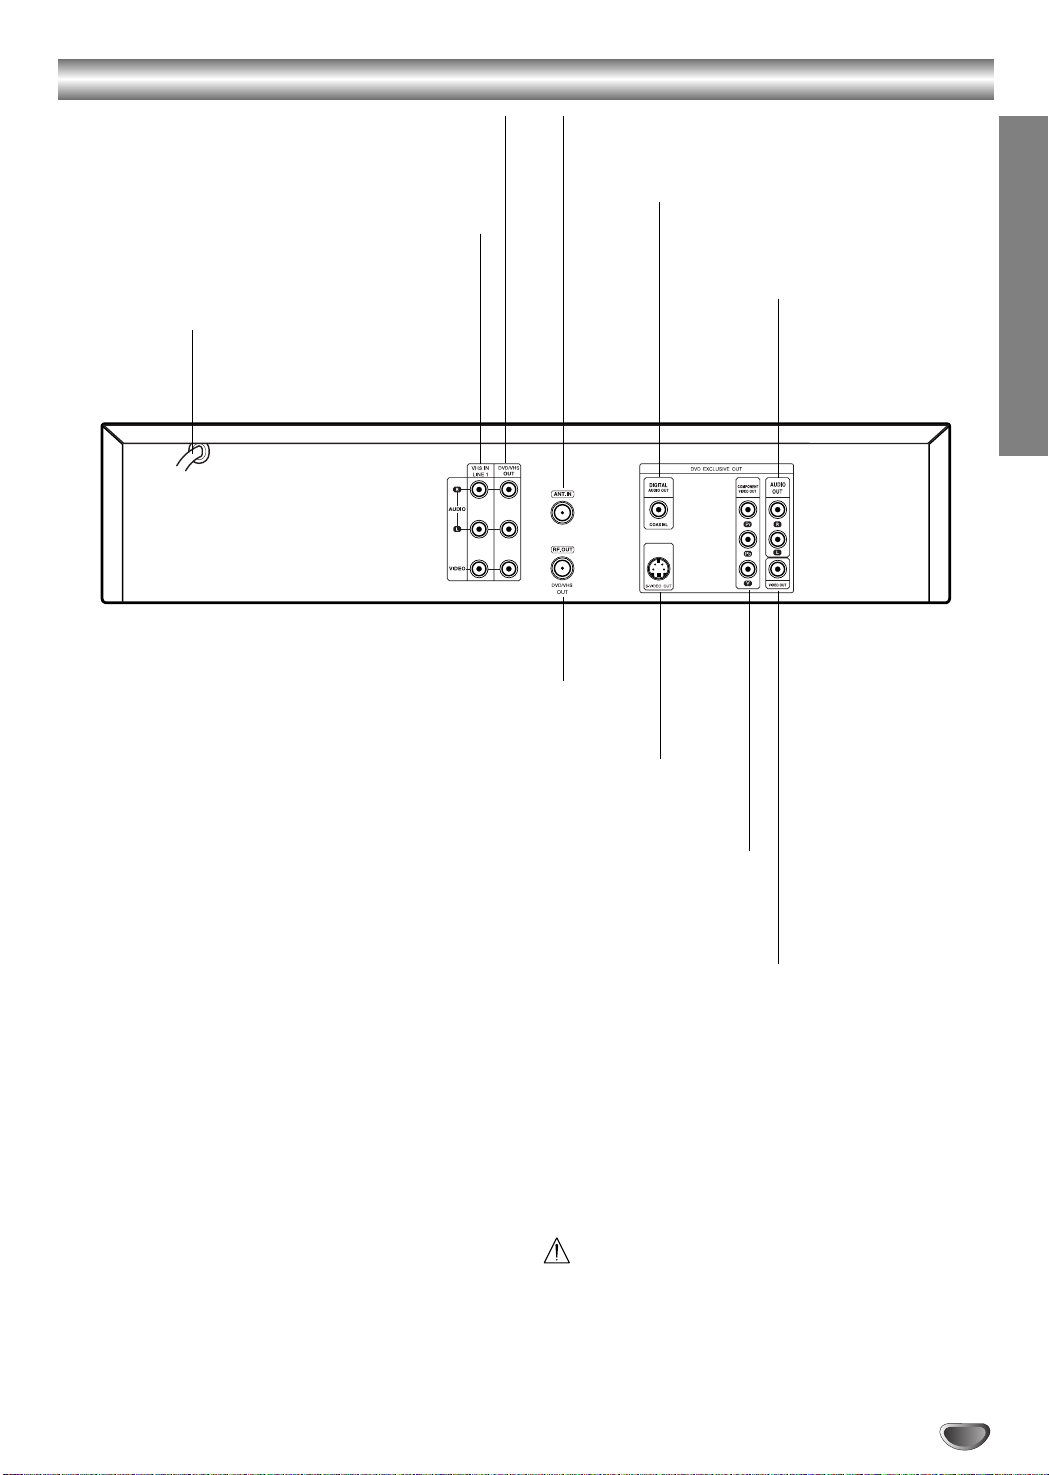
Rear Panel
DVD/VHS OUT (VIDEO/AUDIO (Left/Right))
Connect to a TV with video and audio inputs.
VHS IN LINE 1 (VIDEO IN/AUDIO IN (Left/Right))
Connect the audio/video output of an external
source (Audio system, TV/Monitor, Another VCR).
AC Power Cord
Plug into the power source.
RF OUT(DVD/VHS OUT)
Connect to a TV with RF coaxial inputs.
ANTENNA INPUT
Connect the VHF/UHF/CATV antenna to this
terminal.
DIGITAL AUDIO OUT (DVD OUT)
Connect to digital (coaxial) audio
equipment.
AUDIO OUT (Left/Right)
(DVD OUT)
Connect to a TV, amplifier, receiver, or stereo
system.
INTRODUCTION
S-VIDEO OUT (DVD OUT)
Connect to a S-Video Input on TV.
COMPONENT VIDEO OUT (Y Pb Pr) (DVD OUT)
Connect to a TV with Y Pb Pr inputs.
VIDEO OUT (DVD OUT)
Connect to a TV with video inputs.
Do not touch the inner pins of the jacks on the rear
panel. Electrostatic discharge may cause permanent
damage to the unit.
11
Page 12
Connections
Tips
Depending on your TV and other equipment you wish to
connect, there are various ways you could connect the
DVD+VCR. Use connections described on pages 12-14.
Please refer to the manuals of your TV, VCR, Stereo
System or other devices as necessary to make the best
connections.
For better sound reproduction, connect the DVD+VCR’s
DVD/VHS AUDIO OUT jack to the audio in jacks of your
amplifier, receiver, stereo or audio/video equipment. See
Connecting to optional equipment on page 14.
Caution
Make sure the DVD+VCR is connected directly to the TV.
Tune the TV to the correct video input channel.
Do not connect the DVD+VCR’s DVD/VHS AUDIO OUT
jack to the phono in jack (record deck) of your audio
system.
Do not connect your DVD+VCR via your VCR. The DVD
image could be distorted by the copy protection system.
Connecting Antenna/Cable TV to
DVD+VCR
Disconnect the antenna leads from the rear of the
11
TV.
Identify the type of cable from your antenna. If it is
22
a round cable as illustrated, it is a 75 ohm coaxial
antenna cable. This cable will connect directly to
the jack marked ANT.IN on your DVD+VCR.
Without Cable Box
If your cable wire is connected to your TV without a converter
or descrambler box, unscrew the wire from your TV and attach
it to the ANT.IN jack on the DVD+VCR. Use the supplied round
coaxial cable to connect between the DVD+VCR’s RF.OUT
jack and the 75 ohm antenna input jack on the TV. With this
connection, you can receive all midband, super band, and
hyperband channels.
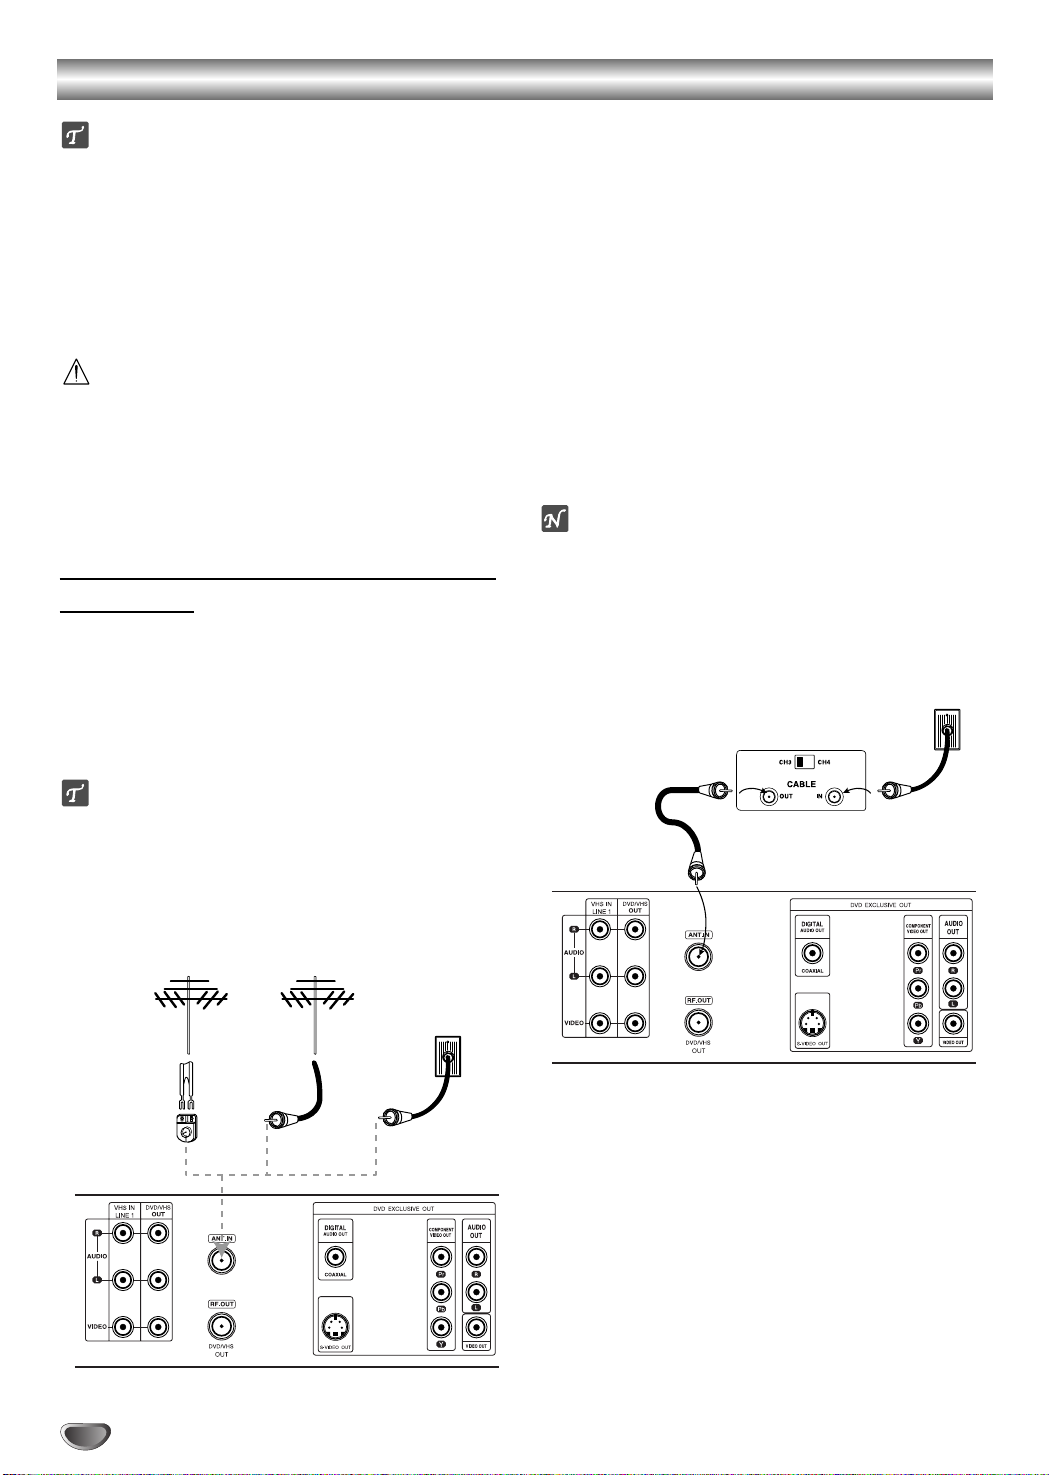
With Cable Box
If a converter is required in your cable system, follow the
instruction below:
The cable hookup permits both TV and DVD+VCR operation.
To view or record CATV channel
1 Tune the TV to the DVD+VCR output channel (CH 3 or 4).
2 Set the DVD+VCR channel selector to the output channel of
the Cable Converter box by pressing the CH/TRK (v/V) or
number (0-9) of your DVD+VCR. (Example: CH3)
3 Select the channel to view at the Cable Converter Box.
Notes
With this connection, you CANNOT record one program
while viewing another.
If you are using a cable box to tune channels, it is not nec-
essary to do Auto Channel Programming, (Auto Channel
Search) as indicated on page 16.
Cable TV
Wall Jack
Back Panel of
Typical Cable Box
Tip
If your antenna lead wire is a flat type antenna cable,
connect it to a Antenna Adaptor (300-ohm to 75-ohm)
(not supplied) and slip the Adaptor onto the ANT.IN
jack. The Adaptor does not screw on to the DVD+VCR,
it just slips over the jack.
Antenna Antenna
Cable TV
Wall Jack
Flat Wire
(300 ohm)
300/75 ohm
Adaptor
(Not supplied)
OR OR
Rear of DVD+VCR
Rear of DVD+VCR
12
Page 13

Connections (Continued)
Basic TV Connections
Make one of the following connections, depending on
the capabilities of your existing equipment.
RF coaxial connection
Connect the RF.OUT jack on the DVD+VCR to the
antenna in jack on the TV using the 75-ohm Coaxial
Cable supplied (R).
Note
If you use this connection, tune the TV to the
DVD+VCR’s RF output channel (CH 3 or 4).
How to set the DVD+VCR’s RF output channel
When the DVD+VCR is turned off,
CHANNEL (v/V) on the front panel for about five
seconds to change the RF output channel (CH 03 or
CH 04). “RF 03” or “RF 04” appears in the display
window.
Audio/Video connection
Connect the DVD/VHS VIDEO OUT jack on the
11
DVD+VCR to the video in jack on the TV using the
video cable supplied (V).
Connect the Left and Right DVD/VHS AUDIO OUT
22
jacks on the DVD+VCR to the audio left/right in
jacks on the TV (A1) using the supplied audio
cables.
Note
If you use this connection, set the TV’s source selector
to VIDEO.
Rear of TV
AUDIO INPUT
L
VIDEO
INPUT
R
ANTENNA
INPUT
press and hold
Optional, Preferred TV Connections
Notes
You can ONLY watch and listen to DVD playback
through the connections shown below.
For using S-VIDEO OUT or COMPONENT VIDEO OUT
jack, set the “TV Output Select” mode on the SETUP
menu to corresponding mode. See page 19.
Audio/Video connection
Connect the VIDEO OUT jack on the DVD+VCR to
11
the video in jack on the TV using the video cable
supplied (V).
Connect the Left and Right AUDIO OUT jacks of
22
the DVD+VCR to the audio left/right in jacks on the
TV using the audio cables supplied (A2).
S-Video connection
Connect the S-VIDEO OUT jack on the DVD+VCR
11
to the S-Video in jack on the TV using the optional
S-Video cable (S).
Connect the Left and Right AUDIO OUT jacks of
22
the DVD+VCR to the audio left/right in jacks on the
TV using the supplied audio cables (A2).
Component Video (Color Stream®) connection
Connect the COMPONENT VIDEO OUT jacks on
11
the DVD+VCR to the corresponding in jacks on the
TV using an optional Y Pb Pr cable (C).
Connect the Left and Right AUDIO OUT jacks of
22
the DVD+VCR to the audio left/right in jacks on the
TV (A2) using the supplied audio cables.
Rear of TV
S-VIDEO
INPUT
COMPONENT VIDEO INPUT
Pr
Pb
AUDIO INPUT
Y
L
VIDEO
INPUT
R
L
PREPARATION
A1 V R
Rear of DVD+VCR
S A2 VC
Rear of DVD+VCR
13
Page 14

Connections (Continued)
Optional, Preferred TV Connections
Note
You can ONLY listen to DVD playback using COAXIAL
(C) and AUDIO OUT (A2) connections. The tuner and
VCR will still be heard through the RF.OUT (R) or
DVD/VHS AUDIO OUT (A1) jack. (See previous page.)
Connecting to an amplifier equipped with two
channel analog stereo or Dolby Surround
Connect the Left and Right AUDIO OUT (or DVD/VHS
AUDIO OUT) jacks on the DVD+VCR to the audio left
and right in jacks on your amplifier, receiver, or stereo
system using the audio cables (A1, A2) supplied.
Connecting to an amplifier equipped with two
channel digital stereo (PCM) or to an Audio/Video
receiver equipped with a multi-channel decoder
(Dolby Digital™, MPEG 2, or DTS)
Connect one of the DVD+VCR’s DIGITAL AUDIO
11
OUT jacks (COAXIAL X) to the corresponding in
jack on your amplifier. Use an optional digital
(coaxial X) audio cable.
You will need to activate the DVD+VCR’s digital
22
output. (See Digital Audio Output on page 20).
Digital Multi-channel sound
A digital multi-channel connection provides the best
sound quality. For this you need a multi-channel
Audio/Video receiver that supports one or more of the
audio formats supported by your DVD+VCR (MPEG 2,
Dolby Digital and DTS). Check the receiver manual and
the logos on the front of the receiver.
Rear of DVD+VCR
A2A1 X
R
L
AUDIO INPUT DIGITAL INPUT
COAXIAL
Amplifier (Receiver)
Accessory Audio/Video (A/V) Connections to
DVD+VCR
Connect the VHS IN LINE1 or AV INPUT jacks on the
DVD+VCR to the audio/video out jacks on your
accessory component, using the optional audio/video
cables.
Accessory Component:
VCR, Camcorder,
Video Camera,
Satellite Receiver,
Laser Disc Player
Caution:
Due to the DTS Licensing agreement, the digital output
will be in DTS digital out when DTS audio stream is
selected.
Notes
If the audio format of the digital output does not match
–
the capabilities of your receiver, the receiver will
produce a strong, distorted sound or no sound at all.
– Six Channel Digital Surround Sound via digital con-
nection can only be obtained if your receiver is
equipped with a Digital Multi-channel decoder.
– To see the audio format of the current DVD in the on-
screen display, press AUDIO.
14
Jack panel of Accessory
AUDIO
OUTPUT
R
L
VIDEO
OUTPUT
OR
Rear of DVD+VCR Front of DVD+VCR
Page 15

Before Operation - VCR Part
MONTH : JANUARY
DAY : 1 TUE
YEAR : 2002
TIME : 12 : 00 AM
AUTO CLOCK SET: ON
PBS CH. : 2 TV
SELECT
TO EXIT PRESS
ADJUST
SELECT
TO EXIT PRESS
ENTER
SET CLOCK
TIMER RECORD
CHANNEL SETUP
VCR SETUP
PROGRAM 1
MONTH :
DAY :
START :
STOP :
CHANNEL :
SPEED :
REPEAT :
SELECT
TO EXIT PRESS
ADJUST
AUTO CHANNEL SEARCH
CHANNEL SOURCE:
ADD/DEL CH:
INPUT SLECT:
SELECT
TO EXIT PRESS
ADJUST
SCREEN DISPLAY: ON
LANGUAGE:
AUDIO MODE:
BROADCAST TYPE:
AUDIO OUTPUT:
On-Screen Display (OSD)
Some of these functions will be displayed every time the
VCR is operated.
❶❷❸ ❹ ❺
PLAY HI-FI CH 4
SP STEREO
JUL 5 , FRI 2:15 PM
❻❼
❶ TAPE SPEED DISPLAY
Shows the current tape speed.
❷ FUNCTION DISPLAY
Indicates the function in progress.
❸ HI-FI DISPLAY
Indicates when this unit is playing back tape recorded with
Hi-Fi.
❹ CHANNEL DISPLAY
I
ndicates the selected channel (or LINE1, LINE2).
❺ STEREO/SAP DISPLAY (MONO is not displayed)
Shows the type of audio signal received by the VCR tuner.
❻ DATE DISPLAY
Shows the current date. (Month/Date/Day of the week
format)
❼ CLOCK/COUNT/REMAIN DISPLAY
Shows the current time, the tape counter and remaining time
on the tape.
Setting the On-Screen Display
The SETUP, clock setting, and timer recordings are
accessed conveniently with On-Screen Menu Displays
that lead you through each step. The following pages
describe the On-screen selections to be set.
Menu Selection
Your VCR allows remote control adjustment of several
features.
Press MENU and the MAIN menu will appear.
11
Select the desired menu with v/V button and
22
then press SELECT/ENTER.
Note
Menus remain on-screen for 3 minutes.
SET CLOCK (page 17)
PREPARATION
Each press of the SELECT/ENTER changes the TV
screen in the following sequence.
One press Two presses Three presses
STOP CH 4
SP
JUL 05 , FRI 2:15 PM
After 3 seconds
2:15 PM
Press
SELECT/ENTER
STOP CH 4
SP
M 0:35:40
After 3 seconds
M 0:35:40
Press
SELECT/ENTER
STOP CH 4
SP
After 3 seconds
Press
SELECT/ENTER
All indicator are turned off.
Notes
The function displays can be seen displayed on the TV
screen for 3 seconds.
The clock (or tape counter, tape remaining) mode will contin-
ue until you press SELECT/ENTER.
The tape counter and the remaining tape length indicator
appear only when a cassette is inserted. Also, the remaining
tape length indicator appears after any tape operation.
REM 1:56
REM 1:56
MAIN MENU
TIMER RECORD (page 23)
CHANNEL SETUP (page 16)
VCR SETUP (page 16)
15
Page 16

Before Operation - VCR Part (Continued)
SELECT
TO EXIT PRESS
ENTER
SET CLOCK
TIMER RECORD
CHANNEL SETUP
VCR SETUP
SELECT
TO EXIT PRESS
ADJUST
SCREEN DISPLAY: ON
LANGUAGE:
AUDIO MODE:
BROADCAST TYPE:
AUDIO OUTPUT:
SET CLOCK
TIMER RECORD
CHANNEL SETUP
VCR SETUP
SELECT
TO EXIT PRESS
ENTER
AUTO CHANNEL SEARCH
CHANNEL SOURCE:
ADD/DEL CH:
INPUT SLECT:
Setting the VCR Setup Menu
Press MENU and the MAIN menu will appear.
11
Press vv/VVto select the VCR SETUP menu, then
22
press SELECT/ENTER.
The VCR SETUP menu will appear.
Press vv/VVto choose a desired option on the
33
VCR SETUP menu. Then press bb/BBto choose a
desired setting.
SCREEN DISPLAY
The on-screen display of this DVD+VCR can be turned on or off.
SCREEN DISPLAY can be switched between ON and OFF
by pressing b/B.
LANGUAGE
The on-screen programming of this DVD+VCR can be
displayed in either English, Spanish, or French.
LANGUAGE can be switched among ENGLISH, SPANISH
and FRENCH by pressing b/B.
AUDIO MODE
The DVD+VCR has two separate audio playback systems, the
high quality VHS Hi-Fi system and standard NORMAL mono
system. The same audio is generally recorded on both
systems. The VHS Hi-Fi system plays on separate (left and
right) channels, and the NORMAL system plays monaural
sound. The normal track is always played so the cassette can
be played on a DVD+VCR that does not have VHS Hi-Fi.
AUDIO MODE can be switched between HI-FI and
NORMAL by pressing b/B.
BROADCAST TYPE (STEREO/SAP/MONO)
Multichannel Television Sound (MTS) carries stereo and/or
Second Audio Program (SAP) bilingual signals. Set this display to
the desired position when both MTS stereo and SAP signals are
received. When only one of the MTS signal is received, the
DVD+VCR automatically selects the corresponding receiving
mode (Stereo or SAP) regardless of the selected position. For
normal operation, the display should be in the STEREO position.
The DVD+VCR will then record a STEREO program when available,
and record a mono program IF the program is NOT IN STEREO.
For weak STEREO and/or SAP broadcasts, changing the display to mono may give clearer sound.
BROADCAST TYPE can be switched among STEREO, SAP,
and MONO by pressing b/B.
AUDIO OUTPUT (STEREO/LEFT/RIGHT)
Used during playback [when AUDIO MODE (HI-FI/NORMAL) is
in HI-FI position] for selecting the audio output signals from the
AUDIO OUT terminals (L ch and R ch), and RF.OUT.
This display setting should normally be left in the stereo position, so that when a stereo tape is played, the stereo sound will
be heard through the left and right channels. If a mono tape is
played and the audio output is set to stereo, the same mono
sound will be heard from both left and right channels.
AUDIO OUTPUT can be switched among STEREO, LEFT,
and RIGHT by pressing b/B.
16
Channel Selection
This DVD+VCR is equipped with a frequency
synthesized tuner capable of receiving up to 181
channels. These include VHF channels 2-13, UHF
channels 14-69 and CATV channels 1-125.
Preparation:
Connect the DVD+VCR to the desired type of antenna or
cable TV system, as shown in Connecting Antenna/Cable TV
to DVD+VCR on page 12.
AUTO CHANNEL PROGRAMMING
Press MENU and the MAIN menu will appear.
11
Press vv/VVto select the CHANNEL SETUP menu,
22
then press SELECT/ENTER.
The CHANNEL SETUP menu will appear.
Press VVto choose the INPUT SELECT option,
33
then press bb/BBto select TUNER.
Press b/B repeatedly to switch among TUNER, LINE1
and LINE2.
Press vv/VVto choose the AUTO CHANNEL SEARCH
44
option, then press bb/BBto set the channel.
The tuner will automatically cycle through all
available channels in the area and place them in
the tuner’s memory.
After the AUTO CHANNEL SEARCH PROCEED-
55
ING is complete, make sure the CHANNEL
SOURCE is set appropriately (TV or CATV) by
pressing vv/VVand choosing the correct CHANNEL SOURCE (TV or CATV) by pressing bb/
using the CHANNEL SETUP menu.
Remember, TV is for the air antenna reception,
CATV is for cable or wireless cable connection.
Press MENU to return to the TV screen.
BB
66
Use CH/TRK (vv/VV) or CHANNEL (vv/VV) on the
77
front panel to cycle the DVD+VCR through the
channels in memory.
TO ADD OR ERASE CHANNELS FROM MEMORY
This feature allows you to add or erase channels from
memory manually.
1 Press VVto choose the ADD/DEL CH option on the
CHANNEL SETUP menu. Press b/B to select a
channel to add or erase.
2 Press SELECT/ENTER to add or erase the channel.
Repeat steps 1 and 2 to add or erase channels.
3 Press MENU to return to the TV screen.
Page 17

Before Operation - VCR Part (Continued)
SELECT
TO EXIT PRESS
ENTER
SET CLOCK
TIMER RECORD
CHANNEL SETUP
VCR SETUP
MONTH : JANUARY
DAY : 1 TUE
YEAR : 2002
TIME : 12 : 00 AM
AUTO CLOCK SET: ON
PBS CH. : 2 TV
SELECT
TO EXIT PRESS
ADJUST
SELECT
TO EXIT PRESS
ENTER
SET CLOCK
TIMER RECORD
CHANNEL SETUP
VCR SETUP
MONTH : JANUARY
DAY : 1 TUE
YEAR : 2002
TIME : 12 : 00 AM
AUTO CLOCK SET: ON
PBS CH. : 2 TV
SELECT
TO EXIT PRESS
ADJUST
Setting the Clock
The DVD+VCR gives you two ways to set the time and
date: the Auto Clock Feature or manually. The Auto
Clock Feature enables the DVD+VCR to set up the clock
when the DVD+VCR is turned off.
Things to know before starting
The clock uses the 12-hour system. (Be sure to set AM
and PM correctly.)
The initial Clock Setting is JANUARY 1, 2002, 12:00 AM.
Auto Clock Set
The Auto Clock Set feature is set to ON at the factory. In the
ON setting, the DVD+VCR looks for a channel carrying XDS
(Extended Data Services) information. XDS updates the clock
using the Coordinated Universal Time.
The Auto Clock Feature enables the DVD+VCR to set up
the clock when the DVD+VCR is turned off.
Press MENU and the MAIN menu will appear.
11
Press vv/VVto choose the SET CLOCK menu.
22
Press SELECT/ENTER and the SET CLOCK
menu will appear.
Manual Clock Set
Example: July 5, 2002 ; 2:15 AM
Press MENU and the MAIN menu will appear.
11
Press vv/VVto choose the SET CLOCK menu.
22
Press SELECT/ENTER and the SET CLOCK
menu will appear.
Press bb/BBto choose the month.
33
Press VVto choose the DAY option.
44
Use bb/BBto choose the day.
The day of the week will display automatically.
Press VVto choose the YEAR option.
55
Use bb/BBto choose the year.
Press VVto choose the TIME option.
66
Use bb/BBto choose the time.
Press MENU when finished.
77
PREPARATION
Press VVto choose the AUTO CLOCK SET
33
option.
Press bb/BBto choose ON.
The Auto Clock Set feature is set to ON at the factory. In
the ON setting, the DVD+VCR looks for a channel
carrying XDS (Extended Data Services) information. XDS
updates the clock using the Coordinated Universal Time.
Press VVto choose the PBS CH. option.
44
Press bb/BBto choose channel of PBS
broadcast.
Press MENU when finished.
55
Note
There are cases where the TV station does not send or sends
wrong date and/or time information and the DVD+VCR sets the
incorrect time.
If this happens we recommend that you set the clock manually.
Note
If setting the clock manually, “AUTO CLOCK SET” must
set to “OFF”.
If set to “ON”, an incorrect date and/or time will be
entered again when the DVD+VCR is turned off.
17
Page 18

Before Operation - DVD Part
1
1
0:16:57
1 ENG
D
6 CH
OFF
1
NORM.
1
16:57
STER.
NORM.
General Explanation
This manual gives the basic instructions for operating
the DVD+VCR. Some DVDs require specific operation
or allow only limited operation during playback. When
this occurs, the symbol appears on the TV screen,
indicating that the operation is not permitted by the
DVD+VCR or is not available on the disc.
On-Screen Display
The general playback status can be displayed on the
TV screen. Some options can be changed on the menu.
On-screen display operation
Press DISPLAY during playback.
11
Use vv/VVto select an option.
22
The selected option will be highlighted.
Use bb/BBto change the setting of an option.
33
The number buttons can be also be used for setting
numbers (e.g., title number). For some functions,
press SELECT/ENTER to execute the setting.
DVD
Temporary Feedback Field Icons
TITLE
Repeat Title (DVD)
CHAPT
Repeat Chapter (DVD)
TRACK
Repeat Track (CD)
ALL
Repeat All Tracks (CD)
A B
Repeat A-B
OFF
Repeat Off
Resume play from this point
Action prohibited or not available
Notes
Some discs may not provide all of the features on the
on-screen display example shown below.
If no button is pressed for 10 seconds, the on-screen
display disappears.
Options
Title Number
Chapter Number
Time search
Audio language
and Digital Audio
Output mode
Subtitle language
Angle
Sound
CD
Options
Track Number
Time
Audio Channel
Sound
Function (Press
Shows the current title number and,
skips to the desired title number.
Shows the current chapter number and,
skips to the desired chapter number.
Shows the elapsed playing time and,
searches the point by the elapsed time directly.
Shows the current audio soundtrack language,
encoding method, and channel number, and
changes the setting.
Shows the current subtitles language, and
changes the setting.
Shows the current angle number and,
changes the angle number.
Shows the current sound mode, and
changes the setting.
Function (Press
Shows the current track number and,
skips to the desired track number.
Shows the elapsed playing time (Display only)
Shows the audio channel, and
changes the audio channel.
Shows the current sound mode, and
changes the setting.
vv/VV
to select desired option)
vv/VV
to select desired option)
Selection Method
bb/BB
bb/BB
bb/BB
, AUDIO
bb/BB
, SUBTITLE
bb/BB
, ANGLE
bb/BB
,or
,or
Numeric, SELECT/ENTER
Numeric, SELECT/ENTER
Numeric, SELECT/ENTER
Selection Method
bb/BB
bb/BB
,or
–
, AUDIO
bb/BB
Numeric, SELECT/ENTER
18
Page 19

Before Operation - DVD Part (Continued)
Initial Settings
You can set your own Personal Preferences on the
DVD+VCR.
General Operation
Press SETUP.
11
The setup menu appears.
Disc Audio
Disc Subtitle
Disc Menu
Rating
Password
TV Aspect
Menu Language
TV Output Select
Digital Audio Output
5.1 Speaker Setup
Others
Use vv/VVto select the desired option.
22
The screen will show the current setting for the
selected option, as well as alternate setting(s).
While the desired option is selected, press BB,
33
then vv/VVto select the desired setting.
Press SELECT/ENTER to confirm your selection.
44
Some options require additional steps.
Press SETUP, RETURN, or PLAY (HH) to exit the
55
setup menu.
Language
Disc Language
Select a language for the disc’s Menu, Audio, and
Subtitle.
Original : The original language set for the disc is selected.
Other : To select another language, press number buttons to
enter the corresponding 4-digit number according to the language code list on page 36. If you enter the wrong language
code, press CLEAR.
DVD
Disc Audio
Disc Subtitle
Disc Menu
Rating
Password
TV Aspect
Menu Language
TV Output Select
Digital Audio Output
5.1 Speaker Setup
Others
Original
English
French
German
Spanish
Italian
Chinese
Polish
Hungarian
Russian
Other — — — —
Original
English
French
German
Spanish
Italian
Chinese
Polish
Hungarian
Russian
Other — — — —
Menu Language
Select a language for the setup menu. This is the menu
you see when you press SETUP.
Disc Audio
Disc Subtitle
Disc Menu
Rating
Password
TV Aspect
Menu Language
TV Output Select
Digital Audio Output
5.1 Speaker Setup
Others
English
Spanish
French
Picture
TV Aspect
4:3 Letterbox: Select when a standard 4:3 TV is con-
nected. Displays theatrical images with masking bars
above and below the picture.
4:3 Panscan: Select when a standard 4:3 TV is connected. Displays pictures cropped to fill your TV screen.
Both sides of the picture are cut off.
16:9 Wide: Select when a 16:9 wide TV is connected.
TV Output Select
It is used to select the video output source, either
S-VIDEO OUT jack or COMPONENT VIDEO OUT
jacks.
S-Video: Select when you use S-VIDEO jack for TV
connection.
Component: Select when you use COMPONENT VIDEO OUT
jacks for TV connection.
DVD
Disc Audio
Disc Subtitle
Disc Menu
Rating
Password
TV Aspect
Menu Language
TV Output Select
Digital Audio Output
5.1 Speaker Setup
Others
DVD
Disc Audio
Disc Subtitle
Disc Menu
Rating
Password
TV Aspect
Menu Language
TV Output Select
Digital Audio Output
5.1 Speaker Setup
Others
4:3 Letterbox
4:3 Panscan
16:9 Wide
S-Video
Component
PREPARATION
19
Page 20

Before Operation - DVD Part (Continued)
Sound
Digital Audio Output
Each DVD disc has a variety of audio output options.
Set the DVD+VCR’s Digital Audio Output according to
the type of audio system you use.
DOLBY DIGITAL/PCM: Select DOLBY DIGITAL/PCM if
you connected the DVD+VCR’s DIGITAL AUDIO OUT
jack to a Dolby Digital decoder (or an amplifier or other
equipment with a Dolby Digital decoder).
Stream/PCM: Select Stream/PCM if you connected the
DVD+VCR’s DIGITAL AUDIO OUT jack to an amplifier
or other equipment with a DTS decoder, Dolby Digital
decoder or MPEG decoder.
PCM: Select when connected to a 2 channel digital
stereo amplifier. The DVD+VCR output sounds in the
PCM 2ch format when you play a DVD video disc
recorded with a Dolby Digital, MPEG1, or MPEG2
recording system.
DOLBY
/PCM
Disc Audio
Disc Subtitle
Disc Menu
Rating
Password
TV Aspect
Menu Language
TV Output Select
Digital Audio Output
5.1 Speaker Setup
Others
DIGITAL
Stream/PCM
PCM
Others
The DRC and Vocal settings can be changed.
Use v/V to select the desired option and press
SELECT/ENTER. The setting of the selected option
is changed between On and Off.
Disc Audio
Disc Subtitle
Disc Menu
Rating
Password
TV Aspect
Menu Language
TV Output Select
Digital Audio Output
5.1 Speaker Setup
Others
Dynamic Range Control (DRC)
With the DVD format, you can hear a program’s soundtrack in the most accurate and realistic presentation
possible, thanks to digital audio technology. However,
you may wish to compress the dynamic range of the
audio output (the difference between the loudest sounds
and the quietest ones). Then, you may listen to a movie
at a lower volume without losing clarity of sound. Set
DRC to On for this effect.
Vocal
Set Vocal to On only when a multi-channel karaoke
DVD is playing. The karaoke channels on the disc will
mix into normal stereo sound.
DRC Off
Vocal On
20
Page 21

Before Operation - DVD Part (Continued)
Parental Control
Rating
Movies on DVDs may contain scenes not suitable for
children. Therefore, discs may contain Parental Control
information that applies to the complete disc or to
certain scenes on the disc. These scenes are rated
from 1 to 8, and alternatively, more suitable scenes are
available for selection on some discs. Ratings are
country dependent. The Parental Control feature allows
you to prevent discs from being played by your children
or to have certain discs played with alternative scenes.
11
DVD
Disc Audio
Disc Subtitle
Disc Menu
Rating
Password
TV Aspect
Menu Language
TV Output Select
Digital Audio Output
5.1 Speaker Setup
Others
8
7
6
5
4
3
2
1
Unlock
Select Rating on the Setup menu using vv/
buttons.
While Rating is selected, press BB.
VV
22
When you have not entered a password yet.
33
Go to step 4.
When you have already entered a password;
Enter a 4-digit password using the numerical buttons to confirm the personal 4-digit security password, then press SELECT/ENTER.
If you make a mistake before pressing SELECT/ENTER,
press CLEAR and enter 4-digit security password again.
Select a rating from 1 to 8 using vv/VVbuttons.
44
One (1) has the least playback restrictions.
Eight (8) has the most playback restrictions.
Unlock: If you select Unlock, Parental Control is
not active. The disc will play in full.
Ratings 1 to 8: Some discs contain scenes not
suitable for children. If you set a rating for the
DVD+VCR, all disc scenes with the same rating or
lower will be played. Higher rated scenes will not be
played unless an alternative scene is available on
the disc. The alternative must have the same rating
or a lower one. If no suitable alternative is found,
playback will stop. You must enter the 4-digit password or change the rating level in order to play the
disc.
Press SELECT/ENTER to confirm your rating
55
selection, then press SETUP to exit the menu.
Password
DVD
If you change the rating level to 7 or lower, you must
enter a 4-digit password to prevent playback of discs
with higher ratings.
Disc Audio
Disc Subtitle
Disc Menu
Rating
Password
TV Aspect
Menu Language
TV Output Select
Digital Audio Output
5.1 Speaker Setup
Others
New
— — — —
Select Password using vv/VVbuttons on the
11
setup menu.
While Password is selected, press B.
22
Enter a 4-digit password using the numerical
33
buttons to create a personal 4-digit security
password, then press SELECT/ENTER.
Do not forget your password.
Enter the 4-digit password again and press
44
SELECT/ENTER to verify.
Setting is complete.
Note
Confirmation of the 4-digit password is necessary when
the password is changed (see Changing the 4-digit
password below ).
Changing the 4-digit password
1 Press SETUP to display the setup menu.
2 Press VVto select Password.
3 While Password is selected, press B.
4 Enter the old password, then press SELECT/ENTER.
5 Select Change using vv/VVbuttons then press
SELECT/ENTER.
6 Enter the new 4-digit password, then press
SELECT/ENTER.
7 Enter exactly the same password a second time and
verify by pressing SELECT/ENTER.
8 Press SETUP to exit the menu.
If you forget your 4-digit password
If you forget your password, to clear the current password, follow the procedure below.
1 Press SETUP to display the setup menu.
2 Press VVto highlight “Password”.
3 Enter the 6-digit number 210499 and then press
SELECT/ENTER.
The 4-digit password is cleared.
4 Enter a new password as shown above.
PREPARATION
21
Page 22

Operation with tape
Normal Playback
Preparation:
Turn on the TV.
Tune the TV to the DVD+VCR output channel (CH 3 or 4) or
set the TV’s source selector to VIDEO.
If a direct VIDEO/AUDIO connection is made between the
DVD+VCR and the TV, set the TV’s source selector to VIDEO.
Set the Output Source to VCR as shown in Setting the
Output Source on page 7.
Insert a prerecorded video cassette.
11
The indicator will light and the DVD+VCR will
power-up automatically.
Make sure that the TIMER indicator in the display
window is not lighted. If it is, press POWER once.
If a tape without a safety tab is inserted, the unit will
start playback automatically.
Press PLAY (HH) once.
22
PLAY appears on the TV screen .
It is not necessary to select the tape speed for play-
back. It will be automatically selected by the DVD+VCR.
In playback, the TV/VCR selector switches to VCR
mode automatically.
Press STOP (xx) to stop playback.
33
STOP appears on the TV screen.
If the tape reaches the end before STOP (x) is
pressed, the DVD+VCR will automatically stop, rewind,
eject, and it will turn itself off.
Tracking Control
Auto Tracking
The automatic tracking function adjusts the picture to
remove snow or streaks.
The AUTO TRACKING function works in the following
cases:
A tape is played back for the first time.
Tape speed (SP, LP, EP) changes.
Streaks or snow appear because of scratches on the tape.
Manual Tracking
If noise appears on the screen during playback, press
either
CH/TRK (vv/VV)
CHANNEL (vv/VV) on the front panel until the noise on
the screen is reduced.
In case of vertical jitter, adjust these controls very carefully.
Tracking is automatically reset to normal when the tape is
ejected or the power cord is unplugged for more than 3 seconds.
on the remote control or
Special Effect Playbacks
Search
This function lets you quickly and visually search for a
desired tape section in either direction: forward and
reverse.
1 Press BACKWARD (.) or FORWARD (>)
during playback.
The DVD+VCR will be activated in the SEARCH
mode.
If the DVD+VCR is left in the SEARCH mode for more
than 3 minutes, the DVD+VCR will automatically enter the
PLAY mode, to protect the tape and video heads.
2 To return to playback, press PLAY (H).
Still Picture and Frame-by-Frame Playback
1 Press PAUSE/STEP (X) during playback.
Still picture will appear on the TV screen.
If a still picture vibrates vertically, stabilize it by pressing
CH/TRK (v/V)
If the DVD+VCR is left in the STILL mode for more than 5
minutes, the DVD+VCR will automatically enter the STOP
mode to protect the tape and video heads.
2
Press PAUSE/STEP (X) repeatedly to advance the
on the remote control.
video picture one frame at a time while viewing a still
picture.
3 To return to playback, press PLAY (H).
Slow Motion
1 While in still mode, press FORWARD (>).
The tape will be played back at a speed 1/19 times
slower than the normal speed.
During slow playback, use CH/TRK (v/V) on the Remote
Control to minimize noise bands.
If slow motion mode continues for more than 30 seconds,
the DVD+VCR will automatically change to playback
mode.
2 To return to playback, press PLAY (H).
Ad JUMP (Advertisement Jump)
This is useful for skipping commercials or short program
segments.
1 Press Ad JUMP during the playback mode.
The tape will fast forward picture search through 30
seconds of recording.
The skipping time can be extended by pressing Ad JUMP.
Subsequent presses result in advancing the fast forward
picture search time by 30-second increments (maximum 2
minutes).
2 When the search is completed, the DVD+VCR will go
into playback mode automatically.
Special effects playback notes
Horizontal lines (noise bars) will appear on the TV screen. This
is normal.
The audio is automatically muted during special effect modes,
so there is no sound during search.
During the high-speed picture search modes, a short period is
needed to stabilize tape speed when re-entering the PLAY
mode. Slight interference may be observed during this period.
22
Page 23

Operation with tape (Continued)
Normal Recording
Preparation:
Turn on the power of both the DVD+VCR and TV.
Tune the TV to the DVD+VCR output channel (CH 3 or 4) or
set the TV’s source selector to VIDEO.
If a direct VIDEO/AUDIO connection is made between the
DVD+VCR and the TV, set the TV’s source selector to
VIDEO.
Insert a video cassette that the safety tab intact.
11
Select the desired channel by using CH/TRK
22
(vv/VV).
If you are recording from another source via audio/video
input jacks (at the Rear or Front panel), select the
LINE1 or LINE2 by pressing INPUT.
Set the desired recording speed (SP or EP) by
33
pressing SP/EP.
This DVD+VCR is not designed to record in LP mode.
Set the MTS mode as desired (See page 16, 26).
44
Press REC (zz) once.
55
Recording will start. (The REC indicator will light in
the display window.)
If a cassette with no safety tab is loaded, the cassette
will be ejected automatically.
Press STOP (xx) to stop recording.
66
If the tape reaches the end before STOP (x) is pressed,
the DVD+VCR will automatically stop, rewind, eject, and it
will turn itself off.
To pause the recording
1 Press PAUSE/STEP (X) to pause the tape during
recording.
The REC indicator will flash in the display window.
2 When you want to continue recording, press
PAUSE/STEP (X) or press REC (zz).
After 5 minutes in pause mode, the tape will be stopped
automatically to protect the tape and the video heads.
To record one TV program while
watching another
1 Press TV/VCR to select the TV mode during record-
ing.
The VCR indicator disappears.
2 Using the TV, select the channel to be viewed.
Tips
Always use PAUSE/STEP (X) for best results when making
changes during recording.
For example: To change channels during recording, first press
PAUSE/STEP (
the desired channel on the DVD+VCR, and press
PAUSE/STEP (X) again to resume recording.
X) to put the unit in pause mode. Then select
Timer Recording
This DVD+VCR can be programmed to record up to 8
programs within a period of 1 year. For unattended
recording, the timer needs to know the channels to be
recorded and the starting and ending times.
Things to know before starting
If you try to set the program timer before setting the clock,
PLEASE SET THE CLOCK appears for a moment and
then SET CLOCK menu appears on the TV screen. Set the
time and date before proceeding.
Make sure a tape is in the DVD+VCR and the safety tab is
in place or the tape will be automatically ejected.
Preparation:
Turn on the power of both the DVD+VCR and the TV.
Be sure the TV is set to the DVD+VCR output channel (3 or 4).
Make sure the CHANNEL SOURCE in the CHANNEL
SETUP menu is set appropriately (TV or CATV).
Press MENU and the MAIN menu will appear.
11
Use vv/VVto choose the TIMER RECORD menu.
22
Press SELECT/ENTER to go to the TIMER
33
RECORD menu.
The TIMER RECORD menu will appear.
If all programs have already been entered, MAX
NUMBER OF EVENTS SCHEDULED message will
appear for a moment and then PROGRAM 1 will
appear on the TV screen.
SET CLOCK
TIMER RECORD
CHANNEL SETUP
VCR SETUP
SELECT
TO EXIT PRESS
Use bb/BBto choose the PROGRAM No. (1-8).
ENTER
PROGRAM 1
MONTH :
DAY :
START :
STOP :
CHANNEL :
SPEED :
REPEAT :
SELECT
TO EXIT PRESS
ADJUST
44
Use VVto choose the MONTH option.
55
Use bb/BBto choose the desired month.
Use VVto choose the DAY option.
66
Use bb/BBto choose the desired day.
Use VVto choose the START option.
77
Use bb/BBto choose the desired start time.
Use VVto choose the STOP option.
88
Use bb/BBto choose the desired stop time.
Use VVto choose the CHANNEL option.
99
Use bb/BBto choose the desired channel
(Channel, LINE1 or LINE2).
Cable Users: If you have CABLE TV and used Cable Box
in Connecting Antenna/Cable TV to DVD+VCR (page 12),
using a cable box converter, you must set the channel in
this step to match the cable box output channel (usually
CH 3 or 4). Change channels on the cable box instead of
with the DVD+VCR.
OPERATION
23
Page 24

Operation with tape (Continued)
Use VVto choose the SPEED option.
1100
Use bb/BBto choose the desired recording
speed (AUTO, SP or EP).
AUTO mode determines how much tape is left and
switches speed from SP to EP, if necessary, to complete recording the program. There will be some picture and sound distortion at the point of the speed
change.
Use VVto choose the REPEAT option.
1111
Use bb/BBto choose the desired repeat (ONCE,
WEEKLY, or DAILY).
ONCE event....for recording up to 8 programs on a
single day or over the days within a period of 1 year.
WEEKLY event....for recording up to 8 programs on a
certain day of every week.
DAILY event....for recording up to 8 programs at the
same time(s) Monday through Friday.
PROGRAM 1
MONTH : JULY
DAY : 6 SAT
START : 6 : 00 PM
STOP : 7 : 30 PM
CHANNEL : 4 TV
SPEED : SP
REPEAT : ONCE
SELECT
TO EXIT PRESS
ADJUST
Tip
If the input data is wrong, use vvto select the data
and correct it using bb/BB.
Press MENU, the program will be memorized
1122
at the DVD+VCR.
If the program preset time is past, the EVENT
SCHEDULED IN THE PAST message will appear on
the TV screen. Return to the incorrect program and
program it with the correct time.
If you had entered a past date, the timer recording
will be performed on that date of the next year.
Additional programs may be entered by repeating
steps 1-12.
Cable Users: If your cable hookup is via a TV converter box, you can program multiple recordings only on
the converter box output channel. This is because the
converter determines what channel you view through
your DVD+VCR.
Turn the DVD+VCR off for timer recording to
1133
take place.
Checking (Erasing) the Timer Program
Programming can be checked whenever the DVD+VCR
is turned on.
1 Press MENU and the MAIN menu will appear.
2 Use v/V to choose the TIMER RECORD menu.
Press SELECT/ENTER and the PROGRAM menu
will appear.
SET CLOCK
TIMER RECORD
CHANNEL SETUP
VCR SETUP
SELECT
TO EXIT PRESS
ENTER
PROGRAM 1
MONTH : JULY
DAY : 6 SAT
START : 6 : 00 PM
STOP : 7 : 30 PM
CHANNEL : 4 TV
SPEED : SP
REPEAT : ONCE
TO ERASE PRESS
TO EXIT PRESS
3 Use b/B to select a program you want to check or
erase. If you want to erase the program, press
CLEAR.
4 Press MENU to return to the TV screen.
Program Priority
If the recording start and end
times of preset programs
overlap on the same day
(see the example and diagram left), program number 2
will not be recorded until pro-
gram number 1 is finished.
The first part of program number 2 will not be recorded.
The same thing will happen to program number 3.
Tip
If you are finished programming and you want to set the
DVD+VCR to record the programs you have entered.
A) MAKE SURE YOU HAVE INSERTED A TAPE INTO THE
DVD+VCR. B) YOU MUST TURN OFF THE DVD+VCR
BEFORE IT WILL RECORD ANY TIMER PROGRAMS.
(TIMER indicator lights). The DVD+VCR is now set to record
the preset programs.
Note
If the power fails or the DVD+VCR is unplugged from the AC
outlet, the correct clock time and timer settings are kept in
memory for approximately 3 seconds. After 3 seconds, the
clock and program timer must be reset when power is
restored. Reset the clock according to instructions.
24
Page 25

Operation with tape (Continued)
Instant Timer Recording (One-Touch Record)
Instant Timer Recording allows you to make a recording
easily of a preset length without using the program
timer.
Preparation:
Turn on the power of both the DVD+VCR and the TV.
Be sure the TV is tuned to the DVD+VCR output channel (3 or 4).
If a direct VIDEO/AUDIO connection is made between the
DVD+VCR and the TV, set the TV’s source selector to VIDEO.
Insert a video cassette with the safety tab intact.
11
Select the desired channel by using CH/TRK
22
(vv/VV) or number (0-9).
The channel number appears on the TV screen.
If you are recording from another source via audio/video
input jacks (at the Rear or Front panel), select the
LINE1 or LINE2.
Set the desired recording speed (SP or EP) by
33
pressing SP/EP.
The tape speed will appear on the TV screen.
Press REC (zz) twice.
The menu as illustrated, will appear on the TV screen.
44
Recording will start. (The TIMER indicator will light)
Press REC (zz) repeatedly to select the record-
55
ing time length.
At the end of the recording, the DVD+VCR will stop
recording and shut off.
During Instant Timer Recording, changing the channel
on the DVD+VCR will not be possible.
You can stop the recording by pressing STOP (x).
INSTANT TIMER RECORD (ONE-TOUCH RECORD) MENU
ONE-TOUCH RECORD
CHANNEL 2
SPEED SP
START NOW
LENGTH 0H30M
Checking the Recording Time
Press REC (z) once to check the recording time. The
recalled setting will automatically return to the TV
screen after 6 seconds.
To extend the Recording Time
The recording time can be extended anytime by pressing REC (z).
Subsequent presses result in advancing the recording
time by 30-minute increments.
0H30M ..... 9H00M ➝ 0H00M
Length Display
(each additional press of
REC (zz) increases recording
time 30 minutes)
Dubbing and Editing
If you wish to edit or dub your camcorder (or another
VCR) recordings to this DVD+VCR, the rear (or Front)
panel mounted Audio and Video (A/V) input jacks
make the connections quick and easy. These direct
A/V jacks will also provide better picture results than
using the RF jack on the rear panel.
Connect the camcorder’s (or another VCR’s) A/V
11
outputs to your DVD+VCR as illustrated on page 14.
Set the input channel “LINE2”. (press INPUT to
22
select LINE2.)
If you have connected your DVD+VCR to the A/V input
jacks on the rear of DVD+VCR, you should select the
input channel LINE1 by pressing INPUT twice.
Play the tape in the camcorder (or another
33
VCR). If you have a TV attached to your
DVD+VCR, you can see the video playing.
When you desire recording to begin, press
44
DVD+VCR’s REC (zz) once to start.
Note
Before recording, please confirm the recording start position.
Copying from DVD to VCR
This unit allows you to copy the contents of a DVD to a
VHS tape.
Note
If the DVD you are attempting to copy is copy protected,
you will not be able to copy the disc. It is not permitted
to copy Macrovision encoded DVDs. “LOCK” is
displayed in the display window.
Insert Disc
11
Insert the disc you wish to copy in the DVD deck
and close the disc tray.
Insert VHS Tape
22
Insert a blank VHS video tape into the VCR deck.
Press PLAY (HH) on the DVD deck.
33
The DVD will go into play mode
If the DVD disc menu appears, you may need to press
the PLAY (
Press REC (zz) on the VCR deck.
44
The DVD+VCR will go into Record mode.
Stop the Copy Process
55
When the DVD is finished playing, press the VCR on the
remote control and then press STOP (x) to end the copy.
You must stop the Copy process manually when the DVD
movie ends, or the unit may replay and record over and
over again.
HH
) manually to begin copying.
OPERATION
Notes
If you press PAUSE/STEP (X) during instant timer record-
ing, the DVD+VCR will enter the recording pause mode.
Instant timer recording is cancelled.
If the DVD+VCR is set to “0H00M”, the DVD+VCR goes to
normal recording mode.
Note
When you stop the DVD playback during copying, the recording on VCR is stopped automatically.
25
Page 26

Operation with tape (Continued)
SELECT
TO EXIT PRESS
ADJUST
SCREEN DISPLAY:
LANGUAGE:
AUDIO MODE: HI-FI
BROADCAST TYPE:
AUDIO OUTPUT:
SELECT
TO EXIT PRESS
ADJUST
SCREEN DISPLAY:
LANGUAGE:
AUDIO MODE:
BROADCAST TYPE:
AUDIO OUTPUT: STEREO
SELECT
TO EXIT PRESS
ADJUST
SCREEN DISPLAY:
LANGUAGE:
AUDIO MODE:
BROADCAST TYPE: SAP
AUDIO OUTPUT:
VHS Hi-Fi Stereo System/
MTS Broadcast
This DVD+VCR is equipped with the VHS Hi-Fi audio
sound system for recording and playback. The information below gives a brief description of Hi-Fi audio and
how to record and play a tape in the Hi-Fi audio mode.
Playback with Hi-Fi Stereo Audio Sound
A stereo TV with AUDIO/VIDEO input jacks or a stereo
audio system is required for true stereo playback. To
experience the full and rich stereo sound available with
Hi-Fi recorded tapes, we recommend the connection of
this unit to a home stereo audio system.
Set the AUDIO MODE option to HI-FI on the VCR
11
SETUP menu .
Set the AUDIO OUTPUT option to STEREO
22
position.
(STEREO) POSITION: The left channel sound (L) is
heard from the left speaker and the right channel sound
(R) is heard from the right speaker.
(LEFT) POSITION: The left channel sound (L) is heard
from both speakers.
(RIGHT) POSITION: The right channel sound (R) is heard
from both speakers.
Insert a cassette and press PLAY (HH).
33
Adjust volume at your stereo system.
MTS (Multi-Channel TV Sound)
This DVD+VCR will decode MTS stereo and bilingual
(SAP) off-the-air broadcast sound signals. It also
decodes stereo TV sound from local cable companies,
as long as they operate on assigned cable frequencies
and use the EIA-recommended MTS stereo/bilingual TV
sound system.
Multichannel TV Sound Indicator (MTS)
Shows Onscreen as illustrated below when
SELECT/ENTER is pressed.
One or both of the indicators will light, depending on the
MTS broadcast.
TV screen
CH 4
STEREO/SAP
If only STEREO appears on the TV screen.
The DVD+VCR can record in stereo onto the VHS Hi-Fi audio
tracks when the BROADCAST TYPE option is in the STEREO
position. The DVD+VCR will also record mono audio onto the
mono audio track.
If only SAP appears on the TV screen.
Set the BROADCAST TYPE option to SAP.
If STEREO/SAP appears on the TV screen
Use the BROADCAST TYPE option to select the desired
recording mode (STEREO or SAP).
STEREO
Lights up when a stereo broadcast
is being received.
SAP
Lights up when a SAP BILINGUAL
broadcast is being received.
SAP (Second Audio Program) Recording
Some stations transmit a Second Audio Program, which
is used for a second language or additional information.
When the station broadcasts a Second Audio Program,
follow the procedure below to record the SAP.
Insert a video cassette with the safety tab intact.
11
Set the BROADCAST TYPE option to SAP (VCR
22
SETUP menu).
Do this if only the SAP appears on the TV screen or you
know the program will use the SAP.
26
Set the desired recording speed (SP or EP) by
33
pressing SP/EP.
Select the desired channel. The SAP should
44
appear on the TV screen.
Press REC (zz) once
You are now recording the program you see and hear on the
55
TV.
Press STOP (xx) to stop recording.
66
Page 27

Operation with tape (Continued)
Tape Counter Memory Feature
Real-Time Counter
Shows length of tape run in hours, minutes, and seconds. Press CLK/CNT to select the real-time counter
display.
Every press of CLK/CNT changes the TV screen as
illustrated below.
2:15 AM M 0:05:25 REM 1:07
CLOCK COUNTER REMAINING TIME
Counter changes to “M 0:00:00” when the cassette is
ejected.
The real-time counter does not operate if nothing is recorded on the tape.
The real-time counter will not work unless a tape is
inserted.
Counter Memory Function
This is useful if there is a section of tape you want to
view immediately after recording or if you want to return
to the same point several times.
Begin recording or playing a tape.
11
Press CLK/CNT repeatedly to display the real-
22
time counter appears on the TV screen.
At the point that you want locate later, reset the
33
real-time counter to “M 0:00:00” by pressing
CLEAR.
Continue to play or record.
44
Press STOP (xx) when recording or playback fin-
55
ishes.
Press BACKWARD (..).
66
The tape automatically stops when the tape counter
returns to about “M 0:00:00”.
Additional Information
In manual recording, Timer recording, Instant Timer
Recording, playback, or fast forward modes, the DVD+VCR
automatically starts rewinding the tape at the end of the
tape. The cassette will stop at the beginning of the tape and
be ejected, and the DVD+VCR will turn itself off.
After you have finished using the DVD+VCR, rewind, eject,
and remove the cassette. Place the cassette in its protective sleeve to protect it from dust. It is not necessary to
rewind the cassette before removing it, but if you do, it will
be ready to play or record the next time you use it.
Be sure the DVD+VCR Channel Selector is on the correct
channel you wish to record. The channel that is being
recorded can always be checked by setting the television
on the DVD+VCR channel (3 or 4) and pressing the
TV/VCR selector to turn the DVD+VCR’s VCR indicator on.
Do not attempt to hook up more than one television set to
the DVD+VCR for either recording or playback.
Auto Play System
This DVD+VCR features automatic playback.
Load a cassette (with the safety tab removed).
The power turns on automatically and playback begins.
At the end of the tape, the DVD+VCR stops, then rewinds.
The cassette is ejected after rewinding and turn itself off
automatically.
LOAD
TAPE
AUTO
PLAY
AUTO
REWIND
AUTO
EJECT
AUTO
POWER
OFF
OPERATION
Tape Remaining
This function allows the time of the remaining tape to be
displayed during recording or playback.
Press CLK/CNT until the REM indicator displays on the
TV screen during recording or playback.
Note
The remaining tape length indicator may not be displayed
correctly depending on the condition of the tape and the kind of
the tape (T-140, T-160, or T-210 etc)
27
Page 28

Operation with DVD and Audio CD
Playing DVD and Audio CD
Playback Setup
Turn on the TV and select the video input source con-
nected to the DVD+VCR.
Audio system: Turn on the audio system and select
the input source connected to the DVD+VCR.
Set the Output Source to DVD as shown in Setting
the Output Source on page 7.
Press OPEN/CLOSE (ZZ) to open the disc tray.
CDDVD
11
Load your chosen disc in the tray, with the label
22
facing up.
When a double-sided DVD is inserted, make sure
the side you want to play is facing down.
Press OPEN/CLOSE (ZZ) to close the tray.
33
“DISC LOAD” appears in the display window, and
playback starts automatically. If playback does not
start, press PLAY (H).
In some cases, the disc menu might appear
instead.
If a menu screen is displayed
The menu screen may be displayed first after loading a
DVD which contains a menu.
DVD
Use b/B/v/V buttons to select the title/chapter you
want to view, then press SELECT/ENTER to start
playback.
Press TITLE or DISC MENU to return to the menu
screen.
Notes
If Parental Control is set and the disc is not within the
Rating settings (not authorized), the 4-digit password
must be entered and/or the disc must be authorized
(see Parental Control, on page 21).
DVDs may have a region code.
Your DVD+VCR will not play discs that have a region
code different from your DVD+VCR. The region code
for this DVD+VCR is 1 (one).
Do not keep an image or on-screen displayed for a
long time.
General Features
Note
Unless stated otherwise, all operations described use
the remote control. Some features may also be
available on the Setup menu.
Moving to another TITLE
When a disc has more than one title, you can move to
another title as follows:
Press DISPLAY when playback is stopped, then
press the appropriate numbered button (0-9) then
press SELECT/ENTER to select a title number.
DVD
Moving to another CHAPTER/TRACK
CDDVD
When a title on a disc has more than one chapter or a
disc has more than one track, you can move to another
chapter/track as follows:
Press BACKWARD (.) or FORWARD (>) briefly
during playback to return to the beginning of the current chapter/track or to select the next chapter/track.
Press BACKWARD (.) twice briefly to step back to
the previous chapter/track.
To go directly to any chapter/track during playback,
press DISPLAY. Then, press vv/VVto select C
(chapter) (or for a Audio CD, select T for track). Then,
enter the chapter/track number using the numbered
buttons (0-9). Then, press SELECT/ENTER.
Tip
In case of audio CD, to go directly to any track, enter
the track number using the numbered buttons (0-9)
during playback.
Slow Motion
1 Press PAUSE/STEP (X) during playback.
The DVD+VCR will now go into PAUSE mode.
2 Press BACKWARD (.) or FORWARD (>)
during pause mode.
The DVD+VCR will enter SLOW mode.
3 Use BACKWARD (.) or FORWARD (>) to
select the required speed: t 1/16, t 1/8, t 1/4 or
t 1/2 (backward), or T 1/16, T 1/8, T 1/4 or T
1/2 (forward).
4 To return to playback, press PLAY (H).
1
DVD
1
1
28
Page 29

Operation with DVD and Audio CD (Continued)
General Features (continued)
Still Picture and Frame-by-frame playback
CDDVD
DVD Video Discs
1 Press PAUSE/STEP (X) during playback.
The DVD+VCR will now go into PAUSE mode.
2 With a DVD, you can advance the picture frame by
frame by pressing PAUSE/STEP (X) repeatedly on
the remote control.
3 To return to playback, press PLAY (H).
Audio CDs
1 Press PAUSE/STEP (X) during playback.
The DVD+VCR will now go into PAUSE mode.
2 To return to playback, press PLAY (H) or
PAUSE/STEP (X) again.
Search
1
Press and hold BACKWARD (.) or FORWARD (>)
for about two seconds during playback.
The DVD+VCR will now go into SEARCH mode.
2
Press and hold BACKWARD (.) or FORWARD (>)
repeatedly to select the required speed: mX2, mX4,
mX16, mX100 (backward) or MX2, MX4,
MX16, MX100 (forward).
With a Audio CD, the Search speed changes: mX2
(backward) or MX2 (forward).
3 To return to playback, press PLAY (H).
Random
1 Press RANDOM during playback or in stop mode.
The unit automatically begins Random Playback and
“RANDOM” appears on the TV screen.
2 To return to normal playback, press RANDOM until
“NORMAL” appears on the TV screen.
CDDVD
CDKaraoke DVD
3 To exit Repeat mode, press REPEAT a third time.
The Repeat Off icon appears on the TV screen.
Audio CDs - Repeat Track/All/Off
1 To repeat the track currently playing, press REPEAT.
The Repeat Track icon appears on the TV screen.
2 To repeat the disc currently playing, press REPEAT a
second time.
The Repeat All icon appears on the TV screen.
3 To exit Repeat mode, press REPEAT a third time.
The Repeat Off icon appears on the TV screen.
Repeat A-B
A *
A B
CDDVD
OFF
To repeat a sequence in a title:
1 Press A-B at your chosen starting point.
A- appears briefly on the TV screen.
2 Press A-B again at your chosen end point.
A-B appears briefly on the TV screen, and the repeat
sequence begins (A y B appears in the display window).
3 To cancel the sequence, press A-B.
3D Surround
CDDVD
NORM.
3D SUR
This unit can produce a 3D Surround effect, which
simulates multi-channel audio playback from two
conventional stereo speakers, instead of the five or
more speakers normally required to listen to multichannel audio from a home theater system.
1 Press DISPLAY during playback.
2 Use v/V to select the sound icon.
The sound option will be highlighted.
3 Use b/B to to select “3D SUR”.
To turn off the 3D Surround effect, select “NORM”.
OPERATION
Tips
By pressing BACKWARD (.) or FORWARD (>)
during Random playback, the unit selects another title
(track) and resumes Random playback.
Note
This function only works with DVD Karaoke discs and
audio CDs.
Repeat
CD
DVD
TRACK
CHAPT
ALL
TITLE
OFF
OFF
DVD Video Discs - Repeat Chapter/Title/Off
1 To repeat the currently playing chapter, press
REPEAT.
The Repeat Chapter icon appears on the TV screen.
2 To repeat the title currently playing, press REPEAT a
second time.
The Repeat Title icon appears on the TV screen.
Changing the Audio Language
1 ENG
D
6 CH
DVD
Press AUDIO repeatedly during playback to hear a
different audio language or audio track.
Changing the Audio Channel
STER.
LEFT
RGHT
CD
Press AUDIO repeatedly during playback to hear a
different audio channel (STEREO, LEFT or RIGHT).
29
Page 30

Operation with DVD and Audio CD (Continued)
X4
X16
Maker
Picture 1
Maker
Picture 2
Maker
Picture 3
Maker
Picture 4
Maker
Picture 5
Present
Picture
General Features (Continued)
Time Search
DVD
0:16:57
The Time Search function allows you to start playing at
any chosen time on the disc.
1 Press DISPLAY during playback. The on-screen dis-
play appears on the screen.
The Time Search box shows the elapsed playing time of the
current disc.
2 Within 10 seconds, use vv/VVto select the Time
Search icon in the on-screen display.
The “-:--:--” appears in the Time Search box.
3 Within 10 seconds, use the numbered buttons to
enter the required start time. Enter hours, minutes
and seconds from left to right in the box.
If you enter the wrong numbers, press CLEAR to remove the
numbers you entered. Then enter the correct numbers.
4 Within 10 seconds, press SELECT/ENTER.
Playback starts from the selected time on the disc. If you enter
an invalid time, playback will continue from the current point.
Zoom
DVD
The Zoom function allows you to enlarge the video
image and to move through the enlarged image.
1 Press ZOOM during playback or still playback to acti-
vate the Zoom function.
The square frame will be displayed in the center of the picture. If no button is pressed for more than 10 seconds, the
square frame will disappear.
Each press of the ZOOM button changes the TV screen in
the sequence shown below.
(X4) (X16) (Normal)
-:--:--
Marker Search
DVD
1/5
You can start playback from a memorized point. Up to
five points can be memorized.
To enter a mark, follow these steps.
1 During disc playback, press MARKER when playback
reaches the spot that you want to memorize.
The Marker icon will appear on the TV screen briefly.
2 Repeat step 1 to enter up to five Marker points on a
disc.
To Recall a Marked Scene
1 During disc playback, press SEARCH.
The Marker Search menu will appear on the screen.
2 Use b/B/v/V to select a Marker that you want to
recall.
3 Press SELECT/ENTER.
Playback will start from the Marked scene.
To clear a Marked Scene
1 During disc playback, press SEARCH.
The Marker Search menu will appear on the screen.
2 Use b/B/v/V to select the Marker that you want to
erase.
3 Press CLEAR.
The Marker will be erased from the Marker Search menu.
4 Repeat steps 2 and 3 to erase additional Marker
numbers.
5 To return to the present picture, use b/B/v/V to
select the present picture then press
SELECT/ENTER.
2 Use b/B/v/V buttons to move the zoom point.
3 Press SELECT/ENTER.
The zoomed picture appears.
4 To resume normal playback, press ZOOM repeatedly
until the normal picture appears.
Notes
The zoom function may not work for some DVDs.
The zoom function may not work on multi-angle
scenes.
30
Page 31

Operation with DVD and Audio CD (Continued)
Step
Total Time100:00
Program
Clear All
Special DVD Features
Checking the contents of DVD Video
discs: Menus
DVDs may contain menus that allow you to access special features. To use the disc menu, press DISC MENU.
Then, press the appropriate number button to select an
option. Or, use b/B/v/V buttons to highlight your selection, then press SELECT/ENTER.
DVD
DVD
DVD
DVD
1
1 ENG
Title Menu
1 Press TITLE.
If the current title has a menu, the menu will appear on the
screen. Otherwise, the disc menu may appear.
2 The menu can list camera angles, spoken language
and subtitle options, and chapters for the title.
3 To remove the title menu, press TITLE again.
Disc Menu
1 Press DISC MENU.
The disc menu is displayed.
2 To remove the disc menu, press DISC MENU again.
Camera Angle
If the disc contains sequences recorded from different
camera angles, the angle icon blinks on the display. You
can then change the camera angle if you wish.
Press ANGLE repeatedly during playback to select a
desired angle.
The number of the current angle appears on the display.
Subtitles
Press SUBTITLE repeatedly during playback to see the
different subtitle languages.
Note
If appears, the feature is not available on the disc.
Programmed Playback with
Audio CD
Program allows you to store your favorite tracks for a
particular disc in the DVD+VCR memory.
Program can contain 20 tracks.
Insert an audio CD and close the tray.
11
Press PROGRAM during playback or in the stop
22
mode.
The Program menu appears.
Note
Press PROGRAM to exit the Program menu.
Use the numbered buttons to select the desired
33
track number.
Press BBand use the numbered buttons to
44
select the next track number.
Repeat step 4 to place additional tracks on the
55
Program list.
Press PLAY (HH) or SELECT/ENTER to start
66
playback.
Playback begins in the order in which you programmed
the tracks and “PROG.” appears in the display window.
Playback stops after all of the tracks on the Program
menu have played once.
Clearing the program
To clear the programmed tracks one by one
1. Press PROGRAM during playback or in the stop
mode.
The Program menu appears.
2. Use b/B/v/V to select the unwanted number and
then press CLEAR.
OPERATION
To clear all the programmed tracks
1. Press PROGRAM during playback or in the stop
mode.
The Program menu appears.
2. Use b/B/v/V to select “Clear All” and then press
SELECT/ENTER.
3. Press SELECT/ENTER again.
Note
The programs are also cleared when the power is
turned off or the disc is removed.
31
Page 32

Operation with MP3 Discs
Program
MP3
MP3-1
MP3-2
MP3-3
MP3-4
MP3-5
MP3-6
MP3-7
MP3-8
MP3-9
Clear All
ABCD
Notes on MP3 Discs
About MP3
An MP3 file is audio data compressed by using
MPEG1, the audio layer-3 file-coding scheme. We call
files that have the .mp3 file extension MP3 files.
The DVD+VCR cannot read an MP3 file that has a
file extension other than .mp3.
The DVD+VCR cannot read a fake MP3 file that has
a file extension .mp3.
MP3 disc compatibility with this DVD+VCR is
limited as follows:
1. Sampling Frequency/only at 44.1kHz
2. Bit rate/within 32 - 320kbps
3. CD-R physical format should be ISO 9660
4. If you record MP3 files using the software which
cannot create a FILE SYSTEM, for example DirectCD etc., it is impossible to playback MP3 files. We
therefore recommend that you use Easy-CD
Creator, which creates an ISO9660 file system.
5. A single session disc requires MP3 files in the first
track. If there is no MP3 file in the 1st track, it cannot playback MP3 files. If you wish to playback MP3
files, format all the data in the disc or use a new
one.
6. File names should be named using 8 letters or less
and must incorporate the .mp3 extension
e.g. “********.MP3”.
7. Do not use special characters such as
“_?!><+*}{`[@ ]:;\/.,” etc.
8. Total number of files on the disc should be less than
256.
9. Use 74 minute CD-R discs (650M), do not use 80
minute CD-R (700M) software.
This DVD+VCR requires discs/recordings to meet
certain technical standards in order to achieve optimal
playback quality. Pre-recorded DVDs are automatically
set to these standards. There are many different types
of recordable disc formats (including CD-R containing
MP3 files).
Customers should also note that permission is required
in order to download MP3 files and music from the
Internet. Our company has no right to grant such permission. Permission should always be sought from the
copyright owner.
Playing MP3 Discs
The DVD+VCR can play MP3 format recordings on CDROM, CD-R, or CD-RW discs.
Before playing MP3 recordings, read the notes on MP3
Recordings to the left.
Insert an MP3 disc and close the tray.
11
The MP3 menu appears on the TV screen.
MP3 menu
Use vv/VVto select the directory containing the
22
track that you want to play.
Press SELECT/ENTER and use vv/VVto select the
33
desired track.
Press SELECT/ENTER or PLAY (HH).
44
Playback starts.
During playback, the current track’s elapsed playing
time will appear in the display window.
Playback will stop after the last track in the directory has played.
To return to the previous MP3 menu
Press RETURN.
To move to the first MP3 menu
Press DISC MENU.
To return to the top of the page within the directory
Press TITLE.
Each time you press the button, the pages within
directory will change in rotation.
To pause playback
Press PAUSE/STEP (X) during playback. To return to
playback, press PLAY (H) or PAUSE/STEP (X) again.
To skip to another track during playback
Press BACKWARD (.) or FORWARD (>) briefly
during playback to return to the beginning of the current track or to select the next track.
Press BACKWARD (.) twice briefly to step back to
the previous track.
32
Page 33

Operation with MP3 Discs (Continued)
Program
MP3-1
MP3
Clear All
..
TRACK_1
TRACK_2
TRACK_3
TRACK_4
TRACK_5
TRACK_2
TRACK_7
TRACK_6
TRACK_9
TRACK_6
TRACK_7
TRACK_8
Program
MP3-1
MP3
Clear All
..
TRACK_1
TRACK_2
TRACK_3
TRACK_4
TRACK_5
TRACK_6
TRACK_7
TRACK_8
Program
MP3-1
MP3
Clear All
..
TRACK_1
TRACK_2
TRACK_3
TRACK_4
TRACK_5
TRACK_6
TRACK_7
TRACK_8
Program
MP3-1
MP3
Clear All
..
TRACK_1
TRACK_2
TRACK_3
TRACK_4
TRACK_5
TRACK_2
TRACK_7
TRACK_6
TRACK_9
TRACK_6
TRACK_7
TRACK_8
Program
MP3-1
MP3
Clear All
..
TRACK_1
TRACK_2
TRACK_3
TRACK_4
TRACK_5
TRACK_2
TRACK_7
TRACK_6
TRACK_9
TRACK_6
TRACK_7
TRACK_8
Programmed Playback with
MP3 Discs
Program allows you to store your favorite tracks for a
particular disc in the DVD+VCR memory.
Program can contain 60 tracks.
Follow steps 2 - 3 of Playing MP3 Discs on page
11
32.
Press PROGRAM to list the selected track on
22
the MP3 Program list.
Program list
Repeat steps 1 - 2 to place additional tracks on
33
the Program list.
Press B.
The programmed track you selected last is highlighted on
44
the program list.
Use vv/VVto select the track you want to start
55
playing.
Repeat Playback with MP3 Discs
To playback a track repeatedly
Press REPEAT once during playback.
The current track will be played back repeatedly.
Repeat symbol
OPERATION
To playback a entire directory repeatedly
Press REPEAT twice during playback.
All of the tracks within the directory will be played back repeatedly.
To playback an programmed track repeatedly
Press REPEAT once during programmed playback.
The current track will be played back repeatedly.
Press PLAY (HH) to start.
Playback begins in the order in which you programmed
66
the tracks and PROG. appears in the display window.
Playback stops after playing the last programmed track on
the program list.
Erasing a Track from Program List
1 Use b/B/v/V to select the track that you wish to
erase from the Program list.
2 Press CLEAR.
The track will be erased from the Program list.
Erasing the Complete Program List
Use b/B/v/V to select Clear All then press
SELECT/ENTER.
To playback an entire directory repeatedly
Press REPEAT twice during programmed playback.
All of the listed tracks on the MP3 Programmed list will be
played back repeatedly.
To exit Repeat mode
Press REPEAT repeatedly until the Repeat icon disap-
pears on the menu screen.
33
Page 34

Troubleshooting
Check the following guide for the possible cause of a problem before contacting service.
Symptom
No power.
The power is on, but
the DVD+VCR does not
work.
No picture.
No sound.
The playback picture is
poor.
The DVD+VCR does
not start playback.
The remote control
does not work properly.
Cause
The power cord is disconnected.
No disc is inserted.
No tape is inserted.
The TV is not set to receive DVD+VCR
signal output.
TV/VCR mode for DVD+VCR is set to
TV.
The video cable is not connected
securely.
The connected TV power is turned off.
The equipment connected with the
audio cable is not set to receive
DVD+VCR signal output.
The audio cables are not connected
securely.
The power of the equipment connected
with the audio cable is turned off.
The Digital Audio Output is set to the
wrong position.
The disc is dirty.
Tape heads are dirty.
Tape is a rental or was recorded on
another VCR.
No disc is inserted.
No tape is inserted.
An unplayable disc is inserted.
The disc is placed upside down.
The disc is not placed within the guide.
The disc is dirty.
The Rating level is set.
The remote control is not pointed at the
remote sensor of the DVD+VCR.
The remote control is too far from the
DVD+VCR.
There is an obstacle in the path of the
remote control and the DVD+VCR.
The batteries in the remote control are
exhausted.
This remote control has same buttons
between VCR and DVD (ex. PLAY).
Correction
Plug the power cord into the wall outlet
securely.
Insert a disc or tape. (Check that the
disc or tape indicator in the display
window is lit.)
Select the appropriate video input mode
on the TV so the picture from the
DVD+VCR appears on the TV screen.
Press the TV/VCR button on the remote
control repeatedly to choose VCR
mode. VCR indicator light appears in
the display window.
Connect the video cable securely.
Turn on the TV.
Select the correct input mode of the
audio receiver so you can listen to the
sound from the DVD+VCR.
Connect the audio cable securely.
Turn on the equipment connected with
the audio cable.
Set the Digital Audio Output to the
correct position, then turn on the
DVD+VCR again by pressing POWER.
Clean the disc.
Clean video heads.
Use
CH/TRK (v/V)
for manual tracking
adjustment while tape is playing.
Insert a disc or tape. (Check that the
disc or tape indicator in the display
window is lit.)
Insert a playable disc. (Check the disc
type, color system, and Regional code.)
Place the disc with the playback side down.
Place the disc on the disc tray correctly
inside the guide.
Clean the disc.
Cancel the Rating function or change
the rating level.
Point the remote control at the remote
sensor of the DVD+VCR.
Operate the remote control within 23 ft
(7 m).
Remove the obstacle.
Replace the batteries with new ones.
When using a VCR, first press the VCR
button. When using a DVD, first press
the DVD button.
34
Page 35

Troubleshooting (Continued)
Symptom
Some channels are
skipped over when
CH/TRK (v/V)
using
Picture and sound of
broadcasting channel
are weak or missing.
Camcorder image is not
shown.
Camcorder image via
A/V input to DVD+VCR
is not shown on TV
screen.
Timer recording is not
possible.
TIMER indicator light
appears after DVD+VCR
is turned off.
Stereo Audio Record
and/or Playback is not
present.
Cause
Those channels were deleted with the
ADD/DEL CH. option.
Antenna or cables are loose.
Wrong CHANNEL SOURCE option is
being used.
Camcorder is off.
DVD+VCR INPUT SELECT is not set to
LINE1 or LINE2.
Clock in DVD+VCR is not set to correct
time.
DVD+VCR is on which disables timer.
Timer has been programmed
incorrectly.
TIMER indicator light does not appear
after programming timer.
DVD+VCR is in Timer Recording mode.
TV is not Stereo-compatible.
Broadcast program is not in stereo for-
mat.
DVD+VCR A/V Out jacks are not con-
nected to TV A/V In jacks.
DVD+VCR Audio/Video Out is not
selected for viewing at the TV.
DVD+VCR BROADCAST TYPE mode is
set to SAP or MONO.
Correction
Use ADD/DEL CH. to restore channels.
See “Channel Selection” on page 16.
Tighten connections or replace cable.
Try all CHANNEL SOURCE options.
See “Channel Selection” on page 16 for
details.
Turn camcorder on and operate
properly.
Press INPUT to select LINE input chan-
nel (LINE1 or LINE2).
Set clock to correct time. See “Setting
the Clock” on page 17.
Turn DVD+VCR off to enable timer.
TIMER indicator light appears in the
display window.
Reprogram Timer. See “Timer
Recording” on pages 23 and 24.
Reprogram Timer and turn DVD+VCR
off to enable timer.
This is the normal indication that the
DVD+VCR is in TIMER mode.
No action is possible.
No action is possible.
Make A/V connections. Stereo is
available only via A/V output from
DVD+VCR.
Select AUX or A/V source as TV input.
Set BROADCAST TYPE mode to
STEREO. See “Setting the VCR Setup
Menu” on page 16.
REFERENCE
Moisture Condensation
Moisture condensation can occur:
• When the DVD+VCR is moved from a cold place to a
warm place.
• Under extremely humid conditions.
In locations where moisture condensation may occur:
•
Keep the DVD+VCR plugged into an AC power outlet
with POWER On. This will help prevent condensation.
• When condensation has occurred, wait a few hours
for the DVD+VCR to dry before using it.
35
Page 36

Language Code List
Enter the appropriate code number for the initial settings “Disc Audio”, “Disc Subtitle” and/or “Disc Menu”
(See page 19).
Code Language
6566 Abkhazian
6565 Afar
6570 Afrikaans
8381 Albanian
6577 Amharic
6582 Arabic
7289 Armenian
6583 Assamese
6588 Aymara
6590 Azerbaijani
6665 Bashkir
6985 Basque
6678 Bengali; Bangla
6890 Bhutani
6672 Bihari
6682 Breton
6671 Bulgarian
7789 Burmese
6669 Byelorussian
7577 Cambodian
6765 Catalan
9072 Chinese
6779 Corsican
7282 Croatian
6783 Czech
6865 Danish
7876 Dutch
6978 English
6979 Esperanto
6984 Estonian
7079 Faeroese
Code Language
7074 Fiji
7073 Finnish
7082 French
7089 Frisian
7176 Galician
7565 Georgian
6869 German
6976 Greek
7576 Greenlandic
7178 Guarani
7185 Gujarati
7265 Hausa
7387 Hebrew
7273 Hindi
7285 Hungarian
7383 Icelandic
7378 Indonesian
7365 Interlingua
7165 Irish
7384 Italian
7465 Japanese
7487 Javanese
7578 Kannada
7583 Kashmiri
7575 Kazakh
7589 Kirghiz
7579 Korean
7585 Kurdish
7679 Laothian
7665 Latin
7686 Latvian, Lettish
Code Language
7678 Lingala
7684 Lithuanian
7775 Macedonian
7771 Malagasy
7783 Malay
7776 Malayalam
7784 Maltese
7773 Maori
7782 Marathi
7779 Moldavian
7778 Mongolian
7865 Nauru
7869 Nepali
7879 Norwegian
7982 Oriya
8065 Panjabi
8083 Pashto, Pushto
7065 Persian
8076 Polish
8084 Portuguese
8185 Quechua
8277 Rhaeto-Romance
8279 Romanian
8285 Russian
8377 Samoan
8365 Sanskrit
7168 Scots Gaelic
8382 Serbian
8372 Serbo-Croatian
8378 Shona
8368 Sindhi
Code Language
8373 Singhalese
8375 Slovak
8376 Slovenian
8379 Somali
6983 Spanish
8385 Sudanese
8387 Swahili
8386 Swedish
8476 Tagalog
8471 Tajik
8465 Tamil
8484 Tatar
8469 Telugu
8472 Thai
6679 Tibetan
8473 Tigrinya
8479 Tonga
8482 Turkish
8475 Turkmen
8487 Twi
8575 Ukrainian
8582 Urdu
8590 Uzbek
8673 Vietnamese
8679 Volapük
6789 Welsh
8779 Wolof
8872 Xhosa
7473 Yiddish
8979 Yoruba
9085 Zulu
36
Page 37

Specifications
General
Power requirements AC 120V , 60 Hz
Power consumption 23W
Dimensions (approx.) 430 X 97.5 X 360 mm (16.9 x 3.9 x 14.2 inches) (w x h x d)
Mass (approx.) 5.3 kg (11.7 lbs)
Operating temperature 5˚C to 40˚C (41˚F to 104˚F)
Operating humidity 5 % to 90 %
Signal system NTSC
Inputs
ANTENNA IN Antenna or CATV input, 75 ohms
VHS VIDEO IN 1 Vp-p 75 ohms, sync negative, RCA jack x 1
VHS AUDIO IN -6.0 dBm more than 47 kohms, RCA jack (L, R) x 1
Outputs
VIDEO OUT 1 Vp-p 75 ohms, sync negative
S-VIDEO OUT (Y) 1.0 V (p-p), 75 ohms, negative sync, Mini DIN 4-pin x 1
(C) 0.3 V (p-p) 75 ohms
COMPONENT VIDEO OUT (Y) 1.0 V (p-p), 75 ohms, negative sync, RCA jack x 1
(Pb)/(Pr) 0.7 V (p-p), 75 ohms, RCA jack x 2
Audio output (digital audio) 0.5 V (p-p), 75 ohms, RCA jack x 1
Audio output (analog audio) 2.0 Vrms (1 KHz, 0 dB), 330 ohms, RCA jack (L, R) x 1
RF OUT Channel 3 or 4
VCR Specifications
Head system Four head helical scan azimuth system
Timer 12-hour display type with AM, PM
Tape speed SP: 33.35 mm/sec, LP: 16.67 mm/sec, EP: 11.12 mm/sec
Tape width 12.7 mm
Maximum recording time SP: 2 HOURS (T-120), EP: 6 HOURS (T-120)/8 HOURS (T-160)
Rewind time About 3 minutes (T-120)
Antenna 75 ohms (VHF/UHF)
VHF output signal Channel 3 or 4 (Switchable)
Channel coverage VHF: 2-13, UHF: 14-69, CATV: 1-125 (4A, A-W, W+1 - W+84, A-5 - A-1)
Frequency range 20Hz to 20kHz
Signal-to-noise ratio More than 43dB
Dynamic range More than 83 dB
Channel separation More than 55 dB
DVD Specifications
Laser system Semiconductor laser, wavelength 650 nm
Frequency response DVD (PCM 96 kHz): 8 Hz to 44 kHz, DVD (PCM 48 kHz): 8 Hz to 22 kHz
CD: 8 Hz to 20 kHz
Signal-to-noise ratio More than 100dB (ANALOG OUT jacks only)
Harmonic distortion Less than 0.008%
Dynamic range More than 95 dB (DVD/CD)
Accessory:
Video cable x 1, Audio cable x 1, RF 75-ohm Coaxial Cable x 1, Remote control x 1, Batteries x 2
Design and specifications are subject to change without notice.
37
Page 38

 Loading...