

Page 1
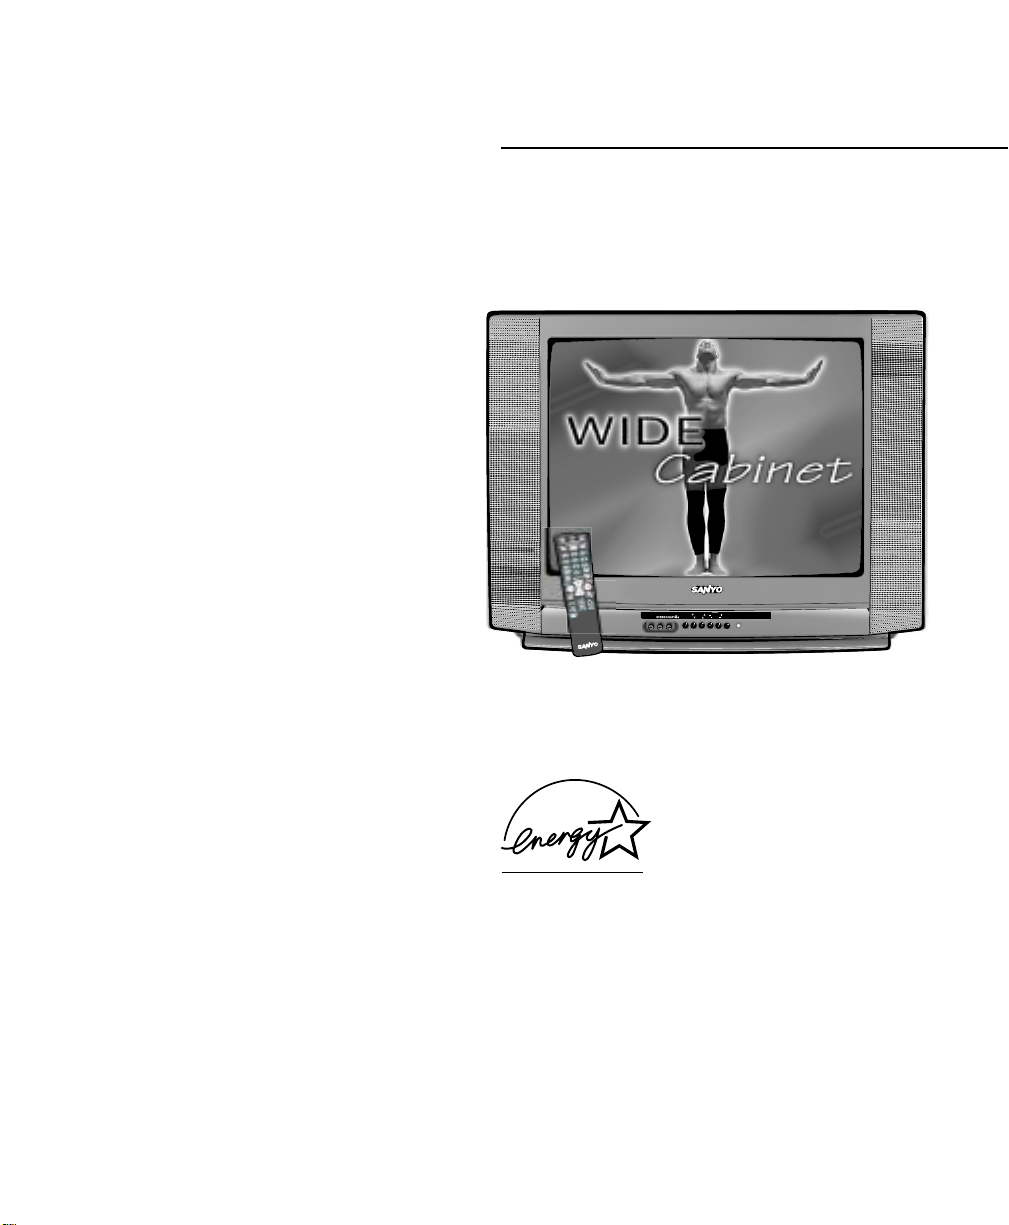
DS25500
AS
CONTENTS
Important Safety Tips . . . . . . . . . . . . . . . . . 2
Features . . . . . . . . . . . . . . . . . . . . . . . . . . . . 3
Specifications . . . . . . . . . . . . . . . . . . . . . . . . 3
Basic Setup . . . . . . . . . . . . . . . . . . . . . . . . . 3
Basic Hookup Methods . . . . . . . . . . . . . . . . 4
Front Panel . . . . . . . . . . . . . . . . . . . . . . . . . . 5
Rear Panel . . . . . . . . . . . . . . . . . . . . . . . . . . 5
Multimedia Remote Control . . . . . . . . . 5 ~ 8
TV Adjustment and Setup . . . . . . . . . . 9 ~ 10
Resetting the TV . . . . . . . . . . . . . . . . . . . . . 10
Using Front Audio/Video Input Jacks . . . . 11
Using Audio Output Jacks . . . . . . . . . . . . . 11
Using Rear Audio/Video Input Jacks . . . . . 12
V-Guide Information . . . . . . . . . . . . . . . . . 13
V-Guide Operation (Parental Control) . . 14 ~ 15
Setting the Sleep Timer . . . . . . . . . . . . . . . 15
Care and Cleaning . . . . . . . . . . . . . . . . . . . 15
Closed-Captioning . . . . . . . . . . . . . . . . . . . .16
Troubleshooting . . . . . . . . . . . . . . . . . 17 ~19
Warranty (Mexico) . . . . . . . . . . . . . . . . . . . 20
Warranty (U.S.A. and Canada) . . . . . . . . . 21
Child Safety Matters . . . . . . . . . . . Back cover
FRANÇAIS . . . . . . . . . . . . . . . . . . . . 22 ~ 41
Table des matières . . . . . . . . . . . . . . . . . . 22
ESPAÑOL . . . . . . . . . . . . . . . . . . . . . 42 ~ 63
Contenido . . . . . . . . . . . . . . . . . . . . . . . . . . 42
Printed in U.S.A. SMC, October 2001 / Imprimé aux É.-U. SMC, octobre 2001 /
Impreso en U.S.A. SMC, Octubre 2001
Part No. / N
o
de pièce / No. de Parte : 1AA6P1P2600A–
Service Code /Code de service / Código de Servicio : 610 289 3052
Welcome to the World of Sanyo
Thank you for purchasing a Sanyo Color Television. You
made an excellent choice for Performance, Reliability, and
Value. The TV is designed with easy on-screen set-up
instructions and operating features. To meet the growing
needs of our customers, this television has a “V-Chip” for
parental controlled viewing. “Read this manual before
assembling (or using) this product.” Need assistance?
Visit our web site at www.sanyoctv.comor call
toll free 1-800-877-5032.
TV screen image / Image de télévision /
Imagen de la Pantalla del Televisor © 2001 PhotoDisc, Inc.
“As an ENERGY STAR®Partner,
Sanyo Manufacturing Corporation
has determined that this product
meets the ENERGY STAR®guidelines
for energy efficiency.”
Color TV Owner’s Manual
Manuel d’instructions du télécouleur
I
Color TV Manual Del Propietario
Importado Por :
Comercializadora México
Americana, S. DE R.L. DE C.V.
Nextengo Nº 78
Col. Santa Cruz Acayucan
Del. Azcapotzalco, México D.F. C.P.
02770, RFC CMA 9109119LO
Telefono: (5) 328-3500
MTS
MENUMENU
CHANNELCHANNEL
VOLUMEVOLUME
POWERPOWER
MENUMENU
MENUMENU
VIDEO IN L- AUDIO -R
Page 2
2
Positioning the appliance
1. Do not place your appliance on an unstable cart, stand, shelf or table.
Serious injury to an individual, and damage to the appliance, may result
if it should fall. Your salesperson can recommend approved carts and
stands or shelf and wall mounting instructions. An appliance and cart combination should be moved with care.
Quick stops, excessive force, and uneven surfaces may
cause the appliance and cart combination to overturn.
2. Slots and openings in the cabinet and in the back or bottom are
provided for ventilation. To ensure reliable operation of the appliance and
to protect it from overheating, these openings must not be blocked or
covered. The openings should never be covered with a cloth or other
material, and the bottom openings should not be blocked by placing the
unit on a bed, sofa, rug, or other similar surface. This appliance should
never be placed near or over a radiator or heat register. This appliance
should not be placed in a built-in installation such as a bookcase unless
proper ventilation is provided.
3. Do not expose the appliance to rain or use near water . . . for example,
near a bathtub, swimming pool, kitchen sink, in a wet basement, etc.
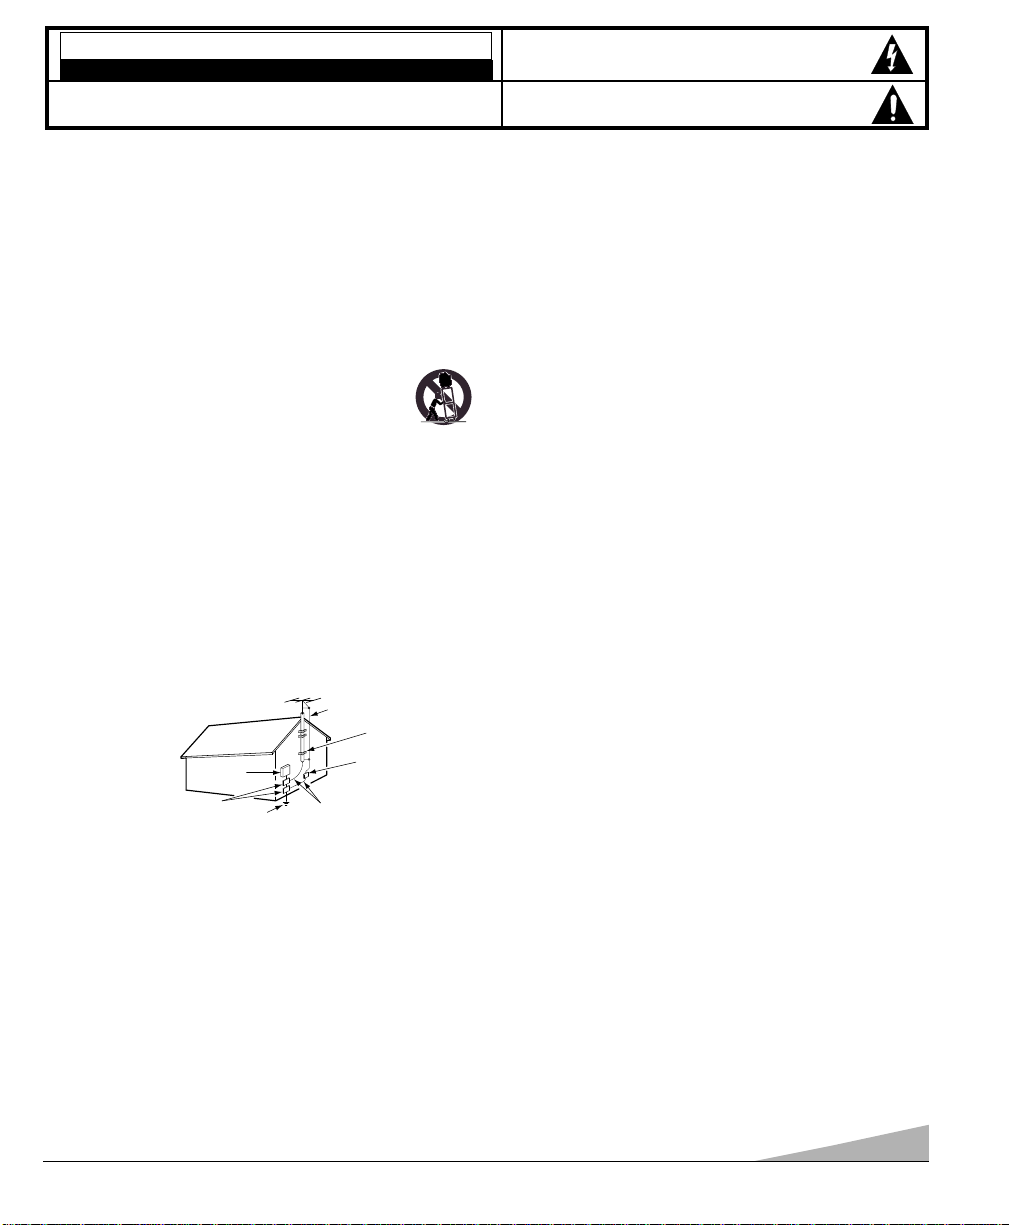
Hooking Up Outdoor Antenna
LIGHTNING PROTECTION FOR YOUR ANTENNA AND SET AS PER
NATIONAL ELECTRICAL CODE INSTRUCTIONS.
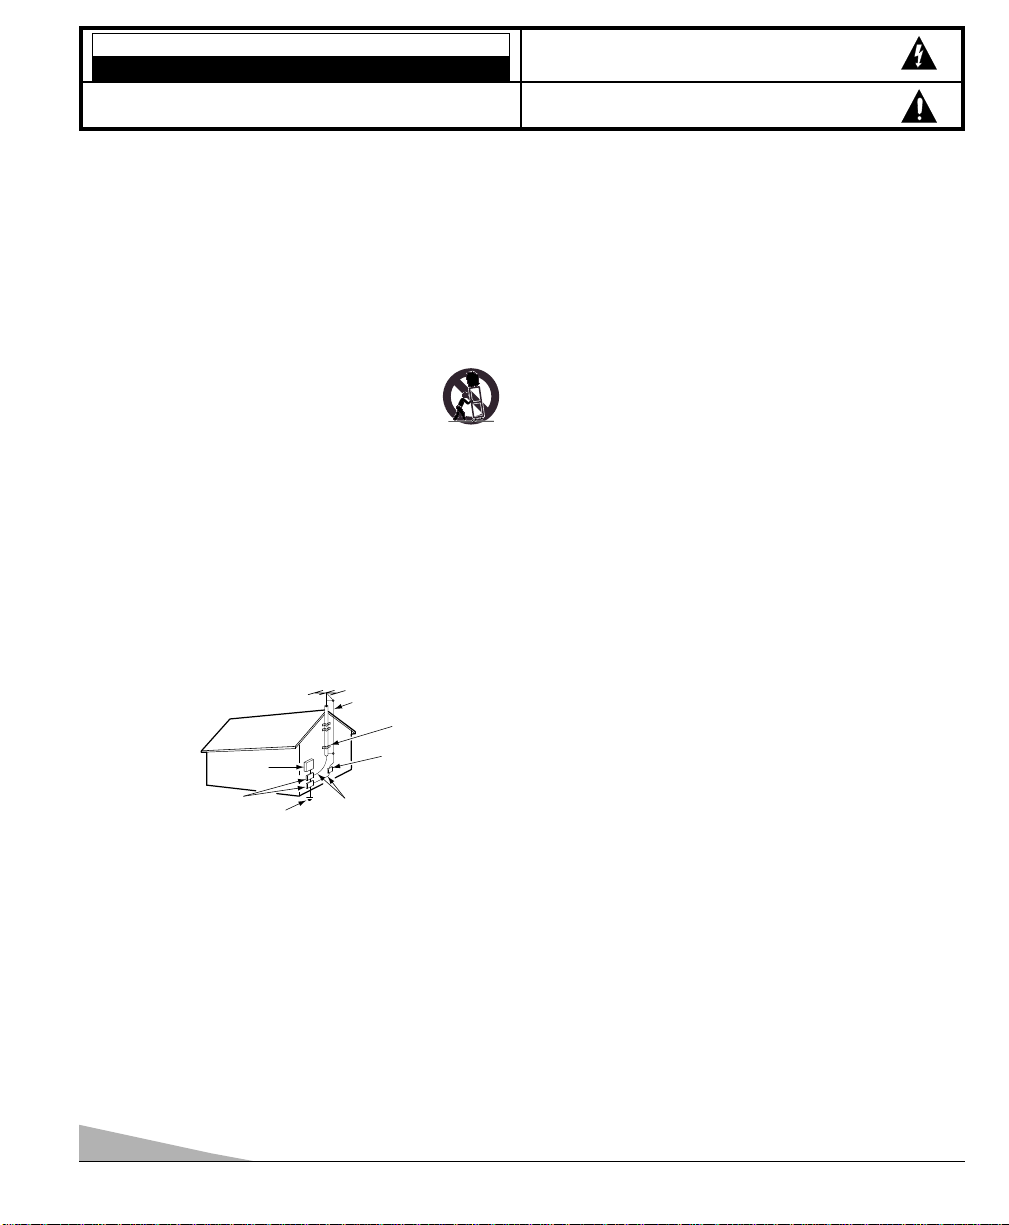
4. If an outside antenna is connected to the receiver, be sure the antenna
system is grounded so as to provide some protection against voltage
surges and built up static charges. Article 810 of the National Electrical
Code, ANSI/NFPA 70, provides information with respect to proper
grounding of the mast and supporting structure, grounding of the lead in
wire to an antenna discharge unit, size of grounding conductors,
location of antenna discharge unit, connection to grounding electrodes,
and requirements for the grounding electrode.
An outside antenna system should not be located in the vicinity of overhead power lines or other electric light or power circuits, or where it can
fall into such power lines or circuits. When installing an outside antenna
system extreme care should be taken to keep from touching such power
lines or circuits as contact with them might be fatal.
Plug in the power cord
5. This product should be operated only from the type of power source indicated on the marking label. If you are not sure of the type of power
supply to your home, consult your product dealer or local power
company. This product is equipped with a polarized alternating current
line plug (a plug having one blade wider than the other). This plug will fit
into the power outlet only one way. This is a safety feature. If you are
unable to insert the plug fully into the outlet, try reversing the plug. If the
plug should still fail to fit, contact your electrician to replace your obsolete outlet. Do not defeat the safety purpose of this polarized plug. Do not
overload wall outlets, extension cords, or integral convenience receptacles as this can result in a risk of fire or electric shock.
6. Power-supply cords should be routed so that they are not likely to be
walked on or pinched by items placed upon or against them, paying particular attention to cords at plugs, convenience receptacles, and the point
where they exit from the product.
Cleaning
7. Before cleaning, unplug the unit from the wall outlet. Do not apply liquid cleaners or aerosol cleaners directly to the unit. Use a damp cloth for cleaning.
Service & Repair
8. Unplug the appliance from the wall outlet and refer servicing to
qualified service personnel under the following conditions:
A. If the power cord or plug is damaged or frayed.
B. If liquid has been spilled into the appliance.
C. If the appliance has been exposed to rain or water.
D. If the appliance has been dropped or the cabinet has been damaged.
E. If the appliance exhibits a distinct change in performance.
F. If the appliance does not operate normally by following the operating
instructions, adjust only those controls that are covered in the operating instructions. Improper adjustment of other controls may result
in damage and will often require extensive work by a qualified technician to restore the appliance to normal operation.
9. Upon completion of any service or repair, request the service technician’s assurance that only Factory Authorized Replacement Parts that
have the same characteristics as the original parts were used, and that
routine safety checks have been performed to determine that the appliance is in safe operating condition. Unauthorized substitutions may
result in fire, electrical shock, or other hazards.
10. Never add accessories that have not been specifically designed for use
with this appliance as they may cause hazards.
11. For added protection during a lightning storm, or when the set is left
unattended and unused for long periods of time, unplug it from the wall
outlet and disconnect the antenna. This will prevent damage to the set
due to lightning or power line surges.
12. Never push objects of any kind into this product through openings as
they may touch dangerous voltage points or short-out parts that could
result in a fire or electric shock. Never spill liquid of any kind on the
product.
EXAMPLE OF ANTENNA GROUNDING ACCORDING TO NATIONAL
ELECTRICAL CODE, ANSI/NFPA 70
CAUTION
RISK OF ELECTRIC SHOCK DO NOT OPEN
CAUTION: TO REDUCE THE RISK OF ELECTRIC SHOCK, DO NOT REMOVE COVER (OR
BACK). NO USER-SERVICEABLE PARTS INSIDE. REFER SERVICING TO QUALIFIED
SERVICE PERSONNEL.
THIS SYMBOL INDICATES THAT DANGEROUS VOLTAGE CONSTITUTING
A RISK OF ELECTRIC SHOCK IS PRESENT WITHIN THIS UNIT.
THIS SYMBOL INDICATES THAT THERE ARE IMPORTANT OPERATING
AND MAINTENANCE INSTRUCTIONS IN THE LITERATURE ACCOMPANYING THIS UNIT.
WARNING: TO REDUCE THE RISK OF FIRE OR ELECTRIC SHOCK, DO NOT EXPOSE THIS
APPLIANCE TO RAIN OR MOISTURE.
IMPORTANT SAFETY INSTRUCTIONS
CAUTION: PLEASE ADHERE TO ALL WARNINGS ON THE PRODUCT AND IN THE OPERATING INSTRUCTIONS. BEFORE
OPERATING THE PRODUCT, PLEASE READ ALL OF THE SAFETY AND OPERATING INSTRUCTIONS. RETAIN THIS
LITERATURE FOR REFERENCE. Follow all instructions...
“Note to CATV system installer:
This reminder is provided to call the CATV system installer’s attention to Article 820-40
of the NEC that provides guidelines for proper grounding and, in particular, specifies that
the cable ground shall be connected to the grounding system of the building, as close to
the point of cable entry as practical.”
NEC
- NATIONAL ELECTRICAL CODE
ANTENNA
LEAD IN
WIRE
GROUNDING CONDUCTORS
(NEC SECTION 810-21)
GROUND CLAMPS
ANTENNA
DISCHARGE UNIT
(NEC SECTION 810-20)
GROUND
CLAMP
ELECTRIC
SERVICE
EQUIPMENT
POWER SERVICE GROUNDING
ELECTRODE SYSTEM
(NEC ART 250, PART H)
Page 3

3
FEATURES
◆Trilingual On-Screen Menu
◆Automatic Channel Search
◆Auto Shut Off
◆Closed-Captioning/Quikcap
◆Digital picture controls
with on-screen display
◆MTS stereo/dbx
®
/SAP
Decoder
◆Auto Flesh Tone
◆Factory preset adjustments
for picture/sound
◆Front Surround Sound
◆Tone
◆V-Guide (Parental Control)
◆Game Mode
◆Front (AV1) and Rear (AV2)
Audio /Video Input Jacks
◆Audio Output Jacks (Fixed)
◆S-Video Input Jack
◆Sleep Timer (3 hours)
◆TV Reset
181 Channel Tuning System
VHF Channels 2-13
UHF Channels 14-69
Cable TV (CATV) 1, 14-125
Automatic Fine Tuning
VHF and Cable Channels
Multimedia/Universal
Remote Control
VCR/TV/AUX
Large Glow-in-the-Dark
basic operating keys
Numbered Channel
Selection
Channel Scanning
Volume Mute
Power Recall
Display Sleep
Caption Reset
Menu VCR keys
Input V-Guide
SPECIFICATIONS
PICTURE TUBE SIZE
(Measured Diagonally) . . . . . . . . . 25-Inch screen
PICTURE RESOLUTION . . . . . . . . . 260 Lines
Video Input . . . . . . . . . . 600 Lines
ANTENNA INPUT . . . . . . . . . . . . . . UHF/VHF/CATV 75Ω
POWER REQUIREMENT . . . . . . . . . 120VAC 60Hz
POWER . . . . . . . . . . . . . . . . . . . . . 86 watts
HORIZONTAL DIM. (Width) . . . . . . . 29.9 in. (760mm)
VERTICAL DIM. (Height) . . . . . . . . 22.5 in. (572mm)
DEPTH DIM. (Thickness) . . . . . . . . 19.9 in. (505mm)
WEIGHT (LB.) (Approx.) . . . . . . . . 63.4 lbs. (28.8 Kg.)
SOUND (2 Speakers) . . . . . . . . . . . Size: 8 cm
AMPLIFIER . . . . . . . . . . . . . . . . . . Built-in with 1W/ch
AUDIO/VIDEO INPUT JACKS . . . . . Video Input
(Front/Rear) . . . . . . . . . . . . . . . . . Audio Input (R/L)
. . . . . . . . . . . . . . . . . . . . . . . . . . . S-Video Input (Rear)
AUDIO OUTPUT JACKS . . . . . . . . . Fixed Audio Output (R/L)
. . . . . . . . . . . . . . . . . . . . . . . . . . . (RCA Connectors)
dbx
®
is a registered trademark of
Carillon Electronics Corporation
CAUTION: FCC Regulations state that improper modifications or
unauthorized changes to this unit may void the user’s
authority to operate the unit.
VOLUME
POWER
MENU
❷
❸
❹
BASIC SETUP
(See Hookup
on page 4.)
❺
➊
(Install batteries, see page 5.)
(Switch on Power.)
QuickTips
■
Do not position the TV
in a confined area.
Allow normal air circulation for electronic
parts.
■
Position your TV at
least 2 feet from stereo
speakers. The magnets
in the speakers may
affect the picture
quality.
■
The TV will automatically select the correct
Antenna mode for the
type of signal you
connect.
Need help?
visit our website at
www.sanyoctv.com
or Call 1-800-877-5032
UHF/VHF/CATV
75 Ω
First
Please connect
cable system or
an antenna to the
terminal on the back
Then press the MENU key
AS
VCR
T
V
AUX
INP
UT
P
O
WER
RE
S
E
T
1
2
3
45
6
7
CA
8
PTI
ON
9
S
ME
0
LEE
N
U
P
CH
RECALL
VO
L
VO
L
MUT
E
DISP
L
P
LA
Y
REC S
T
O
P
P
AUS
V-G
UID
E
E
MENU
Please wait
TV is searching
for your channels
VOLUME
MENU
POWER
Page 4
4
RECEIVER
VCR
CABLE BOX
TV BACK
❸
CATV FRANCHISE NOTE:
Cable companies, like public
utilities, are franchised by local
government authorities. To
receive cable programs, even
with equipment which is
capable of receiving cable
channels, the consumer must
subscribe to the cable
company’s service.
❷
➊
d
➊
b
➊
a
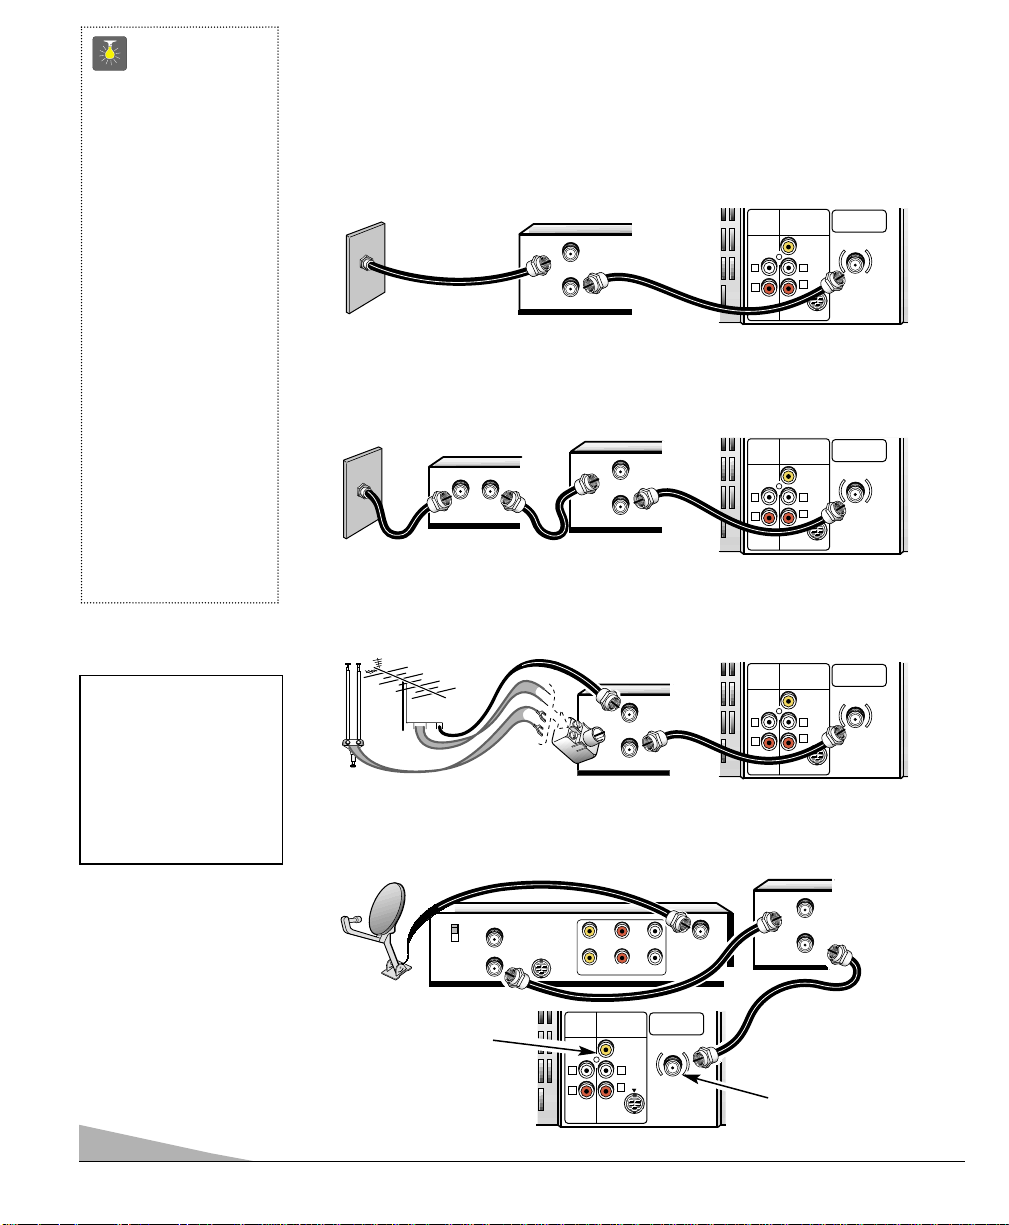
75 OHM Terminal
Use the 75 ohm terminal
to connect a VCR, cable,
cable box, outdoor/
indoor antenna or satellite
receiver directly to the TV.
Cable with VCR and TV
Cable with Cable Box, VCR and TV
Satellite Dish with Receiver, VCR and TV
➊
c
Outdoor or Indoor Antenna with VCR and TV
❷
❷
VCR
VCR
VCR
❷
TV BACK
TV BACK
TV BACK
❸
See page 12, Using the
Audio/ Video jacks.
BASIC HOOKUP METHODS
Use one of these methods to connect a signal to your TV. Select 1a—if you have cable
service and a VCR, 1b—if you have a cable box and a VCR, 1c—if you have an outdoor
or indoor antenna and a VCR, or 1d—if you have a satellite dish and a VCR. Connect
your cable or antenna directly to the TV if you don’t have any optional accessories.
QuickTips
■
The TV will automatically select the correct
Antenna mode for the
type of signal you
connect.
■
TV will switch off
automatically after 15
minutes if there is no
signal reception (cable
out or station not
broadcasting).
Exception—When the
Video mode is selected,
the TV will not automatically switch off when
signal reception has
stopped for 15 minutes.
Need help?
visit our website at
www.sanyoctv.com
or Call 1-800-877-5032
IN
OUT
OUT TO TV.
FROM ANT.
IN
AUDIO
OUTPUT
L
R
OUT
AUDIO VIDEO
IN OUT
+
+
CATV IN
CH3
CH4
OUT TO TV
S-VIDEO
FROM ANT.
OUT TO TV.
IN
FROM ANT.
OUT
OUT TO TV.
R- -LAUDIOVIDEO
R- -LAUDIOVIDEO
INPUT
VIDEO
L
R
S-VIDEO
(MONO)
IN FROM
UHF/VHF/CATV
75Ω
SAT.
AUDIO VIDEO
INPUT
VIDEO
(MONO)
L
R
S-VIDEO
UHF/VHF/CATV
75Ω
AUDIO
OUTPUT
L
R
AUDIO VIDEO
INPUT
VIDEO
(MONO)
L
R
S-VIDEO
UHF/VHF/CATV
75Ω
AUDIO
OUTPUT
L
R
AUDIO VIDEO
INPUT
VIDEO
(MONO)
L
R
S-VIDEO
UHF/VHF/CATV
75Ω
AUDIO
OUTPUT
L
R
IN
FROM ANT.
OUT
OUT TO TV.
Page 5

5
REAR PANEL
QuickTips
■
Make sure all cable
connectors are fully
seated on jacks.
See pages 11~12
before connecting
external video
equipment.
■
Cables are not
supplied for connecting your external
equipment.
■
A solid Blue screen
with the word Video1
or Video 2 displayed
means that the
Video/Game mode is
selected, but no signal
is being detected at the
Video jack. Check connection, and turn on
external equipment.
■
Be sure batteries are
installed correctly.
■
Point the remote
control toward the
equipment you want to
operate. Objects
between the remote
control and the equipment may cause
misoperation of the
remote control
function.
Need help?
visit our website at
www.sanyoctv.com
or Call 1-800-877-5032
INSTALLING BAT TERIES (2 AA not included)
1. Remove the battery cover by pressing the tab and tilting the cover upward. Insert batteries.
Make sure you match / signs on the batteries with marks inside the remote control.
2. Replace battery cover. The remote control is ready!
Notes:
– Do not mix old batteries with new ones or mix
different types of batteries together.
– Remove the batteries if the remote control will not be
used for a month or more. Weak batteries may leak
and cause damage.
+
MULTIMEDIA REMOTE CONTROL
Operates your TV, VCR, DVD, and Cable converter box. To familiarize yourself with this
remote control, see page 6. To program the remote control, see pages 7 ~ 8.
IMPORTANT NOTE: Spent or discharged batteries must be recycled
or disposed of properly in compliance with all applicable laws. For
detailed information, contact your
local County Solid Waste Authority.
FRONT PANEL
Audio/ Video Input Jacks (Video1)
Connect external video equipment
here (see page 11).
MTS
MENUMENU
CHANNEL
VOLUMEVOLUME
POWERPOWER
MENUMENU
MENUMENU
VIDEO IN L- AUDIO -R
Cable / Antenna Input
Terminal (75 ohms)
Audio/ Video Input Jacks (Video2)
Connect external video equipment
here (see page 12).
S-Video Input Terminal
To enhance video detail use the S-Video jack
instead of the Video jack, if available on your
external equipment. (S-Video connection will
override a connection to the rear Video jack.)
Audio Output Jacks
Connect external audio equipment
here (see page 11).
AUDIO
OUTPUT
L
R
AUDIO VIDEO
INPUT
VIDEO
L
R
S-VIDEO
(MONO)
UHF/VHF/CATV
75Ω
Page 6

6
➀
Mode Keys
Use these keys to program the remote
control and to select the operating
mode (VCR, TV, or AUX).
➁
Input Key
Press to select the program source to
be displayed on the screen: TV signal
or signal from the equipment you have
connected to the A/V jacks.
➂
Number Keys
Two keys must be pressed to select a
channel. Example: Press 0 then 6 to
select channel 6. For cable channels
100 through 125, press and hold the
1 key until C1–– appears. Then press
the other two numbers.
➃
Caption Key (See page 16.)
➄
Menu Key
Use this key with the / and
/ keys to navigate and adjust
features of the on-screen menu system
(see pages 9 ~ 10).
➅
Channel (CH) Scanning ( / )
and Volume ( / ) Keys
Press to scan through the channels in
memory and to adjust the volume.
➆
Mute Key
Press once to minimize the volume.
Press again to restore.
Note: When using the audio out jacks
this key will not mute the sound.
➇
VCR/ DVD Keys
These keys control VCR and/or DVD
functions for Fast Forward ( ),
Rewind ( ), Play ( ), Record
( ), Stop ( ), and Pause ( )
functions.
➈
V-Guide Key (See pages 13 ~15.)
➉
Reset Key
Press this key twice to restore factory
settings. The TV will automatically
start Channel Search and clear all customized settings. (See page 10.)
Power Key
Press to turn TV on or off.
Sleep Key
Use this key with the “0” key to set the
Sleep Timer (see page 15).
Recall Key
Select a channel then select another
channel using the number keys. Press
Recall to switch between the channels.
Display Key
Press once to display the channel
number. Press twice to display the
channel number continuously. Press
again to remove the display.
Point towards TV
11
12
13
QuickTips
■
Make sure batteries
have been installed
correctly.
■
If the remote control
does not work: Press
TVkey (see item 1).
■
The remote control
must be programmed
before it will operate
your VCR, DVD, or
Cable Box. See
pages 7~8.
■
Cannot select channel
with number keys.
Press “0” in front of
numbers 1 ~ 9.
Example: Channel 05.
■
The “C” in front of the
channel number indicates a Cable channel.
■
Adjusting the volume
level: Right flashing
arrow indicates
volume is increasing
and left flashing arrow
indicates volume is
decreasing.
■
Channel number will
not display continuously when captioning
is on.
■
Using V-Guide TV
Parental Guidelines
settings can be
changed only by using
the Remote Control.
See pages 14 ~ 15.
Need help?
visit our website at
www.sanyoctv.com
or Call 1-800-877-5032
MULTIMEDIA REMOTE CONTROL KEYS
14
➀
➁
➂
➃
➄
➇
➅
➈
➆
➉
12
13
14
11
➠
VCR TV AUX
POWER
RESETINPUT
123
123
456
456
789
789
CAPTION SLEEP
MENU
VOL VOL
V-GUIDE
0
0
CH
PLAY
REC STOP
RECALL
DISPLAYMUTE
PAUSE
Page 7
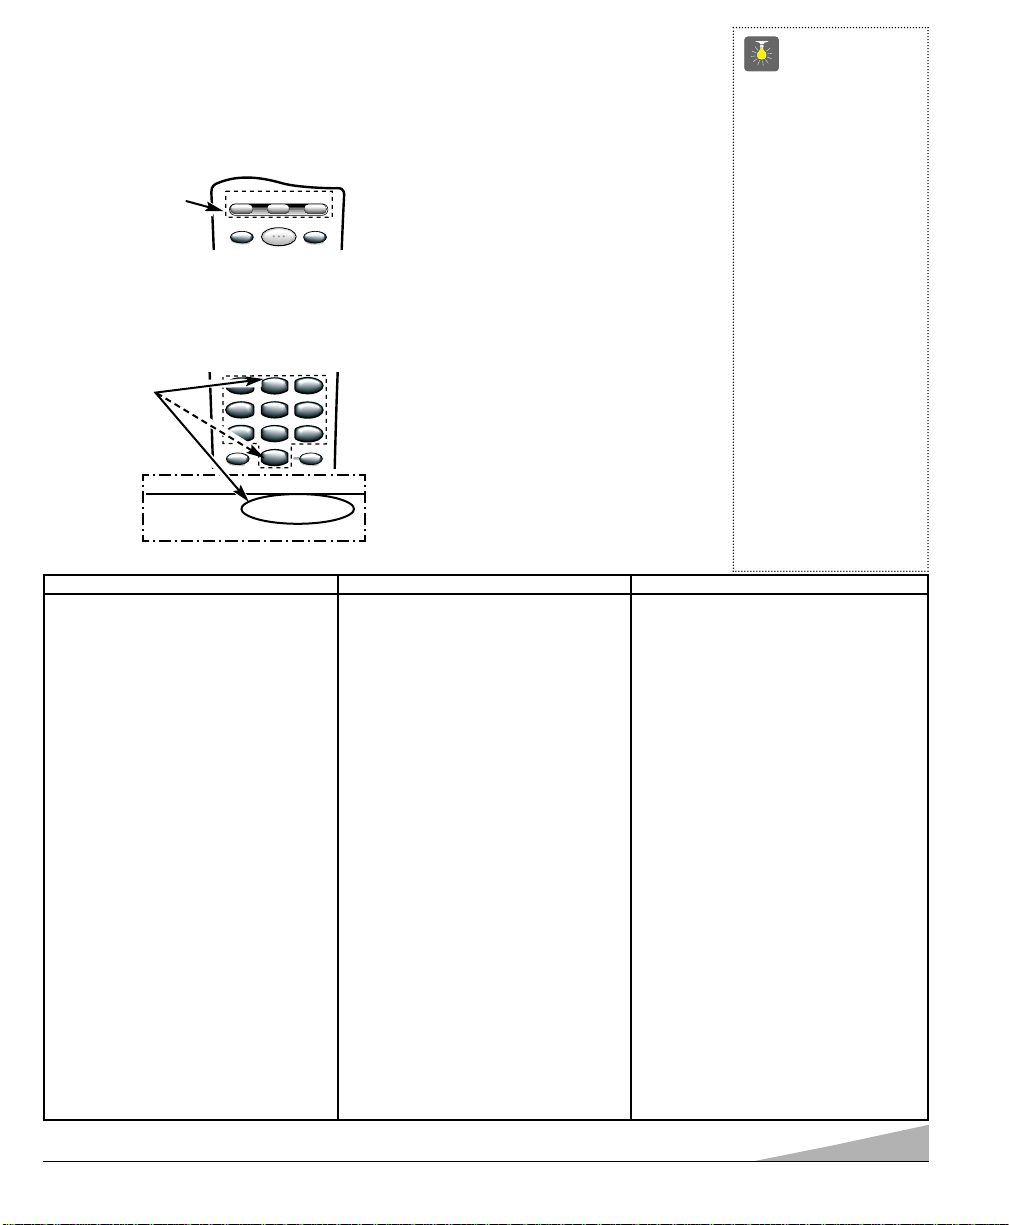
PROGRAMMING THE MULTIMEDIA REMOTE CONTROL
Find your code. It is next to the brand name
of your equipment in the chart below and
on page 8. (The illustrated example is for a
Sanyo VCR.)
➊
Press and hold VCR or AUX key.
❷
Using the NUMBER keys on the
remote, enter the three-digit code
number for your VCR, DVD, or Cable
Box. The key will flash 5 times when
released if the code was accepted.
❸
Press the POWER and CHANNEL keys
to check programming. If they operate
properly, programming is completed. If
not, use another code, if available and
repeat steps.
Notes:
– There may be VCRs, DVDs, and cable
boxes that this remote control cannot
operate.
– Some manufacturers use different types
of remote controls. If your brand has
several codes listed, repeat steps
❶
and
❷
with each number until you find the
correct code. Write your codes in the
spaces on back of remote control and
page 8 for quick reference.
To Operate Your...
VCR—Press the VCR key.
Cable Box—Press the
AUX
key.
DVD Player—Press the
AUX
key.
Television—Press the TV key.
VCR ..............CODE
SANYO ..............200,201,202,203
SCOTT................
Enter Code:
Example: For a
Sanyo VCR, Enter
code “200” (from
chart below).
CAPTION SLEEP
123
456
789
0
123
456
789
0
RESETINPUT
POWER
VCR TV AUX
Press button
and hold down.
QuickTips
■
Make sure batteries have
been installed correctly.
■
The remote control will
not operate my VCR,
DVD, or Cable Box.
– Press the VCR
or AUX key.
– Reprogram the
remote control.
■
Special key functions:
The INPUT key functions as the VCR’s
TV/VCR key when the
Remote Control is in the
VCR mode.
■
The AUX mode will
accept codes for DVDs,
Cable boxes, or a
second VCR, but only
one at a time.
Need help?
visit our website at
www.sanyoctv.com
or Call 1-800-877-5032
VCR Codes Chart
BRAND NAME CODE NO.
ADMIRAL ................... 234,239,243,247,224,229,222,215
ADVENTURA............... 228
AIKO............................ 240,205
AIWA .......................... 228,217
AKAI ........................... 209,215
AMERICA ACTION....... 205
AMERICA HIGH........... 232
BELL & HOWELL ....... 203
BROKSONIC ............... 234,243,247,227,204
CANDLE ..................... 233,240,222,223,204,205,208
................................... 211,216,217
CANON ....................... 232,216
CCE............................. 240,205
CINERAL..................... 240,205
CITIZEN ...................... 233,240,222,205,211,216,217
CRAIG ........................ 223,202,219
CRAVER...................... 204
CURTIS MATHES ....... 232,236,238,222,228,208,209
................................... 211,216,217
DAEWOO .................... 205,240,211
DAYTRON.................... 240,205
DENON........................ 221
DYNATECH ................. 228
EMEREX...................... 214
EMERSON .................. 234,236,240,243,247,223,227,228
................................... 203,204,205,206,210,211,217
FISHER ....................... 200,201,202,203,211
FUJI............................. 232
FUNAI ......................... 228,233,217
GARRARD................... 228
GE .............................. 222,246,232,236,239,226
................................... 229,224,208,212,216
GOLDSTAR ................ 223,238,226,206,208,215,217
GO VIDEO .................. 248,249,208,212,219
GRADIENTE................. 228
HARLEY DAVIDSON.... 228
HEADQUARTER........... 200
HITACHI ..................... 230,246,226,228,221,222,209,217
BRAND NAME......... CODE NO.
HUGHES...................... 221
JBL ............................. 237
JENSEN....................... 209
JVC ............................ 220,225,238,226,203,209,221
KEC............................. 240,205
KENWOOD ................. 226,238,220,201,203,209
KODAK........................ 232
LLOYD’S...................... 228
LOGIK ........................ 235,219
LXI ............................. 232,221,228,201,202,203,206
................................... 211,217
MAGNASONIC............. 223,240,205,219
MAGNAVOX ............... 204,232,228,211,216,217,219,220
MARTA........................ 206
MATSUSHITA ............. 232,216
MEI.............................. 232
MEMOREX ................. 232,239,243,245,223,224,228,
................................... 229,221,200,202,203,206,215
MINOLTA .................... 221
MITSUBISHI ............... 231,239,244,224,226,229,210,223
MOTOROLA................. 232,239,229,224
MTC ........................... 228,217,219
MULTITECH ............... 228,217
NEC ............................ 238,208,223,226,203,206,209
................................... 215,217
OLYMPUS................... 232
OPRIMUS.................... 239,245,248,223,224,229,203,208
ORION ........................ 243,227,234,205,206,210,211,240
PANASONIC ............... 245,232,236,223,202,211,216,219
PENNY ........................ 230,232,221,223,208,211,216,219
PENTAX ...................... 238,221
PHILCO ...................... 204,232,243,228,216,217
PHILIPS ..................... 204,232,211,216,217,228
PIONEER .................... 242,204,207,220
PROSCAN .................. 222,241,246,230,236,226
PROTON ..................... 219
PULSAR ..................... 233,240,205, 208,216,217
QUARTER.................... 200
BRAND NAME......... CODE NO.
QUARTZ...................... 200
QUASAR ..................... 245,232,236,223,216
RADIO SHACK ............ 228,245,223
RCA ............................ 221,241,246,230,232,236,239,224
................................... 226,229,221,201,207,208,210,216
REALISTIC ................. 232,239,223,224,228,229,200,201
................................... 202,203,206,208,216,217,245
SAMSUNG .................. 208,233,211,217,222
SANKY ........................ 239,229,224
SANSUI ...................... 243,226,228,209,219,220
SANYO ....................... 200,201,202,203
SCOTT ........................ 234,247,223,227,211
SEARS ........................ 232,223,228,221,200,201
,................................. 202,203,206,211,216,217
SEMP.......................... 211
SHARP ....................... 239,229,224
SHINTOM ................... 219,227
SIGNATURE ............... 217,239,229,224,200
SONY ......................... 214,218,232,237,226,228
STS............................. 221
SYLVANIA .................. 228,232,244,204,216,217
SYMPHONIC .............. 217,228,233,226,202
TATUNG ..................... 226,209
TEAC .......................... 228,209,214,217
TECHNICS................... 232
TEKNIKA .................... 232,223,228,216,217
TOMAS ....................... 228,217
TOSHIBA .................... 211,240,244,202,205,210
VECTOR ...................... 211
VIDEO CONCEPT......... 211
WARDS ...................... 230,232,239,223,224,228,229
................................... 221,202,204,208,211,217
WHITE
WESTINGHOUSE......... 240,243,205
XR-1000...................... 228,232
YAMAHA .................... 238,226
ZENITH ....................... 215,237,243,223,225,228,222
7
Page 8
8
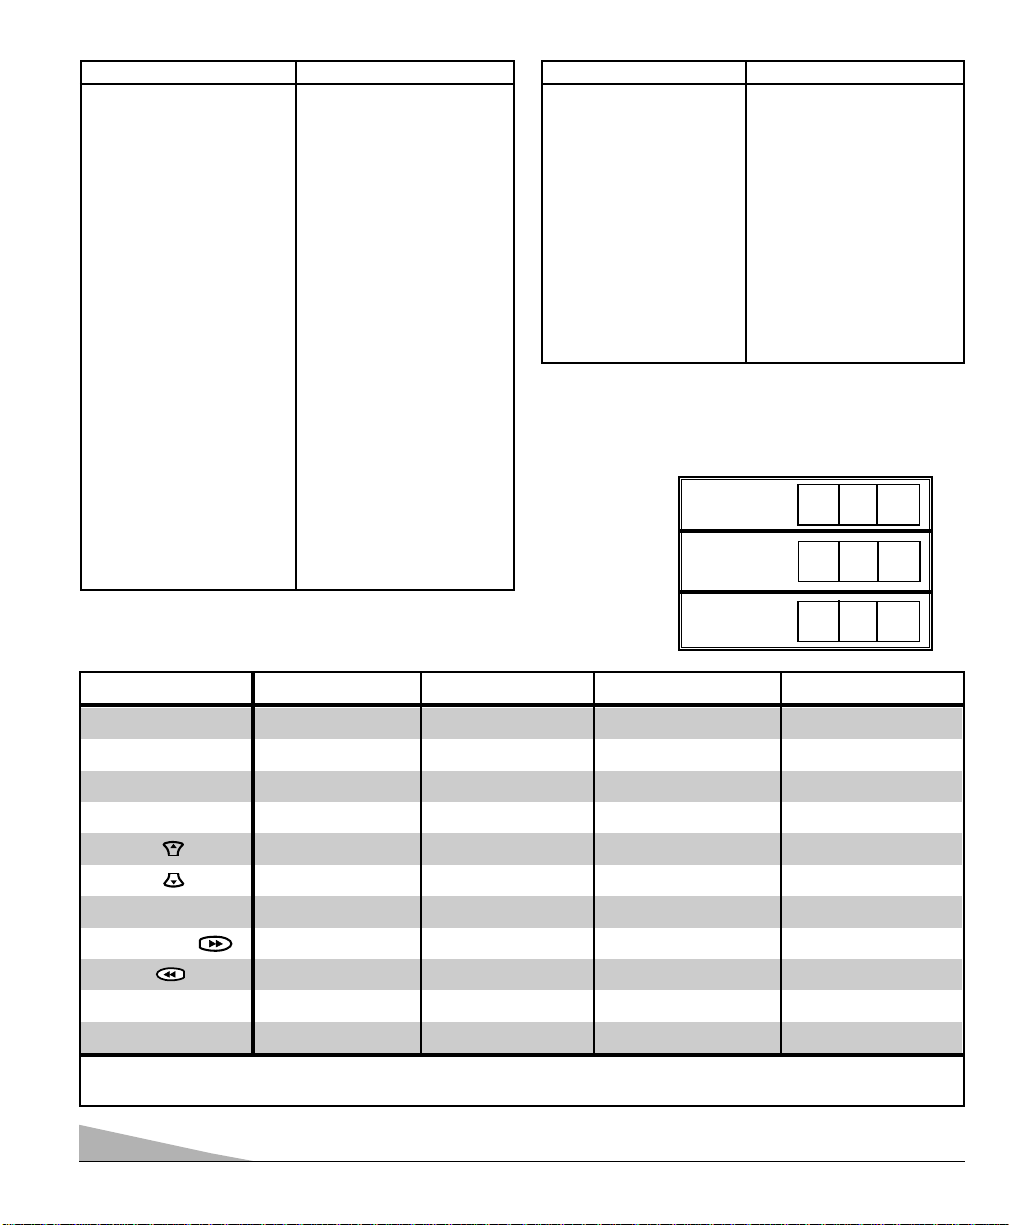
DVD PLAYER Codes Chart
BRAND NAME .......... CODE NO.
APEX ............................ 523
DENON.......................... 501,520
EMERSON .................... 521
FISHER ........................ 500
GE ................................ 504
HARMAN/KARDON........ 513
JVC................................ 510,515
KENWOOD.................... 507
MAGNAVOX.................. 508,502
MARANTZ .................... 508
MITSUBISHI ................ 503
ONKYO.......................... 502,516
OPTIMUS...................... 511
ORITRON...................... 522
PANASONIC.................. 501,518
BRAND NAME .......... CODE NO.
PHILIPS ........................ 508,502
PIONEER ...................... 511,505,518
PROSCAN .................... 504
RCA .............................. 504
SAMSUNG.................... 512
SANYO.......................... 500
SHARP.......................... 517
SHERWOOD.................. 519
SONY............................ 506
TECHNICS .................... 501
THETA DIGITAL............ 511
TOSHIBA ...................... 502
YAMAHA ...................... 501,509
ZENITH ........................ 514,502
Cable Converter Box Codes Chart
BRAND NAME ...... CODE NO.
ABC ........................ 304,306,309,312
.............................. 313,314,318,321
.............................. 322,324
AIM ........................ 321
ARCHER .................. 334
BELL & HOWELL .... 313
CONTEC .................. 302,305,307,308
.............................. 311,318,320,324
CPI .......................... 319
DIAMOND .............. 320
EAGLE .................... 313
EMERSON................ 334
GEMINI.................... 334
GENERAL
INSTRUMENTS .... 303,309,311,320
.............................. 321,322,323,300
GOLDSTAR.............. 312
GOODMIND ............ 334
HAMLIN .................. 330,320
HITACHI .................. 309
HYTEX .................... 318
JERROLD ................ 303,308,309,311
.............................. 313,319,320,321
.............................. 322,323,300
MAGNAVOX ............ 325,329,301
.............................. 313,314,322
MEMOREX .............. 332,313,314
MOVIE TIME .......... 306,310,314
NORTHCOAST ........ 316
NSC ........................ 305,306,314
OAK ........................ 305,318,320
PANASONIC ............ 302,307,317
PARAGON .............. 313,314
BRAND NAME ...... CODE NO.
PHILIPS .................. 325,329,301
.............................. 313,314,322
PIONEER ................ 333,312,317
PROSCAN .............. 327
QUASAR.................. 302,307,317
RADIO SHACK ........ 334
RCA ........................ 328,302,307
REGAL .................... 330,307,320
REMBRANT ............ 305,309
SAMSUNG .............. 310,312
SCIENTIFIC
ATLANTA .............. 327,307,324
SIGNAL .................. 310
SIGNATURE ............ 300,309,321,322
SPRUCER .............. 302,307,316
STARCOM .............. 332,309,311,321
.............................. 322,323
STARGATE .............. 309,310,311,321
.............................. 322,334
TELEVIEW .............. 310
TOCOM .................. 300,303,304,305
.............................. 306,307
TOSHIBA ................ 331,309,311
.............................. 316,322
UNIKA .................... 314
UNITED AIRTISTS .. 318
UNITED CABLE ...... 309
U.S.
ELECTRONICS ...... 309,322,324
VIEWSTAR .............. 326,313,315
WARDS .................. 321,322
WARNER ................ 312
ZENITH .................. 331,316,322,324
Replacing Batteries
The programming code numbers will remain in memory
for 5 minutes as you replace the batteries.
VCR Code:
Cable Box
Code:
DVD Player
Code:
Record your
VCR, Cable Box,
and DVD Player
codes for future
reference.
Multimedia Remote Control Keys Functions Chart
REMOTE KEYS FUNCTION IN TV MODE FUNCTION IN VCR MODE FUNCTION IN CABLE MODE FUNCTION IN DVD MODE
POWER On/Off On/Off On/Off On/Off
NUMBER KEYS (0 ~ 9) Used to Select Channels Used to Select Channels Used to Select Channels No Function
INPUT Selects TV/Video mode Selects TV/VCR mode Selects TV/Video mode Selects TV/Video mode
RECALL Selects previous channel Selects previous channel No Function Select Repeat
CHANNEL (UP) Selects next channel up Selects next channel up Selects next channel up Next or Skip Forward
CHANNEL (DOWN) Selects next channel dn Selects next channel dn Selects next channel dn Previous or Skip Reverse
PLAY Selects VCR Play Mode Selects VCR Play Mode Selects VCR Play Mode Selects DVD Play Mode
FAST FORWARD Fast Forwards tape Fast Forwards tape Fast Forwards tape Fast Forwards disc
REWIND Rewinds tape Rewinds tape Rewinds tape Steps backward
STOP Selects VCR Stop Selects VCR Stop Selects VCR Stop Stops disc
PAUSE Selects VCR Pause Selects VCR Pause Selects VCR Pause Pause (still) disc
NOTE: Other remote control keys operate only TV functions.
Page 9

TV ADJUSTMENT AND SETUP
The on-screen menu provides the viewer with easy access to adjustments and settings. Just use
the keys on the remote control and follow the instructions.
HOW TO MAKE ADJUSTMENTS
1. Press MENU key.
2. Use the / keys to highlight
the desired feature.
3. Use the / keys to choose desired
option (
➧
indicates selected item).
Items with submenus requires additional steps.
SETTING AUDIO MODE
Select desired sound setting, Stereo, Mono, or SAP (secondary audio program).
Note: Stereo and SAP must be part of the broadcast signal.
1. Choose Stereo, Mono, or SAP from the Audio options.
2. Press the MENU key to exit.
Note: The TV will automatically reset to stereo
if unplugged or a power interruption occurs.
ADJUSTING PICTURE/SOUND
Factory preset adjustments for
picture/sound :
Choose Auto from the Picture/Sound options.
Adjust the picture/sound manually:
1. Choose Manual from the Picture/Sound
options.
2. Press the MENU key to open the
picture/sound settings submenu.
3. Use the / keys to highlight the
picture or sound setting you want to
change.
4. Use the / keys to adjust settings.
5. Press the MENU key to exit.
For automatic game settings:
1. Choose Game from the Picture/Sound menu options. The screen and
sound will automatically change to preset settings.
2. Press the MENU key to exit.
Note: Select the front A/V input jacks by pressing
the INPUT key on the remote control.
9
QuickTips
■
Always follow
on-screen instructions.
■
All TV adjustments are
controlled through the
menu.
■
The menu will display
on the screen for
approximately 20
seconds. Press MENU
again to redisplay.
■
Use the CHANNEL
/ keys and the
VOLUME /
keys to navigate
through the menus and
to make selections
from the menus.
■
Under weak stereo
signal conditions, you
may receive better
quality sound in the
“Mono” position.
■
Use the Surround
feature to expand the
sound effect while
receiving MTS stereo
signals as well as
enhancing video
games sounds.
Need help?
visit our website at
www.sanyoctv.com
or Call 1-800-877-5032
▲▼ keys – + keys
AAAAuuuuddddiiiioo
oo
➧SSSStttteeeerrrreeeeoooo Mono SAP
▲▼ keys – + keys
Audio
➧
Stereo Mono SAP
Picture/Sound
➧
Auto Manual
Game
Antenna
➧
Cable VHF/UHF
CH. Search
➧
NO Start
CH. Scan Memory C 34 Added
Espanol
Menu Language
➧
English Francais
Press MENU key for adjustment
▲▼ keys – + keys
Audio
Antenna
PPPPiiiiccccttttuuuurrrreeee////SSSSoooouuuunnnndddd
Auto
➧MMMMaaaannnnuuuuaaaallll
Game
▲▼ keys – + keys
Audio
Antenna
PPPPiiiiccccttttuuuurrrreeee////SSSSoooouuuunnnndddd
Auto Manual
➧GGGGaaaammmmeeee
▲▼ keys – + keys
Color
Tint
Contrast
Brightness
Sharpness
Press MENU key to exit
TTTToooonnnnee
ee
LLLL----------------■■❙❙❙❙❙❙❙❙❙❙❙❙❙❙❙❙❙❙❙❙❙❙❙❙HH
HH
SSSSuuuurrrrrrrroooouuuunnnndd
dd OFF
➧
OOOONNNN
➥
Page 10
10
QuickTips
■
When setting the
Antenna mode, choose
Cable if your TV is
connected to a cable
system, otherwise
choose VHF/UHF.
■
Channels deleted from
scan memory can be
selected with the
number keys.
■
The channel number
area must
be highlighted before
pressing the key
to add or delete.
■
Restoring deleted
channels, use the
on-screen menu to
manually add channels
or start CH. (Channel)
Search from the menu.
Need help?
visit our website at
www.sanyoctv.com
or Call 1-800-877-5032
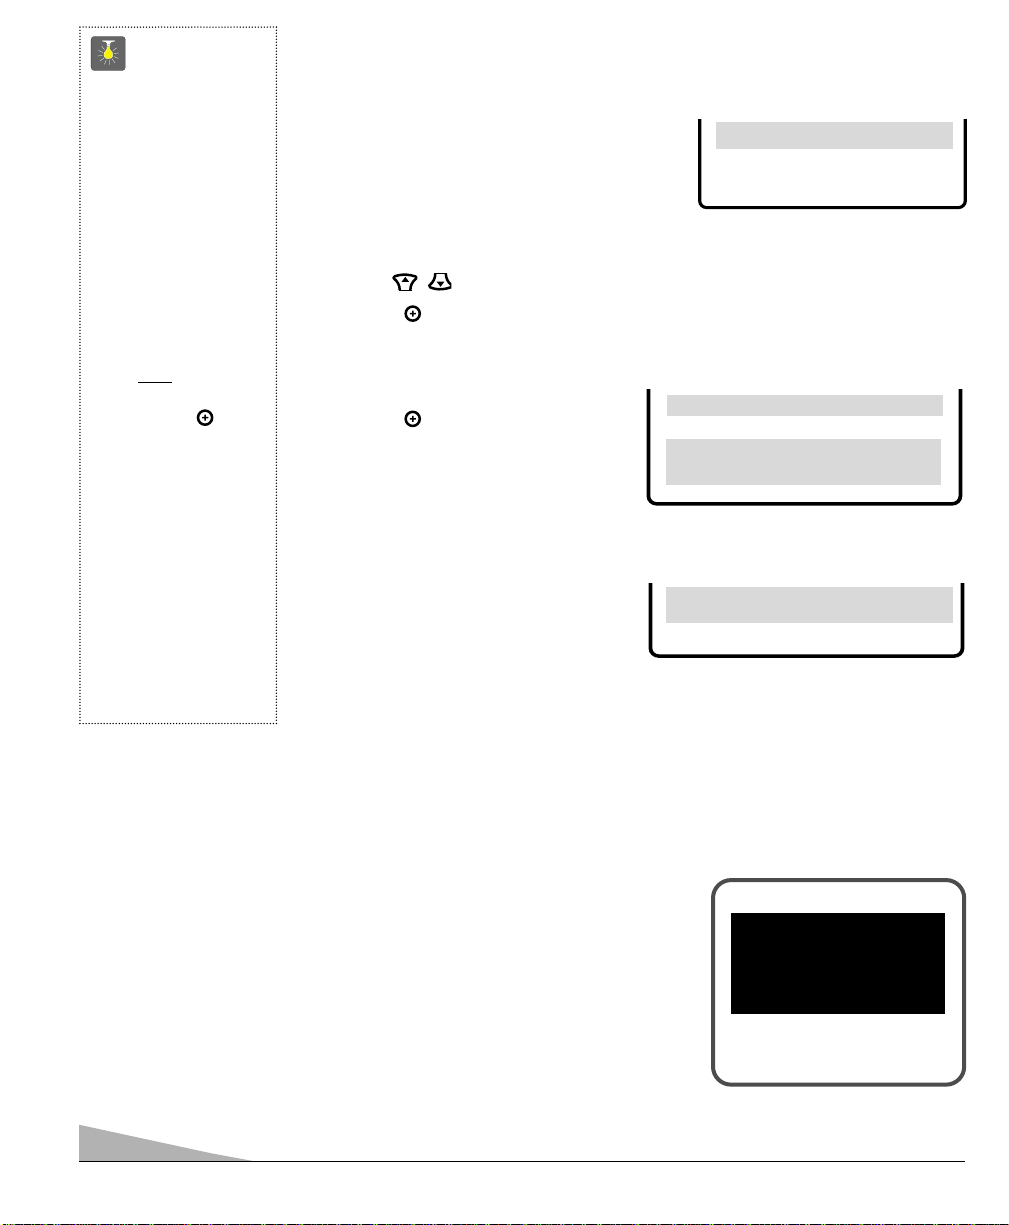
ADDING OR DELETING CHANNELS
1. Press MENU key.
2. Use the / keys to highlight CH. Scan Memory.
3. Press the key to highlight the channel number entry area.
4. Enter the channel number you want to add or delete (example): C34. For cable chan-
nels above 99, press and hold the 1 key until C1– – appears. Then enter the other two
numbers.
5. Press the key to change the present
setting. Example: Added will change to
Deleted.
6. Press the MENU key to exit.
Menu Language
SSSSeeeelllleeeecccctttt cccchhhhaaaannnnnnnneeeellll uuuussssiiiinnnngggg ▲▲▲▲▼▼▼▼,,,, 0000~~~~9999 kkkkeeeeyyyyss
ss
PPPPrrrreeeessssssss MMMMEEEENNNNUUUU kkkkeeeeyyyy ttttoooo eeeexxxxiiiitt
tt
CH. Scan Memory CCCC 33334444 Deleted
SELECTING THE DISPLAY LANGUAGE
1. Choose English, Francais, or Espanol
from the Menu Language options.
2. Press the MENU key to exit.
Press MENU key to exit
Espanol
MMMMeeeennnnuuuu LLLLaaaannnngggguuuuaaaaggggee
ee
➧EEEEnnnngggglllliiiisssshhhh Francais
RESETTING THE ANTENNA/CABLE MODE AND CHANNEL SEARCH
Resetting the Antenna/Cable Mode or CH. (Channel) Search is required only if additional
channels become available, such as moving to another city or having a cable service
installed.
1. Choose Start from the Ch. Search menu
options.
CH.Scan Memory
Menu Language
Press MENU key to exit
CCCCHHHH.... SSSSeeeeaaaarrrrcccchh
hh NO
➧SSSSttttaaaarrrrtttt
RESETTING THE TV
Press the RESET key to automatically reset the television to factory settings. These
features will automatically reset:
•
Picture/Sound Adjustments: Color, Tint, Contrast, Brightness,
Sharpness, Tone, and Surround
•
Channel Memory
•
Audio to Stereo
•
Caption to OFF
•
V-Guide to OFF
•
Language to English
•
Sleep Timer (if previously set)
•
Game/ Video to TV (if previously selected)
If desired, personal settings can be made again using the menu options.
Press RESET key
again to return
factory preset and
begin channel search
Page 11
11
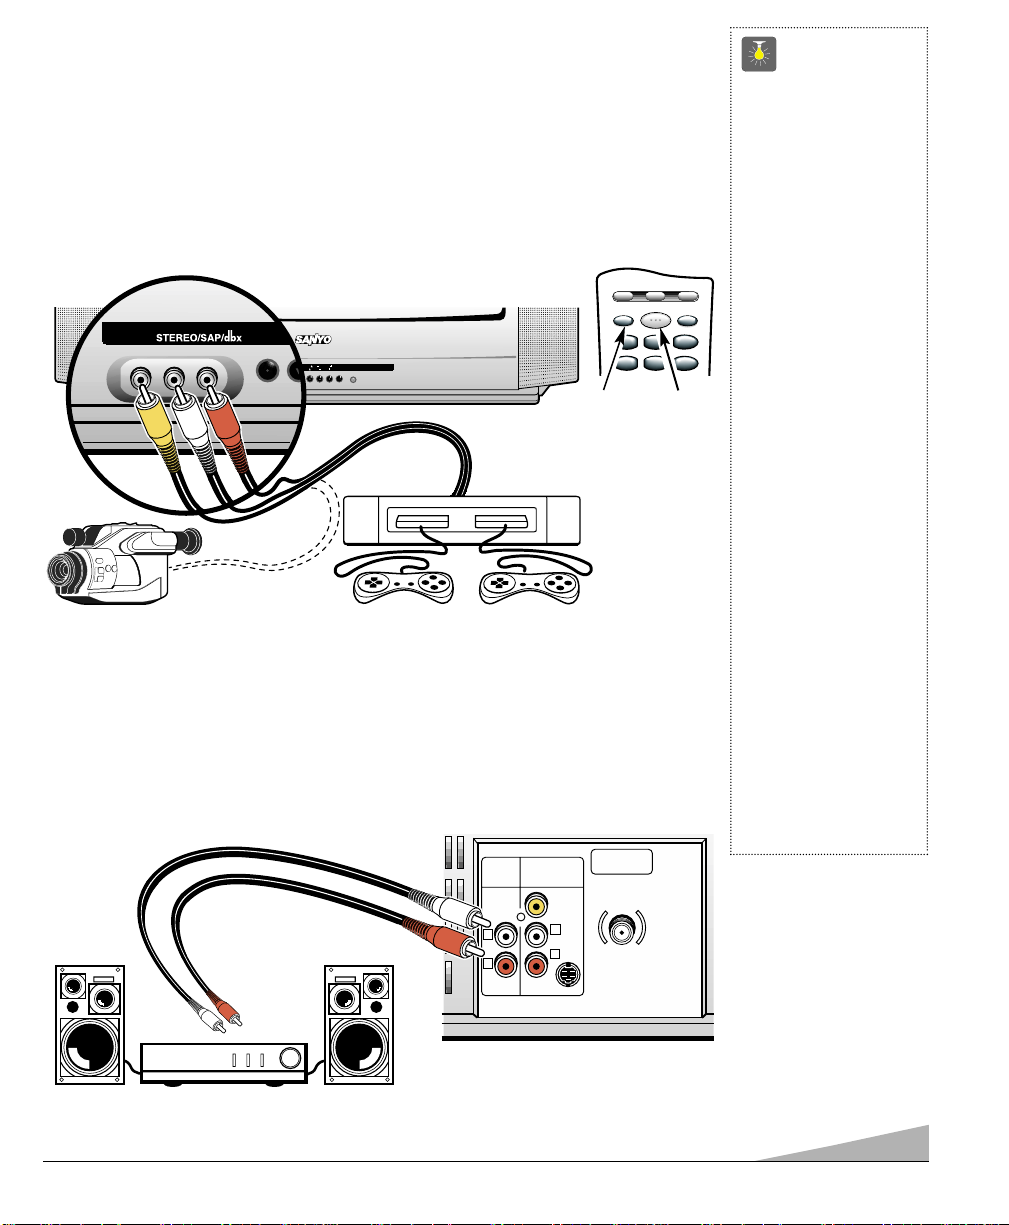
USING THE FRONT AUDIO/VIDEO INPUT JACKS
CONNECTING A VIDEO GAME OR OTHER EXTERNAL EQUIPMENT
Switch off TV and video game before connecting cables.
1. Connect game Audio Output (R/L) to the TVAudio Input (R/L). Then connect game
Video Out to the TV Video In
❶
.
2. Press POWER key
❷
to turn on the TV
. Turn on external equipment also.
3. Press the INPUT key ❸ on the remote control.
MTS
MENU
CHANNEL
VOLUME
POWER
MENU
MENU
MTS
MENU
❶
Video Game
❷
❸
Remote Control
Camcorder
USING THE AUDIO OUTPUT JACKS
CONNECTING A STEREO AMPLIFIER TO AUDIO OUT JACKS
1. Connect the TV Audio Out (R/L) ❶to the Stereo Amplifier In (R/L) ❷.
2. Press POWER to turn on the TV. Turn on external equipment also.
AUDIO
OUTPUT
AUDIO VIDEO
INPUT
R
L
UHF/VHF/CATV
75Ω
R
L
VIDEO
(MONO)
S-VIDEO
❶
❷
Back of TV
Stereo Amplifier
QuickTips
■
Position your TV at
least 2 feet from stereo
speakers. The magnets
in the speakers may
affect the picture
quality.
■
Do not connect
external speakers
directly to the TV.
■
Make sure all cable
connectors are fully
seated on jacks.
■
Always match cables
according to the
colors;
RED for right
audio,
WHITE for left
audio and
YELLOW for
video.
■
A solid Blue screen
with the words Video1
or Video2 displayed
means that the
Video/Game mode is
selected, but no signal
is being detected at the
Video jack.
Need help?
visit our website at
www.sanyoctv.com
or Call 1-800-877-5032
VIDEO IN L- AUDIO -R
MENU
VIDEO IN L- AUDIO -R
VCR TV AUX
POWER
123
123
MENU
POWER
VOLUME
CHANNEL
MENU
MENU
456
456
RESETINPUT
Page 12
12
QuickTips
■
Make sure all cable
connectors are fully
seated on jacks.
■
Always match cables
according to the
colors;
RED for right
audio,
WHITE
for left
audio and
YELLOW
for
video.
■
A solid Blue screen
with the words Video1
or Video2 displayed
means that the
Video/Game mode is
selected, but no signal
is being detected at the
Video jack.
Need help?
visit our website at
www.sanyoctv.com
or Call 1-800-877-5032
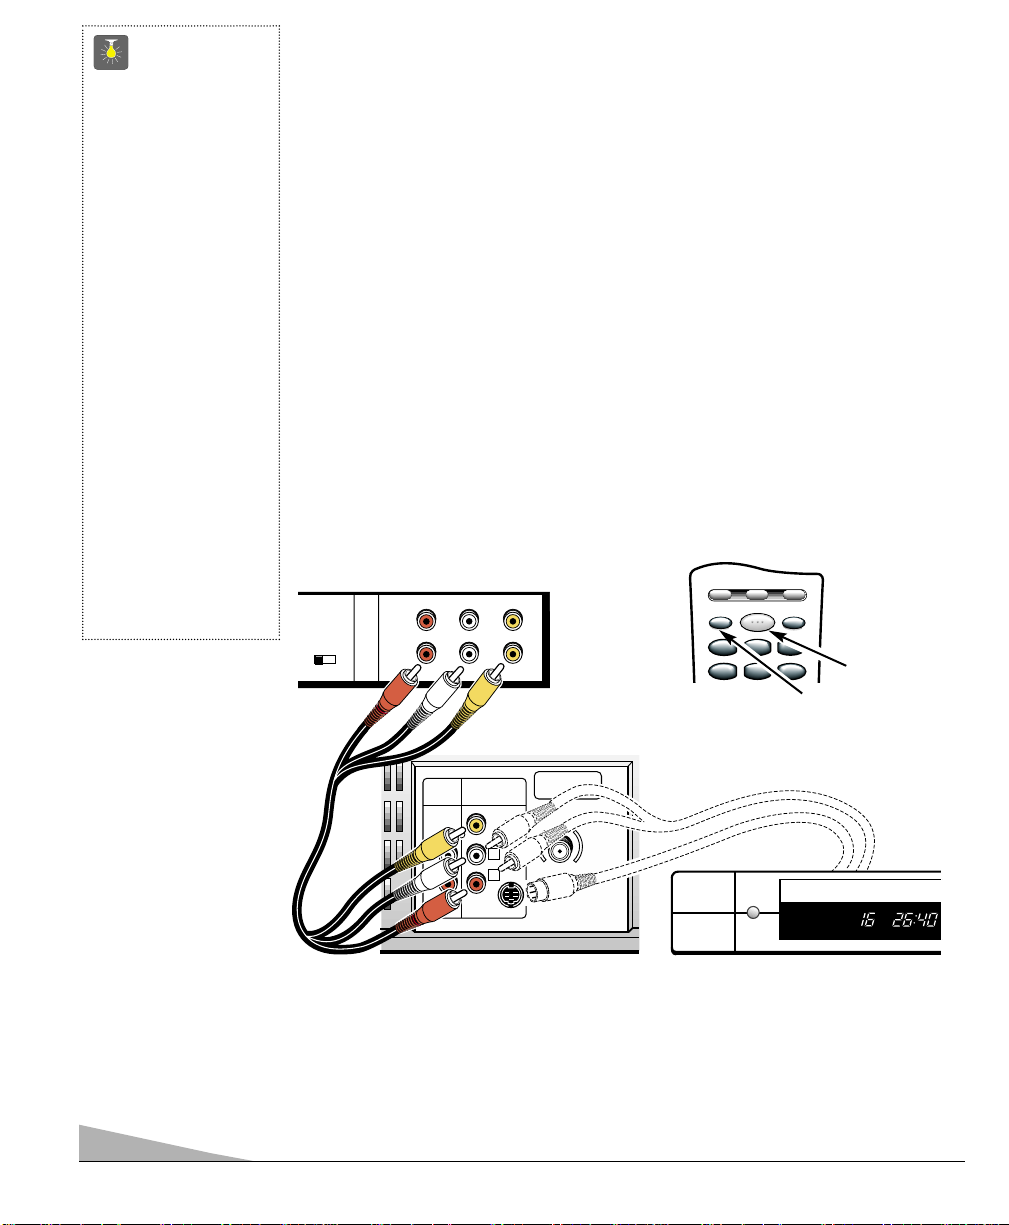
USING THE REAR AUDIO/VIDEO INPUT JACKS
CONNECTING A VCR OR OTHER EXTERNAL EQUIPMENT
Switch off TV and external equipment before connecting cables. (Cables are
not supplied.)
1. Connect VCR, DVD, or other equipment’s Audio Out (R/L) to the TVAudio
Input (R/L)
❶
.
For Mono VCR (Single Audio Jack) connect VCR Audio Out to TVAudio (L) In.
2. Connect VCR, DVD, or other equipment’s Video Out to the TV Video In
❷
.
Optional
Connect VCR, DVD, or other equipment’s S-Video Out to the TV S-Video In Jack ➁.
Using the S-Video jack overrides the rear Video jack
❷
.
3. Press POWER to turn on the TV. See
❸
. Turn on external equipment also.
4. Press the INPUT key
❹
to select program source: TV signal or signal from the equipment you have connected to the A/V jacks. (Press this key until Video2 displays on the
screen.)
AUDIO
OUTPUT
AUDIO VIDEO
INPUT
R
L
UHF/VHF/CATV
75Ω
R
L
VIDEO
(MONO)
S-VIDEO
CH3 CH4
IN
OUT
A/V JACKS
RF
CHANNEL
R- -L
AUDIO VIDEO
R- -LAUDIO VIDEO
❶
Back View of VCR
❷
❹
❸
Remote Control
TV A /V Input Rear Jacks
➁
DVD
VCR TV AUX
POWER
RESETINPUT
123
123
456
456
Page 13
13
ABOUT MPAA AND TV PARENTAL GUIDELINES
MPAA and TV Parental Guidelines are rating systems that provide advance cautionary
information to parents about the content of movie and television programming.
MPAA is a voluntary rating system used by the movie industry. TV Parental Guidelines
are modeled after the MPAA ratings and were designed to be simple to use, easy to
understand, and easy to find.
TV Parental Guidelines contain both age-based and content-based information. This
gives parents discretionary ways of choosing appropriate material for their children to
view.
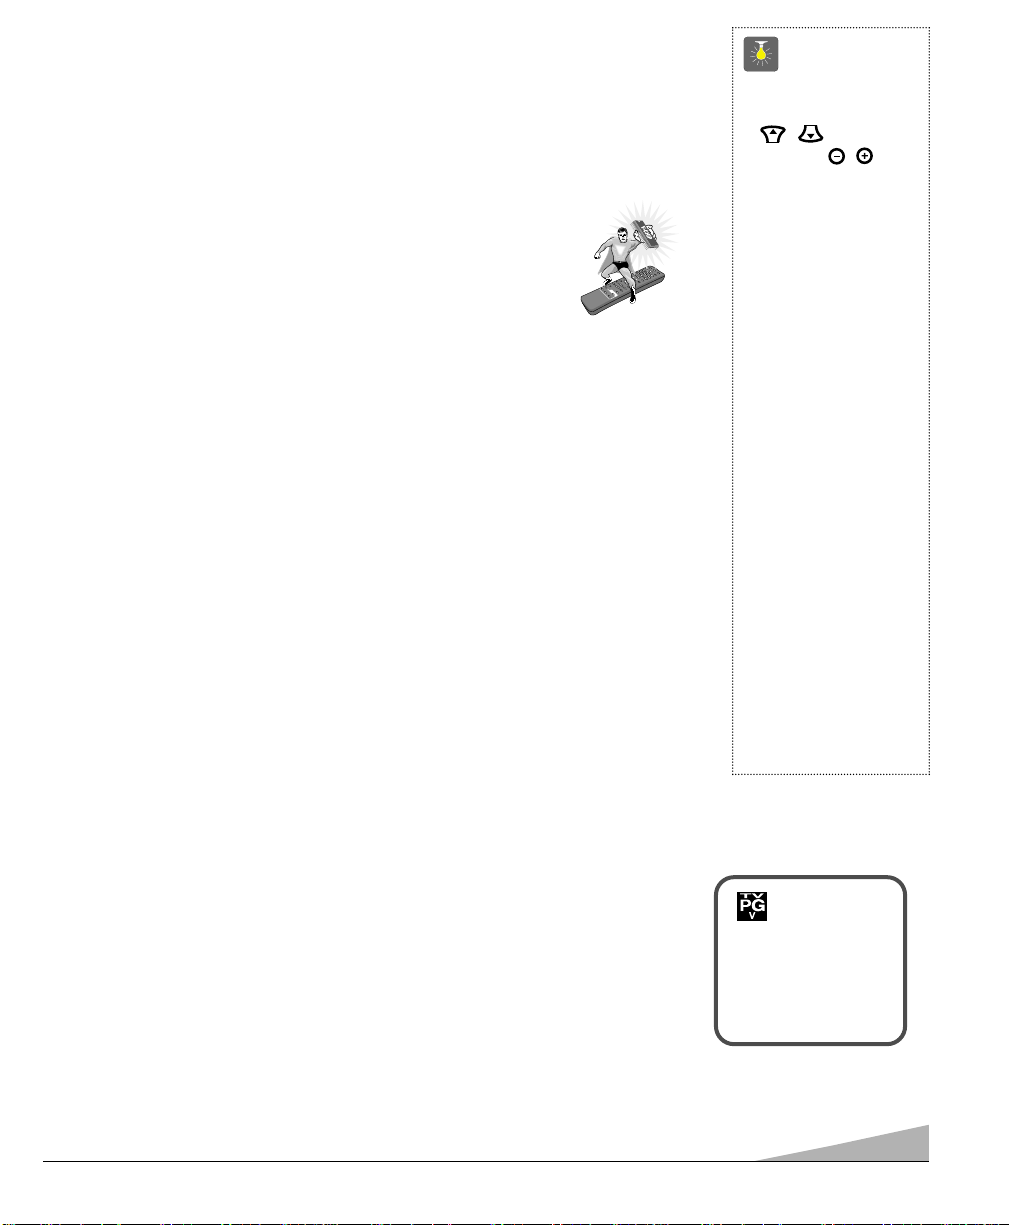
Content ratings are represented by the initials D (Suggestive Dialog), L (Adult
Language), S (Sexual Situations), V (Violence), and FV (Fantasy Violence). When programming contains any or all of these conditions, these letters become part of the icon
that is displayed on the TV screen.
A rating icon will generally appear in the upper left hand corner of the TV screen for
about fifteen seconds at the beginning of a program and should be repeated at the beginning of the second hour of a long program. It may also appear when returning from
commercials. There may be other instances when these icons will be displayed as well.
Parents are encouraged to become familiar with these icons and their meanings.
WHERE CAN I FIND ADVANCE NOTICE OF PROGRAM RATING
Publishers of programming guides have been asked to include these ratings along with
other information they publish. You can expect to find this information in newspapers,
magazines, and on-screen listings and guides.
TYPES OF PROGRAMS TO RECEIVE RATING
The TV Parental Guidelines will apply to various types of TV programming, including:
specials, mini-series, and movies. Sports and news shows will not carry the guidelines.
C 34
Rating: TVPG-V
V-GUIDE INFORMATION
NOTE: THIS FEATURE IS DESIGNED TO COMPLY WITH THE UNITED
STATES OF AMERICA’S FCC V-CHIP REGULATIONS. THEREFORE, IT
MAY NOT FUNCTION WITH BROADCASTS THAT ORIGINATE IN
OTHER COUNTRIES.
With the introduction of “V-Chip” technology, it is now possible for Sanyo
televisions to interpret MP AAand TVParental Guidelines rating codes. When
these codes are detected, the TV will automatically display or block the
program, depending upon choices you make when setting up the
V-Guide system.
QuickTips
■
Use the CHANNEL
/ and
VOLUME / keys
to navigate through
the menus and to make
selections from the
menus.
■
V-Guide feature is
accessible only from
the remote control.
■
The TV guidelines
rating icon will
generally appear in
the upper left hand
corner of your TV
screen.
■
The V-Guide display
remains on screen for
approximately 20
seconds. If it
disappears, press
the
V-GUIDE key.
Need help?
visit our website at
www.sanyoctv.com
or
Call 1-800-877-5032
V
v
V
C
R
I
N
PUT
TV
PO
1
W
4
E
A
R
U
2
X
7
C
R
A
ESE
5
P
T
IO
M
T
N
E
8
3
N
VO
U
0
6
L
-
CH
9
S
L
M
E
U
E
P
T
RESET
E
+
R
VO
E
PL
C
V
L
AY
G
U
STOP
D
I
P
I
D
S
I
P
E
PL
O
A
N
Y
SWAP
/O
F
PA
F
U
QU
SE
L
O
I
C
CK
A
T
I
F
O
R
N
E
E
SELEC
ZE
T
Page 14
14
V-GUIDE OPERATION
Use this feature to supervise television viewing for young children. This television can be set
to automatically block programs with content you deem as inappropriate for your children to
view, including: suggestive dialog, adult language, sexual situations, violence, and fantasy
violence.
The ability of the television to block the reception of specific programming content depends
upon several conditions: 1) The program must be rated, 2) Networks must broadcast the
rating code data, 3) Cable companies must transmit the rating code signal, and 4) The TV
must be properly setup to decode the signal.
The TV guidelines rating icon will generally appear at the upper left hand corner of your
TV screen.
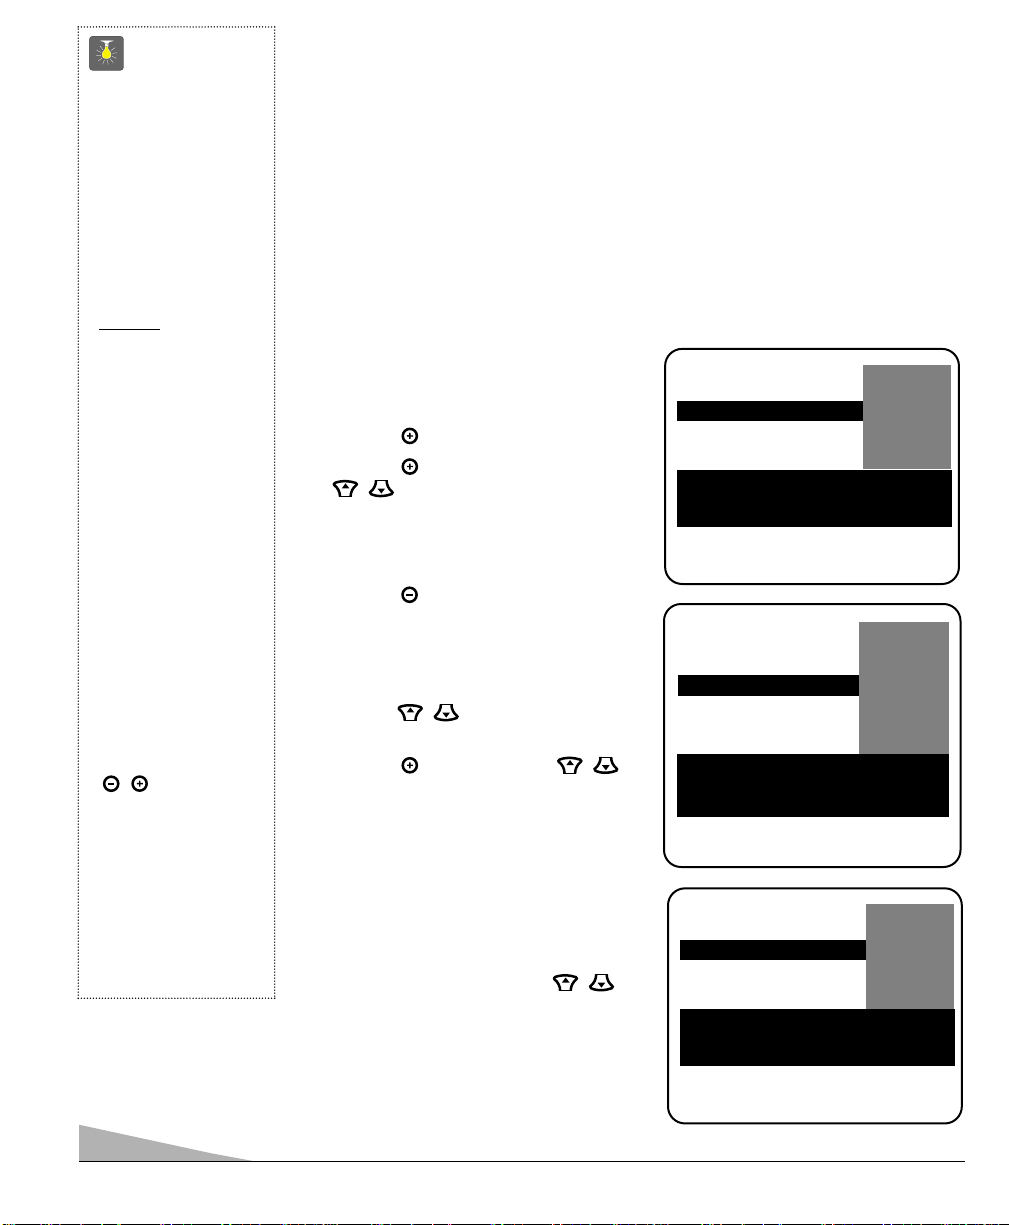
SETTING MPAA MOVIE RATING
1. Press the V-GUIDE key on the remote
control to display menu.
2. Press the key to switch V-Guide ON.
3. Press the key again. Then use the
/ keys to highlight rating.
4. Press the MENU key to Block (B) or
Unblock (U) selected rating. (➡ Arrow
indicates selection.)
5. Press the key to return to the V-Guide
Options menu.
SETTING AGE-BASED GUIDELINES
6. Use the / keys to highlight TV
Parental Guidelines.
7. Press the key. Then use the /
keys to highlight rating.
8. Press the MENU key to Block (B) or
Unblock (U) selected rating.
(➡ Arrow indicates selection.)
SETTING CONTENT-BASED
GUIDELINES
9. Follow steps 6 and 7. Use the /
keys to highlight Content.
10. Press the MENU key to display the
Content Option menu.
V-GUIDE
MPAA Movie Ratings
TV Parental Guidelines
Press MENU key to BLOCK
Use ▲▼, – + keys to select
Press V-GUIDE key to exit
XB
NC17 B
➡RRBB
PG13 U
PG U
GU
QuickTips
■
The TV will automatically block (B) ratings
above or unblock (U)
ratings below selection. For example, if
you block rating R,
NC17 and X will be
blocked as well.
■
Blocking TVY7
does not
block higher
ratings.
■
You can block a
content rating such
as TVPG-V and
still be able to watch
TVPG programs with
ratings of S-L-D
provided TVPG is
unblocked (U).
■
To view Blocked (B)
programs, set
V-GUIDE to OFF, or
press the RESET key
twice to clear all
Blocked (B) ratings
and customized
settings.
■
When in the V-Guide
menu system, the
/ keys allows you
to navigate between
the ratings and the
options menu.
Need help?
visit our website at
www.sanyoctv.com
or Call 1-800-877-5032
V-GUIDE
MPAA Movie Ratings
TV Parental Guidelines
TVMA B
TV14 B
TVPG B
➡TTVV--GGBB
TVY7 U
TV-Y U
Content
Press MENU key to BLOCK
Use ▲▼, – + keys to select
Press V-GUIDE key to exit
V-GUIDE
MPAA Movie Ratings
TV Parental Guidelines
Press MENU key to BLOCK
Use ▲▼, – + keys to select
Press V-GUIDE key to exit
XB
NC17 B
➡RRBB
PG13 U
PG U
GU
Page 15
15
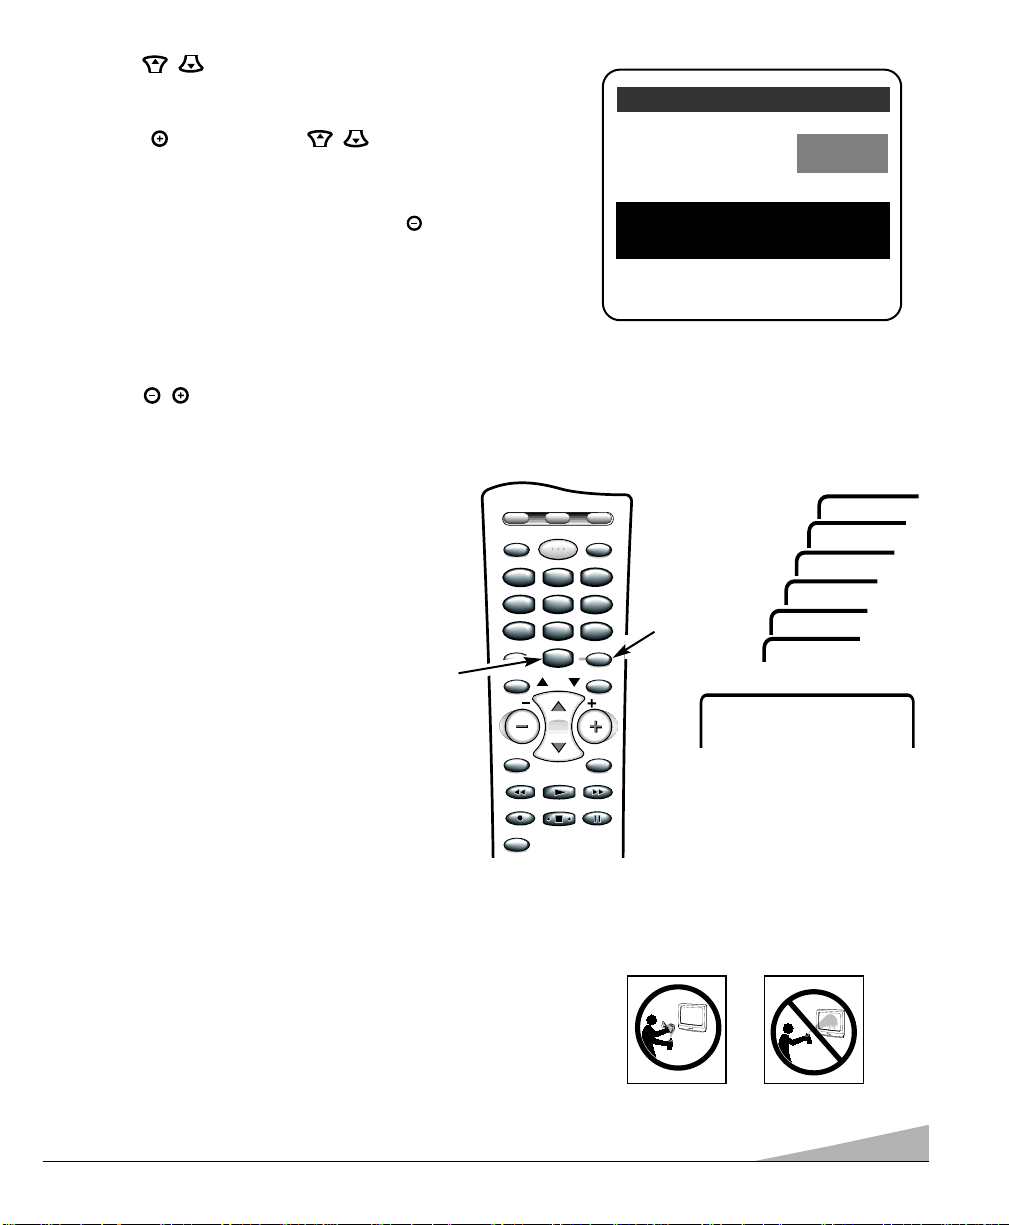
11. Use the / keys to highlight a category (D-Suggestive Dialog,
L-Adult Language, S-Sexual Situations, V-Violence,
FV-Fantasy Violence).
12. Press the key. Then use the / keys to highlight a rating.
13. Press the MENU key to Block (B) or Unblock (U) selected rating.
(➡ Arrow indicates selection.)
14. Press the V-GUIDE key to exit; or press the key to return
to the Content Options menu.
15. Repeat steps 11 through 13 to Block (B) or
Unblock (U) additional content ratings, if desired.
TURNING OFF THE V-GUIDE
1. Press the V-GUIDE key.
2. Use the / keys to select OFF.
D-Suggestive Dialog
L-Adult Language
S-Sexual Situations
V-Violence
FV-Fantasy Violence
➡TTVV1144BB
TVPG B
Press MENU key to BLOCK
Use ▲▼, – + keys to select
Press V-GUIDE key to exit
Note: Networks and local stations may or may not
include the content ratings portion of the
TV Parental Guidelines.
SETTING THE SLEEP TIMER
The Sleep Timer will switch off the TV automatically.
1. Press the SLEEP key.
2. Use the 0 key to select the desired time
(from 30 minutes up to 3 hours).
Note: The Sleep Timer cancels when the
TV is turned off or if a power
failure occurs.
Sleep : 0:30
Use 0 key
Sleep : 1:00
Sleep : 1:30
➧
Sleep : 2:00
Sleep : 2:30
Sleep : 3:00
Sleep : Clear
❷
❶
CARE AND CLEANING
The surface of the cabinet can be damaged if not properly maintained. Many common household aerosol sprays,
cleaning agents, solvents and polishes will cause permanent damage to the fine surface.
1. Unplug the power cord before cleaning the television.
2. Clean the screen and cabinet with a soft dry cloth.
Note: Never spray liquids on the screen because they can run down and
drip onto the chassis. This may cause component failure not covered
under Warranty.
VCR TV AUX
POWER
RESETINPUT
123
123
456
456
789
789
CAPTION SLEEP
0
0
CH
PLAY
RECALL
DISPLAYMUTE
PAUSE
MENU
VOL VOL
REC STOP
V-GUIDE
Page 16
16
RECALL
DISPLAYMUTE
PLAY
PAUSE
V-GUIDE
REC STOP
MENU
CAPTION SLEEP
RESETINPUT
CH
VOL VOL
POWER
VCR TV AUX
123
456
789
0
123
456
789
0
❷
❶
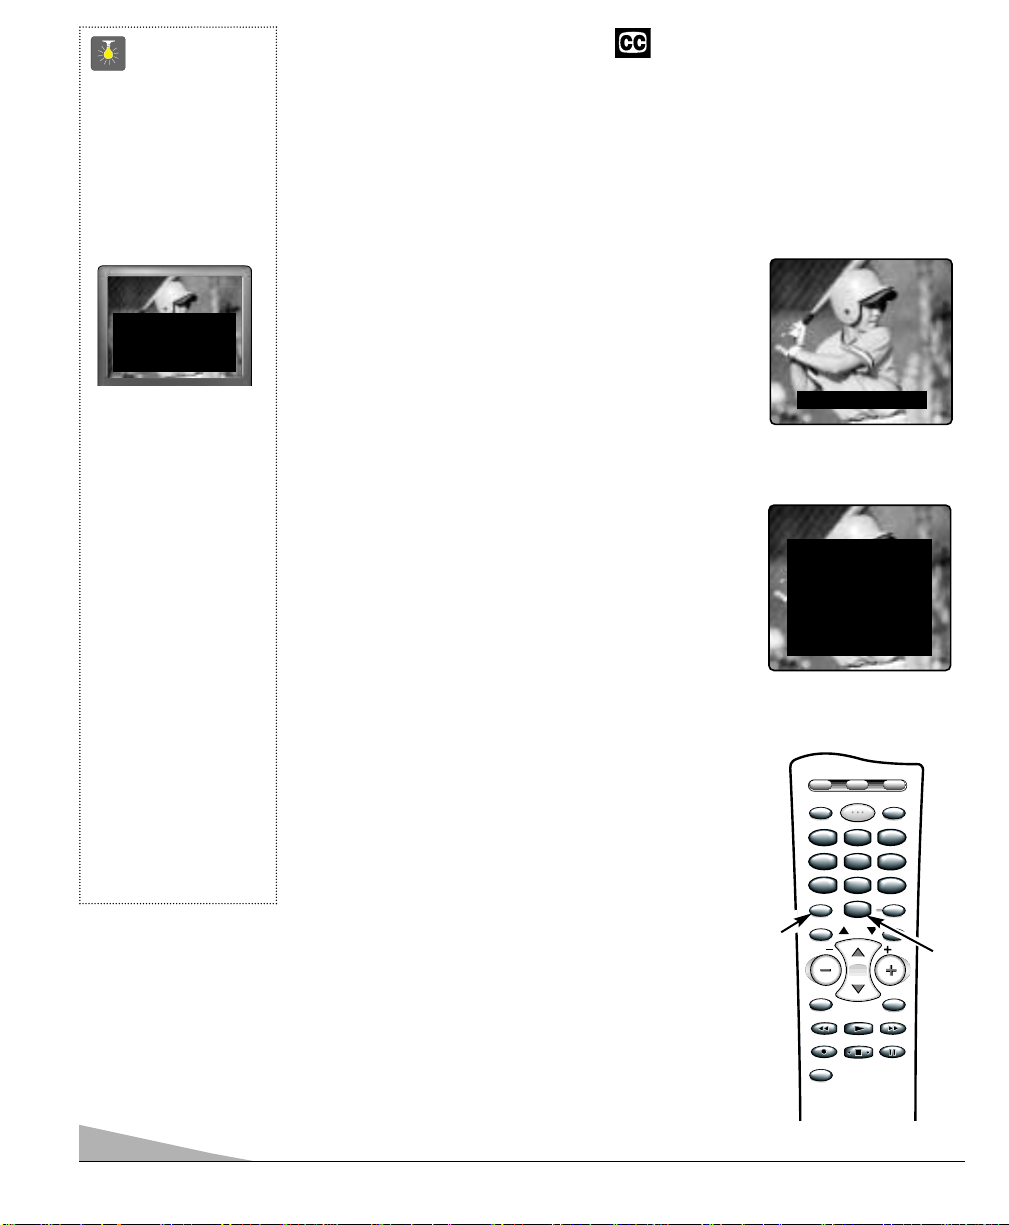
Caption1: This is the main mode used for program
captioning (words match the program you are watching).
Almost all broadcasters will use Caption1 to transmit
program captions. These captions are generally one or
two lines.
Caption2: This is an alternative mode for program captioning. Caption2 may be used by the broadcaster to
provide captions in another language, such as, Spanish or
French.
Text1: This mode is used to display large amounts of text.
This text will appear within a black box that may be
nearly as large as the TV screen. Text displayed in this
manner does not generally relate to the program. These
captions may be used by broadcasters to provide weather
reports, community bulletins, stock quotes, etc.
Text2: This is an alternative mode used to display large
amounts of text. The same types of information displayed
in Text1 can be displayed in Text2.
Quikcap: Quikcap allows captions to toggle on and off
with the Mute function. For example, the phone rings; you
press the MUTE key on the remote control to block the
TV sound; the captions display automatically. When you
finish your conversation and press the MUTE key again to
restore the sound, the captions will disappear.
Quikcap displays program captions in the Caption1 mode.
SETTING CAPTIONS
1. Press the CAPTION key on the remote control.
2. Use the 0 key to select OFF, Caption1, Caption2,
Text1, Text2, or Quikcap.
CLOSED-CAPTIONING
Captioning is textual information transmitted along with the picture and sound so it can be
displayed on the TV screen. Because different types of captions can be transmitted with
the TV signal, separate captioning modes are provided. The captioning modes recognized
by this model are: Caption1, Caption2, Text1, and Text2. Local broadcasters decide which
caption signals to transmit. They may not choose to provide captions or may provide
captions in one or all of the available modes.
Caption1/ Caption2
QuickTips
■
If Caption Text mode is
selected and no
captioned text is
broadcasted, a black
box may appear and
remain on the TV
screen.
To remove this black
box, set captioning to
any mode other than
Text1 or Text2 or press
the RESET key to
cancel captioning and
customized
settings.
■
When captioning
is turned on, the
channel display will
not stay on the screen.
For these displays to
stay on the screen you
must set Captioning
to OFF.
Need help?
visit our website at
www.sanyoctv.com
or Call 1-800-877-5032
Text1/ Text2
TWO OUTS AND TWO STRIKES
TONIGHT: BECOMING MOSTLY
CLOUDY WITH A 40 PERCENT
CHANCE OF RAIN. COLD WITH
A LOW IN THE UPPER 30's WEST
WIND AROUND 20 MPH, SHIFTING TO NORTHWEST AROUND
MIDNIGHT. FRIDAY: MOSTLY
CLOUDY AND COLDER WITH
A 50 PERCENT CHANCE OF
RAIN. HIGH IN THE MID 50's.
Page 17

17
Did the Blue Screen disappear?
Yes. The TV was in the Video mode. (A Blue Screen will appear when the Video mode is
selected and there is no video signal being detected.) Your AV equipment may be
turned off or unplugged.
My TV screen is solid blue
Press the INPUT
key.
No Picture or Poor Picture
Is picture ok?
Yes. Problem is with signal (station, cable, or satellite reception).
No. Turn off household/shop appliances such as, vacuum, blender, drill, etc.
Did picture improve?
Yes. Problem was interference from an appliance.
No. Adjust antenna direction/alignment. / Press the RESET key twice
(personalized settings will be reset to factory defaults).
Change Channels.
Is color better?
Yes. Problem is with program or signal (station, cable, or satellite reception).
No. Adjust antenna direction/alignment.
Did color improve?
Yes.
Antenna was not adjusted properly for the channel you’re watching.
No. Press the RESET key twice (personalized settings will be reset to
factory defaults).
Was the connector loose or disconnected?
Yes. Problem could be auto shutdown due to loss of signal. (See page 4.)
No. Press the POWER key.
Did the TV come on?
Yes. Sleep Timer may have been set.
No. Unplug the TV for a few seconds. Reconnect and press POWER.
TV Turns of f by itself
Check antenna
connection.
TROUBLESHOOTING
Before calling for assistance, please look for the condition that most closely resembles your problem
in the following charts, then follow the instructions for that condition. Visit our web site at
www.sanyoctv.com
or call toll free 1-800-877-5032.
Poor color or no color
Change Channels.
(Continued on next page.)
Page 18

18
Do you hear any sound now?
Yes. Mute function was activated or Volume was turned down.
No. Change Channels
Do you hear any sound now?
Yes.
Problem is with program or signal (station, cable, or satellite reception).
No. Adjust antenna direction/alignment; check connections to AV jacks.
Did sound improve?
Yes. Antenna misadjusted or AV cables were not fully seated.
No. Select Mono sound from on-screen menu.
No sound, Poor Stereo sound
Press and hold
the Volume
key.
Did the black box disappear or disappear briefly then reappear?
Yes. TV station is broadcasting a Caption text signal without any textual data.
Press the RESET key twice (customized settings will be reset to factory defaults).
To retain customized settings, just turn captioning off (see page 16).
A Black box appears on the screen
Change Channels.
Yes. Set captioning on. Press the Caption key then press the 0 key to highlight Caption1.
No. Tune to a channel that is broadcasting a closed-captioned program.
No Captioning
Is the program
you are watching
closed-captioned?
Do you recognize the menu words now?
Yes. A language other than English was selected.
I don’t recognize words in the on-screen menu
Press the RESET
key twice
(personalized
settings will be
reset to factory
defaults).
Did the problem go away?
Yes. It may have been the channel scan memory or V-Guide settings.
Cannot select or scan some channels
Press the RESET
key twice
(personalized
settings will be
reset to factory
defaults).
TROUBLESHOOTING (Continued)
Page 19

19
This symbol on the nameplate means the product is Listed by Underwriters’
Laboratories Inc. It is designed and manufactured to meet rigid U.L. safety
standards against risk of fire, casualty and electrical hazards.
The cabinet makes a popping sound
This is a normal condition during the warm-up and cool down of the plastic cabinet parts.
Does the remote control work now?
Yes. Another mode was selected. Press the appropriate key to operate the different
types of equipment. (Remote must be programmed. See pages 7~8.)
No. Replace the batteries or confirm that they are properly installed.
My remote control will not operate my Television
Press the TV key
on the Remote
Control. Then try it
again. Be sure to
point the remote
control at the TV.
Does the remote control operate the Cable Box or other auxiliary equipment now?
Yes. Another mode was selected. Press the appropriate button to operate the
different types of equipment. (Remote must be programmed. See pages 7~8.)
No. Reprogram the remote control.
My remote control will not operate my Cable Box
or other auxiliary equipment
Press the AUX key
on the Remote
Control. Then try
it again. (Make
sure the Cable
Box or auxiliary
equipment is
turned on.)
Page 20
20
MEXICO GUARANTEE
COMERCIALIZADORA MÉXICO
AMERICANA, S. DE R.L. DE C.V.
NEXTENGO Nº 78
COL. SANTACRUZ ACAYUCAN
DEL. AZCAPOTZALCO, MÉXICO D.F. C.P.
02770, RFC CMA 9109119LO
TELEFONO: (5) 328-3500
GUARANTEE
THIS APPARATUS THATYOU HAVE ACQUIRED, HAS AONE YEAR GUARANTEE FOR MANUF ACTURING DEFECTS
AND AONE YEAR SERVICE WARRANTY FROM THE DATE OF PURCHASE GRANTED BY:
COMERCIALIZADORA MEXICO--AMERICANA, S.A. DE C.V.
UNDER THE FOLLOWING CONDITIONS:
1. TO MAKE THE GUARANTEE EFFECTIVE, SIMPLY SHOW THIS POLICY FILLED OUT BY THE STORE OR
SUPPLIER UNIT OR THIS SALES INVOICE, WITH THE APPARATUS IN ANY OF THE SERVICE CENTERS
INDICATED ON THIS GUARANTEE.
2. IF THE FAULT IS ATTRIBUTED TO A MANUFACTURING DEFECT, THE APPARATUS WILL BE FIXED WITH NO COST
TO THE CONSUMER.
3. REPAIR TIME WILL NEVER BE MORE THAN 30 DAYS. IF THIS TIME HAS ELAPSED, AND THE PRODUCT ISN’T
REPAIRED, COMERCIALIZADORA MEXICO–AMERICANA, S.A. DE C.V. WILL PROCEED TO EFFECTUATE THE
EXCHANGE FOR AN EQUIVALENT APPARATUS OR THE RETURN OF THE BUYING–SALE COST RESPECTIVELY.
THE GUARANTEE WILL
BE NULL AND VOID IN THE FOLLOWING CIRCUMSTANCES:
A) IF THE APPARATUS HAS BEEN USED IN A MANNER INCONSISTENT WITH THE MANUFACTURERS INSTRUCTIONS.
B) IF THE APPARATUS HAS BEEN USED IN A MANNER INCONSISTENT WITH THE MANUFACTURERS WARNINGS
OR PRECAUTIONS.
C) IF THE APPARATUS HAS BEEN EXPOSED TO SUDDEN CHANGES IN VOLTAGE.
D) IF THE APP ARATUS HAS SUFFERED IRREP ARABLE AND ESSENTIALDETERIORATION DUE TO THE ACTIONS OF
THE CONSUMER.
E) IF THE APPARATUS HAS BEEN OPENED OR SOMEONE OTHER THAN OURSEL VES HAS A TTEMPTED T O REPAIR IT.
F) THIS POLICY IS NULL IF IT DOESN’T HAVE THE REQUIRED DATES BELOW AND THE STAMP OF THE STORE
WHERE THE SALE TOOK PLACE.
G) THE TRANSPORTATION COSTS OF THE PRODUCT DERIVED FROM THE EFFECTUATION OF THIS POLICY WILL
BE BILLED TO THE BUSINESS.
APPARATUS:________________________________________________SERIAL No.______________________________
CLIENT’S NAME:_____________________________________________________________________________________
DOMICILE:__________________________________________________________________________________________
CITY:________________________________________________________________ STATE:________________________
DATE OF SALE:_____________________________________________
TALLER DE SERVICIO Y VENTA DE
PARTES: PONIENTE 126 Nº 288-B
COL. INDUSTIAL VALLEJO
TELS: 368-01-05
SEALAND SIGNATURE
OF
STORE
DESCRIPCION: Television
MARCA: SANYO
MODELO: DS25500
Page 21

21
United States and Canada Warranty
ONE-YEAR LIMITED WARRANTY
THIS LIMITED WARRANTY IS VALID ONLY ON SANYO TELEVISIONS PURCHASED AND USED IN THE
UNITED STATES OF AMERICA, CANADA, AND PUERTO RICO, EXCLUDING THE UNITED STATES, OTHER
TERRITORIES, AND PROTECTORATES. THIS LIMITED WARRANTYAPPLIES ONLYTO THE ORIGINAL PURCHASER, AND DOES NOTAPPLY TO PRODUCTS USED FOR INDUSTRIAL OR COMMERCIAL PURPOSES.
FOR ONE YEAR from the date of purchase, Sanyo Manufacturing Corporation will replace any defective TV
without charge to the original purchaser.
To insure proper warranty exchange, keep the original sales receipt for evidence of purchase. Return the
defective TV to the retailer along with the receipt and the included accessories, such as the remote
control. The defective TV will be exchanged for the same model, or a replacement model of equal or
greater value, if necessary. Replacement model will be contingent on availability and at the sole
discretion of Sanyo Manufacturing Corporation.
THE FOREGOING WARRANTY IS EXCLUSIVE AND IN LIEU OF ALL OTHER WARRANTIES OF
MERCHANTABILITYOR FITNESS FOR A PARTICULAR PURPOSE.
OBLIGATIONS
For one year
from the date of purchase, Sanyo Manufacturing Corporation warrants this product to be free from
defects in material and workmanship under normal use and conditions. Should replacement be necessary under
this warranty for any reason due to manufacturing defect or malfunction during the first year from date of original purchase, Sanyo Manufacturing Corporation will provide a new TV via exchange at the retailer at no charge
.
For customer assistance, whether during or out of the warranty period, call toll free 1-800-877-5032.
Weekdays 7:30 AM – 7:00 PM Central Time
Saturday 7:30 AM – 4:00 PM Central Time
This warranty expresses specific contractual rights; retail purchasers may have additional statutory rights which
vary from state to state.
(EFFECTIVE: April 1, 2000)
For your protection in the event of theft or loss of this product, please fill in the information requested
below and KEEP IN A SAFE PLACE FOR YOUR OWN PERSONAL RECORDS.
Model No.______________________________ Date of Purchase _________________________
Serial No.______________________________ Purchase Price___________________________
Where Purchased_________________________
(Located on back of unit)
AS
Sanyo Manufacturing Corp.
3333 Sanyo Road, Forrest City, AR 72335
Page 22
42
ESPAÑOL
Manual de Instrucciónes
Importantes Medidas de Seguridad . . . . . . . . 43
Especificaciones . . . . . . . . . . . . . . . . . . . . . . . 44
Características . . . . . . . . . . . . . . . . . . . . . . . . . 44
Ajustes Básicos . . . . . . . . . . . . . . . . . . . . . . . . 44
Métodos Básicos de Conexión . . . . . . . . . . . . 45
Panel Frontal . . . . . . . . . . . . . . . . . . . . . . . . . . 46
Panel Posterior . . . . . . . . . . . . . . . . . . . . . . . . 46
Control Remoto Multimedia . . . . . . . . . . 46 ~ 49
Ajustes del TV. . . . . . . . . . . . . . . . . . . . . 50 ~ 51
Usando Las Entradas Frontales
de Audio/Video . . . . . . . . . . . . . . . . . . . . . . 52
Usando Las Salidas
de Audio . . . . . . . . . . . . . . . . . . . . . . . . . . . . 52
Usando Las Entradas Posteriores
de Audio/ Video . . . . . . . . . . . . . . . . . . . . . . 53
Transmisión Captada . . . . . . . . . . . . . . . . . . . 54
Informacíon de Guía-V . . . . . . . . . . . . . . . . . . 55
Operación de Guía-V
(Control Paternal) . . . . . . . . . . . . . . . . . 56 ~ 57
Ajustando el Cronómetro para Dormir . . . . . . 57
Reajustando la TV . . . . . . . . . . . . . . . . . . . . . . 58
Cuidado y Limpieza . . . . . . . . . . . . . . . . . . . . . 58
Solución de Problemas . . . . . . . . . . . . . 59 ~ 61
Garantía (México) . . . . . . . . . . . . . . . . . . . . . . 62
Garantía (U.S.A.) . . . . . . . . . . . . . . . . . . . . . . . 63
“Como un Asociado de ENERGY STAR®,” Sanyo Manufacturing
Corporation, ha determinado que este producto cumple con
los lineamientos en eficiencia energética de ENERGY STAR®.
CONTENIDO
Bienvenido al mundo SANYO
Gracías por comprar un Televisor a Color Sanyo. Usted hizo una excelente selección por Funcionamiento,
Confiabilidad, y Precio. El TV esta diseñado con instrucciones de fácil ajuste y operación en pantalla. Para
reunir las necesidades de nuestros clientes, el TV tiene el V-chip electrónico de control paternal, para tener
un control de los programas vistos por menores. “Lea este manual antes ensamblar (o usar) este
producto.” ¿ Necesita ayuda? Visite nuestro sitio en internet en www.sanyoctv.com o llame sin costo al
1-800-877-5032.
Page 23
43
PRECAUCION
RIESGO DE TOQUE ELECTRICO NO ABRIR!
PRECAUCION : PARA REDUCIR EL RIESGO DE TOQUE ELECTRICO, NO QUITE LA CUBIERTA (O
LA TAPA TRASERA). NO HAY PARTES ADENTRO QUE LAS PUEDA REPARAR EL USUARIO.
REFIERASE A PERSONAL CALIFICADO PARA REPARAR EL APARATO.
ESTE SIMBOLO INDICA QUE VOLTAJES PELIGROSOS QUE CONSTITUYEN UN RIESGO DE TOQUE ELECTRICO ESTAN PRESENTES DENTRO
DE ESTA UNIDAD.
ESTE SIMBOLO INDICA QUE HAY INSTRUCCIONES IMPORTANTES DE
OPERACION Y MANTENIMIENTO EN LA LITERATURA QUE SE ANEXA A
ESTA UNIDAD.
ADVERTENCIA : PARA REDUCIR EL RIESGO DE FUEGO O TOQUE ELECTRICO, NO EXPONGA ESTE
APARATO A LLUVIA O HUMEDAD.
IMPORTANTES MEDIDAS DE SEGURIDAD
PRECAUCION : POR FAVOR SIGA TODAS LAS ADVERTENCIAS EN EL PRODUCTO Y EN LAS INSTRUCCIONES DE OPERACION. ANTES DE OPERAR EL PRODUCTO, POR FAVOR LEA TODAS LAS INSTRUCCIONES DE OPERACION Y SEGURIDAD.
GUARDE ESTA LITERATURA PARA SU REFERENCIA. Siga todas las instrucciones. . .
Colocando el aparato
1. No coloque su aparato en carrito, pedestal, anaquel o mesa que sean inestables. Heridas serias a un individuo, y avería al aparato, pueden resultar si
este cae. Su vendedor puede recomendar carritos y pedestales o anaqueles
e instrucciones para montaje en la pared. Una combinación de
aparato y carrito deberá de ser movida con cuidado. Paradas
rápidas, fuerza excesiva, y superficies irregulares pueda causar
que la combinación de aparato y carrito se volteen y caigan.
2. Las ranuras y aperturas en el gabinete y en la parte trasera e inferior fueron
provistas para ventilación del aparato. Para asegurar una operación confiable
del aparato y protejerlo de sobrecalentamiento, estas aperturas no deberán de
ser tapadas o cubiertas. Las aperturas nunca deberán de ser cubiertas con un
trapo u otro material, y las aperturas de la parte inferior no deberán de ser
tapadas poniendo la unidad en una cama, sofá, alfombra, u otra superficie
similar. Este aparato nunca deberá de ser puesto cerca o sobre radiadores de
calor. Este aparato nunca deberá de ser puesto en instalaciones tales como
libreros a no ser que haya una adequada ventilación en tales instalaciones.
3. No exponga el aparato a lluvia o a uso cerca de agua . . . por ejemplo, cerca
a una bañera, una alberca, un lavabo, en un sótano húmedo, etc.
Conectando la Antena Externa
PROTECCION EN CONTRA DE RAYOS ELECTRICOS PARA SU ANTENA Y APARATO DE
ACUERDO A LAS INSTRUCCIONES DEL CODIGO NACIONAL ELECTRICO (EUA).
4. Si una antena exterior es conectada al receptor, asegúrese que el sistema de
antena esté aterrizado para proveer alguna protección en contra de impulsos de
voltaje y la acumulación de cargas estáticas. El articulo 810 del código nacional
eléctrico de los Estados Unidos de América (National Electrical Code,
ANSI/NFPA 70), provee información con respecto al aterrizamiento correcto del
mástil y la estructura de soporte, el aterrizamiento del alambre a la antena en
una unidad de descarga, el tamaño de los conductores de aterrizamiento, la
localización de la unidad de descarga, conexión a los electrodos de aterrizamiento, y requerimientos para los electrodos de aterrizamiento.
Una antena exterior no deberá de ser localizada en la vecindad de líneas de
potencia que pasen por encima de otros circuitos de luz eléctrica o de potencia,
o en donde pueda caer sobre tales líneas de potencia o circuitos. Cuando se
instale un sistema de antena externa, se debe de tener cuidado extremo en no
tocar tales líneas de potencia o circuitos ya que contacto con ellos puede llegar
a ser fatal.
Conectando el cordon de potencia
5. Este producto debe ser operado solamente con el tipo de cordón de potencia
indicado en la etiqueta. Si usted no esta seguro del tipo de alimentación en su
casa, consulte a su distribuidor de este producto, o a la compañía de
suministro eléctrico. Este producto esta equipado con cordón de potencia
polarizado (una de las navajas de la clavija es más ancha, que la otra). Esta
clavija debe de ajustar en el toma corriente de una manera solamente. Esta
característica es una medida de seguridad. Si usted no puede insertar la clavija
totalmente en el toma corriente, trate invirtiendo la clavija.Si la clavija continua
floja en el toma corriente, llame a su electricista, para reemplazar su toma
corriente obsoleto. No deshabilite el propósito de seguridad de la esta clavija
polarizada. No sobre cargue los toma corrientes de pared, extensiones
eléctricas, o receptáculos integrales, ya que esta condición puede resultaren
un riesgo de fuego o descarga eléctrica.
6. Los cordones de potencia deben ser direccionados de tal manera que no
puedan ser pisados o dañados con enseres colocados a un lado arriba del
cordón de potencia. ponga una particular atención a los cordones de potencia
y clavijas, receptáculos de toma corrientes, y el punto donde ellos salen del
producto.
Limpieza
7. Antes de limpiar, desconecte la unidad del receptáculo de la pared. No
aplique limpiadores líquidos o de aerosol directamente a la unidad. Use un
trapo húmedo para limpiar.
Servicio y Reparación
8. Desconecte el aparato del receptáculo de pared y refiera servicio a personal
de servicio eléctrico calificado bajo las siguientes condiciones :
A Si el cordón de potencia o el conector están averiados o raídos.
B. Si líquido ha sido derramado en el aparato.
C. Si el aparato ha sido expuesto a lluvia o agua.
D. Si el aparato ha sido tirado o el gabinete a sido averiado.
E. Si el aparato exhibe un cambio perceptible en funcionamiento.
F. Si el aparato no opera normalmente siguiendo las instrucciones de
operación, ajuste solamente aquellos controles que han sido cubiertos en
las instrucciones de operación. Ajuste impropio de otros controles puede
resultar en avería al aparato y posiblemente requiera de trabajo extensivo
por un técnico calificado para restaurar el aparato a su operación normal.
9. Cuando se termine cualquier servicio o reparación, requiera del técnico de servicio confirmación de que solo Partes Autorizadas de Remplazo de Fabrica que
tengan las mismas características que las partes originales hayan sido usadas,
y que verificaciones de seguridad rutinarias hayan sido llevadas a cabo para
determinar que el aparato se encuentra en condiciones seguras de operación.
Substituciones no autorizadas pueden resultar en fuego, toque eléctrico u
otros peligros.
10. Nunca adicione accesorios que no han sido especificamente diseñados
para uso con este aparato.
11. Para protección adicional durante una tormenta eléctrica, o cuando el aparato
es dejado sin atención ni uso durante largos periódos de tiempo,
desconéctelo del receptáculo de la pared y desconecte la antena. Esto evitará
daños al aparato debido a rayos o a cambios bruscos en el voltaje de línea.
12. Nunca introduzca ningún tipo de objetos a través de las ranuras, ya que el
contacto con componentes de alto voltaje pueden poner corto dichas componentes que pueden resultar en incendios o descargas eléctricas, Nunca
derrame líquidos o cualquier tipo de productos.
EJEMPLO DE ATERRIZAMIENTO DE ANTENA DE ACUUERDO AL CODIGO
NACIONAL ELECTRICO (National Electrical Code, ANSI/NFPA 70)
CABLE DE ANTENA
GRAPA DE TIERRA
CODIGO NACIONAL ELECTRICO
CONDUCTORES DE TIERRA
(NEC SECCION 810-21)
UNIDAD DE
DESCARGA DE ANTENA
(NEC SECCION 810-20)
EQUIPO DE
SERVICIO
ELECTRICO
GRAPA DE TIERRA
TIERRA DE SERVICIO DE POTENCIA
ELECTRODO DEL SISTEMA
(NEC ART 250, PARTE H)
“Nota al instalador del sistema de cable CATV :
Este recordatorio es dado para llamar la atención del instalador del sistema de cale CATV
al Articulo 820-40 del NEC que provee guias para el aterrizamiento adecuado y, en particular, especifica que la tierra del cable debéra de estar conectada al sistema la tierra del
edificio, tan cercano al punto de entrada del cable como sea practico.”
Page 24
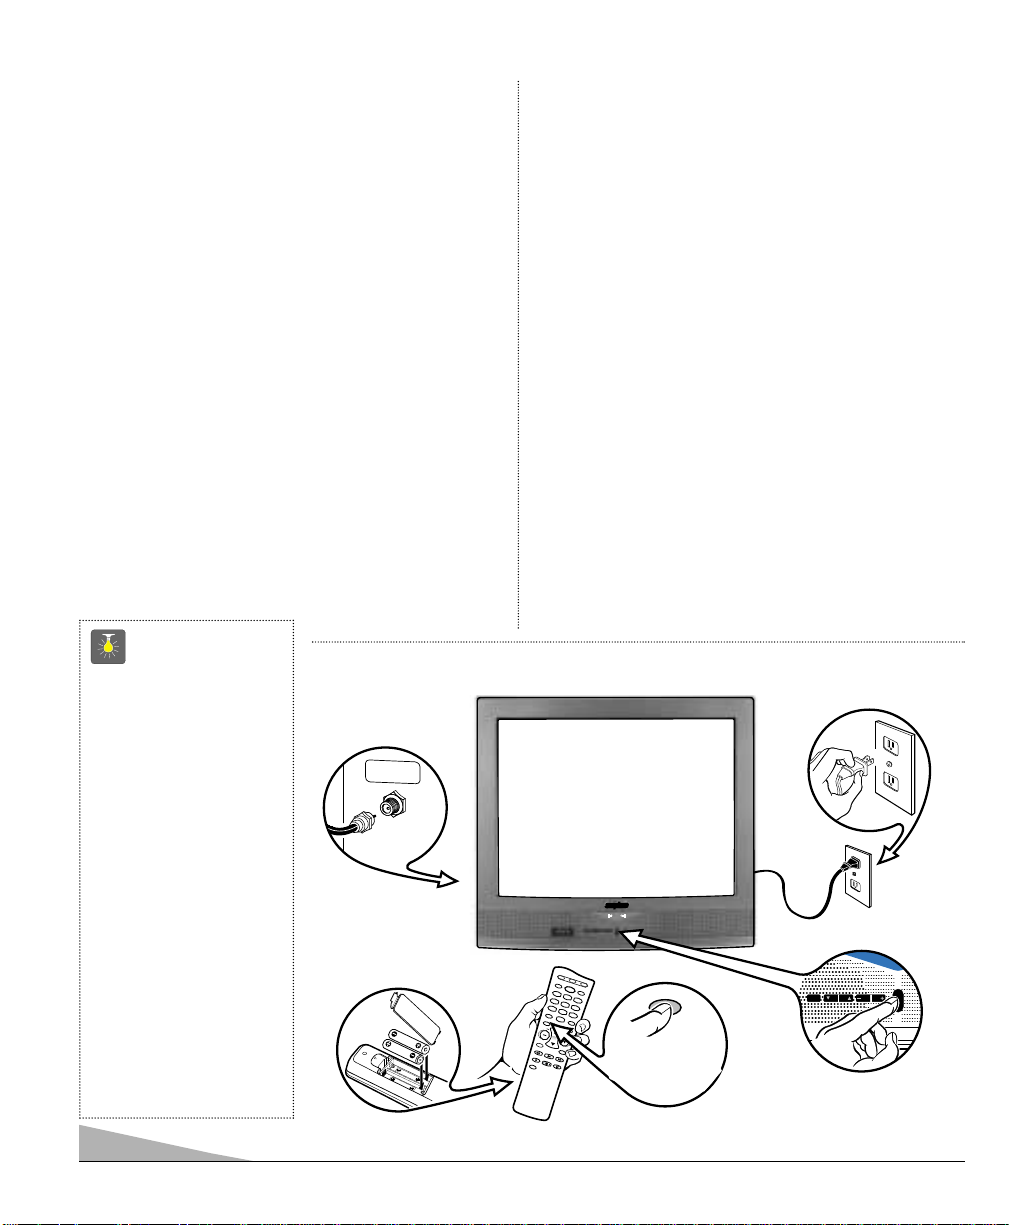
44
dbx®es una marca registrada de
Carillon Electronics Corporation
◆
Menú en Pantalla Trilingüe
◆Búsqueda Automática de
Canales
◆Apagado Automático
◆Transmisión Captada /
Quikcap
◆Controles digitales de
Imagen desplegados
en Pantalla
◆MTS sonido estereofónico/
dbx
®
/sonido SAP
◆Tonos de piel por ajuste
Automático
◆ Frontal Ambient Sonido
◆Ajustes de Fabrica para
Imagen/Sonido
◆Tono
◆V-Guide (Control Paternal)
◆Modo de Juego
◆Entradas de Audio/Video,
Frontal(AV1) y Posterior (AV2)
◆Entrada de S-Video
◆Salidas Fijas de Audio
◆Cronómetro para Dormir
(3 horas)
◆Reajuste de TV
Sistema de sintonía de
181 canales
VHF Canales 2~13
UHF Canales 14-69
Cable TV (CATV) 1, 14~125
Sintonía Fina Automática
VHF y Canales de Cable
Control Remoto
Multimedia/universal
VCR/ TV/AUX, Teclas de
operaciones básicas
grandes que se
iluminan en la Oscuridad
Selección de Canales
Numerados
Búsqueda de Canales
Volume Mute
Power Recall
Display Sleep
Caption Reset
VCR teclas V-Guide
Entrada
Menu
CARACTERÍSTICAS
TAMAÑO DEL TUBO DE IMAGEN
(Medido Diagonalmente) . . . . . . . . . 25-pulgadas
RESOLUCIÓN DE IMAGEN. . . . . . . . . . . 260 Líneas
Entrada de Video . . . . . . . . . . . . . . . . 600 Líneas
ENTRADA . . . . . . . . . . . . . . . . . . . . . . . . . . . UHF/VHF/CATV 75Ω
FRECUENCIA DE OPERACION . . . . . . . . 60 Hz.
TENSION DE ALIMENTACION . . . . . . . . 120 V~
CONSUMO DE CORRIENTE . . . . . . . . . . 86 watts
DIMENSIÓN HORIZONTAL (Ancho) . . . . 29.9 in. (760mm)
DIMENSIÓN VERTICAL (Alto) . . . . . . . . 22.5 in. (572mm)
DIMENSIÓN EN PROFUNDIDAD (Grosor) . . 19.9 in. (505mm)
PESO (APROX.) . . . . . . . . . . . . . . . . . 63.4 lbs. (28.8 Kg.)
SONIDO (2 Bocinas) . . . . . . . . . . . . . . Tamaño 8 cm
AMPLIFICADOR . . . . . . . . . . . . . . . . . . . Interon 1W/canal
ENTRADAS DE A/V (Frontal/Posterior) . . Entrada de Video
. . . . . . . . . . . . . . . . . . . . . . . . . . . . . . . Entrada de Audio (R/L)
. . . . . . . . . . . . . . . . . . . . . . . . . . . . . . . S-Video (Posterior)
SALIDAS DE AUDIO. . . . . . . . . . . . . . . . Salida de Audio Fijo (R/L)
. . . . . . . . . . . . . . . . . . . . . . . . . . . . . . . (RCA Connectors)
ESPECIFICACIONES
AJUSTES BÁSICOS
MTS
STEREO/SAP/dbx
A
S
First
Please connect
cable system or
an antenna to the
terminal on the back
Then press the MENU key
U
H
F
/V
H
F
/CA
T
V
7
5
Ω
RECALL
DISP
L
MUT
E
P
LA
Y
P
A
US
E
V-G
UIDE
REC
S
T
O
P
ME
NU
CA
P
T
I
ON
S
LEE
P
RE
S
E
T
I
NP
UT
CH
VO
L
VO
L
P
O
WER
VCR
T
V
AUX
1
23
4
5
6
7
8
9
0
Please wait
TV is searching
for your channels
MENU
POWER
CH
CH VOL VOLMENU
❷
❸
❹
(Ver conexión en
la página 45.)
❺
➊
Por favor espere TV
esta automáticamente
el búscando sus
canales
Consejos Rápidos
■
No se coloque el TV en
áreas confinadas.
Permita una circulación
normal de aire para las
partes eléctricas.
■
Coloque su TV por lo
menos a 2 pies (60 cm.)
de las bocinas del
estéreo. Los magnetos de
las bocinas pueden
afectar la calidad de la
imagen.
■
El TV seleccionará el
modo correcto de
Antena, de acuerdo al
tipo de señal que Ud.
conecto.
¿ Necesita ayuda?
Visite nuestro sitio en internet
www.sanyotv.com
o Llame 1-800-877-5032
PRECAUCION : Las Regulaciones de FCC declaran, que las
modificaciones no apropiadas o cambios no
autorizados a esta unidad, pueden anular la
autoridad del usuario para operar la unidad.
(Interruptor activado
para encender.)
(Instalación de Baterías, vea página 46.)
Page 25
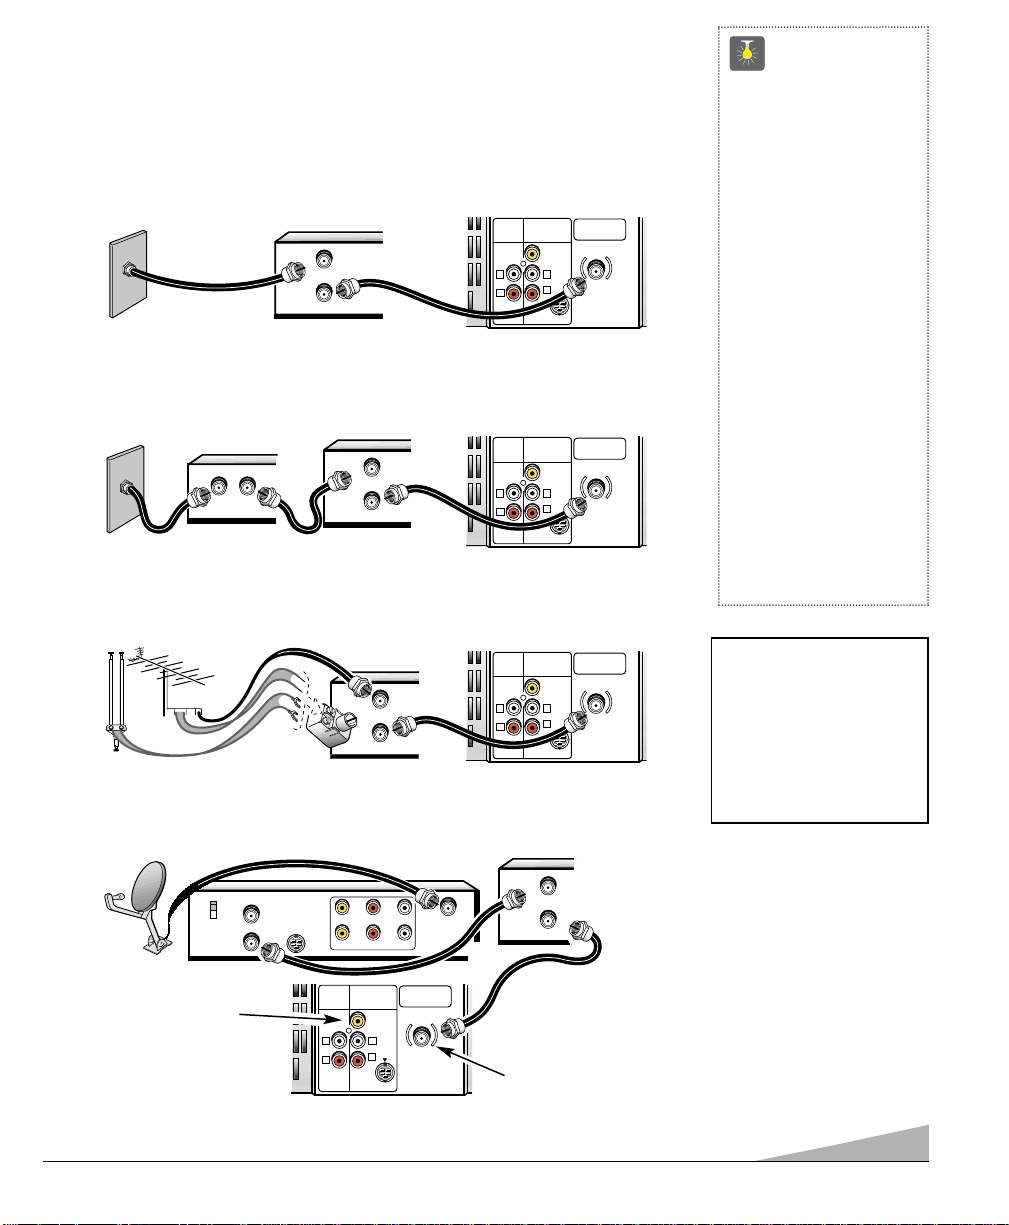
45
Consejos Rápidos
■
El TV seleccionará el
modo correcto de Antena,
de acuerdo al tipo de
señal que Ud. conecto.
■
El TV se apagará
automáticamente despuès
de 15 minutos, si no hay
recepción de señal (si la
estación de cable o la
estación de TV no esta
transmitiendo).
Excepciones—Cuando el
modo de Video este seleccionado, el TV no se
apagará automáticamente
cuando la señal de recepción ha sido detenida por
15 minutos.
¿ Necesita ayuda?
Visite nuestro sitio en internet
www.sanyotv.com
o Llame 1-800-877-5032
VCR
DECODIFICADOR DE CABLE
TV
❷
❷
NOTA CONCESIÓN DE CATV : Compañás de cable, como servicios
públicos, son concesionados por
las autoridades de los gobiernos
locales. Para recibir programas de
cable, cada equipo debe de ser
capaz de recibir canales de cable,
para recibir este servicio, el consumidor debe de suscribirse a una
compañía de cable.
RECEPTOR
❷
❷
VCR
VCR
VCR
❸
TV
TV
TV
❸
Ver página 53, Usando
las Entradas de
Audio/Video.
MÉTODOS BÁSICOS DE CONEXIÓN
Use uno de los siguientes métodos para conectar una señal a su TV. 1a— Si Ud. tiene
servicio de cable y una VCR. 1b—Si Ud. tiene un decodificador de cable y una VCR,
1c—Si Ud. tiene una antena externa o interna y una VCR, 1d— Si Ud. tiene un receptor
de satélite y una VCR. Conecte su sistema de cable o antena directamente a la TV, si Ud.
no tiene accesorios opcionales.
➊
Sistema de Cable con VCR y TV
a
➊
Antena Exterior o Interior a VCR a TV
c
➊
Receptor de Satélite, VCR y TV
d
➊
Sistema de Cable con Decodificador de Cable, VCR y TV
b
Conector de 75 OHMS
Use un conector de 75 ohms
para conectar una VCR,
sistema de cable, antena
externa/interna, o, receptor
satélite directamente a la TV.
OUT
IN OUT
IN
FROM ANT.
OUT TO TV.
IN
OUT
FROM ANT.
OUT TO TV.
IN
+
+
FROM ANT.
OUT
OUT TO TV.
AUDIO
OUTPUT
L
R
AUDIO
OUTPUT
L
R
AUDIO
OUTPUT
L
R
AUDIO VIDEO
INPUT
VIDEO
(MONO)
L
R
S-VIDEO
AUDIO VIDEO
INPUT
VIDEO
(MONO)
L
R
S-VIDEO
AUDIO VIDEO
INPUT
VIDEO
(MONO)
L
R
S-VIDEO
UHF/VHF/CATV
75Ω
UHF/VHF/CATV
75Ω
UHF/VHF/CATV
75Ω
CATV IN
CH3
CH4
OUT TO TV
S-VIDEO
AUDIO
OUTPUT
L
R
R- -LAUDIOVIDEO
R- -LAUDIOVIDEO
AUDIO VIDEO
INPUT
VIDEO
(MONO)
L
R
S-VIDEO
IN FROM
SAT.
UHF/VHF/CATV
75Ω
IN
FROM ANT.
OUT
OUT TO TV.
Page 26
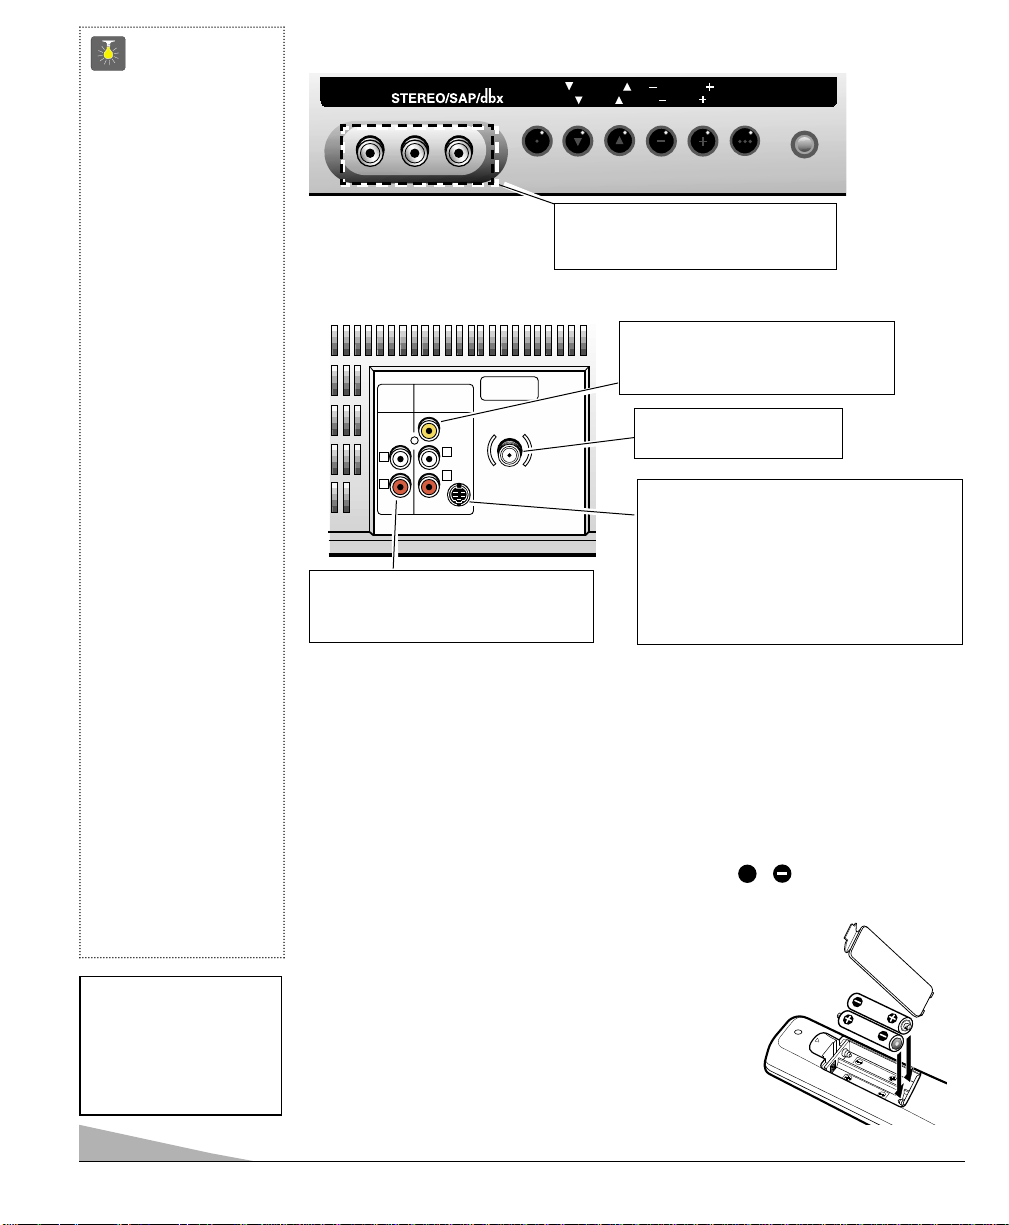
46
PANEL POSTERIOR
CONTROL REMOTO MULTIMÉDIA
Operar su TV, VCR o decodificador de Cable. Para familiarizarce con este control remoto,
vea página 47. Para programar este control remoto, vea página 48 ~ 49.
INSTALACIÓN DE BATERÍAS (2 AA no incluídas)
1. Quite la cubierta de las baterías, presionando la lengüeta e inclinando la cubierta hacía
adelante. Inserte las baterías. Asegúrese que las marcas / correspondan con los
signos de las baterías, y estas coincidan con las marcas internas del control remoto.
2. Coloque la cubierta de las baterías. ¡El control remoto esta listo!
Notas :
– No mezclar baterías viejas con nuevas o mezclar diferentes tipos de
baterías a la vez.
– Quite las baterías, si el control remoto no va ser usado por
más de un mes. Baterías débiles pueden escurrirse y dañar
el control remoto.
+
PANEL FRONTAL
Entradas de Audio y Video (Video1)
Conecte el equipo de video aquí (vea
página 52).
MTS
MENUMENU
CHANNELCHANNEL
VOLUMEVOLUME
POWERPOWER
MENUMENU
MENUMENU
VIDEO IN L- AUDIO -R
Entrada de Terminal de
Antena/Cable (75 ohms)
Conectores de Salidas de Audio (Fijo)
Conecte aquí el equipo de audio
externo (vea página 52).
AUDIO
OUTPUT
AUDIO VIDEO
INPUT
R
L
UHF/VHF/CATV
75Ω
R
L
VIDEO
(MONO)
S-VIDEO
Entradas de Audio y Video (Video2)
Conecte el equipo de video aquí (vea
página 53).
Terminal de Entrada para S-Video
(Super-Video)
Para mejorar los detalles de la imagen, use la
entrada de S-Video en lugar de la entrada
posterior de A/V, sí la salida de S-Video se
encuentra disponible en su equipo externo.
(La entrada de S-Video cancelará la conexión
de posterior Video ).
Consejos Rápidos
■
Asegúrese que los
conectores de los cables
estén totalmente asentados en los conectores.
Ver páginas 52~53
antes de conectar el
equipo de video
externo.
■
Un pantalla de color
Azul, con las palabras
de Video1 o Video2
desplegada, significa
que el modo de
Juego/Video esta
seleccionado, pero la
señal no ha sido detectada en el conector de
Video.
■
Los cables para conectar su equipo externo
no están incluídos.
■
Asegúrese que
baterías este instaladas
correctamente.
■
Apunte el control
remoto hacía el equipo
que Ud. quiere operar.
Objetos entre el control
remoto y el equipo,
pueden causar un mal
funcionamiento del
control remoto.
¿ Necesita ayuda?
Visite nuestro sitio en internet
www.sanyotv.com
o Llame 1-800-877-5032
NOTA IMPORTANTE : Las baterías
descargadas deben de ser
recicladas o deshechadas adecuadamente, de acuerdo con los
reglamentos aplicables. Para más
información, contacte a sus
Autoridades Locales para el
manejo de Deshechos Sólidos.
Page 27
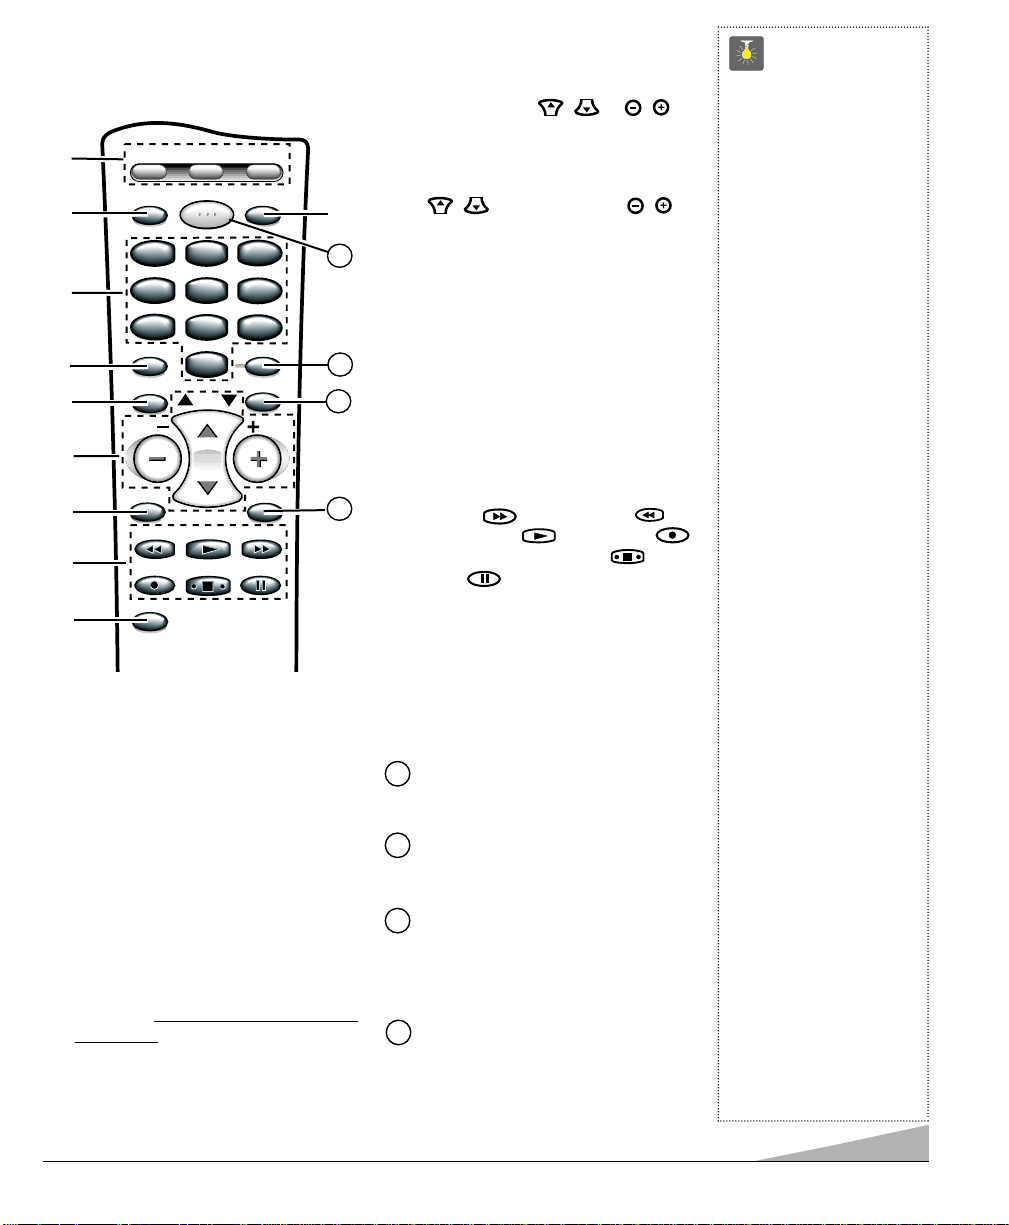
47
➀
Teclas de Modo
Use estas teclas para programar el control
remoto y para seleccionar el modo de
operación (VCR, TV, o AUX).
➁
Tecla de Input
Presione para seleccionar la fuente del
programa que va a ser desplegado en la
pantalla: Señal TV o señal de del
equipo de video que ha sido conectado
a las entradas de A/V.
➂
Teclas Numeradas
Dos teclas deben de ser presionadas
para seleccionar un canal. Ejemplo :
Presione 0 y después 6, para seleccionar
el canal 6. Para canales de cable del 100
hasta el 125
, presione y mantenga así la
tecla del número 1 hasta que el C1– –
aparezca.
➃
Tecla de CAPTION (Vea página 54.)
➄
Tecla de MENU
Use esta tecla, junto con las teclas de
navegación, use / y / para
ajustar las funciones del sistema de
menú en pantalla (vea páginas 50 y 51).
➅
Teclas de búsqueda de Canales
( / ) y de Volumen ( / )
Presione para búscar a través de los
canales en memoria y para ajustar el
volumen.
➆
Tecla de MUTE
Presione una vez para apagar el
volumen y presione nuevamente para
restaurarlo.
Nota : Cuando este usando las salidas
de audio, esta tecla no enmudecera en
sonido.
➇
Teclas para VCR/ DVD
Estas teclas controlan el VCR y/o
Funciones de la DVD Avance hacia
adelante ( ), Rebobinado ( ),
Reproducción ( ), Grabación ( ),
y la funciones de Detener ( ), y
Pausa ( ) de su VCR.
➈
V -Guide (Vea páginas 55 ~ 57.)
➉
Tecla de RESET
Presione esta tecla dos veces para llamar
a los ajustes de fábrica. La TV inicializará automáticamente la búsqueda de
canales, y eliminará todos los ajustes
hechos por el usuario (vea página 58).
Tecla de POWER
Presione esta tecla para encender o
apagar la TV.
Tecla de SLEEP
Use esta tecla con “0”para ajustar el
cronómetro para Dormir (vea página 57).
Tecla de RECALL
Seleccione un canal, entonces seleccione otro usando las teclas numeradas.
Presione Recall, para hacer el cambio
entre estos canales.
Tecla de DISPLAY
Presione una vez para que aparezca el
desplegado del canal. Presione dos
veces para que el desplegado aparezca
nuevamente. Presione nuevmente para
eliminarlo.
Apunte hacía el TV
11
12
13
TECLAS DEL CONTROL REMOTO MULTIMÉDIA
14
➀
➁
➂
➃
➄
➇
➅
➈
➆
➉
12
13
14
11
➠
Consejos Rápidos
■
Las teclas del panel
frontal trabajan igual
que las teclas del control
remoto.
■
Apunte el control remoto
hacía el equipo que Ud.
quiere operar. Objetos
entre el control remoto y
el equipo, pueden causar
un mal funcionmiento del
control remoto.
■
Asegúrese que baterías
este instaladas
correctamente.
■
Sí el control remote no funciona: presione la tecla de
TV (ver artículo 1).
■
El control remote debe de
ser programado antes de
operar su VCR o su
Decodificador de Cable.
(Ver páginas 47~48.)
■
No puede seleccionar un
canal con las teclas
numeradas. Presione “0”
antecediendo a los
números del 1~9.
Ejemplo :Canal “05.”
■
La letra “C” antecediendo a número de canal,
indica que es un canal de
cable
.
■
Ajustando el nivel de
volumen: La flecha de
parpadeante hacia el lado
derecho, indica que el
volumen esta aumentando. La flecha
parpadeante hacia la
izquierda indica que el
volumen es disminuyendo.
■
Usando V-Guide
Los comandos de
ajuste de control
Paternal solo pueden ser
cambiados usando el
control remoto.
Ver páginas 56 ~ 57.
¿ Necesita ayuda?
Visite nuestro sitio en internet
www.sanyotv.com
o Llame 1-800-877-5032
VCR TV AUX
POWER
123
123
456
456
789
789
CAPTION SLEEP
MENU
VOL VOL
REC STOP
V-GUIDE
0
0
CH
PLAY
RESETINPUT
RECALL
DISPLAYMUTE
PAUSE
Page 28
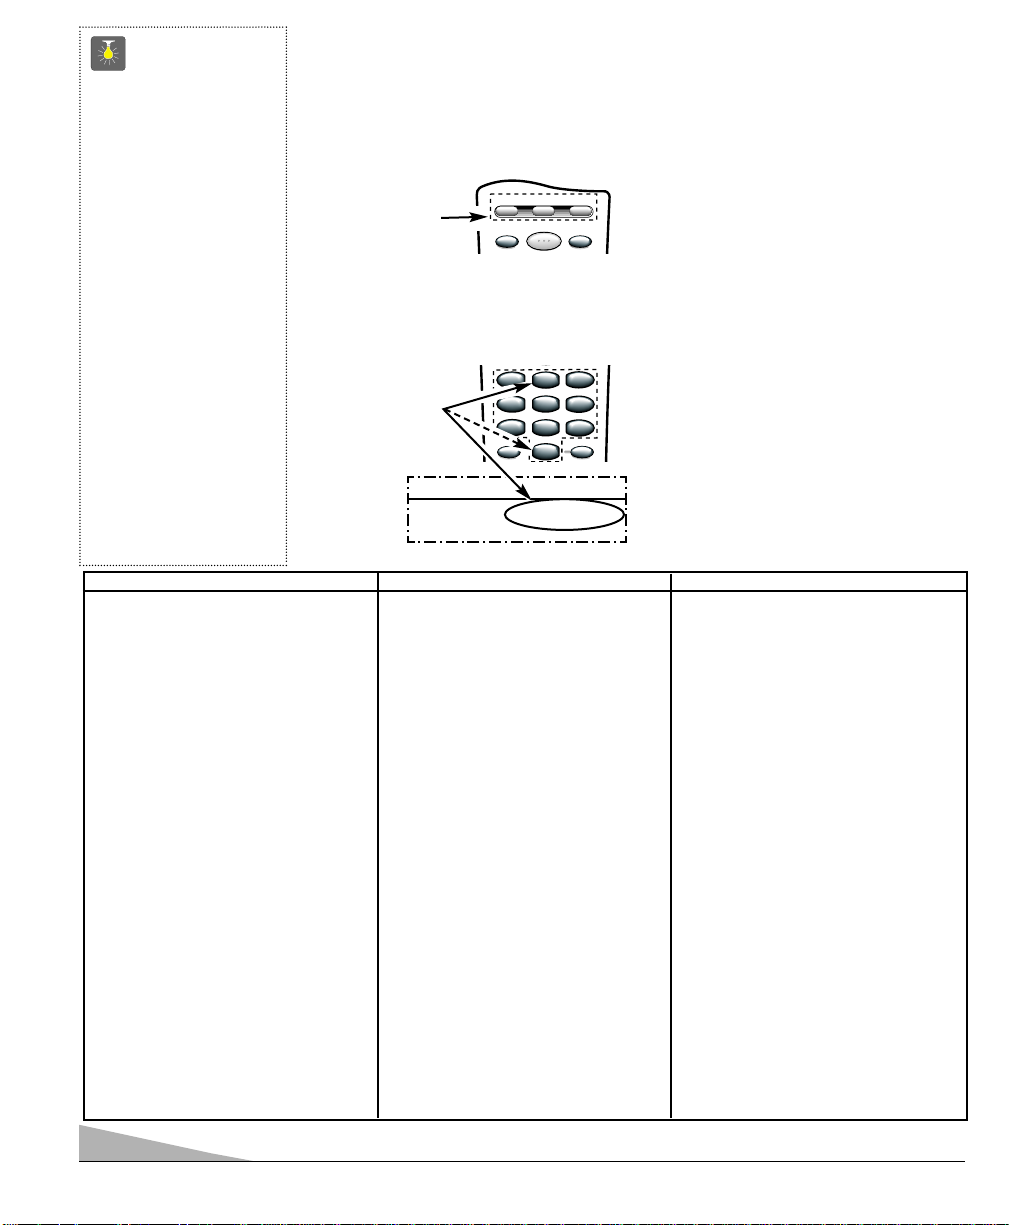
48
Localice su código. Este se encuentra junto a
la marca de su equipo, en la carta de abajo y
en página 49. (Ejemplos ilustrados para una
VCR Sanyo.)
➊ Presione y mantenga asi la tecla de
VCR o AUX.
❷ Usando las teclas NUMERADAS en el
control remoto, de acceso el número de
tres dígitos para su VCR, DVD, o
Decodificador de Cable. La tecla se iluminará 5 veces cuando sea liberada, sí el
código fue aceptado.
❸ Presione la tecla de Power y las teclas de
Channel. Sí estas operan de manera adecuada la programación esta completa. Sí
no es así, use otro código, sí este esta
disponible y repita los pasos.
Notas :
– Puede haber VCR’s, DVD’s, y decodifi-
cadores de cable que este control remoto
no pueda operar.
– Algunos manufacuradores pueden usar
diferentes tipos de controles remoto. Si la
marca de su equipo, tiene listados varios
códigos, repita el pasos
❶y ❷
con cada
número, hasta que Ud. encuentre el
código correcto. Escriba sus códigos en
los espacios en la parte posterior de su
control remoto y en los siguientes
espacios como una rápida referencia.
Para operar su...
VCR—Presione la tecla de VCR.
Decodificador de Cable—Presione la
tecla de AUX.
Reproductor DVD—Presione la tecla de AUX.
TV—Presione la tecla de TV.
PROGRAMANDO EL CONTROL REMOTO MULTIMEDIA PARA
OPERAR SU VCR Y DECODIFICADOR DE CABLE
MARCA CÓDIGO NO.
SANYO................200,201,202,203
SCOTT ................
De acceso al Código :
Ejemplo para una
VCR Sanyo, de
acceso al código
"200"(de la carta
de códigos).
CAPTION SLEEP
123
456
789
0
123
456
789
0
RESETINPUT
POWER
VCR TV AUX
Presione y
mantenga
así el botón.
Carta de Códigos para VCR
MARCA CóDIGO NO.
ADMIRAL ................... 234,239,243,247,224,229,222,215
ADVENTURA............... 228
AIKO............................ 240,205
AIWA .......................... 228,217
AKAI ........................... 209,215
AMERICA ACTION....... 205
AMERICA HIGH........... 232
BELL & HOWELL ....... 203
BROKSONIC ............... 234,243,247,227,204
CANDLE ..................... 233,240,222,223,204,205,208
................................... 211,216,217
CANON ....................... 232,216
CCE............................. 240,205
CINERAL..................... 240,205
CITIZEN ...................... 233,240,222,205,211,216,217
CRAIG ........................ 223,202,219
CRAVER...................... 204
CURTIS MATHES ....... 232,236,238,222,228,208,209
................................... 211,216,217
DAEWOO .................... 205,240,211
DAYTRON.................... 240,205
DENON........................ 221
DYNATECH ................. 228
EMEREX...................... 214
EMERSON .................. 234,236,240,243,247,223,227,228
................................... 203,204,205,206,210,211,217
FISHER ....................... 200,201,202,203,211
FUJI............................. 232
FUNAI ......................... 228,233,217
GARRARD................... 228
GE .............................. 222,246,232,236,239,226
................................... 229,224,208,212,216
GOLDSTAR ................ 223,238,226,206,208,215,217
GO VIDEO .................. 248,249,208,212,219
GRADIENTE................. 228
HARLEY DAVIDSON.... 228
HEADQUARTER........... 200
HITACHI ..................... 230,246,226,228,221,222,209,217
MARCA................. CóDIGO NO.
HUGHES...................... 221
JBL ............................. 237
JENSEN....................... 209
JVC ............................ 220,225,238,226,203,209,221
KEC............................. 240,205
KENWOOD ................. 226,238,220,201,203,209
KODAK........................ 232
LLOYD’S...................... 228
LOGIK ........................ 235,219
LXI ............................. 232,221,228,201,202,203,206
................................... 211,217
MAGNASONIC............. 223,240,205,219
MAGNAVOX ............... 204,232,228,211,216,217,219,220
MARTA........................ 206
MATSUSHITA ............. 232,216
MEI.............................. 232
MEMOREX ................. 232,239,243,245,223,224,228,
................................... 229,221,200,202,203,206,215
MINOLTA .................... 221
MITSUBISHI ............... 231,239,244,224,226,229,210,223
MOTOROLA................. 232,239,229,224
MTC ........................... 228,217,219
MULTITECH ............... 228,217
NEC ............................ 238,208,223,226,203,206,209
................................... 215,217
OLYMPUS................... 232
OPRIMUS.................... 239,245,248,223,224,229,203,208
ORION ........................ 243,227,234,205,206,210,211,240
PANASONIC ............... 245,232,236,223,202,211,216,219
PENNY ........................ 230,232,221,223,208,211,216,219
PENTAX ...................... 238,221
PHILCO ...................... 204,232,243,228,216,217
PHILIPS ..................... 204,232,211,216,217,228
PIONEER .................... 242,204,207,220
PROSCAN .................. 222,241,246,230,236,226
PROTON ..................... 219
PULSAR ..................... 233,240,205, 208,216,217
QUARTER.................... 200
MARCA................. CóDIGO NO.
QUARTZ...................... 200
QUASAR ..................... 245,232,236,223,216
RADIO SHACK ............ 228,245,223
RCA ............................ 221,241,246,230,232,236,239,224
................................... 226,229,221,201,207,208,210,216
REALISTIC ................. 232,239,223,224,228,229,200,201
................................... 202,203,206,208,216,217,245
SAMSUNG .................. 208,233,211,217,222
SANKY ........................ 239,229,224
SANSUI ...................... 243,226,228,209,219,220
SANYO ....................... 200,201,202,203
SCOTT ........................ 234,247,223,227,211
SEARS ........................ 232,223,228,221,200,201
,................................. 202,203,206,211,216,217
SEMP.......................... 211
SHARP ....................... 239,229,224
SHINTOM ................... 219,227
SIGNATURE ............... 217,239,229,224,200
SONY ......................... 214,218,232,237,226,228
STS............................. 221
SYLVANIA .................. 228,232,244,204,216,217
SYMPHONIC .............. 217,228,233,226,202
TATUNG ..................... 226,209
TEAC .......................... 228,209,214,217
TECHNICS................... 232
TEKNIKA .................... 232,223,228,216,217
TOMAS ....................... 228,217
TOSHIBA .................... 211,240,244,202,205,210
VECTOR ...................... 211
VIDEO CONCEPT......... 211
WARDS ...................... 230,232,239,223,224,228,229
................................... 221,202,204,208,211,217
WHITE
WESTINGHOUSE......... 240,243,205
XR-1000...................... 228,232
YAMAHA .................... 238,226
ZENITH ....................... 215,237,243,223,225,228,222
Consejos Rápidos
■
El control remoto no funciona con mi VCR o
Decodificador de Cable.
– Presione la tecla
de VCR o AUX.
– Reprogramar el
control remoto.
■
Tecla de función
especial: La tecla de
VIDEO MODE funciona como la tecla de
TV/VCR en la VCR,
cuando el control remoto
es ajustado para funcionar con la VCR.
■
El modo AUX aceptará
códigos para DVD´s y
Decodificadores de
Cable, o una segunda
VCR, pero solamente
una a la vez.
¿ Necesita ayuda?
Visite nuestro sitio en internet
www.sanyotv.com
o Llame 1-800-877-5032
Page 29
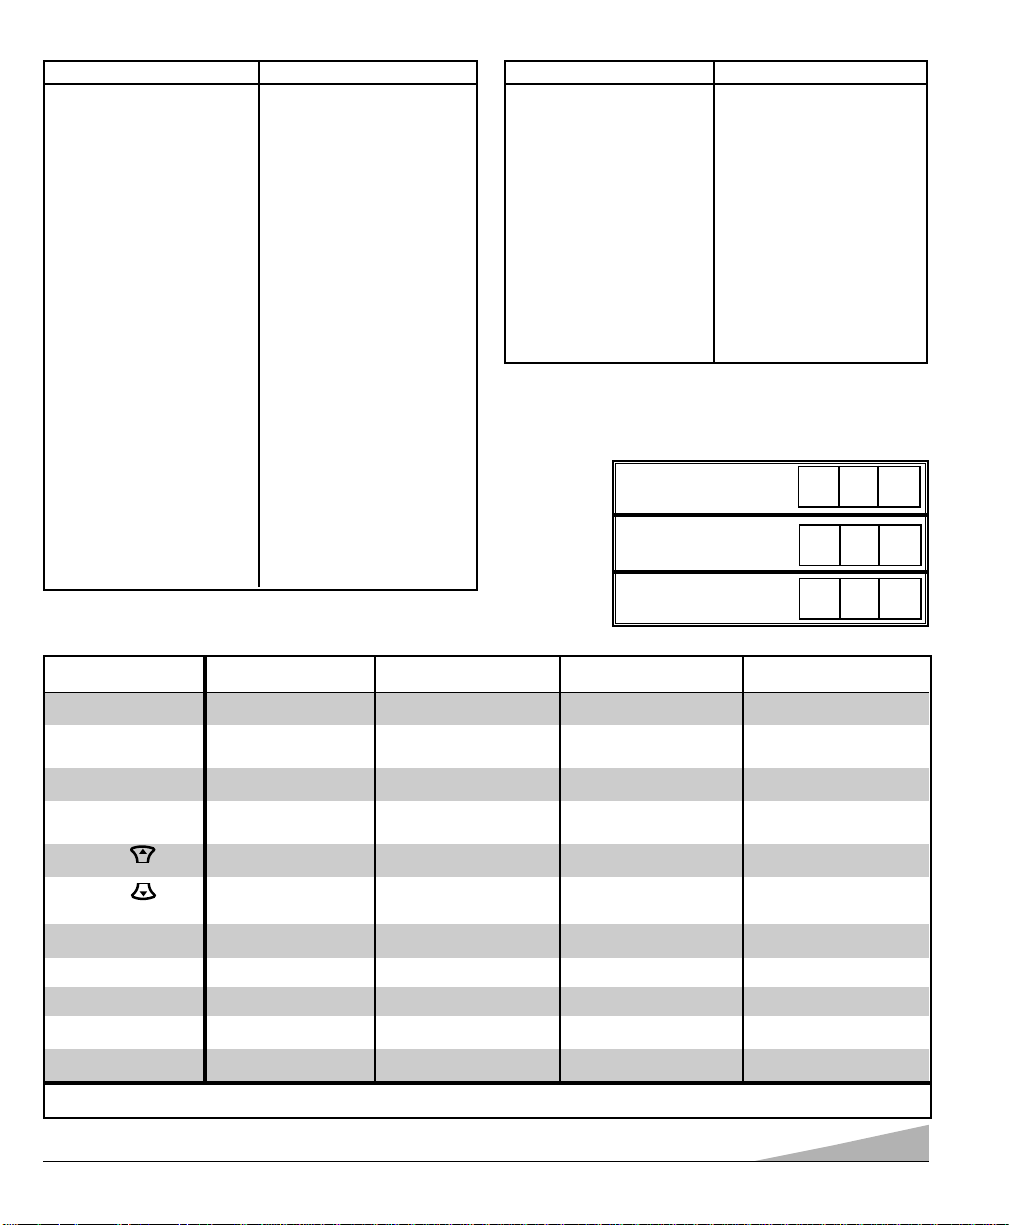
49
Carta de Teclas de Funciones del Control Remoto Multimedia
Cambiando las Baterías
Los números del código de programación, se mantendrán en
la memoria por 5 minutos, cuando Ud. cambie las baterías.
Carta de códigos para reproductores de DVD
MARCA ..................
CóDIGO NO.
APEX ............................ 523
DENON.......................... 501,520
EMERSON .................... 521
FISHER ........................ 500
GE ................................ 504
HARMAN/KARDON ...... 513
JVC .............................. 510,515
KENWOOD.................... 507
MAGNAVOX.................. 508,502
MARANTZ .................... 508
MITSUBISHI ................ 503
ONKYO.......................... 502,516
OPTIMUS...................... 511
ORITRON...................... 522
PANASONIC.................. 501,518
MARCA ..................
CóDIGO NO.
PHILIPS ........................ 508,502
PIONEER ...................... 511,505,518
PROSCAN .................... 504
RCA .............................. 504
SAMSUNG.................... 512
SANYO.......................... 500
SHARP.......................... 517
SHERWOOD.................. 519
SONY............................ 506
TECHNICS .................... 501
THETA DIGITAL............ 511
TOSHIBA ...................... 502
YAMAHA ...................... 501,509
ZENITH ........................ 514,502
Carta de Códigos par Decodificador de Cable
MARCA ..............CóDIGO NO.
ABC ........................ 304,306,309,312
.............................. 313,314,318,321
.............................. 322,324
AIM ........................ 321
ARCHER .................. 334
BELL & HOWELL .... 313
CONTEC .................. 302,305,307,308
.............................. 311,318,320,324
CPI .......................... 319
DIAMOND .............. 320
EAGLE .................... 313
EMERSON................ 334
GEMINI.................... 334
GENERAL
INSTRUMENTS .... 303,309,311,320
.............................. 321,322,323,300
GOLDSTAR.............. 312
GOODMIND ............ 334
HAMLIN .................. 330,320
HITACHI .................. 309
HYTEX .................... 318
JERROLD ................ 303,308,309,311
.............................. 313,319,320,321
.............................. 322,323,300
MAGNAVOX ............ 325,329,301
.............................. 313,314,322
MEMOREX .............. 332,313,314
MOVIE TIME .......... 306,310,314
NORTHCOAST ........ 316
NSC ........................ 305,306,314
OAK ........................ 305,318,320
PANASONIC ............ 302,307,317
PARAGON .............. 313,314
MARCA .............. CóDIGO NO.
PHILIPS .................. 325,329,301
.............................. 313,314,322
PIONEER ................ 333,312,317
PROSCAN .............. 327
QUASAR.................. 302,307,317
RADIO SHACK ........ 334
RCA ........................ 328,302,307
REGAL .................... 330,307,320
REMBRANT ............ 305,309
SAMSUNG .............. 310,312
SCIENTIFIC
ATLANTA .............. 327,307,324
SIGNAL .................. 310
SIGNATURE ............ 300,309,321,322
SPRUCER .............. 302,307,316
STARCOM .............. 332,309,311,321
.............................. 322,323
STARGATE .............. 309,310,311,321
.............................. 322,334
TELEVIEW .............. 310
TOCOM .................. 300,303,304,305
.............................. 306,307
TOSHIBA ................ 331,309,311
.............................. 316,322
UNIKA .................... 314
UNITED AIRTISTS .. 318
UNITED CABLE ...... 309
U.S.
ELECTRONICS ...... 309,322,324
VIEWSTAR .............. 326,313,315
WARDS .................. 321,322
WARNER ................ 312
ZENITH .................. 331,316,322,324
Marca de VCR
Código No:
Marca del Decodificador
de Cable Código No:
Marca del Reproductore
DVD Código No:
Anote sus
códigos de
VCR, Decodificador de Cable,
Reproductor de
DVD’s, para
referencias
futuras.
Teclas de Control Remoto Funciones en modo de TV Funciones en modo de VCR Funciones en modo de Funciones en modo de DVD
Decodificador de Cable
POWER Encendido / Apagado Encendido / Apagado Encendido / Apagado Encendido / Apagado
Teclas Numeradas (0~9) Usadas para Seleccionar Usadas para Seleccionar Usadas para Seleccionar No tiene función
Canales Canales Canales
INPUT Seleccionar TV/modo Seleccionar TV / VCR mode Seleccionar TV/modo Seleccionar TV/modo
de Vídeo de Vídeo de Vídeo
RECALL Canal seleccionado Canal seleccionado No tiene función Se repite la selección
previamente previamente
Canal Arriba Selecciona el próximo Selecciona el próximo canal Selecciona el próximo Próximo o Adelanta
canal arriba canal arriba canal arriba
Canal Abajo Selecciona el próximo Selecciona el próximo canal Selecciona el próximo Anterior o atrasa
canal abajo abajo canal abajo
PLAY Selecciona el modo de Selecciona el modo de Selecciona el modo de Selecciona el modo de
reproducción En VCR reproducción en VCR reproducción en VCR reproducción En DVD
AVANCE RÁPIDO Adelanta la cinta de vídeo Adelanta la cinta de vídeo Adelanta la cinta de vídeo Adelanta el disco de vídeo
REBOBINADO Rebobina la cinta de vídeo Rebobina la cinta de vídeo Rebobina la cinta de vídeo Atrasa el disco de vídeo
STOP Se detiene la VCR Se detiene la VCR Se detiene la VCR Se detiene el disco de vídeo
PAUSE Se selecciona pausa Se selecciona pausa en la Selecciona pausa en la VCR Selecciona pausa el disco
en la VCR VCR de vídeo
NOTA : Otras teclas en el control remoto operan solamente en la TV.
Page 30
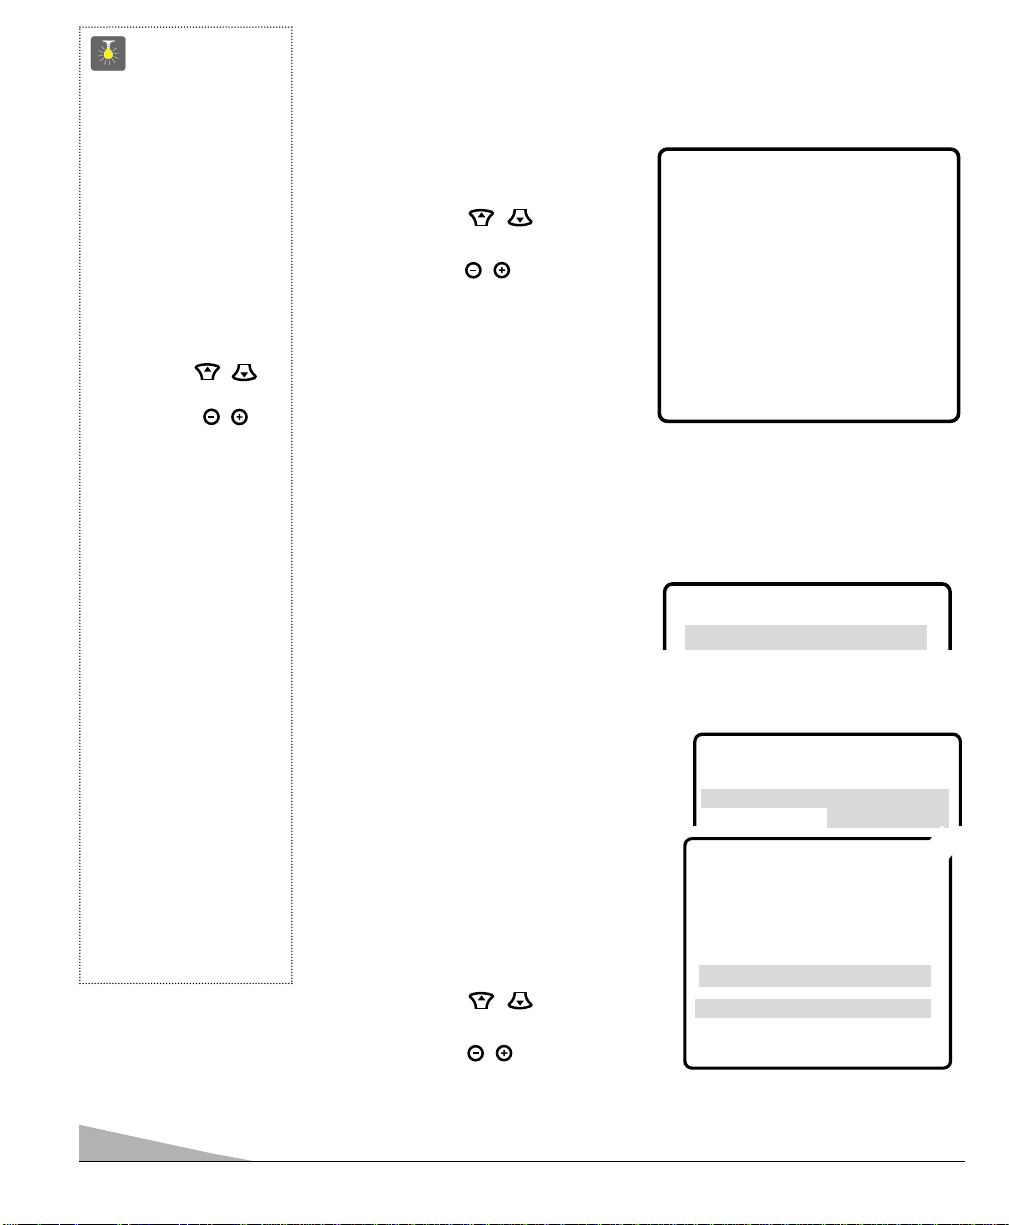
50
AJUSTES DEL TV
Los menús en pantalla proveen al observador, un fácil acceso a los ajustes. Solamente
use las teclas del control remoto y siga las instrucciones.
COMO HACER LOS AJUSTES
1. Presione MENU.
2. Use las teclas de / para resaltar
la función deseada.
3. Use las teclas de / para escoger la
opción deseada (
➧
indica la opción
seleccionada).
Artículos con submenús requiere pasos
adicionales.
AJUSTE EL MODO DE AUDIO
Seleccione el sonido deseado; Estéreo (Stereo) Mono, o SAP (segundo programa
de audio).
Nota : Estéreo y SAP deben ser parte de señal transmitida.
1. Seleccione Estéreo (Stereo), Mono,o SAP de la opción de Audio.
2. Presione la tecla de MENU para salir.
Nota : La TV se ajustará automáticamente
aestéreo, sí esta es desconectada o
una falla en el suministro eléctrico
ocurre.
AJUSTE DE IMAGEN/SONIDO
Ajustes de Fabrica para Imagen/Sonido :
Seleccione Auto la opcione de Imagen/Sonido.
Para personalizar manualmente la
Imagen/Sonido :
1. Seleccione Manual de las opciones de
Imagen/Sonido.
2. Presione MENU para activar los submenús
controles.
3. Use las teclas de / para resaltar el
control que se quiere ajustar.
4. Use las teclas de / para hacer los
ajustes.
5. Presione la tecla de MENU para salir.
Imagen/Sonido Submenús Controles
Consejos Rápidos
■
Siga siempre las instrucciones de la pantalla.
■
Todas las funciones de la
TV son controladas a
través del menú.
■
El menú se desplegará
por 20 segundos aproximadamente. Presione
MENU nuevamente
para desplegarlo.
■
Use las teclas de
CANALES / y
las teclas de
VOLUMEN /
para navegar a través
del menú y para hacer
las selecciones de los
menus.
■
Bajo condiciones de
señal estéreo débil,
Usted puede recibir un
sonido de mayor
calidad en la posición
de“Mono.”
■
Use la función de Sonido
Envolvente para
expandir los efectos del
sonido, mientras este
recibiendo una señal
estéreo MTS, o también
para realzar los sonidos
de los juegos de vídeo.
¿ Necesita ayuda?
Visite nuestro sitio en internet
www.sanyotv.com
o Llame 1-800-877-5032
Botones ▲▼ Botones – +
Audio
➧
Stereo Mono SAP
Imagen/Sonido
➧
Auto Manual
Juego
Antena
➧
Cable VHF/UHF
Loc. Canales
➧
NO Iniciar
Buscar Canales C 34 Anadido
➧
Espanol
Menu Lenguaje English Francais
Use MENU para salirse
Botones ▲▼ Botones – ++++
AAAAuuuuddddiiiioooo
➧SSSStttteeeerrrreeeeoooo Mono SAP
Botones ▲▼ Botones – +
Color
Tinte
Contraste
Brillo
Nitidez
Use MENU para salirse
SSSSuuuurrrrrrrroooouuuunnnndddd
NO
➧
SSSSII
II
Botones ▲▼ Botones – +
Audio
Antena
IIIImmmmaaaaggggeeeennnn////SSSSoooonnnniiiiddddoo
oo Auto
➧MMMMaaaannnnuuuuaaaallll
Juego
➥
TTTToooonnnnoo
oo
LLLL--------------
--
■
❙❙❙❙❙❙❙❙❙❙❙❙❙❙❙❙❙❙❙❙HH
HH
Page 31
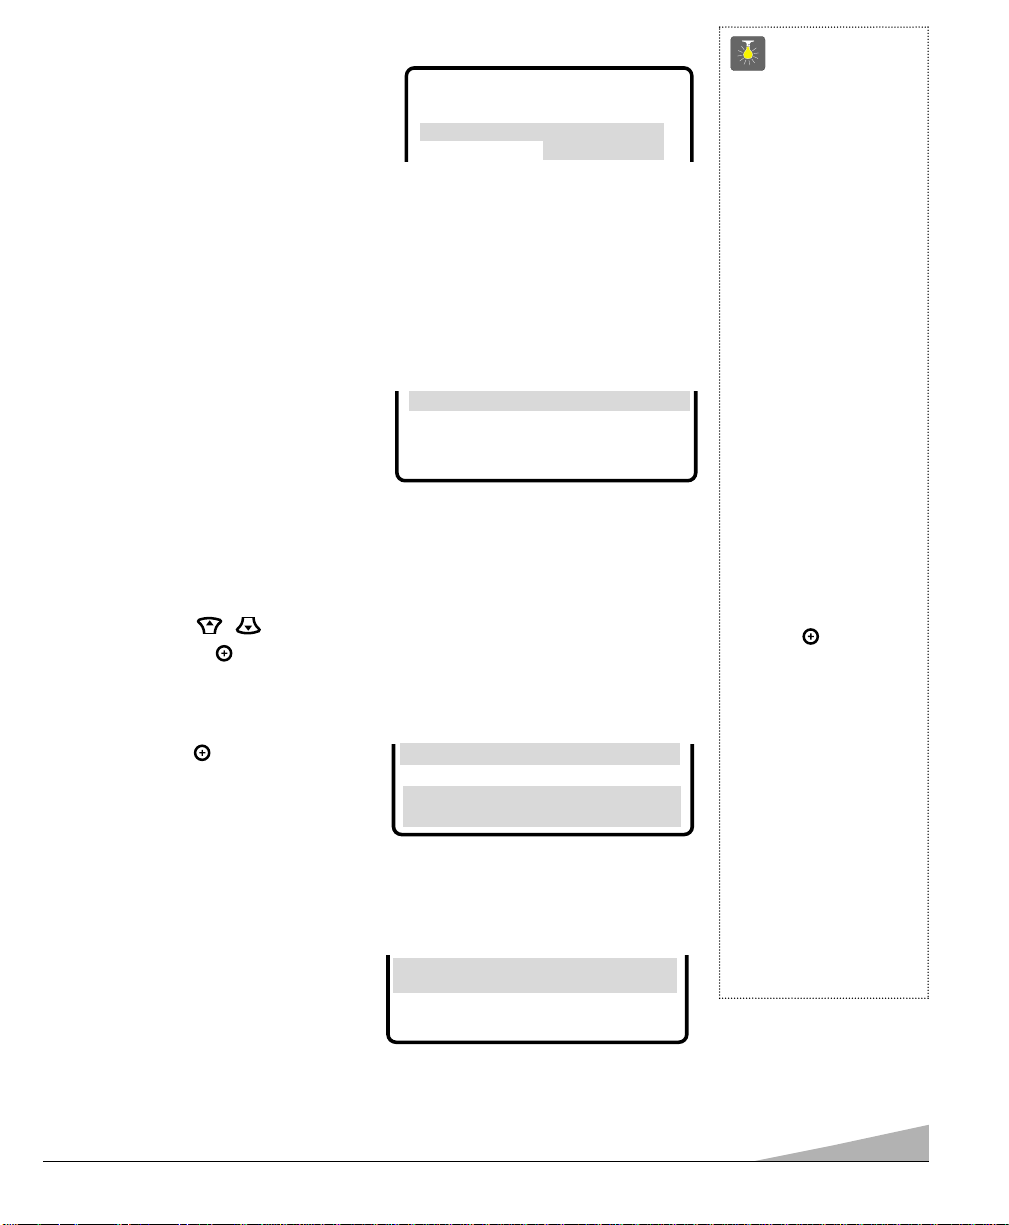
51
Para selección automática de Juego :
1. Seleccione Juego del menú de opciones
de Imagen/Sonido. La imagen cambiará
automáticamente por ajustes previamente
establecidos.
2. Presione la tecla de MENÚ para salir.
Nota : Seleccione el modo de juego presionando
la tecla de INPUT en el control remoto.
REAJUSTANDO EL MODO DE ANTENA/CABLE Y
BÚSQUEDA DE CANALES
Reajuste el Modo de Antena/Cable o Búsqueda de Canales si es requerido, si tienen canales
adicionales, si es que se cambio a otra ciudad o si se ha instalado el servicio de cable.
1. Seleccione Iniciar del menú de
opciones de búsqueda de canales.
AGREGANDO O BORRANDO CANALES
Use las teclas del control remoto para hacer los ajustes.
1. Presione la tecla de
MENU.
2. Use las teclas de / para iluminar Buscar Canales.
3. Presione la tecla de para iluminar el número del canal en el área de entrada.
4. De entrada al número del canal por ejemplo : C34. Para canales de Cable arriba de 99,
presione y mantenga así la tecla del 1, hasta C1- - aparezca. Entonces entrar en la otra
dos números.
5. Presione la tecla para seleccionar
la opción (ejemplo) : Anadido cambiara a
Saltado.
6. Presione la tecla de
MENU para salir.
Consejos Rápidos
■
Una pantalla de color
azul con la palabra
Video desplegada, significa que el modo de
Video/Juego esta seleccionado, pero la señal
no ha sido detectada en
el conector de Video.
■
Cuando ajuste el modo
de Antena, escoja el
modo Cable, si su TV
esta conectada a un
sistema de cable, de
otra manera escoja
VHF/UHF.
■
Canales borrados en la
memoria de canales,
pueden ser seleccionados con las teclas
númeradas.
■
El número del canal
debe de ser iluminados
antes de presionar la
tecla de para
agregarlo o borrarlo.
■
Para restaurar canales
borrados, use el menú
en pantalla, manualmente, agregue los
canales o inicie la
Búsqueda de Canales
en el menú.
¿ Necesita ayuda?
Visite nuestro sitio en internet
www.sanyotv.com
o Llame 1-800-877-5032
Menu Lenguaje
SSSSeeeelllleeeecccccccciiiioooonnnneeee ccccaaaannnnaaaalllleeeessss ccccoooonnnn ▲▲▲▲▼▼▼▼oooo 0000~~~~99
99
UUUUsssseeee MMMMEEEENNNNUUUUppppaaaarrrraaaa ssssaaaalllliiiirrrrssssee
ee
Buscar Canales CCCC 33334444 SSSSaaaallllttttaaaaddddoooo
SELECCIONANDO EL DESPLEGADO DE LENGUAJE
1. Seleccione las opciones de English
(Ingles), Francais (Francés), o
Espanol del Menu de Lenguaje.
2. Presione la tecla de
MENU para salir.
Use MENU para salirse
➧EEEEssssppppaaaannnnoooollll
Menu Lenguaje English Francais
Buscar Canales
Menu Lenguaje
Use MENU para salirse
Loc. Canales NO
➧IIIInnnniiiicccciiiiaaaarrrr
Botones ▲▼ Botones – +
Audio
Antena
➧JJJJuuuueeeeggggoooo
IIIImmmmaaaaggggeeeennnn////SSSSoooonnnniiiiddddoo
oo Auto Manual
Page 32
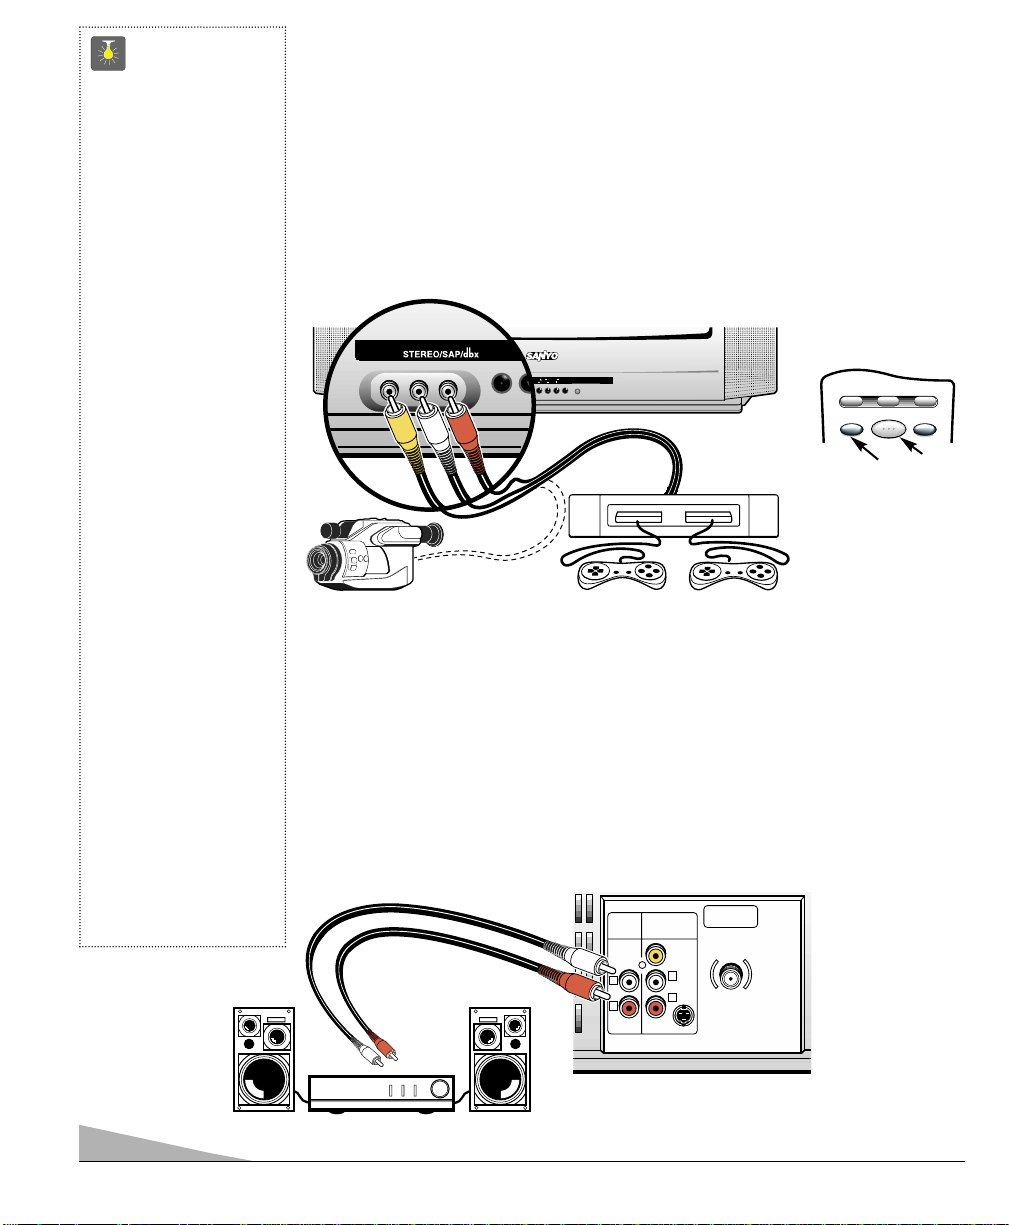
USANDO LA SALIDA DE AUDIO
CONECTE UN AMPLIFICADOR ESTÉREO
A LAS SALIDAS DE A/V
1. Conecte la Salida de Audio (R/L)❶a la entrada del Amplificador Estéreo (R/L) ❷.
2. Presione POWER para encender la TV. Además Encienda el equipo externo.
52
MTS
MENUMENU
CHANNELCHANNEL
VOLUMEVOLUME
POWERPOWER
MENUMENU
MENUMENU
VIDEO IN L- AUDIO -R
MTS
MENUMENU
VIDEO IN L- AUDIO -R
Vidéo Juego
USANDO LAS ENTRADAS FRONTALES DE
AUDIO/VIDEO
CONECTANDO UNA JUEGO DE VIDEO
Apague la TV y los equipos externos antes de conectar los cables.
1. Conecte la salidas de la Juego (R/L) a las entradas de la TV (R/L). Conecte la salida
de la Juego a la entrada de video de la TV
❶
.
2. Presione POWER
❷
para encender la TV. Además Encienda el equipo externo.
3. Presione INPUT key
❸ en el control remoto.
❶
❷
❸
Control Remoto
Consejos Rápidos
■
Asegurese que todos los
conectores este correctamente asentados en
las entradas.
■
Siempre combine los
cables de acuerdo a los
colores:
ROJO para el
audio del lado derecho,
BLANCO para el audio
del lado izquierdo, y
AMARILLO para video.
■
Un pantalla de color
Azul, con las palabras
de Video1 o Video2
desplegada, significa
que el modo de
Juego/Video esta seleccionado, pero la señal
no ha sido detectada en
el conector de Video.
■
Coloque su televisor al
menos a 60 cm de las
bocinas de un sistema
estéreo. Los magnetos
en dichas bocinas
pueden afectar la
calidad de pureza de la
imagen.
■
No conecte bocinas
externas directamente a
la TV.
¿ Necesita ayuda?
Visite nuestro sitio en internet
www.sanyotv.com
o Llame 1-800-877-5032
Cámara de Vidéo
❶
Parte Posterior de TV
Amplificado Estéréo
❷
VCR TV AUX
POWER
RESETINPUT
UHF/VHF/CATV
VIDEO
L
R
75Ω
(MONO)
AUDIO
OUTPUT
L
R
AUDIO VIDEO
INPUT
S-VIDEO
Page 33
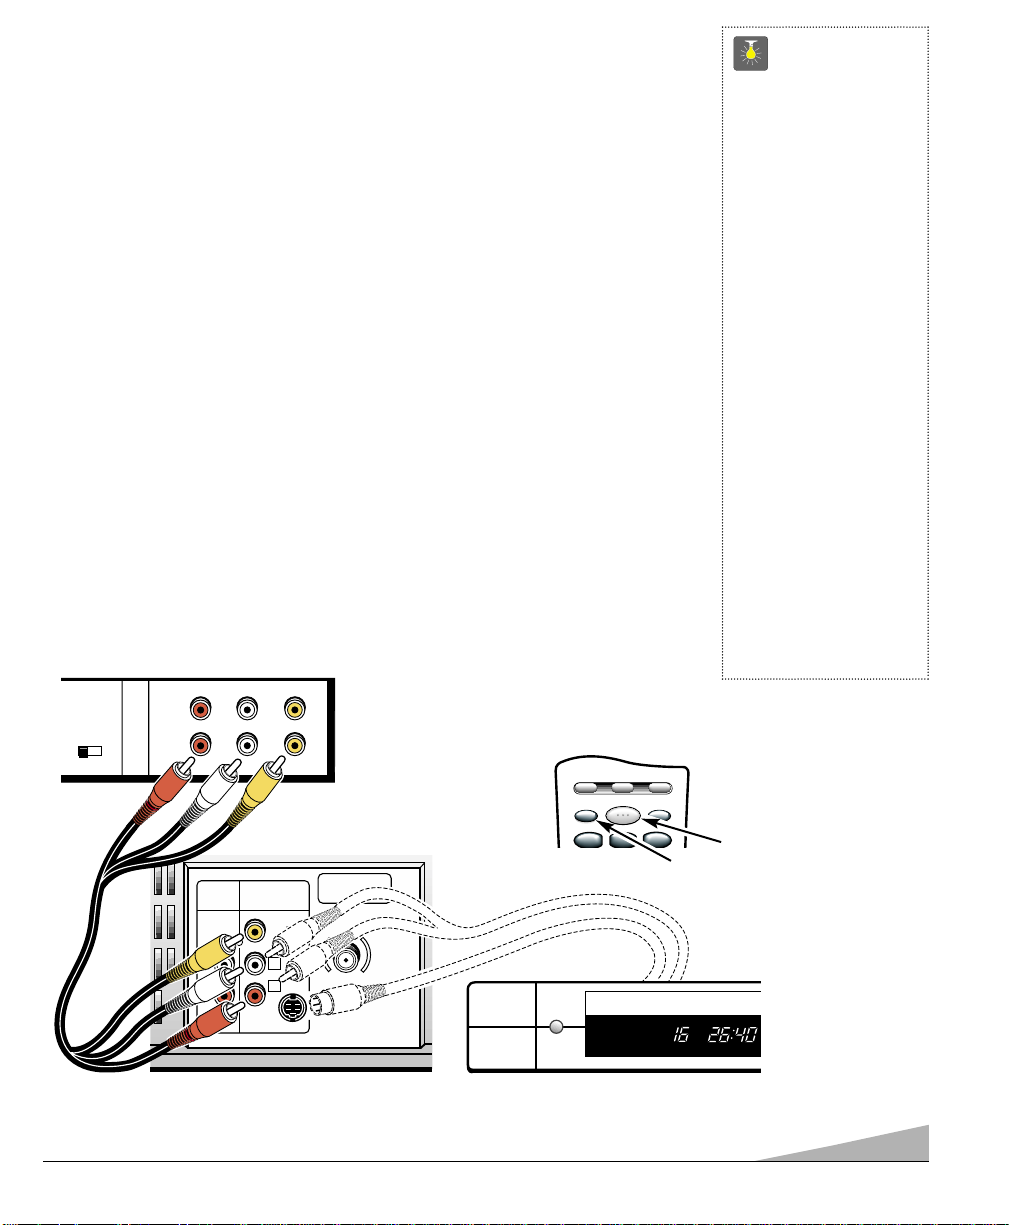
53
USANDO LAS ENTRADAS POSTERIORES
DE AUDIO/VIDEO
CONECTANDO UNA VCR O OTROS EQUIPOS EXTERNOS
A LA TV
Apague la TV y los equipos externos antes de conectar los cables. (Los cables no son
suministrados con la TV.)
1. Conecte la salidas (R/L) de la VCR o otros euipos’ a las entrad as de la
TV (R/L)
❶
.
Para VCR monofónicas (una salida de Audio) conecte la salida de la VCR a la
entrada (L) de la TV.
2. Conecte la salidas (R/L) de video la VCR o otros euipos’ a la entrada de la TV
video
❷
.
Optativo
Conecte la Salida de S-Video de la VCR, DVD, o otro equipo
➁ a la Entrada de Video
en la TV
❷
. Usando el conector S-Video invalida el conector de entrada de Video.
3. Presione POWER
❸
para encender la TV. Además Encienda el equipo externo.
4. Presione INPUT
❹
para seleccionar la fuente del programa : Señal de TV o señal
del equipo que ha sido conectado a las entradas de A/V. (Presione esta tecla hasta
que el desplegado de Vídeo2 este en la pantalla.)
AUDIO
OUTPUT
AUDIO VIDEO
INPUT
R
L
UHF/VHF/CATV
75Ω
R
L
VIDEO
(MONO)
S-VIDEO
CH3 CH4
IN
OUT
A/V JACKS
RF
CHANNEL
R- -L
AUDIO VIDEO
R- -LAUDIO VIDEO
❶
Parte Posterior
de VCR
❷
Las Entradas de la TV
Consejos Rápidos
■
Asegurese que todos los
conectores este correctamente asentados en
las entradas.
■
Siempre combine los
cables de acuerdo a los
colores:
ROJO para el
audio del lado derecho,
BLANCO para el audio
del lado izquierdo, y
AMARILLO para video.
■
Un pantalla de color
Azul, con las palabras
de Video1 o Video2
desplegada, significa
que el modo de
Juego/Video esta seleccionado, pero la señal
no ha sido detectada en
el conector de Video.
¿ Necesita ayuda?
Visite nuestro sitio en internet
www.sanyotv.com
o Llame 1-800-877-5032
❹
❸
Control Remoto
➁
DVD
VCR TV AUX
POWER
RESETINPUT
123
123
Page 34
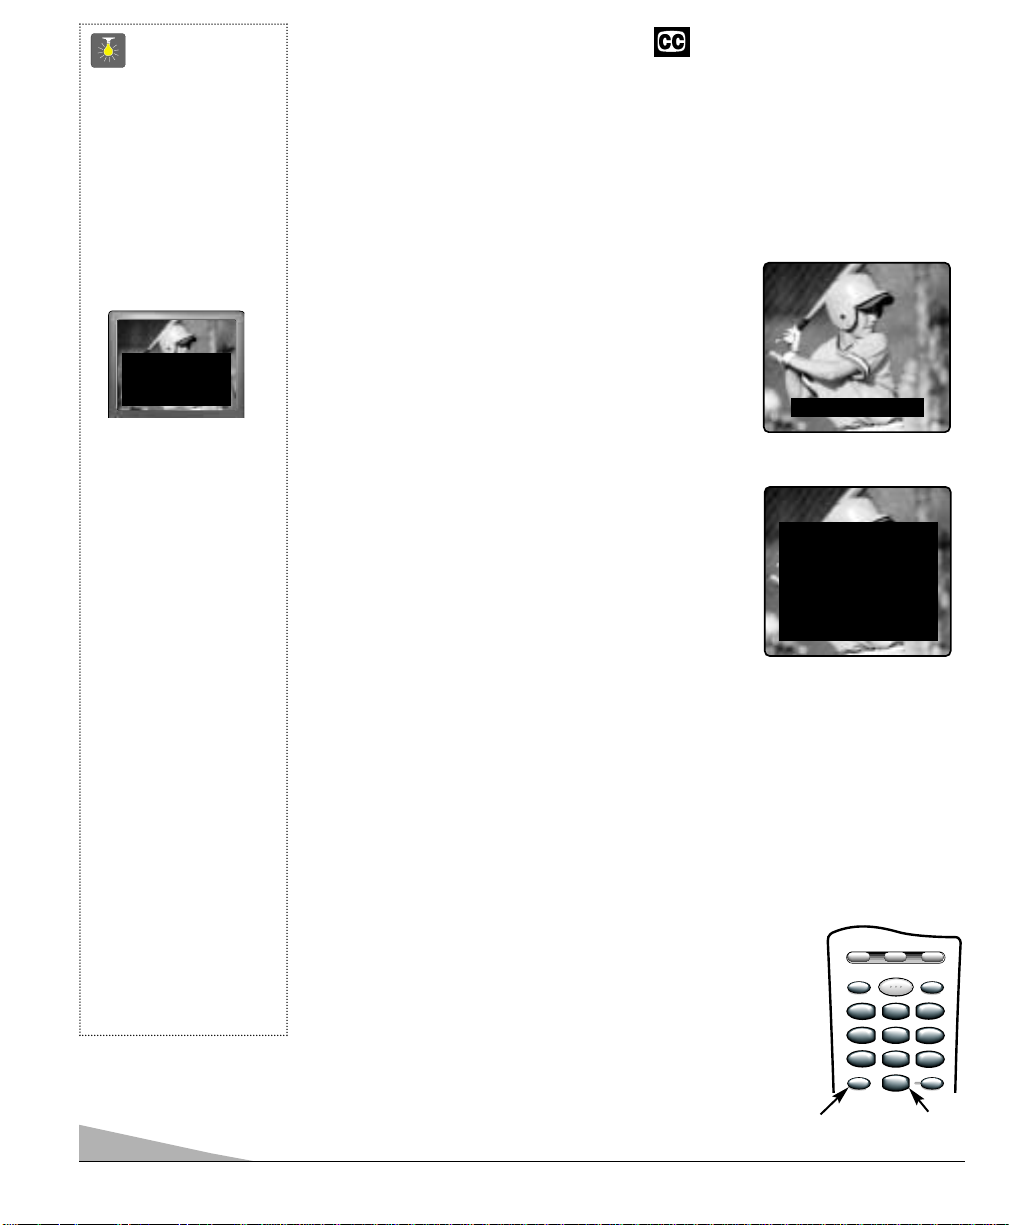
54
TRANSMISIÓN CAPTADA (Closed-Caption)
La transmisión captada es información de texto transmitida junto con la imagen y el
sonido, y que puede ser desplegada en la pantalla de la TV. Debido a los diferentes tipos
de subtítulos que pueden ser transmitidos con la señal de TV, existen diferentes modos de
transmisión capatada que son usados para desplegar subtítulos. Los modos de transmisíon
captada reconocidos por este modelo son los siguientes : Caption1, Caption2, Texto1 y
Texto2. Las transmisoras locales deciden que tipo de señal de transmisión captada es
transmitida. Ellos escogen de no proveer subtítulos o proveerlos en uno o todos los
modos disponibles.
Caption1 : Este es el principal modo usado para subtítular
programas (las palabras coinciden con el programa que Ud.
esta viendo). La mayoría de las transmisoras usarán
Caption1 para transmitir programas subtítulados, Estos
subtítulos son generalmente una o dos lineas y aparecen el
la parte inferior de la pantalla o cerca de la persona que esta
hablando.
Caption2 : Es un modo alterno para programar
subtítulos. Caption2 puede ser usado por las estaciones
transmisoras para proveer subtítulos en otro lenguaje,
como puede ser Español o Francés.
Texto1 : Es el modo usado para desplegar un gran
cantidad de texto. Este texto aparecerá dentro de un fondo
negro que casi puede ser tan grande como la pantalla
de la TV. El texto desplegado de esta manera no esta
relacionado con el programa. Estos subtítulos pueden ser
usados por las estaciones transmisoras para proveer de
reportes de clima, boletines a la comunidad,
cotización de acciones, etc.
Texto2 : Este es un modo alternativo usado para desplegar una gran cantidad de texto. Es
el mismo tipo de información desplegada en Texto1, puede ser desplegada en Texto2. Por
ejemplo las estaciones transmisoras pueden escoger de proveer reportes de clima en
Texto1, y boletines a la comunidad en Texto2.
Quikcap : Quikcap permite activar y desactivar subtítulos con la función de Mute. Por
ejemplo, el teléfono llama, Ud. presiona la tecla de MUTE en el control remoto para
desactivar el sonido de la TV, los subtítulos se desplegarán automáticamente, Cuando Ud.
termine su conversación, presione MUTE nuevamente, para restaurar el sonido, los
subtítulos desaparecerán.
Quikcap desplegará programas subtítulados en el modo de Caption1.
AJUSTANDO LA FUNCIÓN DE CAPTION
1. Presione la tecla de CAPTION en el control remoto.
2. Use la tecla de 0 para seleccionar, NO, Caption1,
Caption2, Texto1, Texto2, o Quikcap.
Consejos Rápidos
■
Si la funcíon de Transmisíon Captada esta
activada, y los subtítulos no son transmitidos,
un cuadro de color
negro puede aparecer y
mantenerse así en la
pantalla de la TV.
Para eliminar este
cuadro de color negro,
ajuste la función de subtítulos a cualquier otro
modo, como Texto1
o Texto2, o presione la
tecla de
RESET, para
cancelar la función de
subtítulos y ajustes
personalizados.
■
Cuando la funcíon de
transmisión captada este
activada, el desplegado
de canales no aparecerá
en la pantalla. Para que
estos desplegados
vuelvan a aparecer en la
pantalla, Ud. debe de
apagar la función de
transmisión captada.
¿ Necesita ayuda?
Visite nuestro sitio en internet
www.sanyotv.com
o Llame 1-800-877-5032
Caption1/2
Texto1/2
❷
➊
Dos fuera y dos golpes
ESTA NOCHE: NUBLADO CON
40% DE PROBABILIDAD DE
LLUIA, TEMPERATURA MAS
ALTA QUE LOS 30', VELOCIDAD
DEL VIENTO OESTE 20m/hr. CON
DESVIACIÓN AL NOROESTE A
MEDIA MOCHE. VIERNES NUBLADO
TOTAL Y MAS FRIÓ CON
PROBABILIDAD DE LLUVIA DEL
50%
VCR TV AUX
POWER
RESETINPUT
123
123
456
456
789
789
CAPTION SLEEP
0
0
Page 35
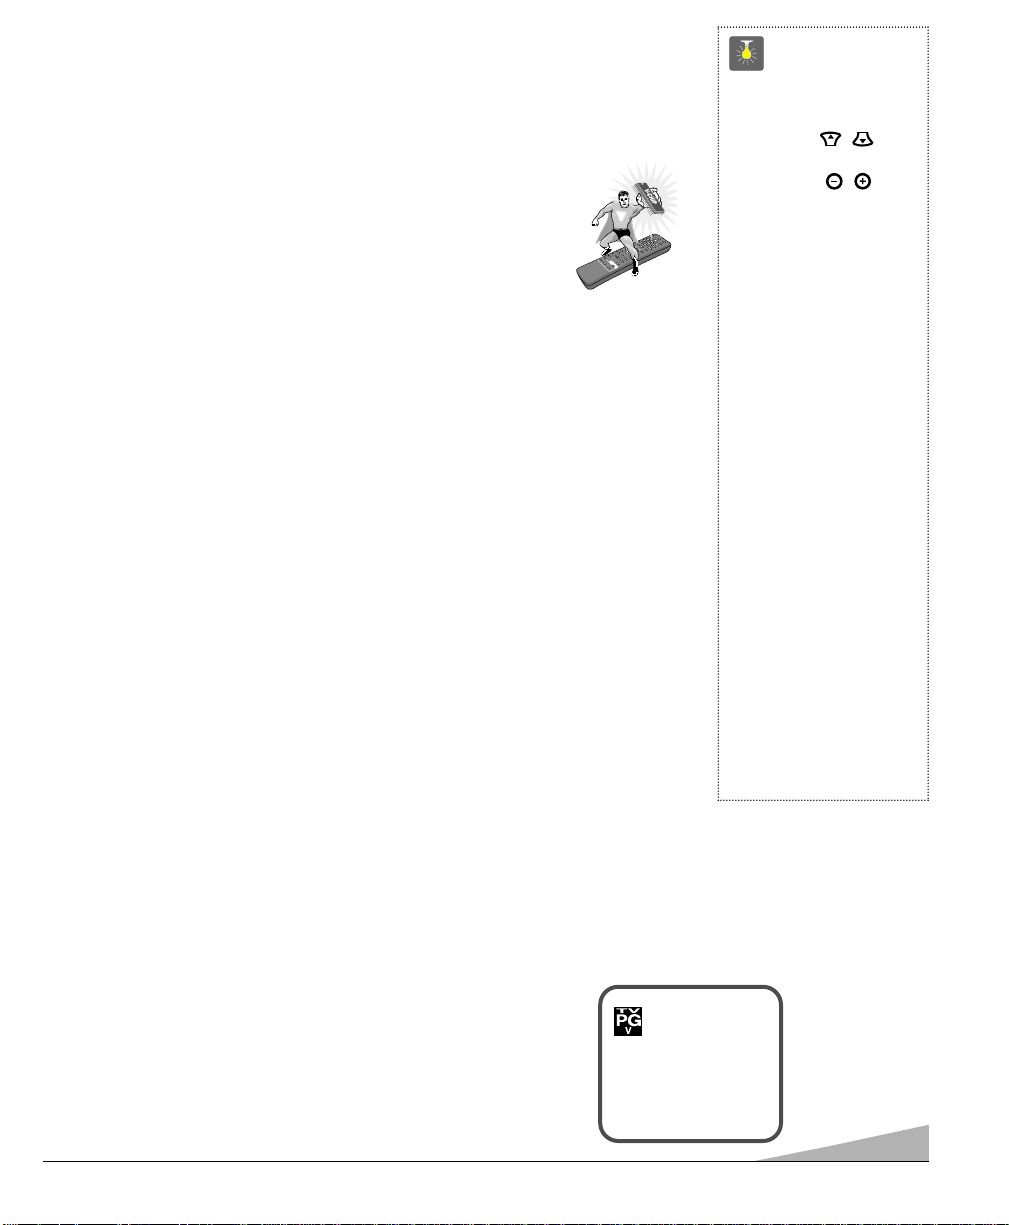
55
INFORMACÍON DE GUÍA-V
NOTA : ESTA FUNCIÓN ESTA DISEÑADA PARA CUMPLIR REGULACIONES DE LA
FCC PARA V-CHIP EN LOS ESTADOS UNIDOS DE AMÉRICA, ESTA
FUNCIÓN NO PUDIERA ACTIVARSE CON SEÑALES QUE SE ORIGINEN EN
OTROS PAÍSES.
Con la introducción de la tecnlogía de “V -Chip”, es ahora posible que los televisores Sanyo, puedan interpretar los códigos de clasificación de la MPAA
y Ordenamientos de Control Paternal en TV. Cuando estos códigos son
detectados, el TV bloqueará, dependiendo de las selecciones hechas en el
sistema de V-Guide.
1
2
3
4
5
6
7
8
9
0
PLAY
PA
USE
R
EC
STO
P
V
G
U
I
D
E
L
O
C
A
T
I
O
N
SE
LE
C
T
SWAP
P
I
P
O
N
/O
F
F
D
I
SPL
A
Y
M
U
TE
RESET
SLE
E
P
C
A
P
T
IO
N
M
ENU
C
H
VO
L
VO
L
R
ESE
T
I
N
P
U
T
V
C
R
AUX
TV
POW
E
R
+
-
QU
I
CK
F
R
E
E
ZE
V
v
ACERCA DE LOS ORNENAMIENTOS DE CONTROL
PATERNAL EN TV Y MPAA
MPAA y los Ordenamientos de control paternal en TV, son sistemas de clasificación que
permiten a los padres tener una información avanzada de prevención contra el contenido
de una película o programa de televisión.
MPAA es una sistema voluntarío de clasificación, usado por la industria cinematográfica. Los Ordenamientos de Control Paternal en TV estan moldeados a la
clasificación de la MPAA después que fue diseñada por ser fácil de usar, de entender y
de localizar.
El Ordenamiento de Control Paternal en TV esta basado en edad y contenido de información. Esta información da a los padres una manera discreta de escoger el material que
va a ser visto por sus hijos.
La clasificación contenida esta representada por iniciales : D (Diálogos Sugestivos),
L (Lenguaje para Adultos), S (Contenido Sexual), V (Violencía), y FV (Fantasía
Violenta). Cuando la programación contiene cualquiera de estas condiciones, estas
iniciales forman parte del ícono que es desplegado en la pantalla de la TV.
Un icono de clasificación aparecerá generalmente en la esquina superior izquierda en la
pantalla de su TV por 15 segundos, en el inicio del programa, y debe de repetirse a la
segunda hora, a largo del programa. Este icono además puede aparecer cuando se esta
regresando de comerciales. Puede haber otras instancias por lo que se pueden desplegar
estos íconos. Los padres estan alentados a familiarizarse con estos íconos y sus
significados
.
DONDE PUEDO ENCONTRAR INFORMACIÓN ACTUALIZADA
ACERCA DE LA CLASIFICACIÓN DE PROGRAMAS
Los editores de guías de programación han sido cuestionados para incluir estas clasificaciones junto con otra información que ellos publican. Ud. puede espera encontrar esta
información en, periódicos, revistas, y en listados de guías en pantalla.
TIPOS DE PROGRAMACION QUE
RECIBEN CLASIFICACIÓN
Los Ordenamientos de Control Paternal en TV aplicará a varios tipos de
programación, incluyendo especiales, mini series y películas. Deportes y
noticias no muestran esta clasificación actualmente.
Consejos Rápidos
■
Use las teclas de
CANALES /
y las teclas de
VOLUMEN / para
navegar a través del
menú y para hacer las
selecciones de los
menus.
■
La función de V-Guide
es accesible solamente
por el control remoto.
■
Un icono con indicaciones de clasificaciones
aparecerá generalmente
la esquina superior
izquierda en la pantalla
de su TV.
■
El desplegado de
V-Guide se mantendra
en pantalla aproximadamente por 20 segundos.
Si este desaparece
presione la tecla
de
V-GUIDE.
Necesita ayuda?
Visite nuestro sitio en internet
www.sanyotv.com
o Llame 1-800-877-5032
C 34
Codigo: TVPG-V
Page 36
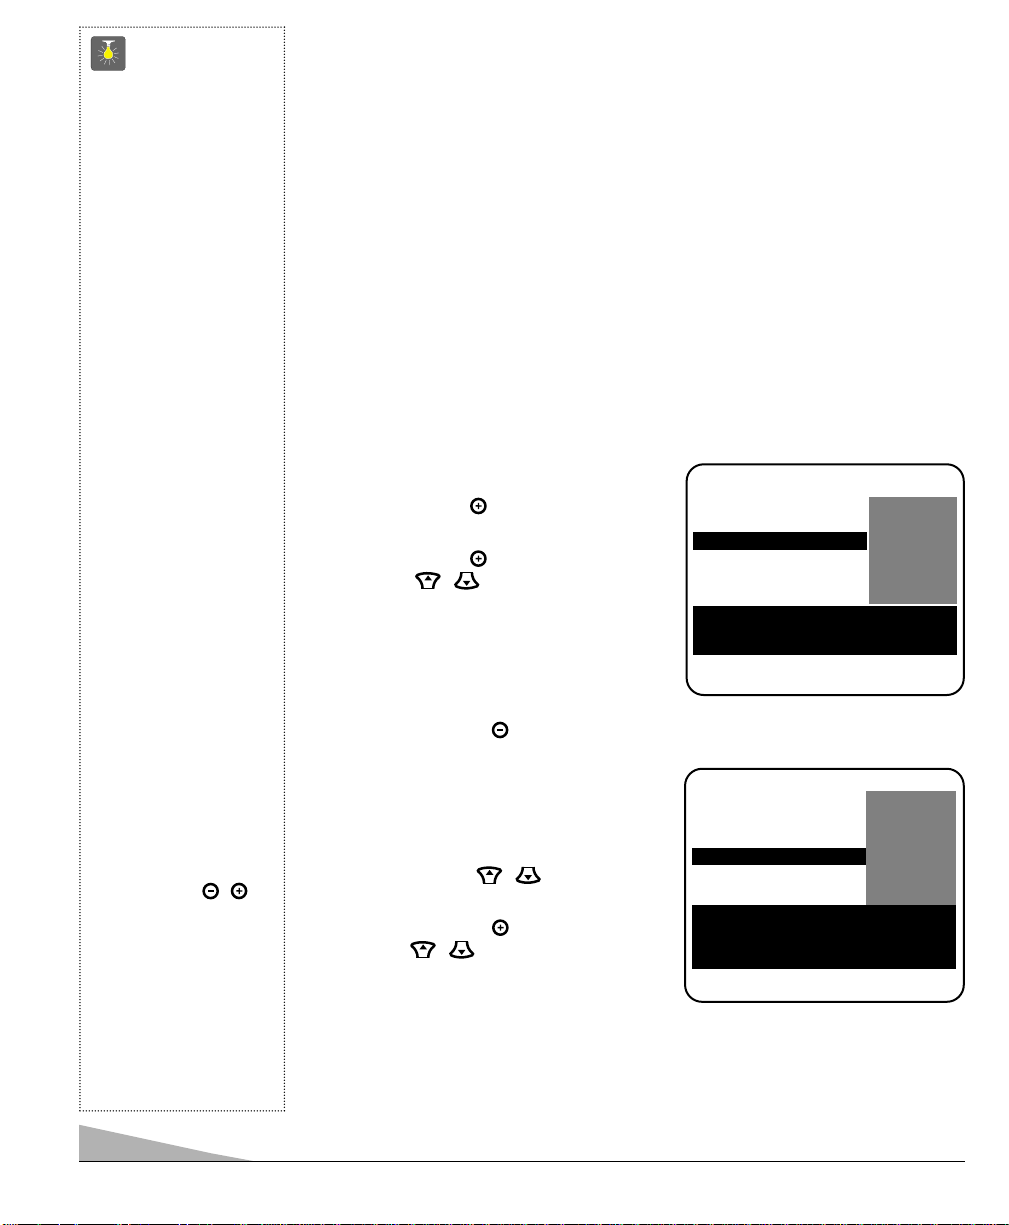
56
OPERACION DE GUÍA-V
Esta es una función que le permite supervisar los programas de televisión que son vistos
por los niños. Esta televisor puede ser ajustado para bloquear automáticamente programas
que a su juicio no son apropiados para ser vistos por niños que incluyen diálogos sugestivos, lenguaje para adultos, situaciones sexuales, violencía, y violencía fantástia.
La capacidad de la televisión para bloquear la recepción sobre el contenido de programación específica, depende de varias condiciones : 1) El programa debe de ser
clasificado, 2) Las cadenas transmisoras debe transmitir información sobre el código de
clasificación, 3) Las compañias de Cable deben de transmitir la señal con el código de
clasificación, y 4) La TV debe de esta ajustada para decodificar la señal.
El icono de clasificaciones aparecerá generalmente en la parte superior izquierda de la
pantalla de su TV.
AJUSTE DE LA CLASIFICACIÓN DE
PELÍCULAS
1. Presione la tecla de V-GUIDE en el control
remoto para desplegar el menú.
2. Presione la tecla para cambiar a
V-Guide SI.
3. Presione la tecla nuevamente. Use las
teclas de / para iluminar las
clasificaciones.
4. Presione la tecla de MENU para
Bloquear (B) o No Bloquear (U) la
clasificación seleccionada. (Flecha
➡ indica el artículo seleccionado.)
5. Presione la tecla de para regresar a las
opciones del menú de Guía-V.
AJUSTES DE CLASIFICACIÓN
BASADOS EN EDAD
6. Use las teclas de / hasta que se
ilumine TV Supervision Paternal.
7. Presione la tecla de . Entonces use las
teclas de / hasta iluminar las
clasificaciones.
8. Presione la tecla de MENU para
Bloquear (B) o No Bloquear (U) una
clasificación seleccionada. (Flecha
➡ indica el artículo seleccionado.)
Guia-V
MPAA Seleccion Peliculas
TV Supervision Paternal
Use MENU para BLOQUEAR
Use ▲▼, – + para seleccion
Use V-GUIDE para salirse
Guia-V
TV Supervision Paternal
MPAA Seleccion Peliculas
Use MENU para BLOQUEAR
Use ▲▼, – + para seleccion
Use V-GUIDE para salirse
XB
NC17 B
➡RRRRBBBB
PG13 U
PG U
GU
TVMA B
TV14 B
TVPG B
➡TTTTVVVV----GGGGBBBB
TVY7 U
TV-Y U
Content
Consejos Rápidos
■
La TV automáticamente
Bloqueará
(B) las clasi-
ficaciones superiores o
No Bloqueará
(U) la
selección de clasificaciones inferiores. Por
ejemplo, si Ud. bloquea
la clasificación
R,NC17
y
X tambien serán
bloqueados. (Ver menú
de clasificación de
películas de la MPAA.)
■
Bloqueando TV-Y7 no
bloqueará clasificaciones superiores.
■
Ud. puede bloquear
una clasificación por
contenido como pueden
ser programas
TVPG-V
y se mantendrá así
para ver programas
TV-PG con clasificación
S-L-D, estipulados en
TV-PG como no
bloqueados
(U).
■
Para ver programas
Bloqueados
(B),
deshabilite V-Guide o
presione la tecla de
RESET dos veces para
eliminar todas las
clasificaciones
Bloqueadas
(B).
■
Cuando en el sistema
de menú de V-Guide,
las teclas de / le
permiten a Ud. navegar
entre las clasificaciones y el menú de
opciones.
Necesita ayuda?
Visite nuestro sitio en internet
www.sanyotv.com
o Llame 1-800-877-5032
Page 37
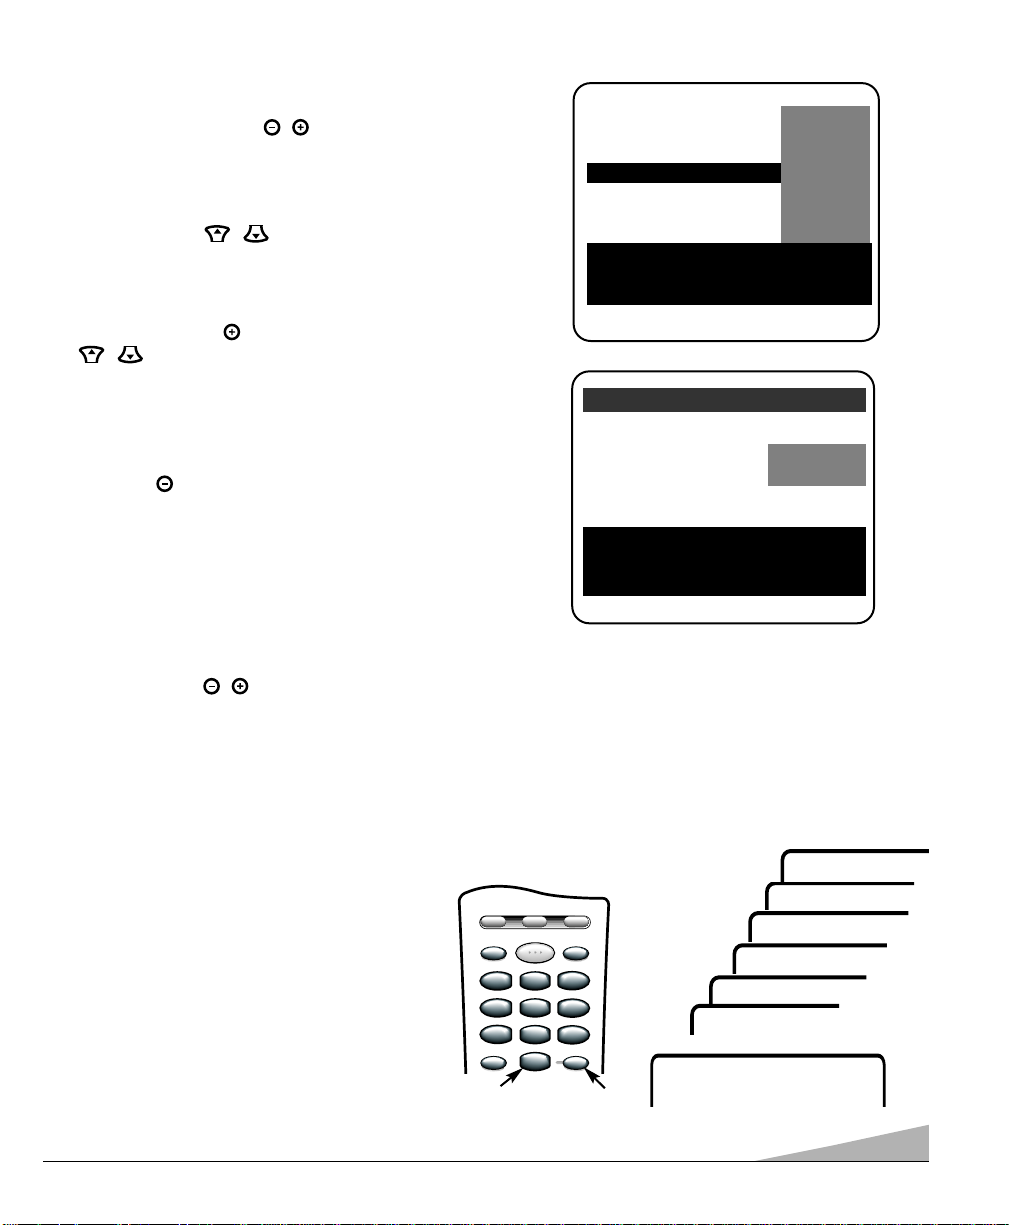
57
AJUSTES DE CLASIFICACIÓN BASADOS EN
EL CONTENIDO
9. Siga los pasos 6 y 7. Use / hasta iluminar
Content.
10. Presione la tecla de MENU para desplegar el menú
Content Option.
11. Use las teclas de / hasta iluminar categorías
(D-Diálogos Sugestivos, L-Lenguaje para Adultos,
S-Contenido Sexual, V-Violencía, FV-Fantasía
Violenta).
12. Presione la tecla de . Entonces use las teclas de
/ hasta iluminar una clasificación.
13. Presione la tecla de MENU para Bloquear (B) o No
Bloquear (U) la clasificación seleccionada. (Flecha ➡
indica el artículo seleccionado.)
14. Presione la tecla de V-GUIDE para salirse; o presione
la tecla de para retornar al menú de Content
Options.
15. Repita los pasos del número 11 hasta el 13 para
Bloquear (B) o No Bloquear (U) clasificación
de contenidos, si se desea.
APAGANDO V-GUIDE
1. Presione la tecla de V-GUIDE.
2. Use las teclas de / hasta seleccionar
apagado (NO).
Use MENU para BLOQUEAR
Use ▲▼, – + para seleccion
Use V-GUIDE para salirse
D-Dialogos Sugestivos
L-Lenguaje para Adultos
S-Contenido Sexual
V-Violencia
FV-Fantasia Violenta
➡TTVV1144BB
TVPG B
Nota : Las cadenas transmisoras y las estaciones locales,
pueden no incluir las porciones de contenido de
clasificación de los Ordenamientos del control de
TV Paternal.
Guia-V
TV Supervision Paternal
MPAA Seleccion Peliculas
Use MENU para ajuste
Use ▲▼, – + para seleccion
Use V-GUIDE para salirse
TVMA B
TV14 B
TVPG B
TV-G B
TVY7 U
TV-Y U
➡CCCCoooonnnntttteeeennnntttt
AJUSTANDO EL CRONÓMETRO PARA DORMIR
Dorm. : 0:30
Use tecla 0
Dorm. : 1:00
Dorm. : 1:30
➧
Dorm. : 2:00
Dorm. : 2:30
Dorm. : 3:00
Dorm. : Cancel
El cronómetro para dormir apagará automáticamente la TV.
1. Presione la tecla de SLEEP.
2. Use la tecla 0 para seleccionar la cantidad de
tiempo deseado (de 30 minutos hasta 3 horas).
Nota : El cronómetro para dormir se cancela
cuando la TV se apaga o ocurren
fallas en el suministro eléctrico.
CAPTION SLEEP
RESETINPUT
POWER
VCR TV AUX
123
456
789
0
123
456
789
0
➊
❷
Page 38
58
REAJUSTANDO LA TV
Presione la tecla de RESET, para reajustar automáticamente la televisión a los ajustes de fábrica. Estas
funciones se reajustarán automáticamente :
• Se reajusta imagen /sonido: Color, Tinte, Contraste, Brillo, Nitidez,
Tono, y Sonido Envolvente (Surround)
• Se restablecen los Canales en Memoria
• Se ajusta el Audio a Estéreo
• Se desactiva la función Subtítulos
• Se desactiva la función de Guía-V
• Se cambia el lenguaje a Inglés
• Cronometro para Dormir (Si fue previamente ajustado)
• Se Juego/Video (Si se ha seleccionado previamente)
Si quiere personalizar los ajustes, estos pueden ser hechos nuevamente
usando el menú de opciones.
Para preajustes
de fabrica oprima
nuevamente RESET y
comenzar loc. canales
CUIDADOS Y LIMPIEZA
La superficie del gabinete puede ser dañada si no recibe un apropiado mantenimiento. Varios productos usados
en el hogar como aerosoles, agentes de limpieza, solventes y ceras pueden causar daños en el terminado de la
superficie del gabinete.
1. Desconecte el cordón de Potencia antes de limpiar el televisor.
2. Limpie la pantalla y gabinete con un paño limpio y suave.
Nota : Nunca aplique liquidos en aerosol en la pantalla, este puede escurrirse
y gotear dentro del chassis. Este puede causar fallas en los componentes
no cubiertos por la garantía.
Este símbolo impreso, significa que el producto esta listado por Underwriters’s
Laboartories Inc. El diseño y manufactura de este producto, reúne los rígidos
estándares de U.L., contra riesgos de incendio , accidentes o descargas eléctricas.
Page 39

59
(Continua en la página 60.)
¿Estaba el conector suelto o desconectado?
Sí. El problema pudo apaga la TV por una perdida de Señal. (Vea página 45.)
No. Presione la tecla de encendido.
¿ La TV encendió?
Sí. El cronómetro para dormir había sido activado.
No. Desconecte la TV por unos segundos. Conéctela nuevamente y
presione el botón de encendido.
La TV se apaga sola
Cheque la
conexión de
la antena.
SOLUCION DE PROBLEMAS
Antes de llamar por asistencia, por favor vea las condiciones que más se pueden parecerse a sus
problemas en las siguientes cartas, entonces siga las instrucciones para esta condición. Visite nuestro
lugar en internet en
www. Sanyotv.como llame sin costo 1-800-877-5032.
¿El color azul desaparece?
Si. La TV estaba en modo de Vídeo. (Una pantalla Aparecerá cuando el modo de vídeo
este seleccionado y la señal no haya sido detectada.) Su equipo de AV puede estar
apagado o desconectado.
La pantalla de mi TV esta de color azul
Presione la tecla de
Entrada (INPUT).
No Imagen o Imagen Pobre
¿La imagen esta bien?
Si. Problemas con la señal (estación transmisora, cable o recepción de la señal
del satélite).
No. Apague los electrodomésticos como, aspiradora, licuadora, taladro, etc.
¿Se mejoro la imagen?
Sí. El problema era la interferencia de un equipo electrodoméstico.
No. Ajuste la dirección / alineación de la antena./
Presione la tecla de
Reajuste dos veces (los ajustes personalizados regresaran a los ajuste
de fabrica).
Cambie de
canales.
¿El color esta mejor?
Sí. El problema esta con el programa o señal (estación Transmisora o recepción de la
señal del satélite).
No. Ajuste la dirección / alineación de la antena.
¿Se mejoro el color?
Sí. La antena no fue ajustada adecuadamente para el canal que Ud.,
esta viendo.
No. Presione la tecla de Reajuste dos veces (los ajustes personalizados
regresaran a los ajustes de fabrica).
Color pobre o sin color
Cambie de canales.
Page 40

60
¿ Ud. reconoce las palabras del menú ahora?
Sí. Otro lenguaje distinto al Español fue seleccionado.
El rectángulo negro desaparece o reaparece momentáneamente.
Sí. La señal transmitida por la estación esta enviando señal de subtítulos sin
información de texto.
Presione la tecla de Reajuste dos veces (los ajustes personalizados se regresaran a
los ajustes de fabrica). Para mantener los ajustes personalizados, solo desactive la
función de subtítulos (vea página 54).
Un rectángulo negro aparece en la pantalla
Cambie de canales.
Sí. Active la función de subtítulos. Presione la de Caption, y presione la tecla de 0 hasta
resaltar Caption1.
No. Sintonice un canal que este transmitiendo un programa subtitulado.
No hay Subtítulos
El programa que
Ud., esta viendo
esta Subtitulado.
¿Escucha algún sonido?
Sí. La función de Enmudecimiento estuvo activada o el Volumen estaba ajustado al mínimo.
No. Cambie de Canales.
¿Escucha algún sonido?
Sí. El problema esta con el programa o señal (estación transmisora o
recepción de la señal del satélite).
No. Ajuste la dirección / alineación de la antena.
¿Se mejoro el sonido?
Sí. La antena estaba mal ajustada o los cables de
AV no estaban totalmente asentados.
No. Seleccione el sonido Mono en el menú en pantalla.
Sin sonido, Sonido Estéreo Pobre
Presione y
mantenga así
la tecla de
Volumen .
No reconozco las palabras en el menú el pantalla
Presione la tecla de
RESET dos veces
(los ajustes personalizados serán
reajustados a los
ajustes de fabrica).
SOLUCION DE PROBLEMAS (Continuación)
Page 41

61
¿El control remoto funciona con el Decodificador de Cable u otro equipo auxiliar ahora?
Sí. Otro modo fue seleccionado. Presione la tecla apropiada para operar
diferentes tipos de equipos. (El control remoto debe ser programado.
Ver páginas 48~49.)
No. Reprograma el control remoto.
Los gabinetes hacen ruidos
Esta es una condición normal durante el calentamiento y enfriamiento de las partes plásticas del gabinete.
¿El control remoto trabaja ahora?
Sí. Otro modo fue seleccionado. Presione la tecla apropiada para operar los
diferentes tipos de equipos. (El Control Remoto debe de ser programado.
Vea páginas 48~49.)
No. Reemplace las baterías o confirme que estén correctamente instaladas.
Mi control remoto no opera con mi TV
Presione la tecla de
TV en el Control
Remoto. Trate
nuevamente.
Asegúrese de
apuntar el control
remoto a la TV.
Mi control remoto no funciona con mi Decodificador de Cable u otro
equipo auxiliar
Presione la tecla de
AUX en Control
Remoto. Trate nuevamente. (Asegúrese
que el Decodificador
de Cable o equipo
Auxiliar estén
encendidos.
¿ El problema desapareció?
Sí. Es posible que los canales estén en memoria o en los ajustes de V-Guide.
No puedo seleccionar o detectar algunos canales
Presione la tecla de
RESET dos veces (los
ajustes personalizados serán reajustados
a los ajustes de
fabrica).
Page 42
62
MEXICO GARANTÍA
COMERCIALIZADORA MÉXICO
AMERICANA, S. DE R.L. DE C.V.
NEXTENGO Nº 78
COL. SANTA CRUZ ACAYUCAN
DEL. AZCAPOTZALCO, MÉXICO D.F. C.P.
02770, RFC CMA 9109119LO
TELEFONO: (5) 328-3500
GARANTIA
EL APARATO QUE USTED HA ADQUIRIDO CUENTA CON UNA GARANTIA DE UN AÑO POR DEFECTOS DE
FABRICACIÓN Y UN AÑO DE SERVICIO A PARTIR DE LA FECHA DE ADQUISICION OTORGADA POR:
COMERCIALIZADORA MEXICO--AMERICANA, S.A. DE C.V.
BAJO LAS SIGUIENTES CONDICIONES:
1. PARA HACER EFECTIVA LA GARANTIA, BASTARA PRESENTAR ESTA POLIZA DEBIDAMENTE LLENADA POR LA
TIENDA O UNIDAD VENDEDORA O LA FACTURA DE COMPRA, JUNTO CON EL APARATO EN CUALQUIERA DE
LOS CENTROS DE SERVICIO INDICADOS EN ESTA GARANTIA.
2. SE COMPROMETE A REPARAR EL APARATO SIN COSTO ALGUNO AL CONSUMIDOR, SI LA FALLA ES
ATRIBUIBLE A DEFECTO DE FABRICACION.
3. EN NINGUN CASO EL TIEMPO DE REPARACION SERA MAYOR DE 30 DIAS, TRANSCURRIDO ESTE TERMINO,
COMERCIALIZADORA MEXICO--AMERICANA, S.A. DE C.V. PROCEDERA A EFECTUAR EL CAMBIO POR UN
APARATO EQUIVALENTE O A LA DEVOLUCION DEL IMPORTE DE COMPRA--VENTA RESPECTIVA.
ESTA GARANTIA SERA NULA EN LOS SIGUIENTES CASOS:
A) SI EL APARATO NO HA SIDO USADO COMO SEÑALA EL INSTRUCTIVO.
B) SI NO SE HA OBSERVADO LAS ADVERTENCIAS SEÑALADAS.
C) SI HA SIDO EXPUESTO A CAMBIOS BRUSCOS DE VOLTAJE.
D) SI HA SUFRIDO DETERIORO ESENCIAL IRREPARABLE ATRIBUIDO AL CONSUMIDOR.
E) SI EL APARATO HA SIDO ABIERTO O TRATADO DE REPARAR POR PERSONAS AJENAS A NOSOTROS.
F) ESTA POLIZA ES NULA SI NO CUENTA CON LOS DATOS ABAJO REQUERIDOS Y SELLO DE LA TIENDA DONDE
SE REALIZO LA COMPRA.
G) LOS GASTO DE TRANSPORTACION DEL PRODUCTO QUE SE DERIVEN DEL CUMPLIMIENTO DE ESTA POLIZA,
SERAN POR CUENTA DE LA EMPRESA.
APARATO______________________________________________________________SERIE No._____________________________
NOMBRE DEL CLIENTE _______________________________________________________________________________________
DOMICILO ___________________________________________________________________________________________________
CIUDAD ______________________________________________________________
ESTADO ______________________________
FECHA DE COMPRA____________________________________________
TALLER DE SERVICIO Y VENTA DE
PARTES: PONIENTE 126 Nº 288-B
COL. INDUSTIAL VALLEJO
TELS: 368-01-05
SELLO Y FIRMA
DE
TIENDA
DESCRIPCION: Televisor
MARCA: SANYO
MODELO: DS25500
Page 43

63
GARANTÍA, ESTADOS UNIDOS Y CANADÁ
GARANTíA LIMITADA POR UN AÑO
ESTAGARANTÍA LIMITADAES VALIDAUNICAMENTE EN TELEVISORES SANYO COMPRADOS Y USADOS
EN LOS ESTADOS UNIDOS DE AMERICA, CANADÁ Y PUERTO RICO, EXCLUYENDO OTROS
TERRITORIOS Y PROTECTORADOS. ESTA GARANTÍA LIMITADAAPLICA SOLAMENTE AL COMPRADOR
ORIGINAL, Y NO APLICA A OTROS PRODUCTOS USADOS CON PROPÓSITOS INDUSTRIALES Y
COMERCIALES APLICAA LOS PRODUCTOS USADOS CON PRÓPOSITOS INDUSTRIALES Y COMERCIALES.
POR UN AÑO, a partir de la fecha de compra, Sanyo Manufacturing Corporation, reemplazará cualquier TV
defectuosa sin cargo al comprador original.
Para asegurar el intercambio adecuado por garantía, mantenga el recibo original de la compra como
evidencia de la compra. Regrese la TV defectuosa al vendedor, junto con el recibo de compra y los
accesorios incluidos, como es el control remoto. La TV defectuosa será cambiada por una del mismo
modelo, o el reemplazo de un modelo igual o de mayor valor, sí es necesario. El modelo de reemplazo
dependerá de la disponibilidad y de la voluntad de Sanyo Manufacturing Corporation.
LA ANTERIOR GARANTÍA ES EXCLUSIVA Y EN LUGAR DE OTRAS GARANTÍAS DE MERCANCÍA O
CONVENIENTE PARAUN PROPÓSITO PARTICULAR.
OBLIGACIONES
Por un año a partir de la fecha de compra, Sanyo Manufacturing Corporation garantiza que este producto esta
libre de defectos en materiales y mano de obra bajo condiciones normales de uso. El reemplazo solo será
necesario bajo esta garantía, por cualquier razón debido a defecto de manufactura o mal funcionamiento durante
el primer año a partir de la fecha de compra original. Sanyo Manufacturing Corporation proveerá de una TV
nueva, vía intercambio al vendedor sin cargo
.
Para asistencia al cliente o en localización de centros de servicio más cercanos a Ud. llame gratis al
1-800-877-5032.
En días hábiles de 7:30 A.M. – 7:00 P.M. Hora del Centro.
Sàbado 7:30 A.M. – 4:00 P.M. Hora del Centro.
Esta garantía le da derechos legales específicos. Usted puede tener otros derechos, los cuales varíar de
estado a estado.
(EFECTIVO: Abril 1, 2000)
Para su protección en caso de robo o pérdida de esté producto, por favor llene la siguiente
información requerida y GUARDELA en un lugar seguro en sus registros personales:
Modelo No.__________________________ Fecha de compra __________________________
Serie No. ___________________________ Precio de compra __________________________
Lugar de compra __________________________
(Localizada en la parte posterior)
AS
Sanyo Manufacturing Corp.
3333 Sanyo Road, Forrest City, AR 72335
Page 44
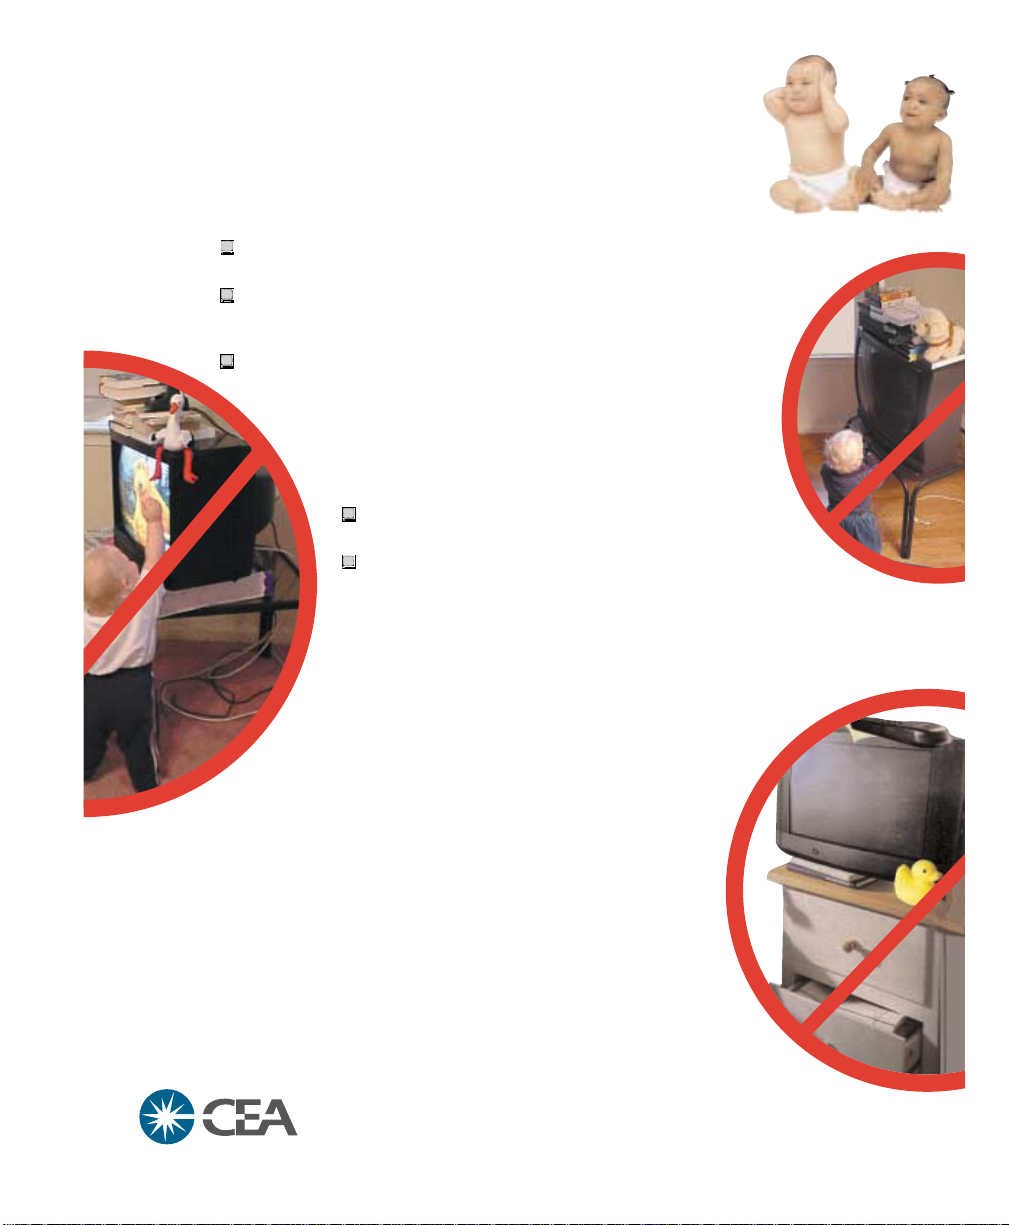
The
Issue
Child Safety:
It Makes A Difference Where Your TV Stands
Congratulations on your purchase! As you enjoy your new product,
please keep these safety tips in mind:
If you are like most Americans, you have a television in your home.
Many homes, in fact, have more than one television.
The home theater entertainment experience is a growing trend, and larger
televisions are popular purchases and are not always supported on the
proper TV stands.
Sometimes televisions are improperly secured or inappropriately situated on
dressers, bookcases, shelves, desks, audio speakers, chests, or carts. As a
result, TV sets may fall over and may cause unnecessary injury.
Sanyo Cares!
The industry is committed to making home entertainment
enjoyable and safe.
The Consumer Electronics Association formed the Home
Entertainment Support Safety Committee comprised of television and
consumer electronics furniture manufacturers to advocate children’s safety
and educate customers and their families about television safety.
Tune Into Safety
1 One size does NOTfit all. Use the appropriate furniture that is
large enough to support the weight of your television (and other
electronic components).
2 Use appropriate angle braces, straps, and anchors to secure your
furniture to the wall (but never screw anything directly into the TV).
3 Carefully read and understand the other enclosed instructions for proper use
of this product.
4 Don’t allow children to climb on or play with furniture and television sets.
5 Avoid placing any items on top of TVs such as VCRs and remotes that may
pique the children’s curiosity.
6 Remember that children can become excited while watching a program and can
potentially push or pull a TV over.
7 Share our safety message on this hidden hazard of the home with your family and
friends. Thank you!
CEA, 2500 Wilson Boulevard Arlington, VA22201 Tel 703 907 7600 Fax 703 907 7690 www.CE.org
CEAis the Sponsor, Producer and Manager of the International CES®and is a Sector of the Electronic Industries Alliance
Consumer Electronics Association
Asector of EIA
 Loading...