

Page 1
Printed in U.S.A. SMC, May 2002
Part No. : 1JC6P1P0109– –
Service Code : 610 297 0548
DDIIRR--22000000
Digital Box
Owner’s Manual
DD
II
GG
II
TT
AA
LL
TTOO
AA
NN
AA
LL
OO
GG
CC
OO
NN
VV
EE
RR
TT
EE
RR
“As an ENERGY STA R
®
Partner, Sanyo
Manufacturing Corporation has determined that this product meets the
E
NERGY STAR
®
guidelines for energy
efficiency.”
Page 2
Positioning the appliance
1. Do not place your appliance on an unstable cart, stand, shelf or table. Serious
injury to an individual, and damage to the appliance, may result if it should fall.
Your salesperson can recommend approved carts and stands
or shelf and wall mounting instructions. An appliance and cart
combination should be moved with care. Quick stops, excessive force, and uneven surfaces may cause the appliance and
cart combination to overturn.
2. Slots and openings in the cabinet and in the back or bottom are
provided for ventilation. To ensure reliable operation of the appliance and to
protect it from overheating, these openings must not be blocked or covered.
The openings should never be covered with a cloth or other material, and the
bottom openings should not be blocked by placing the unit on a bed, sofa, rug,
or other similar surface. This appliance should never be placed near or over a
radiator or heat register. This appliance should not be placed in a built-in
installation such as a bookcase unless proper ventilation is provided.
3. Do not expose the appliance to rain or use near water . . . for example, near a
bathtub, swimming pool, kitchen sink, in a wet basement, etc.
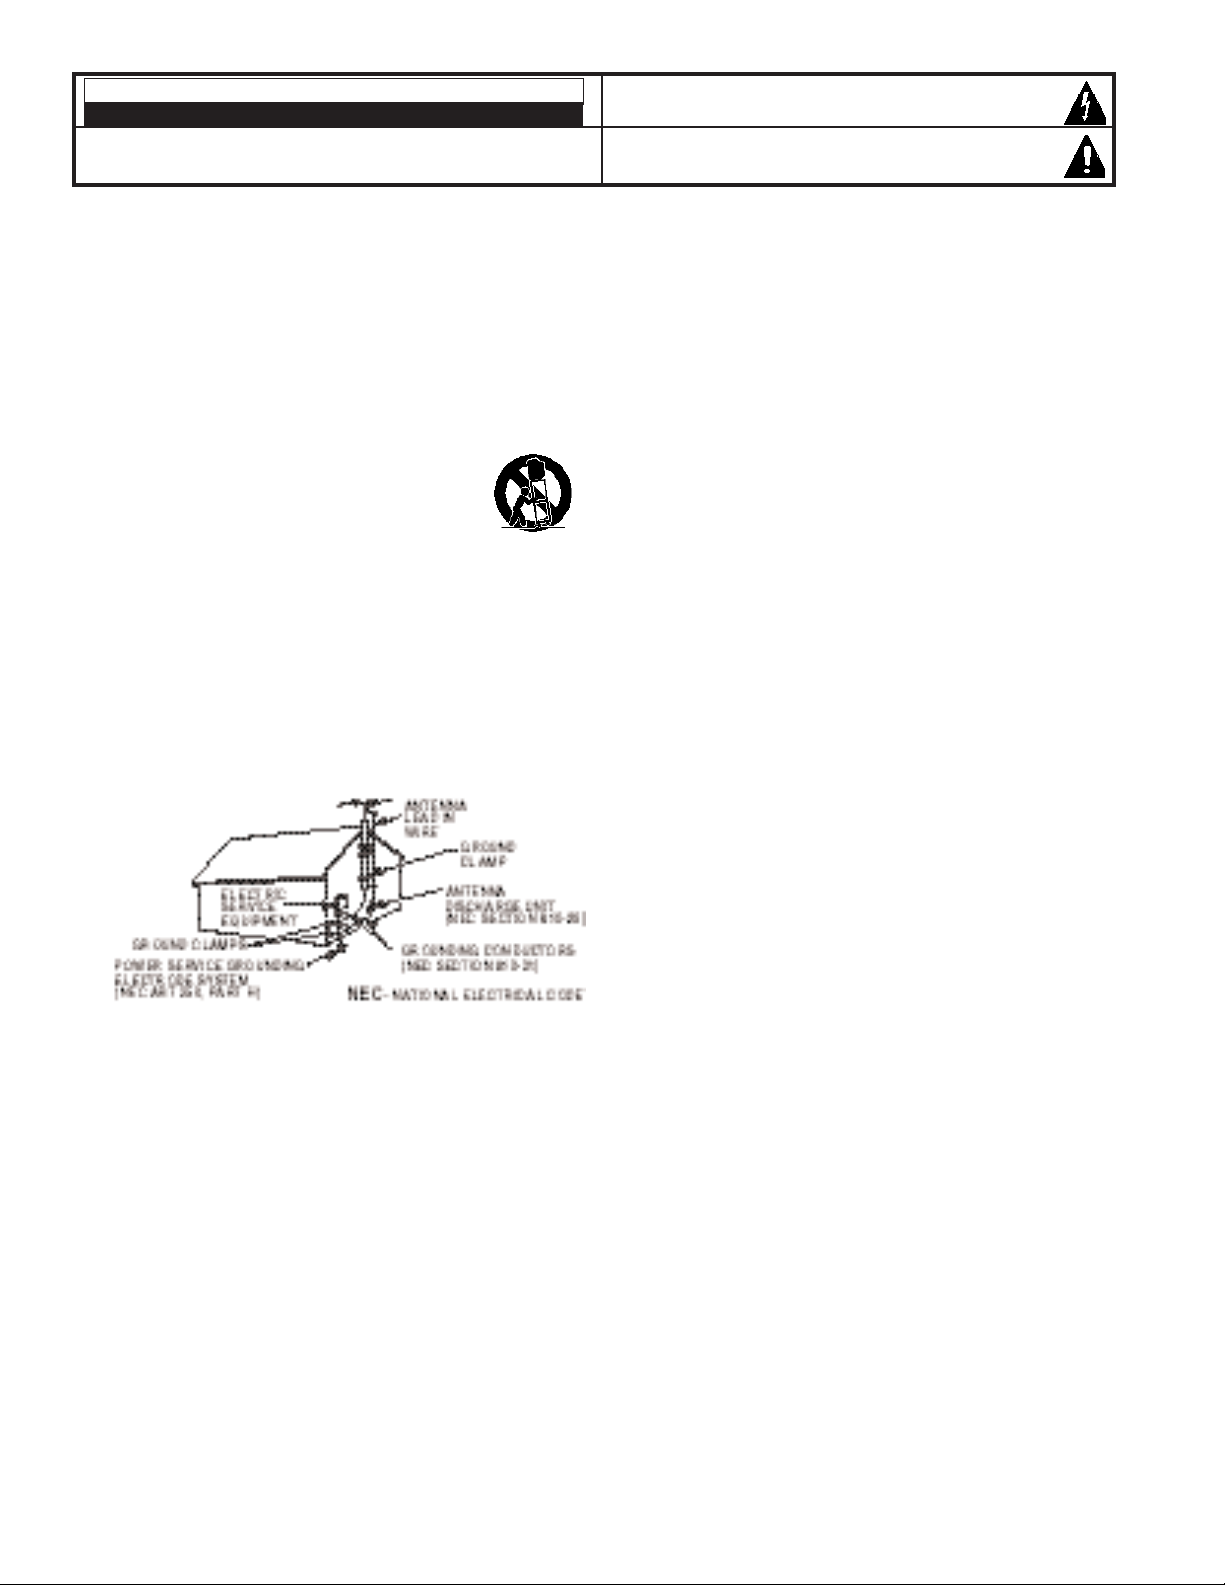
Hooking Up Outdoor Antenna
LIGHTNING PROTECTION FOR YOUR ANTENNA AND SET AS PER NATIONAL
ELECTRICAL CODE INSTRUCTIONS.
4. If an outside antenna is connected to the receiver, be sure the antenna system
is grounded so as to provide some protection against voltage surges and built
up static charges. Article 810 of the National Electrical Code, ANSI/NFPA 70,
provides information with respect to proper grounding of the mast and supporting structure, grounding of the lead in wire to an antenna discharge unit,
size of grounding conductors, location of antenna discharge unit, connection
to grounding electrodes, and requirements for the grounding electrode.
An outside antenna system should not be located in the vicinity of overhead
power lines or other electric light or power circuits, or where it can fall into
such power lines or circuits. When installing an outside antenna system
extreme care should be taken to keep from touching such power lines or circuits as contact with them might be fatal.
Plug in the power cord
5. This product should be operated only from the type of power source indicated on the marking label. If you are not sure of the type of power supply to your
home, consult your product dealer or local power company. This product is
equipped with a polarized alternating current line plug (a plug having one blade
wider than the other). This plug will fit into the power outlet only one way. This
is a safety feature. If you are unable to insert the plug fully into the outlet, try
reversing the plug. If the plug should still fail to fit, contact your electrician to
replace your obsolete outlet. Do not defeat the safety purpose of this polarized
plug. Do not overload wall outlets, extension cords, or integral convenience
receptacles as this can result in a risk of fire or electric shock.
6. Power-supply cords should be routed so that they are not likely to be walked
on or pinched by items placed upon or against them, paying particular attention to cords at plugs, convenience receptacles, and the point where they exit
from the product.
Cleaning
7. Before cleaning, unplug the unit from the wall outlet. Do not apply liquid cleaners or aerosol cleaners directly to the unit. Use a dry cloth for cleaning.
Service & Repair
8. Unplug the appliance from the wall outlet and refer servicing to
qualified service personnel under the following conditions:
A. If the power cord or plug is damaged or frayed.
B. If liquid has been spilled into the appliance.
C. If the appliance has been exposed to rain or water.
D. If the appliance has been dropped or the cabinet has been damaged.
E. If the appliance exhibits a distinct change in performance.
F. If the appliance does not operate normally by following the operating
instructions, adjust only those controls that are covered in the operating
instructions. Improper adjustment of other controls may result in damage
and will often require extensive work by a qualified technician to restore the
appliance to normal operation.
9. Upon completion of any service or repair, request the service technician’s
assurance that only Factory Authorized Replacement Parts that have the same
characteristics as the original parts were used, and that routine safety checks
have been performed to determine that the appliance is in safe operating condition. Unauthorized substitutions may result in fire, electrical shock, or other
hazards.
10.Never add accessories that have not been specifically designed for use with
this appliance as they may cause hazards.
11.For added protection during a lightning storm, or when the set is left
unattended and unused for long periods of time, unplug it from the wall outlet and disconnect the antenna. This will prevent damage to the set due to
lightning or power line surges.
12. Never push objects of any kind into this product through openings as they may
touch dangerous voltage points or short-out parts that could result in a fire or
electric shock. Never spill liquid of any kind on the product.
CAUTION
RISK OF ELECTRIC SHOCK DO NOT OPEN
CAUTION: TO REDUCE THE RISK OF ELECTRIC SHOCK, DO NOT REMOVE COVER (OR
BACK). NO USER-SERVICEABLE PARTS INSIDE. REFER SERVICING TO QUALIFIED
SERVICE PERSONNEL.
THIS SYMBOL INDICATES THAT DANGEROUS VOLTAGE CONSTITUTING A
RISK OF ELECTRIC SHOCK IS PRESENT WITHIN THIS UNIT.
THIS SYMBOL INDICATES THAT THERE ARE IMPORTANT OPERATING AND
MAINTENANCE INSTRUCTIONS IN THE LITERATURE ACCOMPANYING THIS
UNIT.
WARNING: TO REDUCE THE RISK OF FIRE OR ELECTRIC SHOCK, DO NOT EXPOSE THIS APPLIANCE TO
RAIN OR MOISTURE.
IMPORTANT SAFETY INSTRUCTIONS
CAUTION: PLEASE ADHERE TO ALL WARNINGS ON THE PRODUCT AND IN THE OPERATING INSTRUCTIONS. BEFORE OPERATING THE PRODUCT,
PLEASE READ ALL OF THE SAFETY AND OPERATING INSTRUCTIONS. RETAIN THIS LITERATURE FOR REFERENCE.
Follow all instructions...
“Note to CATV system installer:
This reminder is provided to call the CATV system installer’s attention to Article
820-40 of the NEC that provides guidelines for proper grounding and, in particular,
specifies that the cable ground shall be connected to the grounding system of the
building, as close to the point of cable entry as practical.”
EXAMPLE OF ANTENNA GROUNDING
ACCORDING TO NATIONAL
ELECTRICAL CODE,
ANSI/NFPA 70
2
Page 3

Important Safety Instructions . . . . . . . . . . . . . . . . . . . . . . . . 2
Introduction — Welcome to the World of Sanyo . . . . . . . . . 3
Glossary . . . . . . . . . . . . . . . . . . . . . . . . . . . . . . . . . . . . . . . . . 4
Features . . . . . . . . . . . . . . . . . . . . . . . . . . . . . . . . . . . . . . . . . 5
Specifications . . . . . . . . . . . . . . . . . . . . . . . . . . . . . . . . . . . . . 5
Basic Startup and
Connections . . . . . . . . Refer to Quick ‘N Easy Startup Guide
Understanding the DIR-2000 Features . . . . . . . . . . . . . . . 6~8
Using the Remote Control . . . . . . . . . . . . . . . . . . . . . . . . 9~10
SDB Menu Operation . . . . . . . . . . . . . . . . . . . . . . . . . . 11~16
General Menu Operation . . . . . . . . . . . . . . . . . . . . . . . . . . . 11
Picture Adjustment
Aspect Ratio (Width to Height) . . . . . . . . . . . . . . . . 12
Pix Shape . . . . . . . . . . . . . . . . . . . . . . . . . . . . . . . . . . 12
Scan Mode . . . . . . . . . . . . . . . . . . . . . . . . . . . . . . . . . 12
Channel Operation
Channel Search . . . . . . . . . . . . . . . . . . . . . . . . . . . . . 13
Channel Scan Memory . . . . . . . . . . . . . . . . . . . . . . . 13
Initial Channel setup . . . . . . . . . . . . . . . . . . . . . . . . . 14
Channel Display Banner Info . . . . . . . . . . . . . . . . . . 14
Feature Setup
Setting the Clock/Day . . . . . . . . . . . . . . . . . . . . . . . . 15
Digital Audio Out . . . . . . . . . . . . . . . . . . . . . . . . . . . 15
Setting the Menu Language . . . . . . . . . . . . . . . . . . . 16
System Information . . . . . . . . . . . . . . . . . . . . . . . . . . 16
Other Feature Operation
Using the Channel Map . . . . . . . . . . . . . . . . . . . . . . . 16
Express Channel Selection . . . . . . . . . . . . . . . . . . . . 17
Selecting a Direct Channel . . . . . . . . . . . . . . . . . . . . 18
Selecting a (–) Sub Channel
Major/Minor Channels . . . . . . . . . . . . . . . . . . 18~19
Audio Reception . . . . . . . . . . . . . . . . . . . . . . . . . . . . . . . . . 19
V-Guide Operation . . . . . . . . . . . . . . . . . . . . . . . . . . . . . . . . 20
SDB Output Jacks Connection . . . . . . . . . . . . . . . . . . . . . . 21
Resetting the SDB . . . . . . . . . . . . . . . . . . . . . . . . . . . . . . . . 21
Closed-Captioning
Selecting Caption Options . . . . . . . . . . . . . . . . . . . . . 22
Care and Cleaning . . . . . . . . . . . . . . . . . . . . . . . . . . . . . . . . 22
Troubleshooting . . . . . . . . . . . . . . . . . . . . . . . . . . . . . . . . . . 23
Index . . . . . . . . . . . . . . . . . . . . . . . . . . . . . . . . . . . . . . . . . 23
Warranty and Service . . . . . . . . . . . . . . . . . . . . . . . . . . . . . . 24
3
Introduction
Welcome to the World of Sanyo
Thank you for purchasing the Sanyo Digital Box (SDB). You made an excellent choice for Performance, Reliability, Features,
Value, and Styling.
To The Owner
We are aware that you are eager to begin using your new SDB. However, we also understand that to enjoy it fully you must first
understand its many features. While this owner's manual is intended to fully acquaint you with the SDB’s operation, it is not
meant to be read from cover to cover. Instead, it has been carefully arranged for easy use so you can quickly move on to
enjoying your SDB.
Contents
Page 4

4
Glossary
Aspect Ratio—The aspect ratio of a television picture is the
relationship of the width to the height. The standard Analog aspect
ratio is 4:3. The 16:9 aspect ratio appears wider and shorter, more
closely resembling a movie theater screen image.
ATSC—Advanced Television Standards Committee.
Brief Banner—Station ID channel number, and time display that
appears when changing channels.
Brief Channel Number Display—The small display that appears
when entering channel numbers.
Category Tab Area—Tabs are located at the top of each main
on-screen display: Menu, CHannel Map, or V-Guide.
Channel Search—This process establishes the basic database. The
search process looks for available channels in both tuning systems
(DTV and NTSC). If a signal is present, the channel is added to the
database. The database will be entirely reset anytime a full Channel
Search is completed. If the search is started from the Menu, then the
display returns to the Menu after the search is finished.
CHannel Scan Memory—This is a list of active channels that is
created during the Channel Search process and stored in memory.
Viewers can scan through this list using the Up/Down Scan keys.
This area is also used to delete unwanted channels. (Channels
viewers want to skip over when scanning.) However, to undelete a
channel, another Channel Search will need to be completed. For
DTV, the CHannel Scan Memory will include only major channel
numbers.
CHannel Map—This displays pages of ALL available channels in
the database and their status. Channels that have been removed from
the CHannel Scan Memory will appear as blue numbers. Any
channel can be selected from the CHannel Map, even the “blue”
channels.
For DTV, the CHannel Map will show only major channel numbers.
Channel Number Entry Area—This area is used to actually select
a channel number when adjusting or setting the Scan Memory and
Initial Channel features.
Channel NightScan—NightScan searches for new DTV channels
and adds them to the channel database. This search will be
performed at random intervals (during an inactive time).
Cursor Keys—The CURSOR keys are the four arrow keys on the
remote control and on the SDB front panel. When accessing any
page, menu option, or condition, the front panel keys and the remote
control keys operate identically.
DTV—Digital Television. Picture is transmitted in a digital format
that is sharp and crystal clear.
DTV Indicator—Indicates a digital (ATSC) channel is being
received by the SDB.
Direct Channel Selection—This allows the viewer direct access to
DTV and NTSC channels. Use the 0-9 number keys to directly enter
a new channel number. Use the (–) SUB CH key when necessary.
HDTV—High Definition Television. Picture is transmitted in a
highly defined format.
Initial Channel—This feature allows the customer to select a
specific channel for the SDB to tune each time the unit is switched
on. If not set, the last watched channel will be selected.
NTSC—National Television Standards Committee.
OSD—On Screen Display.
PCM—Pulse Code Modulation is a binary digital signal format
used for digitizing analog data. The SDB outputs PCM audio signal
from digital audio output. This is the default digital audio output
signal.
SDB—Sanyo Digital Box.
S/P DIF—S/P DIF is a digital audio format which can transmit a
Dolby Digital bitstream. By connecting this output to an AV
receiver that includes a Dolby Digital decoder, you can reproduce
up to 5.1 channel surround sound.
Tuner Indicator—A single character “D” or “C” will appear
directly to the left of the channel number. Channels selected with
the digital (DTV) tuner will be identified with a “D.” Channels
selected with the analog (NTSC) tuner will be identified with a
“C” if cable or will be blank if Off-Air (VHF/UHF).
Tuner Key—This key is used to switch between only two choices
(the ATSC tuner and NTSC tuner).
480P Indicator—Indicates that the progressive video scan option is
selected.
4:3 Indicator—Indicates the 4:3 option is selected for the aspect
ratio.
Page 5

5
Convenient Features:
Dual Tuning Systems
DTV terrestrial digital ATSC (18 formats)
NTSC analog (Cable 1~125), (VHF/UHF)
Audio formats: Dolby Digital for DTV and analog for NTSC
NightScan automatically updates DTV channels
Menu System Adjustments:
Picture adjustments–Aspect Ratio: 4:3 format and 16:9 format
Picture Shape: Normal, Letterbox, Cropped, Stretch, and Expand
Scan Mode: Interlaced and Progressive (for 480i/p televisions)
Automatic Channel Search for both tuners (DTV and NTSC)
Channel Scan Memory
Initial Channel
Channel Display Banner (Full and Brief)
Auto or Manual Clock setting
Digital Audio Output: S/P DIF and PCM
Trilingual Menu Options
On-Screen Displays (OSD):
Channel Display Banner Information (Full and Brief)
Channel Map listing of all channels
Closed-Captioning
XDS (Extended data service) station call letters,
title of show, and rating
Audio Modes: DTV—Main and Sub
NTSC—Stereo, Mono, and SAP
DTV signal quality to aid antenna orientation
V-Guide rating limits: Movies and TV guidelines
Power Requirement:
Source: AC 120V, 60Hz
Consumption: Approximately 21 Watts
Controls and Indicators:
Front Panel Indicators: Power, 480P, DTV, and 4:3
Front Panel Keys:
Power Channel (up-down) Enter
Menu Cursor (left-right) Reset (CPU)
Remote Control Keys:
Mode Selection Power Display
0~9 number keys Enter Caption
Menu Recall Audio
Pix Shape CH Map Tuner
V-Guide (–) Sub Channel
Volume/Cursor (left-right)
Channel/Cursor (Up/Down)
Reset (factory settings)
Auxiliary control keys
Jacks and Connectors:
1 – NTSC Input F-Connector, 75 ohm
1 – DTV (ATSC) Input F-connector
1 – RF Output F-connector with Ch3–4 switch
2 sets – Audio/Video Outputs (A/V-1, A/V2)
2 – S-Video Outputs (S-1, S-2)
1 – Component Output (Y-Pb-Pr)
1 – Digital Audio Output (Optical S/P DIF or PCM)
Accessories (Included):
Multimedia Remote (SDB/TV/VCR/DVD)
Coaxial RF Cable
Audio Video Cable (phono-type)
S-Video Cable
Component Cable
Quick ‘N Easy Startup Guide
Size and Weight (approximately):
Size: Horizontal Dim. (Width): 13.1 in. (332.7mm)
Vertical Dim. (Height): 2.7 in. (69.1mm)
Depth Dim. (Thickness): 11.0 in. (278.1mm)
Weight: 6.46 (lbs), 2.9 (Kg)
Features and Specifications
Trademarks Information:
Manufactured under license from Dolby Laboratories. “Dolby” and the double-D symbol are trademarks of Dolby Laboratories.
Contains iType™ font rendering technology from Agfa Monotype Corporation. “The Type software used in this product are under
license from Agfa Monotype Corporation and cannot be extracted for any other use.”
is a federal registered trademark of Zentek Technologies, Inc.
This product is subject to continuous improvement, resulting in the design and
specifications to change without notice. The weight and dimensions shown are
approximate measurements.
Page 6
6
Understanding the DIR-2000’s Features
Analog and Digital Signals
Analog
Traditionally, televisions have received signals sent (broadcast) over the airwaves or via cable (CATV). These signals included the carrier wave
and the picture and sound data. The picture and sound information is superimposed upon a carrier wave by varying the signal frequency and
the signal amplitude. This varying signal method is also known as ANALOG. The television tuner selects the channel and decodes these signals and the television uses the decoded data to recreate the picture and sound.
Digital
The SDB receives DTV signals sent through the air as well. However, the digital signals are encoded differently. The digital signal represents
the picture and sound information as zeros and ones. Both analog and digital transmissions are limited to six megahertz of bandwidth per
channel. However, digital signals are compressed (made to fit in a much smaller space), therefore, more data can be transmitted within the
same six megahertz bandwidth. This allows the digital signal to contain data as well as the picture and sound. The digital signal could contain
information such as program guides.
Analog and Digital Tuners
The DIR-2000 includes tuners to receive both analog and digital signals. The digital tuner will
receive digital channels. The analog tuner can receive VHF channels 2–13 and UHF channels
14–69, or up to 125 cable channels.
Output Signals
The DIR-2000 can output 480i (Interlaced) and 480p (Progressive) component signals. The display device you choose during initial setup determines which signals are available for output.
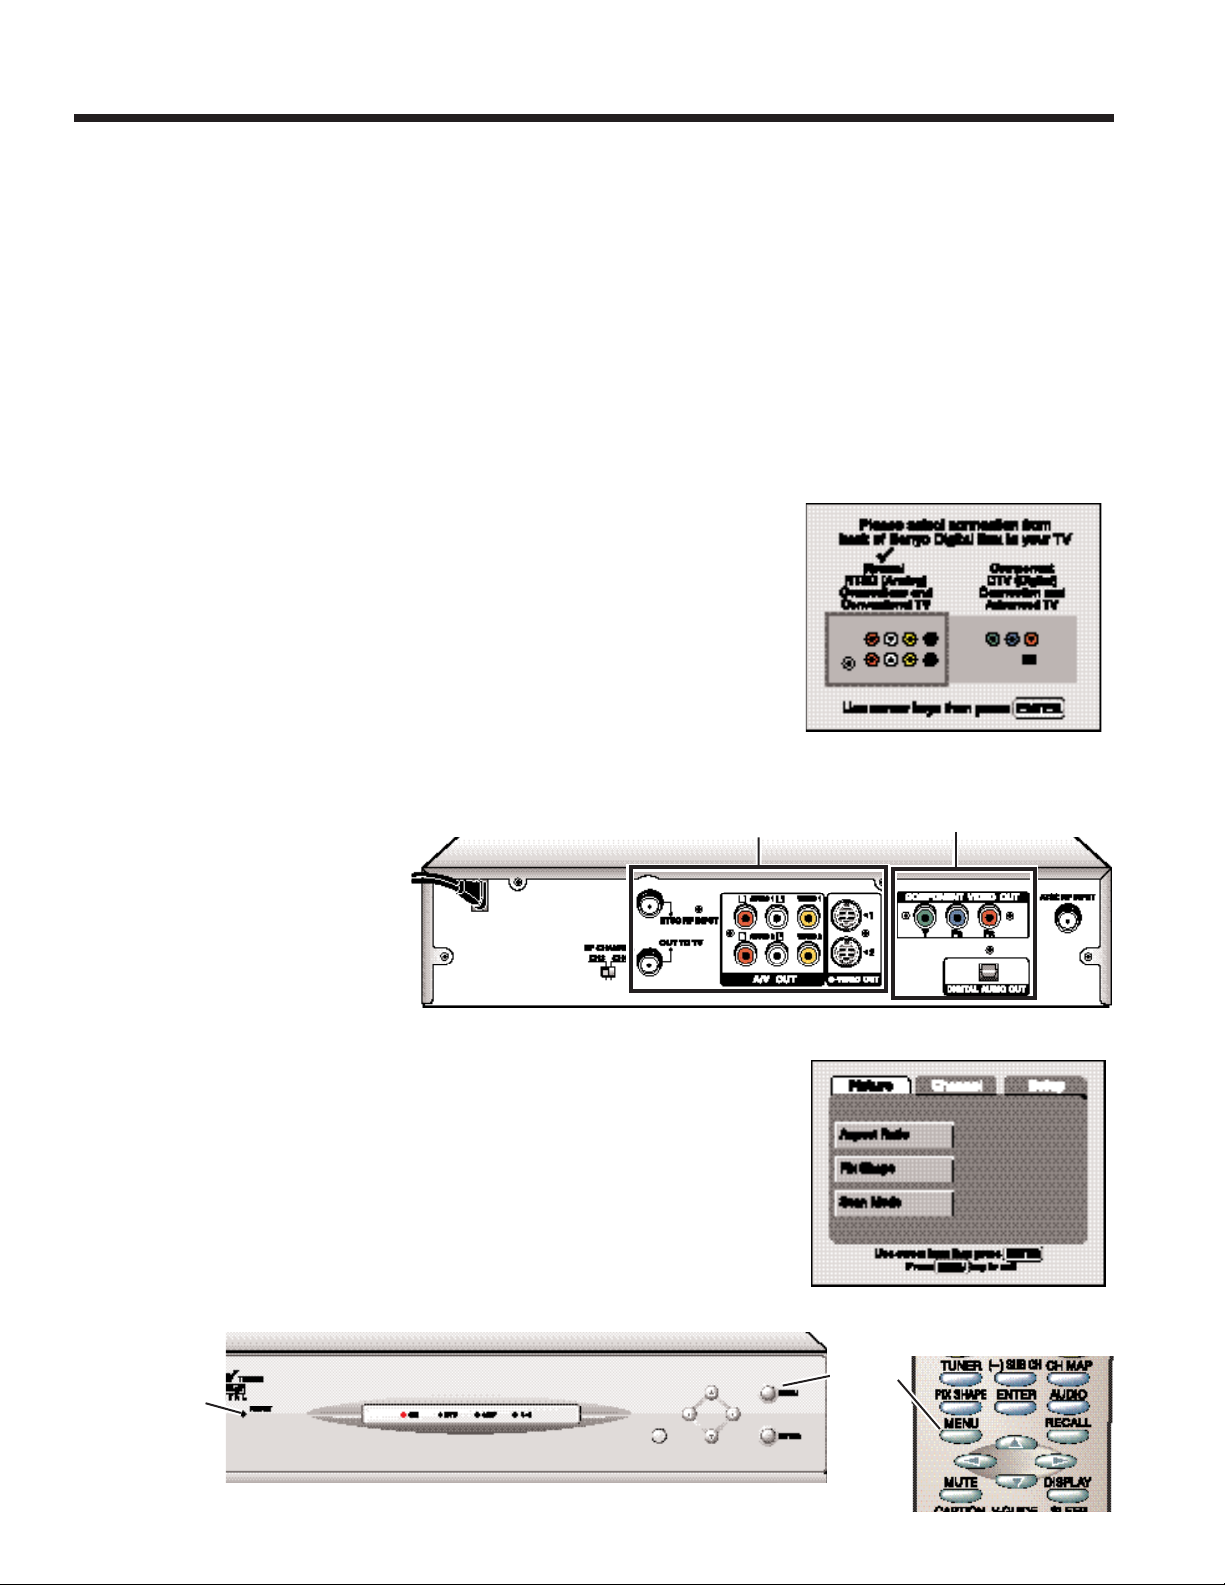
Choosing the Appropriate Connection Method
If you are connecting the Sanyo Digital Box to
an Advanced TV or component system, use
the SDB Component Video output jacks and
the digital audio out or analog audio L/R out
on the back of the box.
Otherwise connect your analog TV to the
A/V output jacks or to the “Out to TV” RF
terminal on the SDB back.
The Main Menu
The Main menu is divided into three categories, Picture, Channel, and Setup. These categories
appear as tabs across the top of the display. Each of these categories offers several features and
various options for each feature. (The Features are in the left hand column and the options
appear in the right hand column.) The available options will vary depending upon the type of
signal being received and the type of output device you choose during the initial output device
setup (Conventional TV or Advanced TV). (Figure 1.)
Accessing the Main Menu
You access the Main menu by pressing the MENU key on the remote control or front panel.
Figure 1—Output Options
Analog Jacks
Digital Jacks
Figure 2—SDB Back Connections
Menu Key
Figure 4—Menu key locations
Figure 3—Main Menu Categories
RESET
In the event of a
software lockup
use a paper clip to
reset the SDB.
Page 7
7
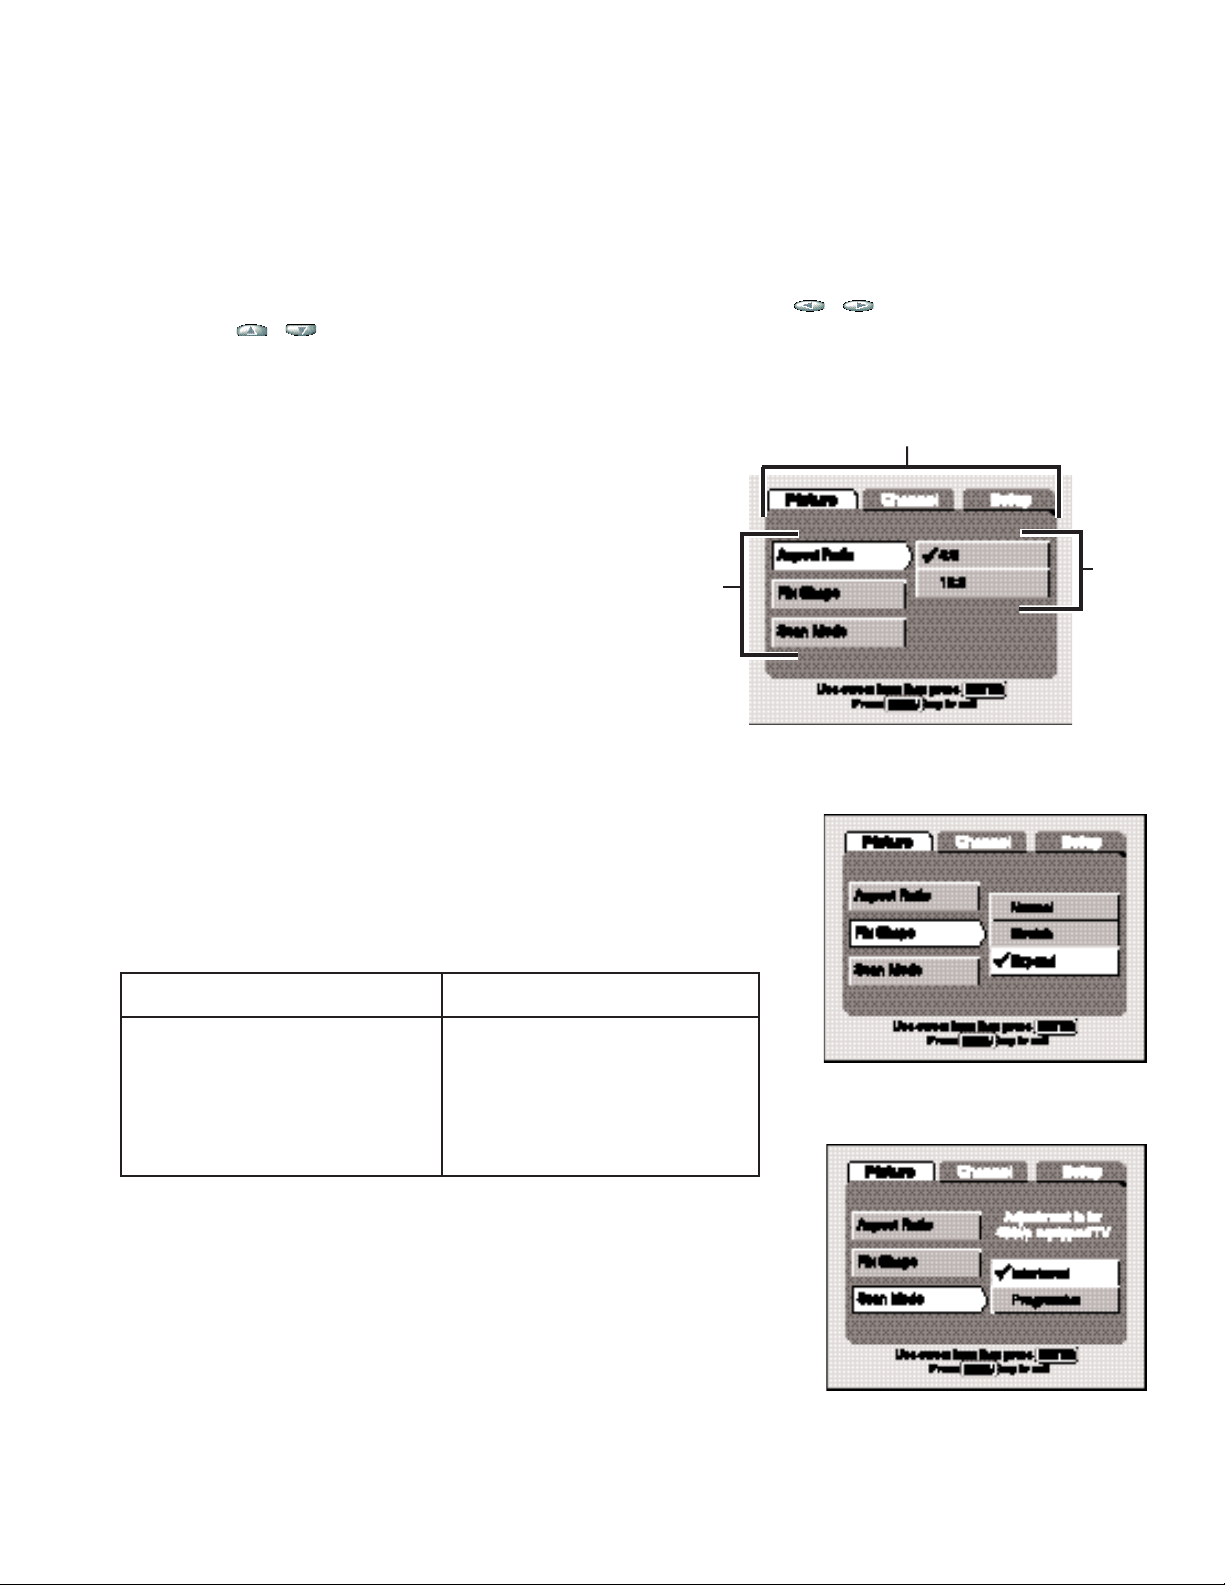
Menu Labeling
When a category or option is selected its label will have a yellow highlight. When a feature is selected, not only will its label be highlighted, but
it will also “point” to the available options that appear in the right hand column. The active option will have a checkmark () beside its title.
(Figure 5.)
Navigating the Menu System
Use the CURSOR keys to navigate through the menu Categories, Features, and Options. The / cursor keys move the highlight to the
left or right. The / cursor keys move the highlight up and down. (The Up and Down keys move the highlight in a continuous loop.)
Picture Category, Features, and Options
Aspect Ratio
The aspect ratio of a television picture is the relationship of the
width to the height. The standard Analog aspect ratio is 4:3
(pronounced four to three). The 16:9 aspect ratio appears wider,
more closely resembling a movie theater screen image.
Pix Shape
The image can be viewed in the following on-screen formats:
•
LetterBox – picture image appears with black bars on the top and bottom
of the screen.
•
Cropped – the picture image right and left sides are cut off.
•
Stretch – picture image is horizontally enlarged to fill 16:9 screen
•
Expand – 4:3 setting enlarges the picture image proportionally with minimal
portion of top and bottom cut-off to fill screen.
16:9 setting enlarges the picture image proportionally to fill screen
both vertically and horizontally providing a wide picture format.
These options will depend on the current signal reception and the following
Aspect Ratio setting:
Scan Mode
Interlaced
This is the term given to the dual-field method of scanning. Two separate fields of scan lines are
created and “interlaced” together to produce a picture.
Progressive
Progressive is the term given to sequentially scanned lines (or non-interlaced). This is the
method most commonly used in computer monitors.
NOTE: When receiving an analog signal (NTSC), Normal will be the only option available
for each of the Picture category features.
Figure 7—Scan Mode
Figure 6—Pix Shape
Settings Options Available
4:3 Reception and 4:3 Aspect setting Normal
4:3 Reception and 16:9 Aspect setting Normal, Stretch, and Expand
16:9 Reception and 4:3 Aspect setting LetterBox and Cropped
16:9 Reception and 16:9 Aspect setting Normal, Stretch, and Expand
Figure 5—Aspect Ratio
CATEGORIES
FEATURES
OPTIONS
Page 8
8
Channel Category Features and Options
Search
Search is used to find and store in memory all active channels being received. This includes
NTSC and Digital DTV channels.
NightScan Search
The NightScan feature automatically searches to keep the database fresh and updated with new
DTV channels. This occurs at random intervals during inactive times. Please note that NightScan
adds channels to the memory, it does not delete or replace existing channels.
Initial Channel
The SDB can be programmed to tune to a specific channel each time it is powered on,
such as your favorite news or sports channel.
Display Banner
The Display Banner appears when you change
channels and when you press the DISPLAY
key. It has two options, Full and Brief. The Full
banner may include the station ID, program
title, the time, and other TV settings concerning
picture and sound options. The Brief banner
may only include the station ID (with tuner
indicator C for Cable [C34], D for Digital
[D43-05], or Blank for Off-Air [13]) and
time (if the clock has been set).
Figure 8—Selecting An Initial Channel
Figure 10—Full DTV Display Banner
Figure 11—Full NTSC Display Banner
Figure 9—Display Banner Selection
Understanding the DIR-2000’s Features
CHannel Map Pages
These pages are basically charts of channel numbers. The CHannel Map shows the available channels discovered during the last Channel Search. The Map pages also indicate channels which have
been deleted from the Channel Scan Memory List, they appear as blue numbers. For DTV, the
CHannel Map will show only major channel numbers.
Setup Category Features and Options
Figure 12—CHannel Map Page
Clock/Day
Use this feature to choose
between Auto and Manual
clock settings. Choosing
Auto will begin the automatic
clock setting routine. If you
choose Manual you will be
directed to input the
correct time and day information manually using
the 0-9 and Cursor keys
on the remote control.
Digital Audio Output
When receiving a digital
signal there will be two
Audio options, PCM and S/P
DIF. PCM will be the only
option available when receiving an analog signal.
Menu Language
There are three options
available for the menu display
language: English, Español,
and Français. All menu
categories, features, and
options will appear in the
language you choose. English
is the default language.
System Information
The information displayed is
for service technician use
only.
Figure 13—Manual Clock Settings
Figure 14—Digital Settings
Figure 15—Menu Language
Figure 16—System Information
Page 9

9
Using the Remote Control
Use this universal remote to operate your SDB, TV, VCR, and DVD. Refer to the “Quick ‘N Easy” Startup Guide for programming procedure.
Since this remote control will operate several pieces of equipment, make sure you press the appropriate key to control that component. For
example, to operate your VCR, press the
VCR key after programming the remote control.
SDB Mode Key—Press to select Sanyo Digital Box as the
operating mode.
VCR Mode Key—Press to select VCR as the operating mode.
Must be programmed, refer to “Quick ‘N Easy” Startup Guide.
Input Key—Use this key to switch between TV and Video
modes or TV and VCR modes.
Number Keys—Use these keys to directly select channels on
your SDB, TV, and VCR. Also use them to set the Clock and
Day.
Channel (CH) Scan Up/Down Keys—Use the / keys to
select next channel up or down on your SDB, TV, and VCR. For
DVD operation, use these keys to skip forward or reverse. DTV
channels will show only the major channel numbers. These keys
have multiple usage; during normal viewing they function as
scan keys, within the menu system they function as directional
keys. Channel Up/Down Scan keys move highlight in a continuous loop through all available channels: NTSC DTV.
(Same function as item 20, cursor keys.)
Tuner Key—Use this key to toggle from one tuning system to
another, digital DTV channels and analog NTSC channels (cable
and VHF/UHF). This key will only operate the SDB.
(–) Sub CH (Channel) Key—This key will only operate the
SDB. Use this key to access minor channels numbers.
11
12
Pix shape Key—Use this key to access the picture shape
options: LetterBox, Cropped, Stretch, and Expand. This key
will only operate the SDB.
Menu Key—Press this key to display the on-screen menu on
your SDB and Sanyo Television. This key will not operate your
VCR, other brand TV, or DVD player.
(Continued on page 10.)
Enter Key—Press this key when using the SDB menu to choose
the selection, channel number entry, and on-screen menu
Caption Key—Press to select the Closed Captioning modes for
your DVD and Sanyo TV only. Captioning is only received
through the NTSC analog tuner.
12
Mute Key—Press this key to instantly turn off the TV sound.
Press again to restore the sound to its previous level.
11
Page 10

Volume (VOL)
++
Up/
––
Down Keys—Use the ++/––keys to
adjust the sound level on your TV.
TV Mode Key—Press to select the operating mode for your TV.
Must be programmed. Refer to “Quick ‘N Easy” Startup Guide.
DVD Mode Key—Press to select the operating mode for your
DVD. Must be programmed. Refer to “Quick ‘N Easy” Startup
Guide.
Reset Key—Press twice to restore all customer adjustable
controls to the original factory settings. A display warning
will appear. Press again to begin channel search procedure.
13
16
15
Audio Key—Press to select the desired audio reception feature
options (if available) for DTV: Main, Sub-1, Sub-2, Sub-3 etc.,
or for NTSC: Stereo, Mono, and SAP. This key will only operate
the SDB.
Display Key—Use this key to show the full channel and time
banner display for the SDB, VCR, and DVD mode. Pressing this
key in the TV mode will display the Channel Number.
Recall Key—Use this key to alternate between two channels. It
will select the previous channel on your SDB as well as your TV
and VCR. This key functions differently on the DVD, it selects
the repeat function.
Cursor Keys—Use these keys to scan channels, as directional
arrows to highlight features and options, and to navigate through
the menu.
The Cursor Up/Down keys move the cursor up and down within
the SDB menu, and selects next channel up and down on the
SDB, TV, and VCR. Using the Cursor Up/Down keys in DVD
mode activates the next/previous or skip forward/reverse
function.
The Cursor Left/Right keys move the cursor left and right within
the SDB menu. Use the Cursor Left key to delete or undo any
numeric entry. The Left/Right keys operate only the SDB.
Sleep Key—Use this key with the “0” key to set the Sleep Timer
on a Sanyo TV. It does not function in any other mode.
18
19
20
21
22
CH (Channel) Map Key—Press this key to display the channel
map page. The map page will display either DTV digital channels or NTSC analog channels (cable or VHF/UHF). Currently
selected channel number will be highlighted in yellow. Deleted
channels will be blue.
14
17
V-Guide Key—Use to access the parental control restrictions for
viewing movies and TV programs. (Reference page 20 for detail
operation.)
23
VCR/DVD Keys—Use these keys to operate your VCR and
DVD. Remember the remote control must be programmed first.
Rewind – Fast rewinds VCR tape, and fast skip reverse
for DVD.
Play – Selects play mode.
Fast Forward – Fast forward VCR tape, and fast skip
forward for DVD.
Record – Selects recording mode for VCR only.
Stop – Selects stop mode.
Pause – Select pause mode.
Tracking / – Adjusts VCR head tracking, and still
frame step forward or reverse for DVD.
24
10
13
14
18
19
20
21
15
16
17
22
23
24
Using the Remote Control (Continued)
Page 11

11
SDB Menu Operation
General Menu Operation
Use the CURSOR keys to navigate through the menu Categories, Features, and Options. The / cursor keys move the highlight to the left or right. The / cursor keys move the highlight up and down.
(The Up and Down keys move the highlight in a continuous loop.)
There are three on-screen menu categories: Picture, Channel, and Setup.
Selecting a Category and Feature Option
1. Press the MENU key for on-screen display.
2. Use the / keys to select a category.
3. Use the / keys to view features and options.
As each feature is highlighted, available options will
appear and a checkmark “ ” will indicate the current setting.
4. Use the / keys to highlight the desired feature.
5. Press the key.
6. Use the / keys to highlight the desired
option.
7. Press ENTER to set or choose the highlighted option.
8. Press MENU to exit.
OR
9. Use the / keys to move to the category
tab area and the / keys to select another category.
QuickTips
The menu will
disappear from
the screen after
approximately 30
seconds, if no keys
are pressed. Press
MENU key again
to redisplay.
The last adjusted
feature is selected
when returning to
the menu on-screen
display.
Press the remote
control RESET key to
clear all customized
settings and return to
factory default settings.
(SDB starts searching
for available
channels.)
Need help?
Visit our Web site at
www.sanyoctv.com
Figure 17—Category (tab
highlighted in yellow)
with Feature listed
Figure 18—Option selected
Operational Tips:
– The Cursor keys are multi-functional keys.
– During numeric entries, the key will “undo” any number
entered (0~9). This allows numbers to be corrected or changed
during channel selection or Clock/Day manual settings.
Page 12

12
SDB Menu Operation—Picture
Picture Category
The picture feature allows you to change and adjust the on-screen image by changing the aspect ratio, pix
shape, and scan mode. Please note that the adjustable menu options depend on the current tuner, channel
selection (DTV or NTSC), and signal reception.
Selecting the Picture Aspect Ratio (Width to Height) for DTV Channels
1. Press MENU key for on-screen display.
2. Use the / keys to select the Picture Category.
3. Use the / keys to highlight the Aspect Ratio
feature.
4. Press the key.
5. Use the / keys to select the desired option: 4:3 or
16:9. Press ENTER.
NOTE: Normal is the only option available for NTSC
channels.
Selecting the Pix (Picture) Shape for DTV
Channels
1. Use the / keys to highlight the Pix Shape feature.
2. Press the key.
3. Use the / keys to select the desired option: LetterBox, Cropped, Stretch, or Expand.
Press the ENTER key.
Figure 19—Aspect Ratio
QuickTips
For Picture Aspect Ratio:
The 4:3 ratio setting is
the NTSC standard.
The 16:9 ratio setting
is a wide-screen
picture image.
Press the remote control RESET key to
clear all customized
settings and return
to factory default
settings. (SDB starts
searching for available
channels.)
F
or Pix (Picture) Shape:
The PIX SHAPE key
on the remote operates
the same as the PIX
SHAPE menu
selection.
Using the remote PIX
SHAPE key allows you
to quickly access the
Pix Shape feature.
If Pix Shape did not
change the image
appearance, make sure
you are receiving a
digital signal, and the
correct feature setting
is selected.
Need help?
Visit our Web site at
www.sanyoctv.com
Figure 20—Letterbox Setting
(16:9 Reception & 4:3 Aspect Ratio)
Figure 21—Expand Setting
(4:3 Reception & 16:9 Aspect Ratio)
(16:9 Reception & 16:9 Aspect Ratio)
Selecting the Scan Mode for DTV Channels
The SDB scan feature is designed to automatically adjust your TV’s picture image depending on the signal
received and tuner selected. For conventional TV the scan mode should be set to interfaced. For advanced television, the scan mode can be set to either interlaced or progressive. In order to received the best quality picture,
match your settings with your equipment (DTV-advanced [digital] or NTSC-conventional [analog]).
1. Use the / keys to highlight the Scan Mode feature.
2. Press the key.
3. Use the / keys to highlight the appropriate option:
Interlaced or Progressive. Press the ENTER key.
NOTE: Normal is the only option available for NTSC channels.
Figure 22—Scan Mode selection
Page 13

13
Channel Category
Use this feature to automatically search and scan for available channels including NTSC and DTV channels. The
Channel Category adjustable features are: Search, Scan Memory, Initial Channel, and Display Banner.
Starting Channel Search
NOTE: An initial search occurs during the first time setup proce-
dure. Running a manual search should be necessary only
when you want to search for channels that may have been
added or to recover channels you deleted using the Scan
Memory feature.
1. Press MENU key for on-screen display.
2. Use the / keys to select the Channel Category.
3. Use the / keys to highlight the Search feature.
4. Press the key.
5. Use the / keys to highlight Start.
6. Press ENTER to start channel search. The SDB will automatically
start searching for available Digital DTV and NTSC (analog)
channels. The NTSC signal search includes Cable and VHF/UHF
channels.
NOTES:
•
The on-screen message will appear with arrows displayed across
the bottom of the screen (to indicate activity) as the search process
continues. (See Figure 24.) This may take some time, so please be
patient.
•
During the Channel Search procedure, only the POWER key is
operable.
Figure 23—Channel Search
Figure 24—SDB searching for active
channels
SDB Menu Operation—Channel
QuickTips
Some features and
options may not be
available at all times
depending on your
current signal reception, tuner, and
channel selection.
If you cannot scan
some channels, check
the CH map page and
restart channel search
operation or press the
remote control RESET
key to rescan active
channels.
Channel Up/down
Scan keys move highlight in a continuous
loop.
When the remote
Channel (up/down)
keys are pressed
repeatedly faster than
the video can be
processed, the screen
will change to a solid
blue color with only a
display of the channel
number.
Need help?
Visit our Web site at
www.sanyoctv.com
Channel Scan Memory
Channel scan memory is a list of active channels that you can scan
through when using the CHannel Scan (up/down) keys. The scan
process will select only major channels. This list can be customized by
deleting unwanted channels. The Channel Map pages will reflect any
changes made to the Channel Memory Scan List.
1. Use the / keys to highlight the Scan Memory feature.
2. Use the key to move to the channel number selection area
(highlighted). The current channel number will appear. DTV
channels will show only the major channel number.
3. Use the / keys to select the unwanted channel.
For example, Ch D35.
4. Press Enter to remove the channel.
5. To delete other channels, repeat steps 3 and 4 above.
Operational Tip:
Press the CH Map key on the remote to view a complete listing of
the active channels. “Deleted” channel numbers will be blue. (See
page 16 for more detailed information on CH Map usage.)
Figure 25—Deleting channels
Figure 26—CHannel Map with deleted
channels (blue numbers)
Continuous
Loop
NTSC
DTV
Page 14

QuickTips
When Initial Channel
is set to OFF the SDB
will tune to the last
channel selected when
powered on.
Each time the channel
is changed or selected,
the banner information
display will appear on
screen.
Use the DISPLAY key
to switch the Banner
on/off.
Need help?
Visit our Web site at
www.sanyoctv.com
14
SDB Menu Operation—Channel
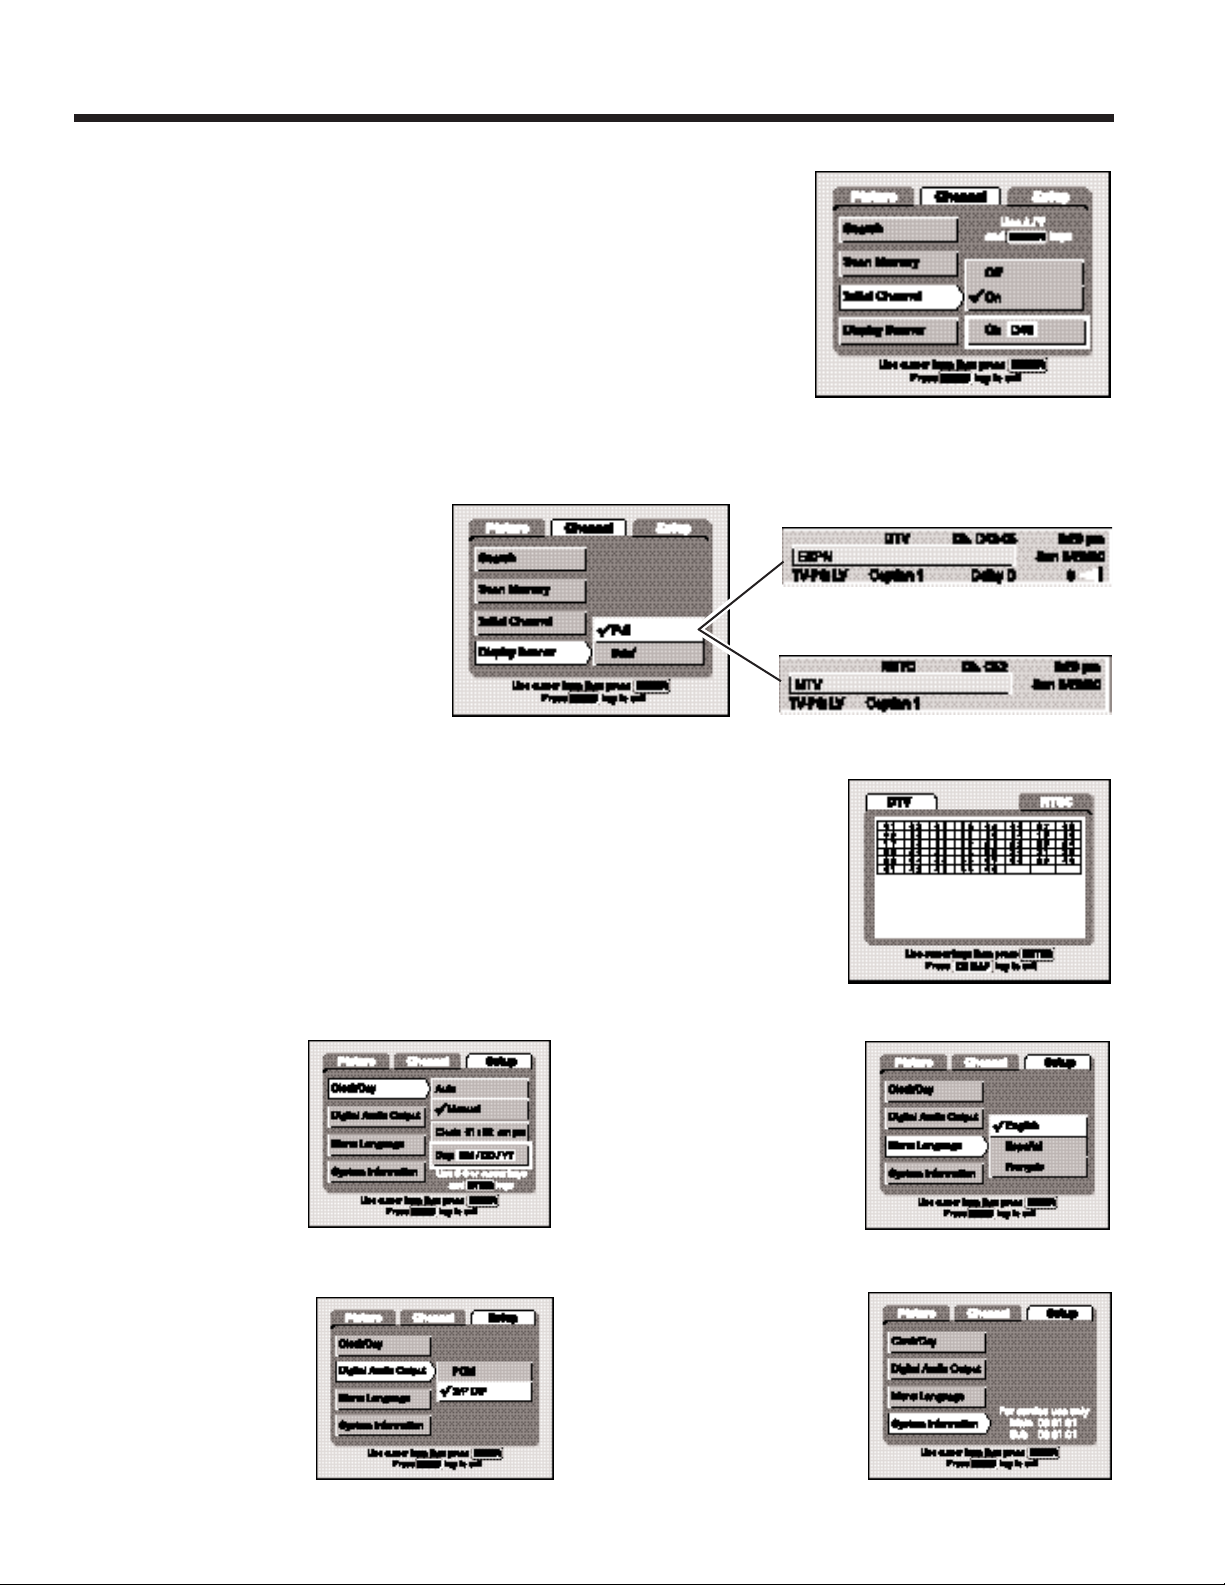
Initial Channel
The SDB can be programmed to tune to your favorite channel
each time it is powered on, such as your favorite news or sports
channel.
1. Use the / keys to highlight the Initial
Channel feature.
2. Press the key.
3. Use the / keys to highlight On. Press
the ENTER key.
4. Use the / keys to select desired digital or analog
channel. For example, Digital Channel 43.
Figure 27—Initial Channel selected
Display Banner
The Banner information will depend on the current tuner, channel selection (DTV or NTSC), and current signal
reception.
1. Use the / keys to highlight the
Display Banner feature.
2. Press the key.
3. Use the / keys to highlight setting: Full or Brief.
Press the ENTER key.
NOTES:
• When the Display key is pressed, the Full banner will appear
regardless of the menu selection and remain on the screen until
the Display key is pressed again.
• Captions will not be displayed while the Full banner is on the
screen.
Banner Information:
Figure 28—Display Banner
Figure 29—DTV FULL Banner Display
Figure 30—NTSC Full Banner Display
DTV Full Banner includes:
– Station ID number (if available)
– “DTV” digital channel icon
– Major-Minor channel number and
tuner indicator “D”
– Clock time (if set)
– Day date (if set)
– Program Title (if available)
– Program Rating (if available)
– Caption Setting (if set)
– “Dolby D” indicator (if digital signal is received)
– Signal quality with meter
NTSC Full Banner inc
ludes:
– Station ID number (if available)
– “NTSC” analog channel icon
– Channel Number with tuner indicator “C”
(cable channels)
– Clock time (if set)
– Day date (if set)
– Program Title (if available)
– Program Rating (if available)
– Caption Setting (if set)
DTV Br
ief Banner includes:
– Station ID number (if available)
– Major-Minor channel number and
tuner indicator “D”
– Clock time (if set)
NTSC Br
ief Banner includes:
– Station ID number (if available)
– Channel Number with tuner indicator “C”
(cable channels)
– Clock time (if set)
Page 15

15
Use the setup category to set the Clock/Day, Digital Audio Output, and Menu Language features. (No settings
required for System Information.) The menu setup feature and options listing will depend on the current
tuner/channel selection (DTV or NTSC) and current signal reception.
SDB Menu Operation—Setup
To set the Clock / Day manually
1. Press MENU key for on-screen display.
2. Use the / keys to select the Setup category.
3. Use the / keys to highlight the Clock/Day feature.
4. Press the key.
5. Use the / keys to highlight Manual. The on-screen
Clock/ Day entry areas appear. Press ENTER.
6. Use the remote 0~9 number keys or / keys to enter
the proper clock time.
7. Use the / keys to highlight AM or PM.
8. Press ENTER to set the time and move the cursor to the Day
Setting entry area.
9. Use the remote 0~9 number keys or / keys to select
the proper day/date. Then press the ENTER key.
Operational Tips:
– Use the left key to clear any incorrect number entry.
– The clock must be set before setting the day/date.
Figure 32—Clock Time
Figure 33—Day [month/day/year]
Figure 34—Banner display with Clock
Time/Day Settings
Figure 31—Setup Category
Digital Audio Output
Use this feature to choose the format of the digital DTV audio output signal: PCM or S/P DIF.
1. Use the / keys to highlight the Digital Audio Output
feature.
2. Press the key.
3. Use the / keys to highlight option: PCM or S/P DIF.
Press the ENTER key.
NOTE: If you are watching an NTSC (analog) channel, “PCM” will
be the only option shown.
Figure 35—Digital Audio Output
QuickTips
To see the time of day
and date, press the
DISPLAY key, the
banner information
will appear on screen.
The Channel Banner
(Full or Brief) Clock
display will be blank if
the clock/day has not
been set.
To use the Auto
Clock/Day feature, a
local PBS station that
is broadcasting an
extended data service
(XDS) signal must be
received. The Auto
Clock/Day searches for
the transmitted signal
and automatically sets
the Clock/Day.
If no NTSC channel
signals are found
during the channel
search process, the
SDB will automatically
skip the Automatic
Clock/Day Setup
process.
During the Clock/Day
setup procedure, only
the POWER and
DISPLAY keys are
operational.
Need help?
Visit our Web site at
www.sanyoctv.com
Page 16

16
QuickTips
If you don’t recognize
words in the on-screen
menu, change the
menu option language
or press the remote
control RESET key
twice (personalized
settings will be reset to
factory defaults).
The CH MAP remote
key will only operate
the Sanyo Digital Box.
Need help?
Visit our Web site at
www.sanyoctv.com
SDB Menu Operation—
Picture
Selecting the Menu Language
All menu Categories, Features, and Options will appear in the
language you choose. English is the default language.
1. Use the / keys to highlight the Menu Language feature.
2. Press the right key.
3. Use the / keys to highlight a language option: English,
Español, or Français. Press the ENTER key.
NOTE: The menu language does not affect the Captioning text
language.
System Information
This feature is designed for use by the factory and/or service
personnel. The display is for diagnostic purposes only, there are no
customer adjustments.
Figure 37—System Information
Figure 36—Menu Language
The SDB automatically displays the CHannel Map in columns regardless of the total number of channels. Rows
will vary based on the number of channels received. If the CHannel Map page is longer than the screen display,
simply use the cursor keys to scroll as needed. Also, this feature can be used as an express selection process to
access channel numbers, see page 17.
The SDB Channel NightScan feature searches for new channels and adds them to the channel database. This
operation will be performed at random intervals during in-active times. This feature automatically updates only
DTV channels.
The CHannel Map display depends on the following conditions:
— If channel signals are not detected, the Map page for that
category (DTV or NTSC) will be blank.
— The NTSC CHannel Map page will display either CATV
channels or Off-Air channels but not both. During channel
search, the SDB will scan both types. The SDB will automatically detect the proper type to be displayed and used for the
NTSC database (for a maximum of 125 cable channels or a
maximum of 68 VHF/UHF channels [VHF 2-13,
UHF 14-69]). (NTSC channels depend on the type of signal
connected to the NTSC RF input.)
— When the CHannel Map is displayed on the screen, you can
press the TUNER key to switch between the categories.
— DTV channels will show only the major channel number.
Figure 39—DTV CH Map
Channel Map
Page 17

17
QuickTips
Pressing the CH Map
remote key will display
a blank page with category tabs only, if
channel signals are
not detected.
When the CHannel
Map page is active,
only the Power, CH
Map, Tuner, Enter and
Cursor keys are
operational.
When the CHannel
Map page is active, the
TUNER key will switch
between the tuning
systems (DTV and
NTSC).
Need help?
Visit our Web site at
www.sanyoctv.com
Using the Channel Map
1. Press the CH MAP key on the remote control once to display the
CHannel Map page(s).
2. Use the / keys to highlight the desired category: DTV
or NTSC.
3. Press the CH MAP key to exit.
NOTE: Deleted channels will be blue. The current channel will
have a yellow background.
Figure 40—NTSC CH Map
To quickly select a channel within the CHannel Map page:
1. Press the CH MAP key on the remote control.
2. Use the / keys to highlight the desired category:
DTV or NTSC.
3. Use the CURSOR keys to highlight the desired channel. For
example, Channel 52. Press the ENTER key. (See Figure 42.)
To quickly switch between a DTV and NTSC channel:
1. Press the TUNER key repeatedly until the desired tuning system
channel number display appears on the screen.
2. Select an NTSC cable channel by entering the channel number.
For cable channels above 100 press and hold the 1 key for about
two seconds (until 1-- appears). Then enter the other two digits.
OR
3. Select a DTV channel by entering the major and minor numbers of
the channel as follows: 4, 3, (–) Sub, 0, and 5 for channel “D43-05.”
NOTES:
• The CHannel Map shows all available channels and reflects the
current status of channels within the CHannel Scan Memory. All
deleted channels will appear blue.
• The tuner channel (DTV and NTSC) categories:
DTV (digital) channels with only major channel numbers listed.
NTSC (analog) channels with Cable channels 01~125 or
VHF/UHF channels 02-69.
• Entering 00 for the minor channel number will cause the SDB to
tune to the NTSC channel matching the major channel number.
Express Channel Selection
Figure 42—NTSC Channel C52,
selected
Figure 41—Channel Map of NTSC
channels display
Page 18

18
Direct Channel Selection
The 0~9 Number keys are used to select channels directly within the Brief Channel Number Display entry area.
DTV or NTSC channels 01 through 09 can be entered using one or two digits. To enter one hundred digit,
press and hold the “1” key for about two seconds, if cable channels are available, 1– – will appear. Then enter
the other two digits.
To select a direct channel:
1. Press any numeric key (0~9), the Brief Channel Number Display will
appear on the screen.
2. Enter a channel number. After three seconds the channel will be selected,
or press the ENTER key to instantly select the channel.
NOTE: During number entry, use the left key to undo an entry.
The following conditions of selecting a direct channel will occur.
— If you select a nonexistent DTV channel or a very weak NTSC channel,
see figure 43.
— If you select a valid DTV channel that is currently broadcasting no video
signal or no audio signals, see figure 44.
— If you select a valid DTV channel that is broadcasting an audio signal, but
no video signal, see figure 45.
— If you incorrectly connect a DVD player or VCR to the NTSC RF Input (on
back of SDB) and then try to watch a copyrighted program, disc, or tape.
A copyright protection signal is detected which triggers the SDB to display
an error message, see figure 46.
QuickTips
Changing a channel
within the same tuner
system, simply enter
the channel number.
For example
DTV-to-DTV or
NTSC-to-NTSC.
Need help?
Visit our Web site at
www.sanyoctv.com
Figure 43
Figure 44
Figure 45
Figure 46
(–) Sub CHannel Selection
(–) Sub CHannel Selection
The (–) Sub CHannel key on the remote control can be used as a direct channel selection process for DTV
channels. Any time the (–) Sub CHannel key is pressed, the DTV tuning system is automatically selected. Use
this key to select major and minor channels. After a major channel is entered, the (–) Sub CHannel key is used
to provide access to the minor channels.
Using the (–) Sub CHannel key to select a channel
1. Press the (–) SUB CH key, the major channel number for the current
program will appear with a list of up to three available minor (sub)
channels. (The selected minor channel will appear with a yellow
arrow indicator.)
2. While the Sub-Channel Display is on the screen, select the minor
channel using the Channel (up/down keys). If more than three minor
sub-channels are available, scroll up or down the list to locate
channel.
3. Press ENTER to instantly select the minor channel or just wait for
three seconds and the SDB will automatically select the minor channel.
NOTES:
• If no keys are pressed after five (5) seconds, the Sub-CHannel display will disappear from the screen.
• While the Sub-CHannel display is on the screen, only the POWER, ENTER, and CHANNEL SCAN keys
are operable.
Figure 47—Major Channel
with Minor Channel 02, selected
Page 19

19
QuickTips
Major channels can be
selected from the CH
Map page.
Minor channels can be
selected only when the
(–) Sub CHannel key
is pressed; then the
Major channels
appears with a list
of available minor
channels.
If the RF out jack is
used, the signal will be
monaural.
Stereo is not available
through RF out; only
through A/V
connections.
Need help?
Visit our Web site at
www.sanyoctv.com
Selecting a Major or Minor Channel using the (–) Sub CHannel Key
1. DTV Channels may be selected by entering only the major number. If a DTV minor channel is not entered
after pressing the (–) Sub CHannel key, the SDB will automatically select the lowest minor channel, -01
or -1 for the DTV major channel entered. For example, if D34-_ _ is entered, the SDB will tune to DTV
Channel 34-01.
2. If any DTV minor channel number is entered as –00 or –0, the SDB will
tune to the NTSC channel matching the major channel number. For
example, if D24-00 is entered, the SDB will tune to Cable C24 or (UHF
channel 24).
3. To select a major channel with a specific minor sub-channel: enter the
major number, press (–) SUB CH key, and then enter the minor channel
number.
4. Press ENTER to instantly select the minor channel or just wait for three
seconds and the SDB will automatically select the minor channel.
Figure 48—Channel Entry for
Major Channel
Operational Tips:
• If you are watching an NTSC channel and decide
to change to a DTV channel. Simply press the
(–) SUB CH key, the DTV channel number entry
(D__ ) display will appear. Enter the channel number. Then press ENTER to instantly select the
minor channel or just wait for three seconds and the
SDB will automatically select the minor channel.
• If watching a DTV channel with the banner
dis-played on the screen, and you press the (–)
SUB CH key, the SDB will automatically remove
the full banner (see Figure 49). The Brief Channel
display will appear with sub channels listed (see
Figure 50).
• If watching an NTSC channel with the banner dis-
played on the screen, and you press the (–) SUB
CH key, the SDB will automatically change the
channel number entry area (D__) in the full banner
display. A digital channel number may be entered.
Figure 49
Figure 50
Figure 51—Channel entry area (circled)
Audio options will depend on the channel tuning system selected and the current broadcaster’s signal received.
The audio mode will display on screen for each selected choice, if available.
1. Press the AUDIO key, current setting will appear on screen.
2. To change setting, press the AUDIO key repeatedly until the desired option
appears.
DTV options: Main, Sub-1, Sub-2, Sub-3, ...
NTSC options: Stereo, Mono, SAP
For DTV—Main.
For NTSC—Stereo.
3. Press ENTER to instantly select the option.
NOTES:
• If audio selection is not available, the Audio mode will change to the SDB
default modes.
• If you select SAP while watching an NTSC channel, the SDB will remain in the
SAP audio mode until another option is selected. If SAP is not available, the
audio mode defaults to Stereo.
• If you select Sub-1 while watching a DTV channel, the SDB will remain in the Sub-1 audio mode until
another option is selected. If Sub-1 is not available, the audio mode defaults to Main.
Figure 53—NTSC
Option: Stereo
Audio Reception
Figure 52—DTV
Option: Main
Page 20

20
QuickTips
Press the V-Guide;
then press the
DISPLAY key to
temporarily override
the restriction settings
and instantly return to
normal viewing.
V-Guide restrictions
will be restored when
power is reapplied.
Need help?
Visit our Web site at
www.sanyoctv.com
The V-Guide feature is used to access the parental control restrictions. This Sanyo Digital Box is equipped with
a V-Chip that can be programmed to block shows with content you deem as inappropriate for your children to
view. There are three guidelines to choose: Movies, TV Age, and TV Content. Each category is blocked as rating information is received and decoded. The V-Guide blocked rating restricts the viewing of Digital and NTSC
channels.
BLOCKING MOVIES
1. Press V-GUIDE key on the remote control once, the entry page of the
V-Guide (parental control) setup OSD will appear.
2. Press the ENTER key to proceed to the main option selection page.
3. Use the / keys to choose Movies.
4. Use the / keys to highlight your choice, (such as, R).
5. Press ENTER key to switch between the Blocked and Unblocked option
rating.
V-Guide
Figure 54—V-Guide
Figure 57—TV Age, TVPG rating
NOTES—As a Rating Limit is selected:
•
Block action will block all higher rated limits. For example, Setting the limit to Block an “R” rating
automatically blocks the ratings NC-17 and X.
•
Unblock action will unlock all lower rated limits. For example, Setting the limit to Unblock a “PG-13”
rating automatically unblocks the ratings “PG” and “G.”
•
For complete V-Chip operation and function capabilities, please refer to EIA-744A Standard (U.S.
requirements only) on Web site http://www.tvguidelines.org.
BLOCKING TV PROGRAMS
TV Age Based
1. Press V-GUIDE key.
2. Press the ENTER key to proceed to the main
option selection page.
3. Use the / keys to choose TV Age.
4. Use the / keys to highlight your
choice, (such as, TV-PG).
5. Press ENTER key to switch between the
Blocked and Unblocked rating option.
TV Content Based
1. Press V-GUIDE key.
2. Press the ENTER key to proceed to the main option
selection page.
3. Use the / keys to choose TV Content.
4. Use the / keys to highlight a content
option, (such as, D-Suggestive Dialog).
5. Use the / then / keys to highlight your choice (such as, TV14).
6. Press ENTER key to switch between the Blocked
and Unblocked rating option.
7. Use the key to select another category. Repeat
steps above.
Figure 55—V-Guide Main Option Display
Figure 56—Movie Rating R, blocked
Figure 58—TV Content, D-Suggestive
Dialog TV14, blocked
Page 21

SDB Output Jacks Connection
21
Connect the SDB Output
jacks to a VCR’s A/V input
jacks.
Connect VCR A/V output
jacks to the TV
A/V input jacks.
NOTES:
• For input and digital output connections, refer to the “Quick ‘N Easy”
Startup Guide Connecting Diagrams.
• DO NOT connect VCR/DVD RF output to the RF Input of the SDB. (See
page 18, figure 46.)
Resetting the SDB
Use this feature to return all customer adjustable controls to the original factory settings.
1. Press RESET key on the remote control once, the on-screen message appears.
2. Press RESET key again to cancel all customized settings and return to factory settings.
NOTE: The SDB will return to the Initial power on procedures: Channel Search, Monitor Type
Selection, and Auto Clock/Day Setup process.
Factory Default Settings
Channel Search . . . . . . . . . Reset with initial setup procedures
Monitor Type Selection . . Reset with initial setup procedures
Clock/Day . . . . . . . . . . . . . Reset with initial setup procedures
Aspect Ratio . . . . . . . . . . . 4:3
Pix Shape . . . . . . . . . . . . . NTSC-Normal, DTV-Normal (for 4:3 Reception,
. . . . . . . . . . . . . . . . 16:9 Reception and 16:9 Aspect),
. . . . . . . . . . . . . . . . LetterBox (for 16:9 Reception and 4:3 Aspect)
Scan Mode . . . . . . . . . . . . Interlaced (480i)
CH Scan Memory . . . . . . . Reset with initial channel search
Initial Channel . . . . . . . . . . Off
Display Banner . . . . . . . . . Brief
Audio Reception . . . . . . . . NTSC-Stereo, DTV-Main
Digital Audio Out . . . . . . . S/P DIF
Menu Language . . . . . . . . English
Caption . . . . . . . . . . . . . . . Off
V-Guide . . . . . . . . . . . . . . . Off with all settings/rating limits cleared
Figure 59—Reset the SDB
Figure 60—Resetting the SDB to
factory default settings
Connect the SDB output jacks
to the TV Audio (L/R) input jacks
and S-Video input jack.
SDB
TV BACK
VCR
QuickTips
A/V1 and A/V2 jacks
have identical functions. Any compatible
video equipment can
be connect to either set
of jacks.
Make sure all cable
connectors are fully
seated on jacks.
Always match cables
according to the
colors on the jacks.
Need help?
Visit our Web site at
www.sanyoctv.com
Page 22

22
QuickTips
If Caption Text mode is
selected and no
captioned text is
broadcasted, a black
box may appear and
remain on the TV
screen.
To remove this black
box, set captioning to
any mode other than
Text 1 or Text 2 or
press the
RESET
key to cancel captioning and customized
settings.
Need help?
Visit our Web site at
www.sanyoctv.com
Captioning is text transmitted along with the picture and sound so it can be displayed on the screen. Captioning
will depend on the channel tuning system selected and the current broadcaster’s signal received. ClosedCaptioning is received only through the NTSC tuner.
Selecting Captioning:
Press CAPTION key to select desired options:
Local broadcasters decide which caption signals to transmit.
They may not choose to provide captions or may provide
captions in one or all of the available modes.
Caption 1: This is the main mode used for program captioning (words match the program you are watching). Almost all
broadcasters will use Caption 1 to transmit program captions.
These captions are generally one or two lines.
Caption 2: This is an alternative mode for program captioning. Caption 2 may be used by the broadcaster to provide
captions in another language, such as, Spanish or French.
Text 1: This mode is used to display large amounts of text.
This text will appear within a black box that may be nearly
as large as the TV screen. Text displayed in this manner does
not generally relate to the program. These captions may be
used by broadcasters to provide weather reports, community
bulletins, stock quotes, etc.
Text 2: This mode is an alternative mode used to display
large amounts of text. The same types of information
displayed in Text 1 can be displayed in Text 2.
NOTE: This SDB provides standard analog closed-
captioning displays.
Closed-Captioning
Caption OFF → Caption 1 →Caption 2 →Text 1 →Text 2
Figure 61—Caption 1 Mode
Figure 63—Text 1 Mode
Figure 62—Caption 1
Figure 64—Text 1
Care and Cleaning
The surface of the cabinet can be damaged if not properly maintained. Many common household aerosol sprays, cleaning agents,
solvents, and polishes will cause permanent damage to the fine surface.
1. Unplug the power cord before cleaning.
2. Use a dry cloth for cleaning.
Page 23

23
Poor stereo reception
Is the quality sound better?
Yes. Problem is with program or weak signal (station, cable, or satellite reception).
No. Change channels.
Press AUDIO key.
Did the Blue Screen disappear?
Yes. Normal operating conditions. You are changing channels faster than the video can be processed.
No. Signal might be too weak to be received. Try installing an outdoor antenna or repositioning
existing antenna.
Before calling for assistance, please look for the condition that most closely resembles your problem in the following charts, then
follow the instructions for that condition. Visit our web site at
www.sanyoctv.com or call toll free 1-800-877-5032.
Screen is solid blue
Press the Channel
Up/Down key once.
Is the channel map page still blank?
Yes. Problem could be NO ATSC or NTSC signal received during channel search process.
No. Press CHannel Map to select Map page. Channels will be available only if the
transmitted signals were detected.
Blank Channel Map Page
Start Channel
Search.
Troubleshooting
No Picture or No sound
Is picture and sound ok?
Yes. Maybe a blank channel (signal not being transmitting or weak) was selected.
No. Check to be sure all your equipment is properly connected, turned on, tuned to channel 3 or 4
(VCR or TV), and correct mode selected.
Press the Volume key
and Change Channels.
Did the problem go away?
Yes. It may have been the channel scan memory or V-Guide settings.
Cannot select or scan some channels
Press the RESET key
twice (personalized settings
will be reset to factory defaults).
My remote control will not operate my SDB or other equipment
Press the SDB or other
mode keys on the Remote
Control. Then try it again.
Be sure to point the remote
control at the equipment.
Does the remote control work now?
Yes. Another mode was selected. Press the appropriate key to operate the different types of
equipment. (Remote must be programmed. Refer to Quick ‘N Easy.)
No. Replace the batteries or confirm that they are properly installed.
Index
Analog tuner, 6
Antenna, refer to Quick ’N Easy
Aspect ratio, 4, 7, 12
Audio reception, 19
A/V jacks, 21
Brief banner, 4, 8, 14
Category tabs, 4
Channel map, 8, 10, 13, 16, 17
Channel scanning, 4, 13, 17, 18
Channel search, 4, 10, 13
Channel selection, 9, 17, 18
Clock/day setup, 8, 15
Closed captioning, 9, 22
Digital audio output, 8, 15
Digital tuner, 6
Direct channel selection, 4, 18
Express channel, 17
Full banner, 8, 14, 19
Initial channel, 4, 8, 14, 21
Major channel, 14, 17, 18, 19
Menu language, 8, 16
Minor Channel, 14, 17, 18, 19
Movie rating, 20
NightScan, 4, 8
Output Jacks, 6
Picture adjustment, 12
Pix shape, 7, 9, 12
Remote control, 9, 10
Remote programming, refer to Quick ’N Easy
Resetting the SDB, 21
Scan mode, 7, 12
Sub channel, 18, 19
TV ratings, 20
V-Guide (Parental Control), 20
Page 24

OBLIGATIONS
In order to obtain warranty service, the product must be delivered to and picked up at the user’s expense, unless specifically stated otherwise in this
warranty.
For customer assistance please visit www.sanyoctv.com or call toll free 1-800-877-5032.
THIS WARRANTY IS VALID ONLY ON SANYO PRODUCTS PURCHASED AND USED IN THE UNITED STATES OF AMERICA, EXCLUDING ALL U.S.
TERRITORIES AND PROTECTORATES. THIS WARRANTY APPLIES ONLY TO THE ORIGINAL RETAIL USER, AND DOES NOT APPLY TO PRODUCTS
USED FOR ANY INDUSTRIAL, PROFESSIONAL OR COMMERCIAL PURPOSE. THE ORIGINAL DATED BILL OF SALE OR SALES SLIP MUST BE
SUBMITTED AT THE TIME WARRANTY SERVICE IS REQUESTED.
Subject to the OBLIGATIONS above and the EXCLUSIONS below, SANYO MANUFACTURING CORPORATION (SMC) warrants this SANYO product
against defects in materials and workmanship for the periods specified below. SMC will repair or replace (at its option) the product and any of its
parts which fail to conform to this warranty. The warranty period commences on the date the product was first purchased at retail.
EXCLUSIONS
This warranty does not cover (A) the adjustment of customer-operated controls as explained in the appropriate model’s instruction manual, or
(B) the repair of any product whose serial number has been altered, defaced or removed.
This warranty shall not apply to the cabinet, cosmetic parts, or batteries.
This warranty does not apply to uncrating, setup, installation, removal of the product for repair, or reinstallation of the product after repair.
This warranty does not apply to repairs or replacements necessitated by any cause beyond the control of SMC including, but not limited to, any
malfunction, defect or failure caused by or resulting from unauthorized service or parts, improper maintenance, operation contrary to furnished
instructions, shipping or transit accidents, modification or repair by the user, abuse, misuse, neglect, accident, incorrect line voltage, fire, flood or
other Acts of God, or normal wear and tear.
The foregoing is in lieu of all other expressed warranties and SMC does not assume or authorize any party to assume for it any other obligation or
liability.
THE DURATION OF ANY WARRANTIES WHICH MAY BE IMPLIED BY LAW (INCLUDING THE WARRANTIES OF MERCHANTABILITY AND FITNESS)
IS LIMITED TO THE TERM OF THIS WARRANTY. IN NO EVENT SHALL SMC BE LIABLE FOR SPECIAL, INCIDENTAL OR CONSEQUENTIAL
DAMAGES ARISING FROM OWNERSHIP OR USE OF THIS PRODUCT, OR FOR ANY DELAY IN THE PERFORMANCE OF ITS OBLIGATIONS UNDER
THIS WARRANTY DUE TO CAUSES BEYOND ITS CONTROL.
SOME STATES DO NOT ALLOW LIMITATIONS ON HOW LONG AN IMPLIED WARRANTY LASTS AND/OR DO NOT ALLOW THE EXCLUSION OR
LIMITATION OF CONSEQUENTIAL DAMAGES, SO THE ABOVE LIMITATIONS AND EXCLUSIONS MAY NOT APPLY TO YOU.
THIS WARRANTY GIVES YOU SPECIFIC LEGAL RIGHTS. YOU MAY HAVE OTHER RIGHTS, WHICH VARY FROM STATE TO STATE.
For your protection in the event of theft or loss of this product, please fill in the information requested below and KEEP in a safe place for your own
personal records.
Model No. ___________________________________ Serial No.__________________________________________________
(Located on back.)
Date of Purchase _____________________________ Purchase Price ____________________________________________
Where Purchased _____________________________________________________________________________________________________
UNIT EXCHANGE PARTS
90 DAYS 1 YEAR
SANYO Digital Box Limited Warranty
 Loading...