

Page 1
Instruction Manual
Manuel d'utilisation
Bedienungsanleitung
Gebruiksaanwijzing
CE42LM5B-B
Manuale d'Istruzioni
Manual de instrucciones
LCD Monitor
Moniteur d'affichage à cristaux liquides
LCD-Monitor
LCD-Monitor
Monitor LCD
Monitor de LCD
CE
42LM5B-
English Page 2~13
GB
Français Page 14~25
F
Deutsch Seite 26~37
D
NL
Nederlands Bladzijde 38~49
Italiano Pagine 50~61
I
Español Página
E
C
62- 74
Please read this Instruction book before using your LCD monitor. We wish you many hours of pleasure from your new LCD monitor
Veuillez lire attentivement ce mode d’emploi avant d’utiliser votre moniteur d’affichage à cristaux liquides. Nous espérons que votre
nouveau dispositif d'affichage vous procurera de nombreux instants de bonheur.
Lesen Sie diese Anleitung bitte aufmerksam durch, bevor Sie Ihren LCD- Monitor in Betrieb nehmen. Wir wünschen Ihnen viel Freude
mit Ihrem neuen Gerät.
Lees deze handleiding voordat u uw LCD- monitor gaat gebruiken. We wensen u vele uren van plezier met uw nieuwe beeldscherm.
Leggere attentamente questo manuale d’istruzioni prima di utilizzare il monitor LCD. Vi ringraziamo per aver scelto un monitor LCD
Sanyo che vi consentirà di trascorrere momenti piacevoli e divertenti.
Lea este manual de instrucciones antes de usar su nuevo monitor. Deseamos que disfrute de él muchas horas.
Page 2
GB
CAUTION: Please read and retain for your safety. This unit has been engineered and manufactured to assure your personal safety, but
improper use can result in potential electric shock or fire hazards. In order not to defeat the safeguards incorporated in this monitor observe the
following basic rules for its installation, use and servicing.
GB
Installation
Do not allow anything to rest on the power
cord. Do not locate this LCD monitor where
the cord will be damaged by people walking
on it.
Do not overload wall outlets and extension
cords as this can result in fire or electric
shock.
Do not place this LCD monitor near any heat sources such as
radiators, heaters, stoves and other heat-generating products
(including amplifiers).
Do not place this LCD monitor in direct sunlight.
Do not place your LCD monitor on an unstable stand, shelf or
table. Serious injury to an individual, and damage to the LCD
monitor may result if it should fall. Your sales person can
recommend approved wall mounting kit. A special wall mounting
kit is available for this model.
This LCD monitor should be operated only from the type of power
source indicated on the monitor or as indicated in the Operating
Instructions. If you are not sure of the type of power supply, consult your sales person or your local power company
For added protection it is strongly recommended that this LCD
monitor is supplied via a RCCB. Safety unit.
WARNING:
attached to the wall in accordance with the manufacturers
installation instructions
To prevent injury the LCD monitor must be securely
.
Important:
THIS PRODUCT MUST BE EARTHED
This equipment is fitted with an approved mains lead and an
approved non rewireable UK mains plug. To change a fuse in this
type of plug proceed as follows:
1. Remove the fuse cover and fuse.
2. Fit a new fuse which should be a BS1362 13 Amp A.S.T.A. or
BSI approved type.
3. Ensure that the fuse cover is correctly refitted.
If the fuse cover is lost or damaged the plug must NOT be used
but replaced with a serviceable plug.
If the fitted plug is not suitable for your socket outlets, it should be
cut off and an appropriate plug fitted in its place. If the mains plug
contains a fuse, this should have a rating of 13 Amp, ensure the
fuse cover is correctly fitted. If a plug without a fuse is used, the
fuse at the distribution board should not be greater than 13 Amp.
Note:
The severed plug must be destroyed to avoid a possible
shock hazard should it be inserted into a 13 Amp socket elsewhere.
The wires in this mains lead are coloured in accordance with the
following code:
Blue -------> Neutral
Brown ----> Live
Green and Yellow ----> Earth
1. The Blue wire must be connected to the terminal which is
marked with the letter “N” or coloured BLACK.
Use
Never add accessories that have not been specifically designed
for this monitor.
Do not place items such as vases containing liquid on top of the
monitor. Some internal parts carry hazardous voltages and contact may result in an electric shock hazard. Never spill liquids of
any kind on this LCD monitor.
Do not expose the LCD monitor to rain or use near water.
For example, near a bathtub, kitchen sink, in a wet basement, etc.
Do not use immediately after moving the LCD monitor from a low
temperature to a high temperature environment, as this causes
condensation, which may result in fire, electric shock, or other
hazards. Before cleaning, unplug the monitor from the wall
socket.
This LCD monitor should have a minimum distance of 5cm away
from the wall and the monitor should have 10cm distance around
the top and sides
Do not apply liquid cleaners or aerosol cleaners directly onto the
LCD monitor. Use a soft cloth for cleaning.
Do not mount near an open flame source. Open flames must
never be used near this LCD monitor.
This LCD monitor should not be built in or enclosed in any way,
heat build up will reduce the life of the monitor.
Always mount using recommended and substantial fixtures and
fittings.
2. The Brown wire must be connected to the terminal with the
letter “L” or coloured RED.
3. The Green and Yellow wire must be connected to the terminal
which is marked with the letter “E” or coloured GREEN or
GREEN and YELLOW.
Before replacing the plug cover, make certain that the cord grip is
clamped over the sheath of the lead - not simply over the wires.
Do not attempt to bypass the safety purpose of the grounding
type plug.
THIS UNIT IS NOT DISCONNECTED FROM THE MAINS UNLESS
THE MAINS LEAD IS UNPLUGGED.
THE INSTALLER MUST MAKE SURE THE MAINS LEAD IS
EASILY ACCESSIBLE.
Important recycling information.
Your SANYO product is designed and manufactured with high quality materials and components which can be recycled and reused.
This symbol means that electrical and electronic
equipment, at their end-of-life, should be disposed of separately.
In the European Union there are separate collection systems for used electrical and electronic
products.
Please help us to conserve the environment we
live in!
Note: This symbol mark and recycle system are applied only to EU
countries are not applied to other countries of the world.
Page 3
GB
GB
Servicing
Your monitor is fully transistorised and does not contain any user serviceable components.
You must not remove the rear cover of the Monitor by yourself. The apparatus is working with high voltages and could damage
objects or even endanger people. Leave all required repair and service jobs to an authorised service technician. He will exclusively
use such spare parts that are complying with the same safety standards as applicable to the original parts. The use of original spare
parts can prevent fire, shock and other hazards.
Unplug the LCD monitor from the wall outlet and refer servicing to qualified service personnel under the following conditions:
n
If the power cord or plug is damaged.
n
If liquid has been spilt in to the LCD monitor.
If the LCD monitor has been exposed to rain or water.
n
If the LCD monitor has been dropped or the cabinet has been damaged.
n
If the LCD monitor exhibits a distinct change in performance.
n
n
If the LCD monitor does not operate normally by following the operating instructions.
Adjust only those controls that are covered in the operating instructions as improper adjustment of other controls may result in damage. This will
often require extensive work by a qualified technician to restore the monitor to normal operation.
End-User License
The product (meaning the equipment or appliance to which this
documentation relates) incorporates Software (the software applications, utilities and modules embedded within the Product) which is
owned by Sanyo or its licensors. Before using the product, please
read the End-User License Conditions detailed below. If you do not
agree to the terms and conditions of the End-User License, Please
do not proceed to use the Product- repack the Product unused and
return it to your supplier together with proof of purchase for a full
refund. By using the product, you agree to be bound by the terms
and conditions of the End-User License.
License Grant, Conditions and restrictions
Sanyo grants you a non-exclusive, world-wide (subject to export
1.
controls), non-transferable (except as permitted by 2 below),
royalty-free license to use the Software upon and with the Product.
You may not transfer any of your license rights in the Software
2.
without the prior written consent of SANYO and if consent is
provided then the Software shall only be transferred in conjunction
with the transfer of the Product AND provided that the transferee
has read and agreed to accept the terms and conditions of this
license.
You must ensure that the copyright, trademark and other protective
3.
notices contained in the Software are maintained and not altered
or removed.
4.
The Software provided hereunder is copyrighted and licensed (not
sold). SANYO especially does not transfer title or and ownership
rights in the Software to you. The Software provided hereunder
may contain or be derived from portions of materials provided to
SANYO under license by a third party supplier.
l
incorporate all (or any of) the Software into other programs
developed by (or on behalf of) you and/or used by you;
reverse-engineer, decompile or disassemble the Software;
l
l
make the Software (or any part of it) available, or permit its
redistribution, for use with any computer hardware other than the
Product; or rent, lease, gift, loan, sell, distribute or transfer possession of the whole or any part of the Software.
Termination
This license is effective until terminated. This license will terminate
automatically without notice if you fail to comply with any of its
p r o v i s i o n s .
Disclaimer
The Software is(to the extent permitted by law) supplied ‘as is’ and
1.
SANYO and its suppliers expressly exclude all warranties, express
or implied, including (but not limited to) warranties of satisfactory
quality, fitness for purpose and non-infringement (save to the
extent that the same are not capable of exclusion at law).
2.
In no circumstances will SANYO be liable for any direct, indirect,
consequential, or incidental damage (including loss of profits,
business interruption, loss of data or the cost of procurement of
substitute goods, technology or services) arising out of the use or
the inability to use the Software (save to the extent that such
liability is not capable of exclusion at law).
General
This End-User License will be governed by laws of England and
1.
the User may only bring claims in the English Courts and SANYO
shall be entitled to bring a claim in the courts of any jurisdiction.
Except as expressly permitted by statute
5.
l
use the Software in conjunction with any other computer hardware other than the product;
l
copy all or part of the Software;
you may not;
The above terms and conditions supersede any prior agreement,
2.
oral or written, between you and SANYO relating to the Software.
Page 4
GB GB
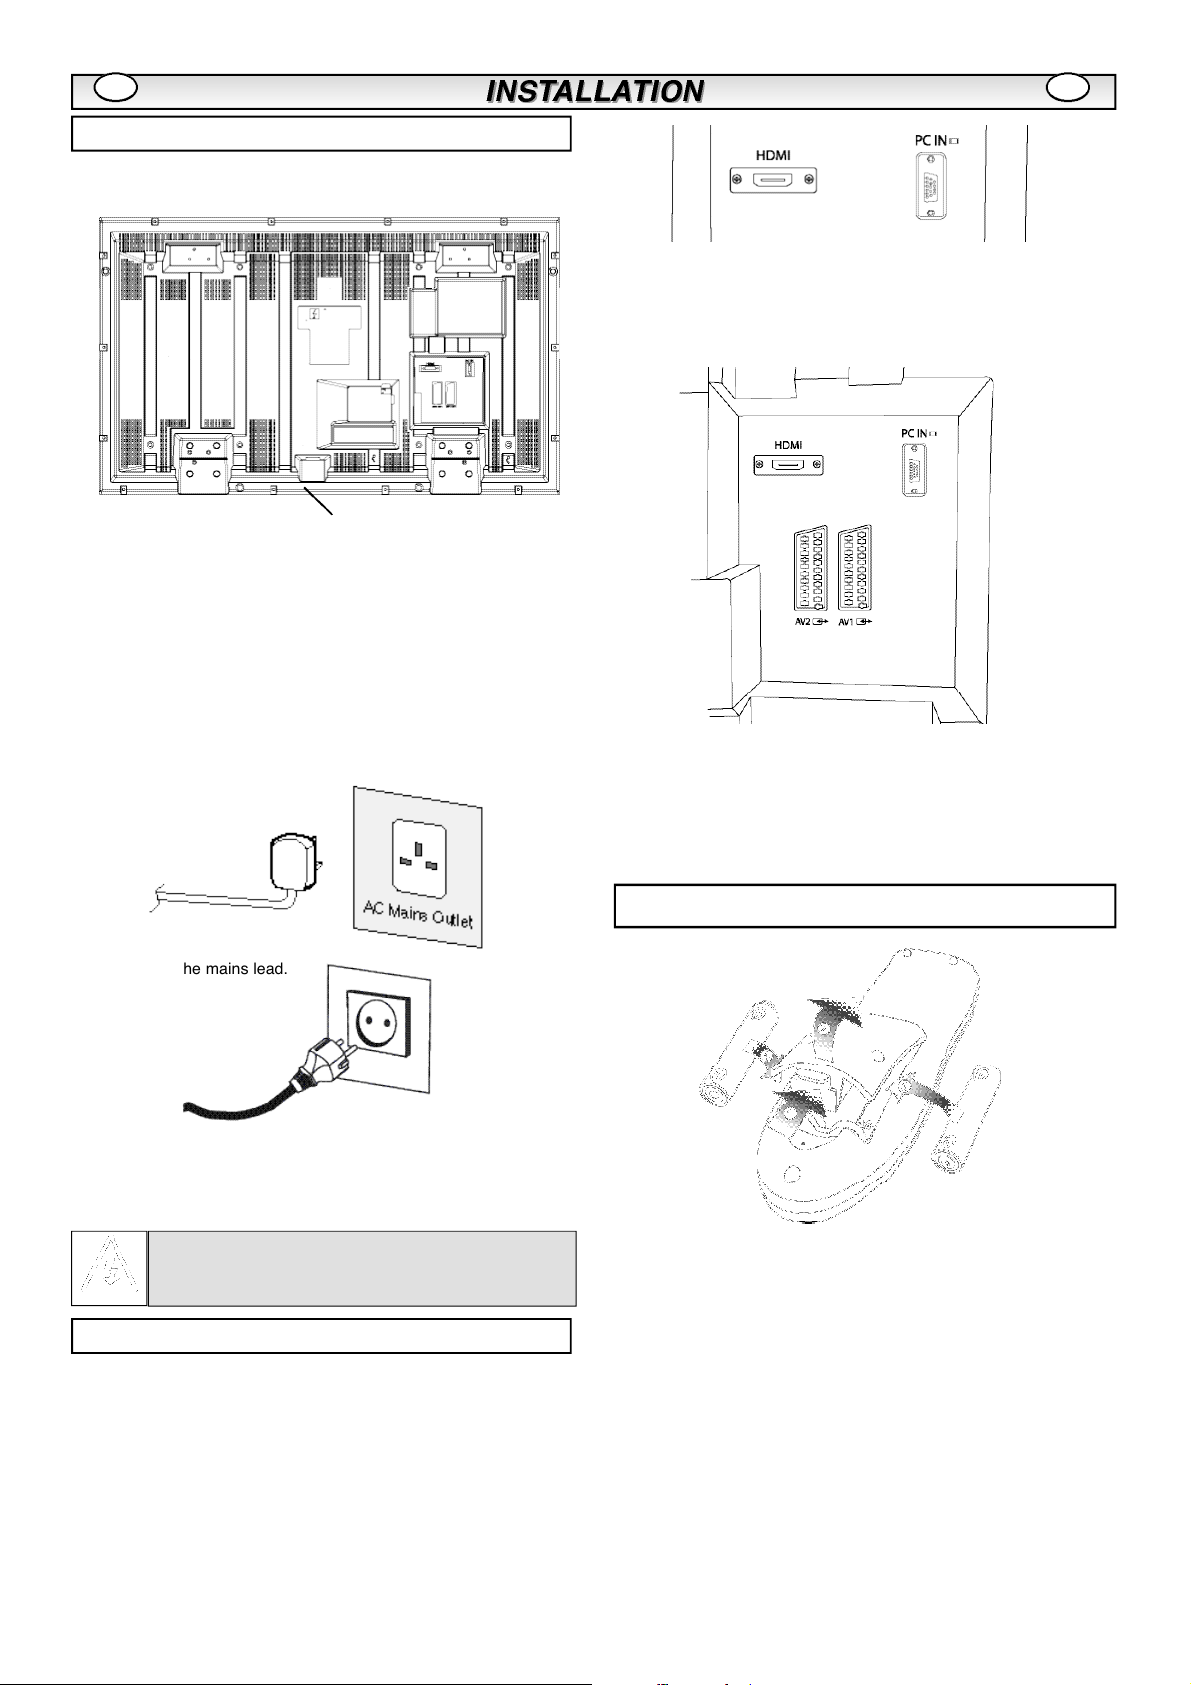
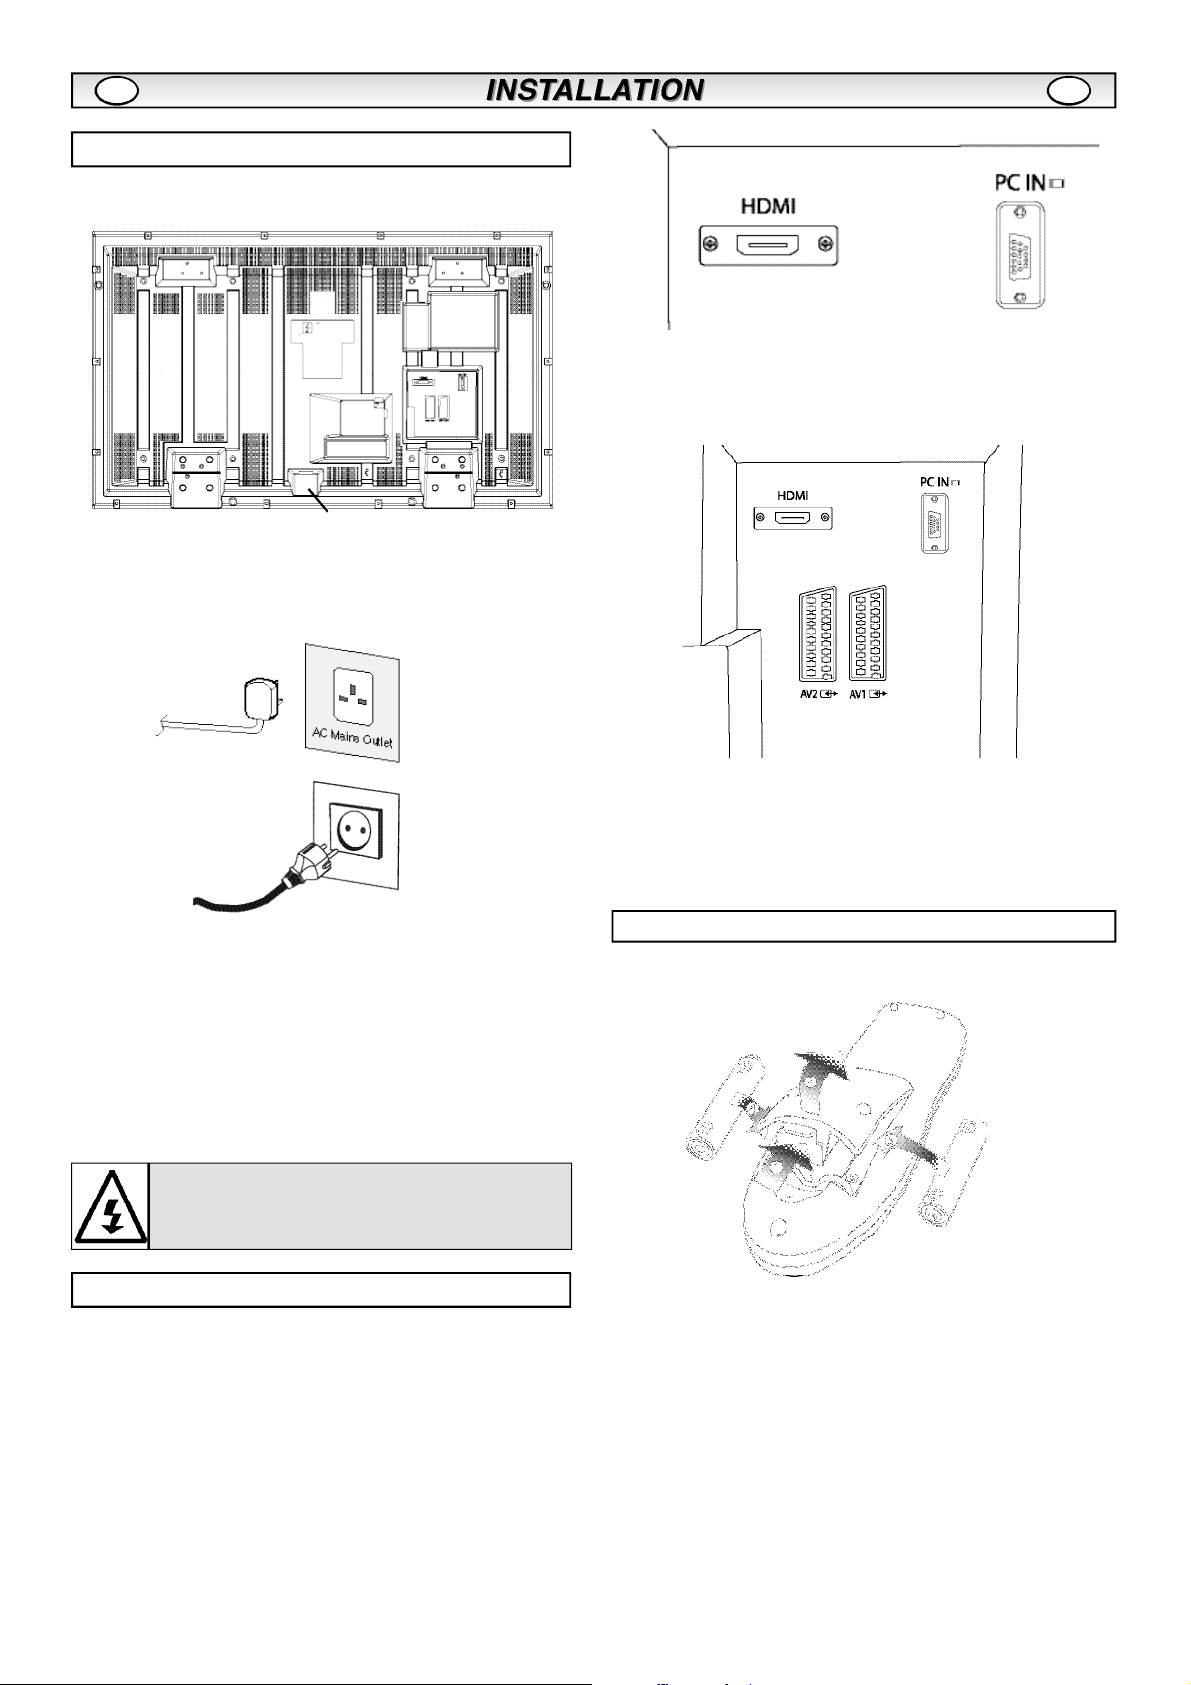
Step : 1 Mains Connection
n
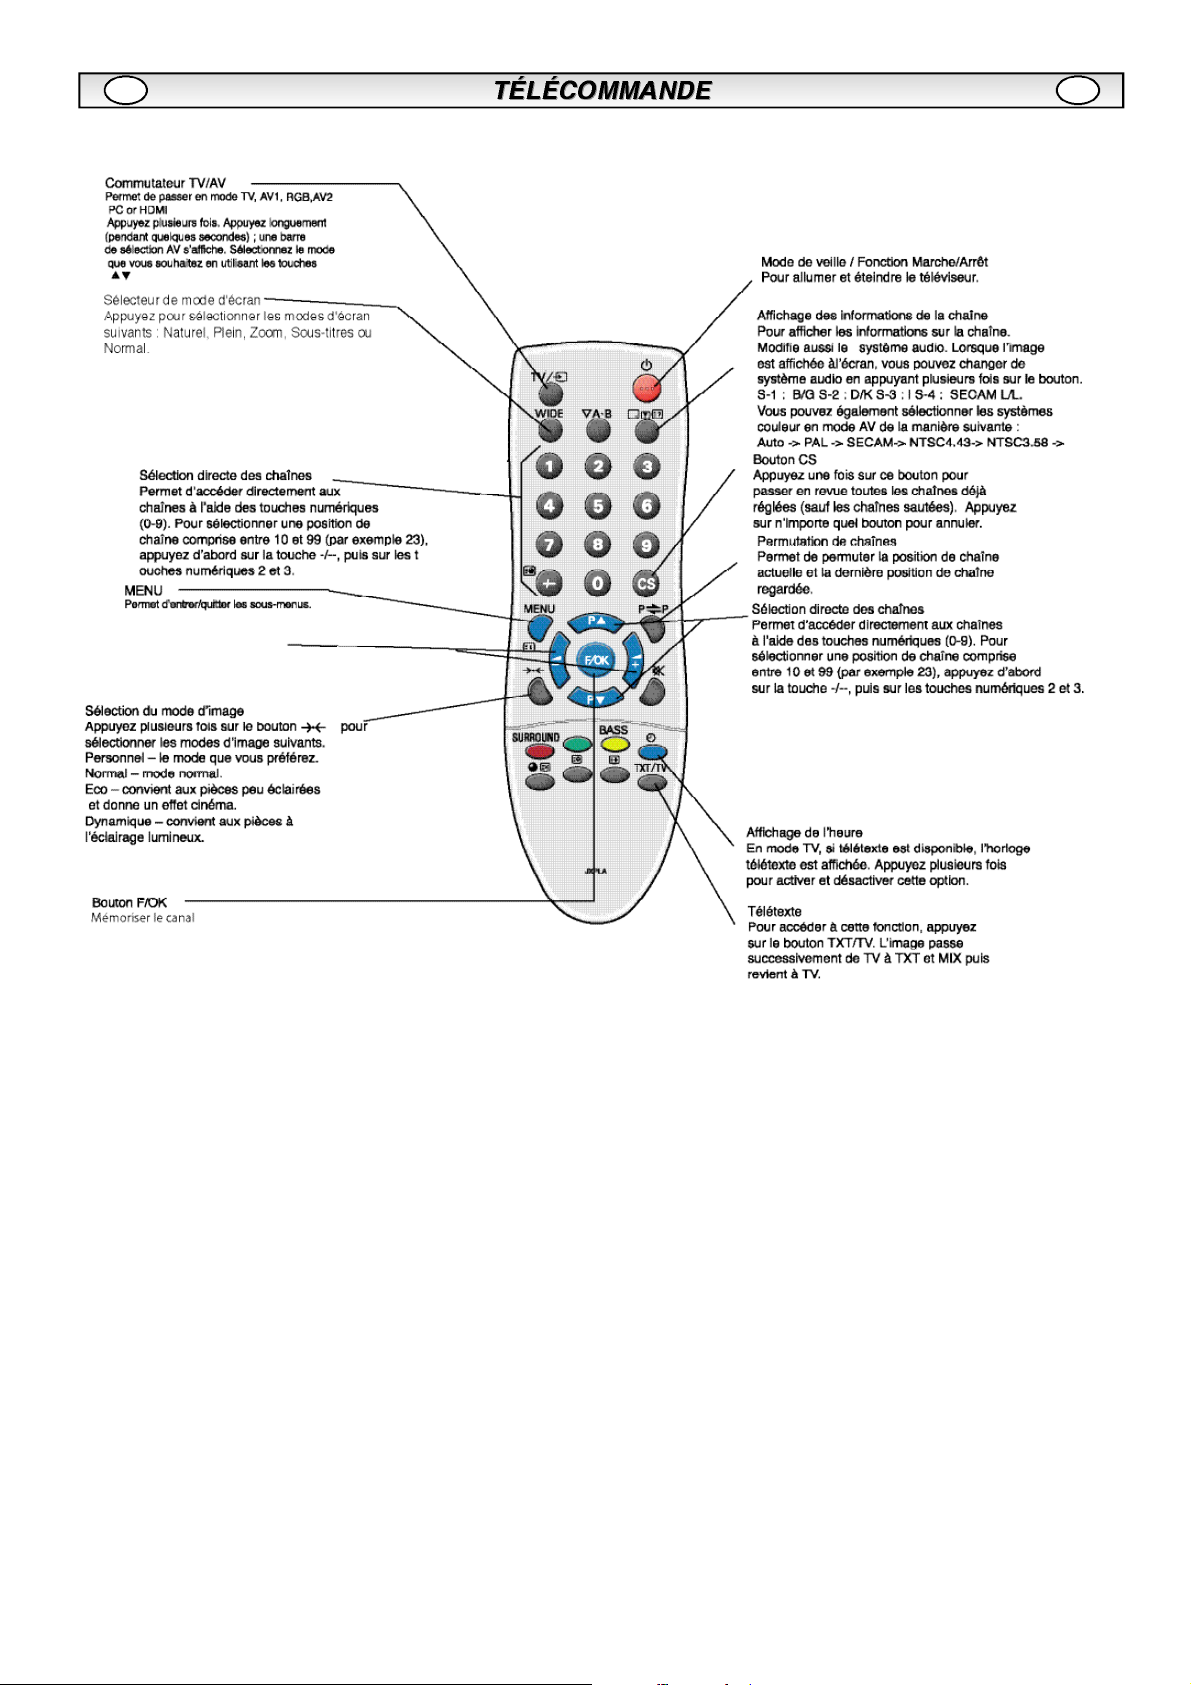
Connect the display unit to Aerial, VGA, HDMI and Scart
To switch between TV, AV1,RGB, AV2, HDMI or PC mode press the
TV/ AV switch on your remote control repeatedly or press and hold the
TV/AV button for a few seconds and a selection menu will appear on
screen. Use the e or d buttons to select the correct mode.
1.HDMI (High Definition Multimedia Interface)
connectors as required.
1. Connect the IEC power connector to the mains inlet at the rear of
the LCD monitor as shown above.
2. Connect the power cord of the LCD monitor to a wall outlet.
0
As this product does not have a mains On/Off switch, please
ensure your mains plug is easily accessible.
The LCD monitor is prepared for a mains voltage AC220~240V,
0
50Hz. To completely switch off the mains, or when the LCD
monitor is not to be used for an extended period of time, it is
disconnect the mains lead.
AC connection
advisable to
disconnect the
power
cord
from the
power
outlet or
remote control.This input will suport a large range of resolutions as
shown on page 13.
This connection is located at the back of the monitor set.
2. AV1 / AV2
You can connect your DVD player or other scart connected equipment
Step : 2 Remote control battery installation
This
TV set
has an
HDMI
connector.
When
connected
to the
HDMI
source
and
HDMI
is
selected
using
the
WARNING! High voltages are used in the operation of
this set. Refer service to qualified service personnel.
Step : 2 Connections
0
Please use the correct mains lead supplied with the set for your
area
3.
Warning: To prevent injury, the unit must be securely attached to
the wall in accordance with the installation instructions.
INPUT selection
n
to the AV1 and AV2 scart connection terminals at the rear of the
monitor as required.
Page 5
GB
GB
Page 6

GB GB
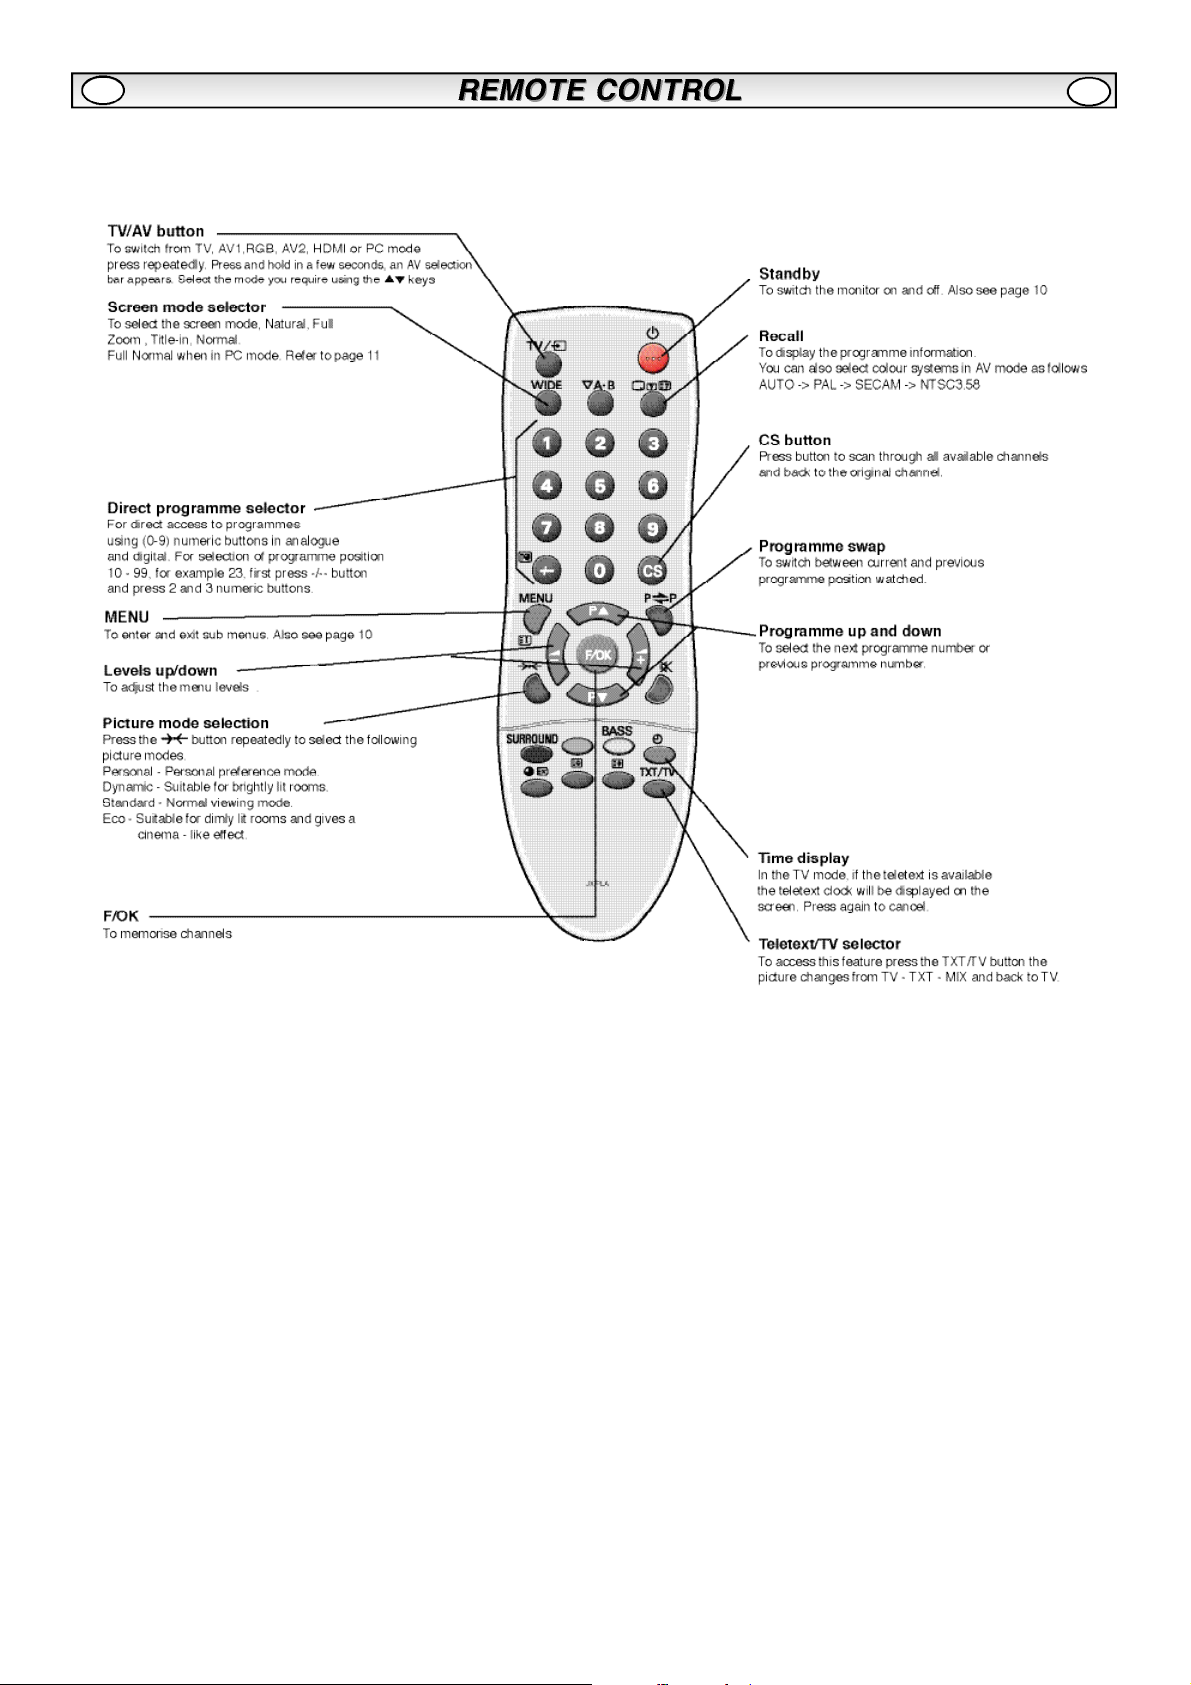
Controls and Menus
1. The LCD display will have a Standby light to show there is power.
Switching into/from standby mode
The Standby mode is used for switching the LCD monitor off for
short periods of time. In standby mode the monitor is switched
off but is still receiving mains power.
To turn the monitor into standby mode, press the4button.
l
The blue power indicator illuminates more brightly
To turn the monitor ON from standby mode, press any of the
l
following buttons:
4,5, 6
or
0-9 buttons.
.
Menu Operation
Many of your monitors functions are controlled through the menu
function, using the remote control handset.
During menu operation the bottom of the on screen display will
show which controls can be used for menu navigation.
Press the MENU button to enter the main menu.
If you find the power indicator flashing, disconnect
power cord from the power outlet and contact our
Service desk.
This warning is a sign to let you know that the power
protection function of this TV set is now operating.
2. Control buttons (bottom edge of cabinet)
Menu/F button:
colour, sharpness and OSD language
Input/ OK button: s
PC mode.
ed
adjustments.
buttons:
4 button:
completely disconnect the monitor from the power supply).
rotate between volume, contrast, Brightness,
witch between TV, AV1,RGB,AV2, HDMI and
Change TV and provide up and down
To switch from display to standby mode (to switch off
A sub menu is selected using the e or d button and pressing the
1 button when the required sub menu is highlighted.
When you have finished you can press the MENU button to exit,
then the MENU button again to exit the main menu.
Picture menu
1. Press the MENU button. Select Picture using the e or d button.
Press the1 button to enter.
Set the picture settings for your “personal” preference.
2. Use the e or d button to select eg. Brightness and the 1 or
2 button to adjust levels.
3. Preset : You can select either your “Personal” settings, or
4. Noise Reduction: May be used to reduce any local picture ‘noise’
(granular appearance) being experienced by using 1 or 2 to
select between Mid / Max / Auto / Min / OFF.
5. Dynamic skin tone: May be used to enhance skin tone by using
1 or 2 to select between On / Off.
Tint : is only available if NTSC equipment is connected.
6. Text Brightness: May be adjusted by using 1 or 2 button
to select between Min / Mid / Max.To exit press the MENU button
twice.
0
Your personal settings are automatically saved when you exit the
Dynamic, Standard or Eco settings.
Page 7
GB
GB
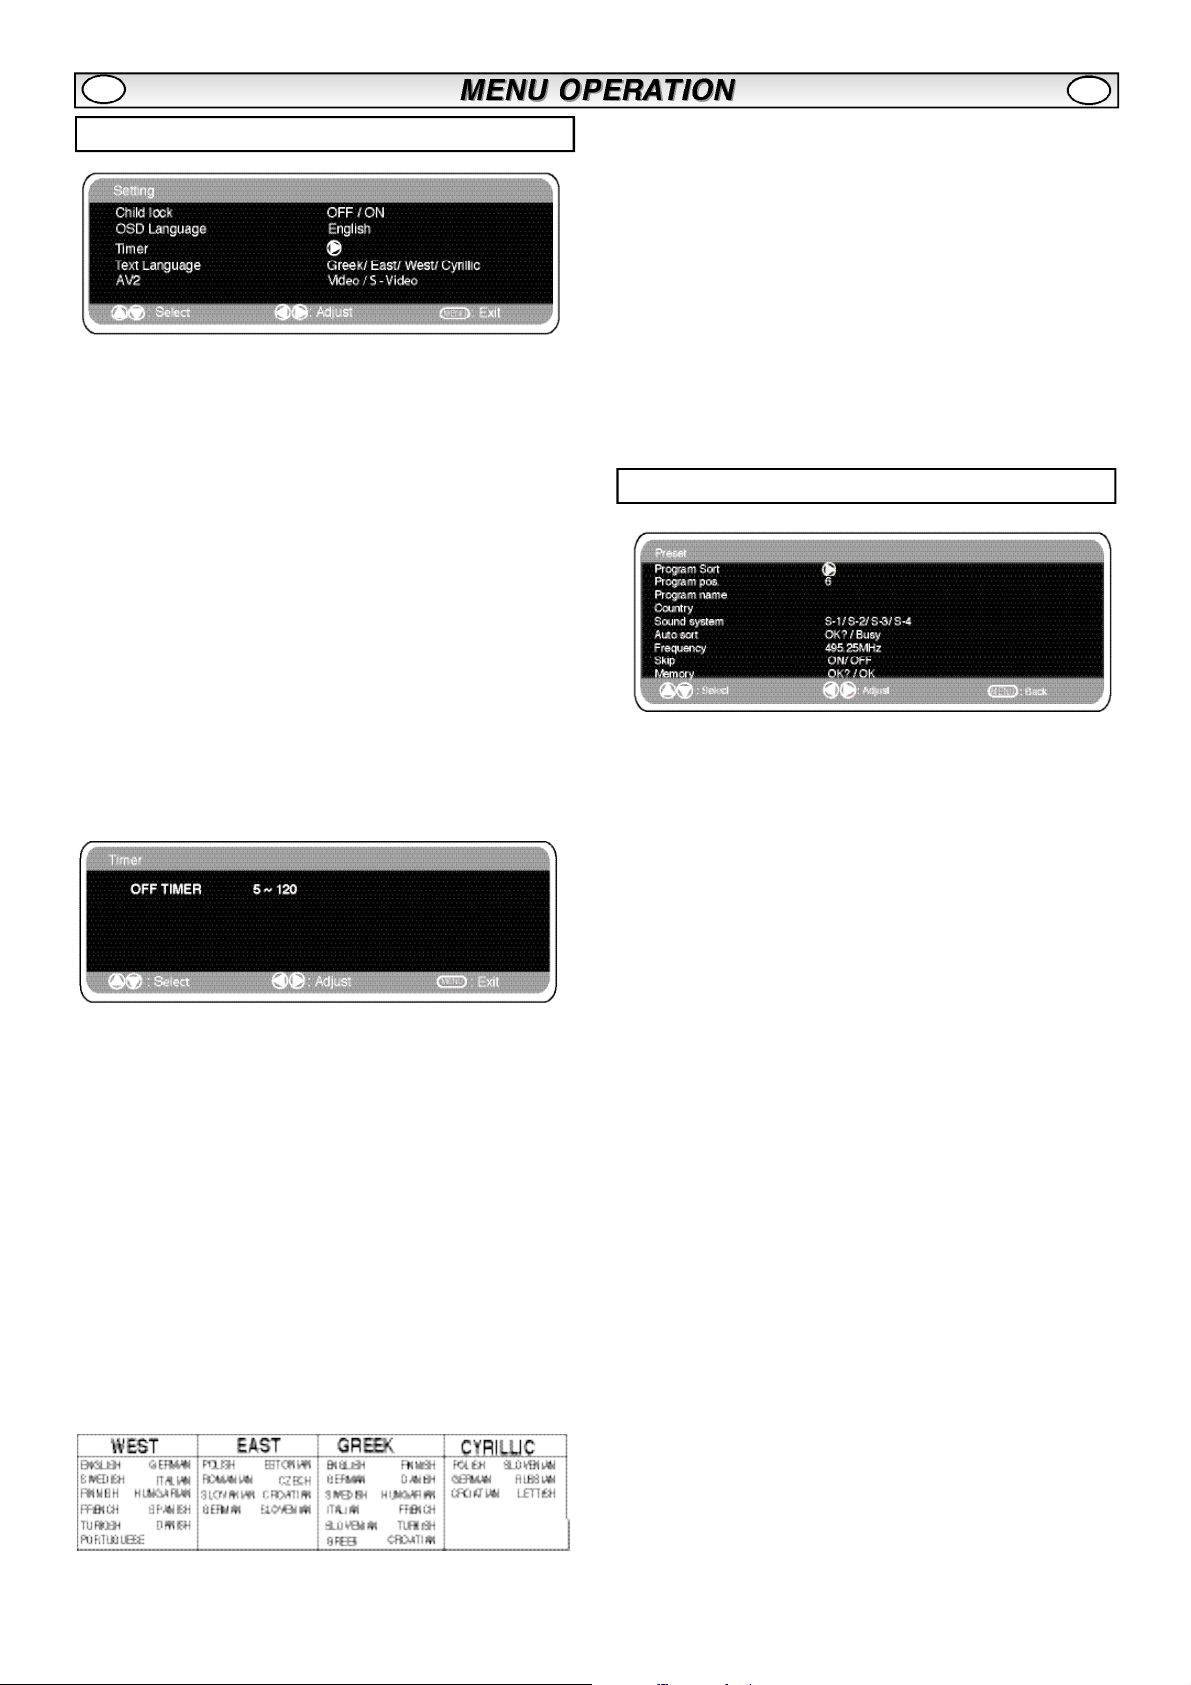
Setting menu
Child lock
n
You can prevent unwanted operation on the LCD monitor via the
buttons on the bottom edge of the monitor.
1. Press the MENU button. Select Setting using the e or d button.
Press the1 button to enter.
2. Select Child lock using the e or d button.
3. Set the Child lock to Off or On by pressing the 1 or 2
button.
4. Press the MENU button twice to exit.
OSD Language
n
Use the 1 or 2 button to select the prefered OSD language
(French, German, Italian, Spanish, Dutch). Press the MENU button to
exit
AV2 setting
n
In setting menu, to select AV2 press the d button. AV2 can be
configured to accept composite Video or S-Video inputs, depending
on your external equipment.
1. Press the MENU button. Select Setting using the e or d button
press the1 button to enter.
2. Select AV2 setting using the e or d button.
3. Press the 1 or 2 button to select Video or S-Video.
4. Press the MENU button to exit, this automatically stores your
changes.
5. Press the MENU button to exit the main menu.
Preset menu
Off-timer setting
n
The Off timer will switch the monitor into the standby mode when the
selected time has elapsed.
1. Press the MENU button. Select Setting using the e or d button
press the1 button to enter.
2. Select Timer using the e or d button.
3. Press the 1 or 2 button to change time.
The time changes in 5 minute steps.The maximum time is 120 minutes.
If you have set the off timer, a display appears in the corner of the
screen, when the recall button is pressed.
0
If the monitor is switched off by the standby button 4 on the
remote control or by the standby switch 4 on the bottom edge of
the monitor set the timer settings will be cancelled.
Text Language
n
1. Press the MENU button. Select Setting using the e or d button
press the1 button to enter.
2. Select Text language using the e or d button.
3. Press the 1 or 2 button to select West, East, Greek or
Cyrillic.
1.Press the MENU button.
2.Select Preset using the e or d button. Press the 1 button t o
e n t e r.
0
The preset menu can be used to tune new channels, to re-order
channels and their programme positions, and to make fine adjust ments to the tuning.
4. Press the MENU button to exit.
Page 8
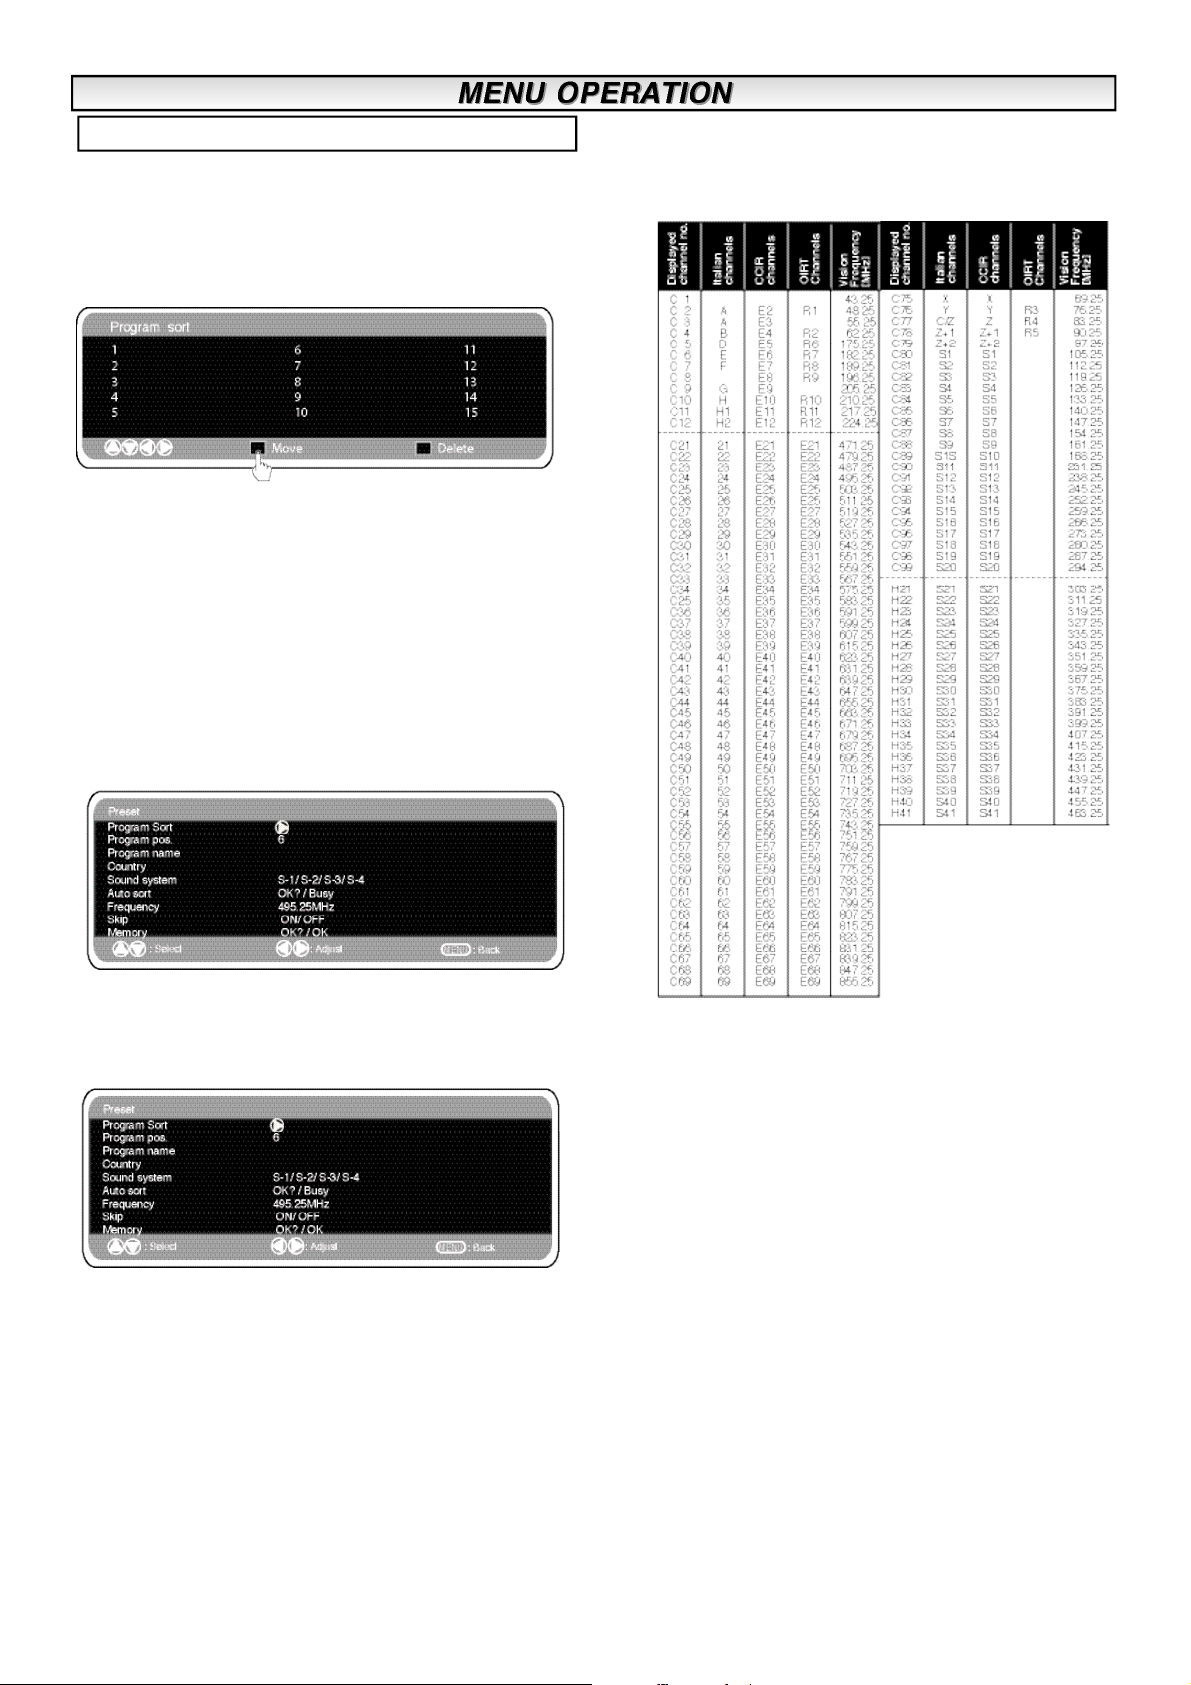
Preset Menu
Program sort.
n
Use this channelsorting feature to move the channels between two
programme positions. This feature is particularly useful after automatic tuning.
You have to choose a programme that you wish to move from one
position to another.
1. Select programme position eg. 4.
2. Press the Green button.
3. Select Channel position you would like the channel moved to
eg.7
4. Press the Green button again.
5. Press the MENU button twice to exit.
Program Name.
n
n
Channel Table
The table below shows the receivable channels and channel
allocation for this LCD monitor.
With this feature individual channels may be renamed by using the
1 or 2 and e or d buttons.
n Auto sort (auto tuning and sorting)
1. Select Auto sort by using the e or d button. Press the OK
button to start scan.
2. While Scan is in progress, channel frequencies will be captured
and stored automatically, starting from position one.
Skip.
n
Skip is situated directly beneath Frequency on the screen.
When ‘ON’ it removes access to a channel using the e or d button.
The only way that selected channel can be accessed will be by
using the numerical keys on the remote control.
To memorise, select ‘memory’ using the 6 button and then press
the F/OK button
Memory.
n
Memory is situated directly beneath Skip on the screen.
This is used to memorise the frequency and skip features. Pressing
the OK button will change the display from ‘OK?’ to ‘OK’ signalling
successful memorisation.
Frequency.
n
The frequency shown is the current frequency of the channel
selected. (frequency changes during auto sort)
1. Select Frequency by using the 5 or 6 button.
(Refer to the channel table.)
You can either...
a) Enter the frequency using the 0-9 buttons referring to the
channel table.
b) Press and hold the 1 or 2 buttons until the frequency
starts scanning (about 5 seconds), scanning will stop when a
channel is found.
c) Press intermittently to de-tune the frequency if required.
Repeat above until the correct channel is found.
2. Press the 5 or 6 button to select Memory. Press the OK
button to store the new frequency.
Page 9
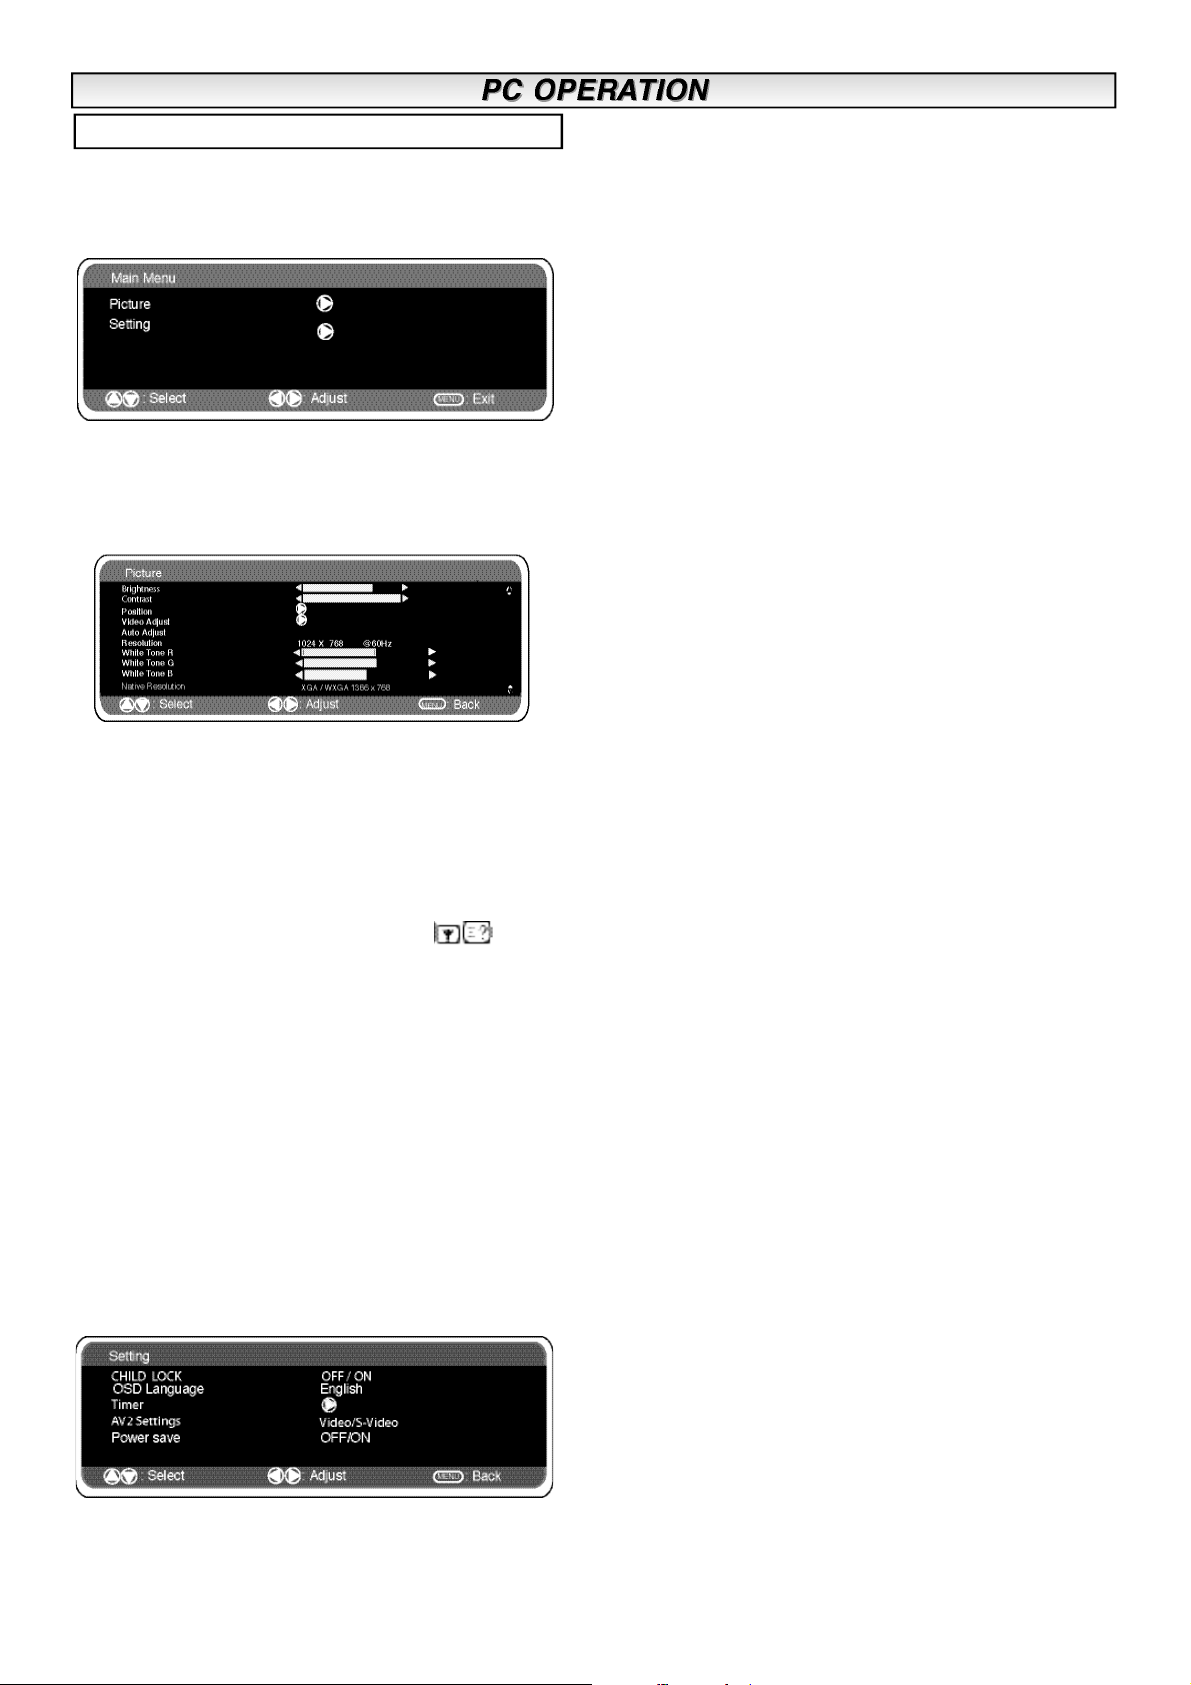
PC menu settings
Connect your PC to PC-IN on the rear of the set.
Once connected select PC mode via the v button on your
remote control.The set will become a monitor for the PC.
By pressing the MENU button on the remote control a menu window
will appear on screen, this allows the settings to be adjusted.
To adjust the Picture settings select picture using the e or d buttons
on the remote then the1 button to enter the following picture
settings menu.
Press the 1 or 2 buttons to adjusted the Picture brightness
and the same to adjust the contrast of the picture.
back on when a signal has been detected (PC input).
Use1
or 2 buttons to select power save ON or OFF.
Picture position changes the picture horizontally or vertically. Press
the1 button to enter the sub menus, adjustment is carried out
using the1 or 2 buttons on the remote control.
Video adjust changes the Phase and the clock of the screen. If the
picture is blurred or grainy this function will adjust it to a clearer
picture, adjustment is carried out using the 1 or 2 buttons on
the remote control.
Auto Adjust will automatically adjust the picture by using the
1 button. This will change all the above settings automatically
.Auto adjust can also be achieved by pressing the /recall
button on the remote control without having to select the menu
Resolution displays the current resolution of the picture. This is for
information only and cannot be adjusted.
White tone: Using the 1or2 buttons it is possible to adjust
the colour tone of the picture using the White tone Red(R) / Green
(G)/ Blue(B). This will adjust the picture to show more or less of the
chosen colour. For example if red is selected you can adjust the pro
portion of red in the picture to increase or decrease using the 1
or 2 buttons
Native Resolution is used when the PC can output WXGA
1366 x 768. The setting on your Monitor set can be changed
to receive XGA/WXGA signal using the1 or 2 buttons. Once
the native resolution has been selected, save the settings by
switching the monitor off then on using the standby button.
Setting: Press the menu button on your remote and using the e or
d buttons to select Settings. The 1 button will enter the settings
menu.
Timer and AV2 settings are the same as in all other input modes
(pg 7).
Power save if turned ON will switch the monitor into Powersave
mode after 1 minute if no signal is detected, the LED light will turn a
brighter blue to indicate stand by. The monitor will automatically turn
Page 10
GB GB
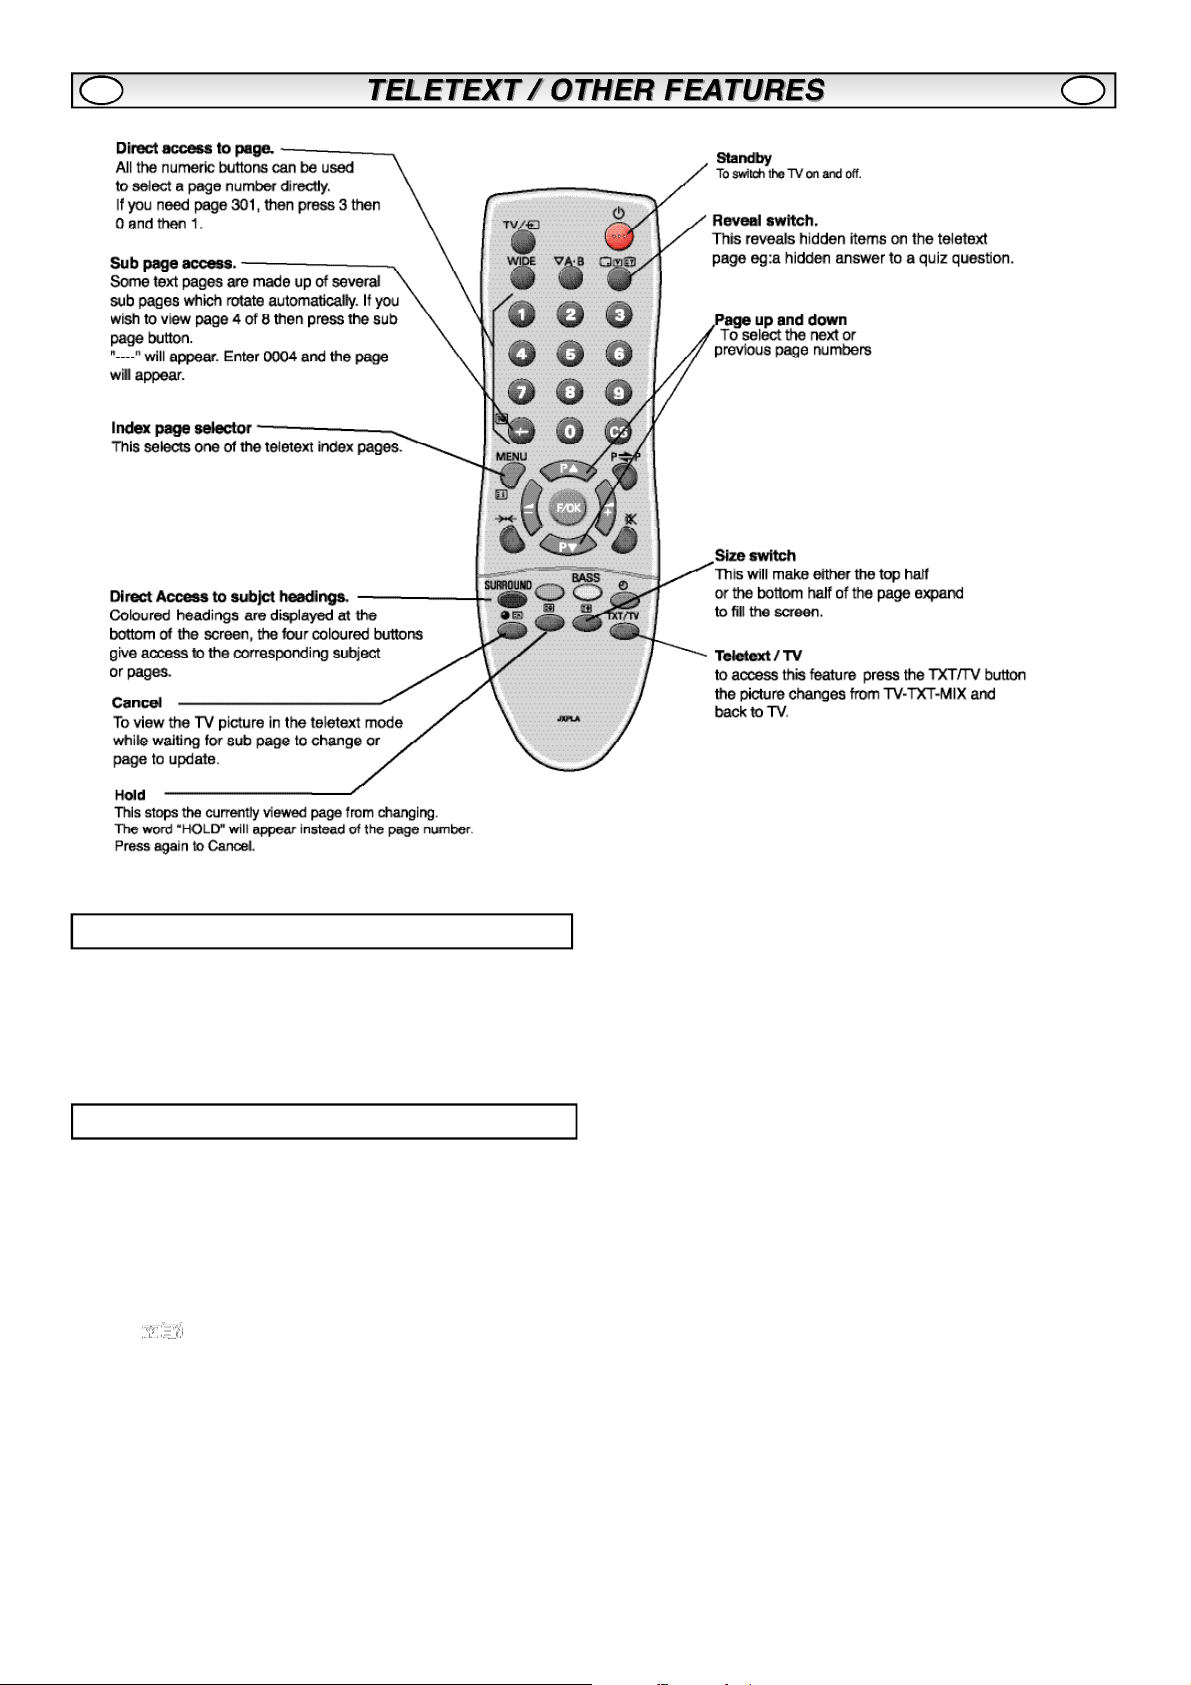
Teletext
Teletext reception
If your aerial signal is poor, the teletext reception operation may be
erratic.
Teletext brightness level
You can change the teletext brightness level. Please return to TV
mode.(See Picture menu -Text Brightness on page 6).
Other functions
n
Auto shut off
This monitor will automatically switch into the standby mode, 10
minutes after an aerial signal is no longer received. The remaining
time before the set will switch off is displayed on the screen.
n Sound system selection and Programme
information
Press the button to display programme information such as current programme number, station name, stereo status, sound
system and Off Timer period remaining (if set). This will remain on
screen for 5 seconds
S-1: B/G sound system
S-2: D/K sound system
S-3: I Sound system
S-4: France SECAM L/L’ system
Page 11
GB GB
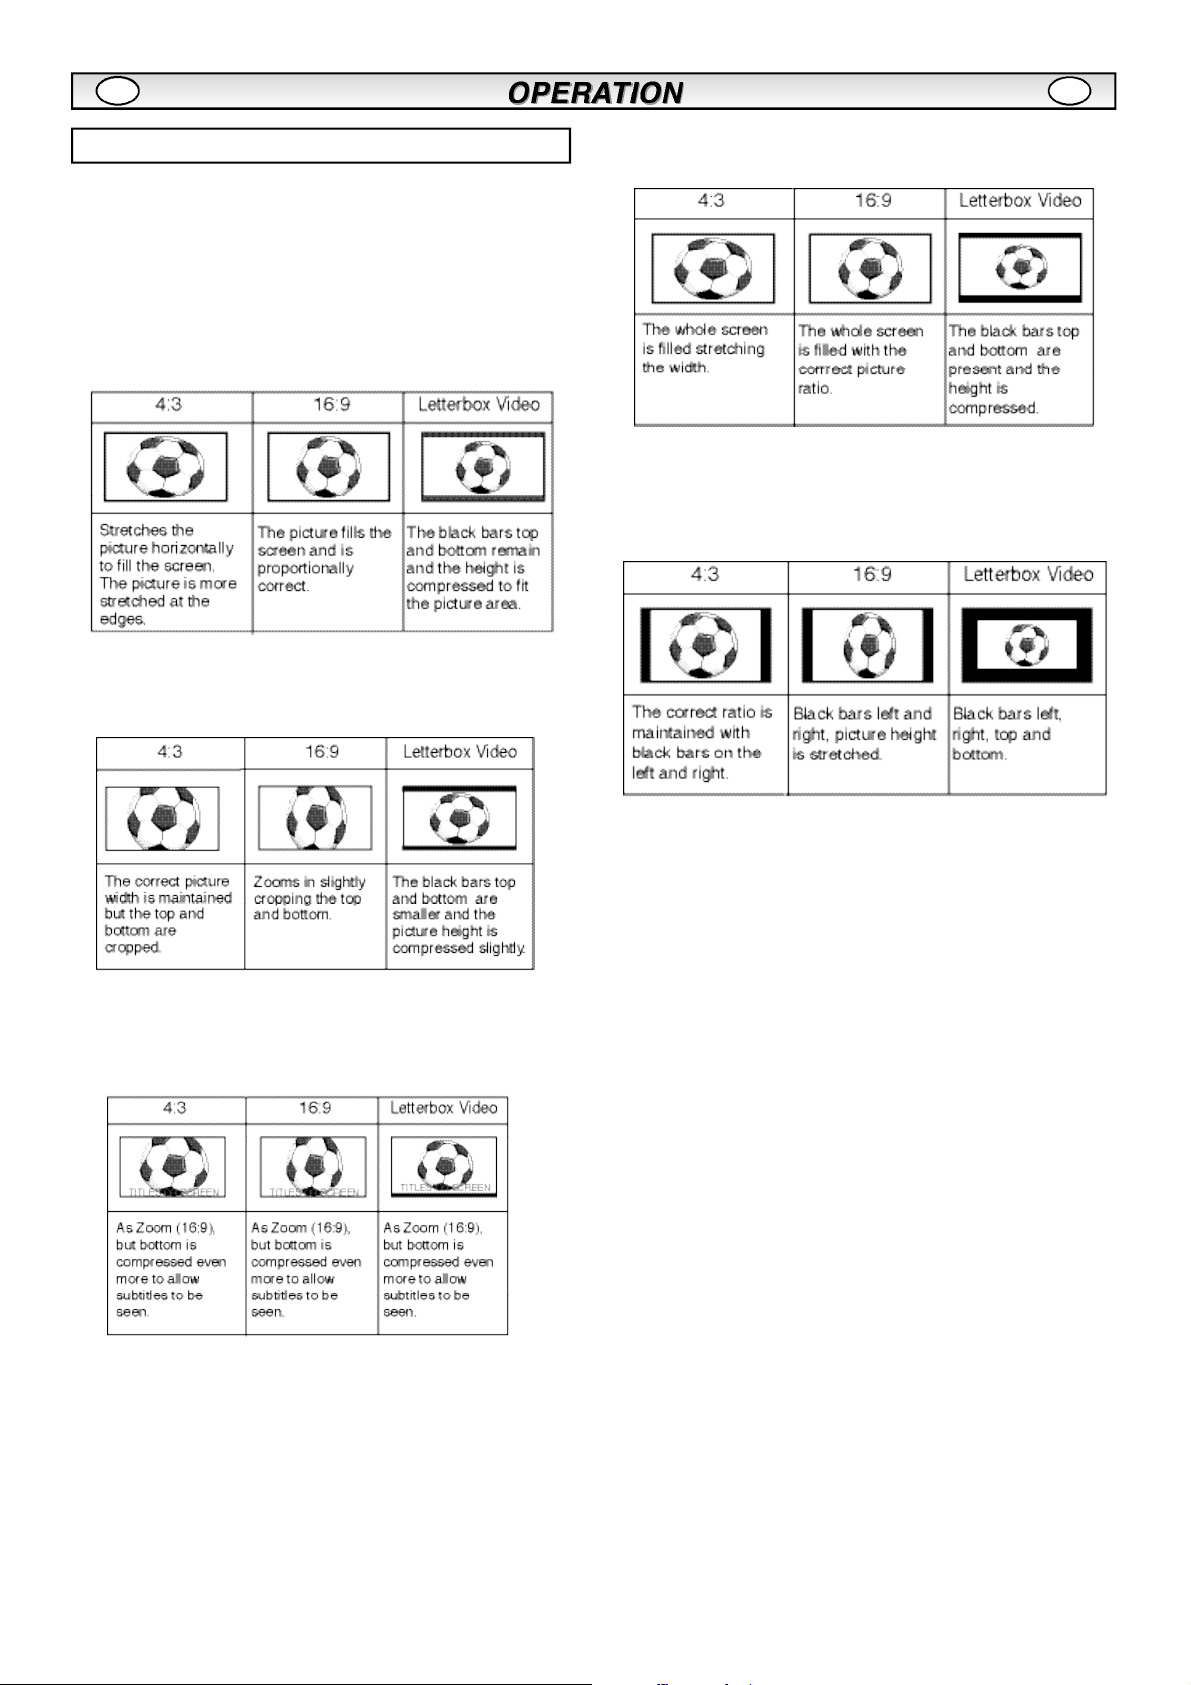
Selecting of picture size
n
Screen options
Today there are various transmission formats with different size
ratios, eg. 4:3 , 16:9 and video formats such as letterbox.
When in High Resolution (720p / 1080i) HDMI, the picture will
0
remain fixed in 16:9 format ‘Full size’ and may not be changed.
Natural
n
Zoom
n
n Full
Normal
n
n
Title - In
Page 12
GB
GB
Specification
Common specification
Power source 220~240V 50Hz
Television system System I B/G, D/K, L’L
Colour system PAL / NTSC3.58 (in AV mode),SECAM
Channel coverage UHF: 21-69,
VHF: E2-E12,F2-F10,R1-R12
C AT V: X, Y, S1 -S41, B-Q
Aerial input impedance 75 ohm
AV terminal
AV1: CENELEC Standard
Input: Composite video, RGB (5V RGB with 5V sync to
pin 14) and audio-L/R
Output: TV-output with composite video and audio-L/R
AV2: CENELEC Standard
Input: Composite video, S-VHS and audio-L/R
Output: Monitor-output with composite video and
audio-L/R
HDMI Input : Digital RGB input
PC Input 15-pin D-Sub type
Contrast Ratio 1500:1
Screen(inches/ cm) 42” / 107 cm
(viewing measured
diagonally)
Display Native Resolution 1366 X 768 (WXGA)
Helpful hints
n NO PICTURE,
l
Check if the monitor is plugged in.
l Try a different channel, if OK, probably station trouble.
l
Check monitor is not in standyby mode.
n
POOR PICTURE
Adjust BRIGHTNESS control.
l
l
Adjust FINE TUNING control.
Check aerial connections.
l
n NO COLOUR, PICTURE OK
Adjust COLOUR control.
l
l
Adjust FINE TUNING control.
Does the programme/ signal have in colour ?
l
l
Check lead connections.
n
WEAK PICTURE
Check aerial connections on back of set.
l
l
Check aerial for broken wires.
l
Re-orientate aerial.
n
REMOTE CONTROL DOES NOT WORK
Check batteries are inserted correctly
l
Check condition of batteries
l
l
Check to see if remote control inhibit is set ON
The following faults are not caused by the receiver:
"GHOSTS"
Reflections of signals from mountains or high buildings will cause
multiple images, called "Ghosts". These abnormal conditions can be
reduced to a minimum by repositioning the aerial or by installing a
new one suited for your area.
"INTERFERENCE"
Interference may be caused by electrical appliances, car ignition
systems, etc. This should normally be a temporary condition, but
should this interference persist, contact your dealer.
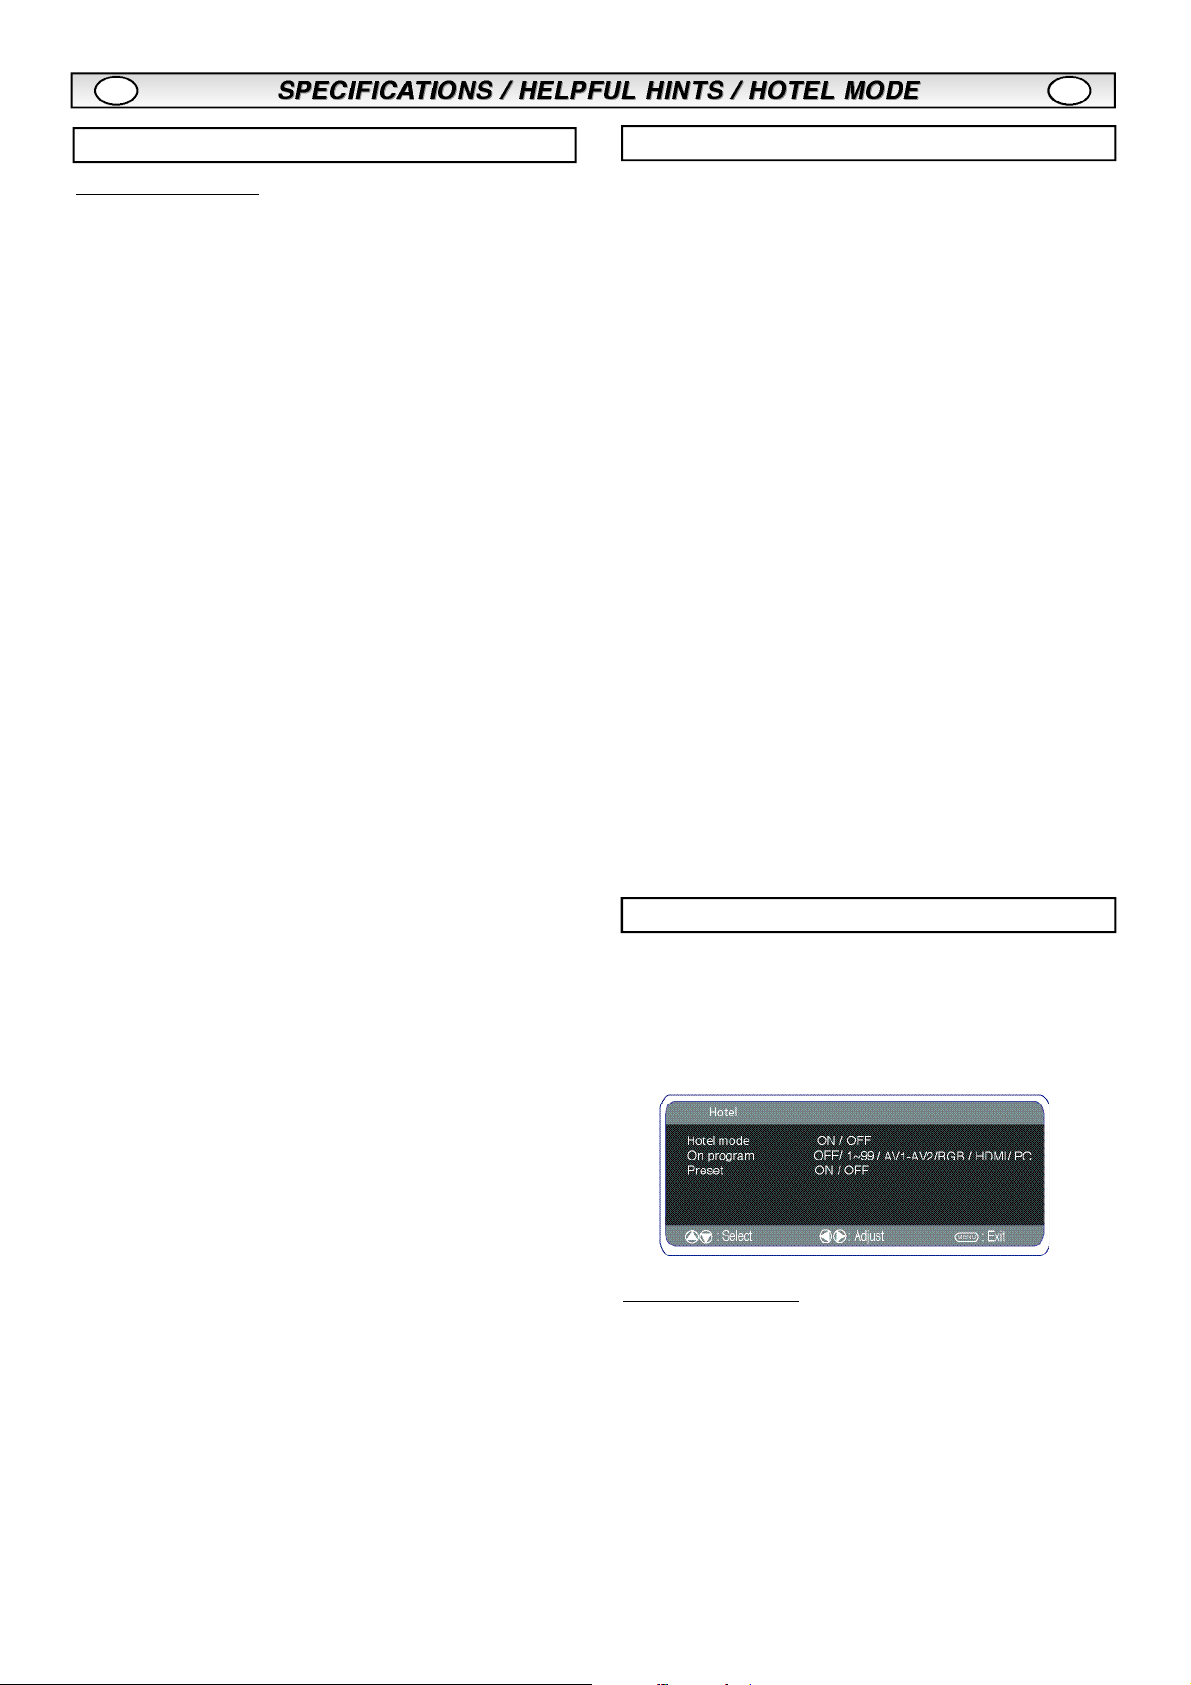
Hotel Mode
Viewing angles H:178°, V:178°
Dimensions (WxHxDmm) 1032X625X126.5
Weight (kg) 22.5Kg
This LCD monitor set allows you to set up the following:-
n Prohibition of presetting.
This prohibits the use of tuning.
Programme position at Start up
n
SETTING PROCEDURE
1.
Press and hold the green button on the remote control
handset for 5 seconds to enter the hotel menu.
2.
Use the 5 or 6 button to highlight Hotel Mode, use the 1
to switch ON or OFF.
3.
Select ON program using the
position using the
(OFF- 0 - 1 - 2 - 3 - 4 ........99- AV1 - RGB -AV2 - HDMI-PC)
1 or 2 buttons.
6 button, select the start up
4.
Press the MENU button to exit from the menu.
Page 13
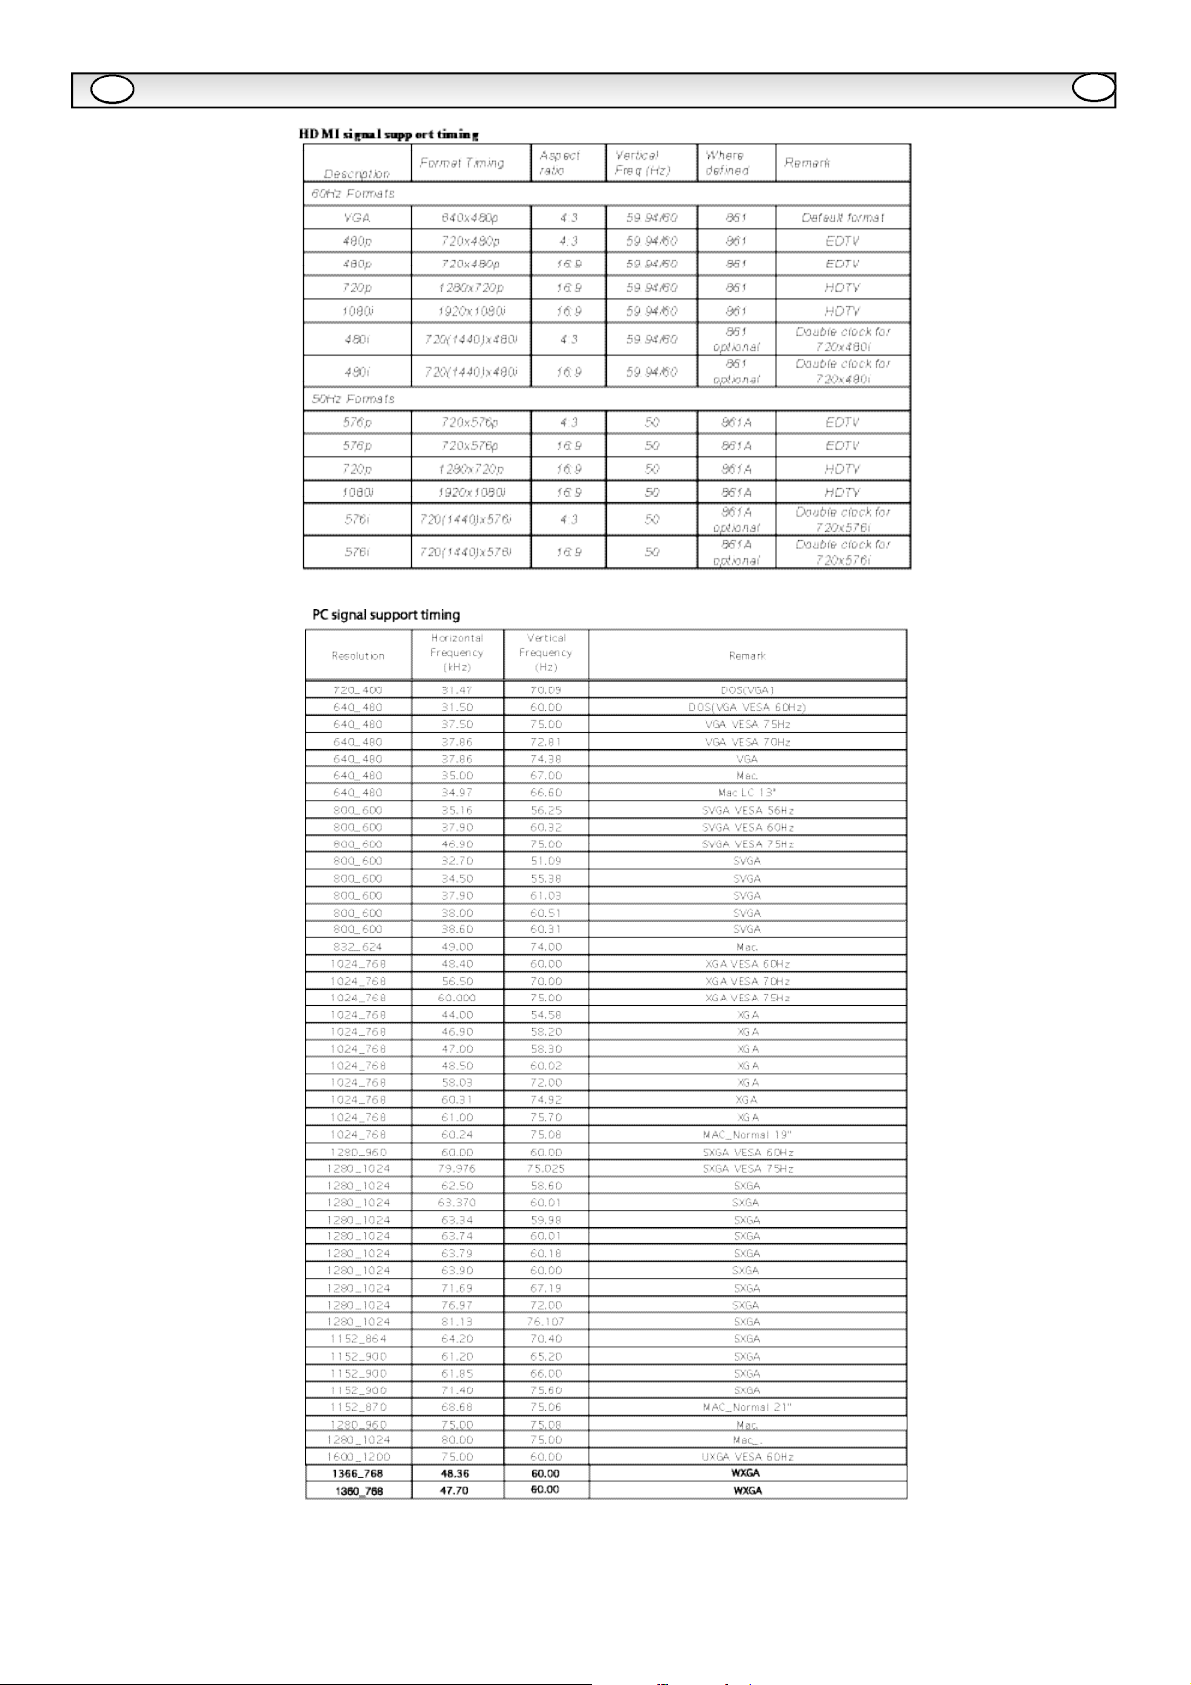
GB
HDMI / PC SIGNAL SUPPORT TIMING LIST
GB
Page 14
F
ATTENTION : Pour votre sécurité, lisez attentivement ce qui suit. Ce moniteur a été conçu et fabriqué pour garantir votre sécurité personnelle, mais
peut poser un risque de choc électrique ou d'incendie en cas d'utilisation incorrecte. Afin de faciliter le bon fonctionnement des dispositifs de sécurité
intégrés, veuillez observer les règles de base suivantes, relatives à l’installation, l’utilisation et l'entretien de votre moniteur.
F
Installation
Ne posez rien sur le câble d’alimentation. Ne placez pas le
câble là où on risquerait de l’endommager en marchant
dessus.
Ne surchargez pas les prises murales et les rallonges afin de
prévenir les risques d'incendie ou de choc électrique.
Ne placez pas ce moniteur près d'une source de chaleur,
telle qu'un radiateur, un poêle ou tout autre appareil
dégageant de la chaleur (y compris un amplificateur).
N'exposez pas ce moniteur LCD à la lumière directe du
soleil.
Ne placez pas votre moniteur sur un support, une étagère ou
une table instable. La chute de votre moniteur pourra endommager ce dernier et provoquer des blessures graves. Votre
revendeur pourra vous conseiller des supports agréés. Un kit
de montage mural spécial est disponible pour ce modèle.
Ce moniteur LCD est prévu pour fonctionner uniquement à
partir du type d’alimentation indiqué sur celui-ci ou au
chapitre des consignes d'utilisation. En cas de doute, veuillez
consulter votre revendeur ou votre électricien habituel.
Pour plus de protection, il est fortement recommandé d’alimenter ce moniteur LCD via un dispositif RCCB sécurisé.
AVERTISSEMENT : Afin de prévenir tout risque d'accident,
veillez à fixer le moniteur LCD solidement au mur conformément aux instructions d'installation du fabricant.
Utilisation
N’ajoutez jamais d’accessoires qui n’ont pas été conçus
spécifiquement pour ce moniteur.
Ne placez aucun objet contenant des liquides (vases, etc.)
sur le moniteur. Certaines pièces internes fonctionnent à
des tensions dangereuses, et tout contact pourrait provoquer un choc électrique. Veillez à ne pas renverser de liquide sur votre moniteur.
N'exposez pas le moniteur à la pluie et ne l'utilisez pas à
proximité d'une source d'humidité ( baignoire, évier, sous-sol
humide, etc.).
N'utilisez pas immédiatement votre moniteur après l’avoir
déplacé d’un lieu froid à un lieu chaud, afin de prévenir la
formation de condensation susceptible d'entraîner un
incendie, un choc électrique ou tout autre problème. Av a n t
de nettoyer le moniteur , débranchez-le de la prise secteur.
N’utilisez pas de produits nettoyants liquides ou aérosols
directement sur le moniteur. Nettoyez-le à l'aide d'un chiff o n
h u m i d e .
Ce moniteur d'affichage LCD doit être placé à une distance
minimum de 5 cm du mur et de 10 cm en haut et sur les
c ô t é s .
N'installez pas le moniteur à proximité d’une flamme nue. Il
est interdit d’utiliser une flamme nue à proximité de ce moniteur LCD.
Ce moniteur LCD ne doit jamais être encastré ou inséré
dans un espace confiné, afin de prévenir une température
excessive susceptible de réduire la durée de vie du monit e u r .
Veuillez toujours utiliser les accessoires et éléments de
montage recommandés.
Important :
CE PRODUIT DOIT ÊTRE BRANCHÉ SUR UNE PRISE DE
TERRE.
Ce moniteur est équipé d’un cordon secteur homologué et d’une
fiche secteur britannique non démontable. Pour remplacer le
fusible de ce type de fiche, procédez comme suit :
1. Retirez le cache du fusible et le fusible.
2. Installez un nouveau fusible, de type BS1362 13 A., A.S.T.A ou
BSI
3. Veillez à ce que le cache du fusible soit remis correctement en
place.
Si le cache du fusible est perdu ou endommagé, la fiche NE doit
PAS être utilisée mais être remplacée par une fiche en bon état.
Si la fiche installée ne correspond pas à votre prise de courant,
coupez-la et remplacez-la par une prise adaptée. Si la fiche
secteur comporte un fusible, utilisez un fusible de 13 A et veillez à
ce que le cache du fusible soit correctement installé. Si la fiche
utilisée ne nécessite pas de fusible, le fusible du panneau de distribution ne devra pas excéder 13 A.
Remarque : Le fusible endommagé doit être éliminé pour prévenir
tout risque de choc électrique en cas d'utilisation accidentelle sur
une autre prise 13 A
.
Les fils du cordon secteur correspondent au code de couleurs
suivant :
Bleu -------> Neutre
Marron ----> Sous tension
Vert/Jaune ----> Terre
1. Le fil Bleu doit être raccordé à la borne « N» ou de couleur
NOIRE.
2. Le fil Marron doit être raccordé à la borne «L» ou de couleur
ROUGE.
3. Le fil Vert/Jaune doit être raccordé à la borne « E » ou de
couleur VERTE ou VERTE et JAUNE.
Avant de reposer le couvercle de la fiche, assurez-vous que le
serre-fils est placé sur la gaine du cordon et non pas simplement
sur les fils.
N’essayez pas de contourner le système de sécurité de la fiche
de raccordement à la terre.
LE MONITEUR RESTERA SOUS TENSION TANT QUE L’ALIMENTATION SECTEUR N’EST PAS DÉBRANCHÉE.
IL INCOMBE A L’INSTALLATEUR DE S’ASSURER QUE LE CORDON D'ALIMENTATION SECTEUR EST FACILEMENT ACCESSIBLE.
Information importante sur le recyclage.
Votre produit Sanyo est conçu et fabriqué avec
des matèriels et des composants de qualité
supérieure qui peuvent être recyclés et réutilisés.
Ce symbole signifie que les équipements électriques et électroniques en fin de vie doivent être
éliminés séparément des ordures ménagères.
Dans l’Union Européenne, il existe des systèmes
sélectifs de collecte pour les produits électriques
et électroniques usagés.
Aidez-nous à conserver l’environnement dans
lequel nous vivons !
0
Ce symbôle et le système de recyclage ne concernent que les pays
de l'Union européenne et ne s'appliquent pas aux autres pays.
Page 15
F
F
Entretien
Votre moniteur LCD est entièrement transistorisé et ne contient aucun composant réparable.
Vous ne devez pas enlever le capot arrière du moniteur par vos propres moyens. L’appareil fonctionne sous haute
tension et vous risqueriez d'endommager ses composants ou de provoquer un accident. Confiez les réparations
nécessaires à un technicien agréé. Celui-ci utilisera exclusivement des pièces de rechange conformes aux normes
de sécurité des pièces d'origine. L’utilisation de pièces de rechange d'origine contribue à prévenir les risques d'incendie, de choc électrique, etc.
Débranchez le moniteur LCD de sa prise murale et faites appel à du personnel
qualifié dans les cas suivants :
Le câble d’alimentation ou la prise sont endommagés.
n
Du liquide a été renversé sur le moniteur LCD.
n
Le moniteur LCD a été exposé à la pluie ou à l’eau.
n
Le moniteur LCD est tombé ou le boîtier est endommagé.
n
n
Dégradation des performances de votre moniteur LCD.
Le moniteur ne fonctionne pas normalement lorsque vous suivez les instructions données.
n
Ne réglez que les commandes mentionnées dans le manuel d'utilisation. Tout réglage incorrect des autres commandes pourrait endommager le moniteur et exiger l'intervention prolongée d'un technicien qualifié.
Page 16
Etape 1 : Connexion à la prise secteur
n
Raccordez le poste d’affichage à l'antenne, par le câble VGA, et
au connecteur Scart comme le mentionnent les instructions.
FF
2.AV1/AV2
Vous pouvez relier votre lecteur DVD ou autre connecteur scart aux
terminaux de connexion scart AV1 et AV2 situés au dos des terminaux s’il y a lieu.
1. Raccordez le connecteur d’alimentation IEC à la prise secteur située au dos du moniteur LCD,
conformément au schéma ci-dessus.
2. Raccordez le cordon d’alimentation du moniteur LCD à une prise
murale.
Ce produit n'étant pas équipé d'un interrupteur Marche/Arrêt de
0
secteur, veuillez-vous assurer que la prise secteur est facilement
accessible.
Le
moniteur
0
Hz. Pour arrêter complètement le
le
moniteur
recommandé de débrancher le cordon d’alimentation au secteur.
est réglé pour une alimentation C.A. 220~240 V, 50
ne sera pas utilisé pendant une longue période, il est
Connecteur à C.A.
moniteur
au secteur, ou lorsque
3. Raccordement à un PC
Ce poste d'affichage possède un raccordement pour PC. Vous pouvez ainsi raccorder un PC au poste d’affichage et l’utiliser comme
moniteur (veuillez vous reporter à la page 21). L'entrée audio peut
être connectée via la prise PC audio 3,5 mm. Cette entrée est compatible avec une vaste gamme de résolutions (voir page 62).
Étape 2 : Installation de la pile de la télécommande
Si vous avez des problèmes avec votre antenne, référez-vous à
0
votre distributeur.
ATTENTION!
tensions. Confiez l'entretien à un personnel d'entretien
qualifié.
Ce moniteur contient des hautes
Étape 2 : Connexions
n
Sélection du mode D'ENTREE
Pour permuter entre les modes AV1, RGB, AV2 (RGB H/V ou Y, Pb,
Pr) AV3, DVI ou PC, appuyez de manière répétée sur la touche TV/
AV de votre télécommande ou maintenez cette touche enfoncée
quelques secondes : le menu de sélection doit s'afficher sur l'écran.
Utilisez les touches e ou d pour choisir le mode souhaité.
1.HDMI (Interface multimédia haute définition)
Ce
moniteur
une résolution d'image supérieure quand il est branché sur une
source HDMI. Cette entrée est compatible avec une vaste gamme
de résolutions, comme indiqué à la page 74. Voir page 18 pour l'utilisation détaillée du menu.
est équipé d'une connexion HDMI et permet d'obtenir
Installez deux piles “ AA “ de 1,5 volts de manière à ce que les marques“+“et“-“despilescorrespondent aux marques “ + “ et “ - “ à
l’intérieur du boÎter de la télécommande.
Page 17
FF
Page 18
F
Commandes / Terminaux
1. L’affichage à cristaux liquides possède un voyant
Veille pour signifier que l’appareil est sous tension.
Mode de veille
Le mode de veille permet d’éteindre le moniteur pendant de brèves
périodes de temps. En mode de veille, le moniteur est éteint mais
reste sous tension.
Pour passer le moniteur en mode veille, appuyez sur le bouton 4.
l
Le témoin lumineux bleu brille plus intensément.
Pour allumer votre moniteur depuis le mode Veille, appuyez sur un
l
des boutons suivants: 4
Si le voyant de mise sous tension clignote, arrêtez le
téléviseur au moyen de l’interrupteur de veille, débranchez
le cordon d’alimentation au secteur et contactez notre service après-vente.
Ceci est un signe que la protection interne s’est mis á
fonctionner.
,
5, 6 boutons numériques 0 à 9.
F
De nombreuses fonctions de votre moniteur sont accessibles depuis
la fonction de menu de votre télécommande.
Les commandes de navigation disponibles s'affichent au bas de
l'écran pendant l'utilisation du menu.
2. Boutons de commande (au bas du moniteur)
Touches Menu/F : Permet de faire défiler les fonctions
de volume, luminosité, contraste, couleurs, définition et
langue d'affichage.
Touches entrée/OK : permet de permuter entre les
modes TV, AV1,RGB,AV2, HDMI et PC.
Touches ed: Curseurs de réglage vers le haut/bas
Touches 4: Pour passer du mode affichage au mode
veille (pour éteindre complètement l’appareil,
débranchez le cordon d’alimentation).
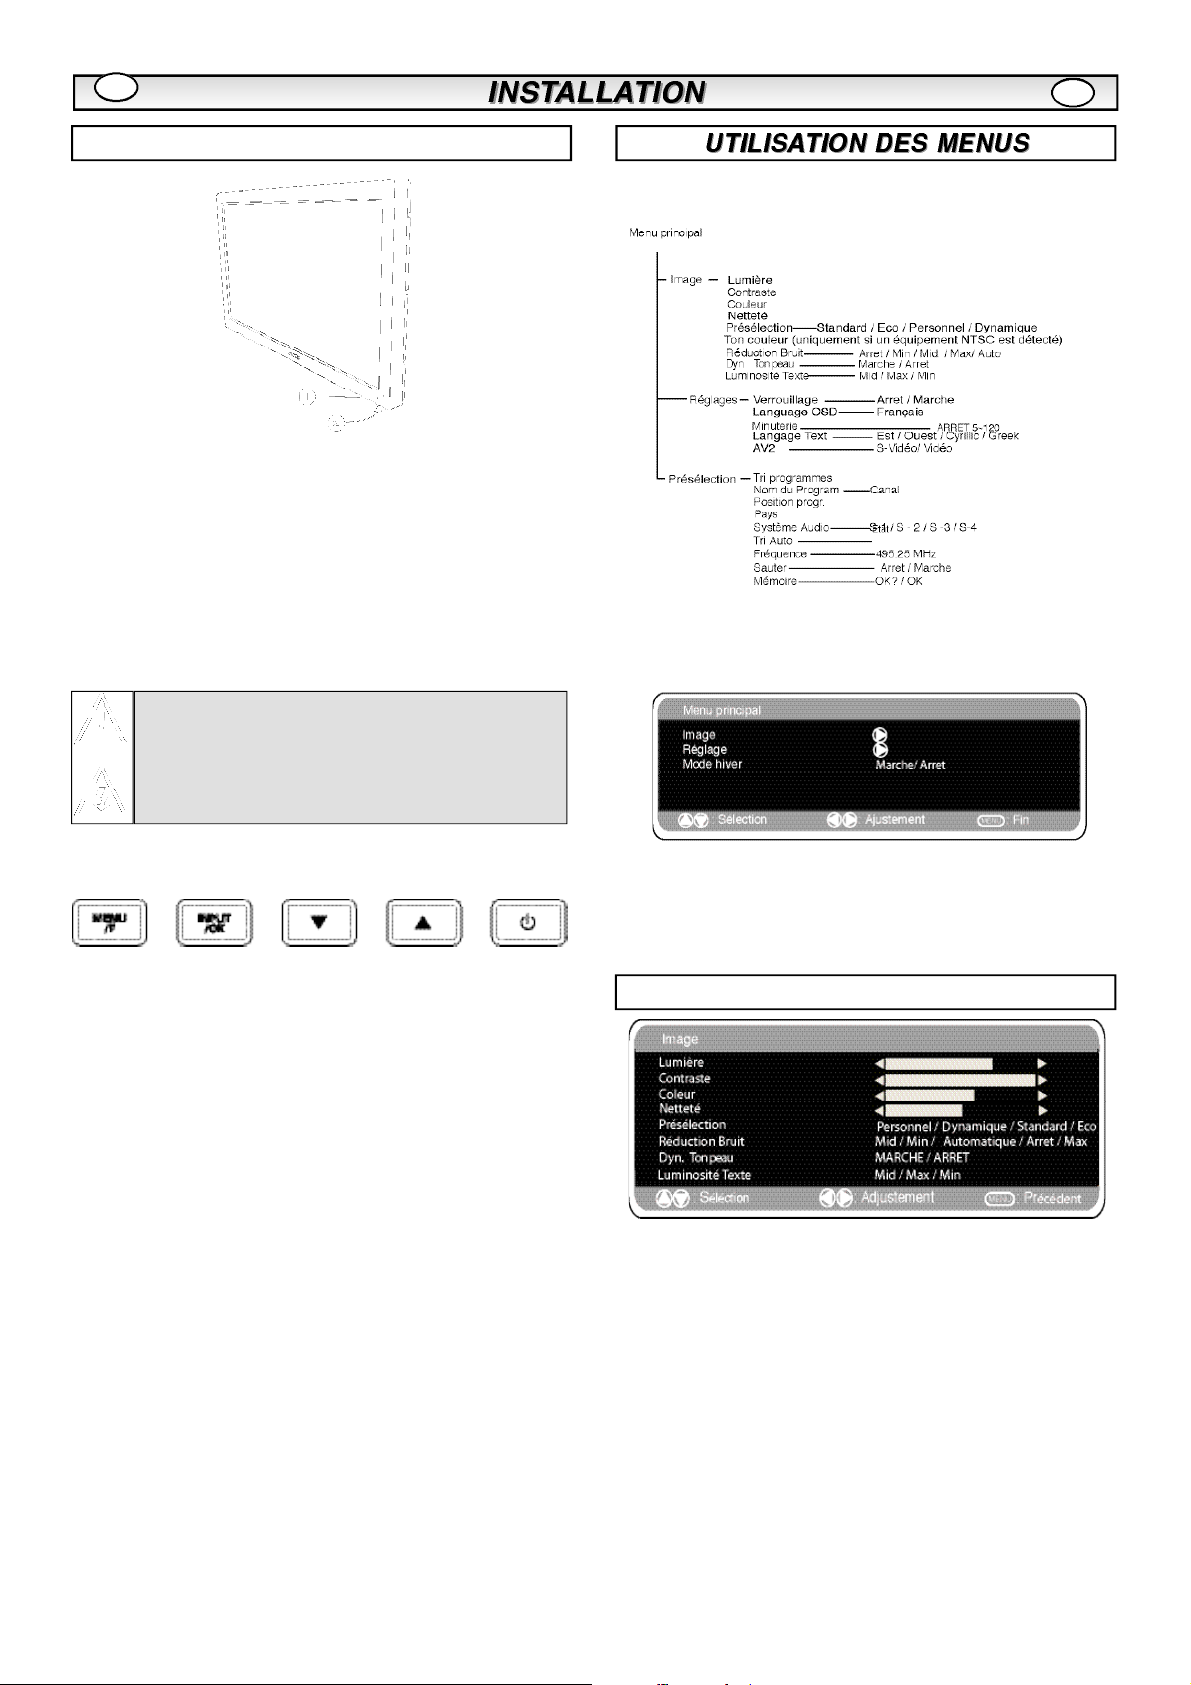
Appuyez sur le bouton MENU pour entrer dans le menu principal.
Pour sélectionner un sous-menu, utilisez les boutons e ou det
appuyez sur le bouton1 lorsque le sous menu souhaité est
surligné.
Lorsque vous avez réglé un sous-menu, appuyez sur le bouton
MENU pour sortir, puis à nouveau sur le bouton MENU pour sortir du
Menu Image
menu principal.
1. Appuyez sur le bouton MENU. Sélectionnez Image en utilisant le
bouton e ou d. Appuyez sur le bouton 1 pour entrer.
Sélectionnez les réglages Image de vos préférences "personnelles".
2. Pour sélectionner un réglage, utilisez le bouton e ou d. Lumière,
Contraste, Couleur et Définition. Utilisez le bouton 1 ou 2 pour
ajuster au niveau souhaité.
3. Présélection : Utilisez le bouton 1 ou 2 pour sélectionner
vos réglages "personnels" ou les réglages Dynamique, Standard ou
Eco (Pour Lumière, Contraste, Couleur et Définition).
4. Réduction Bruit : Atténue les "bruits" locaux de l'image (neige),
utilisez 1 ou 2 pour sélectionner Automatique / ARRET. / Min /
Mid. / Max.
Teinte : Disponible uniquement si un équipement NTSC est branché.
5. Ton chair Dynamique : Améliore le rendu des tons chair, utilisez
1 ou 2 pour sélectionner Marche / Arrêt.
6. Lumière Texte : Ajustez-la en utilisant le bouton 7 ou 8 pour sélectionner Min. / Mid. / Max. Pour sortir la presse le bouton de MENU
deux fois
0
Vos réglages personnels sont automatiquement sauvegardés
Page 19
F
F
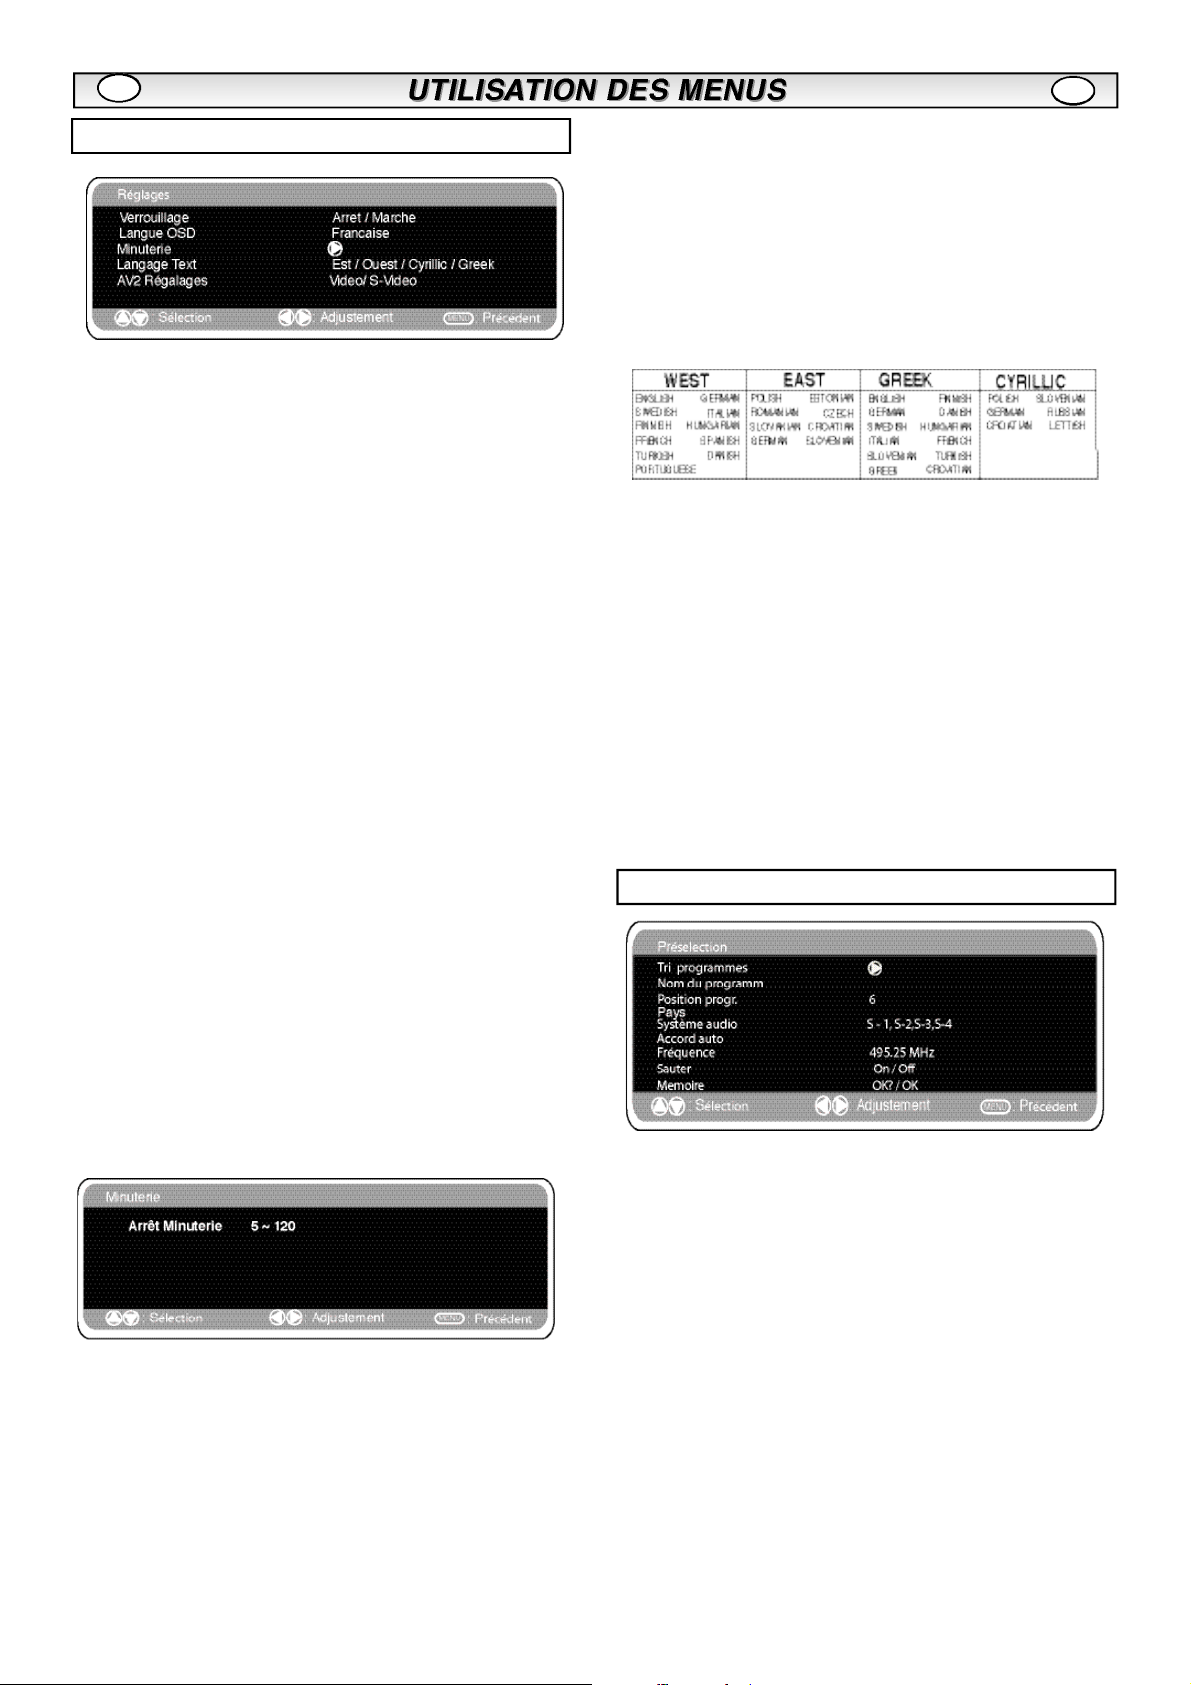
Menu Réglages
n
Verrouillage
Vous pouvez prévenir toute opération non souhaitée sur le moniteur
d’affichage à cristaux liquides via les boutons situés au bas du moniteur.
1. Appuyez sur le bouton MENU. Sélectionnez Réglages en utilisant
le bouton e ou d. Appuyez sur le bouton 1 pour entrer.
2. Sélectionnez Verrouillage en utilisant le bouton e ou d.
3. Réglez le Verrouillage sur ARRET ou MARCHE en appuyant sur le
bouton 1 ou 2.
4. Appuyez sur le bouton MENU pour sortir.
n
Langue OSD(affichage sur l'écran)
Utilisez les touches
de votre choix (français, allemand, italien, espagnol, néerlandais).
Appuyez sur la touche MENU pour quitter le menu.
n
Réglages Arrêt Minuterie
1 ou 2
pour sélectionner la langue OSD
n
Langue
1. Appuyez sur le bouton MENU. Sélectionnez Réglages en utilisant
le bouton e ou d. Appuyez sur le bouton1 pour entrer.
2. Sélectionnez Langue en utilisant le bouton e ou d.
3. Pour sélectionner Ouest, Est, Grec ou Cyrillique, appuyez sur le
bouton 1 ou 2.
4. Appuyez sur le bouton MENU pour sortir.
n
Réglages AV2
Pour sélectionner AV2 dans le menu Réglages, appuyez sur le bouton d et sélectionnez S-Vidéo, Vidéo selon votre équipement.
1. Appuyez sur le bouton MENU. Sélectionnez Réglages en utilisant
le bouton e ou d. Appuyez sur le bouton 1 pour entrer.
2. Sélectionnez AV2 en utilisant le bouton e ou d.
3. Pour sélectionner S-Vidéo,Vidéo appuyez sur le bouton 1 ou
2.
4. Appuyez sur le bouton MENU pour sortir, vos modifications sont
automatiquement sauvées.
L'arrêt Minuterie met le moniteur en mode veille lorsque la durée
sélectionnée est écoulée.
1. Appuyez sur le bouton MENU. Sélectionnez Réglages en utilisant
le bouton e ou d. Appuyez sur le bouton1 pour entrer.
2. Sélectionnez Arrêt Minuterie en utilisant le bouton e ou d.
3. Pour modifier la durée, appuyez sur le bouton 1 ou 2.
La durée est réglable par palier de 5 minutes. La durée maximale
s'élève à 120 minutes.
Un symbole s'affiche à l'angle de l'écran si l'arrêt minuterie est
activé.
4. Appuyez sur le bouton MENU pour sortir.
Menu Préréglages
1.Appuyez sur le bouton MENU.
2.Sélectionnez Présélection en utilisant le bouton 1 ou 2.
Appuyez sur le bouton1 pour entrer.
0
Utilisez le menu Présélection pour enregistrer de nouveaux
canaux, pour réorganiser les canaux et la position de leurs programmes ou pour réajuster les réglages.
Page 20
F
F
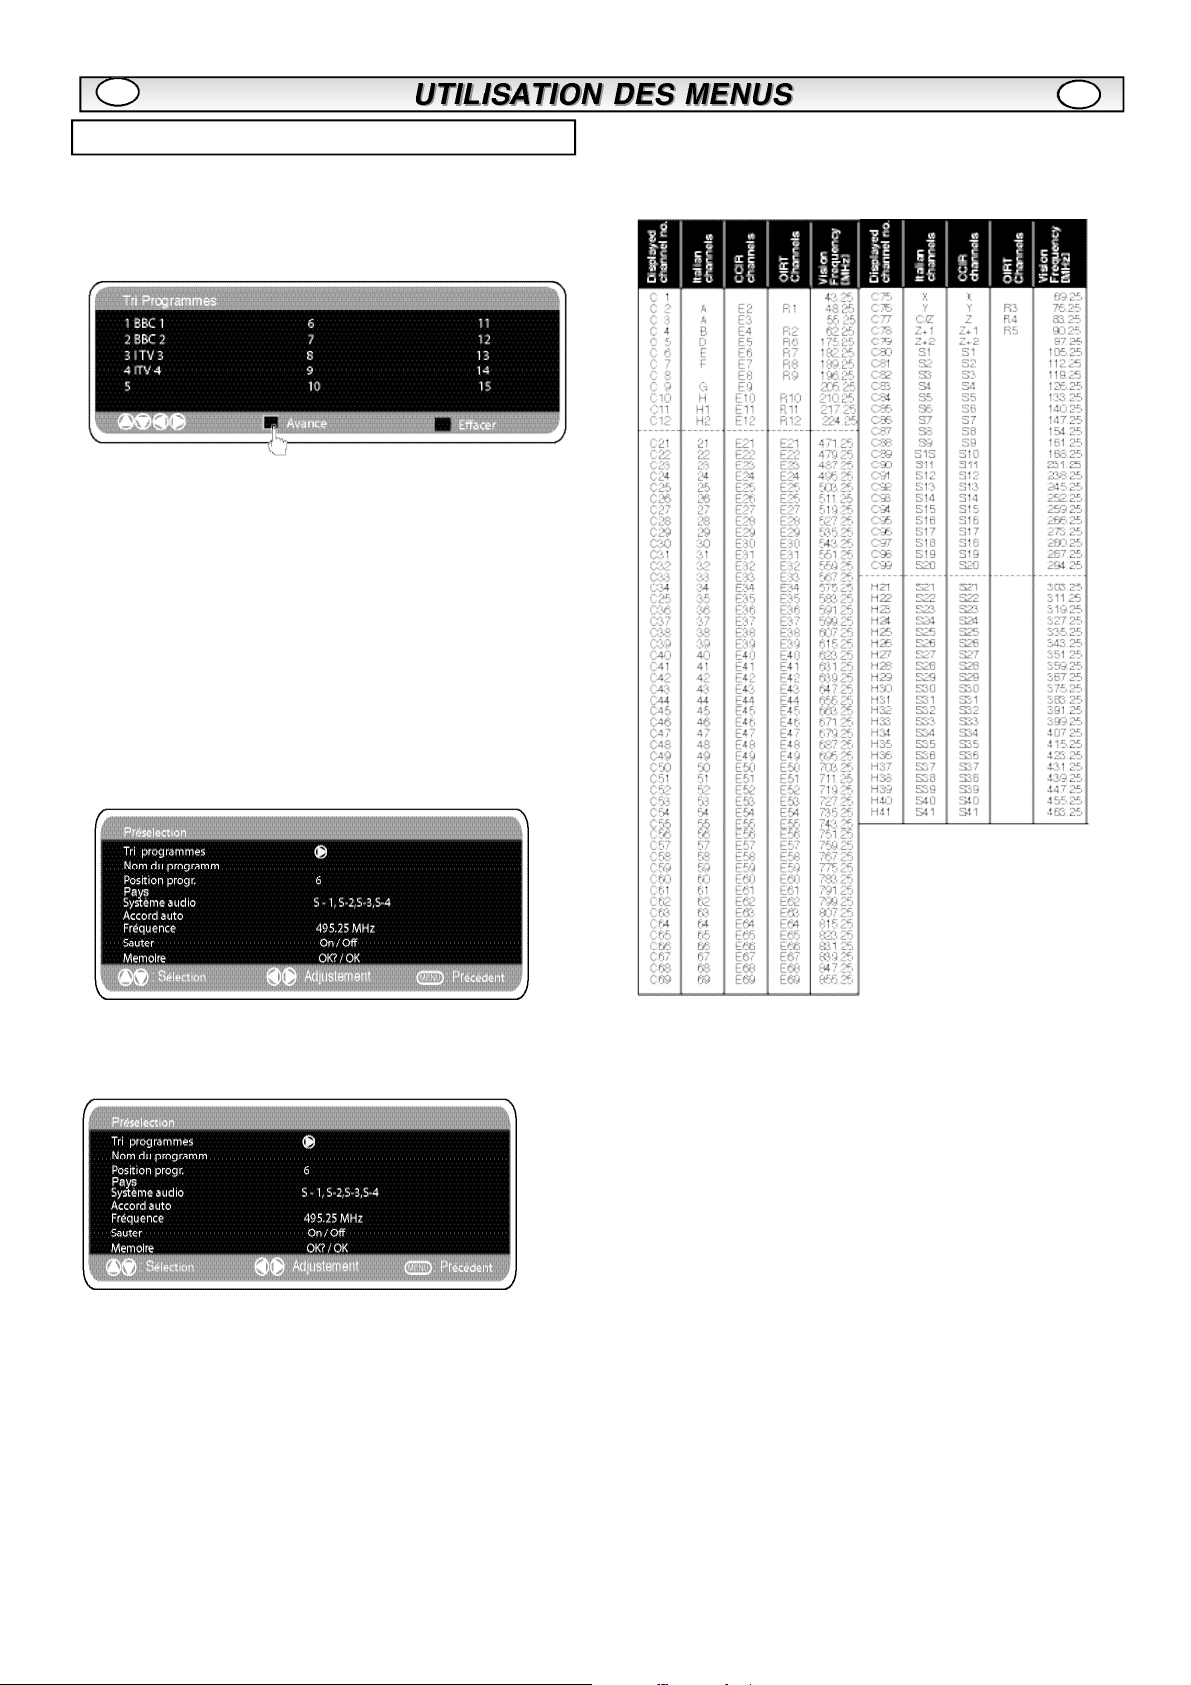
Menu préréglages
n
Tri Programmes
Utilisez cette fonction pour déplacer les canaux entre deux programmes. Cette fonction est particulièrement recommandée après un
réglage automatique des canaux.
Choisissez le programme que vous souhaitez déplacer.
1. Sélectionnez la position d'un programme, par ex. 4.
2. Appuyez sur le bouton vert.
3. Sélectionnez la position du canal que vous souhaitez déplacer, par
ex. en 7
4. Appuyez à nouveau sur le bouton vert.
5. Pour sortir, appuyez deux fois sur le bouton MENU.
n
Nom du Programme
Cette fonction vous permet d'attribuer un nouveau numéro ou de
renommer chaque canal en utilisant les boutons 1 ou 2.
.
Tableau des chaines
n
Le tableau ci-dessous indique les chaines captables et l’affectation
des chaines pour ce moniteur.
n
Réglage automatique
1. Sélectionnez réglage Auto en utilisant le bouton e ou d. Appuyez
sur le bouton1 pour lancer la recherche.
2. Pendant la recherche, les fréquences des canaux sont captées et
enregistrées automatiquement, à partir de la position un.
Sauter
n
A l'écran, Sauter est situé directement en dessous de Fréquence.
Lorsqu'il est sur ‘MARCHE’, il empêche l'accès à un canal en util-
isant le bouton e ou d. Pour accéder au canal sélectionné,
il faut entrer le code d'accès direct au canal.
Mémoire
n
A l'écran, Mémoire est situé directement en dessous de Sauter.
Lorsque vous avez ajusté à votre convenance tous les titres précé-
dents du menu Présélection, modifiez le ‘OK?’ en ‘OK’ en utilisant le
bouton OK pour enregistrer automatiquement tous les réglages de
présélection.
.
.
Fréquence
n
La fréquence indiquée est la fréquence affichée
sauf lors de la recherche, où la fréquence
indiquée se modifie au cours de la recherche.
1. Pour sélectionner manuellement une fréquence, utilisez le bouton 5
ou 6.
(Se référer au tableau récapitulatif des canaux)
Vous pouvez...
a) Entrer la fréquence en utilisant les boutons 0-9 en vous référant au
tableau récapitulatif des canaux.
b) Maintenir appuyés les boutons 1 ou 2 jusqu'à ce que la
recherche de fréquences se lance (env. 5 secondes), la recherche s'interrompt dès qu'un canal est détecté.
c) Continuer d'appuyer pour modifier le réglage de la fréquence.
Répétez les instructions mentionnées ci-dessus jusqu'à ce que le canal
souhaité soit détecté.
2. Appuyez sur le bouton 5 ou 6 pour sélectionner Mémoire. Appuyez
sur le bouton OK pour enregistrer la nouvelle fréquence et les autres
réglages.
.
Page 21
F
FONCTIONNEMENT DU PC
F
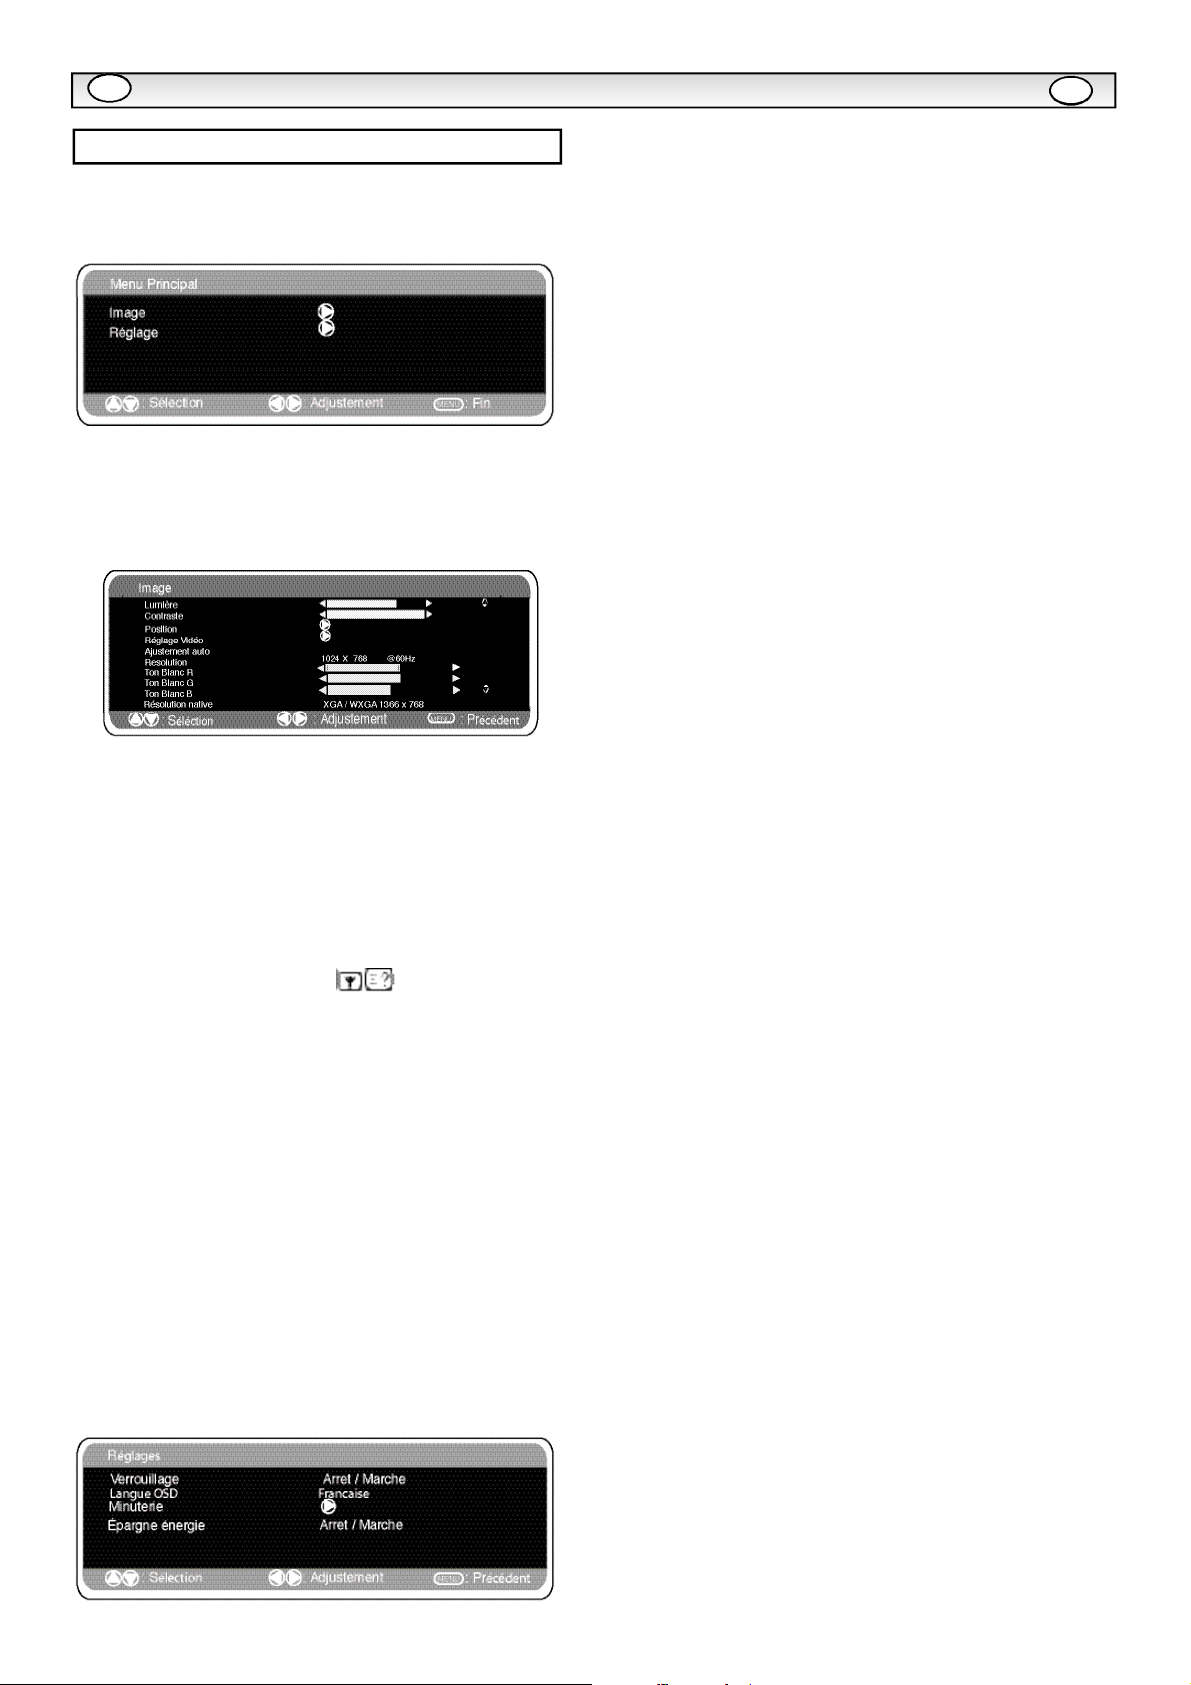
Réglages du menu PC
Raccordez votre PC au connecteur PC-IN à l'arrière de l’appareil. Une
fois le raccordement effectué, sélectionnez le mode PC à l'aide de la
touche v de votre télécommande. L'appareil servira alors de moniteur pour votre PC.
La touche MENU de la télécommande permet d'afficher une fenêtre de
menu sur l’écran et d'ajuster les réglages.
Pour ajuster les réglages Image, sélectionnez Image à l'aide des touches
de la télécommande, puis appuyez sur la touche
e ou d
er dans le menu de réglage Image suivant.
Appuyez sur les touches
age et le contraste de l'image.
La fonction Position de l’image permet de modifier verticalement ou hori-
1 ou2
pour ajuster la luminosité de l’im-
1
pour entr-
Les réglages Minuterie et AV2 sont les mêmes que dans tous les autres
modes d'entrée (page 17).
Si la fonction Economiseur d’énergie est activée, le moniteur passera en
mode Economie d’énergie au bout de 1 minute si aucun signal n'est
détecté, et le voyant Le voyant bleu deviendra plus lumineux pour indiquer que le moniteur est en mode de veille. Dès la détection d’un signal
(PC), le moniteur s’allumera automatiquement.
Utilisez les touches
tion.
1 ou2 pour activer ou désactiver cette fonc-
zontalement la position de l’image. Appuyez sur la touche
accéder aux sous-menus. Utilisez les touches
commande pour effectuer le réglage.
La fonction Ajustement vidéo permet de changer la Phase et l’horloge de
l’écran. Si l’image apparaît floue ou grenue, cette fonction permet
d’obtenir une image plus claire. Utilisez les touches
télécommande pour effectuer le réglage.
La fonction Ajustement automatique permet de régler automatiquement
l’image via la touche
les réglages mentionnés ci-dessus. La fonction Ajustement automatique
peut être obtenue à l'aide de la touche de la télécommande
sans avoir à sélectionner de menu.
La fonction Résolution affiche la résolution en cours de l’image. Ces
informations sont données à titre indicatif seulement et aucun ajustement
ne peut être effectué.
Ton blanc : l'utilisation des touches
de l'image à l'aide des tons Rouge (R) / Vert (V) / Bleu (B). Cette fonction
permet d’ajuster le niveau de couleur de l’image ; par exemple, si le
rouge est sélectionné, vous pouvez régler la proportion de rouge de l'image, en l’augmentant ou en la diminuant, à l’aide des touches
.
ou2
La résolution native est utilisée pour les sorties PC en mode WXGA1366
x 768. Utilisez les touches
votre moniteur et recevoir les signaux XGA/WXGA. Une fois la résolution
native sélectionnée, sauvegardez les réglages en éteignant puis en rallumant le moniteur via la touche de veille.
Pour le réglage du son, reportez-vous au menu précédent.
Réglages : appuyez sur la touche Menu de votre télécommande et
utilisez les touches
permet d'accéder au menu Réglages.
. Cette fonction modifie automatiquement tous
1
1 ou2
1 ou2
pour sélectionner Réglages. La touche
e et d
1 ou2
pour modifier le réglage de
1
pour
de la télé-
1 ou2
permet d’ajuster le ton
de la
1
1
Page 22
FF
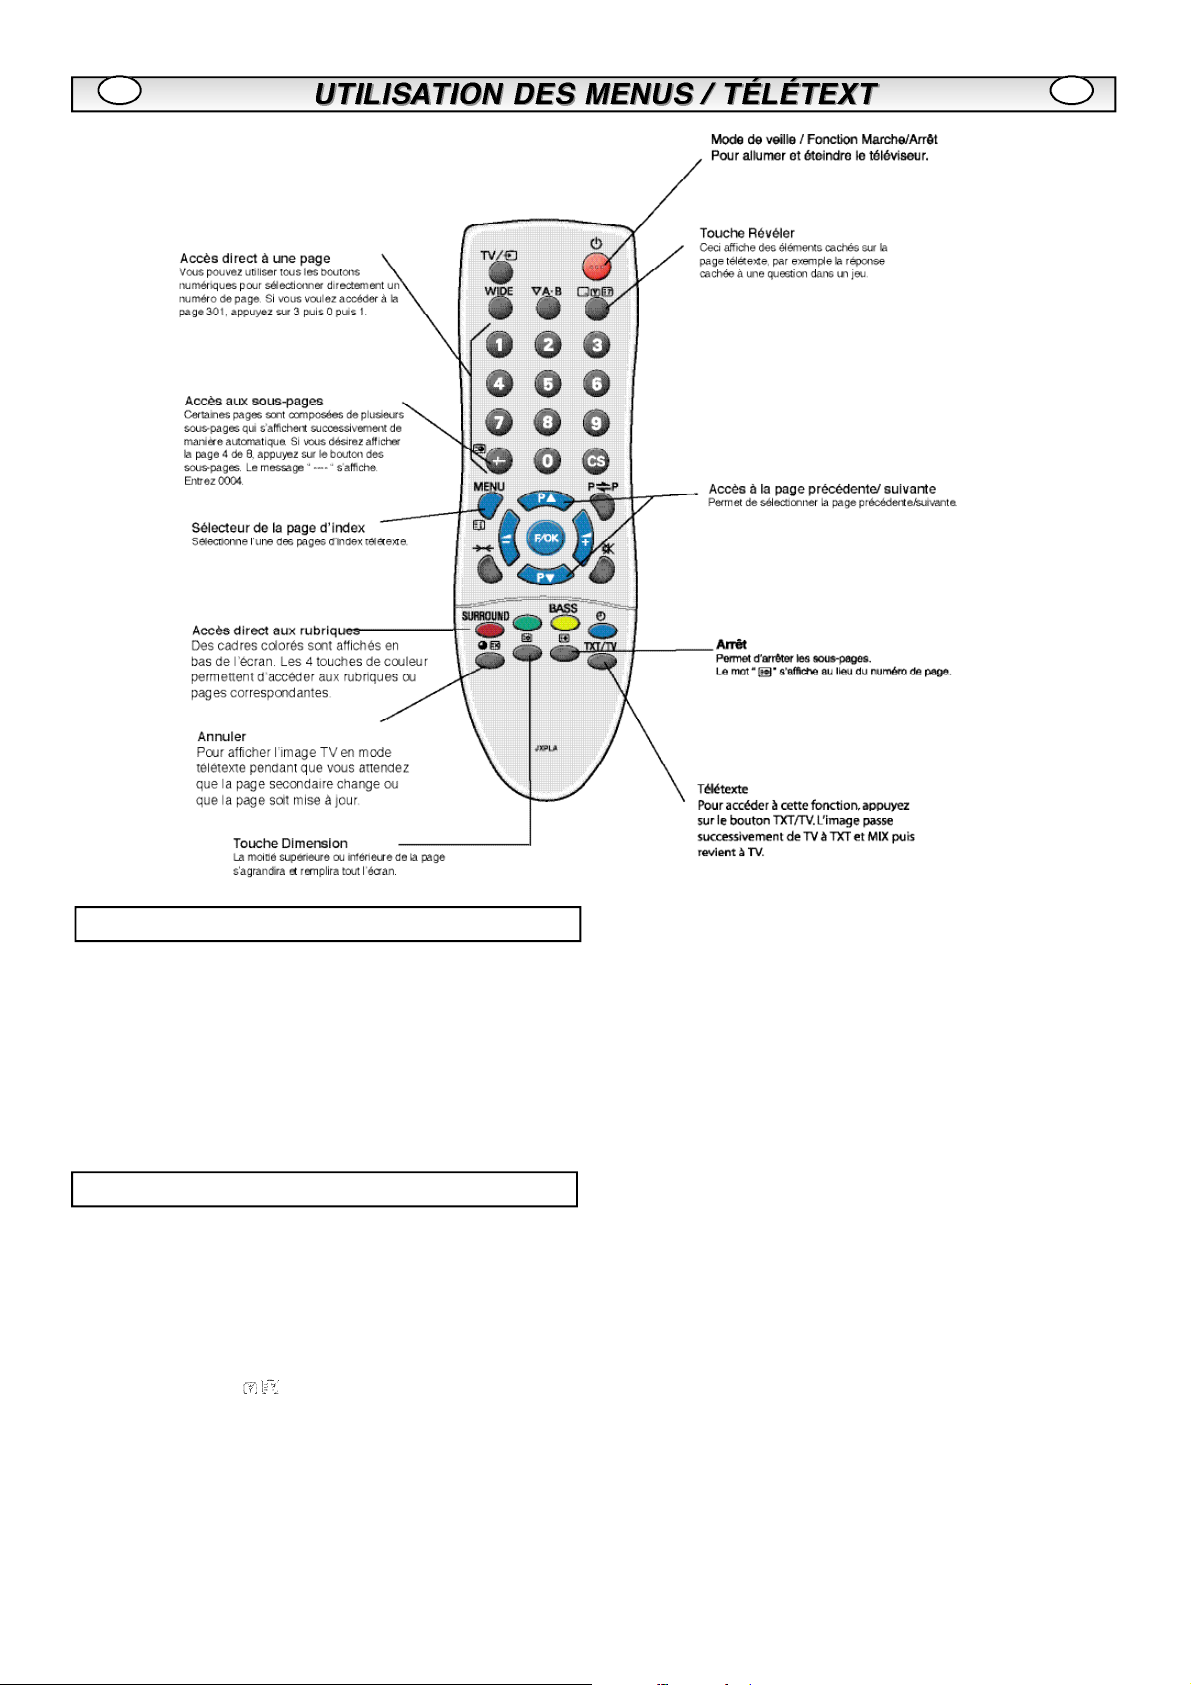
Utilisation du télétexte
Télétexte – Service gratuit qui vous donne de nombreuses
informations comme les actualités, les résultats sportifs, la météo et
des informations sur les transports.
Réception de Télétexte
Si le signal capté par votre antenne est de mauvaise qualité, la
réception et le fonctionnement du télétexte pourront être irrégulièrs.
Luminosité du télétexte
Vous pouvez modifier la luminosité du télétexte. Revenez au mode
TV. (voir le menu Image – Luminosité du texte en page 18).
Fonctionnement
Arrêt automatique
n
Lemoniteur est doté d’une fonction d’arrêt automatique. Même si
vous oubliez de l’éteindre avant d’aller vous coucher, il passe en
mode Veille 10 minutes après avoir reçu le dernier signal d’antenne.
n
Affichage des informations sur les émissions et
sélection du système audio
Appuyez sur la touche . Les informations relatives à la chaîne,
telles que le numéro de la chaîne actuelle, le nom de la chaîne, le
mode stéréo, le système de son et le temps restant si la minuterie est
programmée, s’afficheront pendant 5 secondes environ.
S-1 : Système de son B/G
S-2 : Système de son D/K
S-3 : Système de son I
S-4 : Système France SECAM L/L
Page 23
FF
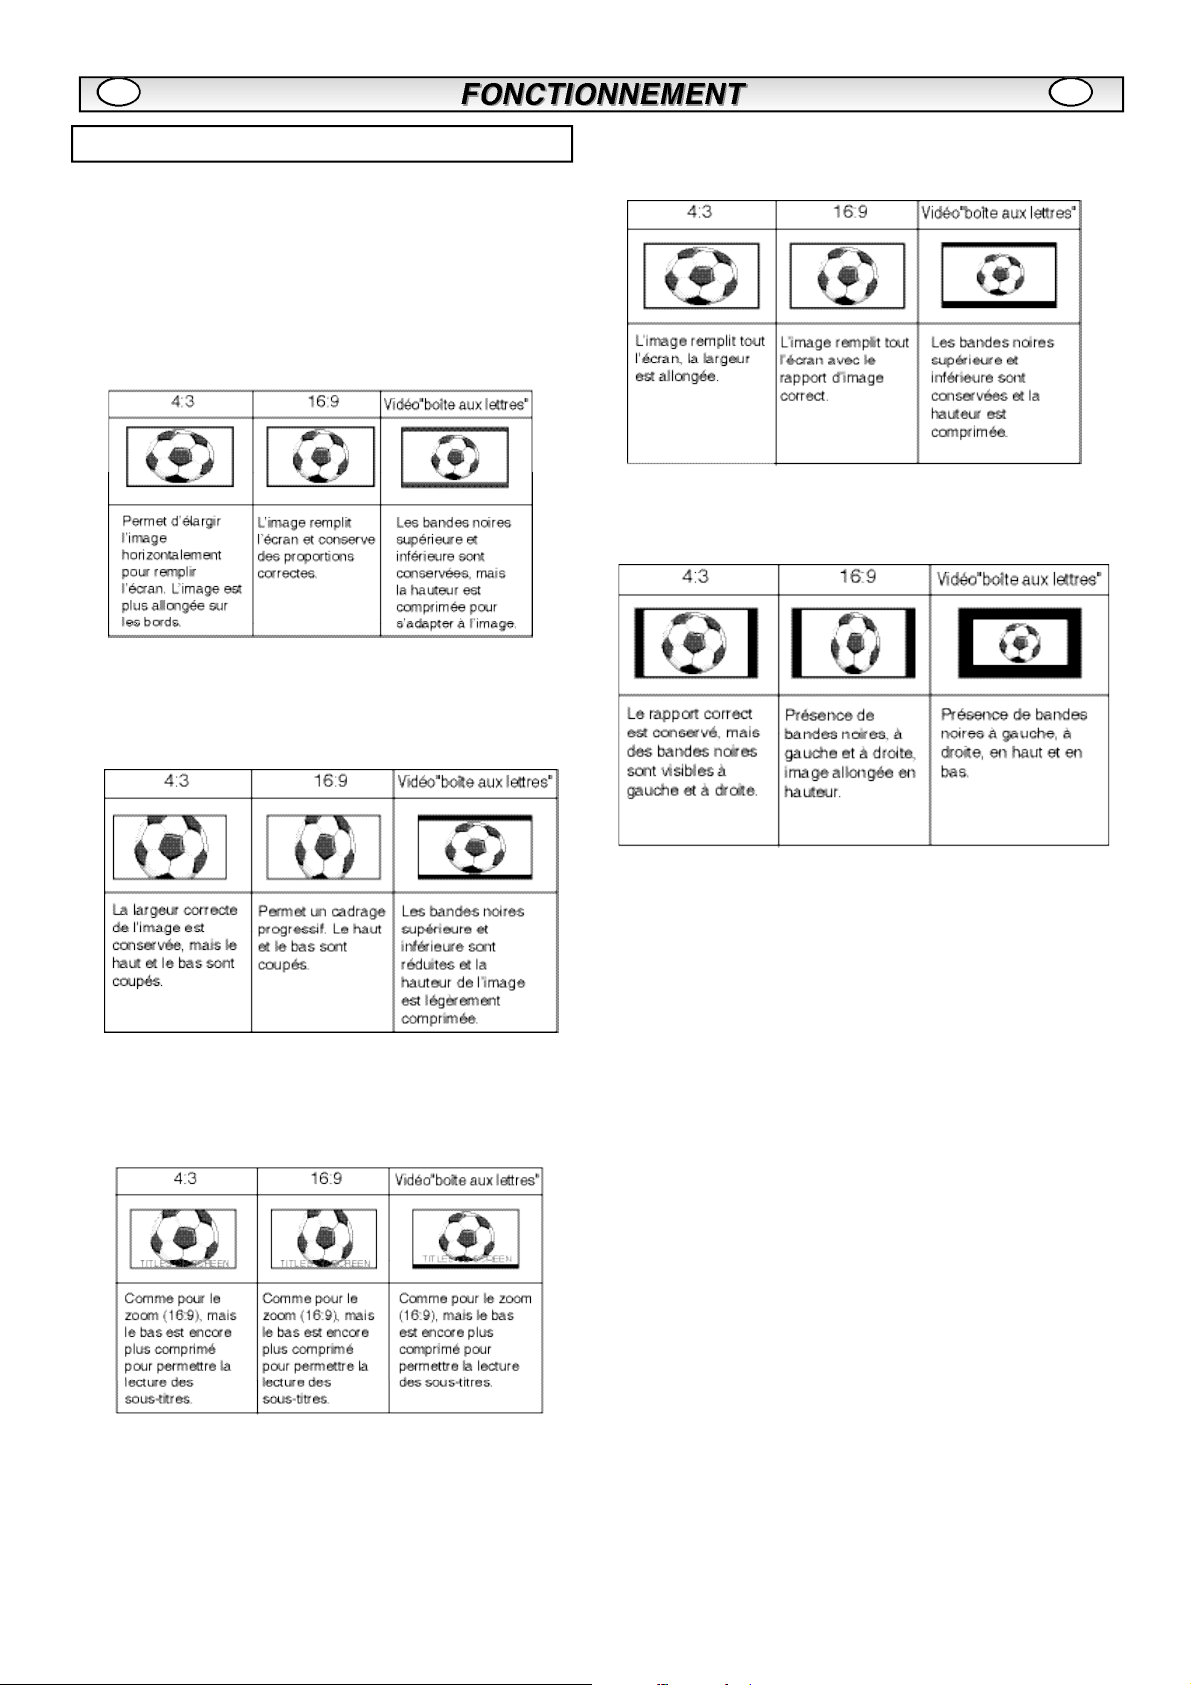
Sélection de la taille de l'image.
Options d’écran
n
Aujourd’hui, plusieurs formats de transmission sont utilisés, avec différentes proportions, comme 4:3, 16:9 et des formats vidéo comme “
boîte aux lettres “.
Lorsque la résolution est élevée (720p / 1080i) HDMI, le format de
0
l’image sera un format 16:9 ‘image totale’ et ne pourra peut-être pas
être modifié.
Natural
n
n
Plein
n
Normal
n
Zoom
n
Sous
Page 24

FF
TV Spécifications
Caractéristiques communes
Alimentation C A 2 2 0 ~ 2 4 0 V, 50Hz
Standards de réception Système B/G, D/K, I, L’L
Système couleurs PAL/SECAM à l'antenne
PAL/SECAM/NTSC 3.58 (en mode AV)
Chaînes couvertes
Impédance de l’entrée d’antenne 75 ohms
Prise AV
AV1 : CENELEC standard
Entrée : vidéo composite, RGB (5 V RGB avec 5 V synch.,
vers broche 14) et audio-L/R
Sortie : sortie TV avec vidéo composite, RGB et audio-L/R
AV2: CENELEC Standard
Entrée: vidéo composite
Sortie
: Monitor-output with composite video and audio-
L/R
Entrée HDMI : Digital RGB input
Entrée PC : Mini D-SUB 15 broches et jack audio 3,5 mm
Taille d’ecran (pouces) 42” / 107 cm
(Mesuré diagonalement).
Contraste 1500:1
Résolution d'affichage 1366 x 768
(WXGA)
Angles de visualisation H:178º, V:178º
Dimensions (L x H xP m m) 1032 x 625 x 126.5
Poids (kg) 22.5
VHF E2~E12, F2~F10, R1~R12.
UHF 21~69,
CATV: X, Y, Z,S1~S41, B-Q
, S-VHS and audio-L/R
Conseils Pratiques
n PAS D'IMAGE NI DE SON
l Vérifiez que le poste est branché.
l Essayez un autre canal; si ce nouveau canal fonctionne correcte-
ment, il s'agit sans doute d'un problème technique au niveau de la
station émettrice.
l
Vérifiez que le moniteur n'est pas en mode de veille.
n
IMAGE DE MAUVAISE QUALITE, SON CORRECT
l
Ajustez la commande de LUMINOSITE.
Ajustez LA COMMANDE D'ACCORD PRECIS.
l
Vérifiez le branchement d'antenne.
l
n
PAS DE COULEURS, IMAGE CORRECTE
l
Ajustez la commande de COULEUR.
l Ajustez la commande d'ACCORD PRECIS.
l
Vérifiez les branchements du cordon d'alimentation.
Le programme/ signal est-il en couleur?
l
n
IMAGE FAIBLE
Vérifiez le branchement de l'antenne à l'arrière du poste.
l
l
Vérifiez qu'il n'y a pas de fils cassés dans l'antenne.
Ré-orientez l'antenne.
l
LA TELECOMMANDE NE FONCTIONNE PAS
n
l
Vérifiez que les piles sont correctement insérées.
l
Vérifiez l'état des piles.
Vérifiez que la fonction de verrouillage de la télécommande n'est
l
pas activée.
Les pannes suivantes ne sont pas provoquées par le poste:
"IMAGES FANTOMES"
Les réflexions de signaux sur des montagnes ou sur des structures
élevées provoquent des images multiples "images fantômes". Ces
conditions normales peuvent être minimisées en repositionnant
l'antenne ou en installant une nouvelle adaptée à votre région.
"INTERFERENCES/PARASITES"
Les interférences peuvent être provoquées par des appareils
ménagers, des systèmes d'allumage automobiles, etc.. Il doit s'agir
normalement d'un problème passager; consultez votre distributeur si
ce problème persiste.
Mode Hôtel
n
Interdiction d'accès aux préréglages
Cette fonction empêche l'accès aux réglages.
n
Position du programme au démarrage.
Procédure de réglages
1. Maintene appuyé le bouton vert
de la télécommande, puis appuye sur le bouton 5 du moniteur.
2. Utilise le bouton 5 ou 6 pour surligner Mode Hôtel, utilise
1 pour le mettre en MARCHE ou ARRET.
3. Sélectionne programme MARCHE en utilisant le bouton 6,
sélectionne la position au démarrage en utilisant les boutons 1
ou 2. (OFF/ 0~99 / AV1/RGB/AV2 / HDMI/ PC)
4. Appuyez sur le bouton Menu pour en sortir.
.
Page 25

LICENSE DE L’UTILISATEUR FINAL
FF
License de l'utilisateur final
Le Produit (soit l'équipement ou l'appareil auquel se réfère la
présente documentation) comprend un Logiciel (applications,
utilitaires et modules du logiciel vendus avec le Produit) qui
est la propriété de Sanyo ou de ses concédants de license.
Lire les conditions d'utilisation de la license de l'utilisateur
final décrites ci-dessous avant d'utiliser le Produit. Si vous
refusez les termes et conditions de la license de l'utilisateur
final, n'entreprenez pas d'utiliser le Produit. Retournez-le
intact dans son emballage à votre fournisseur en apportant la
preuve d'achat pour vous faire rembourser intégralement. En
utilisant le Produit, vous acceptez les termes et conditions de
la license de l'utilisateur final.
Concession de license, conditions et restrictions
1. Sanyo vous concède une license d'utilisation non exclusive, valable dans le monde entier (sujet aux contrôles
douaniers), non transférable (sauf autorisation décrite à l'alinéa 2 ci-dessous) et hors droits du Logiciel exclusivement
utilisé avec le Produit.
2. Vous n'êtes pas autorisé à transférer un des vos droits de
license sur le Logiciel sans l'accord écrit préalable de
SANYO et, si l'accord est consenti, le Logiciel ne peut être
transféré sans le Produit ET à condition que le bénéficiaire
du transfert ait lu et accepté les termes et conditions de la
présente license.
3. Vous devez vous assurer que toutes les remarques relatives aux droits d'auteur, aux droits des marques et à toute
autre mesure de protection contenues dans le Logiciel sont
conservées et non détériorées ou manquantes.
4. Le Logiciel fourni ci-dessous est sujet aux droits d'auteur
et aux droits de license (ne peut être vendu). Notamment,
SANYO ne vous transfère pas le droit de possession et/ou
de propriété sur le Logiciel. Le Logiciel fourni ci-dessous peut
contenir ou être dérivé de certaines parties de matériels fournis sous license à SANYO pour un tiers fournisseur.
5. Sauf autorisation légale expresse, vous n'êtes pas
autorisé à ;
Exclusion
1. Le Logiciel est (dans les limites fixées par la loi) livré "en
l'état" et SANYO et ses fournisseurs excluent expressément
toutes garanties, expresses ou tacites, y compris (mais sans
s'y limiter) les garanties de satisfaction, d'adéquation à un
besoin et de non contrefaçon (sauf si ces garanties ne peuvent être exclues par la loi).
2. SANYO ne saurait être tenu responsable de tout dommage direct, indirect, consécutif ou accessoire (y compris du
manque à gagner, de l'interruption de l'activité de l'entreprise,
de la perte de données ou des coûts liés à l'acquisition d'un
bien, d'une technologie ou de services de substitution)
découlant de l'utilisation ou l'impossibilité d'utiliser le Logiciel
(sauf si une telle responsabilité ne peut être exclue par la
loi).
Remarques générales
1. La présente license de l'utilisateur final est régie par la
législation anglaise ; l'utilisateur ne peut porter plainte
qu'auprès d'un tribunal anglais et SANYO est autorisé à
porter plainte auprès du tribunal de la juridiction de son
choix.
2. Le termes et conditions décrits ci-dessus supplantent tout
accord antérieur, qu'il soit oral ou écrit, conclu entre vous et
SANYO en rapport avec le logiciel
.
l utiliser le Logiciel avec tout autre matériel informa-
tique que le produit ;
l copier tout ou partie du Logiciel ;
l intégrer tout (ou partie) du Logiciel dans
d'autres programmes développés par (ou pour le compte de)
et/ou utilisés par votre personne ;
l effectuer de l'ingénierie inverse, décompiler ou
désassembler le Logiciel ;
l permettre la redistribution ou l'utilisation de tout (ou
partie) du Logiciel avec tout autre matériel informatique autre
que le Produit ; ou bien louer, offrir, prêter, revendre, distribuer ou transférer la possession de tout ou partie du
Logiciel.
Expiration
La présente license est valide jusqu'à son expiration. La
présente license expire automatiquement et sans préavis si
vous ne respectez pas l'une de ces conditions.
Page 26

D
ACHTUNG: Bitte lesen und zu Ihrer Sicherheit aufbewahren. Dieses Gerät wurde so konstruiert und hergestellt, daß Ihre persönliche Sicherheit
gewährleistet ist. Unsachgemäßer Gebrauch kann jedoch zu elektrischem Schlag oder zu Feuergefahr führen. Beachten Sie die folgenden
Grundregeln für den Anschluß, den Gebrauch und die Wartung, um die in diesen Monitor eingebauten Schutzvorrichtungen nicht außer Kraft zu setzen.
D
Anschluß
Stellen Sie keine Gegenstände auf das Anschlußkabel. Stellen
Sie diesen Monitor nirgendwo hin, wo Personen über das Kabel
laufen und es dadurch beschädigen können.
Überlasten Sie Steckdosen und Verlängerungskabel nicht,da
dies zu Feuer oder elektrischem Schlag führen kann.
Diesen LCD-Monitor nicht in der Nähe von Wärmequellen, wie
z.B. Heizkörpern, Öfen, Herden und anderen wärmeerzeugenden Produkten (einschl. von Verstärkern), aufstellen.
Den LCD-Monitor nicht direktem Sonnenlicht aussetzen
Stellen Sie Ihren Monitor nicht auf instabile Ständer, Regale
oder Tische. Falls der Monitor herunterfällt, kann dies zu schweren Verletzungen von Personen und zur Beschädigung des
Monitors führen. Ihr Verkäufer kann Ihnen zugelassene
Wandbefestigungsvorrichtungen empfehlen und Für dieses
Modell ist eine spezielle Wandbefestigungs-vorrichtung lieferbar.
Für diesen Monitor sollte nur die Art von Stromanschluß verwendet werden, die auf dem Gerät oder in den
Bedienungsanleitungen angegeben ist. Wenn Sie nicht sicher
sind, welche Art von Stromversorgung Sie in Ihrem Haus haben,
wenden Sie sich an Ihren Verkäufer oder an Ihre zuständige
Elektrizitätszgesellschaft.
Für zusätzlichen Schutz wird nachdrücklich empfohlen, diesen
LCD-Monitor über einen Fehlerstrom-Schutzschalter an das
Netz anzuschließen.
ACHTUNG: Um Verletzungen zu vermeiden, muss der LCDMonitor unter Einhaltung der Installationshinweise des
Herstellers sicher an der Wand befestigt werden.
Gebrauch
Verwenden Sie niemals Zubehörteile, die nicht speziell für diesen
Monitor entworfen wurden.
Sie keine Gegenstände, wie zum Beispiel mit Wasser oder anderen
Flüssigkeiten gefüllte Vasen, auf den Monitor.
Einige interne Teile sind einer hohen Spannung ausgesetzt, und
eine Berührung kann zu elektrischem Schlag führen. Gießen Sie
niemals Flüssigkeiten irgendwelcher Art auf den monitor.
Den Monitor weder Wasser aussetzen noch in der Nähe von
Wasser, z.B. in der Nähe einer Badewanne, Küchenspüle oder in
einem feuchten Keller, benutzen.
Den monitor nicht sofort betreiben, nachdem er von einem Bereich
niedriger Temperatur in einen wesentlich wärmeren Bereich gebracht
wurde, anderenfalls würde Kondensation gebildet – Brand-,
Stromschlag- und andere Gefahren! Vor der Reinigung des Monitor
den Stecker aus der Netzdose ziehen.
Tragen Sie flüssige Reinigungsmittel oder Sprays nicht direkt auf
den Monitor auf. Verwenden Sie zur Reinigung ein weiches Tuch.
Dieser LCD Monitor sollte einen Mindestabstand von 5cm von der
Wand haben und 10cm Abstand oben und an den Seiten.
Nicht in der Nähe offener Flammen aufstellen. Offene Flammen dürfen niemals in der Nähe dieses LCD-Monitors benutzt werden.
Dieser LCD-Monitor sollte nicht eingebaut oder in irgendeiner Form
eingeschlossen werden, da der Wärmestau seine Lebensdauer
reduzieren würde.
Stets mithilfevon empfohlenen, ausreichend starken
Befestigungsteilen anbringen.
Wichtig:
DIESES PRODUKT MUSS GEERDET WERDEN.
Dieses Gerät verfügt über ein zugelassenes Netzkabel und einen
genehmigten, versiegelten Netzstecker. Zum Wechseln einer
Sicherung in dieser Art von Stecker gehen Sie vor wie folgt:
1. Sicherungsabdeckung abnehmen und Sicherung entfernen.
2. Eine neue Sicherung einsetzen (BS1362 13 A mit ASTA- oder
BSI-Zulassung).
3. Sicherstellen, dass die Sicherungsabdeckung korrekt wieder
aufgesetzt wird.
Wenn die Sicherungsabdeckung verloren geht oder beschädigt
wird, darf der Stecker NICHT mehr verwendet werden, sondern ist
durch einen neuen, funktionstüchtigen Stecker zu ersetzen.
Wenn der installierte Stecker nicht in Ihre Steckdosen passt, sollte
er abgeschnitten und durch einen geeigneten Stecker ersetzt werden. Enthält der Netzstecker eine Sicherung, sollte diese für 13 A
ausgelegt und korrekt eingesetzt sein. Bei Verwendung eines
Steckers ohne Sicherung sollte die Sicherung am Verteilerkasten
für maximal 13 A ausgelegt sein.
Hinweis: Der abgeschnittene Stecker muss sicher entsorgt werden, um die Gefahr von Stromschlägen bei versehentlichem
Einstecken in eine 13-A-Steckdose zu vermeiden.
Die Drähte des Netzkabels sind nach folgendem System farblich
gekennzeichnet:
Blau -------> Nullleiter
Braun ----> Stromführend
Grün und Gelb ----> Erde
1. Der blaue Draht muss mit dem Anschluss verbunden werden,
der mit dem Buchstaben ‚N’ oder in SCHWARZ gekennzeichnet
ist.
2. Der braune Draht muss mit dem Anschluss verbunden werden,
der mit dem Buchstaben ‚L’ oder in ROT gekennzeichnet ist.
3. Der grün-gelbe Draht muss mit dem Anschluss verbunden werden, der mit dem Buchstaben ‚E’ oder in GRÜN bzw. GRÜN und
GELB gekennzeichnet ist
Vor Wiederaufsetzen der Steckerabdeckung sollten Sie sicherstellen, dass die Zugentlastungsschelle die Ummantelung greift,
nicht nur die einzelnen Drähte.
Versuchen Sie nicht, die Sicherheitsvorrichtungen des geerdeten
Steckers zu umgehen.
DIESES GERÄT IST NUR DANN KOMPLETT VOM NETZ
GETRENNT, WENN SIE DAS NETZKABEL AUS DER
STECKDOSE GEZOGEN HABEN.
DER INSTALLATEUR MUSS SICHERSTELLEN, DASS DAS
NETZKABEL LEICHT ZUGÄNGLICH IST.
Wichtige Informationen zum Thema Recycling.
Ihr SANYO Produkt wurde entworfen und
hergestellt mit qualitativ hochwertigen
Materialien und Komponenten, die recycelt und
wiederverwendet werden können.
Dieses Symbol bedeutet, daß elektrische und
elektronische Geräte am Ende ihrer
Nutzungsdauer von Hausmüll getrennt entsorgt
werden sollen.
In der Europäischen Union gibt es unterschiedliche Sammelsysteme
für gebrauchte Elektrik- und Elektronikgeräte.
Helfen Sie uns bitte, die Umwelt zu erhalten, in der wir
leben!
0
Dieses Symbol und das Recyclingsystem finden lediglich in den
EU-Staaten Anwendung und nicht in anderen Ländern der Welt.
Page 27

DD
Wartung
Ihr LCD-Monitor ist voll transistorisiert und enthält keine vom Benutzer zu wartenden Teile.
Sie dürfen die Rückwand des LCD-monitors nicht selber entfernen.
Der Apparat arbeitet mit hohen Spannungen und könnte Sachen beschädigen oder sogar Menschen gefährden. Überlassen Sie alle
erforderlichen Reparaturen und Servicearbeiten einem autorisierten Servicetechniker.
Dieser wird ausschließlich solche Ersatzteile verwenden, welche dieselben Sicherheitsanforderungen erfüllen wie die Originalteile.
Die Verwendung von Original-Ersatzteilen kann Brände, elektrischen Schlag und andere Gefährdungen verhindern.
Ziehen Sie in den folgenden Fällen den Stecker aus der Steckdose, und übergeben Sie den LCD-Monitor qualifizierten Fachkräften zur
Wartung:
wenn das Anschlußkabel oder der Stecker beschädigt ist.
n
wenn eine Flüssigkeit in den LCD-Monitor gelangt ist.
n
n
wenn der LCD-Monitor Regen oder Wasser ausgesetzt war.
n
wenn der LCD-Monitor heruntergefallen oder das Gehäuse beschädigt ist.
n
wenn sich die Leistung des LCD-Monitor erheblich verändert.
n
wenn derMonitor trotz Befolgung der Bedienungsanleitung nicht normal läuft.
Regeln Sie nur die Funktionen, die in der Bedienungsanleitung behandelt werden. Unsachgemäße Einstellungen anderer Funktionen können zu
einer Beschädigung des Gerätes führen. Dies erfordert oft umfangreiche Reparaturen von einem qualifizierten Techniker, um den normalen
Betrieb des Monitors wieder herzustellen.
Page 28

DD
Schritt : 1 Anschlüsse (wesentlich)
n
Bildschirm nach Bedarf mit Antennen-, VGA-, HDMI und SCART-
Steckern verbinden.
AC-Anschluss
1. Integrierten Stromstecker mit dem Netzeingang an der Rückseite
des LCD-Monitors verbinden (siehe Abbildung oben).
2. Stromkabel des LCD-Monitors an eine Wandsteckdose
anschließen.
Dieses Fernsehgerät verfügt über einen HDMI-Eingang. Bei
Verbindung mit der HDMI-Quelle ist die Bildauflösung wesentlich
höher.Der Eingang befindet sich auf der Rückseite des Fernsehgeräts
2.
AV1/AV2
Sie können Ihren DVD-Spieler oder andere SCART-Stecker an die
AV1- und AV2-SCART-Anschlüsse hinten am Gerät anschließen.
Da sich dieses Gerät nicht über einen Hauptschalter ein-/ausschal-
0
ten lässt, stellen Sie bitte sicher, dass der Netzstecker leicht
zugänglich ist.
Der LCD-Monitor ist für eine (AC) Netzspannung von 220~240V,
0
50Hz ausgelegt. Zum vollkommenen Trennen vom Netz oder bei
Nichtgebrauch des Gerätes über einen längeren Zeitraum wird das
Abziehen des Netzsteckers aus der Steckdose empfohlen.
Verwenden Sie das Stromkabel, das in Ihrer Region mit dem
0
Monitor ausgeliefert wird.
3. Achtung: Um Verletzungen zu vermeiden, muss der Monitor unter
Einhaltung der Vorschriften des Herstellers sicher an der Wand
befestigt werden."
WARNUNG!
den hohe elektrische Spannungen verwendet. Das Gerät
darf nur durch qualifizierte Techniker geöffnet werden.
Beim Betrieb dieses Fernsehgeräts wer-
Schritt : 2 Anschlüsse
Auswahl der Eingänge
n
Zum Umschalten zwischen den Modi TV, AV1, RGB, AV2 RGB H/V
oder Y, Pb, Pr, AV3, DVI oder PC drücken Sie mehrmals die TV/AVTaste auf Ihrer Fernbedienung. Oder halten Sie diese Taste einige
Sekunden gedrückt, um ein Auswahlmenü aufzurufen, und wählen
Sie mit den Tasten e oder d den gewünschten Modus aus.
3. Anschluss an einen PC
Anschluss an einen PC
Dieser Bildschirm verfügt über einen PC-Anschluss(PC-IN D-SUB),
so dass Sie ihn mit einem PC verbinden und als Bildschirm für diesen
verwenden können (siehe Seite 33).Audiogeräte können über die 3,5
mm Audio-In-Buchse angeschlossen werden, die eine große Zahl von
Auflösungen unterstützt (siehe Seite 74).
Schritt : 2 Einlegen der Batterien für die
Fernbedienung
1.HDMI (High Definition Multimedia Interface)
Legen Sie zwei 1,5 Volt Batterien (Typ "AA") ein und achten Sie
darauf, dass die "+" und "-" Markierungen auf den Batterien den "+
"und "-" Markierungen auf der Innenseite der Fernbedienung
entsprechen.
Page 29

D
D
Page 30

gesp
DD
Bedienungselemente
. Die rote Standby-Leuchte des Gerätes zeigt die vorhandene
1
/ Anschlüsse
Stromversorgung an.
Schalten in den/aus dem Standby-Modus
Der Standby-Modus wird benutzt, wenn der
ausgeschaltet werden soll. Im Standby-Modus ist das
geschaltet, wird aber immer noch mit Strom versorgt.
l
Drücken Sie die Taste 4, um den Monitor in den Standby-Modus zu
schalten.Die blaue LED-Anzeige leuchtet heller.
Um der
l
en Sie eine der folgenden Tasten auf der Fernbedienung:
LCD-Monitor
im Bereitschaftsbetrieb einzuschalten, drück
0-9.
LCD-Monitor
LCD-Monitor
für kurze Zeit
aus-
4,5, 6,
Wenn Sie die Menübedienung aufrufen, wird unten auf dem LCD
Monitor angezeigt, welche Bedientasten zur Verfügung stehen.
Zum Aufrufen des Hauptmenüs die Taste u drücken.
Die Auswahl der Untermenüs erfolgt über die Taste e oder d und
Drücken von1, sobald das gewünschte Untermenü markiert ist.
Si le voyant de mise sous tension clignote, arrêtez le
téléviseur au moyen de l’interrupteur de veille, débranchez
le cordon d’alimentation au secteur et contactez notre service après-vente.
Ceci est un signe que la protection interne s’est mis á
fonctionner.
2. Bedienungselemente (Unterkante des Gehäuses)
Menu/F:
Schärfe und Menüsprache (die Taste F/OK auf der
Fernbedienung hat die gleiche Funktion).
Input/OK:
RGB, AV2, HDMI und PC.
ed:
4:
Ausschalten muss der Monitor vom Netz getrennt werden).
Viele Funktionen Ihres Fernsehgeräts werden über die Menüfunktion
bedient.
Zum Wechseln zwischen Kontrast, Helligkeit, Farbe,
Zum Umschalten zwischen den Modi TV, AV1,
Zum Auswahl des nächsten oder vorigen Programms.
Zum Umschalten von Betrieb zu Standby (zum völligen
Nachdem Sie die gewünschten Einstellungen im Untermenü
vorgenommen haben, können Sie das Untermenü verlassen, indem
Sie die MENÜ-Taste drücken. Durch erneutes Drücken der MENÜTaste verlassen Sie auch das Hauptmenü.
Bild-Menü
1. Drücken Sie die MENÜ-Taste. Gehen Sie anhand der Taste e oder
d zum Bild-Menü. Zur Bestätigung die Taste1 drücken.
Stellen Sie das Bild auf Ihre persönlichen Präferenzen ein.
2. Anhand der Tasten e oder d können Sie die Helligkeit, den
Kontrast, die Farbe und die Bildschärfe einstellen. Nehmen Sie
anhand der Tasten 1 oder 2 die gewünschten Einstellungen
vor.
3. Preset : Anhand der Tasten 1 oder 2 können Sie entweder
Ihre “persönlichen” Einstellungen vornehmen oder “Dynamisch”,
“Standard” oder “Eco” auswählen (für Helligkeit, Kontrast, Farbe und
Bildschärfe).
4. Rauschunterdrückung: Zur Reduzierung des “Bildrauschens”
(Körnung). Anhand der Tasten 1 oder 2 lässt sich die
Rauschunterdrückung auf Mittel / Hoch / Auto / Niedrig / Aus stellen.
5. Dynamische Hautfarbe: Zur Erzeugung natürlicher Hautfarben.
Anhand der Tasten 1 oder 2 lässt sich die
Hautfarberegulierung ein- oder ausschalten.
6. Texthelligkeit: Anhand der Tasten 1 oder 2 lässt sich die
Texthelligkeit auf Min. / Mittel / Max. stellen.
Tint (Farbton) : Diese Funktion steht nur zur Verfügung, wenn NTSC-
Geräte angeschlossen sind. Zu Presse zweimal herausnehmen der
MENÜ-Knopf
0
Ihre persönlichen Einstellungen werden bei Verlassen des Menüs
automatisch
eichert.
Page 31

DD
Setting menu
n
Kindersicherung
Über die Tasten an der Unterkante des Gehäuses können Sie den
ungewollten Betriebs des LCD-Monitors verhindern.
1. Drücken Sie die MENÜ-Taste. Wählen Sie anhand der Tasten e
oder d die Option “Einstellungen” aus. Zur Bestätigung die
Taste
2. Wählen Sie anhand der Tasten e oder d die Option
“Kindersicherung” aus.
3. Über die Tasten 1 oder 28 können Sie die Kindersicherung
1 oder 2 stellen.
4. Zum Verlassen des Untermenüs die MENÜ-Taste drücken.
n
Wählen Sie mithilfe der Tasten
Bildschirmsprache aus (Französisch, Deutsch, Italienisch, Spanisch,
Niederländisch). Zum Verlassen des Menüs drücken Sie MENÜ.
drücken.
1
OSD-Sprache
1 oder 2
Ihre bevorzugte
Setting menu
n
AV2 (Anschluss eines zweiten Geräts)
Im Menü “Einstellungen” über die Taste d die Option “AV2”
auswählen und je nach Gerätr S-Video, Video auswählen.
1. Drücken Sie die MENÜ-Taste. Wählen Sie anhand der Tasten e
oder d die Option “Einstellung” aus und drücken Sie zur Bestätigung
die Taste
2. Wählen Sie anhand der Tasten e oder d die Option “AV2” aus.
3. Wählen Sie anhand der Tasten
Video,Video aus.
4. Zum Verlassen die MENÜ-Taste drücken. Ihre Änderungen werden
automatisch gespeichert.
1.
1 oder 2 die Option S-
Preset menu
1. Drücken Sie die MENÜ-Taste.
n
Off-Timer
Der Off-Timer schaltet das Gerät automatisch in den Standby-
Modus, nachdem die vorgegebene Zeit verstrichen ist.
1. Drücken Sie die MENÜ-Taste. Wählen Sie anhand der Tasten e
oder d die Option “Einstellung” und drücken Sie zur Bestätigung die
Taste 1.
2. Wählen Sie anhand der Tasten e oder d die Option “OFF-Timer”
aus.
3. Anhand der Tasten1 oder 2 die Zeit bis zur Abschaltung
auswählen.
Die Zeit ändert sich in 5-Minuten-Schritten. Die maximale Zeit beträgt
120-Minuten.
Bei eingeschaltetem Off-Timer erscheint ein Symbol in der
Bildschirmecke.
0
Wird das LCD Monitor über die Standby-Taste 4 der
Fernbedienung oder die Standby-Taste 4 oben auf dem LCD
Monitor ausgeschaltet, wird der Off-Timer aufgehoben.
4. Zum Verlassen des Untermenüs die MENÜ-Taste drücken.
2. Wählen Sie anhand der Tasten1 oder 2 die Option “Preset”
aus. Zur Bestätigung die Taste1drücken.
0
Mithilfe des Preset-Menüs können neue Kanäle eingestellt, die
Kanalbelegung geändert und eine Feineinstellung der Kanäle
vorgenommen werden.
n
Textsprache
1. Drücken Sie die MENÜ-Taste. Wählen Sie anhand der Tasten e
oder d die Option “Einstellung” und drücken Sie zur Bestätigung die
Taste1.
2. Wählen Sie anhand der Tasten e oder d das Untermenü
“Textsprache” aus.
3. Wählen Sie anhand der Tasten 1 oder 2 die Option “West”,
“Ost”, “Griechisch” oder “Kyrillisch” aus.
4. Zum Verlassen des Untermenüs die MENÜ-Taste drücken.
Page 32

D D
Das Voreinstellungsmenu
n
Programmsortierung
Mithilfe dieser Funktion können Sie einzelne Sender von einer
Position in eine andere verschieben. Diese Funktion ist insbesondere dann nützlich, wenn die Sender über die Funktion “Auto Tuning”
eingestellt wurden.
Zunächst müssen Sie den Sender auswählen, den Sie in eine
andere Position bringen möchten.
1. Wählen Sie die Senderposition aus, z. B. 4.
2. Drücken Sie die Grüne Taste.
3. Wählen Sie den Kanal aus, auf den Sie den Sender verschieben
möchten, z. B. 7.
4. Drücken Sie erneut die Grüne Taste.
5. Zum Verlassen des Untermenüs die MENÜ-Taste zweimal drück-
en.
n
Programmname
Über diese Funktion können die einzelnen Sender anhand der
Tasten
1 oder 2
Namen versehen werden
.
neu nummeriert oder mit einem neuen
.
Channel Table
n
Die unten stehende Tabelle zeigt die empfangbaren Kanäle und die
Kanalbelegung für dieses LCD-monitor
n
Selbstart (Selbstabstimmen)
1. Wählen Sie anhand der Taste e oder d die Option “Auto sort”
aus. Die Taste
2. Während des Sendersuchlaufs werden die Kanalfrequenzen –
ausgehend von Position 1 – automatisch erfasst und gespeichert.
Überspringen
n
Die Funktion “Überspringen” befindet sich direkt unter der
Frequenzanzeige auf dem Bildschirm.
Bei eingeschalteter Funktion kann nicht länger Zugriff auf einen
Kanal genommen werden. Durch die Tasten e oder d lässt sich die
Funktion ein- bzw. ausschalten.
Die einzige Möglichkeit, einen solchen Kanal aufzurufen, ist über die
Direkteingabe per Fernbedienung.
Speichern
n
Die Funktion “Speichern” befindet sich direkt unter “Überspringen”
auf dem Bildschirm.
Wenn Sie mit allen Einstellungen unter “Preset” fertig sind, können
Sie von “OK?” auf “OK” schalten. Dies bewirkt, dass alle unter
Preset vorgenommenen Einstellungen automatisch gespeichert
werden.
1
drücken. Der Sendersuchlauf beginnt
.
.
n
Frequenz
.
Die angezeigte Frequenz erscheint auch in der
Anzeige, ausgenommen beim Sendersuchlauf, wo sich
die angezeigte Frequenz während des Suchvorgangs
ändert.
1. Zur manuellen Frequenzwahl die Taste 5oder 6
drücken.
(Siehe Sendertabelle.)
Sie können entweder...
a) anhand der Tasten 0-9 die Kanalfrequenz
anhand der Sendertabelle eingeben oder
b) die Taste 1 oder 2 drücken und eine
Weile niedergedrückt halten (ca. 5 Sekunden), bis der
Sendersuchlauf beginnt. Der Sendersuchlauf stoppt,
sobald ein Sender gefunden wurde.
c) Durch erneutes Niederdrücken der Taste die
Frequenz wieder verlassen.
Wiederholen Sie den obigen Vorgang, bis der
gewünschte Kanal gefunden ist.
2. Die Taste 5oder6 drücken und die Option
“Speichern” auswählen. Die OK Taste drücken. Die neue
Frequenz und alle anderen Einstellungen werden gespeichert.
Page 33

D D
Einstellungen PC-Menü
Schließen Sie Ihren PC über den Stecker an PC-IN an der
Rückseite des Monitors an. Wählen Sie anschließend über die Taste
v auf Ihrer Fernbedienung den PC-Modu aus. Das Gerät wird
dann zum Monitor für den PC.
Durch Drücken der Taste MENU auf der Fernbedienung erscheint
auf dem Bildschirm ein Menüfenster, in dem Sie die Einstellungen
ändern können.
Um die Bildeinstellungen zu ändern, wählen Sie mit den Tasten e
oder d auf der Fernbedienung „Bild“ auf und rufen Sie über die
Taste 1 folgendes Menü für die Bildeinstellungen auf.
Drücken Sie die Taste 1 oder 2, um die Helligkeit und den
Kontrast einzustellen.
Bildposition verändert die horizontale oder vertikale Ausrichtung
sich automatisch ein, wenn er ein Signal findet. Mit denPC-Eingang)
Tasten 1 oder 2 schalten Sieden Energiesparmodus EIN oder
AUS.
des Bildes;rufen Sie die Untermenüs mit der Taste1 auf und
nutzen Sie für Veränderungen die Taste 1 oder 2 auf der
Fernbedienung.
Videoanpassung verändert die Phase und die Uhr auf dem
Bildschirm. Ist das Bild verschwommen oder körnig, so können Sie
es mit dieser Funktion schärfer stellen Nutzen Sie für
Veränderungen die Tasten1 oder 2 auf der Fernbedienung.
Autom. Anpassung passt das Bild automatisch an; verwenden Sie
dazu die Taste 1. Dadurch werden alle oben genannten
Einstellungen automatisch angepasst. Die automatische Anpassung
kann auch über die Taste /Programminformationenauf der
Fernbedienung vorgenommen werden ohne das Menü aufzurufen.
Auflösung zeigt die aktuelle Bildauflösung an. Diese Anzeige dient
ausschließlich zur Information und kann nicht bearbeitet werden.
Weißnuancen:Sie können die Taste 1 oder 2benutzen, um
die Farbnuancen des Bildschirms zu verändern - wählen Sie die
Weißnuancen rot (R), grün (G) oder blau (B). Dadurch zeigt das
Bild mehr von der ausgewählten Farbe an; wenn Sie z.B. rot wählen,
können Sie die Rottöne des Bildes mit der Taste 1 oder 2verstärken oder reduzieren.
Native Auflösung:Sofern der PC WXGA-kompatibel ist (1366x768),
erfolgt die Wiedergabe in nativer Auflösung.
Die Bildschirmeinstellung kann anhand der 1 oder 2Knöpfe
am Monitor geändert werden, um das XGA/WXGA-Signal zu empfangen.Drücken Sie MENU, um zum Hauptmenü zurückzuke
hrengespeichert. Nähere Informationen für Ton-Einstellungen entnehmen Sie dem vorigen Menü.
Off-Timer und AV2-Einstellungen entsprechen denen in allen
anderen Eingangsmodi (Seite 27).
Einstellung: Drücken Sie die MENÜ-Taste auf der Fernbedienung
und wählen Sie mithilfe der Tasten e oder d "Einstellung" aus. Mit
der Taste1 öffnen Sie das Menü.Ist der Energiesparmodus
eingeschaltet, so schaltet derMonitor auf diesen Modus um, wenn 1
Minute lang kein Signal empfangen wird; die LED-Anzeige wechselt
Page 34

DD
Teletext
Teletext
schiedliche Informationen, wie z.B. Nachrichten, Sportergebnisse,
Wetter und Reiseberichte.
Teletext-Empfang
Wenn Ihr Antennensignal schwach ist, kann es zu Problemen beim
Empfang von Teletext kommen.
Helligkeit von Teletext und Bild
Hier können Sie die Helligkeit des Teletextes ändern. Bitte kehren Sie
dazu in den TV-Modus zurück. (Siehe Bildmenü - Text Hell auf Seite
30).
- Dieser kostenlose Service bietet Ihnen viele unter-
Allgemeine bedienung
n
Automatische Ausschaltfunktion
Dieses LCD-monitor verfügt über eine automatische
Ausschaltfunktion. Ist der Fernseher noch nach Sendeschluß
eingeschaltet, schaltet er auf Bereitschaftsbetrieb, wenn er 10
Minuten lang kein Antennensignal mehr empfangen hat.
Programminformation/Tonwiedergabesystem-
n
Wähler
Drücken Sie ca. 5 Sekunden lang die Taste zur Anzeige der
Programminformationen, wie z.B. der aktuellen Programmnummer,
des Sendernamens, Mono/Stereo-Status, Soundsystems und der
verbleibenden Zeit, falls der Timers eingestellt ist.
S-1: B/G Soundsystem
S-2: D/K Soundsystem
S-3: I Soundsystem
S-4: Frankreich SECAM L/L’ System
Page 35

D
Bildgröße auswählen.
Bildschirmeinstellungen
n
Heutzutage gibt es viele verschiedene Übertragungsformate in verschiedenen Größenverhältnissen, z.B. 4:3, 16:9 und Videoformate
wie Letterbox
0
Im hochauflösenden (720p / 1080i) HDMI-Modus, bleibt das Bild im
16:9-„Vollbild”-Format und kann nicht gewechselt werden.
Natural
n
Normal
n
D
Zoom
n
n
Titel Ein
Page 36

D
D
Technische Daten
Netzspannung 220~240V, 50 Hz Wechselspannung
Fernsehnormen B/G, D/K, I, L’L
Farbsysteme PAL/SECAM/NTSC 4,43 bei
Fernsehempfang
Kanäle
Eingangsimpedanz des
Antennenauschlusses 75
AV-Anschlüsse:
AV1: CENELEC Standard
Eingänge: Composite Video, RGB(5V RGB mit 5V sync an
Pin 14) und Audio-L/R
Ausgänge: T V-Ausgabe mit Composite Video undA u d i o - L / R
AV2: CENELEC Standard
Eingänge:
Ausgänge:
HDMI-Eingang: Digital RGB input
PC Input: Mini D-SUB 15-polig und 3,5 mm Audiobuchse
NTSC 3.58 im AV Modus
VHF E2~E12,F2~
UHF 21~69,
KABEL-TV: X,Y,Z, S1~S41, B-Q
Composite video, S-VHS and audio-L/R
Monitor-output with composite video and audio-L/R
F10,
R 1 ~ R 1 2
Nützliche Hinweise
n KEIN BILD, KEIN TON
l
Überprüfen Sie, ob das LCD Monitor an den Strom angeschlossen
ist.
Versuchen Sie, einen anderen Kanal einzuschalten; ist dieser in
l
Ordnung, besteht wahrscheinlich eine Sendestörung.
l
.
Überprüffen Sie, ob der Monitor sich im Standby-Modus befindet.
n
SCHLECHTES BILD, TON IN ORDNUNG
Stellen Sie den HELLIGKEITSREGLER neu ein.
l
Stellen Sie den FEINEINSTELLUNGS REGLER neu ein.
l
l
Überprüfen Sie die Antennenverbindungen.
n
KEINE FARBE, BILD IN ORDNUNG
Stellen Sie den FARBREGLER neu ein.
l
l
Stellen Sie den FEINEINSTELLUNGS REGLER neu ein.
l
Überprüfen Sie die Antennenverbindungen.
l
Überprüfen Sie die Kabelanschlüsse.
SCHWACHES BILD
n
l
Überprüfen Sie die Antennenverbindungen an der Rückseite des
Geräts.
l
Überprüfen Sie die Dachantenne, falls vorhanden.
Richten Sie die Antenne neu aus.
l
n
FERNBEDIENUNG FUNKTIONIERT NICHT
Überprüfen Sie, ob die Batterien richtig eingelegt wurden.
l
Überprüfen Sie den Zustand der Batterien.
l
Überprüfen Sie, ob die RC-Hemmung auf EIN gestellt ist.
l
Kontrastverhältnis 1500:1
Bildschirmgröße (Zoll) 42” / 107 cm
(Diagonale Messung)
Display-Auflösung (WXGA) 1366 x 768
Betrachtungswinkel H:178º, V:178º
Abmessungen in mm(BxHxT) 1032 x 625 x 126.5
Gewicht (kg) 22.5
Die folgenden Fehler werden nicht vom Empfänger verursacht:
"GEISTERBILDER"
Reflektionen von Signalen von Bergen oder hohen Gebäuden verursachen Vielfachbilder, sogenannte "Geisterbilder". Diese Störungen
können durch eine Positionsveränderung der Antenne oder durch
Installierung einer neuen, für Ihr Gebiet geeigneten Antenne, auf ein
Minimum reduziert werden.
"STÖRUNGEN"
Störungen können durch Elektrogeräte, Autozündanlagen usw. verursacht werden. Dies sollte normalerweise ein vorübergehender
Zustand sein, sollte diese Störung jedoch bestehen bleiben, wenden
Sie sich an den Service.
Hotelmodus
Preset nicht gestattet
n
Der Sendersuchlauf ist deaktiviert.
Senderposition beim Einschalten
n
Einstellung
1. Die Taste auf der grün Fernbedienung drücken und bei niederge-
drückter Taste die Taste 5 am LCD-monitor drücken.
2. Anhand der Taste 5 oder 6 die Option Hotelmodus auswählen
und diesen über die Taste 1 ein. bzw. ausschalten.
.
.
3. Anhand der Taste 6 die Option zur Auswahl eines
Startprogramms einschalten und über die Taste 1 oder 2 das
gewünschte Programm auswählen.
4.Zum Verlassen des Menüs, betätigen Sie den Menü knopf.
OFF/ 0~99 / AV1 / RGB / AV2/ HDMI / PC
Page 37

LIZENZVEREINBARUNG
Lizenzvereinbarung
Das Produkt (d. h. das Gerät bzw. die Anlage, auf die sich
diese Dokumentation bezieht) beinhaltet Software (die in das
Produkt eingebetteten Softwareprogramme, Hilfsprogramme
und Module), die Eigentum von Sanyo oder dessen
Lizenzgebern ist. Lesen Sie sich vor dem Gebrauch dieses
Produkts bitte die Bedingungen für die Lizenzvereinbarung
für Endnutzer durch. Falls Sie mit den Bedingungen dieser
Lizenvereinbarung nicht einverstanden sind, verwenden Sie
das Produkt bitte nicht weiter – legen Sie es unbenutzt in die
Verpackung zurück und geben Sie diese zusammen mit dem
Kaufbeleg an Ihren Händler zurück, wo man Ihnen den
Kaufbetrag in voller Höhe zurückerstatten wird. Durch die
Nutzung dieses Produkts erklären Sie sich einverstanden,
sich an die Bedingungen und Konditionen der
Lizenzvereinbarung zu halten.
Gewährung der Lizenz, Konditionen und Einschränkungen
1. Sanyo gewährt Ihnen eine nicht ausschließliche, weltweite
(abhängig von Exportkontrollen), nicht übertragbare
(ausgenommen die Ausnahmeregelungen unter Paragraf 2),
gebührenfreie Lizenz zur Nutzung der Software im und mit
dem Produkt.
2. Ohne die vorherige schriftliche Genehmigung von SANYO
dürfen Sie Ihre Lizenzrechte an der Software an niemanden
abzutreten. Wird eine Abtretungsgenehmigung erteilt, darf
die Software nur gemeinsam mit dem Produkt abgetreten
werden, VORAUSGESETZT, der Abtretungsempfänger hat
die Bedingungen und Konditionen dieser Lizenz gelesen und
sich damit einverstanden erklärt.
3. Sie müssen dafür sorgen, dass die in dieser Software
enthaltenen Copyright-, Waren- und anderen Schutzzeichen
erhalten bleiben und nicht geändert oder entfernt werden.
4. Die hierunter gewährte Software ist urheberrechtlich
geschützt und es wird ein Nutzungsrecht eingeräumt (die
Software wird nicht verkauft). Insbesondere übertragt Ihnen
SANYO keine Rechtsansprüche und Eigentumsrechte an der
Software. Die hierunter gestellte Software kann Materialien
enthalten oder aus Materialien hergeleitet worden sein, die
SANYO in Lizenz von einem Drittunternehmen erhalten hat.
5. Ausgenommen im gesetzlich zulässigen Rahmen dürfen
Sie die Software nicht:
l mit anderer Computer-Hardware als dem Produkt
verwenden;
l ganz oder teilweise kopieren;
DD
Lizenzablauf
Diese Lizenz ist bis zu ihrem Ablauf gültig. Bei Verletzung
der Lizenzbedingungen wird die Lizenz automatisch entzogen.
Ausschlussklausel
1. Die Software wird (im gesetzlich zulässigen Rahmen)
ohne Mängelgewähr geliefert. SANYO und dessen
Lieferanten übernehmen keine Gewährleistung ausdrücklicher oder impliziter Art, einschließlich (aber nicht beschränkt
auf) die Gewährleistung, dass die Ware von zufrieden stellender Qualität und gebrauchstauglich ist und gegen keinerlei Rechte verstößt (die Ausschlussklausel gilt nur in dem
Maße, wie ein Ausschluss gesetzlich nicht zulässig ist).
2. Unter keinen Umständen übernimmt SANYO Haftung für
direkte, indirekte, beiläufige oder Folgenschäden (einschließlich Gewinnverluste, Unterbrechung der
Geschäftsabläufe, Datenverluste bzw. Kosten für die
Beschaffung von Ersatzware, -technologien und -diensten),
die aus der Nutzung bzw. der Nichtnutzbarkeit der Software
erwachsen (ausgenommen in dem Maße, wie ein derartiger
Haftungsausschluss gesetzlich unzulässig ist).
Allgemeines
1. Diese Lizenzvereinbarung unterliegt der englischen
Gesetzgebung. Nutzer können Ansprüche nur in englischen
Gerichtshöfen geltend machen. SANYO ist berechtigt,
Ansprüche in den Gerichtshöfen einer jeden Gerichtsbarkeit
geltend zu machen.
2. Die obigen Bestimmungen und Konditionen treten anstelle
aller früheren Vereinbarungen schriftlicher oder mündlicher
Art, die zwischen Ihnen und SANYO in Bezug auf die
Software abgeschlossen wurden.
l in ihrer Gesamtheit (oder teilweise) in Programme
einbauen, die von Ihnen (oder in Ihrem Auftrag) entwickelt
wurden bzw. von Ihnen genutzt werden;
l zurückbauen, dekompilieren oder disassemblieren;
l zur Nutzung (ganz oder teilweise) mit anderer
Computerhardware als dem Produkt freigeben oder gestatten, dass die Software zur Nutzung mit anderer
Computerhardware weitervertrieben wird, oder die Software
ganz oder teilweise vermieten, verpachten, verschenken,
verleihen, verkaufen, vertreiben oder deren Besitz übertragen.
Page 38

NL
LET OP: De onderstaande informatie voor uw eigen veiligheid goed doorlezen en bewaren. Dit toestel is ontworpen en gemaakt met het oog
op uw persoonlijke veiligheid. Verkeerd gebruik kan echter een elektrische schok veroorzaken of brandgevaar opleveren. Om te voorkomen dat de
beveiligingen die in dit toestel zijn ingebouwd buiten werking worden gezet, dient u de volgende basisregels voor installatie, gebruik en onderhoud in acht
te nemen.
NL
Installatie
Niets op het netsnoer leggen.
De LCD-MONITOR nooit zo plaatsen dat het net-snoer kan worden
beschadigd doordat mensen eroverheen lopen.
De wandcontactdozen en verlengsnoeren nooit overbelasten, omdat
dit brand kan veroorzaken of een elektrische schok kan opleveren.
Plaats deze LCD-MONITOR niet in de buurt van om het even welke
warmtebronnen zoals radiatoren, verwarmingstoestellen, kachels en
andere producten die warmte genereren (met inbegrip van versterkers).
Plaats deze LCD-monitor niet in direct zonlicht.
Zet uw LCD-MONITOR nooit op een onstabiele voet, plank of tafel.
Als de LCD-MONITOR valt, kan dat ernstig lichamelijk letsel tot
gevolg hebben en kan het toestel beschadigd worden. Uw verkoper
kan u adviseren over goedgekeurde standaards of u helpen aan
montagevoorschriften op boekenplanken of aan de muur.
Deze LCD-MONITOR alleen aansluiten op de spanning die is
aangegeven op de televisie of vermeld staat in de handleiding. Als u
niet weet welke spanning u in uw huis heeft, kunt u dit vragen aan
uw leverancier of aan het plaatselijk elektriciteitsbedrijf.
Voor extra bescherming raden we ten zeerste aan om de voeding
naar deze LCD-monitor via een aardlekschakelaar te leiden.
Gebruik
Nooit accessoires aansluiten die niet specifiek voor deze LCD-
MONITOR zijn ontworpen.
Nooit voorwerpen via de gleuven en openingen in de televisie laten
vallen of doordrukken. Sommige interne onderdelen staan onder
zeer hoge spanning en als hiermee contact wordt gemaakt bestaat
het gevaar op elektrische schok. Nooit vloeistof in de LCD-MONITOR laten lopen. Plaats geen voorwerpen zoals vazen met vloeibare
s t o ffen op het televisietoestel.
Stel de LCD-MONITOR niet bloot aan regen of gebruik hem niet in
de buurt van water, b.v. in de buurt van een badkuip, een gootsteen,
in een vochtige kelder, enz. Gebruik de LCD-MONITOR niet net na
een verplaatsing van een omgeving met een lage temperatuur naar
een ruimte met een hoge temperatuur, omdat dit condensatie kan
opleveren die brand, elektrische schokken of andere ongevallen kan
veroorzaken. De LCD-MONITOR vóór het schoonmaken, loskoppelen van het wandcontact.
Geen vloeibare reinigingsmiddelen in spuitbussen direct op de LCDMONITOR gebruiken. Met een zachte doek reinigen.
Deze LCD monitor zou een minimumafstand van 5cm vanaf de
muur moeten hebben en de monitor zou 10cm afstand rond de
bovenkant en de kanten moeten hebben
Plaats geen kaarsen of andere brandende objecten op, naast of
achter het toestel. Brandende voorwerpen mogen nooit gebruikt worden in de nabijheid van het toestel.
Niet opstellen in de buurt van een open vlam. Gebruik nooit
open vuur is in de buurt van deze LCD-monitor.
Deze LCD-monitor mag niet worden ingebouwd in of op
welke andere manier dan ook worden omsloten, omdat de
opbouw van warmte de levensduur van de monitor verkort.
Monteer de monitor altijd met behulp van de aanbevolen
bevestigingsmiddelen.
Belangrijk:
DIT PRODUCT MOET GEAARD ZIJN
Dit toestel is voorzien van een goedgekeurd netsnoer en een
goedgekeurde, niet-verwijderbare netstekker van het Engelse type.
Het vervangen van een zekering in dit type stekker gaat als volgt:
1. Verwijderen de zekeringdeksel en de zekering.
2. Plaats een nieuwe zekering van het type BS1362 13 Amp
A.S.T.A. of een BSI goedgekeurd type.
3. Zorg ervoor dat u de zekeringdeksel weer correct aanbrengt.
Als u de zekeringdeksel kwijt bent of als hij beschadigd is, dan mag
u de stekker NIET gebruiken, maar moet u deze vervangen door
een correcte stekker.
Als de gemonteerde stekker ongeschikt is voor uw wandcontactdozen, snij deze dan los en monteer een passende stekker aan de
kabel. Als de netstekker voorzien is van een zekering, dan moet
deze 13 Amp. Zijn. Zorg ervoor dat de zekeringdeksel correct is
gemonteerd. Als u een stekker zonder zekering gebruikt, dan mag
de zekering op het verdeelbord niet groter zijn dan 13 Amp.
Opmerking: De verwijderde stekker moet worden vernietigd om
mogelijk gevaar van schokken te voorkomen, mocht hij elders in een
stopcontact van 13 Amp worden gestoken.
De draden in dit netsnoer zijn gekleurd volgens de code hieronder:
Blauw -------> Neutraal
Bruin ----> Spanning
Groengeel ----> Aarde
1. De Blauwe draad moet worden verbonden aan de klem die is
gemarkeerd met de letter “N” of ZWART gekleurd.
2. De Bruine draad moet worden verbonden aan de klem met de
letter “L” of ROOD gekleurd.
3. De Groengele draad moet worden verbonden aan de klem die is
gemarkeerd met de letter “E” of GROEN of GROENGEEL is gekleurd.
Voordat u de deksel van de stekker terugplaatst, moet u eerst controleren of snoerklem over de mantel van de kabel klemt – en niet
slechts over de draden.
Probeer nooit de veiligheidsvoorziening van de geaarde stekker te
omzeilen.
DIT TOESTEL IS NIET ONTKOPPELD VAN DE NETVOEDING,
TENZIJ U DE NETSTEKKER HEEFT VERWIJDERD.
DE INSTALLATEUR MOET ERVOOR ZORGEN DAT DE 'NETSTEKKER EENVOUDIG TOEGANKELIJK IS.
Belangrijke recycling-informatie.
Sanyo producten zijn ontwikkeld en gefabriceerd uit eerste kwaliteit materialen, de
onderdelen kunnen worden gerecycled en
weer worden gebruikt.
Het symbool betekent dat de elektrische en
elektronische onderdelen apart van het normale huisafval vernietigd worden.
In de Europese Unie wordt de gebruikte elektrische en elektronis-
che apparatuur bij de daarvoor wettelijke instanties aangeboden.
Alstublieft help allen mee om het milieu te
beschermen.
Dit logo en recyclagesysteem wordt enkel toegepast in EU-
0
landen en wordt niet toegepast in andere landen van de wereld.
Page 39

NL
NL
Onderhoud
Uw LCD-Monitor is volledig getransistoriseerd en bevat geen onderdelen die door de gebruiker kunnen worden vervangen.
Gelieve de achterzijde van deLCD-Monitor niet zelf te verwijderen. Het apparaat werkt met hoge spanningen en kan objecten schade
toebrengen en zelfs mensen in gevaar brengen. Laat alle nodige reparaties en ander onderhoud over aan bevoegde technici. Zij
gebruiken enkel onderdelen die voldoen aan de veiligheidsprocedures van de originele onderdelen. Het gebruik van originele
onderdelen vermijdt allerhande risico’s.
Haal de stekker van de LCD-MONITOR uit de wandcontactdoos en laat in de onderstaande gevallen eventuele reparaties uilcd-monitoroeren door vakbekwame servicemonteurs :
n
Als netsnoer of stekker beschadigd zijn.
n
Als er vloeistof in de LCD- Monitor is gelopen.
Als de LCD-Monitor blootgesteld is aan regen of water.
n
n
Als de LCD-Monitor is gevallen of de kast is beschadigd.
n
Als de LCD-Monitor opeens duidelijk anders werkt dan normaal.
Als de LCD-Monitor niet normaal werkt ook als de aanwijzingen in de handleiding precies zijn opgevolgd.
n
Alleen de bedieningsorganen instellen die in de handleiding genoemd worden, omdat verkeerd instellen van andere bedieningsorganen het
toestel kan beschadigen. Vaak kost het een vakkundige monteur dan heel wat tijd om de LCD-Monitor weer te repareren.
Page 40

NL
Stap : 1 Aansluitingen (Belangrijk)
n
Sluit het toestel naar wens aan op de antenne-, VGA-, BNC-
AC schakelaar
of Scartaansluiting.
1. Sluit de IEC-netsnoerkoppeling aan op de connector van het
toestel zoals hierboven weergegeven.
2. Sluit het netsnoer van de LCD-Monitorl aan op een wandcontact-
NL
2.AV1/ AV2
U kunt uw dvd-speler of andere Scart-stekkers aansluiten op de
AV1 en AV2 Scart-verbindingsklemmen op de achterkant van het
klemmenbord, zoals gewenst.
doos.
Omdat dit toestel geen Aan/Uit schakelaar heeft, moet u ervoor
0
zorgen dat de netstekker eenvoudig toegankelijk is.
De LCD- Monitor is voorbereid voor een netspanning van WS 220-
0
240 V, 50 Hz. De stekker uittrekken om de LCD- Monitor volledig
los te koppelen van het net. Wanneer de LCD- Monitor lange tijd
niet zal worden gebruikt, raden we aan om de stroomkabel uit het
wandcontact te trekken.
Gebruik de juiste netstekker voor uw woonplaats, die is geleverd
0
bij het toestel.'
3. Waarschuwing: Voorkom letsel - het toestel MOET veilig aan de
wand worden bevestigd, in overeenstemming met de instal-
WAARSCHUWING!
spanning. Laat herstellingen door bevoegd personeel
uitvoeren.
latievoorschriften.
n
Invoer selecteren
Om te wisselen tussen AV1, RGB, AV2, (RGB H/V or Y, Pb, Pr) AVF3,
DVI of PC-modus, drukt u een paar seconden lang op de knop TV/AV
van uw afstandsbediening. Dan verschijnt het keuzemenu op het
scherm. Gebruik de knoppen e of d om de juiste invoer te
selecteren.
Dit toestel werkt op een hoge
3. PC-aansluiting
Dit toestel is voorzien van een PC-connector(PC-IN D-SUB).U kunt
een PC aansluiten op het toestel en dit gebruiken een monitor (zie
pagina 45).Audio kan worden aangesloten via de 3,5 mm PC-audio
ingang. Deze invoer ondersteunt vele verschillende resoluties (zie
pagina 74).
Stap 2: Installatie van de batterij voor
afstandsbediening
Twee "AA" batterijen van 1,5 Volt zodanig installeren dat de "+"- en ""-aanduidingen op de batterijen overeenstemmen met de "+"- en "-"aanduidingen in de eenheid voor afstandsbediening.
1.HDMI (High Definition Multimedia Interface)
Dit LCD- Monitor is voorzien van een HDMI-aansluiting. Deze invoer
ondersteunt vele verschillende resoluties, zoals weergegeven op pagina 74. Zie pagina 42 voor meer informatie over gebruik van de
menu's.
Bij dit produkt zijn batterijen geleverd.
Wanneer deze leeg zijn, moet u ze niet
weggooien maar inleveren als KCA.
Page 41

NL NL
Page 42

NL
NL
Bedieningsknoppen / monitor
De rode Standby-lamp van uw LCD-Monitor wijst op de aan-
1.
wezigheid van stroom.
Standby in-/uitschakelen
Standby wordt gebruikt om het LCD-monitor korte tijd uit te schakelen. In standby is de televisie uitgeschakeld, maar staat er wel nog
stroom op.
Om de monitor op standby te zetten, drukt u op knop4.
l
De blauw stroomindicator gaat feller branden.
MENUWERKING
De meeste functies van uw LCD-monitor worden ingesteld via het
menu, met behulp van de afstandsbediening.
Tijdens de menubediening kunt u onderaan het scherm zien welke
functies u kunt gebruiken,voor de navigatie door het menu.
Druk op de toets MENNU om het hoofdmenu op te roepen.
l
Druk op één van de volgende toetsen om de TV vanuit stand-by in
te schakelen: 4 toets, 5, 6 toets, 0-9 Cijfertoetsen.
Wanneer de stroomverklikkerlamp knippert, de TV
uitschakelen met behulp van de Standby-schakelaar, de
stroomkabel uit de contactdoos trekken en contact
zoeken met onze Service-afdeling.
Dit is een teken dat het TV toestel in inwendige protectie
gaat.
2.Bedieningsknoppen (onderkant van de behuizing)
Menu/F knop:
kleur, scherpte en menutaal
Invoer/ OK knop:
AV1,RGB,AV2, HDMI en PC.
edknoppen:
passen
4 knop:
stand (om de LCD-monitor geheel uit te schakelen, moet u de
netstekker verwijderen)
roteren tussenvolume, contrast, helderheid,
wisselen tussen de stand TV,
instellingen naar boven en beneden aan-
wisselen van de weergavestand naar de standby-
Om een submenu te selecteren drukt u op de toets e of d en zodra
het gewenste submenu oplicht, op de toets 1 of 2
Picture menu
Wanneer u een submenu heeft ingesteld, kunt u dit verlaten door op
de toets MENU te drukken. Druk nogmaals op de toets MENU om het
hoofdmenu te verlaten.
1. Druk op de toets MENU. Selecteer Beeld met de toets e of d.
Druk op de toets1 om het beeldmenu op te roepen.
Stel de beeldinstellingen in naar uw eigen voorkeur.
2. Selecteer Helderheid, Contrast, Kleur en Scherpte met de toets e
of d. Stel de gewenste niveaus in met de toets 1 of 2.
3. Voorinstelling: Met de toets 1 of 2 kunt u uw “Persoonlijke”
instellingen selecteren, maar ook de instellingen Dynamisch,
Standaard of Eco (voor helderheid, contrast, kleur en scherpte).
4. Ruisdemping: Hiermee kunt u eventueel aanwezige beeldruis (korrelig beeld) verminderen. Selecteer Midden, Hoog, Auto, Laag of UIT
met de toets 1 of 2.
5. Huidskleur: Hiermee kunt u de weergave van de huidskleur verbeteren. Selecteer Aan of Uit met de toets 1 of 2.
Kleurtint: Is alleen beschikbaar wanneer NTSC-apparatuur is aangesloten.
6. Teksthelderheid: Dit kunt u instellen door Min, Midden of Max te
Page 43

NL
NL
Instellingmenu
Kinderslot
n
U kunt ongewenste bediening van de LCD-monitor via de koppen
aan de onderste rand van de monitor voorkomen.
1. Druk op de toets MENU. Selecteer Instelling met de toets e of d.
Druk op de toets1
om het instellingenmenu op te roepen.
2. Selecteer Kinderslot met de toets e of d.
3. Druk op de toets 1 of 2 om het kinderslot Aan of Uit te
zetten.
4. Druk op de toets MENU om het instellingenmenu te verlaten.
n
OSD-taal
Gebruik de toetsen
stellen (Frans, Duits, Italiaans, Spaans, Nederlands). Druk op de
toets MENU om te verlaten.
Uit-timer instelling
n
De Uit-timer zet de tv op stand-by wanneer de geselecteerde tijd is
verstreken.
1. Druk op de toets MENU. Selecteer Instelling met de toets e of d.
Druk op de toets 1 om het instellingenmenu op te roepen.
.
1 en2
om de gewenste OSD-taal in te
4. Druk op de toets MENU om het instellingenmenu te verlaten.
AV2 Instelling
n
Om in het instellingenmenu AV2 te selecteren drukt u op de toets d,
waarna u Video S-Video,Video kunt instellen, afhankelijk van uw
videorecorder.
1. Druk op de toets MENU. Selecteer Instelling met de toets e of d.
Druk op de toets 1 om het instellingenmenu op te roepen.
2. Selecteer AV2 met de toets e of d.
3. Druk op de toets 1 of 2 om S-Video, Video te selecteren.
Preset menu
4. Druk op de toets MENU om het instellingenmenu te verlaten.
Wijzigingen worden automatisch opgeslagen.
1. Druk op de toets MENU.
2. Selecteer Voorinstelling met de toets 1 of 2 Druk op de
toets 8 om het voorinstellingenmenu op te roepen.
U kunt het voorinstellingenmenu gebruiken om nieuwe kanalen in
0
te stellen, de volgorde van de kanalen en bijbehorende programmaposities te wijzigen en om de zenders nauwkeurig af te stemmen.
2. Selecteer UIT-Timer met de toets e of d.
3. Druk op de toets 1 of 2 om de tijd te wijzigen.
U kunt de tijd wijzigen in stappen van 5 minuten. De maximumtijd is
120 minuten.
Als u de uit-timer heeft ingesteld, dan verschijnt er een venster in de
hoek van het scherm.
4. Druk op de toets MENU om het instellingenmenu te verlaten.
Teksttaal
n
1. Druk op de toets MENU. Selecteer Instelling met de toets e of d.
Druk op de toets 1 om het instellingenmenu op te roepen.
2. Selecteer Teksttaal met de toets e of d.
3. Druk de toets 1 of 2 om West, Oost, Grieks of Cyrillisch te
selecteren.
Page 44

NL
Preset Menu
Programmasortering
n
Deze functie kunt u gebruiken om de posities van de zenders te
veranderen. Dit is vooral handig na de automatische zenderinstelling.
Kies een programma dat u van de ene naar de andere positie wilt
verplaatsen.
1. Selecteer een programmapositie, bv. 4.
2. Druk op de groene toets.
3. Selecteer de programmapositie waarnaar u het kanaal wilt verplaatsen, bv. 7.
4. Druk nogmaals op de groene toets.
5. Druk twee keer op de toets MENU om het menu te verlaten.
Programmanaam
n
Met deze functie kunt u afzonderlijke kanalen een ander nummer of
een andere naam geven met behulp van de toets
1 of 2.
NL
Channel Table
n
In onderstaande tabel ziet u de zenders die u kunt ontvangen en de
kanaalfrequenties voor deze
LCD-monitor
.
Automatisch zenders zoeken
n
1.Selecteer Automatische sortering met de toets e of d. Druk op de
toets1 om het zenderzoeken te starten.
2. Tijdens het zenderzoeken worden de frequenties automatisch
gevonden en opgeslagen, te beginnen met programmapositie 1.
Overslaan
n
Overslaan staat direct onder Frequentie op het scherm.
Als de functie Overslaan aanstaat, dan wordt deze programmapositie
overgeslagen wanneer u op de toets e of d drukt.
De enige manier om de zender op deze programmapositie in te zien
is door de programmapositie met de numerieke toetsen rechtstreeks
te selecteren.
Geheugen
n
Geheugen staat direct onder Overslaan op het scherm.
Wanneer u tevreden bent over alle eerdere instellingen onder
Voorinstelling, gebruik dan de toets OK om ‘OK?’ te wijzigen in ‘OK’.
Alle voorinstellingen worden dan automatisch opgeslagen.
.
.
Frequentie.
n
Van de zender die u ziet, wordt het frequentienummer
weergegeven.
Tijdens het zenderzoeken verandert het frequentienummer telkens
wanneer er een zender is gevonden.
1. Wanneer u de zenders handmatig wilt instellen, druk dan op de
toets 5 of 6 om Frequentie te selecteren.
(Raadpleeg de zendertabel)
U heeft de volgende mogelijkheden...
van de zendertabel.
zoeken begint (na ca. 5 seconden). Het zenderzoeken stopt wanneer
er een zender is gevonden.
wilt instellen.
der heeft gevonden.
2. Druk op de toets 5 of 6 om Geheugen te selecteren. Druk op
de toets OK om de nieuwe zender en alle andere instellingen op te
slaan.
a) Voer de frequentie in met de toetsen 0-9 aan de hand
b) Houd de toets 1 of 2 ingedrukt tot het zender-
c) Blijf de toets ingedrukt houden wanneer u de zender niet
Herhaal de bovenstaande procedure totdat u de juiste zen-
Page 45

NL
PC VERRICHTING
Menu-instellingen pc
Sluit uw pc aan op ofwel PC-IN aan de achterkant van
het toestel. Selecteer na het aansluiten de pc-modus met de
toets v van uw afstandsbediening. Het toestel wordt dan een
monitor voor de pc.
Wanneer u op MENU van de afstandsbediening drukt, verschijnt er
een menuscherm waarmee u de instellingen kunt aanpassen.
Selecteer ‘Beeld’ met de toetsen eof d van de afstandsbediening
om de beeldinstellingen aan te passen. Wanneer u op
verschijnt het volgende menu:
Pas met de toetsen
1 en2
de helderheid en het contrast van
1
drukt,
NL
het beeld aan.
Met Beeldpositie stelt u de weergave in op horizontal of verticaal,
Druk op de toets
u met de toetsen
Met Video aanpassen kunt u de fase en de klok op het scherm aan
passen. Wanneer het beeld onscherp of korrelig is, kunt u met deze
functie het beeld helderder maken.Aanpassen doet u met de toetsen
1 en2
Met Auto aanpassen past u met de1het beeld automatisch aan.
Hiermee worden bovenstaande instellingen automatisch gewijzigd. U
activeert de functie ‘Auto aanpassen’ ook met de toets
van de afstandsbediening.
Resolutie geeft de huidige resolutie van het beeld aan. Dit is alleen
ter informatie, u kunt deze instelling niet wijzigen.
Witte toon: Gebruik
passen, gebruik de witte toon Rood (R) / Groen (G) / Blauw (B).
Hiermee past u past u de kleur van het beeld aan, u kunt de
weergave bijvoorbeeld meer of minder rood maken met de toetsen
1 en 2
De binnenlandse resolutie wordt gebruikt wanneer de pc WXGA
1366 x 768 kan uitvoeren.De instelling van uw monitor kan worden
gewijzigd om het XGA/WXGA-signaal te ontvangen. Dit doet u met
de toetsen1 en 2.Zodra het signaal is geselecteerd, worden
de intellingen opgeslagen door de monitor uit te schakelen met de
standby-knop.
Als de functie Spaarstand AAN staat dan gaat de LCD-Monitor na
van de afstandsbediening.
om de submenu's te openen, aanpassen doet
1
1 en2
1 en 2
van de afstandsbediening.
om de toon van het scherm aan
1 minuut in de spaarstand staan als er geen signaal wordt
gedetecteerd. Het LED lampje wordt blauw om aan te geven dat het
toestel op standby staat. De LCD-Monitor gaat automatisch weer
aan wanneer er een signaal wordt gedetecteerd. Gebruik de
knoppen1 of 2 buttons om AAN of UIT te selecteren.
Page 46

NLNL
Teletekst
Teletekst - Dit is een gratis dienst die u allerlei informatie geeft zoals
nieuws, sportresultaten, weerberichten en reisinformatie.
Teletekst-ontvangst
Wanneer u een zwak antennesignaal krijgt, kan de ontvangst van de
teletekst problemen opleveren.
Helderheidsniveau teletekst
U kunt het helderheidsniveau van de teletekst wijzigen. Keer terug
naar de TV-modus (zie Beeldmenu - Heldere tekst op pagina 42).
Overige functies
Automatisch Afzetten van het Toestel
n
Dit
LCD-monitor
automatisch wordt afgezet. Zelfs als u de
laten staan nadat u in slaap bent gevallen, zal het
minuten nadat door de antenne geen signaal is ontvangen - worden
afgezet.
Programma-informatie oproepen/ keuzeknop
n
geluidssysteeme
Druk op de toets om programma-informatie zoals het huidige
programmanummer, de naam van de zender, de stereostatus, het
geluidssysteem en de resterende tijd als de timer ingesteld is
gedurende ongeveer 5 seconden te tonen.
l is voorzien van een functie waardoor het apparaat
LCD-monitor
LCD-monitor
S-1: B/G sound system (geluidssysteem)
S-2: D/K sound system (geluidssysteem)
S-3: I Sound system (geluidssysteem)
S-4: France (Frankrijk) SECAM L/L’ system
aan heeft
-10
Page 47

NL
Selectie van het beeldformaat
Schermopties
n
Er bestaan vandaag meerdere transmissieformaten met verschillende
beeldverhoudingen, b.v. 4:3, 16:9, en videoformaten zoals letterbox.
Bij de hoge resolutie (720p / 1080i) HDMI blijft het beeld vaststaan
0
op beeldformaat 16:9 (volledig scherm). Dit formaat mag niet worden
gewijzigd.
NL
Zoom
n
n
Vol
n
Normaal
Page 48

NL NL
Eindgebruikerslicentie
Het product (d.w.z. de uitrusting of het apparaat waarnaar
deze documentatie verwijst) bevat Software (de toepassingen, hulpprogramma’s en modules die deel uitmaken van het
product) die in eigendom is van Sanyo of zijn licentiegevers.
Voordat u het product in gebruik neemt, moet u eerst de
onderstaande voorwaarden van de eindgebruikerslicentie
lezen. Als u niet akkoord gaat met de voorwaarden van de
eindgebruikerslicentie, neem het product dan niet in gebruik,
maar pak het weer ongebruikt in en zend het retour naar uw
leverancier samen met het aankoopbewijs. U ontvangt dan
een volledige restitutie. Door het product in gebruik te
nemen, gaat u akkoord met de voorwaarden van de eindgebruikerslicentie.
Licentieverlening, voorwaarden en beperkingen
1. Sanyo verleent u een niet-exclusieve, wereldwijde (onderhevig aan exportcontrole), niet-overdraagbare (tenzij toegestaan volgens punt 2 hieronder), kosteloze licentie voor
gebruik van de Software die is meegeleverd in en bij het
product.
2. U mag geen van uw licentierechten in de software overdragen zonder voorafgaande schriftelijke toestemming van
SANYO en als deze toestemming wordt verleend, dan mag
de Software alleen worden overgedragen in combinatie met
de overdracht van het product EN op voorwaarde dat de
begunstigde de voorwaarden van deze licentie heeft gelezen
en geaccepteerd.
3. U moet garanderen dat het auteursrecht, handelsmerk en
andere beschermende vermeldingen in de Software gehandhaafd blijven en niet worden gewijzigd of verwijderd.
4. De software die hierbij wordt geleverd is auteursrechtelijk
beschermd en gelicenseerd (niet verkocht). SANYO draagt
nadrukkelijk geen titel- en/of eigendomsrechten op de software aan u over. De software die hierbij wordt geleverd kan
onderdelen bevatten die door derden aan SANYO zijn
geleverd of hieraan zijn ontleend.
5. Tenzij dit expliciet is toegestaan krachtens de wet, mag u
niet:
- de Software gebruiken in combinatie met andere
computerhardware dan die van het product;
- de Software geheel of gedeeltelijk kopiëren;
EINDGEBRUIKERSLICENTIE
Beëindiging
Deze licentie geldt totdat ze is beëindigd. Deze licentie
eindigt automatisch zonder voorafgaande kennisgeving als u
niet voldoet aan een van de bepalingen die erin zijn
opgenomen.
Disclaimer
1. De Software wordt (voor zover toegestaan volgens de wet)
‘in ongewijzigde staat’ geleverd en SANYO en zijn leveranciers sluiten uitdrukkelijk alle expliciete of impliciete
garanties uit, inclusief (maar niet beperkt tot) garanties voor
bevredigende kwaliteit, geschiktheid voor beoogde doelen en
niet-inbreuk vormend op bestaande rechten (voor zover dit
niet is uitgesloten krachtens de wet).
2. Onder geen beding kan SANYO aansprakelijk worden
gesteld voor welke directe, indirecte, gevolg- of incidentele
schade dan ook (inclusief winstderving, onderbreking van
bedrijfsactiviteiten, verlies van gegevens of de kosten voor
de aanschaf van vervangende goederen, technologieën of
diensten) die voortvloeit uit het gebruik of de onmogelijkheid
tot gebruik van de Software (voor zover dit niet is uitgesloten
krachtens de wet).
Algemeen
1. Deze eindgebruikerslicentie wordt beoordeeld naar Engels
recht en de gebruiker kan uitsluitend claims indienen bij
Engelse gerechtshoven en SANYO is gerechtigd een claim
in te dienen bij een gerechtshof in elk rechtsgebied.
2. De bovenstaande algemene voorwaarden gelden voor
elke eerder afgesloten, mondelinge of schriftelijke
overeenkomst tussen u en SANYO met betrekking tot de
Software.
- de Software geheel (of gedeeltelijk) opnemen in
andere programma’s die door u (of namens u) zijn ontwikkeld
en/of door u worden gebruikt;
- de Software nabouwen, decompileren of demonteren;
- de Software (of een gedeelte ervan) beschikbaar
maken of de distributie ervan toestaan voor gebruik met
andere computerhardware dan het product; de hele of
gedeeltelijke Software gebruiken voor verhuur, lease, gift,
uitlening, verkoop, distributie of eigendomsoverdracht.
Page 49

NLNL
TV Specificaties
Algemene specificaties
Stroomvoorziening wisselspanning 220~240V, 50Hz
Televisiesysteem B/G, D/K, I, L/L’ Systeem,
Kleursysteem PAL/SECAM on air
PAL/SECAM/NTSC 3.58 in AVmodus
Kanaalbereik VHF: E2~E12, F2~F10, R1~R12.
UHF: 21~69,
CATV: X,Y,Z,S1~S41, B-Q
Antenne ingangsimpedantie 75 ohm
AV-uitgang
AV1: CENELEC standaard
Input: Composiet video, RGB(5V RGB met 5V sync naar
pin 14) en audio-L/R
Output: tv-output met composiet video en audio-L/R
AV2: CENELEC Standard
Input: Composite video, S-VHS and audio-L/R
Output: Monitor-output met composiet video en audio-L/R
HDMI-ingang: Digital RGB input
PC ingang: Mini D-SUB 15 Pin en audio 3,5 mm
Raadgevingen
n
GEEN BEELD, GEEN GELUID
l Controleren of de stekker in het stopcontact is gestoken.
l Een ander kanaal proberen. Indien OK, waarschijnlijk moeilijkheden
met de zender.
l
Conroleer of de monitor niet op standby staat.
n
SLECHT BEELD, MAAR GOED GELUID
HELDERHEID afstellen.
l
l
FIJN-AFSTEMMING afstellen.
De antenne-aansluitingen controleren.
l
n
GEEN KLEUR, MAAR GOED BEELD
l De KLEUR afstellen.
l
FIJN-AFSTEMMING afstellen.
l Wordt het programma in kleur uitgezonden?
ZWAK BEELD
n
l
De antenne-aansluitingen controleren op de achterkant van het
toestel.
De antenne controleren. Let op gebroken draden.
l
l
De antenne beter richten.
DE AFSTANDSBEDIENING WERKT NIET
n
Controleer of de batterijen juist zijn geplaatst
l
l
Controleer of de batterijen nog vol zijn
l
Controleer of de afstandsbediening niet is vergrendeld
De volgende storingen worden niet veroorzaakt door de
ontvanger:
Contrastverhouding 1500:1
Schermformaat (inches) 42” / 107 cm
(diagonaal gemeten beeld)
Weergaveresolutie 1366x 768
(WXGA)
Kijkhoeken H:178º, V:178º
Afmetingen (BxHxD mm) 1032 x 625 x 126.5
Gewicht (kg) 22.5
"SPOOKBEELDEN"
De reflecties van signalen van bergen of hoge gebouwen veroorzaken meervoudige beelden. Die worden "spookbeelden" genoemd.
Deze abnormale condities kunnen tot een minimum worden gereduceerd door de antenne te verplaatsen of door een nieuwe antenne
aan te brengen die geschikt is voor uw lokatie.
"STORING"
Storing kan worden veroorzaakt door elektrische apparaten, ontstekings-systemen van automobielen, etc. Gewoonlijk is dit een tijdelijke
kwestie. Is echter sprake van hardnekkige storing, contact opnemen
Raadgevingen
met uw dealer.
n
Verbod voorinstelling.
Dit verbiedt het gebruik van de afstemfunctie.
n
Programmapositie bij aanzetten.
Instelprocedure
1. Houd de toets
op de knop 5 op de
2. Druk op de toets 5 of 6 om de Hotelfunctie te selecteren en de
op de afstandsbediening ingedrukt en dan
groen
LCD-monitor
.
toets 1 om de functie AAN of UIT te schakelen.
3. Selecteer programma AAN met de toets 5, selecteer de gewenste programmapositie wanneer de tv wordt aangezet met behulp van
de toetsen 1 of 2.
Page 50

II
ATTENZIONE: Leggere e conservare per motivi di sicurezza. Questo apparecchio è stato progettato e fabbricato per garantire la sicurezza
dell’utilizzatore ma un uso inappropriato può causare scariche elettriche o rischio d’incendio. Al fine di non invalidare i circuiti di sicurezza
incorporati nel monitor, osservare le seguenti regole di base durante la sua installazione, utilizzo e manutenzione.
Installazione
Non collocare alcun oggetto sul cavo di alimentazione. Non
collocare il ricevitore delmonitor in una posizione tale da consentire che il cavo venga calpestato.
Non sovraccaricare le uscite a muro e i cavi d’estensione, in
quanto potrebbero causare un incendio o una scarica elettrica.
Non posizionare il monitor vicino a fonti di calore quali radiatori,
caloriferi e stufe, né vicino a qualsiasi altro prodotto che emette
calore (inclusi gli amplificatori).
Non esporre il monitor LCD alla luce diretta del sole.
Ilmonitor non deve mai venire collocato nelle vicinanze o sopra
un termosifone o riscaldatore né in una unità integrale come uno
scaffale da libreria, a meno che non sia provvisto di adeguata
ventilazione.
Questomonitor dev’essere attivato solo dal tipo di alimentazione
indicato sul televisore o nelle Istruzioni per il funzionamento. S e
non siete sicuri del tipo di alimentazione di cui disponete, rivolgetevi all’addetto alle vendite o all’ente per l’energia elettrica locale.
Per un'ulteriore protezione si consiglia di alimentare il monitor
LCD con interruttori differenziali RCCB. Unità di sicurezza.
Non aggiungere mai accessori che non siano stati appositamente
di segnati per questo monitor.
Utilizzo
Non far cadere o inserire oggetti nelle fessure o aperture del
mobile del monitor. Alcuni componenti interni sono caricati di
alta tensione ed il contatto potrebbe causare scosse elettriche.
Non versare mai liquidi di nessun tipo sulmonitor. Non collocare
oggetti che contengono liquidi sopra il monitor.
Non esporre ilmonitor del monitor alla pioggia e non utilizzarlo in
prossimità di acqua o liquidi, ad esempio, vicino alla vasca da
bagno, al lavello della cucina, in scantinati umidi e così via. Non
utilizzare il monitor subito dopo averlo spostato da un ambiente
a bassa temperature a un ambiente a temperatura elevata. In tal
caso, infatti, è possibile che si formi della condensa, che
potrebbe essere causa di incendi, scosse elettriche e altre situazioni pericolose. Prima di eseguire la pulizia del monitor, scollegarlo dalla presa a muro.
Questo video del LCD dovrebbe avere una distanza minima di
5cm via dalla parete ed il video dovrebbe avere distanza
di 10cm intorno alla parte superiore ed ai lati
Non usare prodotti di pulizia liquidi o spray direttamente sulmonitor ma versarli prima su un panno umido. Per la pulizia utilizzare un panno morbido.
Non collocare mai oggetti roventi, candele, altre fonti di calore
o utensili che emanano fiamme sopra, dietro o accanto al monitor.
Non montare il monitor vicino a una fonte di fiamma viva.
Non usare mai fiamme vive in prossimità del monitor LCD.
Questo monitor LCD non deve essere assolutamente incassato o rinchiuso in spazi ristretti poiché il conseguente surriscaldamento ne ridurrebbe la durata.
Montare sempre il monitor utilizzando supporti e accessori
consigliati e robusti.
La sezione posteriore pinnata attorno al mobile funge da
corpo di raffreddamento poiché allontana il calore prodotto
dal monitor. Non coprire la superficie esterna del mobile
(area pinnata) né limitare in alcun modo il flusso di aria chiudendo il monitor LCD in uno spazio ristretto.
Importante:
PER QUESTO PRODOTTO È NECESSARIA LA MESSA A TERRA
L'apparecchio è corredato di un in cavo di rete in linea approvato e
da una spina di rete non smontabile per il Regno Unito approvata.
Per cambiare un fusibile in questo tipo di spina, procedere come
segue:
1. Rimuovere la copertura del fusibile e il fusibile stesso.
2. Inserire un nuovo fusibile. Deve essere di tipo BS1362 a 13A
approvato da A.S.T.A. o BSI.
3. Assicurarsi di riposizionare la copertura del fusibile in modo cor-
retto.
Se la copertura del fusibile viene persa o danneggiata, NON utilizzare la spina ma sostituirla con una intatta.
Se la spina fornita non è adatta alle prese di alimentazione disponibili, deve essere tagliata e sostituita con una spina appropriata. Se
la spina di rete contiene un fusibile, questo deve avere un'intensità
di 13 A. Assicurarsi che la copertura del fusibile sia posizionata in
modo corretto. Se si utilizza una spina senza fusibile, il fusibile del
pannello di distribuzione non deve superare le 13 A di intensità.
Nota: È necessario distruggere la spina rimossa per evitare un possibile rischio di shock qualora fosse inserita in una presa a13 A.
I fili in questo cavo di tensione sono colorati in base al seguente
codice:
Blu -------> Neutro
Marrone ----> Conduttore
Verde e giallo ----> Terra
1. Il filo Blu deve essere connesso al terminale contrassegnato con
la lettera “N” o di colore NERO.
2. Il filo Marrone deve essere connesso al terminale contrassegnato
con la lettera “L” o di colore ROSSO.
3. Il filo Giallo e Verde deve essere connesso al terminale contrassegnato con la lettera “E” o di colore VERDE oppure VERDE e
GIALLO.
Prima di riposizionare la copertura della spina, assicurarsi che il
morsetto del filo sia ben stretto sopra l'involucro del filo conduttore –
non semplicemente sopra i cavi.
Non tentare di aggirare il dispositivo di sicurezza della spina con
messa a terra.
QUESTA UNITÀ NON VIENE DISCONNESSA DALLA PRESA DI
RETE A MENO CHE IL CAVO DI RETE NON SIA DISCONNESSO
DALLA PRESA.
L'INSTALLATORE DEVE ASSICURARSI CHE IL CAVO DI RETE
SIA FACILMENTE ACCESSIBILE.
Informazione importante riguardante la raccolta e il
riciclaggio.
Il vostro prodotto SANYO è stato costruito da
materiali e componenti di alta qualità, che sono
riutilizzabili o riciclabili.
Prodotti elettrici ed elettronici portando questo
simbolo alla fine dell’uso devono essere smaltiti
separatamente dai rifiuti casalinghi.
Nell’Unione Europea esistono sistemi di raccolta differenziata per
prodotti elettrici ed elettronici.
Aiutateci a conservare l’ambiente in cui viviamo!
Nota:
L’indicazione con etichetta riguardante, la raccolta e il riciclaggio
sarà applicata esclusivamente su prodotti commercializzati negli
stati membri della comunità europea.
Page 51

II
Manutenzione
Il monitor LCD è totalmente transistorizzato e non contiene alcun componente da sottoporre a manutenzione.
Non e assolutamente consentito all’utente di rimuovere in parte o interamente, parti aderenti all apparecchio, come ad esempio il retro
del mobile. Durante la funzione dell’apparecchio, sono presenti all’interno, tensioni ad alto livello. Esposti ad oggetti o a persone,
questi livelli d’alta tensione, possono danneggiare o creare gravi ferite. Per tutti gli interventi di manutenzione e riparazioni, si prega
l’utente di rivolgersi a persone aderenti ai centri d’assistenza autorizzati. Solo in questo caso sarà possibile di garantire la sicurezza
dell’ apparecchio, evitando il rischio d’incendio o d’altri danni, questo facendo uso di parti originali con caratteristiche prescritte dal
costruttore, nel caso sia necessario la sostituzione.
Scollegare il ricevitore dalla presa a muro e richiedere
l’intervento di personale qualificato quando si verificano le seguenti condizioni:
n
Il cavo o la presa di alimentazione sono danneggiati.
n
È stato versato del liquido nel ricevitore del monitor LCD.
n Il monitor LCD è stato bagnato da pioggia o da acqua.
Il ricevitore è caduto o il mobile ha subito dei danni.
n
n
La qualità delle immagini è peggiorata.
n
Il ricevitore non funziona normalmente pur avendo seguito le istruzioni per l’uso.
Regolare solo i comandi trattati nelle istruzioni per l’uso in quanto un’incorretta regolazione degli altri comandi potrebbe danneggiare
l’apparecchio e richiedere l’intervento di un tecnico qualificato per riportare l’unità al corretto funzionamento.
Page 52

I
Passaggio 1: Connessioni (Essenziale)
n
Collegare l'unità di visualizzazione a una presa di antenna, VGA,
BNC e SCART, secondo necessità.
Connettore CA
1.Collegare la presa di alimentazione IEC alla presa di rete sul retro del
monitor LCD, come mostrato sopra
2. Collegare il cavo di alimentazione dell'unità di visualizzazione a una
presa a muro.
I
2.AV1/AV2
È possibile collegare il lettore DVD o altre prese scart ai terminali
di connessione scart AV1 e AV2 sul retro del terminale come
richiesto
Poiché il prodotto non dispone di un interruttore di
0
accensione/spegnimento di rete, assicurarsi che la spina di rete sia
facilmente accessibile.
Il monitor LCD è predisposto per un voltaggio di linea
0
AC220~240V, 50Hz. Per staccare completamente la monitor LCD
dalla rete, o nel caso in cui ilmonitor LCD non debba essere utilizzato per lungo tempo, si consiglia di staccare il cavo di alimentazione dalla presa di corrente.
Per ricevere particolari canali, connettere il cavo CATV alla presa
0
dell’antenna.
ATTENZIONE !
chiedere assistenza a personale qualificato a causa dell'elevato voltaggio. Non esporre il televisore all’acqua o accanto
a fonti di umidita` per non causare corto circuiti.
n
Selezione INPUT
Per passare dalla modalità TV alle modalità AV1, RGB, AV2 RGB HV,
Y, Pb, Pr, AV3, DVI o PC, premere ripetutamente il pulsante TV/AV sul
telecomando oppure premere e tenere premuto il pulsante TV/AV per
alcuni secondi. Sullo schermo verrà visualizzato il menu di selezione.
Utilizzare il pulsante e o d per selezionare la modalità corretta.
Per qualsiasi intervento sull’apparecchio
1.HDMI (High Definition Multimedia Interface)
Questo Monitor LCD dispone di un connettore HDMI. Questo input
supporta un'ampia gamma di risoluzioni, come mostrato a pag. 74.
Per informazioni dettagliate sulle funzioni del menu, vedere pag. 54.
3. Connessione del PC
L'unità di visualizzazione dispone di un connettore per PC (PC-IN DSUB). È possibile connettere un PC all'unità e usarla come monitor
(vedere a pag. 57).L'audio può essere connesso attraverso la presa
audio PC da 3,4 mm.Questo input supporterà un'ampia gamma di
risoluzioni (vedere pag. 74)
Passaggio 2: Installazione delle batterie del
telecomando
Installare due batterie "AA" da 1,5 volt in modo che i segni "+" e "-"
riprodotti sulle batterie corrispondano ai segni "+" e "-" riprodotti all'interno del telecomando.
Page 53

I
Page 54

I I
Comandi / Terminali
1.
Il monitor LCD a cristalli liquidi è dotato di una spia rossa di
Standby per indicare che l’alimentazione elettrica è collegata.
Attivazione/disattivazione del modo di standby
Il modo di standby va utilizzato per spegnere il monitor LCD per un
breve periodo di tempo. In posizione di standby il televisore è spento,
ma continua a ricevere la corrente di rete.
Per mettere il monitor in modalità di standby, premere il pulsante
l
4
.La luce blu della spia di alimentazione si fa più intensa
Se il monitor LCD si trova nel modo di standby, premere il tasto 4,
l
5 ,6 oppure uno qualunque dei tasti numerici (0-9) sul teleco-
Se l’indicatore dell'alimentazione lampeggia, spegnere il televisore con l'interruttore di Standby e staccare il cavo di alimentazione dalla presa di corrente. Contattare quindi il nostro
Centro di Assistenza.
Questa indicazione, lampeggio della spia power, vi avverte che
la funzione di protezione, in questo televisore, non e’ piu
operativa.
FUNZIONAMENTO DEL MENU
Molte delle funzioni del monitor LCD sono controllate da menu.
Durante l’uso del menu la parte inferiore dello schermo indica quali
controlli è possibile utilizzare.
Per accedere al menu principale premere il pulsante u.
Per selezionare un sottomenu utilizzare il pulsante e o d, premendo
mando.
2.Pulsanti di controllo (bordo inferiore del telaio)
Pulsante Menu/F:
Contrasto, Luminosità, Colore, Nitidezza e Lingua.
Tasto Input/OK:
modalità AV1,RGB,AV2, HDMI e PC.
Pulsanti ed:
Pulsante 4:
zazione alla modalità di standby (per spegnere completamente il monitor, disconnetterlo dalla presa di alimentazione).
consente di visualizzare le funzioni
consente di passare dalla modalità TV alle
consente di regolare l'impostazione.
consente di passare dalla modalità di visualiz-
il pulsante 1 quando il sottomenu desiderato viene evidenziato.
Una volta impostato un sottomenu, premere il pulsante MENU per
uscire e quindi premere nuovamente il pulsante MENU per uscire dal
Menu Imagine
menu principale.
1. Premere il pulsante MENU. Selezionare Immagine mediante il
pulsante e o d. Premere il pulsante1 per entrare.
Impostare l’immagine secondo le preferenze "personali".
2. Per effettuare la selezione utilizzare il pulsante e o d. Luminosità,
Contrasto, Colore e Nitidezza. Regolare i livelli come desiderato mediante il pulsante 1 e 2.
3. Preselezione: mediante il pulsante 1 e 2 è possibile
selezionare sia le impostazioni “Personali” che quelle Dinamiche,
Standard o Eco (per Luminosità, Contrasto, Colore e Nitidezza).
4. Riduzione rumore: è possibile ridurre eventuali 'rumori' (granulosità)
locali dell'immagine utilizzando il pulsante 1 e 2 per
selezionare Medio / Alto / Autom. / Basso / OFF.
5. Tonalità pelle dinamica: consente di aumentare la tonalità della
pelle utilizzando il pulsante 1 e 2 per selezionare On / Off.
Tonalità: disponibile solo se è collegato un apparecchio NTSC.
6. Luminosità testo: può essere regolata utilizzando il pulsante 1 e
2per selezionare Min / Media / Max.
Per per uscire due volte pressa il tasto del MENU
-
Page 55

I
Menu Settaggio
Selezione vietata
n
È possibile impedire operazioni indesiderate sul monitor LCD mediante i pulsanti sul bordo inferiore dell'apparecchio.
1. Premere il pulsante MENU. Selezionare Impostazioni mediante il
pulsante e o d. Premere il pulsante1 per entrare.
2. Selezionare Selezione vietata mediante il pulsante e o d.
3. Impostare la Selezione vietata su Off o On premendo il pulsante
1 e 2.
4. Premere il pulsante MENU per uscire.
Lingue OSD
n
Utilizzare i pulsanti 1 e 2 per selezionare la lingua OSD
desiderata (francese, tedesco, italiano, spagnolo, olandese). Per
uscire, premere il pulsante MENU
Impostazione Timer spegnimento
n
L’opzione Timer spegnimento consente di spegnere il televisore in
modalità standby quando è trascorso l’intervallo di tempo selezionato.
1. Premere il pulsante MENU. Selezionare Impostazioni mediante il
pulsante e o d, quindi premere il pulsante 1 per entrare.
2. Selezionare Timer spegnimento mediante il pulsante e o d.
I
Impostazione AV2
n
Nel menu impostazioni, premere il pulsante d per selezionare AV2 e
impostare su S-Video,Video a seconda del proprio apparecchio
esterno.
1. Premere il pulsante MENU. Selezionare Impostazioni mediante il
pulsante e o d, quindi premere il pulsante 1 per entrare.
2. Selezionare AV2 mediante il pulsante e o d.
3. Selezionare S-Video, Video premendo il pulsante 1 e 2.
4. Premere il pulsante MENU per uscire, le modifiche sono memorizzate automaticamente.
Preset menu
1.Premere il pulsante MENU.
2.Selezionare Preimpostazioni mediante il pulsante 1 e 2.
Premere il pulsante 1 per entrare.
Il menu preimpostazioni può essere utilizzato per sintonizzare
0
nuovi canali, riordinare i canali e le posizioni dei loro programmi e
per eseguire regolazioni minime della sintonia.
3. Per cambiare l’ora premere il pulsante 1 e 2.
L'ora viene modificata in incrementi di 5 minuti. L'intervallo massimo
è 120 minuti.
Quando si imposta il timer spegnimento, compare un display in un
angolo dello schermo.
4. Premere il pulsante MENU per uscire.
Lingua testo
n
1. Premere il pulsante MENU. Selezionare Impostazioni mediante il
pulsante e o d, quindi premere il pulsante1 per entrare.
2. Selezionare Lingua testo mediante il pulsante e o d.
3. Premere il pulsante 1 e 2 per selezionare Ovest, Est,
Greco o Cirillico.
4. Premere il pulsante MENU per uscire.
Page 56

I
Menu Preselezione
Ordinamento programm.
n
Utilizzare questa funzione per spostare i canali tra due posizioni dei
programmi. Questa funzione è particolarmente utile dopo aver effettuato la sintonia automatica.
Scegliere un programma che si desidera spostare da una posizione
a un'altra.
1. Selezionare la posizione del programma es. 4.
2. Premere il pulsante Verde.
3. Selezionare la posizione canale in cui si desidera spostare il
canale es. 7.
4. Premere nuovamente il pulsante Verde.
5. Premere il pulsante MENU due volte per uscire.
Nome programma
n
Con questa funzione è possibile rinumerare o rinominare singoli
canali mediante il pulsante 1 o 2.
.
Channel Table
n
Nella tabella seguente sono riportati i canali ricevibili con relativa
assegnazione per questo monitor LCD.
I
Sintonia automatica
n
1. Selezionare Ordinamento automatico mediante il pulsante e o d.
Premere il pulsante 1 per iniziare la ricerca.
2. Durante la ricerca, le frequenze dei canali saranno acquisite e
memorizzate automaticamente, a partire dalla posizione uno.
Ignora
n
Il comando Ignora è situato direttamente sotto Frequenza sullo
schermo.
Quando è ‘ON’ rimuove l’accesso a un canale utilizzando il pulsante
e o d.
L’unico modo per accedere al canale selezionato è utilizzare i tasti di
accesso diretto al canale.
Memoria
n
Il comando Memoria è situato direttamente sotto Ignora sullo scher-
mo.
Quando tutte le voci sotto preimpostazioni sono state regolate sec-
ondo le proprie preferenze, mediante il pulsante OK modificare ‘OK?’
a ‘OK’; in questo modo tutte le impostazioni saranno memorizzate
automaticamente.
.
.
Frequenza
n
La frequenza indicata è la frequenza visualizzata
eccetto durante la ricerca, quando la frequenza
indicata cambia al progredire della ricerca.
1. Per selezionare manualmente la Frequenza mediante il pulsante
5 o 6.
(Consultare la tabella canali.)
Si può...
la tabella canali.
do inizia la ricerca della frequenza (circa 5 secondi), la ricerca si
interrompe quando viene trovato un canale.
quenza.
canale.
2. Premere il pulsante 5 o 6 per selezionare Memoria. Premere
il pulsante OK per memorizzare la nuova frequenza e tutte le altre
impostazioni.
a) Inserire la frequenza mediante i pulsanti 0-9 consultando
b) Mantenere premuto il pulsante 1 o 2 fino a quan-
c) Mantenere premuto il pulsante per desintonizzare la fre-
Ripetere le operazioni precedenti fino a quando si trova un
.
Page 57

I
I
Impostazioni menu PC
Connettere il PC a PC-IN sul retro del monitor.
Successivamente, selezionare la modalità PC utilizzando il
pulsantev sul telecomando. Lo schermo diventerà un monitor
per il PC.
Premendo il pulsante MENU sul telecomando apparirà una finestra
di menu da cui potranno essere regolate le impostazioni.
Per regolare le Impostazioni immagine, selezionare Immagine utilizzando i pulsanti e o d sul telecomando, quindi il pulsante 1 per
accedere al menu seguente delle Impostazioni immagine.
Premere i pulsanti1 o 2 per regolare la luminosità e il contrasto dell’immagine.
Con la funzione Posizione immagine, utilizzando i pulsanti1 o
Con il pulsante
Le impostazioni Blocco bambini / Timer e AV2 sono le stesse della
modalità TV (pag. 47) Se si scollega l'alimentazione elettrica, questa
funzione viene disattivata.
Se la funzione Risparmio energia è attivata, la modalità di risparmio
energia viene attivata dopo 1 minuto se non viene rilevato alcun segnale. il LED diventerà di un azzurro più luminoso per indicare lo
stand by. Il monitor si riattiverà automaticamente quando viene rilevato un segnale (input PC).
Utilizzare i pulsanti
1
è possibile accedere al menu impostazioni.
1 o 2
per selezionare ON o OFF.
2 sul telecomando è possibile cambiare la posizione dell’immagine in orizzontale o verticale.Premere il pulsante 1 per accedere
ai sottomenu, la regolazione verrà eseguita
Regola video modifica la fase e l’orologio dello schermo. Se l’immagine è sfocata o granulosa, grazie a questa funzione sarà possibile regolarla fino ad ottenere un’immagine più nitida.
Con la funzione Regolazione Auto è possibile regolare automaticamente l’immagine utilizzando il pulsante 1. In questo modo tutte
le impostazioni precedenti verranno cambiate automaticamente
La regolazione auto può essere ottenuta anche premendo il pulsante
di richiamo sul telecomando, senza dover selezionare il
menu.
Risoluzione visualizza la risoluzione attuale dell’immagine. La
risoluzione viene indicata solamente a titolo informativo e non può
essere modificata.
Utilizzando i pulsanti
schermo utilizzando i toni del regolare il tono del colore dell'immagine utilizzando i toni del bianco Rosso (R) / Verde (G) / Blu (B).
Con questa funzione, l’immagine potrà essere regolata in modo da
visualizzare più intensamente il colore scelto; ad esempio se si
seleziona il rosso è possibile aumentare o diminuire l’intensità di tale
colore dell’immagine con i pulsanti
La risoluzione nativa è possibile se il PC ha compatibilità WXGA
(1366 x 768). Per ricevere il segnale XGA/WXGA, modificare le
impostazioni del monitor usando i pulsanti
Successivamente, salvare le impostazioni spegnendo e accendendo
il monitor utilizzando il pulsante di standby.
Per le impostazioni audio, vedere il menu precedente
Impostazione: premere il pulsante Menu sul telecomando e utilizzare
il pulsante
(please replace with the relevant symbol) è possibile accedere al
menu impostazioni.
Dopo aver impostato la risoluzione desiderata, spegnere e riaccendere il monitor per salvare le impostazioni.
Per selezionare il menu Impostazioni, premere il pulsante menu sul
e o d
1 o 2
per selezionare Impostazioni. Con il pulsante
è possibile regolare il colore dello
1 o 2
.
1 e 2
.
1
telecomando e utilizzare i pulsanti
e o d
per selezionare
Page 58

I
I
Televideo
Televideo
Si tratta di un servizio gratuito che fornisce una grande varietà di
informazioni, quali news, risultati di sport, meteo e viaggi.
Ricezione del Televideo
Se il segnale dell'antenna è scadente, il funzionamento del televideo
può risultare irregolare.
Livello di luminosità dell'immagine e del televideo
È possibile cambiare il livello di luminosità del televideo. Tornare alla
modalità TV. (Vedere il menu Immagine – Luminosità del testo a pagina 54)
Altre funzioni
n
Spegnimento automatico
Il monitor LCD si spegne automaticamente entro 10 minuti dal termine
delle trasmissioni.
Richiamo delle informazioni sui programmi
n
/selettore del sistema audio
Premere il pulsante per visualizzare le informazioni sul
programma, ad esempio il numero del programma corrente, il nome
della stazione, lo stato della funzione stereo, il sistema audio e il
tempo rimasto se il timer è impostato, per circa 5 secondi.
S-1: sistema audio B/G
S-2: sistema audio D/K
S-3: sistema audio I
S-4: sistema SECAM L/L Francia
Page 59

I
Schermo
n Opzioni per lo schermo
Attualmente ono disponibili vari formati di trasmissione con diversi
rapporti di dimensioni, ad esempio 4:3, 16:9 e formati video quali
Letterbox.
0 Se è impostata la modalità HDMI ad alta risoluzione (720p/1080i),
l'immagine resterà fissa in formato 16:9, "Schermo intero", e non
potrà essere modificata.
Natural
I
Completo
Normale
Zoom
Sottotitoli
Page 60

II
Specifiche TV
QSpecifiche generali
Alimentazione CA 220~240 V 50 Hz
Sistema televisivo B/G, D/K, I L/L’
Sistema a colori PAL/SECAM
(PAL/SECAM/NTSC3.58 in modalità AV)
Copertura canali VHF: E2-E12, F2-F10
UHF: 21-69,
CATV: X, Y, Z, S1-S41, B-Q.
Impedenza input antenna 75 ohm
Terminale AV
AV1: standard CENELEC
Input: video composito, RGB (5V RGB con 5V sync in
14 poli) e audio L/R
Output: output del monitor con video composito e
audio-L/R
AV2: CENELEC Standard
Input: video composito, S-VHS and audio-L/R
Output: output del monitor con video composito e
audio-L/R
Ingresso HDMI: Digital RGB input
Input PC: Mini D-SUB 15 poli e
Presa audio da 3,5 mm
,
R1~R12
Consigli Utili
n
QUANDO NON E' PRESENTE NE' SUONO NE' IMMAGINE
l
Controllare se il monitor LCD è alimentato.
l
Verificare un altro canale, nel qual caso è la stazione emittente che
non trasmette.
l
Verificare che il monitor non sia in stand by
.
n
IMMAGINE SCARSA CON AUDIO O.K.
l
Regolare la luminosità LUMINOSITA.
l
Regolare la sintonia fine RICERCA.
l
Verificare che l'attacco d'antenna sia ben inserito.
n
MANCA IL COLORE MA L'IMMAGINE E' O.K.
l Agire sul controllo COLORE.
Regolare la sintonia fine RICERCA.
l
Controllare che i cavi siano collegati
l
l
Accertarsi che il programma non sia in B/N.
IMMAGINE SCARSA
n
l
Verificare la connessione d'antenna sul fondale del monitor LCD.
l Verificare che i connettori (spinotti o cavi) d'antenna siano in buono
stato.
Verificare l'orientamento e la qualità dell'antenna (consultare solo
l
personale qualificato).
n
IL TELECOMANDO NON FUNZIONA
l
Verificare che le batterie siano inserite correttamente
Controllare le condizioni delle batterie
l
Controllare se è attivata la funzione di inibizione del telecomando
l
I seguenti difetti non sono causati dal ricevitore:
Zona di contrasto 1500:1
Dimensioni schermo(pollici) 42” / 107 cm
(Area di visualizzazione misurata in diagonale)
Visualizzazione 1366 x 768
(WXGA)
Angoli di visione H:178º, V:178º
Dimensioni (LxAxP mm) 1032 x 625 x 126.5
Peso (kg)
SI DICHIARA CHE:
L’apparecchio Televisore, marca SANYO, modello
risponde alle prescrizioni dell’articolo 2 comma 1
n° 548 ed alle prescrizioni
a Suffolk U.K. il, 27/02/96
SANYO Industries (U.K.) Limited
Oulton Works, School Road, Lowestoft,
Suffolk, NR33 9NA, United Kingdom.
22.5
dell’articolo 1 del D.M. 26 marzo 1992 fatto
CE42LM4R-E,
del D.M. 28 agosto 1995
"EFFETTO FANTASMA"
Le riflessioni provocate da alti edifici, montagne, tralicci d'alta
tensione ecc., prendono il nome di "Effetto fantasma". Questo
fastidioso effetto può essere ridotto al minimo, o eliminato, riposizio
nando l'antenna.
"INTERFERENZE"
Alcune interferenze possono essere causate da apparecchiature
elettriche, accensioni elettriche delle auto, ecc. Alcune di queste
interferenze sono normali e temporanee. Se persistono, consultare
Modalità hotel
personale qualificato.
n
Blocco preimpostazione.
Impedisce l'uso della sintonia.
n
Posizione programmi all’avvio.
Procedura per l’impostazione
1. Mantenere premuto il pulsante verde sul telecomando e quindi
premere il pulsante 5 sul monitor LCD.
2. Evidenziare Modalità hotel mediante il pulsante 5 o 6, quindi
selezionare ON o OFF mediante il pulsante 1.
3. Selezionare programma ON mediante il pulsante 6 , quindi
impostare la posizione iniziale mediante il pulsante 1 o 2.
OFF/ 0~99 / AV1 / RGB/ AV2/ HDMI / PC
Page 61

Licenza per l’utente finale
II
Licenza per l’utente finale
Il prodotto (ossia l’attrezzatura o l’apparecchio cui si riferisce
la presente documentazione) contiene Software (le applicazioni software, utility e moduli incorporati nel Prodotto) di
proprietà della Sanyo o dei propri licenziatari. Prima di utilizzare il prodotto, leggere le condizioni della licenza per l’utente finale descritte in seguito. Qualora non si accettino i
termini e le condizioni della licenza, non utilizzare il Prodotto;
imballare il Prodotto inutilizzato e rispedirlo al proprio rivenditore accompagnato dalla ricevuta di acquisto per ottenere il
rimborso totale del prezzo pagato. Utilizzando il prodotto l’utente acconsente a sottostare ai termini e alle condizioni
della licenza per l’utente finale.
Concessione, condizioni e limitazioni della licenza
1. Sanyo concede una licenza non esclusiva, su base mondiale (soggetta ai controlli sull’esportazione), non trasferibile
(eccetto per quanto permesso nel punto 2 seguente), priva di
diritti di concessione ad utilizzare il Software contenuto nel
Prodotto.
2. L’utente non può trasferire alcun proprio diritto sul
Software ai sensi della licenza senza il previo consenso scritto della SANYO e qualora tale consenso sia concesso il
Software può essere trasferito solo congiuntamente al
Prodotto E purché il destinatario abbia letto e accettato i termini e le condizioni della presente licenza.
3. L’utente deve assicurarsi che il copyright, il marchio commerciale e altre note protettive contenute nel Software siano
mantenute e non siano alterate o rimosse.
4. Il Software fornito è protetto da copyright ed è concesso
su licenza (non venduto). In particolare SANYO non
trasferisce all’utente alcun diritto o diritto di proprietà sul
Software. Il Software fornito può contenere o essere derivato
da porzioni di materiale fornito alla SANYO sotto licenza da
parte di un terzo fornitore.
5. Eccetto per quanto permesso espressamente dalla legge
l'utente non può:
l utilizzare il Software congiuntamente ad altro hard-
ware a parte il prodotto;
Limitazione di responsabilità
1. Il Software (per quanto permesso dalla legge) è fornito ‘as
is’ (così com’è) e SANYO e i suoi fornitori escludono esplicitamente qualsiasi garanzia espressa o implicita includendo
(senza limitazioni) garanzie di qualità soddisfacente, idoneità
ad uno scopo e non violazione di diritti (salvo nei limiti per
cui gli stessi non possano essere soggetti ad esclusione per
legge).
2. In nessuna circostanza SANYO sarà responsabile per
danni diretti, indiretti, consequenziali o accidentali (compresi
perdita di profitti, interruzione delle attività, perdita di dati o
costo dell’acquisizione di merce, tecnologie o servizi sostitutivi) derivanti dall’uso o dall’incapacità di utilizzare il Software
(salvo nei limiti per cui tale responsabilità non possa essere
esclusa per legge).
Clausole generali
1. La presente Licenza per l’utente finale è soggetta alla normativa britannica e l'utente può presentare reclami esclusivamente in tribunali britannici e SANYO avrà il diritto di presentare reclamo nelle corti di qualsiasi giurisdizione.
2. I termini e le condizioni di cui sopra sostituiscono qualsiasi
eventuale accordo precedente, a voce o per iscritto, tra l’utente e la SANYO relativamente al Software.
l copiare il Software interamente o in parte;
l incorporare tutto (o parte) del Software in altri pro-
grammi sviluppati da (o a nome di) l’utente e/o utilizzati dall’utente;
l retroingegnerizzare, decompilare o disassemblare
il Software;
l rendere il Software (o qualsiasi parte dello stesso)
disponibile o permetterne la ridistribuzione per l’uso con
hardware diverso dal Prodotto; oppure affittare, concedere in
leasing, regalare, prestare, distribuire o trasferire la proprietà
dell’intero Software o di una qualsiasi parte dello stesso.
Rescissione
La presente licenza è valida fino alla sua rescissione. La
licenza è automaticamente annullata senza notifica se l’utente non ottempera a una qualsiasi delle clausole della stessa.
Page 62

EE
opea
PRECAUCION: Le rogamos que lea y conserve este manual para su seguridad. Este aparatose ha diseñado y fabricado para asegurar su
seguridad personal, pero la utilización indebida puede dar como resultado descargas eléctricas o riesgos de incendio. Para evitar situaciones
peligrosas que no puedan evitar las medidas de seguridad de este monitor, cumpla las siguientes normas básicas para su instalación,
utilización y mantenimiento.
Instalación
No se deberá permitir que nada se apoye sobre el cable eléctri-
co. No se deberá colocar el monitor de LCD en sitios en que el cable
eléctrico pueda resultar dañado por gente que lo pise.
No se deberán sobrecargar los enchufes murales ni los cables
eléctricos, ya que esto puede ocasionar incendios o descargas eléctricas.
No coloque este el monitor de LCD cerca de fuentes de calor como
radiadores, estufas, hornos u otros productos que desprendan calor
(incluidos amplificadores).
No sitúe este monitor de LCD a la luz directa del sol.
NO coloque el monitor de LCD sobre una superficie, estantería o
mesa inestables. En caso de que eel monitor de LCD cayera podría
causar lesiones personales y dañar el aparato. El vendedor le puede
aconsejar acerca de soportes aprobados o instrucciones para colocar
el aparato en un estante o montarlo en la pared.
Este monitor de LCD debería hacerse funcionar sólo con la fuente
eléctrica que se indica en el aparato o en el manual de instrucciones.
Si no se está seguro del tipo de suministro eléctrico que se tenga en
casa, consúltese con el vendedor o la compañía eléctrica local.
Para más seguridad recomendamos encarecidamente que la alimentación a este monitor pase por una unidad de seguridad con
interruptor diferencial residual.
ADVERTENCIA: Para evitar lesiones, el monitor de LCD deberá
sujetarse de forma segura a la pared según las instrucciones de
instalación del fabricante.
Utilización
No se deberán añadir accesorios que no estén específicamente
diseñados para este monitor.
NO coloque elementos que contengan líquidos, como jarrones, encima del monitor. Algunas piezas interiores llevan voltajes peligrosos y
el contacto con los líquidos podría provocar una descarga eléctrica.
N U N C A derrame líquidos de ningún tipo sobre este monitor de LCD.
No exponga el monitor de LCD al contacto con la lluvia, ni lo utilice
cerca del agua.
Por ejemplo, cerca de la bañera, el fregadero de la cocina, en un
sótano húmedo, etc. No lo utilice inmediatamente después de mover
el televisor de un entorno con temperatura baja a otro con alta temperatura, pues esto produce vapor que podría generar un incendio,
descarga eléctrica u otros peligros. Antes de limpiarlo, desconecte el
aparato de monitor LCD del enchufe de la pared.No aplique
limpiadores líquidos o con pulverizador directamente sobre el monitor
de LCD. Use un paño húmedo para la limpieza.
Importante:
ESTE PRODUCTO DEBE ESTAR CONECTADO A TIERRA
Este equipo dispone de un cable de alimentación aprobado y de un
enchufe de conexión a la red aprobado de hilo no reemplazable
para su uso en el Reino Unido. Para cambiar un fusible de este tipo
de enchufe, siga las instrucciones que se indican a continuación:
1. Extraiga la tapa del fusible y el propio fusible.
2. Instale un nuevo fusible, que deberá ser de tipo BS1362 13 A
A.S.T.A. o de otro tipo aprobado por BSI.
3. Cerciórese de que la tapa del fusible vuelva a quedar correcta-
mente instalada.
Si se perdiese o sufriese desperfectos la tapa del fusible NO debe
utilizarse el enchufe, sino que habrá que sustituirlo por otro que esté
en condiciones de uso.
Si el enchufe que viene instalado no resulta apropiado para la toma
de corriente que tenga en su casa, deberá cortarlo e instalar en su
lugar un enchufe apropiado. Si el enchufe de conexión a la red
dispone de fusible, éste debe tener una potencia nominal de 13 A.
Cerciórese de que la tapa del fusible esté correctamente instalada.
Si se utiliza un enchufe sin fusible, el fusible del panel de distribución no debe tener más de13 A.
Nota: Debe destruir el enchufe que haya cortado para evitar un
posible riesgo de descarga eléctrica si en algún momento llegase a
enchufarse a una toma de 13 A.
Los colores de los hilos de este cable de alimentación responden al
siguiente código:
Azul -------> Neutro
Marrón ----> Con corriente
Verde y amarillo ----> Tierra
1. El hilo azul debe estar conectado al terminal marcado con la letra
“N” o de color NEGRO.
2. El hilo marrón debe estar conectado al terminal con la letra “L” o
de color ROJO.
3. El hilo verde y amarillo debe estar conectado al terminal marcado
con la letra “E” o de color VERDE o VERDE y AMARILLO.
Antes de instalar de nuevo la cubierta del enchufe, cerciórese de
que la pinza del cable esté sujeta por encima del revestimiento del
cable, no solo por encima de los hilos.
No intente evitar el fin de seguridad del enchufe con conexión a
tierra.
ESTA UNIDAD NO ESTARÁ DESCONECTADA DE LA RED A
MENOS QUE EL CABLE DE ALIMENTACIÓN ESTÉ DESENCHUFADO.
EL TÉCNICO DE INSTALACIÓN DEBE CERCIORARSE DE QUE
RESULTE FÁCIL ACCEDER AL CABLE DE ALIMENTACIÓN.
Este monitor de LCD debe tener una distancia mínima de 5 cm desde
la pared y de 10 cm por encima y a los lados.
No monte el aparato cerca de una fuente de llamas al descubierto.
No permita nunca que haya llamas al descubierto cerca de este monitor de LCD.
Este monitor de LCD no debe encastrarse ni encerrarse de ningún
modo, dado que la acumulación de calor reduciría la vida útildel
monitor.
Monte el aparato siempre utilizando suficientes piezas de sujeción y
de montaje recomendadas.
Informacion sobre reciclaje
Los productos SANYO están diseñados y fabricados con materiales y componentes de alta calidad,
que pueden ser reciclados y reutilizados.
Este símbolo significa que el equipo eléctrico y
electrónico, al final de su ciclo de vida, no se debe
desechar con el resto de residuos domésticos.
En la Unión Europea existen sistemas de recogida
electrónicos.
específicos para residuos de aparatos eléctricos y
Por favor, ayúdenos a conservar el medio ambiente!
0
Este símbolo sólo es aplicable en los países miembros de la Unión
.
Eur
Page 63

EE
Mantenimiento
Su monitor está totalmente transistorizado y no contiene ningún componente en el que pueda realizar labores de mantenimiento el
usuario.
No debe retirar la tapa trasera de su monitor. El aparato trabaja con tensiones elevadas que podrian dañar objetos o incluso poner en
peligro a las personas. Deje que un técnico de mantenimiento autorizado realice las labores de mantenimiento: utilizará únicamente
las piezas de repuesto que cumplan con los mismos niveles de seguridad que las piezas originales. El uso de piezas de repuesto originales puede evitar incendios, descargas eléctricas y otros peligros.
Desenchufe el monitor de LCD de la toma de corriente y encargue el mantenimiento al personal de mantenimiento cualificado en
los casos siguientes:
En caso de que esté dañado el cable o enchufe eléctricos.
n
Si se ha derramado líquido dentro del monitor.
n
Si el monitor ha estado expuesto a lluvia o humedad.
n
Si se ha caído el monitor o se ha dañado.
n
Si
el monitor muestra cambio evidente de rendimiento..
n
Si el monitor no funciona normalmente tras seguir las instrucciones siguientes:
n
Ajustar solamente aquellos controles que se cubren en este manual de funcionamiento, ya que si se realiza un ajuste inapropiado de culesquiera
otros controles puede ocasionar daños. Esto frecuentemente requerirá un trabajo extenso por parte de un técnico cualificado para reponer el
monitor a su funcionamiento normal.
Page 64

Paso : 1 Conexiones (Esencial)
n Conecte la pantalla a la antena, conectores VGA, BNC y euro-
EE
2. AV1/AV2
Si lo desea puede conectar su reproductor de DVD u otros
euroconectores a los terminales AV1 y AV2 para euroconector que
se
conector según sea preciso.
1.Conecte el conector IEC a la toma de alimentación situada en la
parte trasera del monitor de LCD, tal y como se muestra en la ilustración anterior.
2. Conecte el cable de alimentación del monitor a una toma de
pared.
Dado que este aparato no dispone de conmutador de encendi-
0
do/apagado, cerciórese de que resulta fácil acceder al enchufe de
conexión a la red.
El monitor está preparado para un voltaje de corriente de
0
220~240V CA, 50 Hz. Para desconectarlo completamente de la
corriente o, cuando el monitor no se vaya a utilizar por un periodo
prolongado de tiempo, se recomienda desconectar el cable de alimentación de la toma de corriente.
Conexión CA
encuentran en la parte posterior del terminal.
Paso : 2 Instalación de las pilas del mando a distancia
Advertencia: para evitar lesiones, la unidad debe estar sujeta
0
ADVERTENCIA! En el funcionamiento de este aparto
se utilizan voltajes altos. Encárguense las labores de
mantenimiento y reparación a un personal cualificado.
firmemente a la pared según las instrucciones de instalación.
Selección de ENTRADA
n
Para pasar de un modo a otro entre AV1, RGB, AV2 (RGB H/V o Y,
Pb, Pr), AV3, DVI o PC pulse repetidamente el botón TV/ AV del
mando a distancia o manténgalo pulsado unos segundos y aparecerá un menú de selección en pantalla. Utilice los botones e o
dpara seleccionar la entrada correcta.
1.HDMI (Interfaz Multimedia de Alta Definición)
Este monitor dispone de conector HDMI.Este conector se encuentra
en la parte posterior del monitor, junto a las conexiones de audio.
Esta entrada permite una amplia gama de resoluciones, tal y como
se muestra en la página 74. Consulte en la página 66 la información
sobre el funcionamiento del menú.
3.
Conexión a PC
Este monitor de LCD tiene un conector para ordenador (PC-IN, tipo
D-SUB). Puede conectar un ordenador al monitor de LCD y utilizarlo
como monitor del ordenador (consulte la página 67). La entrada de
audio puede conectarse a través de la conexión de 3,5 mm PC
AUDIO IN. Esta entrada permite una amplia gama de resoluciones
Page 65

EE
Page 66

EE
Controles / Terminales
1.El monitor LCD mostrará una luz roja de Standby para señalar que
está encendida.
Cómo entrar y salir del modo de espera
El modo de espera se utiliza para apagar el monitor durante breves
periodos de tiempo. En el modo de espera, el monitor está desconectado, pero sigue recibiendo alimentación de energía.
Para que el monitor pase a modo de espera, pulse el botón 4.
l
El indicador de alimentación azul se iluminará con más intensidad.
Para encender el televisor desde el modo de espera, pulse
l
cualquiera de los siguientes botones: botones 4
Si ve que el indicador de encendido parpadea, apague el
televisor con el botón Standby, desconecte el cable de alimentación de la toma de corriente y póngase en contacto
con nuestro servicio técnico.
5, 6 o 0-9.
,
FUNCIONAMIENTO DEL MEN
Muchas de las funciones de su monitor se controlan mediante la
función “menú”
Mientras utiliza el menú podrá ver en la parte inferior de la pantalla los controles disponibles para navegar por él.
Pulse el botón MENU para acceder al menú principal.
Este aviso es una señal que le hace saber que la función
de protección de corriente de este aparato de TV está
a c t i v a .
2. Botones de control (extremo inferior de la cabina)
Botón Menú/F:
idioma del OSD.
Botón Input/OK
PC.
Botones ed
Botón4:
apagar por completo el monitor es preciso desconectarlo de la alimentación)
para pasar a contraste, brillo, color, realce e
: para pasar a modo TV, AV1,RGB,AV2, HDMI y
: Para subir y bajar los ajustes.
para pasar de modo activado a modo de espera (para
Para seleccionar un menú secundario utilice el botón
cuando esté resaltado el menú secundario al que desee ir, pulse
el botón
Para salir del menú secundario en que se encuentre puede pul-
sar el botón MENU. Pulse de nuevo el botón MENU si desea salir
del menú principal.
1. Pulse el botón MENU. Seleccione Imagen sirviéndose del
botón
Ajuste las opciones de imagen según sus preferencias.
2. Utilice el botón
entre Brillo, Contraste, Color y Realce. Utilice el botón
2
3. Sintonía: Utilice el botón
figuración “Personal” o las opciones de configuración Dinámica,
Estándar o Eco (para Brillo, Contraste, Color y Realce).
4. Filtro de ruido: Esta opción sirve para reducir el “ruido” de imagen local (aparición de ruido granular) que pudiese haber. Utilice
1 o 2
5. Tono de piel dinámico: Esta opción sirve para realzar el tono
de piel. Utilice
Tono: Solo está disponible si el aparato está conectado a equipo
NTSC.
6. Contraste TXT: Puede ajustarse utilizando el botón
para seleccionar entre Min / Med / Max.Para salir la prensa el
botón del MENÚ dos veces
0
1 o 2
. Pulse el botón
e o d
para ajustar los niveles según sea necesario.
para seleccionar Med / Alto / Auto / Bajo / NO.
La configuración personal que haya efectuado quedará guarda-
.
Menú
e o d
1 o 2
de Imagen
para acceder a esta opción.
1
para seleccionar la opción que desee
1 o 2
para seleccionar Sí / No.
para seleccionar la con-
y,
e o d
1 o
1 o 2
Page 67

EE
Menú de Configuracion
Bloqueo Infantil
n
Puede evitar el funcionamiento no autorizado del monitor de LCD
sirviéndose de los botones que se encuentran en el extremo inferior
del monitor.
1. Pulse el botón MENU. Seleccione Opciones sirviéndose del botón
e o d. Pulse el botón1 para acceder a esta opción.
2. Seleccione Bloqueo Infantil sirviéndose del botón e o d.
3. Pulse el botón 1 o 2 para seleccionar la opción No o Sí en
la función de Bloqueo Infantil.
4. Pulse el botón MENU para salir.
Idioma del OSD
n
Utilice los botones1 o 2 para seleccionar el idioma del OSD
que prefiera (francés, alemán, italiano, español, holandés). Pulse el
botón MENU para salir.
Opción de Apagado
n
La opción de Apagado hace que el televisor pase a modo de espera
una vez transcurrido el plazo establecido.
1. Pulse el botón MENU. Seleccione Opciones sirviéndose del botón
e or d y pulse el botón1 para acceder a esta opción.
2. Seleccione Apagado sirviéndose del botón e or d
.
3. Pulse el botón 1 o 2 para cambiar el plazo.
4. Pulse el botón MENU para salir.
Opción AV2
n
Estando en el menú de opciones, seleccione AV2 pulsando el botón
d y elija la opción S-Video, Video en función del equipo externo del
que disponga.
1. Pulse el botón MENU. Seleccione Opciones sirviéndose del botón
e or d y pulse el botón 1 para acceder a esta opción.
2. Seleccione AV2 sirviéndose del botón e or d.
3. Pulse el botón 1 o 2 para seleccionar S-Video,Video.
Menú de Predefinidos
4. Pulse el botón MENU para salir. Los cambios que haya efectuado
se guardarán automáticamente.
1.Pulse el botón MENU.
2.Seleccione Sintonía sirviéndose del botón 1 o 2 Pulse el
botón1 para acceder a esta opción.
0
El menú Sintonía sirve para sintonizar canales nuevos, ordenar
de nuevo los canales y sus posiciones de programa, y ajustar la sintonía fina.
El tiempo cambia en pasos de 5 minutos y el plazo máximo que
puede configurarse es de 2 horas.
Si ha configurado la opción de Apagado aparecerá un mensaje en
una esquina de la pantalla.
4. Pulse el botón MENU para salir.
Zona TXT
n
1. Pulse el botón MENU. Seleccione Opciones sirviéndose del botón
e or d y pulse el botón1 para acceder a esta opción.
2. Seleccione Zona TXT sirviéndose del botón e o d.
3. Pulse el botón 1 o 2 para seleccionar Oeste, Este, Griego
o Cirílico.
Page 68

EE
Menú de Predefinidos
Ordenación de Programas
n
Esta función de cambio de posición de canales sirve para pasar los
canales de un programa a otro. Esta función resulta especialmente
útil tras haber ajustado la sintonía fina.
Debe escoger el programa que desee pasar de una posición a otra.
1. Seleccione la posición de programa, p. ej. 4.
2. Pulse el botón verde.
3. Seleccione la posición de canal a la que desee pasar el canal, p.
ej. 7.
4. Pulse de nuevo el botón verde.
5. Pulse dos veces el botón MENU para salir.
Nombre de programa
n
Esta función le permite cambiar el nombre o el número de posición
de canales individuales sirviéndose de los botones 1 o 2.
Sintonización automática
n
.
n Tabla de canales
La tabla inferior muestra los canales que puede usted recibir y su
ordenación en este monitor.
1. Seleccione Auto Ordenación sirviéndose del botón e o d. Pulse el
botón 1 para iniciar la búsqueda.
2. Al realizar la búsqueda, se encontrarán frecuencias de canales y
éstos se guardarán automáticamente empezando por la posición
número uno.
Saltar
n
La opción de Saltar se encuentra inmediatamente bajo la de
Frecuencia en el menú en pantalla.
Cuando esta opción esté activada, no podrá accederse a los
canales con el botón e o d, sino que solo podrá accederse al canal
seleccionado con las teclas de acceso directo a los canales.
n
Guardar.
La opción de Guardar se encuentra inmediatamente bajo la de Saltar
en el menú en pantalla.
Una vez haya ajustado a su gusto todos los títulos anteriores de
Sintonía, pulse el botón OK, pase de “OK?”a“OK” y todas las
opciones de sintonía se guardaránticamente.
.
Frecuencia
n
La frecuencia que se muestra será la que aparezca en pantalla,
excepto durante la búsqueda, ya que en este caso la frecuencia que
se muestra cambiará al continuar la búsqueda.
1. Utilice el botón 5 o 6 para seleccionar la frecuencia manualmente.
(Consulte el cuadro de canales.)
Se puede...
consultando el cuadro de canales.
que el televisor comience a buscar la frecuencia (aproximadamente
5 segundos). La búsqueda se detendrá al encontrar un canal.
cia.
recto.
2. Pulse el botón 5 o 6 para seleccionar Guardar. Pulse el
botón OK para guardar la frecuencia recién encontrada y las demás
opciones.
a) Introducir la frecuencia sirviéndose de los botones 0-9 y
b) Pulsar y mantener pulsado el botón 1 o 2 hasta
c) Mantener el botón pulsado para desintonizar la frecuen-
Repita la operación anterior hasta encontrar el canal cor-
.
Page 69

EE
Ajustes del menú del PC
Conecte su PC bien a la toma PC-IN situadas en la parte trasera
del monitor. Una vez conectado, seleccione el modo PC utilizando
el botón v del mando a distancia. El monitor se convertirá en
un monitor para el PC.
Pulsando el botón MENU del mando a distancia, aparecerá en la
pantalla una ventana de menú que permite ajustar las opciones.
Para ajustar las opciones de imagen, seleccione Imagen usando los
botones e o ddel mando a distancia y luego el botón 1 para
acceder al siguiente menú de ajuste de la imagen.
Pulse los botones 1 o 2 para ajustar el brillo y el contraste de
la imagen.
Utilice los botones 1 u 2 para seleccionar Sí o NO
Con Posición de la imagen se cambia la imagen horizontal o verti-
calmente. PUlse el botón 1 para acceder a los submenús. La posición se ajusta utilizando los botones 1 o 2. del mando a distancia.Con Ajuste de imagen se cambian la fase y el reloj de la
pantalla. Si la imagen aparece borrosa o con niebla, esta función la
ajustará para conseguir una imagen más nítida.La imagen se ajusta
usando los botones 1 o 2 del mando a distancia.
La función Ajuste Automático ajustará la imagen automáticamente
pulsando el botón1. Esta función cambiará automáticamente
todos los ajustes indicados anteriormente. También se puede conseguir un ajuste automático pulsando el botón de
rellamada en el mando a distancia sin haber seleccionado
el menú.
Con Resolución se mostrará la resolución de imagen actual. La res-
olución se indica a título informativo, pero no puede ajustarse.
Es posible ajustar el tono de la imagen utilizando los botones 1 o
2para modificar los tonos rojo (R), verde (G) y azul (B) del tono
blanco.. De este modo se ajustará la imagen para que muestre con
mayor intensidad el color seleccionado. Por ejemplo, si está seleccionado el rojo, puede ajustar el tono rojo en la imagen, aumentándolo o disminuyéndolo mediante los botones 1 o 2
La resolución nativa se emplea cuando el ordenador puede producir
una señal de WXGA de 1366 x 768. Sirviéndose de los botones1
u 2 puede modificar el ajuste de su monitor para recibir una
señal de XGA/WXGA. Una vez seleccionada la resolución nativa,
guarde el ajuste apagando y encendiendo el monitor con el botón de
modo de espera.
Consulte en el menú anterior las opciones de sonido.
Para seleccionar el menú de Ajustes, pulse el botón menu en el
mando a distancia y, usando los botones e o d, seleccione Ajustes.
Pulse el botón1 para acceder al menú de ajustes.
Los ajustes del temporizador y AV2 son los mismos que para los
otros modos de entrada (página 57).
Cuando Ahorro de energía esté activado, el televisor pasará al modo
de ahorro de energía tras 1 minuto sin detectar ninguna señal. La
luz La luz LED se volverá de un azul más intenso para indicar que
está en modo de espera. El monitor volverá a encenderse automáti-
Page 70

EE
Teletexto
Teletexto - Este es un servicio gratuito que le facilita una gran canti-
dad de información de diversa índole como noticias, resultados
deportivos, el tiempo e información sobre viajes.
Recepción de teletexto
Si la señal de antena no es buena, es posible que la recepción de
teletexto resulte irregular.
Nivel de brillo del teletexto
Puede cambiar el nivel de brillo del teletexto. Vuelva al modo TV.
(Consulte el apartado Menú de imagen - Brillo de texto en la página
66).
Funciones de conveniencia
n
Desconexión automática
Este monitor pasará automáticamente al modo de espera tras 10 minutos sin recibir ninguna señal. Aparecerá en pantalla el tiempo que
queda hasta que se desconecte el monitor.
n
Selección de sistema de sonido e Información del canal
Pulse el botón para ver la información del canal como el
número actual de canal, el nombre de la emisora, el estado de
estéreo, el sistema de sonido y el tiempo restante si está puesto el
temporizador, durante 5 segundos.
S-1: Sistema de sonido B/G
S-2: Sistema de sonido D/K
S-3: Sistema de sonido I
S-4: Sistema francés SECAM L/L’
Page 71

Selección del tamaño de imagen
Opciones de pantalla
n
En la actualidad existen varios formatos de transmisión con distintas
proporciones, p.ej. 4:3, 16:9 y formatos de video como el de buzón.
0
Cuando se encuentra en alta resolución (720p / 1080i) HDMI, la
imagen permanecerá fija en formato 16:9 “tamaño completo” y no
podrá cambiarse.
EE
n
Subtítulos
Page 72

E
Especificación común
Fuente de alimentación 220~240 V c.a. 50 Hz
Sistema de televisión Sistema I, B/G, D/K, L’L.
Sistema de color PAL / SECAM
(PAL / SECAM / NTSC3.58 en modo AV)
Cobertura de canales VHF:
Impedancia de la entrada de la antena 75 ohm
Terminal AV
Entrada HDMI : Norma HDMI grupo
Entrada PC: Mini D-SUB de 15 patillas y conector de audio de 3,5
mm
Proporción de contraste 1500:1
Tubos de imagen (pulgadas)
(Medido diagonalmente). 42”/ 107 cm
Resolución de la imagen 1366 x 768
(WXGA)
Ángulos de visión H:178º, V:178º
Dimensiones (Ancho x Alto
x Profundidad mm) 1032 x 625 x 126.5
Peso (kg) 22.5
AV1: Norma CENELEC
Entrada: Compuesta de vídeo, RGB(RGB de 5V
con sincr. a clavija 14) y audio-I/D
Salida: Salida de monitor con señal compuesta
de video y audio-I/D
AV2: CENELEC Standard
Entrada: Compuesta de vídeo, S-VHS y audio-L/R
Salida: Salida de monitor con señal compuesta
de video y audio-I/D
E2-E12, F2-F10,
UHF: 21-69,
CATV: X, Y, Z, S1-S41, B-Q.
R1~R12
.
E
n
NO HAY IMAGEN NI SONIDO
l
Compruébese que esté enchufado el monitor.
l
Inténtese un canal diferente. Si se soluciona, probablemente se trate
de problemas de la estación emisora.
l
Compruebe que el monitor no esté en modo de espera.
n
M A L A IMAGEN, SONIDO BUENO
l Ajústese el control de BRILLO.
l
Ajústese el control de SINTONÍA FINA.
l
Compruébense las conexiones de antena.
NO HAY COLOR Y LA IMAGEN ES BUENA
n
l
Ajústese el control de COLOR.
l Ajústese el control de SINTONÍA FINA.
l
Compruebe las conexiones de los cables
l Es en color el programa?
IMAGEN DE POCA CALIDAD
n
l
Compruébense las conexiones de antena de la parte posterior del
monitor.
l
Compruébese que la antena no tiene hilos rotos.
l
Reoriéntese la antena.
n
EL MANDO A DISTANCIA NO FUNCIONA
l
Compruebe que las pilas se han introducido correctamente
Compruebe el estado de las pilas
l
Compruebe si la función Inhibición del RC está activada
l
Los siguientes fallos no están motivados por el receptor:
“FANTASMAS”
Reflexiones de señales provenientes de montañas o edificios altos
pueden causar múltiples imágenes, lo que se conoce como “FANTASMAS”. Estas condiciones anormales se pueden reducir al mínimo
reposicionando la antena o instalando una nueva apropiada para su
zona.
“INTERFERENCIAS”
Los electrodomésticos, sistemas d encendido de coche, etc., pueden
causar interferencias. Generalmente se tratará de una condición
temporal, pero en caso de que persista la interferencia, póngase en
Selección del tamaño de imagen
contacto con el vendedor.
Prohibición de sintonía previa
n
Esta opción impide la sintonización.
Posición de programa al inicio
n
.
.
Procedimiento de configuración
1. Pulse y mantenga pulsado el botónverde en el mando a distancia
y, a continuación, pulse el botón 5 en el monitor.
2. Sírvase del botón 5 o 6 para resaltar el Modo hotel y pulse $
para activar o desactivar esta opción seleccionando SÍ o NO.
3. Escoja el programa y seleccione SÍ con el botón 6. A continuación, seleccione la posición al inicio sirviéndose de los botones
1 o 2.
(AV1-0-1-2-3-4-.......99/AV2/ RGB / HDMI/ PC)
Page 73

E
LICENCIA DE USUARIO FINAL
E
Licencia de usuario final
El producto (concretamente el equipo o el aparato al que se
refiere la presente documentación) incluye software (las aplicaciones, utilidades y módulos de software integrados en el
producto) propiedad de Sanyo o de terceros que le hayan
otorgado la licencia a Sanyo. Antes de utilizar el producto,
sírvase leer las Condiciones de la licencia de usuario final
que se detallan a continuación. Si no aceptase los términos
y condiciones de la Licencia de usuario final, no comience a
utilizar el producto. Guarde el producto sin utilizar en su
envoltorio original y devuélvalo al establecimiento donde lo
haya comprado junto con el recibo de compra para que se le
reintegre la cantidad que haya pagado por él. Al utilizar el
producto, acepta los términos y condiciones de la Licencia
de usuario final, y está obligado en virtud de los mismos.
Concesión, condiciones y restricciones de la licencia
1. Sanyo le concede una licencia no exclusiva, de ámbito
mundial (supeditada a controles de exportación), intransferible (salvo lo que se permita en virtud del punto 2), libre de
cánones para utilizar el software con el producto y en el
mismo.
2. No puede transferir ninguno de los derechos sobre el software que le otorga esta licencia sin el consentimiento previo
por escrito de SANYO y, en caso de que obtuviese tal consentimiento, únicamente podrá transferirse el software junto
con la transferencia del producto Y siempre que el beneficiario haya leído y aceptado los términos y condiciones de la
presente licencia.
3. Debe cerciorarse de que los derechos de autor, marcas
comerciales y demás avisos de protección que contiene este
software se mantengan tal cual están y no se modifiquen ni
se eliminen.
4. El software que se facilita en virtud de la presente está
sujeto a derechos de autor y licencia (no está a la venta).
Especialmente, SANYO no le transfiere a usted la titularidad
ni los derechos de propiedad del software. El software que
se facilita en virtud de la presente puede contener o estar
basado en partes de material facilitado a SANYO bajo licencia de terceros.
5. Salvo en los casos expresamente permitidos por la ley, no
puede:
Cancelación
La presente licencia permanecerá en vigor hasta que se produzca su cancelación. La presente licencia quedará
automáticamente cancelada sin previo aviso si usted
incumpliese cualquiera de las disposiciones que contiene la
licencia.
Cláusula de exención de responsabilidad
1. El software (en la medida en que lo permite la ley) se
suministra “tal cual” y SANYO y sus proveedores excluyen
expresamente todas las garantías, explícitas o implícitas,
incluyendo (aunque no exclusivamente) garantías de calidad
satisfactoria, aptitud para el fin con que se suministra e inexistencia de infracción (salvo en la medida que los mismos no
puedan quedar excluidos por la ley).
2. En ningún caso recaerá sobre SANYO la responsabilidad
de cualquier daño directo, indirecto, accesorio o perjuicio
(incluyendo lucro cesante, interrupción de negocio, pérdida
de datos o el coste de la adquisición de bienes, tecnología o
servicios de reemplazo) derivado de la utilización o la incapacidad de utilizar el software (salvo en la medida en que tal
responsabilidad no pueda quedar excluida por la ley).
General
1. La presente Licencia de usuario final se regirá por la ley
inglesa. El usuario únicamente podrá interponer demandas
ante los tribunales de justicia ingleses y SANYO tendrá derecho a interponer demandas ante los tribunales de cualquier
jurisdicción.
2. Los términos y condiciones anteriores sustituyen cualquier
acuerdo previo, ya sea oral o por escrito, que pudiese existir
entre usted y SANYO con relación al software.
a) utilizar el software con ningún otro equipo físico
que no sea el producto;
b) copiar el software parcial ni totalmente;
c) incluir la totalidad (o parte) del software en otros
programas desarrollados por usted (o en su nombre) y/o utilizados por usted;
d) investigar secretos de fabricación del software,
descompilarlo ni desensamblarlo;
e) poner el software (ni cualquier parte del mismo) a
disposición de otros, ni permitir su redistribución, para que
pueda utilizarse con cualquier equipo físico que no sea el
producto; ni alquilar, arrendar, regalar, prestar, vender, distribuir o transferir la posesión del software en su totalidad ni
ninguna parte del mismo.
Page 74

HDMI / PC SIGNAL SUPPORT TIMING LIST
Page 75

Page 76

Part No. 1KA6P1P0360-A N4GA / N4GAA /N4GAB
 Loading...