

Page 1
INSTRUCTION MANUAL
Colour television
CE26LD81-B
1 - 27
ENGLISH
Please read this Instruction book before using your television.
We wish you many hours of pleasure from your new television.
Problems with set-up?
Call 0870 240 7475
Page 2

Contents
Remote Control Buttons ..............................................................................................................................2
LCDTV .......................................................................................................................................................2
Preparation................................................................................................................................................. 3
Safety Precautions .....................................................................................................................................3
Before Switching On Your TV.................................................................................................................... 5
Switching The TV ON/OFF .........................................................................................................................5
Navigating the Menu System ......................................................................................................................5
InitialSettings..............................................................................................................................................6
Basic Operations ........................................................................................................................................7
Everyday Operation ...................................................................................................................................7
IDTVMenuSystem .....................................................................................................................................9
Analogue TV Menu System ...................................................................................................................... 15
PCMode ................................................................................................................................................... 20
Other Features ......................................................................................................................................... 20
Teletext .....................................................................................................................................................22
ConnectPeripheral Equipment .................................................................................................................. 23
Tips .......................................................................................................................................................... 24
Specifications ........................................................................................................................................... 24
AppendixA: PC Input Typical Display Modes ............................................................................................25
Appendix B: Aerial Connection ................................................................................................................. 25
AppendixC: Connect Peripheral Equipment .............................................................................................. 25
PeripheralEquipment Connections ........................................................................................................... 26
ImportantInstruction ................................................................................................................................. 27
English -1 -
Page 3
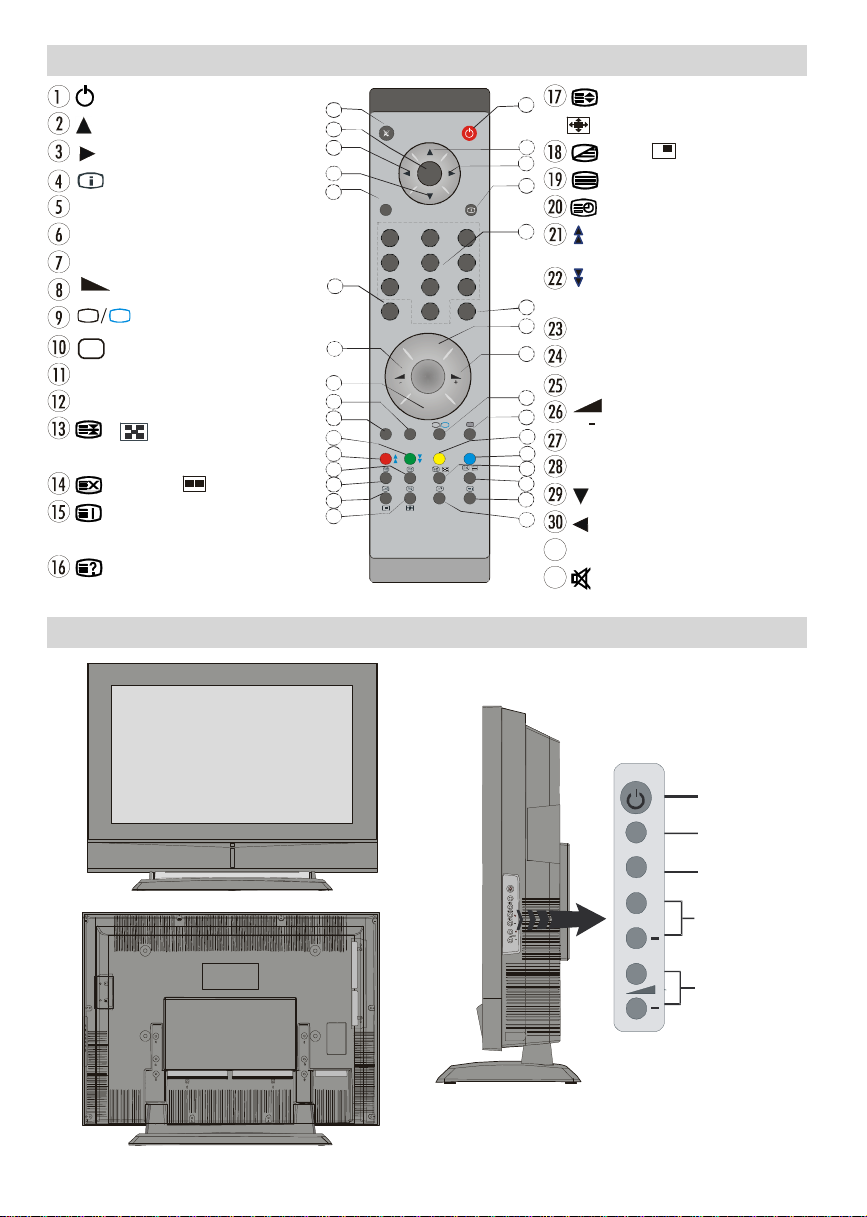
Remote Control Buttons
+
DTV
31
DTV
AV
/
SELECT
12
15
= StandBy
= Cursor Up
= Cursor Right
= Info
0 - 9 =DirectProgramme
-/-- / EXIT = No function
P + =Programme Up
= Volume Up
TV
= TV / DTV
AV
/SOURCE= ExternalSource
Yellow button = Feature Menu
Bluebutton= InstallationMenu
/ = Hold / No function/
subtitleon/off in the digital mode
= Update, = No function
= Index Page
GUIDE= ElectronicProgrammeGuide(EPG)
=Reveal / Switch from TV to PC
32
31
30
29
28
27
26
25
24
23
22
21
20
19
18
17
M
OK
ABC D EF GHI
1 2 3
JKL MNO PQR
4 5 6
STU VWX YZ
7 8 9
0
PP
P -
TV
P<P
LCD TV
1
= Expand,
/WIDE = Image size
2
3
4
= Mix, = No function
= Teletext
=Time
5
/Red button = Page Down /
SoundMenu
/ Green button = Page Up /
6
7
P<P/SWAP =PreviousProgramme
8
I-II =Mono/Stereo- DualI-II
P - =Programme Down
9
PictureMenu
= Volume Down
PP =Picture ModeSelection
OK/SELECT = Okay (Store)
= Cursor Down
= Cursor Left
M = Menu
= Mute
English -2 -
MENU
TV/AV
MENU
P/CH
Page 4
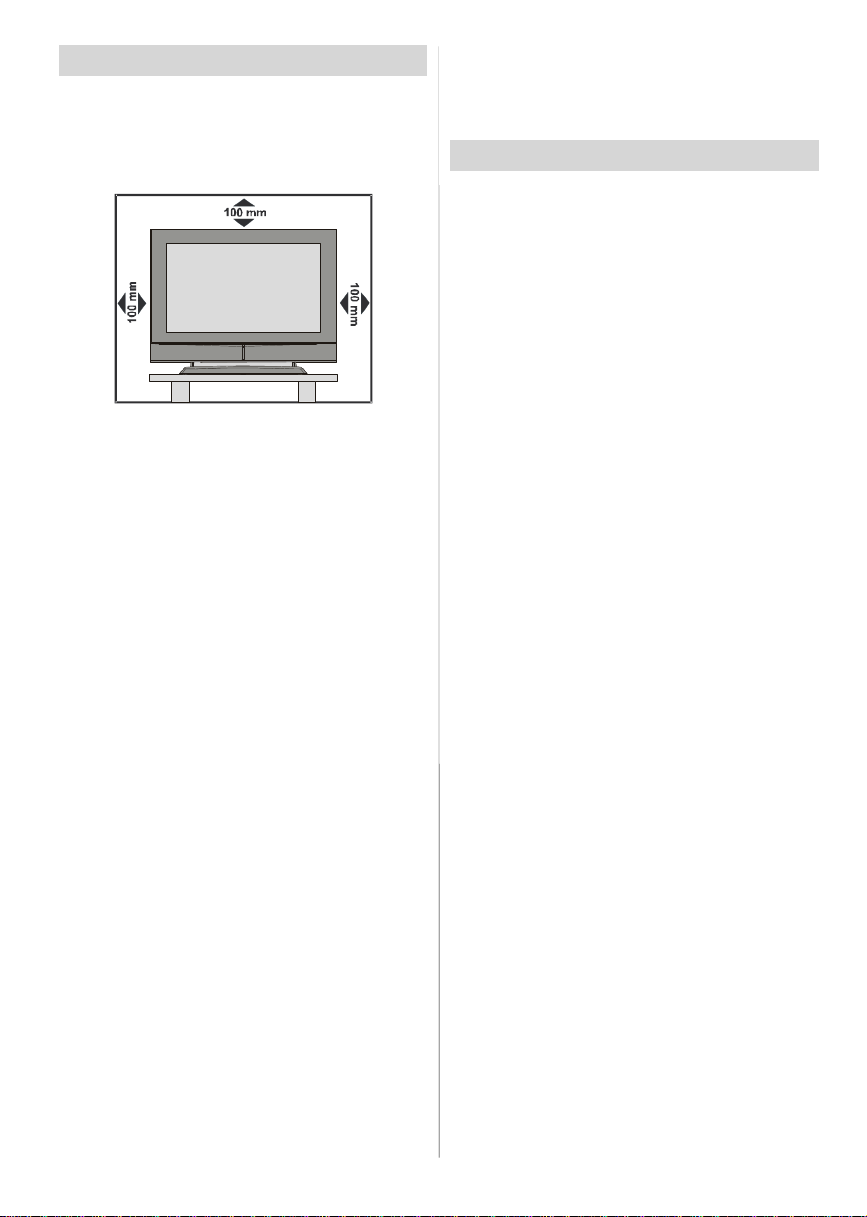
Preparation
Forventilation,leavea space of at least10cm free all
around the set. To prevent any fault and unsafe situ-
ations, please do not place any objects on top of the
set.
Use this apparatusin moderateclimates.
Features
• Remote controlledcolourLCDTV.
•FullyintegratedDigitalTV(DVB-T)
•100programmesfromVHF,UHFbandsorcablechannels can be preset.
•It can tune cablechannels.
•ControllingtheTVisveryeasybyitsmenudrivensystem.
• It has 2 Scart sockets for externaldevices (such as
video, video games, audio set, etc.)
• Stereo sound system (German+Nicam).
•FullfunctionTeletext (500pages).
•Fastext,TOPtext.
•Headphoneconnection.
•A.P.S.(AutomaticProgrammingSystem).
•All programmescan be named.
•Forwardorbackwardautomatictuning.
•Sleeptimer.
•ChildLock.
•Automatic soundmute when no transmission.
•NTSCPlayback.
•AVinandS-VHSin areavailable.
•IthasVGAconnectorforexternaldevicessuchascomputer.
• It has two HDMI connectors for Digital Video and
Audio. This connection is also designed to accept
HighDefinitionsignals.
•AVL(AutomaticVolume Limiting)
• When no valid signal is detected, after5 minutes the
TVswitches itselfautomaticallyto stand-bymode.
• PLL (Frequency Search)
English -3 -
•PC Input
• Plug&Play for Windows9X,ME, 2000, XP
•Audio Line Out
Safety Precautions
Please read the following recommended safety precautions carefully for your safety
1. Power Source
Thesetshouldbe operated only from a 220-240VAC,
50 Hz. outlet. Ensure you select the correct voltage
setting for your convenience.
2. Power Cord
Do not place the set, a piece of furniture,etc. on the
power cord(mains lead) or pinch the cord.Handlethe
power cord by the plug.Do not pull out the plug by
tugging the cord and never touch the power cord
when your hands are wet as this could cause a short
circuitorelectricshock.Never make a knotin the cord
or tie it with other cord.The power cord should be
placed in such a way that they are not likely to be
stepped on.
A damagedpowercord can cause fire or give you an
electric shock. When it is damaged and need to be
changed, it should be done by qualified personel.
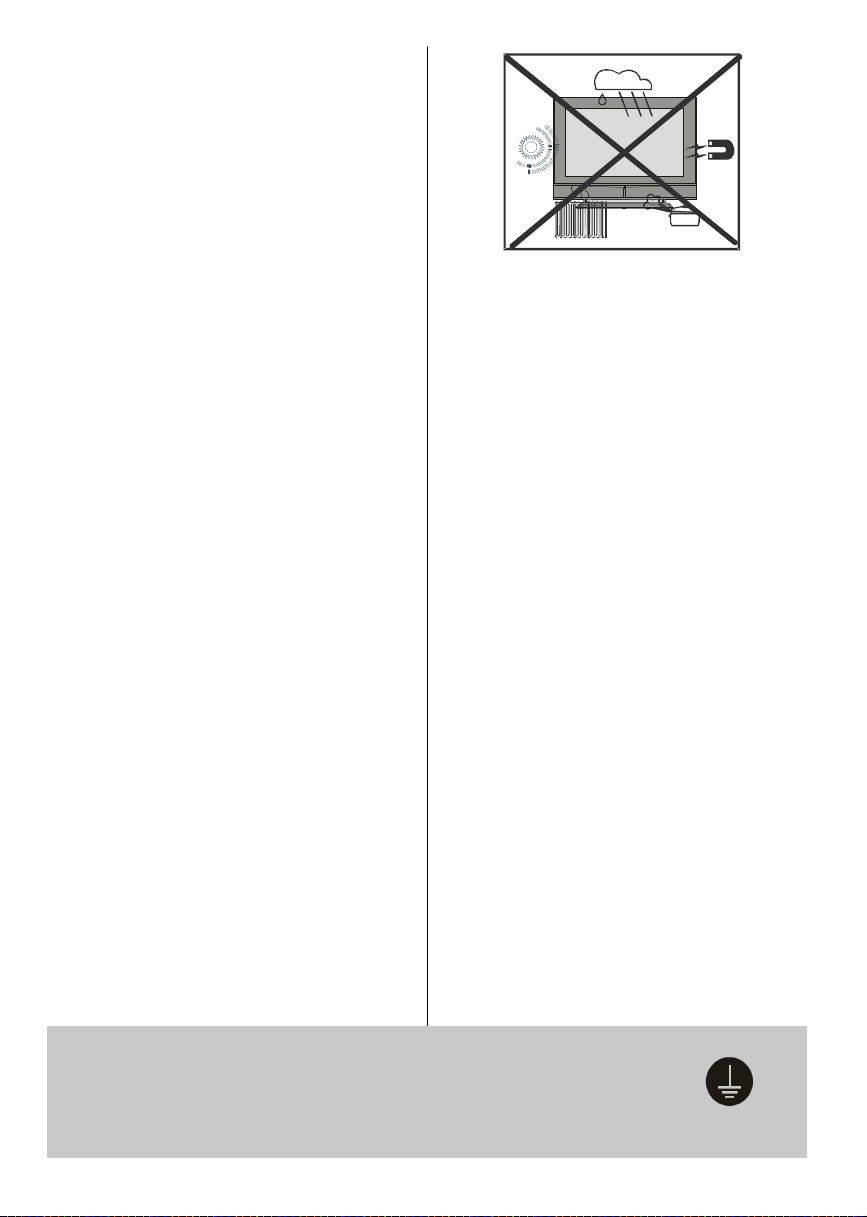
3. Moisture and Water
Donotusethisequipmentin a humidanddamp place
(avoidthe bathroom, the sink in the kitchen,and near
the washingmachine).Do not exposethis equipment
to rain or water, as this may be dangerous and do not
place objects filled with liquids,such as flower vases
on top of the set. Avoid from dripping or splashing.
If any solid object or liquid falls into the cabinet, unplug
the set and have it checked by qualified personnel be-
fore operating it any further
4. Cleaning
Before cleaning, unplug the set from the wall outlet.
Do not use liquid or aerosol cleaners. Use soft and
dry cloth.
5. Ventilation
The slots and openings on the back cover are intended for ventilation and to ensure reliable opera-
tion.Toprevent overheating,theseopeningsmust not
be blocked or covered in anyway.
6. Heat and Flames
The set should not be placed near to naked flames
and sources of intense heat,such as an electric
heater. Ensure that no naked flame sources, such as
lighted candles, are placed on top of the set
Page 5
7. Lightning
the ground wire.
In case of storm and lightning or when going on
holiday, disconnect the power cord from the wall out-
let.
8. Replacement Part
Whenreplacementparts arerequired, be sure the service technician has used replacement parts which are
specified by the manufactureror have the same speci-
fications as the originalone. Unauthorisedsubstitutions
may result in fire, electrical shock, or other hazards.
9. Servicing
Please refer all servicing to qualified personnel. Do
notremovethe cover yourselfas this may result in an
electric shock.
WARNING: When the device is not in use for a long
time, disconnect from power.
Instructions for waste disposal:
• Packaging and packaging aids are recyclable and
should principally be recycled. Packaging materi-
als, such as foil bag, must be kept away from children.
• Battery, including those which is heavy metal-free,
should not be disposed of with household waste.
Please dispose of used battery in an environmen-
tally sound manner. Find out about the legal regulations which apply in your area.
• Cold cathode fluoresant lamp in LCD PANEL contains a small amount of mercury, please follow local ordinates or regulations for disposal.
• The mains plug is used to disconnect the TV from
the mains and therefore it shall remain readily op-
erable.
Warning: To prevent injury, this device must be securely attached to the floor/wall in accordance with
the installation instrutions.
“The LCD panel is very high technologyproduct with
about a million thin film transistors, giving you fine
picture details. Occasionally, a few non-active pixels
may appear on the screen as a fixed point of blue,
greenor red. Please notethat this does not affect the
performance of your product.”
“DONOTLEAVEYOURTVATSTAND-BYOROPERATINGWHENYOULEAVEYOURHOUSE”
Be sure to ground the connection properly.
Connectthe groundterminalof TV withthegroundterminal provided at the power
outletusing the enclosed power cord. If theprovided plug does not fit your outlet,
consult an electrician for replacement of the obsolete outlet.
English -4 -
Page 6
Before Switching On Your TV
Power Connection
IMPORTANT: The TV set is designed to operate on
220-240V AC, 50 Hz.
•After unpacking, allowthe TV set to reach the ambi-
ent room temperature before you connect the set to
themains.
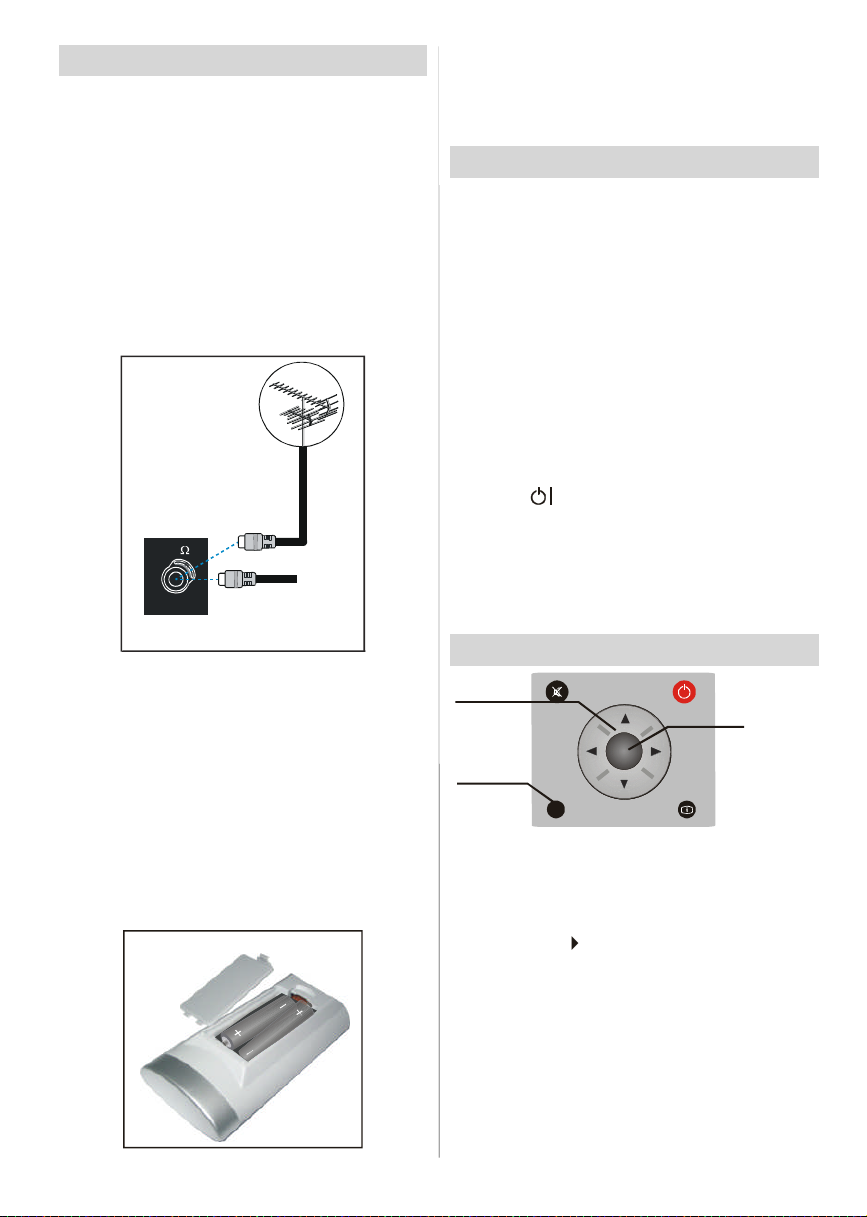
Connections To The Aerial Input Socket
•Connect the aerialor cableTVplugto theAerialinput
socketlocatedat the rear of the TV and connectthe
cable plug coming out from the TV out socket lo-
catedon the devices (VCR, DVB etc.) to this socket
as well.
VHF/UHF
REAR OF THE TV
Inserting Batteries In The Remote
ControlHandset
WARNING :Remotecontrolis batteryincluded.Aplas-
tic protector is used to disconnect the batteries in
orderto preventthe battery life from reducing.Please
remove the plastic protector before the first use.
• Removethebatterycoverlocated on the backof the
handset by gently pulling backwards from the indicated part.
• Insert two AAA/R03 or equivalent type batteries
inside.Place the batteriesin the right directionsand
replace the battery cover.
CABLE TV
Note: Remove the battery from remote control handset when it is not to be used for a long period. Other-
wise it can be damaged due to any leakage of battery.
Switching The TV ON/OFF
To switch the TV on:
Your TV will switch on in two steps:
1- Connect the power supply cord to the system.
Press Power On/Off button.Then the TV switches
itself to stand-by mode (Optional).
2- To switch on the TV from stand-by mode either:
Press a digit button on the remote control so that a
programme number is selected,or Press the "-P/CH"
or"P/CH+" buttonon the TV or press the“P+” or “P-”
buttonontheremotecontrol,so thatlastmodeswitched
offisselected.
Byeither methodthe TV willswitchon.
To switch the TV off:
•Pressthe“ (stand-by)”buttonontheremotecontrol
or On/Off switch on the TV, so the TV will switch to
stand-bymode.
TopowerdowntheTV completely,pressPowerOn/Off
button or unplug the power cord from the mains
socket.
Navigating the Menu System
Fornavigation
To confirm
choices
SELECT
OK
1- Press “M” to display the menu.
2- Press “
“
3- Use “
4- Press “” or “
PressOK to set as default.
5- To exit the menu or return from sub-menu screen,
press “M”.
These explanations are available for the navigation
of the whole Menu System. To select options that are
explained in the following parts, refer to “Navigating
The Menu System”.
” or “
” for more options.
” or “
M
INFO
” button to select an icon. Press
” button to highlight.
” buttons to change the settings.
English -5 -
Page 7
Initial Settings
PLEASE CHECK ANTENNA CABLE
Cancel
When the TV is turned on for the first time, it is in the
digitalmode.
Because this isthe first timetheTVis used, there areno
channelsstoredinthememoryandthefollowingmessage
appearsonthescreen.
Please ensure aerial isplugged in. Do you
want to startfirst time installation?
Yes No
• Tostart installationprocess, select “Yes”, to cancel
select“No”.
•Toselect an option“Yesor No”, highlighttheitemby
using or buttonsandpressthe“SELECT”button.
TheIDTVwillautomaticallytuneto theUHFtransmision
channels21to 68lookingfordigitalterrestrialTVbroadcasts and displaying the names of channels found.
This process will take about five minutes. To cancel
searching, you can press the "M" button at any time
duringthe process.
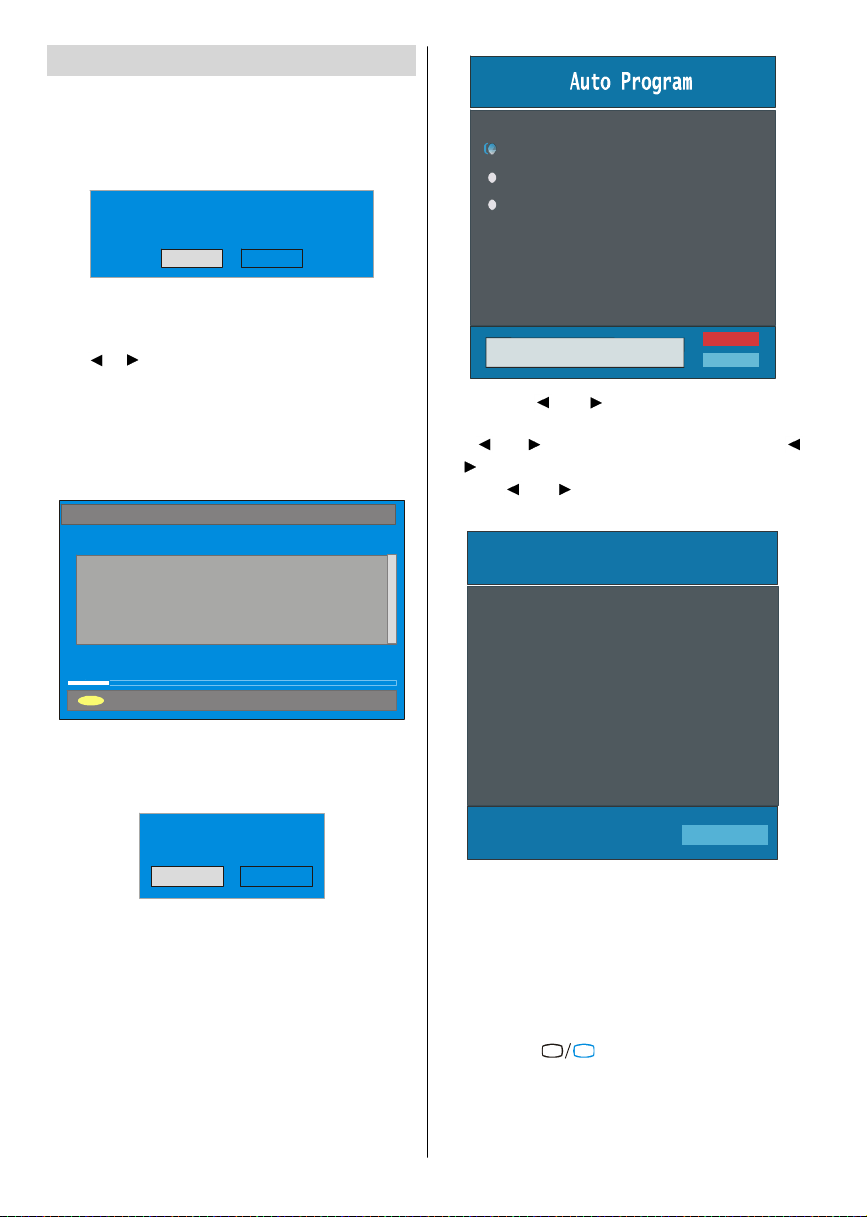
AUTOMATIC SEARCH
Channels:
BBC ONE
BBC TWO
BBC CHOICE
Country
Language
TXT Language
AUTO PROGRAMMING SYSTEM
Ok
Cancel
By pressing “ ” or “ ” button, adjust the Country
item and press “
” to highlight “Language” item.
Use “ ” or “ ” button to set “Language”. Use “ ”
or “ ” buttons to select “TXT Language” and set it
by using ” or “ ” buttons. Press “OK” button to
continue:
APS is running...
12 %
MENU
Cancel searching
After Automatic Search process is completed, the
followingmessage asking for analoguechannel search
appears on the screen. TV switches to the analogue
TVmode.
Do you want to search for
analogue channels?
Yes
No
To seach for analogue channels, select “Yes”. The
menubelowis displayedto searchfor analoguechan-
nels.
AfterAPS isfinalized, a programme list will appearon
the screen. In the programme list you will see the
programme numbers and names assigned to the
programmes.
Ifyoudonotacceptthelocationsand/ortheprogramme
namesofprogrammes, you can changetheminInsall
Menu.Fordetailssee “Install Menu” section.
To display channel list in IDTV, switch to the IDTV via
pressing the “
buttonto entermain menu, Channel Listwill be highlighted.Pressthe“SELECT”buttontoenterthemenu.
English -6 -
UK
P 03 - C 04
TV
63.75 MHz
6%
63.75 MHz
” button. Then press the "M"
Page 8
Basic Operations
You can operate your TV using both the remote
control and onset buttons.
Operation with the buttons on the TV
VolumeSetting
• Press “ -” button to decrease volume or “ +”
button to increase volume, so a volume level scale
(slider)willbe displayed at the middle of the bottom
onthe screen.
Programme Selection
•Press“P/CH +”buttontoselectthenextprogrammeor
“P/CH -”buttontoselect thepreviousprogramme.
Entering Main Menu
• Press the “MENU” buttonto enter Main menu. In the
Mainmenuselectsub-menu using“P/CH -” or“P/CH
+” buttons and enter the sub-menu using “ -” or
“ +” buttons. To learn the usage of the menus,
refertotheMenuSystemsections.
AV Mode
Pressthe“TV/AV” buttonatthecontrolpanelonthe the
TVtoswitchyourTVtoAVmodes.
Operation with Remote Control
The remote control of your TV is designed to control
all the functions of the model you selected. The func-
tions will be described in accordance with the menu
system of your TV.
Functions of the menu system are described in the
following sections.
Volume Setting
Press “ V +“ button to increase volume. Press “V -”
buttonto decreasevolume.Avolumelevelscale(slider)
willbedisplayedinthemiddleatthebottomofthescreen.
Programme Selection (Previous or next
programme)
•Press “P-” buttontoselectthepreviousprogramme.
•Press“P+”buttonto selectthe next programme.
Programme Selection (direct access):
Press digit buttons on the remote control to select
programmes between 0 and 9. TV will switch to the
selectedprogramme.To select programmesbetween
10 - 999 (for IDTV) or 10-99 (for analogue), press the
digitbuttonsconsecutivelywhichprogramme youwant
toselect(eg.forprogramme27, first press2 and then
7).Whenit is late to press seconddigitbuttononlythe
firstdigitprogrammewill be displayed.Thelimit of the
delaytime is 3 seconds.
Pressdirectlytheprogrammenumberto reselectsingle
digitprogrammes.
English -7 -
Everyday Operation
Pressingthe“
ing television programmes will switch the TV set be-
tweendisplayingthedigitalterrestrial televisionbroadcasting and its normal analogue broadcasting.
Information Banner
Wheneveryou changechannel,using the“P-” /“P+”
buttonorthe digitbuttons,TVdisplaysthe channelpic-
turealongwithaninformationbanner at the bottomof
thescreen.This willremainon the screen for approximatelythreeseconds.Theinformationbannercanalso
bedisplayedatanytimewhilewatchingTVbypressing
the“INFO”buttonontheremotecontrol.
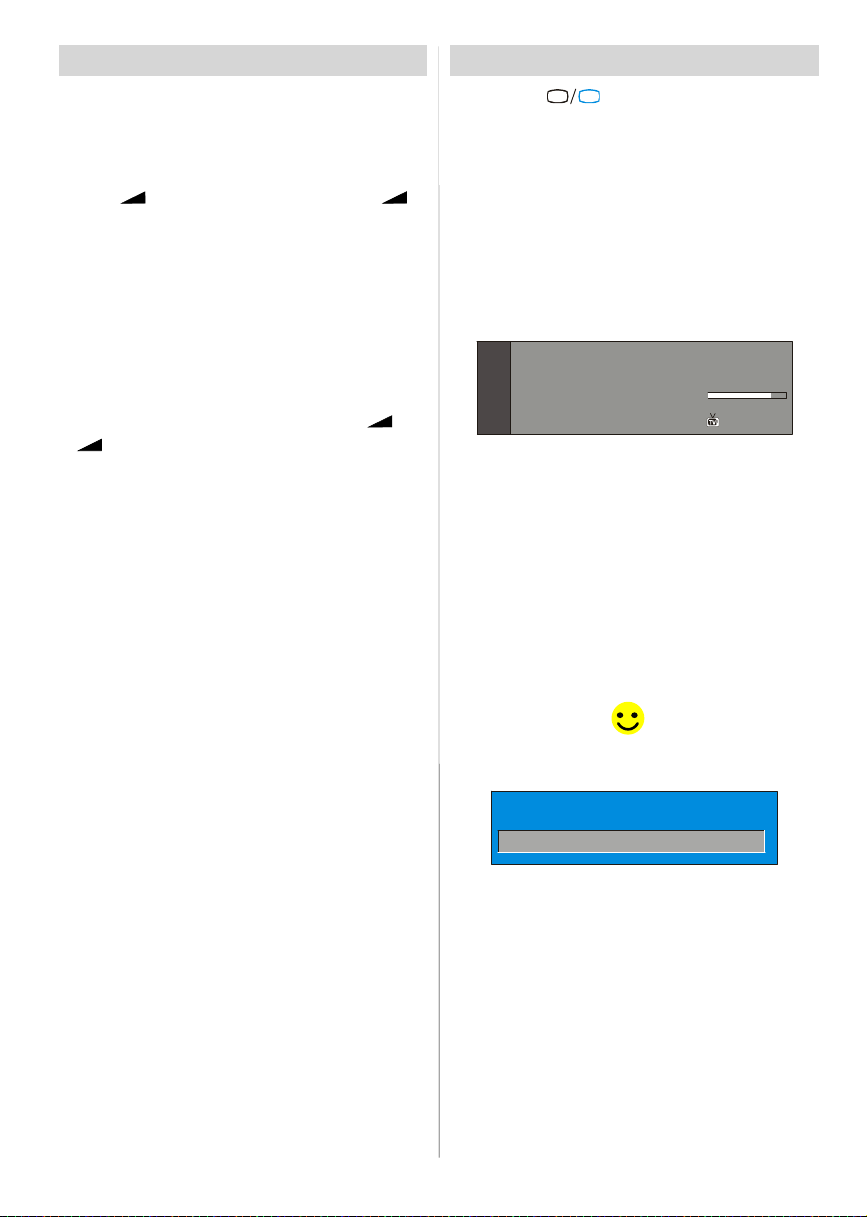
Now: 50/50
Next:Ace Lighting
1. BBC ONE
The information banner gives a number of facts on
the channel selected and the programmes on it. The
name of the channelis displayed,alongwithits channellist numberand an indicationof the strengthof the
signal received on this tuning channel.
Hint
Not all channels broadcast the programme data. If
the name and times of the programmeis not available then “No Information Available” are displayed
inthe informationbanner.
Iconsare also displayedintheinformation bannerand
ifthischannelis afavouritechannel:
Favouritechannel icon .
If the selected channel is locked, you must enter the
correctfourdigitcodetoviewthe channel.
Electronic Programme Guide (EPG)
Some,butnotall,channelssendinformationaboutthe
currentand next events. Please note that event infor-
mation is updated automatically. If there is no event
information data available in channels, only channel
names with “No Information Available” banner is
displayed.
• Press “GUIDE” buttonto view theEPG menu.
• In EPG Menu, you can easily see the extended help
information by pressing“INFO” buttonand by pressing this button again you can close this window.
TV
Enter Lock Key
”button atanytime whilewatch-
09:25 - 11:00
11:00 - 11:25
Signal Level:
13:15
Page 9
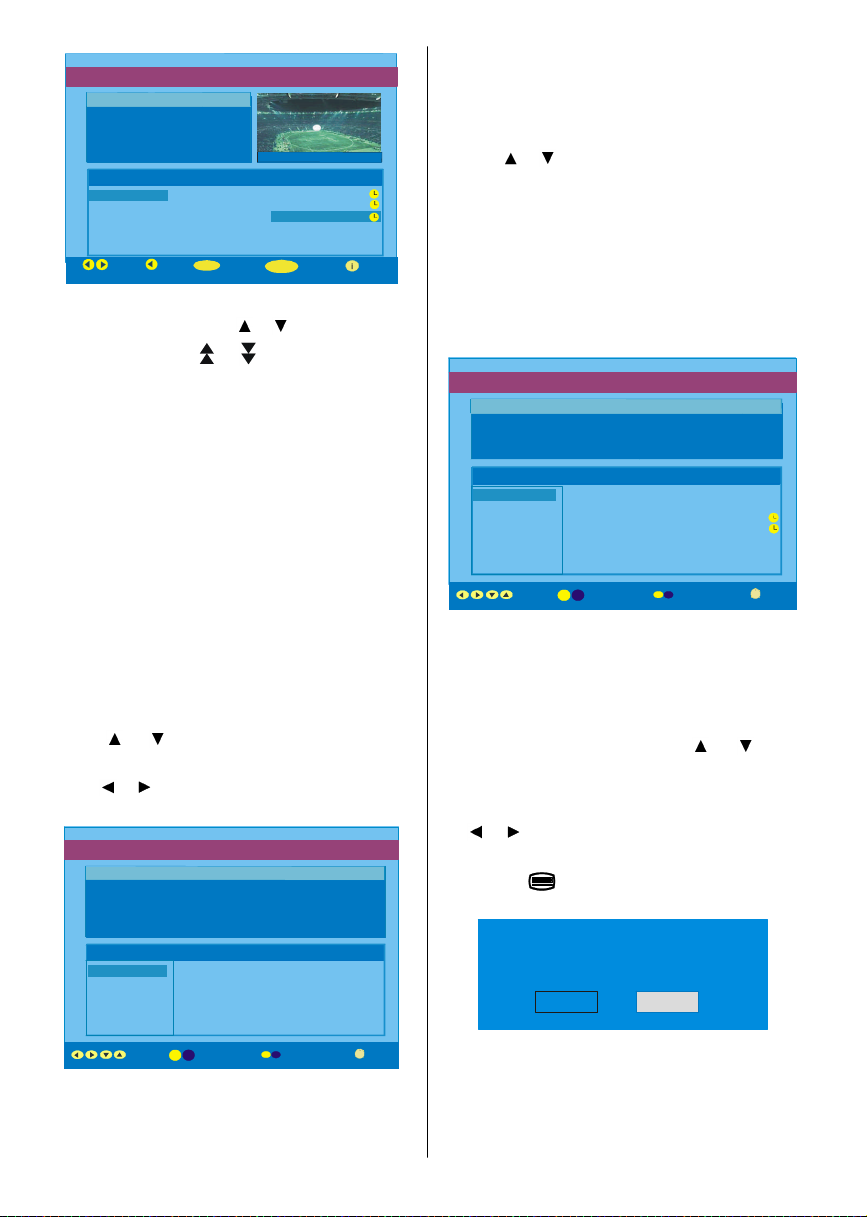
51 BBCi
ELECTRONICPROGRAMMEGUIDE(Now&Next) Saturday 21/8 13:48
MENU
ITVNews 14:00-15.00
Rolling nationa l and international news
including b reaking news as it ha ppens,
businessupda tes,sportsresultsand
weather summaries.
Channels CurrentProgramme Next Programme
30. CBBC Channel Chuckle Vision Tracy Beaker
40. BBC NEWS24 BBC News BBCNews
41. ITVNews ITVNews ITVNews
50. FourText No Information No Information
51. BBCi BBCi BBCi
Current Reminder
Navigate
7 Day EPG More
•In theEPGMenuallchannels are displayed.Current
channelis highlighted.Use or buttonsto change
channels. Also press or buttons to make page
up/down scroll for the channels.
• If you highlight an event, short event description,
extended event description, start and finish times of
event are displayed on the screen.
• When the currentprogramme is highlighted, the box
is switched to the highlighted channel by pressing the
“SELECT”button.
•If youpressthe“SELECT”buttonwhena nexteventis
highlighted, a reminder is set for the highlighted
programmeanda clockappearsacrossthehighlighted
channelline.
Programme reminders can be set to signal that a
programme is about to start when you are watching
anotherchannel. If youset reminderto a programme,
then you will be asked for switching to that channel
whenthe remindertime is reached.
•Pressthe “M” button toviewthe 7 dayEPG.
• Press or button to navigate in Channels or
Programmes.
•Press or buttonto navigatethroughthechannel
and programme list.
ELECTRONICPROGRAMMEGUIDE(7 Day) Saturday 21/8 13:49
ChuckleVision 13:00-14:00
Triple bill.In the Ring/RomanyDays/On the Radio: Pauland Barry
grapple with the world of wrestling; hunt for a mysteriousEmperor's
underpants; and record theirfirst pop song.
Channels Programmeson Saturday 21/8, 13:00 - 15:00
30. CBBC Channel 13:00 Chuckle Vision (Now)
40. BBC NEWS24 14:00 Tracy Beaker
41. ITVNews 14:55 Newsround
50. FourText
800. BLUE/LEFT1k...
801. CCIR17/1kHz...
DayNavigate
•With“RED/GREEN” buttonsyou canchangesched-
ule time. By pressing “YELLOW/BLUE” youcan ad-
vance the schedule backward / forward of a day.
• If you press “INFO” buttonyou can see the detailed
help information easily.And by pressing “INFO” but-
ton again you can exit Help menu.
•Thestarting time forEPG isthecurrenttime.Youcan
see the event information for the next two hours. By
pressing or button, you can go to the next/previous hours while Programmes list is highlighted.
•lf youpressthe“SELECT”buttonwhenanexteventis
highlighted, a reminder is set for the highlighted
programme and a clock appears on the screen.
Programme reminders can be set to signal that a
programme is about to start when you are watching
anotherchannel. If youset reminderto a programme,
then you will be asked for switching to that channel
whenthe remindertime is reached.
ELECTRONIC PROGRAMMEGUIDE(7 Day) Saturday 21/8 13:51
Newsround 16:55-17:00
CBBC joinsthe Newsround team , keeping you up to date on the latest
storiesand events happening at home and abroad.
Channels Programmeson Saturday 21/8, 15:00 - 17:00
30. CBBC Channel 15:00 Even Stevens
40. BBC NEWS24 15:50 Newsround Showbiz
41. ITVNews 16:00 BasilBrush
50. FourText 16:55 Newsround
51. BBCI
800. BLUE/LEFT1k...
801. CCIR17/1kHz...
DayNavigate
Displaying The Subtitles
With Digital terrestrial broadcasting (DVB-T), some
programmesarebroadcastwithsubtitles.Subtitlescan
be displayed when watching these programmes.
Press the “M” button to display the Main menu, high-
light the Configuration line using or button
andpressthe “SELECT”buttontodisplaytheConfigu-
rationmenu.
Highlightthe“Subtitle”iteminConfigurationmenuand
use or buttontoset Subtitletooff or a language.
If“Subtitle” is on via selecting one language option,
pressingthe button causes the following warning
message display on the screen.
Interactive services cannot be used
while subtitles are on. Would you like
to turn subtitlesoff now?
Yes No
Digital Teletext
With Digital terrestrial broadcasting (DVB-T), in addition to pictures and sound, you can also watch digital
teletext.
English -8 -
Page 10

Digital teletext is sometimes broadcast at the same
Configuration
time as normal broadcasting.
1. Press the button.
Thedigitalteletext informationappears.
2. Operate it with the coloured buttons, / / /
buttonsand OK button.
Theoperationmethodmaydifferdependingonthecontentsof thedigitalteletext.
Follow the instructions displayed on digital teletext
screen.
• When “Press SELECT” button or similar message
appears on the screen,pressthe“SELECT” button.
•Whenthe (Text)buttonispressed,theTVreturns
totelevisionbroadcasting.
•WithDigitalterrestrialbroadcasting(DVB-T),inaddi-
tionto digitalteletextbroadcastingatthe same time as
normalbroadcasting,therearealso channelswith just
digitalteletextbroadcasting.
• The aspect ratio when watching a channel with just
digitalteletextbroadcasting is the same as the aspect
ratioofthepicturewatchedpreviously.
•Whenyoupressthe (Text)buttonagain,thedigital
teletext screenis displayed.
Over Air Download
To ensure that your IDTV always has the most up-todate information,pleaseensurethat after use it is set
toits standbymode.At 3AMeachday, the IDTV automaticallysearchesforany newinformationwhichmay
bebroadcastand willdownloadthis to yourIDTVauto-
matically.Thisoperationwillnormallytakeapproximately
30 seconds.
Ifyouwanttodo this,youneedtosetAutomaticDownloadto“Enabled” inReceiverUpgradesetting.Forde-
tails see page 13.
Widescreen
Dependingon the typeof broadcast beingtransmitted,
programmes can be viewed in a number of formats.
Pressthe “WIDE”buttonrepeatedly to selectbetween
Autoor16:9.
When Auto is selected, the format being displayed is
determined by the picture being broadcast.
Please Note: Menu size changes depending on the
chosenimage size.
IDTV Menu System
TheIDTVmenucanonlybeshownwhenwatchingDigital terrestrial broadcasting. Press the “
tontoturnIDTV on whileTVis inanaloguemode.
Press the "M" button. The menu below appears on
the screen:
Main Menu
Channel List
Installation
Timers
Language
TV Setup
Common Interface
Channel List
Usingthe or button ontheremotecontrolin Main
menu, make sure that the first item, Channel List, is
highlightedand pressthe“SELECT” buttontodisplay
theChannelList.
The following operations can be performed in this
menu:
1. Navigating thewhole list of channels
2. Deletingchannels
3. Renamingchannels
4. Adding locks to channels
5. Setting favourites
ChannelLististheplacewherethe channelsare managed.
1. BBC ONE
2. BBC TWO
3. ITV 8
4. Channel 4
5. BBC THREE
6. Teletext
7. BBC FOUR
8. Sky Travel
9. UKHistory
10. RTL
Select
Delete Edit Name Lock Favourites
Function Select Channel Watch More
TV
” but-
Navigating the whole channel list
Press or button for selecting the previous or
next channel. You can press or button to move
page up or page down.
English -9 -
Page 11

To watch a specific channel,highlightit using or
SELECT
buttonandthenpress“SELECT” button,whilethe“Se-
lect”item onChannelListmenuis highlightedbyusing
or button.
Then the name and number of the selected channel
willbedisplayedinthetop-leftandtop-rightofthechan-
neldisplayat thetop-rightof thescreen,respectively.
Deleting the channels in the channel list
Press or button to select the channelthat will be
deleted.
Press or button to select the ‘’Delete’’ item on
Channel List menu. As seen on Channel List menu,
SELECT is writtennexttoDelete itemat the bottomof
thescreento indicatethatpressthe“SELECT”buttonto
deletethe highlighted channel in the channellist.
CHANNELLIST 1 BBC ONE
1. BBC ONE
2. BBC TWO
3. ITV 8
4. Channel 4
5. BBC THREE
6. Teletext
7. BBC FOUR
8. Sky Travel
9. UKHistory
10. RTL
Select Delete Edit Name Lock Favourites
Function Select Channel Delete More
Press the “SELECT’’ button to delete the highlighted
channel in the channel list. Then the message below
appears onthe screen.
The selected service willbe permanently
deleted. Are you sure?
Yes No
Press or button to highlightthedesiredoption.If
“SELECT’’buttonis pressedwhile“Yes”is highlighted,
thehighlightedchannelisdeleted.Selecting“No”cancelsthe deleteoperation.
Renaming channels
To rename a specific channel, the channel must be
highlighted via pressing or button and then high-
light the Edit Name item by pressing or button.
Pressthe“SELECT”toactivaterenamefeature.
1. BBC ONE
2. BBC TWO
3. ITV 8
4. Channel 4
5. BBC THREE
6. Teletext
7. BBC FOUR
8. Sky Travel
9. UKHistory
10. RTL
Select Delete Edit Name Lock Favourites
Function Select Channel Edit Name More
Now pressing or buttonmoves to the previous/
next character. Pressing or button toggles the
current character, i.e., ‘b’ character becomes ‘a’ by
and ‘c’ by . Pressing the numeric buttons ‘0...9’
replaces the highlighted character with the characters printed above the button one by one as the but-
ton is pressed.
Press the "M" button to cancel the editing or “SE-
LECT” button to save the new name.
Adding locks to channels
Channel Locking provides a password-protected accessto channelsselectedbyparents.Inorderto lock a
channelyou shouldknowthe ParentalLockpassword
(default valueissetto0000inthe factoryandcanonly
bechangedfromtheConfiguration Menu).
Select the channel to be locked by highlighting it and
select the “Lock” optionby pressing or button.
Whenthe“SELECT”buttonispressed,apasswordbox
is displayed.
CHANNELLIST 1 BBC ONE
1. BBC ONE
2. BBC TWO
3. ITV 8
4. Channel 4
5. BBC THREE
6. Teletext
7. BBC FOUR
8. Sky Travel
9. UKHistory
10. RTL
Select Delete Edit Name Lock Favourites
Function Select Channel Lock/Unlock More
Enter Lock Key
Enter the password using the digit buttons on the
remote control. The Lock icon will now be dis-
playednextto theselectedchannel.Repeatthesame
operation to cancel the Lock.
English -10-
Page 12

Setting Favourites
SELECT
Pressthe SELECTbutton on your remote control to tune to the
Configuration
Youcan set various channels asfavouritessothat only
thefavouritechannels arenavigated.Tosetafavourite
youshouldhighlightthe“Favourites”itemat bottomof
theChannelListmenu.
Use the or button to highlightthe “Favourites”
item at the base of the screen and then, in turn, high-
lighteachchannelyouwanttoaddtothefavouriteslist,
using the and buttons (or / buttons), and
pressthe “SELECT”button.
Achannel selectedasafavouriteappearsinthemain
channel list with a favourites icon ( ) against the
channel name.
CHANNELLIST 1 BBC ONE
1. BBC ONE
2. BBC TWO
3. ITV 8
4. Channel 4
5. BBC THREE
6. Teletext
7. BBC FOUR
8. Sky Travel
9. UKHistory
10. RTL
Select Delete Edit Name Lock Favourites
Function
Select Channel Add/Remove... More
On Screen Help PressingINFO Button
For all menus press the “INFO” button to display the
helpinformationaboutthe menufunctions. For Chan-
nel List menu the following messageis displayedon
thescreen.
highlighted channel.
PressMENUto exitthisscreen.
Installation
The Installation menu mainly intends to help you for
buildingaChannel Table in themostefficientway.
Main Menu
This menu includes the following items:
1. Add New Channels
2.First TimeInstallation.
ADD NEW CHANNELS:
This tuningmenu consists of twoparts:
AutomaticSearch
ManualSearch
Installation
Add New Channels
First Time Installation
Automatic Search
Manual Search
AutomaticSearch:
Automaticsearchis startedbypressing the“OK” buttonintheauto-searchpopupmenu.Alltheservicesare
searchedanda channeltableis createdautomatically.
All channels found are stored in a sorted form with
respect to their channel numbers. Some services
may not appear with the correct channel number. At
the time of printing, not all broadcasters are sending
theirchannelnumberinformation.
ManualSearch:
In manual search, the number of the multiplexis enteredmanuallyandonlythat multiplexis searched for
the channels. For every valid channel number,signal
level, signal quality and network name are shown at
thebottom of thescreen.
Inbothmanual andautosearchanyexistingchannelin
thedatabaseisnotre-stored to avoidredundantduplicatesof thatchannel.
FIRST TIMEINSTALLATION
The user can use this item to load default settings,
whichhadbeenloadedtothe receiverat the factory.
To installfactorysettings,highlight“FirstTime Installa-
tion” menu andpressthe“OK”button,thenyouwillbe
askedto confirmfordeletingall channelsand settings.
Installation
Add New Channels
Channel List
Installation
Timers
Language
TV Setup
Common Interface
By selecting YES and pressing the “OK” button, the
existing channel table will be deleted.
After factorysettingsisloaded,“FirstTimeInstallation”
menu will be displayed.
English -11-
Are you sure you want to delete all digital channels
and settings for first time installation?
Yes
Please ensure aerial isplugged in. Do you
want to startfirst time installation?
Yes No
No
Page 13

Pressthe“OK” button to startinstallation.After search
i
CONFIGURATION
Parental Settings
is completed for digital channels, a message asking
searchfor analoguechannels appearson the screen.
Do you want to search for
analogue channels?
Yes
No
Press the “OK” button to search for analogue
channels.The following menu appears on the screen
for analoguechannel search.
Country
Language
TXT Language
AUTO PROGRAMMING SYSTEM
Ok
Cancel
First of all choose Language,Country and TXT Language by using / and / buttons. This will
affectthesortprocessinAPS. TostartAPS press“OK”
button:
Configuration
Pressthe"M" buttonto displaythe MainMenuandthe
button twice to highlight Configuration, then press
the“SELECT”buttontodisplaytheConfigurationmenu.
Press the "M" button to leave the menu.
Main Menu
Channel List
Installation
Timers
Language
TV Setup
Common Interface
The various configuration functions are displayed in a
list, alongwith a quarter-screen image of the currently
selectedchannel.Youcanselecta functionbyhighlightingthecorresponding menulineusingthe or but-
ton.
Audio Language
Subtitle
Favourite Mode
EPG Preference
Receiver Upgrade
English
Off
Off
Now&Next
V.1.5
APS is running...
UK
P 03 - C 04
After APS is finalized, the programme table will appear on the screen. In the programme table you will
see the programme numbers and names assignedto
theprogrammes.
Ifyoudonotacceptthelocationsand/ortheprogramme
names,youcanchangethem intheProgrammenu.
63.75 MHz
63.75 MHz
6%
More
Audio Language
Digitalterrestrialtelevisionchannelscanbroadcast simultaneous soundtracks in more than one language.
This function selects which language soundtrack you
will hear when switching to a channel broadcasting
withthe multiple soundtracks.
Highlightthe Audio Language lineintheConfiguration
menuanduse the or buttontocyclethroughthe
language options.
Subtitle
Digital terrestrial television channels can broadcast
subtitles displayedon-screen for the hard-of-hearing.
Thisfunctionselectsthedesiredsubtitlelanguageand
enables the automatic display of subtitles whenever
subtitleinformation is broadcast.
Highlight the Subtitle line in the Configuration menu
anduse the or buttonto cyclethrough“Off” and
language options.
English -12-
Page 14

Favourite mode
CONFIGURATION
Parental Settings
Thisfunctionenablesor disablesthe favouritechannel
list mode.SeeChannelList menu Favouriteson page
13.
Use or button to turn on/off favourite mode. If
the “Favourite Mode” is on, in normal operating
mode pressing “P+” and “P-” buttons will only navi-
gate through the channels that were previously de-
fined as favourites in Channel List.
EPG Preference
Digitalterrestrialtelevisionchannelscanbroadcast simultaneous Next&Now and 7-Day electronic
programme.
Highlight theEPG PreferencelineintheConfiguration
menuand usethe or buttontoselectNext&Now
or7-Day.
ReceiverUpgrade
TheIDTVcanbeupgradedviatheconfigurationmenu,
enteredfrom themain menu.
In the Configuration menu, highlight the “Receiver
Upgrade” item by pressing or buttonand press
the“SELECT”buttonto start upgradeprocess.
Thereare twopossibilities for Receiversoftwareto be
upgraded: automatic andmanual.
tunes to each frequency that have been stored in its
databaseand looks for thenewsoftware.
Software Upgrade
Searching forupgrade. Please wait, or
pressMENUto c ancel.
Search Progress:
Parental Settings
Some channels broadcast material which you do not
wantyoungermembersofthefamilytowatch.Anychan-
nel can be ‘locked’ so that it cannot be selected for
viewingwithoutfirsta four-digitPINcodebeingentered.
Inthiswayanychannelnotsuitableforyoungerviewers
canbe protected.
Thisfunctionenablesor disables the menu protection
systemandallowsthePIN code to be changed.
Use or button to go to ParentalSettings option.
Pressthe“SELECT”button to enterParental Settings
Menu. Aboxaskingforthelock keyisdisplayed.
Enter Lock Key
There is only one key which is set to “0000” initially.
Enterlockkey.IfwrongLockkeyis entered,the follow-
ing message is displayed on the screen and it is returned back.
Audio Language
Subtitle
Favourite Mode
EPG Preference
Receiver Upgrade
AutomaticDownload
Search for New Version
MENU
Exit More
English
Off
Off
Now&Next
V.1.5
Enabled
AutomaticDownload (Automaticupgrade)
Automatic Download canbe enabled or disabled by
pressing or button. If it is enabled,thenthere are
twowaysforautomaticupgrade.Thefirstoneis check-
ingtheexistenceofa newsoftwareeverytime theIDTV
goesto standby. Thesecondoneis wakingup at 03:00
a.m.everynight,providedthattheIDTVis leftinstandby
mode. Both automatic upgrade methods result in
standbymode either upgradedor not.
If the automatic upgrade is set to “Disabled” then this
functionwillnot work.
SearchFor New Version(Manual upgrade)
Manualupgradestartsif the“SearchforNewVersion”
item is highlighted by using or button and acti-
vatedviapressingthe“SELECT” button.
After“Searchfor New Version”isactivated,theIDTV
English -13-
Wrong Lock Key
Ifitiscorrect,theParentalSettingsMenuincludingfollowingitems is displayed:
Menu Lock Installation
Set Lock Key
Thereyoucan set/reset lockingfor the MainMenu,or
theInstallationMenutorestrictaccess.Ifthemenulock
is disabled,therewillbe free access to the menu system.Alsointhismenuyoucanchangethelock keyand
set/changeparentallockmode.
Disabled:Allmenusareunlocked.
Main Menu: Mainmenuisaccessibleonlywiththecor-
rectlockkey. So the user cannotadd,delete,rename,
movechannels, cannot set timers.
Installation: Installation menu is locked, so the user
cannotaddchannels.
Changes will be updated after exiting Configuration
Menu.
Timers
You can set a timer to switch the TV to any channel
without yourintervention.This is also for makingvideo
recordings of programmes whenyou are out.
Page 15

Display the Main Menu by pressing the "M" button.
Highlight the Timers line by pressing or button
and press the “SELECT” button to display the Timer
menu.
Main Menu
Channel List
Installation
Timers
Language
TV Setup
Common Interface
Up to five separatetimer events can be set and each
is displayed in the Timer screen, showing the event
number, the channelto be selected,the starttime,end
time,date and the mode - whetherthat event is active
(and will be acted on) or not.
• The frequency mode determines how often the
receiver operates this event and is set with the or
button to be either Once, Daily, or Weekly.
If an invalid number for the start or end times or the
date is entered, “Entered time is not valid” message
appears on the menu.
If timer action occurs while the TV is watched,the TV
switchesto theselectedchannel.Whentimerexpires,
the TV switches to the channel which it is switched
from.
Selecteddigitalchannelwillbeoutputvia Scart-2.You
shouldconnectyourVCRtoScart-2forrecordingdigital
broadcast.
Language
Some programmes are broadcast in two or more languages simultaneously. The language heard can be
selectedfrom theLanguageMenu.
•Pressthe"M" buttontodisplaytheMainMenuanduse
or buttontohighlighttheLanguagelineandpress
the“SELECT”button.
Main Menu
Channel List
TIMER MENU
No Channel Name Start End Date Mode
1. ITV 1 20:00 21:00 12/05/2005 Active
2. BBC ONE 00:00 00:00 01/01/2005 Inactive
3. BBC ONE 00:00 00:00 01/01/2005 Inactive
4. BBC ONE 00:00 00:00 01/01/2005 Inactive
5. BBC ONE 00:00 00:00 01/01/2005 Inactive
6. BBC ONE 00:00 00:00 01/01/2005 Inactive
Toggle Mode Exit EditTimer More
MENU
• To set an event, highlight its mode button using the
or button and press the “SELECT” button to
display the timer entry window.
Start:
End:
Date:
Mode:
3. ITV 1
00:00
00:00
03/06/2005
Once
• Here the five settings of channel name, start time,
end time, date and frequency mode can be set. You
can move freely between each setting using the
or buttons.
• The channelname is set usingthe or buttonto
displaythechannelwhichbroadcaststhe programme.
•Thestarttime,endtimeanddateareeachsetwiththe
digitbuttonson the remote control in 24-hourformat.
Installation
Timers
Language
TV Setup
Common Interface
• Use the or button to highlight the soundtrack
languagerequiredandpressthe“SELECT”button.Nor-
mal viewing, with the required language soundtrack,
canberesumedby pressingthe"M" button.
Languages
English
TV Setup
Tobe abletogothroughTV functions,youcan use this
item.
The digital TV Setup menu screen is accessed from
the main menu. Press the "M" button to display the
main menu and use or button to highlight “TV
Setup”, press the “SELECT” button to display TV
Setup menu screen.
English -14-
Page 16

Main Menu
Channel List
Installation
Timers
Language
TV Setup
Common Interface
Detailed information about Sound, Picture and Feature menus are inAnalogueTV Menu System section
on page 19.
Common Interface
• Press the "M" button to display the Main Menu and
usethe or buttontohighlightthe “Common Inter-
face”lineandpressthe“SELECT”button.
3. Connect the TV to the mains supply, switch
on and then wait for few moments until the
card is activated.
•Some CAMsmayrequirethe followingsetup.Please
set the CAM by entering the IDTV menu, Common
Interface then pressing the “SELECT” button. (CAM
set up menu is not displayed when it is not required.)
• To see the viewing contract information:
EnterIDTV;pressthe"M" button,then highlightCom-
mon Interface and press the “SELECT” button.
• When no module is inserted, “No Common Inter-
face module detected” message appears on the
screen.
• Refer to the module instructionmanualfor details of
the settings.
Analogue TV Menu System
Picture Menu
Main Menu
Channel List
Installation
Timers
Language
TV Setup
Common Interface
It is required to subscribe to a pay channel company
toviewthe paychannelsofthe DigitalTerrestrialbroad-
casting.
Obtainthe ConditionalAccess Module(CAM) and the
Viewingcardbysubscribingtoa paychannelcompany,
then insert those to the Televisionusing the following
procedure.
1. Switchoff theTV and unplugfrom themains.
2.Insertthe CAM, thenViewing Cardto theslotthatis
located in the terminal cover at the left-hand sideof
theTV (from frontview).
•TheCAMshouldbecorrectlyinserted,itis impossible
to insert fully if reversed. The CAM or the TV terminal
maybe damagedifthe CAMisforcefullyinserted.
English -15-
Mode
Sharpness
Colour
In picture menu if PC,YPbPr or HDMI modes are
selected, resolution information is displayed at the
bottom of the menu osd.
Mode
By pressing
buttonto choose from one of theseoptions:Cinema,
Dynamic and Natural.
/
button,select Mode. Press
/
Contrast/Brightness/Sharpness/Colour/Hue
By pressing
Press
Hint: Hue is displayed in picture menu when the TV
receives an NTSC signal.
/
button,select the desiredOption.
/
button to set the level.
ColourTemp
• By pressing/
• Press/to choose from one of these options:
Cool, Normal and Warm .
button select Colour Temp.
Page 17

Noise Reduction
By pressing
Press
Medium,High or Off.
/
button select Noise Reduction.
/
tochoosefromoneof theseoptions:Low,
Film Mode
Films are recorded at a different number offrames
per second to normal television programmes.
By pressing
Press
this feature on when you are watchingfilms to see
the fast motion scenes clearly.
/
button,select Film Mode.
/
button to set this featureOn or Off. Turn
Picture Zoom
By pressing/
Use
/
16:9, 4:3, Panaromic, 14:9 Zoom, Cinema, Sub-
title or Zoom.
buttons, to change picture zoom to Auto,
button select Picture Zoom.
Reset
By pressing
“OK”buttonto resetthepicturemodestofactorydefault
settings.
/
button, select Reset. Press
Store
•Bypressing
• Press
“Stored” will be displayed on the screen.
/
button selectStore.
or “OK” button to store the adjustments.
Sound Menu
SOUND
Volume
Equalizer
Balance
Headphone
Volume
By pressing
button to change the level of the Volume.
Equalizer
By pressing
button to change the Equalizer setting. In equalizer
/select Volume . Press
/
select Equalizer.Press
/
/
menu,themodecanbechangedto Pop, Rock, Jazz,
Flat, Classic or User. Select the desired frequency
by
/
button and increase or decrease the fre-
quency gain by pressing
Note: Equalizer menu settings can be altered only
when the Equalizer Mode is in User.
/
button.
Balance
Bypressing
tochangethe levelof thebalance.Balancelevelcanbe
adjustedbetween -32 and32.
/
select Balance.Press
Headphone
Bypressing
buttonto enter hedphonemenu.
/
button,selectHeadphone.Press
volume
By pressing/
buttonto increasehp volume level. Press
decrease hp volume level. Headphone volume level
can be adjusted between 0 and 63.
or
sound mode
Bypressing/
/
button to change sound mode.
Sound mode is used to identify sound mode of the
headphone and can be set to mono, stereo,dual I or
dual II according to the transmission.
button,select Volume. Press
button,select Sound Mode. Press
balance
By pressing
button to increase balance to the right. Press
button to decrease balance to the left. Balance level
can be adjusted between -32 and +31.
Press the “M” button to returnto the previous menu.
/
button,select Balance. Press
Sound Mode
By pressing
button,you can select Mono, Stereo, Dual I or Dual II
mode,onlyif theselectedchannelsupportsthatmode.
/
select Sound Mode. Press
AVL
By pressing
set the AVL as on or off.
/
select AVLVL.Press
Effect
Bypressing
setEffect as onoroff.
/
selectEffect.Press/button to
Dynamis Bass
DynamicBassis usedto increasebasseffectof theTV
set.
By pressing
pressing/buttonsetDynamicbasstoLow, Highor
Off.It is not recommendedto select Highif listeningat
highvolumelevels.
/
button, select Dynamic Bass. By
/
/
button to
button
buttonto
/
English -16-
Page 18

Store
• By pressing
• Press
“Stored” will be displayed on the screen.
/
button select Store.
or “OK” button to store the adjustments.
Features Menu
Sleep Timer
Child Lock
Language
Ext-2 Out
PC Audio In
Sleep Timer
By pressing
button to set the Sleep Timer..
The timer can be programmed between Off and 120
minutes in steps of 10 minutes.
Child Lock
By pressing
Press/button to settheChildLockon or off.When
on is selected, the TV can only be controlled by the
remotecontrolhandset.In this case the controlpanel
buttons will not work. Hence, if one of these buttons
is pressed, “Child Lock On” will be displayed on the
screen when the Menu screen is not visible.
Language
By pressing
/
button to select the language.
EXT2 Out
Bypressing
ton,tosetExt-2OuttoTV/DTV, EXT1, FAV, AudioYPbPr
orAudio PC.
Note:
• When TV Source is set to HDMI, HDMI Audio set-
ting will be available among EXT-2 Out options.
• If currently watched source is analogue TV, a con-
nected device displays analogue TV source as well.
If this source is set to digital mode, connected de-
vice displays digital source. In order to avail this
function, EXT-2 Output should be set to TV/DTV.
/
select “Sleep Timer”.Press
/
select Child Lock.
/
button, select Language.Use
/selectEXT2 Output.Use/but-
English -17-
PCAudioIn
By pressing
“ ” / “ ” button, you can change the PC Audio In to
TV/DTV, EXT-1, EXT-2, FAV, YPbPr Audio, PC Audio or FAV.
/
select Pc Audio In.By pressing
BlueBackground
You can set the TV to automatically change to a blue
screen if the signal is weak or absent, or when there
is no input from an external device.
TheBlueBackgroundfeaturecanbe turnedonor offby
pressing“ ”/ “ ”button.
Menu Background
Bypressing“
Transparency level is adjusted by pressing “ ” / “ ”
button.
”/ “
” button,selectMenuBackground.
Menu Timeout
By pressing “
Press ” / “ ” buttonto change menu timeout to 15
sec, 30 sec or 60sec.
” / “
” button, select Menu Timeout.
Teletext Language
Bypressing“
Press “ ” / “ ” button to change Teletext Language
toWest,East,Turk/Gre,Cyrillic, orArabic.
/
”/ “
”button,selectTeletext Language.
Default Zoom
Bypressing“
canset DefaultZoom to Panoramic,4:3,14:9Zoomor
16:9bypressing“ ”/ “ ” button.
”/ “
” button,selectDefaultZoom.Youou
Install Menu
Program Table
Program
Band
Channel
Colour System
Program Table
By pressing
Press “ ” to display Program Table.
/
button, select Program Table.
Page 19

Program Table
UK
Ok
Auto Program
P01 BBC 1
P05 CH 4
P07 C 04
P08 C 07
P09 C 12
P10 C 15
P11 S 18
P12 S 29
P13 S 31
P14 S 33
P15 S 34
P16 S 35
P17 S 36
P18 S 37
P19 S 40
P20 C 21
Name
Delete
Insert
By moving the cursor in four directions you can reach
20 programmes in the same page. You can scroll the
pages up or down by pressing the navigation buttons
to see all the programmesin TV mode(exceptthe AV
mode).By cursoraction,programme selectionis done
automatically.
Name:
To change the name of a decided programme, select
the programmeand press the RED button.
Thefirst letteroftheselectednamewillbe highlighted.
Press
/
button to change that letter and “ ” /
“ ” button to select the other letters. By pressing
the RED button,you can store the name.
Insert:
Select the programme which you want to insert by
navigationbuttons. PresstheGREENbutton.Bynavi-
gation buttons move the selected programme to the
decidedprogrammespaceandpressthe GREENbut-
ton again.
Delete:
To delete a programme, press the YELLOW button.
Pressing the YELLOW button again erases the se-
lected programme from the programme list, and the
programmes below shift one up.
APS (Auto Programming System)
When you press the BLUE button forAPS,Auto Programming System Menu will appearon the Screen.
Country
WARNING!
will be deleted
A.P.S. (Auto Programming System) Country
Press / button to select your country. If you
want to exit from A.P.S. function, press the “BLUE”
button.
When you press OK or RED button for starting APS,
all stored programs will be erased and the following
screen will be displayed:
APS is running...
UK
P 03 - C 04
Wheneveryoupressthe“BLUE”button,A.P.S. function
stopsand Program Table appearson the screen.
If you wait until the end of A.P.S., Program Table is
displayed with the programmes found and located.
Program
By pressing
“ ” / “ button to select the program number. Youou
can also enter a number via digit buttons on the remotecontrol.Thereare100programstoragebetween
0 and 99.
/
button, select Program. Press
63.75 MHz
6%
63.75 MHz
English -18-
Page 20

Band
Band can be selected either “C” or “S” by press“ ” /
“ button.
Channel
Channel can be changedby “ ” / “ ” button or Digit
Buttons.
Colour System
By pressing
Press “ ” / “ ” button to change the colour system
toPAL, SECAM,PAL60orAUTO.
IfSound SystemissettoI,SECAMis notavailablefor
theColourSystem.
Note: In EXT mode, you can choose NTSC 3.58 and
NTSC 4.43 as well.
/
button, select Colour System.
SoundSystem
By pressing/
Press “ ” / “ ” button to change the sound system
toBG,I, L, L’,DK.
button, select Sound System.
Fine Tune
By pressing
“ ” / “ ” button to adjust the tuning.
/
button, select Fine Tune. Press
Search
Bypressing
/ “ ” button to start program searching.You can also
enterthedesiredfrequencyviadigitbuttonswhensearch
item is highlighted.
/
button,select Search. Press “ ”
Store
Bypressing
“OK”buttonto storetheadjustments.“Stored...”willbe
displayed on the screen.
/
button,select Store. Press “ ”or
Install menu in AV modes
The followingscreenappearsin the installmenu:
Colour System
VCR
Store
Colour System
By pressing
ing “ ” / “ ” button, you can change the colour
system to PAL, SECAM, PAL 60, NTSC 4,43, NTSC
3,58 or AUTO.
/
select Colour System. By press-
VC R
By pressing
“ ” button, you can set the VCR to ON or OFF..
/
select VCR. By pressing “ ” /
Store
By pressing
“ ”or“OK” buttonto storetheadjustments. “Stored...”
will be displayed on the screen.
/
button, select Store. Press
Source menu
By pressing “ ” / “ ” button, select the fifth icon.
Source menu appears on the screen.
SOURCE
TV
DTV
EXT-1
EXT-2
EXT-2 S
In source menu, highlight a source by pressing
button and switch to that mode by pressing “ ”
or “OK” button. Source options are; TV, DTV, EXT-1,
EXT-2,EXT-2S,FAV,S-VIDEO,HDMI-1,HDMI-2,YPBPR
andPC.
Note: You can mark desired source options by press-
ing OK button. Therefore, whenAVbuttonis pressed,
only the marked source options will be available.
/
English -19-
Page 21

PC Mode
Installation
•Poweroff both ComputerandDisplaybeforemaking
any connections.
• Set your PC’s resolution correctly before connecting to the TV. See the table on Appendix page.
• Use15-pindisplay cableto connecta PC to the LCD
TV.
Menu System in PC mode
SoundMenu/Feature Menu
The items in these menus are described at Sound &
Feature Menu explained in “Menu System”.
PC Picture Menu
Bypressing
Picture menu appears on the screen.
Brightness, Contrast and Colour Temperature adjustments in this menu are identical to adjustments de-
finedin TV picturemenuin“MENUSYSTEM”.
PC POSITION Menu
By pressing
POSITION menuappearson thescreen.
/
button,selectthesecondicon.PC
/
button, select the sixth icon. PC
H (Horizontal) Position
This item shifts the image horizontally to right hand
side or left hand side of the screen.
• SelectH Positionitem by using
• Use “ ” / “ ” button to adjust the value.
/
button.
V (Vertical) Position
Thisitem shifts the image verticallytowards the top or
bottom of the screen.
• Select V Position item by using
• Use “ ” / “ ” button to adjust the value.
/
button.
Phase
Depending on the resolution and scan frequency that
you input to the TV Set, you may see a hazy or noisy
picture on the screen. In such a case you can use
thisitem togeta clearpicturebytrialanderrormethod.
• Use “ ” / “ ” button to adjust the value.
DotClock
Dot Clock adjustments correct interference that appear as vertical banding in dot intensive presenta-
tionslikespreadsheetsorparagraphsortextin smaller
fonts.
• Use “ ” / “ ” button to adjust the value.
Soundin PC mode
•Connectthe PC’sAudio outputto theTV’sPC Audio
In socket with an audio cable.
H Position
V Position
Phase
Dot Clock
Autoposition
If you shift the picture horizontally or vertically to an
unwanted position,usethisitem to put the picture into
correct place automatically.
• Select Autoposition item by using
Press or “OK” button.
Warning: Auto position adjustment recommended to
be done with the full screen image for the proper
adjustment.
/
buttons.
English -20-
Other Features
TV Status
Pr ogr amm e Num ber, P rog ram me Na me,
Sound Indicator and Zoom Mode are displayed
on the screen when a new programme is entered.
Mute Indicator
It is placed in the upper side of the screen when
enabled.
Mute
To cancel mute, there are two alternatives; the first
one is pressing the button and the second one is
increasing the volume level.
AV Modes
BypressingtheAVbuttonyoucanswitchyourTVtoAVV
modes (exceptbeing in teletext). Pressing this button
consecutivelywillswitchtheTV inoneoftheoptionalAV
modes: TV, DTV, EXT1, EXT2, EXT2 S, FAV, S-
VIDEO,HDMI-1, HDMI-2, YPBPR or PC.
Page 22

Personal Preference
BypressingPP button,youmaychangePictureMode
settings.
Zoom Modes
Zoom mode can be changed by pressing the WIDE
button. Youcan change the screen size according to
the picture aspect ratio. Select the optimum one from
the following ZOOM modes.
Note:
•InYPBPR, HDMI-1andHDMI-2 modes,whilein720p-
1080iresolutions, onlyFULL mode is available.
• In PC mode, only 4:3 and16:9 modes are available.
Auto:
When a WSS (Wide Screen Signalling) signal,
which shows the aspect ratio of the picture, is in-
cluded in the broadcast signal or the signal from an
external device, the TV automatically changes the
ZOOM mode according to the WSS signal.
• When the AUTO mode does not function correctly
due to poor WSS signalqualityor when you want to
changethe ZOOM mode,changeto anotherZOOM
modemanually.
Zoom:
This uniformly stretches the left and right sides of a
normal picture (4:3 aspect ratio) to fill the wide TV
screen.
Subtitle:
This zooms up the wide picture (16:9 aspect ratio)
with subtitles to the full screen.
4:3
Useto viewa normalpicture(4:3aspectratio)asthisis
its original shape.
14:9Zoom:
This zooms up the wide picture(14:9 aspect ratio) to
the upper and lower limits of the screen.
Panoramic:
This stretches the left and right sides of a normal
picture (4:3 aspect ratio) to fill the screen, without
making the picture appear unnatural.
• For 16:9 aspect ratio pictures that have been
squeezed into a normal picture (4:3 aspect ratio),
usethe Fullmodeto restorethepicturetoitsoriginal
shape.
Cinema:
This zooms up the wide picture(16:9 aspect ratio) to
the full screen.
16:9Zoom:
This zooms up the wide picture(16:9 aspect ratio) to
the full screen.
English -21-
The top and bottom of the picture are slightly cut off.
Freeze Picture
You can freeze the picture on the screen by pressing
the “OK” button.
Note: This feaute will be unavailable to be used while
watching PC, YPBPr, HDMI-1 and HDMI-2 sources.
Page 23

Teletext
Youcan displayTeletextinformationon your TV.Each
channel which broadcasts teletext, transmits a page
with information on how to use its teletext system
(usually page 100). Depending on the TV channel,
teletextis transmittedin differentsystems.Thecolours
used in the options line correspond with the colour
buttons of your remote control.
• Ensure that the TV is receiving a good signal, or
some text errors may occur.
• When four coloured items appear at the bottom of
the text page,Fasttext is available.Fasttext allows
you to access pages quickly and easily.Press the
corresponding coloured button to access the page.
Special Teletext Functions
“ ” To Display a page of text.
The view text services press “ ”. To return normal
viewing press again.Programmescannot be changed
until text is cancelled.
• To select a page, press the number buttons or programbuttons(P+, P-).
• To select index page, press “ ” button.
•To select superimposed over the programmeon the
screen, press “ ”.
•Press“ ”once to enlargetophalfof the page,press
again to enlarge the bottom half of the page.Press
again to revert normal size.
• To discover solutionson quiz and games press “ ”
•At times it is convenient to hold a pageof text.Press
“ ” to holda page.The page will be heldonscreen
until the button pressed again.
• To select subcode pages press “ ”.Subcode
pages are subsections of long Teletext pages that
can only be displayed on the screen one section at
atime.
• Time information will be displayed on screen after
pressing “ ” button.If the programme does not
have teletext transmission, no information will be
displayed.
• When ” ” buttonis pressedwhileinteletext mode,
the screen will be splitted into two windows, one
displaying the teletext and the other displaying the
current channel. Press the “ ” button or
TV
“
• To exit text press “ ”.
Note: If the signal becomes insufficient, the teletext
mode will be quitted.
” button to exit from teletext.
Fastext
YourTV supports the500pageTeletextsystem. When
the page number of any of the 500 pages in memory
is entered, the system will not search for the re-
quested page; instead it will display the page automatically. If the requestedpage is not in memory, the
system will search for the requested page number
andsavethe500pagesincludingthe requestedpage
into memory after finding it.
• Press thebutton to move the Teletext screen
forward one page at a time.
• Press the
backward one page at a time.
button to move the Teletext screen
ForFastext
The subject-heading for the information may have a
particular colour.
• Press an appropriate RED, GREEN, YELLOW or
BLUE button in order to reach the relevant page
quickly.
TOP text
TOPtext modeofoperationwillbe activatedautomatically according to the transmission.
• If TOP text transmission is present, colour coded
buttons will appear in status row.
• If TOP text transmission is not present, status row
will not appear.
Thesubject-headingfor informationmay be located in
colored box.
InTop mode the “P+” or “P-” commandswillrequest
thenextorpreviouspagerespectively.IfTOPtexttrans-
mission is not available, in case of operation of these
commands,wraparoundoccurs.Forexamplepage100
appears to be one greaterthanpage199.
English -22-
Page 24

Connect Peripheral Equipment
High Definition
Your LCD Television is capable of displaying High
Definition pictures from devices such as a High Defi-
nitionSatelliteReceiverorDVDPlayer. Thesedevices
must be connectedviathe HDMI-1,HDMI-2socketor
Component Socket.These sockets can accept either
720p or 1080i signals.
Note: When it is desired to watch HDMI-1 and
HDMI-2source with a DVI to HDMI cable; in order to
enableaudio,Audio Input (whichis located at the left
side of the antenna input) is to be used to get DVI
device’s audio signals.
Via The Scart
The TV has 2 Scart sockets. If you want to connect
peripherals (e.g. video, decoder, etc.) which have
Scart sockets to the TV, you can use SCART socket
of the TV.
Note: If an external device is connected via the Scart
sockets, the TV will automatically switch to AV mode.
If both sockets areemployed at the sime time, SCART
1 becomes the preferential.
Via Aerial Input
If the device you want to connect does not have a
Scart socket, you should connect it to theAerialinput
of the TV.
If the VCR is connected via Aerial input, it is
suggested to use Programme 0.
Decoder
If you are subscribed to cable TV offers, the
organisation will supply you a corresponding decoder
unit to allow the programmes to be unscrambled.
For further information consult your dealer.
Connect a decoder with an aerial socket to
the TV
• Connectthe aerialcable.
Connect a decoder without an aerial socket
to the TV
• Connect the decoder to the EXTERNAL socket of
TV with a RCA cable. Through the SCART/RCA
socket of the decoder, you may attain a better dis-
play resolution.
TV And Video Recorder
• Connect the aerial cables.
Betterpicture quality can be obtained if you also connect a Scart cable to SCART sockets.
Playback NTSC
• Connect NTSC VCR playerto a Scart socket of the
TV.
Then,pressthe “AV” buttonto select EXT1 or EXT2.
Copy Facility
Source selection for VCR recording.
• Select Feature menu.
• SelectSCART 2 Out by pressing
• For copying the picture that comes from the tuner,
selectSCART 1.
/
button.
Camera And Camcorder
To Connect To AV Input
Connectyourcameraor camcorder to AVinputof the
TV.
• Connect your equipment to the TV via VIDEO (yellow), AUDIO R (red) and AUDIO L (white) inputs.
You must connect the jacks into the input with the
same colour.
To ConnectToS-VHSInput
Connect your camera or camcorder S-VHS input of
the TV.
• Connect your equipment to the TV via S-VHS input
and audio inputs of AV inputs by using S-VHS
cables.
Connect The Decoder To The Video
Recorder
Some video recorders have a special Scart socket
for decoder.
• Connect a Scart cable to the Scart socket of your
decoder and to the special Scart socket of your
video recorder. Refer to the booklet of your video
recorder.
Connecting Headphones(optional)
Use the stereo headphone socket of the TV, to connect headphones.
Note: If you want to connect more equipment to your
TV, consult your dealer.)
Audio Lineout
To connect the external speakers to your TV, use the
HeadphoneLineOut oftheTV.Additionally,turn“Line
out” setting on in the “Sound Menu”.
Note: While watching PC or YPbPr sources, Lineout
selection could only be the current source.
English -23-
Page 25

Tips
Without stand
Care Of The Screen
Clean the screen with a slightly damp, soft cloth. Do
not use abrasive solvents as they may damage the
TV screen coating layer.
Poor Picture
Haveyouselectedthecorrect TV system? Is your TV
set or house aerial located too close to non-earthed
audioequipmentor neon lights, etc.?
Mountains or high buildings can cause double pictures or ghost images. Sometimes you can improve
the picture quality by changing the direction of the
aerial.
Is the picture or Teletext unrecognisable? Check if
you have entered the correct frequency.
The picture quality may degrade when two peripherals are connectedto the TV at the sametime. In such
a case, disconnect one of the peripherals.
No Picture
Is the aerial connected properly? Are the plugs connected tightly to the aerial socket? Is the aerial cable
damaged? Are suitable plugs used to connect the
aerial? If you are in doubt, consult your dealer.
No Picture means that your TV is not receiving a
transmission. Have you selected the correct button
on the remote control?Try once more.
Sound
You can not hear any sound. Did you perhaps interrupt the sound, pressing the button?
Soundis coming from only one of the speakers.Isthe
balance set to one extreme? See Sound menu.
Remote Control
Your TV no longer responds to the remote control.
Perhaps the batteries are exhausted. If so you can
still use the local buttons at the bottom of the TV.
Specifications
TV BROADCASTING
PAL/SECAMB/G D/KK'I/I' L/L'
RECEIVINGCHANNELS
VHF(BANDI/III)
UHF(BANDU)
HYPERBAND
CABLE TV (S1-S20/ S21-S41)
NUMBEROF PRESET CHANNELS
100
CHANNELINDICATOR
On Screen Display
RF AERIAL INPUT
75 Ohm (unbalanced)
OPERATINGVOLTAGE
220-240V AC, 50Hz
AUDIO
German+NicamStereo
AUDIO OUTPUT POWER (W
2 x 8
POWER CONSUMPTION (W)
160 W (max)
2,7 W (Stand-by)
PANEL
16:9 display, 26” Screen Size
RMS.
) (%10THD)
DIMENSIONS (mm)
English -24-
D L H
210
126
699
699
Weight (kg)
546 11,5
499
10,0
With stand
Page 26

OUT
Appendix A: PC Input Typical Display Modes
Hor.(kHz)
The display has a maximum resolution of 1360 x 768, frequency range of 56-75 Hz.
The following table is an illustration of some of the typical video display modes.
Mode
Horizontal Vertical
640 480 31,5 60
1
640 480 37,9 72
2
Ver.(Hz)
3 640 480 37,5 75
800 600 35,2 56
4
800 600 37,9 60
5
800 600 48,1 72
6
800 600 46,9 75
7
8 1024 768 48,4 60
1024 768 56,5 70
9
1024 768 60 75
10
1280 1024 64 60
11
12 1280 768 47,8 60
1360 768 47,7 60
13
Appendix B: Aerial Connection
Outdoor Aerial Connection
Round 75 ohm coaxial cable
75
Rear of TV
Appendix C: Connect Peripheral Equipment
AUDIO
VIDEO
ANT.IN
ANTENNA
English -25-
VIDEO IN
(R)(L)
CAMCORDER
IN
Page 27

Peripheral Equipment Connections
S-VHS Input
Video Input
Audio Inputss
Headphone
Audio Line Outss
Spdif Coaxial Output
PowerCord Input
Power On/Off Switch
HDMIInput2
HDMIInput1
For Service Use Only
SCART2
SCART1
ComponentAudio Inputss
Component Video Inputs (YBPbr)
RF
PCAudioInput
PCInput
220V-240V
AC~50 H z
POWER
Note: Because FAV CVBS and SVHS Y are connected parallelly, the picture may blend if the two peripherals
are used at the same time. Likewise, because SVHS C and SCART II R are connected parallelly, the picture
may blend if the two peripherals are used at the same time. Thus these two are not to be used at the same
time.
English -26-
Page 28

Important Instruction
For your own safety read following instruction carefully before attempting to connect this unit to the mains
supply.
MAINS (AC) OPERATION
The wires in the mains lead are coloured in accordance with the following code :
GREEN
&
YELLOW
(Earth)
(if there is
earth cable)
BLUE
(Neutral)
IMPORTANT
As the colours of the wires in the mains lead of this appliance may not correspond with the coloured
markings identifying the terminals in your plug, proceed as follows:
The wire which is coloured green and yellow must be connected to the terminal which is marked with
the letter E, or by the earth symbol, or coloured green or green and yellow.
The wire whichis colouredblue or black must be connected to the terminal which is marked with the
letterN or colouredBlack.
The wire which is coloured brown or red must be connected to the terminal which is marked with the
letter L or coloured Red.
For continued protection against risk of fire, replace only with same type and rating of fuse (ASTA
approved 5A 250VAC fuse).
FUSE
BROWN
(Live)
CAUTION
TOPREVENTELECTRICSHOCKDISCONNECT FROMTHEMAINSBEFOREREMOVINGCOVER.NO
USERSERVICEABLEPARTSINSIDE.REFERSERVICINGTOQUALIFIEDSERVICEPERSONNEL.
SAFETY PRECAUTION
THISEQUIPMENTMUSTBEDISCONNECTEDFROMTHEMAINSWHENNOTINUSE.DONOTALLOW
THISUNITTOBEEXPOSEDTORAINORMOISTURE.
English -27-
Page 29

Page 30

50104988
THE GUARANTEE
The seller of this equipment (the vendor) warrants to
the initial retail purchaser that if the equipment
becomes defective, and the defect is shown to be due
to faulty materials or workmanship within a period of
12 Months from the date of sale to the original
purchaser it will be repaired (or at the vendors sole
option) replaced free of charge, always providing that:
The equipment has at all times been used in
accordance with the operating instructions issued by
the manufacturer, and has not been connected to an
electrical supply for which it has not been properly
adjusted.
Unauthorised repairs or modifications, which have not
been expressly approved by the manufacturer, shall
render this guarantee null and void.
This guarantee is not transferable and is only
applicable in the UK.
Nothing in this express warranty affects the statutory
rights available to the purchaser of this equipment
EXCLUSIONS
SANYO shall not be liable for any removal
or installation or re-installation of the equipment.
The warranty does not coverFailure due to fair
wear and tear of any item.
Cosmetic items, remote controls or parts and
consumable items such as lamps, filters,
batteries, tapes, cables or connectors.
Accidental damage or damage caused by
negligence or misuse by the user.
Failure caused by lightning strike, storage or
operation outside the specified environment,
incorrect installation, lack of routine maintenance
outlined in the operating instructions supplied
with the unit, incorrect fitting of lamps, filters,
batteries or other consumables or parts.
Units not originally supplied by SANYO Europe Ltd
through a UK Reseller.
Dear Customer.
Thank you for buying SANYO. This equipment should
give you many years of pleasure and faithful service but
in the event that a fault occurs, the following notes
for you guidance may be helpful:-
1: PLEASE RETAIN YOUR PURCHASE RECEIPT
WHICH WILL BE REQUIRED FOR SERVICE
DURING WARRANTY.
2: If your SANYO equipment proves faulty during the
period of guarantee, take it or send it back to the
dealer who originally supplied it together with this
guarantee and the proof of purchase. We have
made arrangements with our approved dealers
under which they will carry out in guarantee service
repairs on our behalf. In this way, we hope to
reduce to a minimum the amount of time you will be
without your equipment.
3: If for some reason it is impossible to return the
equipment to the original supplier, please contact
our Customer Relations Department at the address
below for further advice.
4: Should the equipment require servicing after the
expiry of the guarantee period, take or send it to
the original supplier or any other Sanyo dealer.
He will be pleased to give you a quotation for the
repair.
Customer Relations Department,
SANYO Europe Ltd.
SANYO House,
18, COLONIAL WAY,
Watford, Hertfordshire, WD24 4PT.
Tel: 01923 246363
SANYO Electric Co., Ltd.
042-02514/1.5
R
P
%
A
0
P
0
E
1
L
R
O
E
D
C
A
I
L
C
 Loading...