

Page 1
1
Do not allow anything to rest on the power
cord.
Do not locate this monitor TV receiver
where the cord will be damaged by people
walking on it.
Do not overload wall outlets and extension
cords as this can result in fire or electric
shock.
Slots and openings in the cabinet and in the back or bottom are
provided for ventilation to ensure reliable operation and to protect
it from overheating. These openings
must not be blocked or
covered. The opening
should never be covered with a cloth or
other material, and the bottom openings
should not be blocked
by placing the monitor TV receiver on a bed, sofa, rug, or other
similar surface.
Do not place this monitor TV or AC adaptor near any heat
sources such as radiators, heaters, stoves and other heat-generating products (including amplifiers).
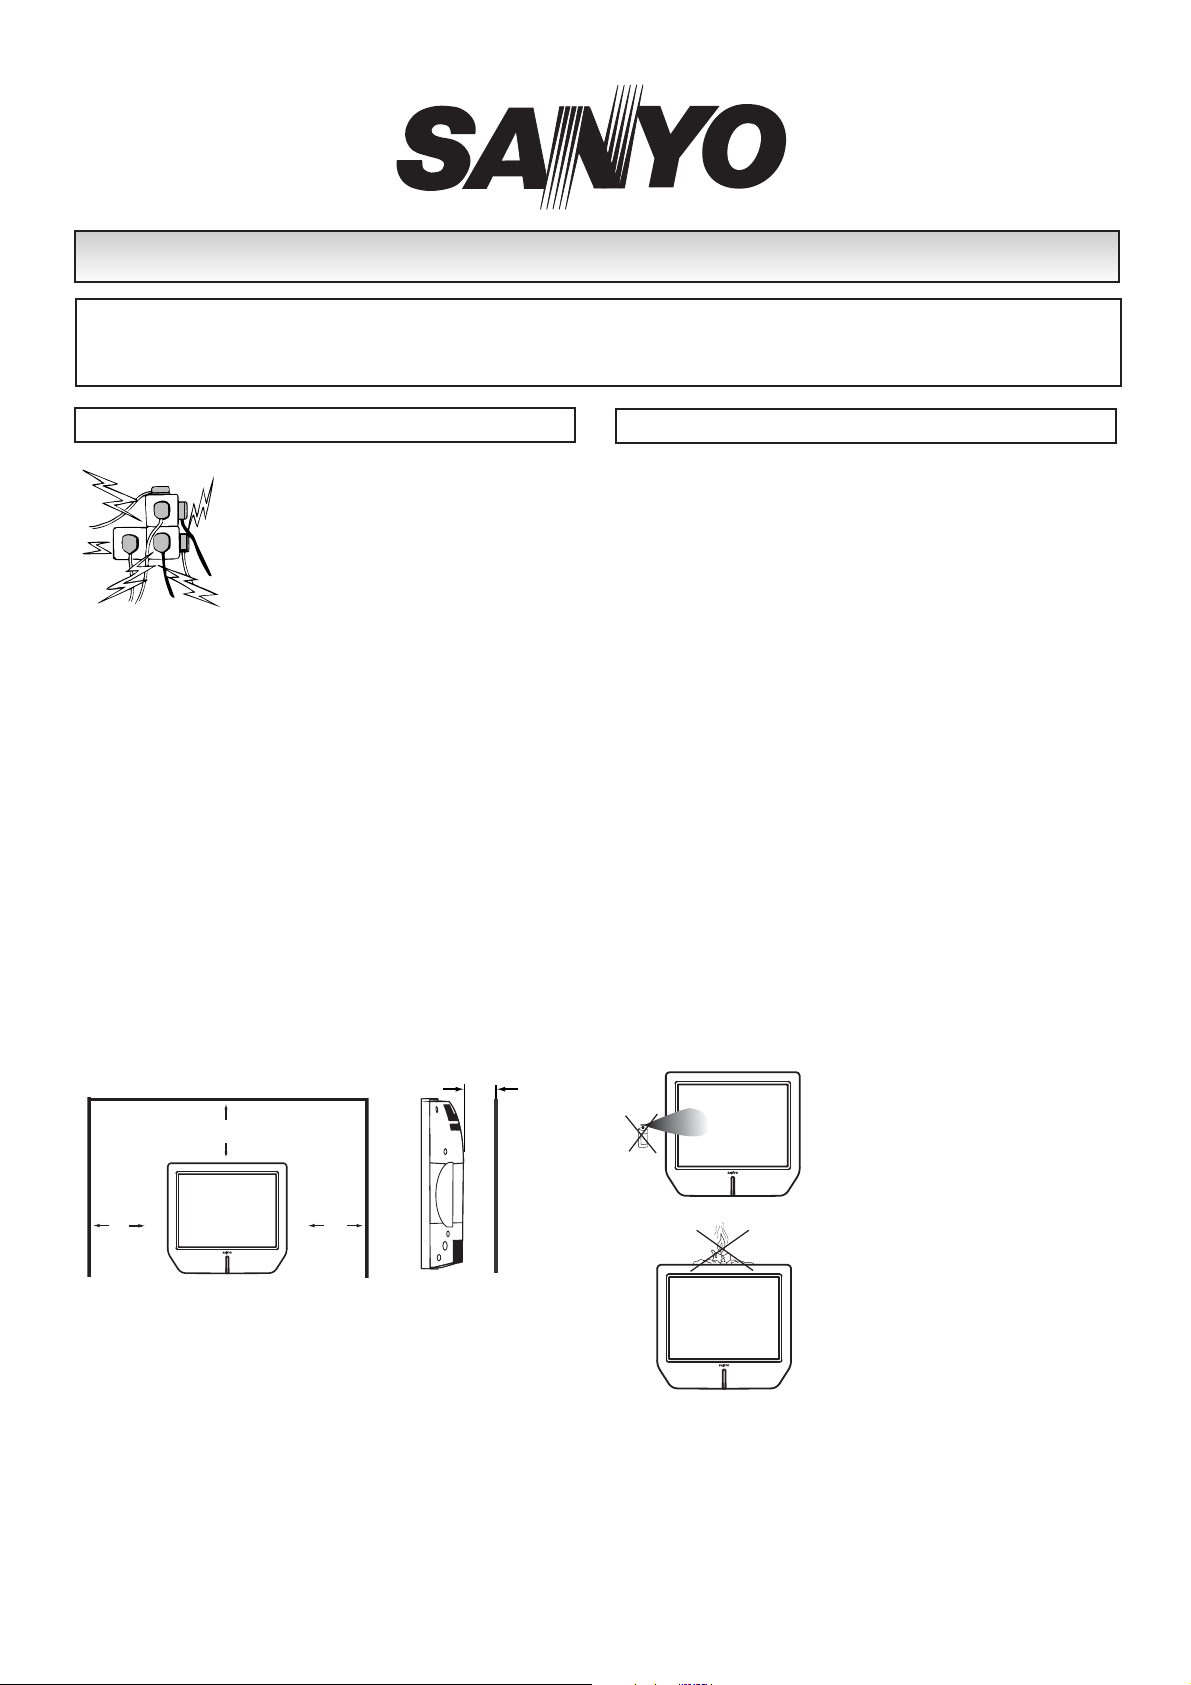
Do not place the monitor TV in direct sunlight.
Do not place your monitor TV receiver on an unstable stand,
shelf or table. Serious injury to an individual, and damage to the
monitor TV may result if it should fall. Your sales person can
recommend approved stands or shelf and wall mounting
instructions. A special wall mounting kit is available for this model.
If the monitor TV is built into a unit, or enclosed, the minimum
distances for ventilation must be maintained. Heat build up can
reduce the life of your monitor TV, and can be dangerous.
This monitor TV receiver should be operated only from the type of
power source indicated on the monitor TV or as indicated in the
Operating Instructions. If you are not sure of the type of power
supply in your home, consult your sales person or your local
power company.
Never add accessories that have not been specifically designed
for this monitor TV.
Do not drop or push objects into the monitor TV cabinet slots or
openings. Some internal parts carry hazardous voltages and
contact may result in an electric shock hazard.
Never spill liquids
of any kind onto the monitor TV receiver or AC adaptor.
Do not
place items such as vases containing liquid on top of the monitor
TV.
Do not expose the monitor TV receiver or AC adaptor to rain or
use near water. For example, near a bathtub, kitchen sink, in a
wet basement, etc.
Do not use immediately after moving the monitor TV from a low
temperature to a high temperature environment, as this causes
condensation, which may result in fire, electric shock, or other
hazards. Before cleaning, unplug the monitor TV receiver from the
wall socket.
Never stand on, lean on or push the monitor TV or its stand.
Never allow children to play with the monitor TV or its stand.
Serious injury may result if it should fall.
Do not apply liquid cleaners or
aerosol cleaners directly onto the
monitor TV receiver. Only use a soft
cloth for cleaning.
Do not place candles or hot objects
upon the monitor TV, next to it or
behind it. Open flames must never be
used near the monitor TV set.
SAFETY
SAFETY
PRECAUTIONS
PRECAUTIONS
Installation
CAUTION: Please read and retain for your safety. This unit has been engineered and manufactured to assure your personal
safety, but improper use can result in potential electric shock or fire hazards. In order not to defeat the safeguards incorporated
in this receiver observe the following basic rules for its installation, use and servicing.
POWER
Use
CE15LM3-B
CE20LM3-B
MINIMUM DISTANCES
10cm
10cm
10cm
4cm
Page 2
2
● Cleaning your LCD screen.
Your LCD screen is coated in a non reflective film. Damage to this
film will result in possible discolouration. Any scratches will not be
repairable.
Clean your screen with a soft cloth, only rub lightly, do not use
detergents.
Do not stick anything to the screen, use solvent or alcohol based
cleaners, hit the screen with a hard object or rub the surface hard.
● Placement of your Monitor LCD TV.
T
able top stand (if included)
This Monitor LCD TV is supplied with a table top stand fitted. It
can be tilted 5˚ forwards and 10˚ backwards.
To tilt your TV hold the base (taking care not to trap your fingers
between the bottom of the screen frame and the base)and gently
push the top of the Monitor TV.
Wall mounting bracket
Optional wall brackets (VESA 100 x 100mm fixing) are available
for your Monitor LCD TV. Before you consider wall mounting this
Monitor TV, check that you have an appropriate wall made from
solid materials such as concrete or bricks. You will have to
remove the table top stand to use this.
SAFETY
SAFETY
PRECAUTIONS
PRECAUTIONS
Important:
This equipment is fitted with an AC Adaptor which has an approved non rewireable UK mains plug. To change a fuse in this type of plug
proceed as follows:
1. Remove the fuse cover and fuse.
2. Fit a new fuse which should be a BS1362 3Amp A.S.T.A. or BSI approved type.
3. Ensure that the fuse cover is correctly refitted.
If the fuse cover is lost or damaged the plug must
NOT be used but replaced with a serviceable plug.
If the fitted plug is not suitable for your socket outlets, it should be cut off and an appropriate plug fitted in its place. If the mains plug
contains a fuse, this should have a rating of 3 Amp, ensure the fuse cover is correctly fitted. If a plug without a fuse is used, the fuse at
the distribution board should not be greater than 5 Amp.
Note: The severed plug must be destroyed to avoid a possible shock hazard should it be inserted into a 13Amp socket elsewhere.
The wires in this mains lead are coloured in accordance with the following code:
Blue -------> Neutral
Brown ----> Live
1.
The Blue wire must be connected to the terminal which is marked with the letter “N” or coloured BLACK.
2. The Brown wire must be connected to the terminal with the letter “L” or coloured RED.
3. Do not connect either wire to the earth terminal in the symbol or coloured GREEN or GREEN and YELLOW.
Before replacing the plug cover, make certain that the cord grip is clamped over the sheath of the lead - not simply over the wires.
THIS UNIT IS NOT DISCONNECTED FROM THE MAINS UNLESS THE MAINS LEAD IS UNPLUGGED.
Care of your product
Your monitor television is fully transistorised and does not
contain any user serviceable components.
You must not remove the rear cover of the monitor TV by yourself. The apparatus is working with high voltages and could
damage objects or even endanger people. Leave all required
repair and service jobs to an authorised service technician. He
will exclusively use such spare parts that are complying with
the same safety standards as applicable to the original parts.
The use of original spare parts can prevent fire, shock and
other hazards.
Unplug the monitor television receiver from the wall outlet and
refer servicing to qualified service personnel under the following conditions:
■ If the power cord or plug is damaged.
■ If liquid has been spilt into the monitor
television receiver or AC Adaptor.
■ If monitor television receiver or AC Adaptor has been exposed to
rain or water.
■ If the monitor television receiver or AC Adaptor has been dropped
or the cabinet has been damaged.
■ If the monitor television receiver exhibits a distinct change in
performance.
■ If the monitor television receiver does not operate normally by
following the operating instructions.
Adjust only those controls that are covered in the operating
instructions as improper adjustment of other controls may result in
damage. This will often require extensive work by a qualified
technician to restore the monitor television receiver to normal
operation.
Servicing
Page 3

3
1. Connect your aerial cable socket to the back of the LCD TV monitor
set. Fit the aerial cable as shown or as shown below when AV
equipment is connected.
● Connecting DVD / VCR player/ Satellite receiver or
Set top box.
The following examples are our recommended standard connection.
For further information please consult your local dealer.
2. Connect the DC power supply adaptor to the LCD TV set. (supplied
with the set).
3. Connect the power cord of the LCD TV to a wall outlet.
✐ The TV set is prepared for a mains voltage AC100~240V, 50Hz. To
disconnect completely from the mains or, when the TV set is not to
be used for an extended period of time, it is advisable to disconnect the power cord from the power outlet.
✐ For all aerial problems please consult your local dealer.
1. Left side terminals
✐
Press the v button on the remote
control repeatedly to select RGB, AV1
modes.
21 pin scart socket.
INST
INST
ALLA
ALLA
TION
TION
Step : 1 Connections
DC 19V
WARNING! High voltages are used in the operation of
this set. Refer service to qualified service personnel.
Terminals
DC 19V
DC 19V
LCD TV
AC Mains Outlet
DC 19V
DISH
IN
OUT
IN
OUT
IN
VCR
Set top box
or
Satellite
VCR
TV
For satellite
only
DVD
DC 19V
DC 19V
Page 4

4
HOTEL
HOTEL
OPTION / SPECIFICA
OPTION / SPECIFICA
TION / HELPFUL
TION / HELPFUL
HINTS
HINTS
Common specification
Power source AC 220~240V 50Hz
Television system System I
Colour system PAL
(PAL/NTSC3.58 in AV mode)
Channel coverage UHF: 21-69.
VHF: A-J, E2-E12.
Aerial input impedance 75 ohm
Side AV terminal
AV1: CENELEC Standard
Input: Composite video, RGB, and
audio-L/R
Output: TV-output with composite video
and audio-L/R
CE15LM3-B CE20LM3-B
Sound output
(Continuous) 1 x 2W N/A
Screen (inches)
(viewing measured
diagonally) 15 20
Contrast ratio 300:1 500:1
Display resolution 1024 x 768(XGA) 640 x 480(VGA)
Viewing Angles H:120º V:100º H:160º V:140º
Dimensions
(W x H x D mm) 396 x 372 x 228 467 x 480 x 228
(including stand)
Weight (kg)
(including stand) 5.3 (including stand) 6.9
This TV set allows you to set up the following special functions.
■ Maximum volume setting and prohibition of pre-setting
Sets the current volume as the maximum volume level and prohibition
of the tuning.
PROHIBITION OFF or PROHIBITION ON
■ Start up programme position
Presets the programme position when the set is switched on.
START POSITION OFF -> Last programme position start
START POSITION P1 -> Programme position "1" start
START POSITION P2 -> Programme position "2" start
You can use the same procedure for P1, P2, P3, etc. to P8, AV.
START POSITION P8 -> Programme position "8" start
START POSITION AV -> "AV1" start
START POSITION RGB -> "RGB" start
SETTING PROCEDURE
1. Set volume level to maximum requirement.
2. Press and hold the Green button on the Remote control handset
for approximately 2 seconds.
3.
Use the 5 or 6 button to highlight the desired option item from
the menu, and select the mode by pressing the 2 or 1 button.
4. Press the rD button to exit from the menu.
■ NO PICTURE, NO SOUND
● Check if Monitor is plugged in.
● Try a different channel, if OK, probably station trouble.
■ POOR PICTURE, SOUND OK
● Adjust BRIGHTNESS control.
● Adjust FINE TUNING control.
● Check aerial connections.
■ NO COLOUR, PICTURE OK
● Adjust COLOUR control.
● Adjust FINE TUNING control.
● Is the programme in colour ?
■ WEAK PICTURE
● Check aerial connections on back of monitor.
● Check aerial for broken wires.
● Re-orient aerial.
The following faults are not caused by the receiver:
"GHOSTS"
Reflections of signals from mountains or high buildings will cause
multiple images, called "Ghosts". These abnormal conditions can be
reduced to minimum by repositioning aerial or by installing new one
suited for your area.
"INTERFERENCE"
Interference may be caused by electrical appliances, car ignition
systems, etc. This should normally be a temporary condition, but
should this interference persist, contact your dealer.
Specification
Helpful hints
Part No. 1KA6P1P0168-- N2JJ/KJ
Printed in U.K.
Hotel Option
Prohibition ON
Start - Position OFF
 Loading...