

Page 1
INSTRUCTION MANUAL
Colour television
CE15LC4-B
CE20LC4-B
Please read this Instruction book before using your television. We wish you many
hours of pleasure from your new television.
Page 2

Servicing
Warnings and Cautions
Your television is fully transistorised and does not contain any user serviceable components.
You must not remove the rear cover of the TV by yourself. The apparatus
is working with high voltages and could damage objects or even endanger people. Leave all required repair and service jobs to an authorised service technician.
Unplug the television receiver from the wall outlet and refer servicing to
qualified service personnel under the following conditions:
* If the power cord or plug is damaged.
* If liquid has been spilt into the television receiver.
* If television receiver has been exposed to rain or
water.
* If the television receiver has been dropped or the cabinet has been
damaged.
* If the television receiver exhibits a distinct change in performance.
* If the television receiver does not operate normally by following the ope-
rating instructions.
Adjust only those controls that are covered in the operating instructions as
improper adjustment of other controls may result in damage. This will
often require extensive work by a qualified technician to restore the television receiver to normal operation.
Important:
This equipment is fitted with an approved non rewireable UK mains plug.
To change a fuse in this type of plug proceed as follows:
1. Remove the fuse cover and fuse.
2. Fit a new fuse which should be a BS1362 3Amp (15 inch) or 5Amp (20
inch) A.S.T.A. or BSI approved type.
3. Ensure that the fuse cover is correctly refitted.
If the fuse cover is lost or damaged the plug must NOT be used but replaced with a serviceable plug.
If the fitted plug is not suitable for your socket outlets, it should be cut off
and an appropriate plug fitted in its place. If the mains plug contains a
fuse, it should have a rating of 3 or 5Amp, ensure the fuse cover is
correctly fitted. If a plug without a fuse is used, the fuse at the distribution
board should not be greater than 5 Amp.
Note: The severed plug must be destroyed to avoid a possible shock
hazard should it be inserted into a 13Amp socket elsewhere.
The wires in this mains lead are coloured in accordance with the following
code:
Blue -------> Neutral
Brown ----> Live
1. The Blue wire must be connected to the terminal which is marked with
the letter “N” or coloured BLACK.
2. The Brown wire must be connected to the terminal with the letter “L” or
coloured RED.
3. Do not connect either wire to the earth terminal in the symbol or coloured GREEN or GREEN and YELLOW.
Before replacing the plug cover, make certain that the cord grip is clamped over the sheath of the lead - not simply over the wires.
THIS UNIT IS NOT DISCONNECTED FROM THE MAINS UNLESS THE
MAINS LEAD IS UNPLUGGED.
1
Page 3
Warnings and Cautions
R
WARNING! High voltages are used in the operation of
this set. Refer service to qualified service personnel.
Warning
High voltages are used in the operation of this television receiver. Do not
remove the cabinet back from your set. Refer servicing to qualified service personnel.
Do not drop or push objects into the television cabinet slots or openings.
Never spill any kind of liquid on the television receiver.
To prevent fire or electrical shock hazard, do not expose the television
receiver to rain or moisture and do not overload wall outlets and extension
cords.
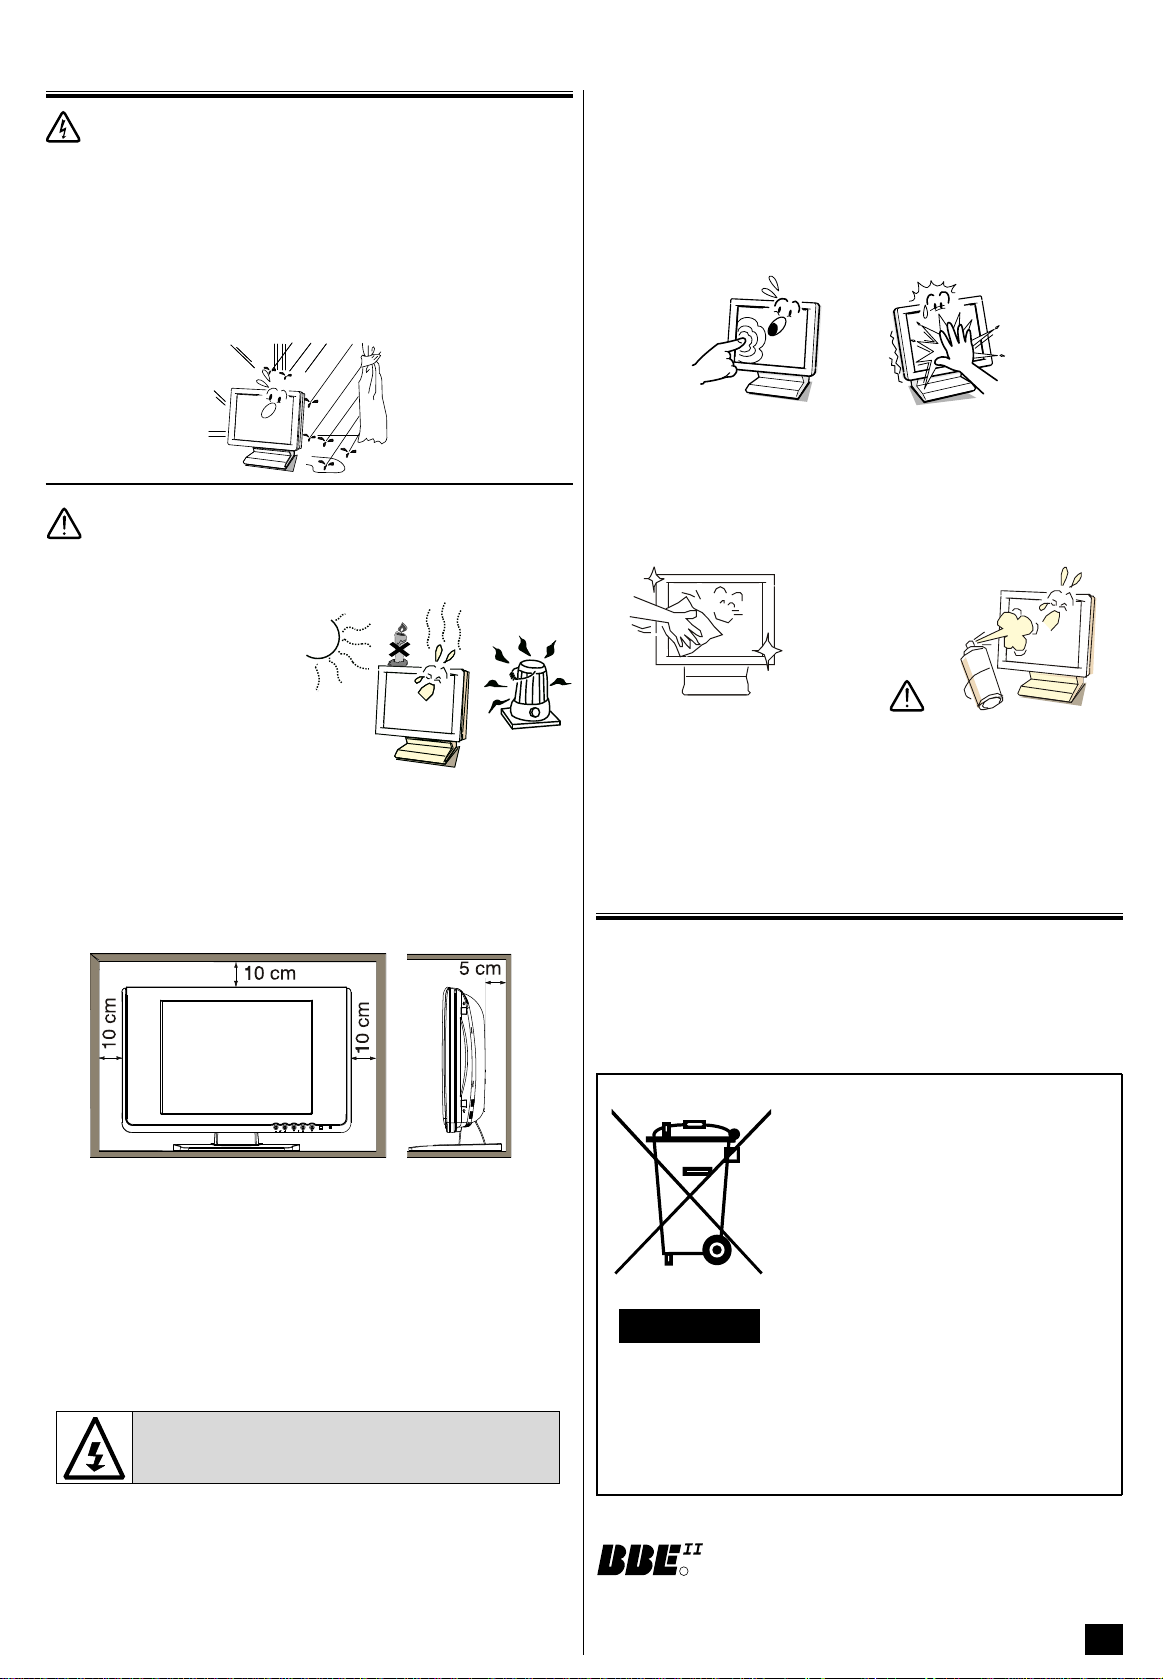
Caution
Avoid exposing the television receiver to direct sunlight and other
source of the heat.
Do not place candles or hot
objects upon the TV, next to it or
behind it. Open flames must
never be used near the TV set.
Care for Using TV Monitor
Screen likely damaged by external shock. When using the TV monitor,
following precautionsshould be taken.
Do not press or hit the screen face.
Do not write, paint or affix anything on the screen.
Do not put anything on the TV monitor.
Do not press Do not hit
Cleaning the TV Monitor
Be sure to disconnect the AC Power Cord from AC outlet before cleaning
the TV monitor.
If the television is to be built into a compartment or similarly enclosed, the
minimum distances must be maintained. Heat build-up can reduce the
service life of your television, and can also be dangerous.
Minimum Distances
Do not block the ventilation holes in the back cover. Adequate ventilation
is essential to prevent failure of electrical components.
The TV set is prepared for a mains voltage AC220~240V, 50Hz. To completely switch off the mains or when the television receiver is not used for
an extended period of time, it is advisable to disconnect the AC power
cord from the AC outlet.
Do not squash power supply cord under the television receiver.
Gently wipe the screen and Caution Screen can easily be
cabinet with dry soft cloth. damaged if it is cleaned with any
liquid or chemicals.
Your sales person can recommend approved stands or shelf and wall
mounting instructions.
Environment Recommendations
• Stand-by: In order to save energy, it is advisable to switch off the TV
when it is not being watched.
• Used batteries: Do not dispose of the battery along with household
waste. Contact your local waste disposal agency for the address of the
nearest battery deposit site.
Your SANYO product is designed and
manufactured with high quality materials
and components which can be recycled
and reused.
This symbol means that electrical and
electronic equipment, at their end-of-life,
should be disposed of separately from
your household waste.
Please, dispose of this equipment at your
local community waste collection/recycling
centre.
In the European Union there are separate collection systems for used electrical
and electronic products.
Please, help us to conserve
the environment we live in!
Manufactured under license from BBE Sound, Inc.
Licensed by BBE Sound, Inc. under USP5510752 and
5736897. BBE and the BBE symbol are registered trademarks of BBE Sound, Inc.
BBE only in 20” models.
2
Page 4
Installation
L/S
R/D
O
AAVV2
1
ANT. 75
12V
ANT. 75
12V
Thank you for purchasing your
SANYO TV. Now I am searching
and storing all the programmes.
Please Wait.
Auto set-up completed. Happy viewing
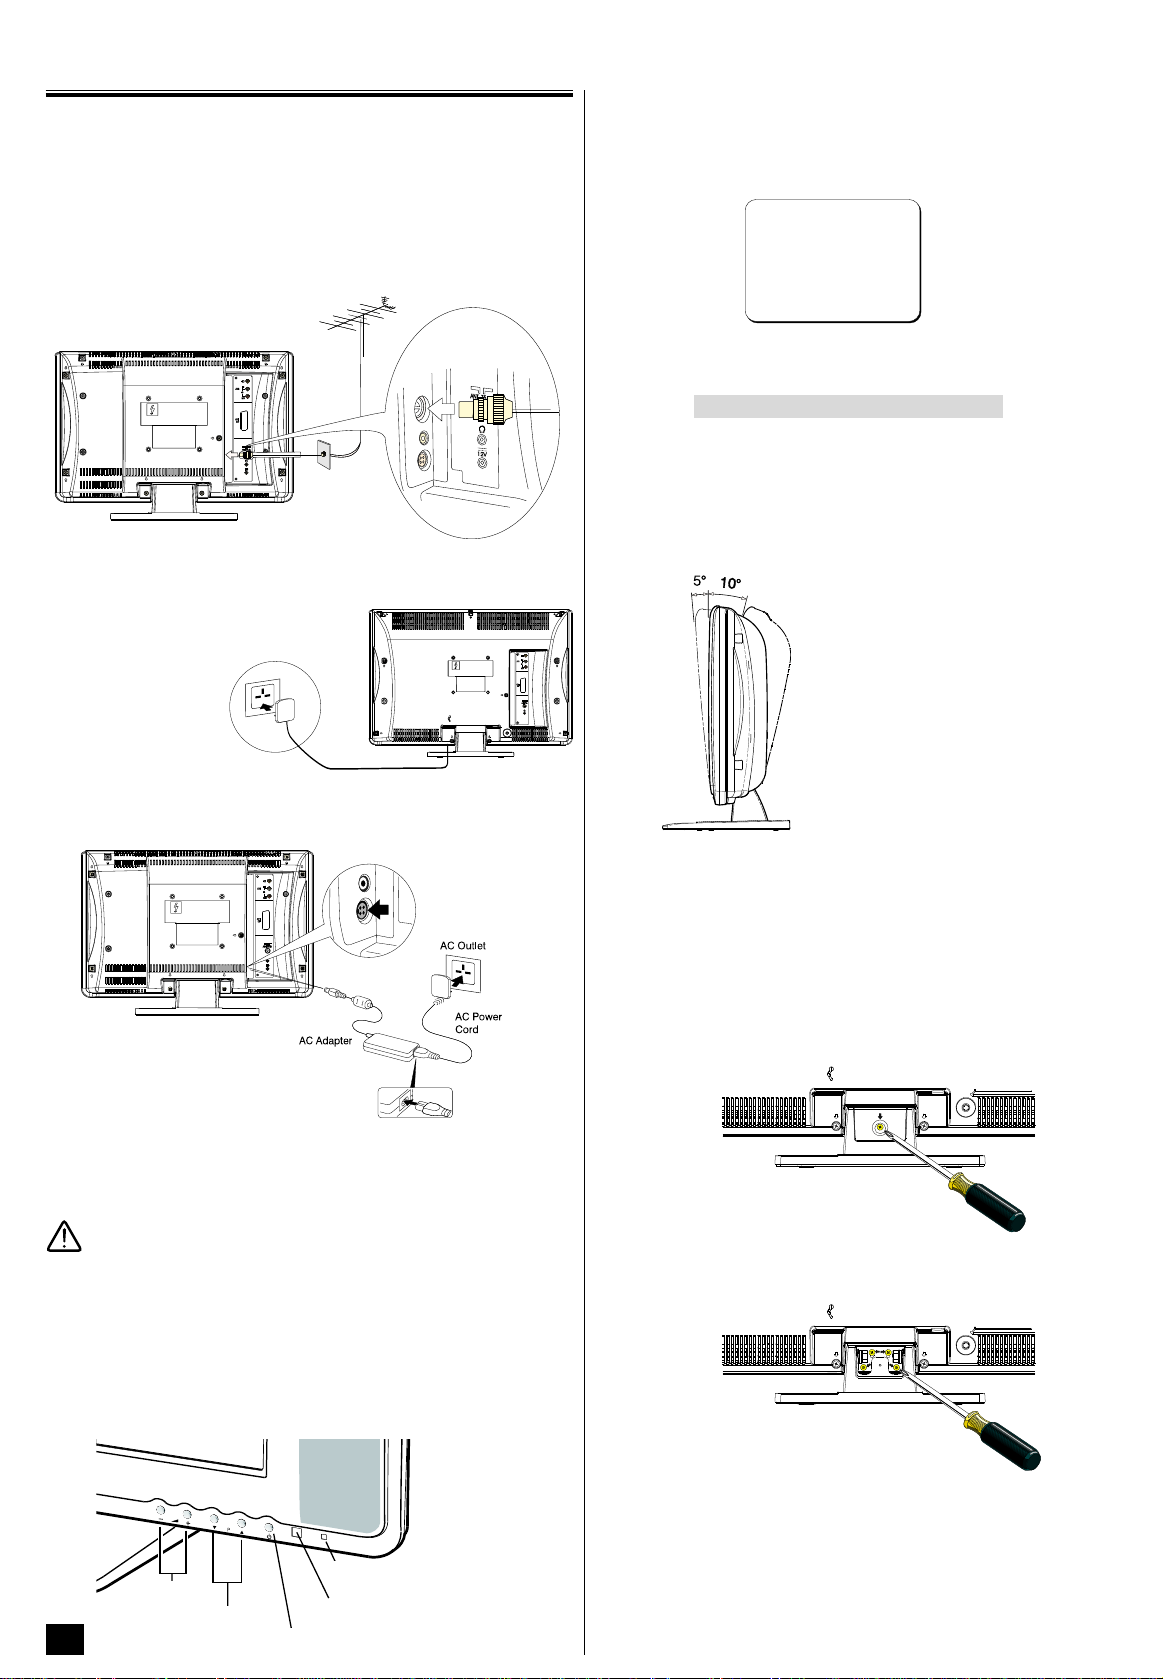
Step 1: Aerial Connections
Connect your aerial cable socket to the rear of the TV set.
We recommend that you connect all other equipment before Plug &
Play.
The following examples are our recommended standard connection. For
further information please consult your local dealer. Please refer toindividual Instruction Manuals for each equipment for their connection suggestions.
For all aerial circuit problems please consult your local dealer.
Step 2 : Connecting Power Supply
Note: The form of the AC code and AC plug are different with each
country.
Model CE20LC4-B
Step 3 : Switching on / Plug & Play
1. Press Power ON/OFF button to switch on the TV set. Next menu will
be displayed.
2. Once finished, the TV set will show the Ending Message. Press MENU
button to start watching.
This procedure only appears at the first switch-on time.
Viewing Angle Adjustment
You can modify the viewing angle of your
LCD TV. To do so hold its base firmly and
tip the television set backwards or forwards
by pushing at the top.
WARNING: Do not place you hand under
the screen when tipping the television set
forwards.
Connect AC power cord into AC outlet.
Models CE15LC4-B
Connect the power with following steps:
1. Connect AC power cord to AC Adapter.
2. Connect AC adapter DC output to DC IN of the monitor.
3. Connect AC power cord into AC outlet.
Caution
Do not use without attached cable and adapter, otherwise fire or electric
shock may result. Do not put AC adapter in enclosed place, take appropriate spaces for cooling.
Note: AC adapter becomes little hot while use, this is normal, not malfunctioning.
Control Panel
Each button listed this section has the same function as it’s corresponding
button on the Remote Control.
Viewing Angle Adjustment - Maximum tilt
is 5° to the front and 10° to the backward.
Removing the television set base
Tools needed: Philips screwdriver.
IMPORTANT: Place the TV with the screen facing downwards on top of a
soft surface so that you protect both the screen and the cabinet.
1. Remove the screw at the back of the base.
2. Remove the four screws from the metal base.
WARNING: Hold the base firmly when removing the last screw so that it
does not fall.
3. Remove with care the base
from the television set.
3
Volume
Programme
Up/Down
Stand-by and Power Indicator
Remote Control Detector
Power ON/OFF button
Once you have removed the base, you will see some screw components
that will allow you to fix the set to the wall using a standard base. Please
note: This base is not supplied, but you can find it in any shop that specialises in this type of component.
Page 5

Remote Control Transmitter
?
T V /
WIDE
A· B
1
2
9
3
4
5
6
7
8
0
SURROUND
BASS
TXT TV
/
P P
P
MENU
P
i
CS
F/ OK
TV/AV Selector
Recall/System
Numerical buttons
Digit
Programme Up
Volume
-
TEXT/TV
Stereo/Mono
Bass
Power ON/OFF
SoundMute
Not operative button
Alternate
CS button
Volume +
Picture Mode
Programme Down
Surround
MENU
OK button
Time Display
Battery Installation of the Remote Control Transmitter
1. Open the battery cover.
2. Install two “AA” 1.5volt batteries so
that the “+” and “-” marks on the
batteries match the “+” and “-”
marks inside the unit.
3. Close the battery cover.
CS Button. Press this button once to scan through all current
channels already tuned in (except skipped channels).
To stop the scan, press any button.
F/OK Button. Use in menu operation.
Volume Control. To increase or decrease the sound volu-
me Level.
TV/AV Selector. Press repeatedly to switch to TV, AV1 or
AV2 mode.
Sound Mute. Should you wish to mute the sound (e.g.
While talking on the telephone), press the Sound Mute button.
To switch the sound back on, press the Sound Mute button
again, or press the Volume + or - button.
Alternate. Press the Alternate button and the programme
position will alternately select the previous position and the present position.
Picture Mode Selection. Press the Picture Mode but-
ton repeatedly to select the following picture modes:
Personal: Your personal preference mode.
Dynamic: Suitable for brightly lit room.
Standard: Normal viewing mode.
Eco: Suitable for dimly lit room and gives a cinema-like effect.
15”: Virtual sub woofer On/Off
20”: Bass Expander On/Off
Press the Bass button to get an emphasised bass sound.
Note:
When Remote Control doesn’t work
in normal or stable condition, or it
can’t control operation of the TV set,
replace the batteries.
General Operation
Power ON/OFF (Stand by)
Press the Power ON/OFF button to turn on or off (Stand-by) the
TV set.
Lighting of the Stand-by and Power Indicator shows that there is a
power supply. For shutting off a power supply completely, disconnect the power cord from the power outlet.
You can turn on the TV in the standby mode by pressing the following button in addition to the Power ON/OFF button.
l Programme UP/DOWN button of the remote control transmitter or the
TV set.
l 1 to 9, 0 button on the remote control transmitter.
Auto Shut Off Function
If the TV is left on after you have gone to sleep, the TV set changes to the
standby mode within 10 minutes after all broadcasts have ended.
Direct Programme Selection
Example:
n Press 6 button to select programme position 6.
n For selection of programme position 10-99, e.g.
Programme Up and Down
27, first press the Digit button, and press 2 then
7 button.
To select the next or previous programme position.
Active 3D Surround. This TV provides an incredible 3
Dimensional Surround sound effect. Press the Surround button
to select the following modes:
Off:To cut off 3D surround effect.
Mid:For NICAM-mono broadcasting.
Max: Gives the optimum 3D surround effect.
Time Display. In the TV mode, if the receiving programme
has a teletext service then when the Time Display button is pressed, the present time will be displayed on the screen. To erase
the time display, press the button again.
Programme Information Call. To display the on screen
indication, press the Recall/System button.
You can also select colour system with the Recall/System button in AV
mode as follows:
4
Page 6

General Operation
P
MEN U
P
i
F/OK
F/OK button
Sound
Bass
Balance
0
33
31
On
Personal
Treble
BBE
OffSurround
Sound preset
Volume
18
Auto Volume
Off
37
Picture
Colour
Contrast 32
32
41
On
Personal
Sharpness
Picture preset
Mid
Brightness
Dyn. skin tone
Text brightness
A2 Stereo, NICAM Stereo and Bilingual Broadcast
Receiving
n A2 Stereo and NICAM Stereo sound reception.
When receiving NICAM stereo broadcast, NICAM will be displayed on the
screen. For A2 (German) stereo broadcasts, Stereo will be displayed.
When a clear stereo sound can not be obtained during NICAM or A2
(German) stereo broadcast due to poor signal reception, press the
Stereo/Mono button to select mono mode.
n Bilingual reception.
If the TV receives bilingual programs, the TV initially selects language A
and displays “A” on the screen briefly. If you want to switch to language B
or MONO (only available in NICAM reception), press the Stereo/ Mono
button.
Menu Operation
The on-screen menu provides the viewer with easy access to adjustments
and settings.
Sound Adjustments
1. Press the MENU button, then select “Sound” menu with
2. Press
3. Select an item with
4. Press
• Balance:
• Sound preset:
• BBE (only in 20” models)
• Surround:
• Auto volume (ON/OFF): This function automatically equates the sound
5. To exit the menu, press the OK button.
Picture Adjustments
1. Press the MENU button, then select “Picture” menu with
12 to display “Sound” menu.
56.
12 to adjust:
Left and Right speaker volume balance adjustment.
Enable to select the suitable sound adjustment.
Personal: Your personal preference mode.
Music: Suitable for music programme.
Talk: Suitable for news programme.
Normal: Normal listening mode.
Note: Your sound adjustment will be memorized to “Personal” of the
Sound preset automatically.
Enable to switch the BBE sound turn on and off. BBE High Definition
Sound restores clarity and presence for better speech intelligibility and
musical realism.
Enable to select active 3D surround modes (Mid, Max, Off). Also possible to select directly by pressing the Surround button of the remote control.
volume of each position. It is used to prevent the sharp volume change
when you change the channel (only in CE15LC4 and CE20LC4).
56.
56.
n During the menu operation, the following buttons are used.
5
2. Press
3. Select an item with
4. Press
• Tint: Adjust colour tints (displayed only on NTSC signal reception.).,
• Picture preset: Enable to select the suitable picture adjustment (Perso-
• Dyn. skin tone (On, Off): The Skin Tone correction locally changes the
• Text Brightness : Brightness of teletext screen (Min, Mid, Max). You can
5. To exit the menu, press the OK button.
12 to display “Picture” menu.
56.
12 to adjust:
nal, Dynamic, Standard, Eco). Also possible to select directly with the
Picture Mode button.
Note: Your picture adjustment will be memorized to “Personal” of the
Picture preset automatically.
hue of colours that match skin tones to the correct hue.
not control the picture and the teletext brightness in the teletext
mode.You must first switch back to the TV mode and then adjust the
picture control or set the teletext brightness level.
Page 7

Menu Operation
Setting
AV1
Child lock
OSD language
Off
English
Timer
Video
Preset
Program sort
Auto sort
Program pos.
Program name
Frequency
Skip
Memory
OK?
1
271.68 Mhz
Off
OK?
Setting
Picture
Preset
Sound
Main menu
Preset
Program sort
Auto sort
Program pos.
Program name
Frequency
Skip
Memory
OK?
1
2--.-- Mhz
Off
OK?
Setting menu
1. Press the MENU button, then select “Setting” menu with
2. Press
3. Select an item with
4. Press 12 to set:
• Child lock (On, Off):
• OSD Language :
• AV1: To choose VHS or S-VHS.
• Off timer:
The Off timer will switch the TV set into the standby mode when the selected time has elapsed.
1. Select “Timer” in the Setting menu.
2. Press
3. Select “Off timer” with
4. Press
12 to display “Setting” menu.
56.
You can prevent that a small child operates television with the control
button of the TV set. When the power plug is pulled out, this function is
turned off.
This is useful if you wish to change the On Screen Display language
(English, French, German, Italian, Spanish, Portuguese, Dutch or
Swedish).
12 to display “Timer” menu.
56.
12 to set:
56.
Auto sort
1. Press the MENU button, then select “Preset” menu with
2. Press 12 to display “Preset” menu.
3. Select “Auto sort” with
4. Press the OK button to start Auto tuning.
“Busy” changes into “OK?” after completing Auto tuning.
Auto sort can be cancelled at any time by pressing the MENU button.
5. To exit the menu, press the OK button.
Manual Tuning (Frequency)
1. Select “Program pos.” with
2. Select a programme position where you wish to preset a channel using
0-9, -/-- or
3. Select “Frequency” with
12 button.
56.
56 in the “Preset” menu.
56.
56.
The time changes in 5 minutes steps.
The maximum time is 2 hours.
When the TV set is turned off, the Off Timer setting will be cancelled.
• Alarm timer:
The alarm will ring for about 15 seconds when you
are watching the television and it reaches at the setup time.
1. Select “Alarm timer” in the Timer menu.
2. Press
To stop the alarm sound and erase alarm mark, press one of the buttons
of the remote control or TV set.
5. To exit the menu, press the OK button.
Preset Menu
The preset menu can be used to tune new channels, to re-order channels
and their programme positions, and to make fine adjustment to the tuning.
The preset menu is used for the following items:
Program sort: To rearrange channel positions after Auto tuning.
Auto tuning: To automatically search and store all receivable channels.
Frequency: To manual search and add channels. To fine tune existing
12 to set.
The time changes in 1 minute steps.
The maximum time is 3 hours.
If the power plug is pulled out, alarm timer is cancelled.
If the TV is switched off (in the standby mode) when the time set for the
Alarm has been reached, alarm setting will be cancelled.
channels.
4. You can either...
a) Enter the frequency using the 0-9 buttons referring channel table.
b) Press and hold
seconds), scanning will stop when a channel is found. Keep pressing 12 to retune the frequency. Repeat above until the correct
channel is found.
5. Select “Memory” with
ferred channels.
"Program name": a name can be selected to make the identification of the
selected programme easier. 7 positions are available. To move from one
position to another the
racters within a position, the 56 buttons should be used. To quit this
option press 12 buttons when the cursor is in the first or last position
in the name.
6. To exit the menu, press the OK button.
12 until the frequency starts scanning (about 5
56 , and press the OK button to store your pre-
12 buttons should be used. To change the cha-
6
Page 8

Menu Operation
Preset
Program sort
Auto sort
Program pos.
Program name
Frequency
Skip
Memory
OK?
1
2--.-- Mhz
Off
OK?
?
T V /
WIDE
A· B
1
2
9
3
4
5
6
7
8
0
SURROUND
BASS
TXT TV
/
P P
P
MEN U
P
i
CS
F/ OK
MEN U
i
?
P
P
9
0
...
TXT TV
/
Program sort
Use the Program sort feature to move the channels (tuning data) between
two stored programme positions or delete the tuning data on a programme position after Auto tuning and Manual tuning.
Channel Moving
1. Select “Program sort” in the Preset menu.
2. Press 12 to display “Program sort” menu.
3. Select a programme position which you want to move using 12 or
56 (For example programme position 4). Then press the Green but-
ton on the remote control.
4. Select a new programme position to move (For example programme
position 2 ). Then press the Green button again.
Max. volume:
Setting the limit of maximum sound volume.
On program:
Setting for the start up programme position.
Setting Procedure
1. Press and hold the Recall/System button on the remote control and
press the Programme Up (
mode menu.
2. Select “Max. volume” with
5) button on the TV set to call up the Hotel
56 and set the maximum volume using
12 button.
3. Select “On program” and set the start up position using
(...98 - 99 - AV1 - AV2 - 0 - 1 - 2 - 3 ...).
4. After complete all of the settings, select “Hotel mode” and set the Hotel
mode “On” by pressing
5. Press the MENU button to return to the normal TV mode.
12 button.
Teletext Operation
Sub page access.- Some text
pages are made up of several sub
you wish to view page-4, press the Sub Page
button, and “S----” will appear. Then enter
“0004” using NUMERIC buttons.
pages which rotate automatically. If
Index page selector.- To select
one of the teletext index pages.
12 button.
Deletion of programme position
5. Select a programme position which you want to delete. (For example
programme position 14). Then press the Red button on the remote
control.
6. Press the Red button again and the tuning data of the programme posi-
tion 14 is now deleted.
7. To exit the menu, press the OK button.
56) button.
12 to set Skip “On”.
Setting of the Skip Channels
If there are positions you do not use, by setting skip channel function, it is
possible to jump over any position when you are selecting a channel using
the PROGRAMME UP/DOWN (
1. Select a programme position that you want to skip.
2. Select “Skip” in the Preset menu and press
To cancel the skip channel, set Skip “Off”.
3. To store the skip setting, select “Memory” and press OK button to set it
“OK”.
4. To exit the menu, press the OK button.
Setting of Hotel Mode
The Hotel Mode is a feature that might be needed by a hotel management
to confine the TV that put in the hotel room, so it will not disturb other
rooms.
Hotel mode (On/Off):
It is used to activate or inactivate all of the hotel mode setting. Also,
channel preset is prohibited when the hotel mode is set on.
7
Cancel.- To view the TV picture in
the teletext mode while waiting for
sub page to change or page to
update. Press again to return to teletext
mode. (Note: The page number will appear
when the page is updated.)
Stop.- To stop sub pages from
changing. To resume page change,
press the button again.
Reveal.- To reveal hidden items on
the text page e.g. a hidden answer
to a quiz question.
Direct access to a page.- To
select a page number directly
using the (0-9) NUMERIC buttons. For example, to select page 301, press
3, then 0 and then 1.
Up/down page access.- To select
the next or previous page number.
Direct access to subject headings.- Coloured boxes are
displayed at the bottom of the screen. The 4 coloured buttons give access
to the corresponding subject or pages.
Teletext / TV selector.- To switch TV, TEXT and MIX mode.
Size switch.- Either the top half or the bottom half of the page can
be expanded.
Teletext brightness level. You can change the teletext brightness level.
Please return to the TV mode (see Picture adjustments).
Sound volume control in teletext mode. In teletext mode, sound volume
and sound muting can be controlled. However they are not displayed on
the screen.
Teletext reception. If your aerial signal is poor, the teletext reception may
be poor.
Page 9

Rear Terminals
TV mode
AV1 AV2
Helpful Hints
n NO PICTURE, NO SOUND
l Check if TV is plugged in.
l Try a different channel, if OK, probably station trouble.
l Try to switch on the TV pressing the red stand-by key from the remote
control.
n POOR PICTURE, SOUND OK
l Adjust BRIGHTNESS, CONTRAST control.
l Adjust FINE TUNING control.
l Check aerial connections.
n NO COLOUR, PICTURE OK
l Adjust COLOUR control.
l Adjust FINE TUNING control.
l Is the programme in colour?
n WEAK PICTURE
l Check aerial connections on back of set.
l Check aerial for broken wires.
l Re-orient aerial.
n POOR SOUND QUALITY
l Check the sound system in “Preset menu”.
n The following faults are not caused by the receiver:
Connecting other equipment
You can connect a VCR, S-VHS VCR, Satellite Tuner, PAY TV Decoder, DVD
or Camcoder to this TV via the SCART terminal and the RCA terminals.
This TV set has the following rear terminals:
- AV1: scart which has RGB and composite video signal inputs and TV
output.
- AV2: RCA Audio/video input.
n Depending on the type of video tape or connected AV equipment being
used, it may be necessary to select colour system. In this case, press
the Recall/System button and select a suitable colour system. Colour
system setting for AV position is automatically stored in the memory.
n Connect the VCR or DVD right and left audio output to the correspon-
ding left (l) and right (r) input channels. By pressing the Stereo/Mono
button repeatedly, you can select the sound track L (left), R (right) or
L/R.
n You can select and return to a TV programme by selecting any of the TV
position while watching a playback from a VCR, DVD, etc.
n By pressing the button on your remote control you can change
the source of the input signal. The sequence is the following:
"GHOSTS"
Reflections of signals from mountains or high buildings will cause multiple
images, called "Ghosts". These abnormal conditions can be reduced to
minimum by repositioning aerial or by installing a new one suited for your
area.
"INTERFERENCE"
Interference may be caused by electrical appliances, car ignition systems,
etc. This should normally be a temporary condition, but should this interference persist, contact your dealer.
Specifications
Power source (20”) AC 220~240V C.A. 50Hz
Television system System I
Colour system PAL/NTSC (in mode AV)
Channel coverage UHF:21-69
Aerial input impedance 75 ohm
AV Terminal
AV1: CENELEC Standard.
Input: Composite video, S-VHS, RGB and audio-L/R.
Output:TV-output with composite video and audio-L/R.
AV2: RCA jacks.
Input: Composite video and audio-L/R.
Headphone socket Stereo jack 3mm
(15”) Input: 100V-240V ~ 1.2A Max.50/60Hz
Output:12V
CATV:X,Y,Z,S1-S41, B-Q
__
---
3.4A
Sound output 2x2W (RMS) 2x2W (RMS)
CE15LC4-B
Picture panel (inches) 38cm./15" 51cm./20"
Dimensions WxHxD(mm) 470x337x191 590x430,5x191
(with stand base)
Dimensions WxHxD(mm) 470x299x88 590x393,7x87,5
(without stand base)
Weight (kg) (w/stand) 4,4 7
Picture resolution XGA 1024 (Horiz.) VGA 640 (Horiz.)
768 (Vert.) píxeles 480 (Vert.) píxeles
Viewing angles Horiz. 120° Horiz. 160°
Vert. 100° Vert. 140°
Contrast ratio 500:1 500:1
Brightness 500cd/m2 500cd/m2
Response time 10 ms. 16 ms.
Due to SANYO's continuous improvement of quality policy, these data can
change without previous notice.
CE20LC4-B
8
Page 10

Index
SERVICING . . . . . . . . . . . . . . . . . . . . . . . . . . . . . . . . . . . . . . . . . . . . . . . . . . . . . . .1
WARNINGS AND CAUTIONS . . . . . . . . . . . . . . . . . . . . . . . . . . . . . . . . . . . . . .1-2
ENVIRONMENT RECOMMENDATIONS . . . . . . . . . . . . . . . . . . . . . . . . . . . . . . .2
INSTALLATION . . . . . . . . . . . . . . . . . . . . . . . . . . . . . . . . . . . . . . . . . . . . . . . . . . . .3
REMOTE CONTROL TRANSMITTER . . . . . . . . . . . . . . . . . . . . . . . . . . . . . . . . . .4
GENERAL OPERATION . . . . . . . . . . . . . . . . . . . . . . . . . . . . . . . . . . . . . . . . . . .4-5
MENU OPERATION . . . . . . . . . . . . . . . . . . . . . . . . . . . . . . . . . . . . . . . . . . . . . .5-7
SETTING OF HOTEL MODE . . . . . . . . . . . . . . . . . . . . . . . . . . . . . . . . . . . . . . . . .7
TELETEXT OPERATION . . . . . . . . . . . . . . . . . . . . . . . . . . . . . . . . . . . . . . . . . . . .7
REAR TERMINALS . . . . . . . . . . . . . . . . . . . . . . . . . . . . . . . . . . . . . . . . . . . . . . . .8
HELPFUL HINTS . . . . . . . . . . . . . . . . . . . . . . . . . . . . . . . . . . . . . . . . . . . . . . . . . .8
SPECIFICATIONS . . . . . . . . . . . . . . . . . . . . . . . . . . . . . . . . . . . . . . . . . . . . . . . . .8
9
Page 11

Notes
10
Page 12

042-02518/1.1
R
P
A
P
E
L
R
E
C
I
C
L
A
D
O
1
0
0
%
www.sanyo.es
 Loading...