

Sansui TV19-PL120DVDA Owners Manual
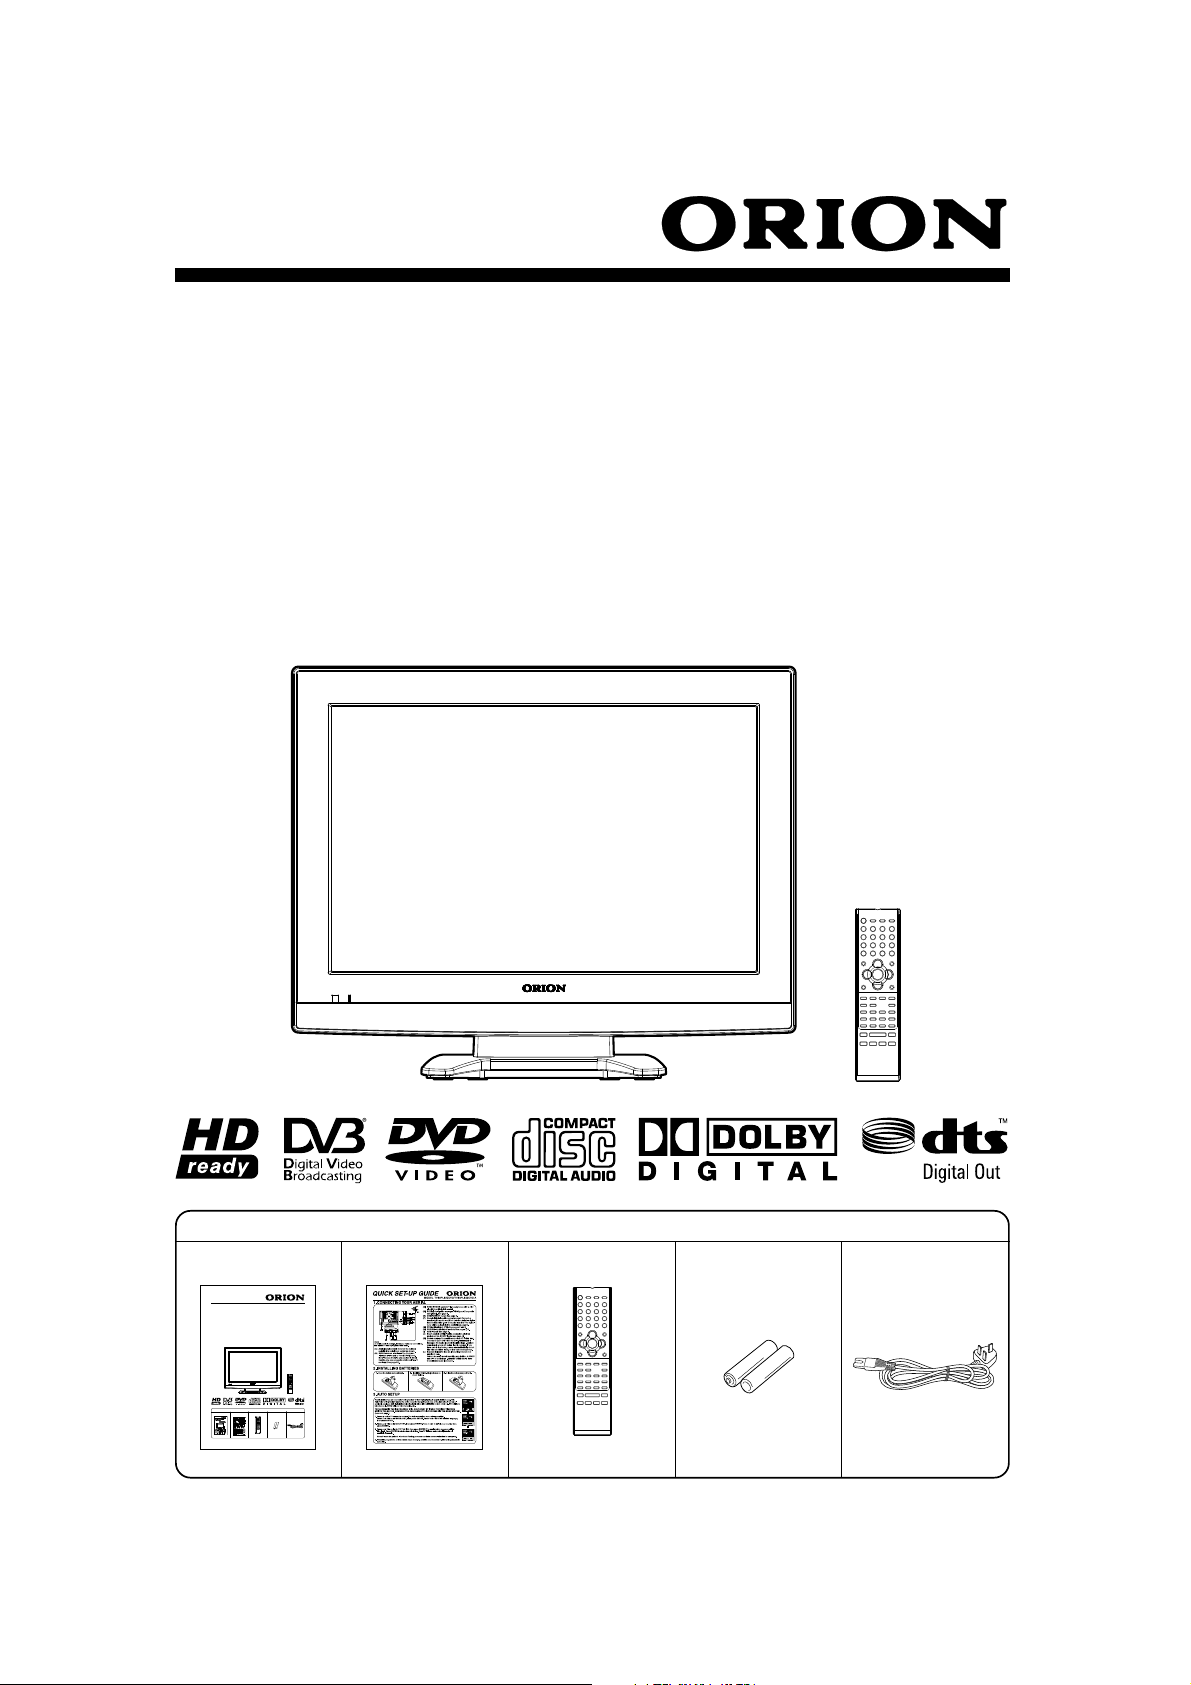
Instruction manual
19" DIGITAL LCD TELEVISION
WITH DVD PLAYER
TV19PL120DVD
TV19PL120DVD A
Accessories
Instruction manual Quick Set-up guide Remote control Battery (R-6, AA) x 2
nsru ton man al
19" D GITAL LCD TELEVISION
WITH DVD PLAYER
TV19PL120DVD
TV19PL120DVD A
I t t Q St d R t t l R t 6 A ) C l d
Beo e op a g he u t p ea e ad hs ma u l oo ghy
Before operating the unit, please read this manual thoroughly.
AC mains lead

Safety warnings
Damage - Never use your TV if it
is damaged in any way. Always
place your TV on a flat level surface
avoiding anywhere which may be
subject to strong vibration.
Weather - It is advisable to unplug
the aerial during an electrical storm.
Moisture - Do not allow your TV to
be exposed to rain, moisture or dust.
If any liquid is spilt into your TV it
can cause serious damage. If you
spill any liquid into your TV switch it
off at the mains immediately. Contact your store.
Interference
Do not place your TV on or near
appliances which may cause
electromagnetic interference (TV or
Hi-Fi speakers). If you do, it may
adversely affect the working of the
unit, causing erratic playback,
distorted picture or sound.
Temperature
Avoid extremes of
temperature, either hot or
cold, place your TV well
away from heat sources such
as radiators or gas/electric
fires.
Ventilation
The TV must be well
ventilated. Do not cover your
TV or place inside a small
confined space. It is recommended that you leave a
10cm gap all around your
TV.
Note:
• When installing the set on
a wall, allow at least 10 cm
clearance between the rear
of the set and the wall.
Clearance of less than 10 cm
will obstruct the vents and
cause the interior of the set
to overheat, resulting in faults
or damage to the set.
• If the unit is mounted on the
wall, contact the shop
where you purchased the
unit for advice, and leave
the installation work to
experts. Incomplete
installation work can cause
you injuries.
• The apparatus must be
connected to a mains
socket outlet with a
protective earthing
connection.
• The socket outlet must be
installed near the
equipment and easily
accessible.
* The “HD ready” Logo is
a trademark of EICTA.
Batteries
Batteries are easily swallowed by
young children. Do not allow young
children to play with the remote
control unit.
Covers - Do not remove any fixed
covers as this may expose dangerous voltages.
Standby
Do not leave your TV in standby for
long periods of time e.g. overnight
or while on holiday. We recommend
that you switch off / unplug at the
mains power supply.
CAUTION:
THIS UNIT IS A CLASS 1 LASER PRODUCT. HOWEVER THIS UNIT USES A
VISIBLE LASER BEAM WHICH COULD
CAUSE HAZARDOUS RADIATION EXPOSURE IF DIRECTED. BE SURE TO
OPERATE THE PLAYER CORRECTLY AS
INSTRUCTED.
WHEN THIS UNIT IS PLUGGED INTO
THE WALL OUTLET, DO NOT PLACE
YOUR EYES CLOSE TO THE OPENINGS TO LOOK INTO THE INSIDE OF
THIS UNIT.
USE OF CONTROLS OR ADJUSTMENTS OR PERFORMANCE OF PROCEDURES OTHER THAN THOSE
SPECIFIED HEREIN MAY RESULT IN
HAZARDOUS RADIATION EXPOSURE.
DO NOT OPEN COVERS AND DO
NOT REPAIR YOURSELF. REFER SERVICING TO QUALIFIED PERSONNEL.
Plasma and LCD TV Screen Burn Warning
Attention!
Cleaning instructions for your LCD TV.
Safety note:
Before you start to clean, switch the
set's power off completely and
disconnect the plug from the mains
power supply.
Be careful not to scratch the plastic
coated front panel - it is highly
vulnerable to accidental scratching
(e.g. by fingernails or other sharp
items).
While cleaning, do not wear
jewellery that could cause surface
scratching (such as rings, wristwatch, etc.).
Use a lint-free cloth and pure water
to clean with, but make sure the
cloth is thoroughly wrung out so that
it is just damp and not soaking wet also make sure that the cloth is free
from any dirt that could cause
scratching to the surface.
Wipe the set clean using minimal
pressure.
Do not use standard window
cleaning fluid. Its alcohol / ammonia
will dissolve the front window's
coating.
Never use solvent or thinner. Never
use special cleaners which are
designed for cleaning PC Monitors
or CRT TVs.
Finally carefully rub dry with a clean
dry lint-free cloth.
Do not use paper towels or tissues to
clean the set - paper can disintegrate
when wet or may leave a trail of
dust behind. Some paper can also
be abrasive and scratch your screen.
A characteristic of Plasma and LCD TV Panels is that displaying the same image
for a long time may cause a permanent after-image to remain on the screen. This
is called screen burn. Most pictures shown on your TV will be constantly moving
and fill the screen.
Examples of images that you need to watch out for are as follows (this is not an
all-inclusive list):
• Black Bars: If black bars appear at the left/right or top/bottom of the screen
it is recommended to change the format so that the picture fills the entire
screen.
• TV Channel Logos: e.g. Shopping channel logos and pricing displays especially if they are bright and stationary. Moving or low-contrast graphics
are less likely to cause ageing of the screen.
• PIP and Multipip: Do not view for long periods of time using the PIP or
Multipip functions.
• Time Displays
• Teletext: Do not view a stationary page for long periods of time.
• TV/DVD Menus: e.g. Listings of DVD disk content.
• Pause Mode: Do not leave the screen in pause mode for long periods of time,
e.g. When watching DVDs or videos.
Note: To prevent screen burn if viewing any of the above for long periods of
time, reduce contrast and brightness when viewing. Once burn-in occurs it will
never disappear completely.
Moving the unit or carrying by hand
When the unit is moved a long way, unplug the power cord and disconnect the aerial, connecting
leads and any fall-prevention apparatus.
• Moving without doing so could result in damage to the power cord, a fire, electric shocks or injuries from dropping the
unit.
The distance between eyes and the screen should be about 5 ~ 7 times as long as
diagonal length of the screen.
• Viewing from too close a distance can cause strain for your eyes.
When installing the Monitor on a table, be careful not to place the edge of its stand.
• This may cause the Monitor to fall, causing serious injury to a child or adult, and serious damage to
the Monitor.
Contents
○○○○○○○○○○○○○○○○○○○○○○○○○○○○○○○○○○○○○○○○○○○○○○○○○○○○○○○○
Location of controls ......................................... Page 2
Aerial connection ........................................... Page 3
Connection to other equipment ..................... Pages 4-6
PC Connection ........................................... Pages 7-8
Connecting an HDMI or a DVI device to the
HDMI input .................................................... Page 9
Analogue Menu System ................................. Page 10
On-screen Language Selection........................ Page 10
Auto setup ................................................... Page 11
Auto tuning .................................................. Page 12
Changing the order of stored channels ............ Page 12
Manual tuning .............................................. Page 13
Basic TV functions ......................................... Page 14
Teletext ........................................................ Page 15
Adjusting the NICAM stereo sound ................. Page 16
Picture format ............................................... Page 17
Other useful functions .................................... Page 18
Guide to using the Digital Menu System .......... Page 19
Language Setup............................................ Page 20
Auto Scan .................................................... Page 20
Manual Scan ............................................... Page 21
Carrier Setup ............................................... Page 21
Channel Organizer ................................. Pages 22-23
Display Setup ............................................... Page 24
Password Setup (Parental lock) ....................... Page 24
Version ........................................................ Page 25
Software Upgrade ........................................ Page 25
Common Interface ........................................ Page 25
Channel list .................................................. Page 26
Channel banner ........................................... Page 27
Multi audio .................................................. Page 28
DVB-Subtitle ................................................. Page 28
DVB Text ...................................................... Page 29
EPG (Electronic Program Guide) ..................... Page 30
EPG Timer.................................................... Page 31
Disc ............................................................ Page 32
Playing a disc ........................................ Pages 33-35
Zooming ...................................................... Page 36
Locating Desired Scene ................................. Page 36
Marking desired scenes ................................. Page 37
Repeat Playback ........................................... Page 38
A-B Repeat Playback ..................................... Page 38
Changing Angles.......................................... Page 39
Title Selection ............................................... Page 39
DVD Menu ................................................... Page 39
Changing Soundtrack Language ..................... Page 40
Subtitles ....................................................... Page 40
Disc Status ................................................... Page 40
MP3/WMA/JPEG and Audio CD
operation ............................................... Pages 41-45
Program playback ........................................ Page 46
Random playback ......................................... Page 46
Customizing The Function Settings ............ Pages 47-50
Temporary Cancel The Rating Level
By DVD Disc ................................................ Page 51
Language Code List....................................... Page 52
Before Requesting Service ........................ Pages 53-54
Specifications ............................................... Page 55
1
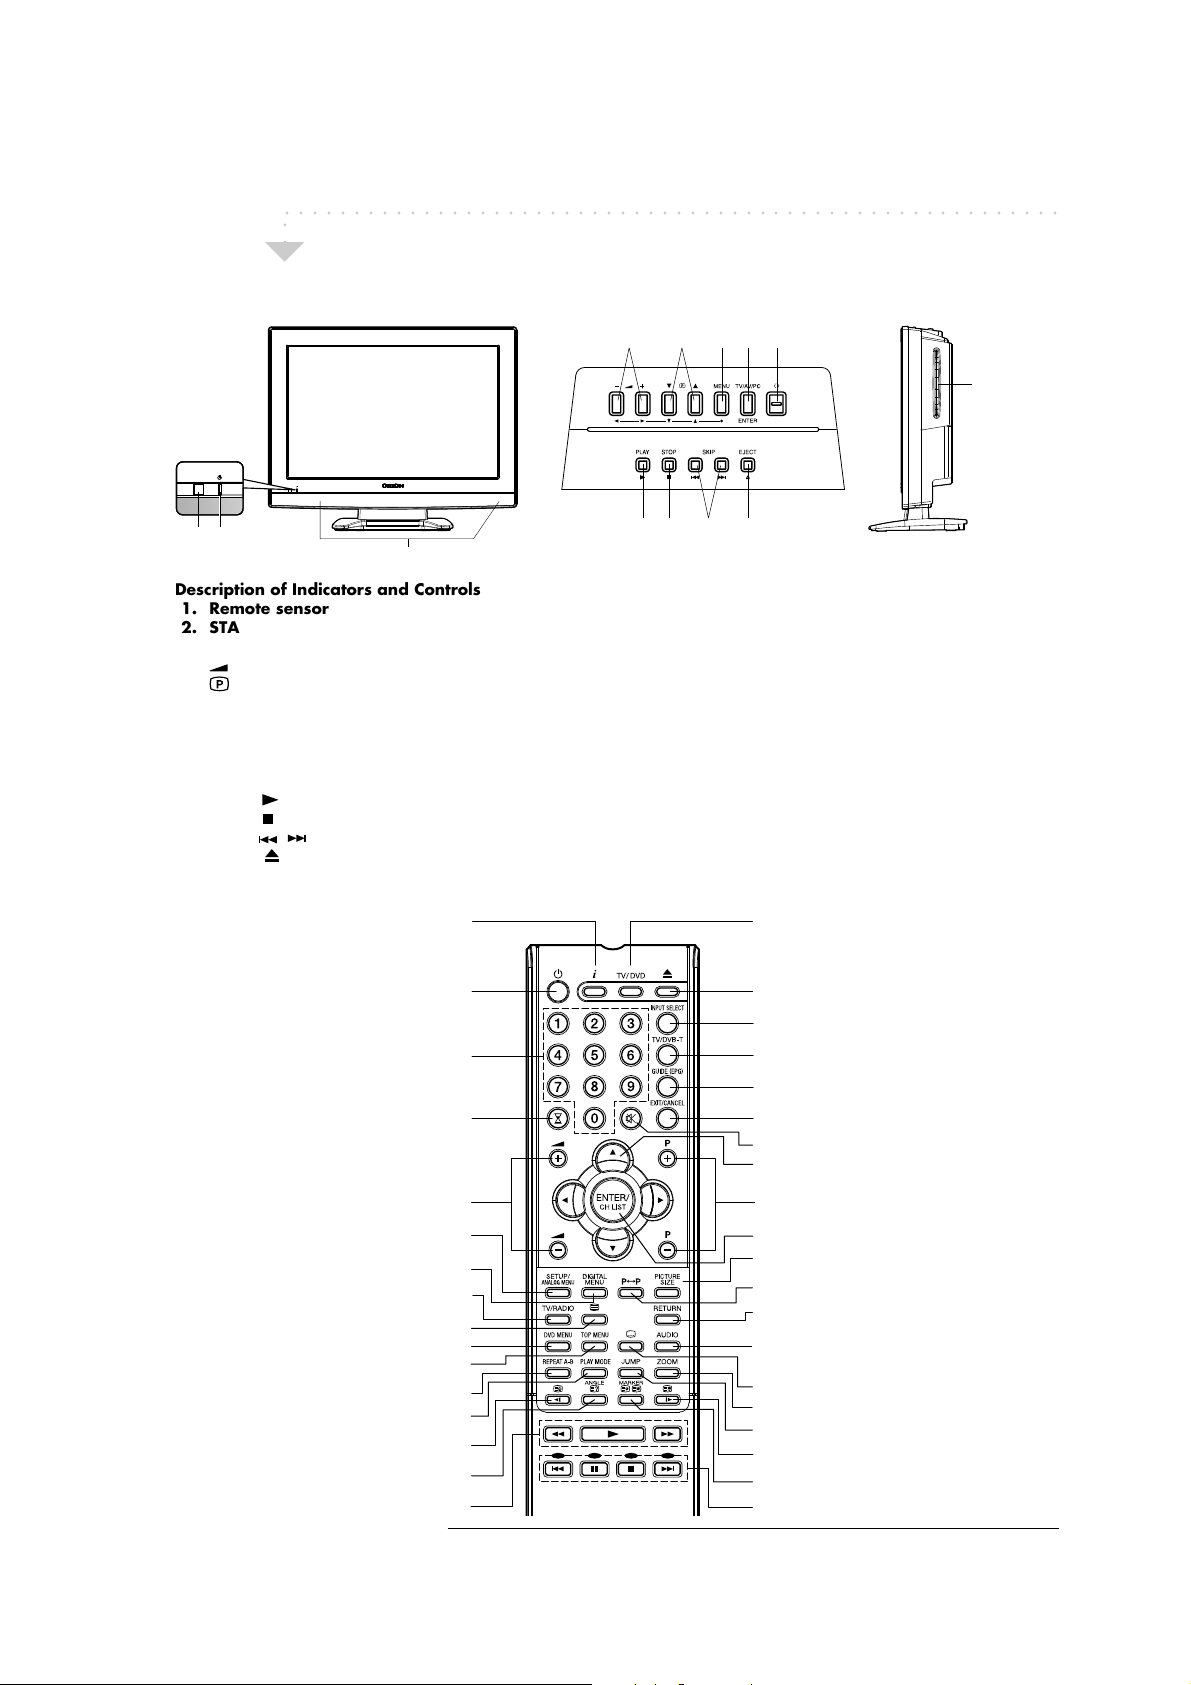
Location of controls
○○○○○○○○○○○○○○○○○○○○○○○○○○○○○○○○○○○○○○○○○○○○○○○○○○○○○○○○
○○
Front Side Right Side
Top
45678
Disc slot
1
2
3
Description of Indicators and Controls
1. Remote sensor
2. STANDBY/TIMER/ON indicator: The LED indicator lights up red in STANDBY mode, green in the POWER ON mode.
3. Loudspeakers
4.
(VOLUME) +/– Buttons: To adjust the volume. When the Menu is on the screen, these are used for changing settings.
5.
(CHANNEL) ▲/▼ Buttons: Press ▲ to move up a channel number. Press ▼ to move down a channel number. When
the Menu is on the screen, these are used for changing settings. When the set is in standby, they can also be used to switch
the power on.
6. MENU Button: To display the menu screen.
7. TV/AV/PC Button: Selects between the TV/AV/PC input modes.
8.
w (STANDBY) button: To switch between the STANDBY and POWER ON modes.
9. PLAY (
10. STOP (
11. SKIP (
12. EJECT (
): Playback
): Stop
/ ): Skip chapter to forword or reverse direction.
): Eject a disc.
910 11 12
Display program position number/
Enter standby mode or turn on the power
Select channel/Select Teletext page/
Activate the channel organizer function
Call Setup menu/Activate the analogue menu
Toggle between the TV and radio mode
Teletext ON / TV+Text / OFF
Repeat playback between A and B (DVD/CD)
Hold the text page/Reverse slow motion
Change playback angle of a DVD disc/
Teletext time display
Enter password/
Sleep Timer
Activate the digital menu
Select menu of a DVD disc
Select title of a DVD disc
Select playback mode
Reveal quiz page answers
DVD control buttons
2
Volume
Remote Control
Select to operate TV/DVD
Eject a disc
Select an input source
Switches between the analogue TV and the
digital TV
Display the EPG (Electronic Progr. Guide)
Exit the menu screen/Cancel marking
Turn the sound on/off
Cursor buttons (C/D/A/B)
Change the TV channel or Teletext page up
or down
Memorize/Teletext page 100/CH LIST
Select picture format
Switches between the present channel and
the last selected channel
Remove DVD set up menu
Select between the available broadcast audio/
Display the multi audio menu/
Change sound track language of DVD
Display the subtitle
Zoom (for DVD playback)
Locating desired scene
Teletext enlargement/Forward slow motion
Marking desired scene/Sub page selection
Four coloured buttons/DVD control buttons
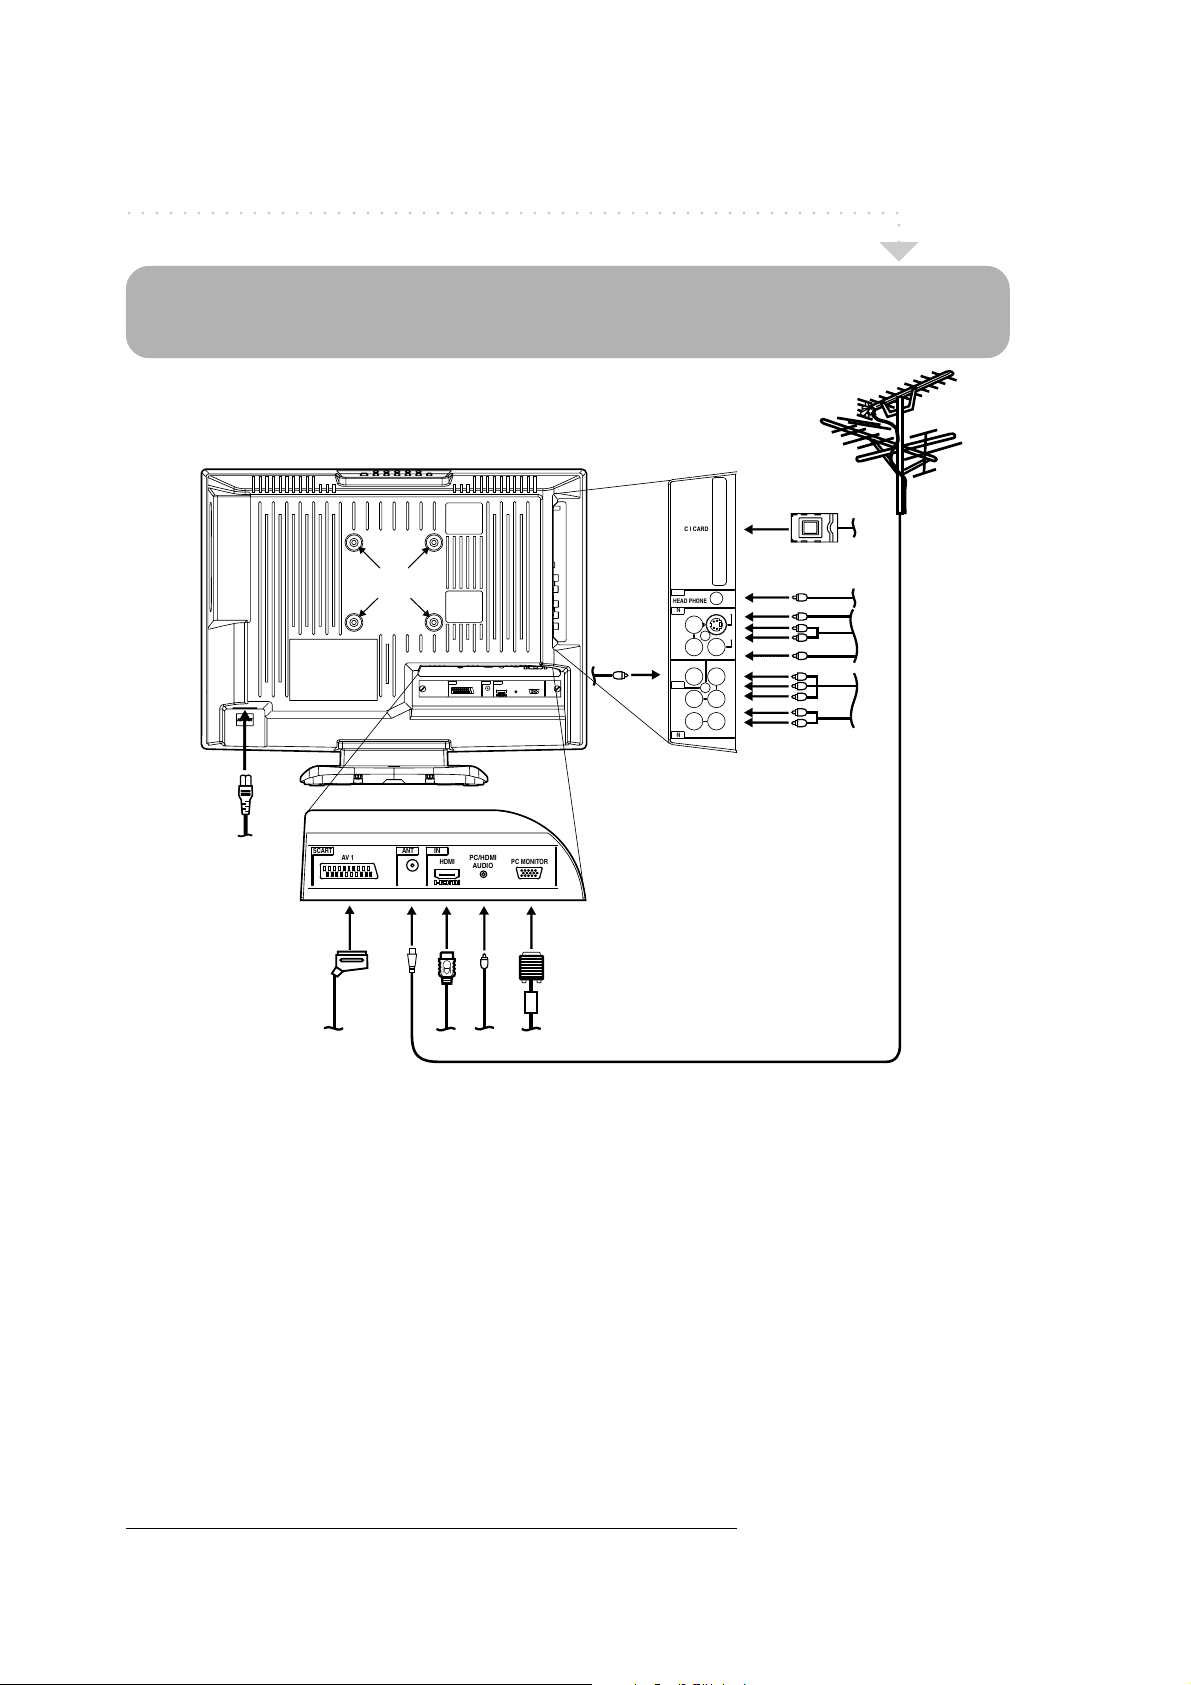
Aerial connection
○○○○○○○○○○○○○○○○○○○○○○○○○○○○○○○○○○○○○○○○○○○○○○○○○○○○○○○○
Note: To avoid possible damage, before you make any connections, turn off the TV at the w
(STANDBY) button and unplug it from the mains. Once the connections are in place, re-connect
the unit to the mains and switch it back on.
Back Side
C I CARD
CAM
○○
(A)
(B)
(K)
SCART
(J)
(L)
SAR
A T
N
AV 1
PCHDMI
PC MONTOR
HDMI
AUDO
ANT
AV 1
IN
PC/HDMI
HDMI
AUDIO
(I) (H)
PC MONITOR
(G)
(F)
OUT
HEAD PHONE
N
L
(MONO
AUDIO
R
DVB T D GITAL
AUD O
OUT
OUT
Pb
L
(MONO)
N
COMPONENT
AUD O
S V DEO
V DEO
(C)
(D)
AV 2
Y
Pr
R
(E)
(A) Aerial input socket: Connect the outdoor aerial to the aerial input socket as shown.
(B) DVB Common Interface: The Common Interface allows you to insert CAM (Conditional Access Module) and
a suitable Smart Card to give you access to additional Pay-TV services (See page 25).
(C)
HEAD PHONE socket: Plug headphones with a mini plug (3.5 mm) into this socket.
(D) AV2 input: Input for analogue A/V-Signal (Composite or S-Video). See page 5.
(E) COMPONENT input: See page 6.
(F) Coaxial digital audio output socket: Connect a coaxial digital audio lead from here to a suitable digital
decoder/amplifier. Only the audio from the TV’s digital tuner will be output via this socket (see page 5).
(G) PC Monitor input (PC): See pages 7 and 8.
(H) PC/HDMI Audio input socket: See pages 7, 9.
(I) HDMI input: See page 9.
(J) Scart socket (AV1): For the connection of other equipment via SCART leads (see page 4).
(K) Power supply: Connect the supplied AC mains lead. Connect to 220~240 V / 50 Hz only. Never repair a
damaged AC mains lead with isolation tape - contact your store if a new AC mains lead is required. If you have
pets in the home, please ensure that they do not bite into any of the leads, as this can be dangerous.
(L) Bracket holes: To fix a wall mounting bracket (not supplied) here.
For any wall or bracket mounting application, ALWAYS use all 4 of the fixings - failure to do this could leave the
set inadequately secured.
3
Connection to other equipment
○○○○○○○○○○○○○○○○○○○○○○○○○○○○○○○○○○○○○○○○○○○○○○○○○○○○○○○○
○○
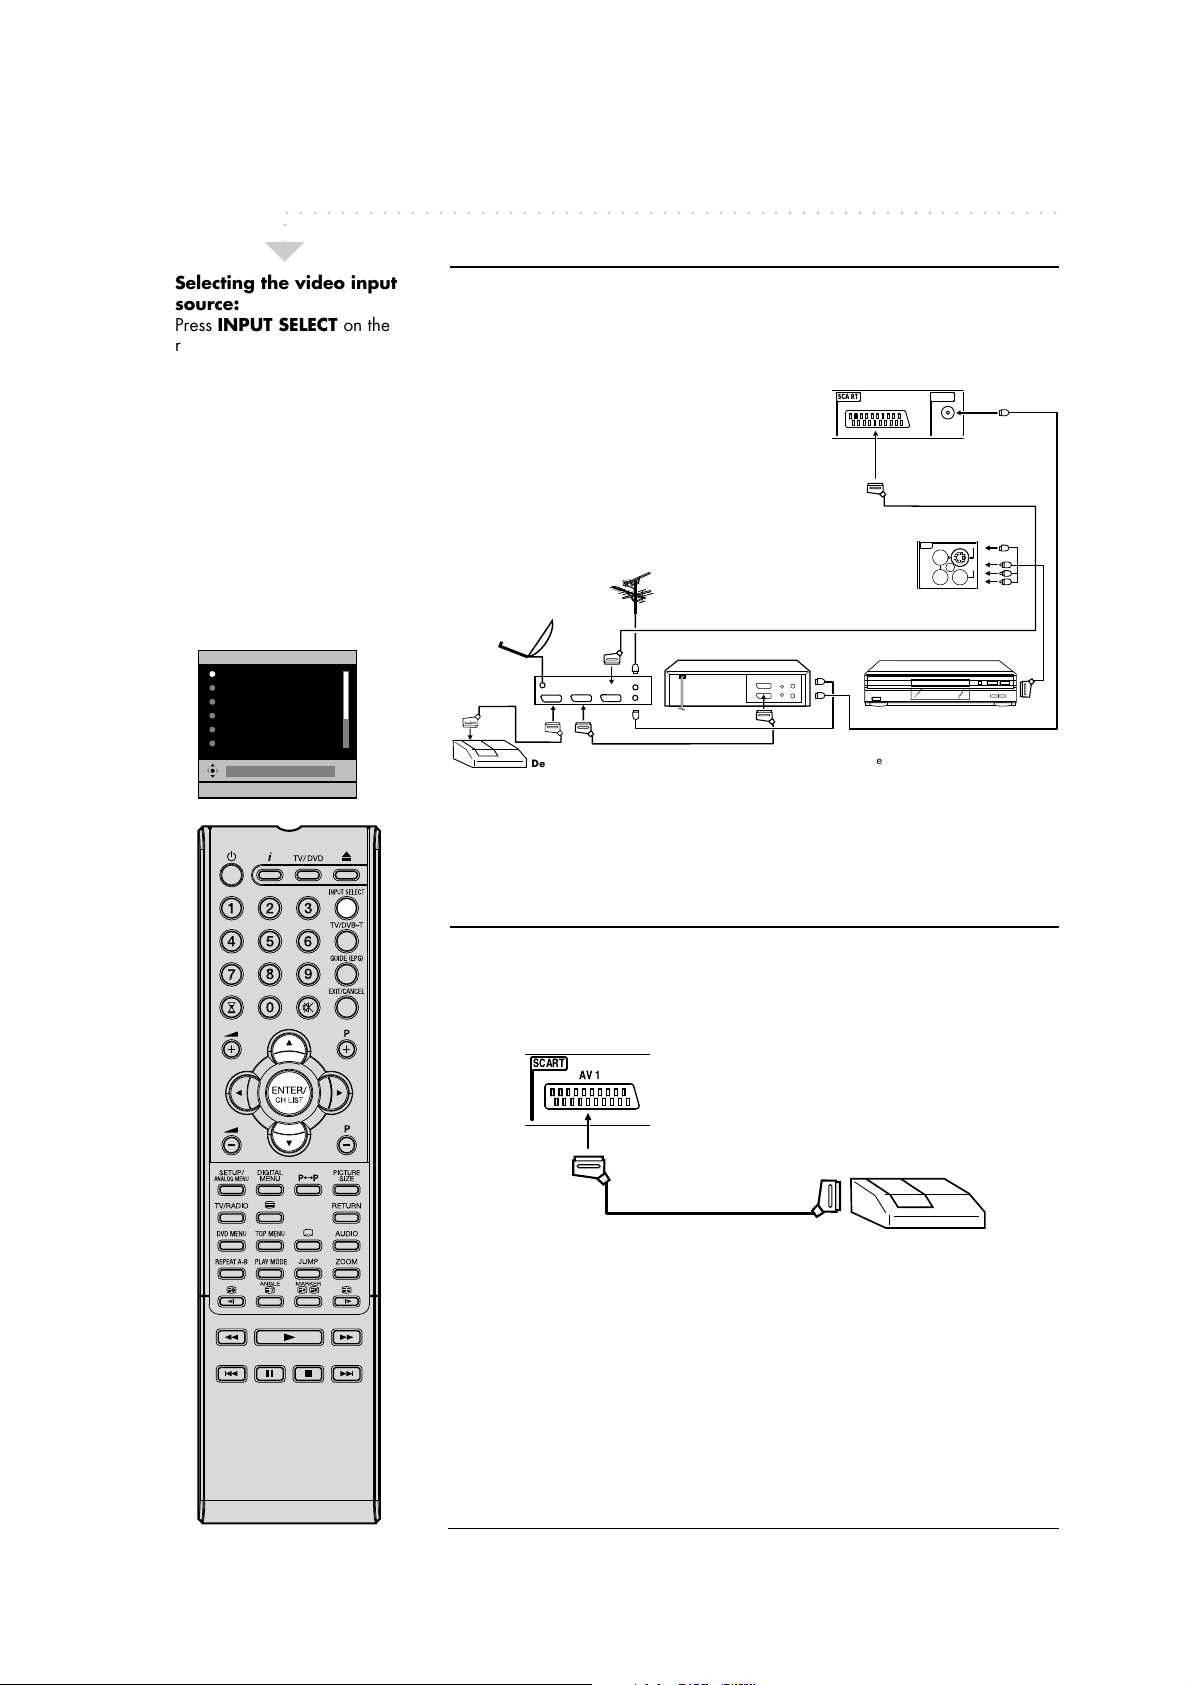
Selecting the video input
source:
Press INPUT SELECT on the
remote control or TV/AV/PC
on the unit. The INPUT
SELECT menu will appear.
Then press C/D to select the
video input source. Then press
ENTER within 6 seconds.
INPUT SELECT
ATV
DTV
AV1
AV2
COMPONENT
HDMI
EXIT : END
1
Examples of other AV equipment that you might connect to this TV
TV (Back side view)
SCA RT
AV 1
TV (Left side view)
Antenna
Satellite antenna
Satellite
receiver
DEC
Decoder
VCR
TV
(All illustrated SCART socket cables and antenna cables are not supplied)
Video recorder
• Make sure to disconnect the appliance from the power supply in order to avoid
any potential damage from occurring.
• Make sure to establish the required connection.
• Make sure that connections are properly and correctly attached before
connecting the appliances to the power supply.
IN
MONO
AUD O
DVD player
ANT
ANT
AV1
AV2
SV DEO
L
VIDEO
R
AV 2
2
Connecting a decoder
TV (Back side view)
5+)46
)8
decoder
(Illustrated SCART socket cable is not supplied)
You can use the AV1 SCART socket when connecting a decoder and other
audiovisual equipment.
4
Y
AV 2
Connection to other equipment
○○○○○○○○○○○○○○○○○○○○○○○○○○○○○○○○○○○○○○○○○○○○○○○○○○○○○○○○
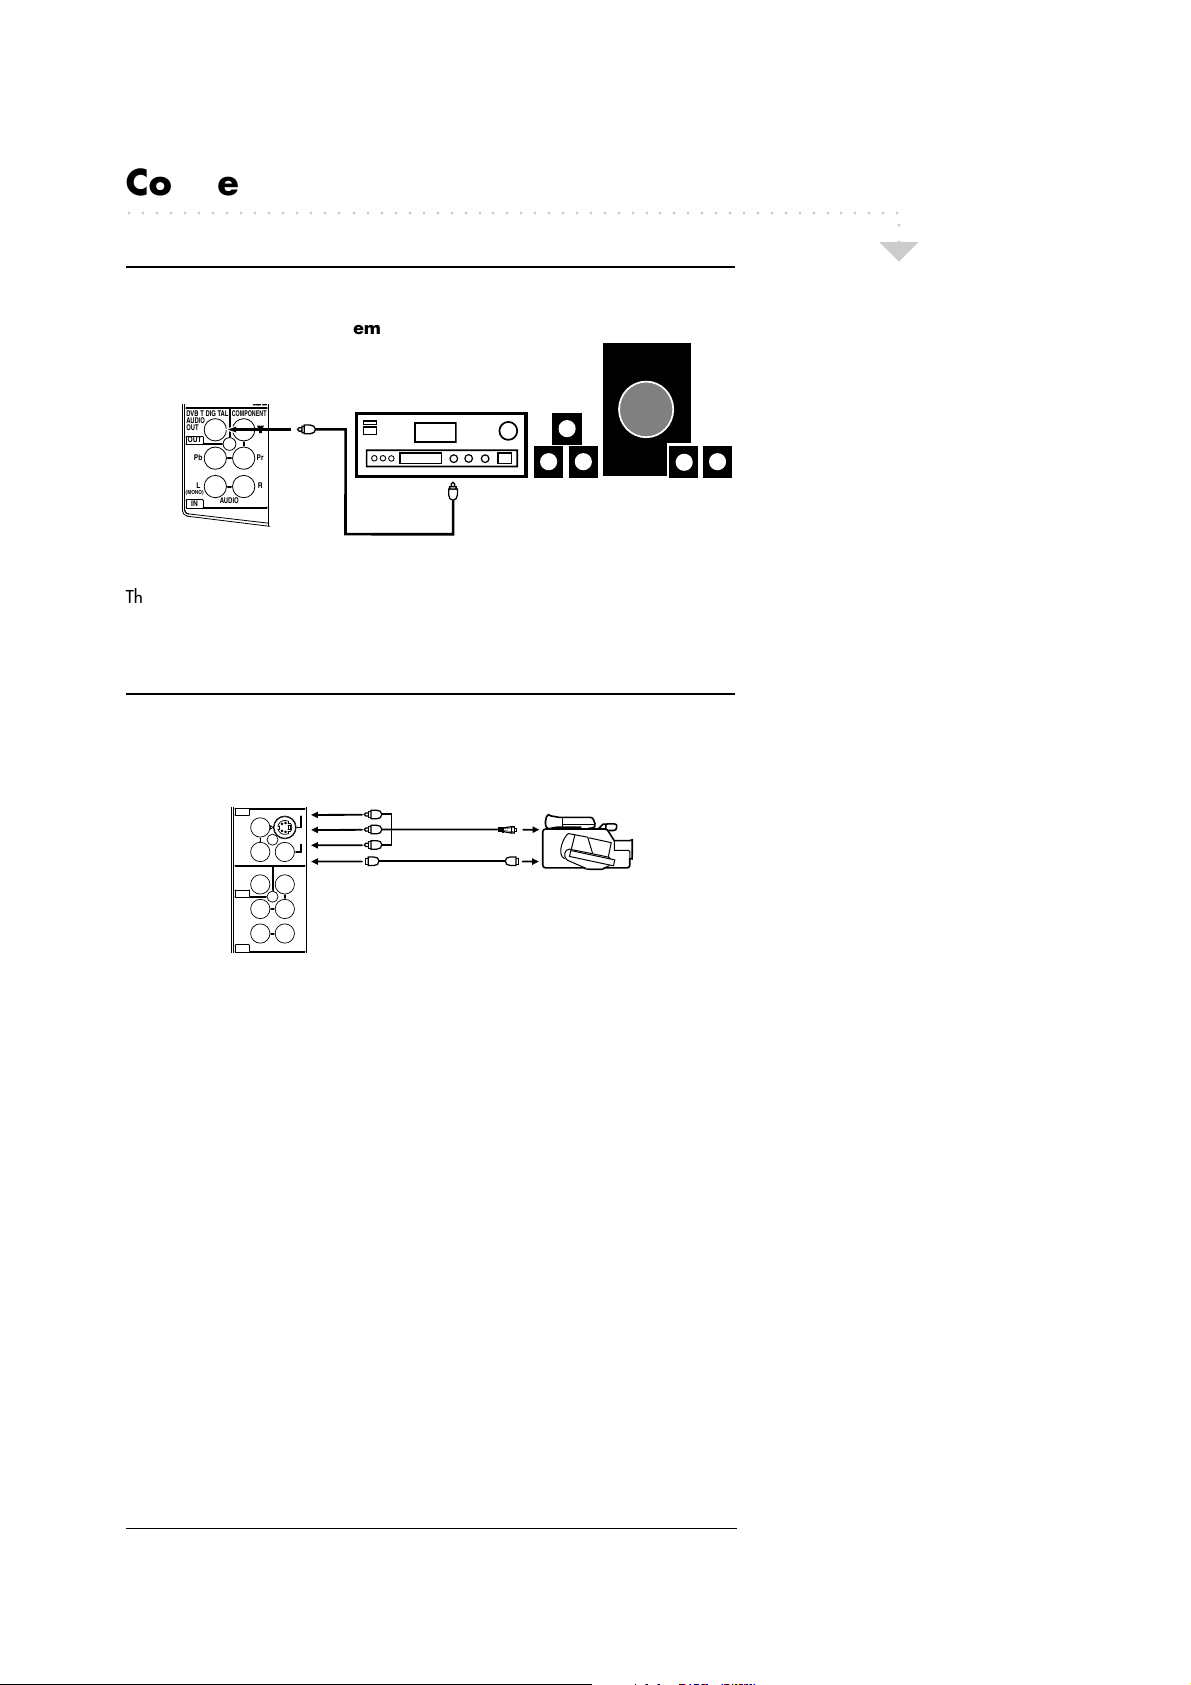
3
Connecting an audio system
TV (Left side view)
DVB T DIG TAL
COMPONENT
AUDIO
OUT
OUT
(MONO)
IN
Pb
L
AUDIO
Pr
R
Surround sound amplifier system
(such as Dolby Digital/DTS/MPEG/etc.)
Coaxial digital lead (not supplied)
The exact arrangement you use to interconnect various video and audio components
to the unit is dependent on the model and features of each component. Check the
Owner’s Manual provided with each component for the location of video and audio
inputs and outputs.
4
Connect to a Video camera or games console
TV (Left side view)
IN
S V DEO
L
(MONO)
AUDIO
VIDEO
R
DVB T D GITAL
AUD O
OUT
(MONO)
AV 2
COMPONENT
Y
OUT
Pb
Pr
L
R
AUD O
IN
(S-VIDEO lead,
not supplied)
(AV lead, not supplied)
AV output
Video camera
(example)
○○
Connect the Video camera (or games console) to the TV unit using the appropriate
RCA / Phono AV leads (or S-Video if applicable). Select AV2-input mode (see
page 4).
Note:
• If you have a camcorder with S-video, use an S-video lead instead of a standard
video lead. Do not connect both a standard video lead and an S-video lead at
the same time, or the picture performance will be unacceptable.
5
N
E P E
UT
AV 2
Connection to other equipment
○○○○○○○○○○○○○○○○○○○○○○○○○○○○○○○○○○○○○○○○○○○○○○○○○○○○○○○○
○○
Note:
• The Component Video
inputs on this unit can
accept both interlaced
signals (PAL: 576i/1080i
or NTSC: 480i/1080i) and
progressive signals (PAL:
576p/720p or NTSC:
480p/720p).
SETUP menu
AUTO TUNING
MANUAL TUNING
CH ALLOCATION
LANGUAGE
VERTICAL POSITION 0
AUTO 4:3 DEFAULT
EXIT : END MENU: RETURN
ENGLISH
16:9
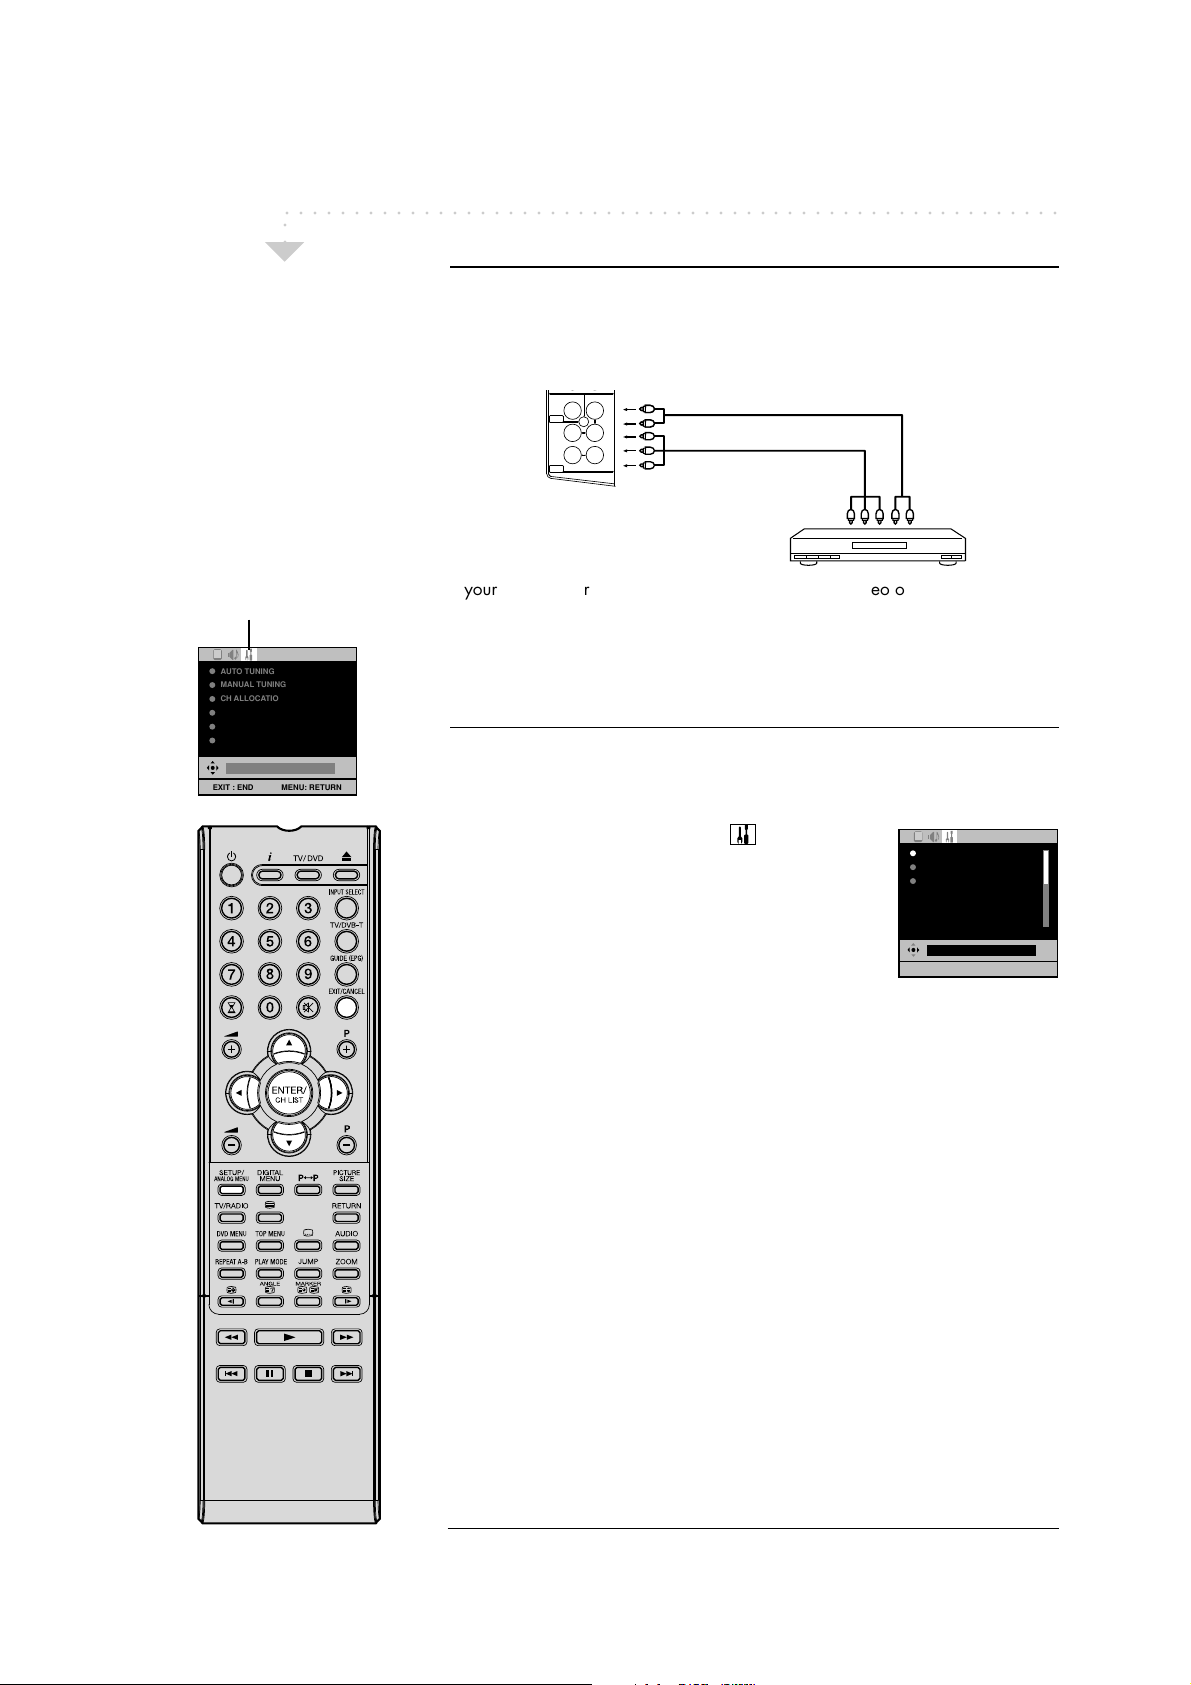
5
Connecting to a DVD player or other AV device with Component
Video outputs
TV (Back side view)
DVB T D G TAL
COMPONENT
AUD O
OUT
Y
OUT
Pb
Pr
L
R
MONO)
AUD O
IN
Audio lead (not supplied)
Video lead (not supplied)
To COMPONENT IN
If your DVD player (or other device) has Component Video output sockets, use a
suitable set of leads (RCA/Phono) to connect these to the Component Video
inputs on this TV as shown - it can greatly enhance the picture quality and
performance. Please remember that you will also need to connect separate leads
(RCA/Phono) for the audio signals. To view this source, select the COMPONENT
input mode (see page 4).
6
Selecting the setting for the SCART socket
1 Press ANALOG MENU, the menu will appear on
the screen. Press B or A to select
Press CC or DD
ENTER.
2 Press B or A to select TV or MONITOR, then press
ENTER.
TV: Outputs the last channel position
MONITOR: Shows the picture displayed on the TV-
3 Press EXIT to return to the normal screen.
to select AV1 OUTPUT, then press
selected on RF.
screen.
YPbPr
(SETUP) menu.
Audio outputComponent output
AV1 OUTPUT TV
AV COLOUR
REC SCREEN STATUS
EXIT : END MENU: RETURN
AUTO
OFF
TV
6

PC Connection
○○○○○○○○○○○○○○○○○○○○○○○○○○○○○○○○○○○○○○○○○○○○○○○○○○○○○○○○
○○
Use a PC-VGA lead (not supplied) to connect your PC to this unit. Plug the lead
carefully not to break or bend the contact inside of plug.
TV
(Back side view)
PC/HDMI
AUDIO
PC MONITOR
PC
to AUDIO 1
input
VGA lead
(not supplied)
Audio lead (not supplied)
Select PC input
Press INPUT SELECT and press CC or DD
PC, then press ENTER. PC appears on the TV
to select
2+
screen.
Note:
• If there is no video signal from the computer when the unit is in PC mode,
‘NO SIGNAL’ will appear on the TV-screen.
• See next page for PC mode menu.
Monitor Display modes
MODE Resolution Refresh rate
VGA 640x480 60Hz
VGA 720x400 70Hz
SVGA 800x600 60Hz
XGA 1024x768 60Hz
WXGA 1280x720 60Hz
WXGA 1280x768 60Hz
WXGA 1360x768 60Hz
(according to Graphic card)
PCs are usually sup-
plied with a ‘normal’
CRT monitor (Cathode
Ray Tube).
Before you connect this
unit to your PC, change
the adjustment of your
PC’s graphic card.
Otherwise the picture
may not appear cor-
rectly on the unit. Turn
on your PC (still with
your old Monitor) and
select under 1360 x
768 for on-screen
graphic resolution.
Select under 60 Hz for
on-screen refresh rate.
Switch off your PC,
then connect it to this
unit while both items
are still switched off.
Note:
•
Digital PC-connection via
HDMI input is not supported.
If you try to connect your PC
digitally anyway, the TVoperation might freeze. TV
will stop to respond properly on usercommands.
Countermeasure:
Switch-off your TV and
disconnect from the
220~240V-power-supply.
Disconnect the digital PCconnection.
Now you may retry operating your TV.
•
If a digital PC-connection
does show a picture, proper
working is not guaranteed.
Digital PCconnection is not
granted for this TV.
7
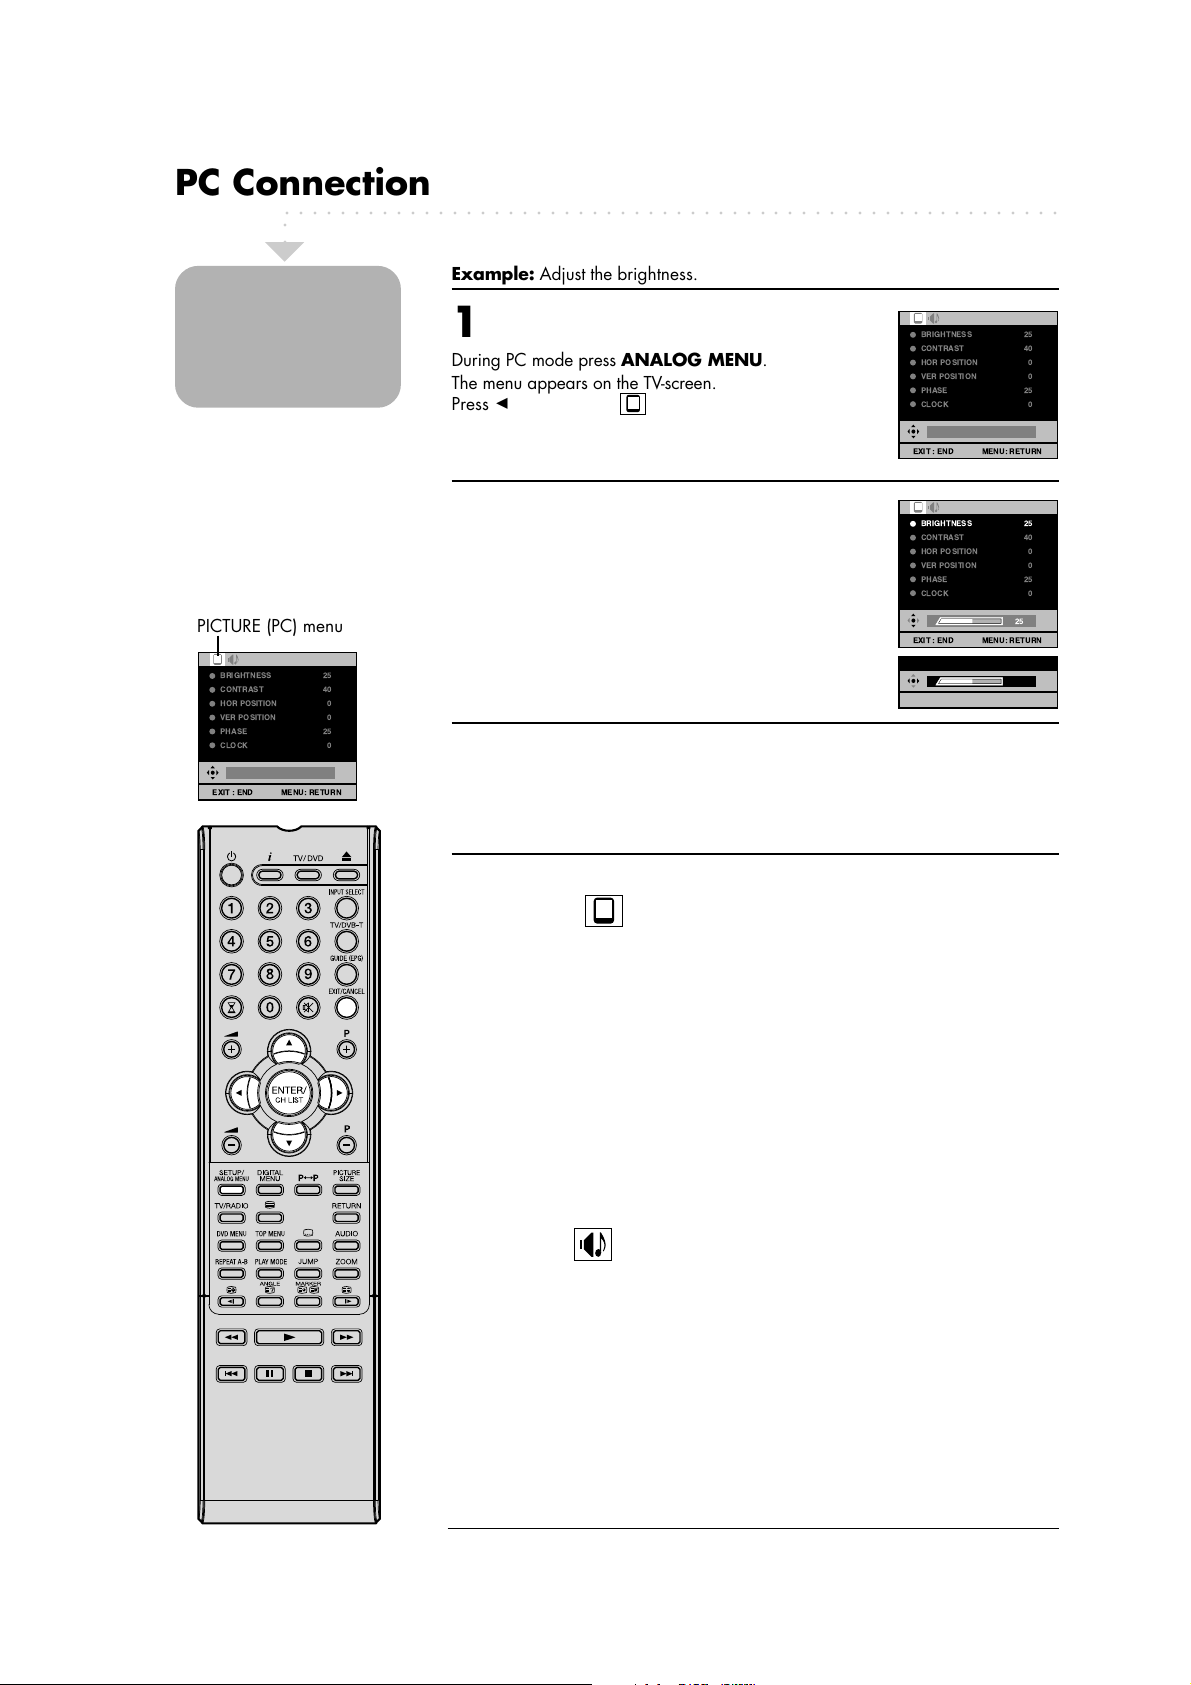
PC Connection
○○○○○○○○○○○○○○○○○○○○○○○○○○○○○○○○○○○○○○○○○○○○○○○○○○○○○○○○
○○
Note: The PC mode
menu settings are not
effective for normal TV-
mode or external input
mode.
PICTURE (PC) menu
BRIGHTNESS 25
CONTRAST 40
HOR POSITION 0
VER POSITION 0
PHASE 25
CLOCK 0
EXIT : END MENU: RETURN
Example: Adjust the brightness.
1
During PC mode press ANALOG MENU.
The menu appears on the TV-screen.
Press B or A to select
(PICTURE) menu.
2
Press C or D to select BRIGHTNESS, then press ENTER.
Then press B or A to adjust the brightness, then press
ENTER.
3
Press EXIT to return to the normal screen.
BRIGHTNESS 25
CONTRAST 40
HOR POSITION 0
VER POSITION 0
PHASE 25
CLOCK 0
EXIT : END MENU: RETURN
BRIGHTNESS 25
CONTRAST 40
HOR POSITION 0
VER POSITION 0
PHASE 25
CLOCK 0
EXIT : END MENU: RETURN
BRIGHTNESS
EXIT : END
25
25
MENU: RETURN
Description of each setting option:
PICTURE menu
BRIGHTNESS and CONTRAST: can be set as you are accustomed to your
TV.
HOR POSITION and VER POSITION: to adjust the horizontal and vertical
placing of the image.
PHASE and CLOCK: eliminates the horizontal (PHASE) and vertical (CLOCK)
interfering lines.
RED/GREEN/BLUE: influences the colour balance.
BACKLIGHT: Press B or A to adjust the level you require.
WXGA INPUT: When you input WXGA, set this option to ‘ON’.
RESET: Press ENTER to reset BRIGHTNESS, CONTRAST, RED, GREEN, BLUE
and BACKLIGHT to the factory preset values.
AUDIO menu
BASS/TREBLE/BALANCE: Tone setting menu.
RESET: Press ENTER to reset BASS, TREBLE and BALANCE to the factory preset
values.
8
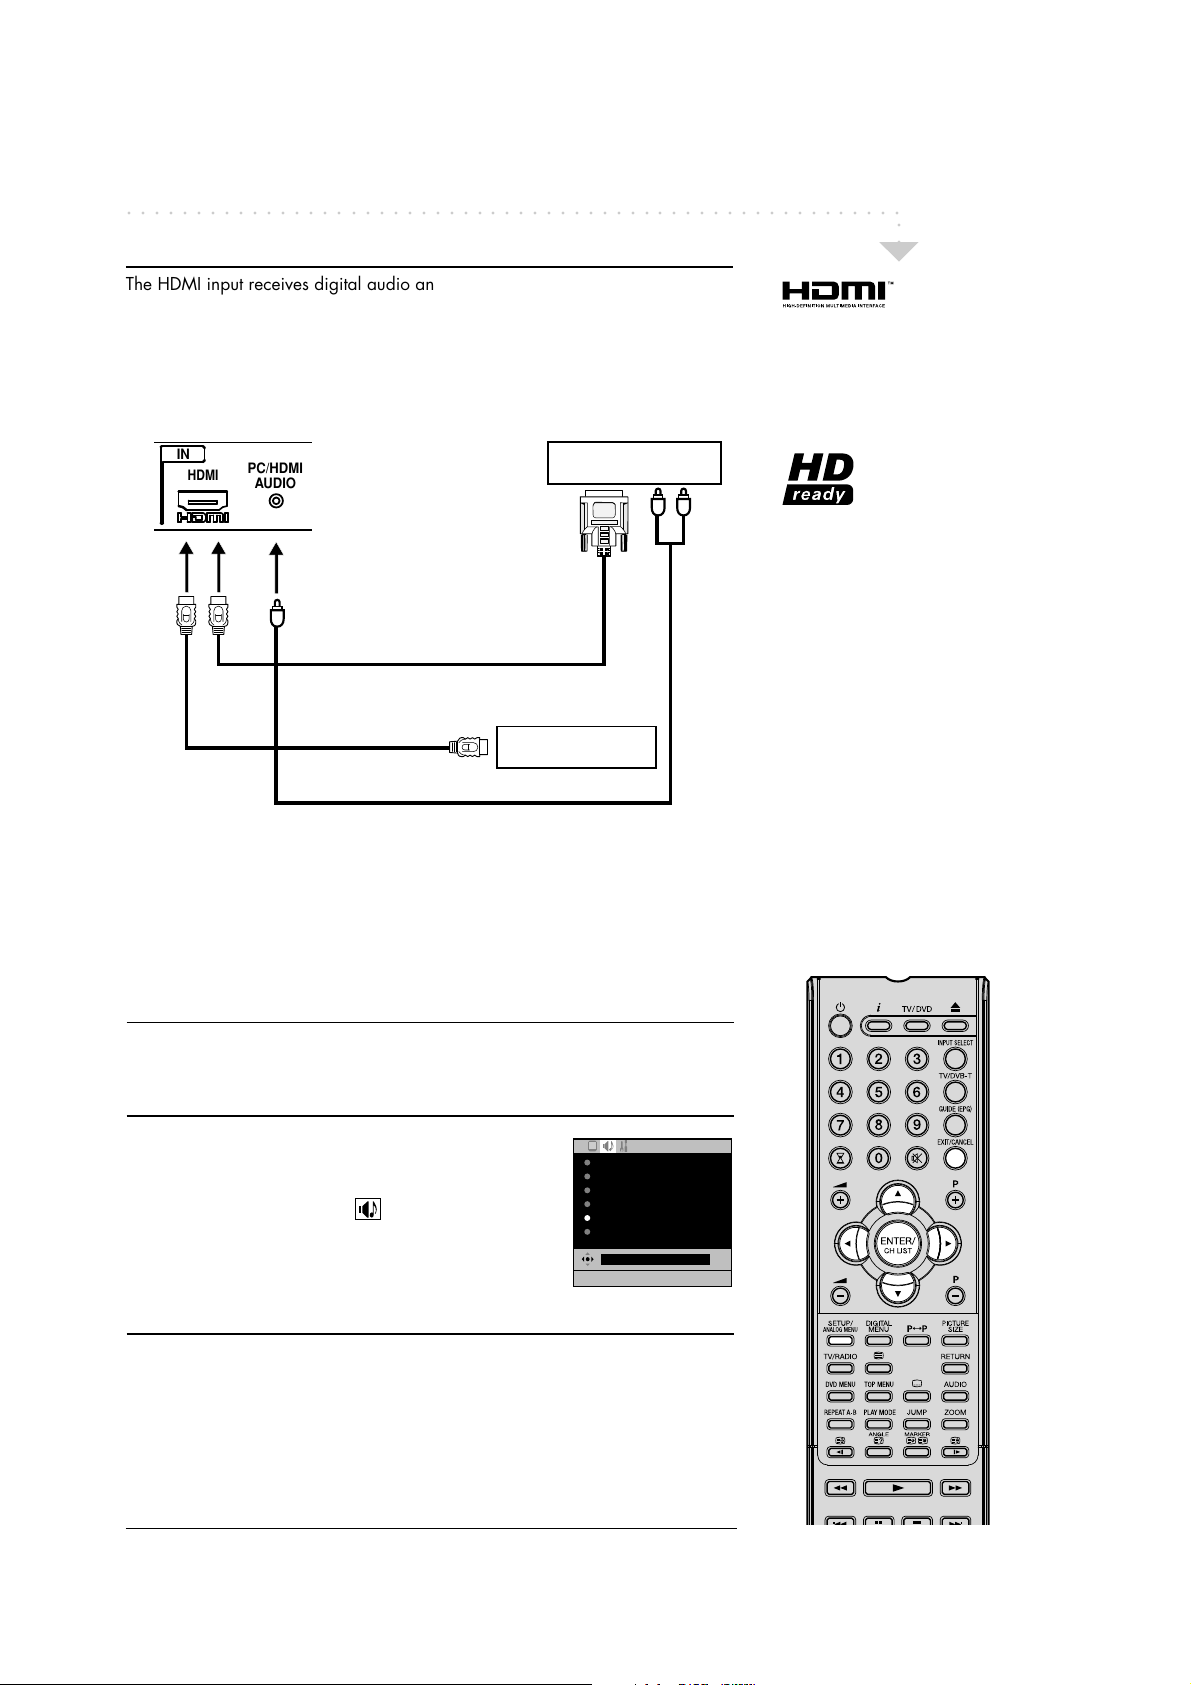
Connecting an HDMI or a DVI device to the HDMI input
○○○○○○○○○○○○○○○○○○○○○○○○○○○○○○○○○○○○○○○○○○○○○○○○○○○○○○○○
The HDMI input receives digital audio and uncompressed video from an HDMI
equipped device or uncompressed digital video from a DVI equipped device.
When you connect to a DVI device with a HDMI-to-DVI adapter lead, it only
transfers the video signal, so it is necessary to use separate analogue leads
(RCA/Phono type) to transfer the audio signals. Select the HDMI input mode
(see page 4).
TV (Rear view)
IN
HDMI
PC/HDMI
AUDIO
DVI device
To DVI
To PC/HDMI
output
AUDIO input
HDMI, the HDMI logo and
High-Definition Multimedia
Interface are trademarks or
registered trademarks of
HDMI Licensing LLC.
is capable of displaying HD
(High Definition) signals when
connected to a suitable HD
source, such as an HD
receiver or DVD player that
HDMI - to - DVI adapter lead
(HDMI type A connector)
(not supplied)
HDMI lead
(type A connector)
To HDMI out
(not supplied)
HDMI device
or
has HD capability, via HDMI,
DVI, or Component Video
connections.
Note:
• Some devices may not
operate properly with the
TV.
○○
This set is classed
as “HD-Ready”.
This means that it
Audio lead (not supplied)
Details of HDMI input signals
HDMI compliant (type A connector), HDCP compliant
Suggested scan rates: PAL: 576i/576p/720p/1080i
NTSC: 480i/480p/720p/1080i
HDMI Audio: 2-channel PCM, 32/44.1/48 kHz sampling frequency
16/20/24 bits per sample
Selecting the HDMI audio input source
You must choose the appropriate HDMI audio input setting for each connection,
depending on whether the source is equipped with a DVI or HDMI socket.
1
Press ANALOG MENU, the menu will appear on the
screen. Press B or A to select
Press C or D to select HDMI AUDIO, then press ENTER.
Then press B or A to select HDMI or DVI, then press
(AUDIO) menu.
NICAM AUTO
BASS 25
TREBLE 25
BALANCE 0
HDMI AUDIO HDMI
RESET
HDMI
EXIT : END MENU: RETURN
ENTER.
2
Press EXIT to return to the normal screen.
9
Analogue Menu System/On-screen Language Selection
○○○○○○○○○○○○○○○○○○○○○○○○○○○○○○○○○○○○○○○○○○○○○○○○○○○○○○○○
○○
Note:
• If no buttons are pressed
for more than approx. 60
seconds, the menu disappears automatically.
• If you have already
successfully selected your
preferred language at the
Automatic Tuning stage,
you don’t need to go
through the procedure
below to select it.
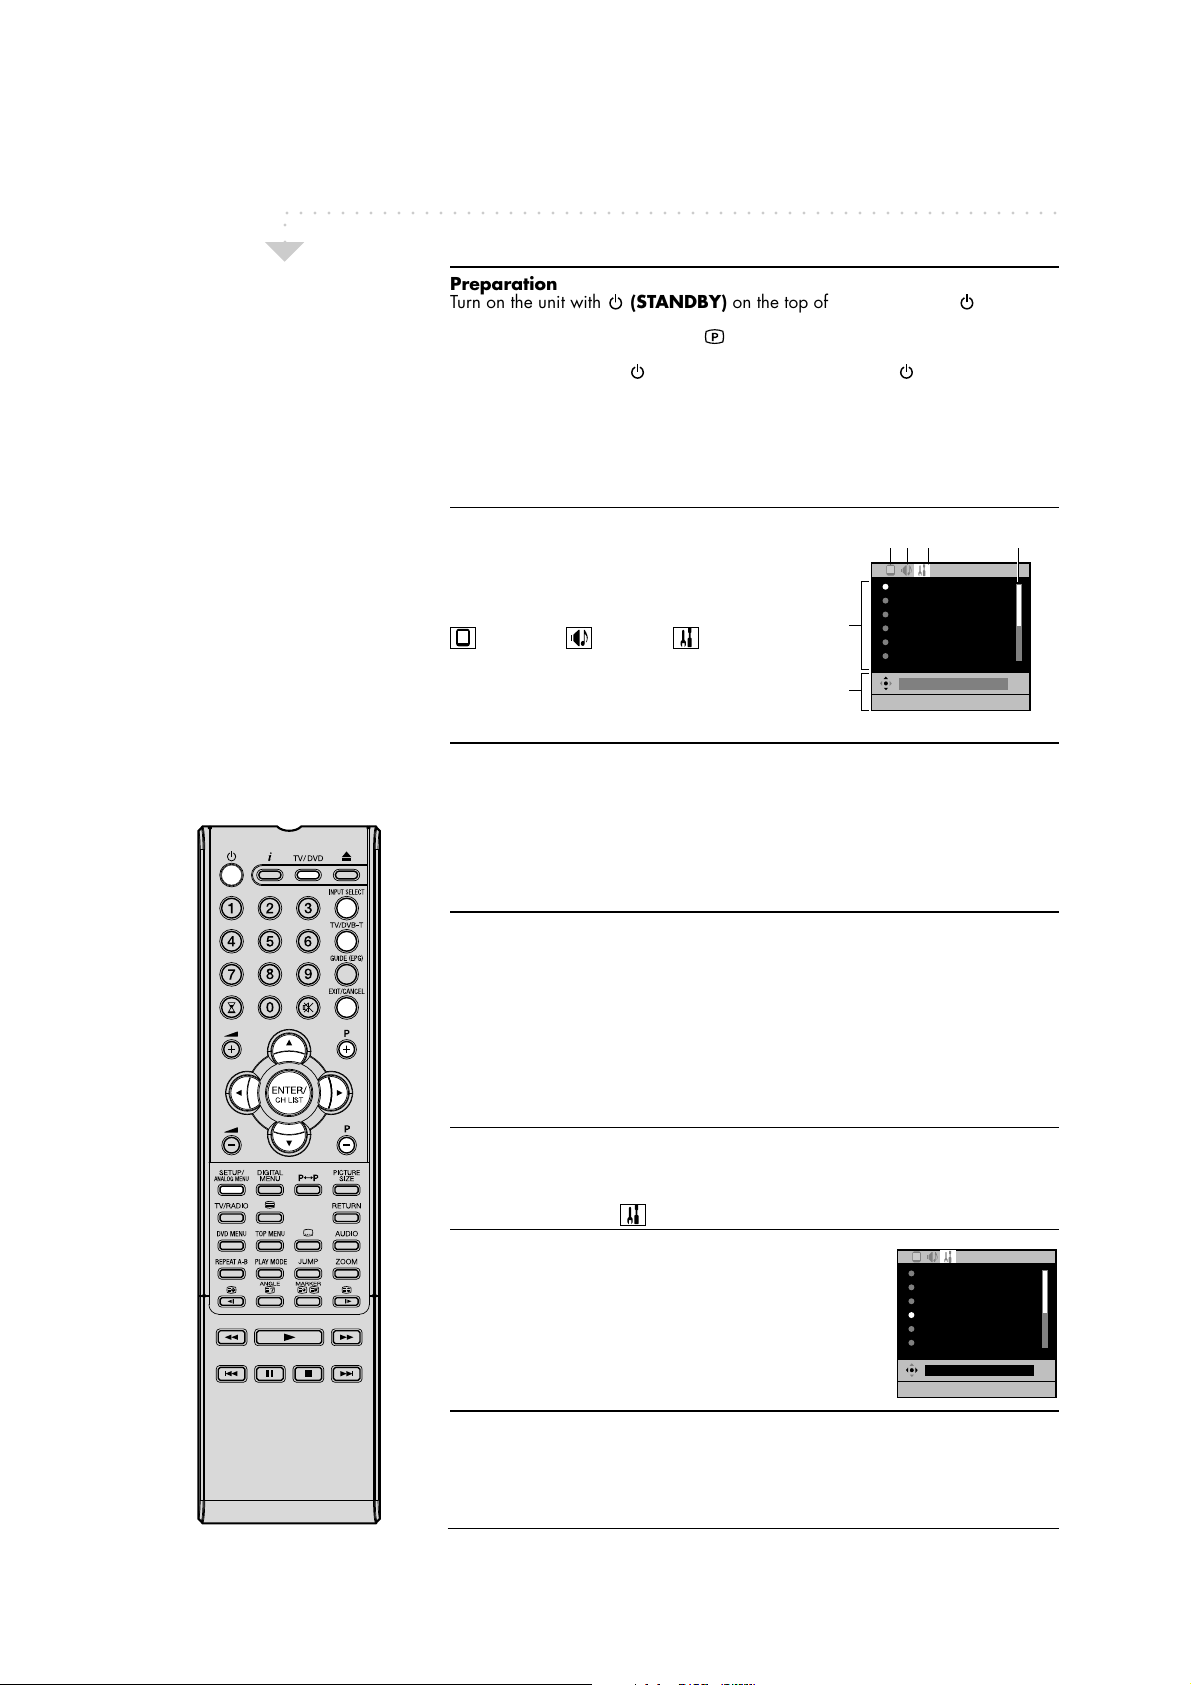
Preparation
Turn on the unit with
(STANDBY) on the top of the unit or press
(STANDBY) on the remote control.
You can also turn the unit on with
(CHANNEL) C or D on the unit or P + or
P – on the remote control.
To turn off the unit press
(STANDBY) on the unit or press (STANDBY) on
the remote control - to completely switch it off, disconnect the mains power supply.
Press TV/DVD to select TV mode, or press INPUT SELECT and press C or D to
select ATV, then press ENTER.
Analogue Menu System
Make sure the antenna and power supply are correctly connected according to
the instructions on page 3.
PICTURE
AUDIO
SETUP
1
Press ANALOG MENU, the menu will
appear on the screen.
Press B or A to view the 3 menu options
(PICTURE), (AUDIO), (SETUP).
Each setting
option
Short guide
menu
menu
AUTO TUNING
MANUAL TUNING
CH ALLOCATION
LANGUAGE
VERTICAL POSITION 0
AUTO 4:3 DEFAULT
EXIT : END MENU: RETURN
menu
Indicates more
options - scroll down
ENGLISH
16:9
2
Press C or D to select whichever item you require. The function can be activated
by pressing ENTER.
Note:
• Some of the menus have more than one page of items - a scroll bar indicates
that you can scroll down or up to select other items.
3
Press EXIT to return to the normal screen.
On-screen Language Selection
This TV has 13 different languages for menu set up which can be selected
through the On-Screen Display: English, German, French, Spanish, Italian,
Dutch, Portuguese, Swedish, Finnish, Polish, Greek, Russian or Turkish.
1
Press ANALOG MENU, the menu will appear on the screen.
Press B or A to select
2
Press C or D to select LANGUAGE, then press ENTER.
Press B or A to select the desired language, then press
ENTER.
(SETUP) menu.
AUTO TUNING
MANUAL TUNING
CH ALLOCATION
LANGUAGE
VERTICAL POSITION 0
AUTO 4:3 DEFAULT
ENGLISH
EXIT : END MENU: RETURN
3
Press EXIT to return to the normal screen.
ENGLISH
16:9
10
Auto setup
○○○○○○○○○○○○○○○○○○○○○○○○○○○○○○○○○○○○○○○○○○○○○○○○○○○○○○○○
Your television has an
Switching on
1
Press (STANDBY) on the top side of the unit.
The Auto Installation menu will appear first.
2
Select language
Press CC or DD to select LANGUAGE, then press ENTER.
Press B or A to select the desired language, then press
ENTER.
3
Select country
Press C or D to select COUNTRY, then press ENTER.
Press B or A to select your country, then press ENTER.
4
Start tuning
Press C or D to select AUTO TUNING, then press
ENTER.
The confirmation message will be displayed.
Press ENTER to start automatic tuning.
AUTO INSTALLATION
LANGUAGE
COUNTRY
AUTO TUNING
EXIT : END MENU: RETURN
AUTO INSTALLATION
LANGUAGE
COUNTRY
AUTO TUNING
EXIT : END MENU: RETURN
AUTO INSTALLATION
LANGUAGE
COUNTRY
AUTO TUNING
EXIT : END MENU: RETURN
ENGLISH
UK
AUTO TUNING
1%
ENGLISH
ENGLISH
ENGLISH
UK
UK
UK
(ANALOGUE)
Automatic Tuning
System which makes
tuning in your televi-
sion easy. This Automatic Tuning System
scans the entire recep-
tion range in your area
and automatically
stores all available
analog and digital
(DVB) channels of
suitable signal strength
in the correct order e.g.
BBC1 will tune into
channel 1, BBC2 will
tune into channel 2,
etc.
THE AUTOMATIC
TUNING PROCESS
WILL ONLY START
BY ITSELF THE FIRST
TIME YOU SWITCH
THE SET ON.
TO RESTART AUTO
TUNING, SEE PAGE 12
FOR ANALOGUE CHAN-
NELS, AND PAGE 20
FOR DIGITAL
CHANNELS.
○○
Your TV will now tune in all available
channels.
Your TV will tune the analogue channels
first, then tune the digital channels.
Note:
• Please be patient - the Auto Tuning
process can take several minutes
to complete.
Auto Scan
TV
001 BBC ONE
002 BBC TWO
003 ITV1
Carrier :1
Frequency (kHz) :562000
Searching ...
Progress
DVB-T 16QAM
:003
Navigate
Radio
700 BBC Radio1
:001
Exit
(DIGITAL)
When the programme on the screen stops changing and the sound comes on,
the search process is complete.
Note:
• To cancel the Auto Tuning, press ANALOG MENU during the process.
• If the received signal for some channels is too weak, the automatic tuning
system may not pick them up - in this case you may need to use manual tuning
(see page 13).
11
Auto tuning/Changing the order of stored channels
○○○○○○○○○○○○○○○○○○○○○○○○○○○○○○○○○○○○○○○○○○○○○○○○○○○○○○○○
○○
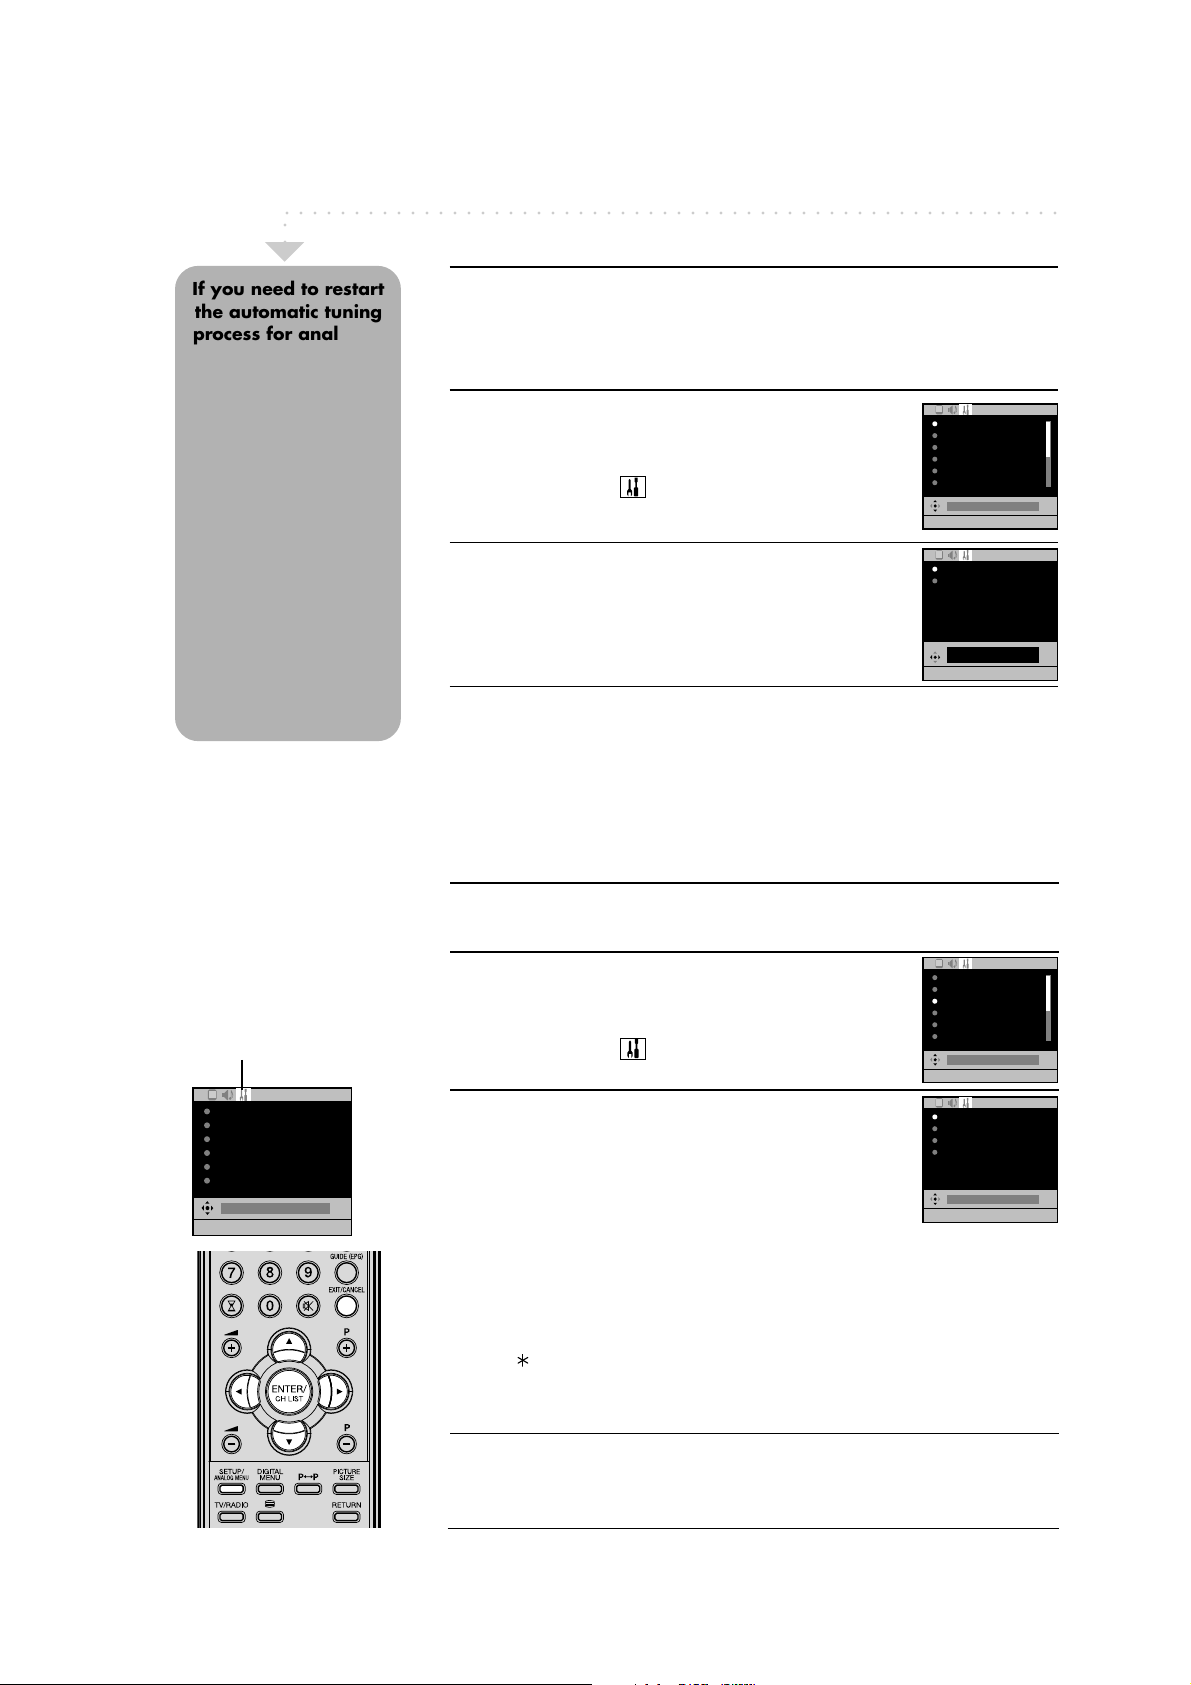
If you need to restart
the automatic tuning
process for analogue
channels, use the
following procedure.
This TV has 18 differ-
ent countries for menu
set up which can be
selected through the
On-Screen Display: UK,
Germany, France,
Spain, Italy, Belgium,
Netherlands, Switzer-
land, Austria, Portugal, Finland, Poland,
Czech Republic, Hun-
gary, Slovenia, Greece,
Russia, Turkey and
Other.
Note:
• To restart digital auto
tuning, see page 20.
• When the COUNTRY is set
to UK, the automatic tuning
will search for UHF broadcasts only.
• When allocating your
channels, we recommend
that you start with CH 1,
continuing with the other
channels afterwards.
SETUP menu
Preparation
Please ensure that all the connections have been made correctly (see page 3).
If you need to restart the automatic tuning process, use the following procedure.
Auto tuning
1
Press ANALOG MENU, the menu will appear on the
screen.
Press B or A to select
(SETUP) menu.
Press CC or DD to select AUTO TUNING, then press
ENTER.
2
Press C or
Press B or A to select your country, then press ENTER.
D to select COUNTRY, then press ENTER.
AUTO TUNING
MANUAL TUN NG
CH ALLOCATION
LANGUAGE
VERTICAL POSITION 0
AUTO 4:3 DEFAULT
EXIT : END MENU: RETURN
COUNTRY
START
EXIT : END MENU: RETURN
ENGL SH
16:9
UK
UK
3
Press C or
The automatic tuning will search for available broadcasts and should store the
channels in the correct order. During the search the sound is muted. When all
programmes have been stored, the normal TV screen will appear.
Changing the order of stored channels
The Automatic station presetting stores the stations found in a specific order. This
will normally be the correct order (e.g. BBC1 on CH 1 etc.), however if it is
necessary the order can be changed.
1
Press ANALOG MENU, the menu will appear on the
screen.
Press B or A to select
Press C or D to select CH ALLOCATION, then press ENTER.
D to select START, then press ENTER.
(SETUP) menu.
AUTO TUNING
MANUAL TUN NG
CH ALLOCATION
LANGUAGE
VERTICAL POSITION 0
AUTO 4:3 DEFAULT
EXIT : END MENU: RETURN
ENGL SH
16:9
12
AUTO TUNING
MANUAL TUNING
CH ALLOCATION
LANGUAGE
VERTICAL POSITION 0
AUTO 4:3 DEFAULT
EXIT : END MENU: RETURN
ENGLISH
16:9
2
Press C or D to select desired option, then press
SORT
ERASE PROGRAM
SK P
CH LABEL
ENTER.
Description about the each setting option:
SORT: Press C or D to select the channel that you want to
EXIT : END MENU: RETURN
move, then press ENTER.
Press C or D to select the position that you want to move the channel to, then
press ENTER.
ERASE PROGRAM: Press C or D to select the channel that you want to erase,
then press ENTER.
SKIP: Press C or D to select the channel that you want to skip, then press
ENTER.
mark will appear.
CH LABEL: Press C or D to select channel that you want to rename, then press
ENTER. Press C or D to select character, then press B or A. The cursor will
move to the next position. Press ENTER to set the channel label.
3
After setting the each option, press EXIT to return to the normal screen.
Manual tuning
○○○○○○○○○○○○○○○○○○○○○○○○○○○○○○○○○○○○○○○○○○○○○○○○○○○○○○○○
○○
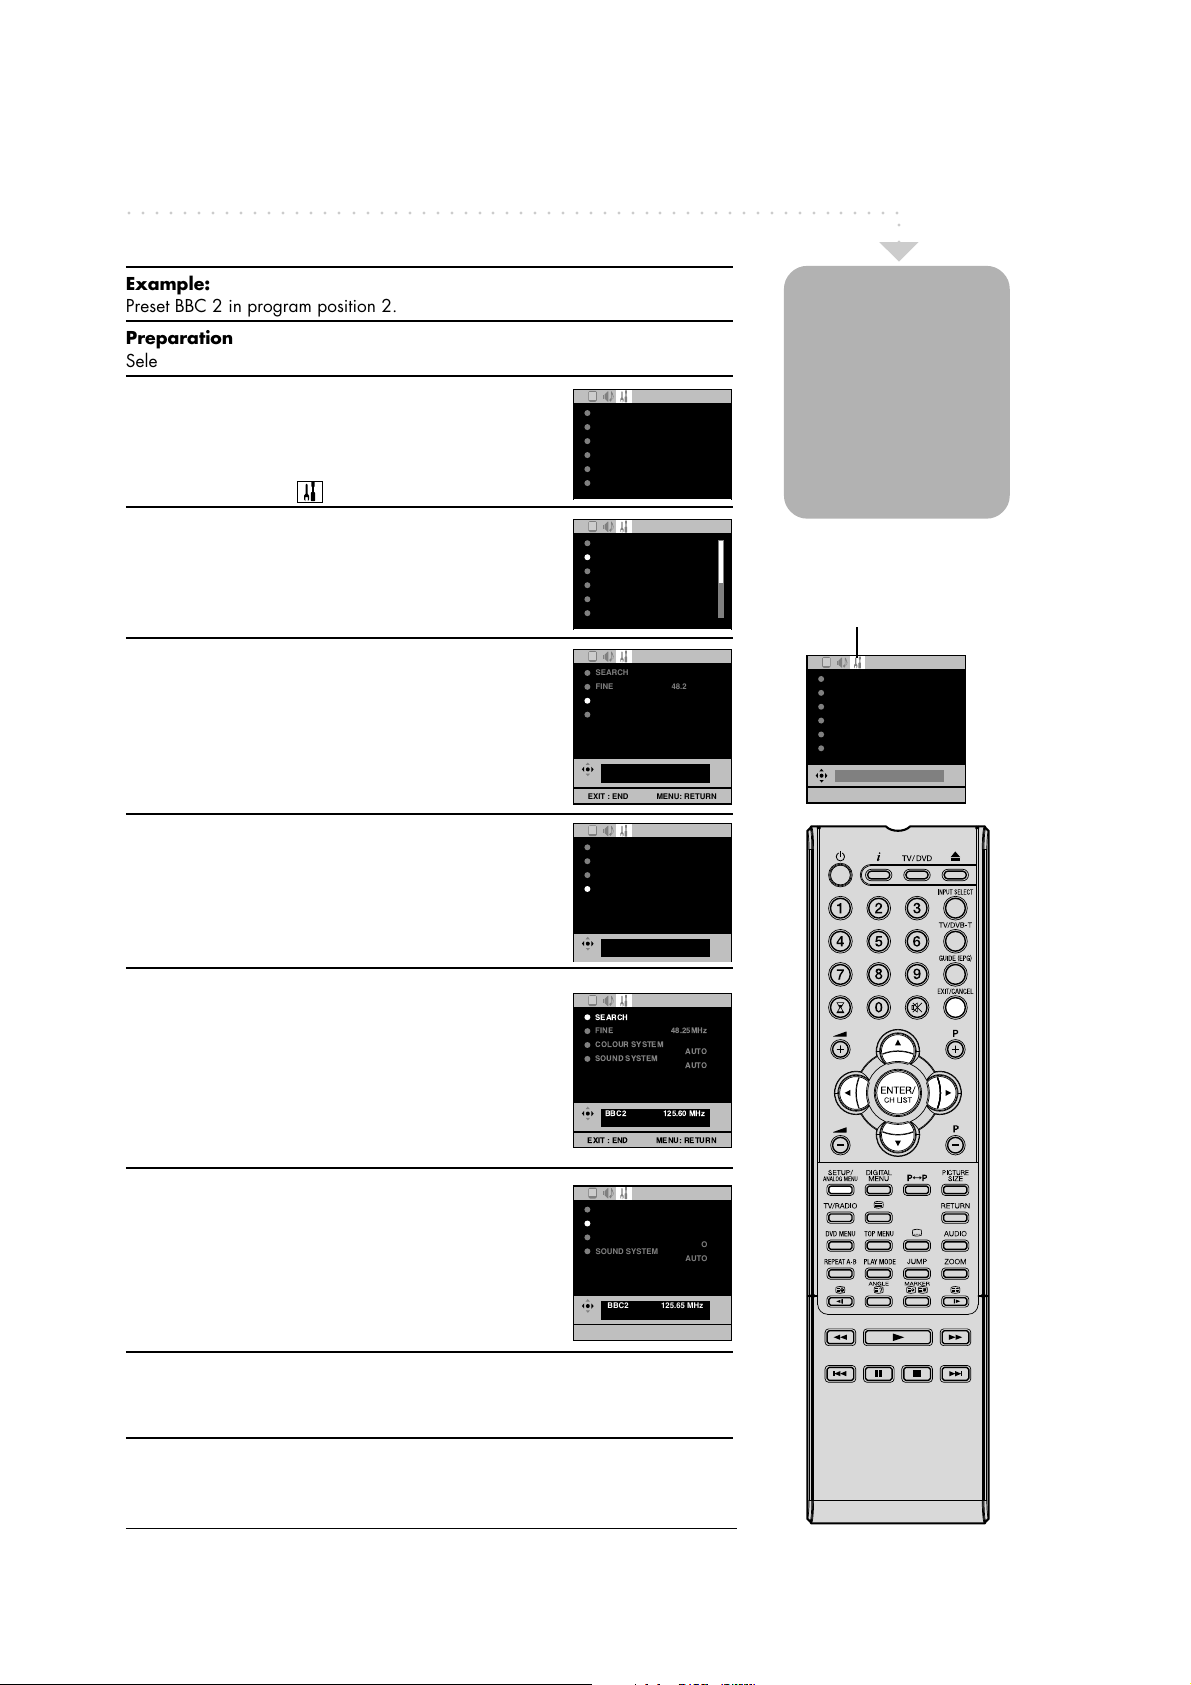
Example:
Preset BBC 2 in program position 2.
Preparation
Select program position 2.
1
Press ANALOG MENU, the menu will appear on the
screen.
Press B or A to select
(SETUP) menu.
2
Press C or D to select MANUAL TUNING, then press
ENTER.
3
Press C or D to select COLOUR SYSTEM, then press
ENTER.
Press B or A to select AUTO, PAL or SECAM then press
ENTER.
Please note that PAL should be selected for use in UK.
4
Press C or D to select SOUND SYSTEM, then press
ENTER.
Press B or A to select AUTO, B/G, I, D/K or L/L’, then
press ENTER.
AUTO TUNING
MANUAL TUNING
CH ALLOCATION
LANGUAGE
VERTICAL POSITION 0
AUTO 4:3 DEFAULT
AUTO TUNING
MANUAL TUNING
CH ALLOCATION
LANGUAGE
VERTICAL POSITION 0
AUTO 4:3 DEFAULT
SEARCH
FINE 48.25MHz
COLOUR SYSTEM
SOUND SYSTEM
BBC1 48.25 MHz
EXIT : END MENU: RETURN
SEARCH
FINE 48.25MHz
COLOUR SYSTEM
SOUND SYSTEM
BBC1 48.25 MHz
AUTO
AUTO
ENGLISH
16:9
ENGLISH
16:9
AUTO
AUTO
AUTO
AUTO
Usually the Auto Tun-
ing stores all available
stations in the recep-
tion area. If some
stations have poor
reception, they may
not be stored - how-
ever, you can store
these manually if you
wish.
SETUP menu
AUTO TUNING
MANUAL TUNING
CH ALLOCATION
LANGUAGE
VERTICAL POSITION 0
AUTO 4:3 DEFAULT
EXIT : END MENU: RETURN
ENGLISH
16:9
5
Press C or D to select SEARCH, then press ENTER.
Press B or A. The auto search begins. It will stop at each
station that has a good enough reception. Press B or A
again until you receive a clear BBC2 picture, then press
ENTER.
• If you want to stop the search manually, press ENTER
while the frequencies is countinig up.
The auto search should find the best reception
automatically, so fine tuning is not normally neces-
6
sary. However if you want to you can fine tune the
reception manually…
Press C or D to select FINE, then press ENTER.
Press B or A to tune the receivable frequencies depending on TV norm, installation site, and range, then press
ENTER.
7
Repeat steps above to preset other TV stations.
8
Press EXIT to return to the normal screen.
SEARCH
FINE 48.25MHz
COLOUR SYSTEM
SOUND SYSTEM
BBC2 125.60 MHz
EXIT : END MENU: RETURN
SEARCH
FINE 125.65 MHz
COLOUR SYSTEM
SOUND SYSTEM
BBC2 125.65 MHz
EXIT : END MENU: RETURN
AUTO
AUTO
AUTO
AUTO
13
Basic TV functions
○○○○○○○○○○○○○○○○○○○○○○○○○○○○○○○○○○○○○○○○○○○○○○○○○○○○○○○○
○○
Note:
• If the built-in tuner does not
receive any signal (e.g. if
no aerial is connected or if
the broadcast transmission
stops) during TV operation,
this unit will switch to
standby after approx. 15
minutes.
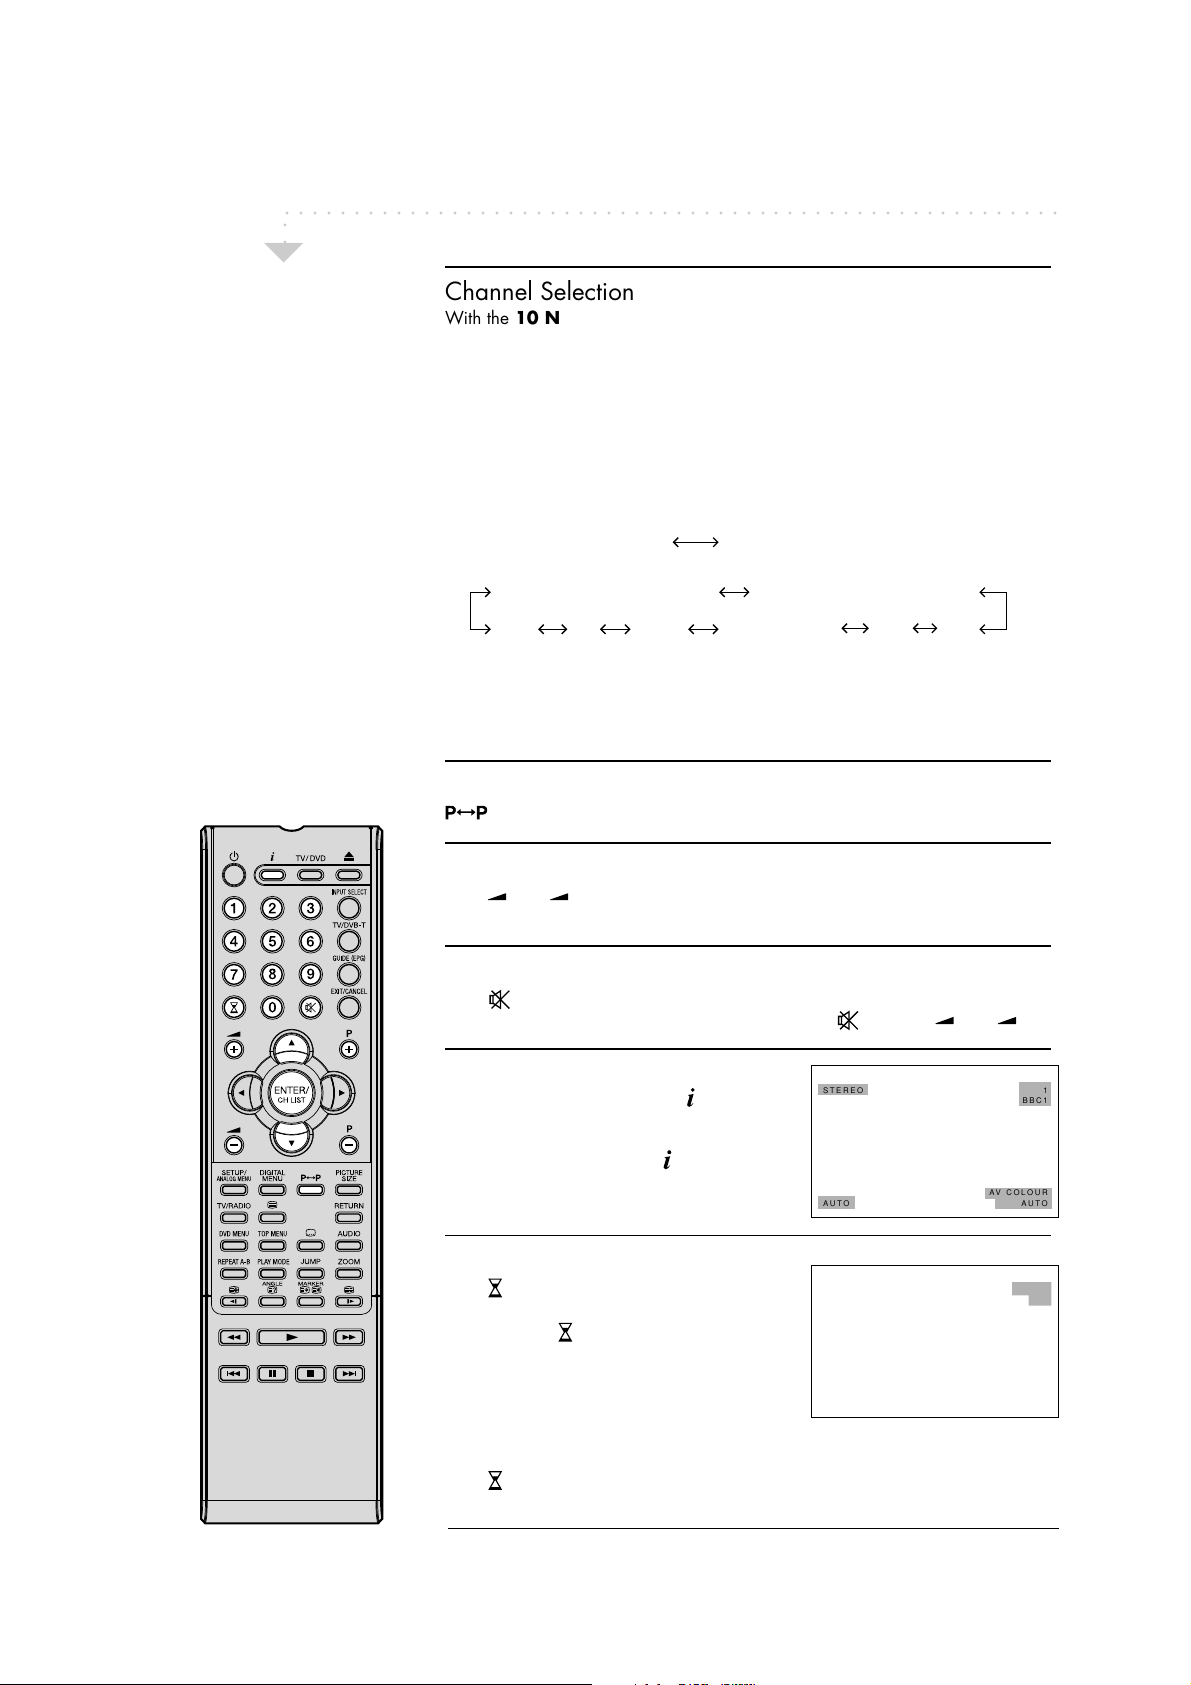
Channel Selection
With the 10 Number Buttons.
Example:
• No. 2: Press 0 and within 2 seconds, press 2. The station stored in the CH2
position will appear.
• No. 29: Press 2 and within 2 seconds, press 9. The station stored in the
CH29 position will appear.
With the P + or P – buttons.
Press P + or P – to change the program number up or down. Each change will
take approx. 2 seconds.
• In DTV mode
Min. numbered Digital CH Max. numbered Digital CH
• Other than DTV mode
Min. numbered Analogue CH Max. numbered Analogue CH
AV2 AV1COMPONENTHDMIPCDVD
With the CH LIST button.
Press CH LIST to display channel list. Press C or D to select the desired program, then press CH LIST to display the selected program.
If the auto search only stored 5 stations, only these 5 will appear. Concealed
channels will not appear (see page 12).
Quick View
button allows you to go back to the last selected channel or input source.
Volume adjusting
Press + or – to adjust the volume. The volume level indicator disappears
after 4 seconds.
MUTE
Press . The sound will be cut off. MUTE will display on the screen for approx.
4 seconds. The muting can be released by pressing
DISPLAY
In the analogue TV mode: Press . Channel
again or + or –.
STEREO 1
BBC1
number and picture size setting will appear
for approx. 4 seconds.
In the digital TV mode: Press
information will appear (see ‘Channel
banner’ on page 27).
. The program
AUTO
AV COLOUR
AUTO
SLEEP TIMER
Press . SLEEP and the number of minutes until
the set is due to shut - off will appear. Each
time you press
the SLEEP time will decrease
in 10 minute intervals.
When the displayed time runs out, the unit will
switch to standby. The display will disappear
after approx. 4 seconds.
SLEEP
120
14
To cancel the sleep timer:
Press repeatedly until ‘0’ appears.

Teletext
○○○○○○○○○○○○○○○○○○○○○○○○○○○○○○○○○○○○○○○○○○○○○○○○○○○○○○○○
Teletext is sent page by page. This unit is able to automatically store up to 256 pages. Storage lasts until all pages
have been received. The pages can only be accessed when they have been stored. This can take a moment.
Fastext/TOPtext
The Fastext/TOPtext is teletext with a special directory.
On the lower part of the screen there are four different coloured fields (red, green, yellow and blue). These fields lead
directly to the pages shown within. The Four coloured buttons on the remote control correspond to the coloured
fields. Press the appropriate coloured button in order to go to the page represented by that particular colour field.
○○
Switch on / off Teletext
Teletext is not transmitted by all channels.
Select a channel that shows teletext.
Press
Press
Each time you press
Note:
You cannot select any other channels as long as teletext is switched on. Switch teletext off when you want to switch
over to another channel.
. You will now see a teletext page (as long as it is available).
again to display the Teletext and normal TV picture at the same time on the screen.
, the screen switches as shown right.
TELETEXT
TELETEXT
Select Page
Press P +
Buttons.
And if you mistype something, just enter the complete 3-digit wrong page number then enter the desired number
again. Or ... press one of the coloured teletext buttons so that a page from Fastext/TOPtext is shown.
or P – until the desired page appears. Or ... enter the requested page number by using the 10 Number
Hold Pages
Some pages are divided up into subpages by the channel.
Subpages are automatically shown in turn, as they are transmitted. In order to hold the page, press
again in order to display the next subpage.
Directly Select Subpages
You can directly select the subpages if required.
Example:
Page 128 from Teletext may comprise 2 subpages. In the right upper corner you will, for example, see 1/2. That
means that page one of 2 subpages is being shown at the moment.
Press
before subpage 0002 appears.
Press
subpage feature is switched off.
in order to select subpage 2. Four dashes (– – – –) are shown. Enter ‘0 0 0 2’. It can take a minute
again in order to switch off the subpage feature. You can only select other teletext pages when the
128 128 CEEFAX 21.07.03 15:01:38
. Press
1/2
Enlargement
In order to enlarge the display, press .
Either the upper or lower half of the screen is enlarged.
Each time you press
you switch between the display of the upper or lower half of the screen or the full picture.
Answering Quiz Questions
Some pages contain quiz questions with concealed answers.
Press
in order to show the answers.
Index page (Page 100)
Press ENTER in order to show page 100 (this is normally the Index page).
15
Adjusting the NICAM stereo sound
○○○○○○○○○○○○○○○○○○○○○○○○○○○○○○○○○○○○○○○○○○○○○○○○○○○○○○○○
○○
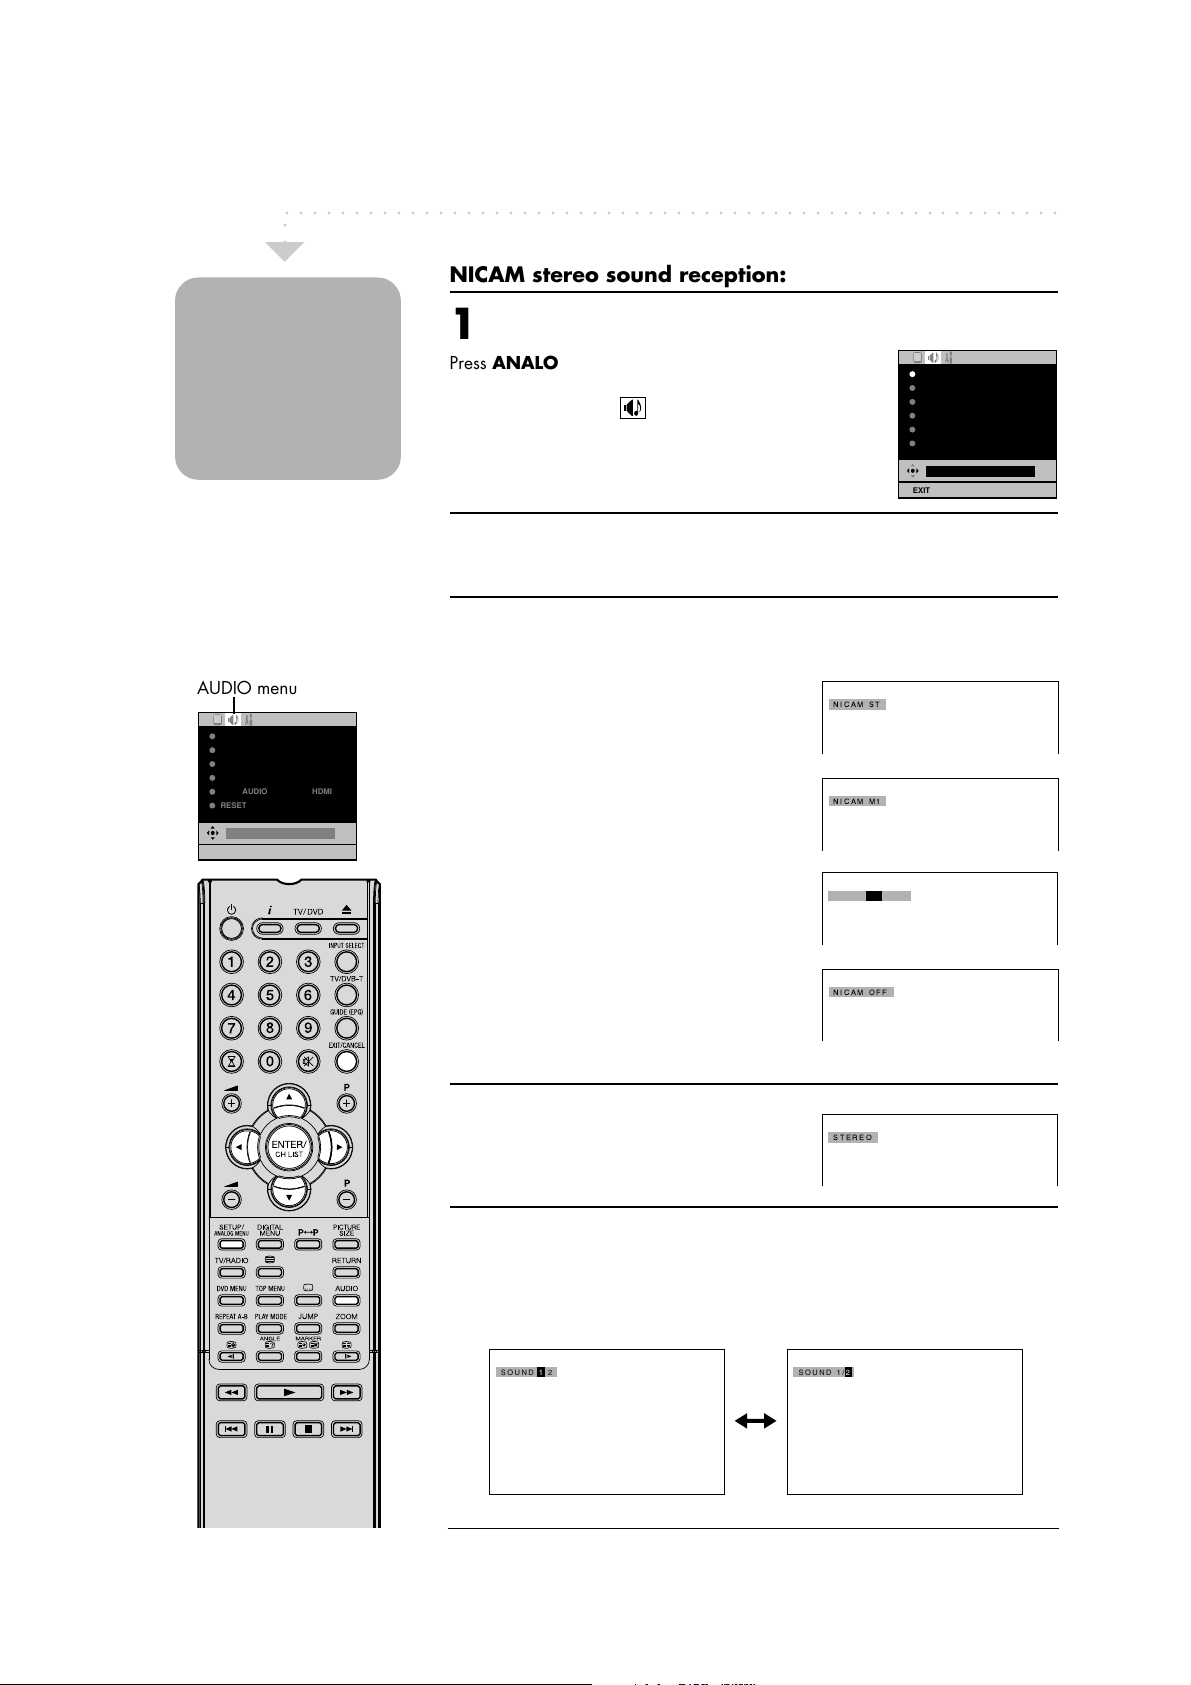
NICAM stereo sound reception:
The built-in tuner can
receive and distinguish
NICAM Stereo
broadcasts
automatically,
provided the NICAM
setting in the menu is
set to ‘AUTO’.
Note:
• Sometimes if reception is
poor, the NICAM stereo
sound may not be received
correctly. In case of 2
channel sound reception,
you can select the desired
sound with AUDIO.
1
Press ANALOG MENU, the menu will appear on the
screen.
Press B or A to select
(AUDIO) menu.
Press C or D to select NICAM, then press ENTER.
Press B or A to select AUTO or OFF.
Select OFF if you want to revert to standard mono FM
audio reception.
2
Press EXIT to return to the normal screen.
When NICAM reception is available, one of the
following indications will be displayed.
NICAM AUTO
BASS 25
TREBLE 25
BALANCE 0
HDMI AUDIO HDMI
RESET
AUTO
EXIT : END MENU: RETURN
AUDIO menu
NICAM AUTO
BASS 25
TREBLE 25
BALANCE 0
HDMI AUDIO HDMI
RESET
EXIT : END MENU: RETURN
‘NICAM ST’ illuminates for approx. 4 seconds
when a NICAM STEREO broadcast signal is
NICAM ST
received.
‘NICAM M1’ illuminates for approx. 4 seconds
when a NICAM MONO A broadcast signal is
NICAM M1
received.
‘NICAM M1/M2’ illuminates for approx. 4
seconds when a NICAM MONO A and
NICAM M1 / M2
MONO B broadcast signal is received.
This will be displayed for approx. 4 seconds
when ‘NICAM OFF’ is selected in the menu
NICAM OFF
screen.
Stereo reception
‘STEREO’ illuminates for approx. 4 seconds
when a STEREO broadcast signal is received.
STEREO
Adjusting the Nicam stereo sound
Pressing AUDIO alternates between the two different audio channels (when
applicable).
16
NICAM 2-channel sound reception
SOUND 1 2
SOUND 1/2
 Loading...