

Page 1

Important Safety In struction s
1. Read these instructions.
2. Keep these instructions.
3. Heed all warnings.
4. Follow all instructions.
5. Do not use this apparatus near water.
6. Clea n only with dry cloth.
7. Do not block any ventilation openings. Install in accorda nce with
the instructions.
8. Do not install near any heat sources such as radiators,
heat registers, stoves or other apparatus ( including amplifiers )
that produce heat.
9. Do not defect the safety purpose of the polarized or
grounding-type plug. A polarized plug has two blades with one
wider than the other. A grounding type plug has two blades and
a third grounding prong. The wide blade or the third prong are
provided for your safety. If the provided plug does not fit into
your outlet, consult an electrician for replacement of the obsolete
outlet – USA version only.
10. Protect the power cord from being walked on or pinched
particularly at plug, convenience recepta cle s, and the point
where they exit from the apparatus.
11. Only use attachments/acce ssorie s specified by
the manufacturer.
1
Page 2

12. Use only with the cart, stand, tripod, bracket, or table specified
by the manufacturer, or sold with the apparatus. When a cart
is used, use caution when moving the cart/apparatus
combination to avoid injury from tip-over.
13. Unplug this apparatus during lightning storms or when unused
for long periods of time.
14. Refer all servicing to qualified service personnel. Servicing is
required when the apparatus has been damaged in any way,
such as power-supply cord or plug is damaged, liquid has been
spilled or objects have fallen into the apparatus, the apparatus
has been exposed to rain or moisture, does not operate
normally, or has been dropped.
15. To reduce the risk of fire or electric shock, Do not expose this
appliance to Rain or Moisture.
16. The Shock Hazard Marking and Associated Graphical Symbol
is provided on the bottom panel of unit.
17. Apparatus shall not be exposed to dri pping or splashing and no
objects filled with liquids, shall be placed on the apparatus.
18. For outdoors use, to avoid electric shock, use battery only
during a raining day or the weather is wet.
19. The power plug should be close to the radio, and easy to be
approached that during the emergency, to disconnect the
power from the radio, just unplug the power plug from the
AC power slot.
20. Notice:
The cha nge s or modifications not expressly approved by the
party responsible for compliance could void the user’s authority
to operate the equipment.
GB
2
Page 3
3
Page 4
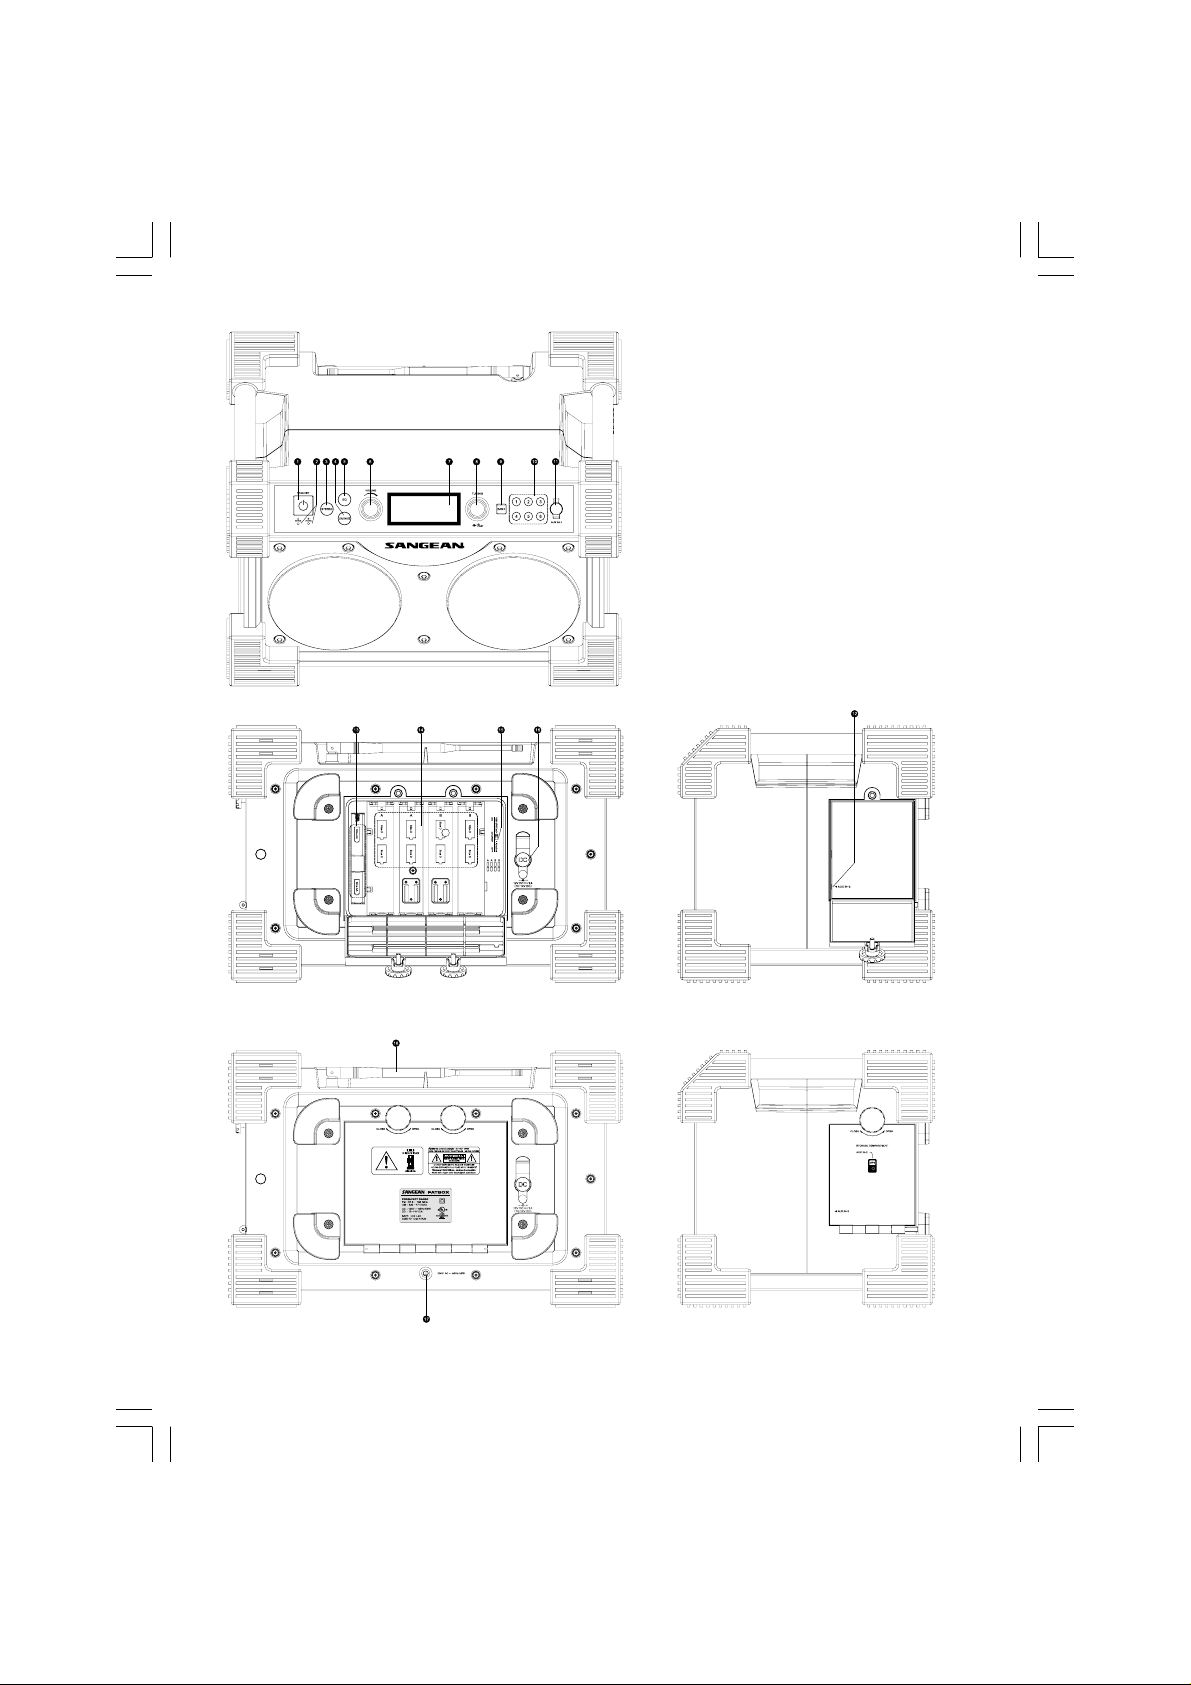
Controls
1
Power On/Off
2
Charge LEDS
3
Stereo/Mono switch
4
EQ ( Equalizer )
5
Loudness On/Off
6
Volume Control
7
LCD display
8
Tuning Control/Time Set
9
Band Selection
10
Preset Stations
11
Aux In 1 socket
12
Aux In 2 socket/MP3 player compartment
13
Back up battery compartment
14
Main battery compartment
15
Alk aline/NiMH/NiCad Rechargeable battery switch
16
10-14V DC In socket
17
Power cord
18
FM rubber antenna
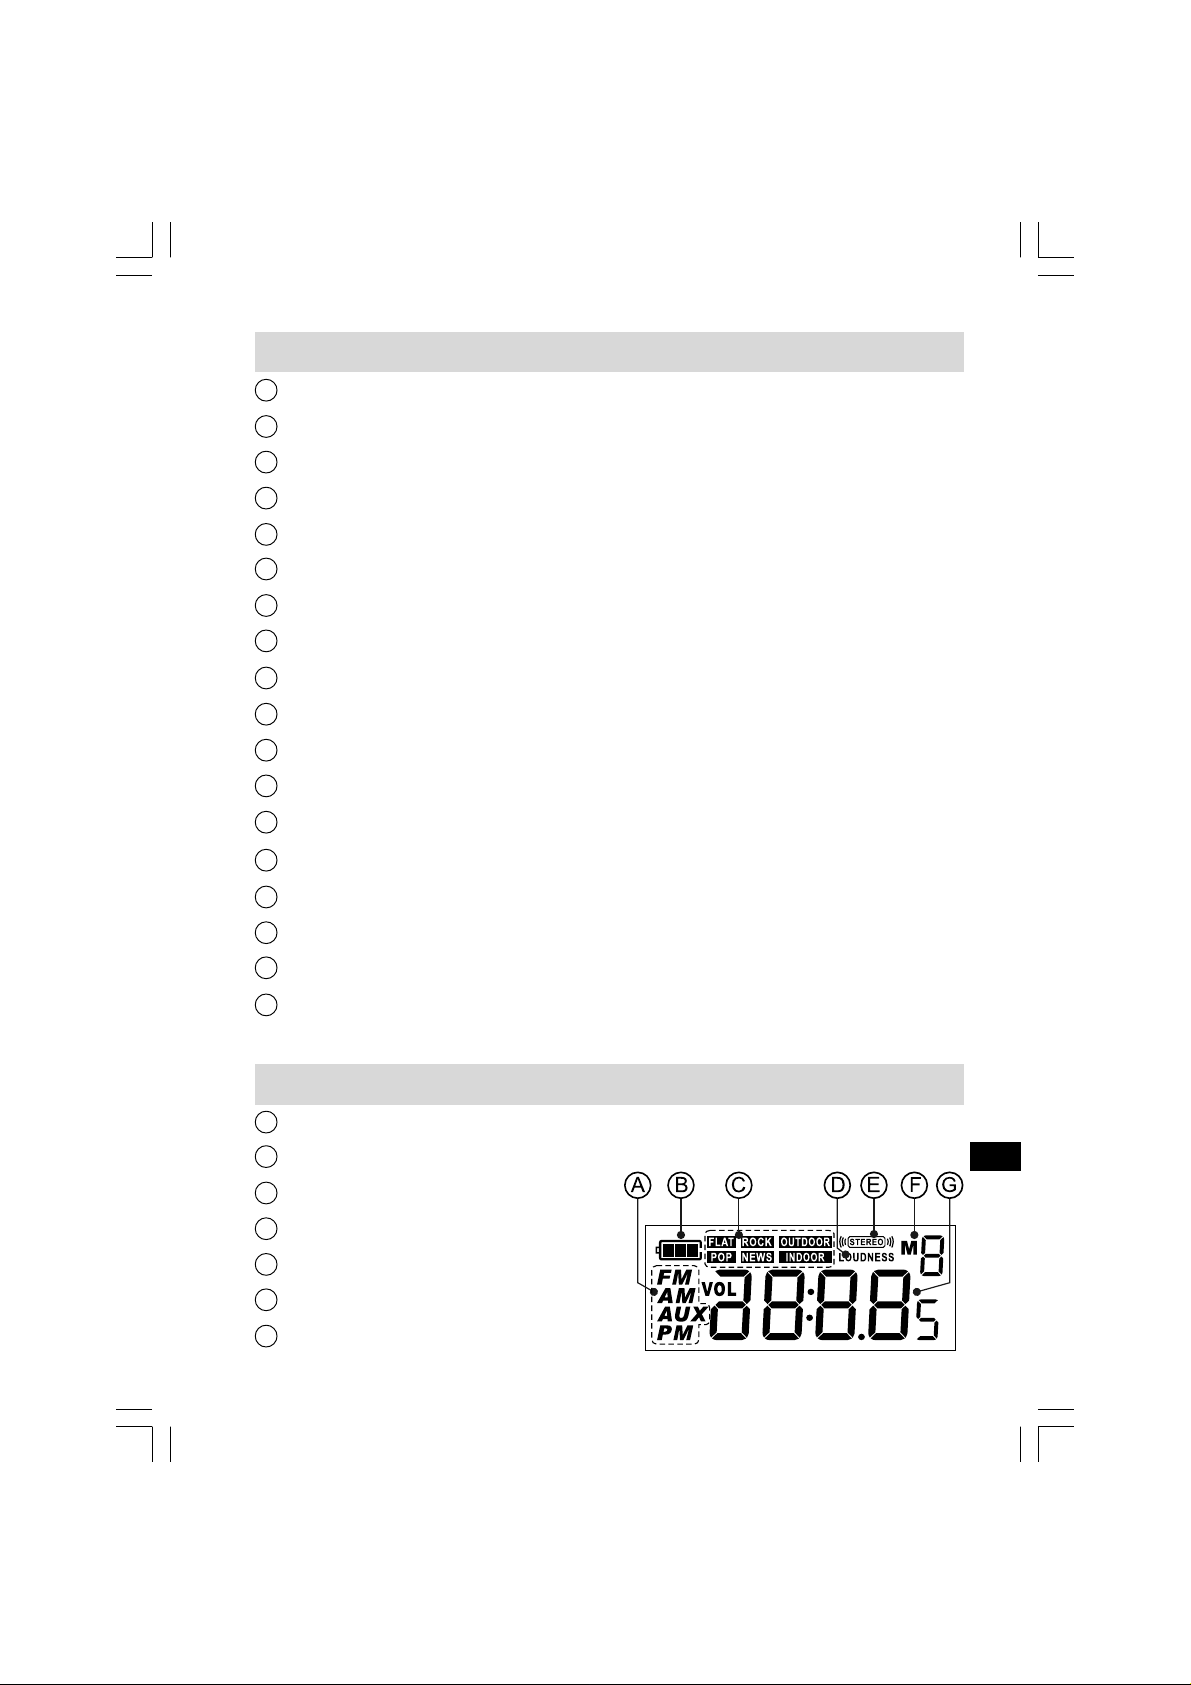
LCD Display
A
Band Indicator and AM/PM
B
Battery power
C
EQ indicator
D
Loudness On
E
Stereo
F
Memory preset
G
Time and Frequency
GB
4
Page 5

Power the radio
A. Battery operation
1. Installing the batteries, first turn battery cover fixtures
anti-clockwise to loosen and pull down the battery cover.
Note:
Before you insert the batteries, if you use non-rechargeable
batteries, make sure the NiMH/NiCad/Alkaline switch which located
inside the battery compartment is switched to Alkaline position.
If you use rechargeable batteries, make sure to switch
NiMH/NiCad/Alkaline switch to NiMH/NiCad position.
2. Insert 8 x D size ( UM-1 ) battery into the compartment.
Ensure the battery is inserted in accordance with the
diagram shown.
3. Insert x 2 AA size ( UM-3 ) battery into the back up
battery compartment.
Note:
The back up battery is for time and memory station back up during
power failure. It is suggested to replace the back up battery every
six months to avoid battery leak age.
Run time of the radio on batterie s varie s strongly depending on
the quality and capacity (mAh) of the batteries, temperature,
volume level etc.
5
Page 6

4. Close the battery cover and fasten the fixture by turning
clockwise.
If the radio is not to be used for any extended period of time, it is
recommended that the batteries are removed from the radio.
Reduced power, distortion and a “ stuttering sound “ or low battery
sign is fla shing on the display are all signs that the batteries
need replacing or re charging ( see below Charging the batterie s ).
GB
6
Page 7

B. AC operation
Before plug the AC power cord into the AC socket, be sure the
voltage is correct. If you have batteries in the radio and connect the
AC power cord into the AC socket, the batteries will automatically
be disconnected.
Charging the batteries
Reduced power, distortion and a “ stuttering sound “ or low battery
sign “ “ is flashing on the display are all the signs that the
batteries need to be recharged if you use rechargeable batteries to
power the radio.
Note:
The batteries can be charged only when the radio is off.
Connect the AC power cord into the AC socket to charge
the batteries. Be sure the battery type switch is set to NiNH/NiCad
Rechargeable position.
Battery charging function of this radio only applies to the 8 D-size
( UM-1 ) batteries and not to the AA-size ( UM-3 ) back-up
batteries.
When the batteries are being charged, the red Charge LED A and
B will be on. LED A and B will turn into green when the batteries of
charge group A or B are fully charged. Charge until both LED A and
B are green.
Charging time ca n take up to approx. 10 hours de pending on
capacity of the rechargeable batteries.
7
Page 8

Charge new batteries fully the first time before first use.
This can take longer depending on the capacity of the
rechargeable batteries.
Do not use a mix of old and new rechargeable batteries.
Do not use a mix of full and empty rechargeable batteries.
Do not use batteries that have a different mAh capacity.
Do not use damaged or leaking batteries.
Charge the batteries in car
The batteries can also be charged in the radio using a 12V car
( cigarette lighter ) UL listed adaptor, voltage range 10V-14V,
maximum current of 2.5 A, DC dimension 2.0 mm inner di ameter
with positive pole and 6.3mm outer diameter with negative pole.
To charge, connect the adaptor to the car ( cigarette lighter )
socket and DC IN socket located on the back of the radio.
Setting the clock
The clock can be set e ither when the radio is on or off.
Press in the T uning Control/T i me set knob until display Hour digit
fla she s. Rotate Tuning Control/Time set knob to sele ct required
hour time then press the Tuning control knob again to confirm hour
set. The minute digit will flash, rotate Tuning Control/T i me set knob
to select required minute time then press the Tuning control knob
again to confirm minute set. Display will show clock time when time
set is completed.
GB
8
Page 9

Radio Operation
1. Press the Power button to turn on the radio.
2. Select the required waveband by pre ssing the Band button.
3. Stand up the FM rubber antenna properly to get best reception.
For AM ( MW ) band, rotate the radio to get best signal.
4. Rotate the Tuning Control knob will change the frequency in the
following increments.
FM: 50 or 100 kHz
AM ( MW ): 9 or 10 kHz
5. Select required EQ a nd stereo/mono mode.
6. Rotate the volume control to get required sound level.
7. To turn off the radio, press the Power button.
Display will show OFF.
Memory pre set stations
There are 6 memory presets f or each waveband. Storing station s
in preset memories, follow below steps.
1. Press the Power button to turn on the radio.
2. Tune to required station pressing Band button and rotate
Tuning Control.
3. Press and hold down the required pre set until the display M
stop flashing. The preset number will appear in the display
together with M and the station will be stored under chosen
preset button.
4. Repeat this procedure for the remaining presets.
5. Stations stored in preset memories can be over written by
following above procedures.
9
Page 10

Recall stations from preset memories
1. Press the Power button to turn on the radio.
2. Select the required waveband.
3. Momentarily press the required Preset button, the preset
number and M also station frequency will appear in the display.
Display backlight
Press any button exce pt Power button will illuminate the LCD
display for approx. 15 seconds.
Changing tuning ste p
Tuning step on some countrie s are dif ferent from where you
purcha se the radio. If you buy the radio in Europe and intend to use
in Northern America or some Latin America n countries, you may
have to adjust tuning step so the radio may continue to serve
you well.
While radio is switched off, long press the Band button for approx.
5 seconds until display flashes current FM tuning step 50 ( kHz ).
Rotate the Tuning Control knob, you may a djust to 100 ( kHz ).
Press Ba nd button again to confirm the tuning step change.
Same procedures as above to change AM ( MW ) tuning step.
GB
10
Page 11

24H/12H format
After tuning step change is completed, display will show 12H or
24H for current hour format. Rotate Tuning Control knob to change
time format and press band button again to complete hour
format cha nge.
Aux In socket
There are 2 Aux In sockets in this radio to connect audio sources
like MP 3 player or CD walkman to listen the audio program via the
speakers of this radio.
Aux In-1 is located on the front panel while Aux In-2 is located
inside the MP3 compartment.
Remove the rubber cover ( Aux In – 1 ) conne ct the audio source
with a 3.5 mm audio connector wire.
Turn MP 3 compartment cover f ixture anti-clockwise to loosen and
pull down to cover to find Aux In- 2 socket, connect the audio
source with a 3.5 mm audio connector wire.
When radio is on, repeatedly press and release Band button to
select AU 1 ( Aux In – 1 ) or AU 2 ( Aux In – 2 ), rotate the Volume
Control to play the audio program.
11
Page 12

Equalizer function ( EQ )
The sound on your radio can be a djusted to suit your person al
taste for the songs you are listening to. It has six preset
equalizer modes.
Press the EQ button to cycle through the various modes.
a. Flat – no tone modification is applied
b. Rock
c. Outdoor
d. Pop
e. News
f. Indoor
Stereo/Mono button
The STEREO button is to switch Stereo/Mono mode. When FM
signal is wea k, some hiss may be audible. To reduce the hiss,
press STEREO button to switch to Mono mode. Display stereo
symbol will disappear.
The STEREO button is active only in FM waveband.
Loudness On/Off
Loudness button is to get enhanced bass, display will appe ar
LOUDNESS when Loudness function is a pplied.
GB
12
Page 13

Specifications
Frequency Coverage:
FM 87.50 – 108 MHz
AM ( MW ) 520 – 1710 kHz ( 10 kHz )
522 – 1629 kHz ( 9 kHz )
AC Power:
AC 120V/60Hz/50 W ( USA )
AC 230V/50Hz/50 W ( Europe )
Batteries:
ALKALINE battery
8 X D size(UM-1)for main battery
2 X AA size(UM-3)for backup battery
Rechargeable battery
Ni-MH or Ni-cd 8 X D size;
Rated Capacity 9000mAH (MFG.: GP, Model: GP900DH)
Output Power:
5 Watt 10% T.H.D. x 2 channels @ 1 kHz @ DC battery 12V
7 Watt 10% T.H.D. x 2 channels @ 1 kHz @ AC 230V or 120V
13
Page 14

14
 Loading...