

Sangean DT-F1/V Operating Instruction
DT-F1/V
Operating instruction
Mode d’emplo i
Instruccions de manejo
Gebruiksaanwijzin g
Bedienungsanleitung
GB
F
E
NL
D
1
2
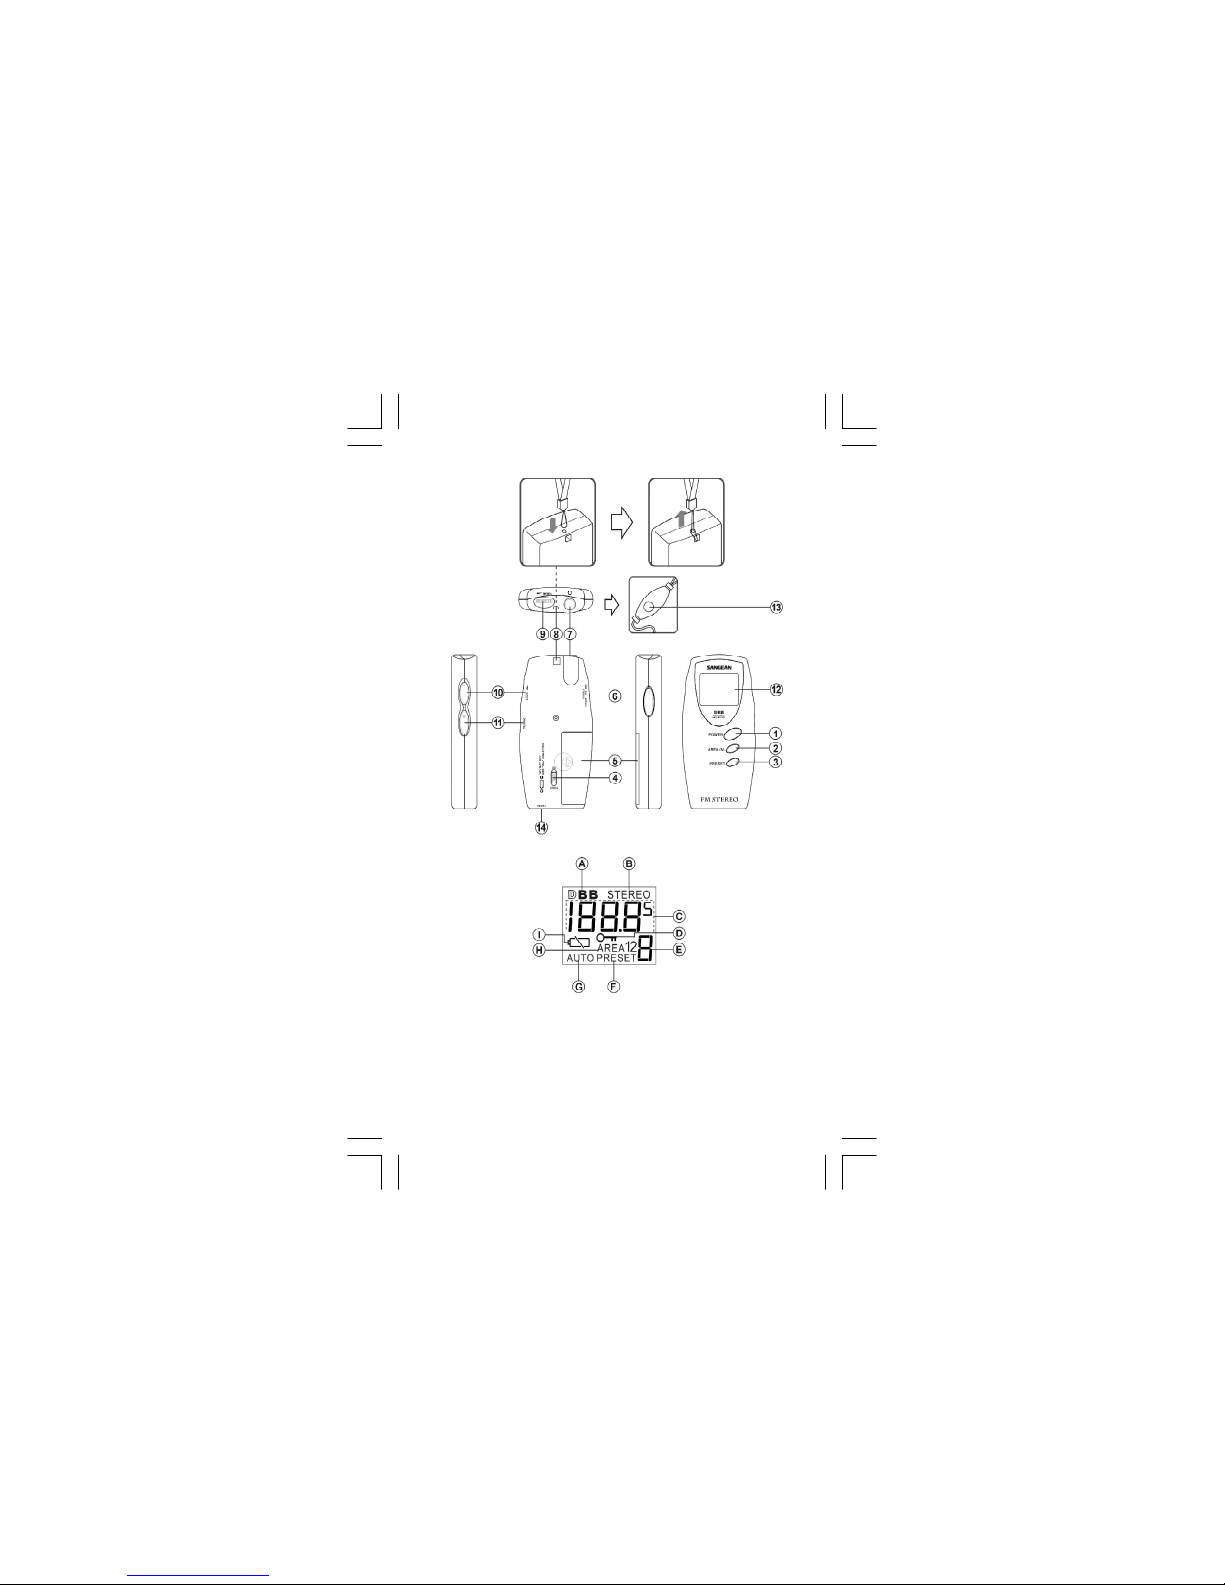
Controls
Power button (also as FM/TV band selector
on DT-F1 V)
Memory and preset area selection button
Preset button
DX/Local selection switch
Battery compartment
Stereo/mono/DBB selection switch
Earphones Jack Neck str ap holder
Volume control Lock switch
Tuning UP/DOWN Display
Remote control on Pre set up and Power
on/off ( located on the supplied earphones )
RESET button
Display
DBB indicator (Dynamic Bass Booster)
Stereo indicator Frequenc y display
Lock indic ator
Memory preset indicator
Preset Auto preset
Preset area Low battery indicator
1
2
3
5
7
9
11
13
14
4
6
8
10
12
A
C
H
G
E
F
B
D
I
GB

Batteries
Open the battery cover located on th e rear of
the set by sliding it in the dir ection shown by
the mark. Insert one AAA (UM-4) size battery
into the compar tment. Ensure that battery is
inserted in accordance with the diagra m
shown alongside the battery
indicator .
Note: Battery should be replaced when the
low batter y indicator appears in
the display.
During battery replacement ensure that the
radio is turned off and the Lock switch is in
the lock position, this will prevent loss of
memory presets during battery replacement.
Battery replacement should be completed
within one minute to prevent loss of stations
stored in memory presets.
If the radio is not to be used for long period,
set the Lock switch to Lock position, this will
reduce power drain on the batteries during
storage.
3

Lock switch
The Lock switch is used to prevent
unintentional operation o f the radio.
Set the Lock switc h located on the right side
of the radio to the Lock position. The power
and all other buttons will be disabled, this will
prevent acciden tal operation when the radio
is packed in a suitcase or travel bag.
To prevent accide ntal operation of the
controls when the radio is switched on, set
the Lock s witch to the Lock position, the
symbol will appear in the display. To release
the Lock switch, move the lock switch to the
down (unlock) position, the symbol will
be removed from the display.
Earphones
Plug the earphones supplied into the
earphones ja ck located on the top of the
radio .
4
GB

5
Antenna
The lead connecting earphones to the set
also acts as a n FM antenna when plugged
into the earphone s jack. The lead should be
extended as much as possible to increa se
the reception.
Radio Operation
Auto Preset
When the battery is inserted into the battery
compartment for the first time, with
earphones plugged in, the radio will quickly
and automatically set all your memory based
upon the signal strength of the incoming
stations, display will flash AUTO PRESET.
Among the many convenien ces offered by
this feature, it is especially useful for the
traveler who can automatically find all the
local stations in any strange city he may
travel to. The radio will turn off automatically
after Auto Preset is done. Up to 9 stations
can be stored on Preset area 1.

6
You may also activate the Auto Preset
anytime when the radio is turned on by
pressing tuning Up/Down buttons at the
sa me time for more than 2.5 seconds.
Note: Activating the Auto Preset function will
overwrite any stations previously
s tored in the memory presets.
Turn on the radio
Turn on the radio by pressing the Power
button for more than 0.7 second. Or press
the remote button on the supplied earphones
for more tha n 1.5 second to turn the radio on.
Note: for DT-F1V Northern America, after
turning on the radio to select the FM or
TV band by pressing the power button
again for less than 0.7 s econd,
pressing the power button for more
than 0.7 second will turn off the radio.
Turn off the radio
Turn off the radio by pressing the Power
button for more than 0.7 second when radio
is on or press the earphones remote button
for more than 1.5 secon d to turn the radio off.
GB

Scan tuning
Turn on the radio, press and hold down the
Tuning up or Tuning down button for more
than half a second a nd release the button to
commence scan tuning. The radio will scan
and stop automatically when a station is
fou nd.
Press and hold down either the Tuning up or
tuning down buttons for more than half a
second to resume scan tuning.
M anual tuning
Turn on the radio by pressing the Power
button for more than 0.7 second. The desired
station may be selected by repeatedly
pressing the Tuni ng up or Tuning down
button until station of your choice is reached.
7

Storing s tations in preset memory
There are 9 preset memories each on are a 1
and area 2 (like page 1 a nd page 2 on some
of car stereo receivers) in total 18 preset
memories for this radio.
Turn on the radio, tune to the desired
stations using sca n and manual tuning as
previously described. Press the Memory
button (AREA/M.) 2, the display will flash
Preset, press PRESET button 3 to select
memory position then press AREA/M again
to complete the memor y preset.
To change PRESET area from area 1 to area
2 a nd vice versa, press AREA/M for more
than 3 seconds, display AREA will flash the
change, continue pressing for a nother 2
seconds until flash stops. The Preset area
now is changed (from Area 1 to Area 2 and
vice versa).
GB
8

9
Recalling the stations from
preset memo ries
Turn on the radio, press PRESET button to
select the required preset memory stations.
Sa me way to change PRESET area as
described above on storing stations in preset
memories.
Pressing remote control button on the
supplied earphones for less than 1.5 seconds
can also recall the preset stations.
(Note: pressing remote control button more
than 1.5 second will turn off the radio)
Mono/Stereo/DBB(Dynamic
Bass Boost) switch
If the station be ing received is weak some
hiss may be audible, to reduce the his s,
switch the button to mono mode, the stereo
indicator will be removed from the display.
Setting the switch to DBB will enhance bass
sounds, display will show both DBB and
STEREO. However both AM (MW) and TV
sound (DT-F1V only) are mono, display won’t
show STEREO.

GB
10
Auto power off
In order to save battery power, the radio is
designed to automatically switch off after 90
minutes of use. Disconnect the earphones
from earphones jack for more 10 seconds will
also turn off the power automatically.
DX/Local switch
When you listen to a strong station and the
signal is slightly distorted, set the s witch to
the LOCAL position for best reception. For
normal or weak stations, set the switch to
the DX position for maximum sensitivity.

11
RESET button
If the radio fails to operate correctly, or some
digits on the display are missing or
incomplete, carry out the following
procedures .
1. Switch off the radio and remove the
batter ies.
2. With the aid of a suitable implement (the
end of a paper clip or pen). Press the
RESET button located in the bottom of
the radio for at least 5 seconds, this will
reset the microprocessor and clear all
stations s tored in the preset memories.
Sp ecifications
Battery: 1 x AAA (LR03,UM-4)
Battery life:
Approx. 30 hours using alkaline batteries
Frequen cy coverage:
FM 87.50 - 108 MHz
TV 2 - 13 channels (DT-F1V only)
Output Power: 0.5 mW
Earphones Jack: 3.5 mm dia (stereo)
The company reserves the right to amend the
specifications without notic e.

12

13
Emp lacement des organes de
commande
Touche Marche/Arrêt (sertégalement de
sélecteur de gammes FM/TV sur DT-F1V)
Sélecteur de présélections et de mise en
mémoire
Touche de pré sélection
Sélecteur DX/Local
Compartiment à piles
Sélecteur Stéréo/mono/DBB
Co nnecteur pour écouteurs
Agrafe pour cordeli ère
Réglage du vo lume sonore
Touche de ve rrouillage
Accord CROISSANT/DÉCROISSANT
Écran d’affichage
Télécommande pour la touche des
présélections croissantes et la touche
Marche/Arrêt (située sur les écouteurs
fournis avec l’appareil)
Bouton DE REMISE À ZÉ RO
1
2
3
5
7
9
11
13
14
4
6
8
10
12

F
14
Écran d’affichage
Indicateur DBB (Dyna mic Bass Booster
= amplification des grave s)
Indicateur sté réo
Affichage des fréquences
Indicateur de verroui llage des touches
Indicateur de la présélection choisie
Touche de pré sélection
Présélection automatique
Zone de présélection
Indicateur de pile déchargée
A
H
E
F
B
D
C
G
I

15
Piles
Ouvrir le compartiment à pile qu i se trouve au
dos de l’appareil en faisant glisser le
couvercle dan s le sens de la flèche. Mettre
une pile AAA/UM-4 dans le compartiment à
pile. Veiller à bien installer la pile suivant le
diagramme indiqué à l’intérieur du
compartiment.
Remarq ue:
Quand l’indicateur de pile déchargée
a pparaît à l’affichage, il y a lieu d’en mettre
une neuve.
Pendant le changement de la pile, s’assurer
que la radio est arrêté e et que l’interrupteur
de verrouillage est bien mis en position de
verrouillag e ce qui permet d’é viter la perte de
présélections mises en mémoire. Pouréviter
la perte de présélections, le change ment de
la pile d evrait être effectué dans un laps de
temps maximum de 1 minute.

F
16
Quand la radio ne doit pas être utilisée
pendant un certain temps, il est recommandé
de mettre l’interrupteur de verrouillage en
position de verro uillage afin de réduire la
consommation de courant en provenance de
la pile penda nt la période d’inutilisation.
In terrupteur de verrouillage
L’interrupteu r de verrouillage sert
à empê cher la commande accidentelle
d’une fonction de la radio.
Mettre l ’interrupteur de verrouillage se
trouvant sur le côté droit de la radio en
position d e verrouillage. L’alimentation en
courant est coupée et toutes les autres
commandes sont désactivées, ce qui permet
de prévenir un fon ctionnement accidentel de
la radio quand l’a ppareil est mis dans une
valise ou un sa c de voyage.
Pour prévenir l a commande accidentelle
d’une des fonctions pendant que la ra dio est
en marche, mettre l’interrupteur de
verrouilla ge en position de verrouillage, le
symbole apparaît à l’affichage. Pour
désactiver le verrouillage, faire glisser
l’interrupteur vers le bas (déverrouillé) et le
symbole disparaît à l’affichage.

17
Écouteurs
Brancher les écouteurs fou rnis dans le
connecteur qui se trouve sur le sommet de la
radio .
Antenne
Le fil de raccordement des écouteurs à la
radio sert également d’antenne FM quand il
est branché dans le connecteur pour le s
écouteurs. Le fil devrait ê tre déroulé le plus
possible pour améliorer la réception de
manière optimale.
UTILISATION DE LA RADIO

F
18
Présélection aut omatique
Quand une pile est mise pour la première fois
dans le compartiment à pile et que les
écouteurs sont bra nchés, la radio va mettre
automatiquement en mémoire des stations
présélectionnées sur la ba se de la force du
signal émis par les stations, l’indication
AUTO PRESET (présélection automatique)
va se mettre à clignoter à l’affichage. Cette
caracté ristique présente bien des avantages,
et son utilité principale pour le voyageur,
c’est qu’au cours de son voyage il peut
trouver automatiquement les stations locales
chaque fois qu’il se trouve dans un nouvel
endroit. La radio va s’éteindre dès que la
présélection automatique e st terminée.
Jusqu’à neuf stations peu vent
ê tre mises en mé moire dans la zone de
présélection 1.

19
On peut également activer la présélection
automatique à n’importe quel moment quand
la radio marche en a ppuyant en même temps
sur les touches d’accord croissant/
décroissant pendant plus des. 5 secondes
Remarq ue:
Quand on active la présélection au tomatique,
toutes les autres stations accordées
préalablement dans les présélections sont
effacées et remplacées.
Allumer la radio
Pour allumer la radio, appuyer sur la touche
Marche/Arrê t pendant plus de 0,7 seconde
ou appuyer pendant plus de 1,5 seconde sur
la touche télécommande qui se trouve sur les
écouteurs fourni s.
REMARQUE: pour DT-F1V en Amé rique du
Nord: après avoi r allumé la radio, appuyer de
nouveau sur la touche M arche/Arrêt pendant
moins de 0,7 seconde pour sé lectionner la
ga mme FM ou TV. Quand on appuie sur la
touche Marche/Arrê t pendant plus de 0.7
seconde, la radio s’éteint.

F
20
Éteindre la radio
Pour éteindre la radio, appuyer sur la touche
Marche/Arrêt pendant plus de 0,7 seconde,
quand la radio est allumée, ou appuyer sur la
touche télécommande pendant plus de 1, 5
seconde.
Accord par balayage
Allumer la radio, appuyer sur la touche
d’accord croissant o u décroissant pendant
plus d’une demi-seconde et relâ cher la
touche pour commencer le balayage des
fréquences. La radio va se mettre à chercher
et s’arrê ter automatiquement quand une
station est trouvée.
Accord manuel
Allumer la radio en appuyant sur la touche
Marche/Arrê t pendant plus de 0.7 seconde.
La station désirée peut ê tre sélectionnée en
a ppuyant de manière répété e sur la touche
d’accord croissa nt ou décroissant jusqu’à ce
que la station soit atteinte.
 Loading...