

Page 1
DT-F1/DT-F1V
GB
Revision 1
Page 2
1
Page 3
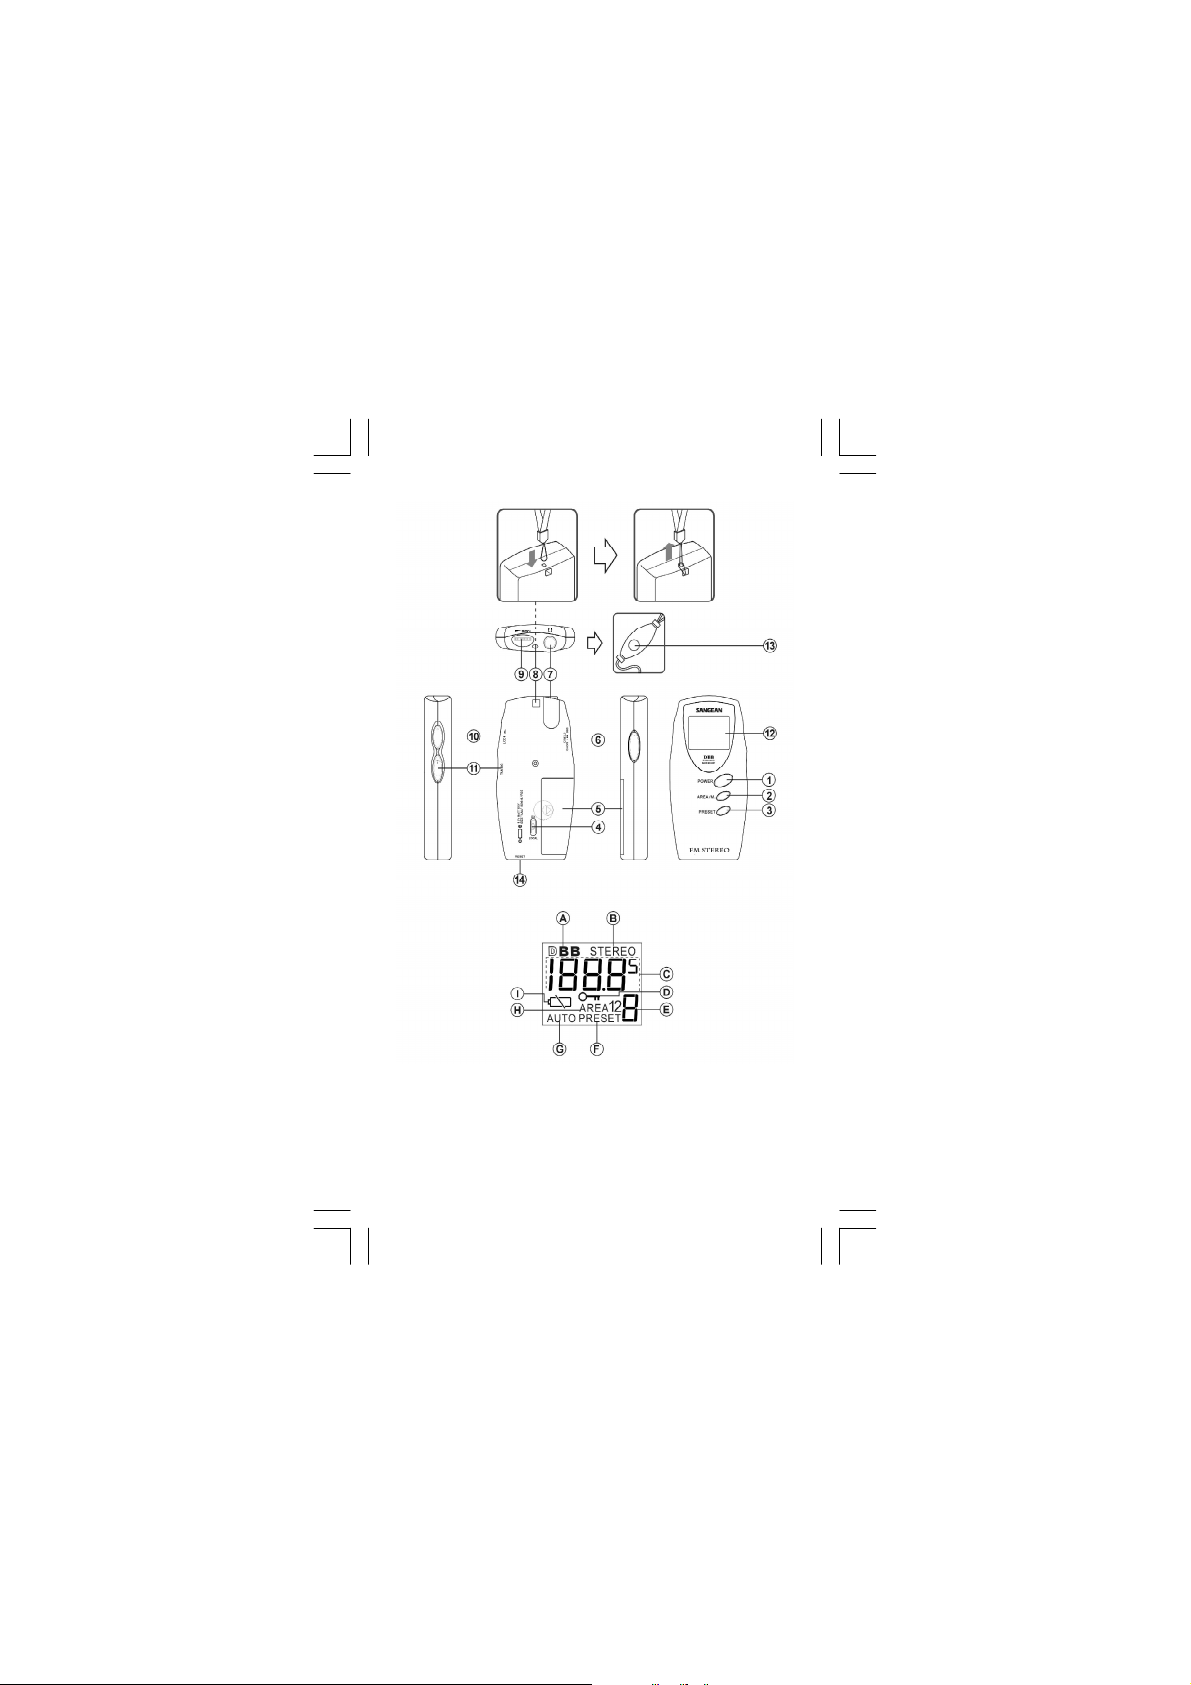
Controls
1
Power button (also as FM/TV band selector
on DT-F1V)
2
Memory and preset area selection button
3
Preset button
4
DX/Local selection switch
5
Battery compartment
6
Stereo/mono/DBB selection switch
7
Earphones Jack Neck strap holder
9
Volume control Lock s witch
11
Tuning UP/DOWN Display
13
Remote control on Preset up and Power
8
10
12
on/off ( located on the supplied earphones )
14
RESET button
Display
A
DBB indicator (Dynamic Bass Booster)
B
Stereo indicator Frequency display
D
Lock indic ator
E
Memory preset indicator
F
Preset Auto preset
H
Preset area Low battery indicator
C
G
I
GB
2
Page 4

Batteries
Open the battery cover located on the rear of
the set by sliding it in the direction shown by
the mark. Insert one AAA (UM-4) size battery
into the compartment. Ensure that battery is
inserted in accordance with the diagram
shown alongside the battery
indicator .
Note: Battery should be replaced when the
low battery indicator appears in
the display.
During battery replacement ensure that the
radio is turned off and the Lock switch is in
the lock position, this will prevent loss of
memory presets during battery replacement.
Battery replacement should be completed
within one minute to prevent loss of stations
stored in memory presets.
If the radio is not to be used for long period,
set the Lock switc h to Lock position, this will
reduce power drain on the batteries during
storage.
3
Page 5

Addendum
GB
Note and Important:
The low battery indicator appears
to remind you to be ready for battery
replacement. The radio can still last for
another 6-10 hours or even more depending
on the types of batteries used, replace the
batteries when the low battery indicator
is flashing.
3-1
Page 6

Lock switch
The Lock switch is used to prevent
unintentional operation of the radio.
Set the Lock switc h located on the right side
of the radio to the Lock position. The power
and all other buttons will be disabled, this will
prevent accidental operation when the radio
is packed in a suitcase or travel bag.
To prevent accidental operation of the
controls when the radio is switched on, set
the Lock s witch to the Lock position, the
symbol will appear in the display. To release
the Lock switch, move the lock switch to the
down (unlock) position, the symbol will
be removed from the display.
Earphones
Plug the earphones supplied into the
earphones jack located on the top of the
radio.
GB
4
Page 7

Antenna
The lead connecting earphones to the set
also acts as an FM antenna when plugged
into the earphones jack. The lead should be
extended as much as possible to increase
the reception.
Radio Operation
Auto Preset
When the battery is inserted into the battery
compartment for the first time, with
earphones plugged in, the radio will quickly
and automatically set all your memory based
upon the signal strength of the incoming
stations, display will flash AUTO PRESET.
Among the many convenience s offered by
this feature, it is especially useful for the
traveler who can automatically find all the
local stations in any strange city he may
travel to. The radio will turn off automatically
after Auto Preset is done. Up to 9 stations
can be stored on Preset area 1.
5
Page 8

You may also activate the Auto Preset
anytime when the radio is turned on by
pressing tuning Up/Down buttons at the
same time for more than 2.5 seconds.
Note: Activating the Auto Preset function will
overwrite any stations previously
s tored in the memor y presets.
Turn on the radio
Turn on the radio by pressi ng the Power
button for more than 0.7 second. Or press
the remote button on the supplied earphones
for more than 1.5 second to turn the radio on.
Note: for DT-F1V Northern America, after
turning on the radio to select the FM or
TV band by pressing the power button
again for less than 0.7 second,
pressing the power button for more
than 0.7 second will turn off the radio.
Turn off the rad io
Turn off the radio by pressing the Po wer
button for more than 0.7 second when radio
is on or press the earphones remote button
for more than 1.5 second to tu rn the radio off.
GB
6
Page 9

Scan tuning
Turn on the radio, press and hold down the
Tuning up or Tuning down button for more
than half a second and relea se the button to
commence scan tuning. The radio will scan
and stop automatically when a station is
found.
Press and hold down either the Tuning up or
tuning down buttons for more than half a
second to resume scan tuning.
Manual tuning
Turn on the radio by pressi ng the Power
button for more than 0.7 second. The desired
station may be selected by repeatedly
pressing the Tuning up or Tuning down
button until station of your choice is reached.
7
Page 10

Storing stations in preset memor y
There are 9 preset memories each on area 1
and area 2 (like page 1 and page 2 on some
of car stereo receivers) in total 18 preset
memories for this radio.
Turn on the radio, tune to the desired
stations using scan and manual tuning as
previously described. Press the Memory
button (AREA/M.) 2, the display will flash
Preset, press PRESET button 3 to select
memory position then press AREA/M again
to complete the memory preset.
To change PRESET area from area 1 to area
2 and vice versa, press AREA/M for more
than 3 seconds, display AREA will flash the
change, continue pressing for another 2
seconds until flash stops. The Preset area
now is changed (from Area 1 to Area 2 and
vice versa).
GB
8
Page 11

Recalling the stations from
preset memories
Turn on the radio, press PRESET button to
select the required preset memory stations.
Same way to change PRESET area as
described above on storing stations in preset
memories.
Pressing remote control button on the
supplied earphones for less than 1.5 seconds
can also recall the preset stations.
(Note: pressing remote control button more
than 1.5 second will turn off the radio)
Mono/Stereo/DBB(Dynamic
Bass Boost) switch
If the station being received is weak some
hiss may be audible, to reduce the hiss,
switch the button to mono mode, the stereo
indicator will be removed from the display.
Setting the switch to DBB will enhance bass
sounds, display will show both DBB and
STEREO. However bo th AM (MW) and TV
sound (DT-F1V only) are mono, display won’t
show STEREO.
9
Page 12

Auto power off
In order to save battery power, the radio is
designed to automatically switch off after 90
minutes of use. Disconnect the earphones
from earphones jack for more 10 seconds will
also turn off the power automatically.
DX/Local switch
When you listen to a strong station and the
signal is slightly distorted, set the switch to
the LOCAL position for best reception. For
normal or weak stations, set the switch to
the DX position for maximum sensitivity.
GB
10
Page 13

RESET button
If the radio fails to operate correctly, or some
digits on the display are missing or
incomplete, carry out the following
procedures .
1. Switch off the radio and remove the
batteries.
2. With the aid of a suitable implement (the
end of a paper clip or pen). Press the
RESET button located in the bottom of
the radio for at least 5 seconds , this will
reset the microprocessor and clear all
stations s tored in the preset memories.
Specifications
Battery: 1 x AAA (LR03,UM-4)
Battery life:
Approx. 30 hours using alkaline batteries
Frequency coverag e:
FM 87.50 - 108 MHz
TV 2 - 13 channels (DT-F1V only)
Output Power: 0.5 mW
Earphones Jack: 3.5 mm dia (stereo)
The company reserves the right to amend the
specifications without notic e.
11
 Loading...