

Page 1
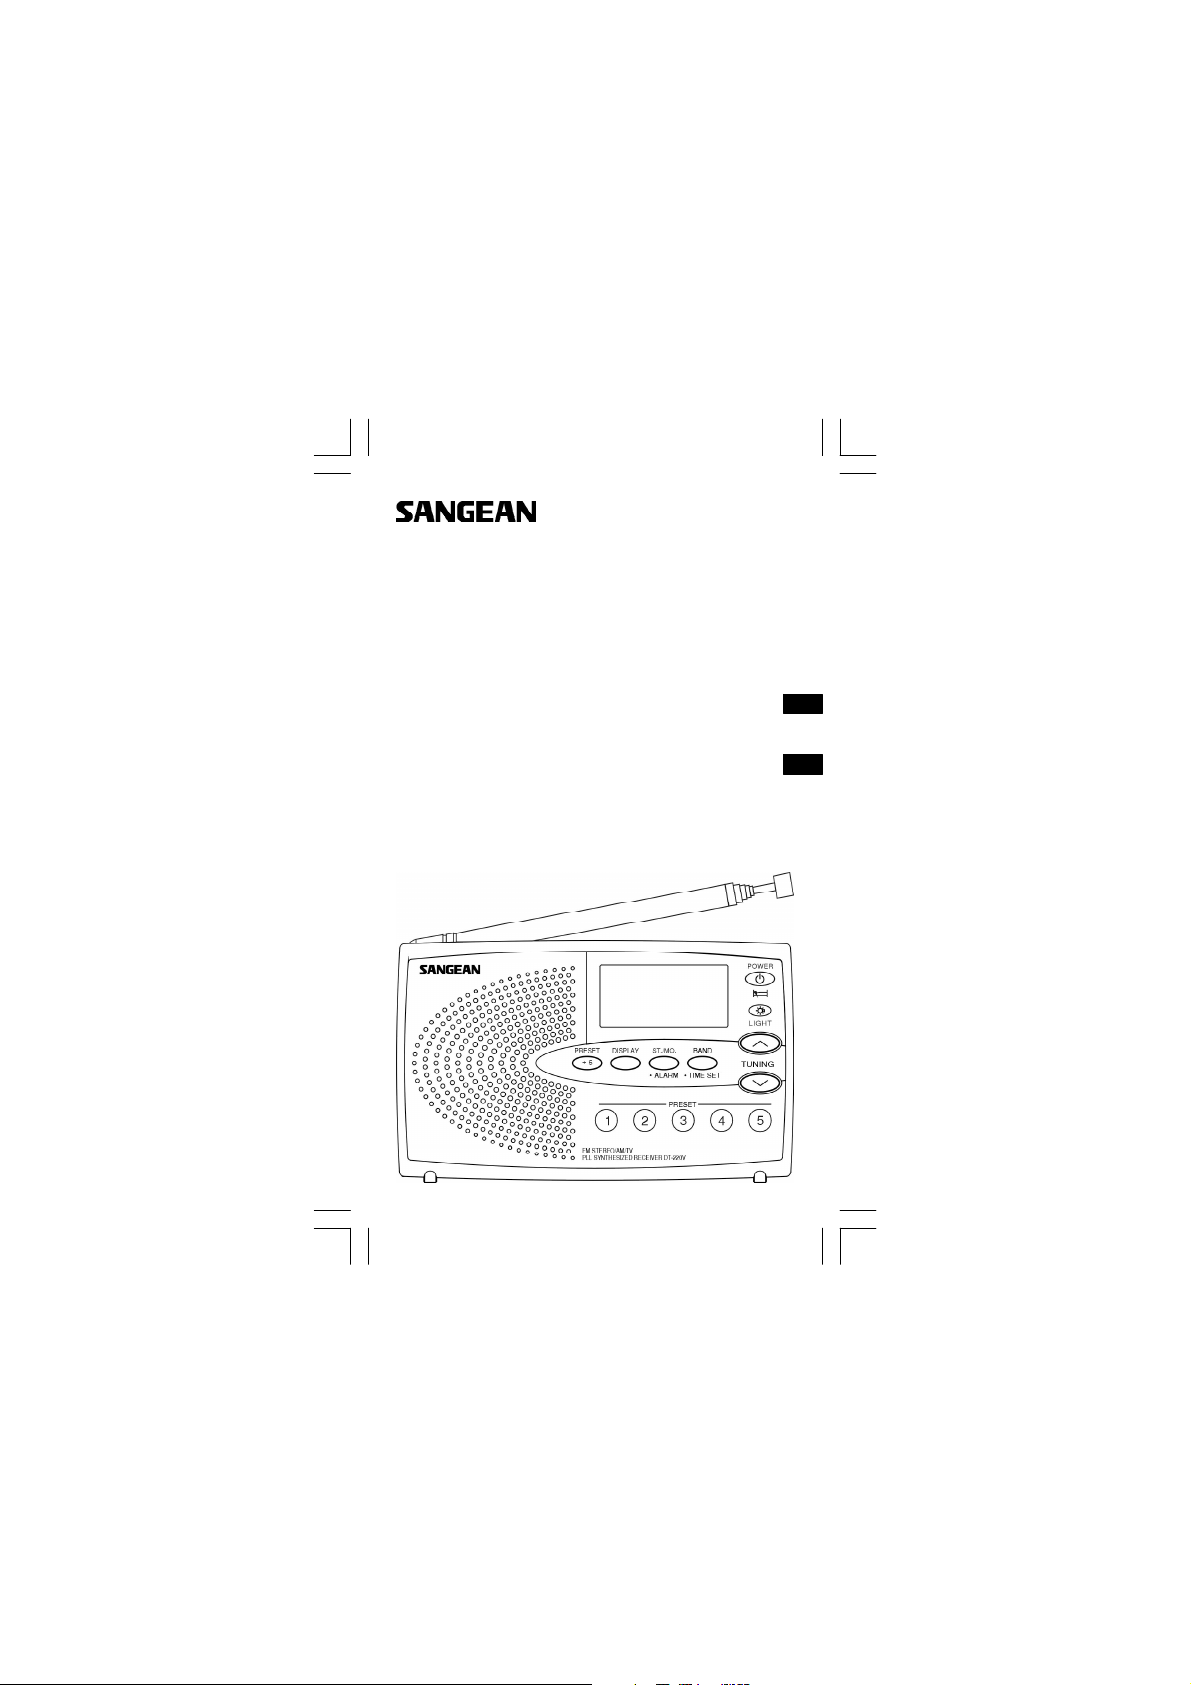
DT-220V
Operating instruction
Instruccions de manejo
GB
E
Page 2
1
Page 3
2
Page 4
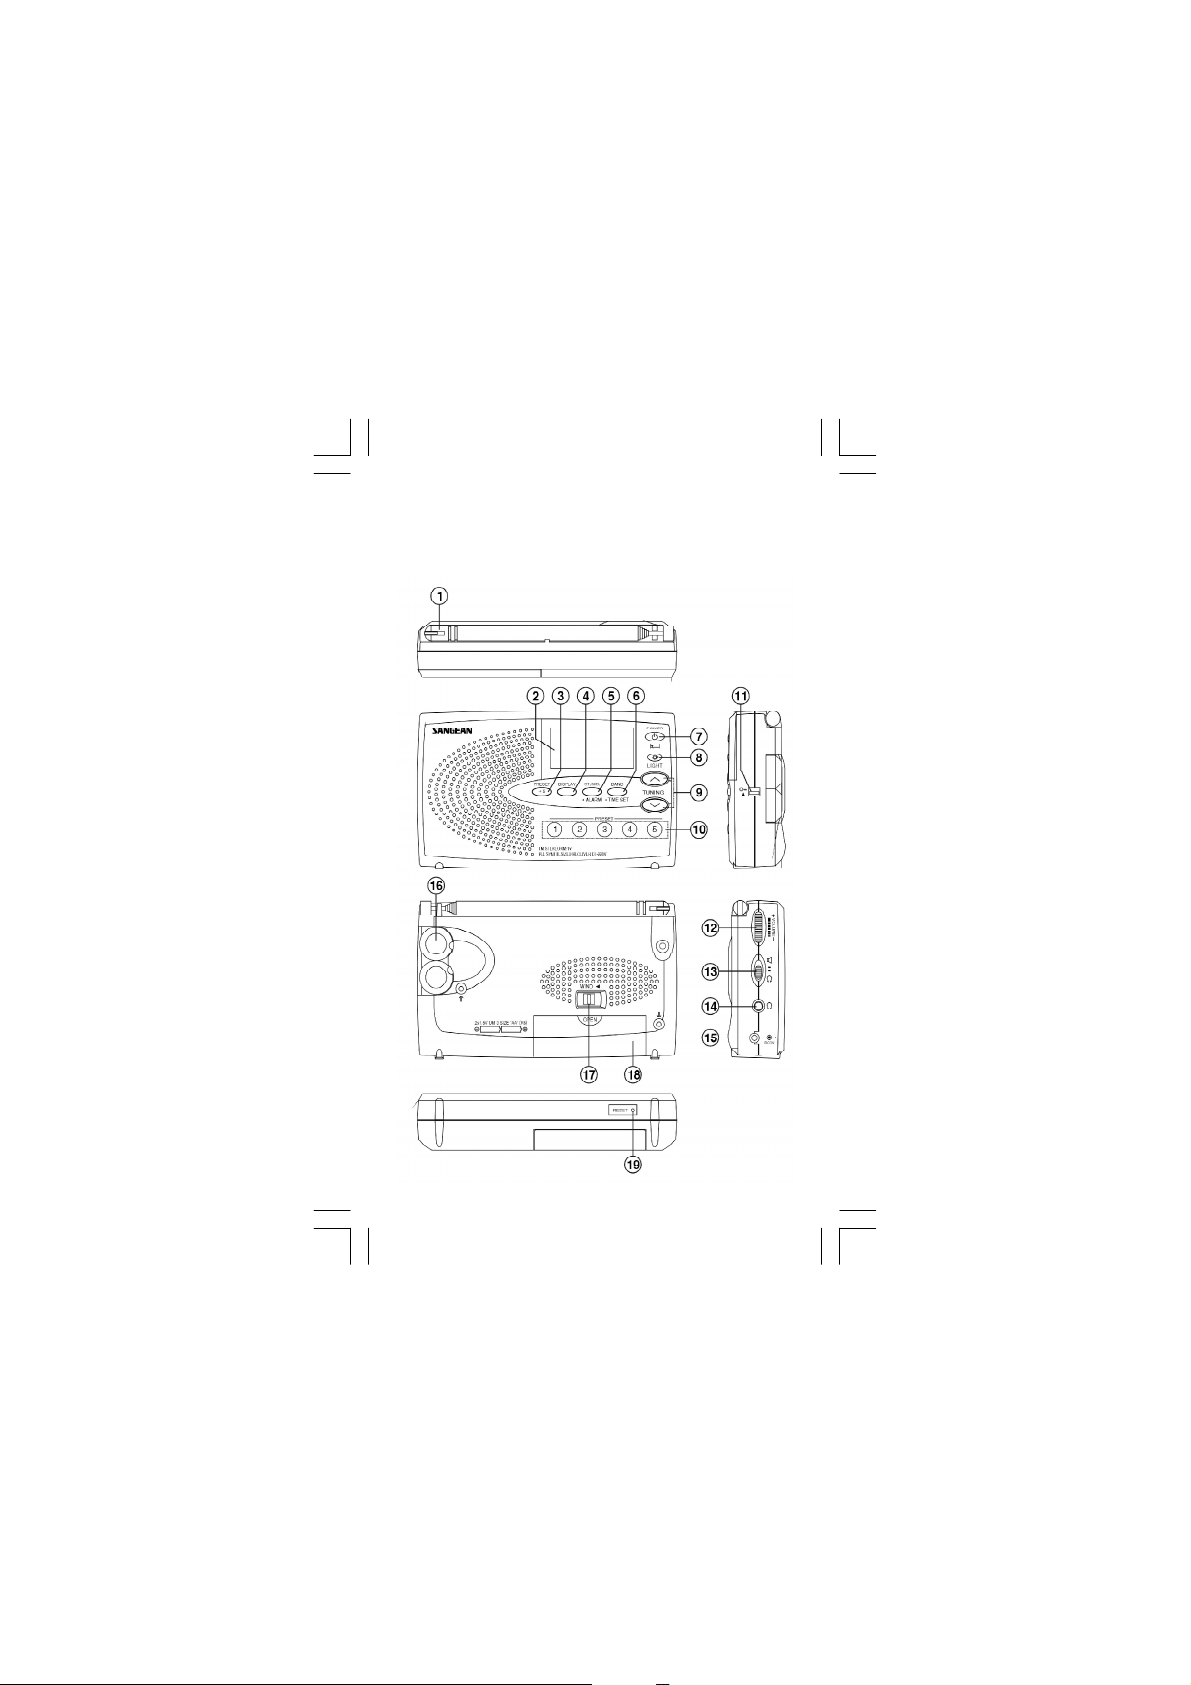
Controls
1 2
Telescopic Aerial Display
3
Pres et 6-10 Display button
5
Stereo/Mono/Alarm button
6
Band/Time set button
7 8
Power button Light button
9
Tuning up/down button Preset 1-5
11
Lock switch Volume Control
13
Loudspeaker/Headphone switch
14 15
Headphone s ocket DC input socket
16
Auto wind earphones
17
Auto wind earphones s witch
18
Battery compartment
19
RESET
4
10
12
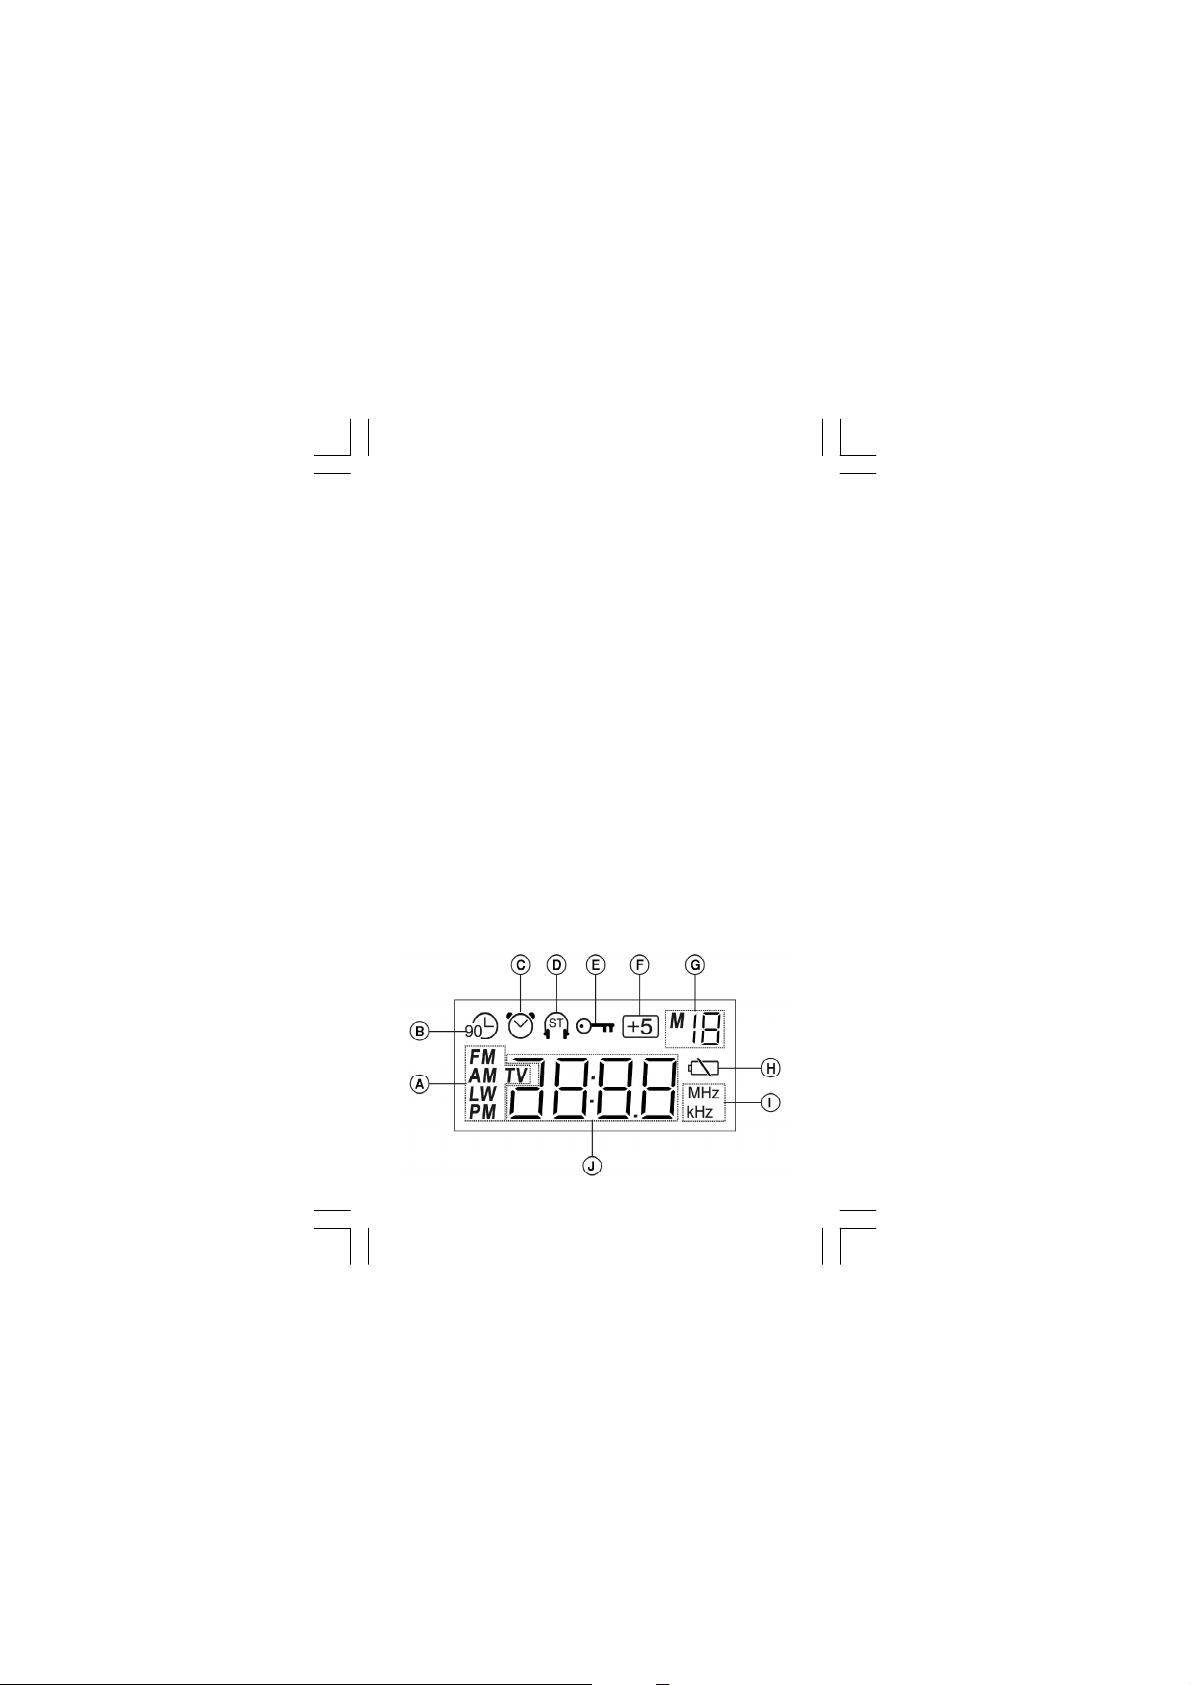
Display
A
Wav eband and A.M./P.M. indicator
B
90 minutes auto shut off indicator
C
Alarm indicator
Stereo indicator
D
E
Key lock indicator
F
Preset 6-10
G
Preset indic ator
H
Low battery indicator
I
Frequenc y unit
J
Frequency/Time display
GB
3
Page 5

Installing batteries
1. position the radio face down.
2. Press the catch and slide in the direction of the
arrow.
3. Lift up the battery cover.
4. Insert 2xUM-3 (AA) size batteries. Make sure the
batteries are positioned in accordance with the
diagram indic ated.
5. Replace the battery cover.
Battery replacement
The battery indicator will appear and flash in the
display when the batteries are in need of replacement
. After removing the batteries , you have
approximately 3 minutes to replace the batteries after
which clock and memory information will be lost.
Setting the clock time
The clock will start running when the batteries are
installed. When the batteries are installed for the first
time, the display will show 0:00.
Note:Time c an only be set with the radio switched off.
1. Ensure that the radio is switched off .
2. Press and hold down the Time Set button for more
than 2 seconds until the hours digit begins to flash
in the display .
3. Whilst the hours digit is flashing, adjust the hours
using Tuning Up/Down buttons.
4. Press the Time Set button, the minute digit begins
to flash in the dis play.
5. Whilst the minute digit is flashing, adjust the
minutes using the Tuning Up/Down buttons.
6. Press the Time Set button to complete time setting.
4
Page 6

Setting the alarm time
1. Ens ure that the radio is switched off.
2. Press and hold down the Alarm button for more
than 2 s econds until the hours digit and alarm
sy mbol begin to flash in the display .
3. Whilst the hours digit is flashing, adjust the hours
using the Tuning Up/Down buttons.
4. Pres s the Alarm button, the minute digit begins to
flash in the dis play.
5. Whilst the minute digit is flashing, adjust the
minutes using the Tuning Up/Down button.
6. Pres s the Alarm button to complete alarm time
setting. The Alarm symbol will appear on the
display indicating the alarm is set.
Wake to alarm
1. At the pre-selected time, the alarm will beep.
The alarm may be turned off for 24 hours by
pres sing any button. The alarm will switch off
automatic ally after 3 minutes .
2. To permanently cancel the alarm, press the alarm
button, the alarm symbol will be removed from
the dis play.
GB
5
Page 7

Operating the radio-search tuning
1. Switch on your radio by pressing the Power Button.
Note: The radio is originally set to be 90 minutes auto
shut off after Power is switched on ( symbol
will appear on the display). If you don’t need
this feature, press Power button for more than
2 seconds until symbol removed from the
display .
2. Select the required waveband by repeatedly
pressing the Band button. On FM and TV bands,
fully extend the Telescopic aerial. On AM (MW)
band, rotate your radio for best reception.
3. Press and hold down either the Tuning Up or Down
buttons until frequency in the display begins to
change rapidly. Release the button.
4. Your radio will scan the s elected waveband,
stopping each time if finds a station of sufficient
strength. Adjust the volume control to the required
level.
6
Page 8

Operating the radio – manual tuning
1. Switc h on your radio by pressing the Power button.
2. Select the desired waveband using the Band
button. The waveband selec ted will appear in the
display. On FM/TV bands, fully extend the
Telescopic aerial. On AM (MW) band, rotate
your radio for bes t reception.
3. A single press on either the Tuning Up/Down will
change the frequency up or down. Adjust the
Volume control to the required level.
AM(MW) tuning step
In Europe and other parts of the world AM (MW)
tuning steps are 9 kHz, in America the AM tuning
step is 10 k Hz.
To change the AM tuning step from 10 k Hz to 9 kHz,
proceed as follows,
1. Switch on your radio and select the AM (MW)
waveband.
2. Switch off the radio.
3. Press Tuning Down then Power button, the radio
will be changed into 9 kHz tuning s tep on AM band.
To change the AM tuning step from 9 kHz to 10 kHz,
proceed as follows,
1. Switch on your radio and select the AM (MW)
waveband.
2. Switch off the radio.
3. Press Tuning UP then Power button, the radio will
be changed into 10 kHz tuning step on AM band.
GB
D
7
Page 9

Presetting stations
You may store up to 10 stations each on FM, AM
(MW) and TV bands giv ing a total of 30 preset
stations.
1. Tune into the required stations using one of the
tuning methods previously described .
2. To store the s tation, press and hold down one of
the PRESET button 1-5 for more than 2 seconds
until display shows preset location.
3. To store the station into preset 6-10, press +5
button, display will show +5, then press and hold
down one of the PRESET button 1-5 for more than
2 seconds until display shows preset loc ation.
Recalling a preset station
1. Switch on your radio using the Power button.
2. Select the desired waveband using the Band
button.
3. Simply pres s one of Preset buttons 1-5 to recall
the required preset stations. To recall preset
stations 6-10, pres s +5 button, then the Preset
button 1-5.
Display modes
Whils t radio is switched on, press Display button to
change between frequency and normal time.
8
Page 10

Display backlight
Pressing the Light button will switch on the dis play
backlight and illuminate the display for approximately
7 seconds.
Lock switch
The lock switc h located on the right side of your radio
is us ed to prevent unintentional operation.
1. Slide the Lock switch to the up ‘ locked ‘ pos ition,
the symbol will appear in the display. The
Power and all other buttons will be disabled exc ept
the Light button . This will prevent accidental
operation when the radio is pac ked in a suitcase.
To releas e the Lock switch, move the switch to the
down ‘unlocked’ position, the symbol will be
removed from the display.
Earphones
The earphones fitted to y our radio are equipped with
an auto wind system to allow for easy s torage.
1. Gently pull out the earphones from the right hand
side of the radio.
2. Slide the Loudspeaker/Headphone switch to the
position, the loudspeaker will mute.
3. to retract the earphones, slide the switch on the
rear of the cabinet. Hold onto the earphones while
they rewind into the cabinet.
4. Slide the Loudspeaker/Headphone switch to the
position to return to normal operation.
GB
9
Page 11

Headphone socket
In addition to the built in earphones, your radio is
provided with a headphone socket. This allows you to
use different types of ear or headphones with your
radio.
1. To use external headphones, s lide the
Loudspeaker/Headphone switch to the position
and plug the headphones into the headphone
soc ket.
2. Slide the Loudspeaker/Headphone switch to the
position to return to normal operation.
AC adaptor (not included)
The AC adaptor for use with this radio should provide
3volts DC output at 200 mA center pin negative.
Insert the adaptor plug into the DC s ocket on the left
side of your radio. Plug the adaptor into mains soc ket
outlet. Whenever the adaptor is us ed, the batteries
are automatically disconnected.
The AC adaptor should be disconnected from the
mains supply and the radio when not in use.
Mono button
1. If the station being received is weak, some hiss
may be audible, to reduc e the hiss press the ST.
/MO. Button to switch to mono mode. The stereo
indicator will be removed from the display .
10
Page 12

Troubleshooting/Reset button
If y our radio fails to operate correctly or some digits
on the display are missing or incomplete, carry out
the following proc edures.
1. Switch off the radio and remove the batteries.
2. With the aid of a suitable implement (the end of a
paper clip), pres s the RESET button located on
the underside for at least 2 seconds, this will
reset the microprocessor but still k eep the clock
time and all stations stored in pres et memory.
Specifications
Power requirements
DC 3V 200 mA center pin negative
Batteries 2 x UM-3 (AA s ize)
Circ uit features
Output power: 100 mW (speaker)
Socket
Headphone socket 3.5 mm dia stereo
DC input socket 3.0 volts center pin negative
GB
The company reserves the right to amend the
specification without notice.
11
Page 13

12
Page 14

Controles
1
Antena telescó pica Pantalla
3
Presintoní as 6-10 Botó n Pantalla
5
Botó n de estéreo/mono/alarma
6
Botó n de selecció n de banda/hora
7 8
Botó n de encendido Botó n de luz
Botó n de sintonizació n ascendente/descendente
9
10
Presintoní as 1-5 Interruptor de bloqueo
12
Control de volumen
13
Interruptor de altavoz/auriculares
14
Conexió n para auriculares
15
Conexió n para la alimentació n de CC
16
Auriculares autorrebobinables
17
Interruptor de rebobinado automático de
auriculares
18
Compartimento para la pila
19
PUESTA A CERO
2
4
11
Pantalla
A
Indicador de banda y A.M./P.M.
B
Indicador de apagado automático en 90 minutos
C
Indicador de alarma
D
Indicador de señ al estereofó nica
E
Indicador de teclas bloqueadas
Presintoní as 6-10
F
G
Indicador de presintoní a
H
Indicador de bajo nivel de pila
I
Unidad de frec uencia
J
Presentació n de frequencia/hora
E
13
Page 15

Instalació n de las pilas
1. Coloque la radio hacia abajo.
2. Pulse el pestillo y deslí celo en la direcció n que
marca la flecha.
3. Levante la tapa del compartimento de pilas.
4. Inserte 2 pilas tipo UM-3 (AA). Compruebe que
las pilas están colocadas de acuerdo con el
diagrama indicado.
5. Vuelva a colocar la tapa del compartimento de
pilas.
Sustitució n de las pilas
Aparec erá en la pantalla el indicador de nivel de la
pila y parpadeará cuando sea nec esario
cambiarlas. Después de s acarlas, dispone de unos
3 minutos para sustituirlas por otras; tras currido ese
tiempo, se perderá la informació n del reloj y la
memoria.
14
Page 16

Configuració n de la hora
El reloj se pondrá en marcha al instalar las pilas.
Cuando se instalen por primera vez, la pantalla
mostrará 0:00.
Nota: La hora só lo se puede configurar con la radio
apagada.
1. Compruebe que la radio está apagada.
2. Pulse y mantenga pulsado el botó n Time Set
durante más de 2 segundos hasta que el dí gito
de las horas empiece a parpadear en la pantalla.
3. Mientras parpadea, ajuste las horas usando los
botones Tuning Up/Down.
4. Pulse el botó n Time Set; el dí gito de los minutos
empezará a parpadear en la pantalla.
5. Mientras parpadea, ajuste los minutos usando los
botones Tuning Up/Down.
6. Pulse el botó n Time Set para completar el ajuste
de la hora.
E
15
Page 17

Configuració n de la hora de la alarma
1. Compruebe que la radio está apagada.
2. Pulse y mantenga pulsado el botó n Alarm durante
más de 2 segundos hasta que el dí gito de las
horas y el sí mbolo de la alarma empiecen a
parpadear en la pantalla.
3. Mientras parpadea, ajuste las horas usando los
botones Tuning Up/Down.
4. Pulse el botó n Alarm; el dí gito de los minutos
empezará a parpadear en la pantalla.
5. Mientras parpadea, ajus te los minutos usando
el botó n Tuning Up/Down.
6. Pulse el botó n Alarm para completar el ajuste de
la hora de la alarma. Aparecerá en la pantalla el
sí mbolo Alarm, lo que significa que la alarma está
configurada.
Alarma despertador
1. A la hora pres eleccionada, sonará la alarma. La
alarma s e puede apagar durante 24 horas
pulsando cualquier botó n. La alarma se
desconectará automáticamente a los 3 minutos.
2. Para cancelarla de forma permanente, puls e el
botó n de alarma, el sí mbolo de alarma
desaparecerá de la pantalla.
16
Page 18

Funcionamiento de la radio:
sintonizació n por búsqueda
1. Encienda la radio pulsando el botó n Power.
Nota:
La radio está configurada de fábric a para apagarse
automáticamente a los 90 minutos después de
encenderla (aparecerá el sí mbolo en la pantalla).
Si no quiere hacer uso de esta funció n, pulse el
botó n Power durante más de 2 segundos hasta que
desaparezca dicho sí mbolo .
2. Seleccione la banda que des ee pulsando
repetidamente el botó n Band. En las bandas de
FM y TV, extienda completamente la antena
telesc ó pica. En las bandas de AM (MW), gire la
radio has ta obtener la recepció n más ó ptima.
3. Pulse y mantenga pulsado el botó n Tuning Up o
Down hasta que la frecuenc ia que aparece en la
pantalla empiece a cambiar rápidamente. Suelte
el botó n.
4. La radio explorará la banda seleccionada,
detenié ndose cada vez que encuentre una
emisora c on la suficiente potencia. Ajuste el
control de volumen hasta alc anzar el nivel
deseado.
E
17
Page 19

Funcionamiento de la radio:
sintoniz ació n manual
1. Encienda la radio pulsando el botó n Power.
2. Seleccione la banda que desee pulsando el botó n
Band. Se mostrará en la pantalla la banda
seleccionada. En las bandas de FM y TV, extienda
completamente la antena telescó pic a. En las
bandas de AM (MW), gire la radio hasta obtener la
recepció n más ó ptima.
3. Una pulsació n en Tuning Up o Down cambiará
la frec uencia un salto hacia arriba o hacia abajo.
Ajuste el c ontrol Volume hasta alcanzar el nivel
deseado.
18
Page 20

Salto de sintonizació n de AM(MW)
En Europa y otras partes del mundo, los saltos de
sintonizació n de la banda de AM (MW) son de 9 k Hz,
en Améric a, son de 10 kHz.
Para cambiar el s alto de sintonizació n de AM de 10
kHz a 9 k Hz, haga lo siguiente:
1. Encienda la radio y seleccione la banda de AM
(MW).
2. Apague la radio.
3. Pulse sucesivamente los botones Tuning Down y
Power, la radio cambiará el s alto de sintonizació
n a 9 kHz en la banda de AM.
Para cambiar el salto de sintonizació n de AM de 9
kHz a 10 kHz, haga lo siguiente:
1. Encienda la radio y seleccione la banda de AM
(MW).
2. Apague la radio.
3. Pulse sucesivamente los botones Tuning Up y
Power, la radio cambiará el s alto de sintonizació n
a 10 kHz en la banda de AM.
E
19
Page 21

Presintonizació n de emisoras
Puede almacenar hasta 10 emis oras por cada banda:
FM, AM (MW) y TV, lo que hace un total de 30
emis oras presintonizadas.
1. Sintonice las es taciones que desee utilizando uno
de los mé todos descritos anteriormente.
2. Para almacenar la emisora, pulse y mantenga
pulsado uno de los botones PRESET 1-5 durante
más de 2 segundos hasta que aparezc a en la
pantalla la posició n de memoria correspondiente.
3. Para guardar la emisora en una de mas memorias
6-10, pulse el botó n +5; la pantalla mostrará +5.
A continuació n, pulse y mantenga puls ado uno de
los botones PRESET 1-5 durante más de
2 segundos hasta que aparezca en la pantalla la
posició n de memoria correspondiente.
Audició n de una emisora presintonizada
1. Encienda la radio pulsando el botó n Power.
2. Seleccione la banda que des ee pulsando el
botó n Band.
3. Pulse uno de los botones Pres et 1-5 para
esc uchar la emisora presintonizada que desee.
Para escuchar las emisoras presintonizadas 6-10,
pulse el botó n +5 y, a continuació n, el botó n Preset
1-5.
20
Page 22

Modos de presentació n
Con la radio encendida, pulse el botó n Display para
cambiar entre frecuenc ia y hora normal.
Luz de fondo de la pantalla
Al pulsar el botó n Light se encenderá la luz de fondo
de la pantalla y é s ta se encenderá durante unos
7 segundos.
Interruptor de bloqueo
El interruptor de bloqueo situado en el lado derecho
de la radio se utiliza para evitar un funcionamiento no
deseado de la radio.
1. Deslic e el interruptor Lock hasta la posició n de
“bloqueado”; aparecerá el sí mbolo en la
pantalla. El botó n Power y los demás botones
quedarán inhabilitados; el ú nico que seguirá
funcionando es el botó n Light. Así se evitará que
la radio se ponga en funcionamiento cuando, por
ejemplo, está en un maletí n. Para soltar el
interruptor Lock, mué valo hac ia abajo hasta la
posició n “desbloqueado”; el sí mbolo
des aparecerá de la pantalla.
E
21
Page 23

Auriculares
Los auriculares acoplados a la radio disponen de un
sistema de rebobinado automático para facilitar s u
almacenamiento.
1. Tire suavemente de ellos desde el lado derec ho
de la radio.
2. Deslic e el interruptor Loudspeaker/Headphone
hasta la posic ió n ; se silenciará el altavoz.
3. Para retraerlos, deslice el interruptor s ituado en
la parte pos terior de la caja. Manté ngalo deslizado
mientras se rebobinan en el interior de la caja.
4. Deslic e el interruptor Loudspeaker/Headphone
hasta la pos ició n para volver al funcionamiento
normal.
Conexió n para auriculares
Además de los auriculares incorporados, la radio
dispone de una conexió n para otros auriculares.
Esto permite utilizar distintos tipos de auriculares c on
la radio.
1. Para utiliz ar los auriculares externos, deslice el
interruptor Loudspeaker/Headphone a la posició n
y enchú felos en la conexió n para auriculares.
2. Deslic e el interruptor Loudspeaker/Headphone
hasta la pos ició n para volver al funcionamiento
normal.
22
Page 24

Adaptador de CA (no incluido)
El adaptador de CA para usar con esta radio debe
suminis trar 3 V de CC y 200 mA en la patilla central
del negativo.
Inserte el enchufe del adaptador en la toma de CC
situada en el lado iz quierdo de la radio. Enchufe el
adaptador en la toma de elec tricidad. Cuando use el
adaptador, las pilas se desconectarán
automáticamente.
El adaptador de CA debe desconectars e de la toma
de c orriente y de la radio cuando no se use.
Botó n Mono
1. Si la señ al que recibe de la emisora es débil,
pueden es cucharse interferencias; para
reducirlas, puls e el botó n ST./MO. Para cambiar
al modo monoaural. El indicador de recepció n
estereofó nica desaparecerá de la pantalla.
E
23
Page 25

Solució n de problemas, botó n de
reinicio
Si la radio no func iona correctamente o faltan, o
aparecen incompletes, algunos dí gitos en la pantalla,
realic e los siguientes procedimientos:
1. Apague la radio y saque las pilas.
2. Con la ay uda de un ú til adecuado (por ejemplo,
la punta de un clip para papel), pulse el botó n
RESET situado en la parte inferior durante un
mí nimo de 2 segundos; de este modo se
reiniciará el microprocesador pero se
mantendránla informació n del reloj y las
emisoras almacenadas en la memoria.
Especificaciones
Electricidad
CC Negativo de patilla central de 3 V y 200 mA
Pilas 2 tipo UM-3 (AA).
Caracterí sticas del circuito
Potencia de salida: 100 mW (altavoz)
Conexiones
Conexió n para auricular
3,5 mm de diámetro estéreo
Conexió n de entrada de CC
3,0 V en el negativo de la patilla central
La compañ í a se reserva el derecho a modificar las
especificaciones sin previo aviso.
24
Page 26

381H512
 Loading...