

Page 1
DT-210/L/V
Operating instruction
Mode d’emploi
Instruccions de manejo
Gebruiksaanwijzing
Bedienungsanleitung
GB
F
E
NL
D
Page 2
1
Page 3

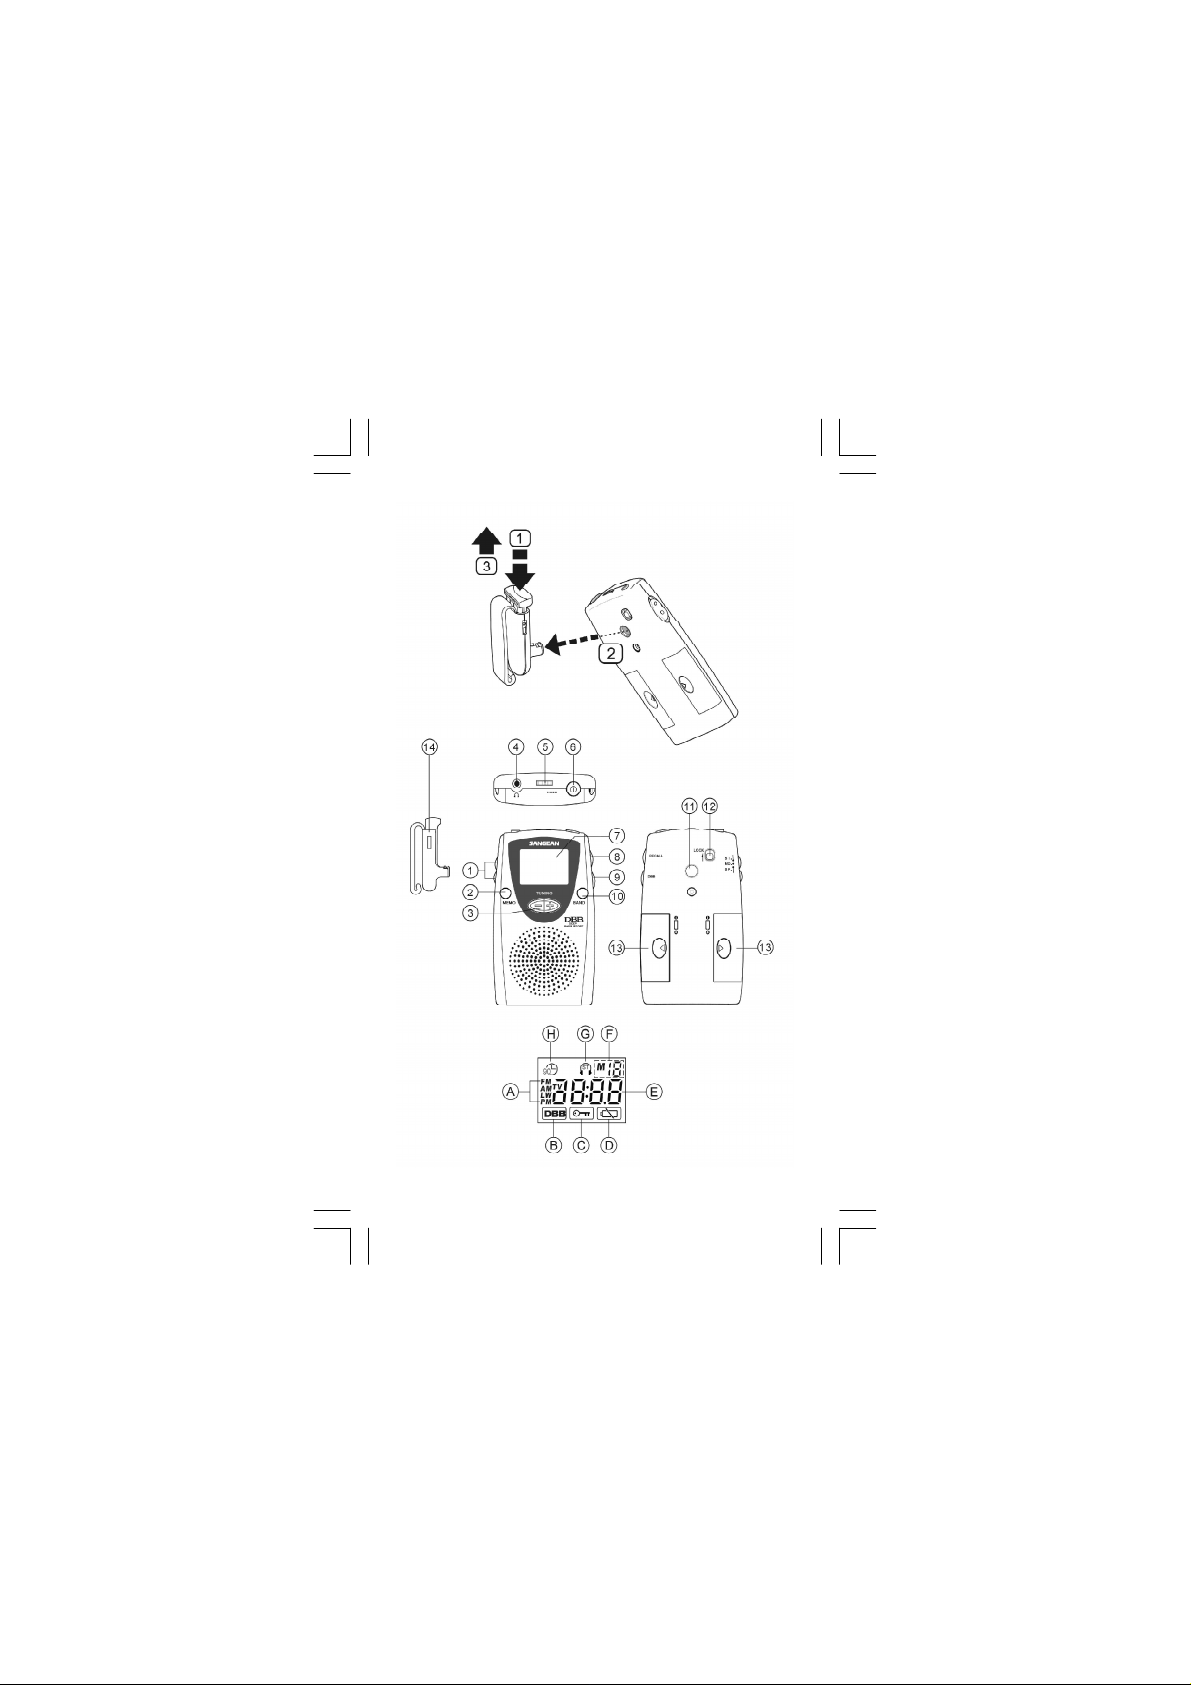
Controls
1
Stereo/Mono/Speaker switch
2
Memory button
3
Tuning Up/Down
4
Earphones Jack
5
Volume Control
6
Power switch
7
Display
8
Memory Recall
9
DBB (Deep Bass Boost) selection
10
Band selector
11
Belt Clip holder
12
Lock switch
13
Battery compartment
14
Belt Clip
Display
A
Waveband indicator
B
DBB on
C
Key lock indicator
D
Low battery indicator
E
Frequency display
F
Memory preset
G
Stereo indicator
H
90 minutes auto shut off indicator
GB
2
Page 4

Installing batteries
1. Position the radio face down.
2. Press the catch and slide in the direc tion
of the mark.
3. Lift up the battery cover and insert
1xUM-4 (AAA) size on each side of
battery compartment. Make sure the
batteries are positioned in accordance
with the diagram indic ated.
4. Replace the battery cover.
Battery replacement
The battery indicator will appear and
flash in the display when the batteries are in
need of replacement . After removing the
batteries, you have approximately 3 minutes
to replace the batteries after which the
preset memory information will be lost.
Operating the radio
3
Page 5

Search tuning
1. Switch on the radio by pressing the Power
button.
Note:
The radio is originally set to be 90 minutes
auto shut off after Power is switched on
( symbol will appear on the display).
If you don’t need this feature, press Power
button for more than 2 seconds until symbol
removed from the display.
2. Select the required waveband by
repeatedly pressing the Band button.
On FM and TV band (DT-210V only ),
connect the supplied earphones as the
antenna or the wire antenna. On AM(MW)
and LW band (DT-210L), rotate the radio
for best reception.
3. Press and hold down either the Tuning Up
or Down buttons until frequency in the
display begins to change rapidly.
Release the button.
GB
4. The radio will scan the selected waveband,
stopping each time if finds a station of
s ufficient strength. Adjust the volume
control to the required level.
4
Page 6

Manual tuning
1. Switch on the radio by pressing the Power
button.
2. Select the required waveband and connect
the supplied earphones or wire antenna for
FM and TV band (DT-210V) listening.
On AM(MW) or LW band (DT-210L),
rotate the radio for best reception.
3. A single press on either the Tuning Up/
Down will change the frequency up or
down. Adjust the volume control to the
required level.
Presetting stations
You may store up to 15 stations on FM band
and 10 stations on AM (MW) band for DT-210
(10 stations each on AM/FM/TV band for
DT-210V and 10 stations each on AM(MW)/
FM/LW band for DT-210L) .
1. Tune into the required stations using one of
the tuning methods previously described.
2. To store the station, press MEMO button,
display will flash M and the suggested
memory location. Press MEMO button
again to finalize the station presetting.
During the M and suggested memory
location are flashing, you may use either
Tuning Up or Down to change the memory
location to edit your memory program then
press MEMO button again to finalize the
presetting.
5
Page 7

Recalling a preset station
1. Switch on the radio.
2. Press RECALL button and Tuning Up/
Down to recall required preset station
Display will flash preset station.
3. Press RECALL button again, once the
required preset station is found.
Lock Switch
The lock switch located on the rear c abinet is
used to prevent unintentional operation.
1. Slide the lock switch to the up locked
position , the symbol will appear in
the display. The power and all other
buttons will be disabled. This will prevent
accidental operation when the radio is
packed in a suitcase. To release the lock
switc h , move the switch to the down
unlocked position, the symbol will
be removed from the display.
GB
6
Page 8

Earphones and antenna
The earphones also acts as the FM antenna
when plugged into the earphones jack. While
listening via speaker, you may plug the
supplied wire antenna into the earphones jack,
and set the ST/MO/SP switch to the SP
(speaker) position.
ST/MO/SP(Stereo/Mono/Speaker)
1. Switch the switch to SP (speaker) position,
while you listen to the radio program via
speaker. Make sure to plug the supplied
wire antenna or the earphones to get best
FM reception.
2. This radio is capable of receiving FM
stereo radio program by plug the supplied
earphones into the earphones jack and set
the ST/MO/SP switch to ST (stereo)
position, display will show stereo symbol.
If the station being rec eived is weak,
some hiss may be audible, to reduce the
hiss, switch the ST/MO/SP to MO(mono)
position. The stereo indicator will be
removed from the display.
7
Page 9

Change AM (MW) band tuning step
( available only on DT-210/V not for
LW version )
In Europe and other parts of the world, AM
(MW) tuning step are 9 kHz, in America the
AM tuning step is 10 kHz.
To change the AM tuning step from 10 kHz
to 9 kHz, proceed as follows,
1. Press Tuning Down button then the power
button to switch on the radio, the radio will
be changed into 9 k Hz tuning step on AM
band.
To change the AM tuning step from 9 kHz to
10 kHz, proceed as follows,
1. Press Tuning UP button then Power button
to switch on the radio, the radio will be
changed into 10 kHz tuning step on AM
band.
GB
8
Page 10

DBB (Deep Bass Boost) button
Press DBB button to activate the Deep Bass
Boost to have stronger bass sound, display
will appear DBB symbol. Another press will
cancel the DBB.
Note:
Suggest to activate the DBB only using
earphones.
9
Page 11

Specification
Power Supply:
2 x AAA (UM-4) (R03) batteries
Output Power:
100 mW (10% T.H.D. 1 kHz)
Earphones socket:
3.5 mm dia stereo 32 ohm
Frequency range:
FM 87.50 - 108 MHz
AM(MW) 522 - 1629 kHz (DT-210/L)
520 - 1710 kHz (DT-210V)
LW 153 - 279 kHz (DT-210L)
TV 2 - 13 CH (DT-210V)
Battery Life:
Approx. 24 hours ( via speaker ) using
Alkaline battery
Approx. 32 hours ( via earphones ) using
Alkaline battery
The company reserves the right to amend
the specification without notice.
GB
10
Page 12

11
Page 13

Emplacement des organes de
commande
1
Sélecteur Stéréo/Mono/Haut-parleur
2
Touche de mise en mémoire
3
Accord croissant/décroissant
4
Connecteur pour écouteurs
5
Réglage du volume sonore
6
Interrupteur principal
7
É cran d’affichage
8
Ac cè s aux mémoires
9
Sélec teur DBB (Amplification des graves)
10
Sélecteur de gammes d’ondes
11
Support pour l’agrafe de ceinture
12
Touche de verrouillage
13
Compartiment à piles
14
Agrafe de ceinture
É cran d’affichage
A
Indicateur des gammes d’ondes
B
Indicateur DBB
C
Indicateur de verrouillage des touches
D
Indicateur des piles déchargé es
E
Affic hage des fréquences
F
Indic ateur de la présélection choisie
G
Indicateur Stéréo
H
Indicateur d’arrê t automatique 90 minutes
F
12
Page 14

Mise en place des piles
1. Placer la radio la face en bas.
2. Appuyer sur le loquet et le faire glisser en
direction du marquage.
3. Enlever le couvercle du compartiment à
piles et installer une pile UM-4 (taille AAA)
à chaque côté du compartiment à piles.
Veiller à bien installer les piles s uivant le
diagramme indiqué .
4. Remettre le couvercle du compartiment à
piles.
Remplacer les piles
L’indicateur du niveau de charge des piles
va apparaître et clignoter sur l’écran
d’affichage quand les piles devraient ê tre
chargé es. Aprè s avoir enlevé les piles
usées, on a encore environ 3 minutes pour
mettre des piles neuves, aprè s quoi les
informations en mémoires seront perdues.
Utilisation de la radio
13
Page 15

Accord par balayage
1. Appuyer sur la touche MARCHE/ARRÊT
pour allumer l’appareil.
Remarque:
La radio est réglée à l’origine pour s’arrê ter
automatiquement 90 minutes aprè s avoir
été mis e en marche. (Le symbole
s’affiche à l’écran d’affichage). Si on ne
veut pas se servir de cette fonction, appuyer
sur l’interrupteur principal POWER pendant
plus de 2 secondes jusqu’à ce que
l’indication disparaisse de l’écran
d’affichage.
2. Sélectionner la gamme de fréquences
voulue en appuyant de maniè re répétée
sur le sélecteur de gammes d’ondes
Band. Pour les gammes d’ondes FM et
TV (seulement DT-210V), brancher les
écouteurs fournis afin de les utiliser
comme antenne ou brancher le fil
d’antenne. Pour les gammes d’ondes AM
(PO) ou GO (seulement DT-210L), tourner
la radio pour obtenir la meilleure réception
possible.
F
14
Page 16

3. Appuyer et maintenir enfoncées les
touches d’accord croissant ou décroissant
jusqu’à c e que la fréquence commence à
changer rapidement sur l’écran
d’affichage. Relâcher la touche.
4. La radio va balayer la gamme de
fréquences s é lectionnée, s’arrê tant
chaque fois qu’une station à signal
suffisamment fort a été trouvée. Procéder
au réglage préférentiel du volume sonore.
Accord manuel
1. Appuyer sur la touche MARCHE/ARRÊT
pour allumer l’appareil.
2. Sélectionner la gamme de fréquences
voulue et brancher les écouteurs fournis
ou le fil d’antenne pour écouter les
é missions sur les gammes FM et TV
(DT-210V). Pour les gammes d’ondes AM
(PO) ou GO (DT-210L), tourner la radio
pour obtenir la meilleure réception
possible.
3. Une seule pression sur une des touches
d’accord croissant ou déc roissant va
changer la fréquence de maniè re
croissante ou décroissante. Procéder au
réglage préférentiel du volume sonore.
15
Page 17

Mise en mémoire des
présélections
On peut entrer en mémoire jusqu’à 15
stations en FM et 10 stations en AM (GO)
pour le DT-210 (10 stations sur chaque
gamme AM/FM/TV pour le DT-210V et 10
stations sur chaque gamme AM(PO)/FM/
LW pour le DT-210L).
1. Accorder la station dés irée d’une des
maniè res d’accord décrites
pré c é demment.
2. Pour entrer en mémoire une station,
appuyer sur la touche MEMO, M et l;
emplacement de mémoire suggéré vont
clignoter à l’é cran d’affichage. Appuyer
de nouveau sur la touche MEMO pour
terminer la mise en mémoire de la
présé lection.
Pendant que M et l’emplacement de
mémoire suggéré clignotent, vous pouvez
utiliser les touches d’accord croissant ou
décroissant pour changer le numéro de
mémoire désiré puis appuyer de nouveau
sur MEMO pour terminer la mise en
mémoire de la présélec tion.
F
16
Page 18

Accè s aux stations
présélectionnées
1. Allumer l’appareil.
2. Appuyer sur les touches ACCÈ S et
Accord crois sant/décroissant pour
accéder aux stations mémorisées
voulues. Le numéro de la présélection
s’affic he à l’écran.
3. Appuyer de nouveau sur la touche
ACCÈ S, une fois la station mémorisée
voulue soit trouvée.
Touche de verrouillage
La touche de verrouillage se trouvant sur le
dos de la radio sert à empê cher une
commande accidentelle.
1. Faire glisser le sélecteur de verrouillage
en position ‘ locked ‘ (verrouillé), le
s ymbole apparaît à l’é cran
d’affichage. La touche Marche/Arrê t et
toutes les autres touches sont
désac tivées. Ceci permet d’éviter toute
opé ration non voulue quand la radio est
mise dans une valise. Pour dés activer le
verrouillage, faire glisser le sélec teur en
position ‘unlocked’ (dé verrouillé), le
s ymbole va s’éteindre à l’affichage.
17
Page 19

É couteurs et antenne
Les écouteurs servent également d’antenne
FM quand ils sont branchés dans le
connecteur pour écouteurs. Pour l’écoute par
le haut-parleur, on peut brancher le fil
d’antenne fourni dans le connecteur pour
écouteurs et mettre le sélecteur ST/MO/SP
en position SP (haut-parleur).
ST/MO/SP (Stéré o/Mono/
Haut-parleur)
1. Faire glisser le commutateur en position
SP (haut-parleur) quand on écoute un
programme de radio par le haut-parleur.
Veiller à brancher le fil d’antenne fourni ou
les écouteurs pour obtenir la meilleure
réception FM possible.
2. Cette radio peut recevoir un programme de
radio FM stéréo en branchant les
écouteurs fournis dans le connecteur pour
é couteurs et en mettant le sélecteur ST/
MO/SP en position ST ( sté réo ), le
s ymbole stéréo apparaît à l’affichage.
Quand la réception de la station est faible,
des sifflements peuvent se faire entendre,
pour réduire c es sifflements, mettre le
commutateur ST/MO/SP dans la position
MO (mono). L’indicateur Stéréo va
s’é teindre à l’affichage.
F
18
Page 20

Modifier le pas de progression
pour la gamme AM (PO)
(seulement sur DT-210/V pas
valide pour version GO)
En Europe et dans d’autres pays du monde,
le pas de progression AM (PO) est de
9 kHz, en Amérique le pas de progression
est de 10 kHz.
Pour changer le pas de progression PO de
10 kHz en 9 kHz, procéder comme suit,
1. Appuyer sur la touche d’accord
déc roissant puis sur l’interrupteur
marche/arrêt pour allumer l’appareil, la
radio va passer en pas de progression de
9 kHz sur la gamme d’ondes AM (PO).
Pour changer le pas de progression PO de
9 kHz en 10 kHz, procéder comme suit,
1. Appuyer sur la touche d’accord croissant
puis sur l’interrupteur marche/arrê t pour
allumer l’appareil, la radio va passer en
pas de progression de 10 kHz sur la
gamme d’ondes AM (PO).
19
Page 21

Sélecteur DBB (Amplification des
graves)
Appuyer sur la touche DBB pour amplifier les
graves, le symbole DBB apparaît à l’écran
d’affichage. Pour annuler l’amplification,
appuyer de nouveau sur la touche DBB.
Remarque:
Nous conseillons d’activer la fonction DBB
seulement quand on utilise les écouteurs.
F
20
Page 22

Spé cification
Alimentation:
2 piles AAA (UM-4) (taille R03)
Puissance de sortie:
100 mW (10% T.H.D. 1 kHz)
Prise pour écouteurs:
3.5 mm dia stéré o 32 Ohm
Gammes de fréquences:
FM 87.50 - 108 MHz
AM (PO) 522 - 1629 kHz (DT-210/L)
520 - 1710 kHz (DT-210V)
GO 153 - 279 kHz (DT-210L)
TV CH 2 - 13 (DT-210V)
Durée de vie des piles:
Environ 24 heures ( via haut-parleur ) en
utilisant des piles alcalines
Environ 32 heures ( via écouteurs ) en
utilisant des piles alcalines
Sous réserves de modifications des
spécifications sans avis préalable.
21
Page 23

22
Page 24

Controles
1
Interruptor de selecció n estéreo/mono/
altavoz
2
Botó n de memoria
3
Sintonizació n ascendente/descendente
4
Conector para los auriculares
5
Control de volumen
6
Interruptor de encendido
7
Pantalla
8
Reproducció n de una emisora en
memoria
9
Selec ció n de DBB (Deep Bass Boost o
amplificador de graves profundos)
10
Selector de banda
11
Sujec ió n para el cinturó n
12
Interruptor de bloqueo
13
Compartimento de las baterí as
14
Clip para el cinturó n
Pantalla
A
Indicador de banda de frecuencias
B
DBB activado
C
Indicador de bloqueo del teclado
D
Indicador de bajo nivel de baterí a
E
Pantalla de frecuencias
F
Presintonizació n de la memoria
G
Indicador de estéreo
H
Indicador de apagado automá tico a los
90 minutos
23
Page 25

Instalació n de las baterí as
1. Coloque la radio con la parte frontal hacia
abajo.
2. Presione el cierre y deslice la tapa en la
direcc ió n de la marca.
3. Levante la tapa del compartimento de
baterí as e inserte una baterí a
tamañ o 1 x UM-4 (AAA) a cada lado de
dicho compartimento. Coloque las
baterí as según el diagrama.
4. Vuelva a colocar la tapa del
compartimento de baterí as.
Cambio de las baterí as
El indicador de carga de las baterí as
aparecerá y parpadeará en la pantalla cuando
sea necesario cambiarlas. Tras sacar las
baterí as, dispone de 3 minutos
aproximadamente para colocar unas nuevas;
transcurrido ese tiempo, se borrará la
informació n de la memoria de
presintonizació n.
E
24
Page 26

Funcionamiento de la radio
Sintonizació n mediante
bú squeda
1. Encienda la radio pulsando el botó n
Power (encendido).
Nota:
La radio está configurada por defecto para
apagarse automá ticamente a los 90 minutos
de haberla encendido (aparecerá el sí mbolo
en la pantalla). Si no desea activar esta
funció n, pulse el botó n Power durante
má s de 2 segundos hasta que desaparezca
el sí mbolo de la pantalla.
2. Seleccione la banda de frecuencias que
desee pulsando repetidamente el botó n
Band (banda). En las bandas de FM y TV
(só lo en el caso del DT-210V), conecte
los auriculares suministrados como
antena o la antena de cable. En las
bandas de AM (MW) y LW (DT-210L),
coloque la radio en la posició n desde la
que se obtenga la mejor recepció n de la
emisora.
25
Page 27

3. Pulse y mantenga pulsado los botones de
sintonizació n ascendente o descendente
hasta que la frecuencia empiece a
cambiar rá pidamente en la pantalla.
Suelte el botó n.
4. La radio explorará la banda de
frecuencias seleccionada, deteniéndose
cada vez que encuentre una emisora con
la potencia suficiente. Ajuste el control de
volumen al nivel que desee.
Sintonizació n manual
1. Encienda la radio pulsando el botó n
Power.
2. Seleccione la banda de frecuencias que
desee y conecte los auriculares que se
incluyen o la antena de cable para
escuchar las bandas de FM y TV
(DT-210V). En las bandas de AM (MW) o
LW (DT-210L), coloque la radio en la
posició n desde la que se obtenga la
mejor recepció n de la emisora.
3. Con só lo pulsar una vez en el botó n de
sintonizació n ascendente o descendente
cambiará la frecuencia hacia arriba o
hacia abajo. Ajuste el control de volumen
al nivel que desee.
E
26
Page 28

Presintonizació n de emisoras
Puede almacenar hasta 15 emisoras en la
banda de FM y 10 en AM (MW) en la DT-210
(10 emisoras de cada banda de AM/FM/TV
en la DT-210V y 10 emisoras de cada banda
de AM (MW)/FM/LW en la DT-210L).
1. Sintonice la emisora que desee usando
uno de los métodos de sintonizació n
descritos más arriba.
2. Para almacenar la emisora, pulse el
botó n MEMO; parpadeará una M y la
posició n de memoria sugerida en la
pantalla. Pulse de nuevo el botó n
MEMO para finalizar la pres intonizació n
de la emis ora.
Mientras parpadeen la M y la posició n
de memoria sugerida, puede usar los
botones de sintonizació n asc endente o
descendente para cambiar la posició n de
la memoria para editar el programa de
memoria y, a continuació n, pulse de
nuevo el botó n MEMO para finalizar la
presintonizació n.
27
Page 29

Reproducció n de una emisora
presintonizada
1. Encienda la radio.
2. Pulse el botó n RECALL y el de
sintonizació n ascendente o descendente
para reproducir una emisora
pres intonizada. La posició n de la
memoria de dicha emisora parpadeará en
la pantalla.
3. Pulse de nuevo el botó n RECALL
cuando encuentre dicha emisora.
Interruptor de bloqueo
El interruptor de bloqueo, situado en la parte
trasera de la radio, se usa para evitar un
funcionamiento no intencionado.
1. Deslice el interruptor de bloqueo hacia
arriba hasta la posició n “locked”,
aparecerá el sí mbolo en la pantalla.
Quedará n desactivados el botó n de
encendido y todos los demá s. Así se
evitará un funcionamiento accidental de la
radio, si está guardada en una maleta o
bolsa de viaje. Para liberarlo, muévalo
hacia abajo a la posició n “unlock”; el
sí mbolo desaparecerá de la
pantalla.
E
28
Page 30

Auriculares y antena
Los auriculares actúan también c omo antena
de FM cuando está n enchufados en el
conector de auriculares. Cuando esté
escuchando la radio a través del altavoz,
puede enchufar el cable de antena
suministrado en el conector de auriculares y
colocar el interruptor ST/MO/SP en la
posició n SP (altavoz).
ST/MO/SP (estéreo/mono/altavoz)
1. Coloque el interruptor en la posició n SP
(altavoz) cuando esté escuchando un
programa de radio a través del altavoz.
Para obtener la mejor calidad de
recepció n en FM, conecte la antena de
cable o los auriculares que se incluyen.
2. Esta radio puede recibir programas de
radio estéreo en la banda de FM
enchufando los auriculares que se
incluyen en el conector correspondiente y
colocando el interruptor ST/MO/SP en la
posició n ST (esté reo); la pantalla
mostrará el s í mbolo de estéreo. Si la
señ al de la emisora que se está
recibiendo es débil, puede escucharse
algún ruido de interferencias; para
reducirlo, cambie el interruptor ST/MO/SP
a la posició n MO (mono). El indicador de
estéreo desaparecerá de la pantalla.
29
Page 31

Cambio de los pasos de
sintonizació n de la banda de AM
(MW) (só lo disponible en la
DT-210/V, no en la versió n LW)
En Europa y en otras partes del mundo, el
paso de sintonizació n de la banda de AM
(MW) es de 9 kHz mientras que en América
es de 10 kHz.
Para cambiarlo de 10 kHz a 9 kHz, haga lo
siguiente:
1. Pulse el botó n de sintonizació n
descendente y, a continuació n, el
botó n de encendido para encender la
radio; de esta forma quedará cambiado el
paso de sintonizació n a 9 kHz en la
banda de AM.
Para cambiarlo de 9 kHz a 10 kHz, haga lo
siguiente:
1. Pulse el botó n de sintonizació n
asc endente y, a continuació n, el botó n
de encendido para encender la radio; de
esta forma quedará cambiado el paso de
sintonizació n a 10 kHz en la banda de
AM.
E
30
Page 32

Botó n DBB(Deep Bass Boost o
amplificador de graves
profundos)
Pulse el botó n DBB para activar la
funció n Deep Bass Boost para que el
sonido de graves sea má s potente; en la
pantalla aparecerá el sí mbolo DBB. Si
vuelve a pulsarlo, cancelará la funció n
DBB.
Nota:
Se ac onseja activar esta funció n só lo
usando auriculares.
31
Page 33

Especificaciones
Alimentac ió n eléctrica:
2 baterí as AAA (UM-4) (R03)
Potencia de salida:
100 mW (10% T.H.D. 1 kHz)
Conexió n para auriculares:
3,5 mm de diá metro, estéreo de 32 ohmios
Banda de frecuencias:
FM 87,50 - 108 MHz
AM (MW) 522 - 1.629 kHz (DT-210/L)
520 - 1.710 kHz (DT-210V)
LW 153 - 279 kHz (DT-210L)
TV 2 - 13 CH (DT-210V)
Duració n de la baterí a:
Aprox. 24 horas (con altavoz) usando
baterí as alcalinas
Aprox. 32 horas (con auriculares) usando
baterí as alcalinas
La compañ í a se reserva el derecho a
modificar las especificaciones sin previo
aviso.
E
32
Page 34

33
Page 35

Plaats van de bedieningsorganen
1
Keuzeschakelaar Stereo/Mono/Luidspreker
2
Toets memory (geheugen)
3
Afstemming Omhoog/Omlaag
4
Aansluitconnector oortelefoon
5
Volumeregeling
6
Aan/uit schakelaar
7
Display
8
Oproepen van voorkeuzezenders
9
Keuzeschakelaar DBB (Lage tonen
versterking )
10
Golfbereikschakelaar
11
Riemcliphouder
12
Vergrendelschakelaar
13
Batterijv ak
14
Riemclip
Display
A
Indicator Golfbereik
B
DBB aan
C
Indicator toetsvergrendeling
D
Indicator lage batterijspanning
E
Frequentie display
F
Geheugen voorinsteltoets
G
Stereo indicator
H
Indicator automatisch uitschakelen na
90 minuten
NL
34
Page 36

Plaatsen van de batterijen
1. Keer de radio om.
2. Druk op het haakje en schuif in de richting
van de markering.
3. Til het batterijdeksel op en plaats 1 batterij
grootte UM-4 (AAA) aan elke kant van het
batterijvak. Verzeker u ervan dat de
batterijen volgens het aangegeven
sc hema zijn geplaatst..
4. Plaats het deksel van het batterijvak
terug.
Vervangen van batterijen
De batterij indicator verschijnt en
knippert in het display wanneer de batterijen
moeten worden vervangen. Na verwijdering
van de batterijen hebt u ongeveer 3 minuten
om de batterijen te vervangen, waarna de
geheugen informatie verloren zal gaan.
Bediening van de radio
35
Page 37

Automatische afstemming
1. Schakel de radio in door de toets AAN/
UIT in te drukken.
Opmerking:
De radio is oorspronkelijk zo ingesteld dat hij
na 90 minuten automatisch uitschakelt
nadat de voeding is ingeschakeld (het
symbool zal in het display verschijnen).
Wanneer u deze functie niet nodig heeft, druk
dan gedurende meer dan 2 seconden op
toets AAN/UIT totdat het symbool uit het
display is verdwenen.
2. Selecteer het gewenste golfbereik door
herhaald indrukken van de toets
Golfbereik. Sluit op de FM en TV band
(alleen DT-210V ), als antenne de
meegeleverde oortelefoons of de
draadantenne aan. Draai bij ontvangst op
de AM (MG) of LG band (alleen DT-210L)
uw radio voor de beste ontvangst.
NL
36
Page 38

3. Druk op een van de toetsen Afstemming
omhoog of Afstemming omlaag en houd
deze ingedrukt totdat de frequentie in het
display snel begint te veranderen. Laat
dan de toets los.
4. De radio zal het gekozen golfbereik
aftasten, en steeds stoppen wanneer een
zender van voldoende sterkte wordt
gevonden. Stel de gewenste
geluidssterkte in met de volumeregelaar.
Afstemming met de hand
1. Schakel de radio in door de toets AAN/
UIT in te drukken.
2. Selecteer het gewenste golfbereik en sluit
de meegeleverde oortelefoons of
draadantenne aan voor luisteren naar
zenders in de FM en TV band (DT-210V).
Draai bij ontvangst in de AM (MG) of LG
band (DT-210L), uw radio voor de beste
ontvangst.
3. Een keer drukken op een van de toetsen
Afstemming omhoog of Afstemming
omlaag zal de frequentie omhoog of
omlaag laten veranderen: Stel de
gewenste geluidssterkte in met de
volumeregelaar.
37
Page 39

Instellen van voorkeuzezenders
U kunt tot 15 zenders opslaan in de FM-band
en 10 zenders in de AM (MG) band voor
DT-210 (10 zenders in elk van de AM/FM/TV
banden voor DT-210V en 10 zenders in elk
van de AM(MG)/FM/LG banden voor
DT-210L).
1. Stem af op de gewenste zender met
behulp van een van de afstemmethodes
die in het voorgaande zijn beschreven.
2. Druk op de MEMO toets om de zender op
te slaan, in het display zal M zowel als de
gesuggereerde geheugenplaats
knipperen. Druk opnieuw op de MEMO
toets om de voorinstelling van de zender
te voltooien.
Terwijl de M en de gesuggereerde
geheugenplaats knipperen, kunt u de toets
Afstemming OMHOOG of OMLAAG
gebruiken om de geheugenplaats te
veranderen om uw geheugenprogramma
aan te passen, druk dan opnieuw op de
MEMO toets om de voorinstelling te
voltooien.
NL
38
Page 40

Oproepen van voorkeuzezenders
1. Schakel de radio in.
2. Druk op de toets Oproepen van
voorkeuzezenders en Afstemming
omhoog/Omlaag om de gewenste
voorkeuzezender op te roepen; in het
display zal het nummer van de
voorkeuzeplaats knipperen.
3. Druk opnieuw op de toets Oproepen van
voorkeuzezenders, zodra de gewenste
voorkeuzezender is gevonden.
Vergrendelschakelaar
De vergrendelschakelaar aan de achterkant
van uw radio wordt gebruikt om onbedoelde
bediening te voorkomen.
1. Schuif de vergrendelschakelaar omhoog in
de stand ‘locked’ (vergrendeld), het
s ymbool zal in het display
verschijnen. De Aan / Uit toets en alle
andere toetsen zullen worden
uitgeschakeld. Dit zal bediening per
ongeluk voorkomen wanneer de radio in
een koffer is gestopt. Schuif, om de
vergrendelschakelaar te ontgrendelen, de
schakelaar naar beneden in de stand ‘
unlocked ‘(niet vergrendeld), het symbool
zal uit het display verdwijnen.
39
Page 41

Oortelefoons en antenne
De oortelefoons werken ook als FM antenne
wanneer ze in de aansluitconnector voor
hoofdtelefoon zijn gestoken. Tijdens het
luisteren via de luidspreker kunt u de
meegeleverde draadantenne in de
aansluitconnector voor hoofdtelefoon steken,
en de ST/MO/SP schakelaar in de stand
SP (luidspreker) zetten.
ST/MO/SP (Stereo/Mono/
Luidspreker)
1. Zet de schakelaar in de stand SP
(luidspreker), om het radioprogramma via
de luidspreker te beluisteren. Verzeker u
ervan dat de meegeleverde draadantenne
of de oortelefoons zijn aangesloten om de
beste FM ontvangst te verkrijgen.
NL
40
Page 42

2. Met deze radio kan een FM stereo
radioprogramma worden beluisterd door de
meegeleverde oortelefoons in de
aansluitconnector voor hoofdtelefoon te
stek en en de ST/MO/SP schakelaar in
de stand ST (stereo) te zetten, het
display zal het stereosymbool tonen.
Wanneer de zender die wordt ontvangen
zwak is, kan enige ruis hoorbaar zijn,
schakel de MONO mode in door de ST/
MO/SP s chakelaar in de stand MO
(mono) te zetten. De stereo indicator zal
uit het display verdwijnen.
Verandering van de afstemstap in
de AM (MG) band ( alleen
beschikbaar op DT-210/V - niet
voor LG versie )
41
Page 43

In Europa en andere delen van de wereld is
de afstemstap bij AM (MG) 9 kHz, in
Amerika is de AM afstemstap 10 kHz.
Om de AM afstemstap van 10 kHz naar
9 kHz te veranderen, handelt u als volgt:
1. Druk op toets AFSTEMMING OMLAAG en
dan op de toets AAN/UIT om de radio in
te sc hakelen, de afstemstap zal
veranderen naar 9 kHz in de AM band.
Om de AM afstemstap van 9 kHz naar
10 kHz te veranderen, handelt u als volgt:
1. Druk op de toets AFSTEMMING
OMHOOG en dan op de toets AAN/UIT
om de radio in te schakelen, de
afstemstap zal veranderen naar 10 kHz in
de AM band.
NL
42
Page 44

Schakelaar DBB ( Lage tonen
versterking)
Druk op toets DBB om de Lage tonen
versterking in te schakelen zodat sterke lage
tonen worden weergegeven, in het display
verschijnt het DBB symbool. Wanneer nog
een keer op de toets wordt gedrukt, zal de
functie DBB worden uitgeschakeld.
Opmerking:
Wij raden U aan de DBB functie alleen bij
gebruik van oortelefoons in te schakelen.
43
Page 45

Specificatie
VOEDING:
2 x AAA (UM-4) (R03) batterijen
UITGANGSVERMOGEN:
100 mW (10% T.H.D. 1 kHz)
Connector voor oortelefoons:
3.5 mm dia stereo 32 ohm
Frequentiebereik:
FM 87.50 - 108 MHz
AM (MG) 522 - 1629 kHz (DT-210/L)
520 - 1710 kHz (DT-210V)
LG 153 - 279 kHz (DT-210L)
TV kanaal 2 - 13 (DT-210V)
Levensduur van de batterij :
Bij benadering 24 uur ( via luidspreker ) bij
gebruik van Alkaline batterij
Bij benadering 32 uur ( via oortelefoons ) bij
gebruik van Alkaline batterij
NL
De fabrikant behoudt zich het recht voor
ontwerp en specificatie zonder voorafgaande
mededeling te veranderen.
44
Page 46

45
Page 47

Regler und Tasten
1
Wahlschalter Stereo/Mono/Lautsprecher
2
Speichertaste
3
Abstimmen Hoch/Nieder
4
Kopfhö rerbuchse
5
Lautstä rkenregler
6
Stromschalter
7
Display
8
Abruftaste Speicher
9
Wahlschalter DBB (Deep Bass Boost)
Tieftonverstä rker
10
Bereichwahlschalter
11
Halter Gü rtelklammer
12
Verriegelung
13
Batteriefach
14
Gü rtelklammer
Display
A
Anzeige des Bereichs
B
DBB aktiv
C
Anzeige Tastenverriegelung
D
Anzeige schwache Batterie
E
Frequenzanzeige
F
Voreinstellung des Speichers
G
Stereo-Anzeige
H
Anzeige 90 Minuten Zeitschalter
D
46
Page 48

Einlegen der Batterien
1. Das Gerä t auf s eine Vorderseite legen.
2. Auf die Sperrklinke des
Batteriefachdeckels drü cken und ihn in
Richtung der Markierung schieben.
3. Den Deckel des Batteriefachs entfernen
und in jede Seite des Batteriefachs 1
Batterie der Grö ß e UM-4 (AAA)
einlegen. Achten Sie darauf, dass die
Batterien in Ü bereinstimmung mit der
Marlierung eingelegt sind.
4. Den Deckel des Batteriefachs wieder
anbringen.
Ersetzen der Batterie
Wenn die Batterien verbraucht sind und
ersetzt werden mü ssen, erscheint im
Display das blinkende Symbol .
Nachdem die alten Batterien
herausgenommen worden sind, mü ssen die
neuen Batterien innerhalb von ca. 3 Minuten
eingelegt worden sein, da sonst alle
gespeicherten Daten (Voreinstellungen)
gelö scht sind.
47
Page 49

Bedienung des Radios
Sendersuchlauf
1. Das Gerä t durch Betä tigung der
Stromtaste einschalten.
Hinweis:
Das Gerä t ist mit einem Zeitschalter
ausgestattet, der den Strom 90 Minuten nach
dem Einschalten automatisch wieder
abschaltet (im Display erscheint das
Symbol ). Ist dies e Eigenschaft nicht
erfordert, drü cken Sie etwas lä nger
(wenigsten 2 Sekunden lang) auf die
Stromtaste, bis dieses Symbol aus dem
Display verschwindet.
2. Den gewü nschten Bereich einstellen,
indem wiederholt auf die
Bereichwahltaste gedrü ckt wird. Fü r
den FM- und TV- Bereich (nur bei Modell
DT-210V), als Antenne die mitgelieferten
Kopfhö rer oder die Drahtantenne
anschließ en. Fü r den Bereich AM (MW)
und LW (DT-210L), das Gerä t dem
besten Empfang entsprechend, drehen.
D
48
Page 50

3. Anhaltend auf die Abstimmtaste Hoch
oder Nieder drü cken, bis im Display die
Anzeige der Frequenz zu laufen beginnt.
Die Taste freigeben.
4. Das Gerä t setzt jetzt im eingestellten
Bereich den Sendersuchlauf ein, wobei
es bei jedem gefundenen Sender, der ein
ausreichend starkes Signal s endet,
anhä lt. Mit dem Lautstä rk enregler die
gewü nsc hte Lautstä rke einstellen.
Manuelles Abstimmen
1. Das Gerä t durch Betä tigung der
Stromtaste einschalten.
2. Den gewü nschten Bereich einstellen und
fü r den FM- und TV- Bereich (nur bei
Modell DT-210V), als Antenne die
mitgelieferten Kopfhö rer oder die
Drahtantenne anschließ en. Fü r den
Bereich AM (MW) und LW (DT-210L), das
Gerä t dem besten Empfang
entsprechend, drehen.
3. Mit jedem Druc k auf die Abstimmtaste
Hoch oder Nieder, wird die Frequenz
entsprechend geä ndert. Mit dem
Lautstä rkenregler die gewü nschte
Lautstä rke einstellen.
49
Page 51

Voreinstellung von Sendern
Bei Modell DT-210 kö nnen im FM-Bereich
bis zu 15 Sender in im Breich AM (MW) bis
zu 10 Sender gespeichert werden. Bei
Modell DT-210V kö nnen in den Bereichen
AM/ FM/ TV jeweils 10 Sender und bei
Modell DT-210L kö nnen in den Bereichen AM
(MW)/ FM/ LW ebenfalls jeweils 10 Sender
vorprogrammiert werden.
1. Mit einer der beiden oben beschriebenen
Methoden auf den gewü nschten Sender
abstimmen.
2. Zum Speichern des eingestellten Senders,
auf die Speichertaste (MEMO) drü cken.
Im Display blinkt jetz t das Symbol M und
die Nummer der empfohlenen
Speicherstelle. Zur Bestä tigung der
Voreinstellung des Speichers, erneut auf
die Speichertaste (MEMO) drü cken.
Solange das Symbol und die empfohlene
Speicherstelle blinken, kö nnen Sie mit
Hilfe der Abstimmtasten Hoch oder Nieder
die Speicherstelle ä ndern und Ihr
eigenes Speicherprogramm
zusammenstellen. Zur Bes tä tigung der
Voreinstellung des Speichers, erneut auf
die Speichertaste (MEMO) drü cken.
D
50
Page 52

Aufruf eines voreingestellten
(gespeicherten) Senders
1. Das Gerä t einschalten.
2. Zum Aufruf des gewü nschten
voreingestellten Senders, auf die
Abruftaste (RECALL) und die
Abstimmtaste Hoch/Nieder drü cken. Im
Display erscheint blinkend die Nummer
des voreingestellten Senders.
3. Nachdem der gewü nschte voreingestellte
Sender gefunden worden ist, erneut auf
die Abruftaste (RECALL)à drü cken.
51
Page 53

Verriegelung
Die Taste der Verriegelung befindet sich an
der Rü ckseite des Gerä tes und dient zur
Verhinderung eines unbeabsichtigen
Betriebs.
1. Den Verriegelungsschalter in die obere
Position (Verriegelung) schieben. Im
Display ersc heint das Symbol . Die
Stromtaste und auch alle anderen Tasten
sind jetzt gesperrt. Auf diese Weise wird
verhindert, dass das Gerä t
unbeabsic htigt eingeschaltet wird, z.B.
wenn Sie es in eine Reisetasche
einpacken. Soll die Verriegelung wieder
behoben werden, schieben Sie den
Schalter auf die untere Position
(entriegelt). Im Display wird das Symbol
erlöschen.
D
52
Page 54

Kopfhörer und Antenne
Sind die Kopfhörer an die entsprechende
Buchse angeschloss en, haben sie beim
Empfang im FM- Bereich auch die Funktion
einer Antenne. Werden dagegen die
Lautsprecher eingeschaltet, schließ en Sie
die mitgelieferte Drahtantenne an die
Kopfhörerbuchse an und schalten den
Schalter ST/ MO/ SP auf Position SP
(Lautsprecher).
ST/ MO/ SP (Stereo/ Mono/
Lautsprecher)
1. Möchten Sie sich ein Programm ü ber die
Lautsprecher anhören, schalten Sie
diesen Schalter auf Position
(Lautsprecher). Vergessen Sie nicht, die
mitgelieferte Drahtantenne an die
Kopfhörerbuchse anzuschließ en, so das
der FM-Empfang optimal stattfinden kann.
53
Page 55

2. Zum Empfang von FM Stereo Radioprogrammen, schließ en sie die
mitgelieferten Kopfhö rer an die
Kopfhö rerbuchse an und schalten Sie
den Schalter ST/MO/SP auf Position ST
(Stereo). Im Display erscheint das Stereo Symbol. Ist das Signal des eingestellten
Senders zu schwach, wird ein gewissen
Zischen zu hö ren sein. Um dieses
Zischen zu unterdrü cken, schalten Sie
den Schalter ST/ MO/ SP auf Position MO
(Mono). Im Display wird die Stereo Anzeige erlö schen.
Ä ndern der Abstimmschritte im
Bereich AM (MW) (nur bei Modell
DT-210/V, nicht für LW- Version)
D
54
Page 56

In Europa und anderen Teilen der Welt,
betragen die Abstimmschritte in AM (MW)
9 kHz, in Amerika betragen die AMAbstimmschritte 10 kHz.
Um die AM- Abstimmschritte von 10 kHz auf
9 kHz zu ä ndern, verfahren Sie wie folgt:
1. Zuerst auf die Abstimmtaste Nieder und
dann zum Einschalten des Gerä tes auf
die Stromtaste drü cken. Das Gerä t hat
die einzelnen Abstimms chritte im AM Bereic h auf 9 kHz geä ndert.
Um die AM- Abstimmschritte von 9 kHz auf
10 kHz zu ä ndern, verfahren Sie wie folgt:
1. Zuerst auf die Abstimmtaste Hoch und
dann zum Einschalten des Gerä tes auf
die Stromtaste drü cken. Das Gerä t hat
die einzelnen Abstimms chritte im AM Bereich auf 10 kHz geä ndert.
55
Page 57

DBB (Deep Bass Boost)- Taste
(Tieftonverstä rkung)
Wird der „Deep Bass Boost“
(Tieftonverstä rker) aktiviert, werden die
Tieftö ne v erstä rkt. Im Display erscheint
das Symbol DBB. Nach einem erneuten
Druck auf diese Taste wird der DBB
abgeschaltet.
Hinweis:
DBB sollte nur beim Einsatz von Kopfhö rern
aktiviert werden.
D
56
Page 58

Technische Daten
Speisung:
2 x AAA (UM-4) (R03) Batterien
Leistung:
100 MW (10% Gesamtklirrfaktor 1 kHz)
Kopfhö rerstecker:
3.5 mm Dia Stereo 32 Ohm
Frequenzbereich:
FM 87.50 - 108 MHz
AM (MW) 522 - 1629 kHz (DT-210/L)
520 - 1710 kHz (DT-210V)
LW 153 - 279 kHz (DT-210L)
TV 2 - 13 CH (DT-210V)
Lebensdauer der Batterie:
Bei Alkalibatterien, ca. 24 Stunden (Einsatz
Lautsprecher)
Bei Alkalibatterien, ca. 32 Stunden (Einsatz
Ko pfhö rer)
Vorbehaltlich Ä nderungen der technischen
Daten durch den Hersteller.
57
Page 59

381G301
 Loading...