

Page 1
DT-210/DT-210L/DT-210V
GB
Revision 1
Page 2
1
Page 3

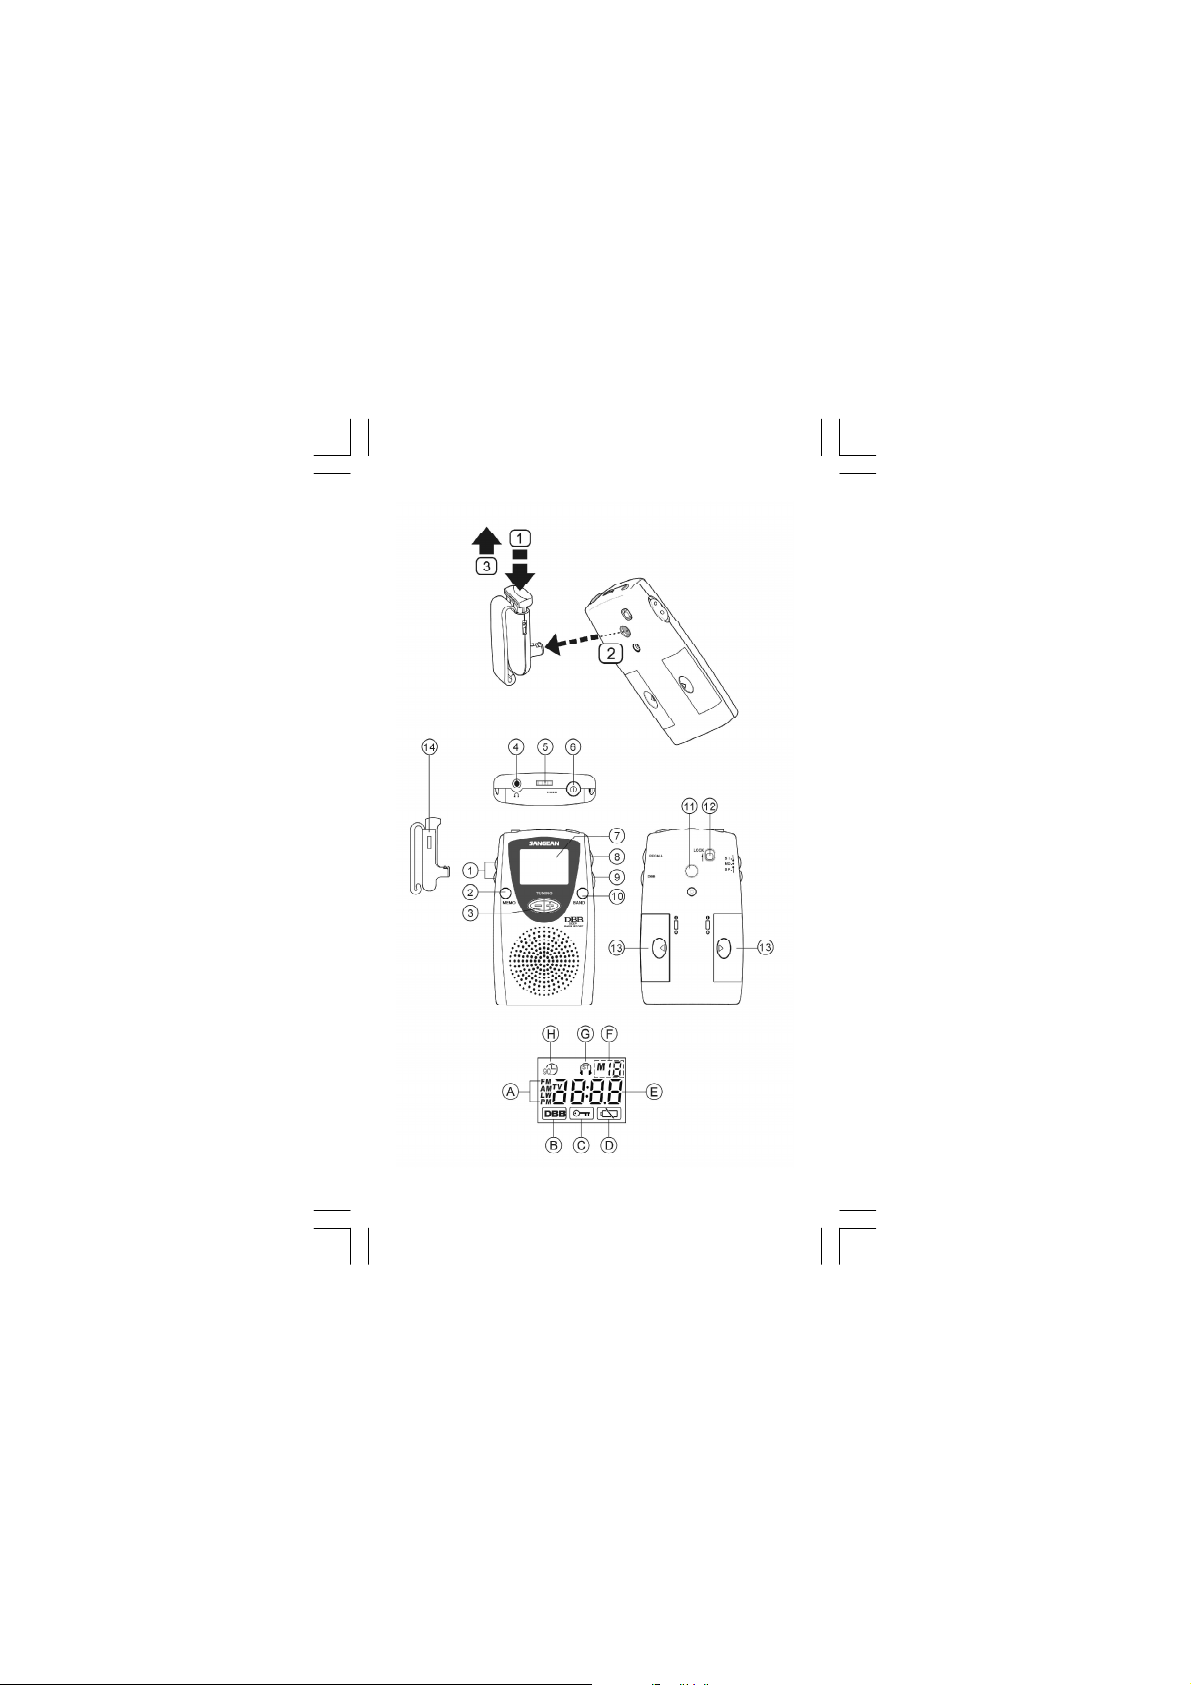
Controls
1
Stereo/Mono/Speaker switch
2
Memory button
3
Tuning Up/Down
4
Earphones Jack
5
Volume Control
6
Power switch
7
Display
8
Memory Recall
9
DBB (Deep Bass Boost) selection
10
Band selector
11
Belt Clip holder
12
Lock s witch
13
Battery compartment
14
Belt Clip
Display
A
Waveban d indicator
B
DBB on
C
Key lock indicator
D
Low battery indicator
E
Frequency display
F
Memory preset
G
Stereo indicator
H
90 minutes auto shut off indicator
GB
2
Page 4

Installing batteries
1. Position the radio face down.
2. Press the catch and slide in the direction
of the mark.
3. Lift up the battery cover and insert
1xUM-4 (AAA) size on each side of
battery compartment. Make sure the
batteries are positioned in accordance
with the diagram indicated.
4. Replace the battery cover.
Battery replace ment
The battery indicator will appear and
flash in the display when the batteries are in
need of replacement . After removing the
batteries, you have a pproximately 3 minutes
to replace the batteries after which the preset
memory information will be lost.
Operating the radio
3
Page 5

Addendum
Important:
Please always replace the batteries within
3 minutes and always with fresh batteries.
If the radio malfunctions after battery
replacement,
1. Switch off the radio and remove the
batteries.
2. With the aid of a suitable implement (the
end of a paper clip or pen), press the
RESET button located in the battery
compartment for about 5 seconds, this
will reset the microprocessor and clear
all stations stored in the preset memory.
3-1
Page 6

Search tuning
1. Switch on the radio by pressing the Power
button.
Note:
The radio is originally set to be 90 minutes
auto shut off after Power is switched on
( s ymbol will appear on the display).
If you don’t need this feature, press Power
button for more than 2 seconds until symbol
removed from the displa y.
2. Select the req uired waveband by
repeatedly pressing the Band button.
On FM and TV band (DT-210V only ),
connect the supplied earphones as the
antenna or the wire antenna. On AM(MW)
an d LW band (DT-210L), rotate the radio
for best reception.
3. Press and hold down either the Tuning Up
or Down buttons until frequency in the
display begins to change rapidly.
Release the button.
GB
4. The radio will scan the selected waveband,
stopping each time if finds a station of
sufficient strength. Adjust the volume
control to the required level.
4
Page 7

Manual tuning
1. Switch on the radio by pressing the Power
button.
2. Select the required waveband and connect
the supplied e arphones or wire antenna for
FM and TV band (DT-210V) listening.
On AM(MW) or LW band (DT-210L),
rotate the radio for best reception.
3. A single press on either the Tuning Up/
Down will change the frequency up or
down. Adjust the volume control to the
required level.
Presetting stations
You may store up to 15 stations on FM band
and 10 stati ons on AM (MW) band for DT-210
(10 stations each on AM/FM/TV band for
DT-210V a nd 10 stations each on AM(MW)/
FM/LW band for DT-210L) .
1. Tune into the required stations using one
of the tuning methods previously
described.
2. To store the station, press MEMO button,
display will flash M and the suggested
memory location. Press MEMO button
again to finalize the station presetting.
During the M and suggested memory
location are flashing, you may use either
Tuning Up or Down to change the memory
location to edit your memory program then
press MEMO button again to finalize the
pres etting.
5
Page 8

Recalling a preset station
1. Switch on the radio.
2. Press RECALL button and Tuning Up/
Down to recall required preset station
Display will flash preset station.
3. Press RECALL button again, once the
required preset station is found.
Lock Switch
The lock switch located on the rear cabinet
is used to prevent unintentional operation.
1. Slide the lock switch to the up locked
position , the symbol will appear in
the display. The power and all other
buttons will be disabled. This will prevent
accidental operation when the radio is
packed in a suitcase. To release the lock
switch , move the switch to the down
unlocked position, the symbol will
be removed from the display.
GB
6
Page 9

Earphones and antenna
The earphones also acts as the FM antenna
when plugged into the earphone s jack. While
listening via speaker, you may plug the supplied wire antenna into the earphones jack,
and set the ST/MO/SP switch to the SP
(speaker) position.
ST/MO/SP(Stereo /Mono/Speaker)
1. Switch the switch to SP (speaker) position,
while you listen to the radio program vi a
speaker. Make sure to plug the supplied
wire antenna or the earphones to get be st
FM reception.
2. This radio is capable of receiving FM
stereo radio program by plug the supplied
earphones into the earphones jack and set
the ST/MO/SP switch to ST (stereo)
position, display will show stereo symbol.
If the station being received is weak,
some his s may be audible, to reduce the
hiss, switc h the ST/MO/SP to MO(mono)
position. The stereo indicator will be
removed from the display.
7
Page 10

Change AM (MW) band tuning step
( available o nly on DT-210/V not for
LW version )
In Europe and other parts of the world, AM
(MW) tuning step are 9 kHz, in America the
AM tuning step is 10 kHz.
To change the AM tuning step from 10 kHz to
9 kHz, proceed as follows,
1. Press Tuning Down button then the power
button to switch on the radio, the radio
will be changed into 9 kHz tuning step on
AM band.
To change the AM tuning step from 9 kHz to
10 kHz, proceed as follows,
1. Press Tuning UP button then Power
button to switch on the radio, the radio will
be changed into 10 kHz tuning step on AM
band.
GB
8
Page 11

DBB (Deep Bass Boost) button
Press DBB button to activate the Deep Bass
Boost to have stronger bass sound, display
will appear DBB symbol. Another press will
cancel the DBB.
Note:
Suggest to activate the DBB only using
earphones.
9
Page 12

Specification
Power Supply:
2 x AAA (UM-4) (R03) batteries
Output Power:
100 mW (10% T.H.D. 1 kHz)
Earphones socket:
3.5 mm dia stereo 32 ohm
Frequency range:
FM 87.50 - 108 MHz
AM(MW) 522 - 1 629 kHz (DT-210/L)
520 - 1710 kHz (DT-210V)
LW 153 - 279 kHz (DT-210L)
TV 2 - 13 CH (DT-210V)
Battery Life:
Approx. 24 hours ( via speaker ) using
Alkaline battery
Approx. 32 hours ( via earphones ) using
Alkaline battery
The company reserves the right to amend the
specification without notice.
GB
10
 Loading...