

Page 1
GB Operating Instructions
F Mode d’emploi
E Instrucciones de manejo
NL Gebruiksaanwijzing
D Bedienungsanleitung
2
1 3
SR-32
GB
CAUTION
Do not allow this unit to be exposed to water, steam or sand. Do not leave the unit where excessive
heat could damage such as in a parked car where the heat from the sun can build up even though the
outside temperature may not seem too high.
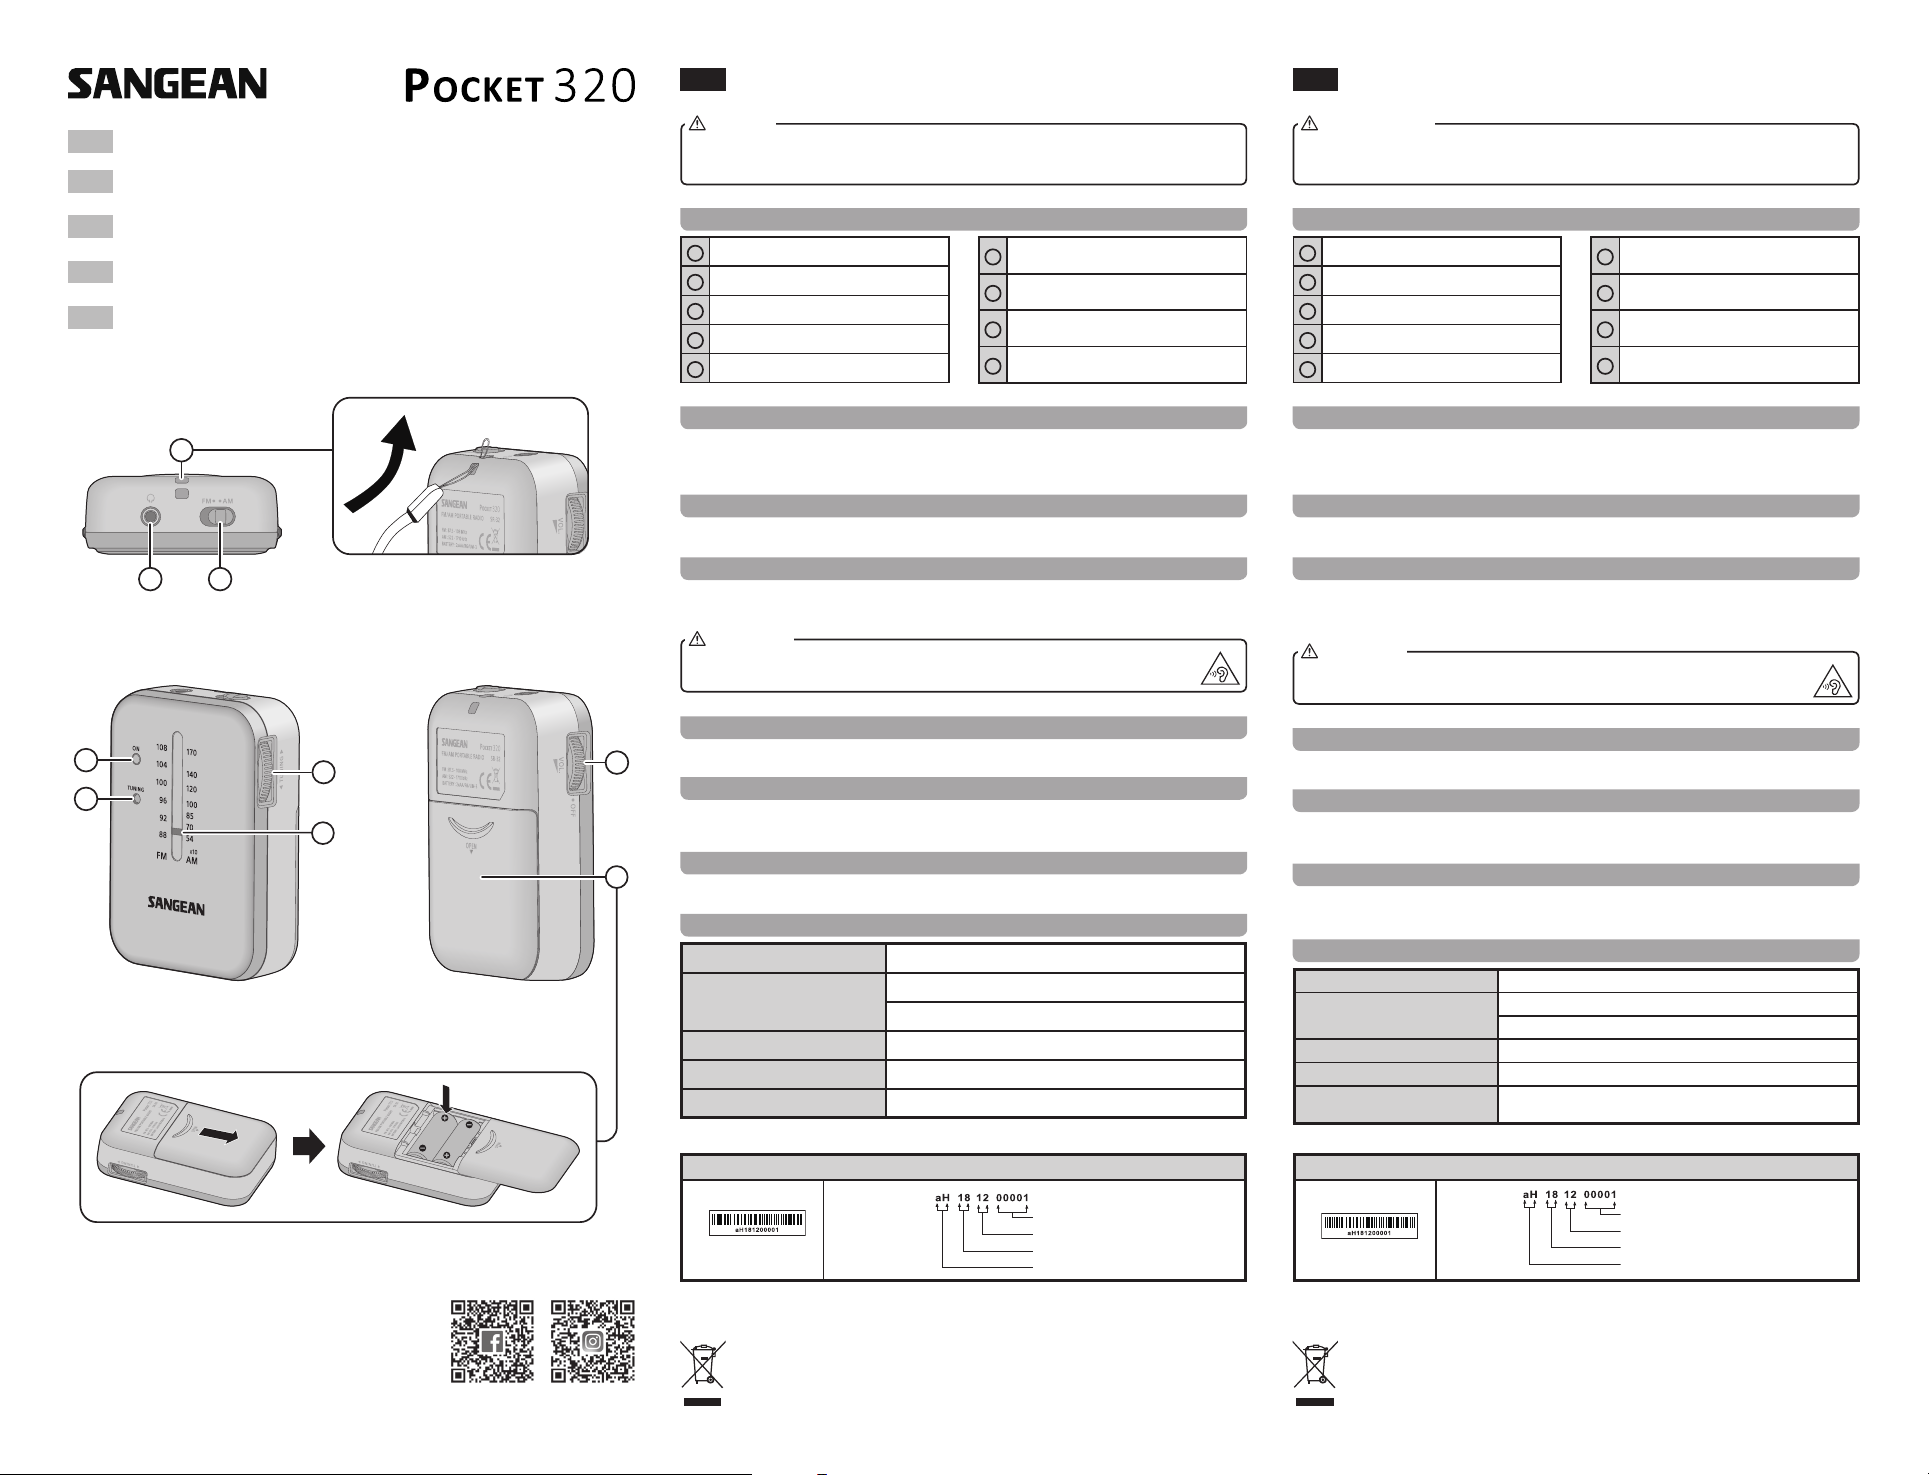
Controls
Headphone socket
1
Strap holder
2
Frequency Band switch
3
Tuning control
4
Tuning scale
5
Tuning LED indicator
6
Power indicator
7
Volume On / Off control
8
Battery compartment
9
Power supply
To insert the batteries, rst open the battery cover by sliding it in the direction shown by the arrow. Insert
two AA size batteries into the compartment. Ensure all batteries are inserted with correct polarity as shown
on the inside of the battery compartment.
Headphone Input
Plug your headphones or earbuds into the headphone socket for private listening.
Volume On / Off control
Turn on the power by switching the Volume On / Off control switch. Adjust it to the desired level of sound.
Rotating the Volume control clockwise will increase the sound level and the color of the power indicator will
be changed. When the power indicator turns red, this indicates that the current volume is too high.
IMPORTANT
Excessive sound pressure from Earbuds or Headphones can cause hearing loss.
To prevent possible hearing damage, do not listen at high volume levels for long periods of time.
F
MISE EN GARDE
Ne laissez pas cet appareil être exposé à l'eau, à la vapeur ou au sable. Ne laissez pas l'appareil dans
un endroit où la chaleur excessive pourrait l’endommager, par exemple dans une voiture garée, où la
chaleur du soleil pourrait s'accumuler, même si la température extérieure ne semble pas trop élevée.
Contrôles
Prise casque
1
Dragonne
2
Commutateur de la bande de fréquence
3
Contrôle de la syntonisation
4
Échelle de la syntonisation
5
Voyant de réglage
6
Voyant d'alimentation
7
Contrôle d’activation / désactivation du
8
volume
Compartiment des piles
9
Alimentation fournie
Pour insérer les piles, ouvrez d’abord le couvercle du compartiment des piles en le faisant glisser dans le
sens indiqué par la èche. Insérez deux piles AA dans le compartiment. Assurez-vous que toutes les piles
soient insérées avec la polarité correcte, comme indiqué à l'intérieur du compartiment des piles.
Entrée de la prise casque
Branchez vos écouteurs ou votre casque dans la prise pour vous permettre d’avoir une écoute privée.
Contrôle d'activation / désactivation du volume
Mettez l'appareil sous tension en appuyant sur l'interrupteur d'activation / désactivation du volume. Ajustez-
le au niveau sonore souhaité. Tournez le bouton de contrôle du volume dans le sens des aiguilles d'une
montre pour augmenter le niveau sonore, l'indicateur d'alimentation changera alors de couleur. Lorsque
l'indicateur d'alimentation devient rouge, cela indiquera que le volume actuel est trop élevé.
IMPORTANT
Une pression sonore excessive des écouteurs ou du casque peut causer une perte auditive.
An d'éviter tout dommage auditif, n'écoutez pas à un volume élevé pendant de longues périodes.
Frequency Band switch
7
4
8
6
5
9
Set the Frequency Band switch to the desired Frequency Band.
Tuning control
Slowly rotate the tuning control to select the required station. The tuning indicator will light when the station
is correctly tuned.
Tuning scale
Rotate the tuning control until the tuning scale corresponds to the frequency of the required station.
Specications
Battery
Frequency coverage
Output Power
Headphone socket
Operating temperature range
The barcode label on the product is dened as below:
※
Sangean reserves the right to amend the specications without notice.
If at any time in the future you should need to dispose of this product please note that: Waste
electrical products should not be disposed of with household waste. Please recycle where
facilities exist. Check with your Local Authority or retailer for recycling advice. (Waste Electrical
and Electronic Equipment Directive)3A81dD1100010
2 X AA (UM-3 / R6) size
FM 87.5–108 MHz
AM 522–1710 kHz
1mW 32ohm
3.5mm dia. (mono)
0°C to +35°C
Serial number
Production month
Production year
Product code
Commutateur de la bande de fréquence
Réglez le commutateur de la bande de fréquence sur la bande de fréquence souhaitée.
Contrôle de la syntonisation
Tournez lentement le contrôle de la syntonisation pour sélectionner la station souhaitée. Le voyant de
réglage s'allumera lorsque la station est correctement syntonisée.
Échelle de syntonisation
Tournez le contrôle de la syntonisation jusqu'à ce que l'échelle de syntonisation corresponde à la
fréquence de la station souhaitée.
Spécications
Batterie
Couverture de fréquence
Puissance de sortie
Prise casque
Plage de température de
fonctionnement
L'étiquette du code-barres sur le produit est dénie comme ci-dessous:
※
Sangean se réserve le droit de modier les spécications sans préavis.
Si à l'avenir vous devez vous débarrasser de ce produit, veuillez noter que: Les produits
électriques ne peuvent pas être jetés avec le reste des déchets ménagers. Si possible,
amenez l'appareil à un centre de recyclage. Vériez auprès de votre municipalité ou de votre
détaillant pour en savoir plus sur le recyclage. (Directive relative aux déchets d’équipements
électriques et électroniques).
taille 2 X AA (UM-3 / R6)
FM 87,5–108 MHz
AM 522–1710 kHz
1mW et 32ohm
3,5mm de diamètre (mono)
0°C à +35°C
Numéro de série
Mois de production
Année de production
Code du produit
Page 2
E
PRECAUCIÓN
No permita que esta unidad se exponga al agua, vapor o arena. No deje la unidad donde un calor
excesivo pueda dañarla, como en un coche aparcado donde el calor del sol pueda acumularse aunque
la temperatura exterior no parezca demasiado alta.
Controles
Toma de auriculares
1
Sujeción para la correa
2
Interruptor de banda de frecuencia
3
Control de sintonización
4
Escala de sintonización
5
Indicador de sintonización LED
6
Indicador de encendido
7
Control de volumen encendido / apagado
8
Compartimiento de la batería
9
Alimentación
Para insertar las baterías, primero abra la cubierta de la batería deslizándola en la dirección indicada por
la echa. Inserte dos baterías de tamaño AA en el compartimiento. Asegúrese de que todas las baterías
están insertadas con la polaridad correcta, tal y como se muestra en el interior del compartimiento de la
batería.
Entrada de auriculares
Enchufe los auriculares a la toma de auriculares para una escucha privada.
Control de volumen encendido / apagado
Enciéndalo moviendo el interruptor de control de volumen encendido / apagado. Ajústelo al nivel de sonido
deseado. Girar el control de volumen en el sentido de las agujas del reloj aumentará el nivel de sonido y
el color del indicador de encendido cambiará. Cuando el indicador de encendido se pone en color rojo,
signica que el volumen actual está a un nivel muy alto.
IMPORTANTE
Una presión sonora excesiva de los auriculares puede causar pérdida de audición.
Para evitar posibles daños en la audición, no escuche a niveles de volumen alto durante largos
periodos de tiempo.
Interruptor de banda de frecuencia
Ponga el interruptor de banda de frecuencia en la banda de frecuencia deseada.
Control de sintonización
Gire lentamente el control de sintonización para seleccionar la emisora deseada. El indicador de
sintonización se iluminará cuando la emisora esté sintonizada correctamente.
Escala de sintonización
Gire el control de sintonización hasta que la escala de sintonización se corresponda con la frecuencia de
la emisora deseada.
Especicaciones
Batería
Cobertura de frecuencia
Potencia de salida
Toma de auriculares
Temperatura de funcionamiento
2 baterías de tamaño AA (UM-3 / R6)
FM 87.5–108 MHz
AM 522–1710 kHz
1mW, 32ohmios
3,5mm de diámetro (mono)
De 0°C a +35°C
NL
LET OP
Stel dit apparaat niet bloot aan water, stoom of zand. Laat het apparaat niet achter op plaatsen
waar overmatige hitte schade kan veroorzaken. Laat het apparaat bijvoorbeeld niet achter in een
geparkeerde auto, waar de warmte van de zon zich kan ophopen, zelfs al lijkt de buitentemperatuur niet
te hoog.
Bedieningselementen
Hoofdtelefoonaansluiting
1
Draagriemhouder
2
Frequentiebandschakelaar
3
Afstemknop
4
Afstemschaal
5
Afstemindicator
6
Vermogenindicator
7
Volume / aan / uit-knop
8
Batterijvak
9
Voeding
Open om de batterijen te plaatsen eerst het batterijdeksel door het in de richting van de pijl te schuiven.
Plaats twee AA-batterijen in het batterijvak. Zorg ervoor dat alle batterijen in de juiste richting zijn geplaatst
(polariteit), zoals aangegeven aan de binnenkant van het batterijvak.
Hoofdtelefooningang
Als u privé wilt luisteren, steek de stekker van uw hoofdtelefoon of oordopjes dan in de hoofdtelefoonaansluiting.
Volume / aan / uit-knop
Schakel het apparaat in met behulp van de Volume / aan / uit-knop. Gebruik de knop vervolgens om
het volumeniveau in te stellen. U kunt de volumeknop met de klok mee draaien om het volumeniveau te
verhogen. De vermogenindicator verandert van kleur tijdens het wijzigen van het volumeniveau. Wanneer
de vermogenindicator rood wordt, geeft dit aan dat het huidige volume te hoog is.
BELANGRIJK
Overmatige geluidsdruk van oordopjes of hoofdtelefoons kan gehoorverlies veroorzaken.
Luister niet langdurig met een hoog volume om mogelijke gehoorschade te voorkomen.
Frequentiebandschakelaar
Gebruik de frequentiebandschakelaar om de gewenste frequentieband te selecteren.
Afstemknop
Draai langzaam aan de afstemknop om de gewenste zender te selecteren. De afstemindicator licht op
wanneer er correct is afgestemd op de zender.
Afstemschaal
Draai aan de afstemknop totdat de frequentie op de afstemschaal overeenkomt met de frequentie van de
gewenste zender.
Specicaties
Batterij
Frequentiebereik
Uitgangsvermogen
Hoofdtelefoonaansluiting
Bedrijfstemperatuurbereik
2 X formaat AA (UM-3 / R6)
FM 87.5–108 MHz
AM 522–1710 kHz
1mW 32ohm
3,5mm dia. (mono)
0°C tot +35°C
D
CAUTION
Schützen Sie das Gerät vor Wasser, Dampf und Sand. Lassen Sie das Gerät nicht an Orten, an
denen es aufgrund extremer Hitze beschädigt werden könnte, wie z.B. in geparkten Autos, da die
Temperaturen im Auto aufgrund von Sonneneinstrahlung extrem ansteigen können, auch wenn die
Außentemperatur nicht sehr hoch ist.
Übersicht des Geräts
Kopfhöreranschluss
1
Riemenhalterung
2
Frequenzband-Taste
3
Tuning-Regler
4
Tuning-Skala
5
Tuning-LED-Anzeige
6
Betriebsanzeige
7
Lautstärkeregler und Ein / Aus-Taste
8
Batteriefach
9
Stromversorgung
Um Batterien einzulegen, öffnen Sie zunächst das Batteriefach, indem Sie die Abdeckung in Richtung der
Pfeilmarkierung schieben. Legen Sie dann zwei Batterien des Typs AA in das Batteriefach ein. Achten Sie
darauf, die Batterien gemäß den Polaritätsmarkierungen im Inneren des Batteriefachs einzulegen.
Kopfhörereingang
Schließen Sie Ihre Kopfhörer oder Ohrhörer an die Kopfhörerbuchse an, um ungestört Musik zu hören.
Lautstärkeregler und Ein / Aus-Taste
Schalten Sie das Gerät mit der Ein / Aus-Taste ein. Stellen Sie dann die Lautstärke entsprechend ein.
Drehen Sie den Lautstärkeregler im Uhrzeigersinn, um die Lautstärke zu erhöhen; die Betriebsanzeige
leuchtet in einer anderen Farbe. Wenn die Betriebsanzeige rot leuchtet, dann ist die aktuelle Lautstärke zu
hoch.
WICHTIG
Übermäßiger Schalldruck von Kopf- oder Ohrhörern kann zu Gehörverlust führen.
Um potenzielle Hörschäden zu vermeiden, hören Sie nicht über längere Zeiten bei hoher
Lautstärke Musik.
Frequenzband-Taste
Stellen Sie mit der Frequenzband-Taste das gewünschte Frequenzband ein.
Tuning-Regler
Drehen Sie den Regler langsam, um den gewünschten Sender einzustellen. Sobald das Gerät den Sender
gefunden hat, leuchtet die Tuning-Anzeige auf.
Tuning-Skala
Drehen Sie den Tuning-Regler, bis in der Skala die Frequenz des gewünschten Senders angezeigt wird.
Technische Daten
Batterie
Frequenzbereich
Ausgangsleistung
Kopfhörerbuchse
Betriebstemperatur
2 x AA (UM-3 / R6)
UKW 87,5–108 MHz
MW 522–1710 kHz
1mW 32Ohm
3,5mm (Mono)
0°C bis +35°C
El código de barras en el producto se dene de la siguiente manera:
※
Número de serie
Mes de producción
Año de producción
Código del producto
Sangean se reserva el derecho de modicar las especicaciones sin previo aviso.
Si requiere desechar este producto en cualquier momento futuro, por favor note que: Los
residuos de productos eléctricos no deben tirarse en la basura doméstica. Por favor recicle
donde existan centros para ello. Consulte con su autoridad local o minorista para obtener
información sobre el reciclaje (Directiva de Residuos de Aparatos Eléctricos y Electrónicos).
De streepjescode op het product is als volgt opgebouwd:
※
Serienummer
Productiemaand
Productiejaar
Productcode
Sangean behoudt zich het recht voor om de specicaties zonder voorafgaande kennisgeving te wijzigen.
Als u dit product op enig moment in de toekomst wilt weggooien, houd er dan rekening mee dat
afgedankte elektrische producten niet met het huisafval mogen worden weggegooid. Recycle
indien mogelijk. Neem contact op met uw gemeente of winkel voor advies over recycling.
(Richtlijn voor afgedankte elektrische en elektronische apparatuur)
Folgender Barcode ist am Gerät angebracht:
※
Seriennummer
Herstellungsmonat
Herstellungstag
Produkt-Code
Sangean behält sich das Recht vor, die technischen Daten ohne Vorankündigung zu ändern.
Beachten Sie bei der Entsorgung des Geräts folgendes: Elektrische Altgeräte dürfen nicht über
den Hausmüll entsorgt werden. Recyceln Sie, sofern entsprechende Möglichkeiten vorhanden
sind. Wenden Sie sich für weitere Informationen bzgl. des Recyclings an Ihre Behörde oder
Ihren Händler vor Ort. (Richtlinie zur Entsorgung elektrischer und elektronischer Altgeräte)
 Loading...