

Page 1

DPR-69+
DNLEFGB
Page 2

Contents
Controls ................................................................................. 2-3
Battery operation .................................................................. 4-5
Using the AC adaptor .............................................................. 6
Lock switch ............................................................................... 6
Operating your radio - DAB .................................................... 7
Selecting a station - DAB ....................................................... 8
Secondary services - DAB ..................................................... 8
Display modes - DAB ............................................................. 9
Finding new stations - DAB .................................................. 10
Manual tuning - DAB ............................................................. 11
Dynamic range control - DAB .............................................. 12
Operating your radio - FM .................................................... 13
Manual tuning - FM ............................................................... 14
Display modes - FM ............................................................. 15
Stereo / Mono setting - FM .................................................. 17
Scan sensitivity setting - FM ................................................ 18
Software version .................................................................... 19
System reset .......................................................................... 19
Headphone socket ................................................................ 20
Display backlight ................................................................... 20
Battery information .......................................................... 21-22
General ................................................................................... 23
Specifications ........................................................................ 23
Circuit features ...................................................................... 23
Presetting stations - DAB and FM ....................................... 16
Recalling a preset - DAB and FM ....................................... 16
1
Page 3
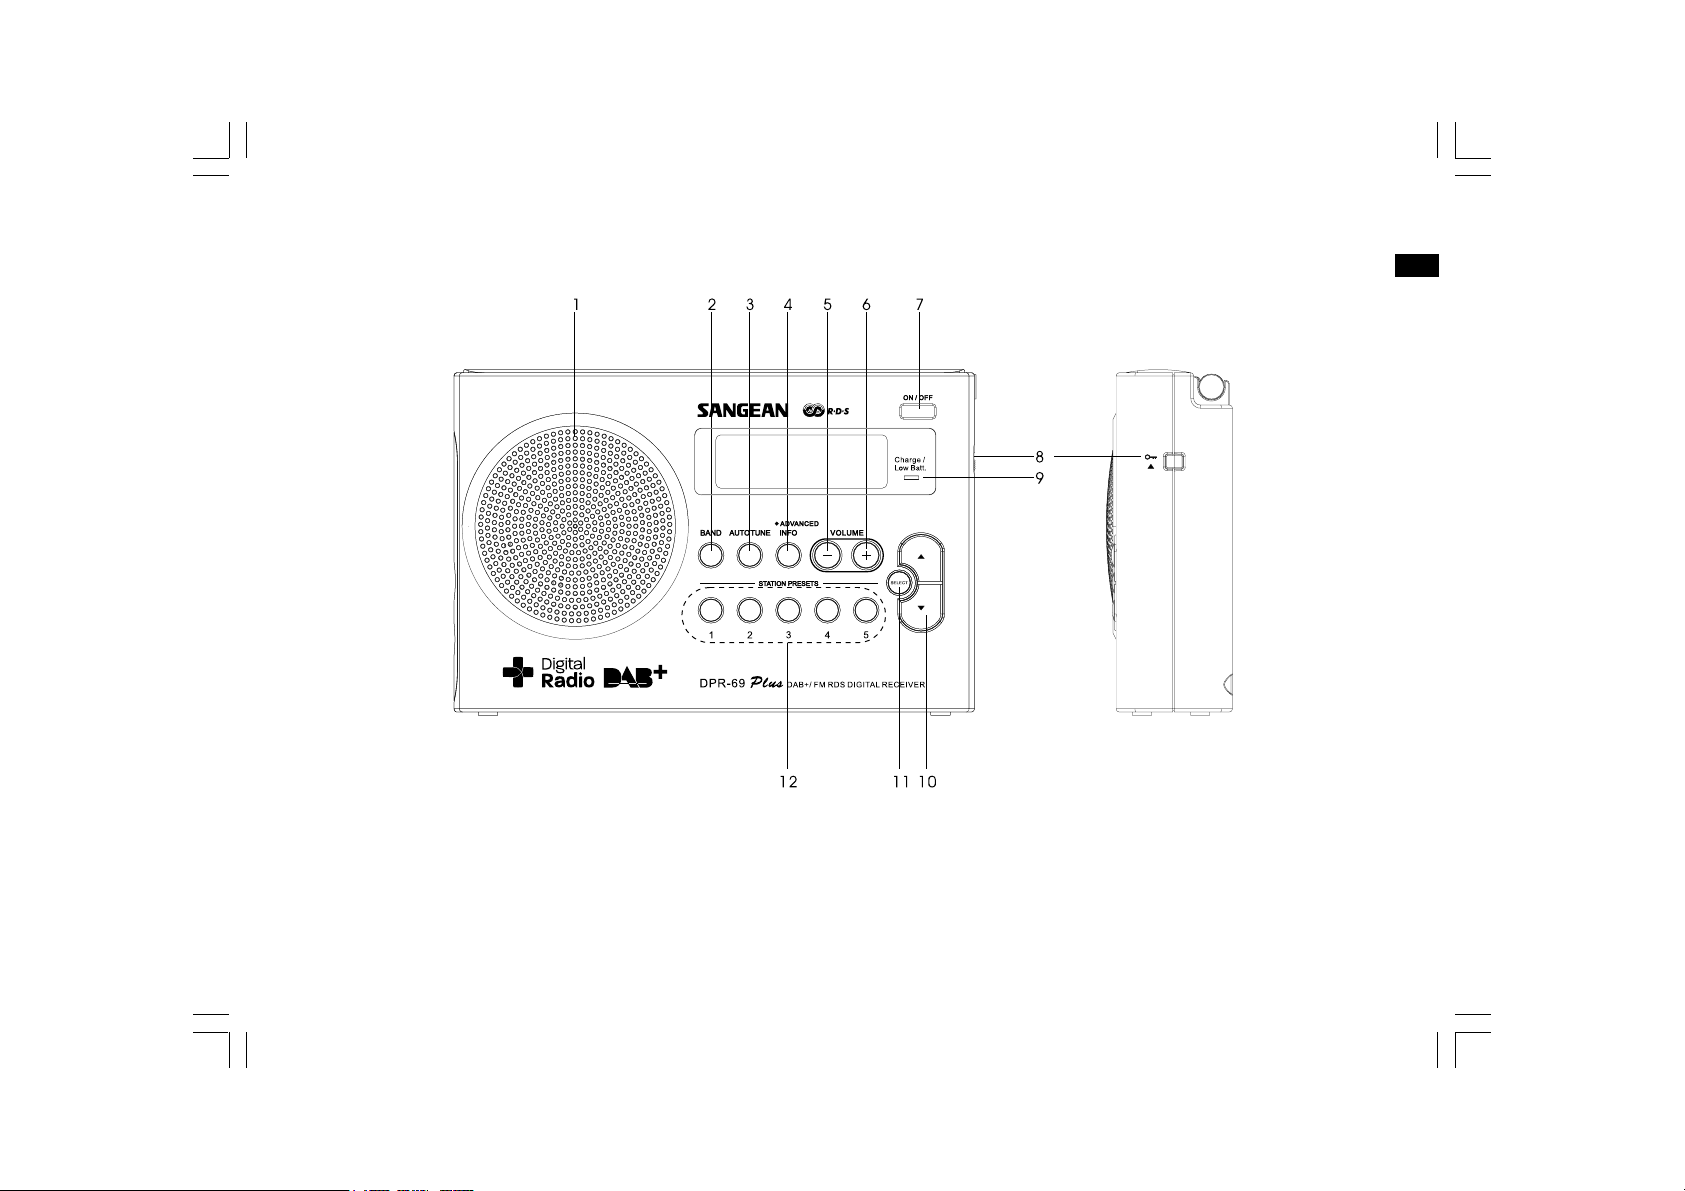
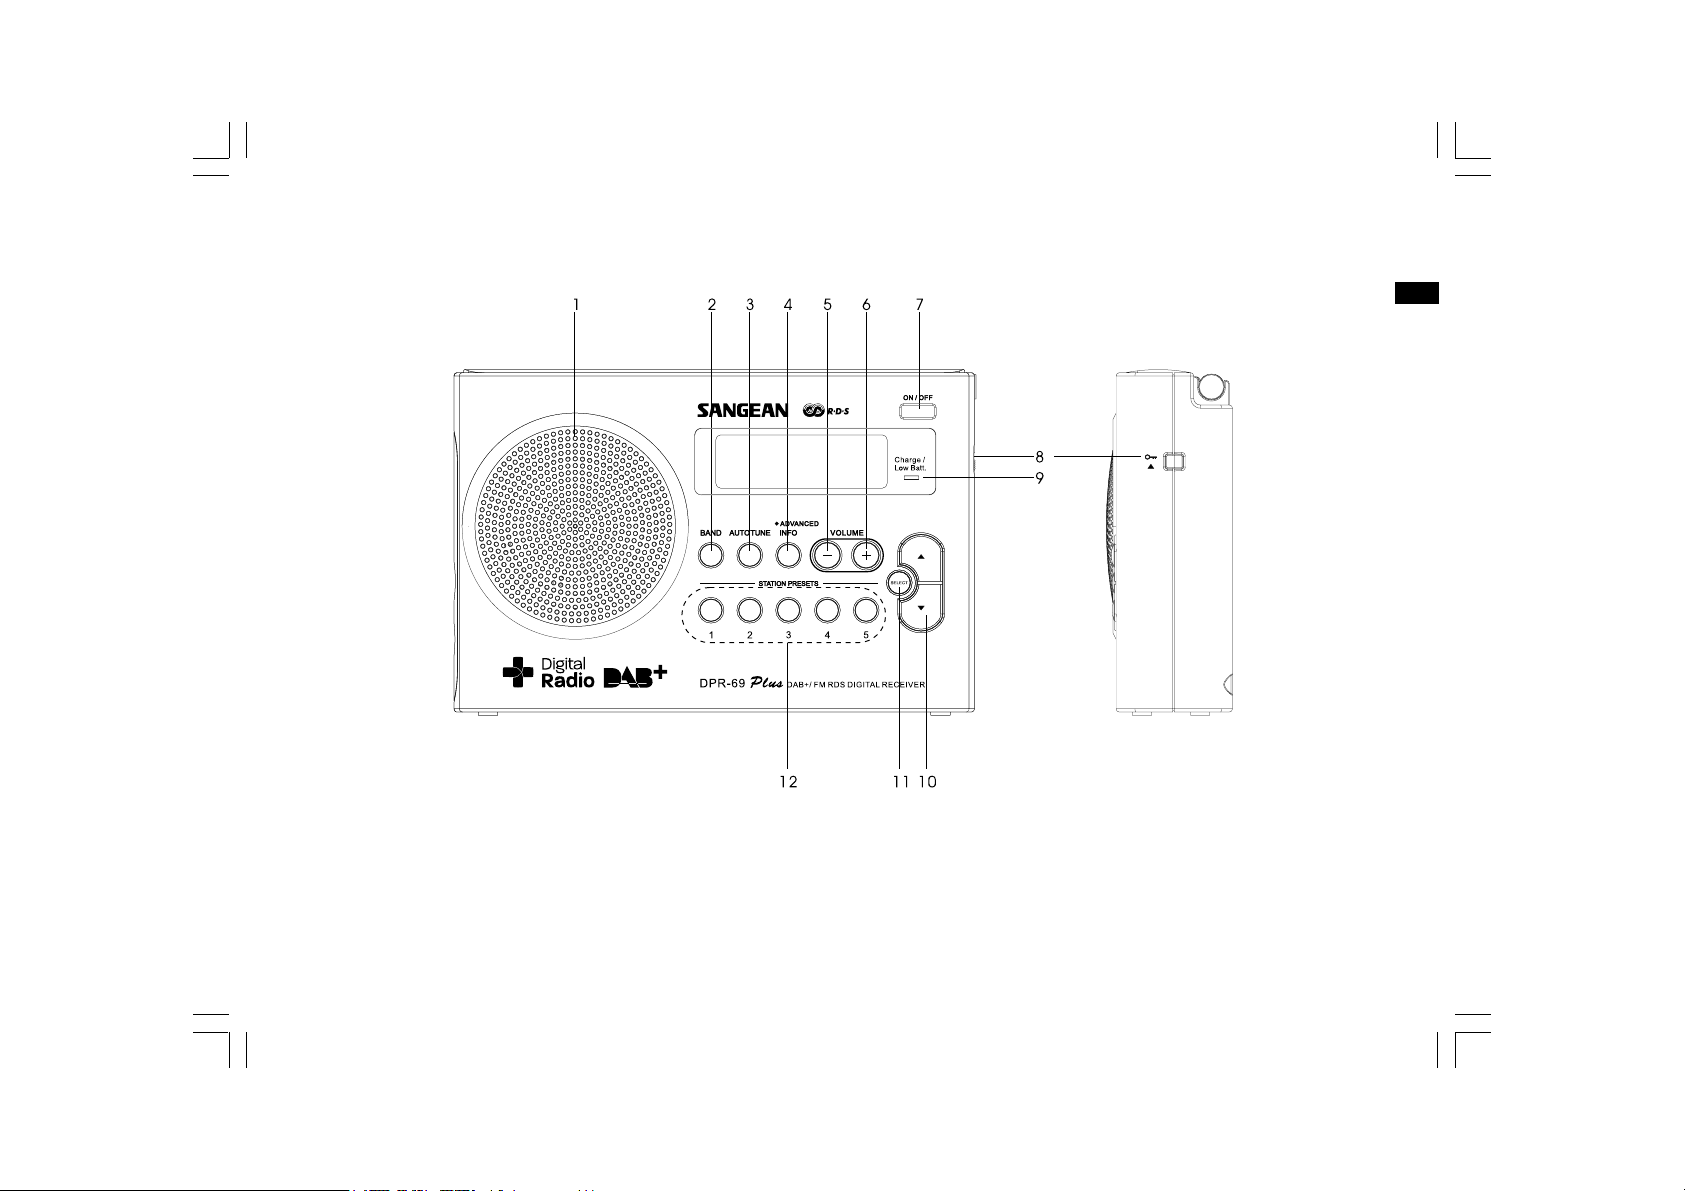
Controls
(Front)
GB
1. Speaker
2. Band button
3. Auto Tune button
4. Info button
5. Volume Down button
6. Volume Up button
7. On / Off button
8. Lock switch
9. Charge / Battery Low indicator
10. Tuning Up / Down buttons
11. Select button
12. Preset buttons
2
Page 4
Controls
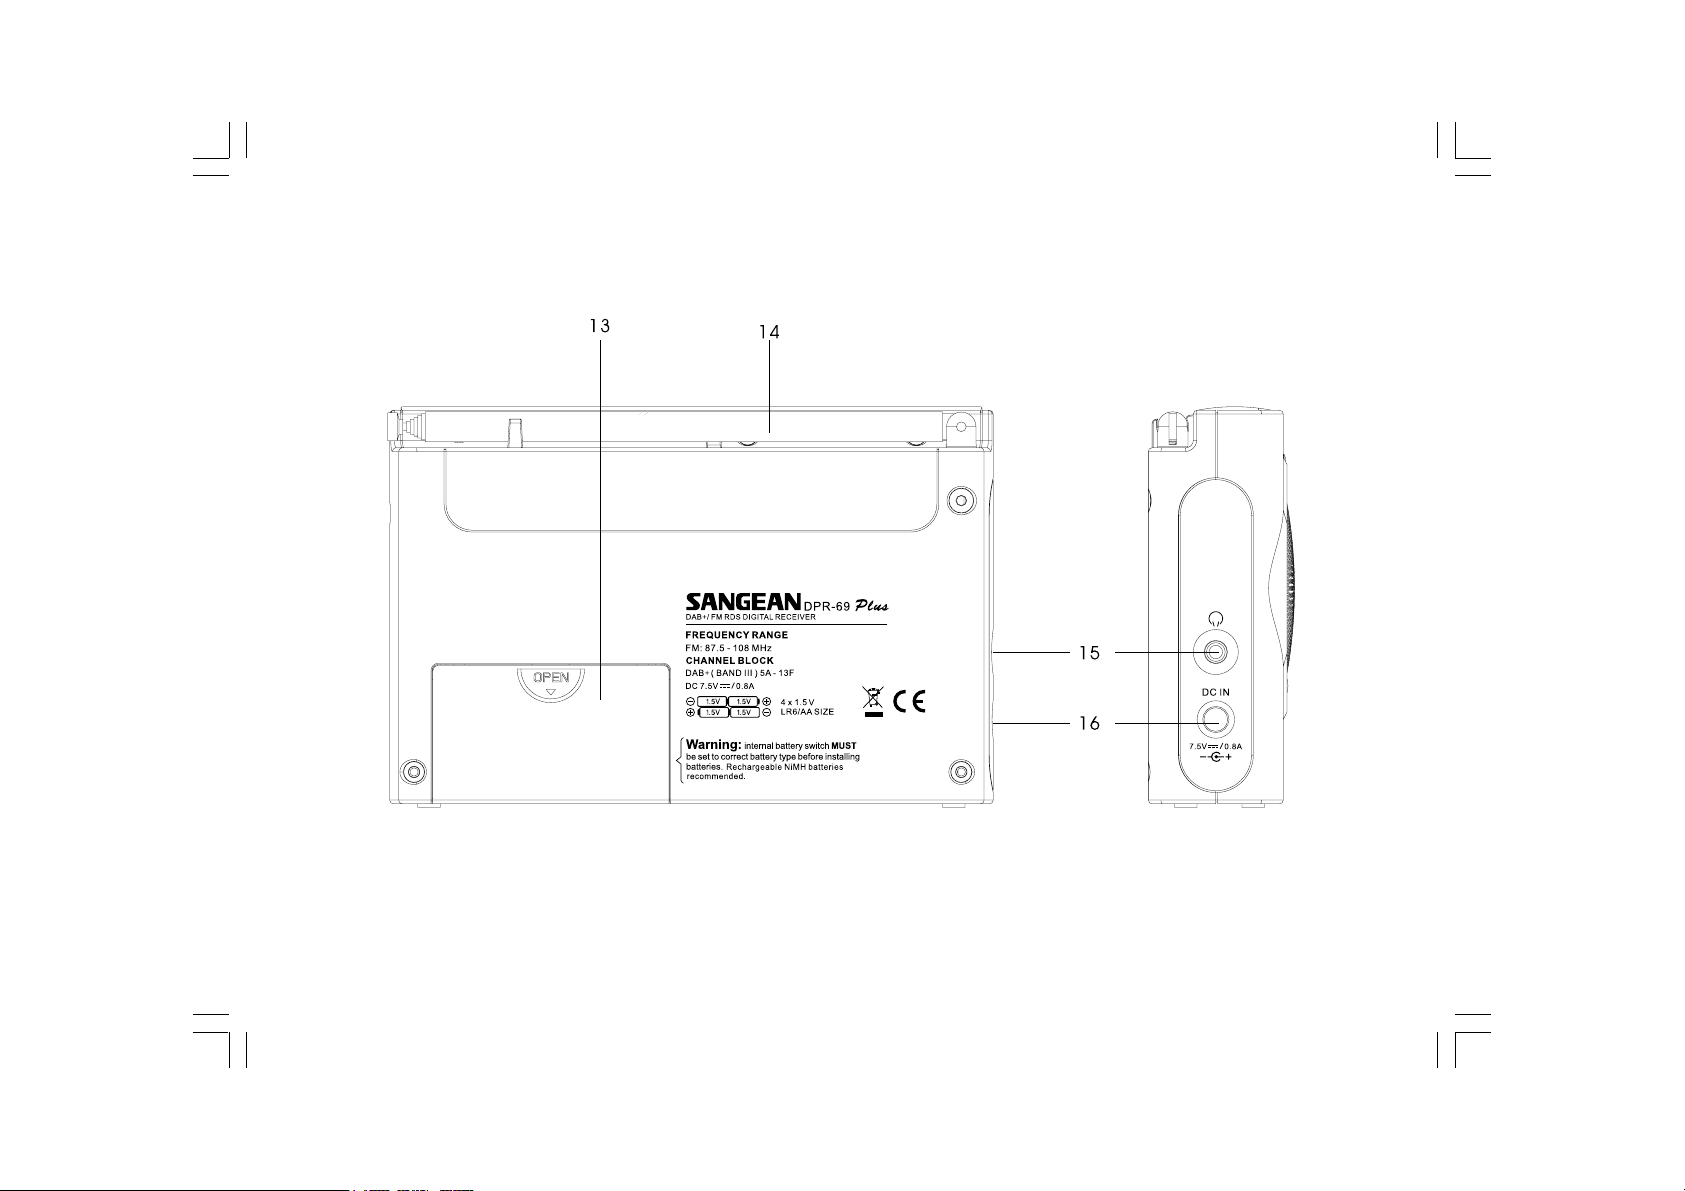
(Back)
13.Battery compartment
14.Telescopic aerial
3
15. Headphone socket
16. DC jack socket
Page 5
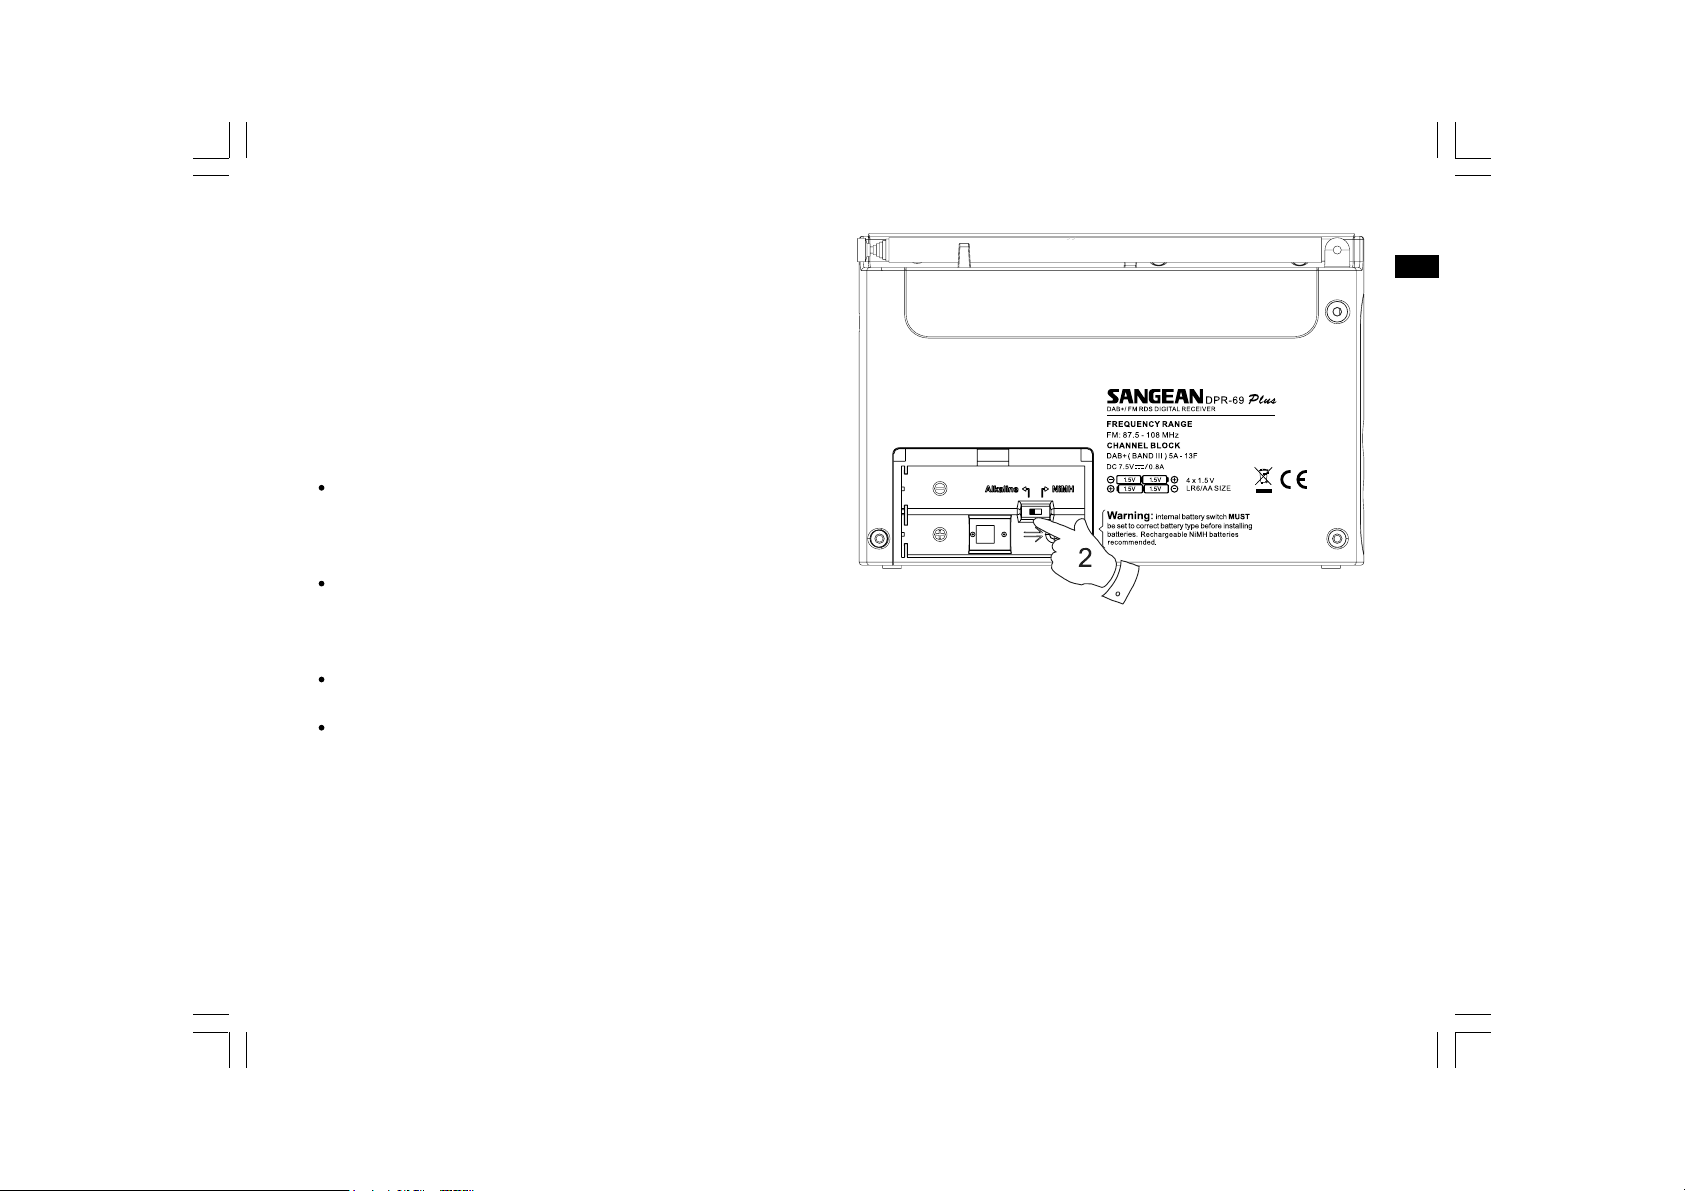
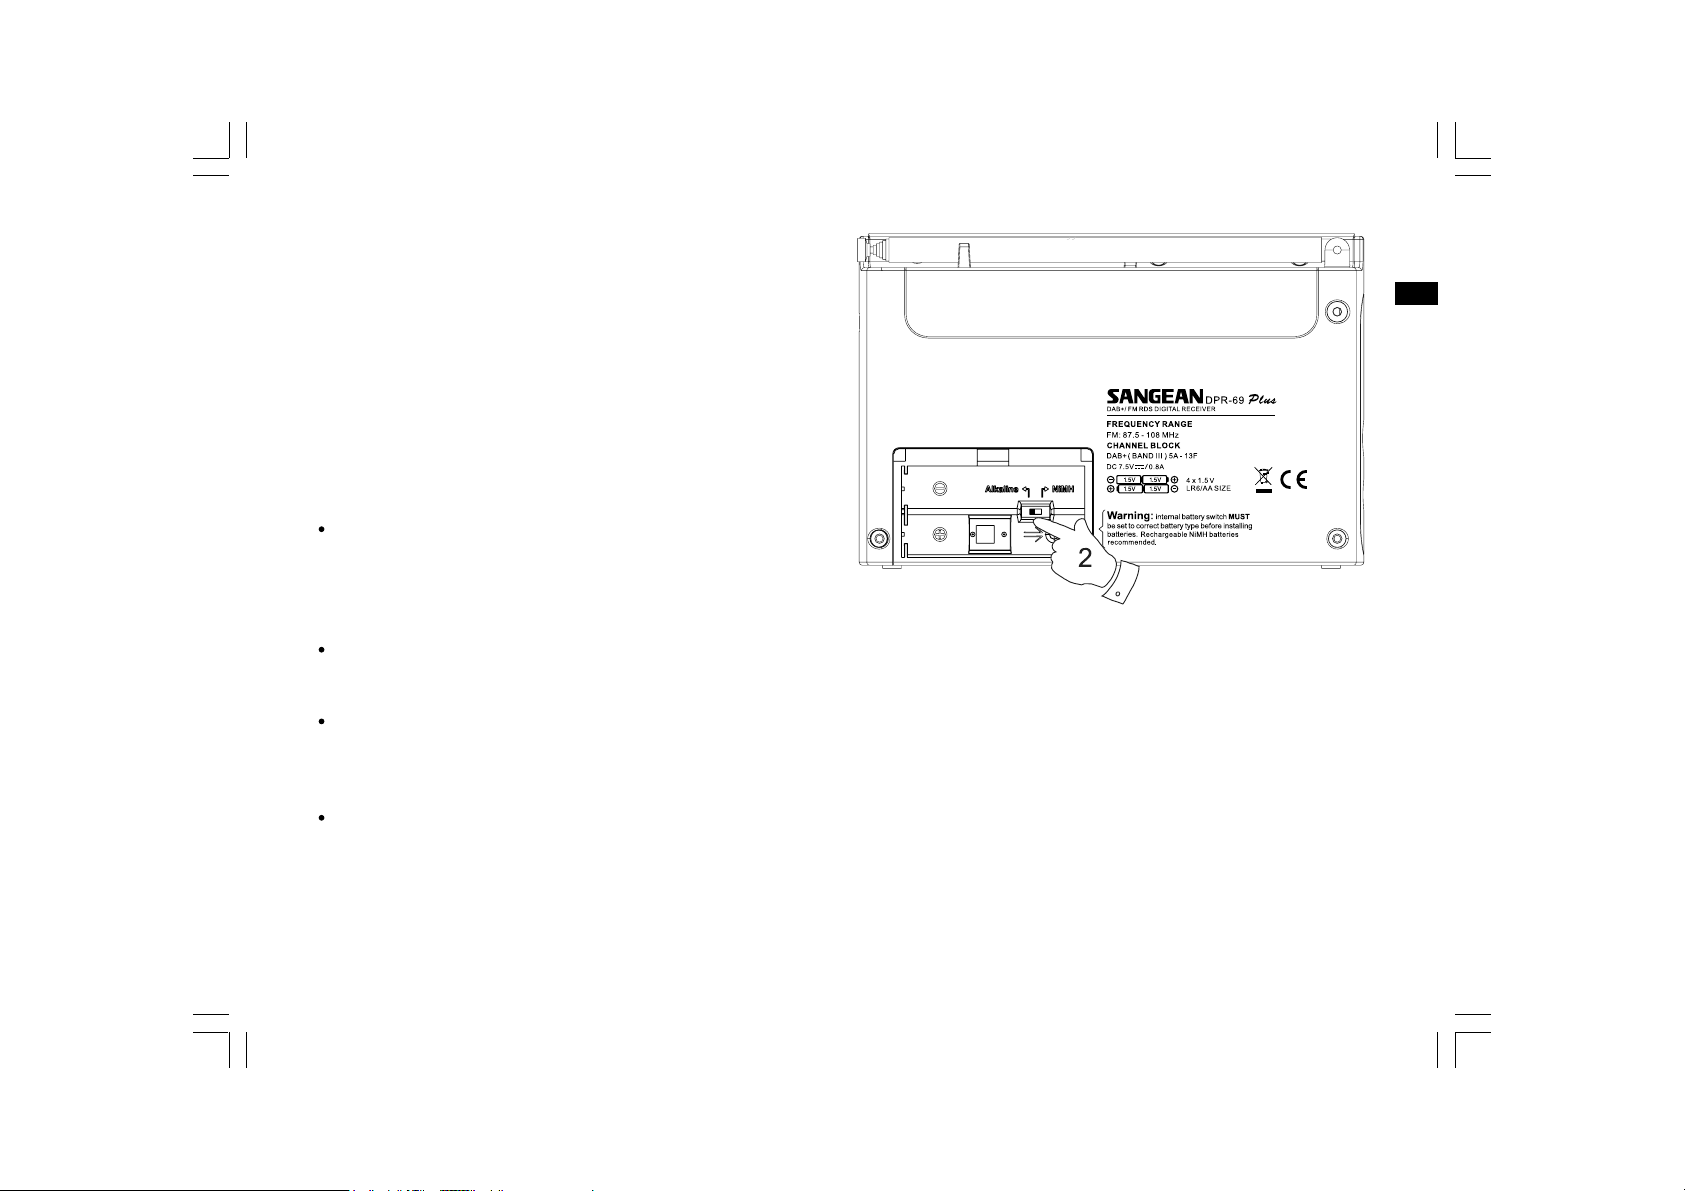
Battery operation using alkaline batteries
1. Remove the battery cover on the back of the unit by sliding the cover
in the direction of the arrow.
2. Slide the switch inside the battery compartment to the
Alkaline position.
3. Insert four LR6 (AA size) alkaline batteries into the spaces in the
compartment. Take care to ensure all batteries are inserted with the
correct polarity as shown on the back of the radio. Then replace the
battery cover.
Important:
when using alkaline batteries the battery switch must be placed
in the alkaline position. Failure to do so could result in serious
damage to the batteries or radio.
When the batteries are exhausted, the battery light will show red for
a short while. The radio will then switch itself off. It may not be
possible to switch the radio back on until the batteries are replaced,
or until the radio is connected to the mains adaptor.
If the radio is not to be used for any extended period of time it is
recommended that the batteries are removed from the radio.
We would recommend for economy that the ecologic 1 is used via
the AC adaptor whenever possible with battery operation for
occasional or stand-by use only. If extended listening using
batteries is anticipated, then the use of rechargeable batteries
is recommended.
GB
4
Page 6

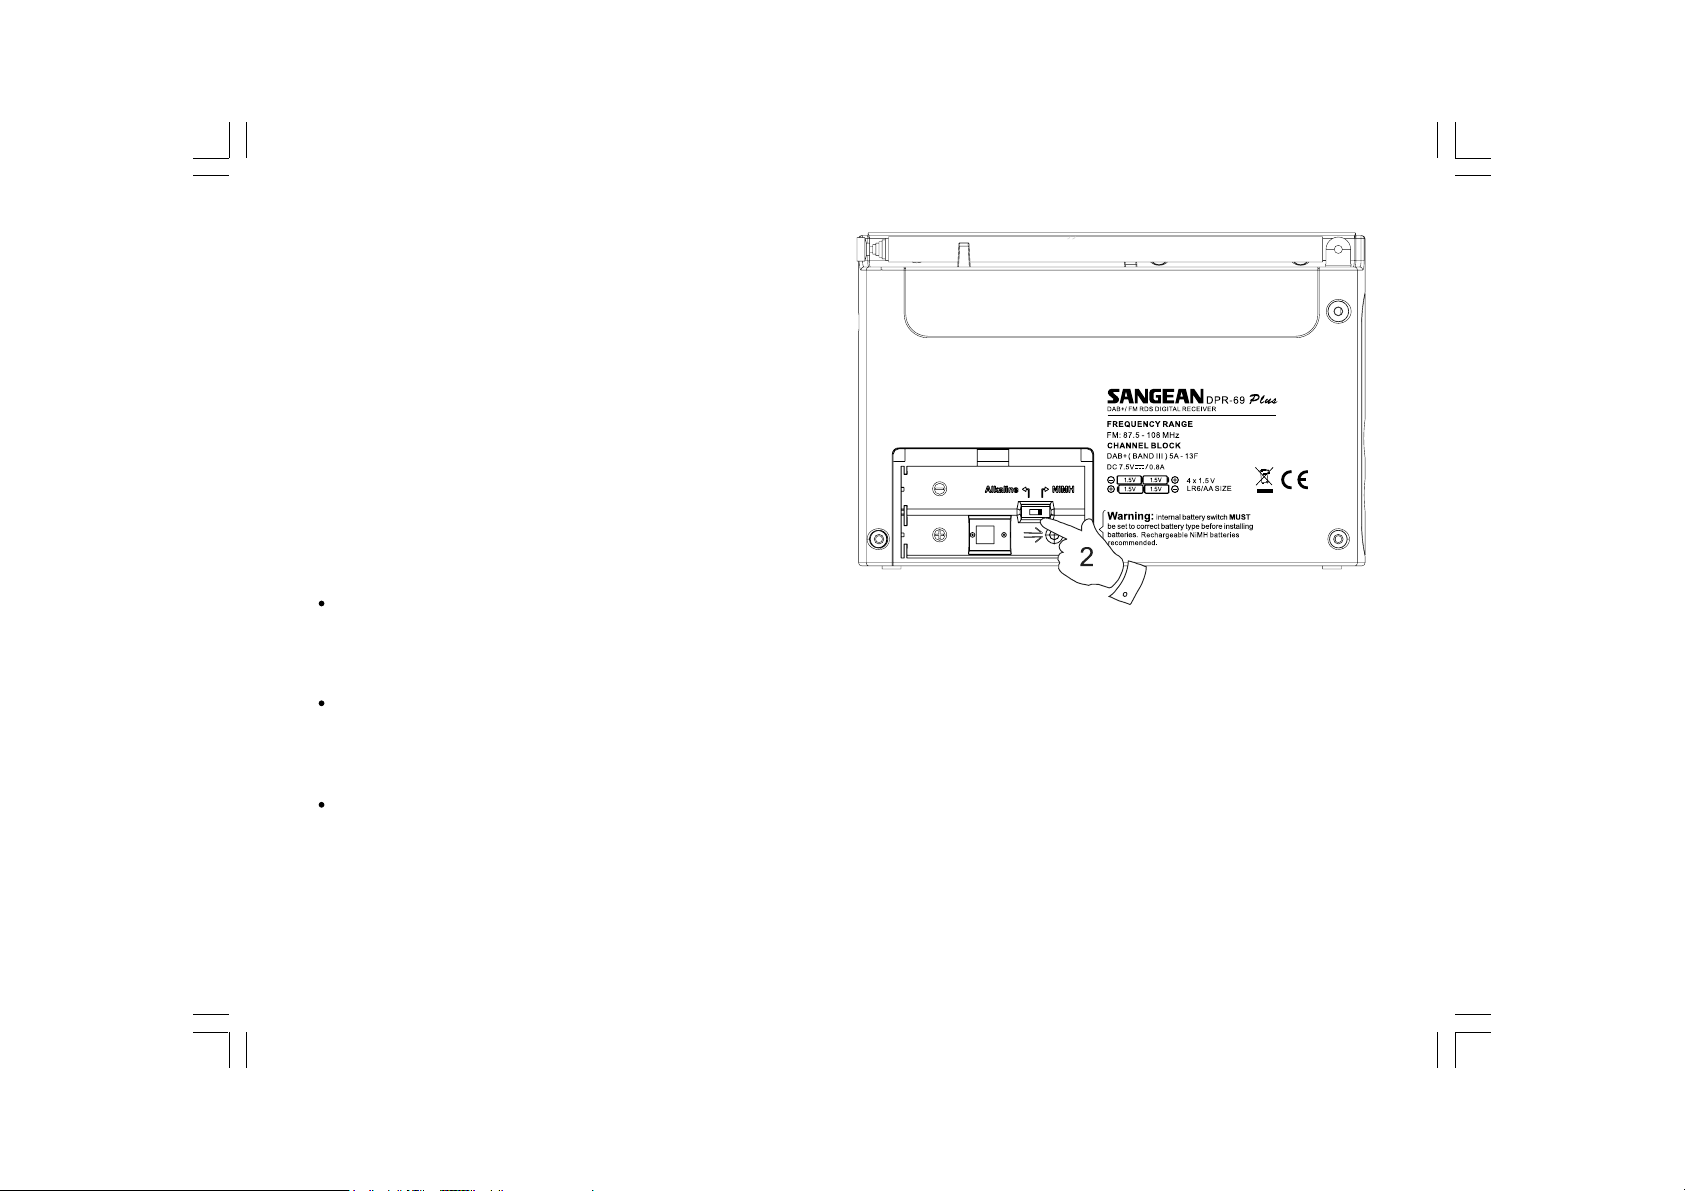
Battery operation using rechargeable batteries
1. Remove the battery cover on the back of the unit by sliding the cover
in the direction of the arrow.
2. Slide the switch inside the battery compartment to the
NiMH position.
3. Insert four Rechargeable LR6 (AA size) batteries into the spaces in
the compartment. Take care to ensure all batteries are inserted with
the correct polarity as shown on the back of the radio. The radio is
designed to be used with Nickel Metal Hydride (NiMH)
rechargeable batteries.
4. Plug the mains adaptor into your radio and then plug the adaptor into
the mains.
5. The battery light will flash green indicating batteries are charging.
Batteries will be fully charged in around 7 hours. The battery light
shows a steady green light when the battery charging is complete.
Important:
when using rechargeable batteries the battery switch must be
placed in the NiMH position. Batteries will only be charged
when the radio is switched off and connected to the AC adaptor.
When the batteries are exhausted, the battery light will show red for
a short while. The radio will then switch itself off. It may not be
possible to switch the radio back on until the batteries are recharged,
or until the radio is connected to the mains adaptor.
If the radio is not to be used for any extended period of time it is
recommended that the batteries are removed from the radio.
IMPORTANT:
The batteries should not be exposed to excessive heat such
as sunshine, fire or the like. After use, disposable batteries should if
possible be taken to a suitable recycling centre. On no account
should batteries be disposed of by incineration.
5
Page 7
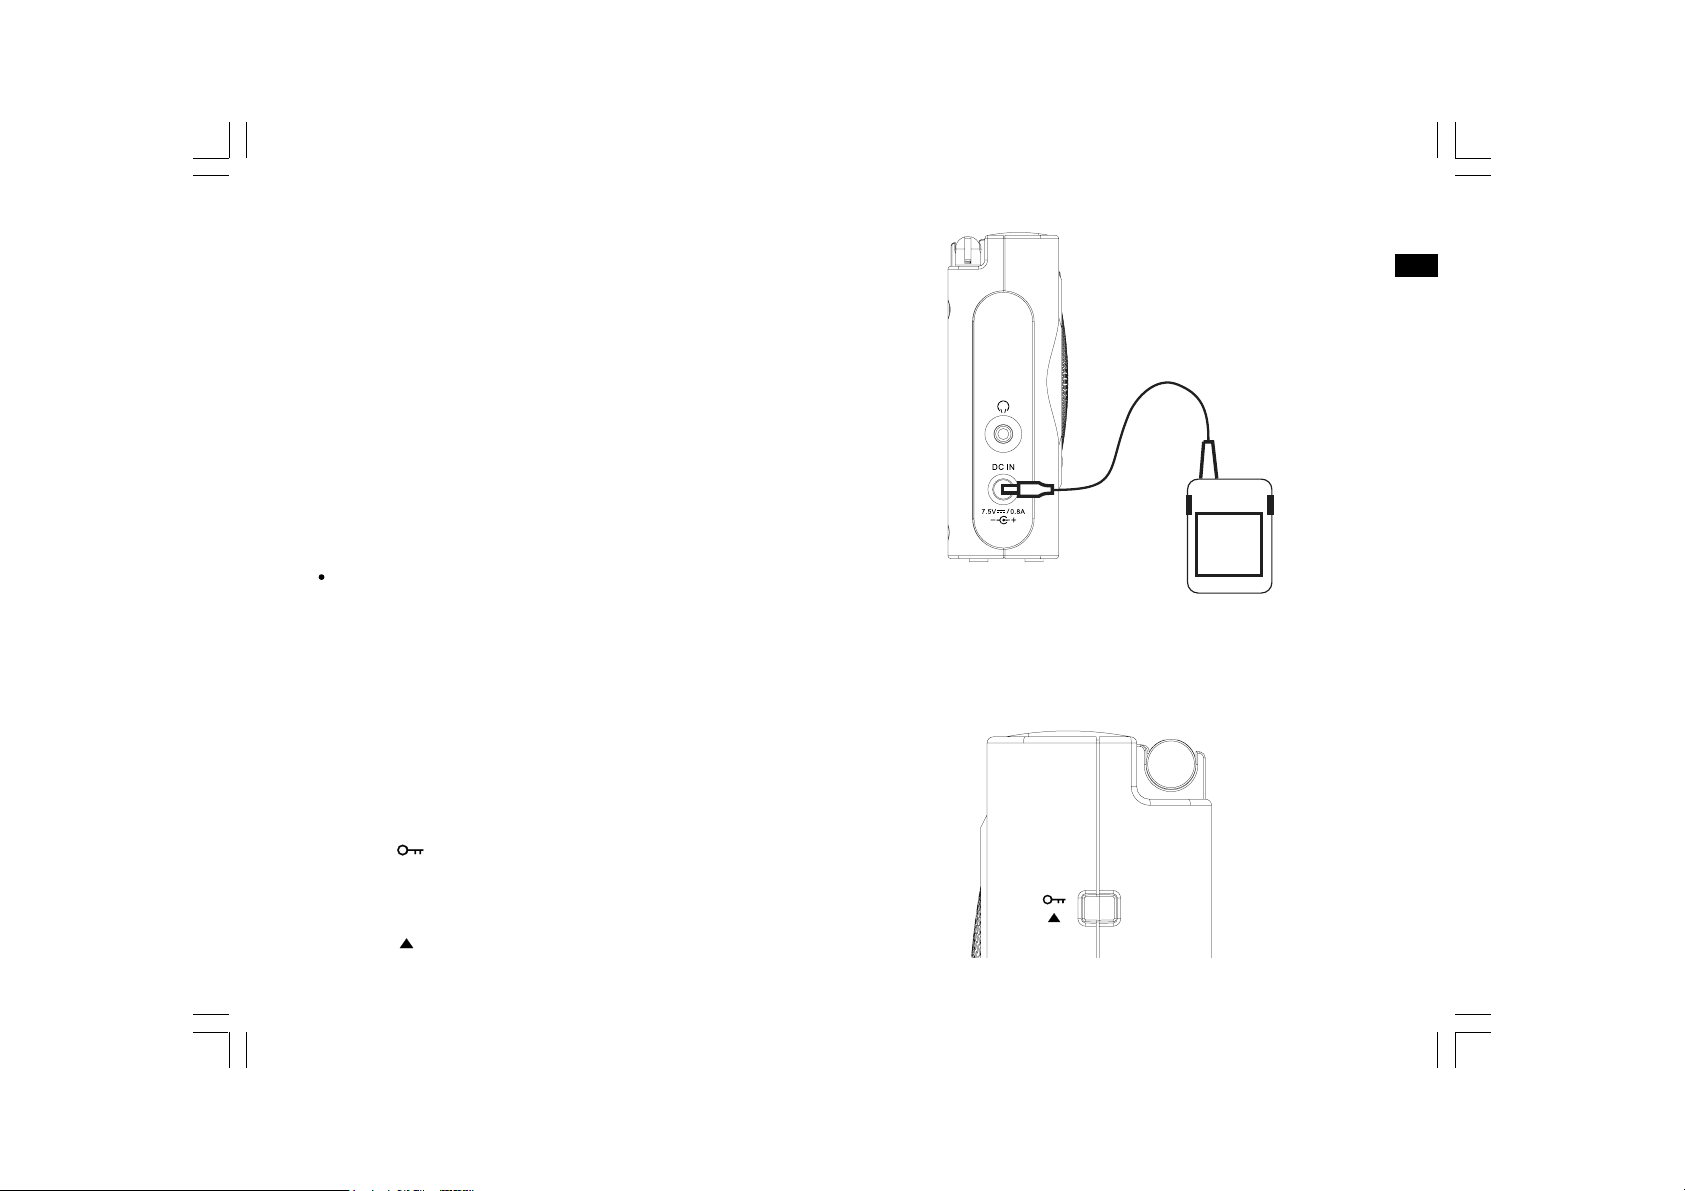
Using the AC adaptor
Your radio is supplied with a Mains Adaptor.
1. Place your radio on a flat surface.
2. Insert the adaptor plug into the DC socket located on the left hand
side of your radio.
3. Plug the adaptor into a standard 13 amp mains socket outlet.
Whenever the adaptor is used with the radio, it will take power from
the mains rather than from the batteries.
The AC adaptor should be disconnected from the mains supply and
the radio when not in use.
IMPORTANT:
The mains adaptor is used as the means of connecting the radio to
the mains supply. The mains socket used for the radio must remain
accessible during normal use. In order to disconnect the radio from
the mains completely, the mains adaptor should be removed from
the mains socket outlet completely.
Lock switch
The Lock switch is used to prevent unintentional operation of your radio.
GB
1. Set the Lock switch located on the side of your radio to the ‘Lock’
position . The power and all other buttons will be disabled,
this will prevent accidental operation when your radio is packed in a
suitcase or travel bag.
2. To release the lock, slide the Lock switch down to the ‘Unlock’
position .
6
Page 8
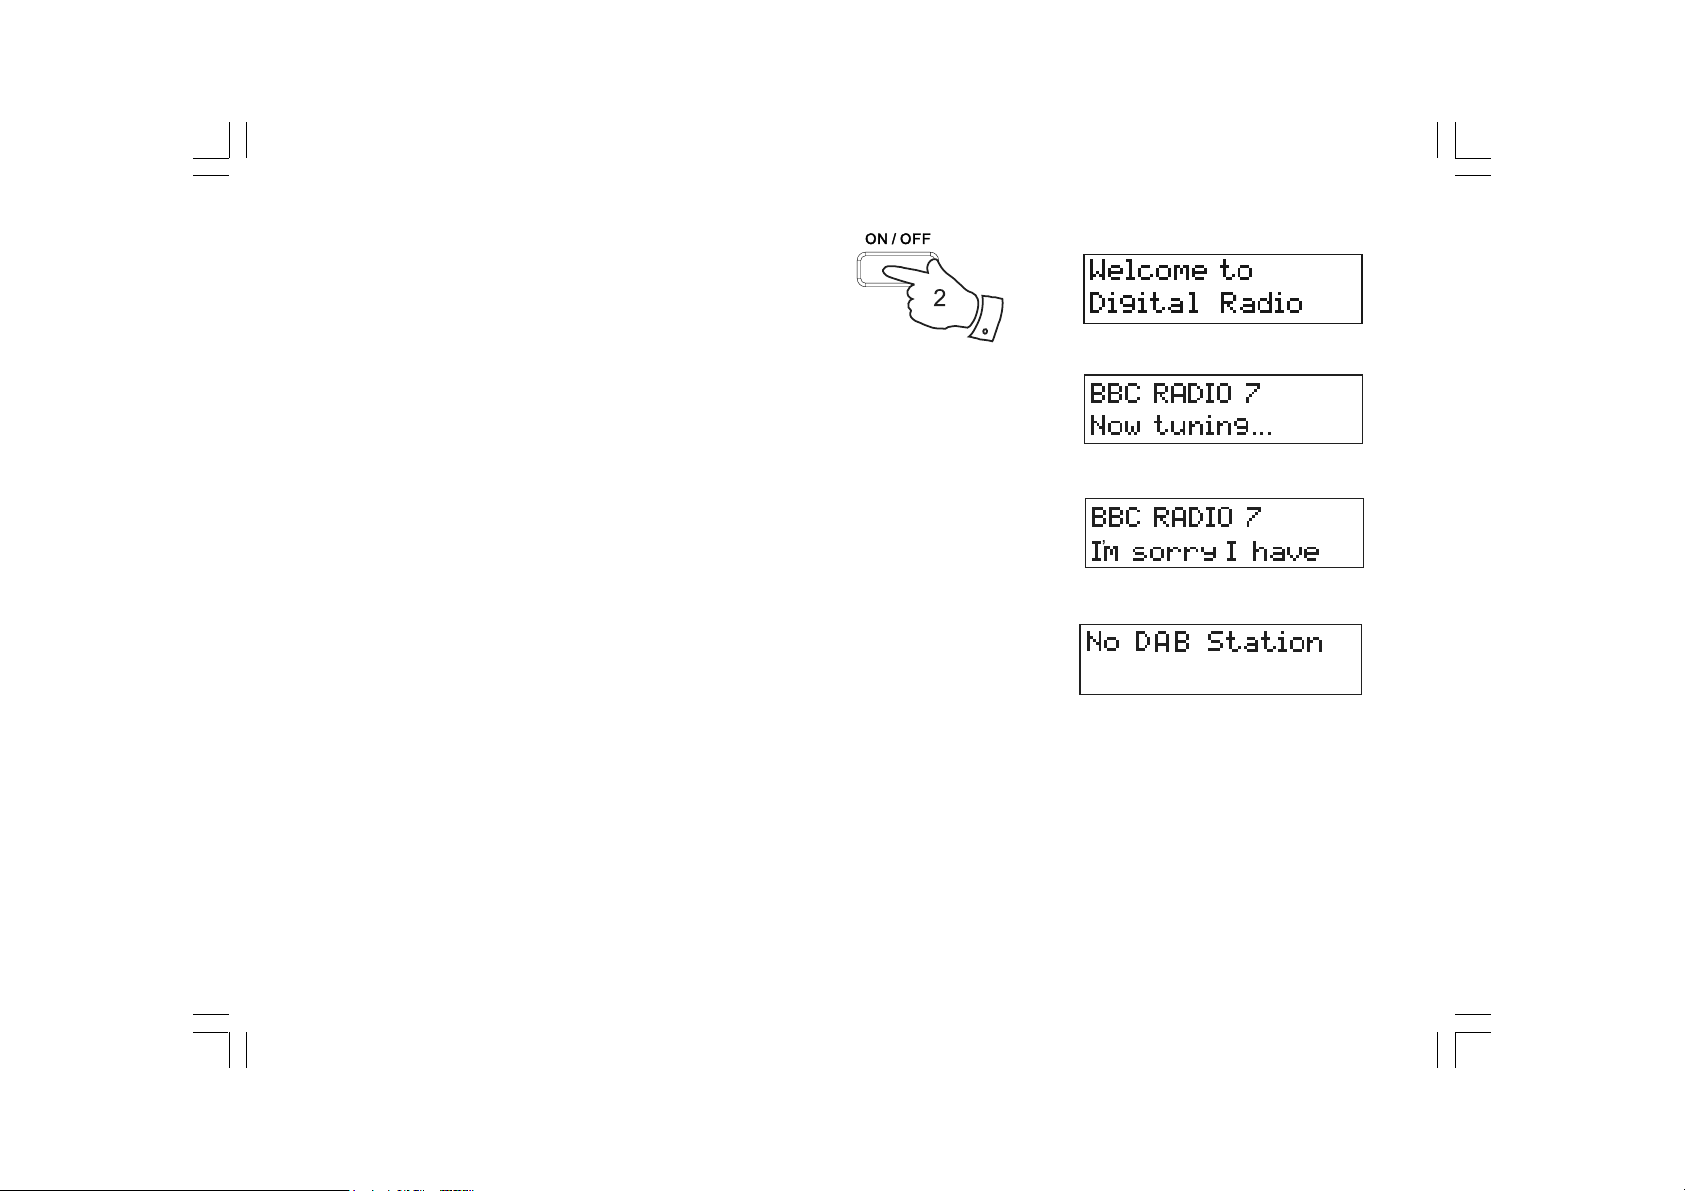
Operating your radio - DAB
1. Carefully extend the telescopic aerial.
2. Press the On/Off button to switch on your radio. The display will
show “Welcome to Digital Radio” for a few seconds.
3. If this is the first time the radio is used to scan of the Band III
DAB channels will be carried out. The display will show
“Welcome to DAB”. If the radio has been used before the last used
station will be selected.
4. During the scanning process, as new stations are detected the
station counter on the right hand side of the display will increase and
stations will be added to the list. The lower line of the display shows
a bar-graph indicating progress of autotune.
5. When the scanning is completed the first station (in numeric-alpha
order 0...9...A....Z) will be selected.
6. If the station list is still empty after the scan, your radio will show
“No DAB Station“ for a moment.
7. If no signals are found it may be necessary to relocate your radio to
a position giving better reception.
7
Page 9
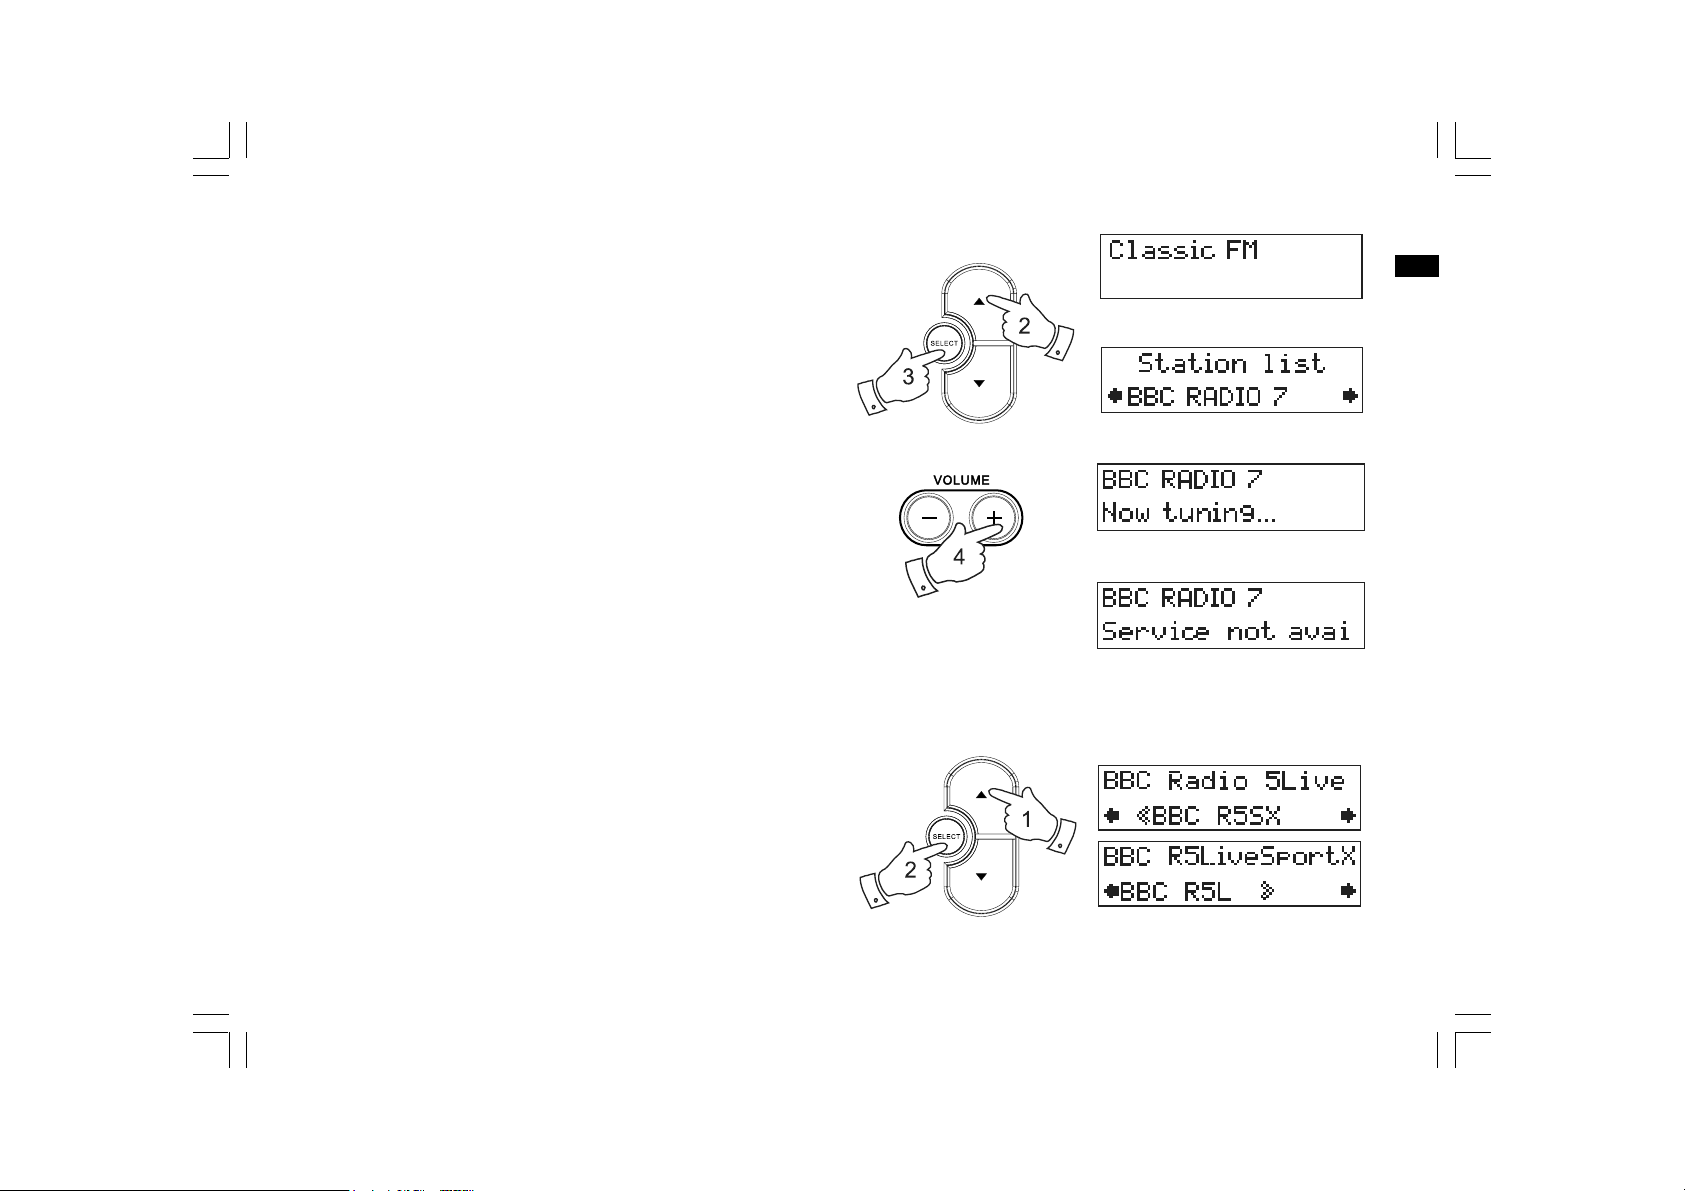
Selecting a station - DAB
1. The top line of the display shows the name of the station
currently selected.
2. Press the Tuning Up/Down buttons to scroll through the list of
available stations.
3. Press and release the Select button to select the station. The display
may show “Now tuning...” while your radio finds the new station.
4. Adjust the Volume up or Down buttons to the required setting.
Note:
If after selecting a station the display shows “Service not available“.
it may be necessary to relocate your radio to a position giving
better reception.
Secondary services - DAB
1. Certain radio stations have one or more secondary services
associated with them. If a station has a secondary service associated
with it the display will show “>>” next to the station name on the
station list. The secondary service will then appear immediately after
the primary service as you press the Tuning Up button.
GB
2. Press the Select control to select the station.
8
Page 10
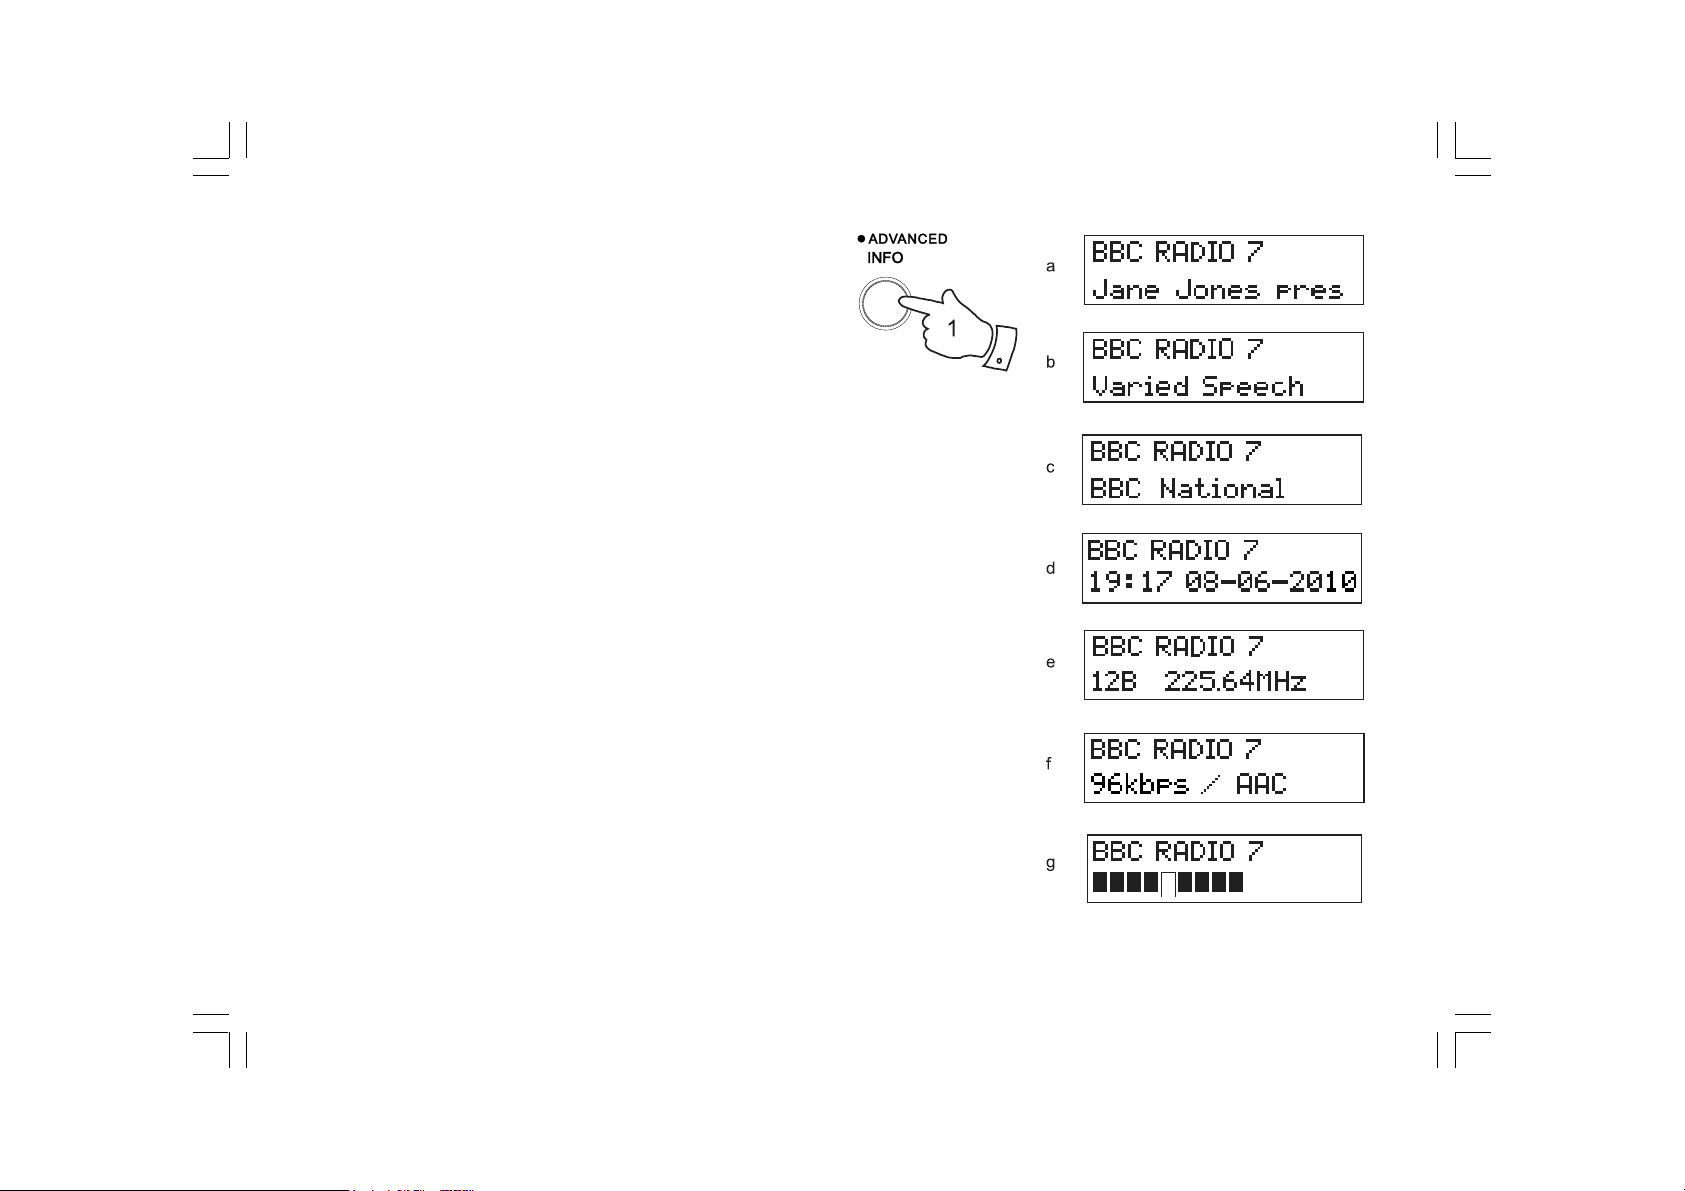
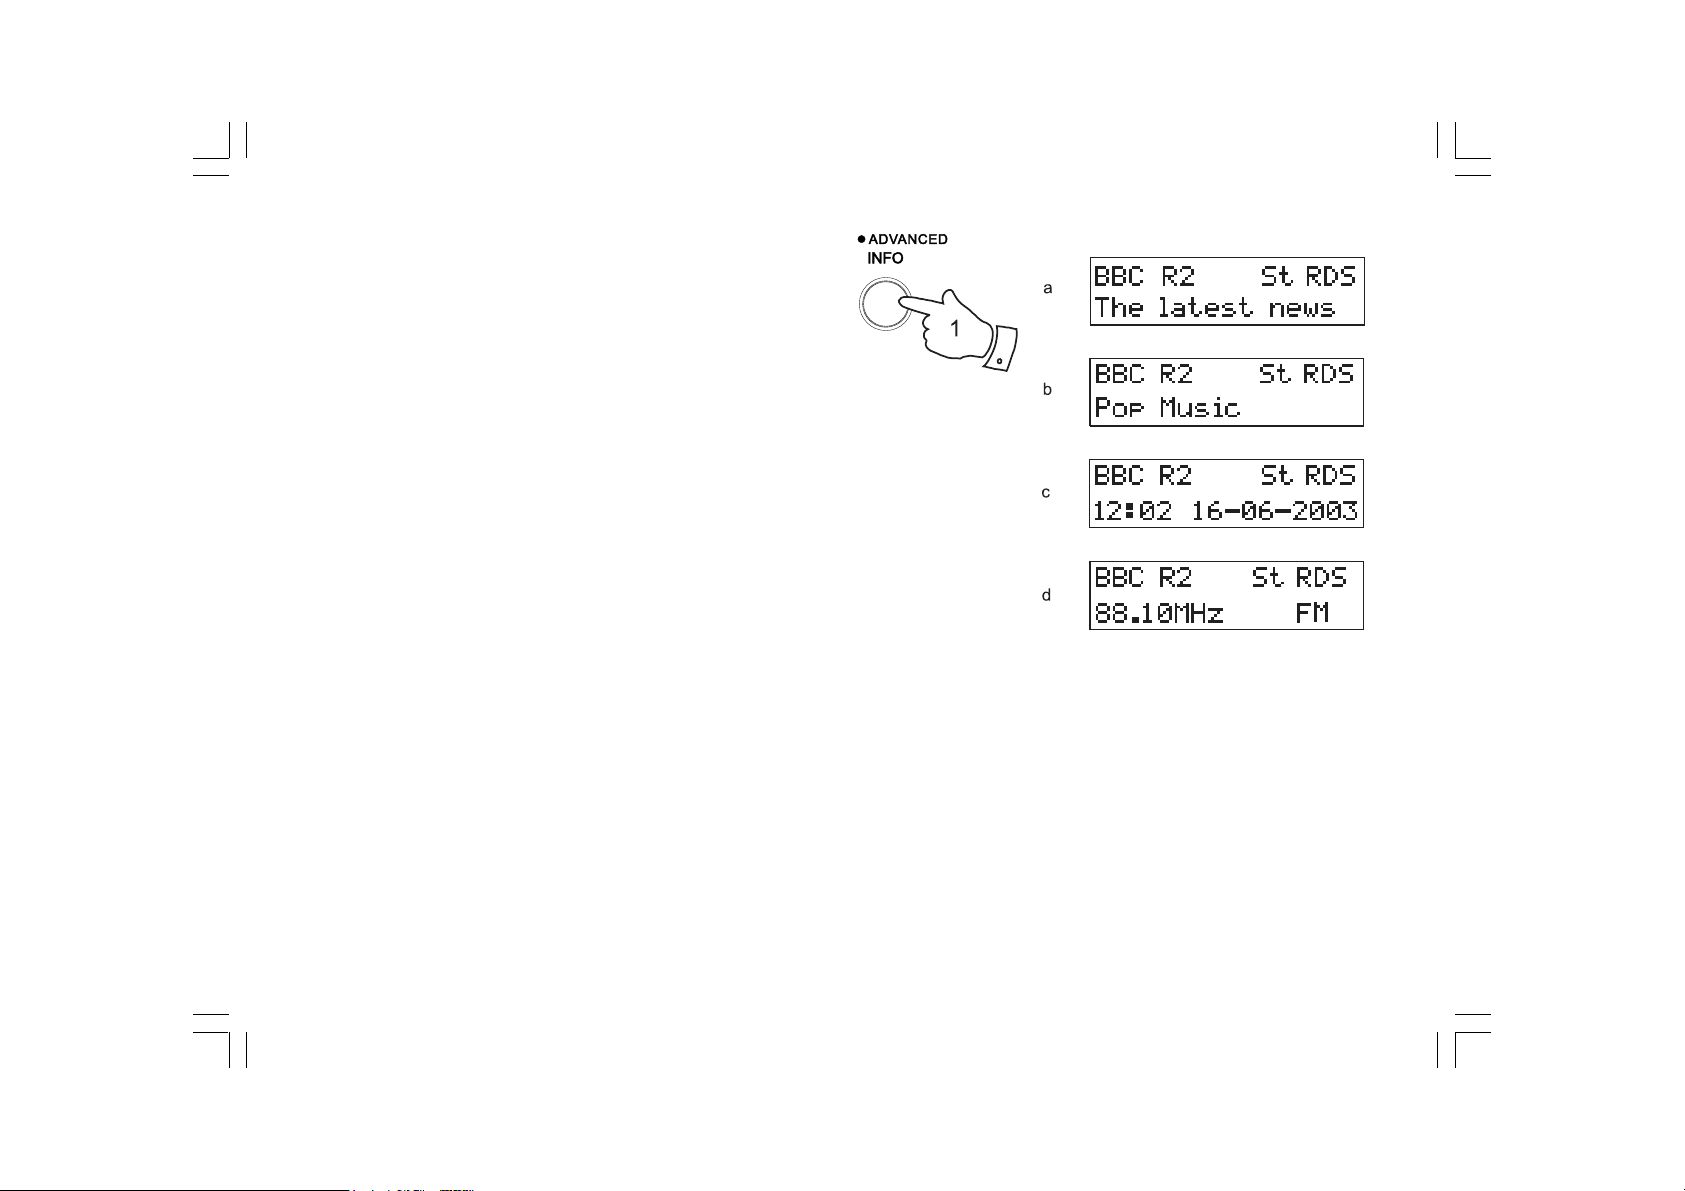
Display modes - DAB
Your radio has seven display modes:-
1. Press the Info button to cycle through the various modes.
a.
Scrolling text
b.
Program Type
c.
Multiplex Name
d.
Time and date
e.
Frequency
f.
Bit rate & audio type
g.
Signal Strength
Displays scrolling text messages such as
artist/track name, phone in number etc.
Displays the type of station being listened to
e.g. Pop, Classic, News etc.
Displays the name of DAB multiplex to which
the current station belongs.
Displays the current the time and date.
Displays the frequency of the DAB multiplex
for the station listened to.
Displays the digital bit rate & audio type for
the station being listened to.
Displays a graph showing the signal strength
for the station being received.
9
Page 11
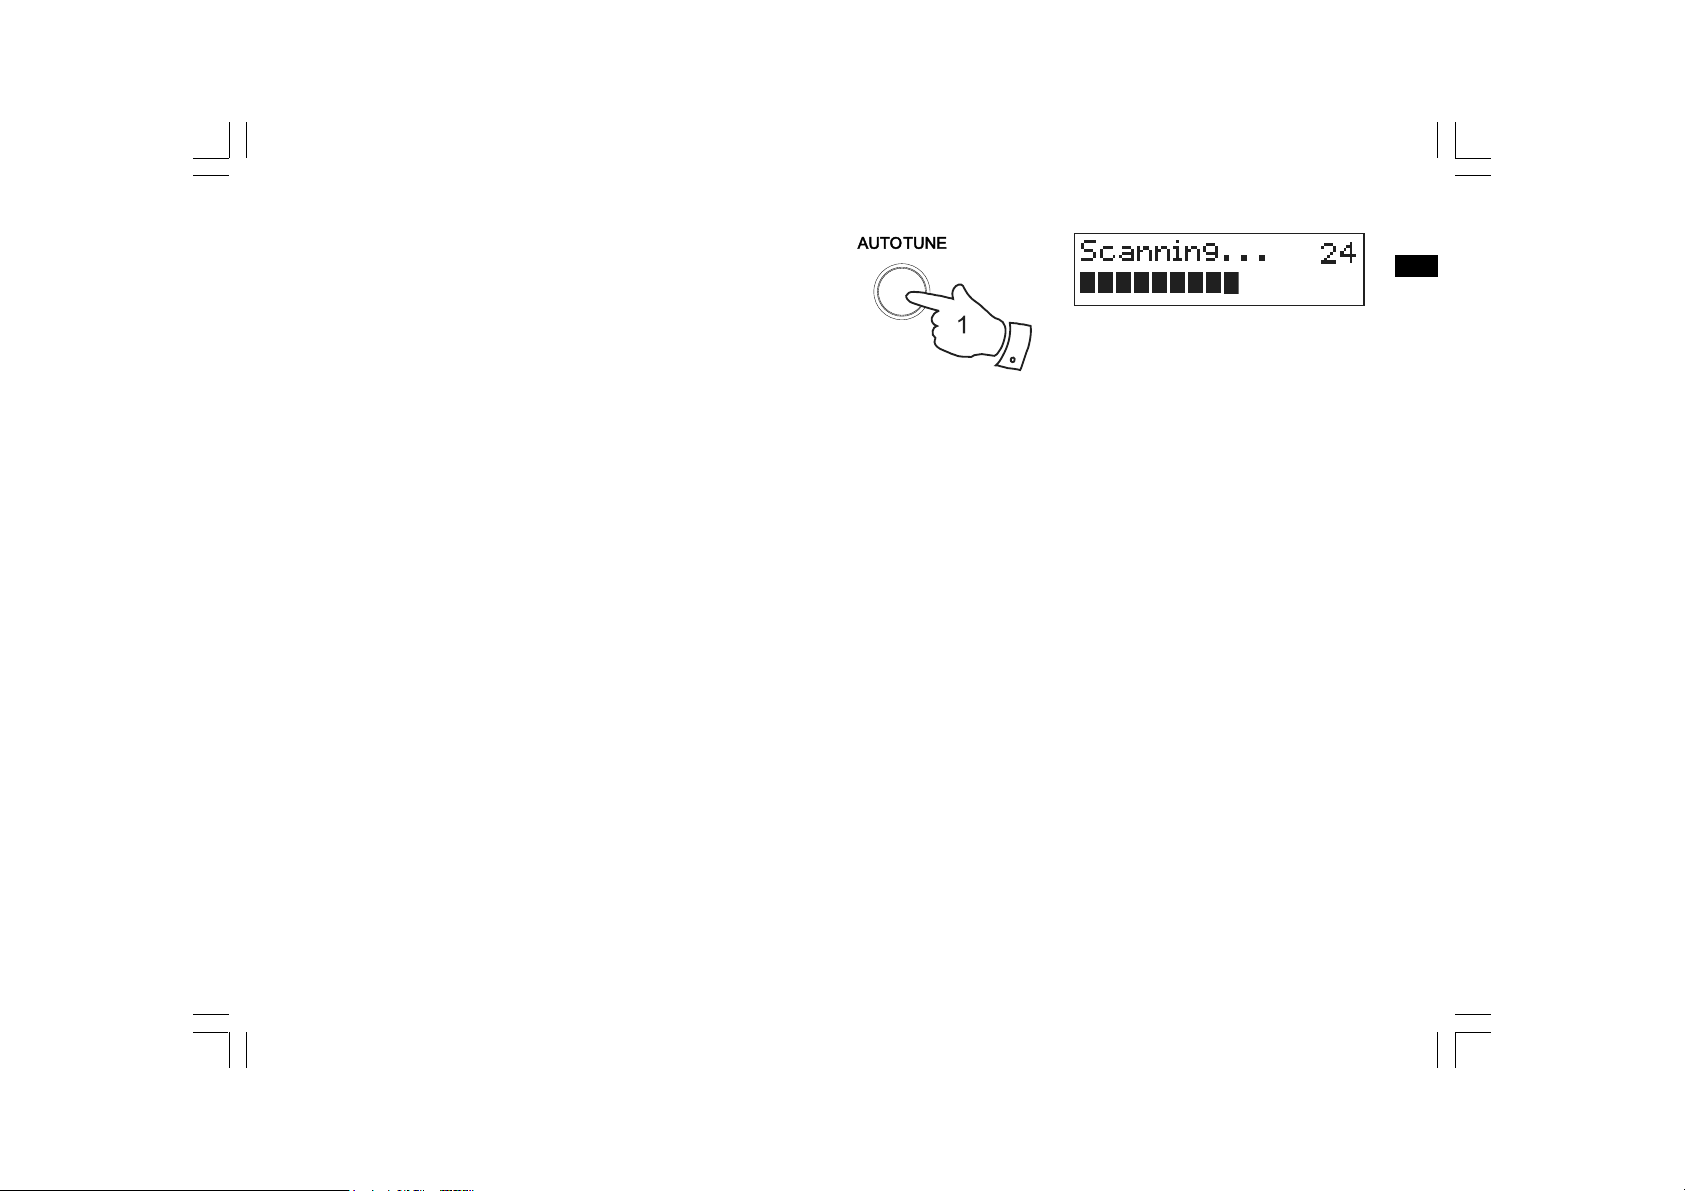
Finding new stations - DAB
As time passes new stations may become available. To find new
stations proceed as follows:-
1. With the radio switched on and in DAB mode, press and release the
Auto Tune button. The display will show "Scanning..." and your clock
radio will perform a scan of the Band III DAB channels. As new radio
stations are found the station counter on the right-hand side of the
display will increase and the radio stations will be added to the list
stored in the radio.
GB
10
Page 12
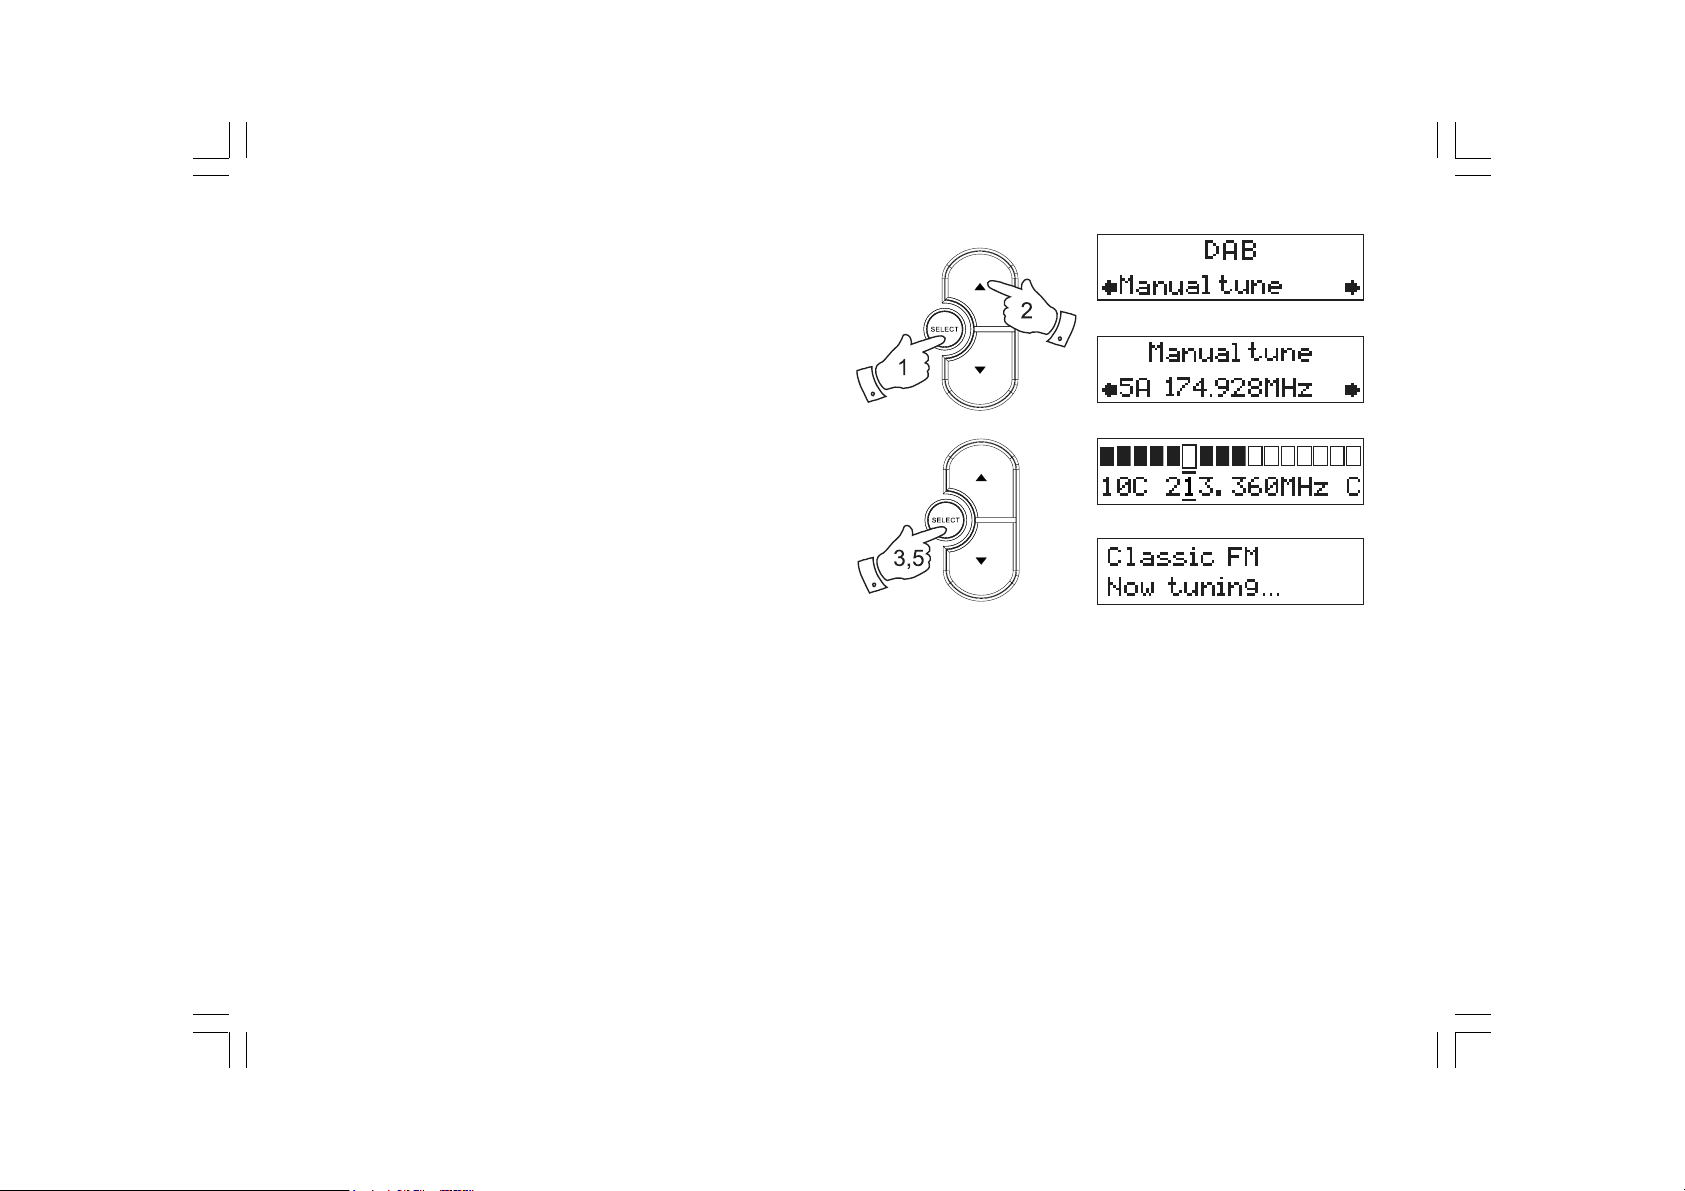
Manual Tuning - DAB
Manual tuning allows you to tune directly to the various DAB Band III
channels. Note that DAB stations are located in the range of 5A-13F.
1. Press and hold the Select button until the display shows
“Manual tune”. Release the Select button.
2. Press either of the Tuning Up/Down buttons to select the required
DAB channel.
3. Press and release the Select button to select the required
DAB channel. The clear unfilled rectangle indicates the minimum
signal level required for satisfactory reception. The signal strength bar
will go up and down showing the changing signal strength as you
adjust the telescopic aerial on your radio.
4. When a DAB signal is found, the display will show the name of the
DAB multiplex. Any new radio stations found will be added to the list
stored in the radio.
5. Press and release the Select button to return to the normal DAB
tuning mode.
11
Page 13
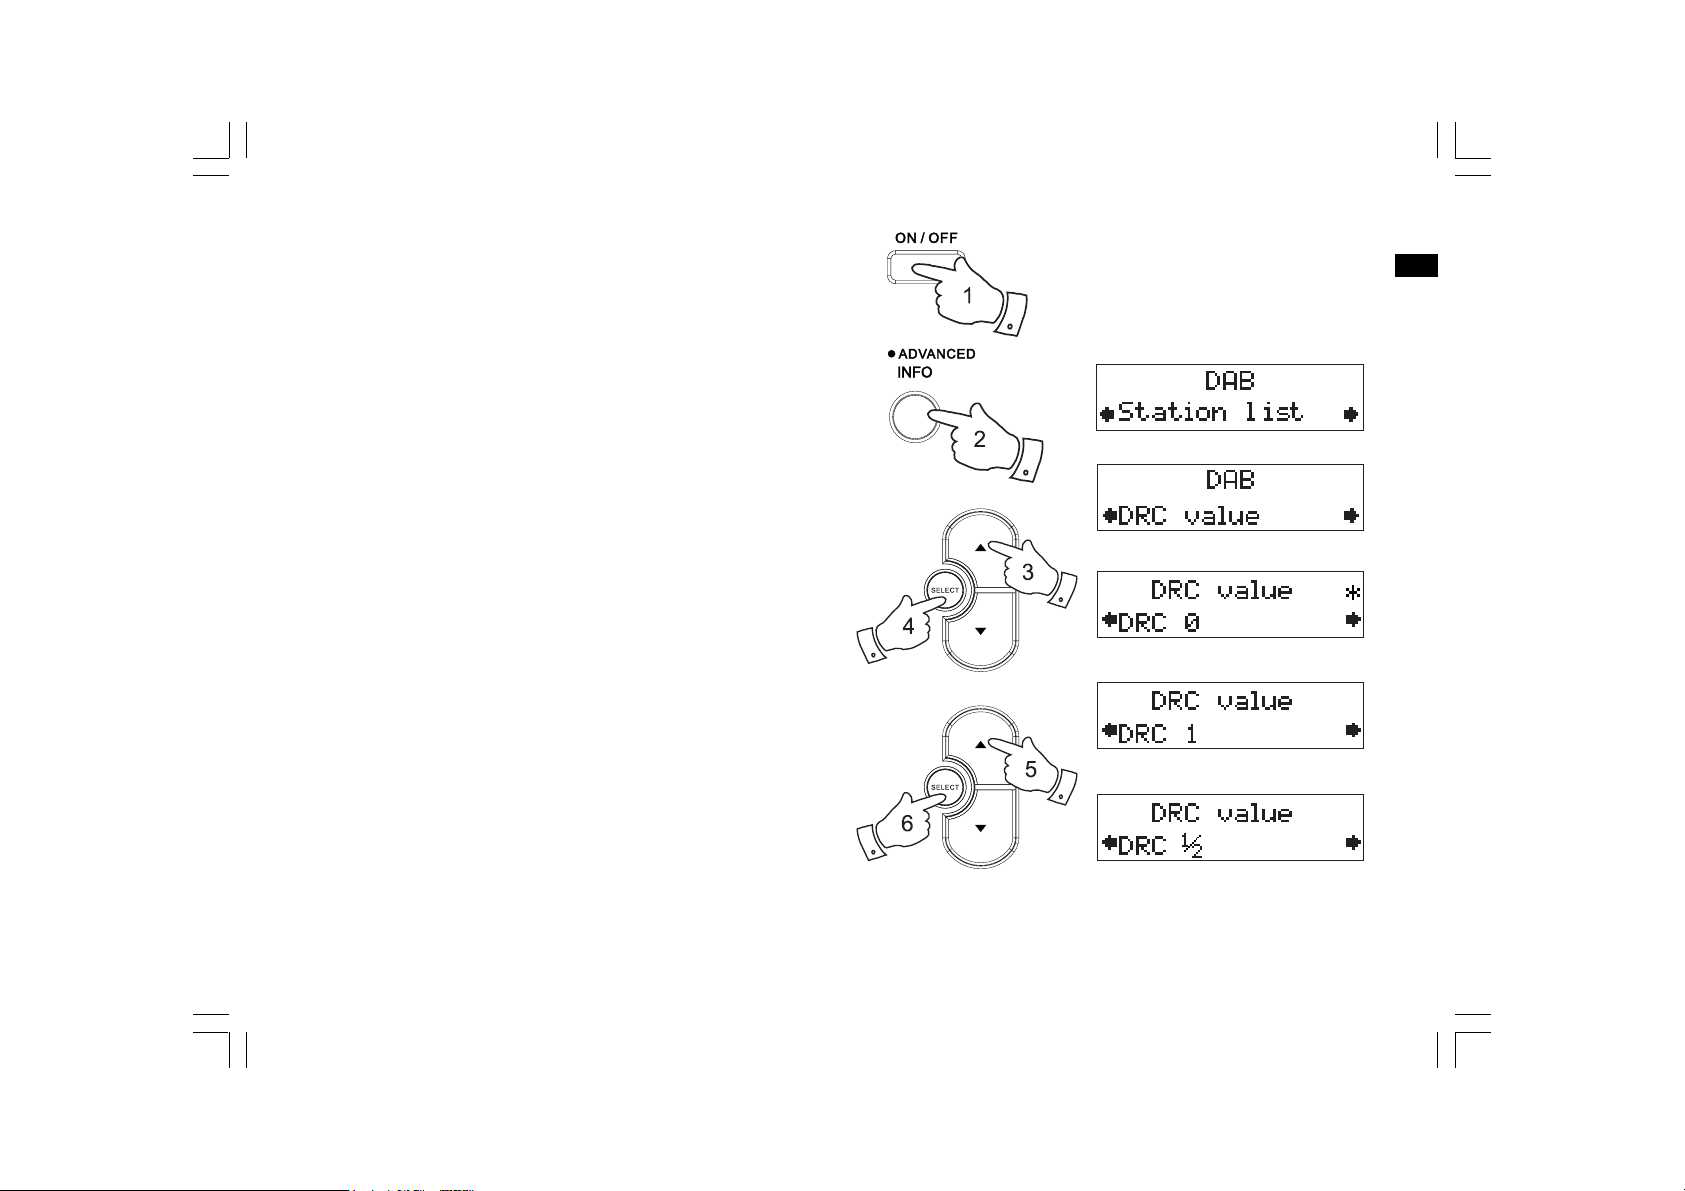
Dynamic Range Control settings - DAB
Dynamic Range Control (also known as DRC) can make quieter sounds
easier to hear when your radio is used in a noisy environment.
1. Press the On/Off button to switch on your radio.
2. Press and hold in the Info button. The display will show
“Station list.”
3. Press the Tuning Up/Down buttons until the display shows
“DRC value”.
4. Press and release the Select button to enter adjustment mode.
5. Press the Tuning Up/Down buttons to select the required DRC setting
(the default is 0).
DRC 0 - DRC is switched off, Broadcast DRC will be ignored.
DRC 1 - DRC is set as sent by broadcaster.
DRC 1/2 - DRC level is set to 1/2 that sent by broadcaster.
6. Press and release the Select button to confirm the setting.
The display will return to normal tuning mode.
Note:
Not all DAB broadcasts are able to use the DRC function.
If the broadcast does not support DRC, then the DRC setting in the radio
will have no effect.
GB
12
Page 14
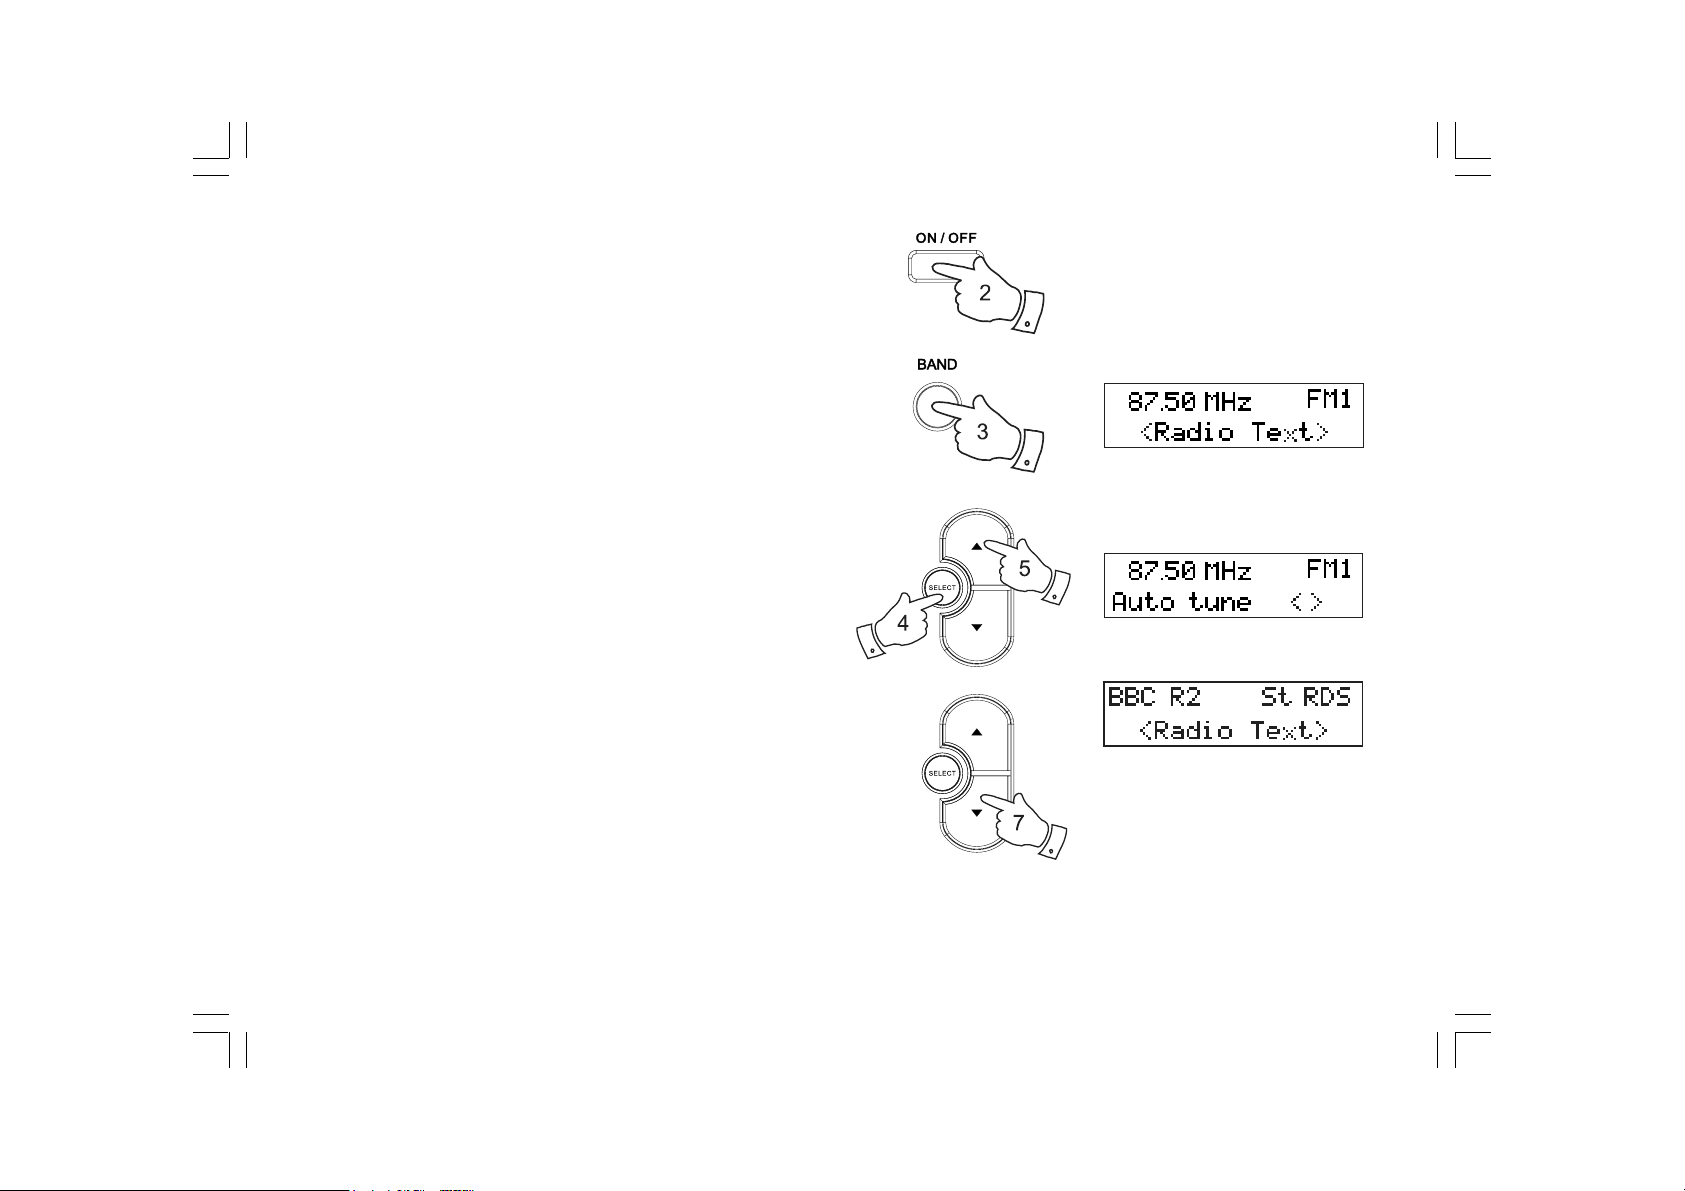
Operating your radio - FM
1. Carefully extend the telescopic aerial.
2. Press the On/Off button to switch on your radio. The display will
show “Welcome to Digital Radio” for a few seconds.
3. Press the Band button to select the FM band.
4. Press and release the Select button until the display shows
“Auto tune <>”.
5. Press the Tuning Up button. Your radio will scan from the currently
displayed frequency direction upwards and will stop scanning when
it finds a station of sufficient strength.
6. The display will show the frequency of the signal which has been
found. If RDS information is available, after a few seconds the display
will show the radio station name. The display will also show “St” and
“RDS” on the upper line if the station is received with stereo and
RDS information.
7. Press the Tuning Down button to scan the FM band in a downwards
direction (high frequency to low frequency).
8. When the end of the waveband is reached your radio will
recommence tuning from the opposite end of the waveband.
9. Adjust the Volume control to the required setting.
10. To switch off your radio press the On/Off button.
13
Page 15
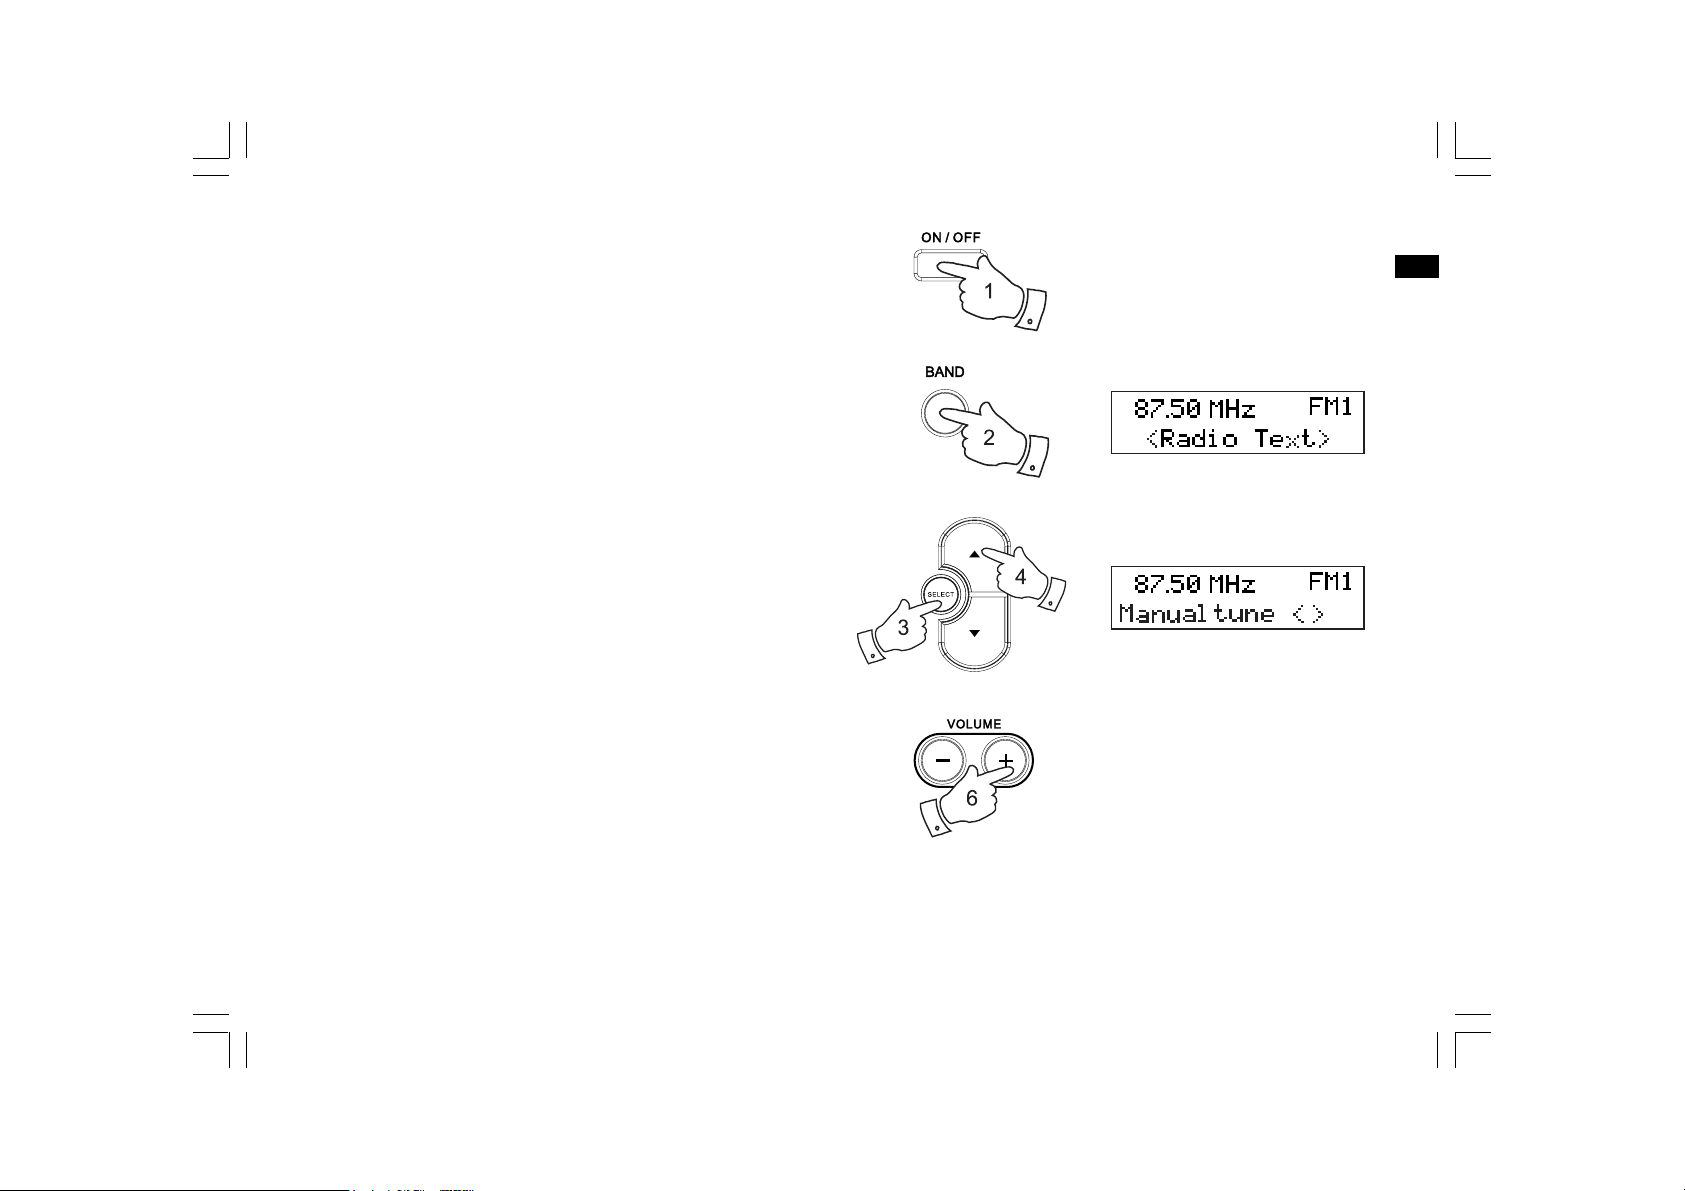
Manual tuning - FM
1. Press the On/Off button to switch on your radio.
2. Press the Band button to select the FM band. Fully extend the
Telescopic aerial.
3. Press and release the Select button until the display shows
“Manual tune < >”.
4. Press either the Tuning Up or Down buttons to tune to a station.
The frequency will change in steps of 50kHz. Pressing and holding
one of the buttons will advance the frequency selection several times
each second.
5. When the end of the waveband is reached the radio will recommence
tuning from the opposite end of the waveband.
6. Adjust the Volume control to the required setting.
7. To cancel the Manual Tune option, press and release the
Select button again so that the display shows “Auto tune < >”.
GB
14
Page 16
Display modes - FM
In FM mode the bottom line of the display can be set any of four
display options.
1. Press the Info button to cycle through the various options.
a. Radio text
b. Program Type
c. Time and date
d. Frequency
Note:
These FM mode information displays are only available when the radio
is able to receive RDS information from the broadcaster.
Displays scrolling text messages such as
artist/track name, phone in number etc.
Displays the programme information for
the station being listened to e.g. Pop,
Classic, News, etc.
Displays the current time and date.
Displays the frequency of the station
being listened to.
15
Page 17
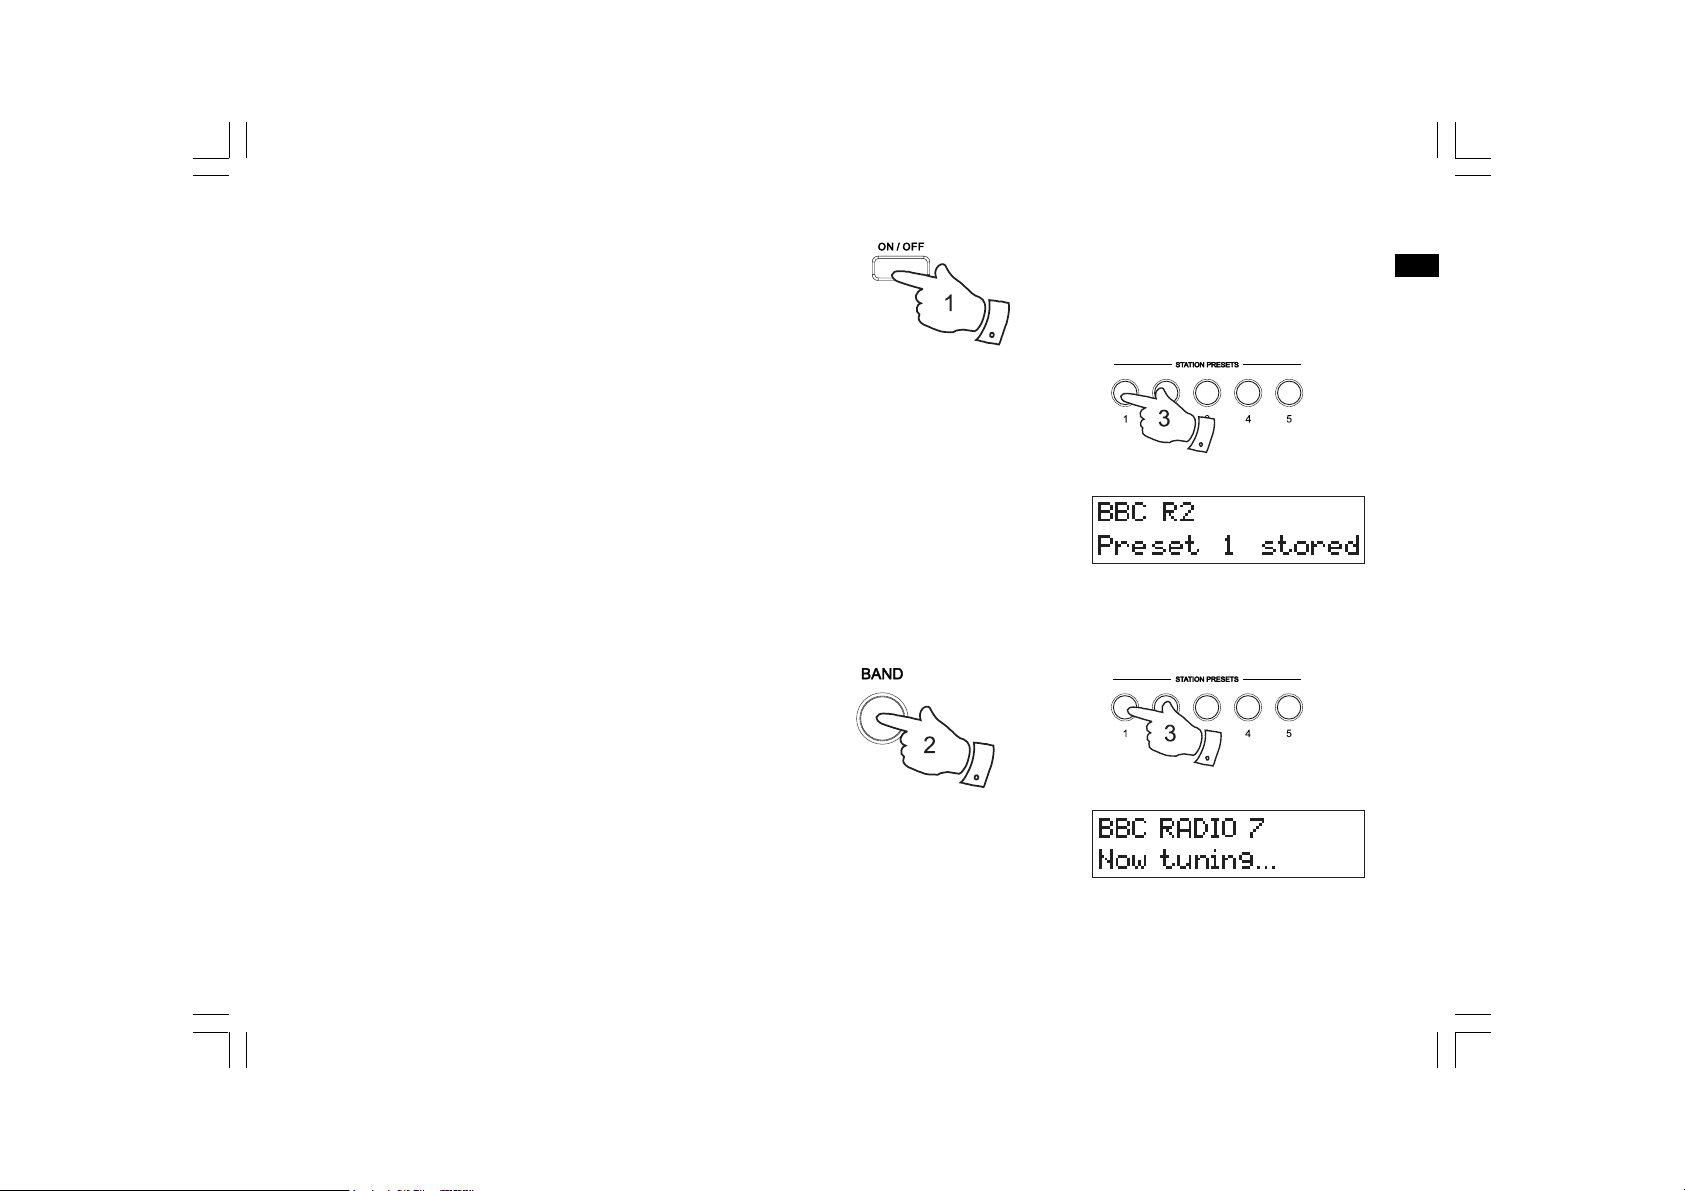
Presetting stations - DAB and FM
There are 5 memory presets for each of the two wavebands.
1. Press the On/Off button to switch on your radio.
2. Tune to the required station as previously described.
3. Press and hold the required Preset button until the display shows,
for example, “Preset 1 stored”. The station will be stored under
the chosen preset button. Repeat this procedure for the
remaining presets.
4. Stations stored in the presets may be overwritten by following the
above procedure.
Recalling a preset - DAB and FM
1. Press the On/Off button to switch on your radio.
2. Select the required waveband.
3. Momentarily press the required Preset button. Your radio will then
tune to the station stored in preset memory.
GB
16
Page 18
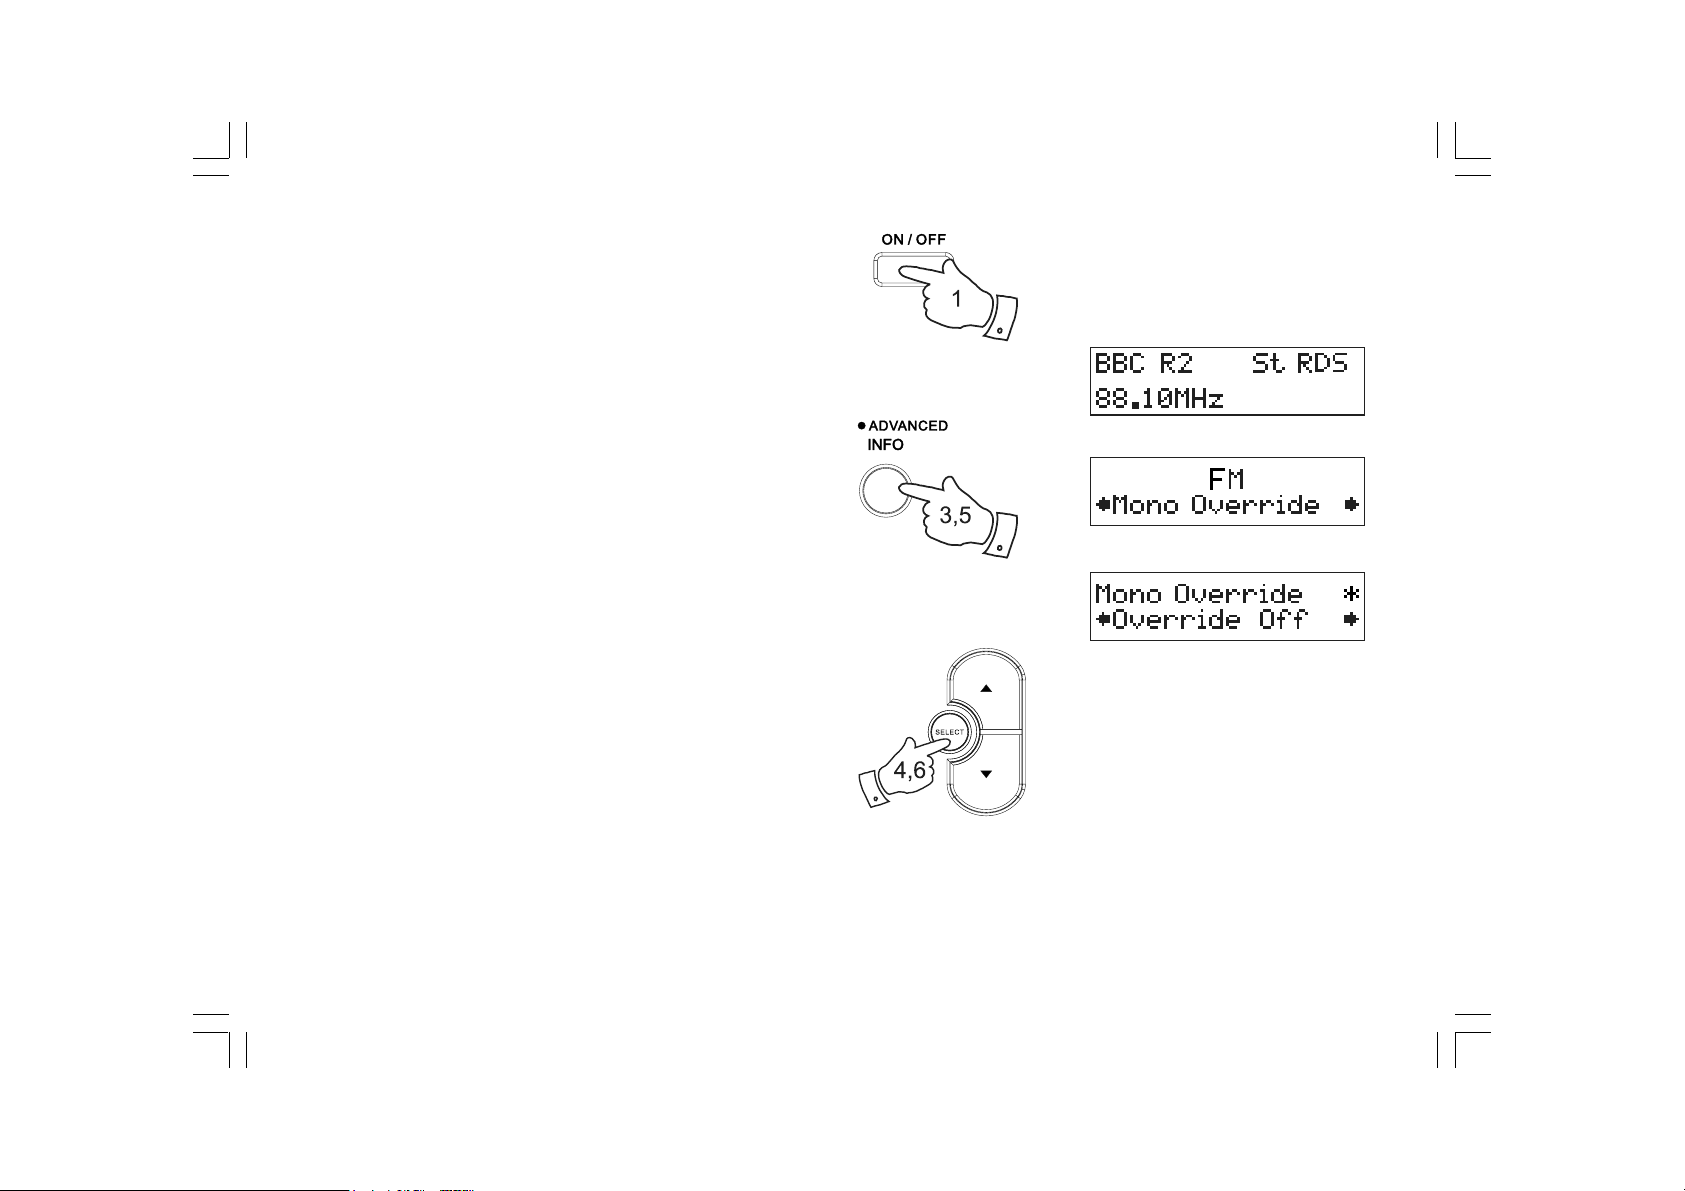
Stereo / Mono setting - FM
Your radio will play stereo broadcasts in stereo (via headphones) so
long as the received signal is of adequate strength. However, as a
stereo signal becomes weaker the audio signal will become poorer.
It may be preferable to force the radio to play the station in mono in
order to reduce the level of audio noise.
1. Press the On/Off button to switch on your radio.
2. Tune to the required FM radio station as previously described.
3. Press and hold the Info button until the display shows “Mono override”
on the lower line.
4. Press the Select button to enter Menu. The lower line of display will
show “Override Off“ if the radio is in the Auto-Stereo mode. Press the
Tuning Up or Down button to switch on the mono override. While this
setting is engaged, the radio will play the current station in mono
whether listening via headphones or the loudspeaker.
Mono Overide is a temporary setting and is applied to the currently
tuned station only. It is cancelled automatically by tuning to another
radio station.
5. If you wish to cancel Mono-Override while listening to the currently
tuned radio station, press and hold the Info button until the display
shows “Mono override“ on the lower line. Press the Select button to
enter the Mono override menu, the lower line will show “Override On“
if the radio is in the Mono-Override mode.
6. Press the Select button to switch off the Mono-Override. The radio
will play then play the current station in stereo through headphones
if the signal is sufficiently strong.
17
Page 19
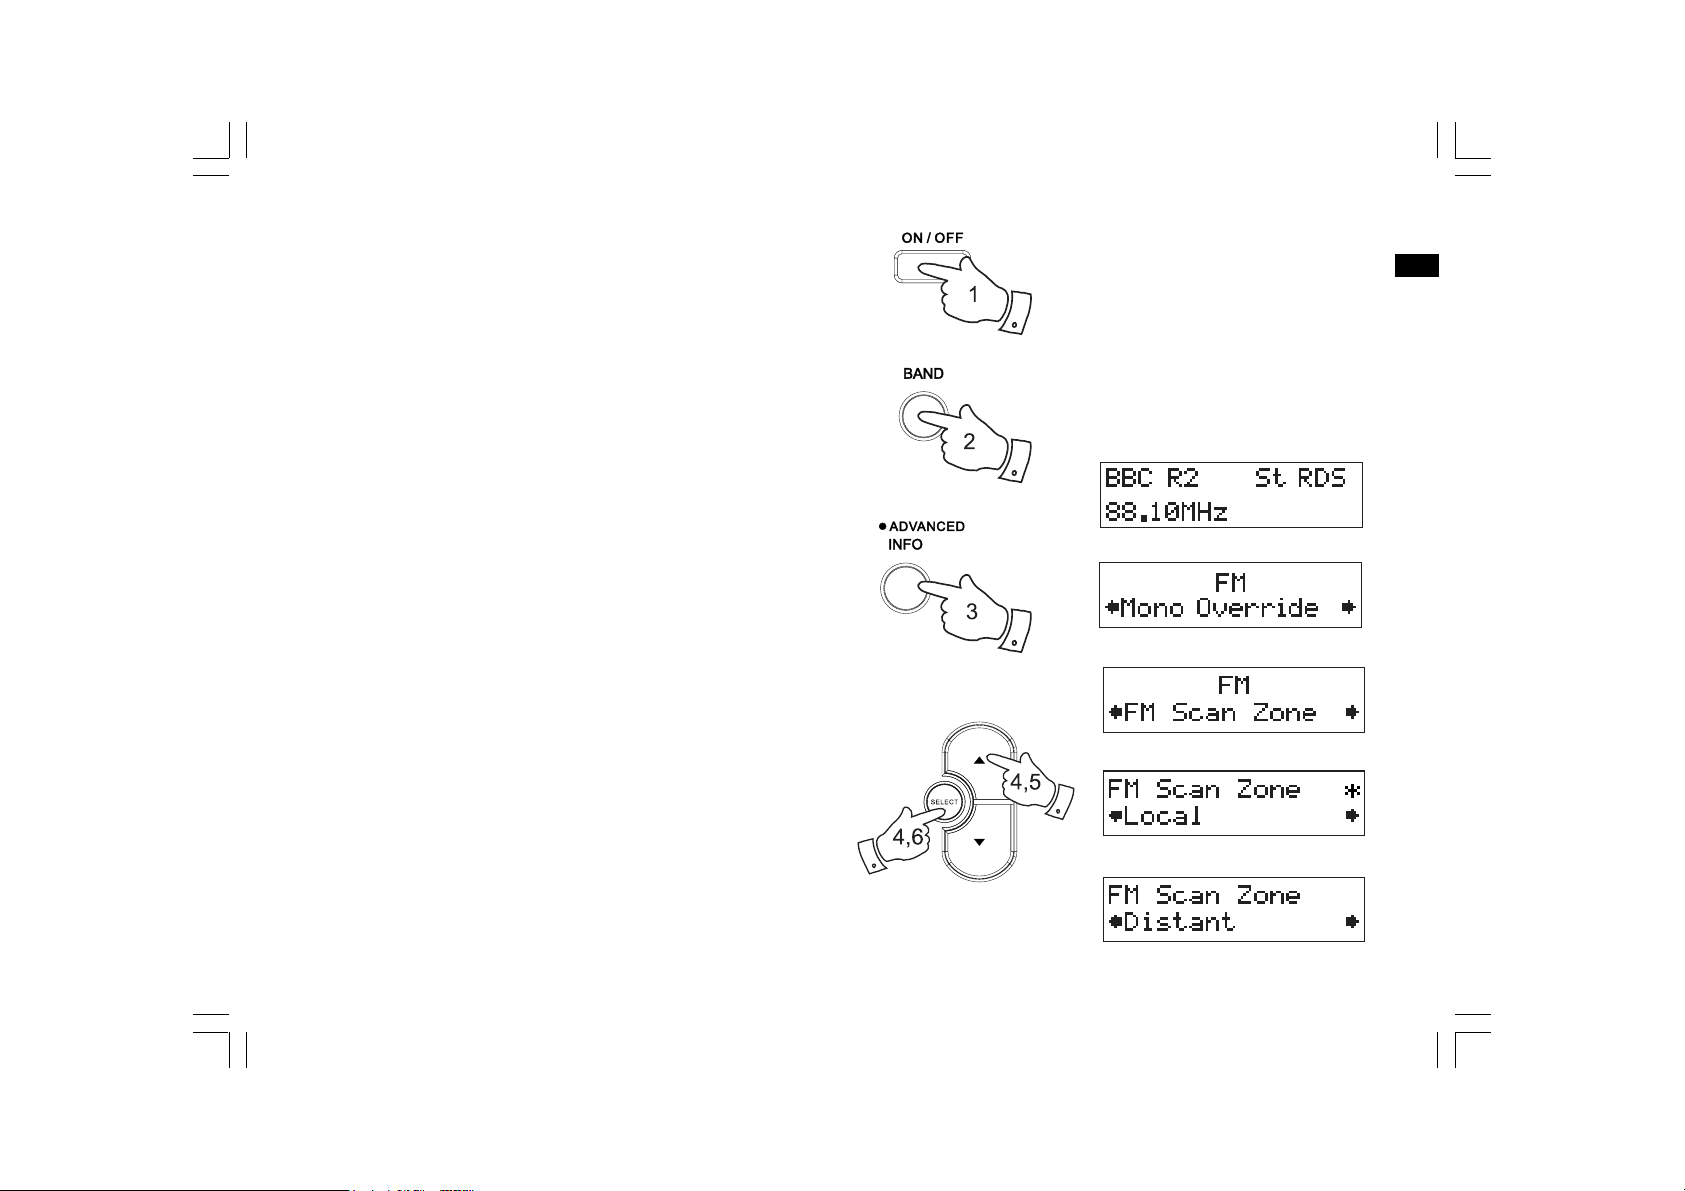
Scan sensitivity setting - FM
Your radio will normally scan for FM broadcasts which are strong
enough to give good reception. However, you may wish the Auto-scan
function to also be able to find weaker signals, possibly from more
distant radio transmitters. Your radio includes a local / distant option for
the Auto-scan function.
1. Press the On/Off button to switch on your radio.
2. If needed, press the Band button to select the FM band.
3. Press and hold the Info button until the display shows “Mono override”
on the lower line.
4. Press and release the Tuning up or down buttons until the display
shows “FM Scan Zone” then press the Select button to enter the
scan zone selection menu.
5. Press the Tuning up or down buttons to switch between Local and
Distant options on the lower line of the display. The Distant option
will allow the radio to find weaker signals when scanning.
6. Press the Select button to confirm your selection. The radio will then
revert to the normal information display. The Local or Distant setting
is stored in the radio and remains in force until changed or until a
System Reset.
GB
Note:
The intial setting (out of the box, or after a System Reset) causes the
radio to ignore weak (distant) signals.
18
Page 20
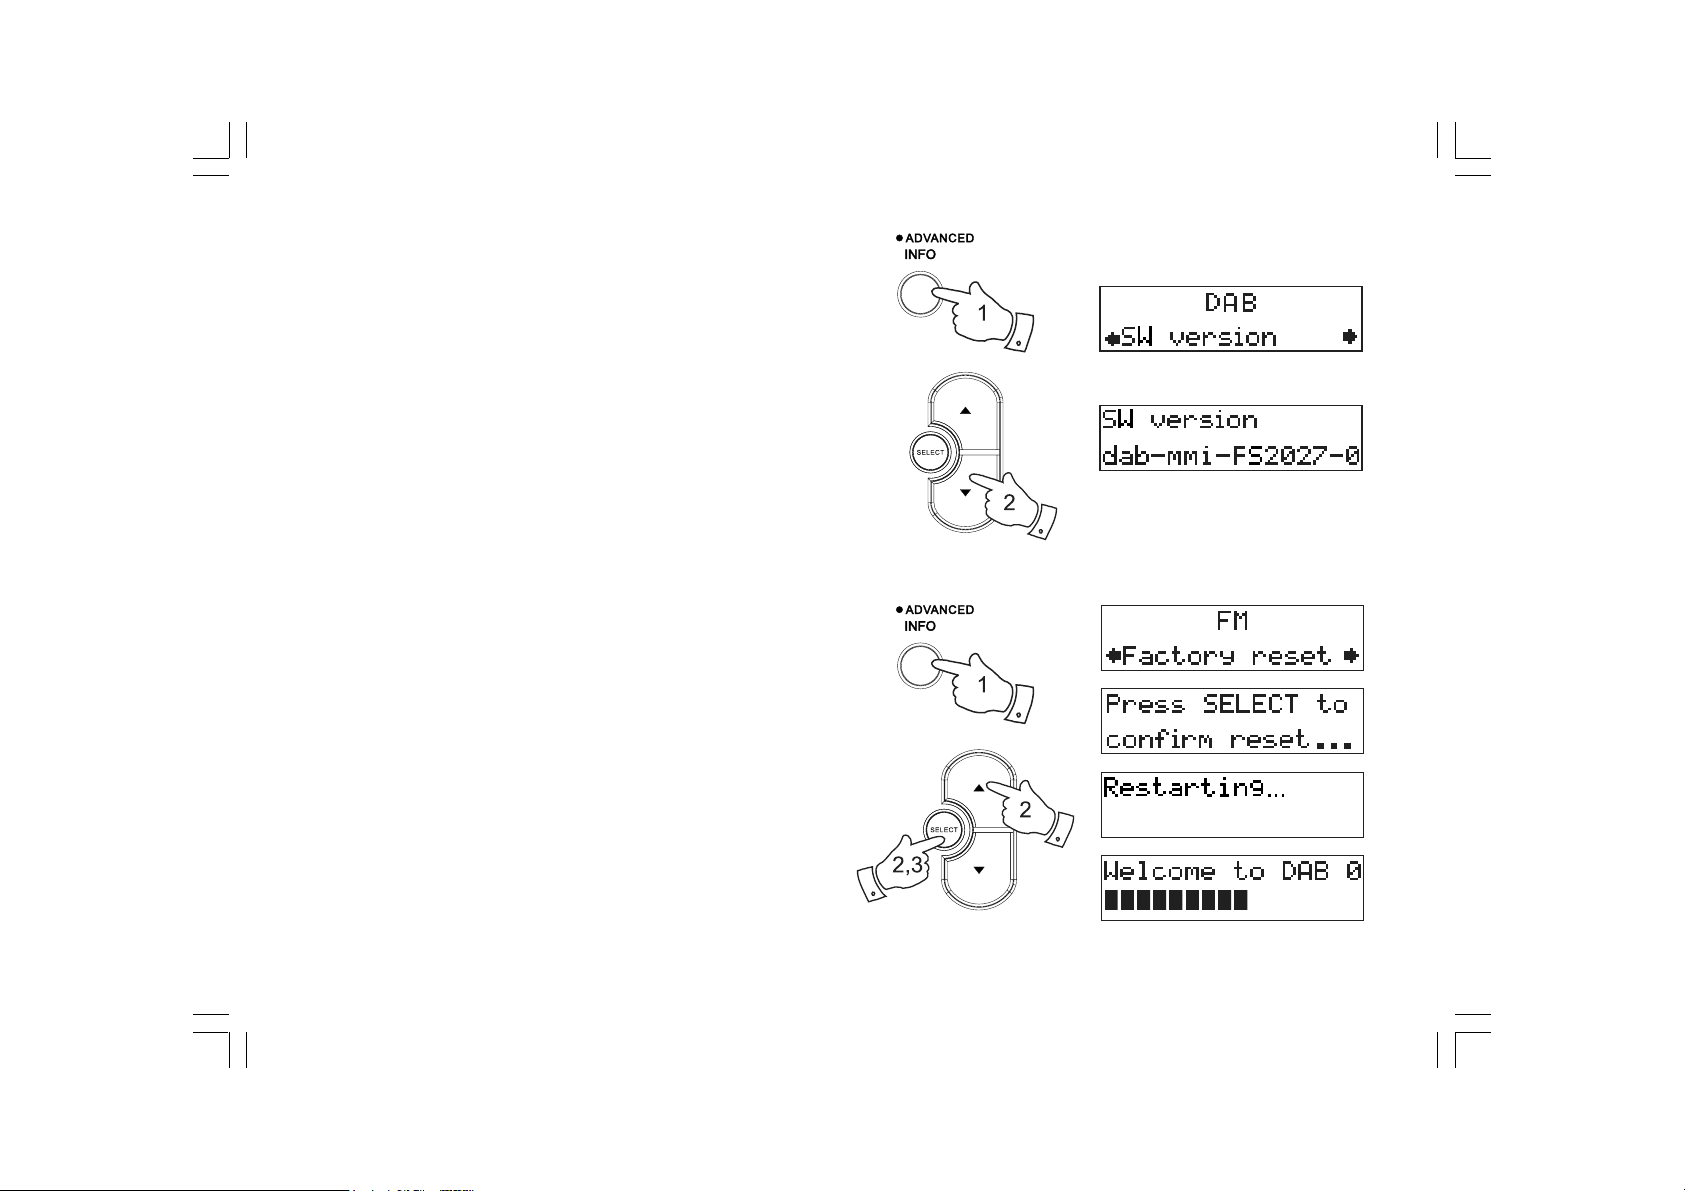
Software version
The software display cannot be altered and is just for your reference.
Ensure your radio is switched on and in DAB mode.
1. To view the software version on the display press and hold the
Info button for 2 seconds.
2. Repeatedly press the Tuning Up/Down button until the display shows
“SW version“ on the lower line. Press the Select button to enter the
SW version. The version number is then shown on the lower line of
the display. Press and release the Info button to normal tuning mode.
System reset
If your radio fails to operate correctly, or some digits on the display are
missing or incomplete carry out the following procedure.
1. Press and hold down the Info button for 2 seconds
2. Repeatedly press the Tuning Up/Down buttons until the display
shows “Factory reset”, then press the Select button.
3. If you wish to perform the reset operation, press the Select button
one more time. A full reset of your radio will be performed. All presets
and station lists will be erased.
4. After a system reset a scan of the DAB band will be performed.
In case of malfunction due to electrostatic discharge, reset the
product (reconnection of power source may be required) to resume
normal operation.
19
Page 21
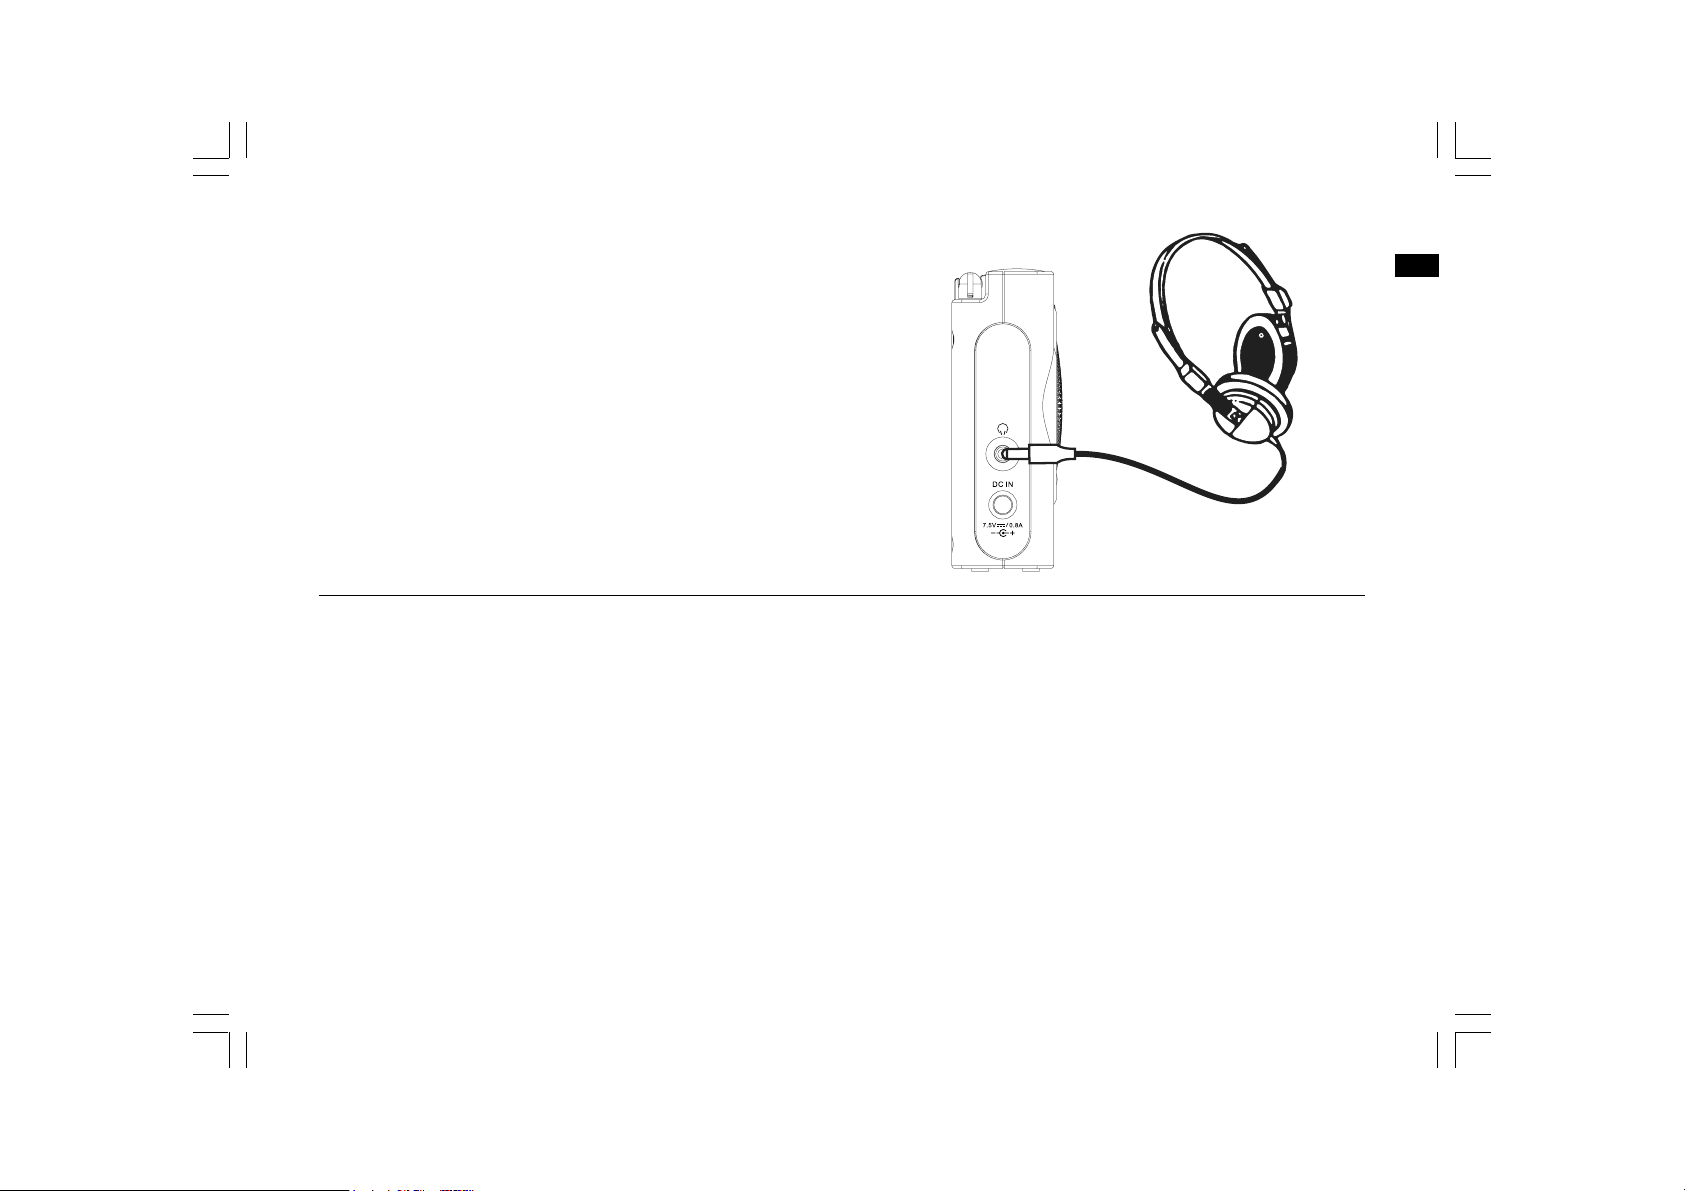
Headphone socket
A 3.5mm Headphone Socket located on the left hand side of your radio
is provided for use with either headphones or an earpiece. Inserting a
plug automatically mutes the internal loudspeaker.
IMPORTANT:
Excessive sound pressure from earphones and headphones can cause
hearing loss.
Display backlight
1. When using on batteries, the display backlight will be switched on for
approximately 12 seconds when any button is pressed.
2. When your radio is powered by AC mains the display backlight will
always be on when the radio is switched on.
GB
20
Page 22

A Few Words about Batteries...
Your radio has been designed to use a choice of power sources.
You may plug it into the mains using the supplied high-efficiency
adaptor, or for listening away from the mains you may use either
alkaline or rechargeable batteries. We do not recommend the use of
carbon-zinc or zinc-chloride batteries.
It is very important that you read the advice and warnings
given below.
Rechargeable batteries
Your radio uses a range of methods to ensure correct and safe charging
of Rechargeable Nickel-Metal-Hydride batteries.
These work to protect your batteries from excessive charge and
discharge. These protections can only work properly if the advice above
is followed. In particular, the radio will not be able to correctly charge
batteries if they are a mixture of different brands, or different ages,
or different capacities.
1) Whichever type of batteries you choose to use, it is very important
that the battery selection switch under the cover is set to the
correct type.
a. If no batteries are fitted, then set the switch to the Alkaline position
(to the left as viewed from the back of the radio). This position
minimises the power consumption when the radio is powered from
the mains.
b. If Alkaline batteries are fitted, then set the switch to the Alkaline
position (to the left as viewed from the back of the radio).
c. If Rechargeable batteries are fitted, then set the switch to the NiMH
position (to the right as viewed from the back of the radio). Your radio
is designed to use Nickel-Metal-Hydride rechargeable batteries.
No other type of rechargeable battery should be used in the radio.
2) NEVER mix old and new Alkaline batteries. The old batteries may
suffer damage and leak which will damage your radio and whatever
the radio is standing on.
3) NEVER mix old and new Rechargeable batteries. This may result in
unreliable charging and shortened battery life. Never mix
Rechargeable batteries of different types or capacities even if they
are new.
4) NEVER mix Alkaline and Rechargeable batteries. The recharging of
Alkaline batteries can be very dangerous.
21
We recommend that all the rechargeable batteries used in your radio
are bought together as a set. They should always be charged together
and discharged together and not “borrowed” from time to time for other
applications. This will ensure that they give their optimum performance
in your radio.
We recommend that the rechargeable batteries that you use should be
from a quality brand, and should be of at least 2000mAh capacity.
Batteries of this capacity should be able to power your radio for between
10 and 20 hours depending upon the volume of the radio, whether DAB
or FM mode is used (DAB mode uses slightly less power than FM),
and also depending on the condition of the batteries.
Before you first install a new set of rechargeable batteries into your
radio you should first make sure that the battery type switch beneath
the battery cover is in the NiMH position. Install the batteries arranging
them as shown on the back of the radio. Plug the mains adaptor into a
mains socket and then into the radio. While the batteries are charging
the battery indicator should show a flashing green light. When the
batteries are fully charged the indicator will stop flashing and will show a
steady green light. The time taken to charge the batteries will depend
on how much charging they require. New batteries may be partly
charged when first fitted, but it is normal for a set of batteries to take
several hours to charge fully (this can be between 5 and 8 hours
depending on the battery capacity and their initial state of charge).
Page 23

If you use the radio powered from the batteries, the battery light will be
off until the batteries are exhausted. The battery light will then show
red for a short while before the radio switches itself off. It does this in
order that the batteries are not excessively discharged. This would
otherwise damage the batteries and shorten their life.
If you use the radio powered from the mains with rechargeable batteries
fitted, the charging process is suspended until you switch off the radio.
When you switch off the radio using its On/Off button charging will
then resume. If the batteries have already been charged then they
will only charge for a few more minutes before the battery indicator
stops flashing.
If you only listen to your radio for short periods, you do not need to
connect your radio to the mains to charge the batteries every time that
you use it. However, if the radio is not to be used for a few weeks,
then we recommend that the batteries are fully charged
(battery light shows steady green) before the radio is put to one side.
If you intend not to use your radio for some months, then we
recommend that the batteries are removed and put away, keeping them
in a cool place out of reach of children, away from moisture and such
that no metal object can contact the battery terminals.
With care, rechargeable batteries can last a long time and can operate
for many hundreds of charge and discharge cycles. When your
rechargeable batteries can no longer power your radio adequately,
please dispose of them thoughtfully.
To avoid danger and risk of injury, please follow these
guide lines
Improper use of batteries may result in leakage of fluid, overheating
or explosion. Battery fluid is corrosive and may also be toxic.
Battery fluid can cause skin burns, can damage the eyes, and can be
harmful if swallowed.
1. Keep batteries out of the reach of children.
2. Do not heat, open, puncture, mutilate or dispose of batteries
by burning.
3. Do not mix different battery types or old and new batteries.
Always replace all the batteries at the same time.
4. Do not carry or store batteries such that metal objects may contact
the end caps.
5. Remove batteries from the radio if they are worn out or if you are
storing it for a long time.
6. Remove old or worn out batteries promptly, and recycle or dispose of
them according to the regulations applicable to your location.
7. If a battery does leak, remove all batteries from the product,
taking care to avoid directly touching the leaked fluid. If the fluid
contacts skin or clothes wash with water immediately.
Before inserting new batteries, thoroughly clean the battery
compartment with a damp paper towel, or follow the battery
manufacturer’s advice for clean up.
GB
22
Page 24
General
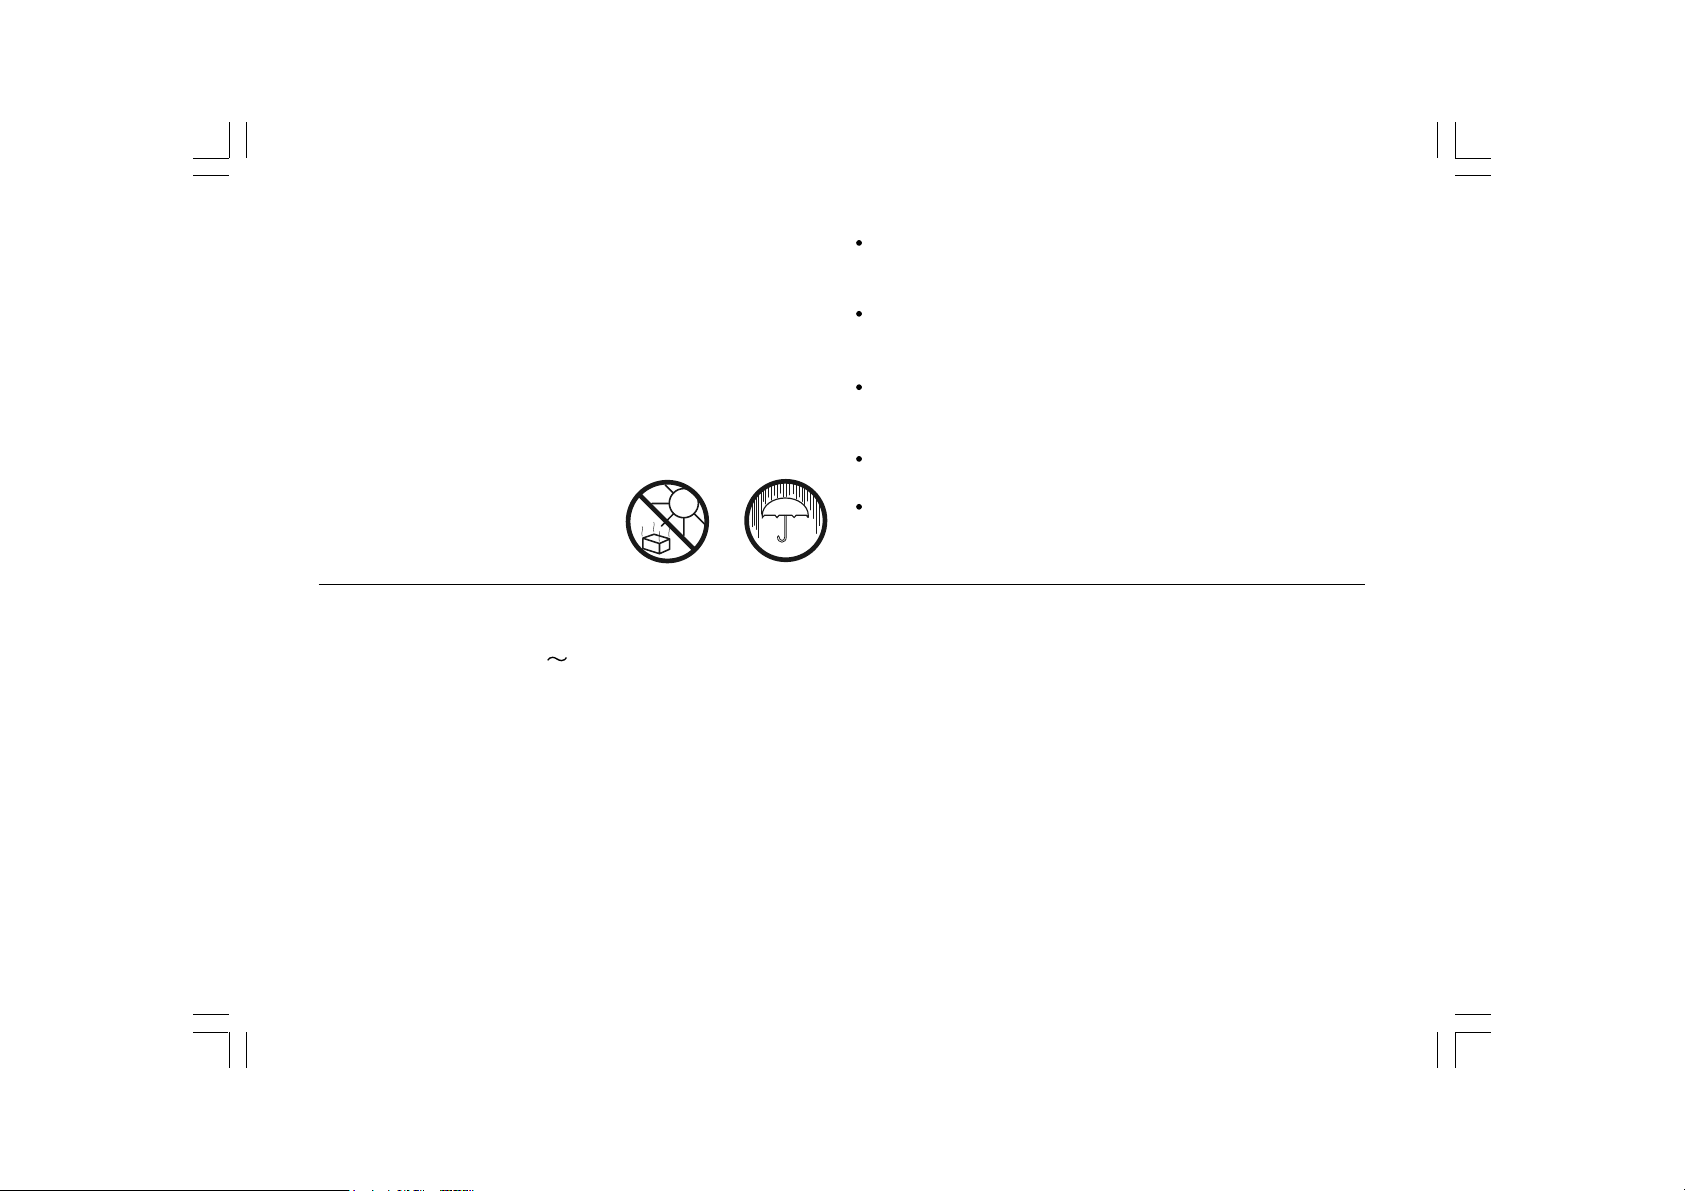
Do not allow this radio to be exposed to water, steam or sand. Do not
leave your radio where excessive heat could cause damage such as in a
parked car where the heat from the sun can build up even though the
outside temperature may not seem too high. It is recommended that the
DAB band be used wherever possible as better results in terms of
quality and freedom from interference will usually be obtained than on
the FM band.
The name plate is located on the back of your radio.
Your radio should not be exposed to dripping or splashing and that
no objects filled with liquids, such as vases, shall be placed on
the radio.
It is recommended to operate the product such that there is a
minimum distance (10cm recommended) to adjacent objects in order
to ensure good ventilation.
The ventilation of the product should not be restricted by covering it
or its ventilation openings with items such as newspapers,
tablecloths, curtains etc.
No naked flame sources such as lighted candles should be placed on
the product.
It is recommended to avoid using or storing the product at extremes
of temperature. Avoid leaving the unit in cars, on window sills,
in direct sunlight etc.
Specifications
Power Requirements
Mains
Batteries
Battery Life
Frequency Coverage
23
AC 100 240V 50/60 Hz (switching adaptor)
4 x LR6 (AA size) Alkaline or NiMH rechargeable
Up to 25 hours of listening when used for 4 hours
a day at normal volume using alkaline cells.
FM 87.5 - 108MHz
DAB 174.928 - 239.200MHz
The Company reserves the right to amend the specification without notice
Circuit Features
Loudspeaker
Output Power
Headphone socket
Aerial System
75mm
0.5 Watt
3.5mm dia
FM Telescopic aerial
DAB Telescopic aerial
Page 25

GB
If at any time in the future you should need to dispose of this product please note that: Waste electrical products should not
be disposed of with household waste. Please recycle where facilities exist. Check with your Local Authority or retailer for
recycling advice. (Waste Electrical and Electronic Equipment Directive)
24
Page 26

Table des matières
Commandes ....................................................... 26-27
Fonctionnement sur piles ..................................... 28-29
Fonctionnement avec l’adaptateur de courant CA ........ 30
Verrou .................................................................... 30
Fonctionnement de la radio DAB ............................... 31
Sélectionner une station radio DAB ........................... 32
Services secondaires- DAB ...................................... 32
Modes d’affichage -DAB ........................................... 33
Recherche de nouvelles stations -DAB ...................... 34
Réglage manuel -DAB .............................................. 35
Contrôle de la gamme dynamique -DAB ..................... 36
Fonctionnement de la radio -FM ................................ 37
Réglage manuel -FM ................................................ 38
Modes d’affichage -FM ............................................. 39
Présélection de stations – DAB et FM ....................... 40
Rappel de stations - DAB et FM ................................ 40
Configuration Stéréo/Mono -FM ................................. 41
Réglage de la sensibilité de recherche-FM ................. 42
Version logicielle ..................................................... 43
Réinitialisation du système ....................................... 43
Connecteur Ecouteurs ............................................. 44
Rétro éclairage ........................................................ 44
Quelques remarques liées à l’utilisation des piles ... 45-46
Général .................................................................. 47
Spécifications ......................................................... 47
Fonctionnalités du circuit ......................................... 47
25
Page 27
Commandes
(Panneau avant)
F
1. Haut-parleur
2. Touche Band
3. Touche Auto Tune
4. Touche Info
5. Touche Volume Bas
6. Touche Volume Haut
7. Commutateur d’alimentation
8. Verrou
9. Témoin de charge / niveau de charge de batterie faible
10. Touches Tuning haut/bas
11. Touche Select
12. Touches de présélection
26
Page 28

Commandes
(Panneau arrière)
27
13. Compartiment à piles
14. Antenne télescopique
15. Connecteur Ecouteurs
16. Connecteur d’alimentation DC
Page 29
Fonctionnement sur piles alcalines
1. Retirez le couvercle du compartiment à piles situé à l’arrière de
l’appareil en faisant glisser le couvercle du compartiment à piles
dans le sens indiqué par la flèche.
2. Positionnez le sélecteur sur la position Alkaline.
3. Insérez six piles LR6 (de taille AA) alcalines dans
les emplacements. Assurez-vous de respecter la polarité indiquée
dans le compartiment à piles lorsque vous installez les piles.
Refermez le couvercle du compartiment à piles.
Important:
Lorsque vous utilisez des piles alcalines, le sélecteur de
piles doit toujours être positionné sur Alkaline. Ne pas
faire ceci pourrait se résulter par de sérieux dommages
à la radio ou aux piles.
Lorsque les piles sont épuisées, le témoin de la batterie s’allume
en rouge pendant une courte période. La radio s’éteindra
ensuite automatiquement. Il est impossible de remettre en marche
la radio avant que les piles ne soient replacées ou d’avoir
reconnecté la radio au secteur.
Il est recommandé de retirer les piles de la radio lorsque vous
pensez ne plus l’utiliser sur une période prolongée.
Nous vous recommandons de raccorder la radio au secteur en
utilisant l’adaptateur de courant CA et de la faire fonctionner
sur piles occasionnellement ou pour laisser l’appareil en veille.
Lorsque vous pensez écouter de la musique sur une
période prolongée, utilisez des piles rechargeables.
F
28
Page 30
Fonctionnement sur piles rechargeables
1. Retirez le couvercle du compartiment à piles situé à l’arrière de
l’appareil en faisant glisser le couvercle du compartiment à piles
dans le sens indiqué par la flèche.
2. Faites glisser le sélecteur de piles sur la position NiMH.
3. Insérez quatre piles rechargeables LR6 (AA) dans
les emplacements. Assurez-vous de respecter la polarité
indiquée dans le compartiment à piles lorsque vous installez
les piles. La radio est conçue pour fonctionner avec des piles
rechargeables Nickel métal hybride (NiMH).
4. Raccordez l’adaptateur de courant à la radio puis raccordez
l’adaptateur au secteur.
5. Le témoin d’alimentation clignote en vert et indique que la mise
en charge des piles est en cours. La durée nécessaire de mise
en charge des piles est d’environ 7 heures. Le témoin de la
batterie s’allume en vert de manière continue lorsque la mise
en charge est terminée.
Important:
Lorsque vous utilisez des piles rechargeables, le sélecteur
de piles doit être positionné sur NiMH. Les piles peuvent
seulement être rechargées lorsque la radio est éteinte et
raccordée à l’adaptateur de courant CA.
Lorsque les piles sont épuisées, le témoin de la batterie s’allume
en rouge pendant une courte période. La radio s’éteindra
ensuite automatiquement. Il est impossible de remettre en marche
la radio avant que les piles ne soient replacées ou d’avoir
reconnecté la radio au secteur.
Il est recommandé de retirer les piles de la radio lorsque vous
pensez ne plus l’utiliser sur une période prolongée.
IMPORTANT:
Les piles ne doivent pas être exposées à une chaleur excessive
telle que les rayons du soleil, le feu ou similaires. Après utilisation,
déposez vos piles dans un point de collecte approprié.
N’incinérez jamais vos piles.
29
Page 31

Raccordement à un secteur C.A.
Votre radio est livrée avec un adaptateur de courant.
1. Placez votre radio sur une surface plane.
2. Insérez une extrémité de l’adaptateur C.C. au connecteur
d’entrée C.C. situé sur le côté gauche de la radio.
3. Raccordez l’autre extrémité de l’adaptateur à une prise murale
standard13 ampères. Lorsque la radio est raccordée au secteur,
l’alimentation par les piles est automatiquement désactivée.
Lorsque vous n’utilisez pas la radio,
déconnectez l’adaptateur C.A.
IMPORTANT:
L’adaptateur permet de mettre l’appareil sous tension. La prise de
courant murale à laquelle la radio est raccordée doit rester
accessible à tout moment. Pour complètement mettre la radio
hors tension, déconnectez l’adaptateur de la prise murale.
Verrou
Le verrou prévient toute pression involontaire des touches de
la radio.
1. Positionnez le verrou situé sur le côté gauche de la radio sur
‘Verrouillé’ . Le commutateur d’alimentation et les autres
commandes sont déverrouillés, ceci permet de prévenir toute
pression accidentelle des touches lorsque vos transportez la
radio dans une mallette ou un sac de voyage.
2. Pour déverrouiller, positionnez le commutateur sur la position
‘Déverrouillé’ .
F
30
Page 32

Fonctionnement de votre radio -DAB
1. Etendez complètement l’antenne.
2. Appuyez sur la touche Marche/Arrêt pour mettre en marche
la radio. L’écran affiche “Bienvenue sur votre radio numérique”
pendant quelques secondes.
3. Lors de la première utilisation de la radio, la recherche rapide de
la bande III DAB se lance. L’écran affiche “Réglage en cours”.
Lorsqu’il ne s’agit pas de la première utilisation de la radio,
la dernière station écoutée est sélectionnée.
4. Durant la recherche, le nombre de nouvelles stations augmente,
un compteur est présent sur la partie droite de l’écran,
celles-ci ont automatiquement ajoutées à la liste. Un graphe
montrant la progression de la recherche de la
progression automatique.
5. Lorsque la recherche automatique est terminée, la première
station (dans l’ordre alphabétique de 0 à 9 et de A à Z)
est sélectionnée.
6. Lorsque la liste des stations est toujours vide après avoir
effectué la recherche automatique, votre radio affichera
“Aucune station disponible”.
7. Lorsqu’aucun signal n’a été détecté, il est nécessaire de
déplacer votre radio dans un endroit propice à une
bonne réception.
31
Page 33

Sélection de stations – DAB
1. La ligne en haut de l’écran affiche le nom de la
station sélectionnée.
2. Appuyez sur la touche Tuning Haut/Bas pour sélectionner
une station.
3. Appuyez et relâchez la touche Select pour sélectionner
une station. L’écran affiche “Réglage en cours” lorsque la
radio trouve une nouvelle station.
4. Réglez le volume à l’aide des touches Volume haut et Volume bas.
Remarque:
Lorsque l’écran affiche toujours “Non disponible” près avoir
sélectionnée une station, il est nécessaire de déplacer votre
radio dans un endroit propice à une bonne réception.
Services secondaires - DAB
1. Certaines stations de radio offrent des services secondaires.
Lorsqu’une station offre de tels services, l’écran affiche “>>”
après le nom de la station de la liste. Le service secondaire
s’affiche après le premier service lorsque vous appuyez sur
la touche Tuning Haut.
F
2. Appuyez sur la touche Select pour sélectionner une station.
32
Page 34

Modes d’affichage - DAB
Votre radio dispose de 7 modes d’affichage DAB:
1. Appuyez sur la touche Info pour sélectionner un mode.
a.
Défilement de texte
b.
Type de programme
c.
Nom multiplex
d.
Heure et date
e.
Fréquence
f.
Type de fichier audio
et débit binaire
g.
Force du signal
Permet de faire défiler des messages texte
comme le nom de la piste/de l’artiste,
un numéro de téléphone, etc.
Permet d’afficher le type de station en
cours d’écoute: Pop, Classique,
Actualités, etc.
Permet d’afficher le nom du multiplex
appartenant à la station.
Permet d’afficher l’heure et la date.
Permet d’afficher la fréquence DAB de la
station radio sélectionnée.
Permet d’afficher le type de fichier audio
et débit binaire
Permet d’afficher la force du signal de la
station en cours d’écoute.
33
Page 35

Recherche de nouvelles stations – DAB
De plus en plus de stations sont disponibles. Pour trouver une
nouvelle station, procédez comme suit:
1. Lorsque la radio est en marche et le mode DAB activé,
appuyez sur la touche Réglage automatique.
« Recherche en cours… » s’affiche, la recherche des stations
radio de la bande III DAB se lance. Lors de la détection de
nouvelles stations radio, le compteur situé sur la partie droite de
l’écran affiche le nombre de stations radio actuellement détectées,
les nouvelles stations radio sont automatiquement ajoutées à la
liste des stations radio.
F
34
Page 36

Réglage manuel – DAB
Le réglage manuel vous permet de régler manuellement une station
radio de la bande DAB. Notez que la plage des stations radio DAB
est comprise entre 5A et 13F.
1. Appuyez et maintenez enfoncée la touche Select jusqu’à ce que
“Réglage manuel” s’affiche. Relâchez la touche Select.
2. Appuyez sur la touche Tuning Haut/Bas pour sélectionner le
canal DAB requis.
3. Pressez puis relâchez la touche Select pour sélectionner la
station DAB de votre choix. La barre située au milieu de l’écran
indique la puissance de signal minimum nécessaire pour obtenir
une bonne réception DAB. Les barres d’indication de la puissance
du signal augmentent et diminuent et indiquent la force actuelle du
signal lorsque vous ajustez l’antenne télescopique de votre radio.
4. Lorsque la radio détecte un signal DAB, l’écran affiche le nom
multiplex de la station DAB. Les stations trouvées seront
automatiquement ajoutées à la liste des stations.
5. Pressez et relâchez la touche Select pour revenir en le mode
de réglage radio DAB normal.
35
Page 37

Contrôle de la gamme dynamique (DRC)
Le contrôle de la gamme dynamique, (également connue sous le
nom de DRC), peut vous aider à mieux entendre les sons faibles
lorsque vous utilisez la radio dans un environnement bruyant.
1. Appuyez sur le Commutateur d’alimentation pour mettre en
marche la radio.
2. Pressez et maintenez enfoncée la touche Info. L’écran affiche
“Ordre des Station list”
3. Pressez sur les touches Tuning jusqu’à ce que l’écran affiche
“Valeur DRC”.
4. Pressez et relâchez la touche Select pour configurer.
5. Utilisez les touches TuningHaut/Bas pour sélectionner une valeur
DRC (la valeur par défaut est 0).
DRC 0 -signifie que le DRC est désactivé, la diffusion DRC
sera ignorée.
DRC 1 -signifie que le niveau de DRC est défini sur la moitié
des informations diffusées.
DRC 1/2 -signifie que le niveau de DRC est identique à celui
des informations diffusées.
6. Appuyez et relâchez la touche Select pour confirmer
les paramètres. L’écran affiche à nouveau l’interface Radio.
F
Remarque:
Certaines diffusions DAB ne sont pas compatibles avec la
fonction DRC. Lorsque la diffusion ne prend pas en charge la
fonction DRC, le paramètre DRC de la radio sera inactif.
36
Page 38

Fonctionnement de votre radio - FM
1. Etendez complètement l’antenne télescopique.
2. Appuyez sur le Commutateur d’alimentation pour mettre en
marche la radio. L’écran affiche “Bienvenue sur votre
radio numérique” pendant quelques secondes.
3. Appuyez sur la touche Band pour sélectionner la bande de
fréquences radio FM.
4. Appuyez et relâchez immédiatement la touche Select jusqu’à ce
que l’écran affiche «Réglage automatique <>».
5. Appuyez sur la touche Tuning Haut, votre radio recherchera
les stations vers les fréquences supérieures et s’arrêtera
automatiquement lorsqu’une station possédant un signal de
force suffisante est détectée.
6. Au bout de quelques secondes, l’écran met à jour les informations.
L’écran affiche le nom de la station si les informations RDS
sont disponibles. L’écran affiche également “St” et “RDS” sur
la ligne supérieure de l’écran lorsque la station offre des
informations RDS et un signal stéréo.
7. Appuyez sur la touche Tuning Bas pour effectuer une recherche
sur les fréquences inférieures de la bande de fréquences radio
FM (des hautes fréquences aux basses fréquences).
8. Lorsque la fin de la bande d’ondes est atteinte, votre radio
recommence la recherche à partir de l’autre extrémité de la
bande de fréquences.
9. Réglez le volume.
10. Appuyez sur le Commutateur d’alimentation pour éteindre la radio.
37
Page 39

Réglage manuel - FM
1. Appuyez sur le Commutateur d’alimentation pour mettre en
marche la radio.
2. Appuyez sur la touche Band pour sélectionner la bande
de fréquences radio FM. Etendez complètement
l’antenne télescopique.
3. Appuyez et relâchez la touche Select jusqu’à ce que l’écran
affiche “réglage manuel <>”
4. Appuyez sur la touche Tuning Haut ou Bas pour sélectionner
une station. La fréquence est modifiée par pas de 50 kHz.
Presser et maintenir une de ces touches enfoncée permet
d’incrémenter la fréquence plusieurs fois par seconde.
5. Lorsque la fin de la bande de fréquences radio est atteinte,
votre radio recommence la recherche à partir de l’autre
extrémité de la bande.
6. Réglez le volume.
7. Pour annuler le réglage manuel, pressez puis relâchez la touche
Select à nouveau pour afficher “Réglage automatique < >”.
F
38
Page 40

Modes d’affichage - FM
En mode FM, la ligne du bas de l’écran est compatible avec les
4 modes suivants:
1. Appuyez sur la touche Info pour sélectionner un mode.
a.
Texte radio
b.
Type de programme
c.
Heure et date
d.
Fréquence
Remarque:
L’affichage des informations est seulement disponible lorsque la
radio peut recevoir des informations RDS.
Permet de faire défiler des messages
texte comme le nom de la piste/de
l’artiste, un numéro de téléphone, etc.
Permet d’afficher le type de station en
cours d’écoute, exemple:
Pop, Classique, Actualités, etc.
Permet d’afficher l’heure et la date.
Permet d’afficher la fréquence de la
station radio sélectionnée.
39
Page 41

Préréglage de stations - DAB et FM
5 touches de présélection sont disponibles pour les deux bandes de
fréquences radio.
1. Appuyez sur le Commutateur d’alimentation pour mettre votre
radio en marche.
2. Sélectionnez une station comme indiqué précédemment
3. Appuyez et maintenez enfoncée la touche de présélection de
votre choix jusqu’à ce que l’écran affiche par exemple
“Touche de présélection 1 mémorisée”. La station sera
mémorisée sur cette touche de présélection. Répétez ce
processus pour les touches de présélection restantes.
4. Les stations mémorisées sur des touches de présélections
peuvent être remplacées en suivant la procédure ci-dessus.
Rappel de stations - DAB et FM
1. Appuyez sur le Commutateur d’alimentation pour mettre en
marche votre radio.
2. Sélectionnez la bande de fréquences radio de votre choix
3. Restez appuyé quelques secondes sur une touche de
présélection de votre choix, la radio sélectionne la
station automatiquement.
F
40
Page 42

Radio FM stéréo/mono
Votre radio lira les diffusions stéréo en stéréo (avec une
paire d’écouteurs) lorsque le signal est de puissance suffisante.
Cependant, le signal audio peut contenir des parasites si le signal
stéréo devient faible. Il est préférable de forcer la radio à diffuser
une station en mono afin de réduire les parasites.
1. Appuyez sur le commutateur d’alimentation Marche /arrêt pour
mettre en marche la radio.
2. Sélectionnez la station radio FM désirée comme
indiqué précédemment.
3. Pressez et maintenez enfoncée la touche Info jusqu’à ce que
l’écran affiche “Mono Override” sur la ligne inférieure. La ligne
supérieure de l’écran affiche “Override désactivé” lorsque la
radio est en mode Auto-Stéréo.
4. Appuyez sur la touche Select pour activer le mode Mono.
Lorsque cette option est activée, la radio diffusera la station
sélectionnée en mono lorsque vous utilisez le haut-parleur ou
les écouteurs. Mono Override est une option temporaire et
s’applique à la station radio sélectionnée seulement. Celle-ci est
automatiquement désactivée en sélectionnant une autre
station radio.
5. Lorsque vous souhaitez annuler le mode Mono Override lorsque
vous écoutez une station. Sélectionnez la station radio,
pressez et maintenez enfoncée la touche Info jusqu’à ce que
l’écran affiche ”Mono Override” sur la ligne inférieure de l’écran.
La ligne supérieure de l’écran affiche “Override activé” si la radio
est en mode Mono Override.
6. Appuyez sur la touche Select pour désactiver le mode
Mono Override. La radio diffusera ensuite la station en stéréo
via les écouteurs si le signal est suffisamment fort.
41
Page 43

Réglage de la sensibilité-FM
Votre radio recherchera les diffusions FM suffisamment puissantes
pour offrir une bonne réception. Cependant, vous souhaitez
sûrement que la fonction de recherche automatique détecte
également les signaux faibles provenant de transmetteurs
radio distants. Votre radio inclut donc une option local/distant pour la
recherche automatique.
1. Appuyez sur le commutateur d’alimentation Marche/Arrêt pour
mettre en marche votre radio.
2. Si besoin est, appuyez sur la touche Band pour sélectionner
la bande FM.
3. Pressez et maintenez enfoncée la touche Info jusqu’à ce que
l’écran affiche “Mono override” sur la ligne inférieure de l’écran.
4. Pressez et relâchez la touche Tuning Haut ou Bas jusqu’à ce
que l’écran affiche “ Zone de recherche FM ”, appuyez ensuite
sur la touche Select pour accéder au menu de sélection de la
zone de recherche.
5. Appuyez sur la touche Tuning haut ou Bas pour basculer entre
les options Local et Distant sur la ligne inférieure de l’écran.
L’option Distant permet à la radio de détecter des signaux plus
faibles lors de la recherche.
6. Appuyez sur la touche Select pour confirmer votre sélection.
La radio affiche à nouveau l’interface normale. L’option Local
ou Distant est enregistrée dans la radio et reste activée
jusqu’à ce que vous apportiez une modification ou effectuiez
une réinitialisation.
F
Remarque:
L’option initiale (à la première utilisation, ou après une réinitialisation
du système) permet à la radio d’ignorer les signaux faibles
(distants).
42
Page 44

Version logicielle
L’affichage de la version logicielle ne peut être modifié et est indiqué
à titre de référence seulement. Assurez-vous que la radio est en
marche et que le mode DAB est activé.
1. Pour afficher la version logicielle de votre radio, appuyez et
maintenez enfoncée la touche Info pendant 2 secondes.
2. Appuyez sur la touche Tuning haut/Bas jusqu’à ce que
“Version logicielle” s’affiche avec la version du firmware.
3. Après quelques secondes, le mode de réglage s’affiche.
Réinitialisation du système
Lorsque votre radio ne fonctionne pas correctement,
lorsque certains caractères s’affichent mal ou sont incomplets,
procédez aux vérifications suivantes.
1. Appuyez et maintenez enfoncée la touche Info pendant
2 secondes.
2. Appuyez sur la touche Tuning Haut/Bas jusqu’à ce que l’écran
affiche “ Configuration d’usine ”, puis appuyez sur la touche.
3. Appuyez une fois de plus sur la touche Select pour confirmer
la réinitialisation. Toutes les stations radio mémorisées et les
listes de station seront effacées.
4. Une recherche rapide des fréquences de la bande DAB se lance.
En cas de dysfonctionnements résultants d’une
décharge électrostatique, réinitialisez le produit (il est nécessaire
de débrancher le cordon d’alimentation puis de le rebrancher)
pour utiliser à nouveau votre radio normalement.
43
Page 45

Connecteur Ecouteurs
Un connecteur Ecouteurs 3.5mm est situé sur le côté gauche
de votre radio Celui-ci permet de raccorder un casque
d’écoute/écouteurs. L’insertion de la fiche du câble de vos
écouteurs/casque d’écoute coupe instantanément les haut-parleurs
de la radio.
IMPORTANT:
Une écoute prolongée avec des écouteurs/casque d’écoute à haut
niveau de volume peut entraîner la perte de l’ouïe.
Rétro éclairage de l’écran
1. Lorsque vous faites fonctionner la radio avec des piles, le rétro
éclairage de l’écran s’active pendant environ 12 secondes
lorsque vous appuyez sur une touche.
2. Lorsque vous faites fonctionner la radio avec le secteur CA,
le rétro éclairage de l’écran s’active lorsque vous appuyez sur
le commutateur d’alimentation.
F
44
Page 46

Quelques remarques sur les piles…
Votre radio a été conçue pour fonctionner sur plusieurs
types d’alimentation. Vous pouvez raccorder la radio eau secteur
en utilisant l’adaptateur de courant fourni, vous pouvez également
emporter la radio avec vous et l’alimenter par des piles alcalines
ou rechargeables. Nous déconseillons l’utilisation de piles
carbone-zinc ou zinc-chlorite.
Il est important que vous lisiez les conseils et
avertissements figurant ci-dessous
1) Quel que soit le type de piles que vous utilisez, il est très
important que vous sélectionniez le correct type de piles avec
le commutateur situé dans le compartiment à piles.
a. Lorsque les piles ne sont pas installées, positionnez le
commutateur sur la position Alkaline. Cette position minimise
la consommation d’énergie lorsque la radio est raccordée
au secteur.
b. Si vous installez des piles alcalines, positionnez le commutateur
sur la position Alkaline.
c. Si vous utilisez des piles rechargeables, positionnez le
commutateur sur la position Rechargeable. Votre radio est
conçue pour employer des piles rechargeables
Nickel-Métal-Hydride. Aucun autre type de piles rechargeables
ne peut être utilisé avec cette radio.
2) Ne mélangez JAMAIS des piles Alkaline neuves et usagées.
Les piles usagées peuvent être endommagées et fuir, ce qui
pourrait endommager votre radio et les objets situés à proximité
de la radio.
3) Ne mélangez JAMAIS des piles rechargeables neuves et
usagées. Car ceci peut entraîner des mises en charge incorrectes
et réduire la durée de service des piles. Ne mélangez JAMAIS des
piles rechargeables de types ou de capacités différents même si
celles-ci sont neuves.
4) Ne mélangez JAMAIS des piles alcalines et rechargeables.
La mise en charge de piles alcalines peut se révéler
très dangereuse.
Les piles rechargeables…
Votre radio emploie une large gamme de méthodes pour assurer
une mise en charge correcte et sûre des piles rechargeables
Nickel-Métal-Hydride. Celles-ci permettent de protéger vos piles
contre une charge et décharge excessives.
Ces protections sont seulement valables lorsque vous suivez les
conseils ci-dessus. En particulier, la radio ne pourra pas
correctement charger les piles lorsque vous utilisez plusieurs piles
de marques différentes, ou de durée d’utilisation différentes, et de
capacités différentes.
Nous vous recommandons d’acheter des paquets de
piles rechargeables. Celles-ci doivent toujours être chargées
ensemble et être utilisées pour cette radio uniquement. Ceci assurera
les performances optimales de votre radio.
Il est conseillé d’utiliser des piles rechargeables de marque,
de capacité minimale de 2000mAh. Les piles de ces capacités
peuvent alimenter votre radio de 10 à 20 heures suivant l’utilisation
de votre radio, lorsque vous utilisez le mode DAB ou FM (le mode
DAB consomme moins d’énergie que le mode FM), ceci dépend
également de l’état des piles.
Avant d’installer un ensemble de piles rechargeables dans
votre radio, assurez-vous d’abord que le sélecteur de types de
piles situé sous le couvercle de la batterie est positionné sur la
position Rechargeable. Installez les piles selon la polarité indiquée à
l’arrière de la radio. Raccordez l’adaptateur de courant à une prise
de courant à une prise de courant puis à la radio. En cours de
charge des piles, l’indicateur s’allume en rouge. Une fois
entièrement chargées, l’indicateur s’éteint. La durée de charge des
piles dépend de la mise en charge nécessaire. Les piles neuves
peuvent être partiellement chargées lors de leur première installation,
il est normal que la mise en charge dure quelques heures (entre 5 et
8 heures selon la capacité et l’état de charge initiale des piles).
45
Page 47

Si vous alimentez la radio par des piles, le témoin des piles
restera éteint. Lorsque les piles sont épuisées, la radio s’éteindra
automatiquement. Ceci indique que les piles ne sont plus
suffisamment chargées. Ceci pourrait endommager les piles et
réduire leur durée de service.
Si vous utilisez des piles rechargeables tout en ayant raccordé la
radio au secteur, la charge est interrompue jusqu’à ce que vous
éteigniez la radio. Lorsque vous éteignez la radio en utilisant le
commutateur On/Off, la charge reprend. Si vous avez déjà chargé
les piles, mettez-les à nouveau en charge jusqu’à ce que l’indicateur
des piles s’arrête de clignoter.
Si vous utilisez la radio sur de courtes périodes seulement, il n’est
pas nécessaire de raccorder la radio au secteur pour recharger les
piles à chaque utilisation. Cependant, si vous pensez ne plus utiliser
la radio pendant quelques semaines, chargez les piles avant de les
ranger (chargez jusqu’à ce que l’indicateur lumineux des piles
s’allume en vert de manière continue).
Lorsque vous pensez ne plus utiliser la radio pendant
quelques mois, nous vous recommandons de sortir les piles,
maintenez-les dans un endroit frais hors de portée des enfants,
à l’écart de l’humidité et des objets métalliques pouvant entrer avec
les bornes de la batterie. Avec soin, les piles rechargeables peuvent
durer et subir des centaines de cycles de décharge et de charges.
Lorsque vos piles rechargeables ne peuvent plus alimenter
votre radio, disposez correctement des piles.
Afin de prévenir tout danger et blessure corporelle,
suivez ces avertissements
Toute utilisation incorrecte des piles peut se résulter par des fuites,
surchauffe ou explosion. Le fluide des piles est corrosif et peut
également se révéler toxique. Le fluide des piles peut causer des
brûlures endommager les yeux, et peut être dangereux si avalé.
1. Maintenez vos piles à l’écart des enfants.
2. Ne pas chauffer, ouvrir, percer, rompre ou incinérer vos piles.
3. Ne mélangez jamais des piles de types différents ou des piles
neuves et usagées. Remplacez toujours toutes les piles en
même temps.
4. Ne transportez et ne rangez pas les piles sur de tels objets
métalliques pouvant entrer en contact avec les bornes des piles.
5. Retirez les piles de la radio si celles-ci sont épuisées ou lorsque
vous souhaitez les ranger pendant une longue période.
6. Ne mélangez pas piles neuves et usagées, ainsi que des piles de
types différents, neuves et usagées. Remplacez toujours toutes
les piles en même temps.
7. En cas de fuite, retirez les piles du produit, en prenant soin de ne
pas toucher le fluide. Si le fluide entre en contact avec votre peau
ou vos vêtements, rincez immédiatement à l’eau courante.
Avant d’installer de nouvelles piles, nettoyez entièrement le
compartiment à piles avec une serviette, ou suivez les conseils
du fabricant pour le nettoyage.
F
46
Page 48

Général
N’exposez pas cette radio à l’eau, la vapeur ou le sable.
N’exposez pas votre radio dans un endroit soumis à de hautes
températures où celle-ci pourrait s’endommager, comme dans un
véhicule garé en plein soleil, dans un endroit où la chaleur pourrait
s’accumuler lorsque la température extérieure n’est pas très élevée.
Il est recommandé d’utiliser uniquement la bande DAB lorsque toutes
les conditions de réception d’un signal optimal sont réunies,
sinon utilisez la bande FM qui offre davantage de qualité de
signal et de liberté.
La plaque signalétique est située sur le panneau arrière de la radio.
Votre radio ne doit en aucun cas être exposée à des
égouttements ou éclaboussures et tout objet rempli de liquide,
comme un vase, ne doit pas être placé sur la radio.
Il est recommandé de conserver une distance minimum autour
de l’appareil (nous recommandons 10 cm) afin d’assurer
sa ventilation.
Les orifices de ventilation de l’appareil ne doivent pas être
obstrués en les couvrant par des objets comme des journaux,
nappes, rideaux, etc.
Aucune source de flammes, comme des bougies, ne doit être
placée sur l’appareil.
Il est recommandé d’éviter d’utiliser et de ranger le produit dans
un endroit soumis à d’extrêmes températures. Evitez de laisser
cette radio dans la voiture, sur le rebord d’une fenêtre,
au soleil, etc.
Spécifications
Alimentation
Secteur: CA 100 240 volts, 50-60Hz-seulement (adaptateur)
Piles:4 piles LR6 (AA) alcalines ou rechargeables NiMH
Autonomie des piles
Jusqu’à 25 heures, à raison de 4 heures d’écoute par jour à un
niveau de volume normal et en utilisant des piles alcalines.
Gamme de fréquences
FM 87.5 - 108MHz
DAB 174.928 - 239.200MHz
La société se réserve le droit de modifier les spécifications sans préavis
47
Fonctionnalités du circuit
Haut-parleur
Puissance
Connecteur Ecouteurs
Système d’antenne
75 mm
0.5 Watt
5mm dia
Antenne FM
Antenne DAB
Page 49

À noter lorsque vous disposerez de cet appareil: les déchets de produits électriques ne doivent pas être jetés avec les
déchets ménagers. Veuillez déposer votre appareil dans un point de recyclage approprié. Consultez votre municipalité ou
votre revendeur pour obtenir des conseils sur le recyclage de cet appareil. (Directive sur les déchets électriques et
électroniques)
F
48
Page 50

Contenido
Controles ........................................................... 50-51
Funcionamiento con baterías ................................ 52-53
Uso del adaptador AC ............................................... 54
Interruptor Lock (bloqueo) ........................................ 54
Uso de su radio - DAB ............................................. 55
Seleccionar una estación - DAB ............................... 56
Servicios secundarios - DAB .................................... 56
Modos de visualización - DAB .................................. 57
Buscar estaciones nuevas - DAB .............................. 58
Sintonización manual - DAB ..................................... 59
Control de Rango Dinámico - DAB ............................. 60
Uso de su radio - FM ............................................... 61
Sintonización manual - FM ....................................... 62
Modos de visualización - FM ..................................... 63
Preprogramar estaciones - DAB y FM ........................ 64
Sintonizar una est. preprogramada - DAB y FM ........... 64
Ajuste estéreo/mono - FM ........................................ 65
Ajustar la sensibilidad de búsqueda - FM ................... 66
Versión de software ................................................. 67
Reiniciar el sistema ................................................. 67
Salida para auriculares ............................................ 68
Luz de fondo ........................................................... 68
Información sobre baterías .................................. 69-70
General .................................................................. 71
Especificaciones ..................................................... 71
Especificaciones de circuito ..................................... 71
49
Page 51

Controles
(Frente)
E
1. Altavoz
2. Botón Band (banda)
3. Botón Auto Tune (autosintonización)
4. Botón Info
5. Botón Volume Down (disminuir volumen)
6. Botón Volume Up (aumentar volumen)
7. Botón On / Off (encender/apagar)
8. Interruptor Lock (de bloqueo)
9. Indicador de Recarga / Batería baja
10. Botones Tuning Up / Down (sintonizar arriba/abajo)
11. Botón Select (seleccionar)
12. Botones Preset (preprogramaciones)
50
Page 52

Controles
(Reverso)
51
13. Compartimiento de baterías
14. Antena telescópica
15. Salida para auriculares
16. Entrada DC
Page 53

Funcionamiento con baterías alcalinas
1. Quite la tapa de las baterías del reverso de la unidad deslizando
la tapa en dirección de la flecha.
2. Deslice el interruptor dentro del compartimiento de baterías a la
posición Alkaline (alcalina).
3. Inserte cuatro baterías alcalinas LR6 (tamaño AA) en los espacios
del compartimiento. Asegúrese de que todas las baterías se
inserten con los polos en la dirección correcta, como se indica
en el reverso de la radio. Y después vuelva a colocar la tapa
de las baterías.
Importante:
Cuando use baterías alcalinas, el interruptor de las
baterías debe colocarse en la posición para alcalinas
(Alkaline). De lo contrario, las baterías o radio podrían
dañarse gravemente.
Cuando se agoten las baterías, el indicador de baterías se
iluminará en rojo durante unos momentos. Después la radio se
apagará automáticamente. Podría resultar imposible volver a
encender la radio hasta que las baterías se sustituyan o la radio
se conecte con el adaptador de corriente.
Si la radio dejará de usarse durante un periodo extendido
de tiempo, se recomienda sacar las baterías de la radio.
Recomendamos por motivos económicos que el Ecologic 1 se
utilice con el adaptador AC siempre que sea posible y que se
utilice con baterías ocasionalmente o cuando se use en estado
de suspensión. En caso de prever un uso extendido con baterías,
se recomienda utilizar baterías recargables.
E
52
Page 54

Funcionamiento con baterías recargables
1. Quite la tapa de las baterías del reverso de la unidad deslizando
la tapa en dirección de la flecha.
2. Deslice el interruptor dentro del compartimiento de baterías a la
posición NiMH.
3. Inserte cuatro baterías alcalinas LR6 (tamaño AA) en los espacios
del compartimiento. Asegúrese de que todas las baterías se
inserten con los polos en la dirección correcta, como se indica
en el reverso de la radio. La radio está diseñada para ser usada
con baterías recargables de níquel e hidruro metálico (NiMH).
4. Enchufe el adaptador a la radio y después enchúfelo a una
toma de corriente.
5. El indicador de baterías parpadeará en verde, señalando que las
baterías se están cargando. Las baterías se cargarán por
completo en aproximadamente 7 horas. El indicador de batería
muestra una luz estable verde cuando la carga se
haya completado.
Importante:
Cuando use baterías recargables, el interruptor de las
baterías debe estar en la posición NiMH. Las baterías sólo
se recargarán cuando la radio esté apagada y conectada
con el adaptador AC.
Cuando se agoten las baterías, el indicador de baterías se
iluminará en rojo durante unos momentos. Después la radio se
apagará automáticamente. Podría resultar imposible volver a
encender la radio hasta que las baterías se recarguen o hasta
que la radio se conecte con el adaptador de corriente.
Se recomienda sacar las baterías de la radio si la radio dejará de
usarse durante un periodo extendido de tiempo.
IMPORTANTE:
Las baterías no deben exponerse a calor excesivo como luz solar,
fuego o cosas semejantes. Después de agotar
baterías desechables, deben llevarse a un centro de reciclaje
en caso de ser posible. En ningún caso deben desecharse las
baterías incinerándolas.
53
Page 55

Uso del adaptador AC
Su radio viene con un adaptador de corriente incluido.
1. Coloque la radio en una superficie plana.
2. Inserte la clavija del adaptador en la entrada DC de la parte
izquierda de su radio.
3. Enchufe el adaptador a una toma de corriente estándar de 13A.
Siempre que el adaptador se use con la radio, esta será
alimentada por la toma de corriente en lugar de las baterías.
El adaptador AC debe desconectarse de la toma cuando la radio
no esté en uso.
IMPORTANTE:
El adaptador de corriente se utiliza para conectar la radio a la red
de suministro eléctrico. La toma utilizada para la radio debe
permanecer accesible durante el uso normal. Para desconectar
la radio de la toma por completo, el adaptador de corriente debe
desconectarse completamente de la toma de corriente.
Interruptor Lock (de bloqueo)
El interruptor Lock se utiliza para prevenir el uso accidental de
su radio.
1. Cambie el interruptor Lock localizado en la parte lateral de la radio
a la posición de bloqueo ‘Lock’ . El botón de encendido y
todos los demás botones se deshabilitarán, previniendo de este
modo el uso accidental de su radio cuando se encuentre dentro
de su equipaje o bolsa de viaje.
2. Para desbloquearla, deslice el interruptor Lock a la posición de
desbloqueo ‘Unlock’ .
E
54
Page 56

Uso de su radio - DAB
1. Extienda cuidadosamente la antena telescópica.
2. Pulse el botón On/Off para encender la radio. La pantalla
mostrará “Welcome to Digital Radio” durante algunos segundos.
3. Si es la primera vez que se utiliza la radio, se llevará a cabo una
búsqueda rápida de canales en la banda BIII DAB. La pantalla
mostrará “Welcome to DAB”. Si la radio fue utilizada anteriormente
se seleccionará la última estación usada.
4. Durante el proceso de búsqueda, mientras se vayan detectando
estaciones nuevas, el contador de estaciones del lado derecho
de la pantalla aumentará y las estaciones se añadirán a la lista.
La línea inferior de la pantalla muestra una barra indicando el
progreso de la autosintonización.
5. Cuando se complete la búsqueda, se seleccionará la primera
estación (en orden alfanumérico 0...9...A....Z).
6. Si la lista de estaciones sigue vacía después de la búsqueda,
su radio mostrará “No DAB Station”.
7. Si no se encuentra ninguna señal quizás necesite cambiar la
radio de ubicación a una que brinde mejor recepción.
55
Page 57

Seleccionar una estación – DAB
1. La línea superior de la pantalla muestra el nombre de la estación
actualmente seleccionada.
2. Pulse los botones Tuning Up/Down para desplazarse por la lista
de estaciones disponibles.
3. Pulse y suelte el botón Select para seleccionar la estación.
La pantalla podría mostrar “Now tuning” mientras la radio
encuentra la nueva estación.
4. Ajuste los botones Volume Up o Down hasta el nivel deseado.
Nota:
Si después de seleccionar una estación la pantalla muestra
“Service not available”, quizás tenga que cambiar su radio de
ubicación a una con mejor recepción.
Servicios secundarios – DAB
1. Algunas estaciones de radio tienen uno o más servicios
secundarios vinculados con ellas. Si una estación tiene un
servicio secundario, la pantalla mostrará “>>” al lado del nombre
de la estación en la lista de estaciones. El servicio secundario
aparecerá inmediatamente después del servicio principal al pulsar
el botón Tuning Up.
E
2. Pulse el botón Select para seleccionar la estación.
56
Page 58

Modos de visualización – DAB
Su radio tiene siete modos de visualización:-
1. Pulse el botón Info para cambiar entre los distintos modos.
Scrolling Text
a.
(texto móvil)
Program Type
b.
(tipo de programa)
Multiplex Name
c.
(nombre de múltiplex)
Time and date
d.
(fecha y hora)
Frequency
e.
(frecuencia)
Bit rate & audio type
f.
(velocidad de
transferencia y tipo
de audio)
Signal Strength
g.
(fuerza de señal)
Muestra un texto móvil con información
como el nombre del artista/pista, t
eléfono de la cabina, etc.
Muestra el tipo de estación que se
está escuchando, p. ej. Pop,
Classic (clásica), News (noticiero), etc.
Muestra el nombre de múltiplex DAB al que
pertenece la estación actual.
Muestra la fecha y hora actual.
Muestra la frecuencia del múltiplex DAB de
la estación sintonizada.
Muestra la velocidad de transferencia
digital y el tipo de audio de la estación
que se está escuchando.
Muestra una barra que indica la fuerza de
señal de la estación recibida.
57
Page 59

Buscar estaciones nuevas – DAB
Nuevas estaciones podrían estar disponibles con el paso del tiempo.
Para buscar estaciones nuevas haga lo siguiente:
1. Con la radio encendida y en el modo DAB, pulse y suelte el
botón Auto Tune. La pantalla mostrará “Scanning…” y su radio
reloj realizará una búsqueda de los canales de la Banda III DAB.
Conforme se vayan encontrando estaciones nuevas el contador
de estaciones del lado derecho de la pantalla aumentará y las
estaciones de radio se añadirán a la lista guardada en la radio.
E
58
Page 60

Sintonización manual – DAB
La sintonización manual le permite sintonizar directamente los
canales de la banda DAB BIII. Recuerde que las estaciones DAB
están ubicadas en la gama de 5A-13F.
1. Pulse y sostenga el botón Select hasta que la pantalla muestre
“Manual tune”. Suelte el botón Select.
2. Pulse cualquiera de los botones Tuning Up/Down para
seleccionar el canal DAB requerido.
3. Pulse y suelte el botón Select para seleccionar el canal
DAB requerido. El rectángulo transparente indica el nivel mínimo
de señal requerido para una recepción satisfactoria. La barra de
fuerza de señal aumentará y disminuirá mostrando el cambio en
la fuerza de señal al ajustar la antena telescópica de su radio.
4. Cuando se encuentre una señal DAB, la pantalla mostrará el
nombre del múltiplex DAB. Toda estación nueva encontrada
será añadida a la lista almacenada en la radio.
5. Pulse y suelte el botón Select para volver al modo de
sintonización DAB normal.
59
Page 61

Ajustes del Control de Rango Dinámico (DRC) - DAB
El Control de Rango Dinámico (también conocido como DRC) puede
hacer que los sonidos más bajos sean más fáciles de escuchar
cuando utilice su radio en un ambiente ruidoso.
1. Pulse el botón On/Off para encender su radio.
2. Pulse y sostenga el botón Info. La pantalla mostrará “Station list.”
3. Pulse los botones Tuning Up/Down hasta que la pantalla muestre
“DRC value”.
4. Pulse y suelte el botón Select para entra al modo para ajustar.
5. Pulse los botones Tuning Up/Down para seleccionar el ajuste
DRC deseado (el valor predeterminado es 0).
DRC 0 - El DRC está apagado, se ignorará el DRC transmitido.
DRC 1 - El DRC está al nivel transmitido por la emisora.
DRC 1/2 - El nivel DRC está a 1/2 del enviado por la emisora.
6. Pulse y suelte el botón Select para confirmar el ajuste.
La pantalla volverá al modo de sintonización normal.
Nota:
No todas las transmisiones DAB pueden utilizar la función DRC.
Si la transmisión no admite DRC, al ajuste DRC de la radio no tendrá
ningún efecto.
E
60
Page 62

Uso de su radio – FM
1. Extienda cuidadosamente la antena telescópica.
2. Pulse el botón On/Off para encender su radio. La pantalla
mostrará “Welcome to Digital Radio” durante algunos segundos.
3. Pulse el botón Band para seleccionar la banda FM.
4. Pulse y suelte el botón Select hasta que la pantalla muestre
“Auto tune <>”.
5. Pulse el botón Tuning Up. Su radio buscará desde la frecuencia
actual mostrada en dirección hacia arriba y dejará de buscar
cuando encuentre una estación de fuerza suficiente.
6. La pantalla mostrará la frecuencia de la señal que se
haya encontrado. Si hay información RDS disponible, la pantalla
mostrará el nombre de la estación de radio después de
unos segundos. La pantalla también mostrará “St” y “RDS” en
la línea superior si la estación se recibe en estéreo y con
información RDS, respectivamente.
7. Pulse el botón Tuning Down para buscar estaciones en la
banda FM en dirección hacia abajo (frecuencias altas a
frecuencias bajas).
8. Cuando se llegue al final de la banda, su radio reiniciará la
sintonización desde el extremo opuesto de la banda.
9. Ajuste el control de volumen hasta el nivel deseado.
10. Para apagar su radio pulse el botón On/Off.
61
Page 63

Sintonización manual – FM
1. Pulse el botón On/Off para encender su radio.
2. Pulse el botón Band para seleccionar la banda FM.
Extienda completamente la antena telescópica.
3. Pulse y suelte el botón Select hasta que la pantalla muestre
“Manual tune < >”.
4. Pulse cualquiera de los botones Tuning Up o Down para
sintonizar una estación. La frecuencia se cambiará en pasos de
50kHz. Pulsar y sostener uno de los botones hará que se cambie
la frecuencia varias veces por segundo.
5. Cuando llegue al final de la banda la radio reiniciará la
sintonización desde el extremo opuesto de la banda.
6. Ajuste el control de volumen hasta el nivel deseado.
7. Para cancelar la opción de sintonización manual, pulse y suelte
el botón Select de nuevo para que la pantalla muestre
“Auto tune < >”.
E
62
Page 64

Modos de visualización – FM
En el modo FM, la línea inferior de la pantalla puede cambiarse a uno
de los siguientes modos.
1. Pulse el botón Info para cambiar entre los distintos modos.
a.
Radio text
(texto de radio)
b.
Program Type
(tipo de programa)
Muestra un texto móvil con información
como el nombre del artista/pista,
teléfono de la cabina, etc.
Muestra la información de programa de
la estación que se está escuchando,
p. ej. Pop, Classic (clásica), News
(noticiero), etc.
c.
Time and date
(hora y fecha)
d.
Frequency
(frecuencia)
Nota:
Estos modos de visualización de información FM sólo están
disponibles cuando la radio pueda recibir información RDS
de la emisora.
63
Muestra la hora y fecha actual.
Muestra la frecuencia de la
estación sintonizada.
Page 65

Preprogramar estaciones - DAB y FM
Hay 5 posiciones de memoria para cada una de las dos bandas.
1. Pulse el botón On/Off para encender la radio.
2. Sintonice la estación deseada como se describió anteriormente.
3. Pulse y sostenga el botón de Preset deseado hasta que la
pantalla muestre, por ejemplo, “Preset 1 stored”
(Est. preprogramada 1 guardada). La estación se guardará en
la posición Preset seleccionada. Repita este procedimiento con
las posiciones restantes.
4. Las estaciones guardadas en la memoria pueden sobrescribirse
siguiendo el proceso anterior.
Sintonizar una estación preprogramada - DAB y FM
1. Pulse el botón On/Off para encender su radio.
2. Elija la banda deseada.
3. Pulse brevemente el botón Preset deseado y la radio sintonizará
la estación almacenada en esa posición.
E
64
Page 66

Ajuste estéreo/mono - FM
Su radio puede reproducir emisiones estéreo en estéreo
(a través de los auriculares) siempre y cuando la señal recibida sea
de fuerza suficiente. Sin embargo, al debilitarse la señal estéreo el
audio empeora. Quizá sea más conveniente obligar a la radio
a que reproduzca la estación en mono para reducir el nivel de
ruido acústico.
1. Pulse el botón On/Off para encender su radio.
2. Sintonice la estación de radio FM requerida como se
describió anteriormente.
3. Pulse y sostenga el botón Info hasta que la pantalla muestre
“Mono Override” en la línea inferior. La línea superior mostrará
“Override Off” si la radio está en el modo Auto-Stereo.
4. Pulse el botón Select para activar Mono Override. Con este ajuste,
la radio reproducirá la estación actual en mono sin importar que
se escuche usando auriculares o el altavoz.
Mono Override es un ajuste temporal y se aplica únicamente a la
estación actualmente sintonizada. Se cancela automáticamente
al sintonizar otra estación.
5. Si quiere cancelar Mono Override al escuchar la estación
actualmente sintonizada, pulse y sostenga el botón Info hasta
que la pantalla muestre ”Mono Override” en la línea inferior.
La línea superior mostrará “Override On” si la radio está en
el modo Mono Override.
6. Pulse el botón Select para desactivar Mono Override. La radio
pasará a reproducir la estación actual en estéreo a través de
los auriculares si la señal tiene suficiente fuerza.
65
Page 67

Ajustar la sensibilidad de búsqueda - FM
Su radio normalmente buscará transmisiones FM de fuerza
suficiente para permitir una buena recepción. Sin embargo,
podría querer que la función de autobúsqueda también busque
señales más débiles, que puede ser el caso de emisoras más
distantes. Su radio incluye una opción de local/distante para la
función de autobúsqueda.
1. Pulse el botón On/Off para encender su radio.
2. De ser necesario, pulse el botón Band para seleccionar la
banda FM.
3. Pulse y sostenga el botón Info hasta que la pantalla muestre
“Mono override” en la línea inferior.
4. Pulse y suelte el botón Tuning Up o Down hasta que la pantalla
muestre “FM Scan Zone” y después pulse el botón Select para
entrar al menú para seleccionar la zona de búsqueda.
5. Pulse el botón Tuning Up o Down para cambiar entre las opciones
Local y Distant en la línea inferior de la pantalla. La opción Distant
permitirá a la radio encontrar señales más débiles al realizar
la búsqueda.
6. Pulse el botón Select para confirmar su selección. La radio pasará
a la pantalla de información normal. El ajuste Local o Distant se
guarda en la radio y permanece vigente hasta que se cambie o
hasta que el sistema se reinicie.
E
Nota:
El ajuste inicial (de fábrica, o después de reiniciar el sistema) es que
la radio ignore señales débiles (distantes).
66
Page 68

Versión de software
La pantalla de software no puede alterarse y es sólo para su
información. Asegúrese de que su radio esté encendida y en el
modo DAB.
1. Para ver la versión del software en la pantalla, pulse y sostenga
el botón Info durante 2 segundos.
2. Pulse los botones Tuning Up/Down repetidamente hasta que
aparezca en pantalla “SW version” junto con el número
de versión. Después de algunos segundos la pantalla volverá al
modo de visualización normal.
Reiniciar el sistema
Si su radio está funcionando irregularmente, o si faltan o están
incompletos algunos dígitos de la pantalla, lleve a cabo el
siguiente procedimiento.
1. Pulse y sostenga el botón Info durante 2 segundos.
2. Pulse los botones Tuning Up/Down repetidamente hasta que la
pantalla muestre “Factory reset”, y después pulse el botón Select.
3. Si desea reiniciar el sistema, pulse el botón Select una vez más.
Se llevará a cabo un reinicio completo de la radio. Todas las
estaciones preprogramadas y listas de estaciones se eliminarán.
4. Después de reiniciar el sistema se llevará a cabo una búsqueda
de la banda DAB. En caso de fallo debido a una
descarga electroestática, reinicie el producto (podría requerir
reconectar la fuente de alimentación) para reanudar el
funcionamiento normal.
67
Page 69

Salida para auriculares
Una salida para auriculares de 3.5 mm está incluida en la parte
izquierda de su radio para ser usada con auriculares o cascos.
Al conectar unos auriculares se desactiva automáticamente el
altavoz interno.
IMPORTANTE:
Presión acústica excesiva de auriculares y cascos puede
ocasionar sordera.
Luz de fondo
1. Cuando se utilicen baterías, la luz de fondo de la pantalla se
encenderá aproximadamente 12 segundos al pulsar
cualquier botón.
2. Cuando la radio reciba corriente de una toma AC, la luz de
fondo de la pantalla siempre estará encendida cuando se
encienda la radio.
E
68
Page 70

Unas palabras acerca de las baterías...
Su radio ha sido diseñada para que usted elija la fuente de
suministro eléctrico. Puede enchufarla a una toma con el adaptador
altamente eficiente incluido, o para escucharla alejada de la toma
puede utilizar baterías alcalinas o recargables. No recomendamos
que use baterías de carbono-zinc ni de cloruro de zinc.
Es muy importante que lea los consejos y
advertencias siguientes.
1) Sin importar qué tipo de baterías elija, es muy importante que el
interruptor selector de baterías que se encuentra debajo de la
cubierta esté puesto en el tipo correcto.
a. Si no coloca baterías, cambie el interruptor a la posición Alkaline
(a la izquierda, vista la radio desde atrás). Esta posición minimiza
el consumo eléctrico cuando la radio se alimenta con la toma
de corriente.
b. Si se usan baterías alcalinas, entonces cambie el interruptor a la
posición Alkaline (a la izquierda, vista la radio desde atrás).
c. Si se usan baterías recargables, cambie el interruptor a la
posición NiMH (a la derecha, vista la radio desde atrás). Su radio
está diseñada para usar baterías recargables de níquel e
hidruro metálico. Ningún otro tipo de batería recargable debe
usarse con la radio.
2) NUNCA mezcle baterías alcalinas viejas y nuevas. Las baterías
viejas podrían dañarse y derramarse, ocasionando daños a la
radio y el objeto sobre el que esté puesta.
3) NUNCA mezcle baterías recargables viejas y nuevas. Esto podría
resultar en recargas no fiables y acortamiento de la duración de
las baterías. Nunca mezcle baterías recargables de diferentes
tipos o capacidades incluso si son nuevas.
4) NUNCA mezcle baterías alcalinas y recargables.
Recargar baterías alcalinas puede ser muy peligroso.
Baterías recargables
Su radio utiliza varios métodos para garantizar la recarga correcta y
segura de baterías recargables de níquel e hidruro metálico.
Sirven para proteger las baterías contra recargas y
descargas excesivas. Estas protecciones solo funcionan
correctamente si las observaciones anteriores se respetan.
En particular, la radio no podrá cargar las baterías correctamente si
hay una mezcla de diferentes marcas, fechas o capacidades.
Recomendamos que todas las baterías recargables utilizadas en la
radio se compren en conjunto como un paquete. Siempre deberán
cargarse y descargarse juntas y no deberán ser “prestadas”
ocasionalmente a otros aparatos. Esto garantiza que den su máximo
rendimiento en la radio.
Recomendamos que las baterías recargables que utilice sean
de una marca de calidad, y que sean de por lo menos 2000mAh
de capacidad. Las baterías de esta capacidad deberán poder
alimentar su radio entre 10 y 20 horas dependiendo del volumen de
la radio, si se está usando el modo DAB o FM (el modo DAB usa un
poco menos de corriente que el FM), así como de la condición de
las baterías.
Antes de instalar por primera vez un juego nuevo de baterías
recargables en la radio, deberá asegurarse de que el interruptor de
tipo de baterías que se encuentra debajo de la tapa de baterías esté
en la posición NiMH. Instale las baterías como se indica en el reverso
de la radio. Enchufe el adaptador a una toma de corriente y después
conéctelo a la radio. Cuando las baterías se estén cargando el
indicador de baterías deberá mostrar una luz verde parpadeante.
Cuando las baterías estén completamente cargadas, el indicador
dejará de parpadear y mostrará una luz verde estable. El tiempo
requerido para cargar las baterías dependerá de cuánta
carga necesiten. Las baterías nuevas podrían recargarse
parcialmente cuando se colocan por primera vez, pero es normal
que un juego de baterías tome varias horas para recargarse
completamente (puede ser entre 5 y 8 horas dependiendo de la
capacidad de las baterías y su estado de carga inicial).
69
Page 71

Si utiliza la radio con alimentación por baterías, la luz de baterías
estará apagada hasta que las baterías se agoten. En ese caso la
luz de baterías se verá roja durante unos momentos antes de que
la radio se apague por sí misma. Hace esto para que las baterías
no se descarguen excesivamente. De lo contrario las baterías
podrían dañarse, acortando su duración.
Si utiliza la radio con alimentación por toma de corriente con baterías
recargables puestas, el proceso de recarga se suspende hasta que
apague la radio. Cuando apague la radio usando el botón On/Off,
la recarga se reanudará. Si las baterías ya se han recargado,
solo se recargarán algunos minutos adicionales antes de que el
indicador de recarga deje de parpadear.
Si sólo escucha la radio en periodos cortos, no tiene que conectar la
radio a la toma para recargar las baterías cada vez que la utilice.
Sin embargo, si la radio dejará de usarse algunas semanas,
recomendamos que las baterías se carguen completamente antes de
hacerlo (la luz de baterías está en verde de forma estable).
Si dejará de usar su radio durante algunos meses, le recomendamos
que las baterías se saquen y guarden en un lugar fresco lejos de
los niños, humedad y sin que ningún objeto metálico toque las
terminales de las baterías.
Cuidándolas, las baterías recargables pueden durar mucho tiempo
y pueden funcionar durante muchos cientos de ciclos de recarga
y descarga. Cuando sus baterías recargables ya no puedan
alimentar su radio adecuadamente, por favor deséchelas
con responsabilidad.
Para evitar peligro y riesgo de lesiones, por favor
respete las siguientes indicaciones
El uso indebido de baterías podría resultar en derrame de líquido,
sobrecalentamiento o explosión. El líquido de las baterías es
corrosivo y también podría ser tóxico. El líquido de batería puede
ocasionar quemaduras en la piel, dañar los ojos, y dañino al
ser ingerido.
1. Mantenga las baterías alejadas de los niños.
2. No caliente, abra, perfore, mutile ni deseche las
baterías incinerándolas.
3. No mezcle baterías de distintos tipos ni baterías viejas y nuevas.
Siempre sustituya todas las baterías al mismo tiempo.
4. No transporte ni guarde las baterías de modo que objetos
metálicos toquen los polos.
5. Saque las baterías de la radio si están agotadas o si la guardará
durante mucho tiempo.
6. Saque las baterías viejas o agotadas sin demora, y recíclelas o
deséchelas conforme a las normas locales vigentes.
7. En caso de que una batería se derrame, saque todas las baterías
del producto, evitando tocar el líquido derramado. Si el líquido
toca la piel o ropa, lave con agua inmediatamente. Antes de
insertar baterías nuevas, limpie el compartimiento de baterías
completamente con papel de cocina humedecido, o siga las
instrucciones del fabricante de baterías para la limpieza.
E
70
Page 72

General
No permita que esta radio se exponga a agua, vapor ni arena.
No deje la radio donde calor excesivo pueda dañarla, como en un
coche aparcado donde el calor del sol puede acumularse a pesar
de que la temperatura exterior no parezca demasiado alta.
Se recomienda utilizar la banda DAB siempre que sea posible ya
que usualmente se obtienen mejores resultados que la banda FM en
cuanto a calidad e interferencias.
La placa de identificación está localizada en el reverso de la radio.
Su radio no debe exponerse a goteos ni salpicaduras y ningún
objeto lleno de líquido, como un jarrón, debe colocarse encima
de ella.
Se recomienda utilizar el producto habiendo una distancia mínima
de 10 cm de otros objetos para garantizar una buena ventilación.
La ventilación del producto no debe restringirse al cubrir el
product entero o sus aberturas de ventilación con objetos
como periódicos, manteles, cortinas, etc.
Ninguna fuente de llama descubierta como velas encendidas
debe colocarse sobre el producto.
Se recomienda evitar usar o guardar el producto en
temperaturas extremas. Evite dejar la unidad en coches,
alféizares, luz directa del sol, etc.
Especificaciones
Requerimientos eléctricos
Toma de corriente: AC de 100 240V 50/60 Hz(adaptador)
Baterías: 4 x LR6 (tamaño AA) alcalina o NiMH recargable
Duración de las baterías
Hasta 25 horas escuchando 4 horas diarias a un volumen normal con
baterías alcalinas.
Rango de frecuencias
FM 87.5 - 108MHz
DAB 174.928 - 239.200MHz
La compañía se reserva el derecho de cambiar las especificaciones sin previo aviso.
71
Especificaciones de circuito
Altavoz
Potencia de salida
Salida para auriculares
Sistema de antena
75mm
0.5 W
5mm de diámetro
Antena telescópica FM
Antena telescópica DAB
Page 73

En caso de requerir desechar este producto en el futuro, por favor note que: Los residuos de productos eléctricos no
deben tirarse en la basura doméstica. Por favor recicle donde existan centros para ello. Consulte con su autoridad local o
minorista para obtener información sobre el reciclaje (Directiva de Residuos de Aparatos Eléctricos y Electrónicos).
E
72
Page 74

Inhoudsopgave
Bedieningselementen .......................................... 74-75
Gebruik met batterijen ........................................ 76-77
Gebruik van de AC adapter ....................................... 78
Lock/Unlock schakelaar .......................................... 78
Gebruik van de radio-DAB ........................................ 79
Selecteren van een zender-DAB ................................ 80
Extra diensten-DAB ................................................. 80
Display modi-DAB ................................................... 81
Vinden van nieuwe zenders-DAB ............................... 82
Handmatig instellen-DAB .......................................... 83
Dynamisch Bereik (DRC) instellingen - DAB ............... 84
Gebruik van uw radio-FM .......................................... 85
Handmatig instellen-FM ............................................ 86
Display modi-FM ..................................................... 87
Voorkeurzenders instellen - DAB and FM ................... 88
Voorkeurzenders oproepen - DAB and FM ................. 88
Stereo/Mono instellen-FM ......................................... 89
Scan gevoeligheid instelling -FM ............................... 90
Software versie ....................................................... 91
Systeem opnieuw instellen ....................................... 91
Koptelefoon ingang .................................................. 92
Display achtergrondlicht ........................................... 92
Batterij informatie ............................................... 93-94
Algemeen ............................................................... 95
Specificaties ........................................................... 95
Circuitkenmerk ....................................................... 95
73
Page 75

Bedieningselementen
(voorkant)
NL
1. Luidspreker
2. Bandbreedte knop
3. Auto zoek knop
4. Info knop
5. Volume omlaag knop
6. Volume omhoog knop
7. Aan/uit knop
8. Lock/Unlock schakelaar
9. LED oplaad/batterij leeg indicator
10. Tuning Omhoog/omlaag knoppen
11. Selectie knop
12. Voorkeuze knoppen
74
Page 76

Bedieningselementen
(achterkant en zijkant)
75
13. Batterijcompartiment
14. Telescopische antenne
15. Koptelefoon ingang
16. DC ingang
Page 77

Batterij gebruik met alkaline batterijen
1. Verwijder de batterij klep aan de achterkant van het apparaat
door de klep in de richting van de pijl te duwen.
2. Zet de batterij schakelaar in de batterij compartiment in de
Alkaline positie.
3. Plaats vier LR6 (AA grootte/UM3) alkaline batterijen in de ruimte
van het compartiment. Zorg dat alle batterijen volgens de
aanwijzingen geplaatst worden, rekening houdende met
hun polariteit, wat aangegeven is op de achterzijde van de radio.
Plaats dan de klep terug.
Belangrijk:
Wanneer alkaline batterijen gebruikt worden,moet de
batterij schakelaar in de alkaline positie worden gezet.
Wanneer dit niet gebeurt, kunnen batterijen of de radio
ernstig beschadigd raken.
Wanneer de batterijen opgebruikt zijn, zal het batterij lampje korte
tijd rood oplichten. Hierna zal de radio zichzelf uitschakelen.
Het is niet mogelijk de radio in te schakelen totdat de batterijen
zijn vervangen, of de radio op het net is aangesloten.
Als de radio voor een langere periode niet wordt gebruikt, is het
raadzaam om de batterijen uit de radio te halen.
Wij raden, voor zuinig verbruik, aan om de radio zoveel mogelijk
te gebruiken op het lichtnet, met de batterij alleen voor
sporadisch gebruik of als stand-by. Bij langdurig gebruik
op batterijen, is het raadzaam om oplaadbare batterijen
te gebruiken.
NL
76
Page 78

Batterij gebruik met oplaadbare batterijen
1. Verwijder de batterij klep aan de achterkant van het apparaat
door de klep in de richting van de pijl te duwen.
2. Zet de batterij schakelaar in de batterij compartiment in de
NiMH positie.
3. Plaats vier herlaadbare LR6 (AA grootte) batterijen in de ruimte
van het compartiment. Zorg dat alle batterijen volgens de
aanwijzingen geplaatst worden, rekening houdende met
hun polariteit,wat aangegeven is op de achterzijde van de radio.
De radio is ontworpen voor gebruik met Nikkel Metaal Hydride
(NiMH) oplaadbare batterijen.
4. Stop de adapter plug in de DC ingang van uw radio en sluit de
adapter aan op het lichtnet.
5. Het batterij lampje zal groen gaan knipperen wat aangeeft dat
de batterijen aan het opladen zijn. De batterijen worden volledig
opgeladen in ongeveer 7 uur. Het batterij lampje zal groen blijven
branden wanneer de batterijen volledig opgeladen zijn.
Belangrijk:
wanneer oplaadbare batterijen worden gebruikt, moet de
batterij schakelaar in de NiMH worden gezet.
Batterijen worden alleen opgeladen, als de radio uit is
geschakeld en is aangesloten op het lichtnet middels
de adapter.
Wanneer de batterijen opgebruikt zijn, zal het batterij lampje korte
tijd rood oplichten. Hierna zal de radio zichzelf uitschakelen.
Het is niet mogelijk de radio in te schakelen totdat de batterijen
zijn op geladen, of de radio op het net is aangesloten.
Als de radio voor een langere periode niet wordt gebruikt, is het
raadzaam om de batterijen uit de radio te halen.
BELANGRIJK:
De batterijen mogen niet worden blootgesteld aan extreme hitte,
zoals zon, vuur en dergelijke. Na gebruik moeten
wegwerp batterijen, indien mogelijk, naar een Recycle Center
gebracht worden. In geen geval mogen batterijen door middel
van vuur worden vernietigd!
77
Page 79

Gebruik van de AC adapter
Uw radio is geleverd met een AC adapter.
1. Plaats uw radio op een vlakke oppervlakte.
2. Stop de adapter plug in de DC ingang aan de linkerkant van
de radio.
3. Plug de adapter in een standaard 13 A stopcontact. Wanneer de
adapter aan staat en is aangesloten op de radio, wordt het
batterijgebruik vanzelf uitgeschakeld.
De adapter dient uit het stopcontact en de radio te worden
gehaald wanneer deze niet wordt gebruikt.
BELANGRIJK:
De adapter is de manier waarop de radio aangesloten is op
de voeding. Het stopcontact moet daarom tijdens het gebruik
van de radio goed toegankelijk zijn. Om de radio volledig van
de netspanning af te halen, moet de adapter volledig van de
stopcontact verwijdert worden.
Lock/Unlock schakelaar
De Lock/Unlock schakelaar wordt gebruikt om per ongeluk in
werking stellen van de radio te voorkomen.
1. Zet de Lock/Unlock schakelaar, te vinden op de zijkant van
uw radio, naar de ‘Lock’ positie . De stroom en alle knoppen
worden uitgeschakelt, dit om te voorkomen dat de radio per
ongeluk aan gaat als deze in uw koffer of draagtas
is opgeborgen.
2. Om de radio te gebruiken, zet de Lock/Unlock schakelaar op de
‘Unlock’ positie .
NL
78
Page 80

Gebruik van uw radio - DAB
1. Schuif voorzichtig de telescopische antenne uit.
2. Druk op de On/Off-knop om de radio aan te zetten. Het scherm
toont een aantal seconden “Welcome to Digital Radio”.
3. Als dit het eerste gebruik van de radio is, wordt een quick scan
uitgevoerd op de Band III DAB kanalen. Het scherm toont
“Welcome to DAB”. Als de radio al eerder is gebruikt, wordt de
laatst gekozen zender geselecteerd.
4. Tijdens het automatisch scannen, als nieuwe zenders
worden gevonden, loopt de teller aan de rechterkant van het
display op en worden zenders toegevoegd aan de lijst. In de
onderste regel van het scherm wordt met een statusbalk de
voortgang van het Automatisch tunen aangegeven.
5. Wanneer het scannen voltooid is, wordt de eerste zender
(in numerieke alfabetische volgorde 0...9...A....Z) geselecteerd.
6. Als de zender lijst nog steeds leeg is na Autotune, dan geeft
de radio “No DAB stations” weer.
7. Als er geen ontvangst is van signalen, kan het nodig zijn om
de radio om een andere plek te zetten, waar betere ontvangst
beschikbaar is.
79
Page 81

Selecteren van een zender - DAB
1. De bovenste regel in de display geeft de naam van de
geselecteerde zender weer.
2. Druk op de omhoog/omlaag knoppen om te bladeren door de lijst
met zenders.
3. Druk kort op de select knop om een zender te kiezen. De display
geeft “Now Tuning” weer terwijl de radio de nieuwe zender zoekt.
4. Stel het volume naar wens in met de Volume omhoog of
Omlaag knoppen.
Opmerking:
Als na het selecteren van een zender de display
“Service not available” toont, kan het zijn dat u de radio op een
andere plek dient te plaatsen, waar betere ontvangst is.
Extra diensten - DAB
1. Bepaalde radio zenders hebben één of meer extra diensten.
Als een zender een extra dienst heeft zal op de display “>>“
staan naast de zender naam op de zender lijst. De extra dienst
verschijnt direct naast de hoofd dienst in beeld als u op de
Tuning omhoog knop drukt.
2. Druk op de selectie knop om een zender te kiezen.
NL
80
Page 82

Display modi – DAB
Uw radio heeft zeven display modi:
1. Druk op de Info knop om door de verschillende modi te gaan
Bladeren door tekst
a.
Programma type
b.
Multiplex-naam
c.
Tijd en datum
d.
Frequentie
e.
Audiotype en bitrate
f.
Signaal sterkte
g.
Geeft al scrollend tekst weer zoals
artiest naam, bel-in nummer enz.
Geeft type genre van een zender weer,
zoals Pop, Klassies, Nieuws enz.
Toont de naam van het DAB-multiplex
waartoe de zender behoort.
Geeft huidige tijd en datum weer.
Toont de frequentie van de DAB multiplex
van het huidige kanaal.
Toont het audiotype en de bitrate voor de
huidige zender.
Geeft signaal sterkte weer van de
huidige zender.
81
Page 83

Vinden van nieuwe zenders - DAB
In de loop der tijd kunnen nieuwe zender beschikbaar worden.
Om nieuwe zender te vinden doet u als volgt:
1. Druk als de radio is ingeschakeld en in DAB-modus is op de
Auto Tune-knop. Het display zal “Scanning...” tonen en uw
wekkerradio zal een scan van de Band III DAB-kanalen uitvoeren.
Wanneer er nieuwe zenders worden gevonden, dan zal de
zenderteller aan de rechterkant van het display verhoogd
worden en zullen de zenders aan de lijst die is opgeslagen
in de radio worden toegevoegd.
NL
82
Page 84

Handmatig zoeken - DAB
Handmatig zoeken maakt het mogelijk om direct verschillende
DAB Band III kanalen te selecteren. DAB-zenders zitten in het bereik
van 5A-13F.
1. Houd de selectie knop ingedrukt tot in beeld “Manual tune”
verschijnt. Laat de selectie knop los.
2. Druk op de omhoog of omlaag knop voor het gewenste
DAB kanaal.
3. Druk kort op de selectie knop voor het gewenste DAB kanaal.
De open balk in het midden geeft minimale signaal sterkte aan
voor een goede DAB ontvangst. De signaalsterkte balk gaat op
en neer bij het herpositioneren van de antenne.
4. Wanneer een DAB signaal is gevonden, geeft de display de
naam van het DAB multiplex weer. Nieuwe zenders worden
aan de opgeslagen lijst in de radio opgeslagen.
5. Druk kort op de select knop om terug te keren naar
normaal instellen.
83
Page 85

Dynamisch Bereik (DRC ) instellingen
Dynamisch Bereik instellen (ook bekend als DRC) zorgt er voor dat
zachte geluiden beter te horen zijn in een rumoerige omgeving.
1. Druk op de aan/uit knop om uw radio aan te schakelen.
2. Houd de info knop ingedrukt. “Station order” zaal op het
display verschijnen.
3. Gebruik de omhoog/omlaag knoppen totdat “DRC value” in
beeld komt.
4. Druk op de ‘Select’ knop om in aanpas modus te geraken.
5. Gebruik de omhoog/omlaag knoppen om de gewenste
DRC instelling te selecteren (standaard is 0) :
Bij DRC 0 is DRC uitgeschakeld en ontvangst wordt genegeerd.
Bij DRC 1 is DRC niveau zoals uitgezonden door de zender.
Bij DRC 1/2 is DRC niveau de helft van wat wordt uitgezonden
door de zender.
6. Druk op de ‘Select’ knop om de instelling te bevestigen.
De display keert terug naar de radio modus.
Opmerking:
Niet alle DAB uitzendingen beschikken over de DRC functie.
Wanneer DRC niet wordt ondersteund, heeft de DRC instelling
geen effect.
NL
84
Page 86

Gebruik van de radio - FM
1. Schuif voorzichtig de telescopische antenne uit.
2. Druk op de aan/uit knop om uw radio aan te schakelen.
Het display toont: “Welcome to Digital Radio” voor een
aantal seconden.
3. Druk op de Band knop en selecteer de FM band.
4. Druk kort op de select knop totdat “Auto tune <>” verschijnt.
5. Druk op de omhoog knop, uw radio zoekt automatisch naar
boven (lage frequentie naar hoge frequentie) en stopt vanzelf
wanneer een zender is gevonden met voldoende signaal sterkte.
6. Het display zal de frequentie van het signaal dat gevonden
is tonen. Als RDS informatie beschikbaar is, zal na enkele
seconden de naam van de zender afgebeeld worden. Het display
zal ook “ST“ en “RDS“ tonen in de bovenste regel als de zender
is ontvangen in stereo en RDS informatie.
7. Druk op de omlaag knop om de FM band van hoog naar beneden
te scannen. (hoge frequentie naar lage frequentie).
8. Wanneer het einde van de golfband is bereikt, begint de radio
met zoeken vanaf het andere einde van de golfband.
9. Pas het volume aan naar wens.
10. Schakel de radio uit met de aan/uit knop.
85
Page 87

Handmatig zoeken - FM
1. Druk op de aan/uit knop om uw radio aan te schakelen.
2. Druk op de band knop en selecteer de FM band. Schuif de
telescopische antenne volledig uit.
3. Druk kort op de selectie knop, de display geeft
“Manual tune <>” weer.
4. Druk op de Tuning Up of Down knoppen om op een zender in
te ‘tunen’. De frequentie loopt in stappen van 50kHz en, als een
van de knoppen langer wordt ingehouden, zal meerdere malen
oplopen per seconde.
5. Wanneer het einde van de golfband is bereikt, begint de radio
met zoeken vanaf het andere einde van de golfband.
6. Stel het volume in naar wens.
7. Om handmatig zoeken te annuleren, druk nogmaals op de
Select knop zodat er “Auto tune < >” op het display verschijnt.
NL
86
Page 88

Display modi - FM
In FM modus, kan de onderste regel van het display ingesteld
worden in een van vier opties:
1. Druk op de Info knop om door de verschillende modi te gaan.
a.
Bladeren door tekst
b.
Programma Type
c.
Tijd en datum
d.
Frequentie
Opmerking:
Deze FM mode informatie weergave is alleen beschikbaar wanneer
de radio RDS informatie kan ontvangen van de zender.
Geeft al scrollend tekstberichten weer
zoals artiest, nummer, enz.
Geeft type zender weer naar
wordt geluister, Pop, Classic,
News, etc.
Geeft de huidige tijd en datum weer.
Geeft de frequentie van de huidige
zender weer.
87
Page 89

Voorkeurzenders instellen - DAB and FM
Er zijn 5 voorkeurzenders in het geheugen voor beide bandbreedtes.
1. Druk op de Aan/uit knop om uw radio aan te schakelen.
2. Stel In op de gewenste zender zoals eerder beschreven.
3. Houd de gewenste voorkeurknop ingedrukt totdat bijvoorbeeld
op de display verschijnt: “Preset 1 stored”. De zender wordt
opgeslagen in het gekozen nummer van de voorkeurknop.
Herhaal dit voor de andere voorkeurknoppen.
4. Zenders die opgeslagen zijn in geheugen, kunnen door hetzelfde
proces worden overschreven door een nieuw gekozen zender.
Oproepen van een voorkeurzender - DAB and FM
1. Druk op de Aan/uit knop om uw radio aan te schakelen.
2. Selecteer de gewenste golfband
3. Druk kort op de gewenste voorkeurknop, uw radio kiest de
zender opgeslagen in het geheugen.
NL
88
Page 90

Stereo/Mono instellen-FM
Uw radio speelt stereo radio-uitzendingen af in stereo
(via koptelefoon) zolang het ontvangen signaal van voldoende
sterkte is. Echter als het stereo-signaal zwakker wordt, zal het
geluid in kwaliteit afnemen. In dat geval is het misschien beter
om de radio op ‘Mono’ in te stellen met het oog op vermindering
van audio-ruis.
1. Druk de aan-/uitschakelaar knop in om de radio aan te zetten.
2. Stem af op een door u gekozen zender met behulp van de
hierboven beschreven methodes.
3. Druk op de ‘Info’ knop tot “Mono override” op de onderste regel
van het display wordt vertoont. De bovenste regel zal
‘Override Off’ als the radio op dat moment in ‘Auto-Stereo’
modus staat.
4. Druk op de ‘Select’ knop om over te schakelen naar
‘Mono Override’. Tijdens ‘Mono Override’ zal de radio het
huidige station, via luidspreker of koptelefoon,
in mono weergeven.
‘Mono Override’ is een tijdelijke instelling en is alleen op het
huidige station toegepast. Het wordt automatisch geannuleerd
wanneer een ander station is gekozen.
5. Als u ‘Mono Override’ wilt annuleren tijdens het luisteren van het
huidige station, druk op de ‘Info’ knop tot “Mono Override” op de
onderste regel verschijnt. De bovenste regel vertoont
“Override On” als de radio in “Mono Override” modus staat.
6. Druk op de ‘Select’ knop om ‘Mono Override’ uit te schakelen.
De radio zal het huidige station in stereo via koptelefoon
weergeven als het signaal sterk genoeg is.
89
Page 91

Scan gevoeligheid instelling - FM
Uw radio zoekt, normaal gesproken, naar FM-zenders die sterk
genoeg zijn voor een goede ontvangst. Echter, het zou wenselijk zijn
dat de ‘Auto scan’ functie zwakkere signalen van meer afgelegen
radio stations afzoekt. Uw radio bevat een dichtbij/ver-af instelling
voor de ‘Auto scan’ functie.
1. Druk de aan-/uitschakelaar knop in om de radio aan te zetten.
2. Indien nodig, druk op de ‘Band’ knop om FM te selecteren.
3. Druk op de ‘Info’ knop tot “Mono override” op de onderste regel
van het display wordt vertoont.
4. Druk kort op de ‘Tuning Up/Down’ knoppen tot “FM Scan Zone”
op het display verschijnt, druk dan op de ‘Select’ knop om in het
‘Scan zone’ menu te geraken.
5. Druk op de ‘Tuning Up/Down’ knoppen om te wisselen tussen
‘Local’ (dichtbij) en ‘Distant’ (ver-af) instelling op de onderste
regel van het display. De optie ‘Distant’ (ver-af) stelt u in staat
om zwakkere signalen te ontvangen tijdens scannen.
6. Druk op de ‘Select’ knop om uw selectie te bevestigen.
De radio keert dan terug naar de normale informatie weergave.
De dichtbij/ver-af instelling wordt opgeslagen in de radio en
blijft van kracht tot deze wordt verandert of na de
‘Systeem opnieuw instellen’ methode.
NL
Let op:
De standaard instelling (uit de doos of na het
‘Systeem opnieuw instellen’) zorgt ervoor dat de radio zwakke
(ver-af) signalen negeert.
90
Page 92

Software versie
De software versie kan niet worden gewijzigd en is slechts ter
kennisgeving.
1. Om de software versie op het display te tonen, druk twee
seconden op de ‘Info’ knop. Zorg ervoor dat uw radio is
ingeschakeld en in DAB-modus is.
2. Druk meerdere malen op de ‘Tuning Up/Down’ knoppen tot er
‘SW version’ met de versie nummer op het display verschijnt.
Na een aantal seconden zal het display terug gaan naar normale
zender modus.
Systeem opnieuw instellen
Als uw radio niet goed werkt, of sommige cijfers op de display of
onvolledig worden afgebeeld, volg dan de volgende procedure.
1. Houd de ‘Info’ knop twee seconden ingedrukt.
2. Druk meerdere malen op de ‘Tuning Up/Down’ knoppen totdat
“Factory reset” op de onderste regel verschijnt, druk dan op
de ‘Select’ knop.
3. om het systeem opnieuw instellen te selecteren, druk nogmaals
op de ‘Select’ knop. De radio gaat terug naar
de fabrieksinstellingen. Alle voorkeurzenders en zender
informatie zal worden gewist.
4. Na het opnieuw instellen van het systeem wordt een DAB
scan uitgevoerd. In het geval van een probleem ten gevolge
van een elektrostatische lading, dient u de stroom of batterij uit
te schakelen, voordat u het apparaat opnieuw kunt gebruiken.
91
Page 93

Koptelefoon ingang
Een 3,5mm koptelefoon ingang bevindt zich aan de linkerzijkant van
uw radio. Het plaatsen van een koptelefoon schakelt het geluid van
de interne speaker uit.
Belangrijk:
Een overmatige geluidsdruk uit een oor- of koptelefoon kan uw
gehoor blijvend beschadigen.
Display achtergrondlicht
1. Wanneer batterijen gebruikt worden, schakelt het achtergrondlicht
na 12 seconden vanzelf uit, nadat een knop is ingedrukt.
2. Wanneer uw radio op het lichtnet is aangesloten, is het
achtergrondlicht altijd aan.
NL
92
Page 94

Over het gebruik van batterijen...
Uw radio is ontworpen met het oog op gebruik van verschillende
spannings bronnen. U kunt deze op het net aansluiten met de
meegeleverde AC adapter of, voor buiten gebruik, alkaline of
oplaadbare batterijen gebruiken. Wij raden aan GEEN Carbon-Zink
of Zink chloride batterijen te gebruiken.
Het is erg belangrijk dat u onderstaande advies en
waarschuwingen goed doorleest.
1) Van welk type batterij u ook gebruik wilt maken, het is van belang
dat de batterij selectie schakelaar onder de deksel is ingesteld op
de juiste type.
a. Als geen batterijen zijn ingevoerd, verplaats de schakelaar naar
de Alkaline positie. Deze positie vermindert stroomgebruik tijdens
gebruik van netspanning.
b. Indien Alkaline batterijen zijn ingevoerd, verplaats de schakelaar
naar de Alkaline positie.
c. Als oplaadbare batterijen zijn ingevoerd, verplaats de schakelaar
naar de ‘Rechargeable’ positie. Uw radio is ontworpen met oog
op gebruik van Nikkel-Metaal-Hydride oplaadbare batterijen.
Geen ander type oplaadbare batterij dient te worden gebruikt
bij deze radio.
2) Mix NOOIT gebruikte en nieuwe Alkaline batterijen. De gebruikte
batterijen kunnen beschadigd en lek raken wat de radio zal
beschadigen en eventuele oppervlakten waar de radio op staat.
3) Mix NOOIT gebruikte en nieuwe oplaadbare batterijen. Dit kan
resulteren in onbetrouwbaar opladen en verkort levensduur van
de batterij. Mix NOOIT oplaadbare batterijen van verschillende
typen of verschillende capaciteit zelfs als deze nieuw zijn.
4) Mix NOOIT Alkaline en oplaadbare batterijen. Het opladen van
alkaline batterijen kan zeer gevaarlijk zijn.
Heroplaadbare batterijen...
Uw radio maakt gebruik van een scala van methoden die zorgen
voor een correcte en veilig opladen van oplaadbare
Nikkel-Metaal-Hydride batterijen. Deze beschermen uw batterijen
tegen overmatig op- en ontladen. Deze bescherming kan alleen
goed functioneren wanneer de bovenstaande adviezen correct
worden gevolgd. Met name de radio zal niet in staat zijn batterijen
correct op te laden als deze van verschillende merken,
verschillende levensduur of verschillende capaciteiten zijn.
We raden aan dat alle oplaadbare batterijen die u gebruikt in uw
radio als een set aangeschaft worden. Zij moeten altijd tezamen
worden op- en ontladen en niet af en toe «geleend» voor
andere toepassingen. Dit zal ervoor zorgen dat zij optimale
prestaties leveren in uw radio.
We raden aan dat u oplaadbare batterijen gebruikt van een
bekend merk, en een capacitieit van ten minste 2000mAh.
Batterijen van deze capaciteit moeten in staat zijn radio tussen de
10 en 20 uur van spanning te voorzien, afhankelijk van het volume,
en/of DAB-of FM-modus wordt gebruikt (DAB mode verbruikt
minder stroom dan FM), en is ook afhankelijk van de conditie
van de batterijen.
Voordat u een nieuwe set van oplaadbare batterijen in uw
radio invoerd, moet u er eerst voor zorgen dat de batterij type
schakelaar onder het klepje van de batterij in de oplaadbare positie
(NiMH) staat. Installeer de batterijen zoals vermeld staat op de
achterzijde van de radio. Steek de stekker in het stopcontact en
vervolgens in de radio. Tijdens het laden van de batterijen gaat de
batterij-indicator groen knipperen. Als de batterijen volledig zijn
opgeladen blijft deze indicator groen branden. De tijd die nodig is
om de batterijen op te laden, is afhankelijk van hoeveel spanning
nodig is. Nieuwe batterijen kunnen misschien half opgeladen zijn
tijdens het invoeren, maar het is normaal dat een nieuw set batterijen
enkele uren nodig hebben om volledig op geladen te zijn (dit kan
tussen de 5 en 8 uur duren, afhankelijk van de batterij capaciteit
en hun initiële oplaad niveau)
93
Page 95

Als u de radio met batterijen gebruikt, wordt het batterij
lichtje uitgeschakeld. Als de batterijen leeg zijn, licht deze rood op
alvorens de radio zichzelf uit schakelt. Dit om ervoor te zorgen dat
de batterijen niet overmatig ontladen woden want dit zou de
batterijen kunnen beschadigen en hun levensduur verkorten.
Als u de radio op het netvoeding gebruikt met oplaadbare
batterijen ingevoerd, wordt het opladen onderbroken totdat u de
radio uitschakelt. Wanneer u de radio uitschakelt met de
‘On’/’Off’ knop, zal het opladen worden hervat. Indien de batterijen al
zijn opgeladen, worden ze alleen voor een paar minuten opgeladen
totdat de batterij-indicator stopt met knipperen.
Als u de radio alleen gebruikt voor korte periodes, is het niet nodig
uw radio op het netspanning aan te sluiten om de batterijen op te
laden elke keer dat u deze gebruikt. Echter, als u de radio voor een
aantal weken niet gaat gebruikten raden we aan dat de batterijen
volledig zijn opgeladen voordat de radio aan de kant wordt gezet
(Laad op tot het batterij-indicator stopt met knipperen).
Als u gedurende enkele maanden geen gebruik wenst te maken van
uw radio, dan raden we aan dat de batterijen worden verwijderd
en opgeborgen, bewaar deze op een koele plaats buiten bereik
van kinderen, ver weg van vocht, en op een manier zodat geen
enkele metalen voorwerp contact kan hebben met de batterij.
Om gevaar en ongevallen te voorkomen,
volg deze instructies
Onjuist gebruik van batterijen kan resulteren in lekkage,
over verhitting of explosie gevaar. Batterijvloeistof is corrosief en
kan ook giftig zijn. Batterijvloeistof kan brandwonden op de
huid veroorzaken, ogen beschadigen en schadelijk zijn bij inslikken.
1. Houd batterijen uit de buurt van kinderen.
2. Niet verhitten, doorboren, verminken of lozen door verbranding.
3. Mix nooit verschillende batterij typen of oude en nieuwe batterijen.
Altijd de batterijen tegelijkertijd vervangen.
4. Nooit batterijen dragen of opbergen zodat metalen voorwerpen
de uiteinden kunnen raken.
5. Verwijder batterijen uit de radio als deze op zijn of u de radio
voor een lange periode niet gebruikt.
6. Oude of versleten batterijen meteen verwijderen en recycle of
lever deze in als klein chemisch afval.
7. Als een batterij gaat lekken, verwijder alle batterijen uit de radio
en neem de nodige voorzormaatregelingen om rechtstreeks
contact met batterijvloeistof te voorkomen. Als batterijvloeistof
toch contact maakt met huid of kleding, onmiddelijk wassen
met water. Voordat u nieuwe batterijen invoerd, reinig het batterij
compartiment grondig met een vochtige papieren doek of volg de
batterij fabrikants advies voor verwijderen van batterijvloeistof.
NL
Met goede zorg kunnen oplaadbare batterijen een lange tijd meegaan
en vele honderden malen herbruikt worden. Als uw oplaadbare
batterijen uw radio niet meer van spanning kunnen voorzien,
lever deze in als klein chemisch afval.
94
Page 96

Algemeen
Stel deze radio niet bloot aan water, stoom of zand. Laat de radio
niet achter op een plaats waar het erg warm kan worden, zoals in
een geparkeerde auto, waar de temperatuur hoog kan raken door
het zonlicht, zelfs als het buiten de auto koel is. Het is raadzaam om
de DAB band te gebruiken wanneer mogelijk, de kwaliteit is vaak
beter dan op de FM band, ook is er minder storing.
De naamplaat bevindt zich aan de achterkant van uw radio.
Het apparaat mag niet blootgesteld worden aan spatwater of
druppelend water. Zet geen voorwerpen met vloeistof zoals
vazen op het apparaat.
Zorg bij de plaatsing van dit apparaat ervoor dat er een
minimum afstand van zo’n 10cm tot andere voorwerpen
gehandhaafd wordt, zodat er genoeg ruimte voor een goede
ventilatie is.
Bedek de ventilatieopeningen niet met voorwerpen zoals kranten,
tafelkleedjes, gordijnen, enz. ; de ventilatie wordt
hierdoor verhinderd.
Voorkom dat open vuur zoals brandende kaarsen op het toestel
gezet worden.
Voorkom gebruik en opslag van dit apparaat onder extreme
temperaturen. Laat het toestel niet achter in een auto,
in een raamkozijn, in direct zonlicht, enz.
Specificaties
Voedingsvereisten
Netspanning: AC100 240v, 50-60Hz(schakelbare adapter)
Batterijen:4 x LR6 (AA grootte) Alkaline of NiMH oplaadbaar
Batterijduur
Ongeveer 25 uur dagen, voor 4 uur per dag op normale
volumestand met alkaline batterijen
Frequentiebereik
FM 87.5-108MHz
DAB 174.928-239.200MHz
De fabrikant behoudt zich het recht voor om specificaties te wijzigen zonder voorafgaande kennisgeving.
95
Circuitkenmerk
Luidspreker
Uitgangsvermogen
Koptelefooningang
Antennesysteem
75mm
0.5 Watt
3,5mm dia
FM Telescopische antenne
DAB Telescopische antenne
Page 97

Als u op een moment in de toekomst dit product zou willen weggooien, merk dan op dat elektrische apparatuur niet
weggegooid hoort te worden in het huisafval. Recycle alstublieft uw producten indien de faciliteiten hiervoor aanwezig zijn.
Raadpleeg uw plaatselijke stadhuis of uw leverancier voor advies betreffende recyclen. (Richtlijn betreffende Afgedankte
Elektrische en Elektronische Apparatuur)
NL
96
Page 98

Inhalt
Bedienelemente .................................................. 98-99
Batteriebetrieb ................................................ 100-101
Benutzung des Netzadapters .................................. 102
Tastensperre ......................................................... 102
Bedienung des Radios – DAB ................................. 103
Senderauswahl – DAB ............................................ 104
Zusätzliche Dienste – DAB ..................................... 104
Anzeigemodi – DAB ............................................... 105
Suche neuer Sender – DAB .................................... 106
Manuelle Sendersuche – DAB ................................. 107
Dynamikbereichsteuerung – DAB ............................ 108
Benutzung des Radios – UKW ................................ 109
Manuelle Sendersuche – UKW ................................ 110
Anzeigemodi – UKW .............................................. 111
Sender speichern – DAB und UKW .......................... 112
Abruf gespeicherter Sender – DAB und UKW ........... 112
UKW Stereo/Mono – UKW ...................................... 113
Suchempfindlichkeit – UKW ................................... 114
Firmwareversion ..................................................... 115
Systemreset .......................................................... 115
Kopfhörerausgang .................................................. 116
Hintergrundbeleuchtung .......................................... 116
Batterieinformationen ............................................. 118
Allgemeines .......................................................... 119
Technische Daten .................................................. 119
Schaltkreismerkmale ............................................. 119
97
Page 99

Bedienelemente
(Gerätevorderseite)
D
1. Lautsprecher
2. Frequenzbandtaste (BAND)
3. Automatische Sendersuche (AUTO TUNE)
4. INFO-Taste
5. Lautstärke verringern (-)
6. Lautstärke erhöhen (+)
7. Ein-/Aus-Taste (ON/OFF)
8. Tastensperre
9. Lade-LED / Batteriestandsanzeige
10. Frequenztasten (TUNING)
11. Auswahltaste (SELECT)
12. Senderspeicher
98
Page 100

Bedienelemente
(Geräterückseite)
99
13. Batteriefach
14. Teleskopantenne
15. Kopfhörerausgang
16. Netzteilanschluss
 Loading...