

Page 1

Page 2

Table of contents
Important safety instructions .............................. 2-4
Controls ............................................................ 5-6
Battery operation .............................................. 7-8
Using the AC adaptor / Lock switch ...................... 9
Operating your radio – DAB ............................... 10
Selecting a station /
Secondary services – DAB ............................ 11-12
Display modes – DAB ........................................ 13
Finding new stations – DAB .............................. 14
Manual tuning – DAB ......................................... 15
Dynamic range control – DAB ............................. 16
Operating your radio – FM ............................ 17-18
Manual tuning – FM ........................................... 19
1
Display modes – FM ........................................... 20
Presetting stations / Recalling a preset – DAB
and FM ......................................................... 21-22
Stereo / Mono setting – FM ........................... 23-24
Scan sensitivity setting – FM ........................ 25-26
Software version / System reset .................... 27-28
Headphone socket / Display backlight ............... 29
Specifications / Circuit features ......................... 30
Page 3

Important safety instructions
1. Read and understand all safety and operating instructions before the
radio is operated.
2. Retain instruction: The safety and operating instructions should be
retained for further reference.
3. Heed warnings. All warnings on the appliance and operating
instructions should be followed.
4. Follow all operations and use instructions.
GB
7. Do not place the radio on an unstable cart, stand, bracket or table.
The radio may fall, causing serious personal injury and damage to
the radio.
8. Ventilation: This radio should be situated so that its location or
position does not interfere with its proper ventilation. For example,
the radio should not be used on a bed, sofa, rug or other soft surfaces
that may block the ventilation openings. It should not be placed in a
built-in situation like a cabinet that may reduce air flow through the
ventilation openings.
5. Water and moisture: The appliance should not be used near water.
Do not use near a bathtub, washbowl, laundry tub, kitchen sink,
wet basement, swimming pool, etc.
6. Unplug the radio from the AC power outlet before cleaning. Use only
a damp cloth for cleaning the exterior of the radio.
9. Power sources: The radio should be operated only from the type of
power source indicated on the marking label. If you are not sure of the
type of power supply to your home, consult your radio dealer or
power company.
2
Page 4

10. Mains adaptor: The mains adaptor should be positioned so it is not
walked on, pinched, or items placed on top of it. Pay particular
attention to wires at plugs, convenience receptacles, and the point
where they exit from the unit. Unplug the mains adaptor by gripping
the adaptor, not the wire. Operate the radio using only the current
type of power source indicated. If you are not sure of the type of
power supply to your home, consult your dealer or local
power company.
11. Do not overload wall outlets or extension cords. This can result in a
risk of fire or electrical shock. Never insert objects of any kind into
the radio through opening. The objects may touch dangerous
voltage points or short out parts. This could cause a fire or
electrical shock.
12. If the radio is left unattended or unused for long periods of time,
unplug it from the wall outlet. This will prevent damage caused by
unplug it from the wall outlet. This will prevent damage caused by
lightning or power line surges.
3
13. If the radio is left unattended and used for a long period of time,
remove the batteries. The batteries may leak and damage furniture or
your radio.
14. Do not attempt to service the receiver yourself. Removing the cover
may expose you to dangerous voltage, and will void the warranty.
Refer all servicing to authorized service personnel.
15. Never push objects of any kind into this radio through opening as
they may touch dangerous voltage points or short-out parts that
could result in a fire or electric shock. Never spill liquid of any kind
into the product.
Page 5

16. The appliance should be serviced by qualified service
personnel when:
The power supply cord or the plug has been damaged.
A.
Objects have fallen or liquid had been spilled into the radio.
B.
The radio has been exposed to rain or water.
C.
The radio does not appear to operate normally or exhibits a marked
D.
change in performance.
The radio has been dropped, or the enclosure damaged.
E.
GB
4
Page 6

Controls and connections
1.
Speaker
2.
LCD display
3.
Power on/off
4.
Charge / Battery Low indicator
5.
Tuning Up / Down buttons
6.
Select button
7.
Info button
5
Preset buttons
8.
Autotune button
9.
Band button
10.
Volume control
11.
Alkaline/NiMH/NiCad rechargeable battery switch
12.
Headphone socket
13.
DC jack socket
14.
Page 7
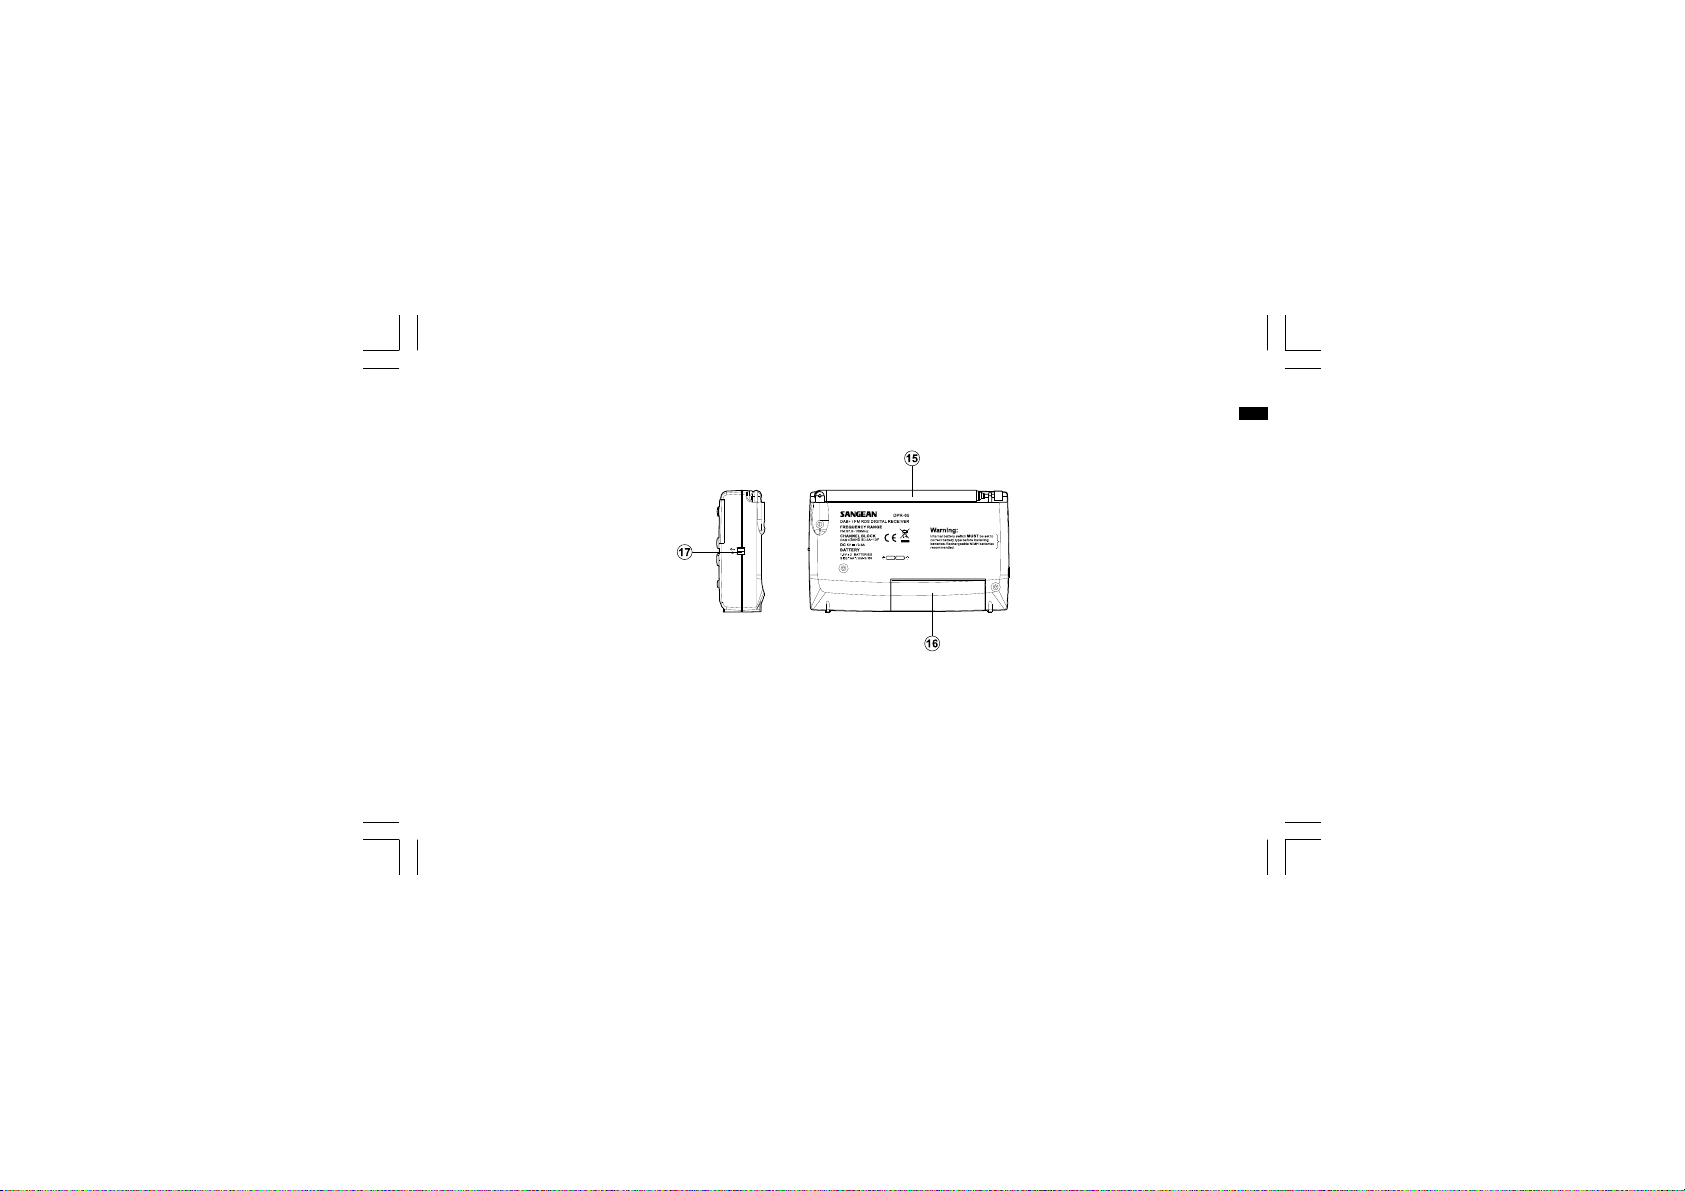
Controls and connections
Telescopic aerial
15.
Battery compartment
16.
Lock switch
17.
GB
6
Page 8

Battery operation
1. Remove the battery compartment cover on the back of the unit by
sliding the cover downwards. Open the battery compartment door.
Note:
Before you insert the batteries, if you use non-rechargeable batteries,
make sure the NiMH/NiCad/Alkaline switch which located on the side of
the unit is switched to OFF. If you use rechargeable batteries,
make sure to switch NiMH/NiCad/Alkaline switch to ON.
2. Insert two LR6 (AA size) batteries into the space in the compartment.
Take care to ensure all batteries are inserted with the correct polarity
as shown on the rear of your radio. Close the battery
compartment door.
3. When the battery capacity drops below a certain level the low battery
indicator will light. When you see this indicator you should replace
the batteries as soon as it is convenient to do so. Reduced power,
distortion and a “stuttering” sound are also signs that the batteries
may need replacing.
7
Page 9

4. If the radio is not to be used for any extended period of time it is
recommended that the batteries are removed from the radio.
We would recommend for economy that the DPR-65 is used via the
mains adaptor whenever possible with battery operation for
occasional use only.
IMPORTANT:
The batteries should not be exposed to excessive heat such as sunshine,
fire or the like. After use, disposable batteries should if possible be taken
to a suitable recycling center. On no account should batteries be
disposed of by incineration.
GB
Note:
The batteries can be charged only when the radio is off. Connect the
mains adaptor into the DC jack socket to charge the batteries. Be sure
the battery type switch is set to ON. Charge new batteries fully the first
time before first use. This can take longer depending on the capacity of
the rechargeable batteries.
Do not use a mix of old and new rechargeable batteries.
Do not use a mix of full and empty rechargeable batteries.
Do not use batteries that have a different mAh capacity.
Do not use damaged or leaking batteries.
8
Page 10

Using the AC adaptor
Lock switch
Your radio is supplied with a Mains Adaptor.
1. Place your radio on a flat surface.
2. Insert the adaptor plug into the DC socket located on the left hand
side of your radio.
3. Plug the adaptor into a mains socket outlet. Whenever the adaptor is
used with the radio, it will take power from the mains rather than from
the batteries.
The AC adaptor should be disconnected from the mains supply and the
radio when not in use.
IMPORTANT:
The mains adaptor is used as the means of connecting the radio to the
mains supply. The mains socket used for the radio must remain
accessible during normal use. In order to disconnect the radio from the
mains completely, the mains adaptor should be removed from the mains
adaptor socket outlet completely.
9
The lock switch is used to prevent unintentional operation of your radio.
1. Set the Lock switch located on the side of your radio to the “Lock”
position and the power and all other buttons will be disabled.
This will prevent accidental operation when your radio is packed in a
suitcase or travel bag.
2. To release the lock, slide the Lock switch down to the “Unlock”
position .
IMPORTANT:
‘Key Locked’ will show on the display if pressing the buttons when the
radio is locked. The radio will not be able to be turned on if locking the
radio when it’s in power off mode.
Page 11

Operating your radio – DAB
1. Carefully extend the telescopic aerial.
2. Press the Power On/Off button to switch on your radio. The display
will show “Welcome to Digital Radio” briefly.
3. If this is the first time the radio is used a quick scan of the Band III
DAB channels will be carried out. The display will show
“Welcome to DAB”. If the radio has been used before the last used
station will be selected.
4. During the scanning process, as new stations are detected the
station counter on the right hand side of the display will increase and
stations will be added to the list. The lower line of the display shows a
bar-graph indicating progress of autotune.
5. When the scanning is complete the first station
(in numeric-alpha order 0…9…A….Z) will be selected.
6. If the station list is still empty after the scan your radio will display
“No DAB station”.
7. If no signals are found it may be necessary to relocate your radio to
a position giving better reception.
GB
2
10
Page 12

Selecting a station –DAB
1. The top line of the display shows the name of the station
currently selected.
2. Press the Tuning Up/Down buttons to scroll through the list of
available stations.
3. Press and release the Select button to select the station. The display
may show “Now tuning…” while your radio finds the station.
4. Adjust the Volume control to the required setting.
2
Note:
If after selecting a station the display shows “Not Available” it may be
necessary to relocate your radio to a position giving better reception.
11
3
4
Page 13

Secondary services – DAB
1. Certain radio stations have one or more secondary services
associated with them. If a station has a secondary service associated
with it the display will show next to the station name on the
station list. The secondary service will then appear immediately after
the primary service as you press the Tuning Up button.
2. Press the Select button to select the station.
GB
1
2
12
Page 14

Display modes – DAB
Your radio has seven display modes:
1. Press the Info button to cycle through the various modes.
a.
Scrolling Text
b.
Program Type
c.
Multiplex Name
d.
Time and Date
e.
Channels & Frequency
f.
Bit rate & Audio type
g.
Signal Strength
13
Displays scrolling text messages such as
artist/track name, phone in number etc.
Displays the type of station be listened to e.g.
Pop, Classic, News etc.
Displays the name of DAB multiplex to which
the current station belongs.
Displays the current time and date.
Displays the frequency of DAB multiplex for
the station listened to.
Displays the digital bit rate & audio type for
the station being listened to
Displays a graph showing the signal strength
for the station being received.
Page 15

Finding new stations – DAB
As time passes new stations may become available. To find new stations
proceed as follows:
1. Press and release the Autotune button. The display will show
“Scanning”. Your radio will perform a scan of the DAB frequencies.
As new stations are found the station counter on the right-hand side
of the display will increase and stations will be added to the list.
GB
14
Page 16

Manual Tuning – DAB
Manual tuning allows you to tune directly to the various DAB Band
III channels.
1. Press and hold the Info button to enter the advanced setting menu.
2. Press either the Tuning Up/Down button until the display shows
“Manual tune”.
3. Press the Select button. Press either the Tuning Up/Down button to
adjust the required DAB channel.
4. Press and release the Select button to select the required
DAB channel. The clear unfilled rectangle indicates the minimum
signal level required for satisfactory reception. The signal strength
bar will go up and down showing the changing signal strength as you
adjust the telescopic aerial on your radio.
5. When a DAB signal is found, the display will show the name of the
DAB multiplex. Any new radio stations found will be added to the list
stored in the radio.
6. Press and release the Select button to return to normal tuning.
15
2
3-4,6
Page 17

Dynamic Range Control settings – DAB
Dynamic Range Control (also known as DRC) can make quieter sounds
easier to hear when your radio is used in a noisy environment.
1. Press the Power On/Off button to switch on your radio.
2. Press and hold the Info button. The display will show “Station list”.
3. Press the Tuning Up/Down buttons until the display shows
“DRC value”.
4. Press and release the Select button to enter the setting.
5. Press the Tuning Up/Down buttons to select the required DRC
setting (the default is 0).
DRC 0 – DRC is switched off, Broadcast DRC will be ignored.
DRC 1 – DRC is set as sent by broadcaster.
DRC 1/2 – DRC level is set to 1/2 that sent by broadcaster.
6. Press and release the Select button to confirm the setting. The display
will return to normal tuning mode.
Note:
Not all DAB broadcasts are able to use the DRC function. If the
broadcast does not support DRC, then the DRC setting in the radio will
have no effect.
GB
16
Page 18

Operating your radio – FM
1. Carefully extend the telescopic aerial.
2. Press the Power On/Off button to switch on your radio. The display
will show “Welcome to Digital Radio” for a few seconds.
3. Press the Band button to select the FM band.
4. Press and release the Select button until the display shows
“Auto tune <>”.
5. Press the Tuning Up button. Your radio will scan from the currently
displayed frequency in direction upwards and will stop scanning
when it finds a station of sufficient strength.
6. The display will show the frequency of the signal which has
been found. If RDS information is available, after a few seconds the
display will show the radio station name. The display will also show
“St” and “RDS” on the upper line if the station is received with stereo
and RDS information.
17
3
4
Page 19

7. Press the Tuning Down button to scan the FM band in a downwards
direction (high frequency to low frequency).
8. When the end of the waveband is reached your radio will
recommencing tuning from the opposite end of the waveband.
9. Adjust the Volume control to the required setting.
10. To switch off your radio press the Power On/Off button.
GB
18
Page 20

Manual tuning – FM
6
3
1. Press the Power On/Off button to switch on your radio.
2. Press the Band button to select the FM band. Fully extend the
Telescopic aerial.
3. Press and release the Select button until the display shows
“Manual tune < >”.
4. Press either Tuning Up or Down button to tune to a station.
The frequency will change steps of 50kHz. Pressing and holding
one of the buttons will advance the frequency selection several times
each second.
5. When the end of the waveband is reached the radio will recommence
tuning from the opposite end of the waveband.
6. Adjust the Volume control to the required setting.
7. To cancel the Manual Tune option, press and release the Select
button again sot that the display shows “Auto tune <>”.
19
Page 21

Display modes – FM
In FM mode the bottom line of the display can be set any of four
display options.
1. Press the Info button to cycle through the various options.
GB
a.
Radio text
b.
Program type
Time and date
c.
Frequency
d.
Note:
These FM mode information displays are only available when the radio
is able to receive RDS information from the broadcaster.
Displays scrolling text messages such as
artist/track name, phone in number etc.
Displays the program information for the station being
listened to e.g. Pop, Classic, News, etc.
Displays the current time and date.
Displays the frequency of the station being listened to.
20
Page 22

Presetting stations – DAB and FM
There are 5 memory presets for each of the two wavebands.
1. Press the Power On/Off button to switch on your radio.
2. Tune to the required station as previously described.
3. Press and hold the required Preset button until the display shows,
for example, “Preset 1 stored”. The station will be stored under the
chosen preset button. Repeat the procedure for the remaining preset.
4. Stations stored in the presets may be overwritten by following the
above procedure.
21
3
Page 23

Recalling a preset – DAB and FM
1. Press the Power On/Off button to switch on your radio.
2. Select the required waveband.
GB
3. Momentarily press the required Preset button. Your radio will then
tune to the station stored in preset memory.
2
3
22
Page 24

Stereo / Mono setting – FM
Your radio will play stereo broadcasts in stereo (via headphone) so long
as the received signal is of adequate strength. However, as a stereo
signal becomes weaker the audio signal will become poorer. It may be
preferable to force the radio to play the station in mono in order to
reduce the level of audio noise.
1. Press the Power On/Off button to switch on your radio. Tune to the
required FM radio station as previously described.
2. Press and hold the Info button to enter the advanced setting.
3. Press the Tuning Up/Down buttons until the display shows
“Mono Override” on the lower line. Press the Select button.
The lower line will show “Override Off” if the radio is in the
Auto-Stereo mode.
23
3,4,6
3,5
Page 25

4. Press the Tuning Up/Down button to switch on the Mono-Override.
While this setting is engaged, the radio will play the current station
in mono whether listening via headphones or the loudspeaker.
Mono Override is a temporary setting and is applied to the currently
tune station only. It is cancelled automatically by tuning to another
radio station.
5. If you wish to cancel Mono-Override while listening to the currently
tune radio station, press and hold the Info button and press the
Tuning Up/Down buttons until the display shows “Mono Override”
on the lower line. Press the Select button. The lower line will show
“Override On” if the radio is in the Mono-Override mode.
6. Press the Tuning Up/Down button to switch off the Mono-Override.
The radio will play the current station in stereo through headphone
if the signal is sufficiently strong.
GB
24
Page 26

Scan sensitivity setting – FM
Your radio will normally scan for FM broadcasts which are strong
enough to give good reception. However, you may wish the Auto-scan
function to also be able to find weaker signals, possible from more
distant radio transmitters. Your radio includes a local / distant option
for the Auto-scan function.
1. Press the Power On/Off button to switch on your radio.
2. If needed, press the Band button to select the FM band.
3. Press and hold the Info button until the display shows
“Mono Override” on the lower line.
4. Press and release the Tuning Up or Down buttons until the display
shows “FM Scan Zone” then press the Select button to enter the
scan zone setting.
25
3
4,5
Page 27

5. Press the Tuning Up or Down buttons to switch between Local and
Distant options on the lower line of the display. The Distant option
will allow the radio to find weaker signals when scanning.
6. Press the Select button to confirm your selection. The radio will then
revert to the normal information display. The Local or Distant setting
is stored in the radio and remains in force until changed or until
a System Reset.
Note:
The initial setting (out of the box, or after a System Reset) causes the
radio to ignore weak (distant) signals.
GB
26
Page 28

Software version
The software display cannot be altered and is just for your reference.
1. To view the software version on the display press and hold the Info
button to enter the menu.
2. Repeatedly press the Tuning Up/Down button until “SW version”
appears on the display.
3. Press the Select button and the version number will appear on
the display. After a few seconds the display will revert to the
normal display mode.
27
1
2
3
Page 29

System reset
If your radio fails to operate correctly, or some digits on the display are
missing or incomplete carry out the following procedure.
1. Press and hold the Info button for 2 seconds to enter the menu.
2. Repeatedly press the Tuning Up/Down button until the display shows
“Factory Reset”, the press the Select button.
3. If you wish to perform the reset operation, press the Select button one
more time. A full reset of your radio will be performed. All presets
and station lists will be erased.
4. After a system reset a scan of the DAB band will be performed.
In case of malfunction due to electrostatic discharge, reset the
product (reconnection of power source may be required) to resume
normal operation.
GB
1
2
2,3
28
Page 30

Headphone socket
Display backlight
A 3.5mm Headphone Socket located on the left hand side of your radio is
provided for use with either headphone or an earpiece. Inserting a plug
automatically mutes the internal loudspeaker.
IMPORTANT:
Excessive sound pressure from earphones and headphones can cause
hearing loss.
29
1. When using on batteries, the display backlight will be switched on
for approximately 12 seconds when any button is pressed.
2. When your radio is powered by AC mains the display backlight will
always be on when the radio is switched on.
Page 31

Specifications
Power Requirements
Mains
Batteries
DC 5V ~/0.6A
2 x LR6 (AA size) Alkaline or NiMH rechargeable
Circuit Features
Loudspeaker
Output Power
2” 8 ohm full range
0.2 Watt
GB
Frequency Coverage
FM: 87.5 – 108 MHz
DAB: 5A 174.928 – 13F 239.200MHz
If at any time in the future you should need to dispose of this product please note that: Waste electrical products should not be disposed
of with household waste. Please recycle where facilities exist. Check with your Local Authority or retailer for recycling advice.
(Waste Electrical and Electronic Equipment Directive)
Headphone socket
Aerial System
3.5mm dia.
FM telescopic rod aerial
30
 Loading...