

Page 1
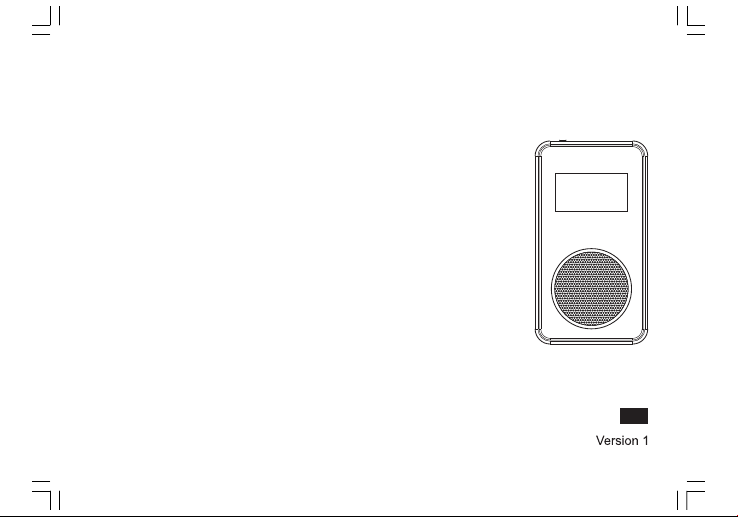
DPR-36
GB
Page 2

Important Safety Instructions
1. Read these instructions.
2. Keep these instructions.
3. Heed all warnings.
4. Follow all instructions.
5. Do not use this apparatus near water.
6. Clean only with dry cloth.
7. Do not block any ventilation openings. Install in accordance with the manufacturer’s
instructions.
8. Do not install near any heat sources such as radi ators, heat registers, stoves, or other
apparatus (including ampliers) that produce heat.
9. Do not defeat the safety purpose of the polarized or grounding-type plug. A polarized plug
has two blades with one wider than the other. A grounding type plug has two blades and a
third grounding prong. The wide blade or the third prong is provided for your safety. If the
provi ded plug does not fit into your outlet. consult an electrician for replacement of the
obsolete outlet.
1
Page 3

10. Protect the power cord from being walked on or pinched particularly at plugs, convenience
receptacles, and the point where they exit from the apparatus.
11. Only use attachments/accessories specied by the manufacturer.
12. Use only with the cart, stand, tripod, bracket, or table specied by the manufacturer, or sold
with the apparatus. When a cart is used, use caution when moving the cart/apparatus
combination to avoid injury from tip-over.
13. Unplug this apparatus during lightning storms or when unused for long periods of time.
14. Refer all servicing to qualied service personnel. Servicing is required when the apparatus
has been damaged in any way, such as power-supply cord or plug is damaged. liquid has
been spilled or objects have fallen into the apparatus, the apparatus has been exposed to
rain or moisture, does not operate normally, or has been dropped.
15. To Reduce the Risk of Fire or El ectric Shock, Do not Expos e This App liance To Rain or
Moisture.
16. The Shock Hazard Marking and Associ ated Graphical Symbol is provided on the bottom
panel of unit.
17. Apparatus shall not be exposed to d ripping or splashing and no o bjects lled with liquids,
shall not be placed on the apparatus.
GB
2
Page 4
3
Page 5

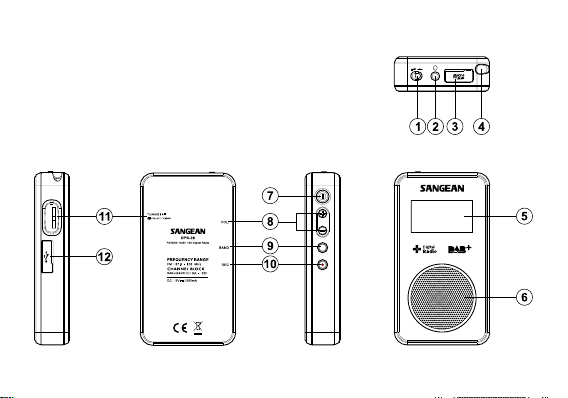
Controls
1. Lock switch (Note: If this is activated the radio will not operate)
2. Headphone socket
3. Micro SD card socket
4. Telescopic antenna
5. LCD display
6. Loudspeaker
7. Power button
8. Volume Control
9. Band
10. Recording / Rewind button
11. Tuning/ Menu jog wheel
12. DC socket
GB
4
Page 6

Charging the radio
The DPR 36 features a built in 1800mAHLithium rechargeable battery to power the radio.
Before operating the radio for the rst time please fully charge the battery.
The DPR 36 is supplied with a 5V/500 mA AC adaptor.
1. Insert the adaptor plug into the DC socket on the right side of your radio. Plug the adaptor
into a standard mains outlet and the radio will begin charging the built in battery. Charging
time is approx. 4 hours with radio off and 10 hours with radio on. The battery power icon on
the LCD display will ash whilst charging and stop ashing when the radio is fully charged.
The battery run time is approx. 15 hours listening through the speaker and approx 18 hours
with headphones. Reduced power, distortion, ‘stuttering’ sounds or battery power indicator in
“low” are all signs that the battery needs to be recharged.
Note:
If charging the radio when the power is off, the battery power icon does not display on
the LCD.
5
Page 7

Headphones
The 3.5 mm stereo headphone socket located on the top of your radio is provided for use with
stereo headphones or an earpiece. Connecting headphones automatically mutes the built in
speaker.
Important:
Excessive volume levels from earphones and headphones may cause damage to yo ur
hearing.
Setting the clock
The clock of DPR-36 will automatically update each time you turn on the radio and tune to a
DAB+ radio station or to an FM station which is broadcasting the time via RDS. Time display
will ash 00:00 for a few seconds then display the clock time when it receives DAB+ or FM –
RDS clock time signal.
GB
6
Page 8

DAB mode
Initial operation –DAB(Digital Radio)
This step is only necessary for initial setup –
1. Ensure the battery is fully charged.
2. Fully extend the telescopic antenna.
3. Press the Power button on the left hand side of your radio.
4. The display will show “WELCOME to Digital Radio” and start to scan the entire DAB channel
range a nd stop at the rst found station. I f the r adio ha s been used before, the last used
station will be selected. Press in the tuning/menu jog wheel to play the station.
5. Turn the jog wheel either up or down to display station list and nd desired station. Press in
the jog wheel to select the station. The radio will tune to the station and display the station
name.
6. Adjust the volume control for comfortable listening.
7
Page 9

Service Information – DAB
The Service Information display – Technical information on the current status of the station
being broadcast.
While listening to DAB+, continually press in the jog wheel to cycle through information on
a. Scrolling text
b. Program type (PTY)
c. Multiplex Name
d. Date
e. Channel and Frequency
f . Audio Format
g. Signal Strength
GB
8
Page 10

Menu in DAB mode
Press and hold the jog wheel for 2 seconds to enter the menu list. Turn the jog wheel up/
down to highlight the following options and press the jog wheel to select the desired function.
If you want to go back to the current listening at any stage, press the jog wheel:
Function
Favorites
Station List
Manual Tune
Full Scan
Station Order
9
Action
to store and recall favorite stations. You can store a maximum of 10
stations in the DAB+ band.
Shows all the available stations at the present.
press in and turn the jog wheel to scroll the whole station list. Press in the
jog wheel to select desired station.
press in the jog wheel to scan the whole DAB+ network in your area.
Radio will tune to rst station found after the scanning is completed.
your radio has 3 station order settings from which you can choose. The
station order settings are as following.
Alphanumeric: sorts the station list alpha-numerically 0…9 A…Z
Ensemble: organizes the station listed by DAB multiplex.
Valid: shows only those stations for which a signal can be found.
The current setting is indicated by an asterisk.
Page 11

DRC Value
System Setup
SD Service
SW version
Back
Dynamic Range Control (DRC) feature can make quieter sounds easier
to hear, especially when your radio is used in a noisy environment. This
function only works within the DAB+ band.
DRC 0: DRC is switched off, broadcast DRC will be ignored.
DRC 1/2: DRC level is set to 1/2 that sent by broadcaster.
DRC 1: DRC is set as sent by broadcaster.
press the jog wheel to select from following settings options:
Sleep: your radio can be set to turn off after a preset time has elapsed.
The sleep timer setting can be adjusted between 15 and 120 minutes in
15 minute increments.
Contrast: turn and press in the jog wheel to select required LCD display
contrast. Display contrast will change accordingly.
Factory reset: press in and turn t he jog wheel t o select YES or N O.
Select YE S to erase a ll saved s ettings, statio n lists and f avorit es. A ll
settings will revert to factory default.
Record Saved: allows you to choose the length of the recording per
track. For example, assumed your desired recording track is 1 hour and
the default setting of record saved function is 30 minutes, which means
your 1 hour track will be recorded with every 30 minutes segment.
SD Information: to view the total space of you Micro SD card and total
available space on your Micro SD card
press the jog wheel to view software version installed in the radio.
press the jog wheel to go back to the previous page
GB
10
Page 12

FM mode
Operating your radio – FM
1. Turn on the radio by pressing Power button. Press BAND button on the left hand side of
your radio to select FM mode.
Service information
When listening to an FM radio station with RDS broadcasting, press in the jog wheel to cycle
through the Radio Text, Program type, Date, Frequency, and Audio type.
Searching tuning - FM
1. Turn the jog wheel either up or down for 2 seconds and release.
2. The radio will sea rch in an upwards or do wnw ard s d irection until it fi nds a station of
sufcient signal strength.
Manual tuning – FM
Turn and releas e the jog wheel either up or d own to change the frequency in 50 kHz
increments until you nd the desired station.
11
Page 13

Menu in FM mode
Press and hold the jog wheel for 2 seconds to enter the menu list. Turn the jog wheel up/
down to highlight the following options and press the jog wheel to select the desired function.
If you want to go back to the current listening at any stage, press the jog wheel:
Function
Favorite Station
FM Scan Zone
Action
the Favorites menu is used to store and recall favorite stations. You can
store a maximum of 10 stations in the DAB+ band.
Preset
Tune to a station as per previous instructions, press in jog wheel to
allocate Favorites menu. Press i n th e jo g wheel again to nd “Preset”.
Turn the jog wheel to alloca te preset n umber you wish to use (1-10).
Press in the jog wheel and display will show “preset x saved”. Repeat this
step to store additional presets as required.
Stat ions which have been stor ed in t he preset favori tes list may be
overwritten by following above procedures.
Recall
Press in the jog wheel to find “Recall”. Turn the jog wheel to find the
preset station you wish to recall. Press in the jog wheel to select
when using FM mode your radio can be set to either scan local stations
or to scan all stations including distant radio stations.
GB
12
Page 14

FM Audio
System Setup
SD Service
SW version
Back
13
If the FM radio station being listened to has a weak signal, some hiss
may be audible. It is possible to reduce this hiss by forcing the radio to
play the station in mono rather than auto.
press the jog wheel to select from the following settings options:
Sleep: your radio can be set to turn off after a preset time has elapsed.
The sleep timer setting can be adjusted between 15 and 120 minutes in
15 minute increments.
Contrast: turn and press in the jog wheel to select required LCD display
contrast. Display contrast will change accordingly.
Factory reset: press in and turn t he jog wheel t o select YES or N O.
Select YE S to erase a ll saved s ettings, statio n lists and f avorit es. A ll
settings will revert to factory default.
Record Saved: allows you to choose the length of the recording per
track. For example, assumed your desired recording track is 1 hour and
the default setting of record saved function is 30 minutes, which means
your 1 hour track will be recorded with every 30 minutes segment.
SD Information: to view the total space of you Micro SD card and the
total available space on your Micro SD card.
press the jog wheel to view software version installed in the radio.
press the jog wheel to go back to the previous page.
Page 15

MP3 mode
Using a MicroSD card with your radio
A Micro SD card can be used in your radio for recording and playing back previously recorded
radio programs, or playing back WMA and MP3 les transferred from a PC.
If you are using a new Micro SD card ensure that it is formatted correctly.
Please format the Micro SD card via your computer before using your Micro SD card with your
radio.
Many different brands and capacities of Micro SD card are available.
Your DPR-36 has been tested with a wide range of cards up to 16GB and support cards of
Secure Digital High Capacity (SDHC) standard.
Inserting and removing a card
To insert a Micro SD card into your radio, lift up the Micro SD cover on top of the radio and
insert the Micro SD card into the slot. Press down the cover.
To remove the card pushes the card in slightly and it will pop out for removal.
Note:
The Micro SD card should not be removed during a recording as damage or corruption of les
on the card may occur.
GB
14
Page 16

Recording an Radio program (DAB & FM)
1. Ensure your MicroSD card is inserted correctly and your radio clock is synchronized.
2. First press the Band button to choose the FM/ DAB band as required. Tune to the station
you want to record.
3. Press and hold the REC button to start recording. The record icon “ ● ”and the recorded
time will show in the display.
4. Press and hold the Tuning control again to stop recording. The recording of FM program
will be saved in the FM Rec Fo lder in yo ur Micro S D card. The recording of DAB pro gram
will be saved in the DAB Rec Folder in your Micro SD card. The last recording will be saved
in the LAST folder.
15
Page 17

If your radio is not recording correctly check the following:
- The card is the correct format
- The card has enough recording space available
- The card has not be come corrupte d (poss ibly by removin g the card durin g recor ding).
Reformat the card if necessary.
Note:
The recordings of FM programs will be saved in the Micro SD card in .WAV format, and the
recordings of DAB programs will be saved in .MP2 format. The recording of DAB+ programs
will be saved in .M4A format.
GB
16
Page 18

Menu in MP3 mode
Press and hold the jog wheel for 2 seconds to enter the menu list. Turn the jog wheel up/
down to highlight the following options and press the jog wheel to select the desired function.
If you want to go back to the current listening at any stage, press the jog wheel:
Function
Repeat mode
System Setup
17
Action
Your DPR-36 provides you various playback option for les, as following:
Normal
Repeat One: repeat one single audio le
Repeat Folder: repeat all les of one single folder
Repeat All: repeat all audio les in the SD card
Random: play all audio les in the SD card randomly
Introduction: play the rst 10 seconds of all audio les in the SD card
press the jog wheel to select from the following settings options:
Sleep: your radio can be set to turn off after a preset time has elapsed.
The sleep timer setting can be adjusted between 15 and 120 minutes in
15 minute increments.
Contrast: turn and press in the jog wheel to select required LCD display
contrast. Display contrast will change accordingly.
Factory reset: press in and turn t he jog wheel t o select YES or N O.
Select YE S to erase a ll saved s ettings, statio n lists and f avorit es. A ll
settings will revert to factory default.
Page 19

GB
SD Service
SW version
Back
SD Browse: to view a full list of the tracks and recordings stored in your
Micro SD card.
Track Information: provides all sorts of information of a track, such as
tile, artist, album, genre, bit rate, type
Record Saved: allows you to choose the length of the recording per
track. For example, assumed your desired recording track is 1 hour and
the default setting of Record Saved function is 30 minutes, which means
your 1 hour track will be recorded with every 30 minutes segment.
Delete le: provides different options to delete les. Turn the jog wheel to
highlight desired option (i.e. delete a le/ delete a folder/ delete all les.).
Press to select your desired option.
*Once a le has been deleted, it is not possible to recover the le.
SD Information: to view the total amount of saved folder/ tracks on you
Micro SD card.
press the jog wheel to view software version installed in the radio.
press the jog wheel to go back to the previous page.
18
Page 20

To play les
1. Turn the jog wheel up/ down to select the track to be played.
2. Your playlist recordings will be played in list order from the rst selected le.
3. To pause playback push in the jog wheel. To resume playback push in the jog wheel again.
Fastforward les
1. Long turn the jog wheel up till the fast-forward symbol shows on the display.
2. Press the jog wheel when the desired part of the track is reached.
Backforward les
1. Long turn the jog wheel down till the backward symbol shows on the display.
2. Press the jog wheel when the desired part of the track is reached.
19
Page 21

To pause playing les
1. Push in the jog wheel and the track will pause playing.
Key lock function
The key lock function is used to prevent unintentional operation of the radio.
1. Key lock switch is located on the top panel of the radio next to headphone socket. When the
key lock switch is set to LOCK, the powe r and volume control buttons will be disabled.
Display will show “Button Locked” icon.
2. To switch off the key lock function switch the key lock button to off position. The key lock
function will be disabled.
GB
20
Page 22

Using DPR-36 Rewind feature- DAB and FM
Missing a great part of your favorite station because of a phone call or other chores must
be familiar with you. The Rewind feature is designed to solve this problem. With a single
press of the Recording button, you can put your favorite station on hold while you have been
interrupted by a phone call or other chores. After the interruption is nished, simply press the
Rewind button again to return to your favorite station exactly where you left of so that you
never miss anything.
1. Ensure your Micro SD card is inserted correctly.
2. First, switch on your radio. Press the Band button to select the desired waveband.
3. To start rewinding the desired station, press the Recording button, the sound from the speaker
will be mu ted. T he di splay will show the ‘ pause symb ol’ and the time (seco nds) you ar e
delayed by.
4. To return to the radio you were listening to, simply press the Recording button again and
your radio will continue playing from where you left off.
21
Page 23

5. To return to real time radio, press and hold the Recording button the display will return to
normal radio display.
Once Rewind has been cancelled, it will not be possible to go back to a previously stored part
of the program.
The radio will no longer be using the Micro SD card to buffer the current program.
Note:
In order for the radio to carry out the rewind feature, the radio requires at least 30MB in the
Micro SD card space.
GB
22
Page 24

Reach a desired point of the rewind program-DAB and FM
1. Turn the jog wheel up/ down to nd the item you wish to listen to. The display will show the
amount of time you have scrolled back together with the maximum time you can rewind
back to.
2. To return to live listening press and hold the Recording button.
3. The rewind capacity is approximately 60 minutes.
Note:
You must stop the Rewind feature before you can access other functions by pressing and
holding the Recording button. If you attempt to use other functions on your radio while using
the Rewind feature a warning message 'Hold REWIND to stop rewinding' will be displayed.
REWIND refers to the Recording button on the radio.
23
Page 25

Specications
Power Requirement:
Mains (via supplied AC adaptor)
AC 100-240 50/60 Hz
DC5V 500 mA
Batteries: 3.7V/1850 mAH
Battery Life:
Approx 15 hours listening through the speaker
for 4 hours a day at normal volume.
Approx 18 hours of listening with headphones
for 4 hours a day at normal volume.
Frequency Coverage:
FM 87.50 – 108 MHz
DAB+ Band III 5A – 13 F
If at any time in the future you should need to dispose of this product please note that: Waste electrical
products should not be disposed of with household waste. Please recycle where facilities exist. Check
with your Local Authority or retailer for recycling advice. (Waste Electrical and Electronic Equipment
Directive)
GB
24
 Loading...