Sandvik Coromant Heat resistant super alloys User Manual
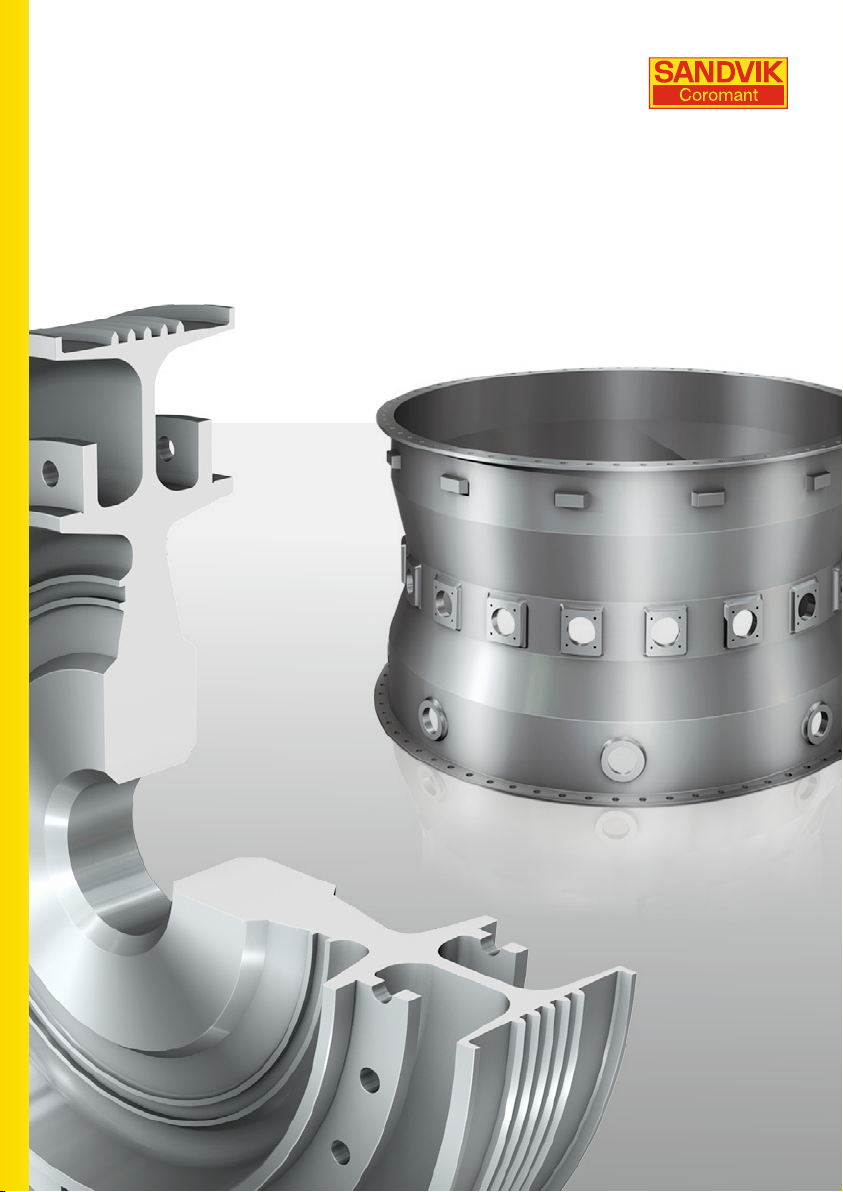
APPLICATION GUIDE
Heat resistant super alloys
High pressure coolant machining
for better productivity and results
More information
Useful information and application techniques can be found in our
catalogues, handbooks and application guides, such as PluraGuide.
CoroGuide web is an internet-based catalogue including a cutting
data module (also available on CD) where you can find cutting data
recommendations for your specific application.
Visit our websites for the latest news!
www.sandvik.coromant.com
www.aero-knowledge.com

Contents
Introduction 2
1. Heat resistant super alloys – HRSA 3
Alloy groups 4
Machinability/raw material
condition 5
Common component types 7
Coolant requirement 8
2. Turning of nickel-based materials 9
Machining stages 9
Typical wear mechanisms 11
Insert shape selection 13
Cutting tool materials 21
Ceramic insert grades 22
Carbide insert grades 26
SCL – predictive machining 28
Geometries and chip breaking 31
Recommended starting choices 34
Tailor Made 36
Engineered solutions 37
Component/feature solutions 42
3. Turning of cobalt-based materials 51
Process considerations 52
Typical wear recommendations 53
Insert shape selection 54
Optimized tools for internal machining 55
Recommended starting choices 57
Carbide insert grades 58
Engineered solution 58
Component/feature solutions 59
4. Milling 60
Production planning process 61
Typical components 61
Machining strategy 62
Cutter concept 64
Milling process with indexable inserts 65
Face milling with carbide inserts 68
End milling/90 degree approach 77
Ceramic milling 82
Solid carbide – CoroMill Plura in
HRSA machining 88
Exchangeable-head CoroMill 316
in HRSA machining 97
Component/feature based solutions 98
Recommended start cutting data 102
5. Hole making 104
Hole types and hole making methods 104
Tools for hole making 106
Circular ramping from solid 107
Circular interpolation of existing holes 108
Back chamfering/deburring 109
Thread milling 110
Recommended start cutting data 112
Component/feature solutions 114
6. Technical data 118
7. Material cross-reference list 120

Introduction
This application guide concentrates on optimizing machining of heat resistant super
alloys (HRSA).
For one of the most challenging material
groups to machine, optimized tools are naturally a prerequisite, but equally important
is how to apply them.
We will guide you through the most common materials and machining applications.
We aim to give you application and process
recommendations that will help you use our
products in the most productive manner
with maximum process reliability and component quality.
Our goal is to support customers with
complete tooling solutions that meet cost
reduction and quality improvment initiatives.
Productivity along with quality and reliability
are our focus. When we talk about productivity you will see that we measure this in
terms of cm3/min. It is important to understand the relationship between the combination of speed, feed and depth of cut and
not just cutting speed alone which is often
the most damaging parameter when considering tool life.
2

1. Heat resistant super alloys – HRSA
Heat resistant super alloys (HRSA) are a family of alloys utilised in
various industry segments:
Aerospace engine – combustion and turbine sections.
Stationary gas turbines – combustion and turbine sections.
Oil and gas – marine applications.
Medical – joint implants.
The properties which make them attractive are:
•Retension of strength and hardness at high temperatures.
•Corrosion resistance.
Aerospace engine Stationary gas tur-
bines
Oil and gas Medical
3

Alloy groups
HRSA materials fall into three groups:
nickel-based, iron-based and cobalt-based
alloys. The physical properties and machining behaviour of each varies considerably,
due both to the chemical nature of the alloy
and the precise metallurgical processing it
receives during manufacture. Whether the
metal is annealed or aged is particularly
influential on the subsequent machining
properties.
Nickel-based are the most widely used, and
currently constitute over 50% of the weight
of advanced aircraft engines. The trend is
that this will increase in new engines in the
future.
Common types include:
•Inconel 718, Waspaloy, Udimet 720
– precipitation hardened
•Inconel 625 – solution strengthened
(not hardenable)
Iron-based have been developed from
austenitic stainless steels. Some have very
low thermal expansion coefficients (such as
Incoloy 909) which make them especially
suited for shafts, rings, and casings.
However, they have the poorest hot strength
properties of the three groups.
Common types:
•Inconel 909
•A286
•Greek Ascoloy
Cobalt-based display superior hot corrosion
resistance at high temperatures compared
to nickel-based alloys. They are more expensive and also more difficult to machine due
to their great wearability.
The use in turbines is restricted to combustion parts in the hottest engine areas.
Their main use is seen in surgical implants,
which utilise their inherent corrosion resistance.
Common types:
•CoCr
•Haynes 25
•Stellite 31
The most common HRSA alloys (see page 120 for the complete list)
Material Hardness HB
Inconell 718
Inconell 706
Inconell 625
Hastelloy S
Hastelloy X 160
Nimonic PK33 350
Udimet 720
Waspaloy
Stellite 21 280 340
Stellite 31
Ann. Aged
285
200
4
Alloy
group
Nickel
Iron
Cobalt
Code
MC S2.0.Z.AN CMC 20.2 425
MC P5.0.Z.AN CMC 05.3 Greek Ascoloy 300
MC M1.0.Z.PH CMC 05.4 A286 300
MC S2.0.Z.AN CMC 20.21 Incoloy 909
MC S3.0.Z.AG CMC 20.3 Haynes 25
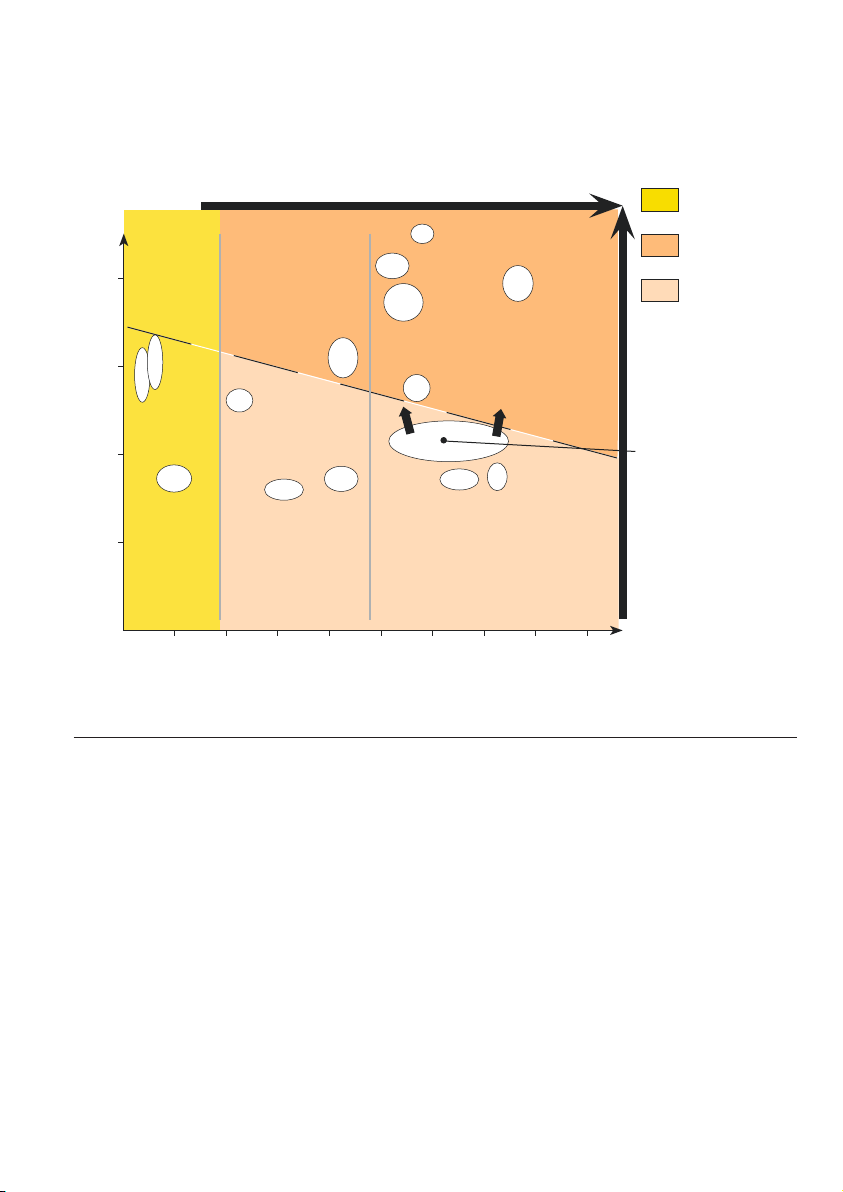
With such a wide spread of materials under the generic heading of HRSA the machining
behaviour can vary greatly even within the same alloy group. In fact the same material can
have numerous machining recommendations.
Heat generated during cutting
Hardness
HB
400
300
200
100
(tendency for plastic deformation)
Nimonic 1023
Inconel 718
Nimonic PK 33
Waspaloy
Nimonic 90
Nimonic 105
Nimonic 263
Inconel 625
Nimonic 75
17-4 PH
Jethete
M152
Austenitics
Stainless
Incoloy 901
Crucible
A286
Incoloy 901
Incoloy 800
Sanicro 30
Fe based alloys Ni based alloys
steels
10 20 30 40 50 60 70 80 90
Nimonic 80A
Weight %
Nickel & cobolt
= Stainless
steel
= Heat treated
(aged)
= Solution
treated
(annealed)
Tendency
for notch wear
Precipitation hard enable
alloys in annealed conditions
Machinability/raw material condition
Heat treatment
Annealing – heating to controlled temperature then cooling at
Solution treatment – heating followed by rapid cooling <30HRC
Ageing – slow cooling after solution treatment up to 48HRC
The state of heat treatment affects the
hardness of the component and hence the
wear mechanisms. The formation of the
chip is a good indicator of the hardness –
with hard materials it is easier to break the
chip.
Hardened materials have increased cutting temperatures and show a tendency to
notching of the cutting edge at the depth
controlled rate.
Softer materials machine similarly to the
stainless steel family.
Insert grades with greater toughness and
reduced hot hardness – resistance to high
temperatures – are required due to reduced
cutting temperatures and increased chip
hammering. Here, damage to areas outside
the actual cutting edge is caused by the
chip breaking against the insert.
of cut. The combination of a low entering
angle and a hard substrate with a coating
offering a heat barrier is required.
<30HRC
5

Comparison of wear depending upon
material hardness and insert grade
CNMX 1204A1-SM – vc 50 m/min, fn 0.25 mm/r, ap 1.5 mm
Hard material Soft material
GC1105 GC1105
S05F
Raw material production method
Depending upon the size, shape and
strength requirements of the component,
various production methods for the blank
material will be adopted.
The production method varies the machinability of the material and will change the
wear characteristics.
S05F
7 min6 min 12 min
Chip hammering
3.5 min
Material
Forging large
Casting complex shape poor
Bar stock <200 mm diameter good
Each of these raw material types directly
affects the alloy’s micro structure, and so
also affects the subsequent machining
behaviour:
Forged materials have a finer grain size
than in castings, which improves the
strength and grain flow of the component.
When machining forgings, reducing the
speed and increasing the feed generally
Components Advantage/suitability Machinability
high strength
low strength
availability/strength
most sensitive to notch wear and abrasive
wear. They can be easily identified due to
their visibly mottled surface (the ‘orange
peel’ effect).
Bar stock material is the easiest form of
raw material to deal with. Notching is not
so much of a problem, which allows harder
and more wear resistant insert grades to
be used than for forgings.
gives the maximum possible metal removal
rate with good tool life.
In castings the opposite applies, and applying low feeds (0.1 mm chip thickness) and
higher speeds can be beneficial. Castings
have poor machinability and tend to be
6
medium
Common component types
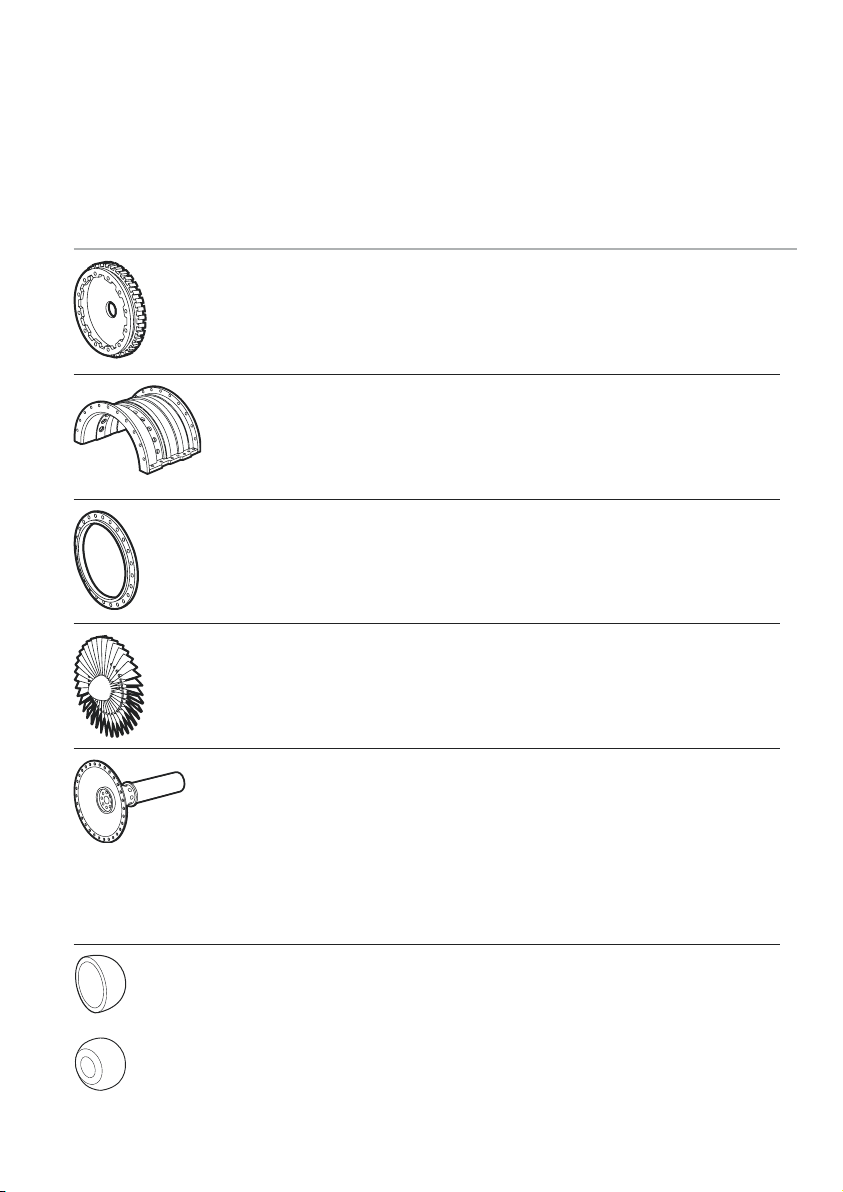
Typical HRSA components, and an indication of the different machining methods involved
for each include:
Aerospace and gas turbine – nickel based
Component
Turning
Milling Drilling Others
Discs
Casings
Rings
Blades
Blisks
Impellers
Shafts
60% 10% 5% 25%
45% 40% 15%
95% 5%
10% 50% 40%
70% 5% 25%
Medical – CoCr
Component Turning
Cup
Head
90% 10%
90% 10%
Milling Drilling Others
7
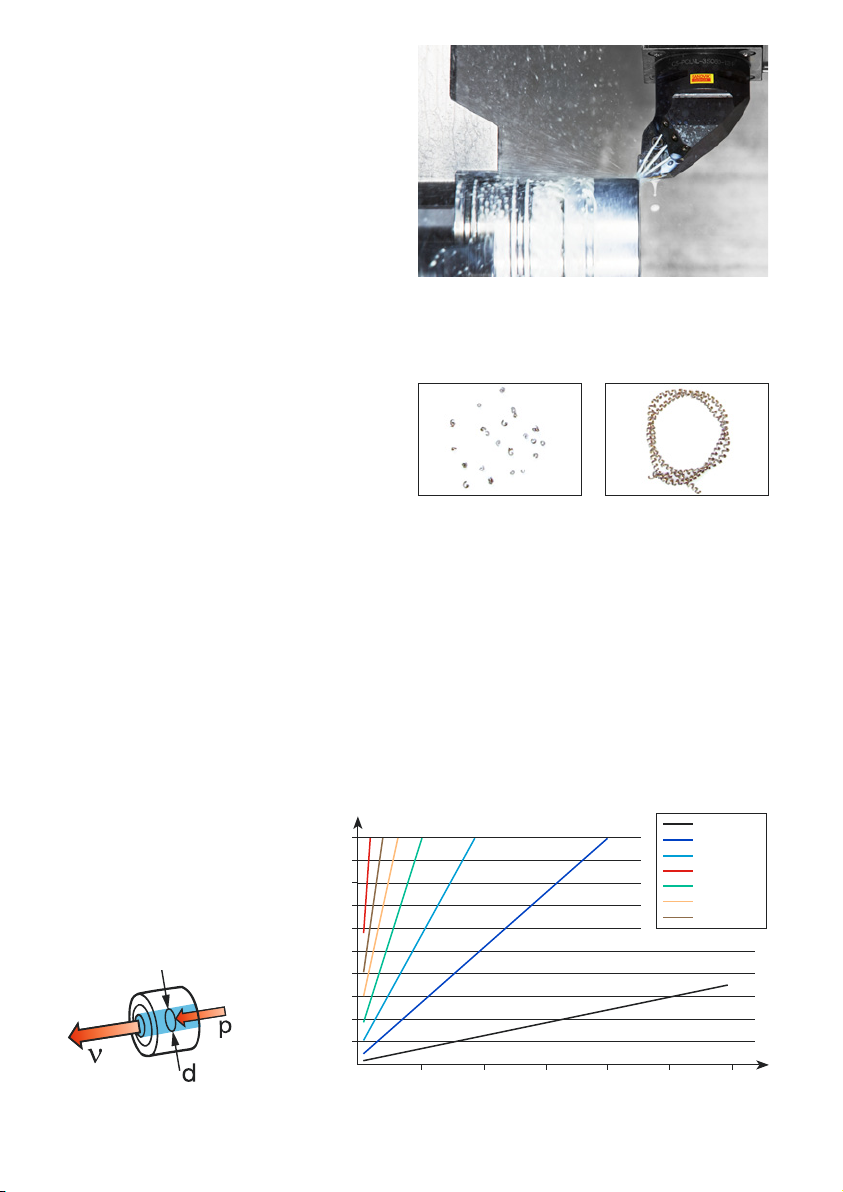
Coolant requirements
Coolant should be applied in all operations
excluding milling with ceramics. The volume
should be high and well directed.
High pressure coolant HPC (up to 80 bar)
shows positive results in terms of tool life
and consistency.
Dedicated HPC-tools with fixed nozzles give
parallel laminar jets of coolant with high
velocity accurately directed at the right zone
between insert and chip.
HPC improves the chip control
CNGG 120408-SGF
vc 65 m/min, ap 1.0 mm, fn 0.2 mm/r
Inconel 718
For milling and drilling, all tools with internal
coolant supply can benefit from HPC even if
tools prepared for nozzles give higher possibility to use smaller nozzle diameters for
high pressure.
• Turning,useatleast20l/minanda
basic pressure of 70 bar.
CoroTurn HP tool, 80 bar
Compared chips made with a CoroTurn HP tool versus a
conventional tool and standard coolant pressure.
Conventional tool
• Millinganddrilling,useatleast50l/min
to accomodate the extra nozzles on the
milling cutter and the largest drill diameters.
Flow required for specified nozzle diameter and 80 bar high pressure pump
The pressure (p) hitting the cutting
zone is dependent on the number
of nozzles, the nozzle diameter
(d) and the flow (ν) given from the
pump.
A higher flow rate is needed for
tools with many outlets or large
hole diameter for the coolant.
Flow, ν
litres/min
100
90
80
70
60
50
40
30
20
10
0
1 5 10 15 20 25 30
Nozzle diameter, d
∅ 0.5 mm
∅ 1.0 mm
∅ 1.5 mm
∅ 2.0 mm
∅ 2.5 mm
∅ 3.0 mm
∅ 3.5 mm
Number of nozzles
8
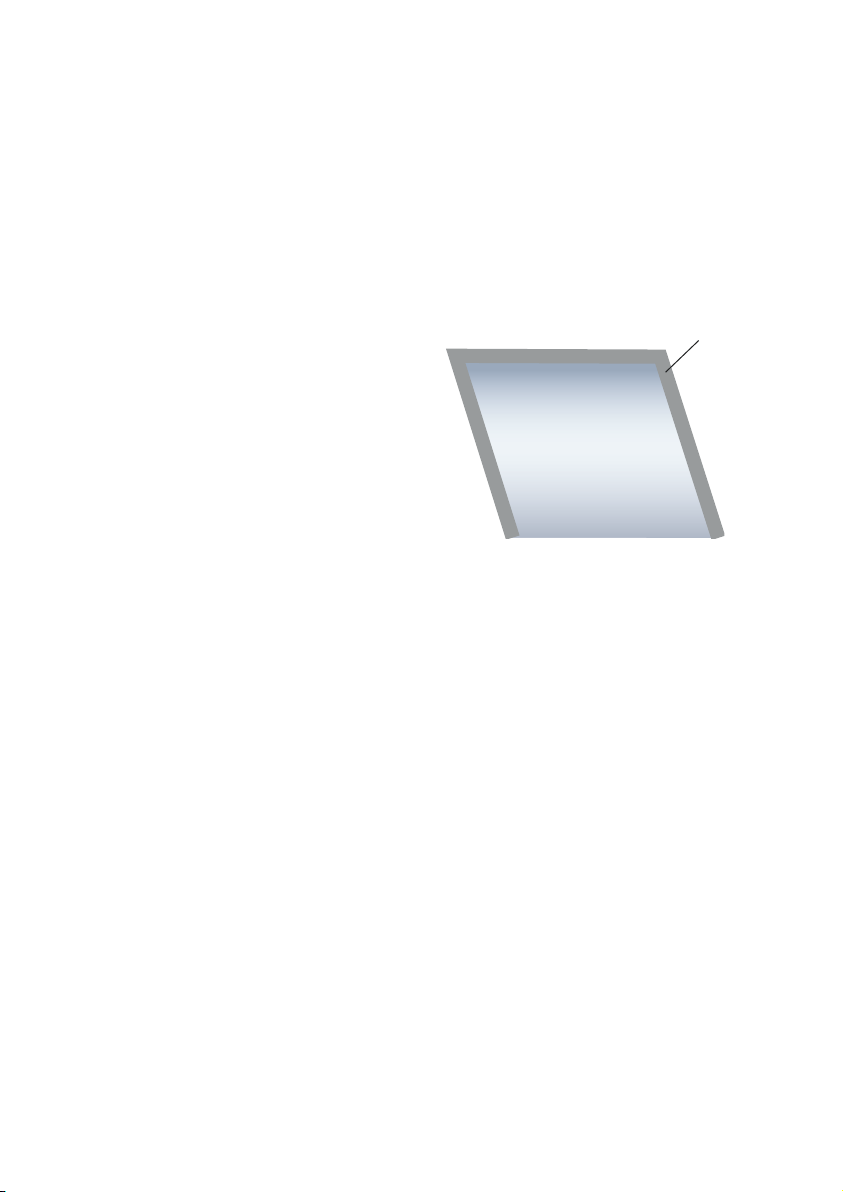
2. Turning of nickel-based materials
– aerospace engine and stationary gas turbines
Classification of machining stages
The production cycle for the machining of a HRSA component can be broken into three distinct stages, each with specific demands on the tooling and the machined surface.
FSM – First stage machining – up to 10 mm depth of cut
The forged components often have rough,
uneven skin or scale. They are generally
machined in the soft condition (the hardness is typically 26 HRC) at the foundry
to the basic component shape. Coated
carbide grades are used at high feed rates,
large depths of cut and low speeds.
Ceramics may also be used with good
machine and forging conditions. Here the
main priorities are productivity and large
stock removal – in the total machining process, up to 80% of the original weight will
be machined away, and the bulk of it will be
removed during FSM.
The component shapes are simple and
standard general turning tool holders can
be used. Many critical parts have a ring
removed at this stage for material analysis.
CoroCut insert in geometry -TF and grade
GC1105 is outstanding for this operation.
Material to be
removed
9
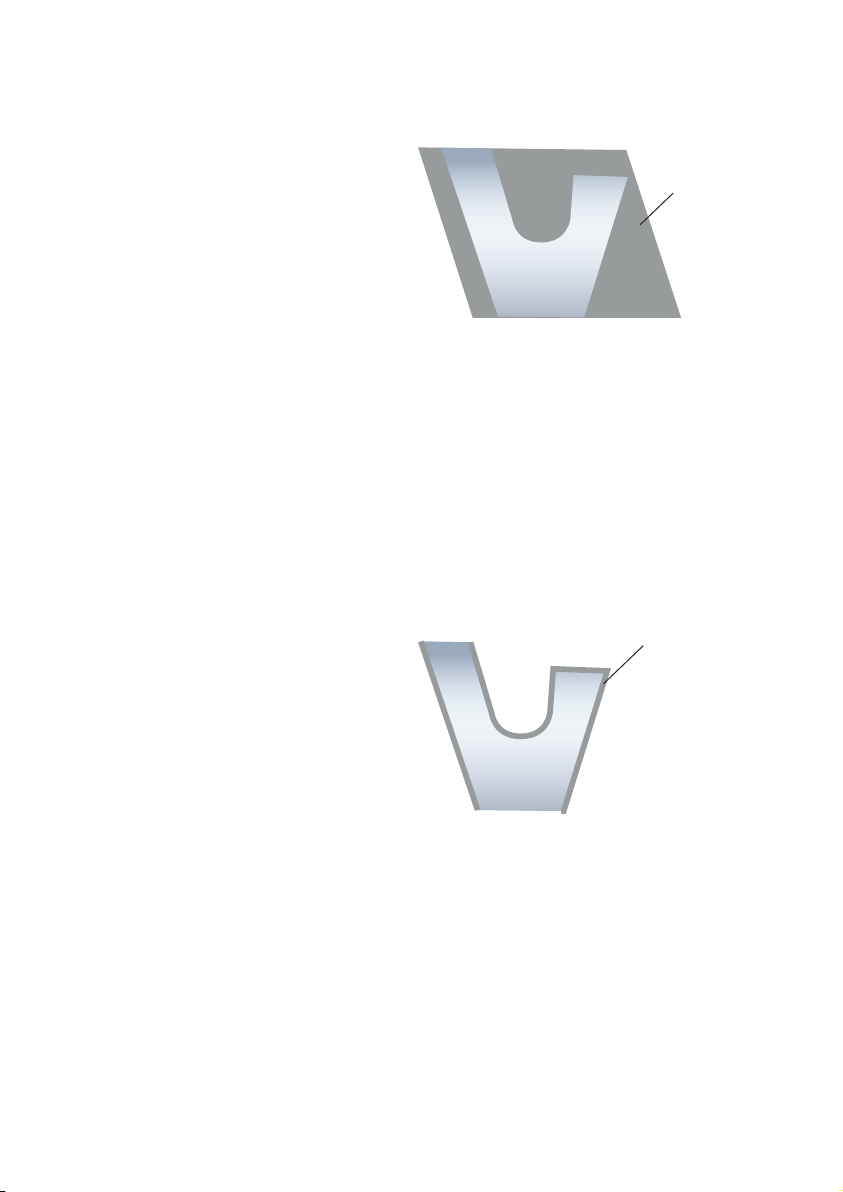
ISM – Intermediate stage machining – 0.5 to 5 mm depth of cut
At this stage the material is mainly in the
final hard/aged condition, (the hardness is
typically 36 to 46 HRC) having undergone
some form of heat treatment after FSM.
The ISM process involves profiling of the
component with varying depths of cut at
moderate tolerances, where productivity is
important but insert security is equally vital.
In this area, ceramics offer the best productivity where stability allows. Due to the complex shape of the components, ISM may
involve a high degree of grooving/ recessing and profiling, which can require a large
amount of special tool holders.
LSM – Last stage machining – 0.2 to 1 mm depth of cut
LSM represents the least amount of material removal, but imposes the highest
demands on surface quality. For this critical
stage of production, the tools, tool paths
and cutting data are sometimes certified by
end producers of the aerospace engine.
These parts should be machined with
cemented carbide grades, to ensure a minimal deformation zone and correct residual
stresses in the finished component surface.
Material to be
removed
Material to be
removed
Factors which affect the residual stresses
most are:
Speed – not above 60 m/min for critical
parts.
Tool wear – maximum 0.2 mm. Use S05F
for best tool life.
10
Chip thickness (feed/radius combination)
– too low chip thickness (below 0.1 mm)
generates more heat and work-harden the
surface. For round inser ts and large radius
increase the feed. (see page 19).
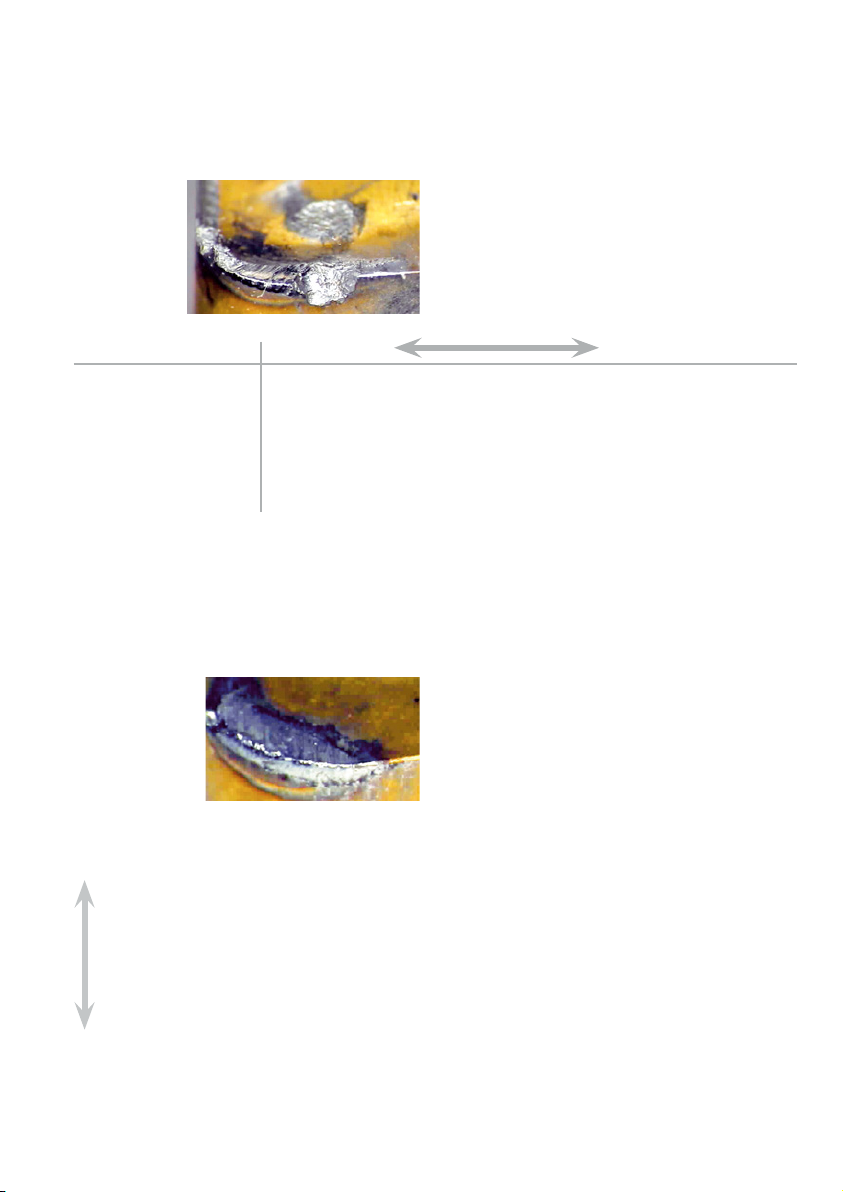
Typical wear mechanisms
With carbide grades two wear mechanisms dominate – plastic deformation and notch wear.
It is important to identify which is the most prominent before selecting the correct grade
and strategy.
Notch wear on main cutting edge is a
mechanical wear which is concentrated at
the depth of cut. The extent of notch wear
is directly related to:
Least notch Most notch
Entering/lead angle
Depth of cut
Geometry
Material hardness
Material condition
Grade
Round inserts
Below nose radius
Positive
Soft condition
Bar stock
PVD fine grain carbide
(GC1115, GC1105)
Forged
CVD
(S05F)
C/DNMG 95 degree
Above nose radius
Negative
Hardened
Cast
Ceramic
(CC6060/CC6065/CC670)
Because of these factors, notching is the critical wear for ISM where the material is hard
and the depth of cut is relatively high. To reduce notching, use as small entering angle as
possible.
Plastic deformation (PD)/even flank wear
– as a result of combined high temperatures and high pressure on the cutting
edge. This wear is much more of a gradespecific issue than notch wear, which is
more application related. Good wear resistance and hot hardness will reduce the likeli-
Flank wear resistance
Hot hardness
Ceramic
Carbide
Bulk toughness
Turning Grooving
CC6060, CC6065
CC670 CC670
S05F
GC1105 GC1105
GC1115
H13A H13A
GC1125 GC1125
GC2025 GC2135
GC2035 GC1145
hood of plastic deformation.
In case of excessive flank wear, use a more
wear resistant grade or reduce the cutting
speed.
11
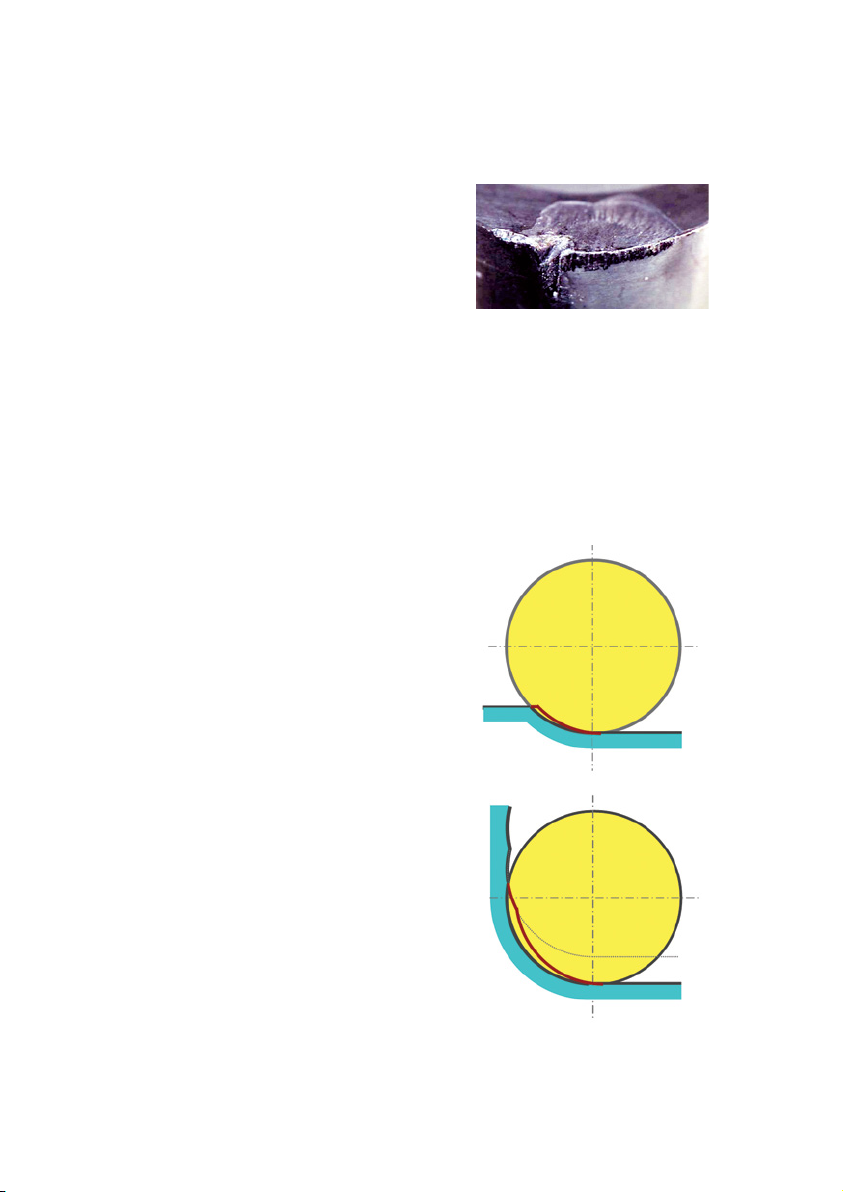
Top slice wear – this type of wear is common for ceramics in HRSA. Small slices of
the cutting tool material are lost around
the insert’s top face. When the flank of
the insert is worn, the workpiece pressure
against the periphery will be high enough
to break small slices away along the edge
line.
The recently sliced area will then form a
new sharp edge that again cuts well, and
the cutting process can continue under
these circumstances for a long time without
posing a threat to the overall quality, in less
sensitive roughing or semi-finishing operations.
In finishing operations, where surface quality and/or burr formation is important,
top slicing can be critical. This tendency
increases with high feed rates due to
increased radial pressure.
To reduce top slice
In stable conditions:
•Lower the cutting pressure by reducing
the chip area:
– feed rate
– depth of cut, a
– arc of engagement
•Use optimized programming techniques
•Use CC670 which is stronger due to
whisker reinforcement.
p
Small slices are lost around the
insert’s top face
In unstable conditions where top slice is
caused by vibrations:
•Reduce engagement angle with program-
ming techniques
•Use CC6065 rather than CC6060
12
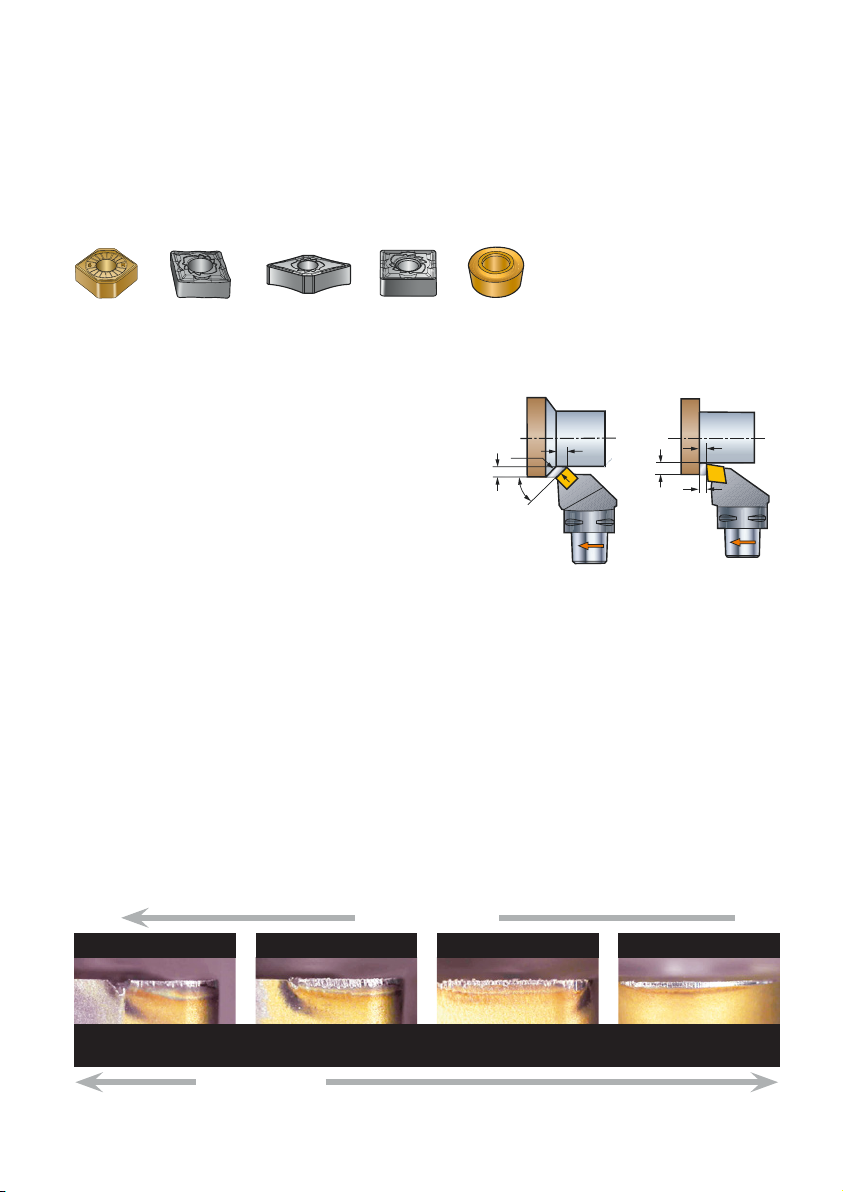
Insert shape selection
Entering angle – k
r
With a standard C/D/SNMG style insert
for roughing, the entering angle is constant
regardless of depth of cut.
CNMX
CNMG DNMG SNMG
Effect of entering angle
Notch wear on the inserts is the major
problem when machining HRSA. The worst
notching occurs when the depth of cut is
greater than the nose radius, and the entering angle is 90°. (The depth of cut is the
influencing factor – with a depth of cut
smaller than the nose radius, the effective
entering angle is reduced even when the
angle on the insert itself is 90°).
By following some general rules the wear
can be controlled allowing more productive
grades to be used.
•Use as small entering angle as possible
(max 60°, min 25°)
– eg. SNMG, CNMX where k
•Round inserts – use no greater entering
angle than 45° or 0.15 x diameter.
= 45°.
r
However, with round inserts the entering
angle varies from 0 to 90° depending upon
the ratio between depth of cut and diameter.
RCMT
h
ex
a
p
k
r
hex = fn x 0.71
hex = chip thickness
f
n
a
p
h
hex ≈ f
f
n
ex
n
•Ramping – program a varying depth of cut
into the cutting operation. This spreads
the notching over the whole cutting edge,
giving longer tool life and more predictable wear. This method is used predominantly with ceramics, and mainly with
round inserts.
Effect of entering angle on wear mechanism
CNMG 95°
Material: Inconel 718 (46 HRC) – ap 2.0 mm, fn 0.25 mm/rev, vc 50 m/min – 5 min. time in cut
Notch No notch
SNMG 75°
Radial forces
SNMG 45°
HighLow
Round
13
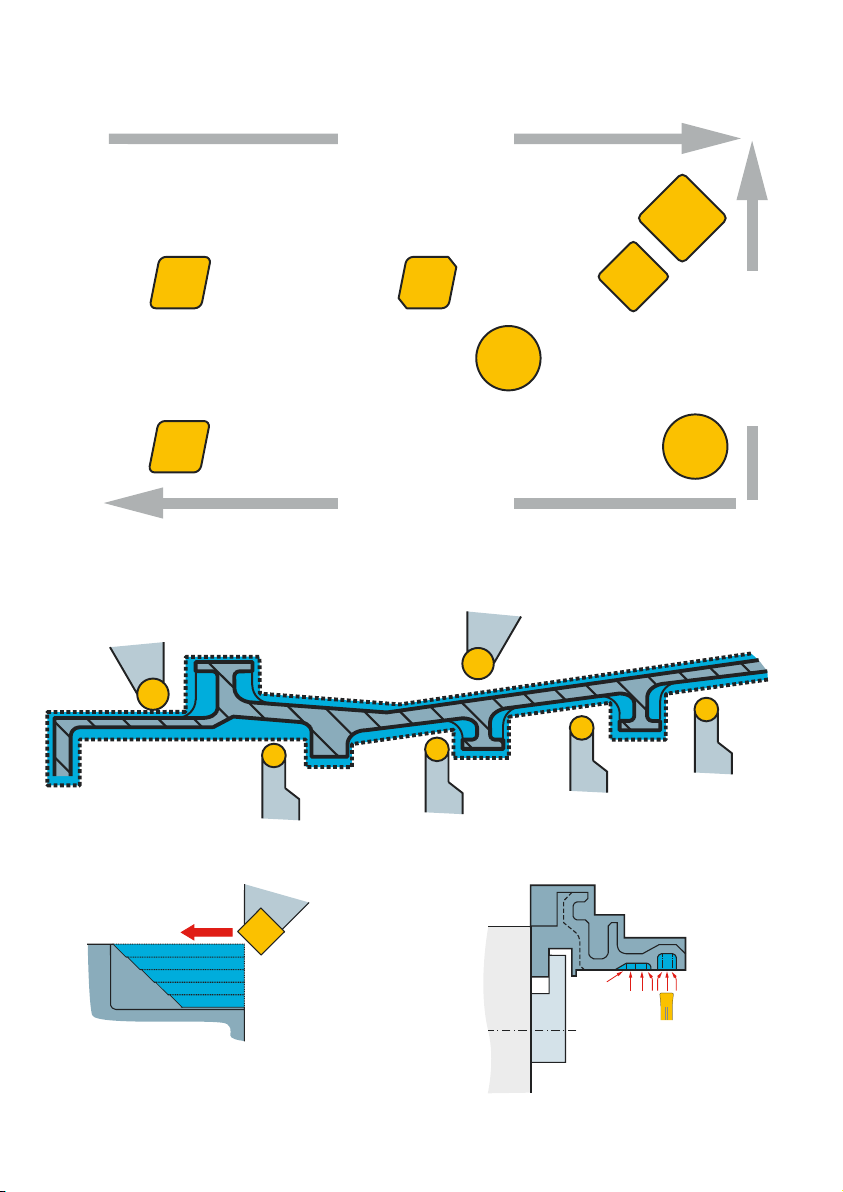
Selecting the right insert for the job
FSM
Best productivity
ISM
LSM
- to shoulder
- pocketing
Depth of cut
Thin walls
14
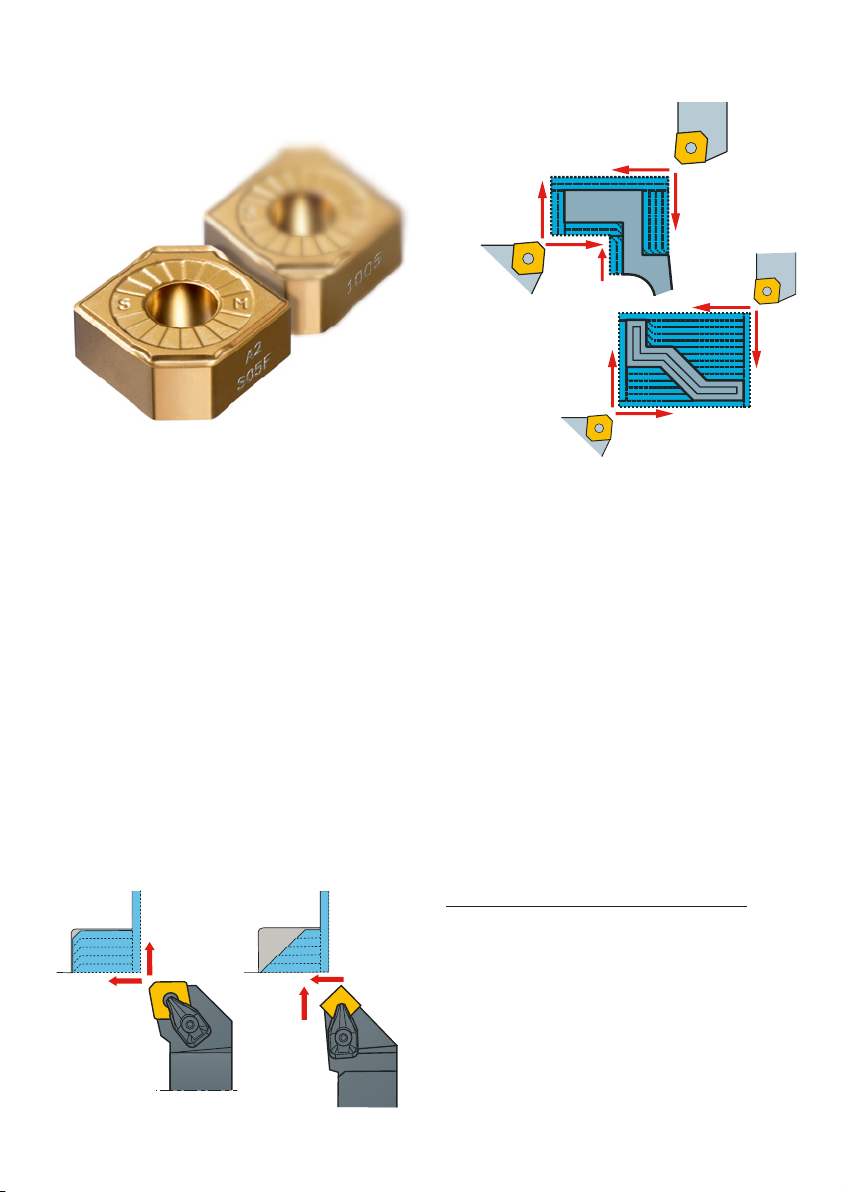
Xcel insert – high productive machining into a corner
Examples of machining
Casing
Ring
A tooling solution for semi-rough turning
into shoulders, combines a host of design
advantages combing the benefits of a
square and rhomboid insert into one single
tool:
•reduced notch wear and increased feeds
compared to rhombic inserts.
•reduced radial forces and constant chip
thickness compared to round inserts.
•greater accessibility in confined spaces
than square inserts, in addition to having
the ability to machine in two directions,
and provide a known offset point for precise positioning of the cutting edge.
C-style CNMX-SM S-style SNMG
Longer tool life, secure machining, and
increased cutting data – all the best possible advantages are available from a single
tool.
Two chamfer sizes are available, to suit
depths of cut up to 2.7 mm in intermediate
stage machining, ISM. They are offered in
several grades, all proven performers in ISO
S materials.
Insert code Max ap mm
CNMX 1204A1-SM 1.7
CNMX 1204A2-SM 2.7
Grade recommendations – first choice
<35 HRC S05F
>35 HRC GC1105
Titanium H13A
Iron based GC2015
15
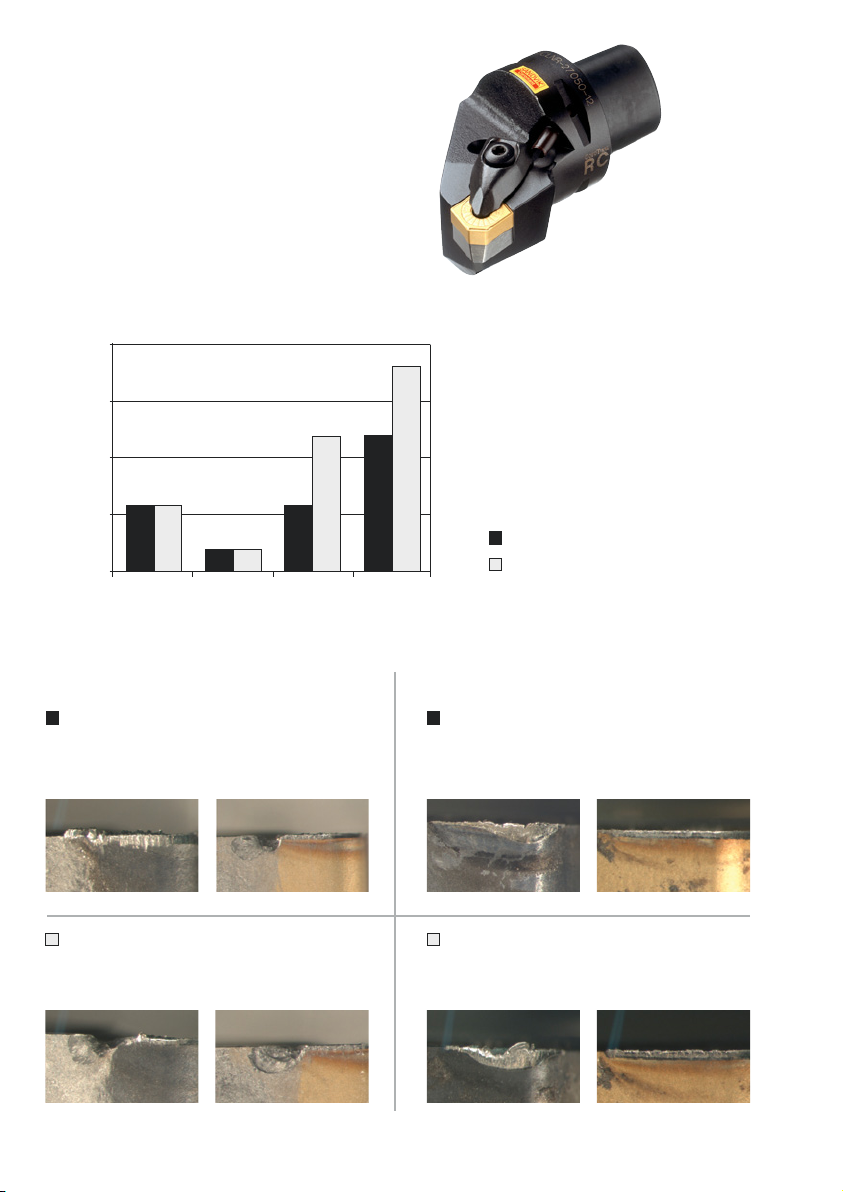
The inserts fit into a standard CNMG holder
but require a new shim to accommodate
their design.
New shims
5322 234-07 for T-Max P lever design holders
5322 234-08 for CoroTurn RC holders
Tool life test – Inconel 718 (46 HRC) – ap 1.7 mm, fn 0.25 mm/r
20
H
min
15
10
A B
5
C D
0
CNMG GC1105 CNMG S05F CNMX GC1105 CNMX S05F
F G
E
CNMG
vc 50 m/min
GC1105
A C E
vc 40 m/min
GC1105
6 min 2 min
6 min 2 min 12 min 18 min
S05F
S05F
DB
CNMX
vc 50 m/min
GC1105
vc 40 m/min
GC1105
vc 50 m/min
vc 40 m/min
S05F
6 min 12 min
G
S05F
HF
16
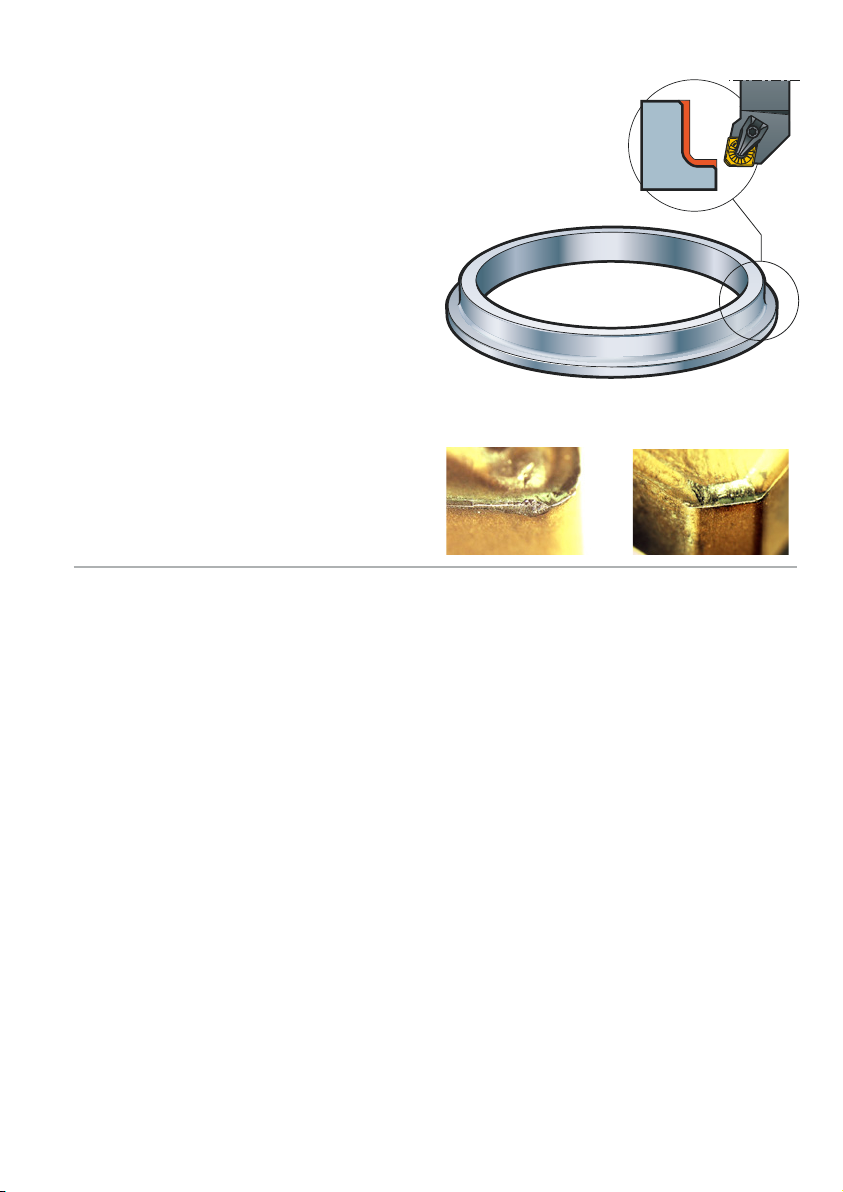
Turning of heat resistant super alloys
Xcel allows productivity to be doubled in
nickel-based HRSA, through increased
cutting data and a longer-lasting tool life.
Data
Material: NIMONIC PE 16
Ring, diameter 650 mm
Cutting depth: 1.7 mm
Insert:
Feed:
Cutting speed:
Number of components/edge:
Competitor
Competitor
0.2 mm/r
32 m/min
1 piece
Result
Over 100 % productivity increase
Time in cut reduction: 8 min to 3.5 min
Xcel
CNMX 12 04 A2-SM
grade GC1005
0.3 mm/r
50 m/min
2 pieces
17
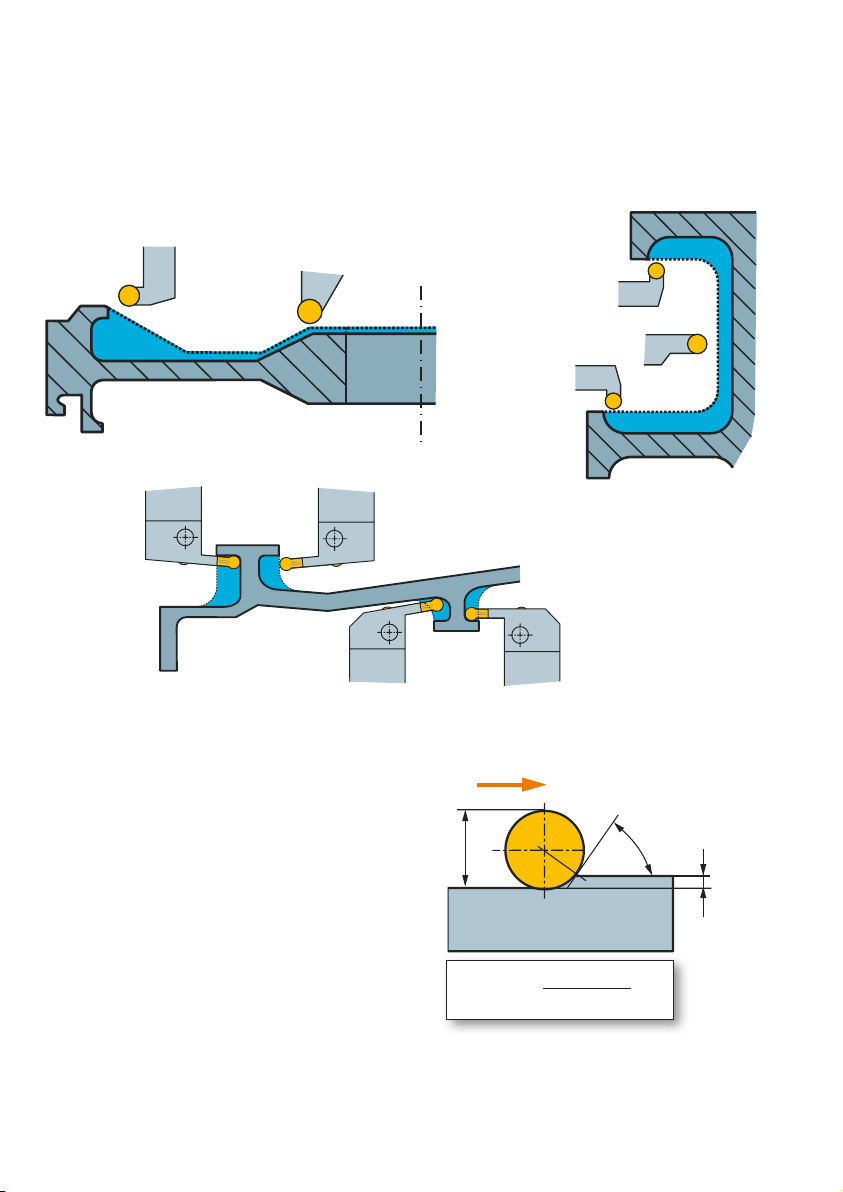
Round inserts and CoroCut®inserts with -RO geometry
Round inserts are the strongest inserts
available, and allow high productivity.
Typically aerospace components are large,
with large radii and blending profiles
designed to eliminate high stress points
allowing round inserts to be used.
Entering angle – k
r
The best performance is achieved when
the entering angle remains under 45°. This
gives a depth of cut of 0.15 x insert diameter (the maximum depth of cut should be
no greater than 0.25 x diameter).
For larger depths of cut than 25% of the
diameter, it is better to use square inserts
with a constant 45° entering angle.
18
k
iC
=
r
(0.5iC–ap)
0.5iC
cosk
r
a
p
Note: this principle also applies to standard
inserts when the depth of cut is less than
the nose radius.
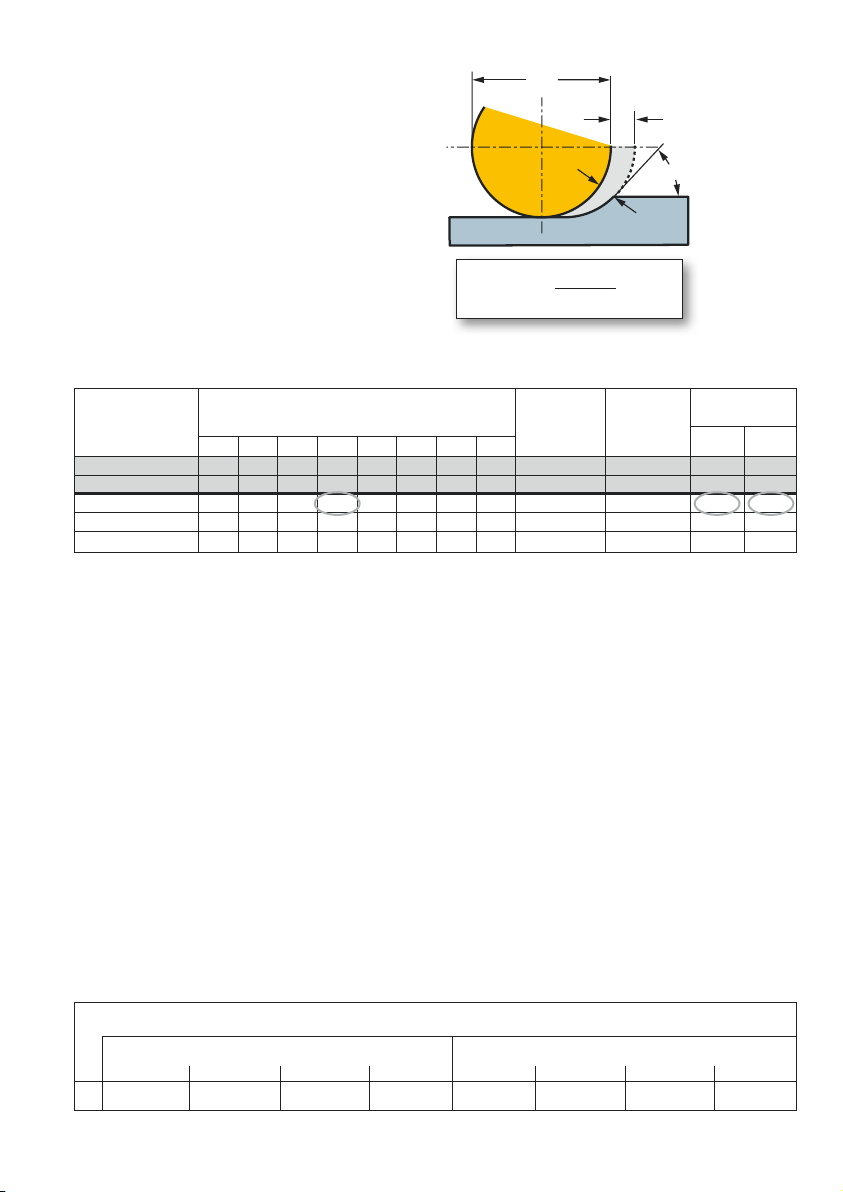
Chip thickness
The chip thickness varies with round
inserts, and depends upon the entering
angle. With low ap/iC ratios, the feed can
be increased in order to raise the chip
thickness to a desired level.
Recommended chip thicknesses h
HRSA are:
Carbide 0.1 to 0.35 mm
Ceramic 0.08 to 0.15 mm
ex
for
fn =
iC
f
n
k
r
h
ex
h
ex
sink
r
Depth of cut to
diameter ratio
ap/iC
3 4 5 6 8 10 12 16
0.25 0.75 1 1.25 1.5 2 2.5 3 4 60° 1.16 0.12 0.41
0.2 0.6 0.8 1 1.2 1.6 2 2.4 3.2 53° 1.25 0.13 0.44
0.15 0.45 0.6 0.75 0.9 1.2 1.5 1.8 2.4 46° 1.4 0.14 0.49
0.1 0.3 0.4 0.5 0.6 0.8 1 1.2 1.6 37° 1.66 0.17 0.58
0.05 0.15 0.2 0.25 0.3 0.4 0.5 0.6 0.8 26° 2.3 0.23 0.81
Depth of cut for insert diameter, in mm
Entering
angle k
r
Feed modification
value
Feed min/max
mm/r
hex 0.1 mmhex 0.35
Example
6 mm diameter CoroCut RO insert.
Depth of cut 0.9 mm gives a maximum
entering angle k
= 46°.
r
To machine with:
Minimum 0.1 mm chip thickness the correct feed is 0.14 mm/r.
Maximum 0.35 mm chip thickness the
correct feed is 0.49 mm/r.
Surface finish
The surface finish generated has a direct
relationship to both the nose radius size
and the feed rate. To achieve a certain
surface finish, a small nose radius requires
a lower feed rate than a large nose radius
– which in practical terms means that small
nose radius inserts lead to lower productivity.
Therefore, for the highest productivity the
nose radius should be as large as possible
– the largest of all being round inserts.
mm
Maximum feed fn mm/r to achieve surface finish R
Nose radius size mm Insert diameter mm
0.4 0.8 1.2 1.6 8 10 12 16
f
0.17 0.22 0.27 0.32 0.5 0.57 0.62 0.7
n
8.0 – Ra 1.6 µm – N7
max
19
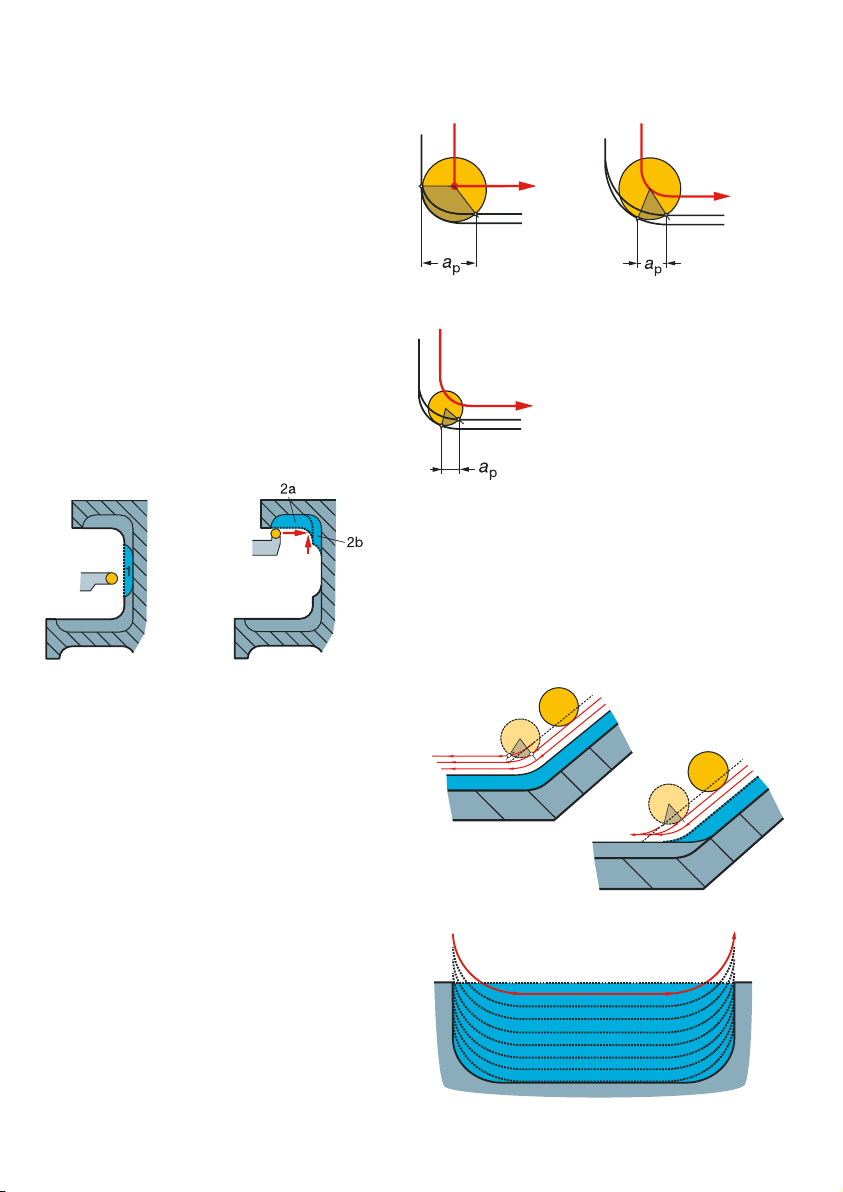
Application hints
‘Wrap-around’ is a problem which occurs
with round inserts when plunging or profiling into corners. Due to high angular
engagement creating high cutting pressures, the feed needs to be reduced. To
reduce this problem, optimized programming strategies together with smaller insert
radii should be used.
Recommendations
1) Never plunge straight into cut.
2) Roll in and out of cut.
3) Roughing – programmed radius same
size as insert diameter.
4) Finishing – insert diameter no greater
than 1.75 times programmed radius.
Insert too large
–
for radius
Insert decreased
+
for radius
The component feature to be machined
needs to be broken down into stages so
that a face and diameter are not machined
simultaneously as this will naturally
increase the depth of cut and cause ‘wraparound’
Radius increased
+
for insert
Programming recommendations
Because of the wrap around problem in the
radii, the feed needs to be reduced as the
size of cut increases. The larger the difference between the radius and the insert
diameter, the less the feed needs to be
reduced.
However a good starting point is to use
50% feed rolling into radius compared to
parallel cuts.
‘Trochoidal turning’
By breaking the part into manageable
pieces this method can be used for all profiling requirements. The direction of passes
can be alternated when using CoroCut and
RCGX inserts to best utilise the edge.
20
Face and
–
diameter
50% f
n máx
f
n max
Programmed radius = inser t diameter
+
50% f
Only
diameter
n max
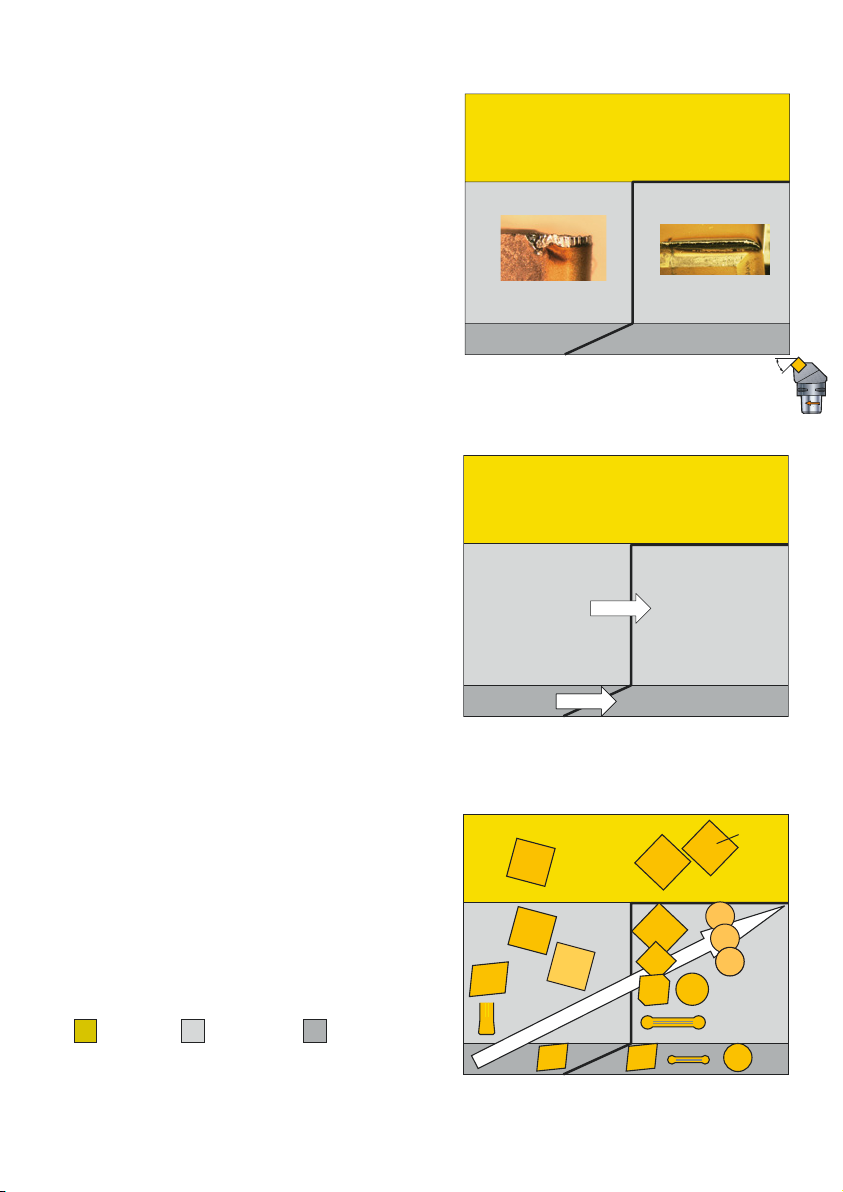
Cutting tool materials
Grade selection when machining HRSA
should not be considered in terms of finishing and roughing. Plastic deformation (PD)
is present in all operations, however the
formation of notch wear is driven by the
entering angle of the insert.
Wear mechanisms per area
Depth of cut (ap) mm
8
Toughness/PD – interrupted cut
PD demanding – continuous cut
5
In practice this means that the grade selection is optimized depending upon the shape
of the insert.
For an ‘all-round’ grade, working in all areas
GC1105 is the best choice.
The diagram shows the most productive
choice of grade relative to the insert shape.
0.5
PD and notch
demanding
PD demanding
90º 75º 60º 45º 30º 15º
Entering angle (k
Optimized grade per area
Depth of cut (ap) mm
8
GC2015 – interrupted cut
GC1105/ceramic – continuous cut
5
PD and notch
demanding
GC1105
GC1115
PD demanding
Ceramic
S05F
(GC1105)
(GC1125
intermittent)
0.5
GC1105 S05F (GC1105)
90º 75º 60º 45º 30º 15º
Entering angle (k
Optimized insert shape per area
Depth of cut (ap) mm
8
1115
1105
2015
intermittent
)
r
)
r
FSM
=
26 HRC
ISM
=
46 HRC
Notch = depth of cut notching
LSM
=
46 HRC
5
3
/min
S05F
S05F
S05F
S05F
S05F
0.5
1105
1105
Productivity –
1105
1115
Q
cm
90º 75º 60º 45º 30º 15º
Entering angle (k
6060
6065
670
S05F
r
21
)
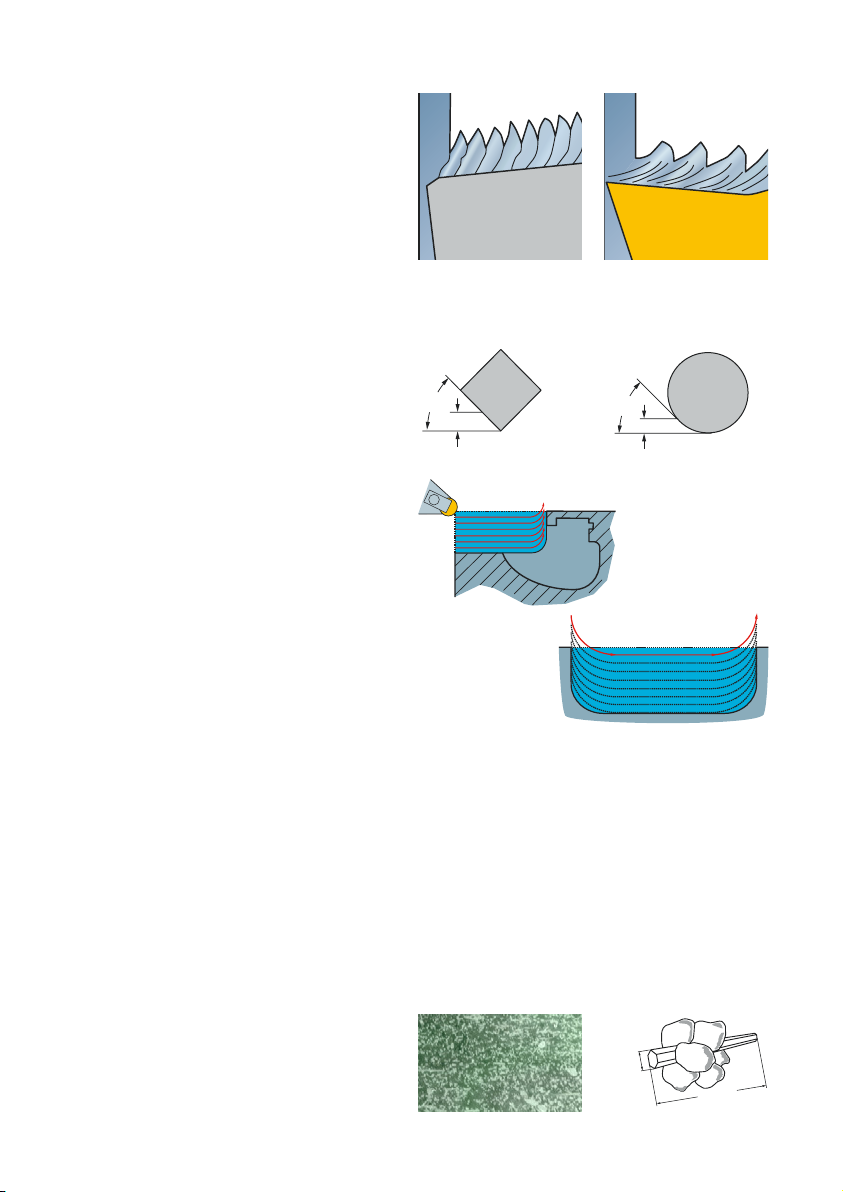
Ceramic insert grades
Ceramic cutting materials offer excellent
productivity in roughing operations in FSM
and ISM. Their application differs greatly
compared to carbide due to their:
•High temperature resistance – allows
high cutting speed to be applied to produce a highly plasticised and sheared
chip.
•Low toughness – can lead to edge frittering, top slice and notch wear.
Both of these factors mean that for successful application the following rules need
to be applied:
• Optimizeenteringangleatabout45° to
reduce notch, round or square inserts
should be used.
• Maximumchipthickness–between
0.08 to 0.15 mm.
• Optimizedprogrammingtechniques
- to minimize notch on entry and long
passes.
- control the cutting arc of engagement in
corners.
Ceramics Carbide
45º
>45º
There are 2 types of ceramics developed
for use in HRSA:
•Sialon – (Silicon, Aluminium, Oxygen,
Nitrogen) – a mixture of silicon nitride and
aluminium oxide. It has the best chemical
stability resisting notch wear:
- CC6060 – optimized choice for long
cutting lengths in clean material and for
profiling/pocketing with optimized programming techniques.
- CC6065 – optimized for heavy roughing
applications, plunging and machining
direct into corner.
22
•Whiskered ceramic – to provide the
improved toughness and bulk strength
compared to the traditional ceramic,
fibres are included:
- CC670 – first choice for machining of
forged components with rough scale
and ovality.
0.5 mm
10–80 mm
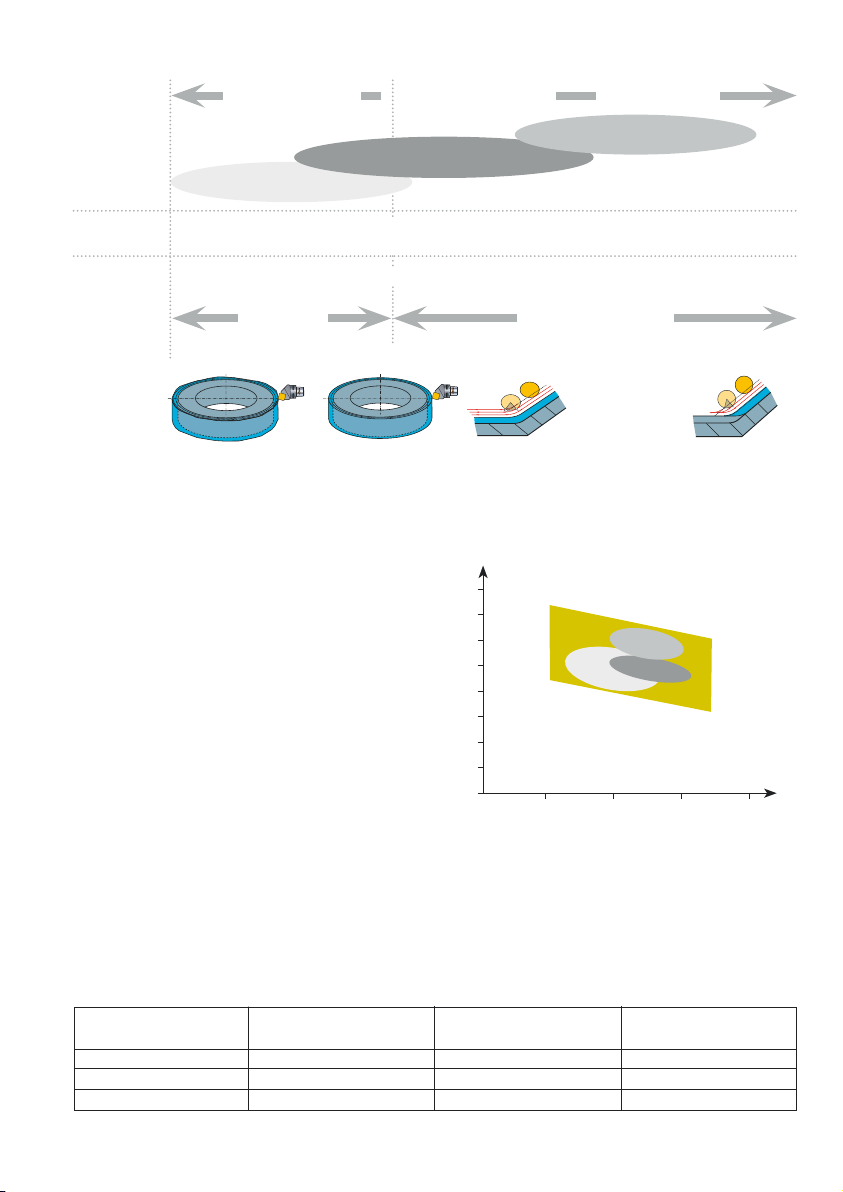
Grade application areas
Bulk toughness
CC670
Notch wear
resistance
CC6060
CC6065
Programming
consideration
Material
consideration
Skin, scale, ovality High quality forging Pre-machined
First stage
machining
– 26 HRC
Programmed direct
into corner/plunging
Cutting parameters
The speed should be balanced to create
enough heat in the cutting zone to plasticise the chip but not too high to unbalance
the ceramic.
The feed should be selected to give a chip
thickness which is high enough to not workharden the material but not be too high to
cause edge frittering.
Higher feeds and depths of cut require a
reduction of the cutting speed.
These boundaries will change depending
upon the component material hardness and
grain size.
400
300
200
100
Programmed with roll-in,
roll-out of corner
Intermediate stage
machining – 46 HRC
v
c
Short tool life – too high
cutting temperature
material
CC6060
CC6065
CC670
Edge line frittering – too
Work hardening of
workpiece material
low cutting temperature
Top slice – high cutting
pressure
0
0.05 0.1 0.15 0.2
h
ex
Start cutting data recommendations (RNGN 12, RCGX 12) – Inconel 718 (38 to 46 HRC)
Grade Cutting speed, vc Cutting depth, a
CC670 200 to 300 m/min 2 mm 0.1 to 0.15 mm/r
CC6065 200 to 250 m/min 2 mm 0.15 to 0.2 mm/r
CC6060 250 to 300 m/min 2 to 3 mm 0.15 to 0.2 mm/r
p
Feed, f
n
23
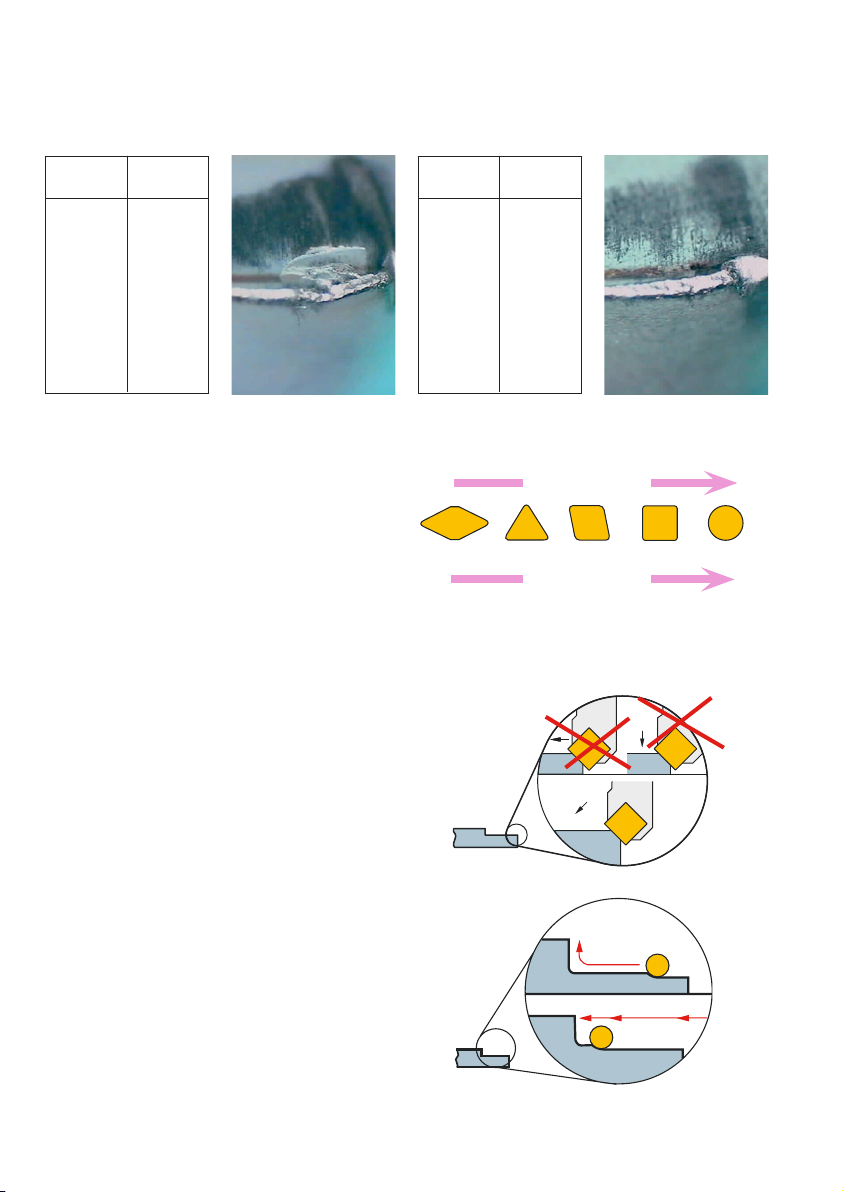
Application hints for round inserts
Trouble shooting – wear mechanisms
Top slice
Notch wear
Reason Remedy
Too high
cutting
pressure
Reduce
feed
Reduce ap
on round
insert
Use
CC670
Application hints for ceramic inserts
Insert selection
•Wherepossibleuseroundorsquare
inserts with a small entering angle and
large nose radius.
•Alwaysusethestrongestinsertnose
angle.
•Thickinsertsgiveadditionalstrength.
Pre-chamfering
•Protectstheinser twhenitfirstenters
from initial chipping/notch formation.
•Toavoidnotchwearwhenchamfering,
use a direction feed at 90° to the produced chamfer.
Reason Remedy
Sensitive
cutting
tool material
Specific
to HRSA
Low High
Low
Careful
programming techniques
Reduce
entering
angle
Use
CC6060,
CC6065
Productivity
Radial forces
High
Turning to a shoulder either:
•Rolluptotheshoulderwitharadiusthe
size of the insert diameter to prevent
increased depth of cut.
•Reducefeedby50%(fn/2) when approch-
ing a shoulder due to the depth of cut
increasing.
24
fn/2 fn fn/2
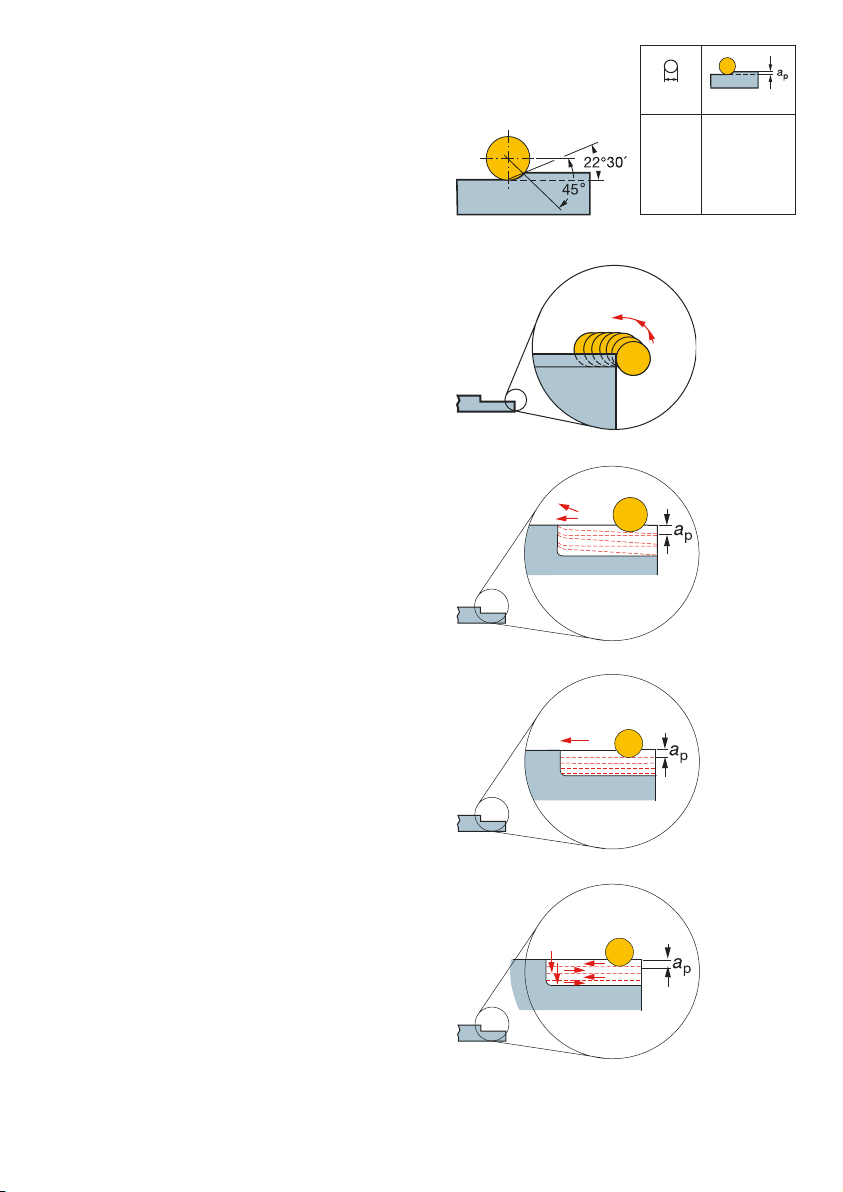
Notch wear
Notch wear can be minimized with good
planning and some general advice:
•Useroundinser tswheneverpossible–
ensure the relationship between depth
of cut a
exceed 25%.
•Use45ºenteringanglewhendepthofcut
exceeds 25% of iC.
•“Rolloveraction”inprogrammingto
eliminate the need for pre-chamfering and
minimize the notch wear. There will be
one contact point where the insert hits
the hard scale/surface at the corner of
the component and one different point at
the ap line.
•Rampingensuresthatanydamageis
spread out along the cutting edge. The
depth of cut should be varied between
25% iC to 15% (do not ramp to zero).
and insert diameter does not
p
mm mm
6.35 0.9
9.52 1.4
12.70 1.9
19.06 2.8
25.40 3.8
•Multiplepasseswithvaryingap can be an
alternative.
•ForRCGX/RPGXinserts,programinboth
directions to utilise more edges on the
insert.
25
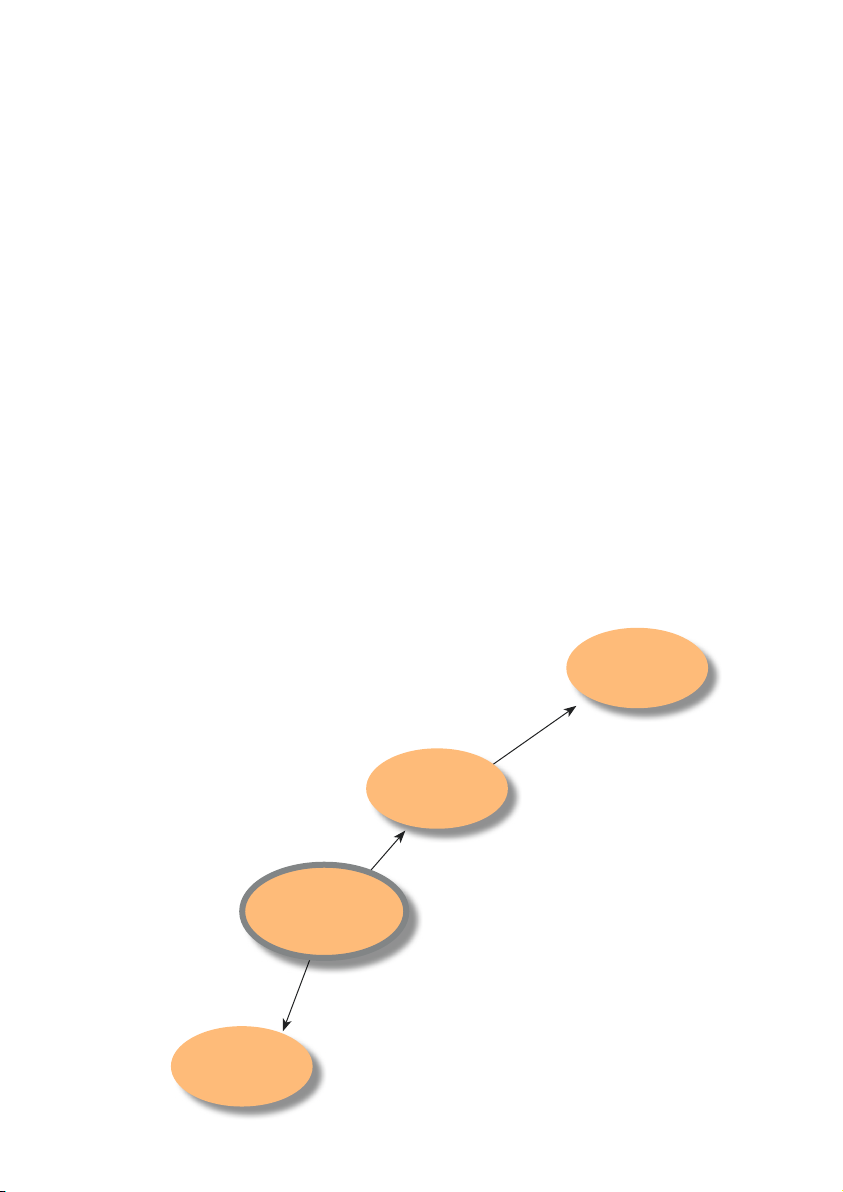
Carbide insert grades
GC1105
A TiAlN PVD coated fine-grain carbide with
good hot hardness and toughness properties. It is optimized for inserts with 95º
entering angle but is an all-round grade giving effective performance through FSM, ISM
and LSM areas.
The coating gives extremely good adhesion which is required for lower feeds and
depths of cut. SGF is a ground insert with
sharp edges, this combined with GC1105
is outstanding in extreme finishing on vibration sensitive components with low feeds.
GC1115
A micro-grained carbide providing security
in more edge toughness demanding operations, e.g. reduce problems with notch wear
or chip hammering.
The PVD coating contains TiAlN for edge
line toughness as well as an aluminium
chromium oxide providing resistance
against built-up formation and crater wear.
A good balance of toughness and wear
resistance makes GC1115 ideal also for
more unstable conditions.
S05F
A CVD coated fine grain carbide with excellent hot hardness properties. It is optimized for applications with a 45º approach
(square, round, CoroCut RO and finishing).
The CVD coating provides an excellent heat
barrier allowing greater productivity and tool
life through ISM and LSM.
It is a grade for optimizing productivity
which does not allow for applications with
entering angles over 75º due to poor notch
wear resistance.
When in need of more bulk
toughness or if an uncoated
grade is required.
H13A
26
When in need of a more secure
solution, in more edge toughness
demanding operations.
GC1105
S05F
GC1115
First choice
When in need of more heat
and wear resistance at entering angles less than 75°.
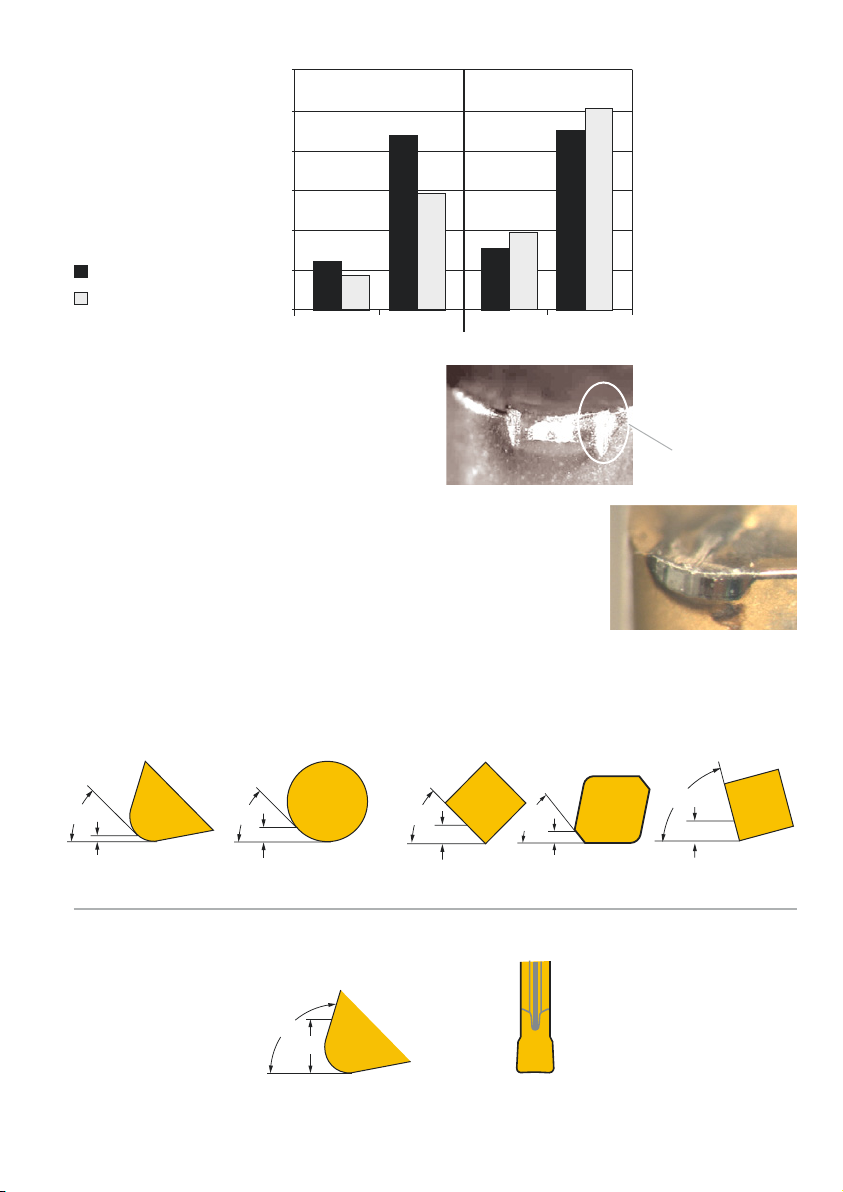
Surface finish
comparison
Surface roughness, Ra mm
3
2.5
2
1.5
1
S05F H13A
= New insert
= Worn insert
0.5
0
0.15 0.25 0.15 0.25
Feed, mm/r
Surface integrity tests have shown that
S05F, applied at vc 40 m/min, gives
extremely consistent deformation depth
and residual stress profiles, when comparing new and worn inserts. The dimensional
accuracy and lack of any coning/taper is
also seen to eliminate the need for re-cut-
CNMG 120408-23 H13A
Wear causing poor
surface with worn
insert.
ting or spring passes. Both of these are the
result of minimal wear on the trailing edge
compared to other grades.
CNMG 120408-SF S05F
S05F applications – PD demanding
45º
a
p
CNMG/DNMG RCMX/RO SNMG/CNMX SNMG
45º
45º
a
p
a
p
45º
a
p
75º
a
p
GC1105 applications – notch demanding
95º
a
p
CNMG/DNMG TF/GF
27
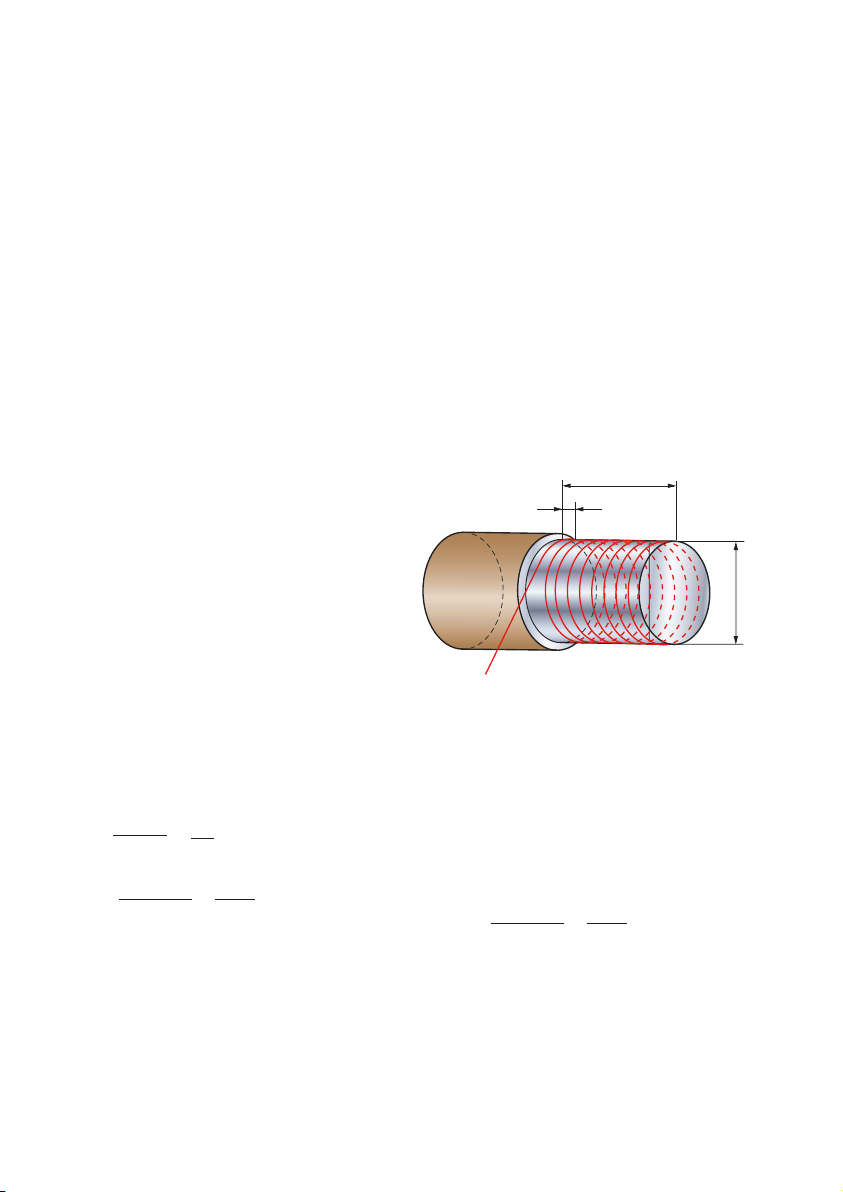
Spiral cutting length (SCL) – predictive machining
SCL was introduced by Sandvik Coromant
for the machining of HRSA due to the typically short tool life. One insert normally
machines one pass and is then indexed. It
is important to be able to predict for:
•Roughing–addingastopintheprogram
to change the insert
•Finishing–cuttingdatawhichensures
that the pass is completed with a predictable wear so as not to have to change
during the cut or recut the pass.
Application – process flow
Roughing
1) Select optimum inser t style to suit component/process.
2) Use optimized vc, ap and fn for that
insert shape/application and note SCL
capability eg CNMX 1204A1-SM S05F
vc 50 m/min, fn 0.35 mm, ap 1.7 mm.
3) Note SCL capability for that insert
SCL = 450 m, see page 30.
4) Calculate SCL for component feature
Dm1 = 450 mm, lm =150 mm.
D
x π
l
SCL =
1000
450 x 3.14
1000
m1
SCL =
5) Confirm calculated SCL with insert capabilities – program required number of
insert changes
eg. 606/450 – 2 edges required.
x
m
f
n
150
x
0.35
= 606 m
SCL is a method of calculating the length
of cut required for a particular feature and
then confirming with our specific recommendations to ensure a reliable process.
Each SCL graph is unique and only applicable for that insert, geometry, grade, depth
of cut and material. For finishing we give
you a range of cutting speeds to allow for
different length of cut requirements. For
roughing we have identified the optimum
parameters for each insert style and give
you one length.
l
m
f
n
D
m1
Finishing
1) Select optimum inser t style to suit component/process.
2) Use optimized ap for that insert shape/
application choose feed
eg. CNMG 120408-SF 1105 – fn 0.15
mm, ap 0.25 mm.
3) Calculate SCL for component feature
eg. Dia 450 mm, lm = 150 mm.
SCL =
450 x 3.14
1000
150
x
0.15
= 1414 m
4) Select cutting speed from:
CNMG 120408-SF 1105 ap 0.25, fn 0.15
mm’ diagram eg. vc = 50 m/min, see
page 30.
Note. How to calculate, see page 118-119.
28
 Loading...