

Page 1

OWNER'S
INSTRUCTIONS
Z-10MM
Even though the MP3 disc that you purchased contains the “MP3” mark on its cover,
the disc not written data by the format of MPEG1 LAYER3
(file extention name: .MP3) can not be played back normally.
COMPACT
DIGITAL AUDIO
COMPACT
DIGITAL VIDEO
This player does not apply to business use
and CD-ROM/CD graphic discs
cannot be played with this player.
VIDEO-CD/CD/MP3 DISC PLAYER
Before operating the unit, please
read this manual throughly, and
retain for future reference.
Page 2
2
SAFETY PRECAU-
SAFETY PRECAUTIONS
DANGER
This symbol is intended to alert you to the
presence of dangerous voltage within the
product.
CAUTION
This symbol is intended to alert you to the
presence of important instruction
accompanying the product.
WARNING
To reduce the risk of fire or electric shock, do
not expose this appliance to rain or moisture.
Enter information here for future reference.
CLASS 1 LASER PRODUCT
This Compact Disc player is classified as a
CLASS 1 LASER product
Use of controls adjustments or performance of procedures
other than those specified
herein may result in hazardous radiation.
CAUTION-INVISIBLE LASER
RADIATION WHEN OPEN AND INTER
LOCK DEFEATED, AVOID EXPOSURE
TO BEAM.
SPECIAL NOTICE
Warning:
•
This unit contains no user serviceable parts.
Never remove covers unless qualified to do so.
This unit contains dangerous voltages, always remove
main plug from the socket before any service operation
and when not in use for a long period.
Important:
•
This unit is designed for your enjoyment in your home.
We cannot be liable for the quality of the unit if you use it
for commercial use.So please do not use this unit for
commercial use.
IMPORTANT NOTICE
NOTE TO CATV SYSTEM INSTALLER;
•
This reminder is provided to call the CATV system
installer's attention to article 820-40 of the NEC provides
guidelines for proper the cable ground shall be connected to the grounding system of the building, as close to
the point of cable entry as practical.
Date of Purchased:_________________________________
Model No:_________________________________________
Serial No: _________________________________________
Selling Dealer:_____________________________________
Dealer Address:____________________________________
Dealer Phone No: __________________________________
CAUTION
TO REDUCE THE RISK OF ELECTRIC SHOCK,
DO NOT REMOVE TOP COVER, NO USER
SERVICEABLE PARTS INSIDE, REFER
SERVICING TO QUALIFIED SERVICE
PERSONNEL.
RISK OF ELECTRIC SHOCK
DO NOT OPEN
CAUTION
CLASS 1
LASER PRODUCT
Page 3

3
•
Do not damage the power cord. Damage to the power
cord may cause a fire or shock hazard.
•
When unplugging the power cord, please hold by the
plug and remove it carefully in standby mode.
•
When you finish operating the unit, always turn off the
power. Leaving a disc loaded for a long time with power
turned on may damage the disc.
•
When you insert the disc, please do not insert over
another disc.
•
This product should not be used in business applications.
•
When the unit is moved from a cold area to a warm area
suddenly, moisture may condense on the mechanical parts
which restricts the laser signal from normal operation.
•
If this occurs, leave the unit with the power turned on for
1~2 hours. (without a disc)
SAFETY INSTRUCTIONS --------------------------------------- 3
CONTROLS AND COMPONENTS ---------------------------- 6
REMOTE CONTROL ---------------------------------------------- 8
SYSTEM CONNECTIONS ------------------------------------- 9
MP3 DISC PLAYBACK ----------------------------------------- 10
VIDEO-CD PLAYBACK ----------------------------------------- 11
DISC VIEW FUNCTION----------------------------------------- 13
REPEAT FUNCTION--------------------------------------------- 14
PROGRAM FUNCTION ---------------------------------------- 15
ZOOM FUNCTION ---------------------------------------------- 16
SEARCHING FUNCTIONS ----------------------------------- 17
KARAOKE FUNCTION ---------------------------------------- 19
TROUBLE SHOOTING ----------------------------------------- 21
WHEN VIDEO IS DISPLAYED THROUGH SET --------- 22
GENERAL INFORMATION ABOUT THE DISC --------- 22
CARE OF PLAYER AND DISCS------------------------------ 22
SPECIFICATIONS ------------------------------------------------ 23
SAFETY INSTRUCTIONS
CONTENTS
SAFETY INSTRUCTIONS
WHEN MOISTURE CONDENSATION GETS
IN THE UNIT
Page 4

4
READ INSTRUCTIONS
•
All the safety and operating instructions should be read
before the appliance is operated.
RETAIN INSTRUCTIONS
•
The safety and operating instructions should be retained
for future reference.
HEED WARNINGS
•
All warnings on the appliance and in the operating
instructions should be adhered to.
FOLLOW INSTRUCTIONS
•
All operating and use instructions should be followed.
WATER AND MOISTURE
•
Do not use this video product near water-for example,
near a bathtub, wash bowl, kitchen sink, or laundry tub, in
a wet basement, or near a swimming pool, and the like.
OVERLOADING
•
Do not overload wall outlets and extension cords as this
can result in the risk of fire or electric shock.
VENTILATION
•
Slots and openings in the cabinet are provided for
ventilation and to ensure reliable operation of the video product and to protect it from overheating these openings must
not be blocked or covered. The openings should never be
blocked by placing the video product on a bed, sofa, rug, or
other similar surface. This video product should never be
placed near or over a radiator or heat register. This video
product should not be placed in a built-in installation such as
a bookcase or rack unless proper ventilation is provided or the
manufacturer's instructions have been followed.
POWER CORD PROTECTION
•
Power-supply cords should be routed so that they are not
likely to be walked on or pinched by items placed upon or
against them paying particular attention to cords at plugs,
convenience receptacles, and the point where they exit
from the appliance.
CLEANING
•
Unplug this video product from the wall outlet before
cleaning. Do not use liquid cleaners or aerosol
cleaners. Use a damp cloth for cleaning.
LIGHTNING
•
For added protection of this video product receiver during
a lightning storm, or when it is left unattended and
unused for long periods of time, unplug it from the wall
outlet and disconnect the antenna or cable system. This
will prevent damage to the video product due to lightning
and power-line surges.
OBJECT AND LIQUID ENTRY
•
Never push objects of any kind into this product through
openings as they may touch dangerous
voltage points or short-out parts that could result in a fire
or electric shock. Never spill liquid of any kind on the
video product.
ACCESSORIES
•
Do not place this video product on an unstable cart, stand,
tripod, bracket, or table. The video product may fall, causing serious injury to a child or adult,
and serious damage to the appliance.
Use only with a cart, stand, tripod, bracket, or table recommended by the manufacturer, or sold with the video product. Any mounting of the appliance should follow the
manufacturer's instructions and should use a mounting
accessory recommended by the manufacturer.
CART
•
An appliance and cart combination should be moved with
care. Quick stops, excessive force, and uneven
surfaces may cause the appliance and cart combination to
overturn.
POWER SOURCES
•
This video product should be operated only from the type of
power source indicated on the marking label. If you are not
sure of the type of supply to your home, consult your appliance dealer or local power company. For video
products intended to be operated from battery power, or
other sources, refer to the operating instructions.
POWER LINES
•
An outside antenna system should not be located in the
vicinity of overhead power lines or other electric light or
power circuits, or where it can fall into such power lines or
circuits. When installing an outside antenna system, extreme
care should be taken to keep from touching such power
lines or circuits as contact with them might be fatal.
POLARIZATION
•
This video product is equipped with a polarized
alternating current line plug (a plug having one blade
wider than the other.) This plug will fit into the power outlet only one way. This is a safety feature. If you are unable
to insert the plug fully into the outlet, try reversing the
plug. If the plug should still fail to fit, contact your electrician to replace your obsolete outlet. Do not defeat the
safety purpose of the polarized plug.
SAFETY INSTRUCTIONS
Page 5
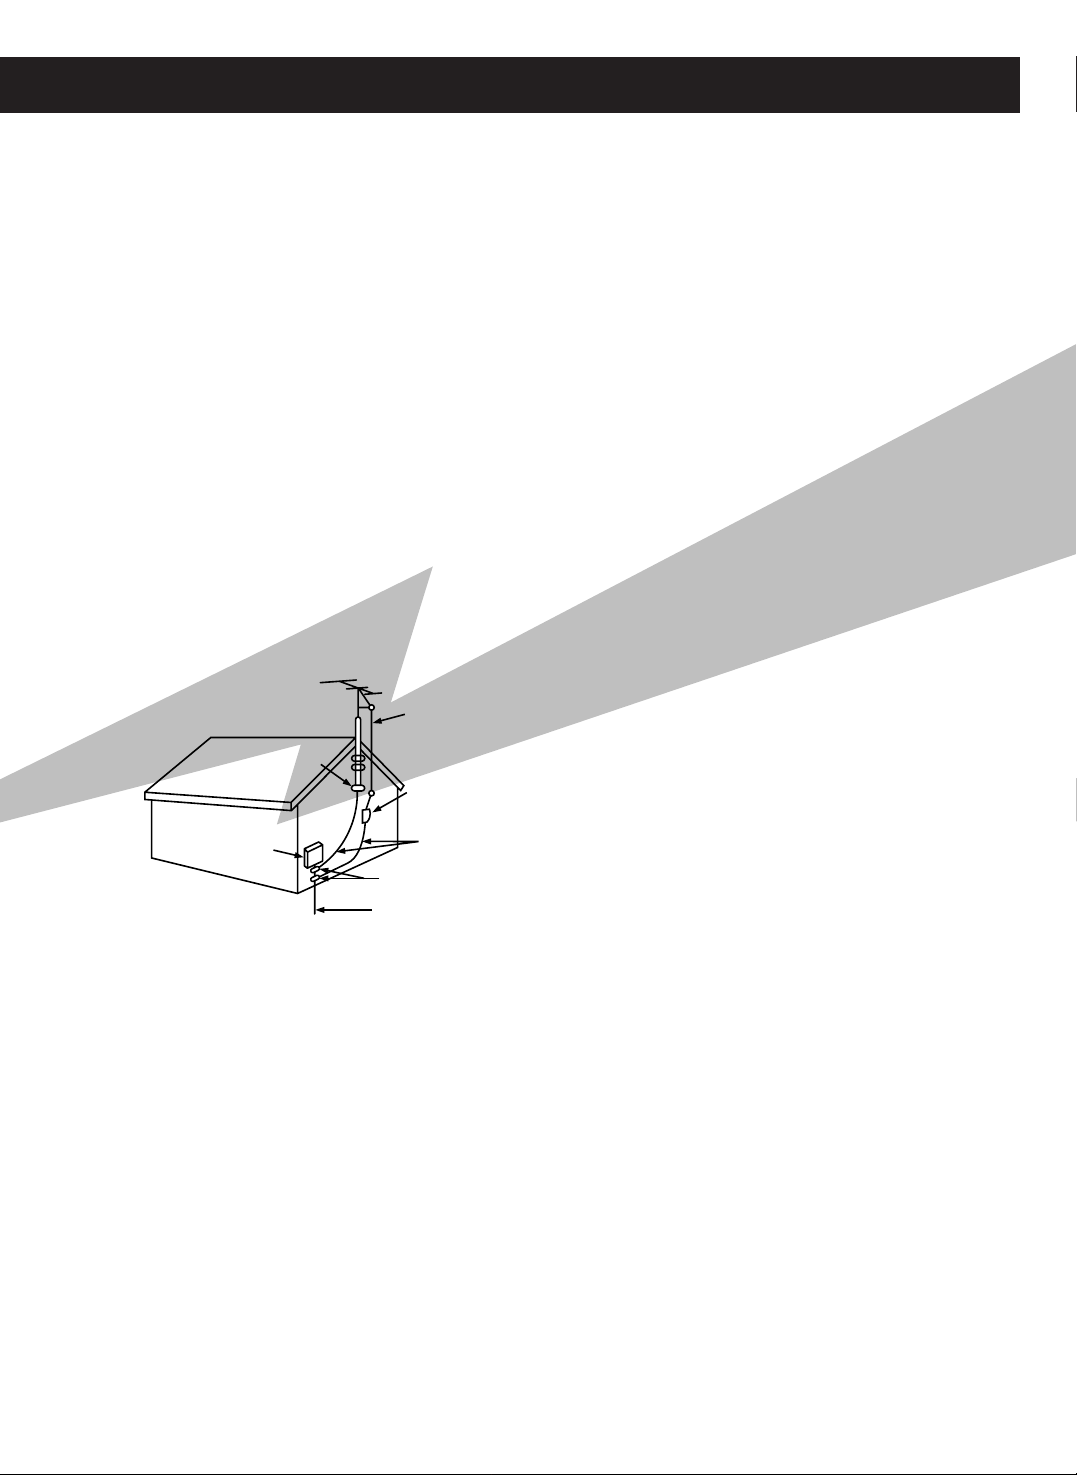
ANTENNA
LEAD IN WIRE
ANTENNA
DISCHARGE UNIT
(NEC SECTION. 810-20)
GROUNDING CONDUCTORS
(NEC SECTION 810-21)
GROUND CLAMPS
POWER SERVICE GROUNDING
ELECTRODE SYSTEM
(NEC ART 250, PART H)
GROUND
CLAMP
ELECTRIC
SERVICE
EQUIPMENT
5
OUTDOOR ANTENNA GROUNDING
•
If an outside antenna is connected to the antenna
terminal, be sure the antenna system is grounded so as to
provide some protection against voltage surges and
built-up static charges.
•
In the U.S.A section 810 of the National Electrical Code,
ANSI/NFPA No. 70-1984, provides information with respect to
proper grounding of the mast and supporting structure,
grounding of the lead-in wire to an antenna
discharge unit, size of grounding conductors location of
antenna discharge unit, connection to grounding
electrodes, and requirements for the grounding
electrode. See the figure below.
ATTACHMENTS
•
Do not use attachments not recommended by the video
product manufacturer as they may cause
hazards.
SERVICING
•
Do not attempt to service this product yourself as opening
or removing covers may expose you to
dangerous voltage or other hazards.
•
Refer all servicing to qualified service personnel.
REPLACEMENT PARTS
•
When replacement parts are required, be sure the
service technician has used replacement parts
specified by the manufacturer or having the same characteristics as the original part. Unauthorized
substitutions may result in fire, electric shock or other hazards.
SAFETY CHECK
•
Upon completion of any service or repairs to this video
product, ask the service technician to perform safety
checks to determine that the video product is in proper
operating condition.
DAMAGE REQUIRING SERVICE
•
Unplug this video product from the wall outlet and refer
servicing to qualified service personnel under the
following conditions.
a. When the power-supply cord or plug is damaged.
b.If liquid has been spilled, or objects have fallen into
the video product.
c. If the video product has been exposed to rain or water
d.If the video product does not operate normally by
following the operating instructions. Adjust only those
controls that are covered by the operating instructions as
an improper adjustment of other controls may result in
damage and will often require extensive work by a
qualified technician to restore the video product to its nor-
mal operation.
e. If the video product has been dropped or the cabinet has
been damaged.
f. When the video product exhibits a distinct change in
performance - this indicates a need for service.
Page 6

6
CONTROLS AND COMPONENTS
FRONT PANEL
1. Power STANDBY/ON button
2. Remote Sensor
3. Play/Pause Select button
4. Stop Return button
5. Skip Previous button
6. Skip Next button
7. MIC jacks
8. Digital Echo Volume knob
9. MIC Volume knob
10. Key Control button
11. Key Control button
12. Open button
Page 7
7
CONTROLS AND COMPONENTS
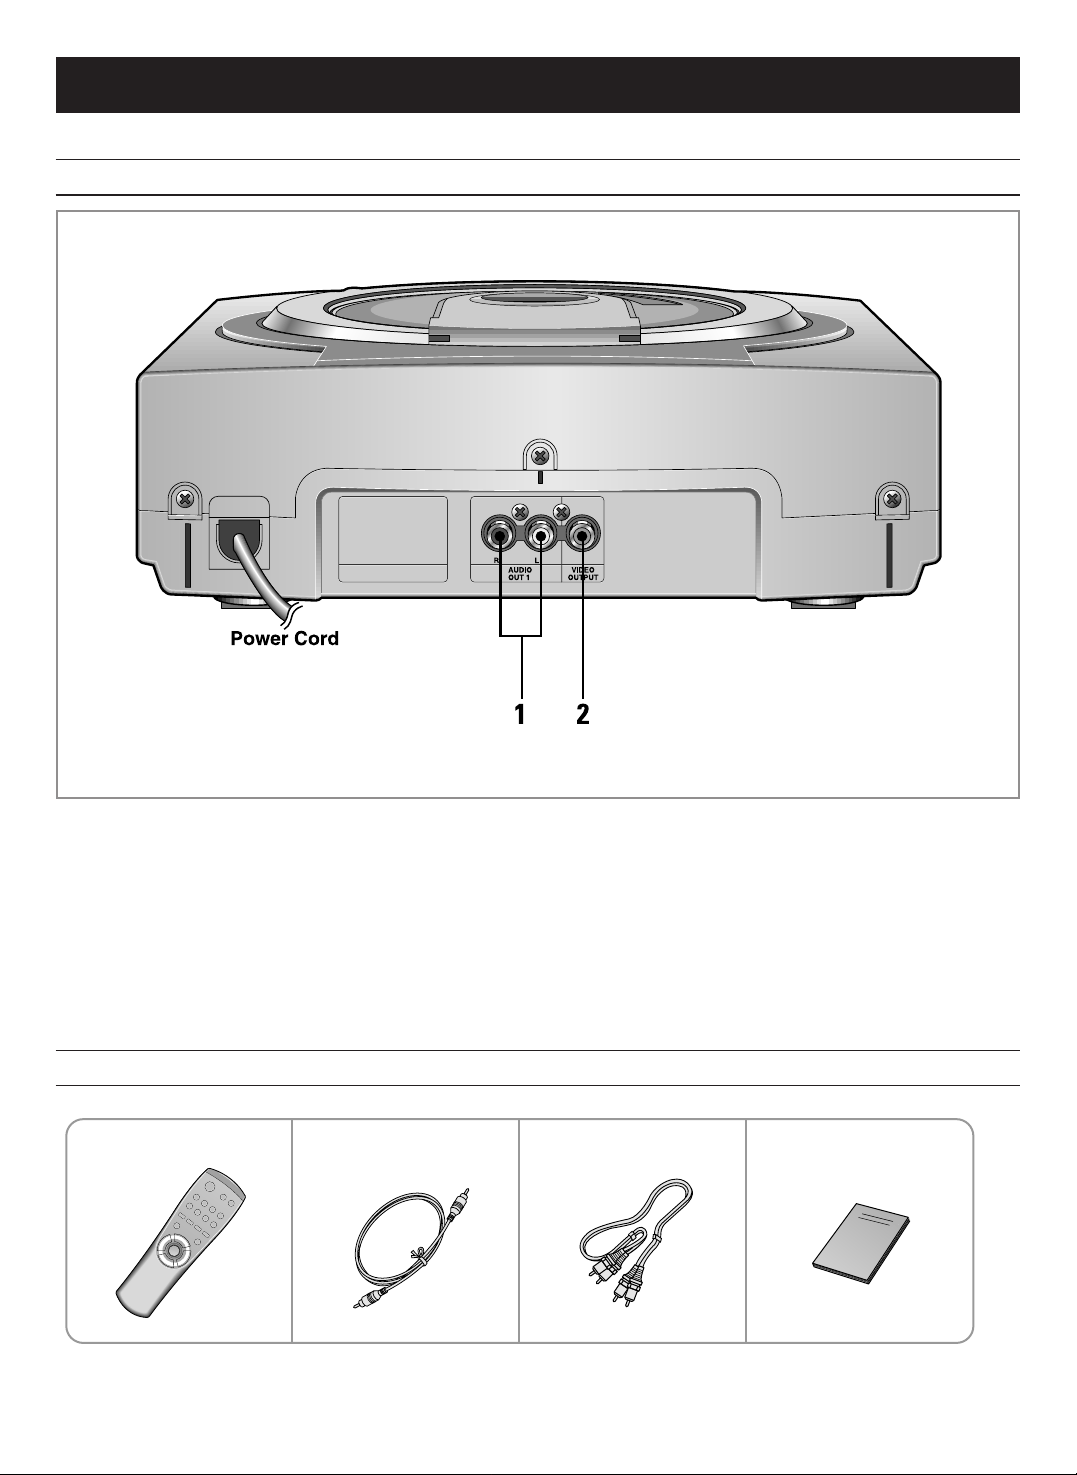
ACCESSORIES
REMOTE CONTROL VIDEO CABLE AUDIO CABLE OWNER'S
INSTRUCTIONS
REAR PANEL
1. AUDIO OUT1
- Connect to the AUDIO IN of your
TV set.
2. VIDEO OUTPUT
- Connect to the VIDEO IN of your TV set.
Page 8

8
REMOTE CONTROL
TO INSERT BATTERIES
1. STANDBY/ON button
2. DIGIT buttons
3. PROGRAM button
4. SOUND SELECTOR button
5. Al SLEEP button
6. SELECT(PLAY / PAUSE) button
7. STOP button
8. REPEAT/PAL/NTSC button
9. SLOW button
10. DISC VIEW/ZOOM button
11. TIME SEARCH(LAST MEMORY) button
12. PREVIOUS / NEXT(SKIP) button
Open the battery
compartment cover.
1
Replace the cover.
3
Install two "AAA" batteries
observing the correct polarity
as shown in compartment.
2
Page 9

9
SYSTEM CONNECTIONS
1. Connect AUDIO OUT1 jack of the VCD and CDP to AUDIO IN jack of the TV.
2. Connect VIDEO OUT jack of the VCD and CDP to VIDEO IN jack of the TV.
VCD AND CDP + TV
Page 10

HOW TO PLAYBACK MP3 DISC directly
MP3-DISC PLAYBACK
e I
: MP3 File display
Select the Number button for Track No. and
Press the “Select” button.
NOTE
•
Song names are marked by only English and digits. But
unsupported Data are marked by “
_
”.
1
3456
7 8 9 +10/0
2
or
Play/Pause
Select
MP3 TOTAL: 150
PAGE 003/030
TR : 016 0 : 02 :39
015 PBAY e I
016 DON’T FOR e I
:
:
After inserting MP3
Disc in the Set, Press
the select button or
Number button after
Reading.
1
You can see the information of Disc
on the TV.
2
Track No. Song name
HOW TO PLAYBACK MP3 DISC on MENU MODE
After inserting MP3
Disc in the Set, Press
the “DISC VIEW”
button.
1
TO RETURN TO THE PREVIOUS MENU
Press the RETURN button.
•
When a wrong menu is selected or
other menu is about to be selected,
hold down the RETURN button more
than one second.
When the RETURN button is pressed shortly,the disc may
be stopped.
• When you want to stop playing , press the RETURN
button short.
STOP
Select the Number of Directory.
You can see the following Display.
Select the No. of song and you can enjoy the Music.
MP3 TOTAL: 150
PAGE 001/003
TR : 000 0 : 00 : 00
1 DIRECTORY NAME
2 ABC
3 KBG
4 CDEG123
You can see the following
information of Disc on the TV.
2
Directory No Directory name
MP3 TOTAL: 150
PAGE 001 : 004
TR : 000 0 : 00 : 00
DIRECTORY NAME
1 DIRECTORY NAME e I
2 ABC e I
3 KBG e I
4 CDEG123 e I
WHAT IS MP3?
MP3 stands for MPEG 1 layer 3. It is an efficient way to store
high-quality music or other audio content on your computer.
MP3 files can be 1/4 to 1/20 the size of a commercial CD
audio file-yet retain a high sound quality. MP3 files usually
have the extension .mp3, and can be downloaded from the
Internet, or can be legally made for personal use from your
favorite CDs that you purchased.
10
DISC VIEW
ZOOM
Page 11

11
VIDEO-CD PLAYBACK
HOW TO PLAYBACK VIDEO-CD version 2.0
SELECT
Main menu
1. The collection of videos
2. Videorche.
3. Music video
4. Movie
5. High definition static image
1. Prologue
2. Beauty of Korea
3.
Beautiful landscape of the South Pacific Ocean
4. A woman's day
4
NEXTPREV
TO RETURN TO THE PREVIOUS MENU
Press the RETURN button.
•
When a wrong menu is selected or
other menu is about to be selected,
hold down the RETURN button more
than one second.
When the RETURN button is pressed shortly in VIDEO-CD
version 2.0, the disc may be stopped.
•
When you want to stop playing at the VIDEO-CD version
2.0 menu on mode, press the RETURN button short.
Press the NEXT button, the next menu will be displayed.
Press the PREVIOUS button, the previous menu will be
displayed.
NOTE
In the case of menu mode
•
PROGRAM, TIME SEARCH, REPEAT,DISC VIEW functions
do not work.
How to select a song or a video without using
menu function.
•
Select a track number from the disc jacket and press it at
the stop mode.
•
When playing version 2.0 disc which has no MENU
screen, If no play or no picture,
Press SELECT button or NEXT button to see MENU
screen or the next screen.
Press the Open button.
•
Press the STANDBY/ON button.
1
Select a number from the menu
and press it.
Ex) When selecting No. 4 A woman's day.
5
Insert a VIDEO-CD disc and push the
door.
•
Make the printed side of the disk facing up.
2
Press the SELECT (PLAY/PAUSE) button.
•
In version 1.1 disc menu is not displayed and
play function is operated.
•
Only in version 2.0 disc menu is displayed.
•
If you press directly the digit key at STOP MODE,
start to play the track of selected digit No without
menu picture (PBC OFF, MENU OFF MODE).
Ex) When playing a VIDEO-CD version 2.0 disc
3
Select a number from the menu and press it.
Ex) In the case of selecting No. 1 the collection of videos.
4
Stop
Return
Page 12

12
Press the SLOW button on the remote control
when the play function is on.
-Voices do not come out when the
SLOW button is pressed
-Slow playing is 1/2 of the normal
playing speed at 1st press.
-Slow playing is 1/4 of the normal
playing speed at 2nd press.
-Slow playing is 1/8 of the normal playing speed at 3rd
press.
-Slow playing is canceled at 4th press.
-The sound is muted during the slow playing.
To return to normal operation
-Press the SELECT(PLAY/PAUSE) button.
SLOW
NTSC/PAL SELECTION METHOD
- Press the PAL/NTSC(REPEAT) button
for 1 sec or longer on STOP Mode.
You can matching the picture display
on your TV.
REPEAT
PAL/NTSC
SELECT
Press the SOUND SELECTOR button
- Every time you press this button, sound changes
as show below
PREPARATION
1. Press the STANDBY/ON button.
(The audio is set to the stereo mode
automatically)
2. Insert a disc and press the PLAY button.
(REMOTE CONTROL)
SOUND
1st press.
2nd press.
3rd press.
Screen on your
TV monitor
L-CH
R-CH
STEREO
L-ch R-ch
L-signal L-signal
R-signal R-signal
L-signal R-signal
Audio Output
SLOW MOTION SELECT SOUND TO YOUR PREFERENCE
AI SLEEP FUNCTION
AI SLEEP
- Press AI SLEEP button, After playing state is finished,
Automatically go to standby.
During stop
When the AI SLEEP button is pressed, the CD and VCD is
played automatically and then the SET is turned standby after
playback is finished
.
During playback
When the AI SLEEP button is pressed ,the SET is turned standby after playback is finished.
To Cancel This Function
Press the AI SLEEP button once again.
Page 13

13
Press the DIGIT button to select the
desired Track .
•
The selected track is displayed on the small
screen with sound played.
EX) When selecting No 4.
Press the SELECT(PLAY/PAUSE)
button.
•
Displayed in full screen.
In case of cancelling the TRACK VIEW function.
Repress the DISC VIEW button.
•
If playbacks as original case.
•
This function is used for show the first views by nine in track.
ex) VCD 1.1 Version
In case the number of tracks is more than ten.
•
Press the NEXT button watching the track bellow.
Press the PREVIOUS button. watching the former track.
EX) If the disc has 14 tracks.
•
Desired music or video display can be used directly without by menu functions (VER 2.0 Mode).
This function is possible in Ver 1.1 and Ver 2.0 menu off mode.
DISC VIEW FUNCTION
TRACK VIEW
02
05
08
03
06
09
04
07
01
Track View
SELECT
DISC VIEW
ZOOM
DISC VIEW
ZOOM
1
2
3
Press the DISC VIEW button.
•
Nine tracks are presented with sound.
Page 14

14
Press the PLAY button to playback.
Press the DISC VIEW button.
•
The display as dividing into nine equal parts
in displayed together with relevant sound.
Press the DIGIT button to playback
the desired part number.
•
It's displayed from the selected part in full
screen.
•
This function acts as displaying the track in playing
sequently by time and so it's convenient for searching
desired video.
ex) VCD 1.1 Version
INDEX VIEW
SELECT
DISC VIEW
ZOOM
1
2
3
DISC VIEW FUNCTION
•
"REPEAT" indicating the one track
repeat lights and the one track is
played repeatedly.
•
"REPEAT" indicating the one disc
repeat lights and the one disc is
played repeatedly.
Note
•
The repeat function is cancelled when the STANDBY/ON,
Open buttons are pressed.
•
Every press of this button, changes lights.
REPEAT FUNCTION
1.TO REPEAT ONE TRACK
Press the REPEAT button.
TO REPEAT ONE DISC
Press the REPEAT button again.
REPEAT
PAL/NTSC
REPEAT
PAL/NTSC
•
Turn on the TV.
•
Load and play a disc.
•
To repeat programmed tracks ,operating as same as
upon steps.
Page 15

15
PROGRAM FUNCTION
•
This function can program up to 30 tracks during STOP mode.
Press the PLAY/PAUSE button.
• Programming is completed, and the first
track of the program is played.
•
When the PREVIOUS/NEXT button is pressed,
the next or previous programmed track is
played.
NOTE
•
If the PROGRAM button is pressed during programming, it
can not be programmed anymore, press again to continue.
•
To escape program function, Press the OPEN button, or
press the STOP button two times.
PROGRAM
PROGRAM
P : 02 000
PROGRAM
ex) To program No.4 track.
Press the PROGRAM button.
Press the track number to
be programmed.
•
Press the digit buttons.
Ex) Select track 4
In a second
•
After step 2, you must press the PROGRAM
button again then the selected number (04) is
programmed.
•
Up to 30 tracks can be programmed by
repeating step 2 to 3.
PROGRAM
PROGRAM
P : 01 004
4
PROGRAM
PROGRAM
P : 01 000
PROGRAM
SELECT
1
4
2
3
PROGRAM No
P : 01 000
Track No
Page 16

16
• This function works only in the VCD play mode.
ZOOM FUNCTION
Press the DISC VIEW/ZOOM key for 1 sec or
longer to change the screen to 2 x ZOOM.
While in the 2 x ZOOM screen, press the
DISC VIEW/ZOOM key for 1 sec or longer
again to change the screen to 4 x ZOOM.
While in the stage of No.1 or No.2 above,
press the , , , key to scroll
the screen to the left, right, down or up.
1
2
While in the 4 x ZOOM, Press the DISC VIEW/ZOOM
button for 1 sec or longer, and display normal picture.
DISC VIEW
ZOOM
4
3
DISC VIEW
ZOOM
DISC VIEW
ZOOM
SELECT
PREV NEXT
STOP
Page 17

17
Press the Previous/Next( , ) buttons.
•
Press the
Previous
/Next( , ) button repeatedly within
one second.
•
When the Previous/Next button is pressed, it quickly
advances to the Previous/Next Track.
•
When the " " button is pressed, it returns to the
beginning of the currently playing track. If pressed again,
it returns to the previous track.
•
Picture moves to the beginning of the next track
whenever " " button is pressed.
•
When the Previous or Next button is pressed while
playing a disc such as a movie disc, it quickly advances 5
minutes in the forward/reverse direction.
NOTE
In case of high speed search
•
When searching a CD disc, the volume is lowered and it
advances in high speed.
•
If the search does not operate properly due to the noise,
release the button momentarily and press it again.
•
When the search for a VIDEO-CD is released, mosaic screen
might appear or the screen might advance slower than the
audio for a short period of time.
•
If you choose ‘SCAN’ in the middle of playing back your MP3
disc, SOUND is not played.
SEARCHING FUNCTIONS
SKIP
•
Turn on the TV.
•
Load and play the disc.
Skip
Previous
Skip
Next
NEXTPREV
HIGH SPEED SEARCH
•
This function is used to searching disc for desired location.
Press and hold down the Search button
during the play.
•
Hold down the Previous/Next button more than one second.
•
When the pressed button is released, it returns to the normal play.
To play normally
SET
Skip
Previous
Skip
Next
NEXTPREV
Page 18

18
SEARCHING FUNCTIONS
TIME SEARCH
Press the TIME button.
Enter the time by pressing the
DIGIT button.
Press the SELECT button.
NOTE
1. If entering the time is greater than total time of the disc,
it will not be entered.
2. If entering the time is greater than track time it will play
next track.
3. This function works only for playing mode.
4. This function can operate only for Menu off mode of
VIDEO-CD.
Time
01 02 : 23
00 : 00
TIME
SEARCH
Time
01 02 : 23
12 : 34
1 2 3 4
SELECT
- If you press the STOP or STANDBY/ON
button during VIDEO-CD playback, a play-
back position slightly ahead of the current
time or track is stored in the unit's memory.
- You can easily find the memorized posi-
tion or track just press the TIME SEARCH
button.
METHOD
- When you press the STOP or STANDBY/ON
button to finish the operation,
- Press TIME SEARCH button and this unit
will search for original position.
NOTE
1. Last memory play is always operated as menu off
mode even if last status is menu on.
2. If you open the door, this function will be
cancelled.
LAST MEMORY FUNCTION
TIME
SEARCH
1
2
3
Page 19

19
Connect the MIC.
•
The key control will be displayed on the screen.
Insert a disc and select a desired track.
•
Open the door by pressing the Open button,
insert a disc and push the door.
Use the microphone.
•
Two microphones can be used at the same time.
KARAOKE FUNCTION
•
Turn on the TV.
•
Load and play a disc.
MIC 1 MIC 2
(SET)
KEY CONTROL FUNCTION
•
Make sure to be at the karaoke mode.
ex) In case of pressing # :
On screen Display will disappear in 3 seconds.
ex) In case of pressing # once more:
NOTE
•
Depending on a type of VIDEO-CD 2.0 disc, it may be not
operated Key Control function in still picture.
•
This function is operated only on VCD Mode.
Press the Key Control button
1
2
3
•
Press the Key Control button to adjust the key to suit to
your voice. (the 15 steps key control)
KEY # 1
KEY # 2
Page 20

20
KARAOKE FUNCTION
Adjust the Digital Echo.
- This will add an echo to your voice,
giving you the feeling of singing on stage,
Adjust it as desired.
To decrease or increase the volume
of the Microphone:
• Turning to the left decreases MIC Volume.
Turning to the right increases MIC Volume.
If howling occurs:
- Reduce the microphone volume.
- Change the direction that the microphone faces.
- Move the microphone away from the speaker.
To decrease
echo effect
To increase
echo effect
(SET)
(SET)
Page 21

21
TROUBLE SHOOTING
SYMPTOM CHECK AND ACTION
Picture appears late when – Repeated pressing of PLAY/STOP/OPEN caused disc
SELECT(PLAY/PAUSE) button is pressed. drive motor to over heat, and protection circuit
activated until motor cools down.
Does not have video although – Check if TV power is turned on.
disc is turned. – Check if connection is secure.
– Check if the unit is bypassed.
Picture shakes vertically. – Picture may shakes momentarily during transition
from dark to bright.
Picture quality of a particular disc – Check if disc is damaged or deformed.
is poor and picture shakes – Check if disc is contaminated.
SKIP or SEARCH takes too – Some discs may require longer time to read encoded
much time. information.
– Check disc.
TIME SEARCH searches – Check if disc is contaminated or deformed.
different time. – When picture shakes disc may be contaminated or
deformed causing malfunction. Clean disc
After pressing the SELECT(PLAY/PAUSE) – If the PLAY/STOP/OPEN operations are repeated within short
button, there is a long delay before period of time, the Disc Drive Motor overheats. The disc will not rotate until
picture appears on screen. the motor cools down. This is a normal condition. Wait a few minutes for
the motor to cool down.
The disc rotates well, but you do not – Check if the TV power is turn ON.
have picture on the screen, You can see – Check if the connection is good.
the picture on screen, but the quality is – Check if the disc is in good condition.
poor and the picture shakes.
No sound – Check if disc is loaded upside down.
– Insert disc with label side up.
– Check if disc is severely deformed. Clean the disc
Page 22

22
WHEN VIDEO IS DISPLAYED THROUGH SET
CARE OF PLAYER AND DISCS
- Source : VIDEO-CD DISC
- Display :TV monitor
Use a soft, dry cloth for cleaning.
Clean the disc with water diluted with neutral
detergent solution and wipe from inside to
outside using dry cloth.
Store a disc away from direct sunlight or heat source.
Keep the disc free from dust.
* Color or sync is in trouble according to TV set.
Compact Disc Digital Audio (Max. 20 min.)
8cm Single
(3 inch)
Compact Disc (CD) Digital Audio (Max.74min.)
12cm Single
(5 inch)
Video Compact Disc Digital Video and Audio (Max.74min.)
(VCD) 12cm Single
(5 inch)
GENERAL INFORMATION ABOUT THE DISC
GENERAL INFORMATION ABOUT THE DISC
CARE OF DISCS
Page 23

23
CARE OF PLAYER AND DISCS
SPECIFICATIONS
Cleaning the Player
- Use soft cloth or the dusting attachment of your vacuum
cleaner to dust the exposed surface of the player.
Use the vacuum cleaner attachment to remove dust from
the ventilation holes on the top, back, sides, and bottom of
the cabinet.
- Some of plastic surfaces are easily scratched, and they can
be marred by alcohol and various solvents.
Avoid excessive use of oil-based furniture polishes since
the materials used in the cabinet are non-porous and the
residue will accumulate more dust.
Handling Discs
- When loading or removing discs, do not touch the play-
ing surface.
CARE OF DISC
- Never play cracked, scratched, or warped disc.
This may damage the player cause it to malfunction.
DO NOT PLAY CRACKED OR WARPED DISCS.
GENERAL – Power consumption: 8W
SPECIFICATIONS – Weight: 1.6 kg
– Dimensions 270 (W) x300 (D) x 88 (H) mm
– Operating temperature: +5°C~+35°C (41°F~95°F)
DISC USABLE NTSC/PAL
single 74 min
single 20 min
74 min
MP3 12cm single
– Format that can be played back: MPEG1 LAYER3
– Sampling frequency: 44.1KHz
– File extention name: .MP3
VIDEO OUTPUT – Output level: 1Vp-p (for 75 ohm load) 1channel
AUDIO OUTPUT – 2 Channels (L/R)
– Output level: 0.5 Vrms (1KHz, 0 dB)
– Audio characteristics: frequency response: 20Hz-20KHz
Signal to Noise: 85dB
total harmonic distortion:
0.1%(at 1KHz, 0dB)
CD
VCD
12cm
8 cm
12cm
single
Audio +
Video
Page 24

ELECTRONICS
In case the need for Servicing arises
Don't hesitate to call any nearby AS center
with your name, address and telephone number
when anything wrong with your product occurs.
AH68-00715B
 Loading...