

Page 1
MP3 Player
user manual
imagine the possibilities
Thank you for purchasing this Samsung
product. To receive a more complete
service, please register your product at
www.samsung.com/r egister
YP-R1
Page 2

Using this manual
Icons used in this manual
• Some of the contents in this manual may differ from your
MP3 player depending on the firmware installed. Some
of the contents may be changed without prior notice.
• To view the special features of your MP3 player, see
"Special features of your MP3 player."
• To view troubleshooting, see "Troubleshooting."
Icon Description
Note
Caution
< >
Notes, usage tips, or additional information
Safety warnings and precautions
Menu names or text on the screen ;
for example: <Yes>
Page 3

1
Safety information
This manual describes how
to properly use your new
MP3 player. Read it carefully
to avoid damaging the player
and injuring yourself. Pay
particular attention to the
following serious warnings.
PROTECT YOURSELF
• Do not disassemble, repair, or modify this product on your own.
• Do not get the product wet or drop it in water. If the product gets wet, do not
switch it on because you could get an electric shock.
• Do not use the product during a thunderstorm, as it may cause malfunction or
a risk of electric shock.
• Do not use the earphones while you are driving a bicycle, automobile or
motorcycle.
It can cause a serious accident, and furthermore, is prohibited by law in some
areas.
Using the earphones while walking or jogging on a road, in particular, on a
crosswalk can lead to a serious accident.
• For your safety, make sure the earphone cable does not get in the way of your
arm or other surrounding objects while you are taking exercise or a walk.
• Do not place the product in damp, dusty, or sooty areas because these
environments could lead to fire or electric shock.
• Do not use the product if the screen is cracked or broken. Broken glass
or acrylic could cause injury to your hand or face. Bring the product to a
Samsung service center to replace the screen. Damage caused by careless
handling will void the warranty.
Page 4
Safety information
2
PROTECT YOURSELF
• Using earphones or headphones for an extended
time may cause serious damage to your hearing.
If you are exposed to sound louder than 85db
for an extended time, you may adversely affect
your hearing. The louder the sound is, the more
seriously damaged your hearing may be (an
ordinary conversation is between 50 to 60 db and
road noise is approximately 80 db).
You are strongly advised to set the volume level to
medium (the medium level is usually less than 2/3
of the maximum).
• If you feel a ringing in the ear(s), lower the volume
or stop using the earphones or headphones.
• Battery shall not be exposed to excessive heat
such as sunshine, fire or the like.
PROTECT YOUR MP3 PLAYER
• Do not leave the player in temperatures above
35° C (95° F), such as a sauna or a parked car.
• Do not cause excessive impact on the player by
dropping it.
• Do not place heavy objects on top of the player.
• Prevent any foreign particles or dust from entering
into the product.
• Do not place the product near magnetic objects.
• Be sure to backup important data. Samsung is not
responsible for data loss.
• Use only accessories provided by or approved by
Samsung.
• Do not spray water on the product. Never clean
the product with chemical substances such as
benzene or thinner, as it may cause fire, electric
shock or deteriorate the surface.
• Failure to follow these instructions may lead to
physical injuries or damage to the player.
• When printing this user manual, we recommend
that you print in color and check “Fit to Page” in the
print option for better viewing.
Page 5

Special features of your MP3 player
Listen to true threedimensional sound with
the Samsung Digital
Natural Sound engine
(DNSe™)
Be a cool DJ and mix
music with your own
beats in Beat DJ
Customise your main
menu screen at your
fingertip
Add your favourite
widgets to the main menu
screen
Easily create Bluetooth
connections with a
single motion
No more complicated
buttons! Control your
player with one simple
touch
Listen to music with the
mini player while viewing
pictures or documents
Page 6
Contents
Use basic functions
6
What's included
7
Your MP3 player
8
Charge the battery
9
Turn your player on and lock the
11
touch screen
Use the touch screen
12
Use the main menu screens
14
Change the menu style
15
Select a wallpaper
15
Organise your favourite menus
16
Use widgets
18
Add widgets to a main menu screen
18
Widget list
19
Use the quick tray and menu tray
21
Use the mini player
22
Enter text
23
Enter text using the virtual keyboard
23
Enter text with the smart finger feature
24
Connect your player to a TV
25
Manage media files
26
Download media files
27
Supported file formats and PC
27
requirements
Download files with EmoDio
28
Download files using your player as a
29
removable disk
Search for files
31
Delete files
32
Play video and music
33
Video
34
Play video files
34
Use the video options
37
Music
38
Listen to music
38
Search for a music file
42
Create playlists
42
Use the music options
44
Beat DJ
45
Page 7

Contents
Use additional
48
applications
Pictures
49
View pictures
49
Use the picture menus
50
Texts
51
View text files
51
Use the text options
53
FM Radio
54
Listen to the FM radio
54
Save radio stations
56
Use the FM radio options
57
Flash Player
58
Games
59
Bluetooth
60
Find and register other Bluetooth-
60
enabled devices
Connect Bluetooth-enabled devices
61
Use call functions (hands-free)
62
Transfer files
64
Use the Bluetooth options
65
Information for using Bluetooth
65
Datacasts
67
Voice REC
68
Address Book
69
Customise settings
70
Settings
71
Sound settings
72
Display settings
72
Language settings
73
Time settings
73
System settings
73
Appendix
76
Maintenance of your player
77
Troubleshooting
78
Specifications
80
Correct disposal of this product
82
(Waste Electrical & Electronic
Equipment)
Correct disposal of batteries in
82
this product
License
83
Contact Samsung World Wide
84
Page 8

Use basic functions
Learn to perform basic operations with your player.
What's included .................................................................7
Your MP3 player .................................................................8
Charge the battery .............................................................9
Turn your player on and lock the touch screen ..................11
Use the touch screen .........................................................12
Use the main menu screens ..............................................14
Use widgets .......................................................................18
Use the quick tray and menu tray ......................................21
Use the mini player .............................................................22
Enter text ............................................................................23
Connect your player to a TV ..............................................25
Page 9
What's included
7
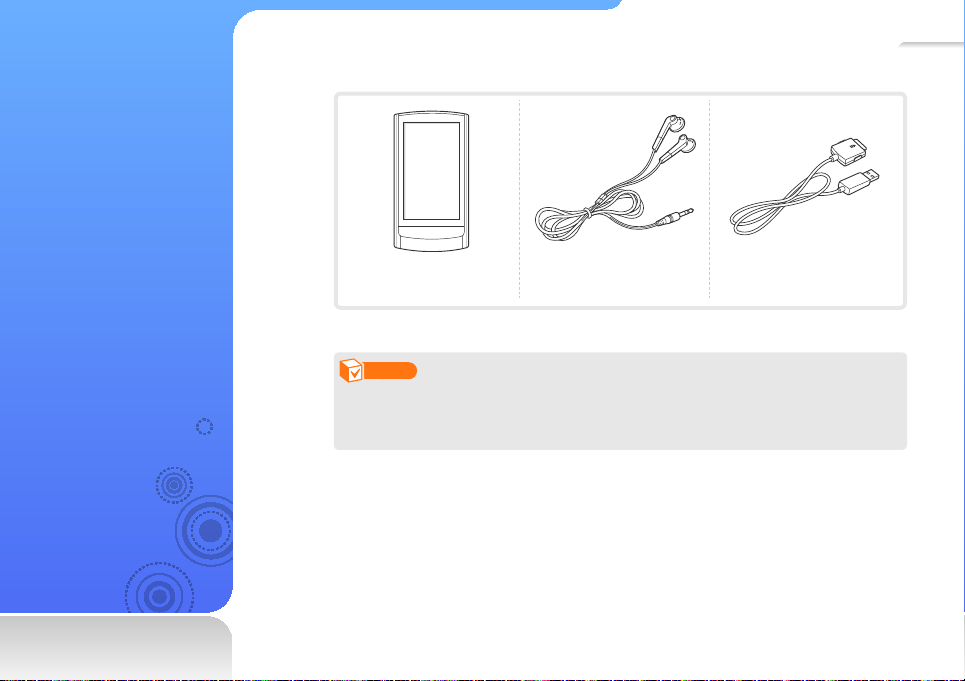
Check your product box for the following items:
MP3 player Earphones USB cable
Note
• The items supplied with your player may appear different from the illustrations in this
manual.
• You can obtain additional accessories from your local Samsung dealer.
Page 10

Your MP3
8
player
Reset hole
If your player is frozen
or unresponsive, insert
a pointed object (such
as the point of a pen)
into the reset hole. The
system will be initialized.
Volume button
(volume down)
Volume button
(volume up)
Power/lock button
Touch screen
Accessories hook
Earphones
jack
Microphone
USB connection port
Page 11

9
C h a r g e t h e battery
Charge the battery before
you use your player for the
first time or when you have
not used it for a long time.
Caution
The rechargeable battery
incorporated in this product is not
user replaceable. For information
on its replacement, please
contact your service provider.
Connect the large end of the USB cable (with the triangle facing up) to the
USB connection port at the bottom of your player.
Connect the small end of the USB cable to the USB port of a PC.
<USB connected>
< >: Charging
< >: Fully charged
Charging time About 3 hours
When the battery is fully charged, unplug the USB cable from your player
and the PC.
Page 12
Use basic functions > Charge the battery
About batteries
• Charge and store the battery at 5˚ C~35˚ C (41˚ F~95˚ F).
• Do not charge the battery for more than 12 hours or leave the
battery fully discharged for a long time. Doing so may shorten
the battery life.
• Depending on how you use your player, actual battery life may
vary and may be shorter than specified.
Note
• The charging time may differ depending on your PC’s
capabilities.
• If you want to charge the battery on your laptop, make
sure that the laptop's battery is full or the laptop is plugged
into a power source.
• The player can only be charged by connecting to your
PC with the USB cable. Do not use a separate USB AC
Adapter as it may not charge the battery or allow proper
operation of the player.
10
Page 13

11
Turn your player on and lock the touch screen
Turn your player on or off
Press and hold to
turn your player on or off.
Note
If you do not use your player for
5 minutes, it will automatically
turn off.
Lock or unlock the touch screen
Lock the touch screen to prevent any unwanted operations while listening to music or playing
videos.
Press to lock or
unlock the touch screen.
Note
• When the touch screen is
locked, will appear at the
top of the screen.
• You can also set your player
to lock the touch screen and
buttons. See page 74.
Page 14
12
Use the touch screen
Learn how to use the touch
screen and browse or
select items.
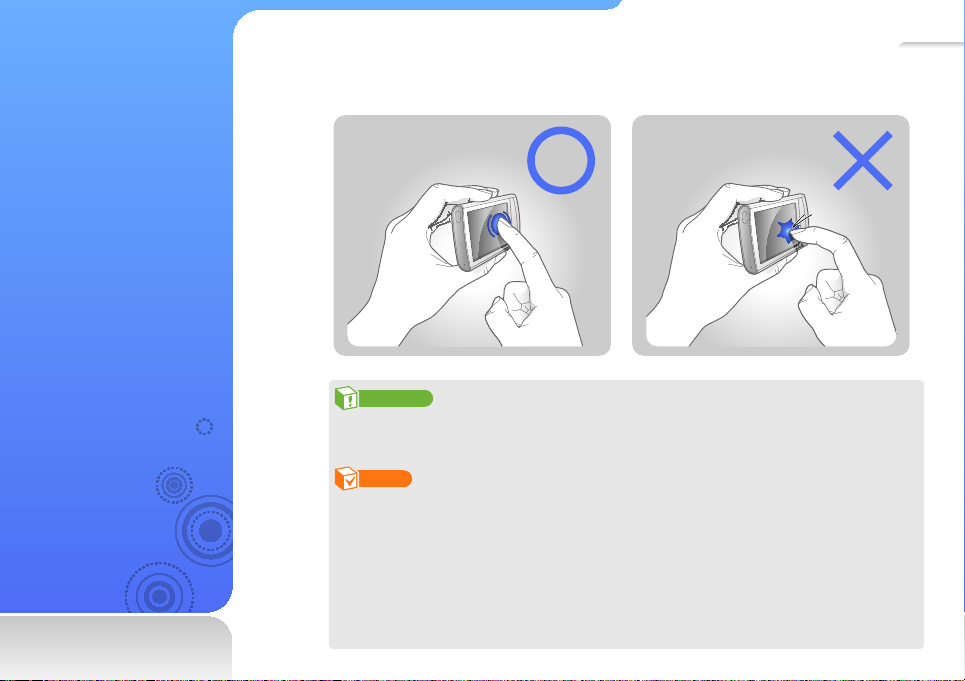
Your player’s touch screen lets you easily select items or perform functions. Tap the touch
screen using your fingertip.
Caution
To avoid damaging the touch screen, do not press too hard with your fingertips or use pointed
objects to touch the screen.
Note
• Tap only one area of the touch screen at a time. Your player will not recognise your input
when you tap two or more areas simultaneously.
• Keep the touch screen dry. Humidity and liquids may lower the recognition of the touch
screen.
• For best results, do not use any protective films on the touch screen and do not allow
accessories to cover the touch screen.
• The touch screen may not properly recognise inputs when you tap the screen with gloves,
dirty fingers, fingernails, or sharp instruments such as ballpoint pens.
Page 15
Use basic functions > Use the touch screen
D
t
o
st
Q
lef
file during playback
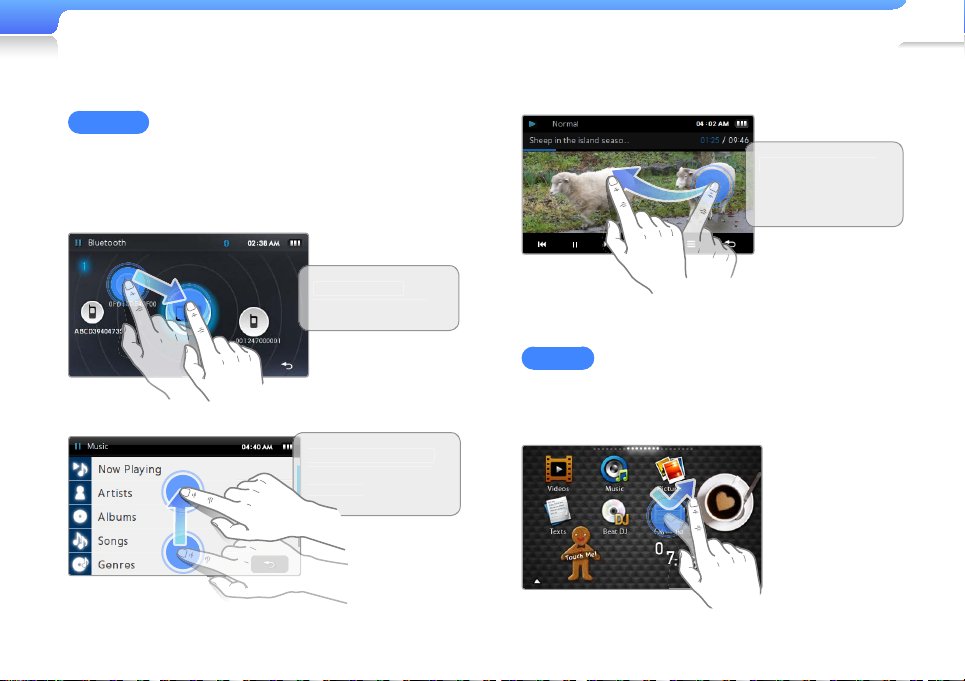
Dragging
To move an item on the screen or browse items, tap and hold
your finger on the screen and drag your finger.
To move to the next screen or flip pages, quickly drag your finger
in the desired direction.
Drag an item to
a location you want
rag from the bottom
o the top to scroll up
n the li
13
uickly drag right to
t to play the next
Tapping
To select a menu or option, tap the screen once with your finger.
You can also open the quick tray or menu tray by tapping the
screen.
Page 16

14
Use the main menu screens
Learn to move between
the main menu screens,
change the menu style or
wallpaper, and organise
your favourite menus.
The main menu screens consist of menu icons and widget icons.
Menu icons
Widgets
Note
To return to a main menu screen while using a function, tap and hold at the bottom of the
screen.
Page 17
Use basic functions > Use the main menu screens
15
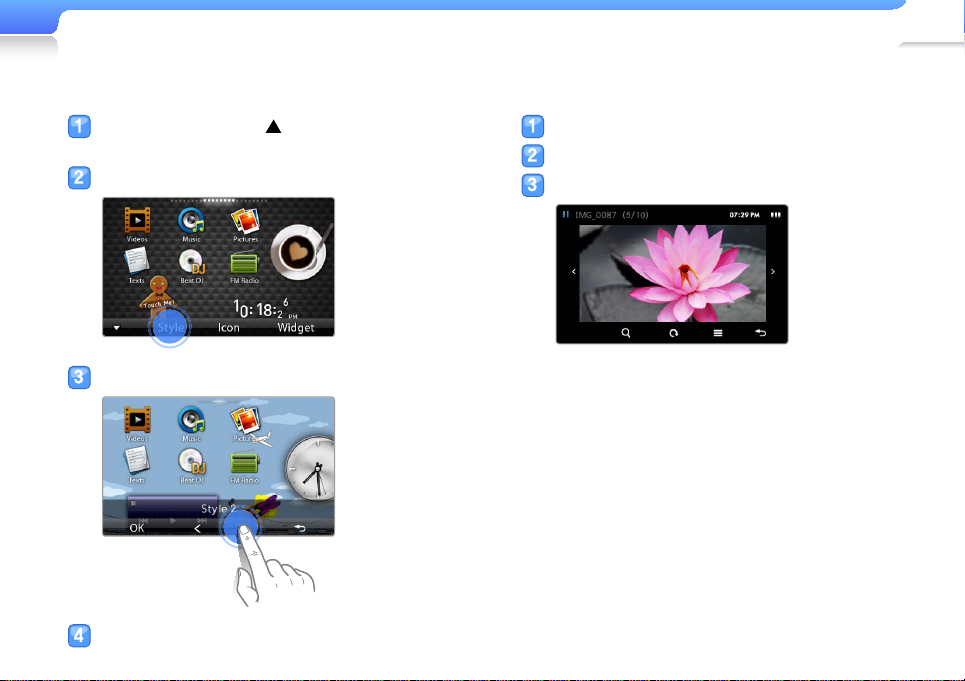
Change the menu style
In the main menu, tap at the bottom of the
screen.
Tap <Style> from the menu tray.
Tap < or > to select a style you want.
Tap <OK> to save the style.
Select a wallpaper
In the main menu, tap and hold an empty space.
Tap an image from the file list.
Tap <OK> to save the wallpaper image.
Page 18
Use basic functions > Use the main menu screens
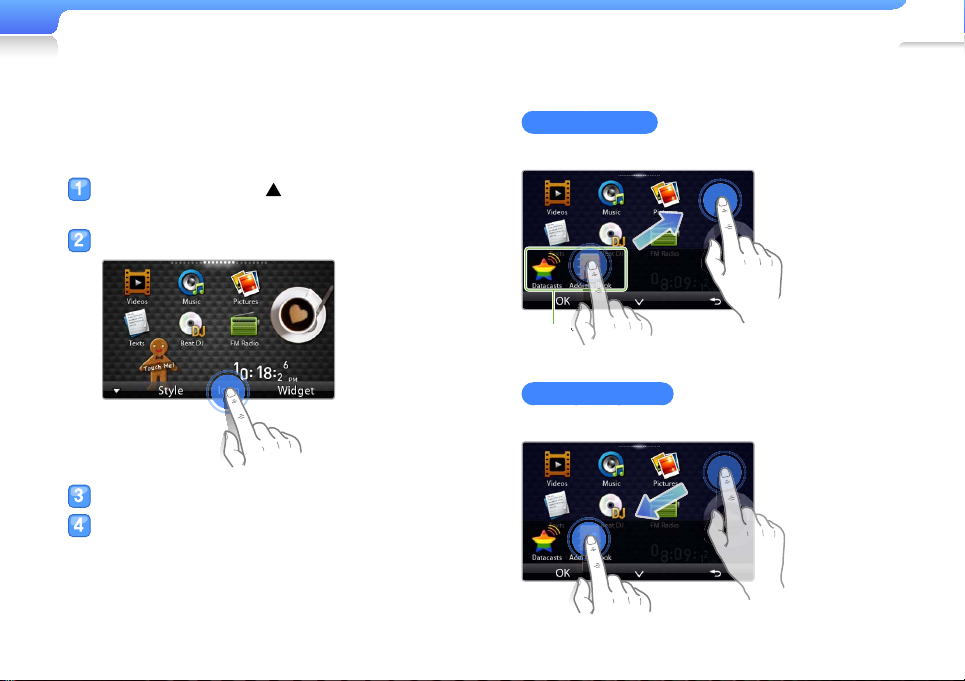
Organise your favourite menus
Your player has three main menu screens by default. You can
add two more screens, and add menu icons that you frequently
use to a menu screen or delete them from the menu screen.
In the main menu, tap at the bottom of the
screen.
Tap <Icon> from the menu tray.
Add or delete menu icons from the menu list.
When you are finished, tap <OK>.
16
Add a menu icon
Drag a menu icon from the menu list to a main menu screen.
Menu list
Delete a menu icon
Drag a menu icon from a main menu screen to the menu list.
Page 19
Use basic functions > Use the main menu screens
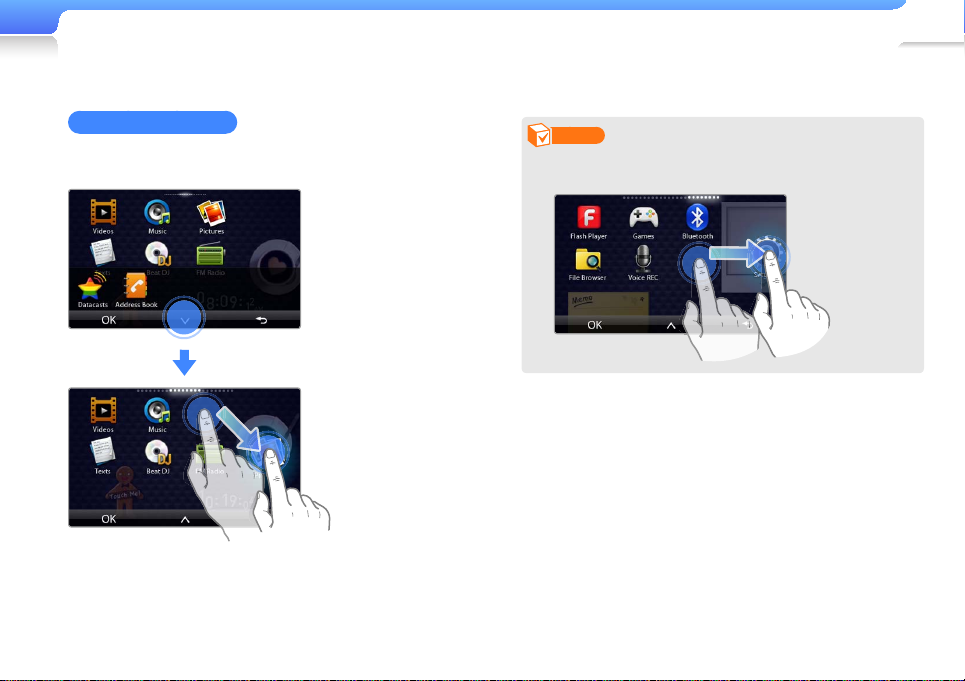
17
Relocate a menu icon
Tap <V> to close the menu list and position the menu icon
anywhere on the screen.
Note
To move a menu icon to a new main menu screen, drag the
icon to the edge of the screen.
Page 20
18
Use widgets
You can use functional and
decorative widgets.
Widgets are user friendly
shortcuts to commonly
used menus allowing you to
add to a main menu screen.
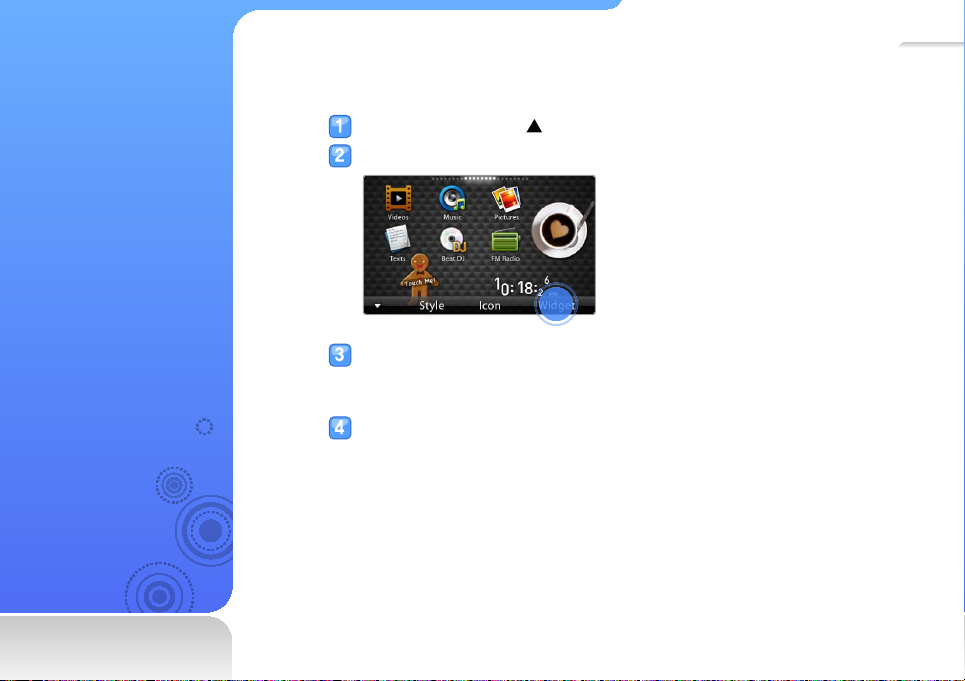
Add widgets to a main menu screen
In the main menu, tap at the bottom of the screen.
Tap <Widget> from the menu tray.
Add or delete widgets from the widget list.
■
For adding or deleting widgets, see "Organise your favourite menus" on page 16.
■
For information about widgets, see "Widget list" on page 19.
When you are finished, tap <OK>.
Page 21

Use basic functions > Use widgets
Widget list
Widget Function
• View the current time.
• Tap > to set the current date. Drag up or
down on each unit.
Analogue
clock/
Digital clock
Tap to change the clock style
Drag up or
down on each
unit to set the
current time
Widget Function
• View the calendar and scheduled events.
• Drag up or down to move by month.
Drag left or right to move by year.
Calendar
Tap to change the
calendar style
Note
To view scheduled events in the
calendar, download Microsoft Outlook
event files (.ics) from a PC. Event files
must be saved in <File Browser> →
<My Pack> → <Calendar>.
19
Tap to view
scheduled events
for that day
Tap to delete all
scheduled events
Page 22

Use basic functions > Use widgets
20
Widget Function
View your pictures in a frame.
Picture
frame
Create your memos.
Memo
Tap to change
the memo style
Brightness
Sleep time
Adjust the brightness of the screen.
See page 72.
Set the sleep time. See page 73.
Tap < or > to
change the
frame style
Tap to select a picture to display
Tap to delete a
memo
Tap to enter a memo; Use the
smart finger (See page 24)
Widget Function
Dual clock
Battery
Mini player
Decoration
item
Decoration
item
Decoration
item
Decoration
item
View the current time in another country or city.
Check the remaining battery.
Listen to music with the mini player.
A cookie gradually crumbles.
Flower petals flutter.
A butterfly circles around a flower.
A cup of coffee steams.
Page 23
21
Use the quick tray and menu tray
Learn to use the quick tray
and menu tray. Tap the top
of the screen to open the
quick tray. Tap the empty
space of the screen to open
the menu tray.
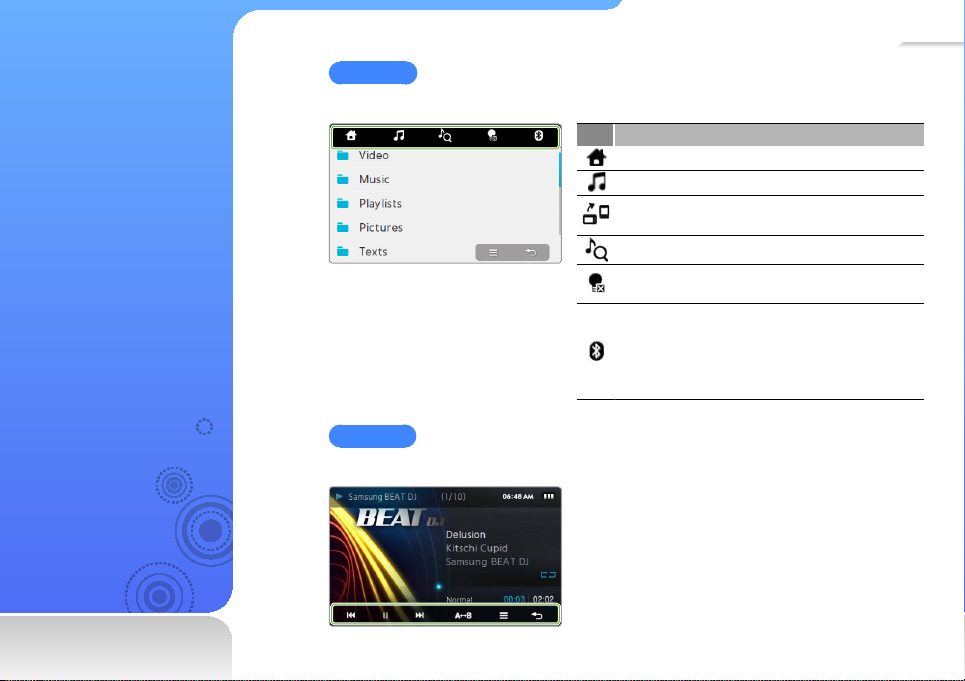
Quick tray
The quick tray allows you to use other functions or return to a main menu screen.
Icon Function
Return to a main menu screen.
Launch the mini player. See page 22.
Rotate the screen 90° clockwise (to the right).
This icon is available on the music playback screen.
Search for music files. See page 42.
Turn off the screen and lock the touch screen.
See page 74.
Connect the Bluetooth stereo headset your player
was last connected to. If you connect your player
to a Bluetooth device for the first time, see "Find
and register other Bluetooth-enabled devices" on
page 60.
Menu tray
The menu tray displays options available in the current menu.
Page 24
22
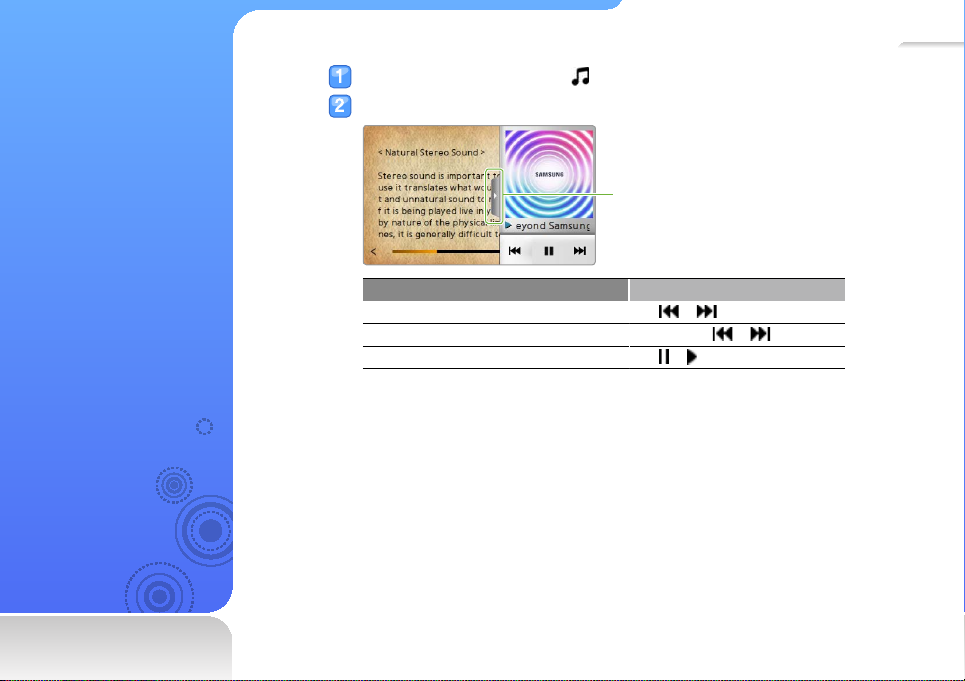
Use the mini player
You can listen to music with
the mini player while viewing
pictures or text files or using
other menus which do not
have the music play feature.
Open the quick tray and tap .
Listen to music with the mini player.
Tap to close the
player screen
To Do this
Skip to the previous file or the next file Tap
Search backward or forward in a file Tap and hold or
Pause or resume playback
or
Tap or
Page 25
23
Enter text
Enter text using the virtual
keyboard or with the smart
finger feature.
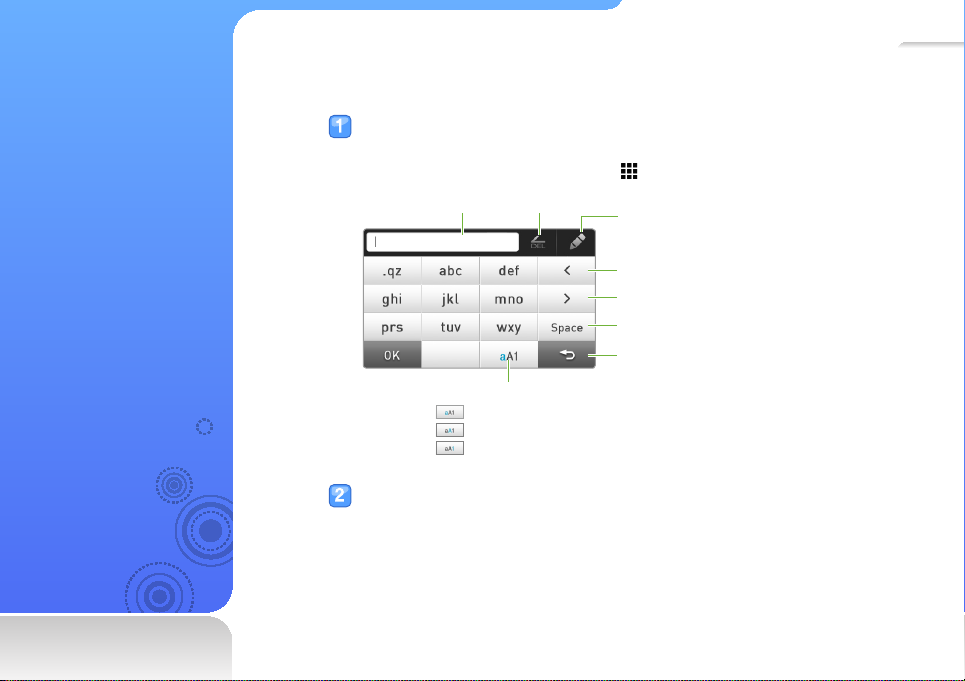
Enter text using the virtual keyboard
Tap an appropriate alphanumeric key until the character you want appears
on the screen.
■
If the smart finger screen appears, tap to switch to the virtual keyboard.
Input field Delete
Change the text input mode
• : English (lowercase)
• : English (uppercase)
• : numbers
When you are finished, tap <OK>.
Switch the text input method
(virtual keyboard ↔ smart finger)
Move the cursor to the left
Move the cursor to the right
Space
Back to the previous screen
Page 26
Use basic functions > Enter text
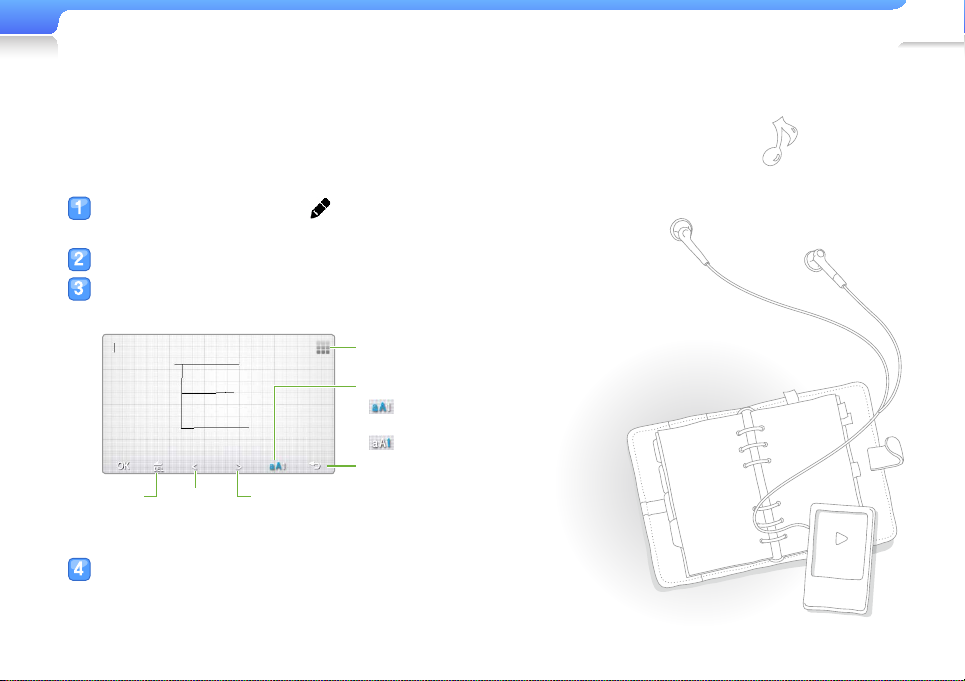
Enter text with the smart finger feature
With the smart finger feature, you can write characters anywhere
on the screen using your finger.
On the virtual keyboard, tap to switch to the
smart finger.
Change the text input mode.
Write characters anywhere on the screen.
▼ When entering a keyword in the music search screen
Switch the text input method
(virtual keyboard ↔ smart finger)
Change the text input mode
•
: English (lowercase or
uppercase)
• : numbers
Back to the previous screen
Delete
When you are finished, tap <OK>.
Move the
cursor to
the left
Move the cursor
to the right
24
Page 27
25
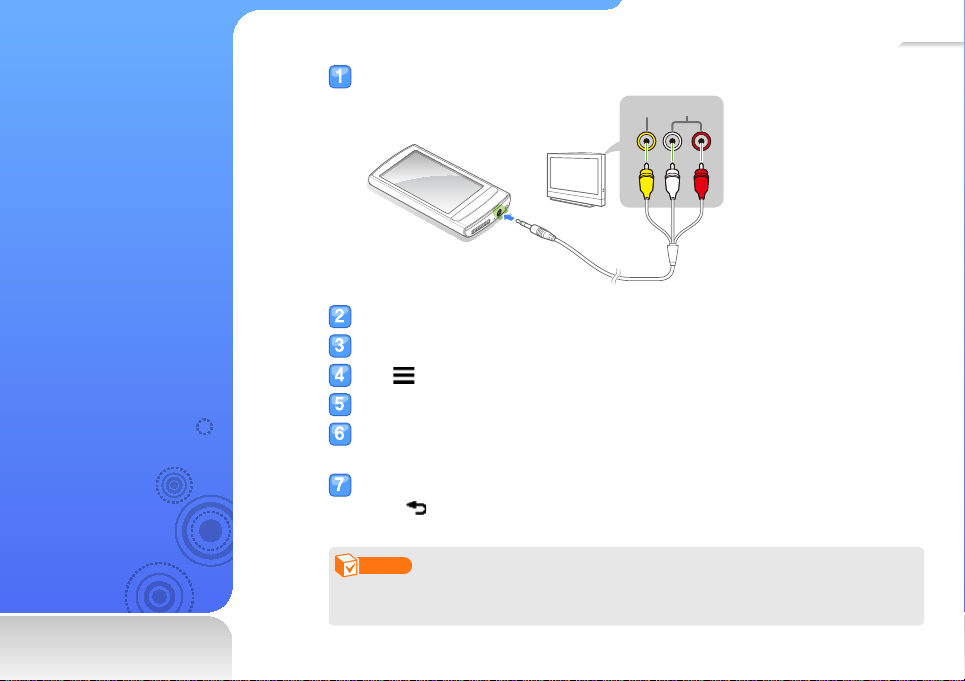
C o n n e c t your player to a TV
You can connect your
player to a TV with an
optional TV-OUT cable and
view multimedia files, such
as pictures and videos, on
the TV screen.
Connect your player to a TV using an optional TV-OUT cable.
Audio
Video
Turn on your TV and switch the TV to the appropriate external input mode.
Turn on your player and view a picture or video.
Tap on the playback screen.
Tap <TV Out> from the option list.
Tap <Yes> from the pop-up window.
■
The TV screen displays the picture or video you are viewing on your player.
Control playback using the menu tray of your player.
■
Tap to end the connection with the TV.
Note
• Some features of your player may not be available when your player is connected to a TV.
• Some TVs may not be compatible with your player.
Page 28

Manage media files
Download media files to your player, and search for or delete files
stored in your player.
Download media files .........................................................27
Search for files ....................................................................31
Delete files ..........................................................................32
Page 29

27
Download
media les
Download media files from
a PC to your player.
Caution
To avoid damage to your player
and corruption of your files, do
not disconnect the USB cable
while files are being transferred.
Supported file formats and PC requirements
Supported file formats
Menu File formats
Music
Videos
Picture
Texts
Flash Player
Recommended PC requirements
CPU Pentium 500 MHz or later
Operating System Windows XP Service Pack 2 or higher
Others
MP3, WMA, Ogg, AAC, FLAC, etc.
AVI, WMV, etc.
JPG, BMP, etc.
TXT
SWF
• Windows Media Player 11.0 or higher
• Resolution 1024 X 768 or higher
• Internet Explorer 6.0 or higher
• DirectX 9.0 or higher
Page 30

Manage media les > Download media les
Download files with EmoDio
You can easily download various media files with EmoDio.
Note
• For information about installing EmoDio on a PC, refer to
the Quick Start Guide supplied with your player.
• EmoDio will be regularly upgraded for peak performance.
Some features of EmoDio may change without prior
notice.
Connect your player to a PC using the USB cable.
■
EmoDio launches automatically on your PC.
Click <My PC> on the main screen of EmoDio.
Click <Add Folder> or <Add File> at the bottom of
the screen.
Select a folder or file you want.
■
The list of the files stored in your PC appears.
Select a file you want and click .
■
The selected file is copied to your player.
Note
• You cannot use your player when connected to a PC.
• If you connect your player to a PC when the player's
battery is low, the battery will be charged for a few minutes
before your player will be connected to the PC.
• If you connect your player to a PC via a USB hub, the
PC may not recognizse your player. Connect your player
directly into the USB port of a PC.
• When you format your player on a PC, use the FAT32
system. In Windows Vista, click <Restore device defaults>
and then format your player.
• Music recognition technology and related data are
provided by Gracenote
Recognition ServiceSM.
• CDDB is a registered trademark of Gracenote. The
Gracenote logo and logotype, the Gracenote CDDB logo
and logotype, and the “Powered by Gracenote CDDB”
logo are trademarks of Gracenote. Music Recognition
Service and MRS are service marks of Gracenote.
®
and Gracenote CDDB® Music
28
Page 31

Manage media les > Download media les
Download files using your
29
player as a removable disk
If the USB connection is set to <MSC>, a PC will recognise your
player as a removable disk when you connect your player to the
PC.
To change the USB connection mode to <MSC>,
in the main menu, tap
Connection> → <MSC>.
Connect your player to a PC using the USB cable.
On your PC, open <My Computer> and
then the <R1> folder.
Select a folder you want.
Copy files on the PC to your player.
→ <System> → <PC
Note
• The order of files on your PC will differ from the order of
files in your player.
• Your player restricts playback of files protected by a DRM
(Digital Rights Management) system.
What is DRM?
Digital Rights Management (DRM) is a technology and service
to prevent illegal copies of the digital contents and protect the
profit and rights of copyright holders or content producers.
Page 32

Manage media les > Download media les
Disconnect your player from a PC
Carefully follow the steps below when disconnecting your player
from a PC to avoid data loss or damage to your player.
Click on the Windows taskbar.
Click the pop-up message.
Click on the window which informs that your
player is safely disconnected.
Unplug the USB cable from your player and the
PC.
Caution
• To avoid damage to your player and corruption of your
files, do not disconnect the USB cable while files are being
transferred.
• Do not disconnect your player when playing files stored
in your player on a PC. Make sure that you stop playback
and then disconnect your player from a PC.
30
Page 33

31
Search for
les
Search for files in folders
and play them in your
player.
In the main menu, tap .
Tap a folder from the list.
Drag up or down to scroll through the file list.
■
If the file name is long, tap and hold the file name area to view the full name.
Tap a file you want.
Page 34

32
Delete les
You can delete unwanted
files from your player.
To delete video files, for example:
In the main menu, tap .
Tap at the bottom of the screen.
Tap <Delete> from the option list.
Tap files to delete and tap <OK>.
■
appears next to the selected files.
■
Tap to delete all files.
Tap <Yes> to confirm.
Note
You can also tap and then select files if the trash icon is available.
Page 35

Play video and music
Transfer music and video files to your player using the EmoDio
program or a removable disk, and then play high-quality video
files and listen to music in excellent 3D surround sound. Also, mix
music files like a disc jockey using Beat DJ.
Video ..................................................................................34
Music ..................................................................................38
Beat DJ ..............................................................................45
Page 36

34
Video
Play video files on your
player.
To download files, see
"Download media files."
Play video files
In the main menu, tap .
Tap a video file from the list.
■
Drag up or down to scroll through the list and select a video file to play.
Note
To change the view mode to the thumbnail view, tap and then <Change View Type>.
Page 37

Play video and music > Video
35
Control playback using the following buttons. See
"Video playback screen."
Volume up
Volume down
Back to the previous menu
Back to the main menu (tap and hold)
To Do this
Skip to the previous file or
the next file
Search backward or
forward in a file
Pause or resume playback
Tap or
Tap and hold or
or
Tap
Note
• When you download unsupported files to your player with
EmoDio, EmoDio will automatically convert the file formats
so you can play them in your player.
• You can play subtitle files (.smi) with video files on your
player. Subtitle files must be saved with video files to play
in the same folder and the file name must be the same as
the video file.
Page 38

Play video and music > Video
36
Video playback screen
1
2
3
4
No. Description
1
Current sound effect
2
Playing status
3
File name
Playing progress bar ; is a bookmark that helps you mark a
4
point within a video
5
Elapsed playing time / Total playing time
Menu tray
6
- <B.MARK>: Open the bookmark options
: Open the video options
-
5
6
Play a video from a chapter
Tap and hold the screen during video playback. Your player will
split the video file into 15 chapters and capture still images from
each clip. When you select one of the still images, the video will
begin playback from that point.
Tap to return to the
previous screen
Page 39

Play video and music > Video
Insert a bookmark
You can insert a bookmark at the point you want and go to the
bookmark to play from that point.
During video playback, tap the screen at the point
you want to bookmark.
Tap <B.MARK> from the menu tray and tap
<Add Bookmark>.
■
A bookmark is inserted to the progress bar.
Note
• You can insert one bookmark per video file.
• The point at which you insert a bookmark within a video file
may not exactly match the bookmarked point.
• To go to a bookmark, tap <B.MARK> and then <Go to
Bookmark>. To delete a bookmark, tap <B.MARK> and
then <Delete Bookmark>.
Use the video options
Tap the video playback screen.
Tap from the menu tray.
Select an option you want.
Option Description
DNSe Select appropriate sound effects for videos.
Mosaic
Search
Display
TV Out
Horizontal
Stroke
Divide a video file into 15 chapters. You can
select one of the chapters and start playback
from that chapter.
Adjust the frame size and the brightness of the
screen.
Note
You cannot adjust the frame size for
some video files.
Set to view videos on the TV screen. See
"Connect your player to a TV" on page 25.
Set the interval when you drag left or right quickly
during video playback.
- <1 File>: Move between previous and next files.
- <Seek>: Change the playback speed
(x1 → x2 → x4 → x8).
- <30sec Skip>: Skip 30 seconds.
- <1min Skip>: Skip 1 minute.
37
Page 40

38
Music
Play music files stored in
your player.
To download files, see
"Download media files."
Note
If the file library is updated, your
player will clear the list of files
displayed in <Recently Added>
and <Most Played (50)>.
Listen to music
Music files are categorized in folders by type. You can easily find a music file you want.
Music category Function
Artists* Display files by artist.
Albums* Display files by album.
Songs*
Genres* Display files by genre.
Playlists Display playlists you created.
Recently Added Display files you recently downloaded.
Most Played (50) Display files you play most often (up to 50 files).
Recorded Files Display files recorded in <FM Radio> or <Voice REC>.
Music Browser Display all files in the Music folder.
Unknown Display files that have no track information (ID3 tag).
* In these music categories, files are sorted by track information (ID3 tag). Files that have no track information
appear as unknown.
What is ID3 Tag?
ID3 tag is a metadata container attached to MP3 files. It includes information for the music,
such as the title, artist, album, or track number, which can be displayed on a music player’s
screen during playback.
Display files by file name (in the order of special characters, numbers, and
alphabets).
Page 41

Play video and music > Music
39
Play music files
In the main menu, tap .
Tap a music category.
■
To play the file you last played, tap <Now Playing>.
Tap an artist, album, genre, or playlist if you
selected <Artists>, <Albums>, <Genres>, or
<Playlists>.
Tap a file to play.
■
Drag up or down to scroll through the list and select a
file to play.
Control playback by using the buttons.
See "Music playback screen."
Volume up
Volume down
Back to the file list
To Do this
Skip to the previous or next file Tap
Search backward or forward Tap and hold or
Pause or resume playback Tap or
or
Page 42

Play video and music > Music
40
Music playback screen
1
2
3
4
No. Description
1
Playing status
2
Track number / Total number of tracks
• Playback image
3
• If an album image displays, tap and hold it to view the
album information
4
Current sound effect
5
Song title, artist, album title
6
Repeat mode
7
Playing progress bar
8
Playing time
Menu tray
9
- <A ↔ B>: Repeat a section of a track
: Opens the music options
-
Repeat a section of a track
You can select a section of a track to repeat.
5
6
7
8
9
Tap <A ↔ B> at the beginning of the section you
want to repeat.
■
<A →> displays at the right centre of the section.
Tap <A ↔ B> at the end of the section you want
to repeat.
■
<A ↔ B> displays at the right centre of the section. Your
player repeats the marked section.
To cancel repeating, tap <A ↔ B> again.
Note
You cannot repeat a section of a track less than 3 seconds.
Page 43

Play video and music > Music
41
Apply a sound effect (DNSe)
Tap the music playback screen.
Tap from the menu tray.
Tap <DNSe>.
Tap a sound effect you want.
■
If you tap <Auto>, your player will search the track
information (ID3 tag) and automatically select an
appropriate effect.
■
To select your own equaliser, tap <myDNSe 1> or
<myDNSe 2>. See "myDNSe" on page 72.
What is DNSe?
Digital Natural Sound Engine (DNSe) is a group of sound
effects for MP3 players, developed by Samsung. It provides
various sound settings to enhance the music you are listening
to.
View album information
If an ID3 tag contains album information, such as a cover image,
you can view the album image and tracks included in the album.
From the music playback screen, tap and hold the
screen.
View the album image and tracks.
■
To view other albums, drag left or right.
■
To play music from the album, tap a music file you want.
■
To browse files, drag up or down.
Indicate the music
file now playing
Page 44

Play video and music > Music
42
Search for a music file
You can search for music files by entering keywords.
Open the quick tray and then tap .
Tap a search option you want.
Option Description
Artists Search by artist name
Albums Search by album name
Songs Search by song tiltle
Enter a keyword on the search field.
If you selected <Artists> or <Albums>, tap an
artist or album name.
Tap a music file you want from the search list.
Note
You cannot search for music files with no track information
(ID3 tag).
Create playlists
There is one default playlist and you can create up to 3 playlists.
Create a playlist
In the main menu, tap .
Tap <Playlists>.
Tap at the bottom of the screen and tap <Add
New Playlist>.
Enter a name for your new playlist and tap <OK>.
Note
To rename a playlist, tap <Rename> from the option list.
Page 45

Play video and music > Music
43
Add music files to a playlist
From the file list, tap .
Tap <Add to Playlist>.
Tap files you want to add to a playlist.
■
appears next to the selected files.
■
To select all files, tap .
Tap <OK>.
Tap a playlist to add the files.
■
To create a new playlist, tap <Add New Playlist>.
Note
• To add all files of an artist, album, or genre at once, tap
from the list of artists, albums, or genres and then tap
<Add to Playlist>.
• To add the currently playing file to a playlist, tap and
then <Add to Playlist>.
Delete music files from a playlist
From the file list, tap <Playlists>.
Tap a playlist that has files you want to delete.
Tap at the bottom of the screen and then tap
<Delete from Playlist>.
Tap files you want to delete.
■
appears next to the selected files.
■
To select all files, tap .
Tap <OK>.
Tap <Yes> from the pop-up window.
Page 46

Play video and music > Music
Use the music options
44
Tap the music playback screen.
Tap from the menu tray.
Customise the following options.
Option Description
DNSe Select appropriate sound effects for music.
Play Mode Change the repeat mode.
Change the image that displays during music
playback.
Music Play
Screen
Add to Playlist
Note
Your player supports less than 2 MB
of cover images.
Add the currently playing music file to the
playlist.
Option Description
Set the interval when you drag left or right
quickly during music playback.
- <1 Song>: Move between previous and
next files.
Horizontal
Stroke
Play Speed Change the playback speed.
Note
You cannot select a sound effect and change the
playback speed if you are playing a music file in Ogg
Q10 format.
- <10sec Skip>: Skip 10 seconds.
- <30sec Skip>: Skip 30 seconds.
- <1min Skip>: Skip 1 minute.
Note
Some files may not skip at the interval
you selected.
Page 47

45
Beat DJ
Add effects to the music
with Beat DJ.
In the main menu, tap .
Tap an album you want.
■
Rotate the wheel or drag up or down to select an album and tap <OK>.
Rotate the wheel to select a music file and tap <OK>.
Apply beat DJ effects to the music file.
Return to the music playback screen
Insert a sample sound
Rotate the wheel clockwise to skip forward or
counter-clockwise to skip backward
Pause or resume playback
Insert a filter effectInsert a scratch sound
Page 48

Play video and music > Beat DJ
46
Insert a sample sound
Rotate the wheel to select a sample sound and then tap <OK>.
Tap at the point you want to insert the sample sound.
Insert a scratch sound
Move your finger on the CD image to insert a scratch sound.
Page 49

Play video and music > Beat DJ
47
Insert a filter effect
Rotate the wheel to select a filter effect and then tap <OK>.
Rotate the wheel to adjust the effect level.
Note
• You can insert up to 2 filters in a music file.
• If you want to adjust the level for the applied filter effects,
return to the music playback screen and tap
centre of the screen. Tap the name of the filter you want
and then rotate the wheel.
at the
Page 50

Use additional applications
Learn how to work with your player’s additional applications.
Pictures ...............................................................................49
Texts ...................................................................................51
FM Radio ............................................................................54
Flash Player ........................................................................58
Games ................................................................................59
Bluetooth ............................................................................60
Datacasts ...........................................................................67
Voice REC ..........................................................................68
Address Book ....................................................................69
Page 51

49
Pictures
View pictures stored in your
player.
To download files, see
"Download media files."
View pictures
In the main menu, tap .
Browse pictures.
Folder (display
the number of
pictures saved)
Start a
slideshow
Tap a picture you want. The picture displays on the full screen.
View the picture.
■
Drag left or right to view other pictures.
Note
If the picture size is large, it may take some time to display.
Change the view mode
To Do this
Zoom in or out
Rotate Tap
Picture with
no thumbnail
information
Delete a picture
Tap and then tap or
Page 52

Use additional applications > Pictures
Use the picture menus
Tap the picture on the full screen.
Tap from the menu tray.
Customise the following options:
Option Description
Start Slideshow View pictures in a slideshow.
Slideshow Effect Select a transition effect for the slideshow.
Assign
TV Out
Set a picture as a wallpaper of a main
menu screen or as an image displayed
when you turn on your player.
Set to view pictures on the TV screen. See
"Connect your player to a TV" on page 25.
50
Page 53

51
Te x t s
You can use the text viewer
to view text files (.txt) stored
in your player.
To download files, see
"Download media files."
View text files
In the main menu, tap .
Tap a text file from the list.
Note
To change the view mode, tap and then <Change View Type>.
View the document.
■
Tap the screen to display the text information and menu tray.
To Do this
Move to the previous
or next page
• Drag left or right
• Tap < or >
Page 54

Use additional applications > Tex t s
52
Insert a bookmark
You can insert a bookmark on the page you want and go to the
bookmark to view that page of a document.
Tap the screen on the page you want to
bookmark.
Tap <B.MARK> from the menu tray and then tap
<Add Bookmark>.
■
A bookmark is inserted to the top left of the screen.
Note
• You can insert one bookmark per text file.
• To go to a bookmark, tap <B.MARK> and then <Go to
Bookmark>. To delete a bookmark, tap <B.MARK> and
then <Delete Bookmark>.
Flip pages automatically
Tap the screen.
Tap <AUTO> from the menu tray.
Tap the automatic flip time.
■
A page automatically flips to the next after the automatic
flip time you set.
Page 55

Use additional applications > Tex t s
Use the text options
You can change settings for viewing documents in the text
viewer.
Tap the screen.
Tap from the menu tray.
Customise the following options:
Option Description
Text Viewer
Type
Font Size
Change the background style of the text
viewer.
Change the size of the font displayed in
your document.
53
Page 56

54
FM Radio
You can listen to and record
the FM radio, as well as
save radio stations.
Note
You must connect the earphones
to your player to listen to the FM
radio. The earphones serve as a
radio antenna.
Listen to the FM radio
In the main menu, tap .
Tap < or > to scan the radio stations.
■
Tap < or > to scroll through radio frequencies. Tap and hold < or > to scan the available
stations automatically.
■
You can also drag the dial to tune stations.
Listen to the FM radio. See "FM radio screen."
Note
The FM radio may not tune frequencies for stations correctly
depending on the signal status of your current region.
Page 57

Use additional applications > FM Radio
55
FM radio screen
1
2
3
5 6
No. Description
1
Frequency scale
Frequency for the current station
- Tap < or > to scroll through radio frequencies
2
- Tap and hold < or > to tune available radio stations
automatically
3
RDS indicator
Tuning dial
4
- Drag the dial to tune stations
Radio mode
5
- <Preset>: Preset mode
- <Manual>: Manual mode
No. Description
Menu tray
: Mute or unmute audio
-
6
4
: Record the FM radio
: Open the FM radio options
-
What is RDS?
• Radio Data System (RDS) provides the reception and
display of messages such as broadcasting information. The
program information such as News, Sports or Music, or the
broadcasting station information is displayed on the screen.
• If the FM signal strength is weak, the RDS information may
not be displayed.
• RDS will be available only in Europe regions.
Page 58

Use additional applications > FM Radio
Record the FM radio
Tap to record the FM radio.
Tap <Yes> from the pop-up window.
■
Tap to pause recording.
Tap to stop recording.
■
The recorded file is saved automatically.
Tap <Yes> to play the recorded file.
■
When you are finished playing the recorded file, the
screen returns to Recording mode.
■
If you want to return to Recording mode without playing
the recorded file, tap <No>.
Note
• The maximum recording time for a file is 5 hours.
• The recorded files will be saved in <File Browser> →
<Recorded Files> → <FM Radio>.
56
Save radio stations
You can save your favourite radio stations to easily access them.
Save the current radio station
In Manual mode, tap .
Tap <Add to Preset>.
Save radio stations automatically
You can automatically search for available radio stations and
save them as your favourites. You can save up to 30 radio
stations.
In Manual mode, tap .
Tap <Auto Preset>.
Tap <Yes> to confirm.
■
Automatic tuning begins. The radio stations located are
saved in your favourites.
Listen to a favourite radio station
In Manual mode, tap <Preset> at the bottom of
the FM radio screen.
Tap the radio station you want.
Page 59

Use additional applications > FM Radio
Use the FM radio options
You can change options for listening to the FM radio.
From the FM radio screen, tap .
Customise the following options:
Option Description
Add to
Preset*
Delete from
Preset**
Auto Preset
FM Region
Save the current radio station.
Delete a saved radio station.
Search for and save available radio stations
automatically (up to 30).
Re-tune frequencies according to your region.
See the following frequency ranges by region:
Worldwide 87.50 MHz~108.00 MHz
USA
Korea
Japan 76.0 MHz~108.0 MHz
Note
• This option may not be available
• If you change the region, the
87.5 MHz~108.0 MHz
depending on your region.
previously saved stations will be
deleted.
57
* Available only in Manual mode
** Available only in Preset mode
Page 60

58
Flash Player
Use the flash player to view
flash files (.swf) stored in
your player. To download
files, see "Download media
files."
In the main menu, tap .
Tap a file you want.
Play the file.
■
Tap at the bottom of the screen to display the menu tray.
To Do this
Move on the screen
Pause or resume playback
Note
• The flash player may not play some flash files (.swf).
• Your player may restart depending on the flash files (.swf) you play.
Tap
Tap
or
Page 61

59
Games
Play games stored in your
player.
In the main menu, tap .
Tap a game you want.
Game Description
Wise Star
Sudoku Champ
Bubble Bang Burst as many bubbles as possible in a set time.
Astro Ranger Tap a visual image in time to musical and visual cues to get high scores.
Play the game.
Note
• Games provided may be changed without prior notice.
• For information about playing games, see the Help of each game.
Line up 3 planets of the same kind horizontally or vertically to explode them
and gain points.
Enter digits from 1 to 9 into the blank spaces. Every row must contain one of
each digit.
Page 62

60
Bluetooth
Use the Bluetooth wireless
feature to connect
Bluetooth stereo headsets
to listen to music. You can
also connect mobile phones
or other wireless devices.
Caution
Do not use the Bluetooth
wireless features for illegal
purposes (pirated copy of
files, illegal wireless tapping
and communications, etc. for
commercial purposes). Samsung
is not responsible for any of these
illegal uses and the consequent
results.
Find and register other Bluetooth-enabled devices
To use the Bluetooth wireless feature, you need to register your player with other devices.
Turn on the Bluetooth wireless feature of the other device you want to
connect to.
In the main menu, tap .
Tap at the centre of the screen, or tap at the bottom of the screen.
■
Your player starts searching for Bluetooth-enabled devices around your player.
■
To stop searching, tap .
■
If your player has not found the device you want to connect to or if you want to refresh
the list of the searched devices, tap or .
Tap and drag a device icon onto the icon.
Indicate the current
page number (The
number increases
as the number of
detected devices
increases)
Note
It is recommended to name mobile devices in English to ensure compatibility.
Indicate mobile phones
Indicate Bluetooth stereo
headsets
Page 63

Use additional applications > Bluetooth
61
Connect Bluetooth-enabled
Enter a Bluetooth password for the device you
connect to for the first time.
■
To set a Bluetooth password, see the user manual of
the device you connect to.
Tap <Yes> to confirm.
■
When you enter the correct Bluetooth password,
registering is complete. Now you can connect your
player to the other device.
■
For connecting Bluetooth-enabled devices, see
"Connect Bluetooth-enabled devices."
Delete registered devices
From the Bluetooth screen, tap a device you want
to delete.
Tap at the bottom of the screen.
devices
You can use the Bluetooth wireless feature to connect to other
devices
In the main menu, tap .
Tap and drag a device icon onto the icon.
■
To search again, tap .
Tap a service depending on the device you
connect to.
Option Description
File Transfer Select to transfer files to and from the device.
Use the Bluetooth-enabled device that is
connected with your player. See "Use call
functions (hands-free)."
■
The Bluetooth icon at the top of the screen will change
according to the device type connected.
( : Mobile phones, : Bluetooth stereo headsets)
■
If a Bluetooth stereo headset is connected, you can
listen to music or hear a voice through the headset.
Page 64

Use additional applications > Bluetooth
Note
• If you restart your player or the other device connected,
the Bluetooth connection will be disconnected. See the
steps above to reconnect the devices.
• Some Bluetooth stereo headsets may not be compatible
with your player.
Disconnect the Bluetooth devices
From the Bluetooth screen, tap the connected
device.
Tap .
Tap <Yes> to confirm.
Note
When you are not using the Bluetooth features, deactivate
the Bluetooth wireless feature to save the battery. Tap and
then tap <Bluetooth : ON>.
Use call functions ( hands-free)
When your player is connected to your mobile phone with the
hands-free service, you can make or receive calls.
Make voice calls
Tap .
Make a call using one of the following options:
Option Description
Call by
Number
Call History
Enter a phone number you want
Make a call from the call log
Note
To clear the call log, tap → <Delete>
or <Delete All>
→ <Yes>.
62
Redial Call the last dialled number
Page 65

Use additional applications > Bluetooth
63
If you selected <Call by Number>, enter a phone
number on the dialler screen and then tap
■
You can make calls with speed dial numbers. From
the dialler screen, tap and hold a speed dial number.
.
When a call is connected, the following screen
appears.
Tap to switch the call
to the mobile phone
Tap to end the call
Note
Your player may emit some noise when you press the buttons
of the mobile phone or make or answer a call.
Answer a call
If you receive a call from the connected mobile phone while
playing music or videos, the playback will stop and a pop-up
window will appear. Tap <Yes> to answer the call.
Page 66

Use additional applications > Bluetooth
Transfer files
When your player is connected with mobile phones or other
MP3 players with the file transfer service, you can send or
receive data, such as music files, pictures, address book entries,
etc.
Send a file
When the file browser launches, tap a file you want to send and
then tap .
Note
• If you send DRM-protected files to another device, the files
will not be available on the destination device.
Receive a file
When you receive a file, a pop-up window appears to confirm
that you are connecting. Tap <Yes> to receive the file.
Note
• For sending files to your player from the other device, see
the user manual of the other device.
• Received files will be saved in <File Browser>
Data>.
• If there is a file with the same name in the folder, your
player will automatically add "(1)" to the name and save
the file.
→ <Shared
64
Page 67

Use additional applications > Bluetooth
65
Use the Bluetooth options
You can set options for the Bluetooth wireless feature.
Tap at the bottom of the Bluetooth main
screen.
Customise the following options:
Option Description
Bluetooth : ON
Search Option
My Device Info.
Turn the Bluetooth wireless feature
on or off.
Select a type of the Bluetooth service
to search.
Check the device name and address
for Bluetooth.
Information for using Bluetooth
• There may be some noise or malfunction due to the interference of
the radio waves from other devices or the user environment.
• Make sure that Bluetooth devices you are trying to connect
to the player are nearby. As the distance between the player
and the connected device increases, the sound quality will be
downgraded.
• The maximum distance for the wireless connection between
your player and another Bluetooth-enabled device is 10 meters
(30 feet). If the player and the device are more than 10 meters
apart, the connection will be terminated automatically. Even
when the devices are within the maximum distance, the quality of
communications will be downgraded if the devices are separated
by obstacles such as walls or doors.
• When you are using Bluetooth stereo headsets, avoid viewing
pictures or documents as this may slow down button responses
and may decrease the quality of your Bluetooth connection.
• The Bluetooth wireless feature in your player is optimised for
Samsung devices and may not be compatible with devices of
other manufacturers.
• You cannot use the Bluetooth wireless feature while you are
listening to the FM radio or playing games. Your player may not
play some music or video files via a Bluetooth stereo headset.
• Use only Bluetooth-certified stereo headsets. Your player does not
support mono hands-free headsets.
• Some menus in your player may not be available when the
Bluetooth wireless feature is activated.
Page 68

Use additional applications > Bluetooth
• Compatible Bluetooth stereo headsets
Manufacturer Model name
SAMSUNG SBH500, SBH100
Sony Ericsson HBH-DS970
Jabra BT620S
iBluon BT-HS02-HQ
Plantronics P590, VOYAGER 855
LUBIX NC1
66
Page 69

67
Datacasts
When you have registered
RSS addresses of your
favourite news website,
UCC, or blogs on EmoDio,
you can view various
contents in Datacasts.
Note
For more information about
Datacasts, see the Help of
EmoDio.
What is RSS?
RSS is a standardised XML
file format used to publish
and deliver to users or
readers frequently-updated
works, such as news or blog
entries.
In the main menu, tap .
Tap a channel folder you want.
Tap the content you want to view.
View the content.
Page 70

68
Voice REC
You can record voice
memos.
In the main menu, tap .
Tap to start recording.
■
The recording starts.
■
Tap to pause recording.
Tap to stop recording.
■
The recorded file is saved automatically.
Tap <Yes> to play the recorded file.
■
After the recorded file has played, the screen will return to Recording mode.
■
If you want to return to Recording mode without playing back the file, tap <No>.
Note
• The recording may be interrupted when you record too close or too far from the
microphone.
• When the battery is low, you cannot record voice memos.
• The maximum recording time for one file is 5 hours.
• The recorded files will be saved in <File Browser> → <Recorded Files> → <Voice>.
Page 71

69
Address Book
View contact information
received via Bluetooth.
When the mobile phone is
connected to your player,
you can make a call directly
from the address book.
In the main menu, tap .
Tap a contact's name you want.
View the contact information.
Tap to add or
change the image
Note
• Address book entries are sorted alphabetically.
• The address book files transferred from other devices will be saved in <File Browser> →
<Shared Data>.
• The address book supports only vCard files.
Tap to make a call (The
calling feature is available
when a mobile phone is
connected to your player
via Bluetooth)
Page 72

Customise settings
Change your player’s settings to match your preferences.
Settings ..............................................................................71
Sound settings ..................................................................................... 72
Display settings .................................................................................... 72
Language settings ................................................................................ 73
Time settings ........................................................................................ 73
System settings .................................................................................... 73
Page 73

71
Settings
Learn to change your
player’s settings.
In the main menu, tap .
Tap a setting menu you want to dustomise.
Menu Description
Sound Set sound settings
Display Set display settings
Language Set language settings
Time Set the current time
System Set system settings
Tap an option.
Change the settings.
Page 74

Customise settings > Settings
72
Sound settings
Menu Description
Street
Mode
Audio
Upscaler
Set to make the music sound clearer by filtering
out ambient noise.
Set to upscale low resolution audio files for
improved sound quality.
Set up your own equalizer (DNSe) to customise
myDNSe
sounds to your preference. Adjust frequencies for
each equalizer and tap <OK>.
Beep
Sound
Turn the beep sound on or off when you tap the
touch screen.
Set to limit the volume of the earphones to protect
your hearing.
- <Off>: You can adjust the volume as you want. If
you increase the volume over level 15 and restart
Wise
Volume
your player, the player will turn on at volume level
15 to protect your hearing.
- <On>: Your player displays a warning message
when you are exposed to a high level of volume
for a long period of time. Your player automatically
decreases the volume to a moderate level.
Optimise the sound settings for your earphones.
Master EQ
Adjust frequencies for the equaliser and tap
<OK>.
Display settings
Menu Description
Font Select a font type for the display text.
Reset My
Skin
Reset
Booting
Image
180º rotate Change the orientation of the screen.
Display Off &
Hold
Brightness Adjust the brightness of the screen.
Restore the wallpaper image.
Restore the image displayed when your player is
turned on.
Set how long the screen stays on when not in use.
When the screen turns off, it is automatically locked.
Page 75

Customise settings > Settings
73
Language settings
Menu Description
Menu Select a language for the display text.
Contents
Time settings
Menu Description
Date&Time
Date Type Set the time format.
Time Zone Select your time zone to view the current time .
Select a language to display the contents stored in
your player.
Set the current time and date. See "Analogue clock/
Digital clock" on page 19.
System settings
Menu Description
Enter user information, such as name and birthday.
Note
My Info
Sleep
PC
Connection
User name you enter will display on the
screen when your player is turned on. On
your birthday, the message "Happy birthday"
will display.
Set to automatically turn off your player after a
specified period of time.
Select a USB connection mode to connect your
player to a PC.
- <MSC> : A PC will recognise your player as a
removal disk.
- <MTP>: A PC will recognise your player as a
media device. The USB connection mode is set
to <MTP> by default.
Page 76

Customise settings > Settings
74
Menu Description
Select a video encoding system for connecting to
a TV. If you are not sure which to select, check the
documentation that came with your TV.
TV out Type
Hold Option
Default Set Restore all settings to the factory settings.
Format
- <NTSC>: USA, Canada, Japan, Korea, Taiwan,
Mexico, etc.
- <PAL> (Supports the BDGHI type only): China,
Denmark, Finland, Germany, United Kingdom,
Netherlands, Italy, Malaysia, Singapore, Spain,
Sweden, Thailand, Norway, etc.
Set how your player works when you press
- <All>: Lock the touch screen and the buttons.
- <Touch Screen Only>: Lock the touch screen only.
Delete all data and files stored in your player.
Note
Remember to make backup copies of all
important data stored in your player. The
manufacturer’s warranty does not cover loss
of data that results from user actions.
Menu Description
Check the DivX registration code for your player.
Note
ABOUT DIVX VIDEO: DivX® is a digital video
format created by DivX, Inc. This is an official
DivX Certified device that plays DivX video.
Visit www.divx.com for more information and
software tools to convert your files into DivX
.
DivX
Registration
code
video.
ABOUT DIVX VIDEO-ON-DEMAND: This
DivX Certified® device must be registered in
order to play DivX Video-on-Demand (VOD)
content. To generate the registration code,
locate the DivX VOD section in the device
setup menu. Go to vod.divx.com with this
code to complete the registration process
and learn more about DivX VOD.
Devices certified to play DivX video at the
Mobile profile:
“DivX Certified to play DivX® video up to
320x240”
Page 77

Customise settings > Settings
Menu Description
Check the system information of your player.
- <Firmware>: View the version of the firmware
installed in your player.
- <Memory>: View the total amount of memory,
and the amount of memory being used and
remaining.
About
Note
• Regarding the Built-In Memory
1GB=1,000,000,000 bytes : actual
formatted capacity may be less as the
internal firmware uses a portion of the
memory.
75
Page 78

Appendix
View the maintenance, specifications, and troubleshooting for your
player.
Maintenance of your player ................................................77
Troubleshooting .................................................................. 78
Specifications .....................................................................80
Correct disposal of this product
(Waste Electrical & Electronic Equipment) ..........................82
Correct disposal of batteries in this product ......................82
License ...............................................................................83
Contact Samsung World Wide .........................................84
Page 79

Maintenance of your player
Carefully read the following to properly clean, store, or dispose of your player.
Cleaning
• When your player is dirty, wipe your player with a soft, clean and dry cloth.
• Do not apply cleaners to your player's surface. This may cause damage or
affect the performance of the player.
• Do not clean your player with gasoline, benzene, thinner, WD-40, or other
chemicals. This may cause damage to your player’s surface.
Storing
Store your player in a well-ventilated area.
Disposing
• Dispose of wrapping materials, batteries, and electronic devices separately.
• The wrapping materials include paper and two kinds of plastics (PC, PE).
77
Page 80

Troubleshooting
When you have a trouble using the player, try the following before contacting a service centre.
78
Problem Solution
• Your player will not turn on if the battery is
My player will not
turn on.
The touch screen
and buttons do
not work.
The screen
does not display
anything.
My player turns
off automatically.
completely drained. Recharge the battery
and turn the player on again.
• Press the reset button to reset your player.
• Check if the touch screen and buttons are
locked.
• Check if the buttons or icons correspond to
the functions you want to activate.
• Press the reset button to reset your player.
• Your player turns off when you do not use it
for a specific period of time. Turn your player
on and try again.
• The screen may not be visible under the
direct rays of the sun.
• The screen turns off automatically after the
period of time you set in <Display Off &
Hold> has elapsed. Press any button or tap
the screen to turn on the screen.
If you do not use your player for 5 minutes after
you pause the playback, it will automatically
turn off.
Problem Solution
The battery
running time is
different from
what is written in
the user manual.
EmoDio will not
work on a PC.
My player will not
connect to a PC.
The file transfer is
too slow.
My player will not
play any files.
• The battery running time may differ
depending on the current sound mode or
display settings.
• The battery running time may shorten
when your player was left in a high or low
temperature.
Check if your PC meets PC requirements.
See "Recommended PC requirements."
Run Windows Update on the PC. Select key
updates and service packs and update all.
When the update is completed, reboot the PC
and reconnect.
Reformat your player on Windows XP or Vista
and try again.
End all programs you are not using. Running
multiple programs simultaneously can slow
down the file transfer rate.
• Check if any playable files are stored in your
player.
• Check the size of the files to play.
Your player will not play more than 2GB files.
• Check if the files are damaged.
• Check the battery remaining.
Page 81

Appendix > Troubleshooting
79
Problem Solution
• Check if the USB cable is correctly
connected. Reconnect it.
I cannot
download files to
my player.
Files or data are
missing.
The playing time
does not display
correctly during
playback.
The file name
does not display
correctly.
My player is
getting hot to the
touch.
• Check if you have Windows Media Player
11 or higher installed on your PC. If you
are using old versions, download Windows
Media Player 11 or higher.
• Check if the memory is full.
• Press the reset button to reset your player.
Check if you disconnected the USB cable while
transferring files or data. This can cause data
loss or fatal errors in your player. Samsung is
not responsible for any damages resulting from
data loss.
This is normal if the currently playing file is of the
VBR (Variable Bit Rate) format.
Change the language setting in <Settings> →
<Language> → <Contents>.
Charging the battery can heat up your player. It
does not affect the player's life or capabilities.
Problem Solution
My player does
not play a video
file but display an
error message.
The Bluetooth
wireless
connection is not
established.
Retransfer the video file with EmoDio.
• Check if you are connecting to Bluetoothcertified stereo headsets. Your player does
not support mono hands-free headsets.
• If you restart your player, stereo headset, or
mobile phone, the Bluetooth connection may
be ended. Reconnect again.
• If you are connecting to a mobile phone, the
connection with a Bluetooth stereo headset
must be ended. Check if a stereo headset is
connected with your player.
Page 82

Specifications
Model Name YP-R1
Rating DC 5.0V / 1A
• MPEG1/2/2.5 Layer 3 (8 kbps ~ 320 kbps, 8 kHz ~ 48 kHz)
• WMA (12 kbps ~ 320 kbps, 16 kHz ~ 48 kHz)
• Ogg (32 kbps ~ 400 kbps, Q0 ~ Q10, 8 kHz ~ 48 kHz)
• AAC-LC (8 kbps ~ 320 kbps, 8 kHz ~ 48 kHz)
Audio
File
Video
Image
Flash
• AAC+ (8 kbps ~ 320 kbps, 8 kHz ~ 48 kHz)
• Enhanced-AAC-Plus (8 kbps ~ 320 kbps, 8 kHz ~ 48 kHz)
• FLAC (level 0 ~ 8, 16 kHz ~ 48 kHz)
• RA (20 kbps ~ 96 kbps, 8 kHz, 11.025 kHz, 44.1 kHz)
• WAV (wav standard, 8 kHz ~ 48 kHz)
AVI/SVI
MP4
WMV/ASF
MOV
JPEG (Baseline, Progressive), BMP (MAX32Bit), PNG, Gif (89a/87a)
SWF (Flash Player 8.0 or lower, ActionScript2.0 or lower)
Video Audio
• MPEG4 (Max.720 X 480) Advanced Simple Profile@Level 5
• Divx3/4/5/(Max. 720 X 480)
• Xvid (Max. 720 X 480)
• H.264/AVC (Max. 720 X 480) High Profile@Level3.0
WMV9 (MAX 720 X 480) Advanced Profile@level1
• MPEG4 (Max.720 X 480) Advanced Simple Profile@Level 5
• H.264/AVC (Max. 720 X 480) High Profile@Level 3.0
WMV9 (MAX 720 X 480) Advanced Profile@level1(vc1)
• MPEG4 (Max.720 X 480) Advanced Simple Profile@Level 5
• H.264/AVC (Max. 720 X 480) High Profile@Level 3.0
MP3/AAC/AAC+
WMA
MP3/AAC/AAC+
WMA
AAC/AAC+
80
Page 83

Appendix > Speci cations
81
Earphones Output
Output Frequency
Range
Signal to Noise Ratio
Supported Number of
Files/Folders
Playing Time
Temperature Range for
Operation
Case Tempered glass, Plastic, Aluminum
Weight 50 g
Dimensions (WxHxD) 45.5 X 85.2 X 8.9 mm
FM T.H.D
FM Radio
FM Signal to
Noise Ratio
FM Useable
Sensitivity
20 mW/Ch. (France 5 mW/Ch.)
(based on16 Ω)
20 Hz~20 kHz
90 dB with 20 kHz LPF
(based on 1 kHz, 0 dB)
File: Max. 5000
Folder: Max. 5000 (including File)
Music: 25 hours (MP3 128 kbps, Volume
level 15, Normal sound mode, LCD off)
Video: 5 hours ((Brightness 3, Volume
level 15, Normal sound mode, SVI)
-5˚ C ~ 35˚ C (23˚ F ~ 95˚ F)
1 %
55 dB
30 dBµ
Wireless System
Bluetooth QD ID B015440
Emission Type F1D
RF power CLASS I
Transmit Frequency 2402 MHz ~ 2480 MHz
Receive Frequency 2402 MHz ~ 2480 MHz
Number of channels 79 channels
Modulation System GFSK
Communication Mode Semi-duplex Operation
Humidity 0 ~ 95 %
Specifications Version
Supported
Module BCM2070
* Some of the contents in this manual are subject to change without prior
notice for further improvement.
2.0 + EDR
Page 84

82
Correct disposal of this product (Waste Electrical & Electronic Equipment)
(Applicable in the European Union and other European countries
with separate collection systems)
This marking on the product, accessories
or literature indicates that the product and
its electronic accessories (e.g. charger,
headset, USB cable) should not be
disposed of with other household waste
at the end of their working life. To prevent
possible harm to the environment or human
health from uncontrolled waste disposal,
please separate these items from other
types of waste and recycle them responsibly to promote the
sustainable reuse of material resources.
Household users should contact either the retailer where
they purchased this product, or their local government office,
for details of where and how they can take these items for
environmentally safe recycling.
Business users should contact their supplier and check the
terms and conditions of the purchase contract. This product
and its electronic accessories should not be mixed with other
commercial wastes for disposal.
Correct disposal of batteries in this product
(Applicable in the European Union and other European countries
with separate battery return systems.)
This marking on the battery, manual or
packaging indicates that the batteries in
this product should not be disposed of with
other household waste at the end of their
working life. Where marked, the chemical
symbols Hg, Cd or Pb indicate that the
battery contains mercury, cadmium or lead
above the reference levels in EC Directive 2006/66. If batteries
are not properly disposed of, these substances can cause harm
to human health or the environment.
To protect natural resources and to promote material reuse,
please separate batteries from other types of waste and recycle
them through your local, free battery return system.
Page 85

License
The product player accompanying this user manual is licensed under certain intellectual property rights of certain third
parties. This license is limited to private non-commercial use by end-user consumers for licensed contents.
No rights are granted for commercial use.
The license does not cover any product player other than this product player and the license does not extend to
any unlicensed product player or process conforming to ISO/IEC 11172-3 or ISO/IEC 13818-3 used or sold in
combination with this product player. The license only covers the use of this product player to encode and/or decode
audio files conforming to the ISO/IEC 11172-3 or ISO/IEC 13818-3. No rights are granted under this license for
product features or functions that do not conform to the ISO/IEC 11172-3 or ISO/IEC 13818-3.
83
Page 86

Contact Samsung World Wide
If you have any questions or comments relating to Samsung products, please contact the SAMSUNG Customer Care
Centre.
84
Country Customer Care Centre Web Site
CANADA
MEXICO
U.S.A
ARGENTINE
BRAZIL
CHILE
NICARAGUA
HONDURAS
COSTA RICA
ECUADOR
EL SALVADOR
GUATEMALA
JAMAICA
PANAMA
PUERTO RICO
REP. DOMINICA
TRINIDAD &
TOBAGO
1-800-SAMSUNG (726-7864)
01-800-SAMSUNG (726-7864)
1-800-SAMSUNG (726-7864)
0800-333-3733
0800-124-421, 4004-0000
800-SAMSUNG (726-7864)
00-1800-5077267
800-7919267
0-800-507-7267
1-800-10-7267
800-6225
1-800-299-0013
1-800-234-7267
800-7267
1-800-682-3180
1-800-751-2676
1-800-SAMSUNG (726-7864)
☎
www.samsung.com/ca
www.samsung.com/mx
www.samsung.com/us
www.samsung.com/ar
www.samsung.com/br
www.samsung.com/cl
www.samsung.com/latin
www.samsung.com/latin
www.samsung.com/latin
www.samsung.com/latin
www.samsung.com/latin
www.samsung.com/latin
www.samsung.com/latin
www.samsung.com/latin
www.samsung.com/latin
www.samsung.com/latin
www.samsung.com/latin
Country Customer Care Centre Web Site
VENEZUELA
COLOMBIA
BELGIUM
CZECH
REPUBLIC
DENMARK
FINLAND
FRANCE
GERMANY
HUNGARY
ITALIA
LUXEMBURG
NETHERLANDS
NORWAY
POLAND
0-800-100-5303
01-8000112112
02 201 2418
800-SAMSUNG (800-726786)
8-SAMSUNG (7267864)
30-6227 515
01 4863 0000
01805 - SAMSUNG
(726-7864 € 0,14/Min)
06-80-SAMSUNG (726-7864)
800-SAMSUNG (726-7864)
02 261 03 710
0900-SAMSUNG
(0900-7267864) (€ 0,10/Min)
3-SAMSUNG (7267864)
0 801 1SAMSUNG
(172678), 022-607-93-33
☎
www.samsung.com/latin
www.samsung.com.co
www.samsung.com/be
(Dutch)
www.samsung.com/be_fr
(French)
www.samsung.com/cz
www.samsung.com/dk
www.samsung.com/fi
www.samsung.com/fr
www.samsung.de
www.samsung.com/hu
www.samsung.com/it
www.samsung.com/lu
www.samsung.com/nl
www.samsung.com/no
www.samsung.com/pl
Page 87

Appendix > Contact Samsung World Wide
85
Country Customer Care Centre Web Site
PORTUGAL
SLOVAKIA
SPAIN
SWEDEN
U.K
EIRE
AUSTRIA
SWITZERLAND
RUSSIA
KAZAKHSTAN
UZBEKISTAN
KYRGYZSTAN
TADJIKISTAN
UKRAINE
LITHUANIA
LATVIA
ESTONIA
80820-SAMSUNG (726-7864)
0800-SAMSUNG (726-7864)
902-1-SAMSUNG
(902 172 678)
075-SAMSUNG (726 78 64)
0845 SAMSUNG (7267864)
0818 717 100
0810-SAMSUNG
(7267864, € 0.07/min)
0848-SAMSUNG
(7267864, CHF 0.08/min)
8-800-555-55-55
8-10-800-500-55-500
8-10-800-500-55-500
00-800-500-55-500
8-10-800-500-55-500
8-800-502-0000
8-800-77777
8000-7267
800-7267
www.samsung.com/pt
www.samsung.com/sk
www.samsung.com/es
www.samsung.com/se
www.samsung.com/uk
www.samsung.com/ie
www.samsung.com/at
www.samsung.com/ch
www.samsung.ru
www.samsung.com/kz_ru
www.samsung.com/kz_ru
www.samsung.ua
www.samsung.com/lt
www.samsung.com/lv
www.samsung.com/ee
Country Customer Care Centre Web Site
AUSTRALIA
NEW ZEALAND
CHINA
HONG KONG
INDIA
INDONESIA
MALAYSIA
PHILIPPINES
SINGAPORE
THAILAND
TAIWAN
VIETNAM
TURKEY
SOUTH AFRICA
U.A.E
1300 362 603
0800 SAMSUNG
(0800 726 786)
800-810-5858, 400-810-5858,
010-6475 1880
3698-4698
3030 8282, 1800 110011,
1-800-3000-8282
0800-112-8888
1800-88-9999
1-800-10-SAMSUNG (726-7864)
1-800-3-SAMSUNG (726-7864),
02-5805777
1800-SAMSUNG (726-7864)
1800-29-3232, 02-689-3232
0800-329-999
1 800 588 889
444 77 11
0860-SAMSUNG (726-7864 )
800-SAMSUNG (726-7864),
8000-4726
www.samsung.com/au
www.samsung.com/nz
www.samsung.com/cn
www.samsung.com/hk
www.samsung.com/in
www.samsung.com/id
www.samsung.com/my
www.samsung.com/ph
www.samsung.com/sg
www.samsung.com/th
www.samsung.com/tw
www.samsung.com/vn
www.samsung.com/tr
www.samsung.com/za
www.samsung.com/ae
Page 88

Open Source Announcement
86
Some software components of this product incorporate source code covered
under the GNU General Public License(GPL) and BSD.
To obtain the source code covered under above licenses, please visit
http://opensource.samsungmobile.com/.
Component License
Linux Kernel 2.6.24 GPL 2.0
MSC application GPL 2.0
Video for Linux Two header file BSD 2.0
Below is the original English text of the GNU GPL and BSD.
GNU GENERAL PUBLIC LICENSE
Version 2, June 1991
Copyright (C) 1989, 1991 Free Software Foundation, Inc.
51 Franklin St, Fifth Floor, Boston, MA 02110-1301 USA
Everyone is permitted to copy and distribute verbatim copies of this license
document, but changing it is not allowed.
Preamble
The licenses for most software are designed to take away your freedom to
share and change it. By contrast, the GNU General Public License is intended
to guarantee your freedom to share and change free software--to make sure
the software is free for all its users. This General Public License applies to most
of the Free Software Foundation's software and to any other program whose
authors commit to using it. (Some other Free Software Foundation software is
covered by the GNU Library General Public License instead.) You can apply it
to your programs, too.
When we speak of free software, we are referring to freedom, not price. Our
General Public Licenses are designed to make sure that you have the freedom
to distribute copies of free software (and charge for this service if you wish), that
you receive source code or can get it if you want it, that you can change the
software or use pieces of it in new free programs; and that you know you can
do these things.
To protect your rights, we need to make restrictions that forbid anyone to
deny you these rights or to ask you to surrender the rights. These restrictions
translate to certain responsibilities for you if you distribute copies of the
software, or if you modify it. For example, if you distribute copies of such a
program, whether gratis or for a fee, you must give the recipients all the rights
that you have. You must make sure that they, too, receive or can get the source
code. And you must show them these terms so they know their rights.
We protect your rights with two steps:
(1) copyright the software, and (2) offer you this license which gives you
legal permission to copy, distribute and/or modify the software. Also, for
each author's protection and ours, we want to make certain that everyone
understands that there is no warranty for this free software.
If the software is modified by someone else and passed on, we want its
recipients to know that what they have is not the original, so that any problems
introduced by others will not reflect on the original authors' reputations.
Finally, any free program is threatened constantly by software patents.
We wish to avoid the danger that redistributors of a free program will individually
obtain patent licenses, in effect making the program proprietary. To prevent this,
we have made it clear that any patent must be licensed for everyone's free use
or not licensed at all.
The precise terms and conditions for copying, distribution and modification
follow.
Page 89

Appendix > Open Source Announcement
87
TERMS AND CONDITIONS FOR COPYING, DISTRIBUTION AND
MODIFICATION
0) This License applies to any program or other work which contains a
notice placed by the copyright holder saying it may be distributed under
the terms of this General Public License. The “Program”, below, refers to
any such program or work, and a “work based on the Program” means
either the Program or any derivative work under copyright law: that is to
say, a work containing the Program or a portion of it, either verbatim or
with modifications and/or translated into another language. (Hereinafter,
translation is included without limitation in the term “modification”.) Each
licensee is addressed as “you”.
Activities other than copying, distribution and modification are not covered
by this License; they are outside its scope. The act of running the Program
is not restricted, and the output from the Program is covered only if its
contents constitute a work based on the Program (independent of having
been made by running the Program). Whether that is true depends on what
the Program does.
1) You may copy and distribute verbatim copies of the Program’s source code
as you receive it, in any medium, provided that you conspicuously and
appropriately publish on each copy an appropriate copyright notice and
disclaimer of warranty; keep intact all the notices that refer to this License
and to the absence of any warranty; and give any other recipients of the
Program a copy of this License along with the Program. You may charge a
fee for the physical act of transferring a copy, and you may at your option
offer warranty protection in exchange for a fee.
2) You may modify your copy or copies of the Program or any portion of it,
thus forming a work based on the Program, and copy and distribute such
modifications or work under the terms of Section 1 above, provided that
you also meet all of these conditions:
a) You must cause the modified files to carry prominent notices stating that
you changed the files and the date of any change.
b) You must cause any work that you distribute or publish, that in whole
or in part contains or is derived from the Program or any part thereof, to
be licensed as a whole at no charge to all third parties under the terms
of this License.
c) If the modified program normally reads commands interactively when
run, you must cause it, when started running for such interactive use in
the most ordinary way, to print or display an announcement including an
appropriate copyright notice and a notice that there is no warranty (or
else, saying that you provide a warranty) and that users may redistribute
the program under these conditions, and telling the user how to view a
copy of this License. (Exception: if the Program itself is interactive but
does not normally print such an announcement, your work based on the
Program is not required to print an announcement.)
These requirements apply to the modified work as a whole.
If identifiable sections of that work are not derived from the Program,
and can be reasonably considered independent and separate works in
themselves, then this License, and its terms, do not apply to those sections
when you distribute them as separate works. But when you distribute the
same sections as part of a whole which is a work based on the Program,
the distribution of the whole must be on the terms of this License, whose
permissions for other licensees extend to the entire whole, and thus to each
and every part regardless of who wrote it.
Thus, it is not the intent of this section to claim rights or contest your rights
to work written entirely by you; rather, the intent is to exercise the right
to control the distribution of derivative or collective works based on the
Program. In addition, mere aggregation of another work not based on the
Program with the Program (or with a work based on the Program) on a
volume of a storage or distribution medium does not bring the other work
under the scope of this License.
Page 90

Appendix > Open Source Announcement
88
3) You may copy and distribute the Program (or a work based on it, under
Section 2) in object code or executable form under the terms of Sections 1
and 2 above provided that you also do one of the following:
a) Accompany it with the complete corresponding machine-readable
source code, which must be distributed under the terms of Sections 1
and 2 above on a medium customarily used for software interchange; or,
b) Accompany it with a written offer, valid for at least three years, to
give any third party, for a charge no more than your cost of physically
performing source distribution, a complete machine-readable copy of
the corresponding source code, to be distributed under the terms of
Sections 1 and 2 above on a medium customarily used for software
interchange; or,
c) Accompany it with the information you received as to the offer to
distribute corresponding source code. (This alternative is allowed only
for noncommercial distribution and only if you received the program
in object code or executable form with such an offer, in accord with
Subsection b above.)
The source code for a work means the preferred form of the work for
making modifications to it. For an executable work, complete source code
means all the source code for all modules it contains, plus any associated
interface definition files, plus the scripts used to control compilation and
installation of the executable. However, as a special exception, the source
code distributed need not include anything that is normally distributed (in
either source or binary form) with the major components (compiler, kernel,
and so on) of the operating system on which the executable runs, unless
that component itself accompanies the executable.
If distribution of executable or object code is made by offering access to
copy from a designated place, then offering equivalent access to copy
the source code from the same place counts as distribution of the source
code, even though third parties are not compelled to copy the source along
with the object code.
4) You may not copy, modify, sublicense, or distribute the Program except
as expressly provided under this License. Any attempt otherwise to copy,
modify, sublicense or distribute the Program is void, and will automatically
terminate your rights under this License. However, parties who have
received copies, or rights, from you under this License will not have their
licenses terminated so long as such parties remain in full compliance.
5) You are not required to accept this License, since you have not signed
it. However, nothing else grants you permission to modify or distribute
the Program or its derivative works. These actions are prohibited by law
if you do not accept this License. Therefore, by modifying or distributing
the Program (or any work based on the Program), you indicate your
acceptance of this License to do so, and all its terms and conditions for
copying, distributing or modifying the Program or works based on it.
6) Each time you redistribute the Program (or any work based on the
Program), the recipient automatically receives a license from the original
licensor to copy, distribute or modify the Program subject to these terms
and conditions. You may not impose any further restrictions on the
recipients’ exercise of the rights granted herein. You are not responsible for
enforcing compliance by third parties to this License.
7) If, as a consequence of a court judgment or allegation of patent
infringement or for any other reason (not limited to patent issues), conditions
are imposed on you (whether by court order, agreement or otherwise) that
contradict the conditions of this License, they do not excuse you from the
conditions of this License.
If you cannot distribute so as to satisfy simultaneously your obligations
under this License and any other pertinent obligations, then as a
consequence you may not distribute the Program at all. For example, if a
patent license would not permit royalty-free redistribution of the Program by
all those who receive copies directly or indirectly through you, then the only
way you could satisfy both it and this License would be to refrain entirely
from distribution of the Program.
Page 91

Appendix > Open Source Announcement
89
If any portion of this section is held invalid or unenforceable under any
particular circumstance, the balance of the section is intended to apply and
the section as a whole is intended to apply in other circumstances.
This section is intended to make thoroughly clear what is believed to be a
consequence of the rest of this License.
8) If the distribution and/or use of the Program is restricted in certain countries
either by patents or by copyrighted interfaces, the original copyright
holder who places the Program under this License may add an explicit
geographical distribution limitation excluding those countries, so that
distribution is permitted only in or among countries not thus excluded. In
such case, this License incorporates the limitation as if written in the body
of this License.
9) The Free Software Foundation may publish revised and/or new versions
of the General Public License from time to time. Such new versions will
be similar in spirit to the present version, but may differ in detail to address
new problems or concerns. Each version is given a distinguishing version
number. If the Program specifies a version number of this License which
applies to it and “any later version”, you have the option of following the
terms and conditions either of that version or of any later version published
by the Free Software Foundation.
If the Program does not specify a version number of this License, you may
choose any version ever published by the Free Software Foundation.
10) If you wish to incorporate parts of the Program into other free programs
whose distribution conditions are different, write to the author to ask
for permission. For software which is copyrighted by the Free Software
Foundation, write to the Free Software Foundation; we sometimes
make exceptions for this. Our decision will be guided by the two goals
of preserving the free status of all derivatives of our free software and of
promoting the sharing and reuse of software generally.
NO WARRANTY
11) BECAUSE THE PROGRAM IS LICENSED FREE OF CHARGE, THERE IS
NO WARRANTY FOR THE PROGRAM, TO THE EXTENT PERMITTED BY
APPLICABLE LAW. EXCEPT WHEN OTHERWISE STATED IN WRITING
THE COPYRIGHT HOLDERS AND/OR OTHER PARTIES PROVIDE THE
PROGRAM “AS IS” WITHOUT WARRANTY OF ANY KIND, EITHER
EXPRESSED OR IMPLIED, INCLUDING, BUT NOT LIMITED TO, THE
IMPLIED WARRANTIES OF MERCHANTABILITY AND FITNESS FOR A
PARTICULAR PURPOSE. THE ENTIRE RISK AS TO THE QUALITY AND
PERFORMANCE OF THE PROGRAM IS WITH YOU. SHOULD THE
PROGRAM PROVE DEFECTIVE, YOU ASSUME THE COST OF ALL
NECESSARY SERVICING, REPAIR OR CORRECTION.
12) IN NO EVENT UNLESS REQUIRED BY APPLICABLE LAW OR AGREED
TO IN WRITING WILL ANY COPYRIGHT HOLDER, OR ANY OTHER
PARTY WHO MAY MODIFY AND/OR REDISTRIBUTE THE PROGRAM AS
PERMITTED ABOVE, BE LIABLE TO YOU FOR DAMAGES, INCLUDING
ANY GENERAL, SPECIAL, INCIDENTAL OR CONSEQUENTIAL
DAMAGES ARISING OUT OF THE USE OR INABILITY TO USE THE
PROGRAM (INCLUDING BUT NOT LIMITED TO LOSS OF DATA OR DATA
BEING RENDERED INACCURATE OR LOSSES SUSTAINED BY YOU OR
THIRD PARTIES OR A FAILURE OF THE PROGRAM TO OPERATE WITH
ANY OTHER PROGRAMS), EVEN IF SUCH HOLDER OR OTHER PARTY
HAS BEEN ADVISED OF THE POSSIBILITY OF SUCH DAMAGES.
Page 92

Appendix > Open Source Announcement
90
END OF TERMS AND CONDITIONS
How to Apply These Terms to Your New Programs
If you develop a new program, and you want it to be of the greatest possible
use to the public, the best way to achieve this is to make it free software which
everyone can redistribute and change under these terms.
To do so, attach the following notices to the program. It is safest to attach
them to the start of each source file to most effectively convey the exclusion of
warranty; and each file should have at least the “copyright” line and a pointer to
where the full notice is found.
<one line to give the program's name and a brief idea of what it does.>
Copyright (C) <year> <name of author>
This program is free software; you can redistribute it and/or modify it under
the terms of the GNU General Public License as published by the Free
Software Foundation; either version 2 of the License, or(at your option) any
later version.
This program is distributed in the hope that it will be useful, but WITHOUT
ANY WARRANTY; without even the implied warranty of MERCHANTABILITY
or FITNESS FOR A PARTICULAR PURPOSE.
See the GNU General Public License for more details.
You should have received a copy of the GNU General Public License along
with this program; if not, write to the Free Software Foundation, Inc., 51
Franklin St, Fifth Floor, Boston, MA 02110-1301 USA.
Also add information on how to contact you by electronic and paper mail.
If the program is interactive, make it output a short notice like this when it starts
in an interactive mode:
Gnomovision version 69, Copyright (C) year name of author Gnomovision
comes with ABSOLUTELY NO WARRANTY; for details type ‘show w’.
This is free software, and you are welcome to redistribute it under certain
conditions; type ‘show c’ for details.
The hypothetical commands ‘show w’ and ‘show c’ should show the
appropriate parts of the General Public License. Of course, the commands you
use may be called something other than ‘show w’ and ‘show c’; they could
even be mouse-clicks or menu items--whatever suits your program.
You should also get your employer (if you work as a programmer) or your
school, if any, to sign a “copyright disclaimer” for the program, if necessary.
Here is a sample; alter the names:
Yoyodyne, Inc., hereby disclaims all copyright interest in the program
‘Gnomovision’ (which makes passes at compilers) written by James Hacker.
<signature of Ty Coon>, 1 April 1989
Ty Coon, President of Vice
This General Public License does not permit incorporating your program into
proprietary programs. If your program is a subroutine library, you may consider
it more useful to permit linking proprietary applications with the library. If this is
what you want to do, use the GNU Lesser General Public License instead of
this License.
Page 93

Appendix > Open Source Announcement
Video for Linux Two header file
Copyright (C) 1999-2007 the contributors
Redistribution and use in source and binary forms, with or without modification,
are permitted provided that the following conditions are met:
1. Redistributions of source code must retain the above copyright notice, this
list of conditions and the following disclaimer.
2. Redistributions in binary form must reproduce the above copyright notice,
this list of conditions and the following disclaimer in the documentation and/
or other materials provided with the distribution.
3. The names of its contributors may not be used to endorse or promote
products derived from this software without specific prior written permission.
THIS SOFTWARE IS PROVIDED BY THE NETBSD FOUNDATION, INC. AND
CONTRIBUTORS "AS IS" AND ANY EXPRESS OR IMPLIED WARRANTIES,
INCLUDING, BUT NOT LIMITED TO, THE IMPLIED WARRANTIES OF
MERCHANTABILITY AND FITNESS FOR A PARTICULAR PURPOSE ARE
DISCLAIMED. IN NO EVENT SHALL THE FOUNDATION OR CONTRIBUTORS
BE LIABLE FOR ANY DIRECT, INDIRECT, INCIDENTAL, SPECIAL,
EXEMPLARY, OR CONSEQUENTIAL DAMAGES (INCLUDING, BUT NOT
LIMITED TO, PROCUREMENT OF SUBSTITUTE GOODS OR SERVICES;
LOSS OF USE, DATA, OR PROFITS; OR BUSINESS INTERRUPTION)
HOWEVER CAUSED AND ON ANY THEORY OF LIABILITY, WHETHER IN
CONTRACT, STRICT LIABILITY, OR TORT (INCLUDING NEGLIGENCE OR
OTHERWISE) ARISING IN ANY WAY OUT OF THE USE OF THIS SOFTWARE,
EVEN IF ADVISED OF THE POSSIBILITY OF SUCH DAMAGE.
91
Page 94

Declaration of Conformity
For the following
Product : MP3 Player (Digital Audio Player)
Model(s) : YP-R1** and YP-R1J** (The mark “*” means the memory capacity and color of product.)
Year of affi xing CE marking : 2009
Manufactured at:
F1: Samsung Electronics Huizhou Co., Ltd.
Industrial Complex, Chenjiang Town, Huizhou City, Guangdong, China
PT. Samsung Electronics Indonesia
F2:
Cikarang Industrial Estate JI, Jababeka Raya Blok F 29-33
Cikarang, Bekasi 17530, Indonesia
(Factories name and address)
We hereby declare, that the product above is in compliance with the essential requirements of the Low Voltage Directive
(2006/95/EC), and Electromagnetic Compatibility Directive (2004/108/EEC) and R&TTE Directive (1995/5/EC) by application of:
EN 60065:2002 ETSI EN 301 489-1 V.1.6.1 :2005
EN 55013:2001+A1:2003+A2 :2006 ETSI EN 301 489-17 V1.2.1 :2002
EN 55020:2002+A1:2003+A2 :2005 ETSI EN 300 328 V1.7.1 :2006
EN 55022:1998+A1:2000+A2 :2003
EN 55024:1998+A1:2001+A2 :2003
The Technical documentation is kept at :
Samsung Electronics Co., Ltd
416, Maetan 3-Dong, Yeongtong-Gu, Suwon-Si, Gyeonggi-Do, 443-742 Korea
Manufacturer :
Samsung Electronics Huizhou Co., Ltd.
Industrial Complex, Chenjiang Town, Huizhou City,
Guangdong, China
30 June 2009 Owon Seo/Senior manager
(Place and date of issue) (Name and signature of authorized person)
Representative in the EU:
Samsung Electronics Euro QA Lab.
Blackbushe Business Park
Saxony Way, Yateley, Hampshire
GU46 6GG, UK
30 June 2009 Yong Sang Park / S. Manager
(Place and date of issue) (Name and signature of authorized person)
Page 95

Halogen Free Product
Samsung's Halogen Free Product means that an environmental friendly product does not
contain Chlorine, Bromine Flame Retardants and PVC (poly vinyl chloride) material based
on the IEC 61249-2-21 standard. This product also complies with EU RoHS Directive,
which restricts the use of certain Hazardous Substances - Cadmium (Cd), Lead (Pb),
Mercury (Hg), Hexavalent Chromium (Cr+6) as well.
REV. 0.0
 Loading...