


NETWORK VIDEO RECORDER
Quick Manual
XRN-2010/2011/2010A/2011A
XRN-3010/3010A
XRN-1610/1610S/1610A/1610SA
English
Features
The product records video and audio from network cameras to a hard disk, and enables playback from the hard disk.
It also provides remote monitoring environment for video and audio over the network using a remote computer.
• User-friendly UI
• Supports a range of 4K camera resolutions (3840X2160, 4096X2160, 4000X3000)
• Outputs a 4K high definition image using HDMI
• Record and play video
• Record and play audio
• Supports ONVIF Profile S standard and RTP / RTSP protocols
• Display the HDD operation status by HDD SMART
• HDD overwrite enabled
• Backup using USB 2.0, 3.0 protocols and external HDD
• Simultaneous play of 16 channels
• Various Search Modes (Time, Event, Smart, Text, Backup, ARB)
• Various Recording Modes (Normal, Event, Scheduled Recording)
• Alarm Input / Output
• Remote Monitoring function by Windows Network Viewer
• Live monitoring of the network camera
• Installation Wizard Function (Easy Setup, Quick Setup)
• Supports the smartphone remote monitoring feature by P2P support (XRN-2010A/2011A/3010A/1610A/1610SA)
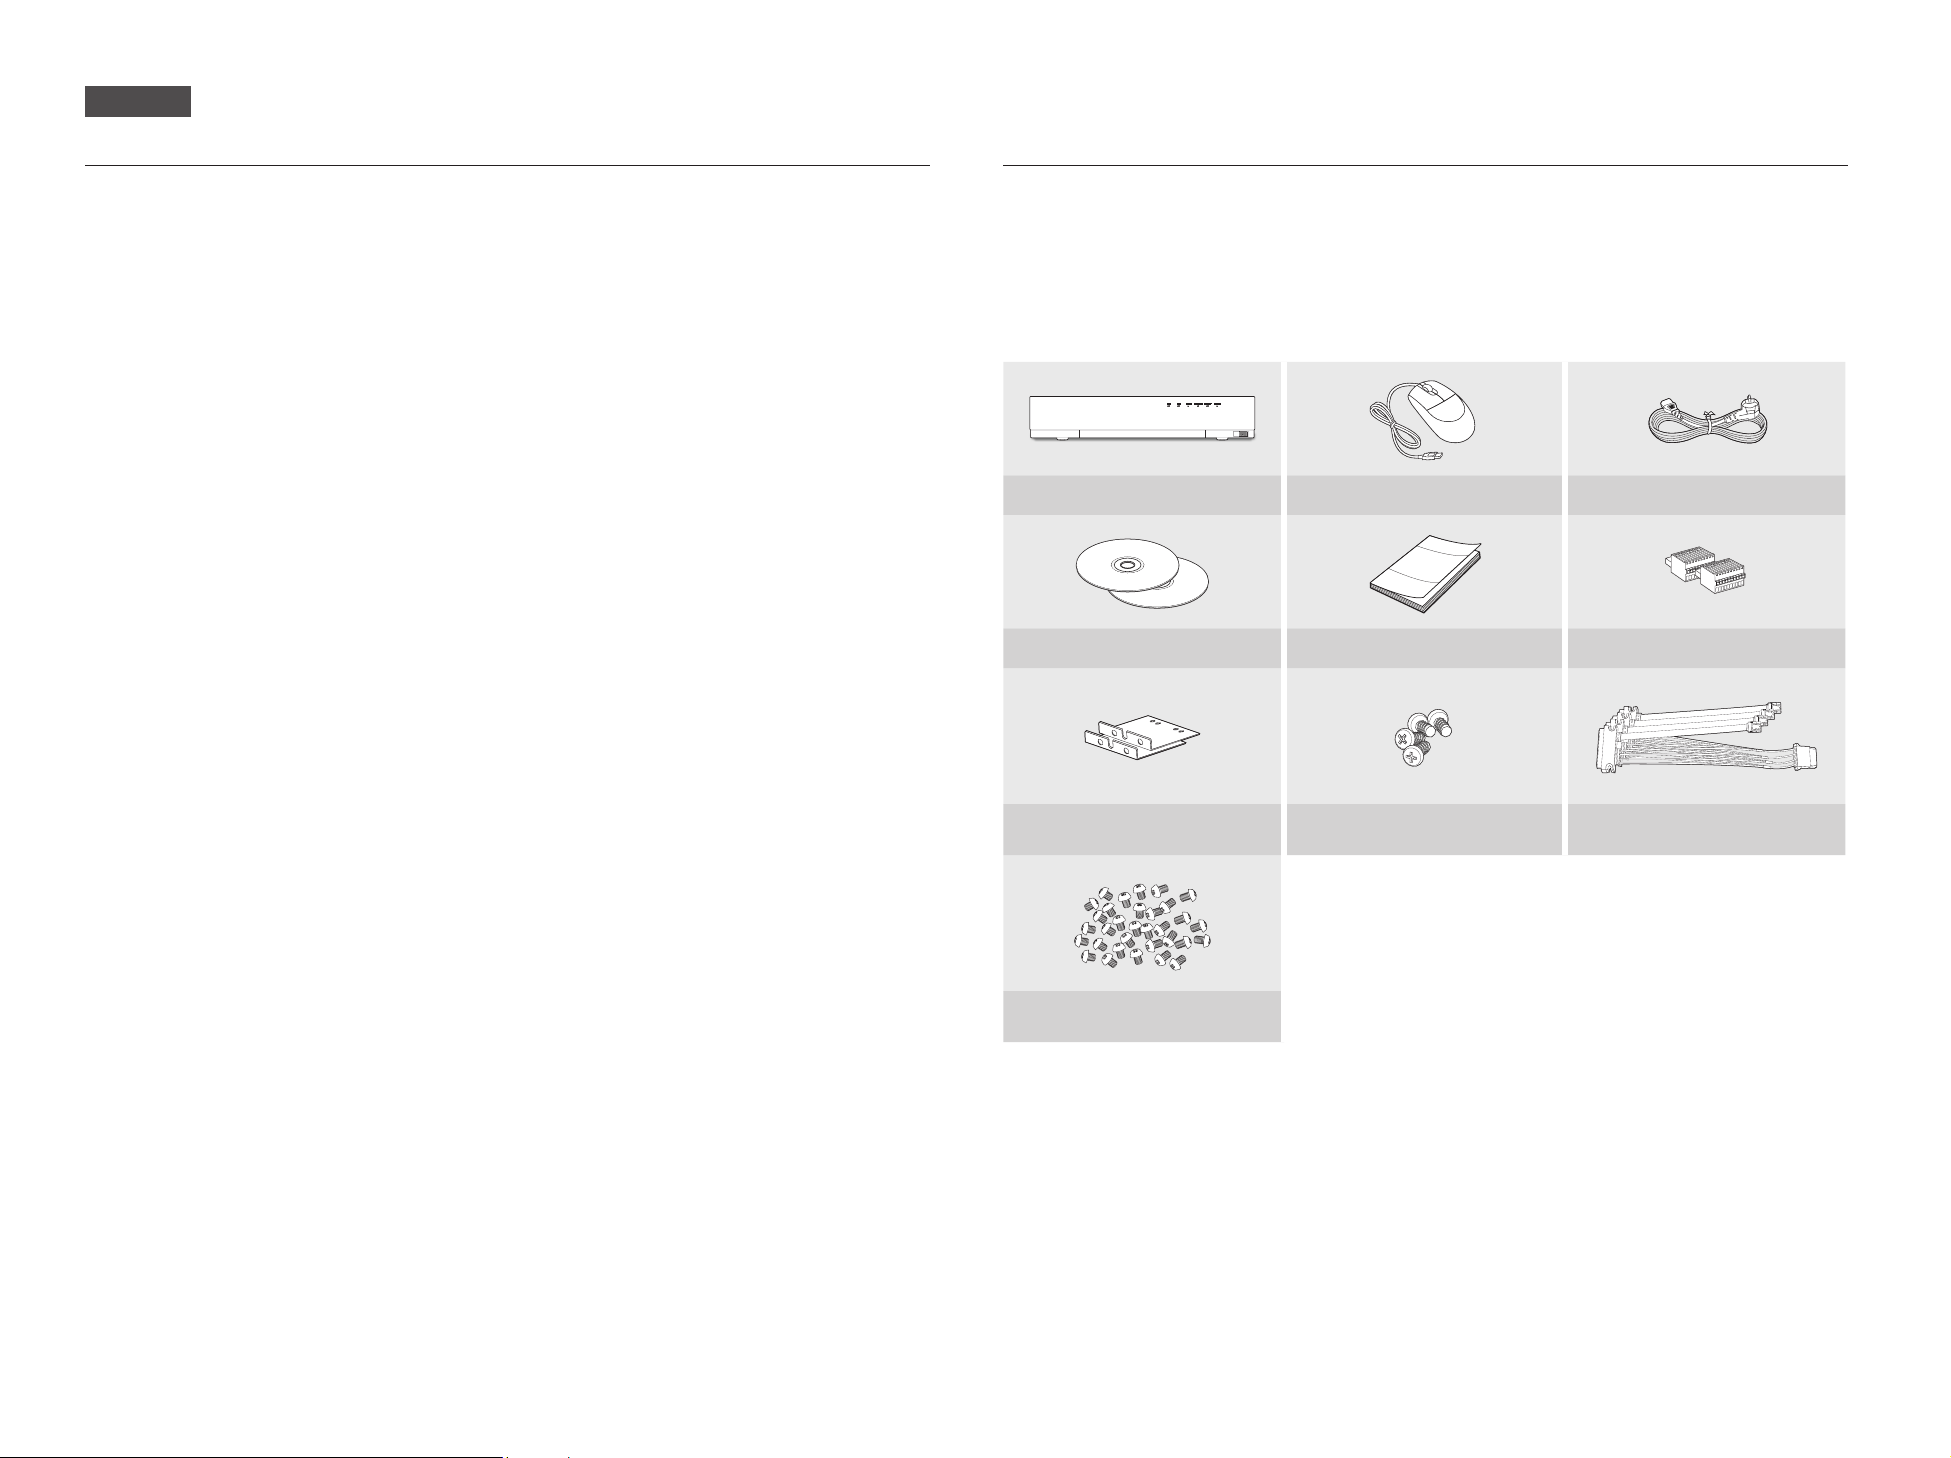
Package Contents
` The appearance of the components may differ from the image shown.
M
` Accessory category and quantity may differ depending on sales region.
` For some regions, HDD is not pre-installed. HDD Fixing Screw, SATA Power Cable, SATA data cable and SATA power/data cable
quantity vary depending on the model.
XRN-2010/2011/2010A/2011A/3010/3010A
NETWORK VIDEO RECORDER
NVR Mouse Power Cable
Network Viewer Software /
User Manual CD
USB
User Manual or Quick Manual Terminal block
Bracket Rack Bracket Fixing Screw
HDD Fixing Screw
(N/A on XRN-2011/2011A)
HDD SATA/Power cable
(N/A on XRN-2011/2011A)
1
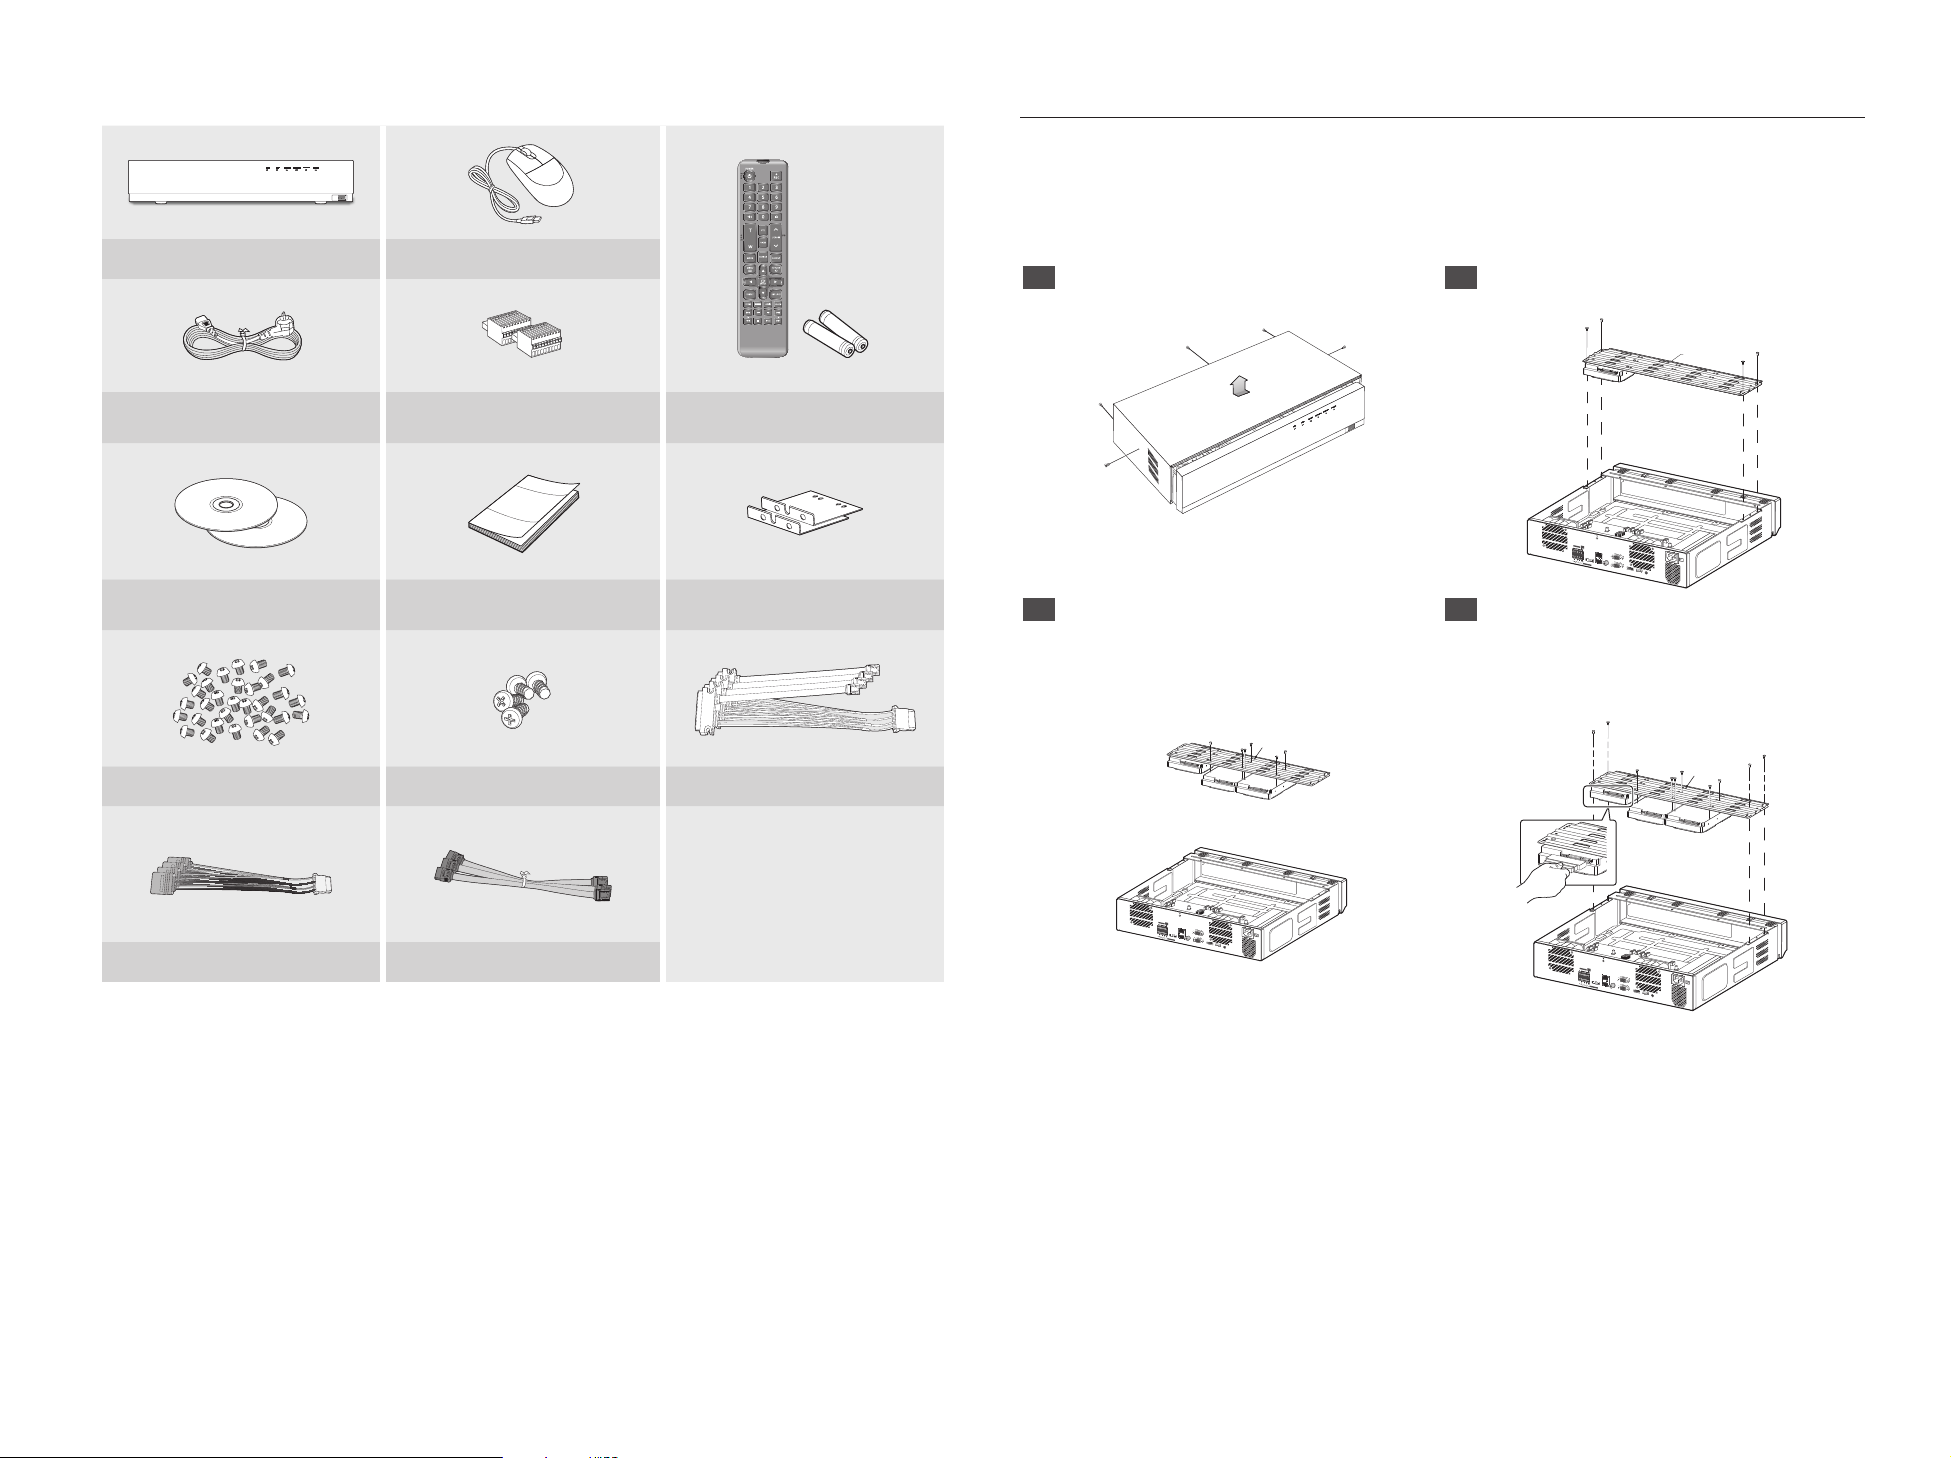
XRN-1610/1610S/1610A/1610SA
NETWORK VIDEO RECORDER
NVR Mouse
USB
HDD Installation
` If you are adding a new or previously used HDD to this product in addition to the HDD(s) originally installed, format the new
J
HDD manually in the set before use.
To learn how to format, see “Device/Format” in the Wisenet NVR User Manual.
XRN-2010/2010A/3010/3010A/1610/1610A/1610S/1610SA
1 Remove the screws located on the left/right side
and on the back side first, then remove the cover.
2 Remove the screws on the left/right side (4 screws)
and remove the bracket.
Bracket
Power Cable Terminal block
Network Viewer Software /
User Manual CD
User Manual or Quick Manual Bracket Rack
HDD Fixing Screw Bracket Fixing Screw
SATA Power Cable (XRN-1610S/1610SA) SATA Data Cable (XRN-1610S/1610SA)
Remote Control /
Remote Control Battery (AAA)
HD D SATA /Power cable (X RN-1610/1610A)
USB
ALARM IN
ALARM
123 4567 8
RESET
G
NETWORK 2
NO
NCNONO NO
COMCOM COMCOM
RS-232C
G
1 23 4
eSATA
ALARM OUT
NETWORK 1
AUDIO OUT
VGA OUT
HDMI USB
CONSOLE
3 Mount HDDs to the bracket and fix it with screws. 4 Connect the cable to the HDD by matching the HDD
SATA/power cable number to the HDD position
number on the bracket.
` For the HDD location number on the bracket, please refer to
the figure below.
Bracket
Bracket
ALARM IN
ALARM
123 45678
RESET
G
NETWORK 2
NO
NCNONO NO
COMCOM COMCOM
RS-232C
G
1 23 4
eSATA
ALARM OUT
NETWORK 1
AUDIO OUT
VGA OUT
HDMI USB
CONSOLE
ALARM IN
ALARM
123 4567 8
RESET
G
NETWORK 2
NO
NCNONO NO
COMCOM COMCOM
RS-232C
G
1 23 4
eSATA
ALARM OUT
NETWORK 1
AUDIO OUT
VGA OUT
HDMI USB
CONSOLE
2
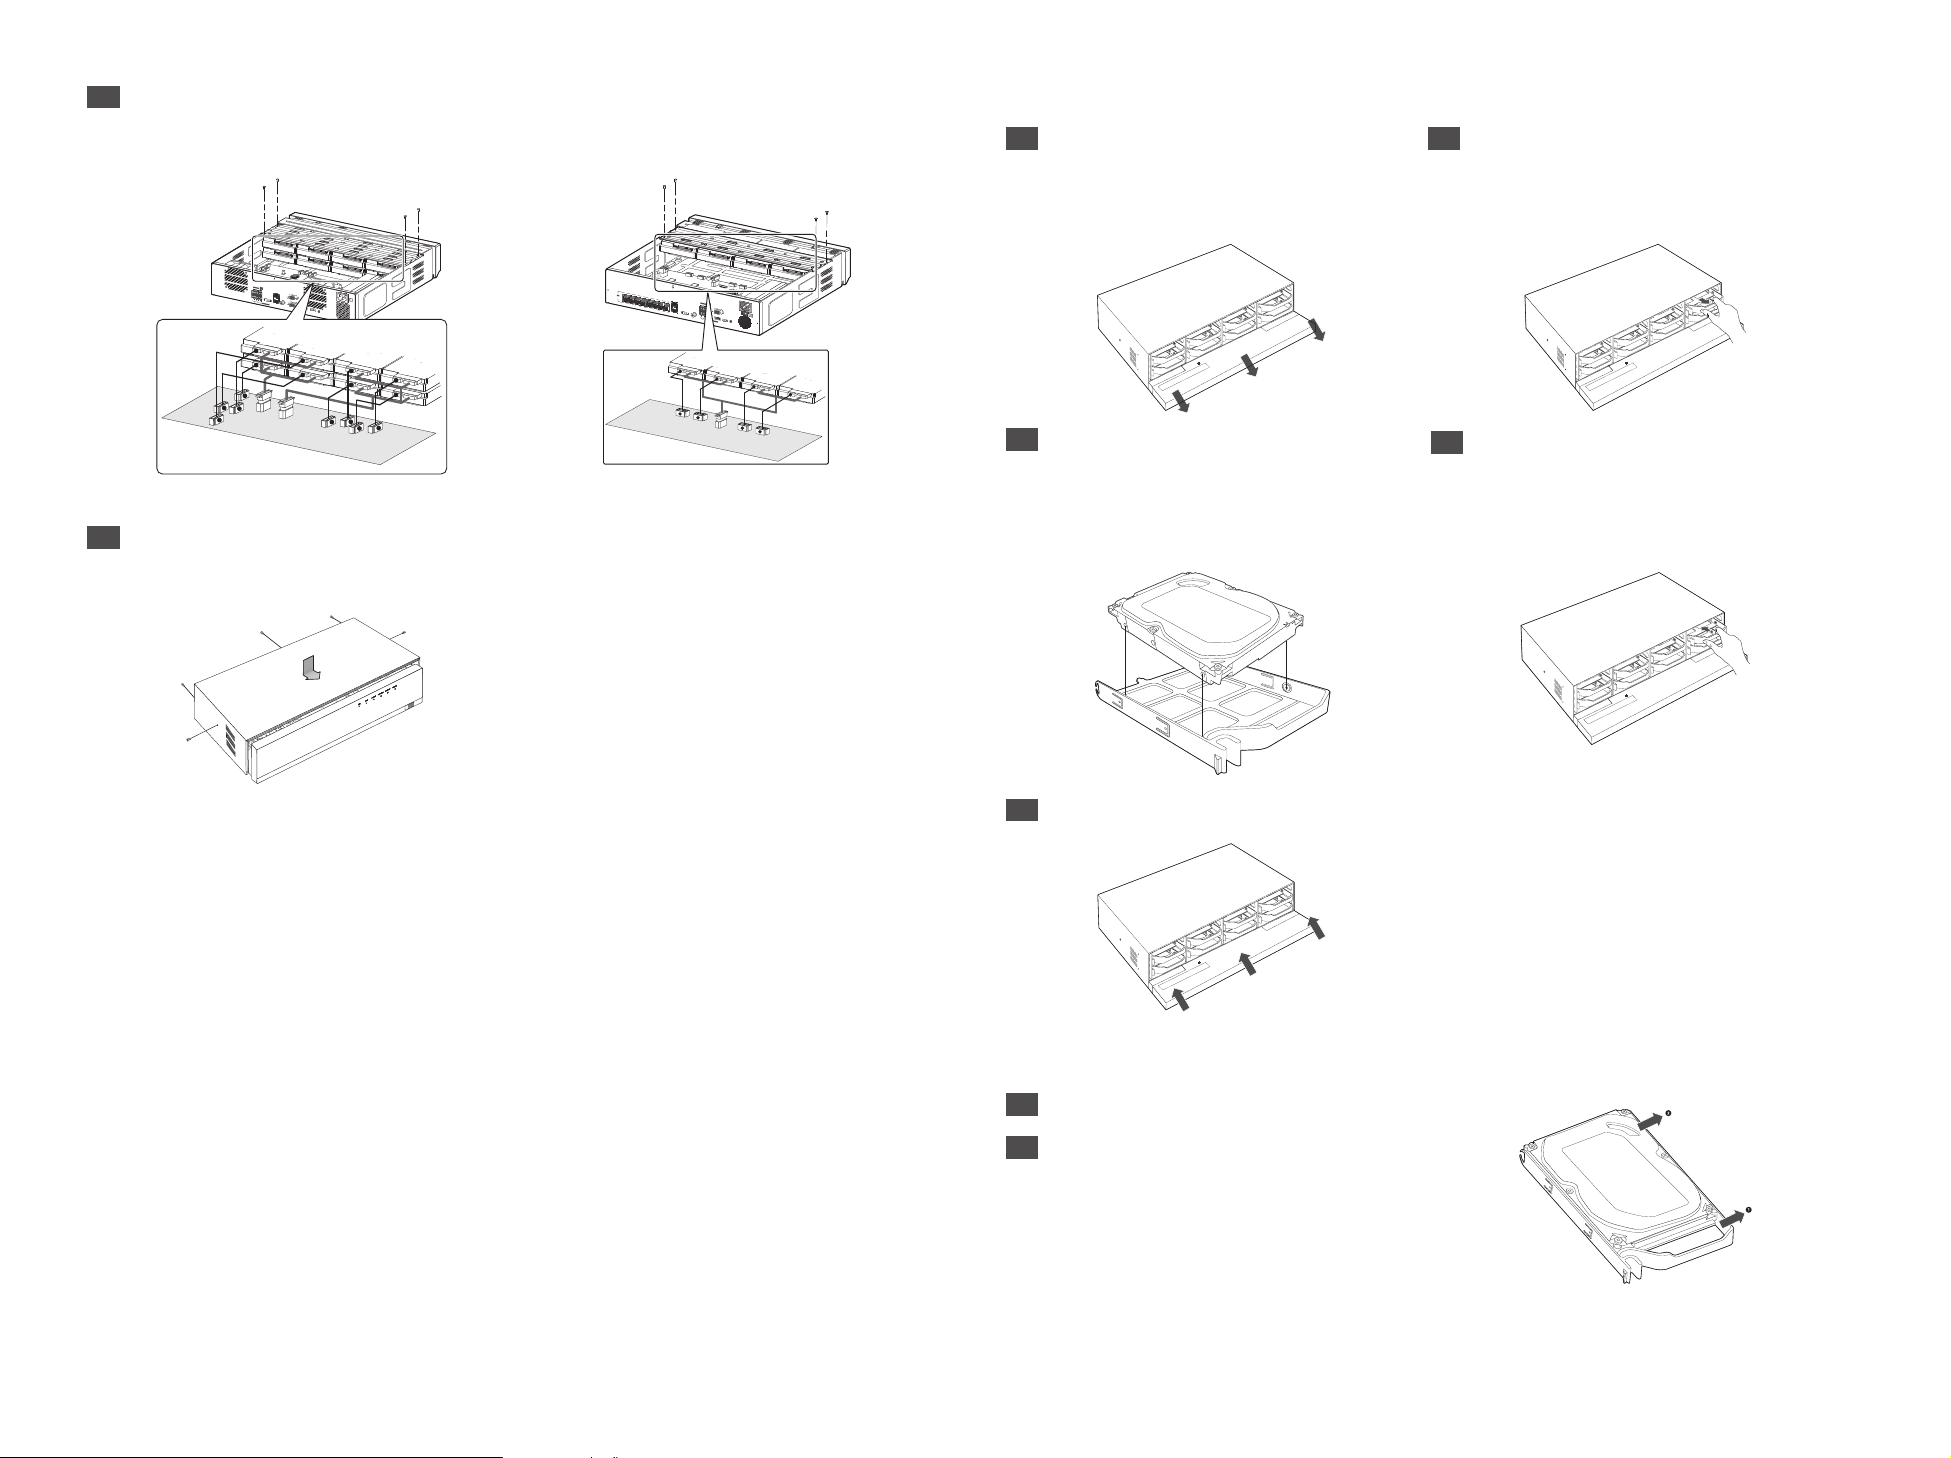
5 Mount the bracket on which an additional HDD is mounted on the NVR, secure it with screws and connect the
SATA/power cable to the connector on the main board by matching the number.
` For the connector numbers, please refer to the figure below.
XRN-2011/2011A
1 Open the front cover and check the HDD installation
bracket.
2 Push the latch to the right and remove the HDD
bracket.
ALARM IN
ALARM
123 45678
RESET
G
NETWORK 2
NO
NCNONO NO
COMCOM COMCOM
VGA OUT
G
1 23 4
eSATA
ALARM OUT
NETWORK 1
AUDIO OUT
RS-232C
HDMI USB
CONSOLE
7
5
8
8
6
7
5
3
6
4
1
4
2
3
1
2
1
3
5
PoE
7
CAMERA
9
11
13
NETWORK 2
15
2
4
6
8
10
12
eSATA
14
16
NETWORK 1
eSATA
4
4
<XRN-2010/2010A/3010/3010A/1610/1610A> <XRN-1610S/1610SA>
6 Check for any problems in the connection terminal
and the wiring in the product, close the cover and fix
it with screws.
USB
` Release the USB connection before opening the front
J
cover to prevent damage to the USB port.
ALARM IN
ALARM
123 4567 8
RESET
G
VGA OUT
AUDIO OUT
NO
HDMI
NCNONO NO
COMCOM COMCOM
USB
G
CONSOLE
1 23 4
ALARM OUT
3
2
1
3
2
1
2
3 Align and insert HDD into the bracket home. After
4 Align the bracket with the HDD installed with the
inserting one side, push and insert the other side
slightly.
` Take care not to scratch your hands when removing
J
the HDD bracket.
enclosure latch, and push the bracket in the
direction of the board.
` Push it until you hear the latch lock sound. If the HDD
J
is not completely connected, it may be detected.
5 Push the front cover upwards and close it.
How to exchange an installed HDD
1
Open a bracket wide in the direction of the arrow and
remove the holder from the HDD.
2 Open the other bracket wide and remove it from the
holder.
` The procedure after HDD exchange is the same as
M
the procedure for “Installing the HDD”.
3
 Loading...