

Page 1

NETWORK VIDEO RECORDER
Quick Manual
XRN-1610/2010/3010/2011
Page 2
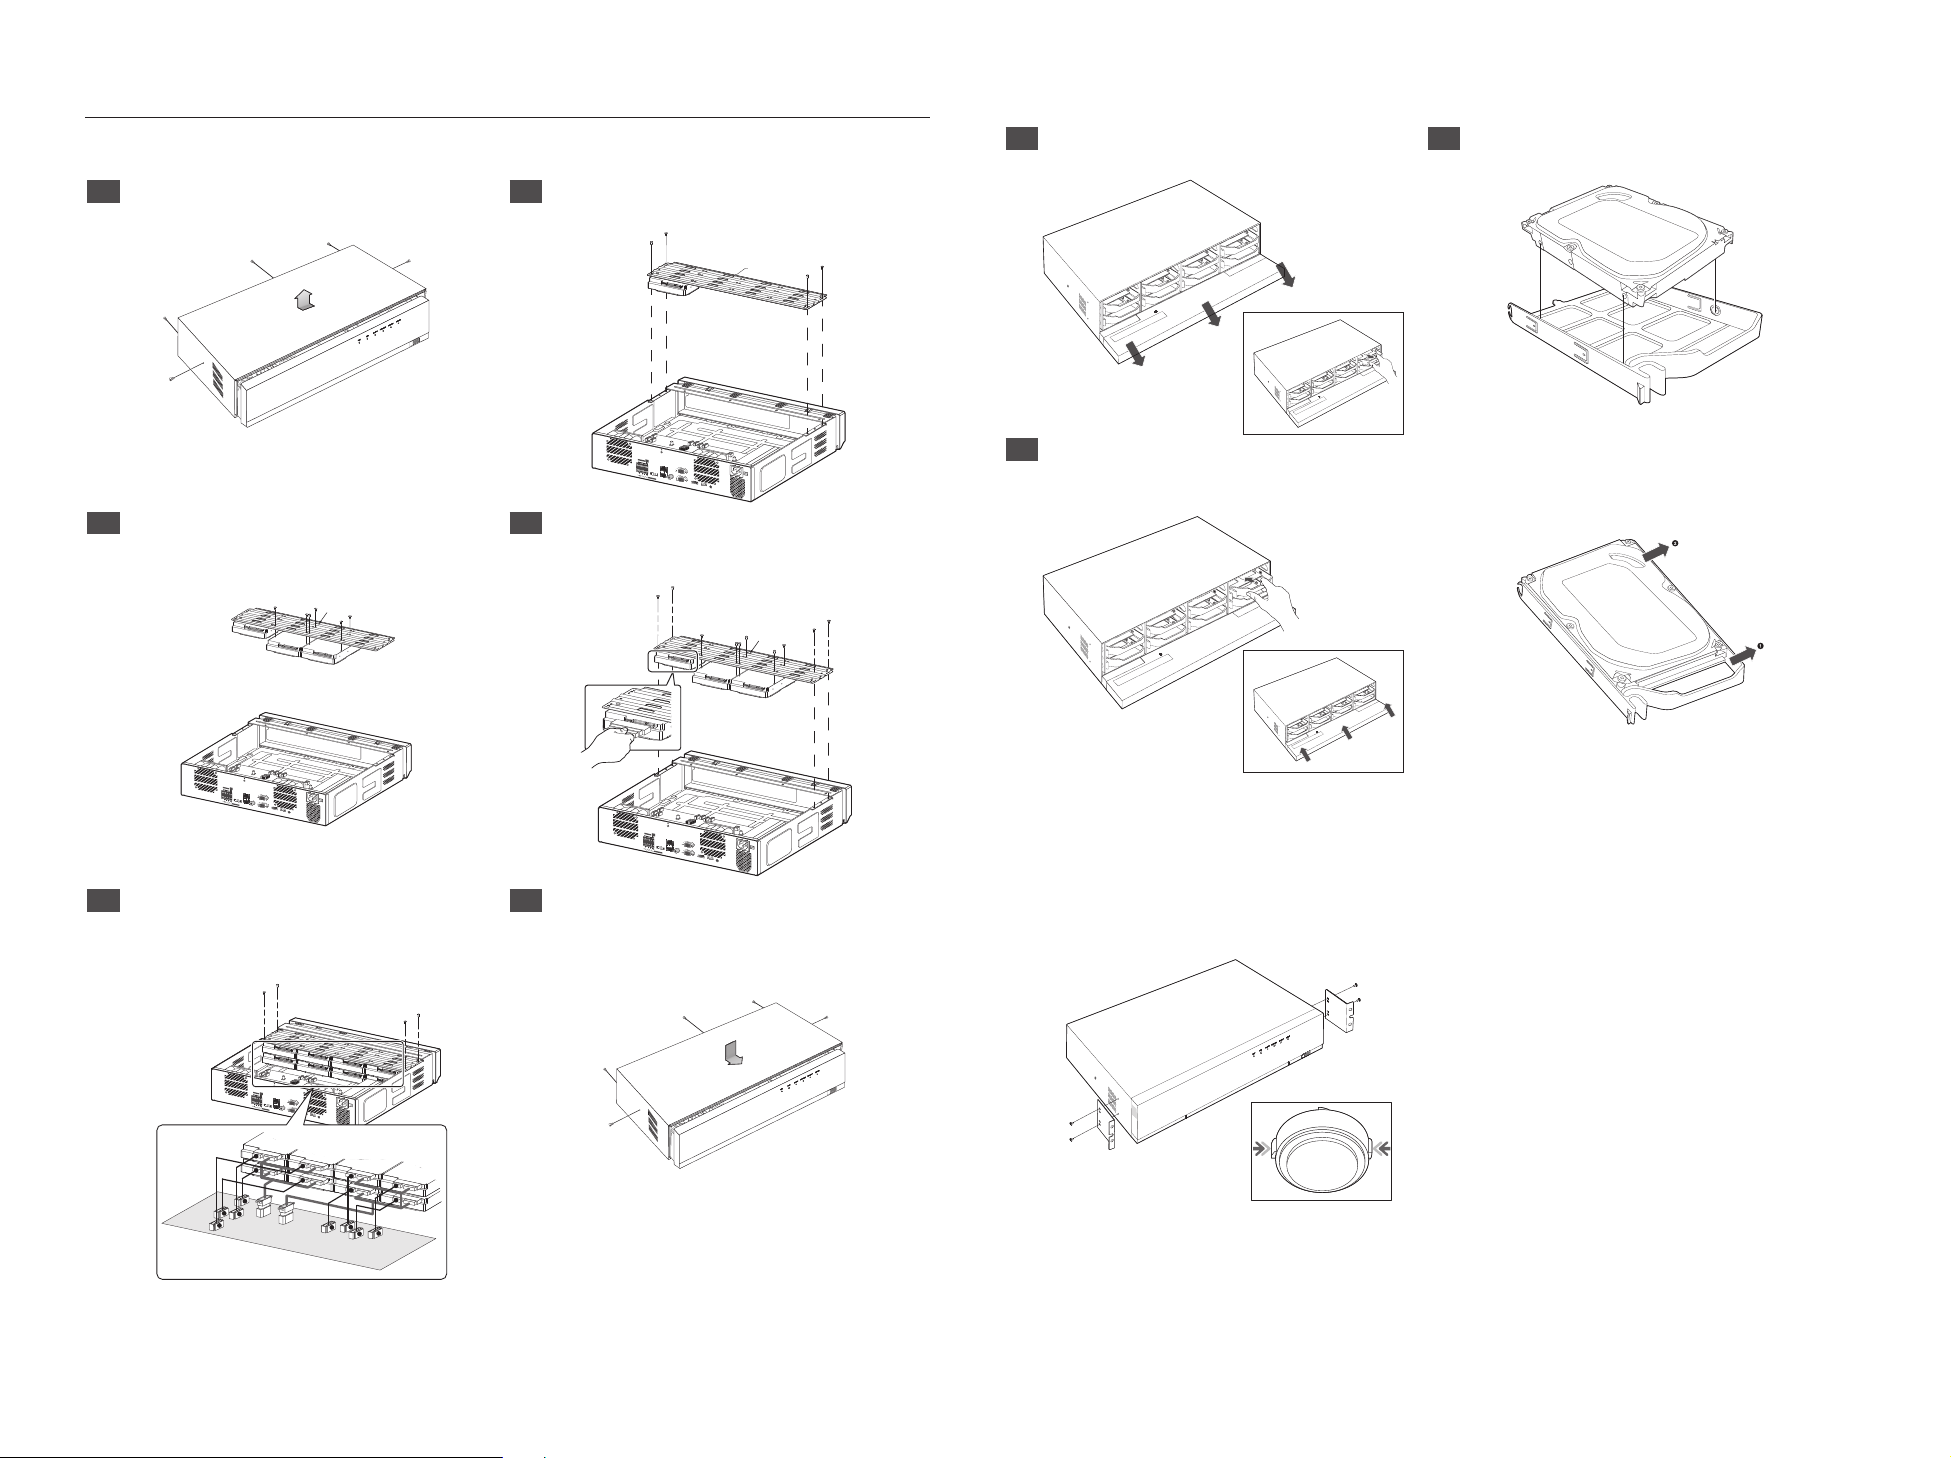
HDD Installation
XRN-2011
XRN-1610/2010/3010
1 Remove the screws located on the left/right side
and on the back side first, then remove the cover.
USB
3 Mount HDDs to the bracket and fix it with screws. 4 Connect the cable to the HDD by matching the HDD
Bracket
2 Remove the screws on the left/right side (4 screws)
and remove the bracket.
Bracket
ALARM IN
ALARM
123 4567 8
RESET
G
NETWORK 2
NO
NCNONO NO
COMCOM COMCOM
RS-232C
G
1 23 4
eSATA
ALARM OUT
NETWORK 1
AUDIO OUT
VGA OUT
HDMI USB
CONSOLE
SATA/power cable number to the HDD position
number on the bracket.
Bracket
1 Open a front cover and push the latch to the right
and remove
3 Align and push a bracket in the direction of the
board
2 After inserting one side, push and insert the other
side slightly
※ How to exchange an installed HDD
Open the other bracket wide and remove it from the
holder
ALARM IN
ALARM
123 45678
RESET
G
NETWORK 2
NO
NCNONO NO
COMCOM COMCOM
RS-232C
G
1 23 4
eSATA
ALARM OUT
NETWORK 1
AUDIO OUT
VGA OUT
HDMI USB
CONSOLE
5 Mount the bracket on which an additional HDD is
mounted on the NVR, secure it with screws and
connect the SATA/power cable to the connector on
the main board by matching the number.
ALARM IN
ALARM
123 45678
RESET
G
NETWORK 2
NO
NCNONO NO
COMCOM COMCOM
VGA OUT
G
1 23 4
eSATA
ALARM OUT
NETWORK 1
AUDIO OUT
RS-232C
HDMI USB
CONSOLE
7
5
8
8
6
7
5
3
6
4
1
4
2
3
1
2
ALARM IN
ALARM
123 4567 8
RESET
G
NETWORK 2
NO
NCNONO NO
COMCOM COMCOM
RS-232C
G
1 23 4
eSATA
ALARM OUT
NETWORK 1
AUDIO OUT
VGA OUT
HDMI USB
CONSOLE
6 Check for any problems in the connection terminal
and the wiring in the product, close the cover and fix
it with screws.
USB
` For Rack Installation, refer to “Rack Installation”.
M
` If you are adding a new or previously used HDD to this product in addition to the HDD(s) originally installed, format the new HDD
J
manually in the set before use.
※ Rack Installation
To install multiple NVRs in the rack, make sure to separate
the foot (turn it counterclockwise)
2
Page 3

[ Installation ] Wizard
1 Select the language
Language will be changed immediately
2 Set Password
Password rule must be applied
※ Click
icon to see the password rule
3 Set up Network
• DHCP server : If the DHCP server is set to enable, an IP is automatically assigned to the camera.
• Network 1 (Camera) : Connects to the camera and receives the video feed from the camera.
• Network 2 (All) : Network for a remote viewer (SSM, Smart Viewer, Webviewer)
• Network 1 / Network 2 Setup
- IP Type : Choose the network connection method.
- IP Address, Subnet Mask, Gateway, DNS
※ For more details on network settings, refer to the User manual.
► To use a simple intranet, click <Next>.
4 Set Date & Time
5 Click <Finish> to finish Wizard
Camera Registration will be executed
8 ~ 9 characters : All combination of English character, Digit, Special character
10 ~ 15 characters : Two combination of English character, Digit, Special character
※ Not allowed to use same characters with ID
※ Not allowed to use 4 or more continuative or repeated characters
2-1. Setting Camera Password
You can change the password of the camera enbloc if the camera password is in a factory reset state.
If the camera password is not in a factory reset state, please enter the password of the current camera to
register the camera.
- New Password : Input a new password according to the password setting rules.
- Confirm Password : Input the new password again.
` A camera password registered with ONVIF and RTSP cannot be changed.
33
Page 4

6 Camera Registration
6-1. If there are *16/*32/*64 or less cameras searched, it will be automatically registered and the camera
information(fps, days of recording) will be displayed.
(*16 : XRN-1610, *32 : XRN-2010/2011, *64 : XRN-3010)
► choose <OK> to register automatically
► choose <Manual Setting> to adjust a framerate (go to 6-2.)
Package Contents
NETWORK VIDEO RECORDER
USB
6-2. Adjust the recording framerate
Recording day will be changed by framerate.
6-3. If there are more than *16/*32/*64 cameras searched, Camera registration window will be displayed.
(*16 : XRN-1610, *32 : XRN-2010/2011, *64 : XRN-3010)
Select a camera to register and click the <Register> button. Once camera registration is finished, proceed in 6-1.
※ For an additional camera registration, refer to User manual.
After selecting a camera, press the register button.
0/32
|
|
Model
Status
Connected Authentication errors Disconnected
Camera Register
|
IP
Register
Searched Cameras
|
MAC
Network
Refresh
Exit
|
NVR Mouse Power Cable
Network Viewer Software /
User Manual CD
User Manual or Quick Manual Terminal block Bracket Rack Bracket Fixing Screw
HDD SATA/Power cable
(N/A on XRN-2011)
HDD Fixing Screw
(N/A on XRN-2011)
Hanwha Techwin cares for the environment at all product manufacturing stages, and is taking measures to provide
customers with more environmentally friendly products.
The Eco mark represents Hanwha Techwin's devotion to creating environmentally friendly products, and indicates
that the product satisfies the EU RoHS Directive.
Correct Disposal of This Product
(Applicable in the European Union and other European countries with separate collection systems)
This marking on the product, accessories or literature indicates that the product and its electronic accessories (e.g. charger, headset, USB
cable) should not be disposed of with other household waste at the end of their working life. To prevent possible harm to the environment
or human health from uncontrolled waste disposal, please separate these items from other types of waste and recycle them responsibly
to promote the sustainable reuse of material resources.
Household users should contact either the retailer where they purchased this product, or their local government office, for details of
where and how they can take these items for environmentally safe recycling.
Business users should contact their supplier and check the terms and conditions of the purchase contract. This product and its electronic
accessories should not be mixed with other commercial wastes for disposal.
(Waste Electrical & Electronic Equipment)
Correct disposal of batteries in this product
(Applicable in the European Union and other European countries with separate battery return systems.)
This marking on the battery, manual or packaging indicates that the batteries in this product should not be disposed of with other household waste at the end of their
working life. Where marked, the chemical symbols Hg, Cd or Pb indicate that the battery contains mercury, cadmium or lead above the reference levels in EC Directive
2006/66. If batteries are not properly disposed of, these substances can cause harm to human health or the environment.
To protect natural resources and to promote material reuse, please separate batteries from other types of waste and recycle them through your local, free battery
return system.
4
Page 5

Head Oce
6, Pangyo-ro 319 beon-gil, Bundang-gu, Seongnam-si,
Gyeonggi-do, 463-400 Rep. of KOREA
Tel : +82.70.7147.8753 Fax : +82.31.8018.3740
http://hanwha-security.com
Hanwha Techwin America
500 Frank W. Burr Blvd. Suite 43 Teaneck, NJ 07666
Toll Free : +1.877.213.1222 Direct : +1.201.325.6920
Fax : +1.201.373.0124
www.hanwhasecurity.com
Hanwha Techwin Europe
Heriot House, Heriot Road, Chertsey, Surrey, KT16 9DT, United Kingdom
Tel : +44.1932.57.8100 Fax : +44.1932.57.8101
www.hanwha-security.eu
Hanwha Techwin(Tianjin) Co.Ltd
No.11, Weiliu Rd., Micro-Electronic Industrial Park, Jingang Road Tianjin 300385, China
Tel : +86.22.2388.7788
www.hanwha-security.cn
Hanwha Techwin Middle East FZE
JAFZA View 18, 20th oor, oce 2001, 2002, 2003, Downtown Jebel Ali,
Dubai, United Arab Emirates
http://hanwha-security.com
 Loading...