

Page 1
Washing Machine
User manual
WW10H9*****
WW90H9*****
Imagine the possibilities
Thank you for purchasing this Samsung product.
Untitled-13 1 2015-07-18 5:33:26
Page 2

Content
Safety information 3
What you need to know about the safety instructions . . . . . . . . . . . . . . . . . . . . . . . . . . . . . . . . 3
Important safety symbols . . . . . . . . . . . . . . . . . . . . . . . . . . . . . . . . . . . . . . . . . . . . . . . . . . . . .3
Important safety precautions . . . . . . . . . . . . . . . . . . . . . . . . . . . . . . . . . . . . . . . . . . . . . . . . . . 4
Instructions about the WEEE . . . . . . . . . . . . . . . . . . . . . . . . . . . . . . . . . . . . . . . . . . . . . . . . .10
Installation 11
What’s included . . . . . . . . . . . . . . . . . . . . . . . . . . . . . . . . . . . . . . . . . . . . . . . . . . . . . . . . . . .11
Installation requirements . . . . . . . . . . . . . . . . . . . . . . . . . . . . . . . . . . . . . . . . . . . . . . . . . . . . . 12
Step-by-step installation . . . . . . . . . . . . . . . . . . . . . . . . . . . . . . . . . . . . . . . . . . . . . . . . . . . . . 14
Before you start 18
Initial settings . . . . . . . . . . . . . . . . . . . . . . . . . . . . . . . . . . . . . . . . . . . . . . . . . . . . . . . . . . . . . 18
Laundry guidelines . . . . . . . . . . . . . . . . . . . . . . . . . . . . . . . . . . . . . . . . . . . . . . . . . . . . . . . . .20
Detergent Guidelines . . . . . . . . . . . . . . . . . . . . . . . . . . . . . . . . . . . . . . . . . . . . . . . . . . . . . . .22
Operations 25
Screen . . . . . . . . . . . . . . . . . . . . . . . . . . . . . . . . . . . . . . . . . . . . . . . . . . . . . . . . . . . . . . . . . .25
Simple steps to start . . . . . . . . . . . . . . . . . . . . . . . . . . . . . . . . . . . . . . . . . . . . . . . . . . . . . . .28
Course overview . . . . . . . . . . . . . . . . . . . . . . . . . . . . . . . . . . . . . . . . . . . . . . . . . . . . . . . . . . 29
Settings . . . . . . . . . . . . . . . . . . . . . . . . . . . . . . . . . . . . . . . . . . . . . . . . . . . . . . . . . . . . . . . . . 33
Samsung Mobile Smart Control . . . . . . . . . . . . . . . . . . . . . . . . . . . . . . . . . . . . . . . . . . . . . . . 37
Samsung Smart Home app . . . . . . . . . . . . . . . . . . . . . . . . . . . . . . . . . . . . . . . . . . . . . . . . . . 39
Samsung Smart Washer app . . . . . . . . . . . . . . . . . . . . . . . . . . . . . . . . . . . . . . . . . . . . . . . . .41
Maintenance 43
Eco Drum Clean . . . . . . . . . . . . . . . . . . . . . . . . . . . . . . . . . . . . . . . . . . . . . . . . . . . . . . . . . . . 43
Emergency drain . . . . . . . . . . . . . . . . . . . . . . . . . . . . . . . . . . . . . . . . . . . . . . . . . . . . . . . . . . 44
Cleaning . . . . . . . . . . . . . . . . . . . . . . . . . . . . . . . . . . . . . . . . . . . . . . . . . . . . . . . . . . . . . . . . . 45
Recovery from freezing . . . . . . . . . . . . . . . . . . . . . . . . . . . . . . . . . . . . . . . . . . . . . . . . . . . . . . 48
Care against an extended time of disuse . . . . . . . . . . . . . . . . . . . . . . . . . . . . . . . . . . . . . . . .48
Troubleshooting 49
Checkpoints . . . . . . . . . . . . . . . . . . . . . . . . . . . . . . . . . . . . . . . . . . . . . . . . . . . . . . . . . . . . . . 49
Information codes . . . . . . . . . . . . . . . . . . . . . . . . . . . . . . . . . . . . . . . . . . . . . . . . . . . . . . . . .50
Specifications 51
Protecting the environment . . . . . . . . . . . . . . . . . . . . . . . . . . . . . . . . . . . . . . . . . . . . . . . . . . .51
Fabric care chart . . . . . . . . . . . . . . . . . . . . . . . . . . . . . . . . . . . . . . . . . . . . . . . . . . . . . . . . . . 52
Specification sheet . . . . . . . . . . . . . . . . . . . . . . . . . . . . . . . . . . . . . . . . . . . . . . . . . . . . . . . . . 53
Information of main washing programmes . . . . . . . . . . . . . . . . . . . . . . . . . . . . . . . . . . . . . . .54
English - 2
Untitled-13 2 2015-07-18 5:33:26
Page 3
Safety information
Congratulations on your new Samsung washing machine. This manual contains important
information on the installation, use and care of your appliance. Please take some time to read this
manual to take full advantage of your washing machine’s many benefits and features.
What you need to know about the safety instructions
Please read this manual thoroughly to ensure that you know how to safely and eciently operate
the extensive features and functions of your new appliance. Please store the manual in a safe
location close to the appliance for future reference. Use this appliance only for its intended purpose
as described in this instruction manual.
Warnings and Important Safety Instructions in this manual do not cover all possible conditions and
situations that may occur. It is your responsibility to use common sense, caution and care when
installing, maintaining and operating your washing machine.
Because the following operating instructions cover various models, the characteristics of your
washing machine may dier slightly from those described in this manual and not all warning signs
may be applicable. If you have any questions or concerns, contact your nearest service centre or
find help and information online at www.samsung.com.
Important safety symbols
What the icons and signs in this user manual mean:
SAFETY INFORMATION
WARNING: Hazards or unsafe practices that may result in severe personal injury,
death and/or property damage.
CAUTION: Hazards or unsafe practices that may result in personal injury and/or
property damage.
NOTE
These warning signs are here to prevent injury to yourself and others.
Please follow them explicitly.
After reading this manual, store it in a safe place for future reference.
Read all instructions before using the appliance.
As with any equipment that uses electricity and moving parts, potential hazards exist. To safely
operate this appliance, familiarize yourself with its operation and exercise care when using it.
English - 3
Untitled-13 3 2015-07-18 5:33:26
Page 4

Important safety precautions
WARNING: To reduce the risk of fire, electric shock, or injury to persons when using
your appliance, follow basic precautions, including the following:
1. This appliance is not to be used by persons (including children)
with reduced physical, sensory or mental capabilities, or lack
of experience and knowledge, unless they have been given
supervision or instruction concerning use of the appliance by a
person responsible for their safety.
2. For use in Europe: This appliance can be used by children aged
from 8 years and above and persons with reduced physical,
sensory or mental capabilities or lack of experience and knowledge
if they have been given supervision or instruction concerning use of
the appliance in a safe way and understand the hazards involved.
Children shall not play with the appliance. Cleaning and user
maintenance shall not be made by children without supervision.
3. Children should be supervised to ensure that they do not play with
the appliance.
4. If the supply cord is damaged, it must be replaced by the
manufacturer, its service agent or similarly qualified persons in
order to avoid a hazard.
5. The new hose-sets supplied with the appliance are to be used and
that old hose-sets should not be reused.
6. For appliances with ventilation openings in the base, that a carpet
must not obstruct the openings.
7. For use in Europe: Children of less than 3 years should be kept
away unless continuously supervised.
8. CAUTION: In order to avoid a hazard due to inadvertent resetting
of the thermal cut-out, this appliance must not be supplied through
an external switching device, such as a timer, or connected to a
circuit that is regularly switched on and o by the utility.
English - 4
Untitled-13 4 2015-07-18 5:33:26
Page 5

WARNING: Critical installation WARNINGS
The installation of this appliance must be performed by a qualified technician or service company.
• Failure to do so may result in electric shock, fire, an explosion, problems with the product, or
injury.
The appliance is heavy, therefore take care when lifting it.
Plug the power cord into an AC 220 - 240 V / 50 Hz wall socket or higher and use the socket for
this appliance only. Never use an extension cord.
• Sharing a wall socket with other appliances using a power strip or extending the power cord
may result in electric shock or fire.
• Ensure that the power voltage, frequency, and current are the same as those of the product
specifications. Failure to do so may result in electric shock or fire. Plug the power plug into the
wall socket firmly.
Remove all foreign substances such as dust or water from the power plug terminals and contact
points using a dry cloth on a regular basis.
• Unplug the power plug and clean it with a dry cloth.
• Failure to do so may result in electric shock or fire.
Plug the power plug into the wall socket so that the cord is running towards the floor.
• If you plug the power plug into the socket in the opposite direction, the electric wires within the
cable may be damaged and this may result in electric shock or fire.
Keep all packaging materials out of the reach of children as these may be dangerous.
• If a child places a bag over its head, it may suocate.
When the appliance, power plug or power cord is damaged, contact your nearest service centre.
This appliance must be properly grounded.
Do not ground the appliance to a gas pipe, plastic water pipe, or telephone line.
• This may result in electric shock, fire, an explosion, or problems with the product.
• Never plug the power cord into a socket that is not grounded correctly and make sure that it is
in accordance with local and national regulations.
Do not install this appliance near a heater or any inflammable material.
Do not install this appliance in a humid, oily or dusty location, or in a location exposed to direct
sunlight or water (rain drops).
Do not install this appliance in a location exposed to low temperatures.
• Frost may cause the tubes to burst.
Do not install this appliance in a location where gas may leak.
• This may result in electric shock or fire.
Do not use an electric transformer.
• This may result in electric shock or fire.
Do not use a damaged power plug, damaged power cord, or loose wall socket.
• This may result in electric shock or fire.
SAFETY INFORMATION
English - 5
Untitled-13 5 2015-07-18 5:33:26
Page 6
Do not pull or excessively bend the power cord.
Do not twist or tie the power cord.
Do not hook the power cord over a metal object, place a heavy object on the power cord, insert
the power cord between objects, or push the power cord into the space behind the appliance.
• This may result in electric shock or fire.
Do not pull the power cord when unplugging the power plug.
• Unplug the power plug by holding the plug.
• Failure to do so may result in electric shock or fire.
This appliance should be positioned so that the power plug, the water supply taps, and the drain
pipes are accessible.
CAUTION: Installation CAUTIONS
This appliance should be positioned in such a way that the power plug is easily accessible.
• Failure to do so may result in electric shock or fire due to electric leakage.
Install your appliance on a solid, level floor that can support its weight.
• Failure to do so may result in abnormal vibrations, movement, noise, or problems with the
product.
WARNING: Critical usage WARNINGS
If the appliance is flooded, turn o the water & power supplies immediately and contact your
nearest service centre.
• Do not touch the power plug with wet hands.
• Failure to do so may result in electric shock.
If the appliance generates a strange noise, a burning smell, or smoke, unplug the power plug
immediately and contact your nearest service centre.
• Failure to do so may result in electric shock or fire.
In the event of a gas leak (such as propane gas, LP gas, etc.), ventilate immediately without
touching the power plug. Do not touch the appliance or power cord.
• Do not use a ventilating fan.
• A spark may result in an explosion or fire.
Do not let children play in or on the washing machine. In addition, when disposing of the appliance,
remove the washing machine door lever.
• If trapped inside the product, children may suocate to death.
Make sure to remove the packaging (sponge, styrofoam) attached to the bottom of the washing
machine before using it.
Do not wash items contaminated with gasoline, kerosene, benzene, paint thinner, alcohol or other
inflammable or explosive substances.
• This may result in electric shock, fire, or an explosion.
English - 6
Untitled-13 6 2015-07-18 5:33:26
Page 7

Do not open the washing machine door by force while it is operating (high-temperature washing/
drying/spinning).
• Water flowing out of the washing machine may result in burns or cause the floor to be slippery.
This may result in injury.
• Opening the door by force may result in damage to the product or injury.
Do not insert your hand under the washing machine while an operation is in progress.
• This may result in injury.
Do not touch the power plug with wet hands.
• This may result in electric shock.
Do not turn the appliance o by unplugging the power plug while an operation is in progress.
• Plugging the power plug into the wall socket again may cause a spark and result in electric
shock or fire.
Do not let children or the infirm use this washing machine without proper supervision. Do not let
children climb in or onto the appliance.
• This may result in electric shock, burns or injury.
Do not insert your hand or a metal object under the washing machine while it is operating.
• This may result in injury.
Do not unplug the appliance by pulling the power cord. Always grip the plug firmly and pull it
straight out of the outlet.
• Damage to the power cord may cause a short-circuit, fire and/or electric shock.
Do not attempt to repair, disassemble, or modify the appliance yourself.
• Do not use a fuse (such as copper, steel wire, etc.) other than a standard fuse.
• When the appliance needs to be repaired or reinstalled, contact your nearest service centre.
• Failure to do so may result in electric shock, fire, problems with the product, or injury.
If the water supply hose comes loose from the water tap and floods the appliance, unplug the
power plug.
• Failure to do so may result in electric shock or fire.
Unplug the power plug when the appliance is not being used for long periods of time or during a
thunder or lightning storm.
• Failure to do so may result in electric shock or fire.
If any foreign substance enters into the appliance, unplug the power plug and contact you nearest
Samsung Customer Service.
• This may result in electric shock or fire.
Do not let children (or pets) play in or on your washing machine. The washing machine door does
not open easily from the inside and children may be seriously injured if trapped inside.
SAFETY INFORMATION
English - 7
Untitled-13 7 2015-07-18 5:33:26
Page 8

CAUTION: Usage CAUTIONS
When the washing machine is contaminated by a foreign substance such as detergent, dirt, food
waste, etc., unplug the power plug and clean the washing machine using a damp, soft cloth.
• Failure to do so may result in discolouration, deformation, damage, or rust.
The front glass may be broken by a strong impact. Take care when using the washing machine.
• If the glass is broken, it may result in injury.
After a water supply failure or when reconnecting the water supply hose, open the water tap slowly.
Open the water tap slowly after a long period of non-use.
• The air pressure in the water supply hose or the water pipe may damage a product part or
result in a water leak.
If a draining error occurs during an operation, check if there is a draining problem.
• If the washing machine is used when it is flooded because of a draining problem, it may result
in electric shock or fire.
Insert the laundry into the washing machine completely so that the laundry does not get caught in
the door.
• If laundry gets caught in the door, it may result in damage to the laundry or the washing
machine, or result in a water leak.
Turn the water supply o when the washing machine is not being used.
Ensure that the screws on the water supply hose connector are properly tightened.
• Failure to do so may result in property damage or injury.
Ensure that the rubber seal and front door glass are not contaminated by a foreign substance (e.g.
waste, thread, hair, etc.).
• If a foreign substance is caught in the door or the door is not completely closed, it may cause a
water leak.
Open the water tap and check if the water supply hose connector is firmly tightened and that there
is no water leak before using the product.
• If the screws on the water supply hose connector are loose, it may result in a water leak.
The product you have purchased is designed for domestic use only.
Using the product for business purposes qualifies as a product misuse. In this case, the product
will not be covered by the standard warranty provided by Samsung and no responsibility can be
attributed to Samsung for malfunctions or damages resulting from such misuse.
Do not stand on the appliance or place objects (such as laundry, lighted candles, lighted cigarettes,
dishes, chemicals, metal objects, etc.) on the appliance.
• This may result in electric shock, fire, problems with the product, or injury.
Do not spray volatile material such as insecticide onto the surface of the appliance.
• As well as being harmful to humans, this may result in electric shock, fire or problems with the
product.
Do not place objects that generate electromagnetic fields near the washing machine.
• This may result in injury due to a malfunction.
English - 8
Untitled-13 8 2015-07-18 5:33:26
Page 9

Water drained during a high-temperature wash or drying cycle is hot. Do not touch the water.
• This may result in burns or injury.
Do not wash, spin, or dry water-proof seats, mats, or clothing (*) unless your appliance has a
special cycle for washing these items.
(*): Woollen bedding, rain covers, fishing vests, ski pants, sleeping bags, diaper covers, sweat suits,
and bicycle, motor cycle and car covers, etc.
• Do not wash thick or hard mats even if the washing machine mark is on the care label. This
may result in injury or damage to the washing machine, walls, floor, or clothing due to abnormal
vibrations.
• Do not wash throw rugs or doormats with rubber backing. The rubber backing may come o
and stick to inside the drum, and this may result in malfunction such as a drainage error.
Do not operate the washing machine when the detergent drawer is removed.
• This may result in electric shock or injury due to a water leak.
Do not touch the insides of the drum during or just after drying as it is hot.
• This may result in burns.
Do not insert your hand into the detergent drawer.
• This may result in injury as your hand may be caught by the detergent input device.
Do not place any objects (such as shoes, food waste, animals) other than laundry into the washing
machine.
• This may result in damage to the washing machine, or injury and death in the case of pets due
to the abnormal vibrations.
Do not press the buttons using sharp objects such as pins, knifes, fingernails, etc.
• This may result in electric shock or injury.
Do not wash laundry contaminated by oils, creams or lotions usually found in skincare shops or
massage clinics.
• This may cause the rubber seal to become deformed and result in a water leak.
Do not leave metal objects such as safety pins, hair pins or bleach in the drum for long periods of
time.
• This may cause the drum to rust.
• If rust starts appearing on the surface of the drum, apply a (neutral) cleansing agent to the
surface and use a sponge to clean it. Never use a metal brush.
Do not use dry cleaning detergent directly and do not wash, rinse, or spin laundry contaminated by
dry cleaning detergent.
• This may result in spontaneous combustion or ignition due to the heat from the oxidation of the
oil.
Do not use water from water cooling/heating devices.
• This may result in problems with the washing machine.
Do not use natural hand-washing soap for the washing machine.
• If it hardens and accumulates inside the washing machine, it may result in problems with the
product, discolouration, rust, or bad odours.
Place socks and brassieres in a washing net and wash them with the other laundry.
Do not wash large laundry items such as bedding in the washing net.
SAFETY INFORMATION
English - 9
Untitled-13 9 2015-07-18 5:33:26
Page 10
• Failure to do so may result in injury due to abnormal vibrations.
Do not use hardened detergent.
• If it accumulates inside the washing machine, it may result in a water leak.
Make sure that the pockets of all the clothing items to be washed are empty.
• Hard, sharp objects such as coins, safety pins, nails, screws, or stones can cause extensive
damage to the appliance.
Do not wash clothing with large buckles, buttons or other heavy metal objects.
Sort the laundry by color on the basis of its colorfastness and select the recommended cycle,
water temperature and additional functions.
• This may result in discoloration or fabric damage.
Take care that children’s fingers are not caught in the door when you close it.
• Failure to do so may result in injury.
WARNING: Critical cleaning WARNINGS
Do not clean the appliance by spraying water directly onto it.
Do not use the a strong acidic cleaning agent.
Do not use benzene, thinner or alcohol to clean the appliance.
• This may result in discolouration, deformation, damage, electric shock or fire.
Before cleaning or performing maintenance, unplug the appliance from the wall socket.
• Failure to do so may result in electric shock or fire.
Instructions about the WEEE
Correct Disposal of This Product (Waste Electrical & Electronic Equipment)
(Applicable in countries with separate collection systems)
This marking on the product, accessories or literature indicates that the product and its
electronic accessories (e.g. charger, headset, USB cable) should not be disposed of
with other household waste at the end of their working life. To prevent possible harm
to the environment or human health from uncontrolled waste disposal, please separate
these items from other types of waste and recycle them responsibly to promote the
sustainable reuse of material resources.
Household users should contact either the retailer where they purchased this product,
or their local government oce, for details of where and how they can take these items
for environmentally safe recycling.
Business users should contact their supplier and check the terms and conditions of
the purchase contract. This product and its electronic accessories should not be mixed
with other commercial wastes for disposal.
English - 10
Untitled-13 10 2015-07-18 5:33:27
Page 11
Installation
Follow these instructions carefully to ensure proper installation of the washing machine and to
prevent accidents when doing laundry.
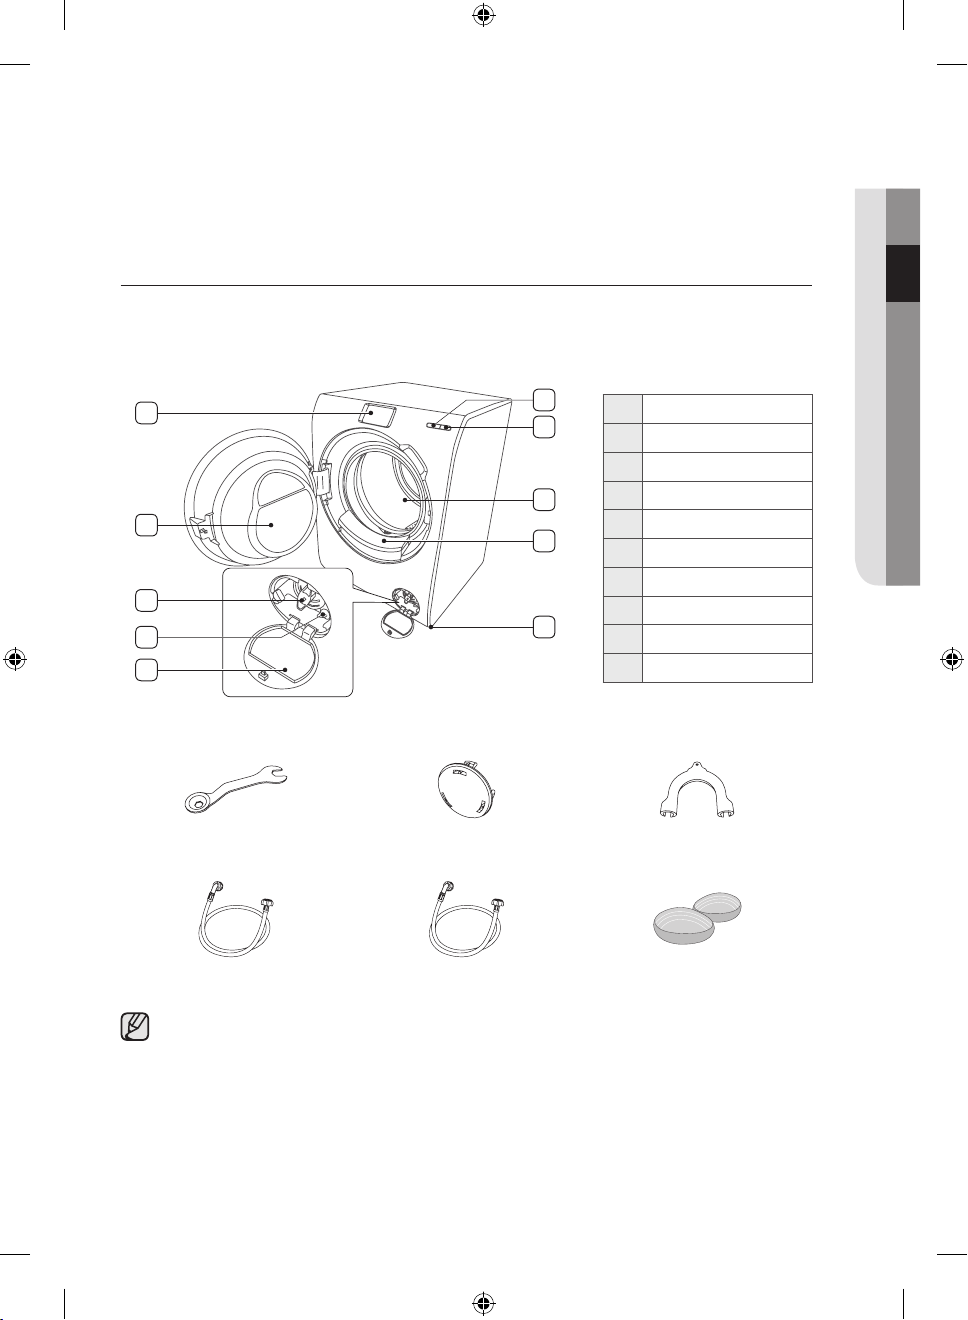
What’s included
Make sure all the parts are included in the product package. If you have a problem with the
washing machine or the parts, contact a local Samsung customer centre or the retailer.
INSTALLATION
3
4
8
9
10
Spanner Bolt caps Hose guide
1
2
5
6
7
1 Start button
2 Power button
3 Control screen
4 Door
5 Drum
6 Auto Dispense unit
7 Levelling feet
8 Debris filter
9 Emergency drain tube
10 Filter cover
Cold water supply hose Hot water supply hose Aqua pebble set
Bolt caps : The provided number (3 to 6) of bolt caps depends on the model.
Hot water supply hose: Applicable models only.
Aqua pebble set: 200 ml and 100 ml (MAX).
English - 11
Untitled-13 11 2015-07-18 5:33:27
Page 12
Installation requirements
Electrical supply and grounding
• AC 220-240 V / 50 Hz fuse or circuit breaker is required
• Use an individual branch circuit specific to the washing machine
To ensure proper grounding, the washing machine comes with a power cord featuring a threeprong grounding plug for use in a properly installed and grounded outlet.
Check with a qualified electrician or serviceperson if you are not sure about the grounding.
Do not modify the provided plug. If it does not fit the outlet, call a qualified electrician to install a
proper outlet.
WARNING
• Do NOT use an extension cord.
• Use only the power cord that comes with the washing machine.
• Do NOT connect the ground wire to plastic plumbing, gas lines, or hot water pipes.
• Improperly connected grounding conductors may cause electric shock.
Water supply
A proper water pressure for this washing machine is between 50 kPa and 800 kPa. Water pressure
less than 50 kPa may cause the water valve not to close completely. Or, it may take longer to fill the
drum, causing the washing machine to turn o. Water taps must be within 120 cm from the rear of
the washing machine so that the provided inlet hoses reach the washing machine.
To reduce the risk of leaks
• Make sure water taps are easily accessible.
• Turn o the taps when the washing machine is not in use.
• Check for any leaks at the water inlet hose fittings on a regular basis.
CAUTION
Before using the washing machine for the first time, check all connections at the water valve
and taps for any leaks.
English - 12
Untitled-13 12 2015-07-18 5:33:27
Page 13
Drain
Samsung recommends a standpipe in height of 65 cm. The drain hose must be connected through
the hose clip to the standpipe, and the standpipe must fully cover the drain hose.
Flooring
For best performance, the washing machine must be installed on a solid floor. Wood floors may
need to be reinforced to minimize vibration and/or unbalanced loads. Carpeting and soft tile
surfaces are not a good resistance to vibrations and may cause the washing machine to move
slightly during the spin cycle.
CAUTION
Do NOT install the washing machine on a platform or a poorly supported structure.
Water temperature
Do not install the washing machine in areas where water may freeze as the washing machine
always retains some water in its water valves, pumps, and/or hoses. Frozen water left in the
connection parts may cause damage to belts, the pump, and other components of the washing
machine.
Alcove or closet installation
Minimum clearance for stable operation:
Sides 25 mm Rear 50 mm
Top 25 mm Front 550 mm
If both the washing machine and a dryer are installed in the same location, the front of the alcove or
closet must have at least a 550 mm unobstructed air opening. Your washing machine alone does
not require a specific air opening.
INSTALLATION
English - 13
Untitled-13 13 2015-07-18 5:33:27
Page 14
Step-by-step installation
STEP 1 - Select a location
Location requirements:
• Solid, level surface without carpeting or flooring that may obstruct ventilation
• Away from direct sunlight
• Adequate room for ventilation and wiring
• The ambient temperature is always higher than the freezing point (0 ˚C)
• Away from a heat source
STEP 2 – Remove the shipping bolts
Unpack the product package and remove all shipping bolts.
1. Loosen all shipping bolts on the rear of the machine using the
supplied spanner.
2. Fill the holes with the supplied plastic bolt caps.
Keep the shipping bolts for future use.
WARNING
Packaging materials can be dangerous to children. Dispose all packaging material (plastic
bags, polystyrene, etc.) out of children’s reach.
STEP 3 - Adjust the levelling feet
1. Gently slide the washing machine into position. Excessive
force may damage the levelling feet.
2. Level the washing machine by manually adjusting the levelling
feet.
3. When levelling is complete, tighten the nuts using the
spanner.
English - 14
Untitled-13 14 2015-07-18 5:33:28
Page 15

STEP 4 - Connect the water hose
A
B
C
C
E
Connect the water supply hose to the water tap.
1. Remove the adaptor (A) from the water supply hose (B).
2. Use a Philips screwdriver to loosen four screws on the
adaptor.
3. Hold the adaptor and turn part (C) in the arrow direction to
loosen it by 5 mm (*).
4. Insert the adaptor into the water tap, and tighten the screws
while lifting up the adaptor.
5. Turn part (C) in the arrow direction to tighten it.
INSTALLATION
6. While holding down part (E), connect the water supply hose
to the adaptor. Then, release part (E). The hose fits into the
adaptor with a clicking sound.
English - 15
Untitled-13 15 2015-07-18 5:33:28
Page 16
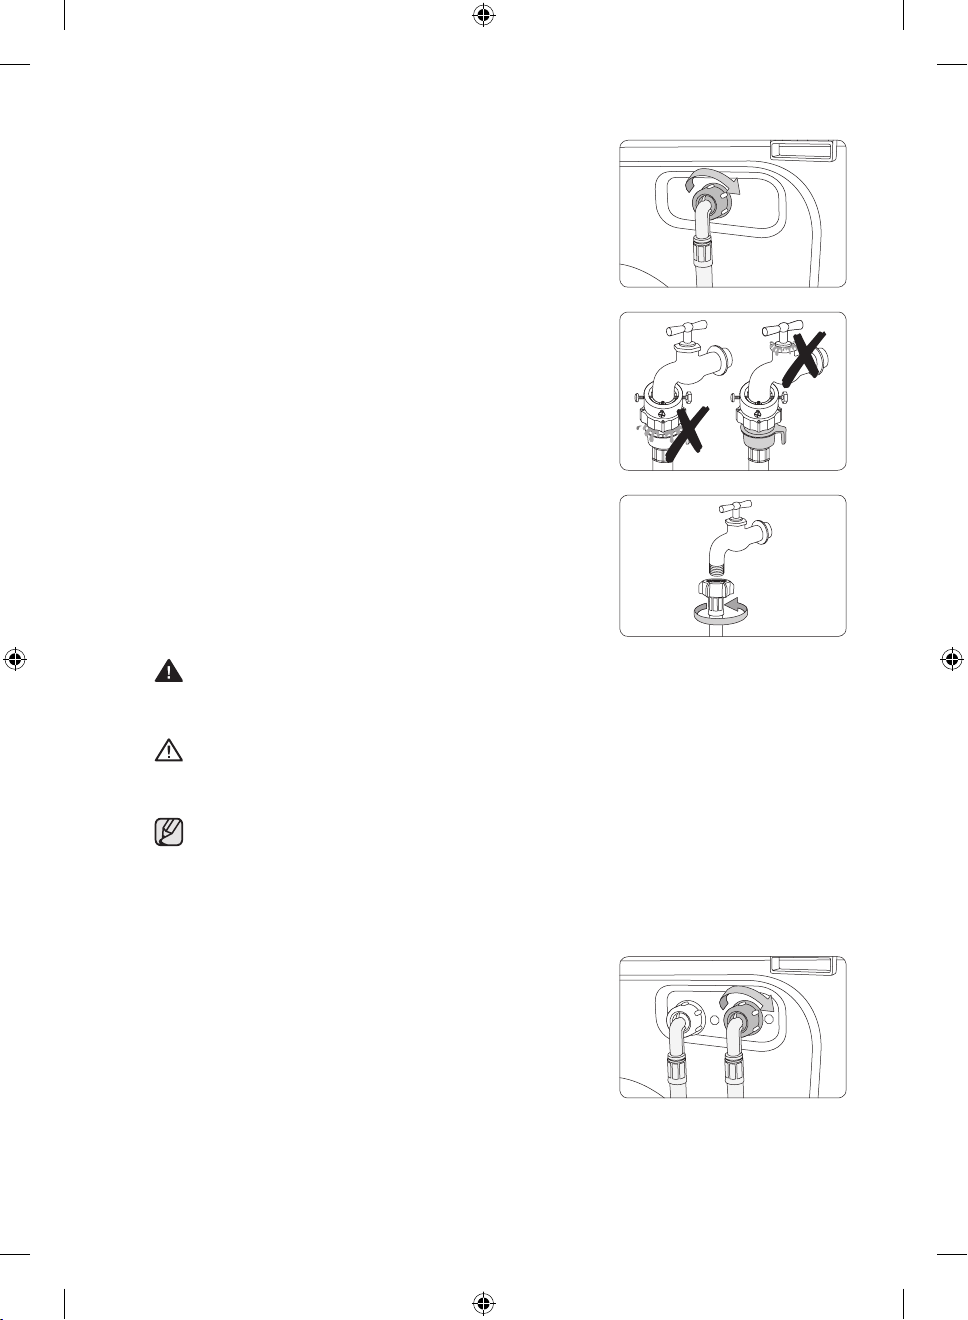
7. Connect the other end of the water supply hose to the inlet
valve on the back of the washing machine. Turn the hose
clockwise to tighten.
8. Open the water tap and check if there are any leaks around
the connection areas. If there are water leaks, repeat the
steps above.
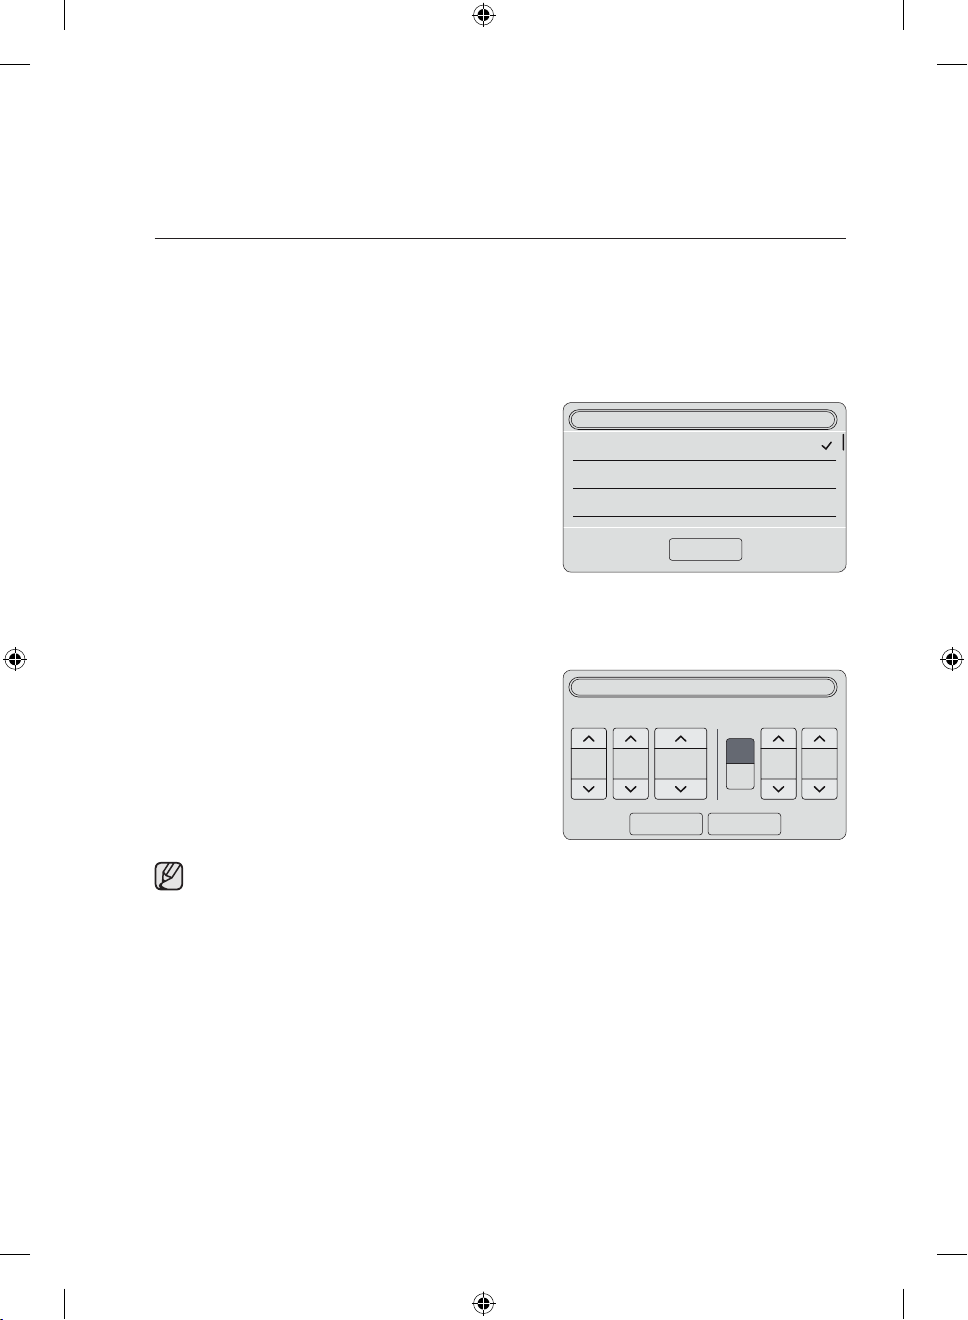
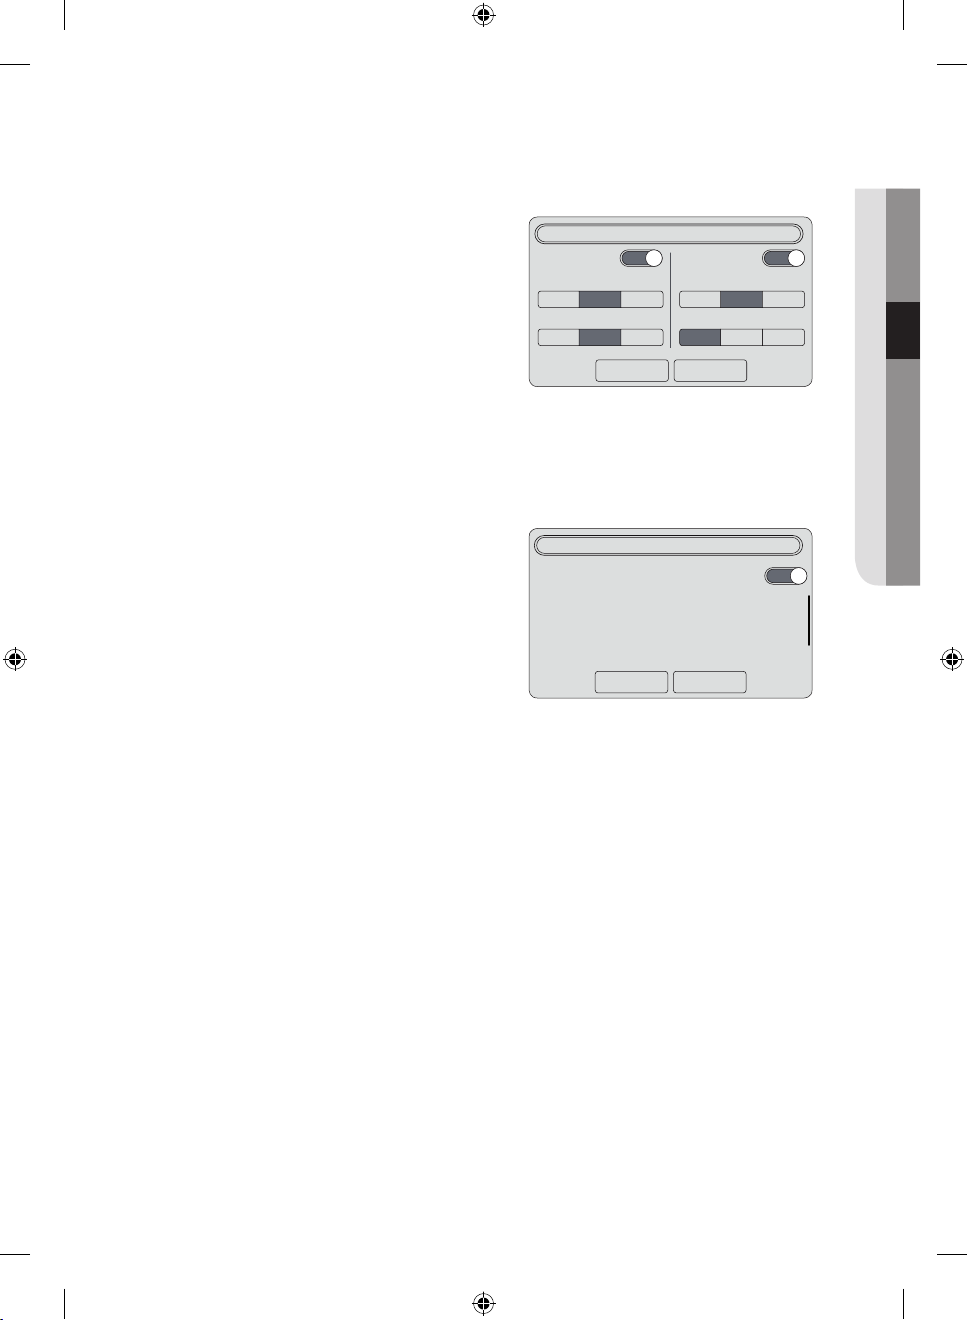
• If using a screw type of water tap, connect the water hose to
the water tap as shown.
WARNING
Stop using the washing machine if there is a water leak, and contact a local Samsung
service centre. Otherwise, this may cause electric shock.
CAUTION
Do not stretch the water supply hose by force. If the hose is too short, replace the hose with
a longer, high-pressure hose.
• After connecting the water supply hose to the adaptor, check if it is connected properly
by pulling the water supply hose downwards.
• Use a popular type of water taps. If the tap is square-shaped or too big, remove the
spacer ring before inserting the tap into the adaptor.
For models with an additional hot water inlet:
1. Connect the red end of the hot water supply hose to the hot
water inlet on the back of the machine.
2. Connect the other end of the hot water supply hose to the
hot water tap.
English - 16
Untitled-13 16 2015-07-18 5:33:29
Page 17

Aqua hose (applicable models only)
A
A
The aqua hose alerts users of a risk of water leaks. It senses the
water flow and turns red on the centre indicator (A) in case of a
leak.
STEP 5 - Position the drain hose
The drain hose can be positioned in three ways:
Over the edge of a wash basin
The drain hose must be placed at a height of between 60 cm and
90 cm (*) from the floor. To keep the spout of the drain hose bent,
use the supplied plastic hose guide (A). Secure the guide to the
wall using a hook to ensure stable drainage.
ln a sink drain pipe
The drain pipe must be above the sink siphon so that the end of the hose is at least 60 cm above
the floor.
ln a drain pipe
The drain pipe should be between 60 cm and 90 cm high (*). It is
advisable to use a 65 cm high vertical pipe. Make sure the drain
hose is connected to the stand pipe at a slant.
Drain standpipe requirements:
• Minimum diameter of 5 cm
• Minimum carry-away capacity of 60 litres per minute
INSTALLATION
STEP 6 – Turn on the washing machine
Plug the power cord into a wall socket featuring an AC 220-240 V / 50 Hz approved electrical
outlet protected by a fuse or circuit breaker. Then, press the Power button to turn on the washing
machine.
English - 17
Untitled-13 17 2015-07-18 5:33:29
Page 18
Before you start
Next
English
Deutsch
Français
Step 1 of 4. Set Language
Step 2 of 4. Set Date & Time
Previous Next
AM
01
DayMonth Year Hour Minute
01 01122014
PM
Initial settings
When the washing machine turns on for the first time, the welcome screen appears with the
Samsung logo. Follow the onscreen instructions to complete the initial settings. You can change the
initial settings later by accessing the Settings screen.
STEP 1 - Set Language
Set a preferred menu language.
1. Select a language.
2. Tap Next.
STEP 2 - Set Date & Time
Set the current date and time.
1. Tap the arrows to set the time for each time element.
2. Tap Next.
The default time is set to the 12-hour format.
To switch between the AM and PM elements, simply tap the corresponding element.
Untitled-13 18 2015-07-18 5:33:29
English - 18
Page 19
STEP 3 - Set Auto Dispense
Step 3 of 4. Set Auto Dispense
Auto Detergent
On On
Previous Next
Amount
Less Std. More
Soft Medium Hard Normal 2X High
Less Std. More
Amount
Water HardenessConcentration
Auto Softener
Step 4 of 4. Set Auto Update
On
Previous Done
The Auto Update function automatically updates the software for
performance improvement purposes ot to x bugs through
communicating with the update server. If you agree to this setting, it is
regarded as an agreement to running the auto update operation. When
the software is updated, some software features may become
The Auto Dispense unit dispenses an appropriate amount of detergent and fabric softener into the
drum according to the course and cycle.
1. Both Auto Detergent and Auto Softener are set
to On by default. To change the setting, slide the
corresponding bar to O.
2. Set the Amount and the Water Hardness.
3. Set the Amount and the Concentration.
4. Tap Next.
STEP 4 - Set Auto Update
Auto Update updates the firmware automatically for improved performance and/or to fix known
bugs through communication with the update server. Once the firmware is updated, some
functions of the washing machine may not be available depending on the firmware version.
1. To update the firmware automatically, set Auto
Update to On.
2. Tap Done.
BEFORE YOU START
STEP 5 - Run Calibration (recommended)
Calibration ensures accurate weight detection by the washing machine. Make sure the drum is
empty before running Calibration.
1. Tap Settings > Calibration > Start.
• The door will be locked during the operation.
• The drum keeps rotating clockwise and anticlockwise for several minutes.
2. When complete, the washing machine turns o automatically.
Untitled-13 19 2015-07-18 5:33:29
English - 19
Page 20
Laundry guidelines
STEP 1 - Sort
Sort the laundry according to these criteria:
• Care Label: Sort the laundry into cottons, mixed fibres, synthetics, silks, wools, and rayon.
• Colour: Separate whites from colours.
• Size: Mixing dierent-sized items together in the drum improves the washing performance.
• Sensitivity: Wash delicate items separately using an Easy Iron option for pure, new woollen
items, curtains, and silk items. Check the labels on the items.
Make sure to check the care label on the clothing, and sort them accordingly before starting
the wash.
STEP 2 - Empty pockets
Empty all the pockets of your laundry items
• Metal objects such as coins, pins, and buckles on clothing may damage other laundry items as
well as the drum.
Turn clothing with buttons and embroideries inside out
• If pants or jacket zippers are open while washing, the drum may be damaged. Zippers should
be closed and fixed with a string.
• Clothing with long strings may become entangled with other clothes. Make sure to tie the
strings before starting the wash.
STEP 3 - Use a laundry net
• Brassieres (water washable) must be placed in a laundry net. Metal parts of the brassieres may
break through and tear other laundry items.
• Small, light clothing such as socks, gloves, stockings, and handkerchiefs may become caught
around the door. Place them inside a fine laundry net.
• Do not wash the laundry net by itself without other laundry. This may cause abnormal vibrations
that could move the washing machine and result in injury.
STEP 4- Prewash (if necessary)
Select the Prewash option for the selected course if the laundry is heavily soiled. Do not use the
Prewash option when detergent is manually added into the drum.
English - 20
Untitled-13 20 2015-07-18 5:33:29
Page 21
STEP 5- Determine the load capacity
Do not overload the washing machine. Overloading may cause the washing machine to not wash
properly. For the load capacity for the type of clothing, see page 29.
When washing bedding or bedding covers, the wash time may be lengthened or the spin
eciency may be reduced. For bedding or bedding covers, the recommended maximum
spin cycle speed is 800 rpm, and the load capacity is 2.0 kg or less.
CAUTION
If the laundry is unbalanced and the “UE” error code is displayed, redistribute the load.
Unbalanced laundry may reduce the spinning performance.
STEP 6- Apply a proper detergent type
The type of detergent depends on the type of fabric (cotton, synthetic, delicate items, wool),
colour, wash temperature, and degree of soiling. Always use “low suds” laundry detergent, which is
designed for automatic washing machines.
• Follow the detergent manufacturer’s recommendations based on the weight of the
laundry, the degree of soiling, and the hardness of the water in your local area. If you are
not sure about the water hardness, contact a local water authority.
• Do not use detergent that tends to be hardened or solidified. This detergent may remain
after the rinse cycle, blocking the drain outlet.
CAUTION
When washing wool using the wool course, use only a neutral liquid detergent. If used with
the Wool course, powder detergent may remain on the laundry and discolour the laundry.
BEFORE YOU START
English - 21
Untitled-13 21 2015-07-18 5:33:29
Page 22

Detergent Guidelines
Auto Dispense
The washing machine provides a two-compartment dispenser: the left compartment for detergent,
and the right compartment for fabric softener. The Auto Dispense unit dispenses an appropriate
amount of detergent and fabric softener into the drum according to the course and cycle.
CAUTION
• Use only a liquid detergent and fabric softener with the Auto Dispense unit.
• Make sure the Auto Dispense unit is inserted completely. The washing machine will not
start operating until the Auto Dispense unit is inserted properly.
• When applying a dierent detergent, make sure to clean the detergent compartment first.
• Do not mix detergent with fabric softener in either compartment.
• To prevent detergent from hardening, do not open the cap once the detergent has been
applied to the compartment.
• Do not use any bleach that may cause corrosion and/or generate gas.
• Do not turn the Auto Dispense unit upside down. The content may spill out of the vents.
• Do not press the outlet at the bottom of the Auto Dispense unit while moving the unit.
The content may leak.
• Use caution when inputting detergent or fabric softener in the unit. The content may spill
around.
• Make sure to remove the Auto Dispense unit before applying detergents.
• When removing the Auto Dispense unit to check the remaining amount of detergent
upon or before an error message, the unit may have some small amount of detergent
remaining or leaking from the bottom of the unit.
• Fully insert the Auto Dispense unit. Incomplete insertion may cause the unit to fail in
dispensing.
• By default, Auto Dispense turns o in the Delicates, Wool, Baby Care, or Outdoor Care
courses.
To enable Auto Dispense in these courses, tap Settings or the Quick Panel Bar > Auto
Dispense, and change the settings as necessary.
English - 22
Untitled-13 22 2015-07-18 5:33:30
Page 23
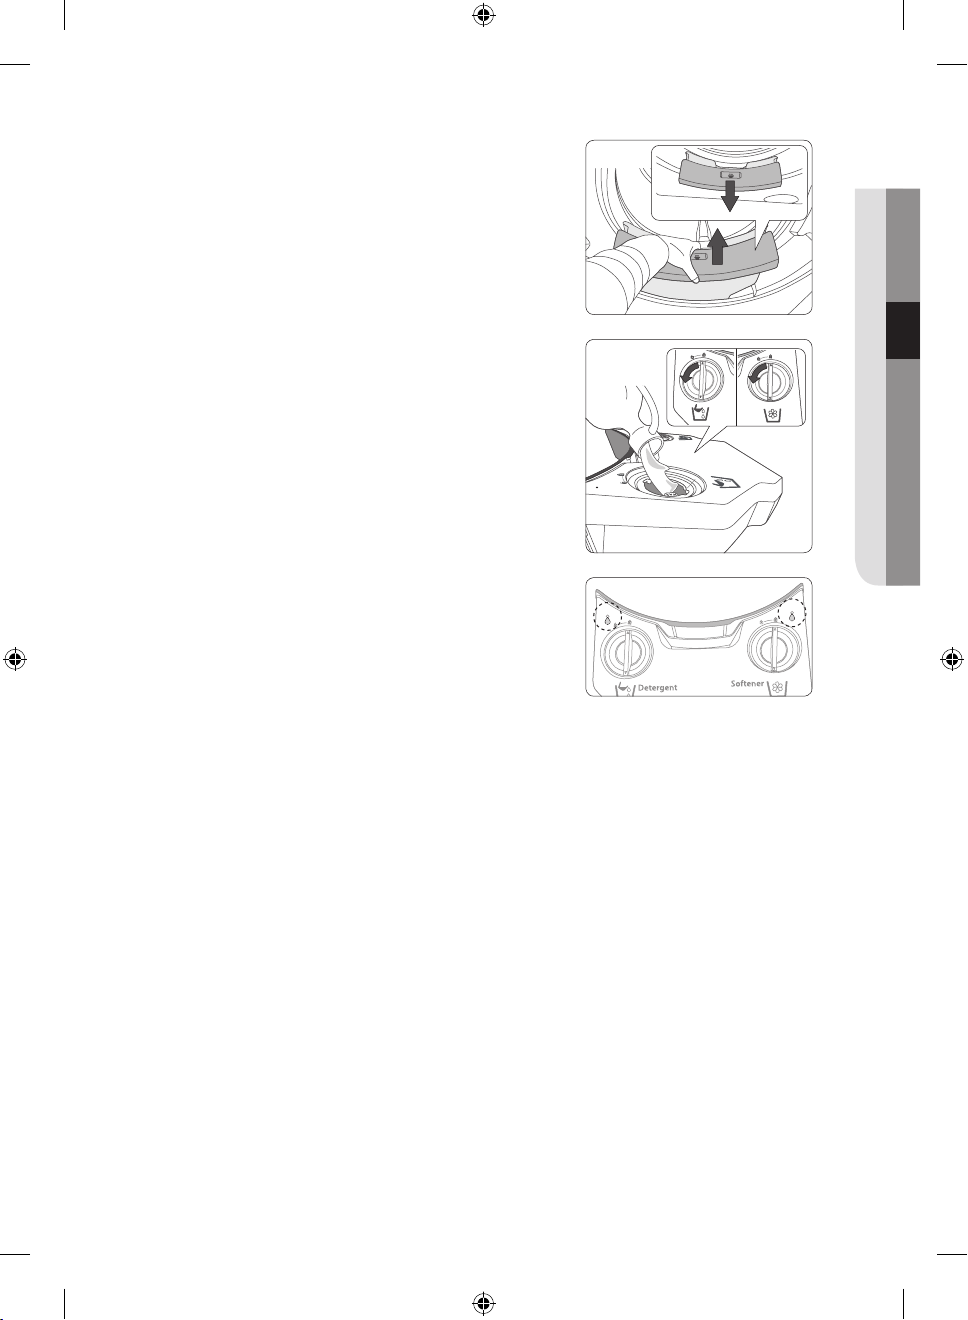
1. Open the door, and pull out the Auto Dispense unit from the
washing machine.
2. Turn the left knob anticlockwise to open, and apply detergent
to the left compartment to the max line.
3. Turn the right knob anticlockwise to open, and apply fabric
softener to the right compartment to the max line.
4. Lock the knobs by turning them clockwise.
5. Reinsert the Auto Dispense unit in the original position.
Use caution when inserting the unit as the content may spill
out of the vents on either side.
6. Turn on Auto Detergent and Auto Softener.
See “Auto Dispense” on page 33.
BEFORE YOU START
English - 23
Untitled-13 23 2015-07-18 5:33:30
Page 24
Manual Dispense
A
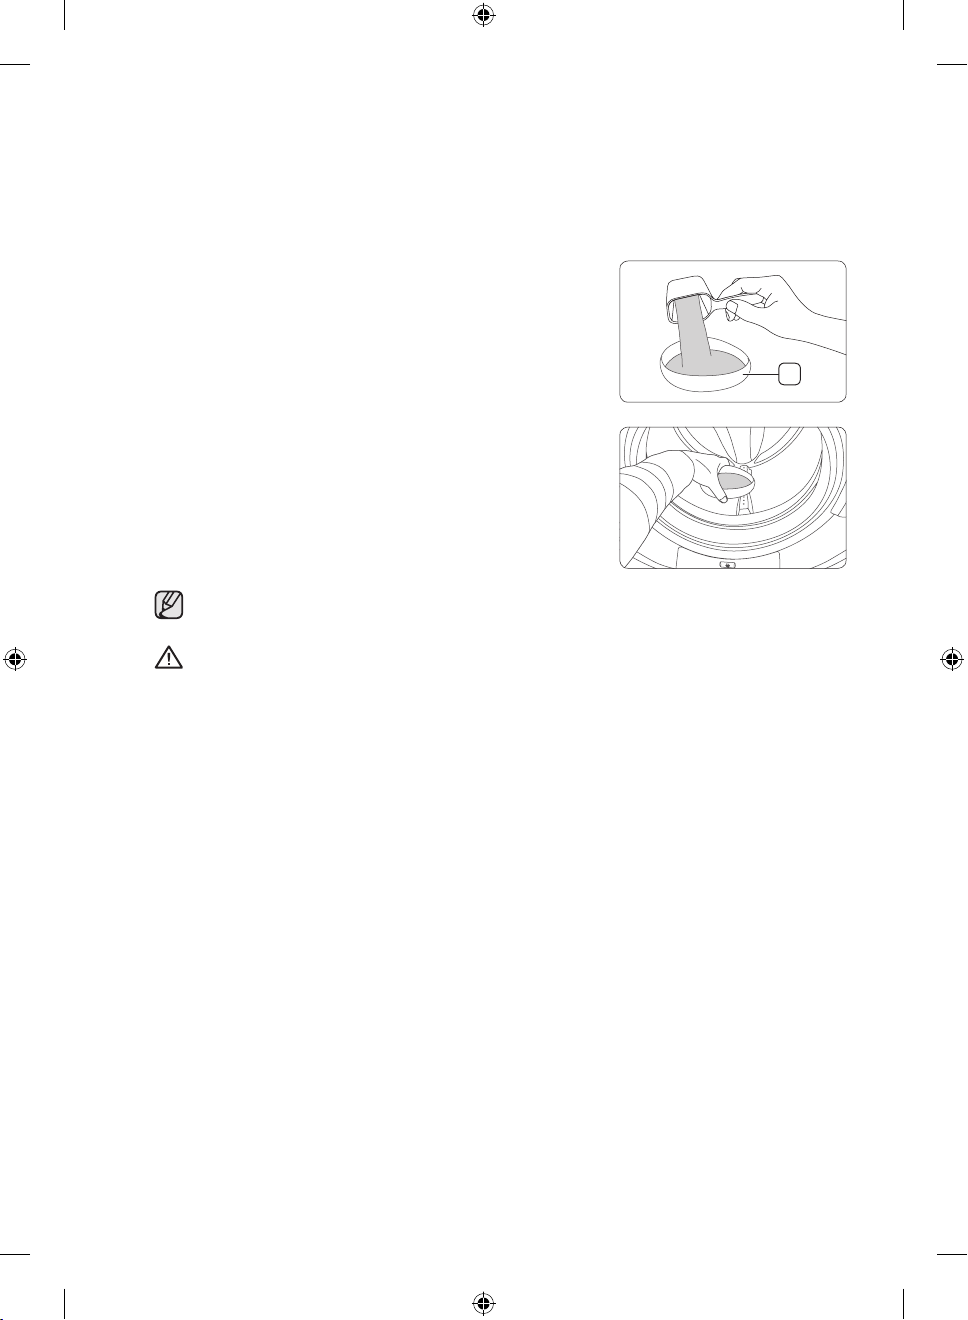
In case you don’t want to use the dispenser (Auto Dispense unit), you can either dose the detergent
directly into the drum or use the provided aqua pebble when applying detergent manually. The
Aqua Pebbles comes in two sizes and are provided as accessories with your appliance. Choose an
Aqua Pebble that is appropriate for the detergent amount.
1. Turn o Auto Detergent.
See “Auto Dispense” on page 33.
2. Apply a powder, gel, or liquid detergent to a proper Aqua
pebble (A). Check the amount marker on the inner side of
the aqua pebble.
3. Insert the aqua pebble near the end of the drum.
When the wash is complete, remove the aqua pebble from the drum and keep it clean for
later use.
CAUTION
• Fabric softener can be applied only using the Auto Dispense unit. Manual input is not
allowed.
• Use caution when inserting the aqua pebble as it is supposed to be balanced at the first
of the wash. Tipping the aqua pebble before the start of a wash may cause detergent
residue on the laundry at the end of the wash, causing discolouration to laundry and/or
reduced washing performance.
• Do not apply detergent to both the auto detergent compartment and the aqua pebble.
• When applying a dierent detergent, make sure to clean the aqua pebble first.
• Do not insert the aqua pebble into a folded blanket or between dierent laundry items.
• Do not select the Pre Wash option when using the aqua pebble.
• A heavy application of detergent may cause the following problems, resulting in a system
failure and/or shortened product life.
• Excessive amounts of detergent cause bubble surpluses and extend the rinse time as a
result.
• This may also cause detergent remaining in the drum after the wash is complete.
• Apply appropriate amounts of detergent according to the specifications of the detergent
manufacturer.
• In case of manual detergent dosage, it is recommended to use the Aqua Pebble when
coloured laundry items are washed.
English - 24
Untitled-13 24 2015-07-18 5:33:30
Page 25
Operations
Most Used
Cotton
1hr 21
min
12:00
AM
Temp.Rinse Spin
40°C 1200
Options
3
Start
3 4 5 6
7
1 2
otto
n
h
1
m
n
B D
8A
C
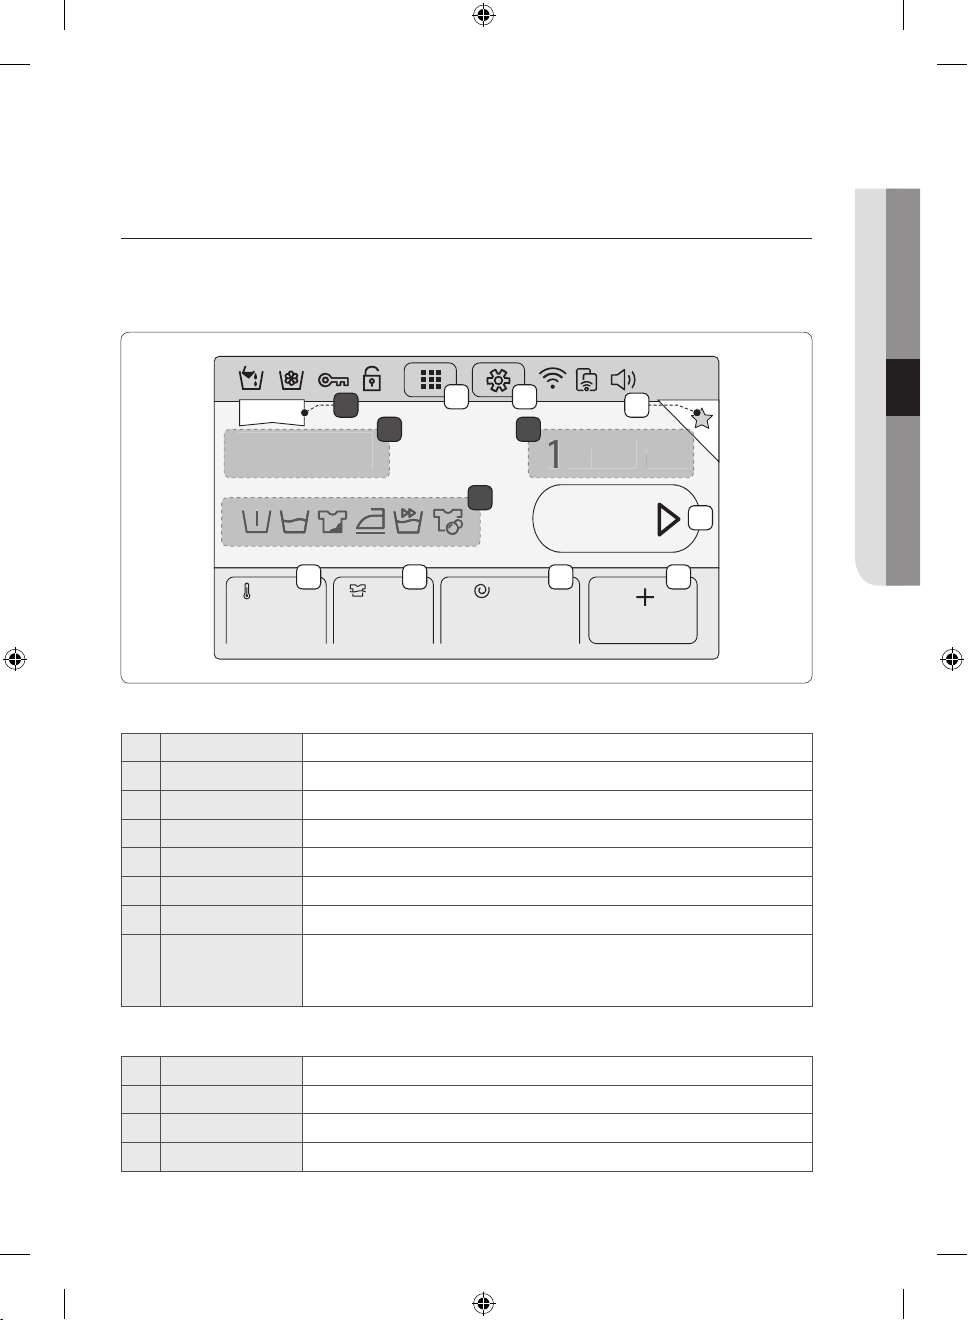
Screen
The actual screen may dier from the image below depending on the model.
Main screen
Buttons
OPERATIONS
1 Course Tap to enter the course tile.
2 Settings Tap to enter the settings screen.
3 Temp. Tap to change the temperature for the current course.
4 Rinse Tap to change the rinse times for the current course.
5 Spin Tap to change the spinning speed for the current course.
6 Options Tap to enter the course options screen.
7 Start Tap to start an operation.
Tap to add the current course configuration to the Favourite list. You
8 Favourite
Information
A Most Used Displays the most frequently used course.
B Current course Displays the current course.
C Active option Displays an active option(s) for the current course.
D Estimated time Displays the estimated operation time for the current course.
Untitled-13 25 2015-07-18 5:33:30
can add up to 4 custom courses, which appear at the first of the
course tile.
English - 25
Page 26
Status bar
12:00
AM
12:00
AM
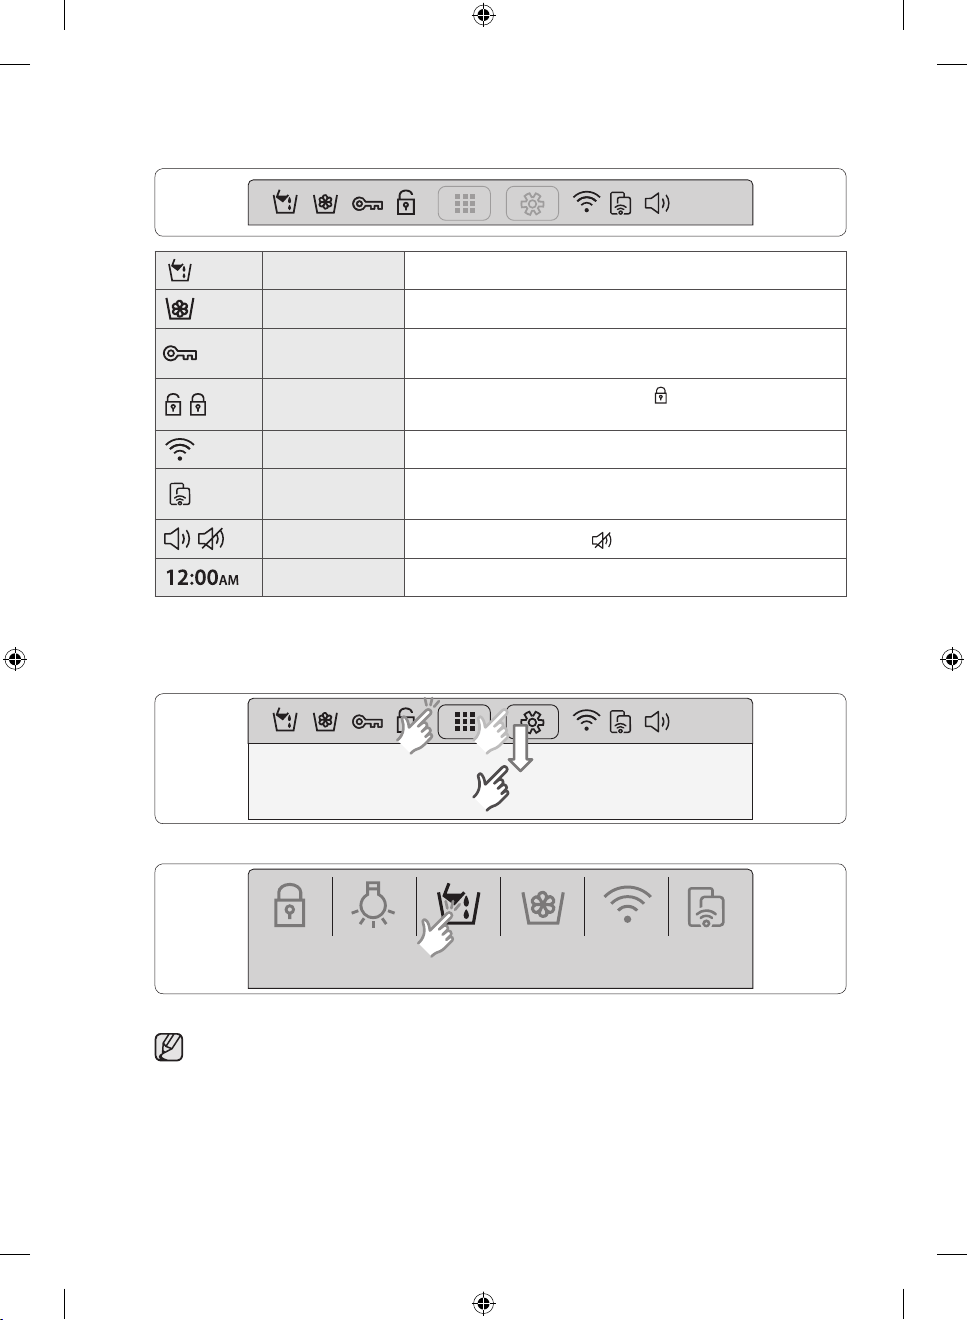
Child Lock Drum
Light
Auto
Detergent
Auto
Softener
NetworkSmart
Control
Auto Detergent If this indicator turns on, Auto Detergent is enabled.
Auto Softener If this indicator turns on, Auto Softener is enabled.
Door Lock
Child Lock
Network It displays the Wi-Fi network connection state.
Smart Control
Sound
Time The current time is displayed.
Quick panel bar
On the Quick panel bar, 6 items are available: Child Lock, Drum Light, Auto Detergent, Auto
Softener, Network, and Smart Control.
If this indicator turns on, the door is locked to prevent a door
opening during operation.
If this icon turns to a closed lock [
], the Child Lock is set
to prevent accidents by children or infants.
If this indicator turns on, the washing machine can be
controlled on a mobile device.
If the icon turns to Mute [
], no sound is output.
1. Tap the Status bar, or swipe it downward to display available items.
2. Tap to turn an item on/o, or change the current settings.
• For advanced settings, go to the settings screen, and make changes to your preference.
• Active items are lit while inactive items are greyed out.
English - 26
Untitled-13 26 2015-07-18 5:33:31
Page 27
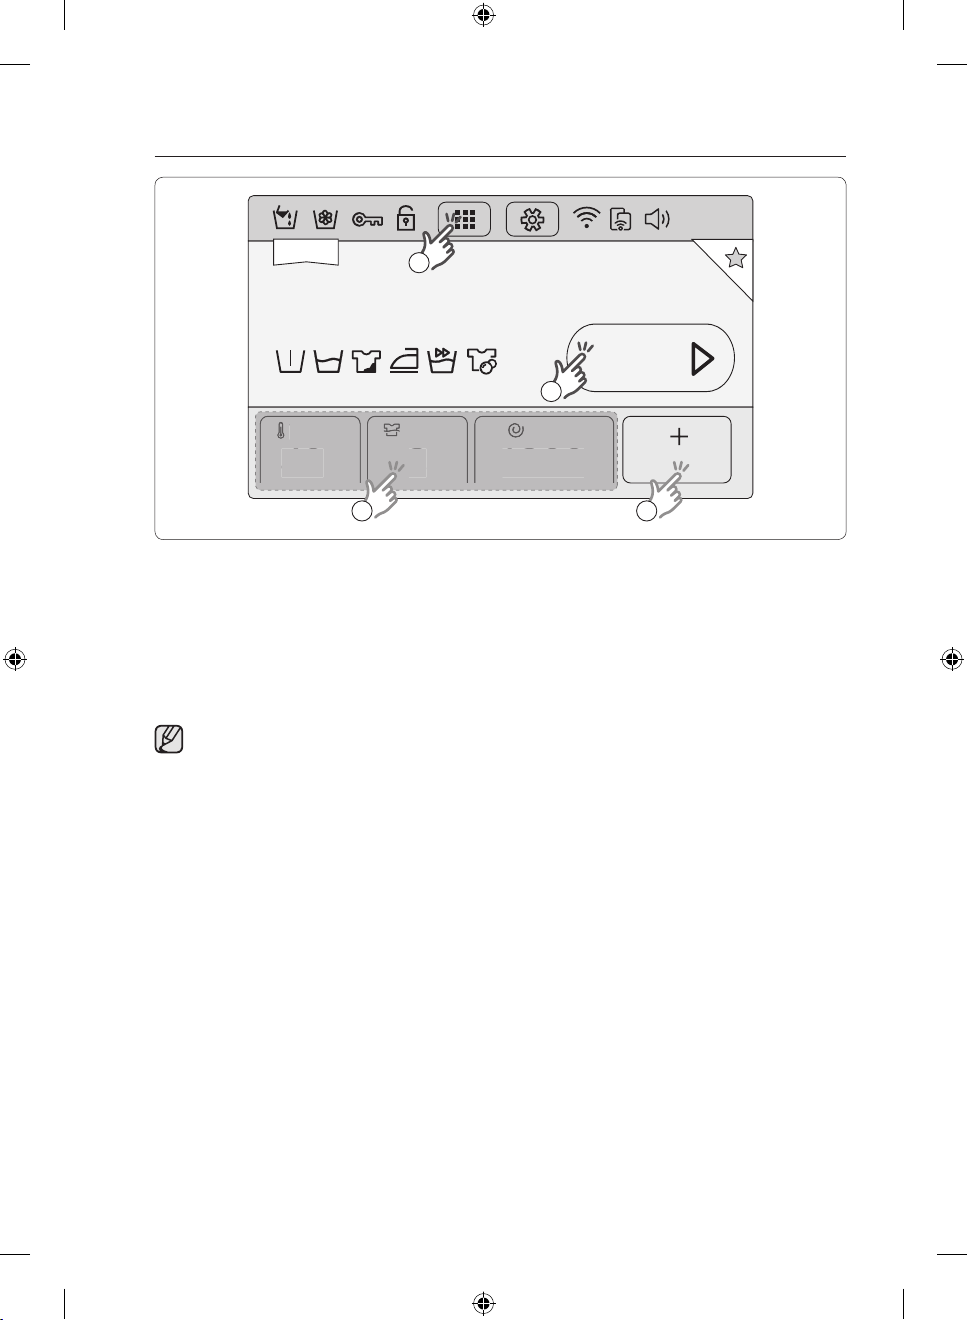
Options screen
Cotton
1hr 21min
12:00
AM
Temp.
40
Quick Wash Pre Wash Soaking
+
IntensiveEasy Iron
Spin
1200
Rinse
3
Start
1 2 3 4 5 7
6
1 Quick Wash Specific for less soiled clothing for a load less than 2 kg.
2 Pre Wash A preliminary washing cycle is added before the main wash.
3 Intensive The operation time for each cycle is longer than normal.
4 Soaking+ This is useful to remove stubborn stains on laundry.
5 Easy Iron This is useful to reduce wrinkles.
6 Delay End Use this to specify the end time of a selected course. See page 32.
7 Return Return to the main screen.
OPERATIONS
For details on each option, see “Options” on page 31.
Untitled-13 27 2015-07-18 5:33:32
English - 27
Page 28
Simple steps to start
Most Used
Cotton
1hr 21min
12:00
AM
Temp.Rinse Spin
40°C 1200
Options
3
Start
Temp.
ins
e
Sp
in
4
0
°C
1200
1
4
2 3
1. Press the Power button to display the main screen.
2. On the main screen, tap the Course icon on the top centre to display the course tile.
3. Select a course. The washing machine supports 22 courses.
4. Change the course settings (Temp., Rinse, and Spin) if necessary.
5. Tap the Options icon at the bottom right corner. Then, select options and change the option
settings.
6. Tap Start.
• The washing machine has the default course settings and options available for each
course. You can accept the default or make changes to your preference.
• You can select a course on the main screen. Simply swipe the screen to the left to open
the next course. To return to the previous list, simply swipe to the right.
Untitled-13 28 2015-07-18 5:33:32
English - 28
Page 29

Course overview
Standard courses
Course Description & Max load (kg)
• Add the current course configuration to the Favourite list, and
Favourite
Most Used
Auto Optimal
Wash
Cotton
Synthetics
Denim
Dark Garment
Super Speed
Super Eco Wash
Outdoor Care
Baby Care
Wool
quickly access the course configuration later. You can add up
to 4 custom courses, which appear at the first of the course
tile.
• The most frequently used course is displayed on the upper
left corner of the main screen by default.
• Auto Optimal Wash adjusts the detergent amount and
the course cycles according to the laundry weight and
contamination level. This is best used with the Auto Dispense
feature.
• For cottons, bed linens, table linens, underwear, towels, or
shirts.
• The washing time and the number of rinse cycles are
automatically adjusted according to the load.
• For blouses or shirts that are made of polyester (diolen,
trevira), polyamide (perlon, nylon), or the like.
• Featuring a higher water level in the main wash and an extra
rinse cycle to ensure that no powder detergent remains.
• Featuring additional rinses and reduced spinning to ensure
that the laundry is washed gently and rinsed thoroughly.
• Fast completion within 1 hour for daily items such as
underwear and shirts.
• The Eco Bubble technology helps reduce power
consumption. Featured by low-temperature washing
eciency, Super Eco Wash compares its washing
performance and power saving to the conventional Eco
Bubble-less Cotton cycle.
• For outdoor clothes, skiwear, and sportswear that are made
of functional materials such as spandex, stretch, and microfibre.
• Featuring a high-temperature wash and extra rinses to ensure
that no powder detergent remains.
• Specific for machine-washable wool for loads less than 2.0
kg.
• The wool course features gentle cradling and soaking to
protect the wool fibres from shrinkage/distortion.
• A neutral detergent is recommended.
OPERATIONS
-
-
Max
Max
5
3
4
5
4
2
4
2
English - 29
Untitled-13 29 2015-07-18 5:33:32
Page 30
Course Description & Max load (kg)
• For sheer fabrics, bras, lingerie (silk), and other handwash-
Delicates
Bedding
Spin • Featuring an additional spin cycle to remove water thoroughly. -
Rinse+Spin
Eco Drum Clean
Cotton
only fabrics.
• For best performance, use liquid detergent.
• For bed spreads, bed sheets, bedding covers, etc.
• For best results, wash only 1 type of bedding and make sure
the load weighs less than 2.5 kg.
• Featuring an additional rinse after applying fabric softener to
the laundry.
• Cleans the drum by removing dirt and bacteria from the drum.
• Perform once every 40 washes with no detergent or bleach
applied.
• Make sure the drum is empty.
• Do not use any cleaning agents for cleaning the drum.
• Optimal performance with lower energy for cotton fabrics, bed
linens, table linens, underwear, towels, or shirts.
2
2.5
-
-
Max
Specialty Cycle
Six specialty courses are designed to eectively remove specific types of stains and dirt that may
accumulate on specific types of activities ranging from household work to professional mountainclimbing.
Course Description & Max load (kg)
Cooking&Dining
Gardening
Active Sports
Active Kids
Working&Everyday
Hygiene Care • This course removes skin oils and blood stains eciently. 4
• This course removes food spills and cooking stains
eciently.
• This course removes grass and mud/dirt stains and cleans
sweat and skin oils eciently.
• This course removes grass, soil, mud, light food stains,
sweat, and make-up eciently.
• Do not use this course for waterproof clothing. This
may result in damage to the waterproof or breathable
capabilities.
• The Active Kids course is for most children’s clothing. This
course removes food, fruit juice, drinks, mud, soil, ink, and
crayon stains eciently.
• The Working&Everyday course is for lightly soiled clothing.
This course removes light ink and pencil stains and cleans
normal day to day stains eciently.
4
4
4
4
4
English - 30
Untitled-13 30 2015-07-18 5:33:32
Page 31

Options
Available options dier depending on the course. Inactive options for a specific course are greyed
out.
Options Description
• Specific for less soiled garments for loads less than 2 kg.
• It takes a minimum of about 15 minutes, depending on the conditions
such as the water pressure, water hardness, and/or extra options
Quick Wash
Pre Wash • This will add a preliminary washing cycle before the main wash cycle.
Soaking+
Intensive
Easy Iron
Delay End • The displayed time refers to the end time of a selected course.
selected.
• The Quick Wash time increases in this sequence: O > 15 min > 20
min > 30 min > 40 min > 50 min > 60 min.
• A recommended amount of detergent is less than 20 g (for a 2 kg
load).
• This option eectively removes stains by soaking the laundry.
• Each soak cycle tumbles the drum for 1 minute and stands still for 4
minutes. You can set the Soaking+ time between 30 minutes and 150
minutes.
• For badly soiled laundry. The operation time for each cycle is longer
than normal.
• The spinning speed decreases to reduce wrinkles.
• Set the spinning speed up to 800 rpm.
OPERATIONS
English - 31
Untitled-13 31 2015-07-18 5:33:32
Page 32

Delay End
You can set the washing machine to finish the current course at a specific hours later.
This is useful if you want to finish the wash by the time you come home from business.
1. Select a course. Then change the course settings if necessary.
2. Tap the Options icon at the bottom right corner.
Then, select options and change the option settings.
3. Tap Delay End.
4. Use the arrows to set the end time of the current course, and tap Start.
• To cancel the option, tap Cancel and return to the Options screen.
Use case
You want to finish a two-hour course 3 hours later from now. For this, you add the Delay End
option to the current course with the 3-hour setting, and press the Start/Pause button at 2:00 p.m.
Then, what happens? The washing machine starts operating at 3:00 p.m., and ends at 5:00 p.m.
Provided below is the time line for this example.
2:00 pm
Set the Delay End to 3 hours.
3:00 pm
Start
5:00 pm
End
English - 32
Untitled-13 32 2015-07-18 5:33:32
Page 33

Settings
Child Lock
To prevent accidents by children or infants, Child Lock locks all buttons except for the Settings
button.
You can access the Child Lock menu from the Settings screen or the Quick panel bar.
• To set the Child Lock, tap Settings, and tap the Child Lock button.
• To activate Child Lock, press and hold the Activate button for 3 seconds.
• To deactivate Child Lock temporarily, press and hold the Temporarily Deactivate button for 3
seconds.
• To deactivate Child Lock completely, press and hold the Deactivate button for 3 seconds.
• To add detergent or more laundry in the drum, or to change the course settings in the
Child Lock state, you must first stop or release the Child Lock.
• The Child Lock will be reactivated one minute after it stops temporarily
Drum Light
• To turn the Drum Light on or o, tap Settings, and slide the Drum Light bar to On or O.
• The drum light turns o automatically after 5 minutes.
Auto Dispense
The washing machine provides a two-compartment dispenser: one for detergent, and the other for
fabric softener. The Auto Dispense unit dispenses an appropriate amount of detergent and fabric
softener into the drum according to the course and cycle.
To enable the Auto Dispense
1. Tap Settings > Auto Dispense.
2. Slide the Auto Detergent bar to On, and set the Amount and the Water Hardness.
3. Slide the Auto Softener bar to On, and set the Amount and the Concentration.
4. Tap Save.
OPERATIONS
Brightness
Set the brightness of LCD screen
• Tap Settings, and tap the (-/+) signs to increase or decrease the brightness level.
Sound Theme
Set the volume level and beep melody.
1. Tap Settings > Sound Theme.
2. To adjust the volume, tap the (-/+) signs to increase or decrease the volume level.
3. To select a beep melody, tap a theme in the list.
English - 33
Untitled-13 33 2015-07-18 5:33:32
Page 34

Date & Time
The default time is set to the 12-hour format.
1. Tap Settings > Date & Time.
2. Tap the arrows to change the time for each time element. For example, to change the date, use
the arrows above and below the date element.
3. To switch between the AM and PM elements, simply tap the corresponding element.
4. Tap Save.
Language
Select a preferred menu language.
• Tap Settings > Language, and select a preferred menu language.
Network
Auto setup
The washing machine supports Wi-Fi protocols of WEP, TKIP, and AES, but it does not come with
a router (AP).
1. Tap Settings > Network, and then slide the Network bar to On. The AP list appears.
2. Tap a network provider, and provide a password if asked.
3. Tap OK. When completed successfully, the selected network provider is ticked.
Manual setup
1. Enable Wi-Fi connection as instructed above.
2. Tap Set IP > Manual.
3. Provide an IP Address, Subnet mask, Gateway, and DNS, and then tap OK.
Wi-Fi connection
Once the network connection is established, the next time you want to turn the Wi-Fi connection
on or o, slide the Network bar to On or O.
Easy Connection
Easy Connection enables you to easily configure the network settings including the authentication
procedure.
English - 34
Untitled-13 34 2015-07-18 5:33:32
Page 35

Smart control
With Smart Control, you can control the washing machine on your mobile device. Tap this icon to
turn the Smart control function on or o.
1. Tap Settings > Slide the Smart Control bar to On.
2. Back on the main screen, Smart Control activated.
3. Tap Deactivate to disable the function, Smart Control deactivated.
• The icon is greyed out if Smart Control is not activated.
• Manipulation such as icon tapping or button pressing on the washing machine will
deactivate Smart Control.
• If wireless network not connected, Smart Control is not available.
• Select a connection method to external devices when tapping Smart Control.
Eco Check
The energy/water eciency of the recent 4 courses is displayed with a technical summary of power
consumption, water levels, course settings, and options.
1. Tap Settings > Eco Check. A summary screen of the recent 4 courses appears.
2. Tap a course to display a technical summary of the selected course.
Self Check
The washing machine performs self-diagnosis on the current system. Operation errors and machine
problems can be found on the results screen.
• Tap Settings > Self Check > Start.
Calibration
Calibration ensures accurate weight detection by the washing machine. Make sure the drum is
empty before running Calibration.
1. Tap Settings > Calibration > Start.
• The door will be locked during the operation.
• The drum keeps rotating clockwise and anticlockwise for several minutes.
2. When complete, the washing machine turns o automatically.
OPERATIONS
English - 35
Untitled-13 35 2015-07-18 5:33:32
Page 36

Update
When updates are available, the update notification appears on the screen.
To check the current firmware version
1. Tap Settings > Update to display the current firmware version.
2. To update the firmware manually, tap Update.
To update the firmware automatically
1. Tap Auto Update on the Settings screen.
2. Slide the Auto Update bar to On. The update proceeds without notification when updates are
available.
WARNING
Do not unplug the power cable of the washing machine or the router during the update.
Help
Refer to the user guide for product usage, and check the troubleshooting section against a
problem.
• Tap Settings > Help.
English - 36
Untitled-13 36 2015-07-18 5:33:32
Page 37

Samsung Mobile Smart Control
S
l
O
This washer provides two dierent mobile control apps that you can use for controlling your washer
via a network connection.
Mobile apps that apply to the Smart Control feature of Samsung
smart washers
Samsung Smart Home
With the newly designed Samsung Smart Home app, you can access your washer on the move,
and control or check the operation status of your washer.
Download the “Samsung Smart Home” app from Play Store or Apple Store, and install on your
mobile device.
Samsung Smart Washer
The Samsung Smart Washer app lets you control the operation of the washer on your mobile
device in two categories: Indoor and Outdoor.
Download the “Samsung Smart Washer” app from Play Store or Apple Store, and install on your
mobile device.
Smart Control settings on the washer
To enable the Smart Control feature, choose a connection method to the mobile app.
Tap the Setup icon, and select Smart Control under the Network menu.
1. Choose a connection method to the mobile app.
Most Used
1
Cotton
Temp.Rinse Spin
40°C 1200rpm
3
12:00
1hr 21min
Start
Options
AM
OPERATIONS
2. Select “Samsung Smart Home” if you want to control the
washer through the Samsung integrated app.
Select “Samsung Smart Washer” if you want to control the
washer through the Samsung washer app.
3. Once setup is complete, your changes are applied and you
may need to reconnect.
• Samsung Smart Home (Default)
• Samsung Smart Washer
Language
AB
Network
Wi-Fi
Easy Connection
Smart Control
mart Contro
1
Maintenance
Smart Control
1. You can select a connection method to external devices with
the Smart Control options.
2. Select “Samsung Smart Home” to remotely access devices through
the Samsung Smart Home app. Select “Samsung Smart Washer” to
Samsung Smart Home
Samsung Smart Washer
Save
12:00
English
On
O
12:00AM
AM
English - 37
Untitled-13 37 2015-07-18 5:33:33
Page 38

• By default, this product uses the newly designed Samsung Smart Home app as a
connection method, which is recommended.
• For iPhone models, the Samsung Smart Home app is scheduled to be available at the
Apple Store from the second half of 2014.
• In some countries, the Samsung Smart Home app may not be available. If this is the
case, use the Samsung Smart Washer app instead.
English - 38
Untitled-13 38 2015-07-18 5:33:33
Page 39

Samsung Smart Home app
When using the Samsung Smart Home app, make sure “Samsung Smart Home” under the Setup
menu is selected.
The Samsung Smart Home app enables you to access and control the washing machine on the
move.
Installation
1. Visit Google Play Store for Android devices, or Apple App Store for iOS devices, and search for
Samsung Smart Home to select.
2. Download and install the Samsung Smart Home app on your mobile device.
• The Samsung Smart Home app supports Android OS 4.0 (ICS) or later which is
optimized for Samsung smartphones (Galaxy S and Galaxy Note series). Some functions
of this app may work dierently on other devices.
• This app supports iOS 7 or later for iPhone models.
• For enhanced performance, the UI design of this app is subject to change without
notice.
• For iPhone models, this app is scheduled to be available from the latter half of 2014 at
Apple App Store.
Preparation
1. To enable the app, you are required to enter your Samsung account. You will be guided
in creating a Samsung account if you don't have one directly on the app. No other app is
necessary for this purpose.
2. To enable the app, first register your washing machine to the Samsung Smart Home service.
1) Select the washing machine in the device list of the Samsung Smart Home app.
2) Enter the necessary information about the wireless AP that you use for wireless connection.
3) Follow the onscreen instructions to configure settings for the washing machine.
4) On the washing machine, select Settings > Easy Connection to configure the network
settings.
5) When complete, you will see the washing machine icon on the app.
CAUTION
• Wi-Fi uncertified routers may fail to establish the connection.
• If installing the washing machine and the AP near microwave ovens or electric hairdryers,
Smart Control may not function properly due to electric interference.
• The washing machine supports only the Wi-Fi 2.4Ghz protocols.
• The surrounding environment may aect the wireless network performance.
• If you run the app without being logged in, you will see the Account guidance screen.
Once logged in, you can change your account settings in Settings > Account.
• Samsung smartphone users can automatically log into the app once registering their
account in Settings.
OPERATIONS
English - 39
Untitled-13 39 2015-07-18 5:33:33
Page 40

Using the Samsung Smart Home app
Key features
• Integrated control of Samsung smart appliances
Register your Samsung smart devices to the Samsung Smart Home service that you can
leverage for easy access. Select the washing machine icon on the app to access the core
features of the washing machine on the move.
• Master key
The master key consists of 4 modes: Going out, Coming home, Good night, and Good
morning.
• Chat controls
Chat between smart devices and get the information to control the device.
• Home monitoring
Use the built-in camera of your smart device to monitor the living room while on the move.
• Customer support
Download the product manual or request for a service repair.
Some features of this service may not be available on the washing machine.
Samsung Smart Home Washing Machine app
Control and monitor the washing machine both home and on the move.
1. Register the washing machine to the Samsung Smart Home app.
2. To enable remote control, turn on Smart Control on the washing machine.
3. Select the washing machine icon on the mobile device and tap Start.
This product is a smart washing machine that supports the Samsung Smart Home
service.
For more information, visit www.samsung.com.
English - 40
Untitled-13 40 2015-07-18 5:33:33
Page 41

Samsung Smart Washer app
When using the Samsung Smart Washer app, make sure “Samsung Smart Washer” under the
Setup menu is selected.
The Samsung Smart Washer app allows you to control some functions of the washing machine on
your mobile device.
Download
1. Search for Samsung Smart Washer at the Play Store or the Apple Store.
2. Download and install the app on the mobile device.
3. Run the Samsung Smart Washer app on your mobile device.
Connect to the washing machine
The washing machine must be connected to a Wi-Fi network.
Indoor control
To enable this mode, the mobile device must be connected to the same network as the washing
machine.
1. On the mobile device, tap Indoor control to display a list of available washing machine models.
2. Tap the model name of a washing machine to connect, and then tap OK. The authentication
window appears.
3. On the washing machine, tap Settings, and slide the Smart Control bar to On. The
authentication procedure begins.
The authentication procedure is required just once for the first use.
Outdoor control
To enable this mode, the washing machine must be registered to the Samsung Smart Appliance
site (www.samsungsmartappliance.com).
1. On the washing machine, tap Settings, and slide the Smart Control bar to On.
2. On the mobile device, tap Outdoor control, and provide the login credentials.
A list of registered devices appears.
3. Tap a device that you want to control from the list. Now, a remote connection will be
established automatically between the washing machine and the mobile device.
OPERATIONS
No authentication procedure is required.
English - 41
Untitled-13 41 2015-07-18 5:33:33
Page 42

Registration
Register your washing machine to the Samsung Smart Appliance site (www.
samsungsmartappliance.com), and get remote access to the washing machine. The washing
machine must be connected to a Wi-Fi network.
1. Go to the Samsung Smart Appliance website (www.samsungsmartappliance.com).
2. Provide your Samsung account credentials to log in. If not a registered user, click Create a
Samsung account and follow the onscreen instructions.
3. Click My Page > Add device, and provide the MAC address of the washing machine.
To check the MAC address, tap Settings > Network on the washing machine.
4. Click Get Approval.
5. Tap Settings on the washing machine, and tap OK if asked to get approval.
Registered washing machines are found in the device list of the website.
Hereby, Samsung Electronics, declares that this washing machine is in compliance with the
essential requirements and other relevant provisions of Directive 1999/5/EC.
The ocial Declaration of conformity may be found at http://www.samsung.com, go to
Support > Search Product Support and enter the model name.
English - 42
Untitled-13 42 2015-07-18 5:33:33
Page 43

Maintenance
Keep the washing machine clean to prevent deteriorated performance and to preserve its life cycle.
Eco Drum Clean
Perform this course regularly to clean the drum and to remove bacteria from it.
1. Tap Course > Eco Drum Clean.
2. Move to the main screen, and tap Start.
The water temperature for Eco Drum Clean is set to 70 °C, which cannot be changed.
CAUTION
Do not use any cleaning agents for cleaning the drum. Chemical residue in the drum
deteriorates the washing performance.
Eco Drum Clean reminder
• The Eco Drum Clean reminder appears on the main screen once every 40 washes. It is
advisable to perform the Eco Drum Clean regularly.
• When you first see this reminder, you can ignore the reminder (up to 6 times) by tapping
Remind later. From the 7th wash, the reminder does not appear. However, it appears again
on the second 40th wash.
MAINTENANCE
English - 43
Untitled-13 43 2015-07-18 5:33:33
Page 44

Emergency drain
In case of a power failure, drain the water inside the drum before taking out the laundry.
1. Unplug the power cord of the washing machine from the main
socket.
2. Gently press the top area of the filter cover to open.
3. Gently pull out the emergency drain tube.
4. While holding the end of the drain tube, open the tube cap.
5. Let the water run into a container.
6. Close the tube cap, and reinsert the drain tube.
7. Close the filter cover.
English - 44
Untitled-13 44 2015-07-18 5:33:33
Page 45

Cleaning
Surface of the washing machine
Use a soft cloth with a nonabrasive household detergent. Do not spray water onto the washing
machine.
Mesh filter
Clean the mesh filter of the water supply hose once or twice a year.
1. Turn o the washing machine, and unplug the power cord.
2. Close the water tap.
3. Loosen and disconnect the water supply hose from the
back of the washing machine. Cover the hose with a cloth to
prevent water from gushing out.
4. Use pliers to pull out the mesh filter from the inlet valve hole.
5. Submerge the mesh filter deeply in water so that the threaded
connector is also submerged.
6. Dry the mesh filter completely in the shade.
7. Reinsert the mesh filter into the water supply hose, and place
the water supply hose in the original position.
8. Open the water tap.
If the mesh filter is clogged, an error code of “4E” appears on the screen.
MAINTENANCE
English - 45
Untitled-13 45 2015-07-18 5:33:34
Page 46

Debris filter
It is advisable to clean the debris filter 5 or 6 times a year to prevent its clogging. A clogged debris
filter may reduce the bubble eect.
1. Turn o the washing machine, and unplug the power cord.
2. Drain the remaining water inside the drum by referring to
“Emergency drain” on page 44.
3. Open the filter cover using a coin or key.
4. Turn the debris filter cap to the left, and drain o the remaining
water.
5. Remove the debris filter.
6. Clean the debris filter using soft brushes. Make sure the drain
pump propeller inside the filter is unclogged.
7. Reinsert the debris filter, and turn the filter cap to the right.
• To open the safety filter cap, push in and turn it
anticlockwise. The spring of the cap helps to open the
cap.
• To close the safety filter cap, turn it clockwise. The
spring makes a rattling sound, which is normal.
• If the debris filter is clogged, an error code of “5E” appears on the screen.
CAUTION
• Make sure the filter cap is closed properly after cleaning the filter. Otherwise, this may
cause a leak.
• Make sure the filter is inserted properly after cleaning it. Otherwise, this may cause an
operational failure or a leak.
English - 46
Untitled-13 46 2015-07-18 5:33:34
Page 47

Auto Dispense unit
The Auto Dispense unit must be cleaned regularly to ensure proper operation at all times.
1. Remove the Auto Dispense unit from the washing machine.
2. Wipe out the recess of the Auto Dispense unit using a dry
cloth.
3. Remove two knobs of the Auto Dispense unit as well as the
two caps at the bottom, and run water through the Auto
Dispense unit to clean the inner area.
Do not shake the Auto Dispense unit as you may be
spattered with water from the vent of the Auto Dispense unit.
4. Reinsert knobs and caps in the original position.
5. Reinsert the Auto Dispense unit in the original position.
MAINTENANCE
English - 47
Untitled-13 47 2015-07-18 5:33:34
Page 48

Recovery from freezing
The washing machine may freeze when it drops below 0 °C.
1. Turn o the washing machine, and unplug the power cord.
2. Pour warm water over the water tap to loosen the water supply hose.
3. Disconnect the water supply hose, and soak it in warm water.
4. Pour warm water into the drum and leave it for about 10 minutes.
5. Reconnect the water supply hose to the water tap.
If the washing machine still doesn’t operate normally, repeat the above steps until it operates
normally.
Care against an extended time of disuse
Avoid leaving the washing machine unused for an extended time.
If this is the case, drain the washing machine and unplug the power cord.
1. On the main screen, tap Course > Cotton with an option of Quick Wash.
2. Empty the drum, and tap Start.
3. When the course is complete, close the water tap and disconnect the water supply hose.
4. Turn o the washing machine, and unplug the power cord.
5. Open the door to let air circulate through the drum.
English - 48
Untitled-13 48 2015-07-18 5:33:34
Page 49

Troubleshooting
Checkpoints
If you encounter a problem with the washing machine, first check the table below and try the
suggestions.
Problem Action
• Make sure the washing machine is plugged in.
The washing machine
won’t start.
Water supply is
insucient, or no water
is supplied.
The washing machine
vibrates badly or makes
noise.
The washing machine
does not drain and/
or spin.
The door won’t open.
The washing machine
produces lots of
bubbles.
I cannot apply
additional detergent.
If a problem persists, contact a local Samsung service centre.
• Make sure the door is properly closed.
• Make sure the water tap is open.
• Tap Start again on the main screen.
• Open the water tap fully.
• Make sure the water supply hose is not frozen.
• Make sure the water supply hose is not kinked or clogged.
• Clean the filter on the water supply hose.
• Make sure the washing machine is installed on a level floor. If the
floor is not level, use the levelling feet to adjust the level.
• Make sure that the shipping bolts are removed.
• Make sure the washing machine is not touching any other object.
• Make sure the laundry load is balanced.
• Make sure the drain hose is straightened all the way to the drain
system.
• Make sure the debris filter is not clogged.
• Tap Start to stop operating the washing machine.
• The door remains locked during the heating cycle of the Sanitize
course.
• It may take several seconds to disengage the locking mechanism.
• Check if the Auto Detergent and Auto Softener settings are
properly specified.
• Make sure you use the recommended types of detergent as
appropriate.
• Check the remaining amount of detergent and fabric softener to
see if they are already up to the limit.
• Make sure the Auto Dispense function is enabled, with both the
Water Hardness and Concentration settings properly specified.
TROUBLESHOOTING
English - 49
Untitled-13 49 2015-07-18 5:33:34
Page 50

Information codes
If the washing machine fails to operate, you may see an information code on the screen. Check the
table below and try the suggestions.
Problem Action
DE
4E
5E
UE • The laundry load is unbalanced. Spread the laundry evenly.
CE/3E/UC • This is not user-repairable. Contact a local Samsung service centre.
If any information code keeps appearing on the screen, contact a local Samsung service centre.
• Make sure the door is properly closed.
• Make sure laundry is not caught in the door.
• Make sure the water tap is open.
• Make sure the washing machine is operating with sucient water pressure,
• Clean the mesh filter as it may be clogged.
• Clean the debris filter as it may be clogged.
• Make sure the drain hose is not kinked all the way to the drain system.
• Clean the mesh filter as it may be clogged.
English - 50
Untitled-13 50 2015-07-18 5:33:34
Page 51

Specifications
Protecting the environment
• This appliance is manufactured from recyclable materials. If you decide to dispose of this
appliance, please observe local waste disposal regulations. Cut o the power cord so that the
appliance cannot be connected to a power source. Remove the door so that animals and small
children cannot get trapped inside the appliance.
• Do not exceed the detergent quantities recommended in the detergent manufacturer's
instructions.
• Use stain removal products and bleaches before the wash cycle only when strictly necessary.
• Save water and electricity by only washing full loads (the exact amount depends upon the
program used).
SPECIFICATIONS
English - 51
Untitled-13 51 2015-07-18 5:33:34
Page 52

Fabric care chart
The following symbols provide garment care directions. The care labels include four symbols in
this order: washing, bleaching, drying and ironing (and dry cleaning when necessary). The use of
symbols ensures consistency among garment manufacturers of domestic and imported items.
Follow the care label directions to maximize garment life and reduce laundry problems.
Resistant material Do not iron
Delicate fabric Can be dry cleaned using any
solvent
Item can be washed at 95 ˚C Dry Clean
Item can be washed at 60 ˚C Dry clean with perchloride, lighter
fuel, pure alcohol or R113 only
Item can be washed at 40 ˚C Dry clean with aviation fuel, pure
alcohol or R113 only
Item can be washed at 30 ˚C Do not dry clean
Hand wash only Dry flat
Dry clean only Can be hung to dry
Can be bleached in cold water Dry on clothes hanger
Do not bleach Tumble dry, normal heat
Can be ironed at 200 ˚C max Tumble dry, reduced heat
Can be ironed at 150 ˚C max Do not tumble dry
Can be ironed at 100 ˚C max
English - 52
Untitled-13 52 2015-07-18 5:33:36
Page 53

Specification sheet
The design and specifications are subject to change without notice for quality improvement
purposes.
According to Regulation (EU) No. 1061/2010
" * " Asterisk(s) means variant model and can be varied (0-9) or (A-Z).
Samsung
Model Name WW10H9*****
Capacity kg 10
Energy Eciency
A + + + (highest eciency) to D (least ecient) A+++
Energy Consumption
Annual Energy Consumption (AE_C)
Energy consumption (E_t.60) Cotton 60 °C at full load kWh 0.50
Energy consumption (E_t.60.1/2) Cotton 60 °C with partial load kWh 0.52
Energy consumption (E_t.40.1/2) Cotton 40 °C with partial load kWh 0.52
Weighted power o-mode (P_o) W 0.48
Weighted Power in left-on mode (P_l) W 10
Annual water consumption (AW_c)
Spin eciency class
A (most ecient) to G (least ecient) A A
Maximum Spin Speed rpm 1600 1400
Residual moisture % 44 44
Programs to which the information on the label and the Sheet relate
Program duration of the standard program
Cotton 60 °C at full load min 305
Cotton 60 °C for partial load min 305
Cotton 40 °C with partial load min 305
Weighted time in left-on mode min 8
Airborne noise emissions
Wash dB (A) re 1 pW 46 46
Spin dB (A) re 1 pW 72 70
Dimensions
Unit dimensions
Net weight kg 87
Gross weight kg 89
Package weight kg 2.5
Water Pressure kPa 50-800
Electrical connection
Voltage V 220-240
Power consumption W 2000-2400
Frequency Hz 50
Name of Company Samsung Electronics Co., Ltd.
3)
1)
2)
Height mm 850
Width mm 600
5)
Depth
kWh/yr 119
L/yr 11500
Cotton 60 °C and 40 °C
mm 600
4)
SPECIFICATIONS
English - 53
Untitled-13 53 2015-07-18 5:33:36
Page 54

1. Annual energy consumption is based on 220 standard washing cycles for Cotton course at
60 °C and 40 °C at full and partial load, and the consumption of o and left-on modes. Actual
energy consumption will depend on how the appliance is used.
2. Annual water consumption is based on 220 standard washing cycles for
Cotton course
at 60 °C and 40 °C at full and partial load. Actual water consumption will depend on how the
appliance is used.
3. Spin extraction is very important when you use a clothes dryer to dry your clothes.
The energy for drying costs much higher than the energy for washing.
Washing with the high spin saves more energy in drying your clothes in a clothes dryer.
4. The
Cotton 60 °C and Cotton 40°C programs are the ‘standard cotton 60 °C program’
and the ‘standard cotton 40 °C program’. They are suitable to clean normally soiled cotton
laundry and they are the most ecient (concerning water and energy consumption) for this type
of laundry.
Please run Calibration after the installation (see “Calibration” on page 35).
In these programs the actual water temperature may dier from the declared temperature.
5. Distance to the wall from the unit is not included in the depth dimension.
Information of main washing programmes
Model Course
WW10H9*****
Temperature
Cotton 20 5 138 50 51 80 0.35
Cotton
Synthetics 40 5 148 30 30 60 0.82
Capacity (kg)
(°C)
40 5 305 44 45 48 0.52
60
Program
Time (min)
5 305 44 45 48 0.52
10 305 43 44 60 0.5
Residual Moisture Content
(%)
1600rpm 1400rpm
The values on the table have been measured under the conditions specified in Standard IEC60456/
EN60456. Autual values will depend on how the appliance is used.
Water
Consumption
(ℓ/cycle)
Energy
Consumption
(kWh/Cycle)
The above test results are based on using the powder detergent, with Auto Dispense o.
English - 54
Untitled-13 54 2015-07-18 5:33:36
Page 55

Memo
Untitled-13 55 2015-07-18 5:33:36
Page 56

QUESTIONS OR COMMENTS?
COUNTRY CALL OR VISIT US ONLINE AT
80111-SAMSUNG (80111 726 7864)
GREECE
(+30) 210 6897691 from mobile and land line
ITALIA 800-SAMSUNG (800.7267864) www.samsung.com/it/support
PORTUGAL 808 20 7267 www.samsung.com/pt/support
FRANCE 01 48 63 00 00 www.samsung.com/fr/support
Untitled-13 56 2015-07-18 5:33:36
only from land line
www.samsung.com/gr/support
DC68-03377B-04
Page 57

Πλυντήριο
Εγχειρίδιο χρήσης
WW10H9*****
WW90H9*****
Φανταστείτε τις δυνατότητες
Σας ευχαριστούμε που αγοράσατε αυτό το προϊόν της
Samsung.
Untitled-15 1 2015-07-18 6:43:18
Page 58

Περιεχόμενα
Πληροφορίες για την ασφάλεια 3
Τι πρέπει να γνωρίζετε για τις οδηγίες ασφαλείας. . . . . . . . . . . . . . . . . . . . . . . . . . . . . . . . . . . . . . . . . . . . . . . . . . 3
Σημαντικά σύμβολα ασφαλείας . . . . . . . . . . . . . . . . . . . . . . . . . . . . . . . . . . . . . . . . . . . . . . . . . . . . . . . . . . . . . . 3
Σημαντικές προφυλάξεις ασφαλείας . . . . . . . . . . . . . . . . . . . . . . . . . . . . . . . . . . . . . . . . . . . . . . . . . . . . . . . . . . . 4
Οδηγίες σχετικά με τα Απορρίμματα Ηλεκτρικού και Ηλεκτρονικού Εξοπλισμού (WEEE) . . . . . . . . . . . . . . . . . . . . . . 10
Εγκατάσταση 11
Τι περιλαμβάνεται . . . . . . . . . . . . . . . . . . . . . . . . . . . . . . . . . . . . . . . . . . . . . . . . . . . . . . . . . . . . . . . . . . . . . . 11
Απαιτήσεις εγκατάστασης . . . . . . . . . . . . . . . . . . . . . . . . . . . . . . . . . . . . . . . . . . . . . . . . . . . . . . . . . . . . . . . . . 12
Εγκατάσταση βήμα προς βήμα . . . . . . . . . . . . . . . . . . . . . . . . . . . . . . . . . . . . . . . . . . . . . . . . . . . . . . . . . . . . . 14
Πριν ξεκινήσετε 18
Αρχικές ρυθμίσεις . . . . . . . . . . . . . . . . . . . . . . . . . . . . . . . . . . . . . . . . . . . . . . . . . . . . . . . . . . . . . . . . . . . . . . 18
Οδηγίες πλύσης . . . . . . . . . . . . . . . . . . . . . . . . . . . . . . . . . . . . . . . . . . . . . . . . . . . . . . . . . . . . . . . . . . . . . . . . 20
Οδηγίες για το απορρυπαντικό . . . . . . . . . . . . . . . . . . . . . . . . . . . . . . . . . . . . . . . . . . . . . . . . . . . . . . . . . . . . . 22
Λειτουργίες 25
Οθόνη . . . . . . . . . . . . . . . . . . . . . . . . . . . . . . . . . . . . . . . . . . . . . . . . . . . . . . . . . . . . . . . . . . . . . . . . . . . . . . 25
Εκκίνηση σε απλά βήματα . . . . . . . . . . . . . . . . . . . . . . . . . . . . . . . . . . . . . . . . . . . . . . . . . . . . . . . . . . . . . . . . 28
Επισκόπηση προγράμματος . . . . . . . . . . . . . . . . . . . . . . . . . . . . . . . . . . . . . . . . . . . . . . . . . . . . . . . . . . . . . . . 29
Settings (Ρυθμίσεις) . . . . . . . . . . . . . . . . . . . . . . . . . . . . . . . . . . . . . . . . . . . . . . . . . . . . . . . . . . . . . . . . . . . . . 33
Smart Control (Έξυπνος έλεγχος) μέσω φορητής συσκευής από τη Samsung. . . . . . . . . . . . . . . . . . . . . . . . . . . . . 37
Εφαρμογή Samsung Smart Home . . . . . . . . . . . . . . . . . . . . . . . . . . . . . . . . . . . . . . . . . . . . . . . . . . . . . . . . . . . 39
Εφαρμογή Samsung Smart Washer . . . . . . . . . . . . . . . . . . . . . . . . . . . . . . . . . . . . . . . . . . . . . . . . . . . . . . . . . 41
Συντήρηση 43
Eco Drum Clean (Οικολογικός καθαρισμός κάδου) . . . . . . . . . . . . . . . . . . . . . . . . . . . . . . . . . . . . . . . . . . . . . . . 43
Επείγουσα άντληση . . . . . . . . . . . . . . . . . . . . . . . . . . . . . . . . . . . . . . . . . . . . . . . . . . . . . . . . . . . . . . . . . . . . . 44
Καθαρισμός . . . . . . . . . . . . . . . . . . . . . . . . . . . . . . . . . . . . . . . . . . . . . . . . . . . . . . . . . . . . . . . . . . . . . . . . . . 45
Επαναφορά μετά από πάγωμα . . . . . . . . . . . . . . . . . . . . . . . . . . . . . . . . . . . . . . . . . . . . . . . . . . . . . . . . . . . . . . 48
Φροντίδα μετά από παρατεταμένη περίοδο αχρησίας . . . . . . . . . . . . . . . . . . . . . . . . . . . . . . . . . . . . . . . . . . . . . 48
Αντιμετώπιση προβλημάτων 49
Σημεία ελέγχου . . . . . . . . . . . . . . . . . . . . . . . . . . . . . . . . . . . . . . . . . . . . . . . . . . . . . . . . . . . . . . . . . . . . . . . . 49
Κωδικοί πληροφοριών . . . . . . . . . . . . . . . . . . . . . . . . . . . . . . . . . . . . . . . . . . . . . . . . . . . . . . . . . . . . . . . . . . . 50
Προδιαγραφές 51
Προστασία του περιβάλλοντος . . . . . . . . . . . . . . . . . . . . . . . . . . . . . . . . . . . . . . . . . . . . . . . . . . . . . . . . . . . . . 51
Πίνακας φροντίδας υφασμάτων . . . . . . . . . . . . . . . . . . . . . . . . . . . . . . . . . . . . . . . . . . . . . . . . . . . . . . . . . . . . . 52
Φύλλο προδιαγραφών. . . . . . . . . . . . . . . . . . . . . . . . . . . . . . . . . . . . . . . . . . . . . . . . . . . . . . . . . . . . . . . . . . . . 53
Πληροφορίες σχετικά με τα βασικά προγράμματα πλύσης . . . . . . . . . . . . . . . . . . . . . . . . . . . . . . . . . . . . . . . . . . 54
Ελληνικά - 2
Untitled-15 2 2015-07-18 6:43:19
Page 59

Πληροφορίες για την ασφάλεια
Συγχαρητήρια για το νέο σας πλυντήριο Samsung. Το παρόν εγχειρίδιο περιέχει σημαντικές πληροφορίες για την
εγκατάσταση, τη χρήση και τη φροντίδα της συσκευής σας. Αφιερώστε λίγο χρόνο για να διαβάσετε αυτό το εγχειρίδιο
προκειμένου να εκμεταλλευτείτε στο έπακρο τα πολυάριθμα πλεονεκτήματα και δυνατότητες του πλυντηρίου σας.
Τι πρέπει να γνωρίζετε για τις οδηγίες ασφαλείας
Διαβάστε αυτό το εγχειρίδιο προσεκτικά, προκειμένου να διασφαλίσετε ότι γνωρίζετε πώς να χρησιμοποιείτε αποτελεσματικά
και με ασφάλεια τα εκτεταμένα χαρακτηριστικά και τις λειτουργίες της νέας σας συσκευής. Φυλάξτε το εγχειρίδιο σε ασφαλές
μέρος κοντά στη συσκευή για μελλοντική αναφορά. Χρησιμοποιήστε τη συσκευή αυτή μόνο για το σκοπό για τον οποίο
προορίζεται, όπως περιγράφεται σε αυτό το εγχειρίδιο οδηγιών.
Οι προειδοποιήσεις και οι σημαντικές οδηγίες ασφαλείας που περιλαμβάνονται σε αυτό το εγχειρίδιο δεν καλύπτουν όλες τις
πιθανές συνθήκες και καταστάσεις που μπορεί να προκύψουν. Αποτελεί δική σας ευθύνη να χρησιμοποιείτε κοινή λογική, να
επιδεικνύετε σύνεση και να προσέχετε κατά την εγκατάσταση, τη συντήρηση και το χειρισμό του πλυντηρίου σας.
Δεδομένου ότι οι ακόλουθες οδηγίες λειτουργίας καλύπτουν διάφορα μοντέλα, τα χαρακτηριστικά του πλυντηρίου σας
ενδέχεται να διαφέρουν ελαφρώς από αυτά που περιγράφονται σε αυτό το εγχειρίδιο και να μην ισχύουν όλα τα σύμβολα
προειδοποίησης. Εάν έχετε απορίες ή ανησυχίες, επικοινωνήστε με το πλησιέστερο κέντρο σέρβις ή αναζητήστε βοήθεια και
πληροφορίες μέσω Διαδικτύου, στη διαδικτυακή τοποθεσία www.samsung.com.
Σημαντικά σύμβολα ασφαλείας
Τι σημαίνουν τα εικονίδια και τα σύμβολα που περιλαμβάνονται σε αυτό το
εγχειρίδιο χρήσης:
ΠΡΟΕΙΔΟΠΟΙΗΣΗ: Κίνδυνοι ή μη ασφαλείς πρακτικές που μπορεί να οδηγήσουν σε σοβαρό τραυματισμό,
θάνατο ή/και υλικές ζημιές.
ΠΡΟΣΟΧΗ: Κίνδυνοι ή μη ασφαλείς χειρισμοί που μπορεί να οδηγήσουν σε τραυματισμό ή/και υλικές ζημιές.
ΠΛΗΡΟΦΟΡΊΕΣ ΓΙΑ ΤΗΝ ΑΣΦΆΛΕΙΑ
ΣΗΜΕΙΩΣΗ
Αυτά τα σύμβολα προειδοποίησης αποσκοπούν στην πρόληψη τραυματισμών για εσάς και τους άλλους.
Να τα ακολουθείτε πιστά.
Αφού διαβάσετε αυτό το εγχειρίδιο, φυλάξτε το σε ασφαλές μέρος για μελλοντική αναφορά.
Διαβάστε όλες τις οδηγίες προτού χρησιμοποιήσετε τη συσκευή.
Όπως ισχύει με κάθε συσκευή που χρησιμοποιεί ηλεκτρικό ρεύμα και κινούμενα εξαρτήματα, υπάρχουν πιθανοί κίνδυνοι. Για
να μπορείτε να χειρίζεστε με ασφάλεια αυτή τη συσκευή, εξοικειωθείτε με τη λειτουργία της και επιδεικνύετε προσοχή κατά
τη χρήση της.
Ελληνικά - 3
Untitled-15 3 2015-07-18 6:43:19
Page 60

Σημαντικές προφυλάξεις ασφαλείας
ΠΡΟΕΙΔΟΠΟΙΗΣΗ: Προκειμένου να μειώσετε τον κίνδυνο φωτιάς, ηλεκτροπληξίας ή τραυματισμού κατά τη
χρήση της συσκευής σας, τηρήστε βασικές προφυλάξεις, στις οποίες περιλαμβάνονται οι παρακάτω:
1. Η συσκευή αυτή δεν πρέπει να χρησιμοποιείται από άτομα (συμπεριλαμβανομένων
των παιδιών) με περιορισμένες σωματικές, αισθητικές ή νοητικές ικανότητες, ή με
έλλειψη εμπειρίας και γνώσης, εκτός αν βρίσκονται υπό επίβλεψη ή τους έχουν δοθεί
οδηγίες σχετικά με τη χρήση της συσκευής από κάποιο άτομο που είναι υπεύθυνο
για την ασφάλειά τους.
2. Για χρήση στην Ευρώπη: Η συσκευή αυτή μπορεί να χρησιμοποιηθεί από παιδιά
ηλικίας 8 ετών και άνω, καθώς και από άτομα με περιορισμένες σωματικές,
αισθητικές ή νοητικές ικανότητες, ή με έλλειψη εμπειρίας και γνώσης, αν βρίσκονται
υπό επίβλεψη ή τους έχουν δοθεί οδηγίες σχετικά με την ασφαλή χρήση της
συσκευής και κατανοούν τους κινδύνους που ενδέχεται να προκύψουν. Τα παιδιά
δεν επιτρέπεται να παίζουν με τη συσκευή. Ο καθαρισμός και η συντήρηση από τον
χρήστη δεν επιτρέπεται να πραγματοποιούνται από παιδιά χωρίς επίβλεψη.
3. Τα παιδιά θα πρέπει να επιβλέπονται, ώστε να διασφαλίζεται ότι δεν παίζουν με τη
συσκευή.
4. Αν το καλώδιο τροφοδοσίας υποστεί ζημιά, πρέπει να αντικατασταθεί από τον
κατασκευαστή, τον αντιπρόσωπο σέρβις του ή έναν εξειδικευμένο τεχνικό,
προκειμένου να αποφευχθεί τυχόν κίνδυνος.
5. Πρέπει να χρησιμοποιούνται οι νέοι σωλήνες που παρέχονται με τη συσκευή, ενώ οι
παλιοί σωλήνες δεν θα πρέπει να επαναχρησιμοποιούνται.
6. Για συσκευές με ανοίγματα εξαερισμού στη βάση τους, βεβαιωθείτε ότι τα ανοίγματα
δεν φράσσονται από κανένα χαλί.
7. Για χρήση στην Ευρώπη: Κρατήστε μακριά τα παιδιά κάτω των 3 ετών, εκτός αν
επιβλέπονται συνεχώς.
8. ΠΡΟΣΟΧΗ: Για την αποτροπή κινδύνου λόγω ακούσιας επαναφοράς του
θερμοδιακόπτη, αυτή η συσκευή δεν πρέπει να τροφοδοτείται μέσω εξωτερικής
συσκευής διακοπής, όπως ένας χρονοδιακόπτης, ή να συνδέεται σε κύκλωμα που
ενεργοποιείται και απενεργοποιείται τακτικά από τον πάροχο ηλεκτρικής ενέργειας.
Ελληνικά - 4
Untitled-15 4 2015-07-18 6:43:19
Page 61

ΠΡΟΕΙΔΟΠΟΙΗΣΗ: Σημαντικές ΠΡΟΕΙΔΟΠΟΙΗΣΕΙΣ για την
εγκατάσταση
Η εγκατάσταση αυτής της συσκευής πρέπει να γίνει από ειδικευμένο τεχνικό ή εταιρεία σέρβις.
• Διαφορετικά, ενδέχεται να προκληθεί ηλεκτροπληξία, πυρκαγιά, έκρηξη, πρόβλημα με το προϊόν ή τραυματισμός.
Η συσκευή είναι βαριά, γι' αυτό πρέπει να προσέχετε όταν τη σηκώνετε.
Συνδέστε το καλώδιο ρεύματος σε πρίζα AC 220 - 240 V / 50 Hz ή υψηλότερη και χρησιμοποιείτε την πρίζα μόνο για αυτή
τη συσκευή. Μην χρησιμοποιείτε ποτέ καλώδιο επέκτασης.
• Εάν χρησιμοποιείτε την ίδια πρίζα και για άλλες συσκευές με τη βοήθεια πολύπριζου ή επεκτείνετε το καλώδιο
ρεύματος, μπορεί να προκληθεί ηλεκτροπληξία ή πυρκαγιά.
• Βεβαιωθείτε ότι η τάση, η συχνότητα και το ρεύμα τροφοδοσίας είναι ίδια με αυτά στις προδιαγραφές του προϊόντος.
Διαφορετικά, ενδέχεται να προκληθεί ηλεκτροπληξία ή πυρκαγιά. Συνδέστε καλά το φις τροφοδοσίας στην πρίζα.
Απομακρύνετε τακτικά όλες τις ξένες ουσίες, όπως σκόνη και νερό, από τους ακροδέκτες και τα σημεία επαφής του φις
τροφοδοσίας, χρησιμοποιώντας ένα στεγνό πανί.
• Αποσυνδέστε το φις τροφοδοσίας και καθαρίστε το με ένα στεγνό πανί.
• Διαφορετικά, ενδέχεται να προκληθεί ηλεκτροπληξία ή πυρκαγιά.
Συνδέστε το φις τροφοδοσίας στην πρίζα με τρόπο ώστε το καλώδιο να πέφτει προς το δάπεδο.
• Εάν συνδέσετε το φις τροφοδοσίας στην πρίζα προς την αντίθετη κατεύθυνση, τα ηλεκτρικά σύρματα που υπάρχουν
μέσα στο καλώδιο μπορεί να φθαρούν και να προκληθεί ηλεκτροπληξία ή πυρκαγιά.
Κρατήστε όλα τα υλικά συσκευασίας μακριά από παιδιά, καθώς μπορεί να είναι επικίνδυνα.
• Εάν ένα παιδί βάλει μια σακούλα πάνω στο κεφάλι του, μπορεί να πάθει ασφυξία.
Εάν η συσκευή, το φις τροφοδοσίας ή το καλώδιο ρεύματος υποστεί βλάβη, επικοινωνήστε με το πλησιέστερο κέντρο
σέρβις.
Αυτή η συσκευή πρέπει να είναι κατάλληλα γειωμένη.
Μην γειώνετε τη συσκευή συνδέοντάς την σε σωλήνα αερίου, πλαστικό σωλήνα νερού ή καλώδιο τηλεφώνου.
• Ενδέχεται να προκληθεί ηλεκτροπληξία, πυρκαγιά, έκρηξη ή πρόβλημα με το προϊόν.
• Μην συνδέετε ποτέ το καλώδιο ρεύματος σε πρίζα η οποία δεν είναι κατάλληλα γειωμένη και βεβαιωθείτε ότι τηρούνται
οι τοπικοί και εθνικοί κανονισμοί.
Μην τοποθετείτε τη συσκευή κοντά σε θερμαντικά σώματα ή εύφλεκτα υλικά.
Μην τοποθετείτε αυτή τη συσκευή σε χώρο με υγρασία, λάδια ή σκόνη, ή σε χώρο εκτεθειμένο σε άμεσο ηλιακό φως ή νερό
(σταγόνες βροχής).
Μην τοποθετείτε αυτή τη συσκευή σε χώρο που εκτίθεται σε χαμηλές θερμοκρασίες.
• Ο παγετός μπορεί να κάνει τους σωλήνες να σπάσουν.
Μην τοποθετείτε αυτή τη συσκευή σε χώρο όπου ενδέχεται να υπάρξει διαρροή αερίου.
• Ενδέχεται να προκληθεί ηλεκτροπληξία ή πυρκαγιά.
Μην χρησιμοποιείτε ηλεκτρικό μετασχηματιστή.
• Ενδέχεται να προκληθεί ηλεκτροπληξία ή πυρκαγιά.
Μην χρησιμοποιείτε φις τροφοδοσίας ή καλώδιο ρεύματος που έχει υποστεί ζημιά, ούτε χαλαρή πρίζα.
• Ενδέχεται να προκληθεί ηλεκτροπληξία ή πυρκαγιά.
ΠΛΗΡΟΦΟΡΊΕΣ ΓΙΑ ΤΗΝ ΑΣΦΆΛΕΙΑ
Ελληνικά - 5
Untitled-15 5 2015-07-18 6:43:19
Page 62

Μην τραβάτε και μην κάμπτετε υπερβολικά το καλώδιο ρεύματος.
Μην συστρέφετε και μην κάνετε κόμπο το καλώδιο ρεύματος.
Μην αγκιστρώνετε το καλώδιο ρεύματος σε μεταλλικό αντικείμενο, μην τοποθετείτε βαριά αντικείμενα πάνω στο καλώδιο
ρεύματος, μην βάζετε το καλώδιο ρεύματος ανάμεσα σε αντικείμενα και μην πιέζετε το καλώδιο ρεύματος στο χώρο πίσω
από τη συσκευή.
• Ενδέχεται να προκληθεί ηλεκτροπληξία ή πυρκαγιά.
Μην τραβάτε το καλώδιο ρεύματος όταν αποσυνδέετε το φις τροφοδοσίας.
• Αποσυνδέστε το φις τροφοδοσίας κρατώντας το.
• Διαφορετικά, ενδέχεται να προκληθεί ηλεκτροπληξία ή πυρκαγιά.
Η συσκευή αυτή θα πρέπει να τοποθετηθεί έτσι ώστε να είναι προσβάσιμο το φις τροφοδοσίας, οι βρύσες παροχής νερού και
οι σωλήνες άντλησης.
ΠΡΟΣΟΧΗ: ΠΡΟΦΥΛΑΞΕΙΣ για την εγκατάσταση
Η τοποθέτηση αυτής της συσκευής πρέπει να γίνει με τρόπο ώστε το φις τροφοδοσίας να είναι εύκολα προσβάσιμο.
• Διαφορετικά, ενδέχεται να προκληθεί ηλεκτροπληξία ή πυρκαγιά λόγω διαρροής ρεύματος.
Τοποθετήστε τη συσκευή σας σε επίπεδη και σταθερή επιφάνεια που μπορεί να αντέξει το βάρος της.
• Διαφορετικά, ενδέχεται να προκληθούν μη φυσιολογικές δονήσεις, μετακινήσεις, θόρυβοι ή προβλήματα με το προϊόν.
ΠΡΟΕΙΔΟΠΟΙΗΣΗ: Σημαντικές ΠΡΟΕΙΔΟΠΟΙΗΣΕΙΣ για τη χρήση
Εάν η συσκευή πλημμυρίσει, κλείστε αμέσως την παροχή νερού και ρεύματος και επικοινωνήστε με το πλησιέστερο κέντρο
σέρβις.
• Μην αγγίζετε το φις τροφοδοσίας με βρεγμένα χέρια.
• Διαφορετικά, ενδέχεται να προκληθεί ηλεκτροπληξία.
Εάν από τη συσκευή ακούγεται κάποιος περίεργος θόρυβος ή αναδύεται οσμή καμένου ή καπνός, αποσυνδέστε αμέσως το
καλώδιο ρεύματος και επικοινωνήστε με το πλησιέστερο κέντρο σέρβις.
• Διαφορετικά, ενδέχεται να προκληθεί ηλεκτροπληξία ή πυρκαγιά.
Σε περίπτωση διαρροής αερίου (όπως προπάνιο, υγραέριο κ.λπ.), αερίστε αμέσως χωρίς να αγγίξετε το φις τροφοδοσίας.
Μην αγγίξετε τη συσκευή ούτε το καλώδιο ρεύματος.
• Μην χρησιμοποιήσετε ανεμιστήρα.
• Ένας σπινθήρας ενδέχεται να προκαλέσει έκρηξη ή πυρκαγιά.
Μην επιτρέπετε στα παιδιά να παίζουν μέσα ή πάνω στο πλυντήριο. Επιπλέον, κατά την απόρριψη της συσκευής, αφαιρέστε
τον μοχλό της πόρτας του πλυντηρίου.
• Εάν εγκλωβιστεί κάποιο παιδί μέσα στο πλυντήριο, μπορεί να πεθάνει από ασφυξία.
Βεβαιωθείτε ότι έχετε αφαιρέσει τα υλικά συσκευασίας (σπόγγους, αφρώδες πολυστυρένιο) που υπάρχουν στο κάτω μέρος
του πλυντηρίου, προτού το χρησιμοποιήσετε.
Μην πλένετε είδη που έχουν έρθει σε επαφή με βενζίνη, κηροζίνη, βενζόλιο, διαλυτικό βαφής, οινόπνευμα ή άλλες
εύφλεκτες ή εκρηκτικές ουσίες.
• Ενδέχεται να προκληθεί ηλεκτροπληξία, πυρκαγιά ή έκρηξη.
Ελληνικά - 6
Untitled-15 6 2015-07-18 6:43:19
Page 63

Μην ανοίγετε την πόρτα του πλυντηρίου ασκώντας δύναμη ενώ το πλυντήριο βρίσκεται σε λειτουργία (πλύση σε υψηλή
θερμοκρασία/στέγνωμα/στύψιμο).
• Το νερό που βγαίνει από το πλυντήριο μπορεί να προκαλέσει εγκαύματα ή να κάνει το δάπεδο ολισθηρό. Αυτό μπορεί
να αποτελέσει αιτία τραυματισμού.
• Εάν ανοίξετε την πόρτα ασκώντας δύναμη, ενδέχεται να προκληθεί ζημιά στο προϊόν ή τραυματισμός.
Μην βάζετε το χέρι σας κάτω από το πλυντήριο ενώ βρίσκεται σε λειτουργία.
• Αυτό μπορεί να αποτελέσει αιτία τραυματισμού.
Μην αγγίζετε το φις τροφοδοσίας με βρεγμένα χέρια.
• Ενδέχεται να προκληθεί ηλεκτροπληξία.
Μην θέτετε τη συσκευή εκτός λειτουργίας αποσυνδέοντας το φις τροφοδοσίας ενώ κάποια λειτουργία βρίσκεται σε εξέλιξη.
• Εάν συνδέσετε και πάλι το φις τροφοδοσίας στην πρίζα μπορεί να δημιουργηθεί σπίθα και να προκληθεί ηλεκτροπληξία
ή πυρκαγιά.
Μην αφήνετε παιδιά ή αδύναμα άτομα να χρησιμοποιούν αυτό το πλυντήριο χωρίς την κατάλληλη επίβλεψη. Μην αφήνετε
παιδιά να σκαρφαλώνουν μέσα ή πάνω στη συσκευή.
• Ενδέχεται να προκληθεί ηλεκτροπληξία, έγκαυμα ή τραυματισμός.
Μην βάζετε το χέρι σας ή μεταλλικά αντικείμενα κάτω από το πλυντήριο ενώ βρίσκεται σε λειτουργία.
• Αυτό μπορεί να αποτελέσει αιτία τραυματισμού.
Μην αποσυνδέετε τη συσκευή τραβώντας το καλώδιο ρεύματος. Να κρατάτε πάντα καλά το φις και να το τραβάτε απευθείας
προς τα έξω από την πρίζα.
• Εάν το καλώδιο ρεύματος υποστεί ζημιά, ενδέχεται να προκληθεί βραχυκύκλωμα, πυρκαγιά ή/και ηλεκτροπληξία.
Μην επιχειρήσετε να επισκευάσετε, να αποσυναρμολογήσετε ή να τροποποιήσετε τη συσκευή μόνοι σας.
• Μην χρησιμοποιείτε καμία ασφάλεια (όπως από χαλκό, συρματόσχοινο κ.λπ.) εκτός από την κανονική.
• Εάν η συσκευή χρειάζεται επισκευή ή επανεγκατάσταση, επικοινωνήστε με το πλησιέστερο κέντρο σέρβις.
• Διαφορετικά, ενδέχεται να προκληθεί ηλεκτροπληξία, πυρκαγιά, πρόβλημα με το προϊόν ή τραυματισμός.
Εάν ο σωλήνας παροχής νερού βγει από τη βρύση νερού και η συσκευή πλημμυρίσει, αποσυνδέστε το φις τροφοδοσίας.
• Διαφορετικά, ενδέχεται να προκληθεί ηλεκτροπληξία ή πυρκαγιά.
Αποσυνδέετε το φις τροφοδοσίας όταν η συσκευή δεν χρησιμοποιείται για μεγάλα χρονικά διαστήματα ή κατά τη διάρκεια
καταιγίδων με κεραυνούς ή αστραπές.
• Διαφορετικά, ενδέχεται να προκληθεί ηλεκτροπληξία ή πυρκαγιά.
Εάν κάποια ξένη ουσία εισέλθει στη συσκευή, αποσυνδέστε το φις τροφοδοσίας και επικοινωνήστε με το πλησιέστερο Τμήμα
Εξυπηρέτησης Πελατών της Samsung.
• Ενδέχεται να προκληθεί ηλεκτροπληξία ή πυρκαγιά.
Μην επιτρέπετε σε παιδιά (ή σε κατοικίδια) να παίζουν μέσα ή πάνω στο πλυντήριο. Η πόρτα του πλυντηρίου δεν ανοίγει
εύκολα από μέσα και τα παιδιά ενδέχεται να τραυματιστούν σοβαρά αν εγκλωβιστούν στο εσωτερικό του.
ΠΛΗΡΟΦΟΡΊΕΣ ΓΙΑ ΤΗΝ ΑΣΦΆΛΕΙΑ
ΠΡΟΣΟΧΗ: ΠΡΟΦΥΛΑΞΕΙΣ για τη χρήση
Εάν στο πλυντήριο υπάρχει κάποια ξένη ουσία, όπως απορρυπαντικό, βρομιά, υπολείμματα φαγητού κ.λπ., αποσυνδέστε το
φις τροφοδοσίας και καθαρίστε το πλυντήριο, χρησιμοποιώντας ένα υγρό και μαλακό πανί.
• Διαφορετικά, ενδέχεται να προκληθεί αποχρωματισμός, παραμόρφωση, ζημιά ή σκουριά.
Ελληνικά - 7
Untitled-15 7 2015-07-18 6:43:19
Page 64

Το μπροστινό γυαλί μπορεί να σπάσει σε περίπτωση δυνατού χτυπήματος. Φροντίστε να χρησιμοποιείτε το πλυντήριο με
προσοχή.
• Εάν σπάσει το γυαλί, ενδέχεται να προκληθεί τραυματισμός.
Μετά από βλάβη στην παροχή νερού ή όταν συνδέετε και πάλι τον σωλήνα παροχής νερού, ανοίγετε σιγά-σιγά τη βρύση
νερού.
Ανοίγετε σιγά-σιγά τη βρύση νερού μετά από μεγάλη περίοδο κατά την οποία δεν έχει χρησιμοποιηθεί η συσκευή.
• Η πίεση του αέρα στον σωλήνα παροχής νερού ή στον αγωγό νερού μπορεί να προκαλέσει ζημιά σε κάποιο εξάρτημα
του προϊόντος ή διαρροή νερού.
Εάν προκύψει σφάλμα άντλησης νερού ενώ το πλυντήριο βρίσκεται σε λειτουργία, δείτε μήπως υπάρχει κάποιο πρόβλημα με
την άντληση νερού.
• Εάν το πλυντήριο πλημμυρίσει λόγω κάποιου προβλήματος με την άντληση νερού και το χρησιμοποιήσετε, ενδέχεται να
προκληθεί ηλεκτροπληξία ή πυρκαγιά λόγω διαρροής ρεύματος.
Τοποθετείτε καλά τα ρούχα μέσα στο πλυντήριο, έτσι ώστε να μην πιαστεί κάποιο από αυτά στην πόρτα.
• Εάν κάποιο ρούχο πιαστεί στην πόρτα, ενδέχεται να προκληθεί ζημιά σε αυτό ή στο πλυντήριο, ή να προκληθεί διαρροή
νερού.
Κλείνετε την παροχή νερού όταν το πλυντήριο δεν χρησιμοποιείται.
Βεβαιωθείτε ότι οι βίδες στο εξάρτημα σύνδεσης του σωλήνα παροχής νερού είναι καλά σφιγμένες.
• Διαφορετικά, ενδέχεται να προκληθούν υλικές ζημιές ή τραυματισμός.
Φροντίστε να μην υπάρχουν ξένες ουσίες (π.χ. σκουπιδάκια, κλωστές, τρίχες κ.λπ.) στην ελαστική τσιμούχα και στο τζάμι της
μπροστινής πόρτας.
• Εάν κάποια ξένη ουσία πιαστεί στην πόρτα ή εάν η πόρτα δεν κλείσει εντελώς, ενδέχεται να προκληθεί διαρροή νερού.
Προτού χρησιμοποιήσετε το προϊόν, ανοίξτε τη βρύση νερού και ελέγξτε ότι το εξάρτημα σύνδεσης του σωλήνα παροχής
νερού είναι καλά σφιγμένο και ότι δεν υπάρχει διαρροή νερού.
• Εάν οι βίδες στο εξάρτημα σύνδεσης του σωλήνα παροχής νερού δεν είναι καλά σφιγμένες, μπορεί να προκληθεί
διαρροή νερού.
Το προϊόν που αγοράσατε έχει σχεδιαστεί αποκλειστικά για οικιακή χρήση.
Η χρήση του προϊόντος για επαγγελματικούς σκοπούς θεωρείται κακή χρήση του προϊόντος. Σε αυτή την περίπτωση, το
προϊόν δεν θα καλύπτεται από την τυπική εγγύηση που παρέχει η Samsung και δεν μπορεί να αποδοθεί καμία ευθύνη στη
Samsung για βλάβες ή ζημίες που προκύπτουν από την εν λόγω κακή χρήση.
Μην στέκεστε όρθιοι επάνω στη συσκευή και μην τοποθετείτε αντικείμενα (όπως άπλυτα ρούχα, αναμμένα κεριά, αναμμένα
τσιγάρα, πιάτα, χημικά, μεταλλικά αντικείμενα κ.λπ.) επάνω στη συσκευή.
• Ενδέχεται να προκληθεί ηλεκτροπληξία, πυρκαγιά, πρόβλημα με το προϊόν ή τραυματισμός.
Μην ψεκάζετε την επιφάνεια της συσκευής με πτητικά υλικά, όπως εντομοκτόνα.
• Εκτός του ότι είναι επιβλαβή για τον άνθρωπο, ενδέχεται επίσης να προκληθεί ηλεκτροπληξία, πυρκαγιά ή πρόβλημα με
το προϊόν.
Μην τοποθετείτε αντικείμενα που παράγουν ηλεκτρομαγνητικά πεδία κοντά στο πλυντήριο.
• Ενδέχεται να προκληθεί τραυματισμός λόγω δυσλειτουργίας.
Το νερό που αντλείται κατά τη διάρκεια της πλύσης σε υψηλή θερμοκρασία ή του κύκλου στεγνώματος είναι καυτό. Μην
αγγίζετε το νερό.
• Μπορεί να προκληθούν εγκαύματα ή τραυματισμοί.
Ελληνικά - 8
Untitled-15 8 2015-07-18 6:43:19
Page 65

Μην πλένετε, μην στύβετε και μην στεγνώνετε αδιάβροχα καθίσματα, χαλάκια ή ρούχα (*), εκτός εάν η συσκευή σας διαθέτει
ειδικό κύκλο για το πλύσιμο αυτών των ειδών.
(*): Μάλλινα κλινοσκεπάσματα, καλύμματα βροχής, γιλέκα ψαρέματος, παντελόνια του σκι, σλίπινγκ μπαγκ, καλύμματα για
πάνες, αθλητικές φόρμες και καλύμματα για ποδήλατα, μηχανές και αυτοκίνητα κ.λπ.
• Μην πλένετε παχιά ή σκληρά χαλάκια, ακόμη κι αν υπάρχει το σύμβολο του πλυντηρίου στην ετικέτα φροντίδας.
Ενδέχεται να προκληθεί τραυματισμός ή ζημιά στο πλυντήριο, στους τοίχους, στο δάπεδο ή στα ρούχα λόγω μη
φυσιολογικών δονήσεων.
• Μην πλένετε χαλάκια ή ταπέτα εισόδου με υπόστρωμα από λάστιχο. Το υπόστρωμα από λάστιχο ενδέχεται να
αποσπαστεί και να κολλήσει στον κάδο, προκαλώντας βλάβη όπως σφάλμα κατά την άντληση.
Μην θέτετε το πλυντήριο σε λειτουργία όταν το συρτάρι απορρυπαντικού δεν βρίσκεται στη θέση του.
• Ενδέχεται να προκληθεί ηλεκτροπληξία ή τραυματισμός λόγω διαρροής νερού.
Μην αγγίζετε το εσωτερικό του κάδου κατά τη διάρκεια ή αμέσως μετά το στέγνωμα, καθώς θα είναι καυτό.
• Ενδέχεται να προκληθούν εγκαύματα.
Μην βάζετε το χέρι σας μέσα στο συρτάρι απορρυπαντικού.
• Ενδέχεται να τραυματιστείτε, καθώς το χέρι σας μπορεί να πιαστεί στη συσκευή εισαγωγής απορρυπαντικού.
Μην τοποθετείτε μέσα στο πλυντήριο άλλα αντικείμενα (όπως παπούτσια, υπολείμματα φαγητού, ζώα) εκτός από ρούχα.
• Μπορεί να προκληθεί ζημιά στο πλυντήριο ή τραυματισμός και θάνατος, εάν πρόκειται για κατοικίδια, λόγω των μη
φυσιολογικών δονήσεων.
Μην πατάτε τα κουμπιά με τα νύχια σας ή χρησιμοποιώντας αιχμηρά αντικείμενα, όπως καρφίτσες, μαχαίρια κ.λπ.
• Ενδέχεται να προκληθεί ηλεκτροπληξία ή τραυματισμός.
Μην πλένετε ρούχα τα οποία έχουν επάνω λάδια, κρέμες ή λοσιόν που πωλούνται συνήθως σε καταστήματα καλλυντικών ή
κλινικές μασάζ.
• Μπορεί να προκληθεί παραμόρφωση της ελαστικής τσιμούχας και διαρροή νερού.
Μην αφήνετε στον κάδο μεταλλικά αντικείμενα, όπως παραμάνες ή καρφίτσες για τα μαλλιά, ή λευκαντικό για μεγάλο
χρονικό διάστημα.
• Ενδέχεται να προκληθεί σκούριασμα του κάδου.
• Εάν αρχίσει να εμφανίζεται σκουριά πάνω στην επιφάνεια του κάδου, απλώστε ένα (ουδέτερο) καθαριστικό επάνω στην
επιφάνεια και χρησιμοποιήστε ένα σφουγγάρι για να την καθαρίσετε. Μην χρησιμοποιείτε ποτέ μεταλλική βούρτσα.
Μην χρησιμοποιείτε απευθείας απορρυπαντικό για στεγνό καθάρισμα και μην πλένετε, μην ξεβγάζετε και μην στύβετε ρούχα
πάνω στα οποία υπάρχει απορρυπαντικό για στεγνό καθάρισμα.
• Ενδέχεται να προκληθεί αυτανάφλεξη ή ανάφλεξη λόγω της θερμότητας που δημιουργείται από την οξείδωση του
λαδιού.
Μην χρησιμοποιείτε νερό από συσκευές ψύξης/θέρμανσης νερού.
• Ενδέχεται να προκληθούν προβλήματα στο πλυντήριο.
Μην χρησιμοποιείτε φυσικό σαπούνι χεριών για το πλυντήριο.
• Εάν ξεραθεί και συσσωρευτεί μέσα στο πλυντήριο, ενδέχεται να προκληθούν προβλήματα με το προϊόν,
αποχρωματισμός, σκουριά ή δυσάρεστες οσμές.
Τοποθετείτε τις κάλτσες και τα σουτιέν σε δίχτυ πλυντηρίου και πλένετέ τα μαζί με τα υπόλοιπα ρούχα.
Μην πλένετε μεγάλα είδη, όπως κλινοσκεπάσματα, στο δίχτυ πλυντηρίου.
• Διαφορετικά, ενδέχεται να προκληθεί τραυματισμός λόγω μη φυσιολογικών δονήσεων.
Μην χρησιμοποιείτε απορρυπαντικό που έχει ξεραθεί.
• Εάν συσσωρευτεί μέσα στο πλυντήριο, μπορεί να προκληθεί διαρροή νερού.
ΠΛΗΡΟΦΟΡΊΕΣ ΓΙΑ ΤΗΝ ΑΣΦΆΛΕΙΑ
Ελληνικά - 9
Untitled-15 9 2015-07-18 6:43:19
Page 66

Βεβαιωθείτε ότι οι τσέπες όλων των ρούχων που θα πλυθούν είναι άδειες.
• Σκληρά και αιχμηρά αντικείμενα, όπως κέρματα, παραμάνες, καρφιά, βίδες ή πέτρες, ενδέχεται να προκαλέσουν
εκτεταμένες ζημιές στη συσκευή.
Μην πλένετε ρούχα με μεγάλες αγκράφες, κουμπιά ή άλλα βαριά μεταλλικά αξεσουάρ.
Ταξινομήστε τα ρούχα με βάση το χρώμα και το βαθμό που ξεβάφουν και επιλέξτε τον συνιστώμενο κύκλο, τη θερμοκρασία
νερού και τις πρόσθετες λειτουργίες.
• Ενδέχεται να προκληθεί αποχρωματισμός ή ζημιά στο ύφασμα.
Όταν κλείνετε την πόρτα, προσέξτε ώστε να μην πιαστούν δάχτυλα παιδιών.
• Διαφορετικά, ενδέχεται να προκληθεί τραυματισμός.
ΠΡΟΕΙΔΟΠΟΙΗΣΗ: Σημαντικές ΠΡΟΕΙΔΟΠΟΙΗΣΕΙΣ για το καθάρισμα
Μην καθαρίζετε τη συσκευή ψεκάζοντας νερό απευθείας επάνω της.
Μην χρησιμοποιείτε ισχυρό όξινο καθαριστικό.
Μην χρησιμοποιείτε βενζόλιο, διαλυτικό ή οινόπνευμα για να καθαρίσετε τη συσκευή.
• Ενδέχεται να προκληθεί αποχρωματισμός, παραμόρφωση, ζημιά, ηλεκτροπληξία ή πυρκαγιά.
Πριν από τον καθαρισμό ή τις εργασίες συντήρησης, αποσυνδέστε τη συσκευή από την πρίζα.
• Διαφορετικά, ενδέχεται να προκληθεί ηλεκτροπληξία ή πυρκαγιά.
Οδηγίες σχετικά με τα Απορρίμματα Ηλεκτρικού και Ηλεκτρονικού Εξοπλισμού (WEEE)
Σωστή Απόρριψη αυτού του Προϊόντος (Απόβλητα Ηλεκτρικού & Ηλεκτρονικού Εξοπλισμού)
(Ισχύει σε χώρες με ξεχωριστά συστήματα συλλογής)
Αυτό το σήμα που εμφανίζεται επάνω στο προϊόν, στα εξαρτήματά του ή στα εγχειρίδια που το συνοδεύουν,
υποδεικνύει ότι το προϊόν και τα ηλεκτρονικά του εξαρτήματα (π.χ. φορτιστής, ακουστικά, καλώδιο USB)
δεν θα πρέπει να ρίπτονται μαζί με τα υπόλοιπα οικιακά απορρίμματα μετά το τέλος του κύκλου ζωής τους.
Προκειμένου να αποφευχθούν ενδεχόμενες βλαβερές συνέπειες στο περιβάλλον ή την υγεία εξαιτίας της
ανεξέλεγκτης διάθεσης απορριμμάτων, σας παρακαλούμε να διαχωρίσετε αυτά τα προϊόντα από άλλους
τύπους απορριμμάτων και να τα ανακυκλώσετε, ώστε να βοηθήσετε στην βιώσιμη επαναχρησιμοποίηση των
υλικών πόρων.
Οι οικιακοί χρήστες θα πρέπει να έλθουν σε επικοινωνία είτε με το κατάστημα απ' όπου αγόρασαν αυτό το
προϊόν, είτε με τις κατά τόπους υπηρεσίες, προκειμένου να πληροφορηθούν τις λεπτομέρειες σχετικά με
τον τόπο και τον τρόπο με τον οποίο μπορούν να δώσουν αυτά τα προϊόντα για ασφαλή προς το περιβάλλον
ανακύκλωση.
Οι επιχειρήσεις-χρήστες θα πρέπει να έλθουν σε επαφή με τον προμηθευτή τους και να ελέγξουν τους όρους
και τις προϋποθέσεις του συμβολαίου αγοράς. Αυτό το προϊόν και τα ηλεκτρονικά του εξαρτήματα δεν θα
πρέπει να αναμιγνύονται με άλλα συνηθισμένα απορρίμματα προς διάθεση.
Ελληνικά - 10
Untitled-15 10 2015-07-18 6:43:19
Page 67

Εγκατάσταση
Ακολουθήστε προσεκτικά αυτές τις οδηγίες, ώστε να διασφαλίσετε ότι το πλυντήριο έχει εγκατασταθεί σωστά και να
αποτραπούν ατυχήματα κατά το πλύσιμο των ρούχων.
Τι περιλαμβάνεται
Βεβαιωθείτε ότι στη συσκευασία του προϊόντος περιλαμβάνονται όλα τα εξαρτήματα. Εάν αντιμετωπίσετε κάποιο πρόβλημα
με το πλυντήριο ή τα εξαρτήματα, επικοινωνήστε με το τοπικό κέντρο εξυπηρέτησης πελατών της Samsung ή με το
κατάστημα λιανικής πώλησης.
ΕΓΚΑΤΑΣΤΑΣΗ
3
4
8
9
10
Κλειδί σύσφιξης Πώματα βιδών Οδηγός σωλήνας
1
2
5
6
7
1 Κουμπί Έναρξη
2 Κουμπί Λειτουργία
3 Οθόνη ελέγχου
4 Πόρτα
5 Κάδος
6
7 Πόδια ευθυγράμμισης
8 Φίλτρο υπολειμμάτων
9
10 Κάλυμμα φίλτρου
Μονάδα αυτόματης
διανομής
Σωλήνας επείγουσας
άντλησης
Σωλήνας παροχής κρύου νερού Σωλήνας παροχής ζεστού νερού Σετ από βότσαλα Aqua
Πώματα βιδών: Ο αριθμός των πωμάτων για βίδες που παρέχονται (3 έως 6) εξαρτάται από το μοντέλο.
Σωλήνας παροχής ζεστού νερού: Μόνο για τα μοντέλα για τα οποία ισχύει.
Σετ από βότσαλα Aqua: 200 ml και 100 ml (ΜΕΓ.).
Ελληνικά - 11
Untitled-15 11 2015-07-18 6:43:20
Page 68

Απαιτήσεις εγκατάστασης
Παροχή ηλεκτρικού ρεύματος και γείωση
• Απαιτείται ασφάλεια ή ασφαλειοδιακόπτης AC 220-240 V / 50 Hz
• Χρησιμοποιήστε χωριστό κύκλωμα τροφοδοσίας μόνο για το πλυντήριο
Προκειμένου να διασφαλιστεί ότι θα γειωθεί σωστά, το πλυντήριο παρέχεται με καλώδιο ρεύματος που διαθέτει φις γείωσης
με τρεις ακροδέκτες για χρήση σε κατάλληλα εγκατεστημένη και γειωμένη πρίζα.
Απευθυνθείτε σε ειδικευμένο ηλεκτρολόγο ή τεχνικό επισκευών εάν έχετε αμφιβολίες σχετικά με τη γείωση.
Μην τροποποιήσετε το φις που παρέχεται. Εάν δεν εφαρμόζει στην πρίζα, καλέστε ειδικευμένο ηλεκτρολόγο να εγκαταστήσει
κατάλληλη πρίζα.
ΠΡΟΕΙΔΟΠΟΙΗΣΗ
• ΜΗΝ χρησιμοποιείτε καλώδιο επέκτασης.
• Να χρησιμοποιείτε μόνο το καλώδιο ρεύματος που παρέχεται με το πλυντήριο.
• ΜΗΝ συνδέετε το καλώδιο γείωσης με γραμμές αποχέτευσης από πλαστικό, γραμμές παροχής φυσικού αερίου
ή σωλήνες ζεστού νερού.
• Εάν οι αγωγοί γείωσης δεν έχουν συνδεθεί σωστά, ενδέχεται να προκληθεί ηλεκτροπληξία.
Παροχή νερού
Η κατάλληλη πίεση του νερού για αυτό το πλυντήριο κυμαίνεται μεταξύ 50 kPa και 800 kPa. Εάν η πίεση του νερού
είναι χαμηλότερη από 50 kPa, ενδέχεται η βαλβίδα νερού να μην κλείσει εντελώς. Διαφορετικά, μπορεί να χρειάζεται
περισσότερος χρόνος για να γεμίσει ο κάδος, με αποτέλεσμα το πλυντήριο να τεθεί εκτός λειτουργίας. Οι βρύσες πρέπει να
βρίσκονται σε απόσταση έως 120 cm από την πίσω πλευρά του πλυντηρίου, προκειμένου οι παρεχόμενοι σωλήνες εισόδου
νερού να μπορούν να φτάσουν στο πλυντήριο.
Για να μειωθεί ο κίνδυνος διαρροών
• Φροντίστε ούτως ώστε οι βρύσες να είναι εύκολα προσβάσιμες.
• Κλείνετε τις βρύσες όταν το πλυντήριο είναι εκτός λειτουργίας.
• Ελέγχετε τακτικά ότι δεν υπάρχουν διαρροές στα σημεία εφαρμογής των σωλήνων εισόδου νερού.
ΠΡΟΣΟΧΗ
Πριν χρησιμοποιήσετε το πλυντήριο για πρώτη φορά, ελέγξτε όλες τις συνδέσεις των βαλβίδων νερού στις βρύσες για
τυχόν διαρροές.
Ελληνικά - 12
Untitled-15 12 2015-07-18 6:43:20
Page 69

Άντληση
Η Samsung συνιστά ο κατακόρυφος σωλήνας να έχει ύψος 65 cm. Ο σωλήνας άντλησης πρέπει να συνδέεται μέσω του κλιπ
σωλήνα με τον κατακόρυφο σωλήνα και ο κατακόρυφος σωλήνας πρέπει να καλύπτει εντελώς τον σωλήνα άντλησης.
Δάπεδο
Για βέλτιστη απόδοση, το πλυντήριο πρέπει να εγκατασταθεί σε σταθερό δάπεδο. Στα ξύλινα πατώματα, ενδέχεται να
χρειαστεί ενίσχυση για την ελαχιστοποίηση των δονήσεων ή/και των μη ισορροπημένων φορτίων. Οι μοκέτες και οι
επιφάνειες με μαλακή επίστρωση δεν παρέχουν καλή αντίσταση ενάντια στις δονήσεις και μπορεί εξαιτίας αυτών το
πλυντήριο να κινείται ελαφρώς κατά τη διάρκεια του κύκλου στυψίματος.
ΠΡΟΣΟΧΗ
ΜΗΝ εγκαθιστάτε το πλυντήριο πάνω σε πλατφόρμα ή σε επιφάνεια που δεν στηρίζεται καλά.
Θερμοκρασία νερού
Μην εγκαθιστάτε το πλυντήριο σε χώρους όπου το νερό μπορεί να παγώσει, διότι το πλυντήριο διατηρεί πάντα κάποια
ποσότητα νερού στις βαλβίδες νερού, στις αντλίες ή/και στους σωλήνες. Το παγωμένο νερό που παραμένει στα εξαρτήματα
σύνδεσης μπορεί να προκαλέσει ζημιά στους ιμάντες, στην αντλία και σε άλλα εξαρτήματα του πλυντηρίου.
Εγκατάσταση σε εσοχές ή ντουλάπια
Ελάχιστος κενός χώρος για σταθερή λειτουργία:
Στα πλάγια 25 mm Στο πίσω μέρος 50 mm
Στο επάνω μέρος 25 mm Στο μπροστινό μέρος 550 mm
Εάν εγκατασταθούν στο ίδιο σημείο το πλυντήριο και ένα στεγνωτήριο, το μπροστινό μέρος της εσοχής ή του ντουλαπιού
πρέπει να διαθέτει τουλάχιστον 550 mm μη φρασσόμενου ανοίγματος. Το πλυντήριό σας μόνο του δεν απαιτεί συγκεκριμένο
άνοιγμα.
ΕΓΚΑΤΑΣΤΑΣΗ
Ελληνικά - 13
Untitled-15 13 2015-07-18 6:43:20
Page 70

Εγκατάσταση βήμα προς βήμα
ΒΗΜΑ 1ο – Επιλογή σημείου τοποθέτησης
Απαιτήσεις για το σημείο τοποθέτησης:
• Σταθερή, επίπεδη επιφάνεια χωρίς μοκέτα ή δάπεδο που ενδέχεται να εμποδίζει τον εξαερισμό
• Μακριά από άμεσο ηλιακό φως
• Επαρκής χώρος για εξαερισμό και καλωδιώσεις
• Η θερμοκρασία περιβάλλοντος είναι πάντα υψηλότερη από το σημείο πήξης του νερού (0 ˚C)
• Μακριά από πηγή θερμότητας
ΒΗΜΑ 2ο – Αφαίρεση των βιδών μεταφοράς
Αποσυσκευάστε το προϊόν και αφαιρέστε όλες τις βίδες μεταφοράς.
1. Ξεσφίξτε όλες τις βίδες μεταφοράς στο πίσω μέρος του πλυντηρίου,
χρησιμοποιώντας το κλειδί σύσφιξης που παρέχεται.
2. Καλύψτε τις οπές με τα παρεχόμενα πλαστικά πώματα βιδών.
Φυλάξτε τις βίδες μεταφοράς για μελλοντική χρήση.
ΠΡΟΕΙΔΟΠΟΙΗΣΗ
Τα υλικά συσκευασίας μπορεί να είναι επικίνδυνα για τα παιδιά. Απορρίψτε όλο το υλικό συσκευασίας (πλαστικές
τσάντες, πολυστυρένιο κ.λπ.) μακριά από τα παιδιά.
ΒΗΜΑ 3ο – Ρύθμιση των ποδιών ευθυγράμμισης
1. Σύρετε προσεκτικά το πλυντήριο στη θέση του. Εάν ασκηθεί υπερβολική
δύναμη, ενδέχεται να προκληθεί ζημιά στα πόδια ευθυγράμμισης.
2. Ευθυγραμμίστε το πλυντήριο ρυθμίζοντας μη αυτόματα τα πόδια
ευθυγράμμισης.
3. Μόλις ολοκληρωθεί η ευθυγράμμιση, σφίξτε τα παξιμάδια χρησιμοποιώντας το
κλειδί σύσφιξης.
Ελληνικά - 14
Untitled-15 14 2015-07-18 6:43:20
Page 71

ΒΗΜΑ 4ο – Σύνδεση του σωλήνα νερού
A
B
C
C
E
Συνδέστε τον σωλήνα παροχής νερού στη βρύση.
1. Αφαιρέστε τον σύνδεσμο (A) από τον σωλήνα παροχής νερού (B).
2. Χρησιμοποιήστε ένα κατσαβίδι Philips για να ξεσφίξετε τις τέσσερις βίδες που
βρίσκονται πάνω στον σύνδεσμο.
3. Κρατήστε τον σύνδεσμο και στρέψτε το μέρος (C) προς την κατεύθυνση που
υποδεικνύεται από το βέλος για να το ξεσφίξετε κατά 5 mm (*).
4. Εισαγάγετε τον σύνδεσμο στη βρύση και σφίξτε τις βίδες ανασηκώνοντας
ταυτόχρονα τον σύνδεσμο.
5. Στρέψτε το μέρος (C) προς την κατεύθυνση που υποδεικνύεται από το βέλος
για να το σφίξετε.
ΕΓΚΑΤΑΣΤΑΣΗ
6. Κρατώντας προς τα κάτω το μέρος (E), συνδέστε τον σωλήνα παροχής νερού
με τον σύνδεσμο. Έπειτα, αφήστε το μέρος (E). Ο σωλήνας εφαρμόζει στον
σύνδεσμο με έναν χαρακτηριστικό ήχο «κλικ».
Ελληνικά - 15
Untitled-15 15 2015-07-18 6:43:21
Page 72

7. Συνδέστε το άλλο άκρο του σωλήνα παροχής νερού στη βαλβίδα εισόδου
νερού, στην πίσω πλευρά του πλυντηρίου. Στρέψτε τον σωλήνα δεξιόστροφα
για να τον σφίξετε.
8. Ανοίξτε τη βρύση και ελέγξτε ότι δεν υπάρχουν διαρροές γύρω από τα
σημεία σύνδεσης. Εάν υπάρχουν διαρροές νερού, επαναλάβετε τα παραπάνω
βήματα.
• Εάν η βρύση διαθέτει στρόφιγγα, συνδέστε τον σωλήνα νερού στη βρύση,
όπως φαίνεται στην εικόνα.
ΠΡΟΕΙΔΟΠΟΙΗΣΗ
Εάν υπάρχει διαρροή νερού, σταματήστε να χρησιμοποιείτε το πλυντήριο και επικοινωνήστε με τοπικό επισκευαστικό
κέντρο της Samsung. Διαφορετικά, ενδέχεται να προκληθεί ηλεκτροπληξία.
ΠΡΟΣΟΧΗ
Μην τεντώνετε τον σωλήνα παροχής νερού ασκώντας δύναμη. Εάν ο σωλήνας είναι πολύ κοντός, αντικαταστήστε τον
με μακρύτερο σωλήνα υψηλής πίεσης.
• Αφού συνδέσετε τον σωλήνα παροχής νερού στον σύνδεσμο, βεβαιωθείτε ότι έχει συνδεθεί σωστά τραβώντας
τον σωλήνα παροχής νερού προς τα κάτω.
• Χρησιμοποιήστε συνηθισμένο τύπο βρύσης. Εάν η βρύση είναι τετράγωνη ή πολύ μεγάλη, αφαιρέστε τον
δακτύλιο απόστασης προτού εισαγάγετε τη βρύση στον σύνδεσμο.
Για μοντέλα που διαθέτουν πρόσθετη βαλβίδα εισόδου ζεστού νερού:
1. Συνδέστε το κόκκινο άκρο του σωλήνα παροχής ζεστού νερού στη βαλβίδα
εισόδου ζεστού νερού, στην πίσω πλευρά του πλυντηρίου.
2. Συνδέστε το άλλο άκρο του σωλήνα παροχής ζεστού νερού στη βρύση ζεστού
νερού.
Ελληνικά - 16
Untitled-15 16 2015-07-18 6:43:21
Page 73

Σωλήνας με σύστημα aqua stop (μόνο για τα αντίστοιχα μοντέλα)
A
A
Ο σωλήνας με σύστημα aqua stop ειδοποιεί τους χρήστες όταν υπάρχει κίνδυνος
διαρροών νερού. Ανιχνεύει τη ροή του νερού και, σε περίπτωση διαρροής, η
κεντρική ένδειξη (A) γίνεται κόκκινη.
ΒΗΜΑ 5ο – Τοποθέτηση του σωλήνα άντλησης
Ο σωλήνας άντλησης μπορεί να τοποθετηθεί με τους εξής τρεις τρόπους:
Πάνω από το χείλος ενός νιπτήρα
Ο σωλήνας άντλησης πρέπει να τοποθετηθεί σε ύψος μεταξύ 60 cm και 90 cm (*)
από το δάπεδο. Για να διατηρήσετε την κλίση του στομίου του σωλήνα άντλησης,
χρησιμοποιήστε τον πλαστικό οδηγό σωλήνα (A) που παρέχεται. Στερεώστε τον
οδηγό στον τοίχο με ένα άγκιστρο, για να εξασφαλίσετε σταθερή άντληση.
Σε σωλήνα άντλησης του νεροχύτη
Ο σωλήνας άντλησης πρέπει να βρίσκεται επάνω από το σιφόνι του νεροχύτη, ώστε το άκρο του σωλήνα να βρίσκεται
τουλάχιστον 60 cm επάνω από το δάπεδο.
Σε σωλήνα άντλησης
Ο σωλήνας άντλησης πρέπει να έχει ύψος μεταξύ 60 cm και 90 cm (*). Συνιστάται
η χρήση κατακόρυφου σωλήνα ύψους 65 cm. Φροντίστε ο σωλήνας άντλησης να
συνδέεται με τον κατακόρυφο σωλήνα με κλίση.
Απαιτήσεις για τον κατακόρυφο σωλήνα άντλησης:
• Ελάχιστη διάμετρος 5 cm
• Ελάχιστη ικανότητα άντλησης 60 λίτρα το λεπτό
ΕΓΚΑΤΑΣΤΑΣΗ
ΒΗΜΑ 6ο – Θέστε το πλυντήριο σε λειτουργία
Συνδέστε το καλώδιο ρεύματος στην πρίζα, σε εγκεκριμένη παροχή ρεύματος AC 220-240V / 50Hz που προστατεύεται από
ασφάλεια ή ασφαλειοδιακόπτη. Έπειτα, πατήστε το κουμπί Λειτουργία για να θέσετε το πλυντήριο σε λειτουργία.
Ελληνικά - 17
Untitled-15 17 2015-07-18 6:43:22
Page 74

Πριν ξεκινήσετε
Next
English
Deutsch
Français
Step 1 of 4. Set Language
Step 2 of 4. Set Date & Time
Previous Next
AM
01
DayMonth Year Hour Minute
01 01122014
PM
Αρχικές ρυθμίσεις
Όταν το πλυντήριο τίθεται σε λειτουργία για πρώτη φορά, εμφανίζεται η οθόνη υποδοχής με το λογότυπο της Samsung.
Ακολουθήστε τις οδηγίες που εμφανίζονται στην οθόνη για να ολοκληρώσετε τις αρχικές ρυθμίσεις. Αργότερα, θα μπορείτε
να αλλάξετε τις αρχικές ρυθμίσεις προσπελάζοντας την οθόνη Settings (Ρυθμίσεις).
ΒΗΜΑ 1ο – Set Language (Ρύθμιση γλώσσας)
Ορίστε τη γλώσσα μενού που προτιμάτε.
1. Επιλέξτε μια γλώσσα.
2. Πατήστε Next (Επόμενο).
ΒΗΜΑ 2ο – Set Date & Time (Ρύθμιση ημερομηνίας και ώρας)
Ορίστε την τρέχουσα ημερομηνία και ώρα.
1. Πατήστε τα βέλη για να ορίσετε την ώρα για κάθε στοιχείο της
ώρας.
2. Πατήστε Next (Επόμενο).
Η προεπιλεγμένη μορφή για την προβολή της ώρας είναι η 12ωρη.
Για εναλλαγή μεταξύ των στοιχείων AM (π.μ.) και PM (μ.μ.), απλά πατήστε το αντίστοιχο στοιχείο.
Untitled-15 18 2015-07-18 6:43:22
Ελληνικά - 18
Page 75

ΒΗΜΑ 3ο – Set Auto Dispense (Ρύθμιση αυτόματης διανομής)
Step 3 of 4. Set Auto Dispense
Auto Detergent
On On
Previous Next
Amount
Less Std. More
Soft Medium Hard Normal 2X High
Less Std. More
Amount
Water HardenessConcentration
Auto Softener
Step 4 of 4. Set Auto Update
On
Previous Done
The Auto Update function automatically updates the software for
performance improvement purposes ot to x bugs through
communicating with the update server. If you agree to this setting, it is
regarded as an agreement to running the auto update operation. When
the software is updated, some software features may become
Η Μονάδα αυτόματης διανομής διανέμει την κατάλληλη ποσότητα απορρυπαντικού και μαλακτικού ρούχων στον κάδο,
ανάλογα με το πρόγραμμα και τον κύκλο.
1. Το Auto Detergent (Αυτόματη διανομή απορρυπαντικού)
και το Auto Softener (Αυτόματη διανομή μαλακτικού)
έχουν ρυθμιστεί στο On (Ενεργοποίηση), ως προεπιλογή. Για
να αλλάξετε τη ρύθμιση, σύρετε την αντίστοιχη γραμμή στο O
(Απενεργοποίηση).
2. Ορίστε Amount (Ποσότητα) και Water Hardness (Σκληρότητα
νερού).
3. Ορίστε Amount (Ποσότητα) και Concentration (Πυκνότητα).
4. Πατήστε Next (Επόμενο).
ΒΗΜΑ 4ο – Set Auto Update (Ρύθμιση αυτόματης ενημέρωσης)
Το Auto Update (Αυτόματη ενημέρωση) ενημερώνει αυτόματα το υλικολογισμικό για ενισχυμένη απόδοση ή/και για
αποκατάσταση γνωστών σφαλμάτων μέσω της επικοινωνίας με τον διακομιστή ενημέρωσης. Αφού ενημερωθεί το
υλικολογισμικό, ορισμένες λειτουργίες του πλυντηρίου ενδέχεται να μην είναι διαθέσιμες, ανάλογα με την έκδοση του
υλικολογισμικού.
1. Για αυτόματη ενημέρωση του υλικολογισμικού, ρυθμίστε το Auto
Update (Αυτόματη ενημέρωση) στο On (Ενεργοποίηση).
2. Πατήστε Done (Ολοκλήρωση).
ΠΡΙΝ ΞΕΚΙΝΗΣΕΤΕ
ΒΗΜΑ 5ο – Εκτέλεση Calibration (Βαθμονόμηση) (συνιστάται)
Το Calibration (Βαθμονόμηση) διασφαλίζει τον ακριβή υπολογισμό του βάρους στο πλυντήριο. Βεβαιωθείτε ότι ο κάδος είναι
άδειος, προτού εκτελέσετε το Calibration (Βαθμονόμηση).
1. Πατήστε Settings (Ρυθμίσεις) > Calibration (Βαθμονόμηση) > Start (Έναρξη).
• Η πόρτα θα παραμείνει κλειδωμένη κατά τη διάρκεια της λειτουργίας.
• Ο κάδος θα περιστρέφεται δεξιόστροφα και αριστερόστροφα για αρκετά λεπτά.
2. Όταν ολοκληρωθεί η διαδικασία, το πλυντήριο θα τεθεί αυτόματα εκτός λειτουργίας.
Untitled-15 19 2015-07-18 6:43:22
Ελληνικά - 19
Page 76

Οδηγίες πλύσης
ΒΗΜΑ 1ο – Ταξινόμηση
Ταξινομήστε τα ρούχα σύμφωνα με τα εξής κριτήρια:
• Ετικέτα φροντίδας: Ταξινομήστε τα ρούχα σας σε βαμβακερά, σύμμικτα, συνθετικά, μεταξωτά, μάλλινα και ρούχα από
τεχνητό μετάξι.
• Χρώμα: Ξεχωρίστε τα λευκά από τα χρωματιστά.
• Μέγεθος: Όταν τοποθετείτε στον κάδο ρούχα διαφορετικού μεγέθους, η πλύση έχει καλύτερα αποτελέσματα.
• Ευαισθησία: Πλένετε τα ευαίσθητα ρούχα χωριστά, χρησιμοποιώντας την επιλογή Εύκολο σιδέρωμα για ρούχα από αγνό
παρθένο μαλλί, κουρτίνες και μεταξωτά. Ελέγχετε τις ετικέτες των ρούχων.
Φροντίζετε να ελέγχετε τις ετικέτες στα ρούχα και να τα ταξινομείτε αναλόγως προτού ξεκινήσετε την πλύση.
ΒΗΜΑ 2ο – Αδειάστε τις τσέπες
Αδειάζετε όλες τις τσέπες των ρούχων
• Ρούχα με μεταλλικά αντικείμενα, όπως νομίσματα, καρφίτσες και αγκράφες, ενδέχεται να προκαλέσουν ζημιά στα
υπόλοιπα ρούχα, καθώς και στον κάδο.
Γυρίζετε τα ρούχα με κουμπιά και κεντήματα από την ανάποδη
• Εάν υπάρχουν ανοικτά φερμουάρ από παντελόνια και μπουφάν κατά τη διάρκεια του πλυσίματος, μπορεί να προκληθεί
ζημιά στον κάδο. Πρέπει να κλείνετε και να στερεώνετε τα φερμουάρ με κλωστή.
• Τα ρούχα με μακριά κορδόνια ενδέχεται να μπερδευτούν με άλλα ρούχα. Βεβαιωθείτε ότι έχετε δέσει τα κορδόνια πριν
από την πλύση.
ΒΗΜΑ 3ο – Χρησιμοποιείτε δίχτυ πλυντηρίου
• Πρέπει να τοποθετείτε τα σουτιέν (που πλένονται με νερό) σε δίχτυ πλυντηρίου. Τα μεταλλικά μέρη των σουτιέν
ενδέχεται να τρυπήσουν και να σχίσουν τα άλλα ρούχα.
• Τα μικρά και ελαφριά ρούχα, όπως κάλτσες, γάντια, καλσόν και μαντήλια, ενδέχεται να πιαστούν γύρω από την πόρτα.
Τοποθετήστε τα μέσα σε λεπτό δίχτυ πλυντηρίου.
• Μην πλένετε το δίχτυ πλυντηρίου μόνο του χωρίς άλλα ρούχα. Ενδέχεται να προκληθούν μη φυσιολογικές δονήσεις, οι
οποίες μπορεί να έχουν ως αποτέλεσμα να μετακινηθεί το πλυντήριο και να προκληθεί τραυματισμός.
ΒΗΜΑ 4ο – Πρόπλυση (εάν χρειάζεται)
Якщо білизна сильно забруднена, увімкніть для вибраної програми додатковий режим попереднього прання. Не
вмикайте режим попереднього прання, якщо засіб для прання додається вручну безпосередньо в барабан.
Ελληνικά - 20
Untitled-15 20 2015-07-18 6:43:22
Page 77

ΒΗΜΑ 5ο – Προσδιορίστε το μέγιστο φορτίο
Μην υπερφορτώνετε το πλυντήριο. Με την υπερφόρτωση, τα ρούχα ενδέχεται να μην πλυθούν σωστά. Για το μέγιστο φορτίο
ανάλογα με τον τύπο των ρούχων, ανατρέξτε στη σελίδα 29.
Κατά το πλύσιμο κλινοσκεπασμάτων ή καλυμμάτων κρεβατιών, ο χρόνος πλύσης μπορεί να παραταθεί ή να μειωθεί
η αποτελεσματικότητα του στυψίματος. Για κλινοσκεπάσματα ή καλύμματα κρεβατιών, η μέγιστη συνιστώμενη
ταχύτητα του κύκλου στυψίματος είναι 800 σ.α.λ., με μέγιστο φορτίο 2 kg ή μικρότερο.
ΠΡΟΣΟΧΗ
Εάν τα ρούχα δεν είναι καλά κατανεμημένα και εμφανίζεται ο κωδικός σφάλματος «UE», ανακατανείμετε το φορτίο.
Εάν τα ρούχα δεν είναι σωστά κατανεμημένα, ενδέχεται να μειωθεί η απόδοση του στυψίματος.
ΒΗΜΑ 6ο – Χρησιμοποιείτε κατάλληλο τύπο απορρυπαντικού
Ο τύπος του απορρυπαντικού εξαρτάται από το είδος του υφάσματος (βαμβακερά, συνθετικά, ευαίσθητα, μάλλινα), το
χρώμα, τη θερμοκρασία του νερού και την ένταση των λεκέδων. Χρησιμοποιείτε πάντα απορρυπαντικό ρούχων «low suds»
(χαμηλού αφρισμού), σχεδιασμένο για αυτόματα πλυντήρια.
• Ακολουθείτε τις συστάσεις του κατασκευαστή του απορρυπαντικού σχετικά με το βάρος των ρούχων που
πλένετε, την ένταση των λεκέδων και τη σκληρότητα του νερού στην περιοχή σας. Εάν δεν είστε σίγουροι για
τη σκληρότητα του νερού, επικοινωνήστε με την τοπική υπηρεσία ύδρευσης.
• Μην χρησιμοποιείτε απορρυπαντικά που έχουν την τάση να ξεραίνονται ή να στερεοποιούνται. Τα
απορρυπαντικά αυτά ενδέχεται να αφήσουν υπολείμματα μετά τον κύκλο ξεβγάλματος και να φράξουν την
έξοδο άντλησης.
ΠΡΟΣΟΧΗ
Όταν πλένετε μάλλινα στο πρόγραμμα για μάλλινα, να χρησιμοποιείτε μόνο ουδέτερο υγρό απορρυπαντικό. Εάν
χρησιμοποιηθούν στο πρόγραμμα για μάλλινα απορρυπαντικά σε σκόνη, ενδέχεται να παραμείνουν επάνω στα ρούχα
και να αλλοιώσουν το χρώμα τους.
ΠΡΙΝ ΞΕΚΙΝΗΣΕΤΕ
Ελληνικά - 21
Untitled-15 21 2015-07-18 6:43:22
Page 78

Οδηγίες για το απορρυπαντικό
Auto Dispense (Αυτόματη διανομή)
Το πλυντήριο διαθέτει δύο θήκες διανομής: η αριστερή προορίζεται για το απορρυπαντικό και η δεξιά για το μαλακτικό
ρούχων. Η Μονάδα αυτόματης διανομής διανέμει την κατάλληλη ποσότητα απορρυπαντικού και μαλακτικού ρούχων στον
κάδο, ανάλογα με το πρόγραμμα και τον κύκλο.
ΠΡΟΣΟΧΗ
• Στη Μονάδα αυτόματης διανομής να χρησιμοποιείτε μόνο υγρό απορρυπαντικό και μαλακτικό.
• Βεβαιωθείτε ότι η Μονάδα αυτόματης διανομής έχει μπει κανονικά στη θέση της. Η λειτουργία του πλυντηρίου
δεν θα ξεκινήσει, έως ότου η Μονάδα αυτόματης διανομής τοποθετηθεί σωστά.
• Εάν πρόκειται να χρησιμοποιήσετε διαφορετικό απορρυπαντικό, φροντίστε να καθαρίσετε προηγουμένως τη
θήκη απορρυπαντικού.
• Μην αναμειγνύετε το απορρυπαντικό με το μαλακτικό σε οποιαδήποτε θήκη.
• Για να μην ξεραίνεται το απορρυπαντικό, μην ανοίγετε το πώμα αφού τοποθετήσετε το απορρυπαντικό στη
θήκη.
• Μην χρησιμοποιείτε λευκαντικό που μπορεί να προκαλέσει οξείδωση ή/και έκλυση αερίων.
• Μην αναποδογυρίζετε τη Μονάδα αυτόματης διανομής. Το περιεχόμενο ενδέχεται να διαρρεύσει από τις
εξόδους.
• Μην πιέζετε το στόμιο στο κάτω μέρος της μονάδας Αυτόματης διανομής απορρυπαντικού όταν μετακινείτε τη
μονάδα. Μπορεί να προκληθεί διαρροή του περιεχομένου.
• Να τοποθετείτε με προσοχή το απορρυπαντικό ή το μαλακτικό στη μονάδα. Μπορεί να χυθεί το περιεχόμενο.
• Φροντίστε να αφαιρέσετε τη μονάδα Αυτόματης διανομής απορρυπαντικού προτού βάλετε απορρυπαντικό.
• Όταν αφαιρείτε τη μονάδα Αυτόματης διανομής απορρυπαντικού για να ελέγξετε την ποσότητα απορρυπαντικού
που απομένει μόλις ή πριν εμφανιστεί μήνυμα σφάλματος, ενδέχεται μικρή ποσότητα απορρυπαντικού να έχει
απομείνει στη μονάδα ή να στάζει από το κάτω μέρος της μονάδας.
• Εισαγάγετε πλήρως τη μονάδα Αυτόματης διανομής απορρυπαντικού. Εάν η μονάδα δεν εισαχθεί πλήρως,
ενδέχεται να μην διανείμει απορρυπαντικό.
• Ως προεπιλογή, το Auto Dispense (Αυτόματη διανομή) απενεργοποιείται στα προγράμματα Delicates
(Ευαίσθητα), Wool (Μάλλινα), Baby Care (Παιδικά βαμβακερά) και Outdoor Care (Ρούχα με αδιάβροχη ύφανση).
Για να ενεργοποιήσετε το Auto Dispense (Αυτόματη διανομή) σε αυτά τα προγράμματα, πατήστε σύντομα το
Settings (Ρυθμίσεις) ή Γραμμή πίνακα γρήγορης > Auto Dispense (Αυτόματη διανομή) και αλλάξτε τις
ρυθμίσεις ανάλογα με τις ανάγκες σας.
Ελληνικά - 22
Untitled-15 22 2015-07-18 6:43:22
Page 79

1. Ανοίξτε την πόρτα και τραβήξτε τη μονάδα αυτόματης διανομής έξω από το
πλυντήριο.
2. Στρέψτε τον αριστερό διακόπτη προς τα αριστερά για να τον ανοίξετε και
γεμίστε την αριστερή θήκη με απορρυπαντικό έως τη γραμμή μέγιστης
στάθμης.
3. Στρέψτε τον δεξιό διακόπτη προς τα αριστερά για να τον ανοίξετε και γεμίστε
τη δεξιά θήκη με μαλακτικό έως τη γραμμή μέγιστης στάθμης.
4. Κλείστε τους διακόπτες στρέφοντάς τους προς τα δεξιά.
5. Τοποθετήστε ξανά τη Μονάδα αυτόματης διανομής στην αρχική της θέση.
Τοποθετήστε τη μονάδα με προσοχή, καθώς το περιεχόμενο ενδέχεται να
διαρρεύσει από τις εξόδους που υπάρχουν σε κάθε πλευρά.
6. Ενεργοποιήστε τις λειτουργίες Auto Detergent (Αυτόματη διανομή
απορρυπαντικού) και Auto Softener (Αυτόματη διανομή μαλακτικού).
Ανατρέξτε στην ενότητα «Auto Dispense (Αυτόματη διανομή)» στη σελίδα
33.
ΠΡΙΝ ΞΕΚΙΝΗΣΕΤΕ
Ελληνικά - 23
Untitled-15 23 2015-07-18 6:43:23
Page 80

Μη αυτόματη διανομή
A
Σε περίπτωση που δεν θέλετε να χρησιμοποιήσετε τη θήκη (μονάδα Αυτόματης διανομής απορρυπαντικού), μπορείτε είτε
να βάλετε τη δόση του απορρυπαντικού απευθείας στον κάδο είτε να χρησιμοποιήσετε το παρεχόμενο βότσαλο aqua όταν
βάζετε το απορρυπαντικό με μη αυτόματο τρόπο. Τα Βότσαλα Aqua είναι διαθέσιμα σε δύο μεγέθη και παρέχονται ως
εξαρτήματα μαζί με τη συσκευή σας. Επιλέξτε το κατάλληλο Βότσαλο Aqua ανάλογα με την ποσότητα του απορρυπαντικού.
1. Απενεργοποιήστε τη λειτουργία Auto Detergent (Αυτόματη διανομή
απορρυπαντικού).
Ανατρέξτε στην ενότητα «Auto Dispense (Αυτόματη διανομή)» στη σελίδα
33.
2. Τοποθετήστε απορρυπαντικό σε σκόνη, τζελ ή υγρό απορρυπαντικό στο
κατάλληλο βότσαλο Aqua (A). Ελέγξτε την ένδειξη ποσότητας στην
εσωτερική πλευρά του βότσαλου aqua.
3. Τοποθετήστε το βότσαλο aqua στο βάθος του κάδου.
Όταν ολοκληρωθεί η πλύση, αφαιρέστε το βότσαλο aqua από τον κάδο και διατηρήστε το καθαρό για την επόμενη
χρήση.
ΠΡΟΣΟΧΗ
• Το μαλακτικό ρούχων μπορεί να χρησιμοποιηθεί μόνο στη μονάδα Αυτόματης διανομής. Δεν επιτρέπεται η
χρήση του με μη αυτόματο τρόπο.
• Να είστε ιδιαίτερα προσεκτικοί κατά την εισαγωγή του βότσαλου aqua, καθώς υποτίθεται ότι ισορροπεί στην
αρχή της πλύσης. Εάν ανατρέψετε το βότσαλο aqua προτού ξεκινήσει η πλύση, ενδέχεται να παραμείνουν
υπολείμματα απορρυπαντικού στα ρούχα μετά το τέλος της πλύσης, τα οποία θα αλλοιώσουν το χρώμα τους ή/
και θα επηρεάσουν την απόδοση της πλύσης.
• Μην τοποθετείτε απορρυπαντικό τόσο στη θήκη αυτόματης διανομής απορρυπαντικού όσο και στο βότσαλο
aqua.
• Εάν πρόκειται να χρησιμοποιήσετε διαφορετικό απορρυπαντικό, φροντίστε να καθαρίσετε προηγουμένως το
βότσαλο aqua.
• Μην τοποθετείτε το βότσαλο aqua μέσα σε διπλωμένη κουβέρτα ή ανάμεσα σε ρούχα.
• Μην επιλέγετε Pre Wash (Πρόπλυση) όταν χρησιμοποιείτε το βότσαλο aqua.
• Η υπερβολική ποσότητα απορρυπαντικού ενδέχεται να προκαλέσει τα παρακάτω προβλήματα και να οδηγήσει
σε αστοχία συστήματος και/ή να μειώσει τη διάρκεια ζωής του προϊόντος.
• Η υπερβολική ποσότητα απορρυπαντικού δημιουργεί υπερβολικές φυσαλλίδες με αποτέλεσμα να παρατείνεται
ο χρόνος ξεβγάλματος.
• Επίσης, μπορεί να μείνει απορρυπαντικό στον κάδο μετά την ολοκλήρωση της πλύσης.
• Να χρησιμοποιείτε την κατάλληλη ποσότητα απορρυπαντικού σύμφωνα με τις προδιαγραφές που ορίζει ο
κατασκευαστής του απορρυπαντικού.
• Στην περίπτωση μη αυτόματης εισαγωγής απορρυπαντικού, συνιστάται να χρησιμοποιείται το Βότσαλο Aqua
όταν πλένετε χρωματιστά.
Ελληνικά - 24
Untitled-15 24 2015-07-18 6:43:23
Page 81

Λειτουργίες
Most Used
Cotton
1hr 21
min
12:00
AM
Temp.Rinse Spin
40°C
Options
3
Start
3 4 5 6
7
1 2
otto
n
h
1
m
n
B D
8A
C
1200
Οθόνη
Η οθόνη της συσκευής σας ενδέχεται να διαφέρει από την παρακάτω εικόνα, ανάλογα με το μοντέλο.
Κεντρική οθόνη
Κουμπιά
ΛΕΙΤΟΥΡΓΙΕΣ
1 Πρόγραμμα Πατήστε το για να μεταβείτε στο παράθυρο προγραμμάτων.
2 Settings (Ρυθμίσεις) Πατήστε το για να προβάλετε την οθόνη ρυθμίσεων.
3 Temp. (Θερμοκρασία) Πατήστε το για να αλλάξετε τη θερμοκρασία για το τρέχον πρόγραμμα.
4 Rinse (Ξέβγαλμα) Πατήστε το για να αλλάξετε τον αριθμό των ξεβγαλμάτων στο τρέχον πρόγραμμα.
5 Spin (Στύψιμο) Πατήστε το για να αλλάξετε την ταχύτητα στυψίματος για το τρέχον πρόγραμμα.
6 Options (Επιλογές) Πατήστε το για να προβάλετε την οθόνη επιλογών προγράμματος.
7 Start (Έναρξη) Πατήστε το για να ξεκινήσετε μια λειτουργία.
Πατήστε το για να προσθέστε την τρέχουσα διαμόρφωση προγράμματος στη
8 Favourite (Αγαπημένα)
Πληροφορίες
Α Most Used (Συχνή χρήση) Προβάλλει το πρόγραμμα με τη συχνότερη χρήση.
Β Τρέχον πρόγραμμα Προβάλλει το τρέχον πρόγραμμα.
C Ενεργή επιλογή Προβάλλει την/τις ενεργή(ές) επιλογή(ές) για το τρέχον πρόγραμμα.
D Εκτιμώμενος χρόνος Προβάλλει τον εκτιμώμενο χρόνο λειτουργίας του τρέχοντος προγράμματος.
Untitled-15 25 2015-07-18 6:43:23
λίστα με τα αγαπημένα σας. Μπορείτε να προσθέσετε έως και 4 προσαρμοσμένα
προγράμματα, τα οποία εμφανίζονται πριν από το παράθυρο προγραμμάτων.
Ελληνικά - 25
Page 82

Γραμμή κατάστασης
12:00
AM
12:00
AM
Child Lock Drum
Light
Auto
Detergent
Auto
Softener
NetworkSmart
Control
Auto Detergent
(Αυτόματη διανομή
απορρυπαντικού)
Auto Softener
(Αυτόματη διανομή
μαλακτικού)
Door Lock
(Κλείδωμα πόρτας)
Child Lock (Γονικό
κλείδωμα)
Εάν ανάψει αυτή η ένδειξη, έχει ενεργοποιηθεί η επιλογή Auto Detergent
(Αυτόματη διανομή απορρυπαντικού).
Εάν ανάψει αυτή η ένδειξη, έχει ενεργοποιηθεί η επιλογή Auto Softener
(Αυτόματη διανομή μαλακτικού).
Εάν ανάψει αυτή η ένδειξη, η πόρτα έχει κλειδώσει, ώστε να αποτραπεί τυχόν
άνοιγμά της κατά τη διάρκεια λειτουργίας.
Εάν το λουκέτο εμφανίζεται κλειδωμένο [
], έχει ενεργοποιηθεί το Child
Lock (Γονικό κλείδωμα) προκειμένου να αποτραπούν ατυχήματα με παιδιά ή
βρέφη.
Network (Δίκτυο) Προβάλλει την κατάσταση σύνδεσης με το δίκτυο Wi-Fi.
Smart Control
(Έξυπνος έλεγχος)
Sound (Ήχος)
Εάν ανάψει αυτή η ένδειξη, είναι δυνατός ο έλεγχος του πλυντηρίου μέσω
φορητής συσκευής.
Εάν επιλεχθεί το εικονίδιο Σίγαση [
], δεν παράγεται ήχος.
Ώρα Προβάλλει την τρέχουσα ώρα.
Γραμμή πίνακα γρήγορης επιλογής
Στη Γραμμή πίνακα γρήγορης επιλογής, είναι διαθέσιμα 6 στοιχεία: Child Lock (Γονικό κλείδωμα), Drum Light (Λυχνία
κάδου), Auto Detergent (Αυτόματη διανομή απορρυπαντικού), Auto Softener (Αυτόματη διανομή μαλακτικού), Network
(Δίκτυο) και Smart Control (Έξυπνος έλεγχος).
1. Πατήστε τη Γραμμή κατάστασης ή σύρετέ τη προς τα κάτω, για να εμφανιστούν τα διαθέσιμα στοιχεία.
2. Πατήστε ένα στοιχείο για να το ενεργοποιήσετε/απενεργοποιήσετε ή για να αλλάξετε τις τρέχουσες ρυθμίσεις.
• Για ρυθμίσεις για προχωρημένους, μεταβείτε στην οθόνη ρυθμίσεων και κάντε τις αλλαγές που επιθυμείτε.
• Τα ενεργά στοιχεία θα είναι αναμμένα, ενώ τα μη ενεργά εμφανίζονται ανενεργά.
Ελληνικά - 26
Untitled-15 26 2015-07-18 6:43:24
Page 83

Οθόνη επιλογών
Cotton
1hr 21min
12:00
AM
Temp.
40
Quick Wash Pre Wash Soaking
+
IntensiveEasy Iron
Spin
1200
Rinse
3
Start
1 2 3 4 5 7
6
Quick Wash
1
(Γρήγορο πλύσιμο)
Pre Wash
2
(Πρόπλυση)
Intensive (Εντατικό
3
πλύσιμο)
Soaking+ (Επιπλέον
4
μούλιασμα)
Easy Iron (Εύκολο
5
σιδέρωμα)
Delay End
6
(Καθυστέρηση
τερματισμού)
7 Επιστροφή Επιστροφή στην κεντρική οθόνη.
Ειδικά για λιγότερο λερωμένα ρούχα και για συνολικό φορτίο μικρότερο των 2 kg.
Προστίθεται ένας προκαταρκτικός κύκλος πλύσης πριν από την κύρια πλύση.
Ο χρόνος λειτουργίας για κάθε κύκλο είναι περισσότερος από τον κανονικό.
Χρησιμοποιείται για να αφαιρεθούν επίμονοι λεκέδες από τα ρούχα.
Χρησιμοποιείται για λιγότερες ζάρες στα ρούχα.
Χρησιμοποιήστε το για να ορίσετε τον χρόνο τερματισμού για το πρόγραμμα που έχετε
επιλέξει. Ανατρέξτε στη σελίδα 32.
ΛΕΙΤΟΥΡΓΙΕΣ
Για λεπτομέρειες σχετικά με κάθε επιλογή, ανατρέξτε στην ενότητα «Επιλογές» στη σελίδα 31.
Untitled-15 27 2015-07-18 6:43:24
Ελληνικά - 27
Page 84

Εκκίνηση σε απλά βήματα
Most Used
Cotton
1hr 21min
12:00
AM
Temp.Rinse Spin
40°C 1200
Options
3
Start
Temp.
ins
e
Sp
in
4
0
°C
1200
1
4
2 3
1. Πατήστε το κουμπί Λειτουργία για να προβάλετε την κεντρική οθόνη.
2. Στην κεντρική οθόνη, πατήστε το εικονίδιο Πρόγραμμα που βρίσκεται προς τα επάνω και στο κέντρο, για να
εμφανιστεί το παράθυρο προγραμμάτων.
3. Επιλέξτε ένα πρόγραμμα. Το πλυντήριο υποστηρίζει 22 προγράμματα.
4. Αλλάξτε τις ρυθμίσεις του προγράμματος [Temp. (Θερμοκρασία), Rinse (Ξέβγαλμα) και Spin (Στύψιμο)], εάν
χρειάζεται.
5. Πατήστε το εικονίδιο Options (Επιλογές) στην κάτω δεξιά γωνία. Στη συνέχεια, κάντε τις επιλογές σας και αλλάξτε τις
ρυθμίσεις τους.
6. Πατήστε Start (Έναρξη).
• Οι ρυθμίσεις προγράμματος και οι επιλογές του πλυντηρίου είναι οι προεπιλεγμένες για κάθε πρόγραμμα.
Μπορείτε να αποδεχτείτε την προεπιλογή ή να κάνετε τις αλλαγές που θέλετε.
• Μπορείτε να επιλέξετε ένα πρόγραμμα στην κεντρική οθόνη. Σύρετε την οθόνη προς τα αριστερά, για να
ανοίξετε το επόμενο πρόγραμμα. Για να επιστρέψετε στην προηγούμενη λίστα, σύρετε προς τα δεξιά.
Untitled-15 28 2015-07-18 6:43:24
Ελληνικά - 28
Page 85

Επισκόπηση προγράμματος
Βασικά προγράμματα
Πρόγραμμα Περιγραφή και Μέγιστο φορτίο (kg)
• Προσθέστε το τρέχον πρόγραμμα στη λίστα Αγαπημένα, για να προσπελάσετε
Favourite
(Αγαπημένα)
Most Used (Συχνή
χρήση)
Αυτόματη βέλτιστη
πλύση
Cotton (Βαμβακερά)
Synthetics
(Συνθετικά)
Denim (Τζιν)
Dark Garment
(Σκούρα υφάσματα)
Super Speed (Πολύ
γρήγορο)
Super Eco Wash
(Σούπερ οικολογική
πλύση)
Outdoor Care (Ρούχα
με αδιάβροχη
ύφανση)
Baby Care (Παιδικά
βαμβακερά)
Wool (Μάλλινα)
γρήγορα τη διαμόρφωση προγράμματος την επόμενη φορά που θα
την χρειαστείτε. Μπορείτε να προσθέσετε έως και 4 προσαρμοσμένα
προγράμματα, τα οποία εμφανίζονται πριν από το παράθυρο προγραμμάτων.
• Κατά προεπιλογή, στην επάνω αριστερή γωνία της κεντρικής οθόνης
εμφανίζεται το πρόγραμμα που χρησιμοποιείται συχνότερα.
• Το πρόγραμμα Αυτόματη βέλτιστη πλύση προσαρμόζει την ποσότητα του
απορρυπαντικού και τους κύκλους του προγράμματος ανάλογα με το βάρος
των ρούχων και το πόσο λερωμένα είναι. Συνιστάται να χρησιμοποιείται με τη
λειτουργία Αυτόματη διανομή.
• Για βαμβακερά, σεντόνια, τραπεζομάντηλα, εσώρουχα, πετσέτες και
πουκάμισα.
• Ο χρόνος πλύσης και ο αριθμός των κύκλων ξεβγάλματος προσαρμόζονται
αυτόματα, ανάλογα με το φορτίο.
• Για μπλούζες και πουκάμισα από πολυεστερικά (ντιολέν, τρεβίρα), πολυαμιδικά
(περλόν, νάιλον) ή άλλα παρόμοια υφάσματα.
• Με περισσότερο νερό στην κύρια πλύση και έναν επιπλέον κύκλο ξεβγάλματος,
που διασφαλίζουν ότι δεν θα μείνουν υπολείμματα απορρυπαντικού σε σκόνη.
• Με επιπλέον ξεβγάλματα και λιγότερο στύψιμο, που διασφαλίζουν ότι τα ρούχα
πλένονται απαλά και ξεπλένονται καλά.
• Ένα πρόγραμμα που ολοκληρώνεται σε 1 ώρα, για καθημερινά ρούχα όπως
εσώρουχα και πουκάμισα.
• Η τεχνολογία "Eco Bubble" συμβάλλει στη μείωση της κατανάλωσης ενέργειας.
Σε συνδυασμό με τον αποτελεσματικό καθαρισμό σε χαμηλές θερμοκρασίες,
η Super Eco Wash (Σούπερ οικολογική πλύση) μπορεί να συγκριθεί σε
αποτελεσματικότητα και εξοικονόμηση ενέργειας με τον συμβατικό κύκλο
πλύσης χωρίς σαπουνάδα για τα Βαμβακερά.
• Για ρούχα που φοριούνται σε υπαίθριους χώρους, φόρμες του σκι και αθλητικά
ρούχα φτιαγμένα από λειτουργικά υφάσματα, όπως σπάντεξ, στρετς και
μικροΐνες.
• Με πλύση σε υψηλή θερμοκρασία και επιπλέον ξεβγάλματα που διασφαλίζουν
ότι δεν θα μείνουν υπολείμματα απορρυπαντικού σε σκόνη.
• Ειδικό πρόγραμμα για μάλλινα ρούχα που μπορούν να πλυθούν στο πλυντήριο
και για φορτία μικρότερα των 2,0 kg.
• Το πρόγραμμα για μάλλινα πλένει με απαλές ρυθμικές κινήσεις και μούλιασμα,
ώστε να προστατεύονται οι ίνες του μαλλιού από συρρίκνωση/παραμόρφωση.
• Συνιστάται ουδέτερο απορρυπαντικό.
ΛΕΙΤΟΥΡΓΙΕΣ
-
-
Μέγιστο
Μέγιστο
5
3
4
5
4
2
4
2
Ελληνικά - 29
Untitled-15 29 2015-07-18 6:43:24
Page 86

Πρόγραμμα Περιγραφή και Μέγιστο φορτίο (kg)
Delicates
(Ευαίσθητα)
Bedding
(Κλινοσκεπάσματα)
Spin (Στύψιμο) • Με έναν επιπλέον κύκλο στυψίματος που απομακρύνει περισσότερο νερό. -
Rinse+Spin
(Ξέβγαλμα+Στύψιμο)
Eco Drum Clean
(Οικολογικός
καθαρισμός κάδου)
Cotton
(Οικονομικό
πρόγραμμα για
βαμβακερά)
• Για λεπτά υφάσματα, σουτιέν, εσώρουχα (μεταξωτά) και άλλα υφάσματα που
προορίζονται μόνο για πλύσιμο στο χέρι.
• Για καλύτερα αποτελέσματα, χρησιμοποιήστε υγρό απορρυπαντικό.
• Για κουβερλί, υποστρώματα, καλύμματα κρεβατιών κ.λπ.
• Για καλύτερα αποτελέσματα, πλένετε 1 είδος κλινοσκεπασμάτων κάθε φορά
και φροντίστε το φορτίο να ζυγίζει λιγότερο από 2,5 kg.
• Με έναν επιπλέον κύκλο ξεβγάλματος, μετά τη χρήση μαλακτικού στα ρούχα. -
• Καθαρίζει τον κάδο, απομακρύνοντας βρομιά και βακτήρια.
• Να εκτελείται μετά από κάθε 40 πλύσεις, χωρίς χρήση απορρυπαντικού ή
λευκαντικού.
• Βεβαιωθείτε ότι ο κάδος είναι άδειος.
• Μην χρησιμοποιείτε κανένα καθαριστικό για να καθαρίσετε τον κάδο.
• Βέλτιστη απόδοση με λιγότερη ενέργεια για βαμβακερά υφάσματα, σεντόνια,
τραπεζομάντηλα, εσώρουχα, πετσέτες και πουκάμισα.
Μέγιστο
2
2,5
-
Κύκλος ειδικών προγραμμάτων
Έχουν σχεδιαστεί έξι ειδικά προγράμματα για να απομακρύνουν συγκεκριμένους τύπους λεκέδων και βρομιάς, που
ενδέχεται να συσσωρεύονται μετά από συγκεκριμένους τύπους δραστηριοτήτων, από οικιακές εργασίες έως επαγγελματική
αναρρίχηση.
Πρόγραμμα Περιγραφή και Μέγιστο φορτίο (kg)
Cooking&Dining
(Μαγείρεμα και
φαγητό)
Gardening (Κηπουρική)
Active Sports
(Αθλήματα με
έντονη σωματική
δραστηριότητα)
Active Kids (Δραστήρια
παιδιά)
Working&Everyday
(Εργασία και
καθημερινότητα)
Untitled-15 30 2015-07-18 6:43:25
• Αυτό το πρόγραμμα απομακρύνει αποτελεσματικά κηλίδες από φαγητά και
λεκέδες που δημιουργούνται κατά το μαγείρεμα.
• Το πρόγραμμα αυτό απομακρύνει αποτελεσματικά λεκέδες από γρασίδι και
λάσπη/ χώμα, καθώς και τον ιδρώτα και τα έλαια που εκκρίνει η επιδερμίδα.
• Το πρόγραμμα αυτό απομακρύνει αποτελεσματικά το γρασίδι, το χώμα, τη
λάσπη, ελαφρείς λεκέδες από φαγητό, ιδρώτα και προϊόντα μέικ-απ.
• Μην χρησιμοποιείτε αυτό το πρόγραμμα για αδιάβροχα ρούχα. Ενδέχεται να
καταστρέψει τις αδιάβροχες ιδιότητες των υφασμάτων ή την ιδιότητά τους να
αναπνέει.
• Το πρόγραμμα Active Kids (Δραστήρια παιδιά) προορίζεται για τα περισσότερα
παιδικά ρούχα. Το πρόγραμμα αυτό απομακρύνει αποτελεσματικά λεκέδες
από φαγητό, χυμούς, αναψυκτικά, λάσπη, χώμα, μελάνι και κηρομπογιές.
• Το πρόγραμμα Working&Everyday (Εργασία και καθημερινότητα)
χρησιμοποιείται για τα ελαφρώς λερωμένα ρούχα. Το πρόγραμμα αυτό
απομακρύνει αποτελεσματικά τους ελαφρείς λεκέδες από μελάνι και μολύβι,
καθώς και τους συνηθισμένους καθημερινούς λεκέδες.
Ελληνικά - 30
4
4
4
4
4
Page 87

Πρόγραμμα Περιγραφή και Μέγιστο φορτίο (kg)
Hygiene Care (Υγιεινή
και φροντίδα)
• Αυτό το πρόγραμμα απομακρύνει αποτελεσματικά λεκέδες από έλαια που
εκκρίνει η επιδερμίδα και από αίμα.
4
Επιλογές
Οι διαθέσιμες επιλογές διαφέρουν ανάλογα με το πρόγραμμα. Οι μη ενεργές επιλογές για ένα συγκεκριμένο πρόγραμμα
εμφανίζονται ανενεργές.
Επιλογές Περιγραφή
• Ειδικά για λιγότερο λερωμένα ρούχα και για συνολικά φορτία μικρότερα των 2 kg.
• Διαρκεί τουλάχιστον 15 λεπτά, ανάλογα με συνθήκες όπως η πίεση του νερού, η
Quick Wash (Γρήγορο
πλύσιμο)
Pre Wash (Πρόπλυση) • Προσθέτει έναν προκαταρκτικό κύκλο πλύσης πριν από τον κύριο κύκλο πλύσης.
Soaking+ (Επιπλέον
μούλιασμα)
Intensive (Εντατικό
πλύσιμο)
Easy Iron (Εύκολο
σιδέρωμα)
Delay End
(Καθυστέρηση
τερματισμού)
σκληρότητα του νερού ή/και οι επιπλέον επιλογές που έχουν γίνει για το πρόγραμμα.
• Ο χρόνος του Quick Wash (Γρήγορο πλύσιμο) αυξάνεται με την εξής σειρά:
Απενεργοποίηση > 15 λεπτά > 20 λεπτά > 30 λεπτά > 40 λεπτά > 50 λεπτά >
60 λεπτά.
• Η συνιστώμενη ποσότητα απορρυπαντικού είναι λιγότερο από 20 g (για φορτίο 2 kg).
• Με αυτή την επιλογή, οι λεκέδες αφαιρούνται αποτελεσματικά μουλιάζοντας τα ρούχα.
• Σε κάθε κύκλο μουλιάσματος, ο κάδος περιστρέφεται για 1 λεπτό και παραμένει
στάσιμος για 4 λεπτά. Η διάρκεια για το Soaking+ (Επιπλέον μούλιασμα) μπορεί να
οριστεί από 30 έως 150 λεπτά.
• Για πολύ λερωμένα ρούχα. Ο χρόνος λειτουργίας για κάθε κύκλο είναι περισσότερος από
τον κανονικό.
• Η ταχύτητα στυψίματος μειώνεται, ώστε να μειωθούν οι ζάρες.
• Ορίστε την ταχύτητα στυψίματος στις έως και 800 σ.α.λ.
• Ο χρόνος που εμφανίζεται αντιστοιχεί στον χρόνο τερματισμού για το πρόγραμμα που
έχετε επιλέξει.
ΛΕΙΤΟΥΡΓΙΕΣ
Ελληνικά - 31
Untitled-15 31 2015-07-18 6:43:25
Page 88

Delay End (Καθυστέρηση τερματισμού)
(Καθυστέρηση τερματισμού) σε 3 ώρες.
Μπορείτε να ρυθμίσετε το πλυντήριο να ολοκληρώσει το τρέχον πρόγραμμα μετά από συγκεκριμένο αριθμό ωρών.
Η λειτουργία αυτή είναι χρήσιμη, όταν θέλετε να ολοκληρωθεί η πλύση την ώρα που θα επιστρέψετε στο σπίτι σας από τις
δουλειές σας.
1. Επιλέξτε ένα πρόγραμμα. Στη συνέχεια, αλλάξτε τις ρυθμίσεις προγράμματος, αν χρειάζεται.
2. Πατήστε το εικονίδιο Options (Επιλογές) στην κάτω δεξιά γωνία.
Στη συνέχεια, κάντε τις επιλογές σας και αλλάξτε τις ρυθμίσεις τους.
3. Πατήστε Delay End (Καθυστέρηση τερματισμού).
4. Χρησιμοποιήστε τα βέλη για να ορίσετε την ώρα τερματισμού του τρέχοντος προγράμματος και, στη συνέχεια, πατήστε
Start (Έναρξη).
• Για να ακυρώσετε την επιλογή, πατήστε Cancel (Ακύρωση) και επιστρέψτε στην οθόνη Επιλογές.
Περίπτωση χρήσης
Θέλετε να ολοκληρωθεί ένα δίωρο πρόγραμμα σε 3 ώρες από τώρα. Για να το κάνετε αυτό, προσθέστε την επιλογή Delay
End (Καθυστέρηση τερματισμού) στο τρέχον πρόγραμμα με την 3ωρη ρύθμιση και πατήστε το κουμπί Start/Pause (Έναρξη/
Παύση) στις 2:00 μ.μ. Τι θα συμβεί στη συνέχεια; Το πλυντήριο θα ξεκινήσει στις 3:00 μ.μ. και θα τελειώσει στις 5:00 μ.μ.
Παρακάτω βλέπετε πώς εξελίσσεται αυτό το πρόγραμμα χρονικά.
2:00 μ.μ.
Ορίστε την επιλογή Delay End
3:00 μ.μ.
Έναρξη
5:00 μ.μ.
Τέλος
Ελληνικά - 32
Untitled-15 32 2015-07-18 6:43:25
Page 89

Settings (Ρυθμίσεις)
Child Lock (Γονικό κλείδωμα)
Προκειμένου να αποτραπούν ατυχήματα με παιδιά και βρέφη, το Child Lock (Γονικό κλείδωμα) κλειδώνει όλα τα κουμπιά,
εκτός από το κουμπί Settings (Ρυθμίσεις).
Μπορείτε να προσπελάσετε το μενού Child Lock (Γονικό κλείδωμα) από την οθόνη Settings (Ρυθμίσεις) ή από το Γραμμή
πίνακα γρήγορης επιλογής.
• Για να ενεργοποιήσετε το Child Lock (Γονικό κλείδωμα), πατήστε Settings (Ρυθμίσεις) και στη συνέχεια το κουμπί
Child Lock (Γονικό κλείδωμα).
• Για να ενεργοποιήσετε τη λειτουργία Child Lock (Γονικό κλείδωμα), πατήστε και κρατήστε πατημένο το κουμπί Activate
(Ενεργοποίηση) επί 3 δευτερόλεπτα.
• Για να απενεργοποιήσετε προσωρινά τη λειτουργία Child Lock (Γονικό κλείδωμα), πατήστε και κρατήστε πατημένο το
κουμπί Temporarily Deactivate (Προσωρινή απενεργοποίηση) επί 3 δευτερόλεπτα.
• Για να απενεργοποιήσετε εντελώς τη λειτουργία Child Lock (Γονικό κλείδωμα), πατήστε και κρατήστε πατημένο το
κουμπί Deactivate (Απενεργοποίηση) επί 3 δευτερόλεπτα.
• Για να προσθέσετε απορρυπαντικό ή ρούχα στον κάδο ή για να αλλάξετε τις ρυθμίσεις του προγράμματος ενώ
το Child Lock (Γονικό κλείδωμα) είναι ενεργοποιημένο, πρέπει πρώτα να απενεργοποιήσετε το Child Lock
(Γονικό κλείδωμα).
• Το Child Lock (Γονικό κλείδωμα) θα απενεργοποιηθεί για ένα λεπτό και θα ενεργοποιηθεί εκ νέου
Drum Light (Λυχνία κάδου)
• Για να ενεργοποιήσετε ή απενεργοποιήσετε το Drum Light (Λυχνία κάδου), πατήστε Settings (Ρυθμίσεις) και σύρετε
τη γραμμή του Drum Light (Λυχνία κάδου) προς το On (Ενεργοποίηση) ή το O (Απενεργοποίηση).
• Η λυχνία κάδου σβήνει αυτόματα μετά από 5 λεπτά.
Auto Dispense (Αυτόματη διανομή)
Το πλυντήριο διαθέτει δύο θήκες διανομής: μία για το απορρυπαντικό και μία για το μαλακτικό ρούχων. Η Μονάδα αυτόματης
διανομής διανέμει την κατάλληλη ποσότητα απορρυπαντικού και μαλακτικού ρούχων στον κάδο, ανάλογα με το πρόγραμμα
και τον κύκλο.
ΛΕΙΤΟΥΡΓΙΕΣ
Για να ενεργοποιήσετε το Auto Dispense (Αυτόματη διανομή)
1. Πατήστε Settings (Ρυθμίσεις) > Auto Dispense (Αυτόματη διανομή).
2. Σύρετε τη γραμμή Auto Detergent (Αυτόματη διανομή απορρυπαντικού) προς το On (Ενεργοποίηση) και
ρυθμίστε το Amount (Ποσότητα) και το Water Hardness (Σκληρότητα νερού).
3. Σύρετε τη γραμμή Auto Softener (Αυτόματη διανομή μαλακτικού) προς το On (Ενεργοποίηση) και ρυθμίστε το
Amount (Ποσότητα) και το Concentration (Πυκνότητα).
4. Πατήστε Save (Αποθήκευση).
Brightness (Φωτεινότητα)
Ρυθμίστε τη φωτεινότητα της οθόνης LCD
• Πατήστε Settings (Ρυθμίσεις) και πατήστε τα σύμβολα (-/+) για να αυξήσετε ή να μειώσετε το επίπεδο φωτεινότητας.
Ελληνικά - 33
Untitled-15 33 2015-07-18 6:43:25
Page 90

Sound Theme (Ήχοι)
Ορίστε την ένταση του ήχου και τη μελωδία ειδοποίησης.
1. Πατήστε Settings (Ρυθμίσεις) > Sound Theme (Ήχοι).
2. Για να προσαρμόσετε την ένταση, πατήστε τα σύμβολα (-/+) για να αυξήσετε ή να μειώσετε το επίπεδο έντασης.
3. Για να επιλέξετε μελωδία ειδοποίησης, πατήστε ένα από τα θέματα στη λίστα.
Date & Time (Ημερομηνία και ώρα)
Η προεπιλεγμένη μορφή για την προβολή της ώρας είναι η 12ωρη.
1. Πατήστε Settings (Ρυθμίσεις) > Date & Time (Ημερομηνία και ώρα).
2. Πατήστε τα βέλη για να αλλάξετε την ώρα για κάθε στοιχείο της ώρας. Για παράδειγμα, για να αλλάξετε την ημερομηνία,
χρησιμοποιήστε τα βέλη πάνω και κάτω από το στοιχείο ημερομηνίας.
3. Για εναλλαγή μεταξύ των στοιχείων AM (π.μ.) και PM (μ.μ.), απλά πατήστε το αντίστοιχο στοιχείο.
4. Πατήστε Save (Αποθήκευση).
Language (Γλώσσα)
Επιλέξτε τη γλώσσα μενού που προτιμάτε.
• Πατήστε Settings (Ρυθμίσεις) > Language (Γλώσσα) και επιλέξτε τη γλώσσα μενού της προτίμησής σας.
Network (Δίκτυο)
Αυτόματη ρύθμιση
Το πλυντήριο υποστηρίζει τα πρωτόκολλα Wi-Fi WEP, TKIP και AES, δεν διατίθεται όμως μαζί με δρομολογητή (AP).
1. Πατήστε Settings (Ρυθμίσεις) > Network (Δίκτυο) και στη συνέχεια σύρετε τη γραμμή Network (Δίκτυο) προς το
On (Ενεργοποίηση). Εμφανίζεται η λίστα AP.
2. Επιλέξτε έναν πάροχο δικτύου πατώντας το όνομά του και εισαγάγετε τον κωδικό πρόσβασης, εάν σας ζητηθεί.
3. Πατήστε OK. Αφού ολοκληρώσετε τη διαδικασία με επιτυχία, ο επιλεγμένος πάροχος δικτύου επισημαίνεται με σημάδι
επιλογής.
Μη αυτόματη ρύθμιση
1. Ενεργοποιήστε τη σύνδεση Wi-Fi σύμφωνα με τις παραπάνω οδηγίες.
2. Πατήστε Set IP (Ρύθμιση IP) > Manual (Μη αυτόματα).
3. Εισαγάγετε IP Address (Διεύθυνση IP), Subnet mask (Μάσκα υποδικτύου), Gateway (Πύλη) και DNS και, στη συνέχεια,
πατήστε OK.
Σύνδεση Wi-Fi
Αφού δημιουργήσετε τη σύνδεση με το δίκτυο, την επόμενη φορά που θα θελήσετε να ενεργοποιήσετε ή να
απενεργοποιήσετε τη σύνδεση Wi-Fi, σύρετε τη γραμμή Network (Δίκτυο) προς το On (Ενεργοποίηση) ή το
O (Απενεργοποίηση).
Εύκολη σύνδεση
Η Εύκολη σύνδεση σας δίνει τη δυνατότητα να διαμορφώσετε τις ρυθμίσεις δικτύου, συμπεριλαμβανομένης της διαδικασίας
ελέγχου ταυτότητας.
Ελληνικά - 34
Untitled-15 34 2015-07-18 6:43:25
Page 91

Smart Control (Έξυπνος έλεγχος)
Με το Smart Control (Έξυπνος έλεγχος), μπορείτε να ελέγχετε το πλυντήριό σας από τη φορητή συσκευή σας. Πατήστε αυτό
το εικονίδιο για να ενεργοποιήσετε ή να απενεργοποιήσετε τη λειτουργία Smart control (Έξυπνος έλεγχος).
1. Πατήστε Settings (Ρυθμίσεις). Σύρετε τη γραμμή Smart Control (Έξυπνος έλεγχος) προς το On (Ενεργοποίηση).
2. Επιστρέψτε στην κύρια οθόνη, όπου το Smart Control (Έξυπνος έλεγχος) είναι ενεργοποιημένο.
3. Πατήστε ελαφρά το κουμπί Deactivate (Απενεργοποίηση) και η λειτουργία Smart Control (Έξυπνος έλεγχος) θα
απενεργοποιηθεί.
• Εάν το Smart Control (Έξυπνος έλεγχος) δεν είναι ενεργοποιημένο, το εικονίδιο εμφανίζεται ανενεργό.
• Εάν πατήσετε κάποιο εικονίδιο ή κουμπί στο πλυντήριο, η λειτουργία Smart Control (Έξυπνος έλεγχος) θα
απενεργοποιηθεί.
• Εάν το ασύρματο δίκτυο δεν είναι συνδεδεμένο, δεν είναι διαθέσιμο το Smart Control (Έξυπνος έλεγχος).
• У разі ввімкнення функції Smart Control (Έξυπνος έλεγχος) виберіть спосіб підключення до зовнішніх
пристроїв.
Eco Check (Οικολογικός έλεγχος)
Προβάλλεται η απόδοση ενέργειας/νερού των 4 τελευταίων προγραμμάτων, μαζί με μια τεχνική σύνοψη της κατανάλωσης
ενέργειας, των επιπέδων νερού, των ρυθμίσεων προγράμματος και των επιλογών.
1. Πατήστε Settings (Ρυθμίσεις) > Eco Check (Οικολογικός έλεγχος). Εμφανίζεται μια οθόνη με τη σύνοψη των
4 τελευταίων προγραμμάτων.
2. Πατήστε ένα πρόγραμμα για να προβάλετε την τεχνική του σύνοψη.
Self Check (Αυτοδιαγνωστικός έλεγχος)
Το πλυντήριο εκτελεί αυτοδιαγνωστικό έλεγχο στο τρέχον σύστημα. Στην οθόνη αποτελεσμάτων μπορείτε να δείτε τα
λειτουργικά σφάλματα και τα μηχανικά προβλήματα.
• Πατήστε Settings (Ρυθμίσεις) > Self Check (Αυτοδιαγνωστικός έλεγχος) > Start (Έναρξη).
ΛΕΙΤΟΥΡΓΙΕΣ
Calibration (Βαθμονόμηση)
Το Calibration (Βαθμονόμηση) διασφαλίζει τον ακριβή υπολογισμό του βάρους στο πλυντήριο. Βεβαιωθείτε ότι ο κάδος είναι
άδειος, προτού εκτελέσετε το Calibration (Βαθμονόμηση).
1. Πατήστε Settings (Ρυθμίσεις) > Calibration (Βαθμονόμηση) > Start (Έναρξη).
• Η πόρτα θα παραμείνει κλειδωμένη κατά τη διάρκεια της λειτουργίας.
• Ο κάδος θα περιστρέφεται δεξιόστροφα και αριστερόστροφα για αρκετά λεπτά.
2. Όταν ολοκληρωθεί η διαδικασία, το πλυντήριο θα τεθεί αυτόματα εκτός λειτουργίας.
Ελληνικά - 35
Untitled-15 35 2015-07-18 6:43:25
Page 92

Update (Ενημέρωση)
Κάθε φορά που μια ενημέρωση είναι διαθέσιμη, εμφανίζεται στην οθόνη η ειδοποίηση ενημέρωσης.
Για να ελέγξετε την τρέχουσα έκδοση του υλικολογισμικού
1. Πατήστε Settings (Ρυθμίσεις) > Update (Ενημέρωση) για να προβάλετε την τρέχουσα έκδοση υλικολογισμικού.
2. Για να ενημερώσετε το υλικολογισμικό μη αυτόματα, πατήστε Update (Ενημέρωση).
Για να ενημερώσετε το υλικολογισμικό αυτόματα
1. Πατήστε ελαφρά το Auto Update (Αυτόματη ενημέρωση) από την οθόνη Settings (Ρυθμίσεις).
2. Σύρετε τη γραμμή Auto Update (Αυτόματη ενημέρωση) προς το On (Ενεργοποίηση). Η ενημέρωση
διεκπεραιώνεται χωρίς ειδοποίηση, κάθε φορά που είναι διαθέσιμη μια ενημέρωση.
ΠΡΟΕΙΔΟΠΟΙΗΣΗ
Κατά τη διάρκεια της ενημέρωσης, μην αποσυνδέετε το καλώδιο του πλυντηρίου ή του δρομολογητή από την πρίζα.
Help (Βοήθεια)
Ανατρέξτε στις οδηγίες χρήσης που αφορούν τη χρήση του προϊόντος και δείτε εάν στην ενότητα αντιμετώπισης
προβλημάτων υπάρχει το πρόβλημα που σας απασχολεί.
• Πατήστε Settings (Ρυθμίσεις) > Help (Βοήθεια).
Ελληνικά - 36
Untitled-15 36 2015-07-18 6:43:25
Page 93

Smart Control (Έξυπνος έλεγχος) μέσω φορητής συσκευής από τη
S
l
O
Samsung
Αυτό το πλυντήριο παρέχει δύο διαφορετικές εφαρμογές ελέγχου μέσω φορητής συσκευής, για να μπορείτε να ελέγχετε το
πλυντήριό σας μέσω σύνδεσης δικτύου.
Εφαρμογές για φορητές συσκευές συμβατές με τη λειτουργία Smart Control
(Έξυπνος έλεγχος) των έξυπνων πλυντηρίων της Samsung
Samsung Smart Home
Με τον ολοκαίνουργιο σχεδιασμό της εφαρμογής Samsung Smart Home, μπορείτε να έχετε πρόσβαση στο πλυντήριό σας
ενώ είστε εν κινήσει, καθώς και να χειρίζεστε ή να ελέγχετε την κατάσταση λειτουργίας του πλυντηρίου σας.
Κάντε λήψη της εφαρμογής “Samsung Smart Home” από το Play Store ή το Apple Store και εγκαταστήστε τη στη
φορητή συσκευή σας.
Samsung Smart Washer
Η εφαρμογή Samsung Smart Washer σας επιτρέπει να ελέγχετε τη λειτουργία του πλυντηρίου σας από τη φορητή συσκευή
σας διακρίνοντας τις λειτουργίες σε δύο κατηγορίες: Εσωτερικούς και Εξωτερικούς χώρους.
Κάντε λήψη της εφαρμογής “Samsung Smart Washer” από το Play Store ή το Apple Store, και εγκαταστήστε τη στη
φορητή συσκευή σας.
Ρυθμίσεις Smart Control (Έξυπνος έλεγχος) στο πλυντήριο
Για να ενεργοποιήσετε τη λειτουργία Smart Control (Έξυπνος έλεγχος), επιλέξτε μια μέθοδο σύνδεσης με την εφαρμογή της
κινητής συσκευής.
Πατήστε το εικονίδιο Setup και επιλέξτε Smart Control (Έξυπνος έλεγχος) κάτω από το
μενού Network (Δίκτυο).
1. Επιλέξτε μια μέθοδο σύνδεσης με την φορητή συσκευή.
Most Used
1
Cotton
Temp.Rinse Spin
40°C 1200rpm
3
12:00
1hr 21min
Start
Options
AM
ΛΕΙΤΟΥΡΓΙΕΣ
2. Επιλέξτε “Samsung Smart Home”, εάν θέλετε να ελέγχετε το πλυντήριο μέσω
της ενσωματωμένης εφαρμογής Samsung.
Επιλέξτε “Samsung Smart Washer”, εάν θέλετε να ελέγχετε το πλυντήριο
μέσω της ενσωματωμένης εφαρμογής Samsung.
Language
AB
Network
Wi-Fi
Easy Connection
Smart Control
mart Contro
1
Maintenance
12:00
English
On
AM
O
Ελληνικά - 37
Untitled-15 37 2015-07-18 6:43:25
Page 94

3. Μόλις ολοκληρωθεί η εγκατάσταση, εφαρμόζονται οι μετατροπές σας και και
ίσως χρειαστεί να επανασυνδεθείτε.
• Samsung Smart Home (Προεπιλογή)
• Samsung Smart Washer
Smart Control
1. You can select a connection method to external devices with
the Smart Control options.
2. Select “Samsung Smart Home” to remotely access devices through
the Samsung Smart Home app. Select “Samsung Smart Washer” to
Samsung Smart Home
Samsung Smart Washer
Save
• Ως προεπιλογή, το προϊόν αυτό χρησιμοποιεί τον ολοκαίνουργιο σχεδιασμό της εφαρμογής Samsung Smart
Home ως μέθοδο σύνδεσης. Αυτή είναι και η συνιστώμενη μέθοδος.
• Για μοντέλα iPhone, η εφαρμογή Samsung Smart Home έχει προγραμματιστεί να είναι διαθέσιμη από το Apple
Store το δεύτερο εξάμηνο του 2014.
• Σε ορισμένες χώρες, η εφαρμογή Samsung Smart Home ενδέχεται να μην είναι διαθέσιμη. Σε αυτή την
περίπτωση, χρησιμοποιήστε την εφαρμογή Samsung Smart Washer στη θέση της.
12:00AM
Ελληνικά - 38
Untitled-15 38 2015-07-18 6:43:25
Page 95

Εφαρμογή Samsung Smart Home
Όταν χρησιμοποιείτε την εφαρμογή Samsung Smart Home, φροντίστε να είναι επιλεγμένο το “Samsung Smart Home”
κάτω από το μενού Setup (Εγκατάσταση).
Η εφαρμογή Samsung Smart Home σάς δίνει τη δυνατότητα να έχετε πρόσβαση και να ελέγχετε το πλυντήριο ρούχων από
απόσταση.
Εγκατάσταση
1. Επισκεφθείτε το Play Store της Google για συσκευές Android, ή το App Store της Apple για συσκευές iOS, και
αναζητήστε την εφαρμογή Samsung Smart Home για να την επιλέξετε.
2. Κάντε λήψη και εγκατάσταση της εφαρμογής Samsung Smart Home στη φορητή συσκευή σας.
• Η εφαρμογή Samsung Smart Home υποστηρίζει λογισμικό Android OS 4.0 (ICS) ή μεταγενέστερο, το
οποίο έχει βελτιστοποιηθεί για τα smartphone της Samsung (σειρές Galaxy S και Galaxy Note). Ορισμένες
δυνατότητες της εν λόγω εφαρμογής ενδέχεται να λειτουργούν διαφορετικά, ανάλογα με τη συσκευή.
• Η εν λόγω εφαρμογή υποστηρίζει λογισμικό iOS 7 ή μεταγενέστερο για μοντέλα iPhone.
• Για βελτιωμένη απόδοση, η σχεδίαση του περιβάλλοντος χρήστη της εν λόγω εφαρμογής υπόκειται σε αλλαγές
χωρίς προηγούμενη ειδοποίηση.
• Για τα μοντέλα iPhone, η εφαρμογή αυτή έχει προγραμματιστεί να γίνει διαθέσιμη το δεύτερο εξάμηνο του
2014 στο App Store της Apple.
Προετοιμασία
1. Για να ενεργοποιήσετε την εφαρμογή, θα σας ζητηθεί να εισαγάγετε τον λογαριασμό σας Samsung. Εάν δεν έχετε ήδη
λογαριασμό Samsung, θα καθοδηγηθείτε από την εφαρμογή για να δημιουργήσετε έναν λογαριασμό. Δεν απαιτείται
άλλη εφαρμογή για αυτόν τον σκοπό.
2. Για να ενεργοποιήσετε την εφαρμογή, πρέπει πρώτα να δηλώσετε το πλυντήριό σας στην υπηρεσία Samsung Smart
Home.
1) Επιλέξτε το πλυντήριό σας από τη λίστα συσκευών της εφαρμογής Samsung Smart Home.
2) Εισαγάγετε τις απαραίτητες πληροφορίες σχετικά με το ασύρματο σημείο πρόσβασης (AP) που χρησιμοποιείτε για
ασύρματη σύνδεση.
3) Ακολουθήστε τις οδηγίες επί της οθόνης για να προσαρμόσετε τις ρυθμίσεις για το πλυντήριο.
4) Στο πλυντήριο, επιλέξτε Settings (Ρυθμίσεις) > Εύκολη σύνδεση για να προσαρμόσετε τις ρυθμίσεις δικτύου.
5) Αφού ολοκληρώσετε τα παραπάνω βήματα, θα εμφανιστεί το εικονίδιο του πλυντηρίου στην εφαρμογή.
ΠΡΟΣΟΧΗ
• Οι μη πιστοποιημένοι δρομολογητές Wi-Fi ενδέχεται να μην πραγματοποιήσουν τη σύνδεση.
• Εάν έχετε τοποθετήσει το πλυντήριο και το σημείο πρόσβασης (AP) κοντά σε φούρνους μικροκυμάτων ή
ηλεκτρικά σεσουάρ μαλλιών, το Smart Control ενδέχεται να μην λειτουργήσει σωστά, λόγω παρεμβολών από τις
ηλεκτρικές συσκευές.
• Το πλυντήριο υποστηρίζει μόνο τα πρωτόκολλα Wi-Fi 2.4 Ghz.
• Ο συνθήκες του περιβάλλοντος χώρου ενδέχεται να επηρεάσουν την απόδοση του ασύρματου δικτύου.
• Εάν χρησιμοποιήσετε την εφαρμογή χωρίς να έχετε πραγματοποιήσει σύνδεση, θα εμφανιστεί η οθόνη Account
guidance (Καθοδήγηση λογαριασμού). Αφού συνδεθείτε, μπορείτε να αλλάξετε τις ρυθμίσεις του λογαριασμού
σας στην ενότητα Settings (Ρυθμίσεις) > Account (Λογαριασμός).
• Οι χρήστες smartphone της Samsung μπορούν να συνδεθούν αυτόματα στην εφαρμογή, αφού καταχωρίσουν
τον λογαριασμό τους στο Settings (Επιλογές).
ΛΕΙΤΟΥΡΓΙΕΣ
Ελληνικά - 39
Untitled-15 39 2015-07-18 6:43:26
Page 96

Χρήση της εφαρμογής Samsung Smart Home
Λειτουργίες πλήκτρων
• Ενσωματωμένος έλεγχος για έξυπνες συσκευές Samsung
Δηλώστε την έξυπνη συσκευή σας Samsung στην υπηρεσία Samsung Smart Home την οποία μπορείτε να
χρησιμοποιήσετε για εύκολη πρόσβαση. Επιλέξτε το εικονίδιο του πλυντηρίου στην εφαρμογή, για να προσπελάσετε τις
βασικές λειτουργίες του πλυντηρίου από απόσταση.
• Головний ключ
Головний ключ може використовуватися в 4 режимах: Going out (Вихід з дому), Coming home (Прихід додому),
Good night (На ніч) і Good morning (На ранок).
• Πλήκτρα ελέγχου διαλόγου
Ενεργοποιήστε τον διάλογο μεταξύ των έξυπνων συσκευών και λάβετε τις πληροφορίες που είναι απαραίτητες για να
ελέγχετε τη συσκευή.
• Παρακολούθηση από το σπίτι
Χρησιμοποιήστε την κάμερα που είναι ενσωματωμένη στην έξυπνη συσκευή σας για να παρακολουθείτε το σαλόνι σας
όσο λείπετε.
• Υποστήριξη πελατών
Κάντε λήψη του εγχειριδίου χρήσης του προϊόντος ή ζητήστε παροχή υπηρεσιών σέρβις.
Ορισμένες λειτουργίες αυτής της υπηρεσίας ενδέχεται να μην είναι διαθέσιμες στο πλυντήριο.
Εφαρμογή Samsung Smart Home Washing Machine
Ελέγξτε και παρακολουθήστε το πλυντήριο όταν είστε εντός και εκτός σπιτιού.
1. Δηλώστε τη συσκευή σας στην εφαρμογή Samsung Smart Home.
2. Για να ενεργοποιήσετε τον απομακρυσμένο έλεγχο, ενεργοποιήστε το Smart Control (Έξυπνος έλεγχος) στο πλυντήριο.
3. Επιλέξτε το εικονίδιο του πλυντηρίου στη φορητή συσκευή και πατήστε ελαφρά το Start (Εκκίνηση).
Το προϊόν αυτό είναι ένα έξυπνο πλυντήριο που υποστηρίζει την υπηρεσία Samsung Smart Home.
Για περισσότερες πληροφορίες, επισκεφθείτε τη διαδικτυακή τοποθεσία www.samsung.com.
Ελληνικά - 40
Untitled-15 40 2015-07-18 6:43:26
Page 97

Εφαρμογή Samsung Smart Washer
Όταν χρησιμοποιείτε την εφαρμογή Samsung Smart Washer, φροντίστε να είναι επιλεγμένο το “Samsung Smart Washer”
κάτω από το μενού Setup (Εγκατάσταση).
Η εφαρμογή Samsung Smart Washer σας δίνει τη δυνατότητα να ελέγχετε ορισμένες λειτουργίες του πλυντηρίου από τη
φορητή συσκευή σας.
Λήψη
1. Πραγματοποιήστε αναζήτηση του Samsung Smart Washer στο Play Store ή στο Apple Store.
2. Κάντε λήψη και εγκατάσταση της εφαρμογής στη φορητή συσκευή σας.
3. Εκτελέστε την εφαρμογή Samsung Smart Washer στη φορητή συσκευή σας.
Σύνδεση με το πλυντήριο
Το πλυντήριο πρέπει να είναι συνδεδεμένο σε δίκτυο Wi-Fi.
Indoor control (Εσωτερικός έλεγχος)
Για να ενεργοποιήσετε αυτή τη λειτουργία, η φορητή συσκευή πρέπει να είναι συνδεδεμένη στο ίδιο δίκτυο με το πλυντήριο.
1. Στη φορητή συσκευή, πατήστε Indoor control (Εσωτερικός έλεγχος) για να προβάλετε μια λίστα με τα διαθέσιμα
μοντέλα πλυντηρίου.
2. Πατήστε πάνω στο όνομα του μοντέλου του πλυντηρίου για να συνδεθείτε και, στη συνέχεια, πατήστε OK. Εμφανίζεται
το παράθυρο ελέγχου ταυτότητας.
3. Στο πλυντήριο, πατήστε Settings (Ρυθμίσεις) και σύρετε τη γραμμή Smart Control (Έξυπνος έλεγχος) προς το
On (Ενεργοποίηση). Αρχίζει η διαδικασία ελέγχου ταυτότητας.
Η διαδικασία ελέγχου ταυτότητας απαιτείται μόνο μία φορά, κατά την πρώτη χρήση.
Outdoor control (Εξωτερικός έλεγχος)
Για να ενεργοποιήσετε αυτή τη λειτουργία, το πλυντήριο πρέπει να έχει καταχωριστεί στη διαδικτυακή τοποθεσία Samsung
Smart Appliance (www.samsungsmartappliance.com).
1. Στο πλυντήριο, πατήστε Settings (Ρυθμίσεις) και σύρετε τη γραμμή Smart Control (Έξυπνος έλεγχος) προς το
On (Ενεργοποίηση).
2. Στη φορητή συσκευή, πατήστε Outdoor control (Εξωτερικός έλεγχος) και εισαγάγετε τα διαπιστευτήρια σύνδεσης.
Εμφανίζεται μια λίστα με τις συσκευές που έχουν καταχωριστεί.
3. Από τη λίστα, πατήστε τη συσκευή που θέλετε να ελέγχετε. Στη συνέχεια, θα δημιουργηθεί αυτόματα μια
απομακρυσμένη σύνδεση μεταξύ του πλυντηρίου και της φορητής συσκευής.
ΛΕΙΤΟΥΡΓΙΕΣ
Δεν απαιτείται διαδικασία ελέγχου ταυτότητας.
Ελληνικά - 41
Untitled-15 41 2015-07-18 6:43:26
Page 98

Καταχώριση
Καταχωρίστε το πλυντήριό σας στη διαδικτυακή τοποθεσία Samsung Smart Appliance (www.samsungsmartappliance.com)
και αποκτήστε απομακρυσμένη πρόσβαση στο πλυντήριο. Το πλυντήριο πρέπει να είναι συνδεδεμένο σε δίκτυο Wi-Fi.
1. Μεταβείτε στη διαδικτυακή τοποθεσία Samsung Smart Appliance (www.samsungsmartappliance.com).
2. Εισαγάγετε τα διαπιστευτήρια του δικού σας λογαριασμού Samsung για να συνδεθείτε. Εάν δεν είστε καταχωρισμένοι
χρήστες, κάντε κλικ στο Δημιουργία λογαριασμού Samsung και ακολουθήστε τις οδηγίες επί της οθόνης.
3. Κάντε κλικ στο My Page (Η σελίδα μου) > Add device (Προσθήκη συσκευής) και εισαγάγετε τη διεύθυνση MAC
του πλυντηρίου.
Για να ελέγξετε τη διεύθυνση MAC, πατήστε Settings (Ρυθμίσεις) > Network (Δίκτυο) στο πλυντήριο.
4. Κάντε κλικ στο Get Approval (Λήψη έγκρισης).
5. Πατήστε Settings (Ρυθμίσεις) στο πλυντήριο και, εάν σας ζητηθεί να λάβετε έγκριση, πατήστε OK.
Τα καταχωρισμένα πλυντήρια εμφανίζονται στη λίστα συσκευών της διαδικτυακής τοποθεσίας.
Διά του παρόντος, η Samsung Electronics δηλώνει ότι αυτό το πλυντήριο συμμορφώνεται προς τις ουσιώδεις
απαιτήσεις και άλλες σχετικές διατάξεις της Οδηγίας 1999/5/ΕΚ.
Μπορείτε να βρείτε την επίσημη Δήλωση συμμόρφωσης στη διαδικτυακή τοποθεσία http://www.samsung.com.
Μεταβείτε στην ενότητα Υποστήριξη > Αναζήτηση υποστήριξης προϊόντος και εισαγάγετε το όνομα του μοντέλου.
Ελληνικά - 42
Untitled-15 42 2015-07-18 6:43:26
Page 99

Συντήρηση
Διατηρείτε το πλυντήριο καθαρό, για να αποφύγετε αρνητικές επιπτώσεις στην απόδοση και για να διατηρήσετε τον κύκλο
ζωής του.
Eco Drum Clean (Οικολογικός καθαρισμός κάδου)
Εκτελείτε τακτικά αυτό το πρόγραμμα, για να καθαρίζετε τον κάδο και να απομακρύνετε τα βακτήρια.
1. Πατήστε Course (Πρόγραμμα) > Eco Drum Clean (Οικολογικός καθαρισμός κάδου).
2. Μεταβείτε στην κεντρική οθόνη και πατήστε Start (Έναρξη).
Η θερμοκρασία του νερού για το πρόγραμμα Eco Drum Clean (Οικολογικός καθαρισμός κάδου) έχει ρυθμιστεί στους
70 °C και δεν μπορεί να αλλάξει.
ΠΡΟΣΟΧΗ
Μην χρησιμοποιείτε κανένα καθαριστικό για να καθαρίσετε τον κάδο. Τυχόν χημικά κατάλοιπα στον κάδο επηρεάζουν
αρνητικά την απόδοση του πλυντηρίου.
Υπενθύμιση Eco Drum Clean (Οικολογικός καθαρισμός κάδου)
• Η υπενθύμιση Eco Drum Clean (Οικολογικός καθαρισμός κάδου) εμφανίζεται στην κεντρική οθόνη μετά από κάθε
40 πλύσεις. Συνιστάται να εκτελείτε συχνά το Eco Drum Clean (Οικολογικός καθαρισμός κάδου).
• Την πρώτη φορά που θα δείτε αυτή την υπενθύμιση, μπορείτε να την αγνοήσετε (έως και 6 φορές), πατώντας
Remind later (Υπενθύμιση αργότερα). Μετά την 7η πλύση, η υπενθύμιση παύει να εμφανίζεται. Ωστόσο,
εμφανίζεται ξανά μετά τις επόμενες 40 πλύσεις.
ΣΥΝΤΗΡΗΣΗ
Ελληνικά - 43
Untitled-15 43 2015-07-18 6:43:26
Page 100

Επείγουσα άντληση
Σε περίπτωση διακοπής ρεύματος, αντλήστε το νερό που βρίσκεται μέσα στον κάδο, προτού αφαιρέσετε τα ρούχα από
αυτόν.
1. Αποσυνδέστε το καλώδιο ρεύματος του πλυντηρίου από την πρίζα.
2. Πατήστε απαλά την πάνω επιφάνεια του καλύμματος φίλτρου για να το
ανοίξετε.
3. Τραβήξτε μαλακά τον σωλήνα επείγουσας άντλησης.
4. Κρατώντας τον σωλήνα άντλησης από το άκρο, ανοίξτε το πώμα του σωλήνα.
5. Διοχετεύστε το νερό σε ένα δοχείο.
6. Κλείστε το πώμα του σωλήνα και βάλτε τον σωλήνα άντλησης ξανά στη θέση
του.
7. Κλείστε το κάλυμμα φίλτρου.
Ελληνικά - 44
Untitled-15 44 2015-07-18 6:43:26
 Loading...