

Samsung WS-28M204D, WS-32M204D Owner's Instructions Manual
DIGITAL
TELEVISION
Owner’s Instructions
Before operating the unit,
please read this manual thoroughly,
and retain it for future reference.
ON-SCREEN MENUS
DIGITAL TERRESTRIAL RECEIVER
Register your product at www.samsung.com/global/register
TELETEXT


Contents
◆ CONNECTING AND PREPARING YOUR TELEVISION
■ Control Panel................................................................................................. 5
■ Infrared Remote Control ................................................................................ 6
■ Inserting the Batteries into the Remote Control............................................. 7
■ Connecting to an Aerial or Cable Television Network ................................... 8
■ Switching Your Television On and Off........................................................... 9
■ Placing Your Television in Standby Mode..................................................... 9
■ Plug & Play Feature....................................................................................... 10
■ Changing Channels....................................................................................... 11
■ Viewing the Demonstration............................................................................ 12
■ Choosing Your Language.............................................................................. 12
◆ USING THE DTV FEATURE
■ Previewing the DTV Menu System................................................................ 13
■ Choosing Your Language.............................................................................. 14
■ Adjusting the Translucency Level.................................................................. 14
■ Updating the Channel List Automatically....................................................... 15
■ Updating the Channel List Manually.............................................................. 16
■ Editing Your Favourite Channels................................................................... 17
■ Setting up the Parental Lock ......................................................................... 19
■ Viewing EPG (Electronic Programme Guide) Information............................. 20
■ Using the Scheduled List............................................................................... 21
■ Setting the Default Guide .............................................................................. 22
■ Viewing All Channels and Favourite Channels.............................................. 23
■ Selecting Category Colours........................................................................... 24
■ Viewing Channel Lists ................................................................................... 25
■ Displaying Programme Information ............................................................... 25
■ Using the Preferences ................................................................................... 26
■ Viewing Product Information.......................................................................... 27
■ Checking the Signal Information.................................................................... 27
■ Upgrading the Software (Option)................................................................... 28
■ Viewing Common Interface ........................................................................... 29
■ Selecting the CI Menu ................................................................................... 30
■ Resetting ....................................................................................................... 31
■ Freezing the Current Picture ......................................................................... 31
◆ SETTING THE CHANNELS (ANALOG TV)
■ Storing Channels Automatically..................................................................... 32
■ Sorting the Stored Channels ......................................................................... 33
■ Storing Channels Manually............................................................................ 34
■ Skipping Unwanted Channels ....................................................................... 36
■ Assigning Names to Channels ...................................................................... 37
English - 3

Contents (continued)
◆ USING YOUR TELEVISION
■ Changing the Picture Standard ..................................................................... 38
■ Customizing the Picture Settings................................................................... 39
■ Selecting the Picture Size.............................................................................. 40
■ Setting the Digital NR (Digital Noise Reduction) .......................................... 40
■ Using the Tilt Control Feature........................................................................ 41
■ Setting the Blue Screen................................................................................. 41
■ Changing the Sound Standard ...................................................................... 42
■ Adjusting the Sound Settings ........................................................................ 43
■ Extra Sound Settings..................................................................................... 44
■ Selecting the Melody ..................................................................................... 45
■ Selecting the Sound Mode ............................................................................ 46
■ Setting and Displaying the Current Time....................................................... 47
■ Setting the Sleep Timer ................................................................................. 48
■ Switching the Television On and Off Automatically ....................................... 49
■ Setting the Preferred Volume Level............................................................... 50
■ Activating the Child Lock ............................................................................... 51
■ Viewing an External Signal Source ............................................................... 52
◆ USING THE TELETEXT FEATURE
■ Teletext Feature ............................................................................................ 53
■ Displaying Teletext Information ..................................................................... 54
■ Selecting Display Options.............................................................................. 55
■ Selecting a Teletext Page.............................................................................. 56
■ Storing Teletext Pages .................................................................................. 57
◆ ADDITIONAL INFORMATION ON CONNECTIONS
■ Connecting to External Input/Output ............................................................. 58
■ Connecting to the Common Interface............................................................ 59
■ Connecting to the RCA input......................................................................... 59
■ Connecting to the S-Video Input.................................................................... 60
◆ RECOMMENDATIONS FOR USE
■ Automatic Degaussing to Remove Colour Patches....................................... 61
■ Troubleshooting: Before Contacting Service Personnel................................ 61
Symbols
English - 4
☛
➢
Press Important Note
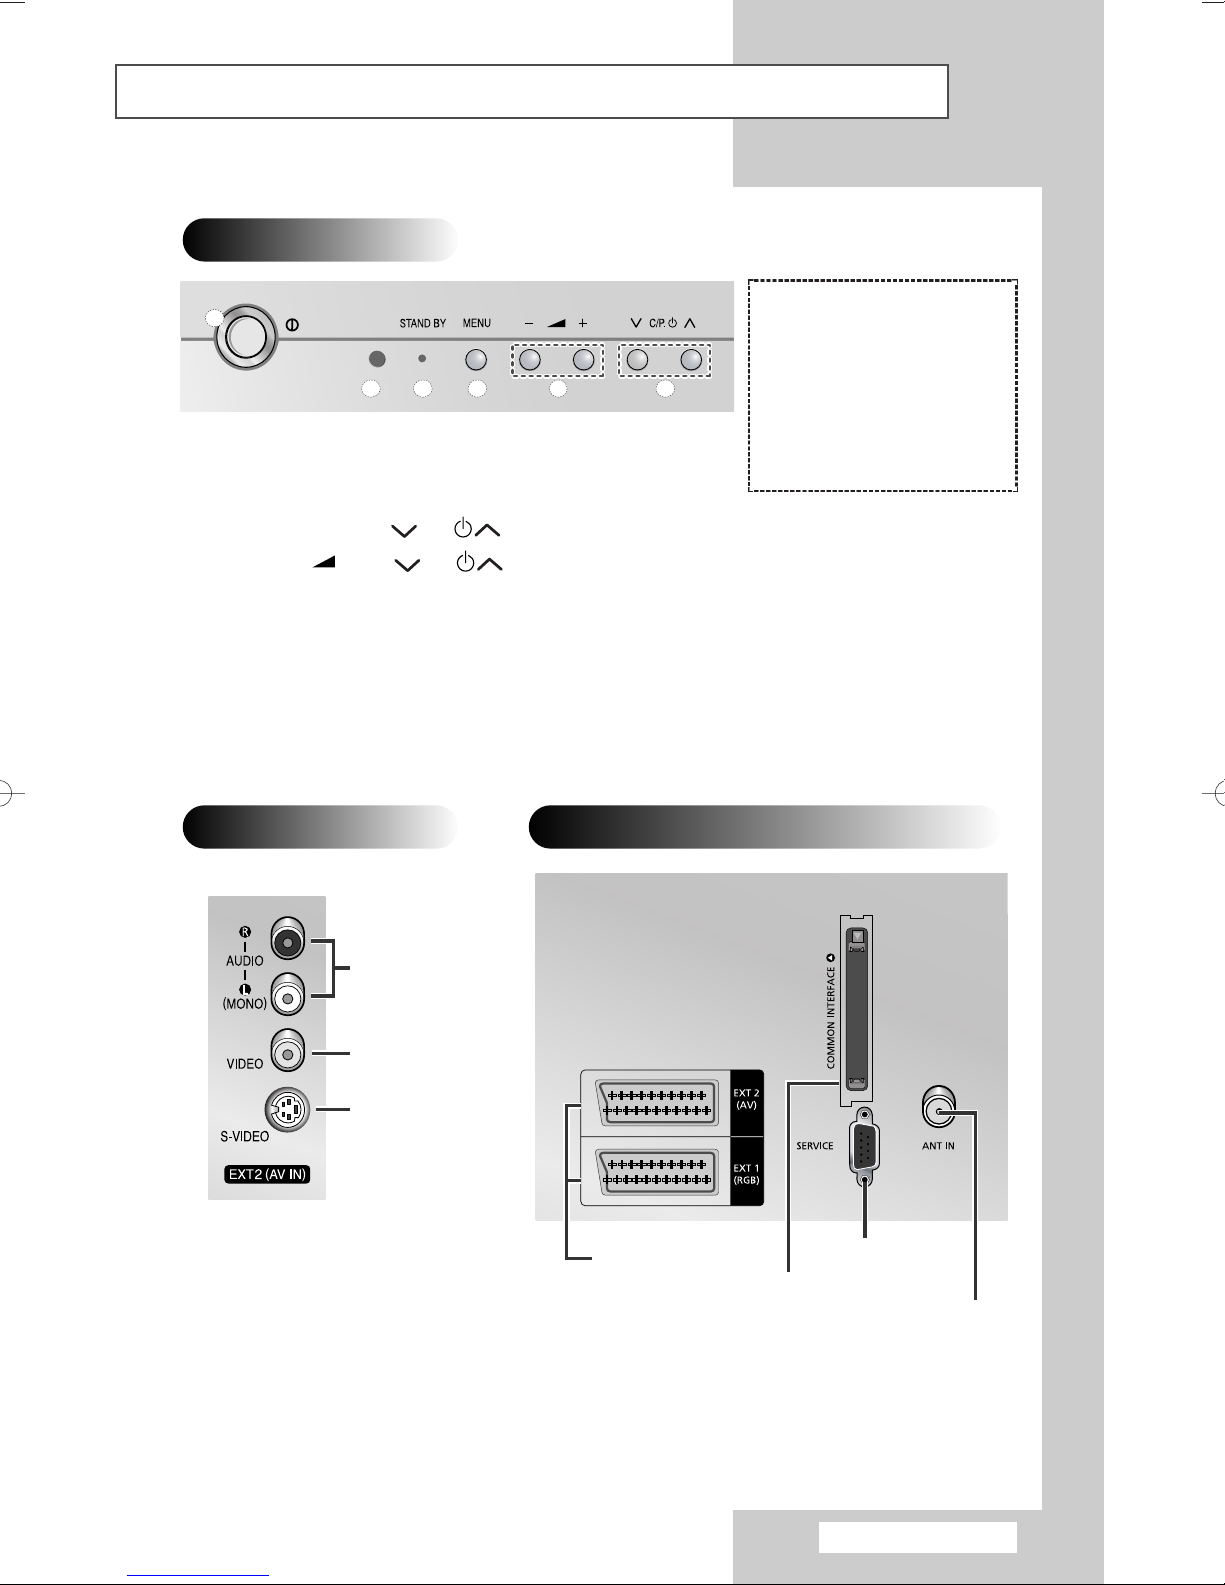
Control Panel
The actual configuration of your TV may be different, depending on
➢
your model.
Front of the TV
1
42
3
◆ You can use the C/P. buttons to switch on the TV when it is in standby mode.
➢
◆ The
If the remote control no longer works or you have misplaced it, you can use the controls on the
➢
panel of the TV.
◆ Press the MENU button once in DTV mode, then the DTV menu is displayed.
◆ To change external sources, display the analog menu by pressing the MENU button twice and
-
+ and C/P. buttons have the same function as the ▲/▼/œ/√ buttons
on the remote control in main menu mode.
For displaying the analog menu, press it twice. Press the
refer to “Viewing an External Signal Source” on page 52.
Side of the TV
5
Rear of the TV
6
1) Switch the TV on and off
2) Remote control sensor
3) Standby & Timer indicator
4) Display the on-screen
menu
5) Adjust the volume
6) Select channels
MENU button three times to off.
Audio Input
Video Input
S-Video Input
◆
➢
☛
Please be sure to match the colour coded input terminals and cable jacks.
◆
For further details about connection, refer to pages 58~60.
Whenever you connect an audio or video system to your television, ensure that all elements
are switched off. Refer to the documentation supplied with your equipment for detailed
connection instructions and associated safety precautions.
SCART Audio/Video
Input/Output
Common Interface
Service Port
75Ω Coaxial Connector for
Aerial/Cable Network
English - 5
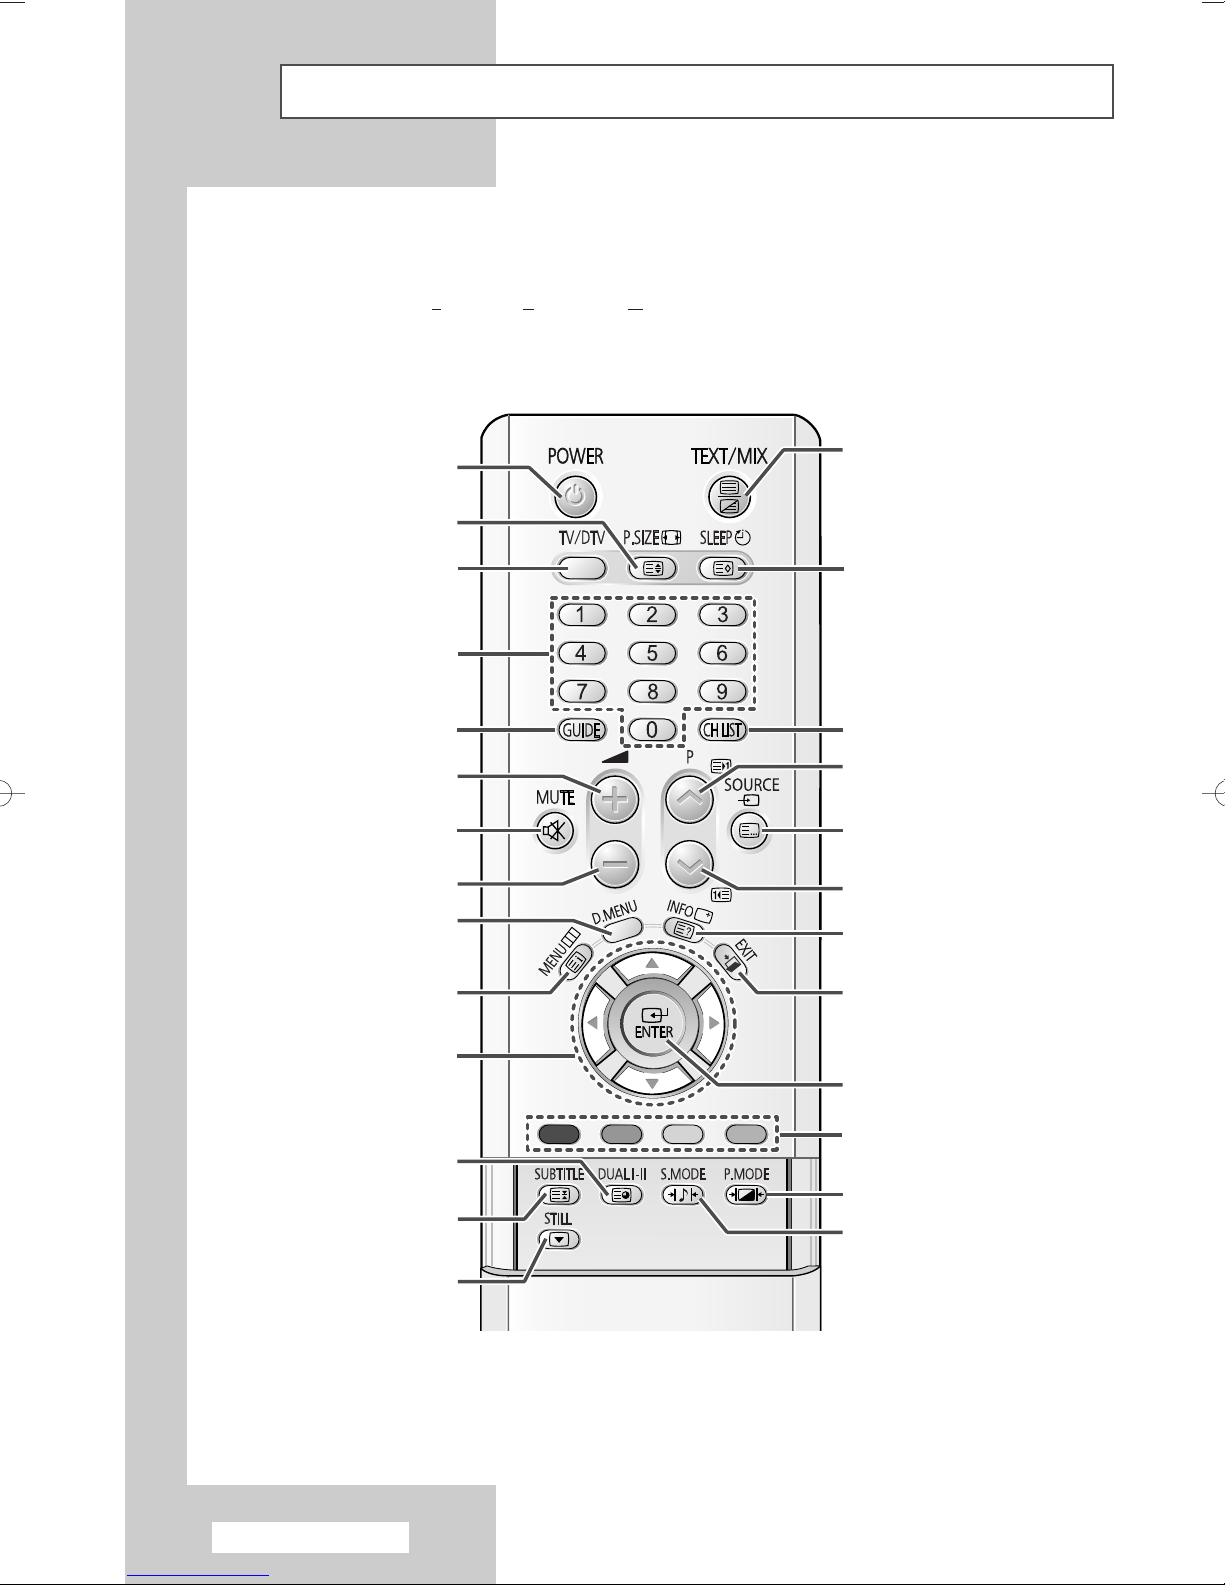
Infrared Remote Control
The remote control is used mainly to:
◆ Change channels and adjust the various settings
Buttons and markings are subject to change.
➢
◆ Use the EPG (E
lectronic Programme Guide)
◆ Set up the television using the on-screen menu system
TELEVISION STAND-BY
PICTURE SIZE SELECTION/
TELETEXT SIZE SELECTION
SWITCH BETWEEN TV AND DTV
DIRECT CHANNEL SELECTION
VOLUME INCREASE
TEMPORARY SOUND SWITCH-OFF
Press it again , or -/+ button
➢
to turn the sound back on.
VOLUME DECREASE
DTV MENU DISPLAY
MODE
EPG DISPLAY
TELETEXT DISPLAY/
MIX BOTH TELETEXT INFORMATION
AND THE NORMAL BROADCAST/
DTV MHEG MENU DISPLAY
AUTOMATIC SWITCH-OFF/
TELETEXT STORE
DTV CHANNEL LIST DISPLAY
NEXT CHANNEL/
TELETEXT NEXT PAGE
EXTERNAL INPUT SELECTION/
TELETEXT MODE SELECTION
(LIST/FLOF)
PREVIOUS CHANNEL/
TELETEXT PREVIOUS PAGE
INFORMATION DISPLAY/
TELETEXT REVEAL
MENU DISPLAY/
TELETEXT INDEX
CONTROL THE CURSOR
IN THE ON-SCREEN MENU
SOUND MODE SELECTION/
TELETEXT SUB-PAGE
DIGITAL SUBTITLE DISPLAY/
TELETEXT PAGE HOLD
PICTURE FREEZE
(AVAILABLE IN DTV MODE)
The performance of the remote control may be affected by bright light.
➢
English - 6
EXIT FROM ANY DISPLAY
CONFIRM YOUR CHOICE
(STORE OR ENTER)
FASTEXT TOPIC SELECTION/
EPG DISPLAY/
FAVOURITE CHANNEL EDITION
PICTURE EFFECT SELECTION
SOUND EFFECT SELECTION
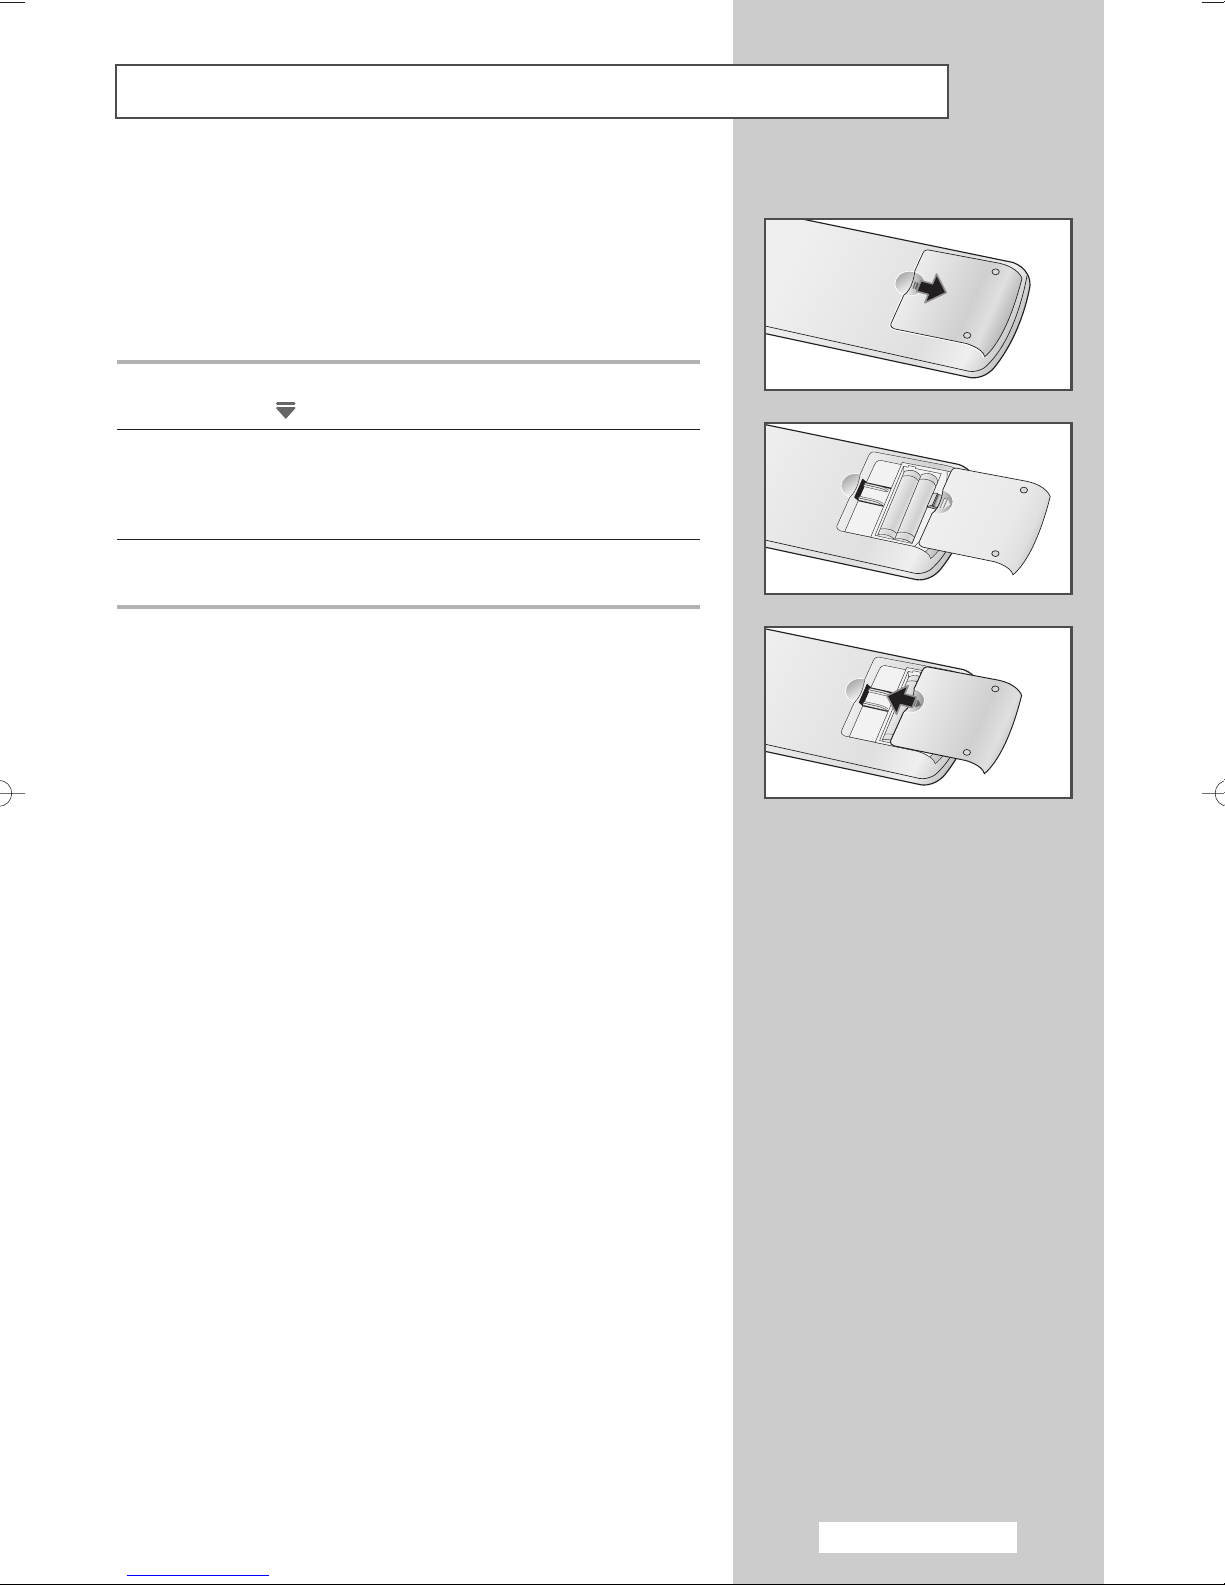
Inserting the Batteries into the Remote Control
You must insert or replace the batteries in the remote control when
you:
◆ Purchase the television
◆ Find that the remote control is no longer operating
correctly
1 Remove the cover on the rear of the remote control by pressing
the symbol ( ) downwards and then pulling firmly to remove it.
2 Insert two R03, UM4, “AAA” 1.5V or equivalent batteries taking
care to respect the polarities:
◆-on the battery against -on the remote control
◆+on the battery against +on the remote control
3 Replace the cover by aligning it with the base of the remote
control and pressing it back into place.
➢
Do not mix battery types, i.e. alkaline and manganese.
English - 7
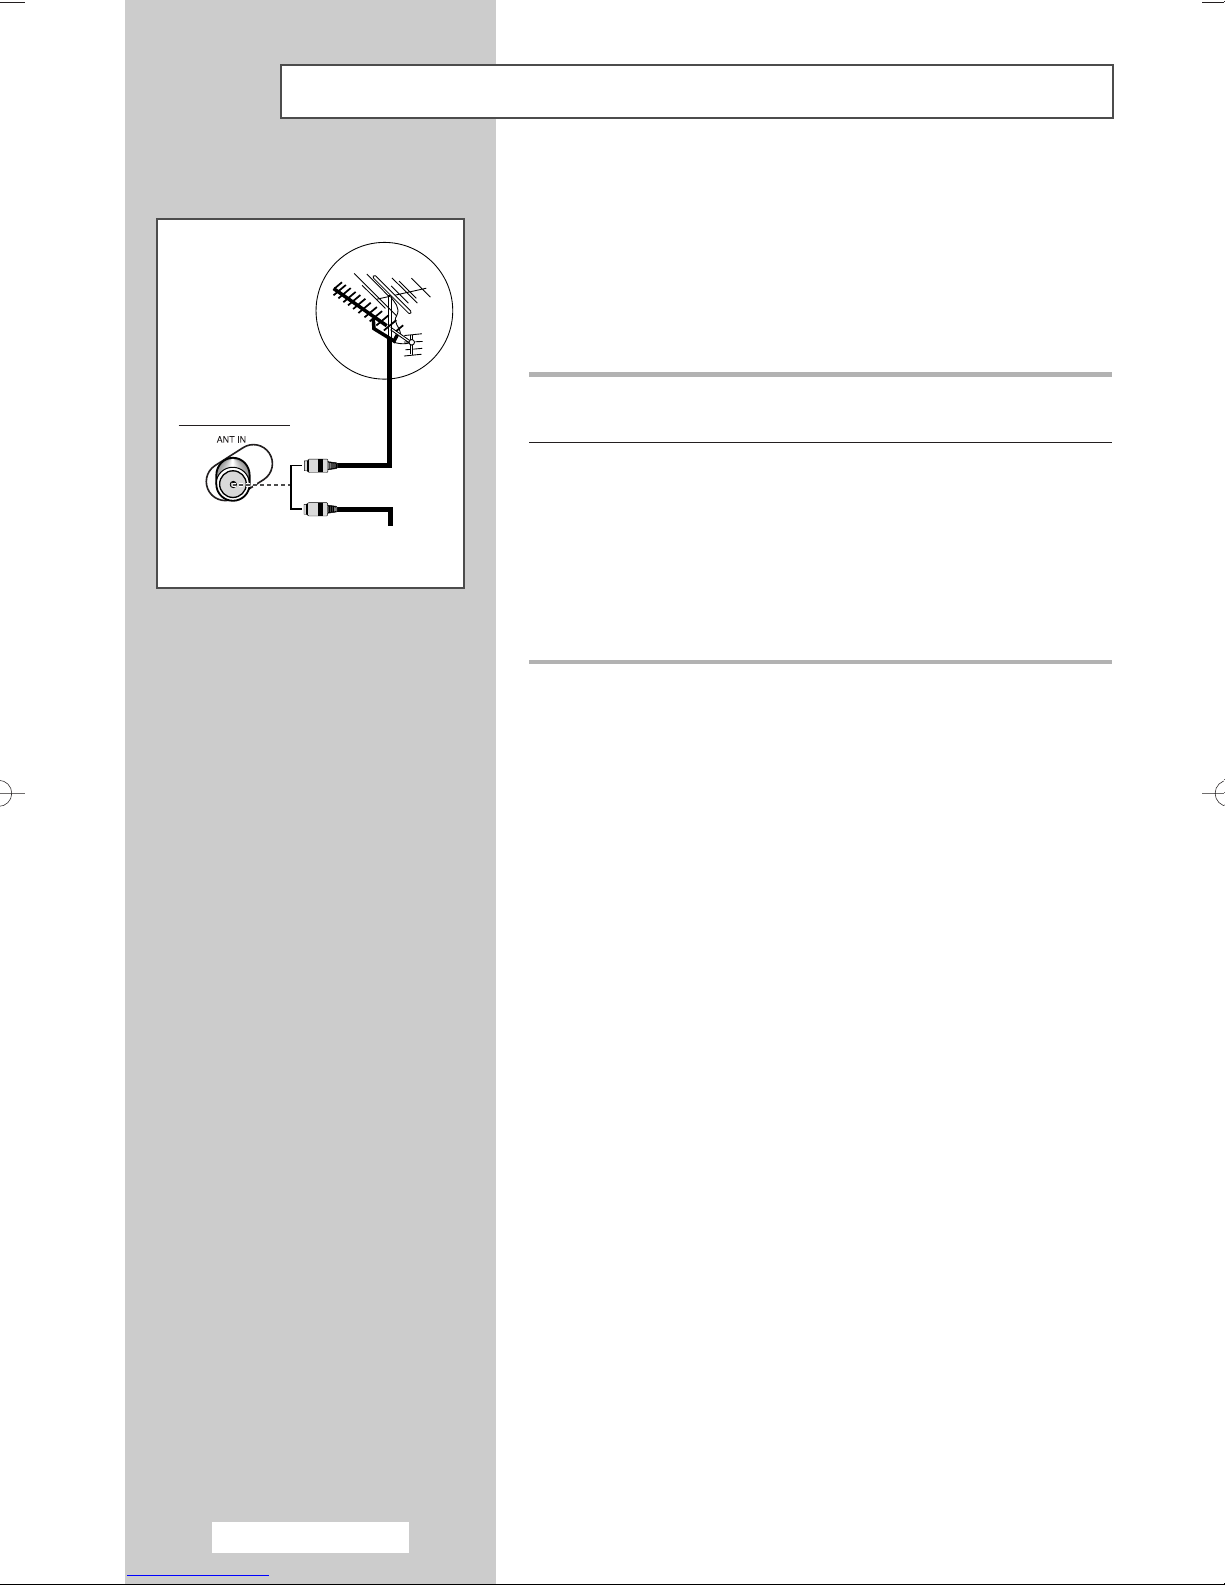
Connecting to an Aerial or Cable Television Network
To view television channels correctly, a signal must be received by
the set from one of the following sources:
◆ An outdoor aerial
◆ A cable television network
◆ A satellite network
Rear of the TV
or
Cable Television
Network
1 In the first three cases, connect the aerial or network input cable to
the
ANT IN on the rear of the television.
2 If you are using an indoor aerial, you may need to adjust it when
tuning your television until you obtain a picture that is both sharp
and clear.
For further details, refer to:
◆ (Digital TV) “Updating the Channel List Automatically” on
page 15
◆ (Digital TV) “Updating the Channel List Manually” on page 16
◆ (Analog TV) “Storing Channels Automatically” on page 32
◆ (Analog TV) “Storing Channels Manually” on page 34
English - 8
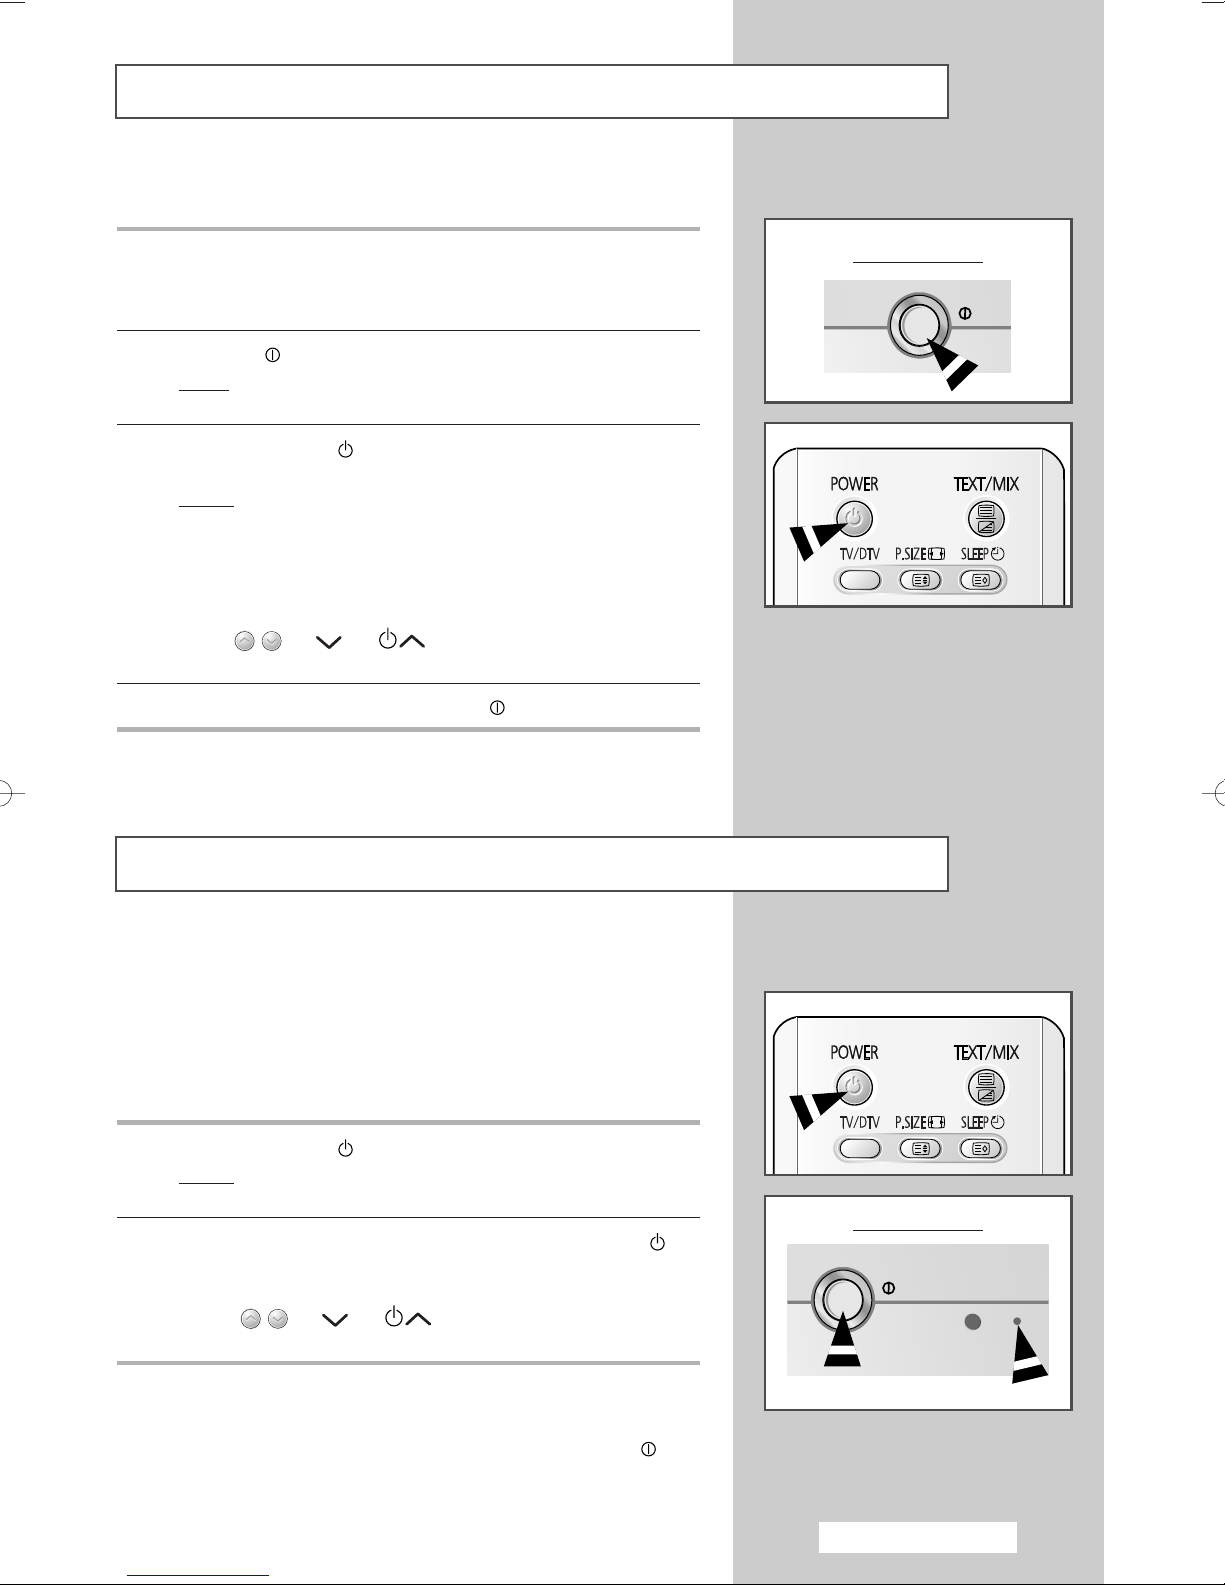
Switching Your Television On and Off
The mains lead is attached to the rear of your television.
1 Plug the mains lead into an appropriate socket.
The main voltage is indicated on the rear of the television
➢
and the frequency is 50 or 60Hz.
2 Press the “ ” (On/Off) button on the front of the television.
: The Standby indicator on the front of the television
Result
lights up.
3 Press the POWER () button on the remote control to switch the
television on.
: The programme that you were watching last is re-
Result
selected automatically.
If you have not yet stored any channels, no clear picture
➢
appears. Refer to “Storing Channels Automatically” on page
32 or “Storing Channels Manually” on page 34.
You can also switch the television back on by pressing the
➢
P
/
button on the remote control.
4 To switch your television off, press the “ ” (On/Off) button again.
C/P. on the front panel) or numeric
(or
Front of the TV
Placing Your Television in Standby Mode
Your television can be placed in Standby mode, in order to reduce:
◆ Power consumption
◆ Wear of the cathode ray tube
Standby mode can be useful when you wish to interrupt viewing
temporarily (during a meal, for example).
1 Press the POWER () button on the remote control.
: The screen is turned off and the Standby indicator
Result
on the front of the television lights up in red.
2 To switch the television back on, simply press the POWER ()
button again.
You can also switch the television back on by pressing the
➢
☛
P
/
button on the remote control.
Do not leave your television in Standby mode for long
periods of time (when you are away on holiday, for
example). Turn your television off by pressing the “ ”
(On/Off) button on the front of the television. It is best to
unplug the set from the mains and aerial.
C/P. on the front panel) or numeric
(or
Front of the TV
English - 9
Plug & Play Feature
Plug & Play
When the television is initially powered on, three basic customer
settings proceed automatically and subsequently: setting the
language, channel and clock.
LanguageTV
English
Deutsch
Español
Italiano
Svenska
Move Enter Skip
Check antenna input.
Enter Skip
TV
Country : UK
Search
Move Enter Skip
TV
Clock -- : --
Sleep Timer :Off
On Timer -- : -- Off
Off Timer -- : -- Off
On Timer Volume : 10
Move Enter Skip
Auto Store
Time
1 If the television is in Standby mode, press the POWER () button
on the remote control.
Result
: The message Plug & Play is displayed. It flickers for
a little while and then
Language menu is automatically
displayed.
2 Select the appropriate language by pressing the ▲ or ▼ button.
Press the
Result
: The message
If any language is not selected on the Language menu, the
➢
Language menu will disappear about 30 seconds later.
ENTER
()
button to enter the language.
Check antenna input. is displayed.
3 Make sure that the antenna is connected to the TV.
Press the
√√
√√
Result
ENTER
: The
4 Press the ENTER
the
▲ or ▼ button, then press the ENTER
To search the channels, select
button, and then press the ENTER
Press the
Press the
Result
➢
ENTER
MENU
: The Time menu is displayed with Clock selected.
Refer to “Storing Channels Automatically” on page 32.
()
button.
Auto Store menu is displayed with Country
selected.
()
button again. Select your area by pressing
()
button.
Search by pressing the ▲ or ▼
()
button.
()
button again to start search the channels.
()
button to stop the search.
5 Press the œ or √ button to move to the hour or minute. Set the
hour or minute by pressing the
Refer to “Setting and Displaying the Current Time” on page
➢
47.
6 When you have finished, press the MENU
▲ or ▼ button.
()
button.
TV
Plug & Play
Language : English
Time
Child Lock
Blue Screen : On
Melody : On
Demonstration
Move Enter Return
English - 10
Setup
Result
: The menu is turned to
Auto Store in DTV mode
automatically.
7 If you want to reset this feature...
Not available in DTV mode.
➢
1 Press the MENU
√√
√√
√√
√√
√√
√√
√√
2 Press the ▲ or ▼ button to select Setup , and then press the
ENTER
Result
()
: The Plug & Play is selected.
3 Press the ENTER
Result
: This feature starts with the message Plug & Play
()
button.
()
displayed.
button.
button again.
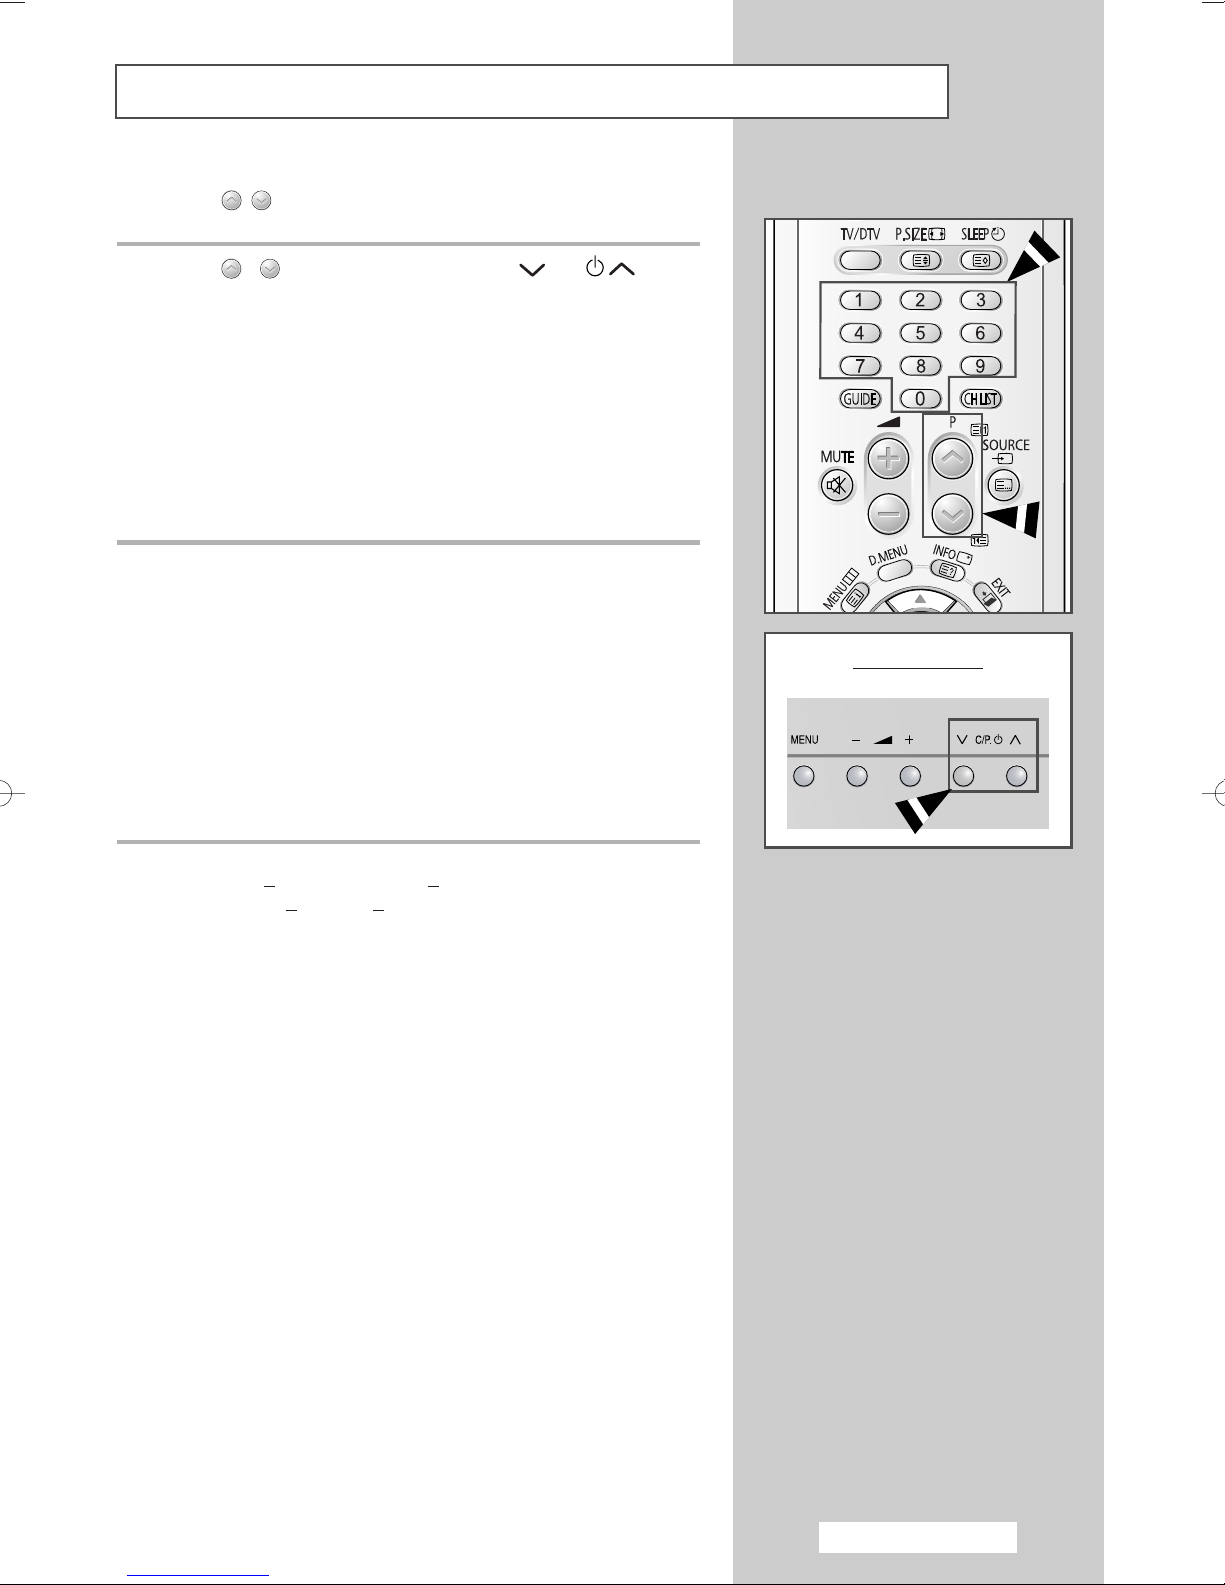
Changing Channels
It may take some time to display a channel if your chosen channel
➢
has the MHEG feature.
Using the P / buttons.
Press the P /P button on the remote control ( C/P. on the
front of TV).
The TV changes channels in sequence. You can select all channels
(analog and digital channels) that the TV has memorized.
You can not select channels that were either erased or not
➢
memorized.
Using the numeric (0~9) buttons.
Press the numeric buttons to quickly tune to any channel.
You can select all channels that were either erased or not
➢
memorized.
To select analog channel
To select digital channel
The TV will change channels when you press the second number.
27, press the 2, then 7.
27, press the 0, 2, then 7.
Front of the TV
To change to single-digit channels (0~9) faster, press the
single digit. (For analog channel
channel
4, press the 0, 0, then 4.)
➢
MHEG(Multimedia and Hypermedia Information
Coding
An International standard for data encoding systems used
in multimedia and hypermedia. This is at a higher level
than the MPEG system which includes data-linking
hypermedia such as still images, character service,
animation, graphic and video files as well as multimedia
data. MHEG is user runtime interaction technology and is
being applied to various fields including VOD (VideoOn-Demand), ITV (Interactive TV), EC (Electronic
Commerce), tele-education, tele-conferencing, digital
libraries and network games.
Experts Group)?
4, press the 0, then 4. For digital
0 before the
English - 11
Viewing the Demonstration
TV
Plug & Play
Language : English
Time
Child Lock
Blue screen : On
Melody : On
Demonstration
Move Enter Return
Setup
To become familiar with the various menus provided by your
television, you can view the in built demonstration.
√√
√√
√√
√√
√√
√√
√√
1 Press the MENU ( ) button.
Result
: The main menu is displayed.
2 Press the ▲ or ▼ button to select Setup.
Result
: The options available in the Setup group are
displayed.
Choosing Your Language
TV
Plug & Play
Language : English
Time
Child Lock
Blue screen : On
Melody : On
Demonstration
Move Enter Return
Setup
3 Press the ENTER
()
button.
4 Press the ▲ or ▼ button to select Demonstration.
5 Press the ENTER
Result
: Each of the menu options is displayed in turn.
When you wish to exit from the demonstration, press the
➢
EXIT ( ) button on the remote control.
When you start using your television for the first time, you must
select the language which will be used for displaying menus and
indications.
√√
√√
√√
√√
√√
√√
√√
1 Press the MENU ( ) button.
Result
: The main menu is displayed.
2 Press the ▲ or ▼ button to select Setup.
Result
: The options available in the Setup group are
()
displayed.
button.
English - 12
3 Press the ENTER
()
button.
4 Press the ▲ or ▼ button to select Language.
5 Press the ENTER
()
button.
6 Select the appropriate language by pressing the ▲ or ▼ button
repeatedly.
7 Press the ENTER
()
button.
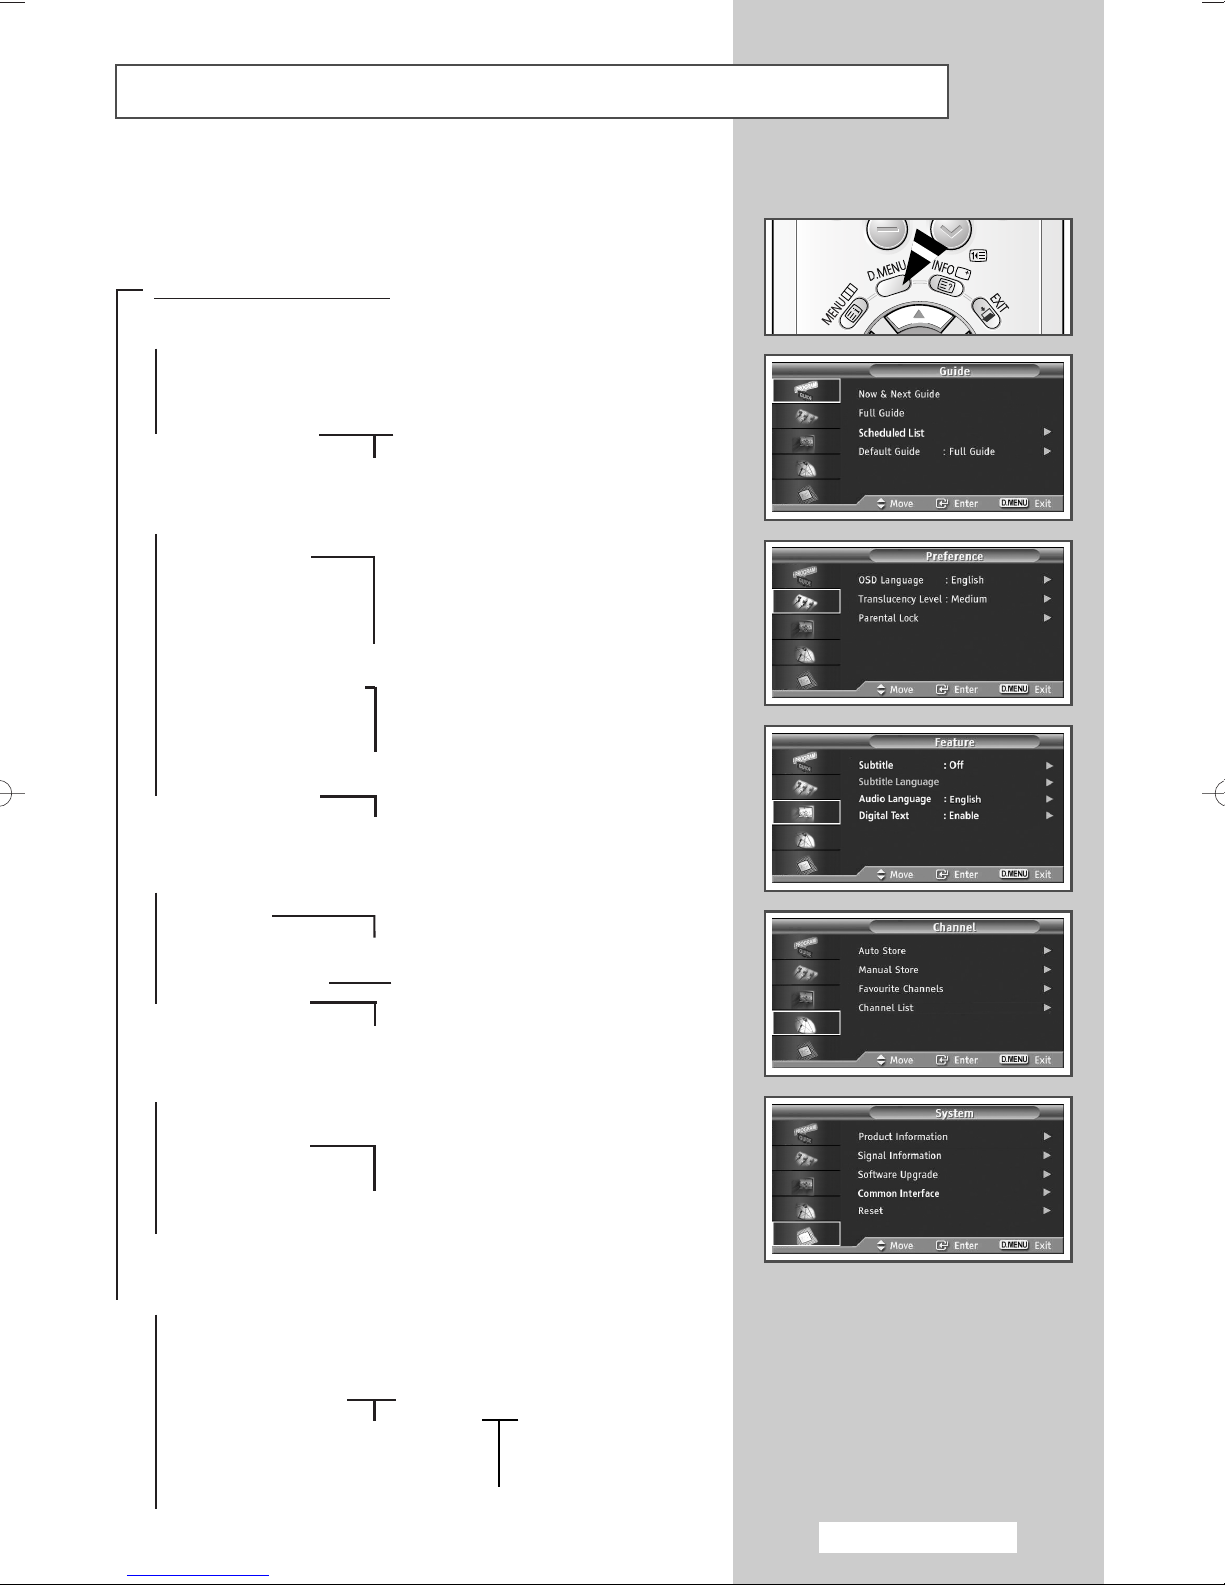
Previewing the DTV Menu System
Available in DTV mode.
➢
Preset to the DTV mode by using the
To help you navigate around the on-screen menu system and adjust
the various settings available, refer to the following illustration.
Press the “D.MENU” button.
➞
Guide
➞
Now & Next Guide
➞
Full Guide
➞
Scheduled List
➞
➞
Preference
➞
Default Guide
OSD Language
➞
➞
➞
➞
➞
➞
➞
TV/DTV button.
Now/Next
Full Guide
English
Deutsch
Español
Italiano
Svenska
➞
➞
➞
Translucency Level➞High
➞
➞
➞
➞
Parental Lock
Feature
➞
Subtitle
➞
Subtitle Language
➞
Audio Language
➞
Digital Text
Channel
➞
Auto Store
➞
Manual Store
➞
Favourite Channels
➞
Channel List
➞
➞
➞
➞
➞
➞
➞
➞
➞
➞
Medium
Low
Opaque
Parental Rating
Change PIN
Off
On
English
Disable
Enable
Channel
Frequency
Bandwidth
➞
System
➞
Product Information
➞
Signal Information
➞
Software Upgrade
➞
Common Interface
➞
Reset
Application Info.
➞
➞
CI Menu
➞
Module information
➞
Smart card information
➞
Language
➞
Software Download
English - 13
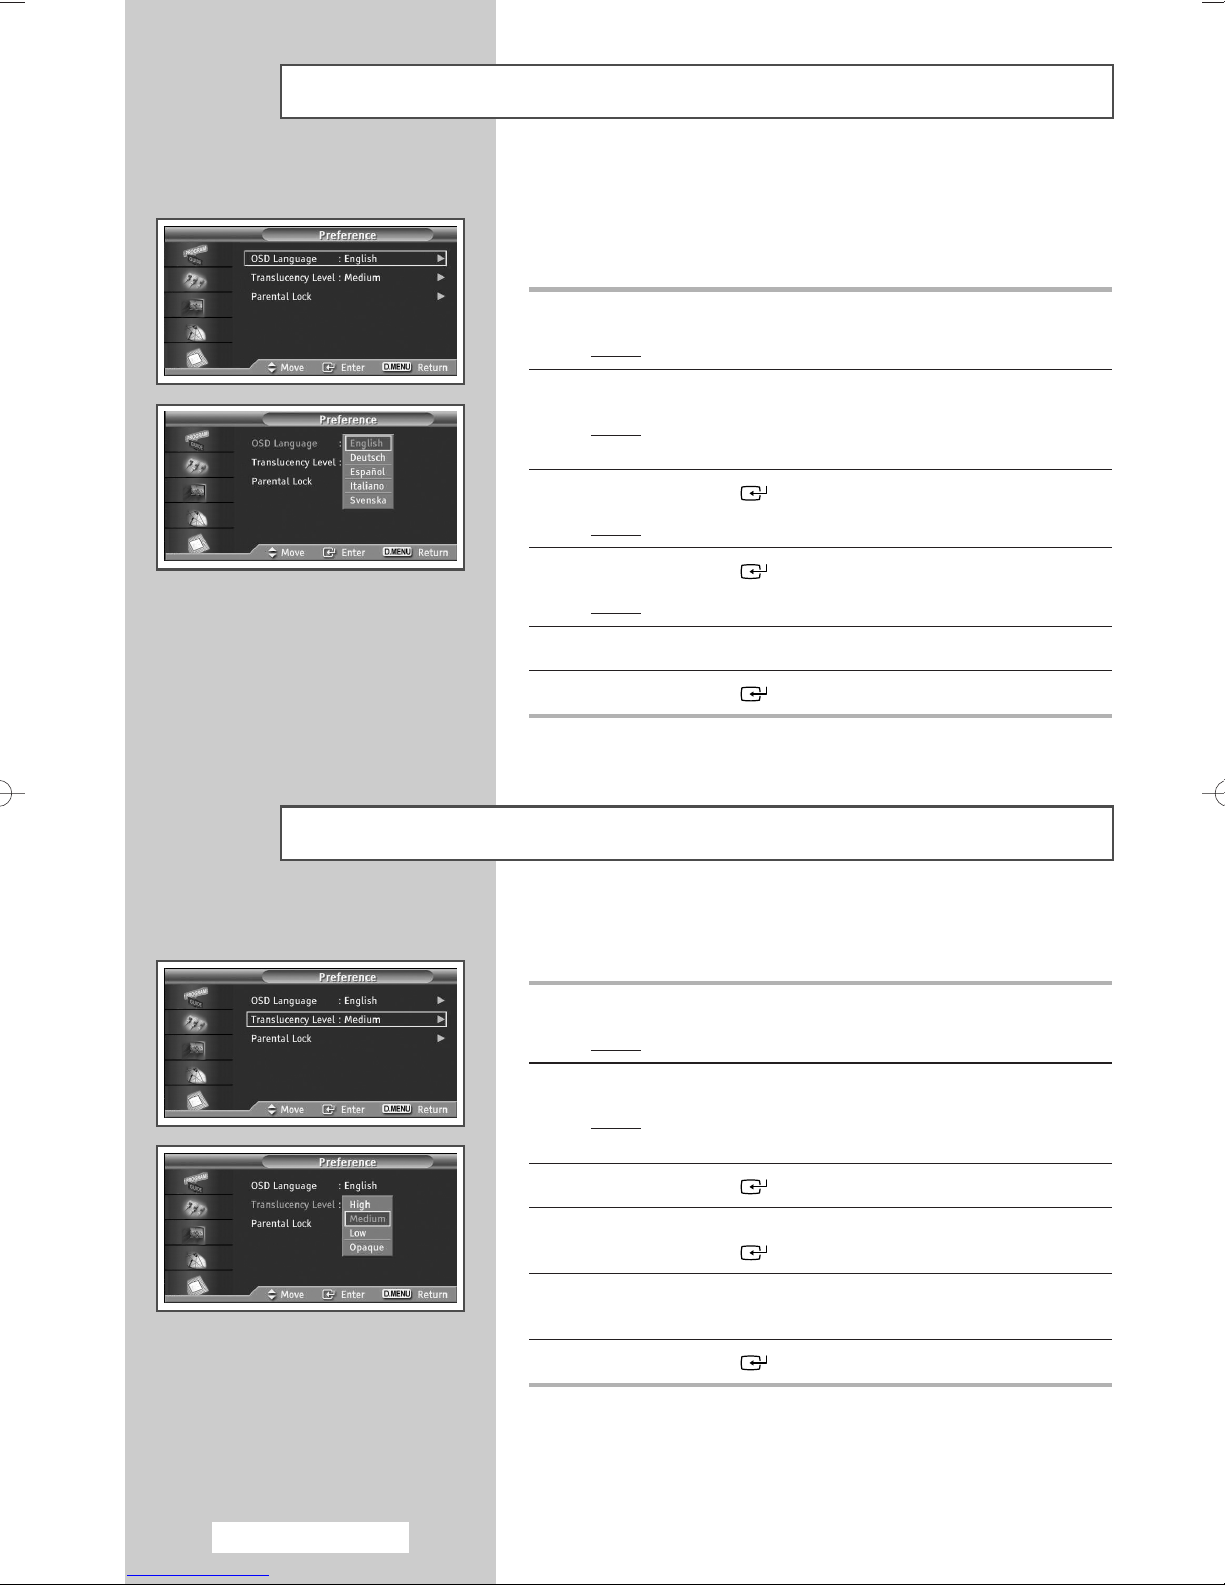
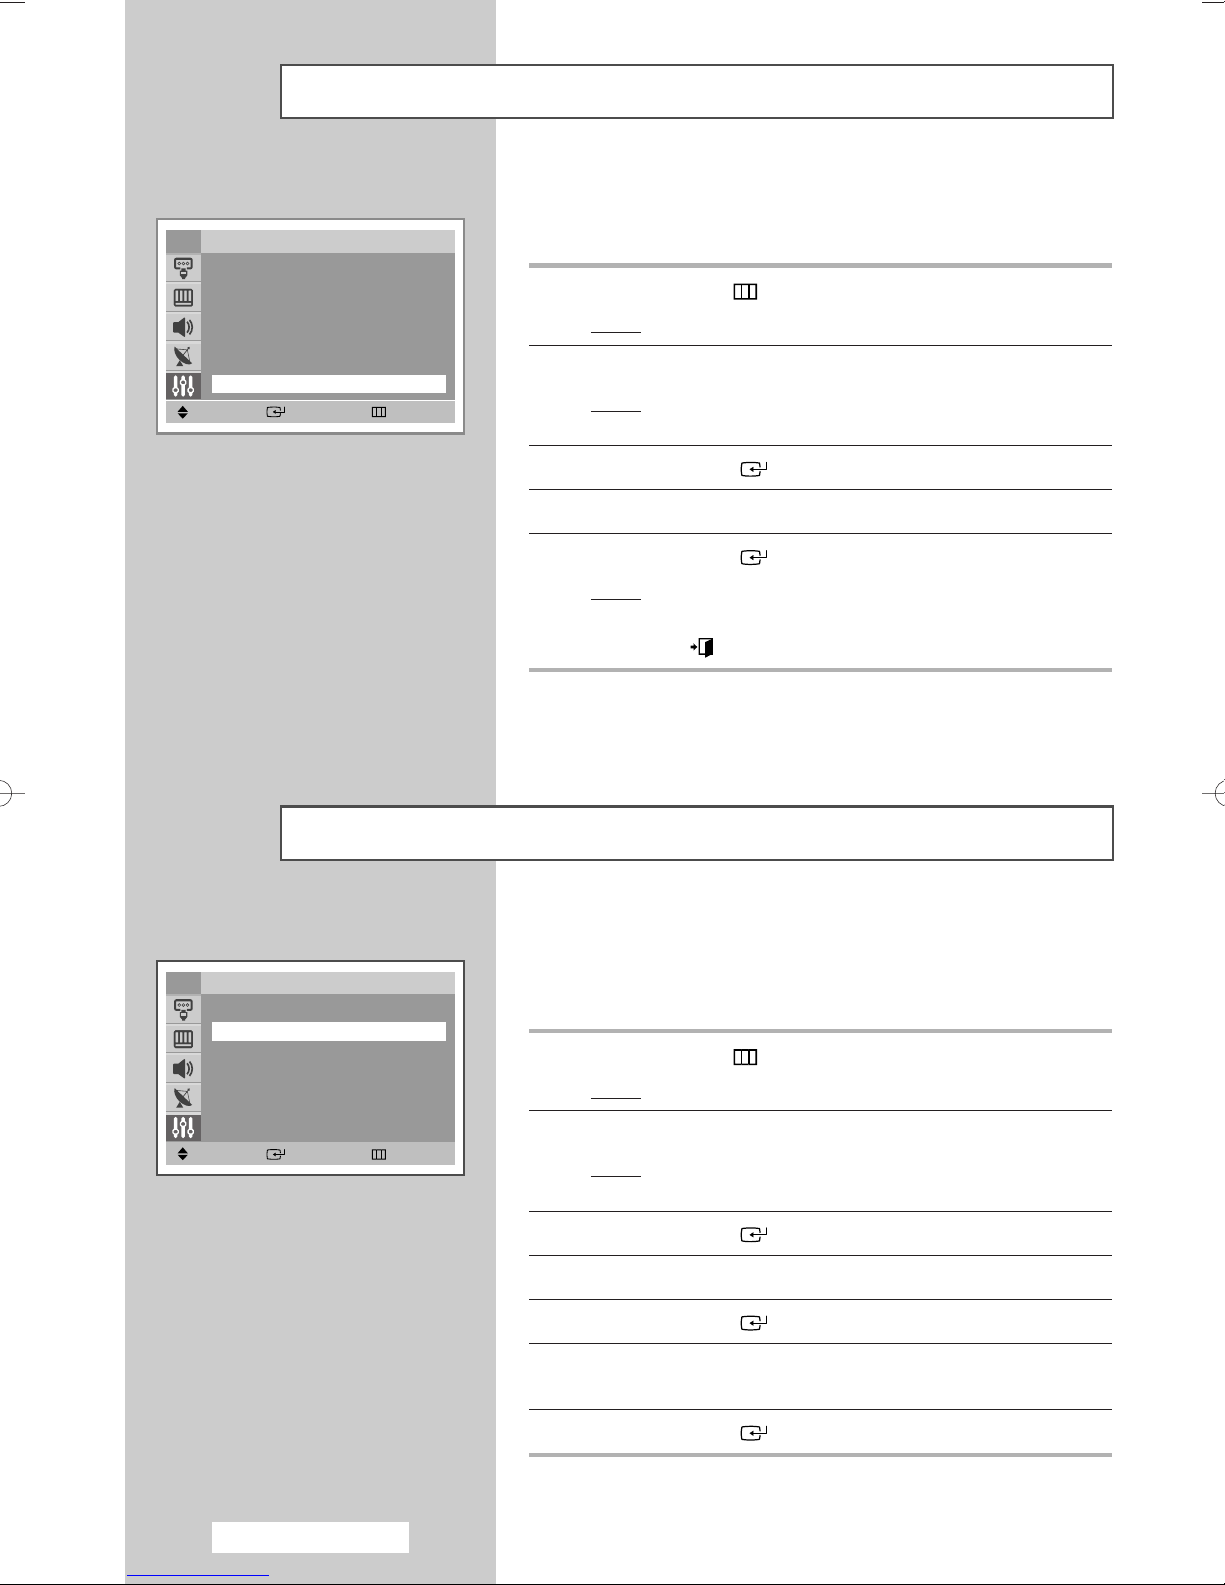
Choosing Your Language
When you start using your television for the first time, you must
select the language which will be used for displaying menus and
indications
1 Press the D.MENU button.
Result
: The DTV menu is displayed.
2 Press the ▲ or ▼ button to select Preference.
Result
: The options available in the Preference group are
displayed.
3 Press the ENTER
Result
: The OSD Language is selected.
4 Press the ENTER
Result
: The available languages are listed.
()
()
5 Select the appropriate language by pressing the ▲ or ▼ button.
6 Press the ENTER
()
Adjusting the Translucency Level
You can set the translucency of the on-screen menu.
1 Press the D.MENU button.
Result
: The DTV menu is displayed.
button.
button again.
button to confirm.
English - 14
2 Press the ▲ or ▼ button to select Preference.
Result
: The options available in the Preference group are
displayed.
3 Press the ENTER
()
button.
4 Press the ▲ or ▼ button to select Translucency Level.
Press the
ENTER
()
button.
5 Select the required option (High, Medium , Low, or Opaque ) by
pressing the
6 Press the ENTER
▲ or ▼ button.
()
button to confirm.
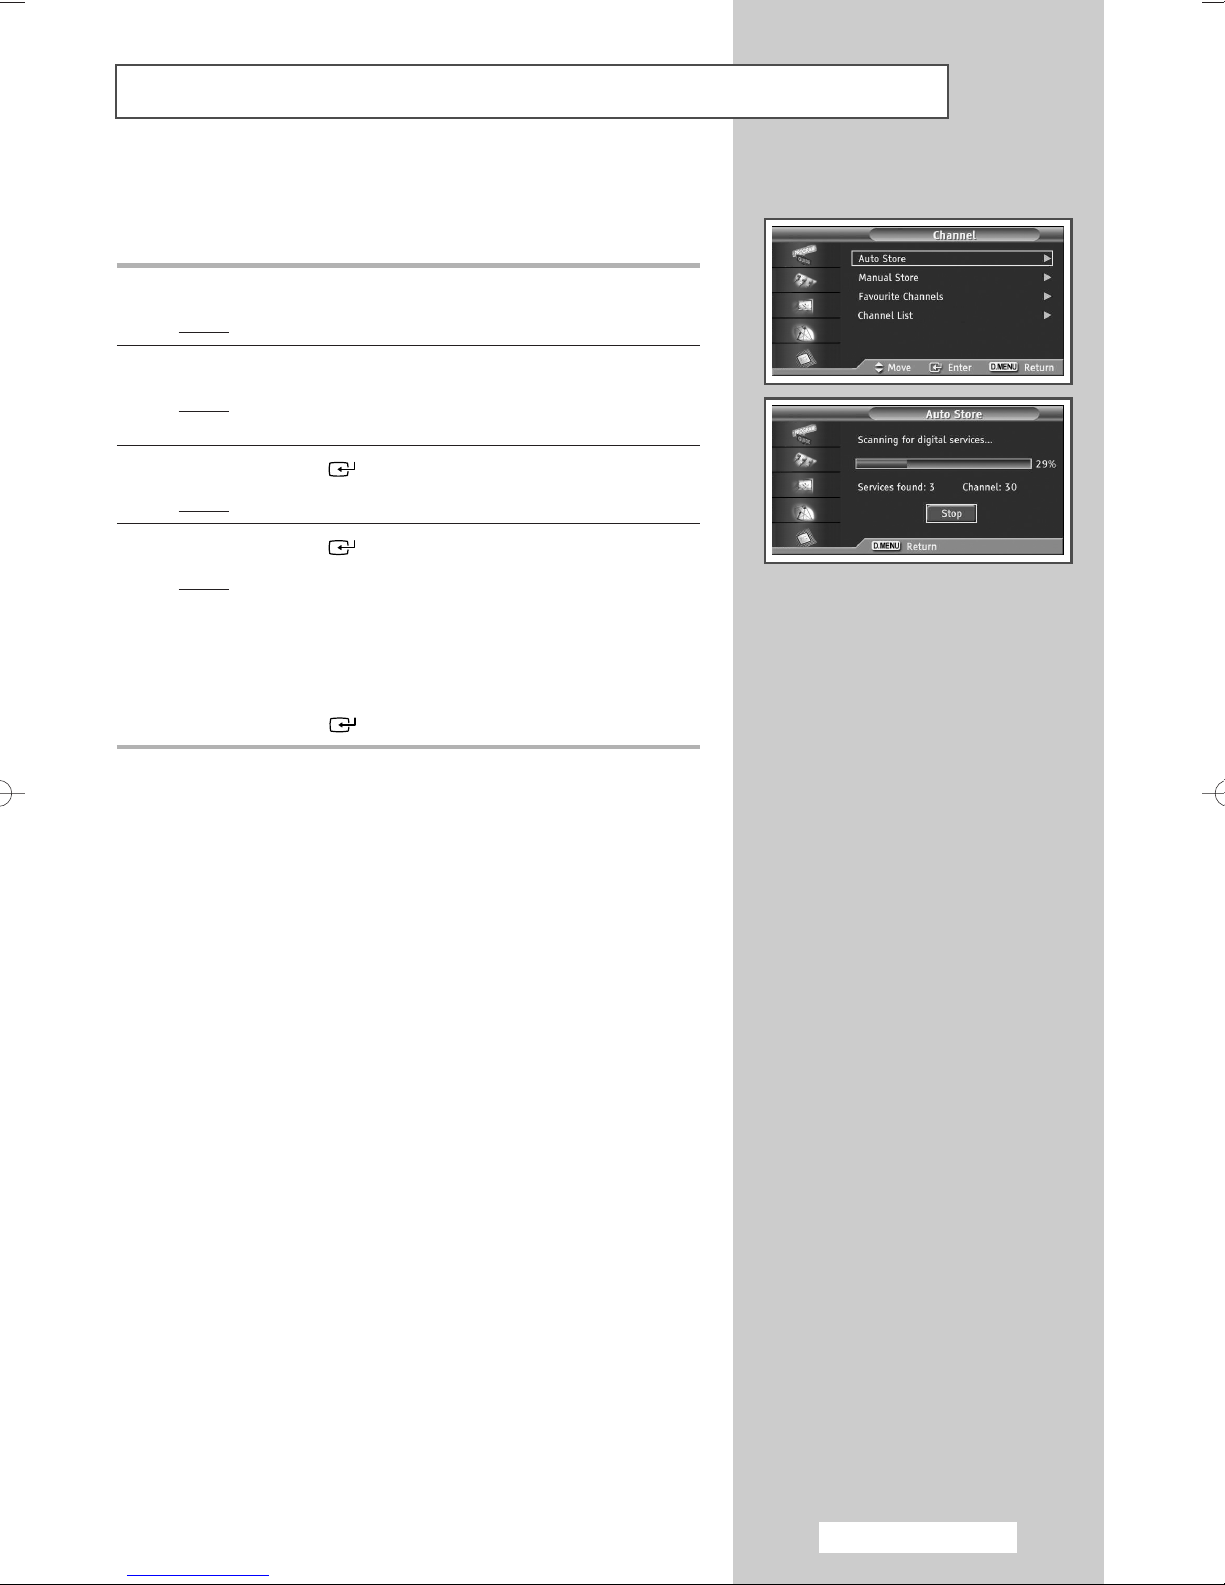
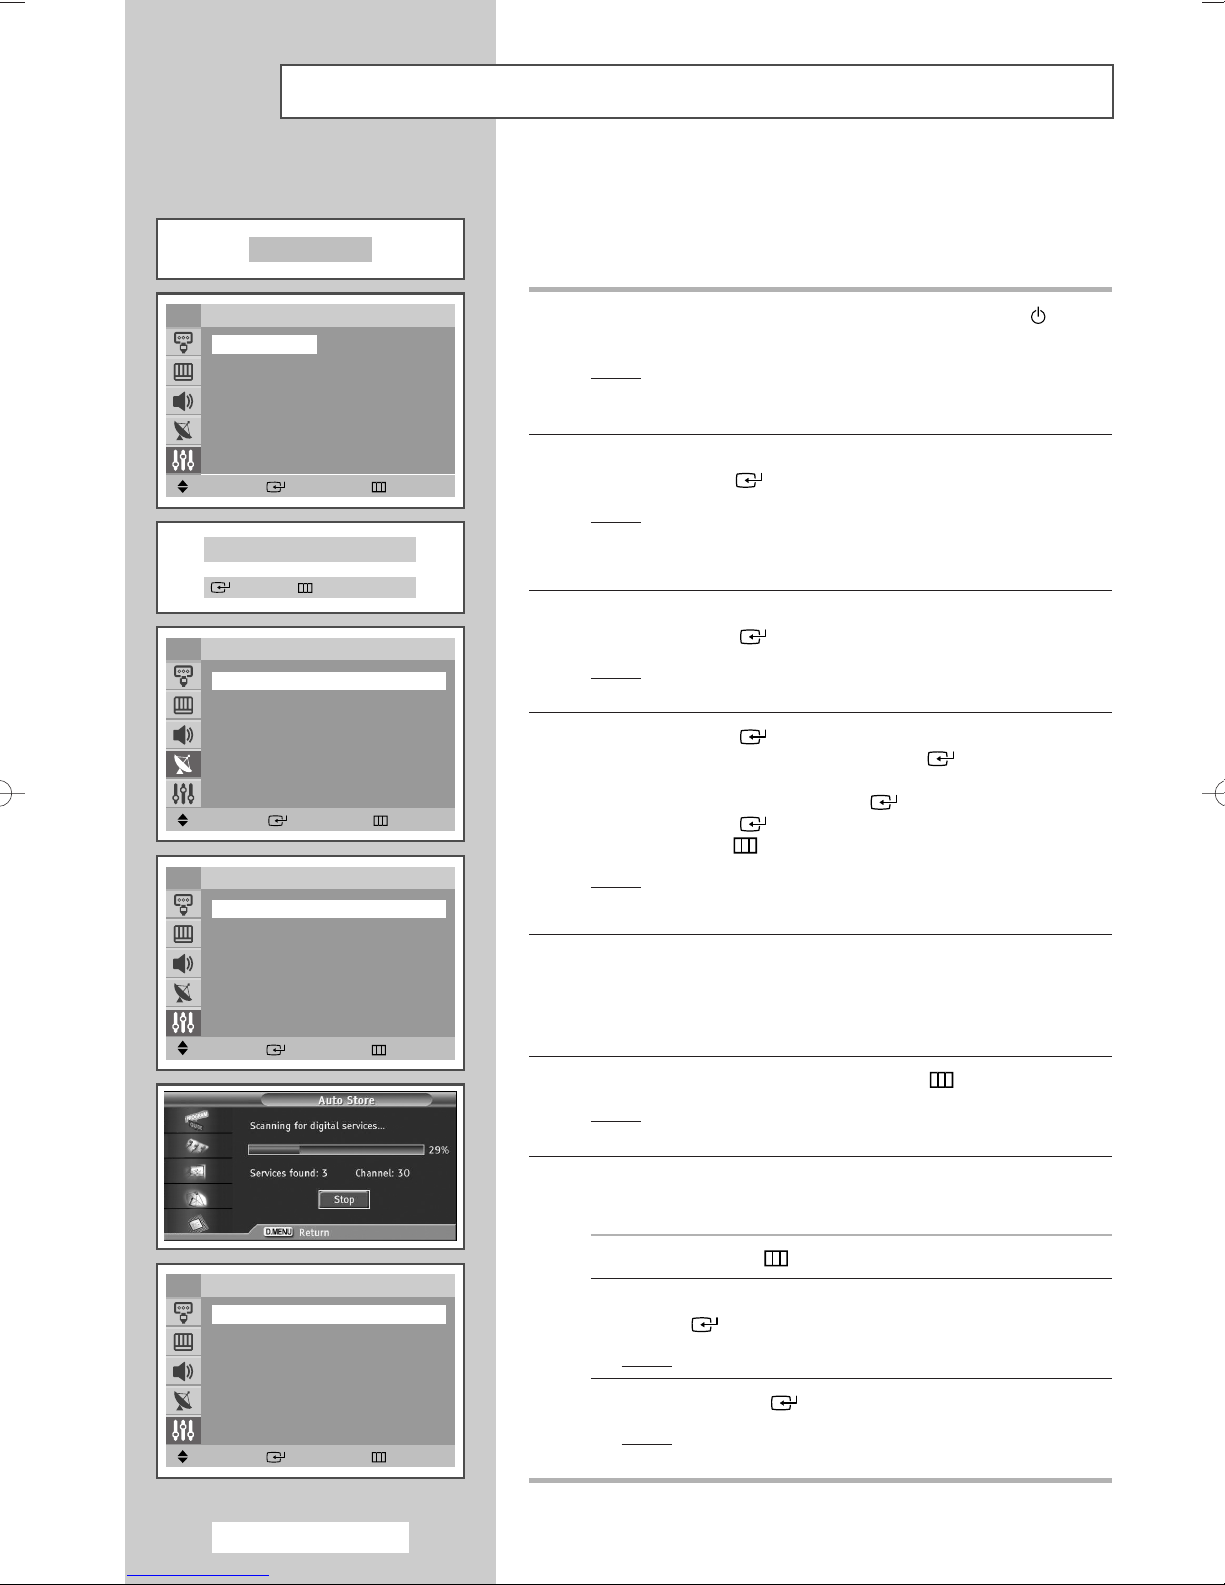
Updating the Channel List Automatically
You can update the channel list when the broadcaster adds new
services or if you move the TV to a new location.
1 Press the D.MENU button.
Result
: The DTV menu is displayed.
2 Press the ▲ or ▼ button to select Channel.
Result
: The options available in the Channel group are
displayed.
3 Press the ENTER
Result
: The Auto Store is selected.
4 Press the ENTER
Result
: When it has finished, the number of scanned services
()
button.
()
button again to start the search.
will be displayed.
➢ ◆ The existing favourite channel list will be deleted when
the channel list is updated.
◆ To stop the scan before it has finished, press the
()
or D.MENU button.
message is displayed.
➢
ENTER
If the signal status is poor, the No service found!
Check the aerial connection
English - 15
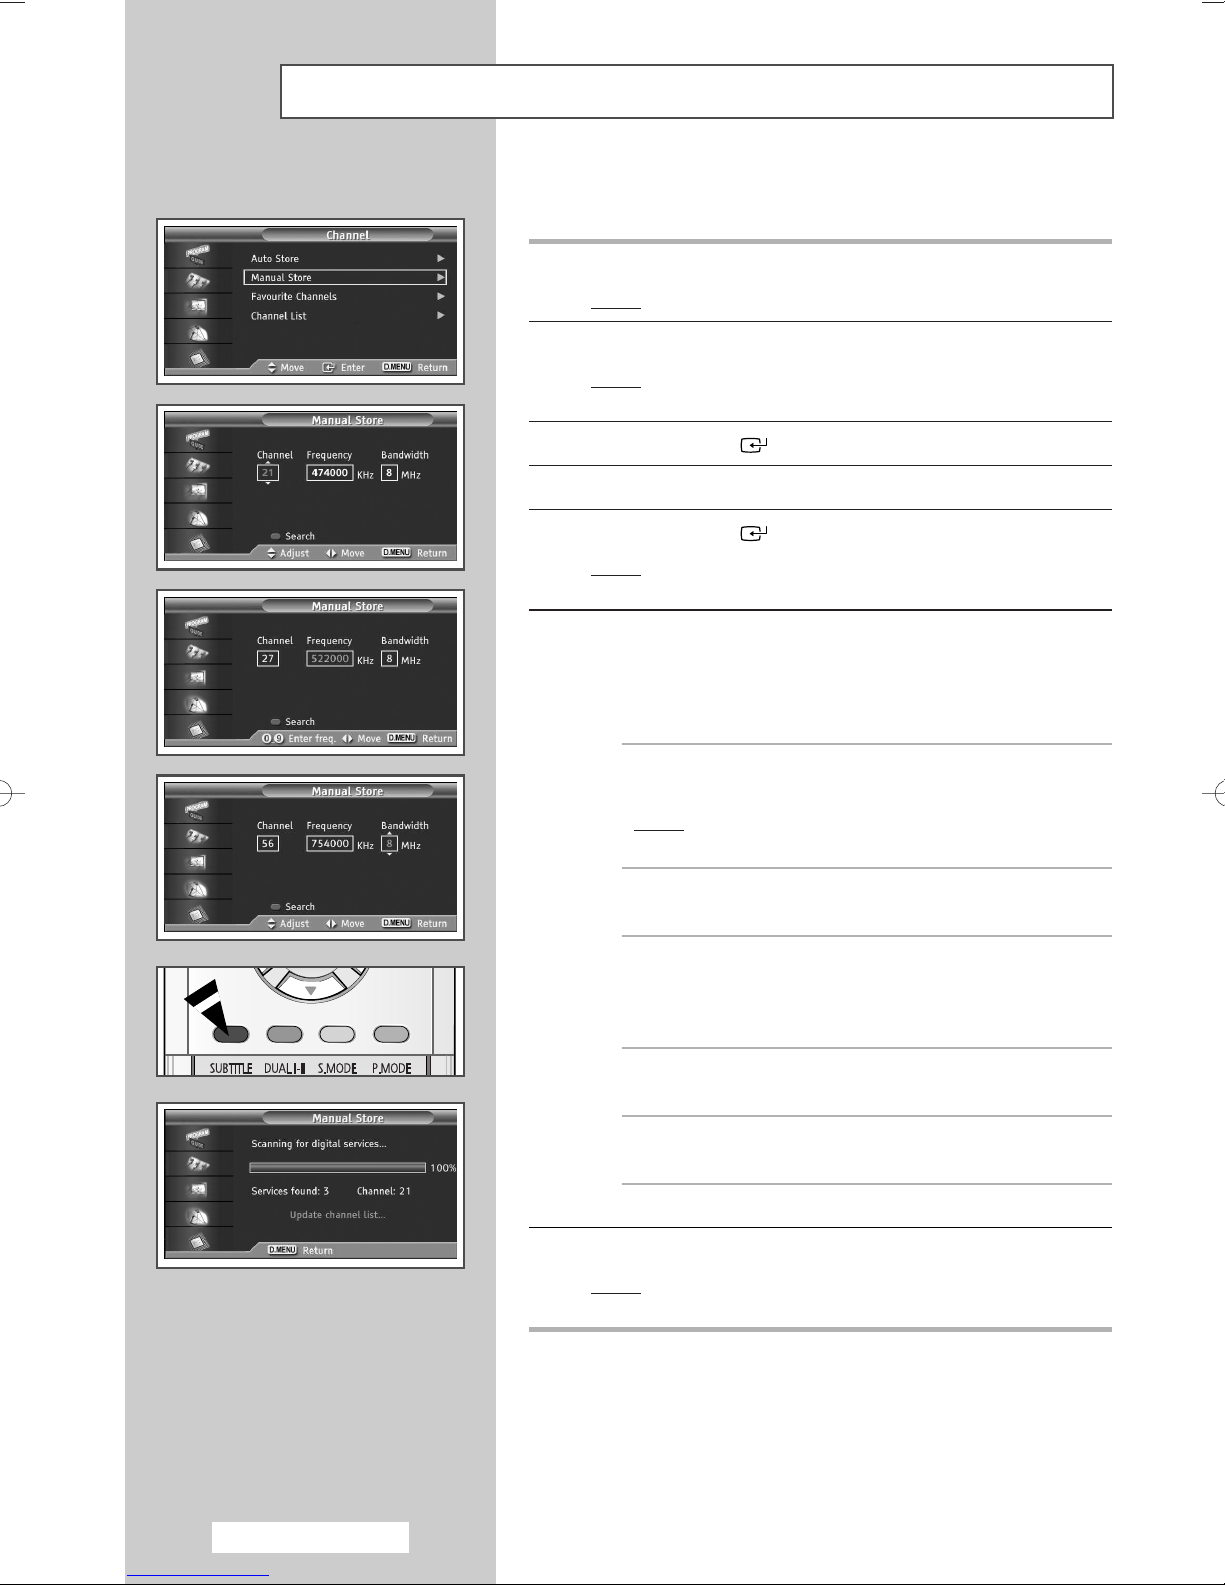
Updating the Channel List Manually
You can specify the channel or frequency for a fast channel search.
1 Press the D.MENU button.
Result
: The DTV menu is displayed.
2 Press the ▲ or ▼ button to select Channel.
Result
: The options available in the Channel group are
displayed.
3 Press the ENTER
()
button.
4 Press the ▲ or ▼ button to select Manual Store.
5 Press the ENTER
Result
: The options available in the Manual Store group are
()
displayed.
button.
6 Press the œ or √ button to select Channel, Frequency, or
Bandwidth.
◆
Channel
Press the ▲, ▼ or numeric buttons (0~9) to select a channel.
The available channels are 21~68.
Result
: The corresponding frequency for the selected
channel is automatically set.
◆
Frequency
You can specify the frequency (KHz) using the numeric
buttons (0~9). If you do not know the exact frequency, follow
the above step to select the frequency automatically using
channel.
English - 16
◆
Bandwidth
Press the ▲ or ▼ button to select a bandwidth. The available
bandwidths are 7 and 8 MHz.
7 Press the red button to start the scan for digital services.
Result
: When it has finished, channels are updated in the
channel list.
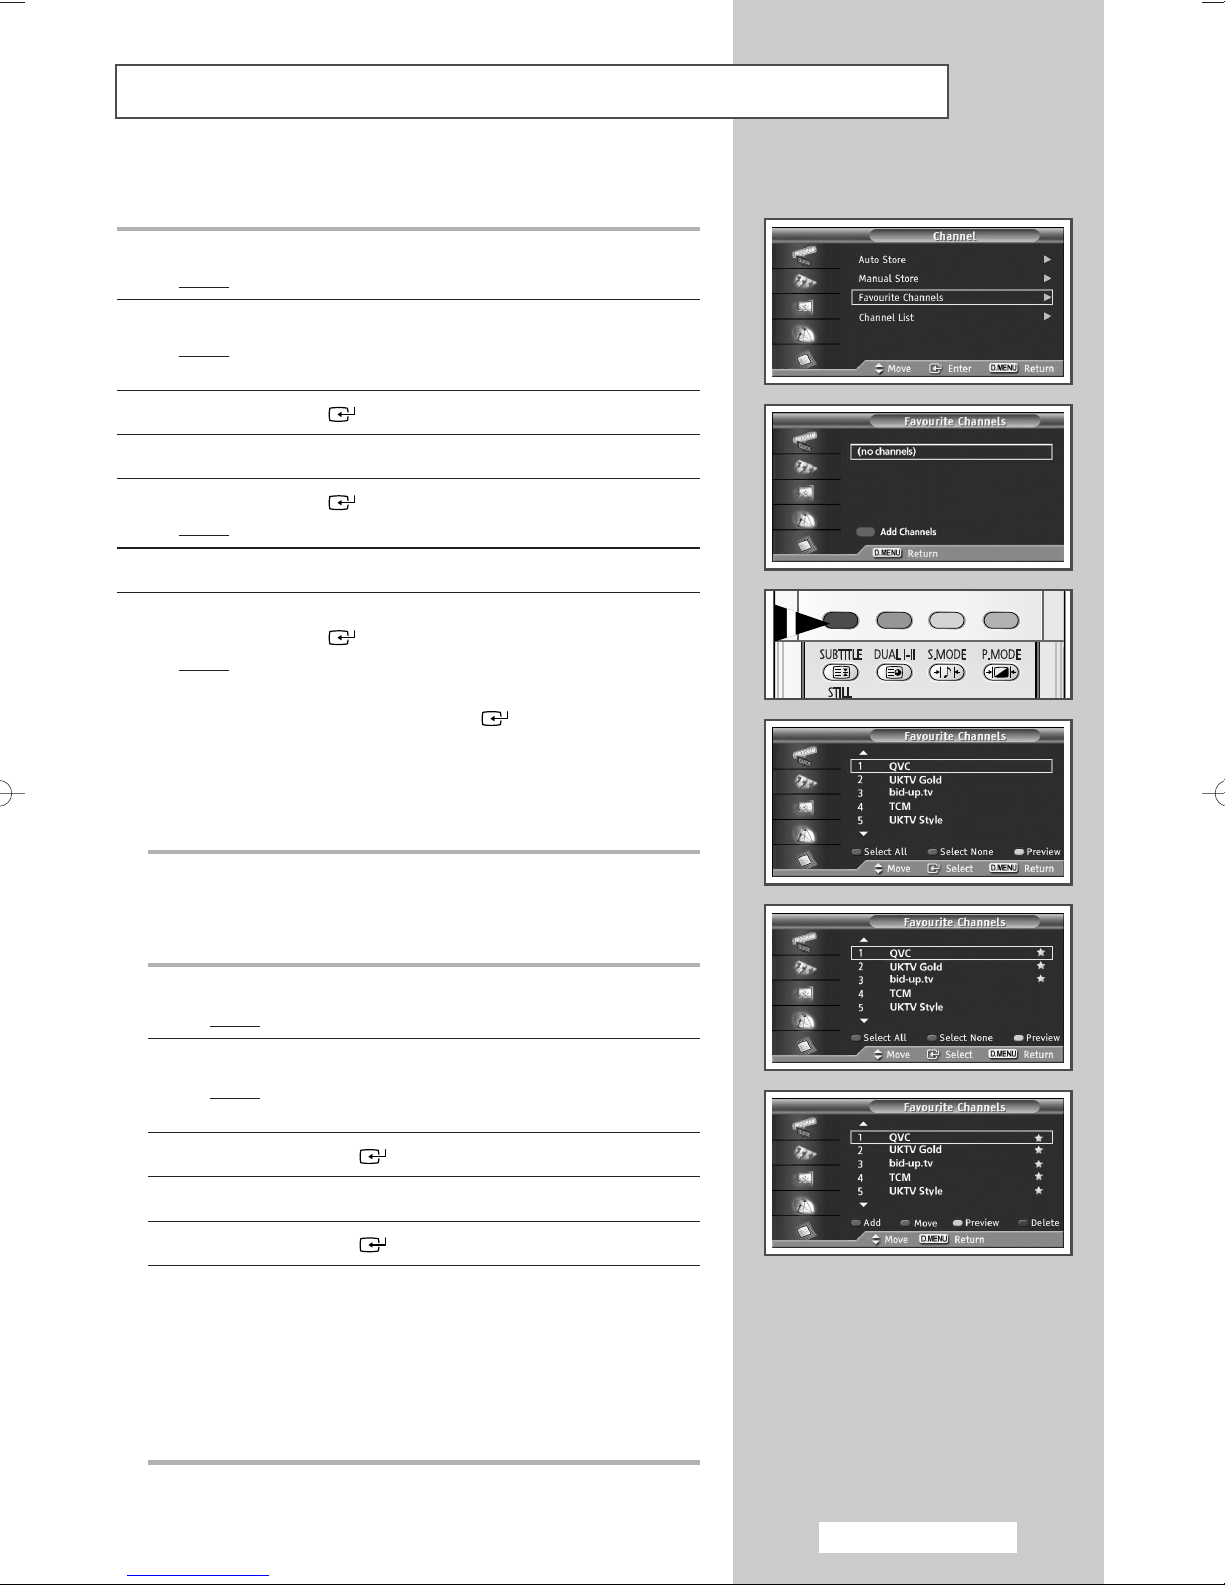
Editing Your Favourite Channels
You can edit your favourite channels using the colour buttons.
1 Press the D.MENU button.
: The DTV menu is displayed.
Result
2 Press the ▲ or ▼ button to select Channel.
: The options available in the Channel group are
Result
displayed.
3 Press the ENTER
()
button.
4 Press the ▲ or ▼ button to select Favourite Channels.
5 Press the ENTER
Result
: The
()
button.
Favourite Channels menu is displayed.
6 Press the red button to display all currently stored channels.
7 Press the ▲ or ▼ button to select a channel you want.
Press the
Result
ENTER
:A “★” icon is shown next to the selected channel and
➢ ◆ To undo, press the ENTER
◆ Select All : Select all channels currently displayed.
◆ Select None : Deselect all selected channels.
◆ Preview : Displays (a) currently selected channel(s).
()
button.
the channel will be added to the favourites list.
()
button again.
➢ The Favourite Channels settings have been completed.
◆ Add
You can use this function when one or more favourite channels
have been selected.
1 Press the D.MENU button.
: The DTV menu is displayed.
Result
2 Press the ▲ or ▼ button to select Channel.
: The options available in the Channel group are
Result
displayed.
3 Press the ENTER
()
button.
4 Press the ▲ or ▼ button to select Favourite Channels.
5 Press the ENTER
()
button.
6 Press the red button in the Favourite Channels menu.
To add more channels, refer to the step
➢ ◆ To add all channels to the favourites channel list,
press the red button.
◆ To remove all channels, press the green button.
◆ Press the CH.LIST button to display the favourite
channel list.
7 above.
English - 17
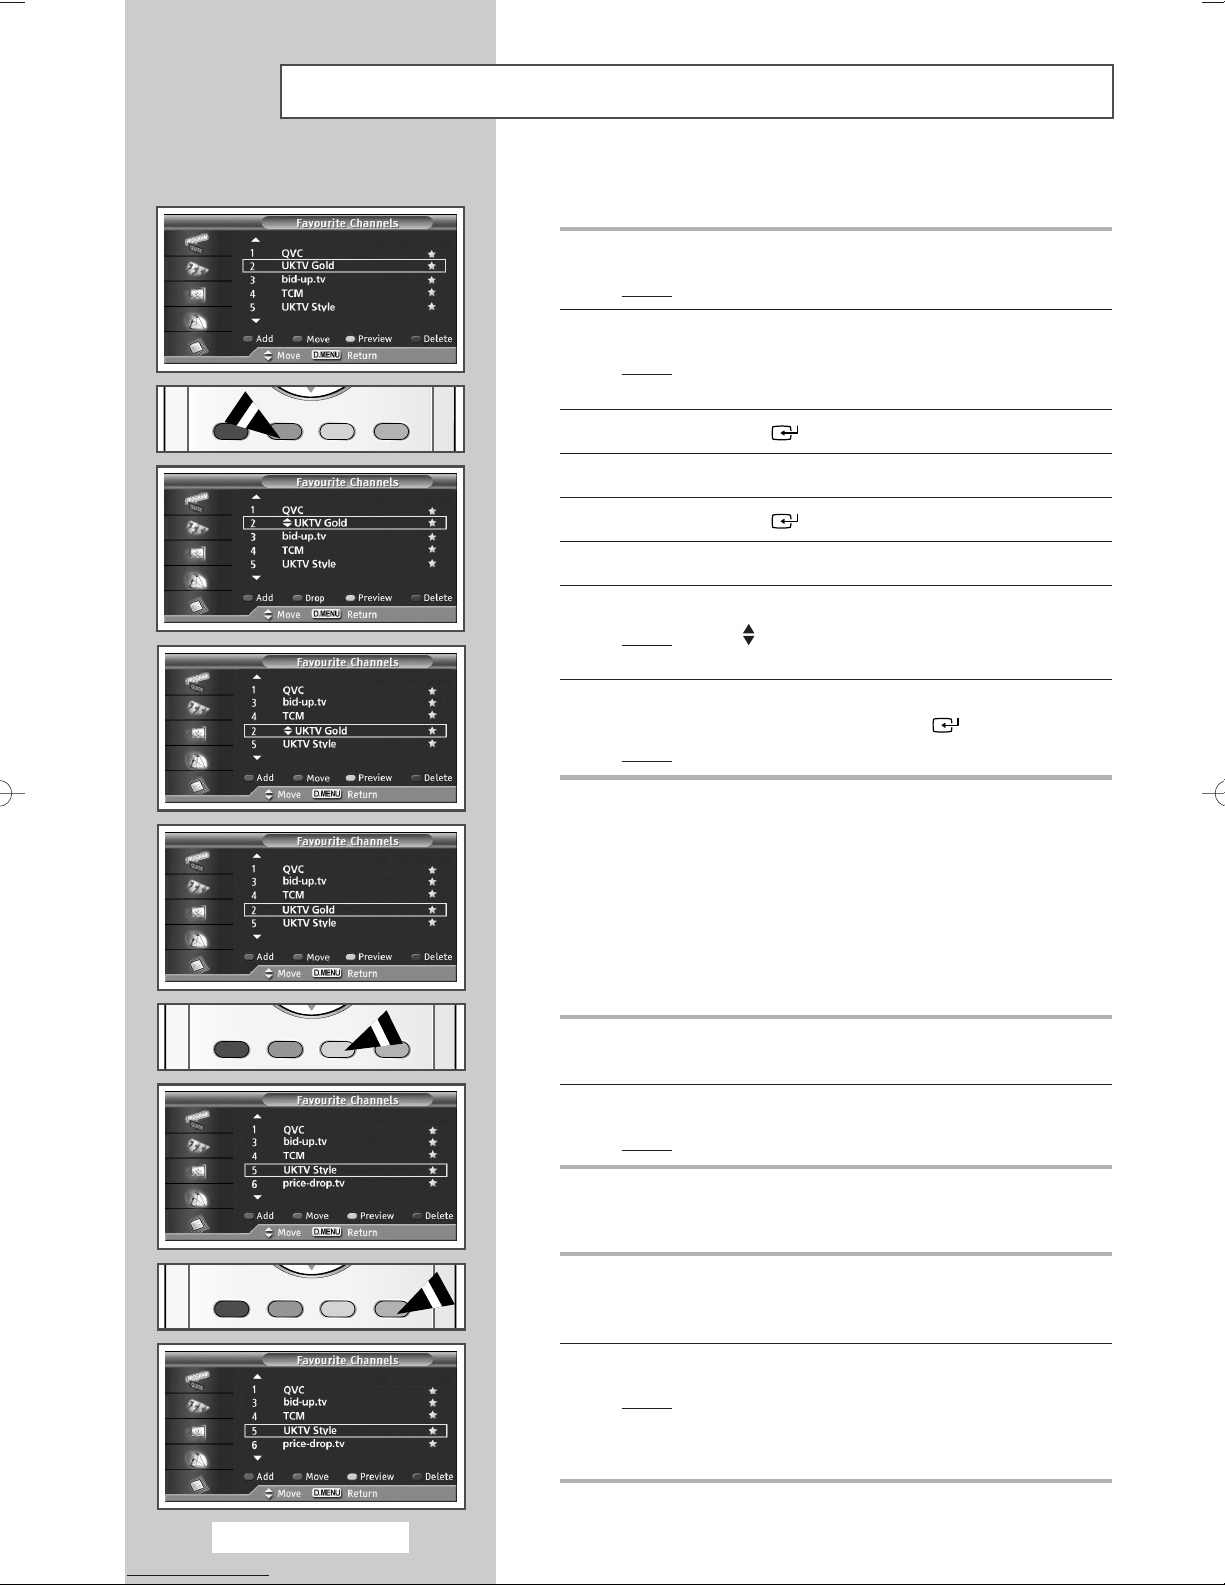
Editing Your Favourite Channels (continued)
◆ Move
1 Press the D.MENU button.
Result
: The DTV menu is displayed.
2 Press the ▲ or ▼ button to select Channel.
Result
: The options available in the
displayed.
3 Press the ENTER
()
button.
Channel group are
4 Press the ▲ or ▼ button to select Favourite Channels.
5 Press the ENTER
()
button.
6 Press the ▲ or ▼ button to select the required channel.
7 Press the green button.
“” icon is displayed on the left side of the
:A
Result
channel name.
8 Press the ▲ or ▼ button to select the channel that you want to
move, then press the green or
: The channel is moved to its new position.
Result
ENTER
()
button.
English - 18
◆ Preview
1 In the Favourite Channels menu, select the channel to be
previewed by pressing the
▲ or ▼ button.
2 Press the yellow button.
Result
: Displays currently selected channel.
◆ Delete
1 In the Favourite Channels menu, select the channel to be
deleted from the favourite channels list by pressing the
button.
2 Press the blue button.
Result
: The selected channel and number will be deleted.
To add a deleted channel back into the favourite
➢
channel list, see “Add” on page 17.
▲ or ▼
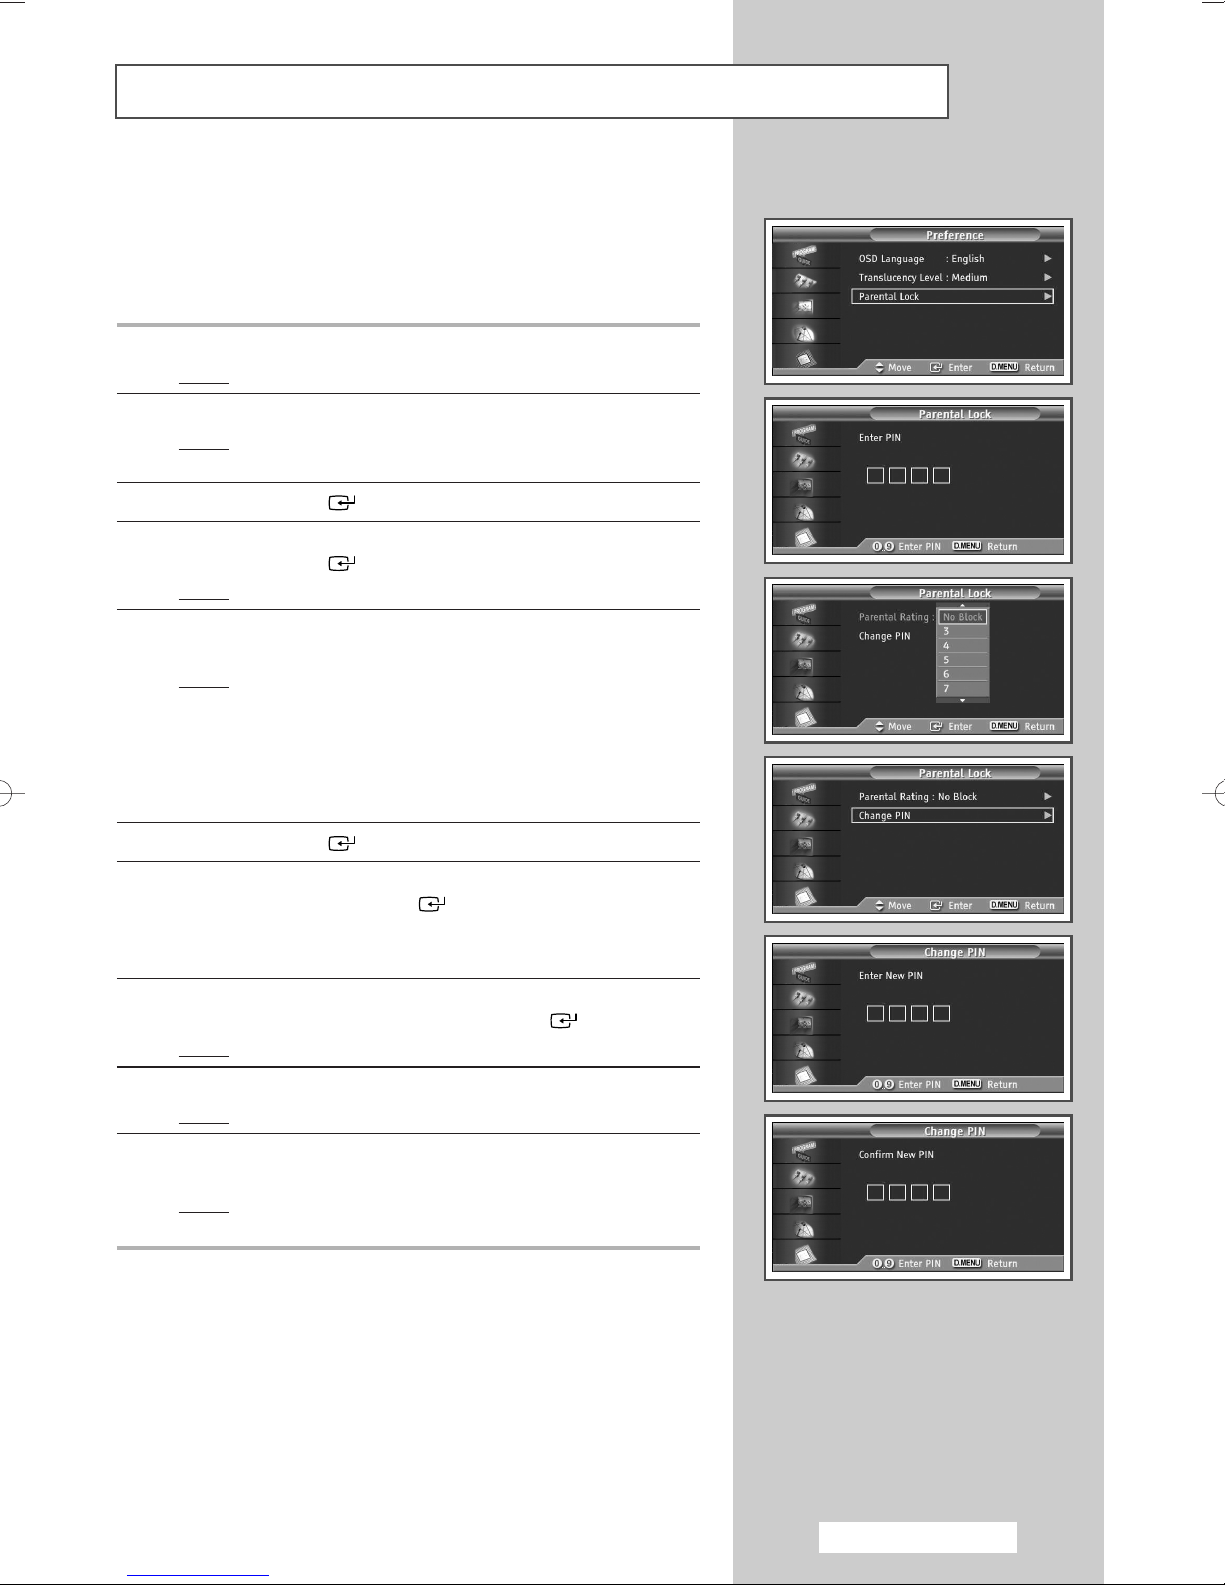
Setting up the Parental Lock
This feature allows you to prevent unauthorized users, such as
children, from watching unsuitable programmes by a 4-digit PIN
(Personal Identification Number) code that is defined by the user.
The on-screen menu will instruct you to assign a PIN code (you can
change it later, if necessary).
1 Press the D.MENU button.
: The DTV menu is displayed.
Result
2 Press the ▲ or ▼ button to select Preference.
: The options available in the Preference group are
Result
displayed.
3 Press the ENTER
()
button.
4 Press the ▲ or ▼ button to select Parental Lock.
Press the
: The
Result
ENTER
()
button.
Enter PIN is displayed.
5 Enter your current 4-digit PIN code by using the numeric buttons
(0~9).
: The options available in the
Result
displayed with the
Parental Rating selected.
Parental Lock group are
➢ ◆ The default PIN code for a new TV set is 0000.
◆ If you enter a invalid PIN code, the Invalid PIN
code. Please try again.
6 Press the ENTER
()
button.
7 Press the ▲ or ▼ button to select the age of 3~18 rating you want
to lock out. Press the
If you set the rating to lower than the parental control level
➢
of the channel, the channel will be locked.
ENTER
()
button.
8 If you want to change the PIN code, select Change PIN by
pressing the
Result
▲ or ▼ button. Press the ENTER
: The Enter New PIN is displayed.
message is displayed.
()
button.
9 Enter your new PIN code by using the numeric buttons (0~9).
: The Confirm New PIN is displayed.
Result
10 Re-enter your new PIN code to confirm by using the numeric
buttons (0~9).
: The Your PIN code has been changed
Result
successfully
➢
If you forget the PIN code, press the remote control
buttons in the following sequence, which resets the PIN
to
0-0-0-0 : POWER (Off), MUTE, 8, 2, 4, POWER (On)
message is displayed.
English - 19
 Loading...