

Samsung WM1255AGS/XEN, WM1245A Service Manual

THE FEATURE OF PRODUCT
WM1255A
Manual
SERVICE
Refer to the service manual in the itself (http://itself.sec.samsung.co.kr/) for the more information.
BASIC MODEL
WM1245A
WM1255AGS/XEN
1. Silver Nano Sterilization,
Anti-bacteria
2. Premium Design
3. Wide Graphic Display
4. Direct Drive Motor
5. A Giant 10kg Capacity
6. 40cm Wide Porthole
7. Slanted Drum
8. Optimal Drying System

1. PRECAUTIONS
1-1. SAFETY PRECAUTIONS
1-2. PRECAUTIONS UPON INSTALLATION
2. THE FEATURE OF PRODUCT
2-1. PART NAMES
2-2. SPECIFICATIONS
2-3. THE COMPARATIVE SPECIFICATIONS OF PRODUCT
2-4. THE COMPARATIVE SPECIFICATIONS OF PRODUCT
2-5. WM1255A FEATURES
3. PRODUCT SPECIFICATIONS
3-1. OVERVIEW OF THE CONTROL PANEL
4. ALIGNMENT AND ADJUSTMENTS
4-1. ERROR MODE
4-2. TROUBLESHOOTING (TEST MODE)
4-3. DETAILED EXAMINATION OF PROBLEMS
5. ASSEMBLY AND DISASSEMBLY
5-1. TOOLS FOR DISASSEMBLY AND ASSEMBLY
5-2. ASSEMBLY AND DISASSEMBLY
6. TROUBLE DIAGNOSIS
6-1. RELATED PARTS TO ERRORS FOR CHECKING
7. EXPLODED VIEWS AND PARTS LIST
7-1.
EXPLODED VIEW OF WHOLE PARTS
7-2.
EXPLODED VIEW OF DETERGENT TRAY/SUB PCB
7-3.
PARTS LIST OF DETERGENT TRAY/SUB PCB
7-4.
EXPLODED VIEW OF TUB/DAMPER/MAIN/MOTOR PCB
7-5. PARTS LIST OF TUB/DAMPER/MAIN/MOTOR PCB
7-6. EXPLODED VIEW OF FRAME FRONT/ASSY DOOR
7-7. PARTS LIST OF FRAME FRONT/ASSY DOOR
7-8. EXPLODED VIEW OF FRAME
7-9. PARTS LIST OF FRAME
7-10. Bolt & SCREW
2
1
6
7
8
13
20
23
25
26
38
41
27
40
5
9
42
43
44
45
46
47
48
49
CONTENTS

8. BLOCK DIAGRAM
9. THE ACTUAL PCB
9-1. THE ACTUAL MAIN PCB
9-2. THE ACTUAL SUB PCB
10. SCHEMATIC-DIAGRAM
11. PCB CIRCUIT DIAGRAM
11-1. PCB CIRCUIT DIAGRAM (Main)
11-2. CIRCUIT DIAGRAMS OF MAIN PARTS
11-3. MOTOR-DRIVING PART
11-4. DISPLAY PART
12. REFERENCE INFORMATION
12-1. MODEL NAME
12-2. TERMINOLOGY
12-3. FABRIC CARE CHART
12-4. ELECTRICAL WARNINGS
12-5. Q&A
51
52
53
56
62
62
63
60
59
55
54
57
58
CONTENTS

- 1 -
1. Ensure that users do not repair the product themselves.
▶
This may cause harm or shorten the lifetime of the product.
2. Ensure that the power plug is disconnected before performing A/S (especially A/S for electrical parts).
▶
Beware of electric shock
3. Ensure that users do not use several plugs for one outlet at the same time.
▶
This may cause fire from overheating.
4. Check for any marks of physical damage, fusion, cuts or fire damage at the power plug and the outlet.
▶
Repair or exchange it at once if there is some damage. (It could cause electric shock or fire)
5. Ensure that the product is properly earthed.
▶
If not, it may cause electric shocks through electrical leakage.
6. Do not use water directly on the main body when cleaning the product.
▶
This may cause electric shocks or fire, and shorten the lifetime of the product.
7. The line connection for the Harness may not be permeabled by water and must be secure while performing
the A/S.
▶
It should not be split or cut when a limited amount of force is applied.
8. Completely remove dust or foreign substances from any parts such as Housing, the line connection, the
contact point, etc. while performing the A/S.
▶
This will prevent in advance the danger of fire by Tracking, Short Circuits, etc.
9. Check for traces of water permeation of electrical parts and the Harness.
▶
If water has permeated any parts already, exchange the parts or completely remove the moisture.
10. Check the assembly condition of the parts after finishing the A/S.
▶
Maintain the same conditions as before the A/S.
11. When you pull out the power cord, be sure to hold the plug part when pulling the cord out.
▶
If the cord is damaged, it may cause electric shocks or fire.
12. Ensure that the power plug is removed from the outlet when the washing machine is not in use.
▶
Else it may cause electric shock or fire through lightning.
13. Do not use or preserve any kind of flammable spray or ignitable materials such as gasoline, thinner, alcohol,
etc. around the washing machine.
▶
Volatile materials may explode or ignite through electrical sparks.
14. Do not place a bowl filled with water or wet clothes on the washing machine.
▶
If the water spills, it may cause electric shock or fire, and shorten the lifetime of the product.
15. Do not install the washing machine in places exposed to snow or rain.
▶
This may cause electric shock or fire and shorten the lifetime of the product.
16. Do not press any operating buttons using sharp items such as pins, needles etc.
▶
This may cause electric shock or mechanical trouble.
17. Check if the product has been evenly and firmly installed on the ground.
▶
Too much vibration will shorten the lifetime of product.
18. Ensure that a connector is being used to connect a wire to another wire for a complete connection.
▶
If it is treated only with tape, it may cause fire by tracking.
19. If you have to turn the washing machine on its side when performing the A/S, ensure that it is placed down
gently on the ground with support
▶
If the washing machine is turned upside down, some of the parts may be damaged by the tub.
1. Precautions
1-1. Safety Precautions
- 2 -
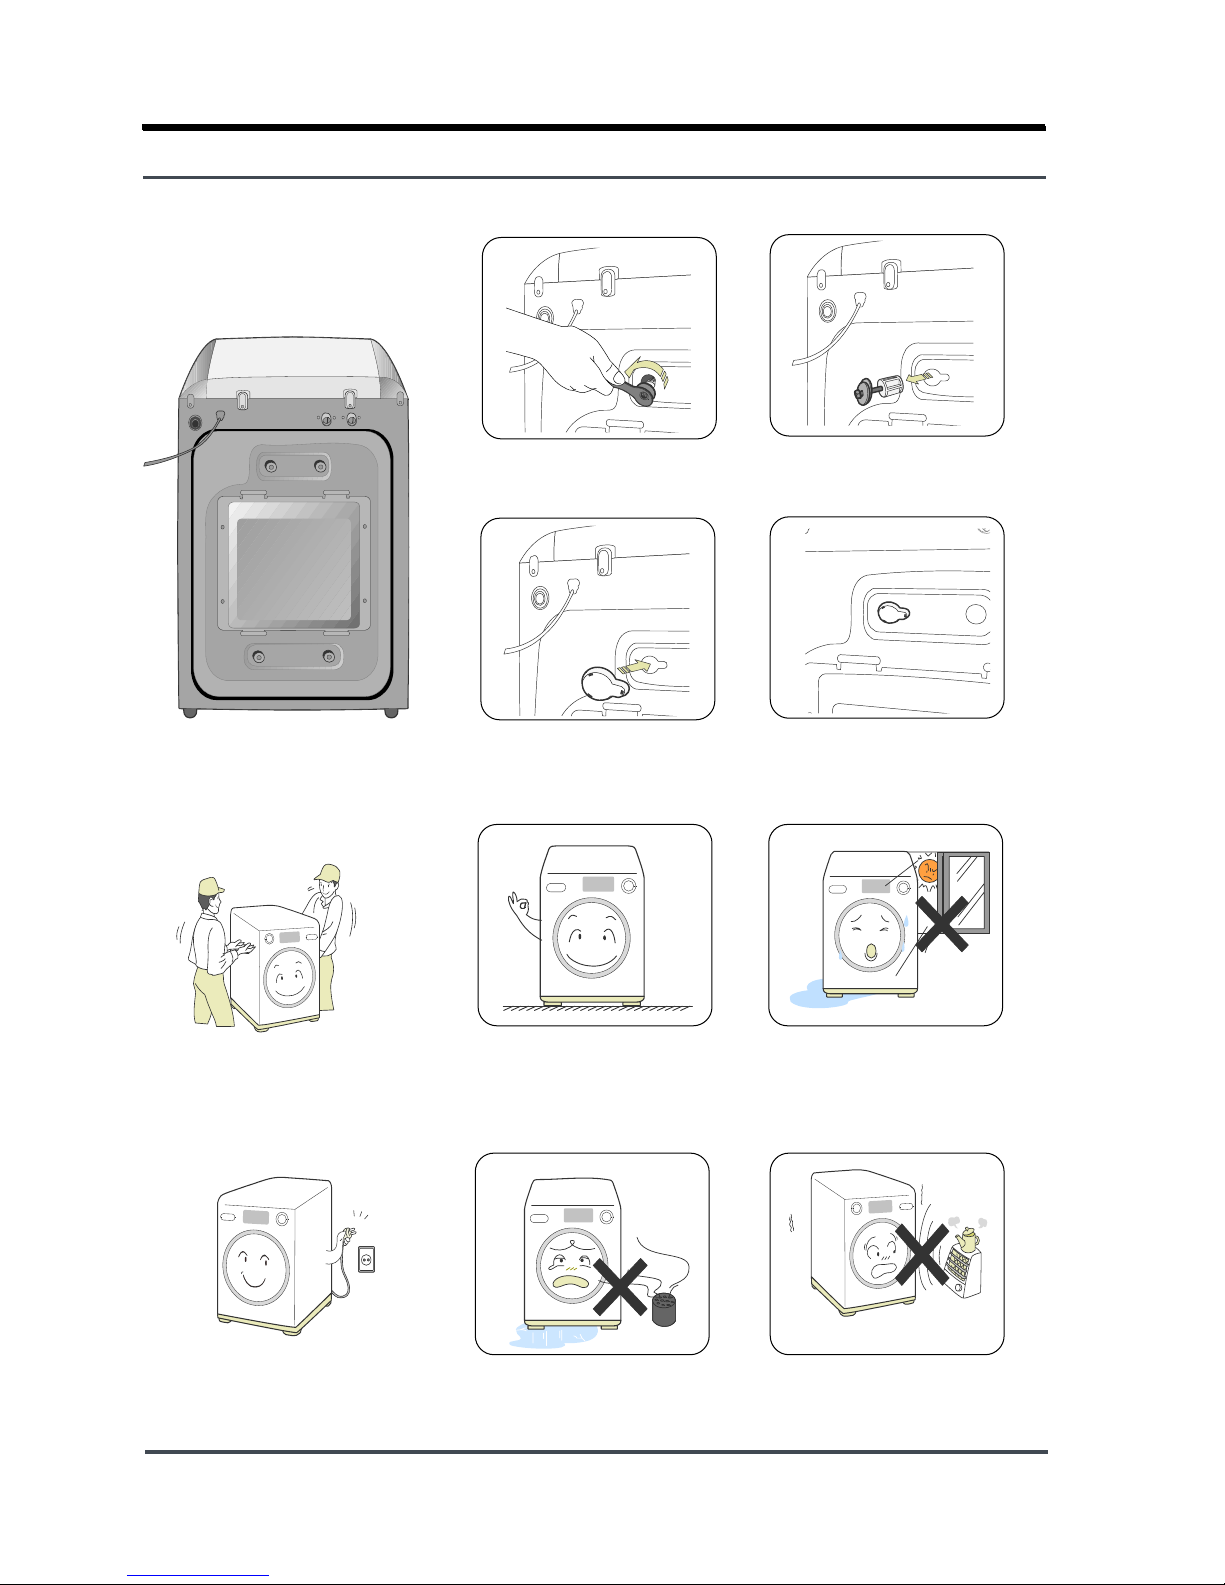
■
How to disassemble
the safety apparatus
1. Remove the screw of the safety
apparatus using a spanner.
2. Remove the safety apparatus from
the back of the main body.
3. Insert the stopper into
the groove for fixing the
safety appratus.
4. Insert 4 stoppers into each
groove for fixing the safety
appratus.
Install the product on a
solid and flat surface.
Avoid places with direct sunlight
and humidity for the installation. A
well-ventilated place is a good
position for installing the product.
Do not install the product at the
place where gas is emitted,
which will freeze the product in
winter season.
Avoid locations close to heat
sources such as a stove.
■
Safety Notes before
Installing
At least two people are needed
to unpack or move the product,
due to its weight.
Install the washig machine
where the power cord or
plug can be easily pulled out.
1-2.Precautions upon Installation
- 3 -
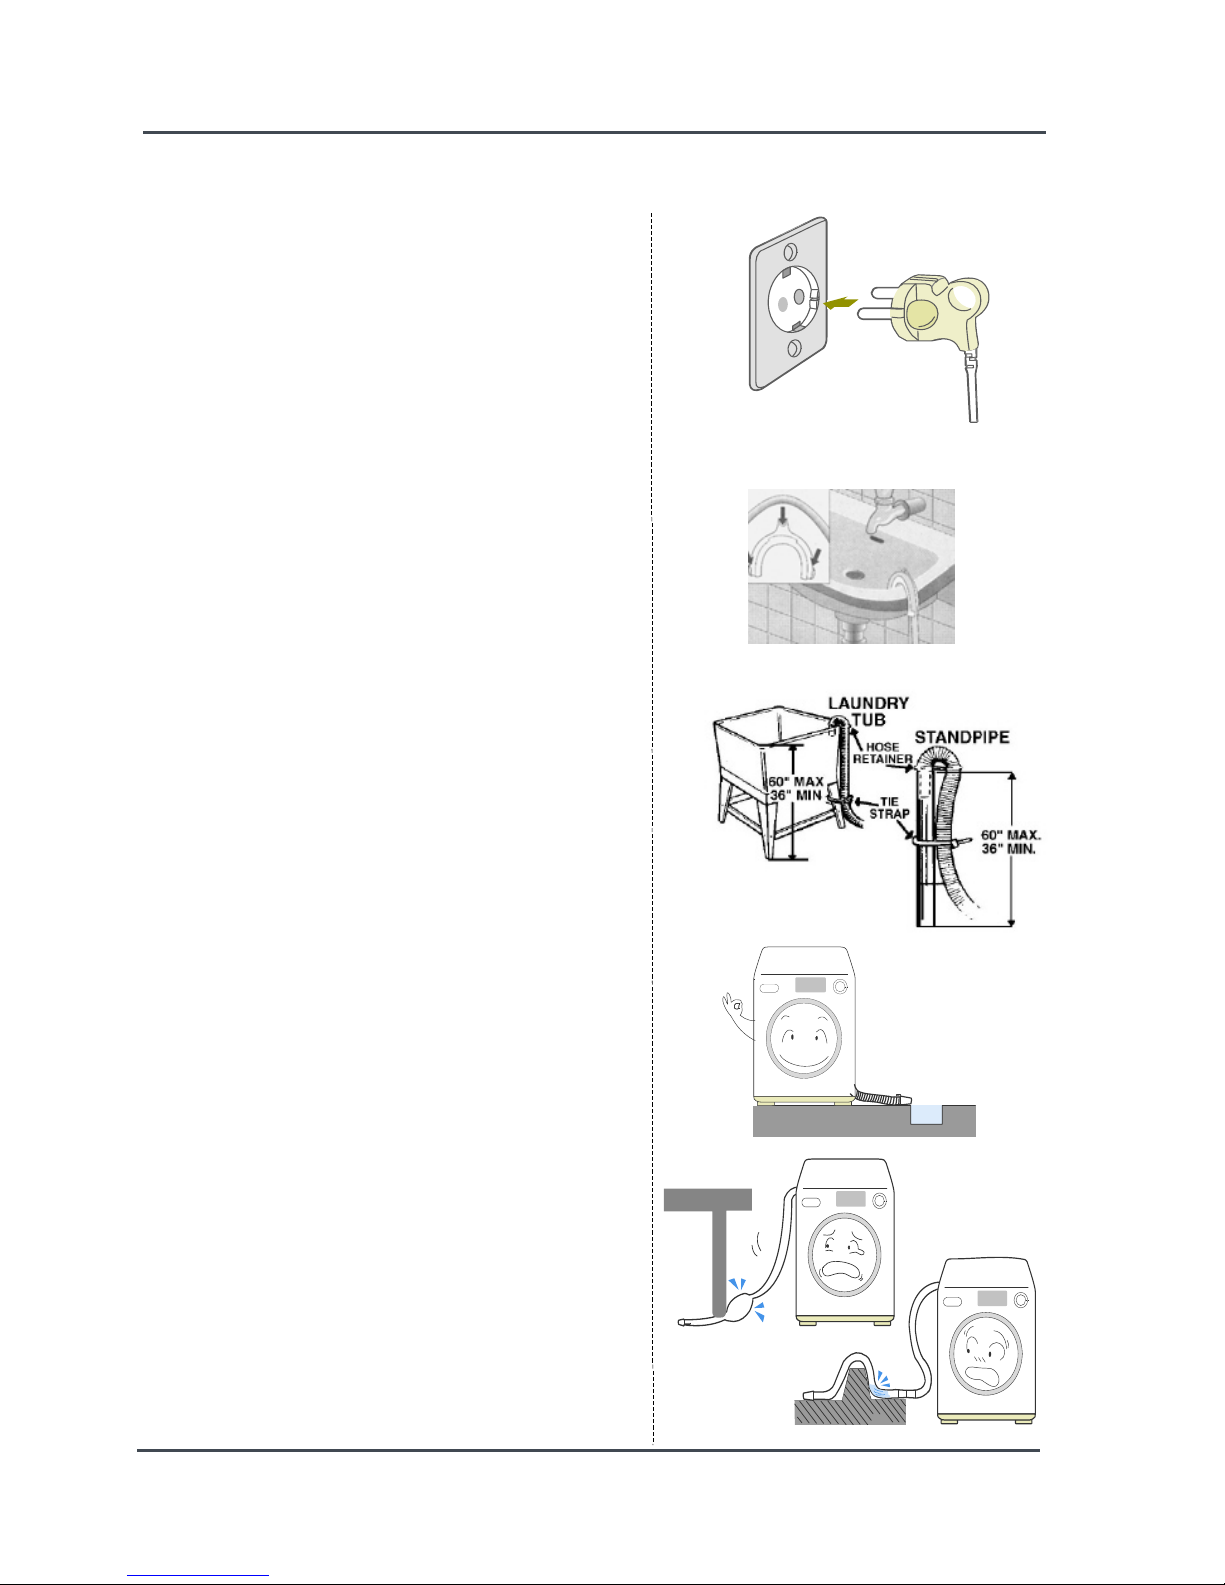
■ Grounding
※ Make sure to ground the unit to prevent
electric leakage or shock.
With a grounded receptacle
▶ It does not need an additional grounding.
■ Water Drainage
Note: Caution must always be exercised to
avoid collapsing or damaging the drain hose.
For best performance the drain hose should
not be restricted in any way, through elbows,
couplings or excessive lengths.
▶ Hook the drain hose over the Wash Basin or
Laundry Tub or plug the end of the drain hose
into the Standpipe
- The end of the drain hose must be passed
through the Hose Guide or secured as shown in
the picture to prevent it from popping up
during drainage of water.
- The outlet end of the drain hose must be at
least 60-90 cm above the base of the machine.
▶ Seal the drain pipe connections
- If not, it may cause water leakage.
▶ Prevent water from siphoning away
- If the end of the drain hose is put in water,
it could siphon away water during washing.
So, make sure that the end of the drain hose
is not put in water.

- 4 -
■
Installation Manner
1. Select an installation place in
advance.
▶
The distance between the washing
machineandthewallmustbeat
least 10cm.
2. Check the balance
▶
If you press down or shake any part of
the front, left or right side of the washing
machine and it still wobbles, adjust the
feet again until the machine is standing
solidly.
3. Adjust the height using the adjustable feet.
▶
The machine is in a
balanced state when all
four adjustable feet are
firnly on the ground and
there is no movement.
If uneven
▶
Adjust the lowest of the 4 adjustable feet while lifting the washing machine a little.
▶
Adjust the height by turning the nut to the left as in the figure.
(The adjustable foot will be lengthened.)
※
Caution
※
After adjusting the horizontal
balance, fix the nut tightly so
that it doesn't come loose
through vibration or noise.
▶
Tighten the nut after making
the adjustments.
- 5 -
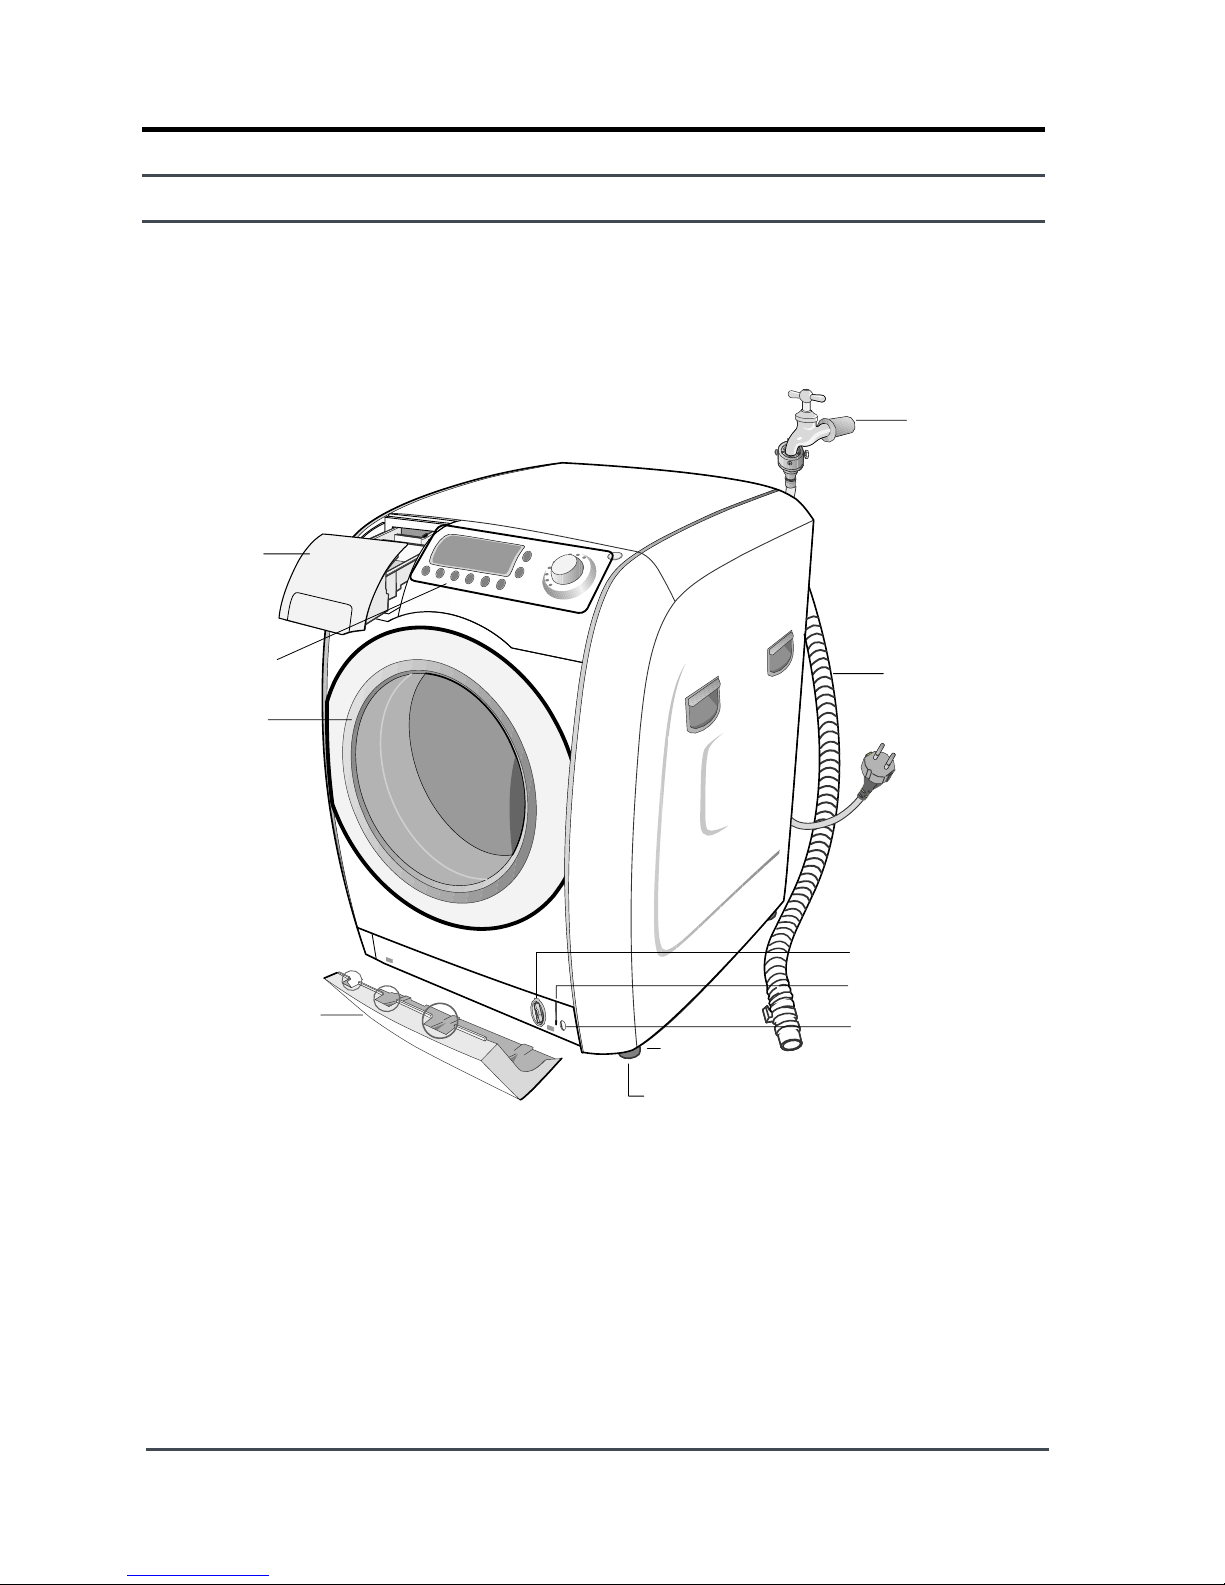
Cold Water
supply hose
Drain Hose
Door
Debris filter
Door release
Emergency drain
tube
Base cover
Adjustable feet
Control panel
Detergent
Drawer
2.
THE FEATURE OF PRODUCT
2-1.
Part Names
- 6 -
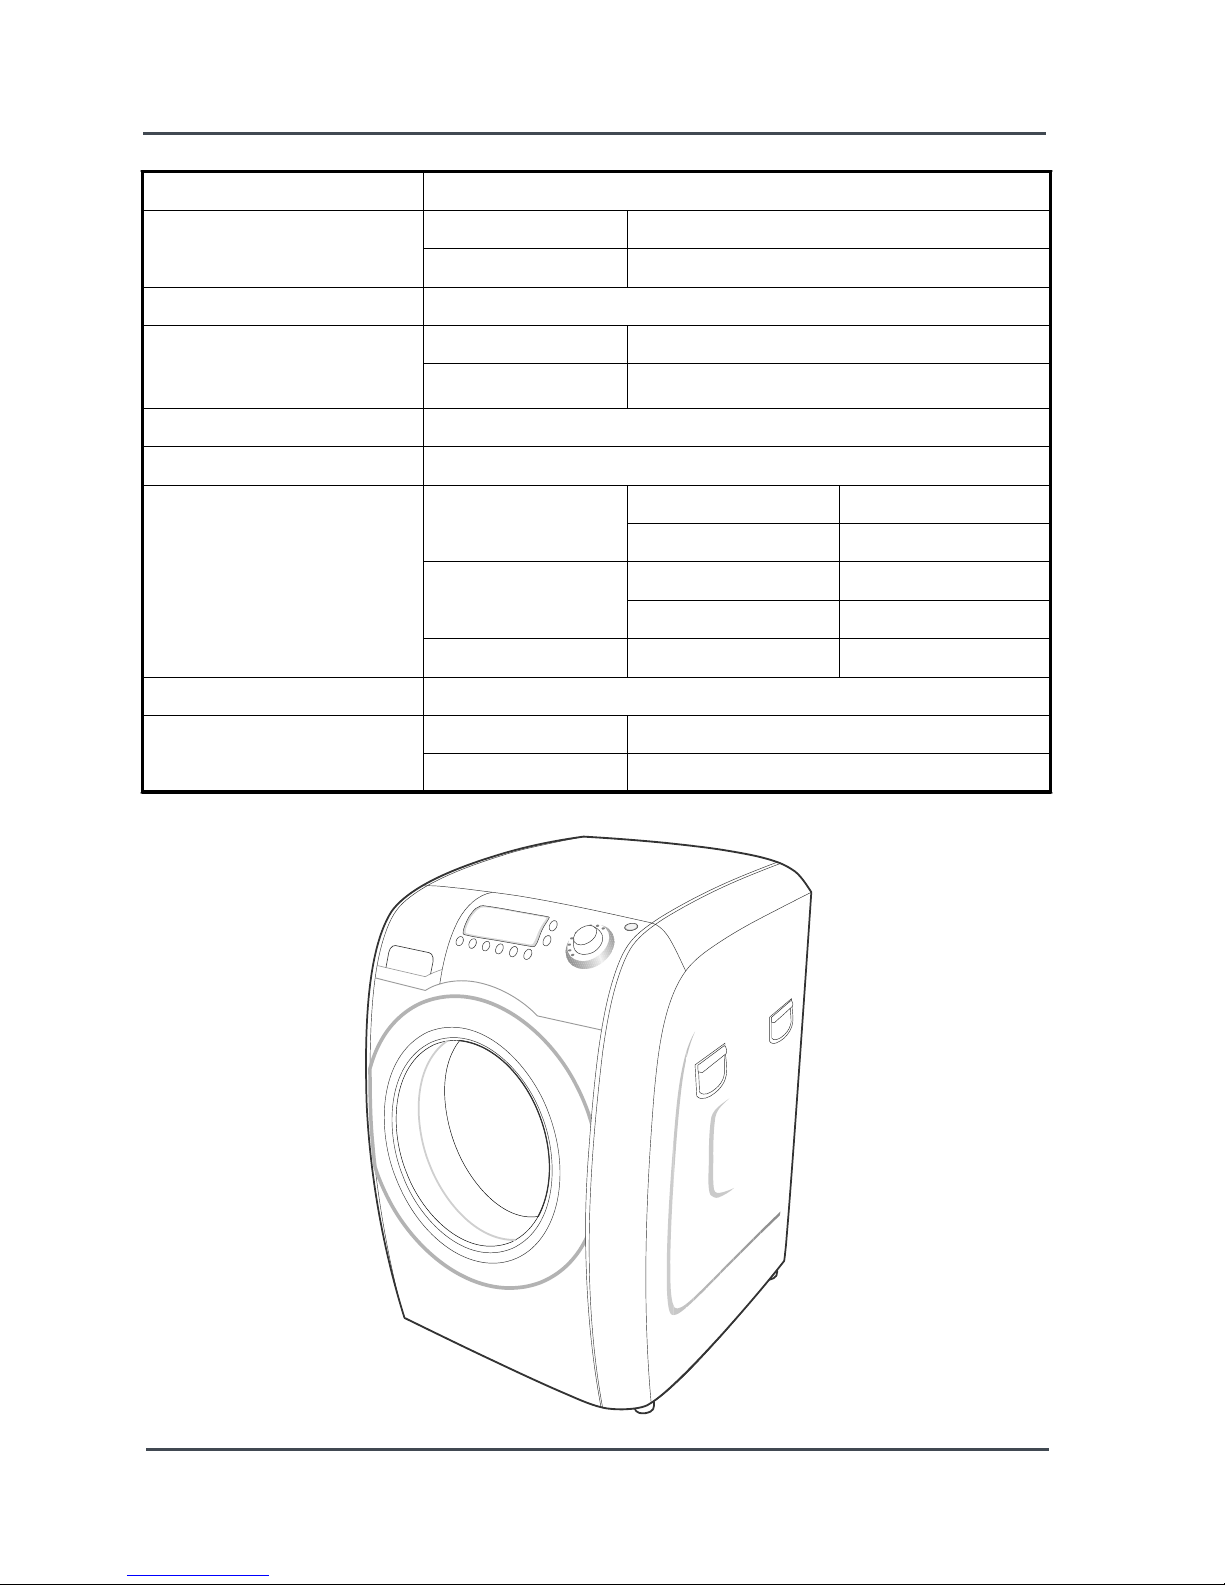
2-2. Specifications
WASH TYPE
FRONT LOADING TYPE
DIMENSION
NET W650mm X D774mm X H939mm
GROSS W727mm X D857mm X H1015mm
WATER PRESSURE
50 kPa ~ 780 kPa
WEIGHT
NET 92 kg
GROSS 99 kg
WASH&SPINCAPACITY
10.0 kg (DRY LAUNDRY)
DRY CAPACITY
6.0 kg
POWER CONSUMPTION
WASHING
220V 170W
240V 170W
WASHING and
HEATING
220V 2000W
240V 2400W
Drying 220V 2100W
WATER C ONSUMPTION
125ℓ(COTTON COURSE)
SPIN REVOLUTION
MODEL WM1255A
rpm 1200

- 7 -
2-3. THE COMPARATIVE SPECIFICATIONS OF PRODUCT
Item 10.0kg Old (10.0kg)
Model Name
WM1255A WM1245A
Capacity
Washing
10.0kg 10.0kg
Drying
6.0kg 6.0kg
Drum Capacity
78
ℓ
78
ℓ
Washing Motor
DD INVERTER DD INVERTER
Heater (220V)
1900W 1900W
Supply/Drain
Cold water / Drain pump Cold water / Drain pump
Balancer
Weight Weight
SIZE(W*D*H)
650*774*939 650*774*939

- 8 -
2-4. THE COMPARATIVE SPECIFICATIONS OF PRODUCT
10.0kg
Model Name
WM1255A WM1245A
Function
AG+ WASH
OO
MEMORY
OO
Exterior Replacement Part
Name
Specifications
Design
Top Cover
SNOW-WHITE SNOW-WHITE
Panel-Control
SNOW-WHITE SNOW-WHITE
Panel-Drawer
SNOW-WHITE SNOW-WHITE
Cover Door
IMPERIAL-SILVER IMPERIAL-SILVER
Deco Top
IMPERIAL-SILVER IMPERIAL-SILVER
Deco Front
IMPERIAL-SILVER IMPERIAL-SILVER
Button-Push(F)
SNOW-WHITE SNOW-WHITE
AG+ KIT
Nomal Hard Water
Knob-Encoder
JOG-DIAL
Chrome Vapor
Disposition
Chrome Vapor
Disposition
Button-Encoder
SNOW-WHITE SNOW-WHITE
Button-Push(P)
SNOW-WHITE SNOW-WHITE
- 9 -
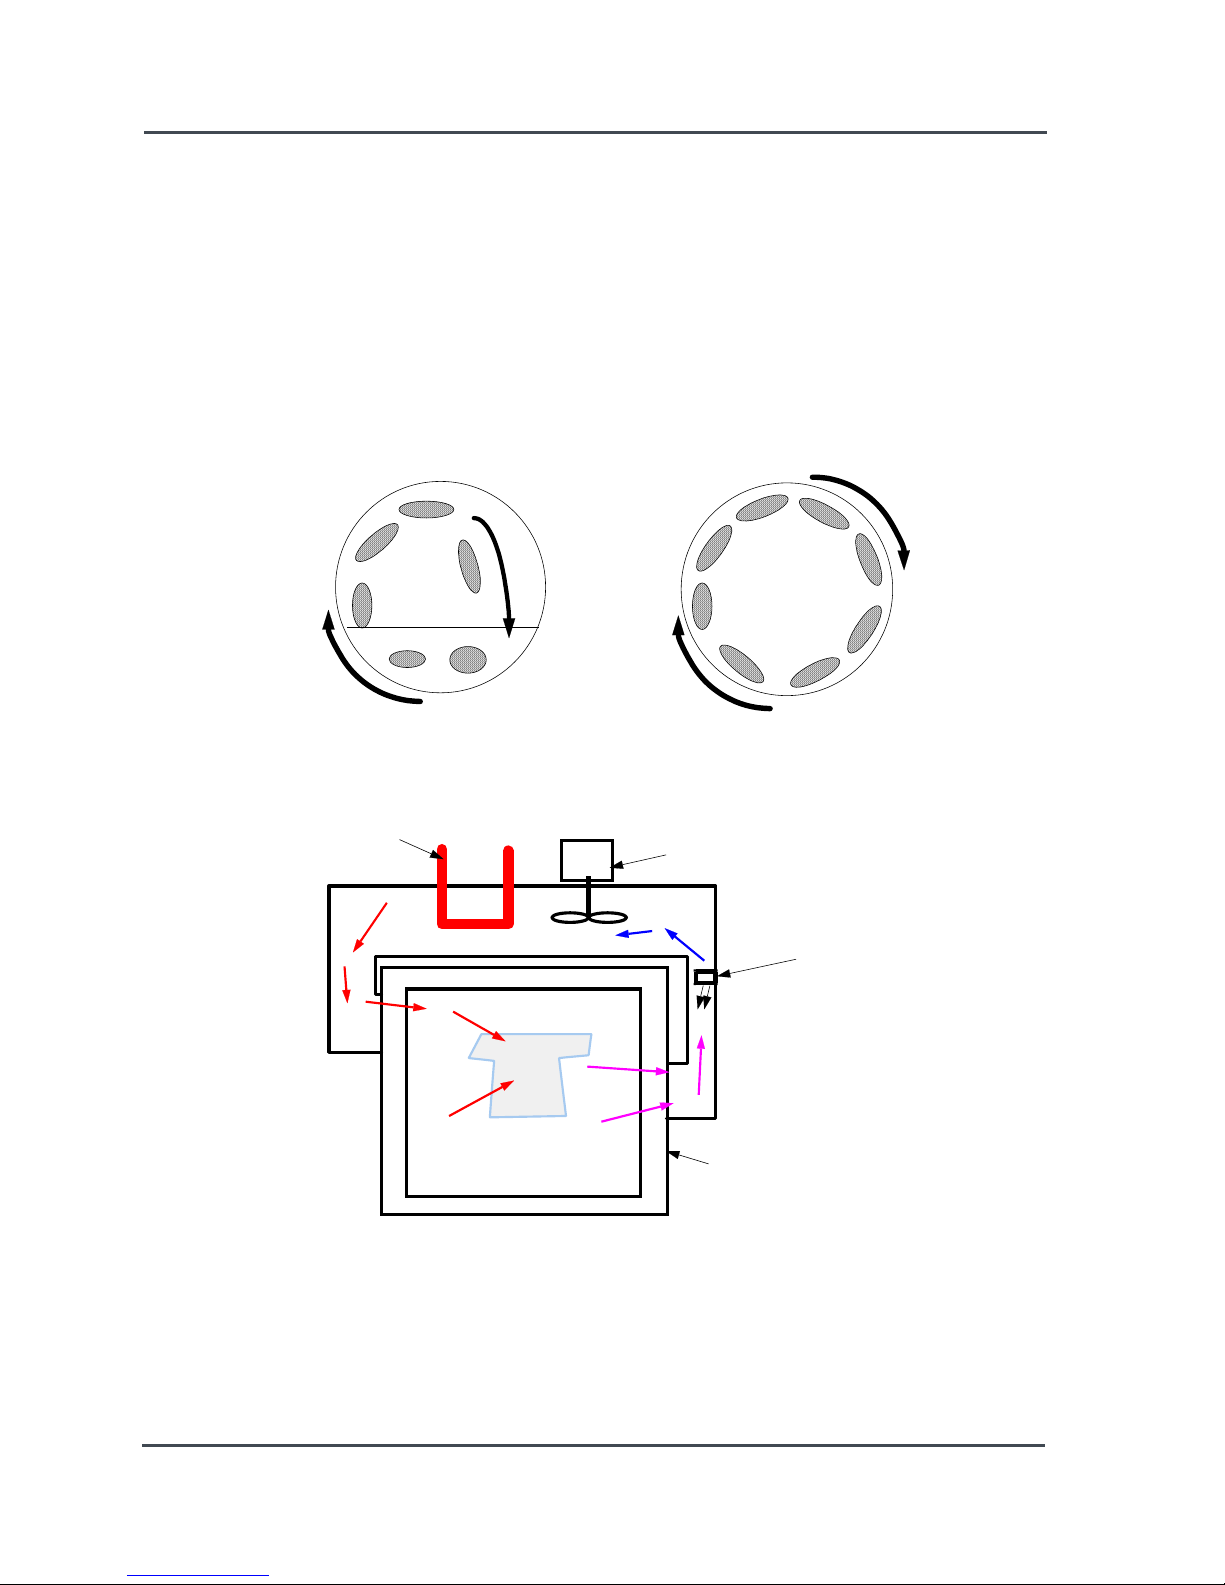
This washing machine performs the washing and dehydration functions by rotating its drum around a 10°
inclined axis of rotation to the horizontal axis.
1. Washing
The washing technique employed is to let the clothing fall from the top of the drum cycle.
2. Dehydration
The dehydration technique employed squeezes the water out using centrifugal force which pushes
the clothing out towards the wall of the drum through the high speed rotation of the drum.
(Max 1200 RPM)
3. Drying
Condensing System: This heats the internal and evaporates the moisture contained in the laundry
into steam and further uses the condenser to condense the steam before draining, resulting in a
temperature decrease inside the drum.
This is easy to install as this does not require a separate duct.
2-5. WM1255A Features
For Dehydration
rotating MAX 1200rpm
For Washing
rotating 40~50rpm
Drum
Tub
Heater
Fan Motor
Condensed
Water Nozzle
- 10 -
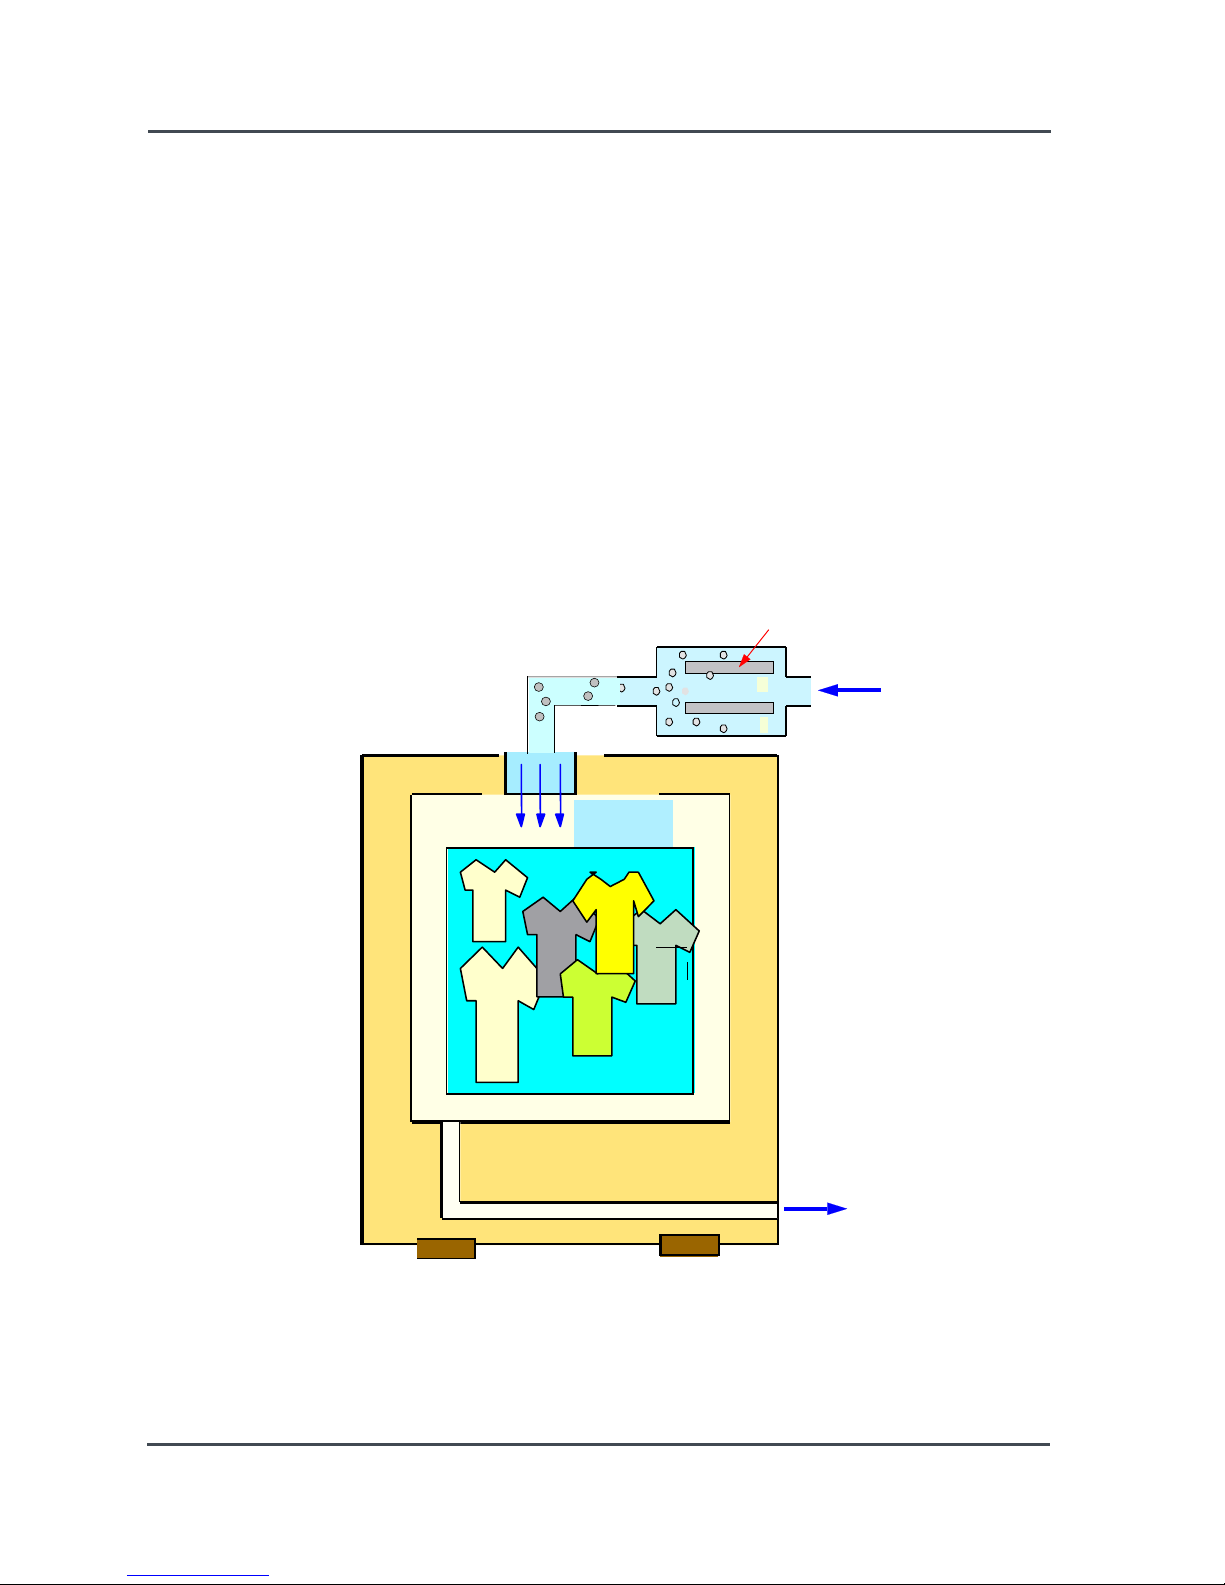
4. Silver-Nano System
1) Purpose
- Provides sterilization for the wash cycle using the combination of the silver ionized water and
the chemical detergent.
- Provides anti-bacteria feature to protect external bacteria from infiltrating into the laundry
by means of silver-nano coating.
- Prevents any harmful substances from growing in the tub (mold, various bacteria, bad smell,
etc)
2) Driving System
- Ag+ ionized water, generated by electrolysis, provides anti-bacteria coating and sterilization
for the laundry.
+
-
Ag+
Ag+
Ag+
Electrolysis
Ag+
Ag+
Ag+
Ag+
Ag+
Ag+
Ag+
Ag+
Ag+
Ag+
Ag+
Ag+ Ag+ Ag+
Ag+
Colloid
Ag+
Ag+
Ag+
Drainage
Water supply
Silver plate

- 11 -
5. Advantages of the WM1255A
(1)
Maximized Anti-bacteria and Sterilization - Introducing Silver Nano Technology
(2) Saves water (Washes with a smaller amount of water than 'normal' washing machines)
(3) Less wear and tear on clothing
(4) High-temperature washing (95℃-washing) available for sterilization/hygiene purposes.
(5) It is an energy saving model by employing a high-efficiency motor.
(6) Less noise and vibration due to the continual sensing of any Unbalance.
(7) The machine has a lighter weight due to the use of a liquid balance.
(8) 10kg super-slim size (650 mm)
(9) An increase in the washing/rinse efficiencyandadecreaseinthewashingtimerealizedby
employing a Water Turbine.
(10) Convenient handles intalled for wasy moving.
(11) Automatic power cut function (If a user doesn't press the START button within 10min of the
power being switched on, power is automatically cut off.)
(12) A self-examining function of any problems.
(13) The addition of clothing for different cycles is possible (the initial stage of the water supply,
the tub-temp low) after the begining of the wash.
(14) A noise-minimizing design for dehydration by employing a low-noise motor, a low-noise pump
andanoildamper.
(15) A Child Lock function (Safety Apparatus for protecting children)
(16) Shortens the drying time owing to the optimal drying system.
(17) Various drying courses (Normal, Sterilization, Low-temp)
(18) Automatically senses the amount of moisture to adjust the drying time.
(19) Uses the sterilization drying system for removing bacteria.
- 12 -
Samsung Electronics
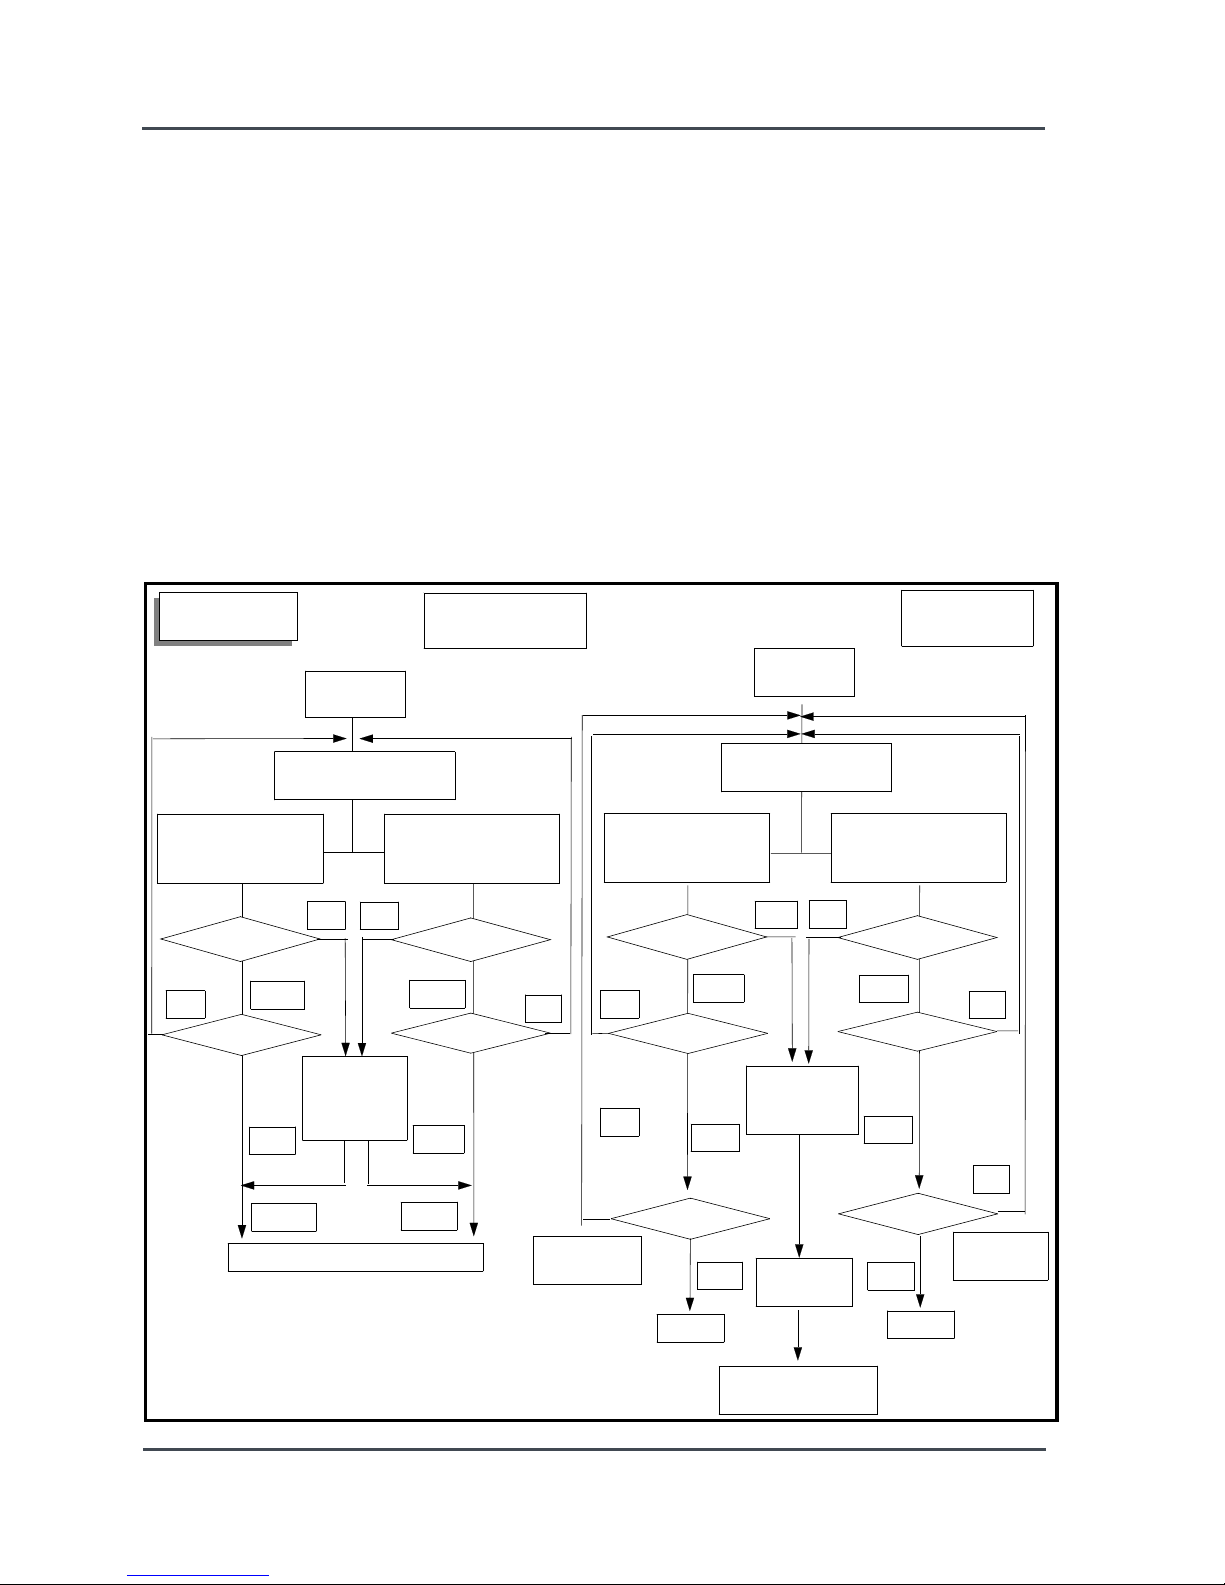
Reference 1. Un-Balance Sensing
The maximum rpm (600, 800, 1000, 1200rpm) for the main dehydration cycle is determined bythe
result of the Unbalance Sensing. And if the result of the Unbalance Sensing goes beyond the set
value, it performs a re-operation.
The restart of the operation begins from the clothes-untwisting cycle after pausing the Unbalance
Sensing.
For wash and rinse cycles (Unbalance Sensing)
If an Unbalance is sensed at a low speed, it performs the Unbalance Sensing a max. of 10 times.
And if sensed at a high speed, it does a max. of 5 times. If Unbalance is over the set value
thereafter, it performs the next cycle without performing dehydration.
For the final dehydration cycle (Unbalance Sensing)
If Unbalance is sensed at a low speed, it performs Unbalance Sensing a max. of 10 times. And if
sensed at a high speed, it does a max. of 5 times. If Unbalance is over the set value thereafter,
the water is supplied during the dehydration cycle to perform the cloth-untwisting cycle a max. of 3
times. However, in a case where 'Unbalances' exceed 3 times, an UE Error is displayed. If there
are no 'Unbalances' during the dehydration cycle, it directly performs dehydration regardless of the
intermediate stages such as dehydration during washing/rinse and final dehydration.
Restart of
Operation
For Final
Dehydration
Drain
Cycle
Cloth-untwisting
Cycle
Unbalance sensing
(low speed :85
~95rpm)
Retry
Simple
/Main
Dedydration
10times
YES
YES
Next Cycle
For
Washing/Rinse
Unbalance sensing
(low speed
:200~250rpm)
NO
NO
YES
Retry
5times
YES
YES
NO
YES
NO
Drain
Cycle
Cloth-untwisting
Cycle
Unbalance sensing
(low speed :85
~95rpm)
Retry
Simple
/Main
Dehydration
10times
YES
Unbalance sensing
(low speed
:200~250rpm)
NO
NO
YES
Retry
5times
YES
NO
YES
NO
Cloth-
untwisting
3times
3times
Error
Error
YES
YES
NO
NO
Re-supply
of Water
Re-supply
of Water
End of
Dehydration
- 13 -
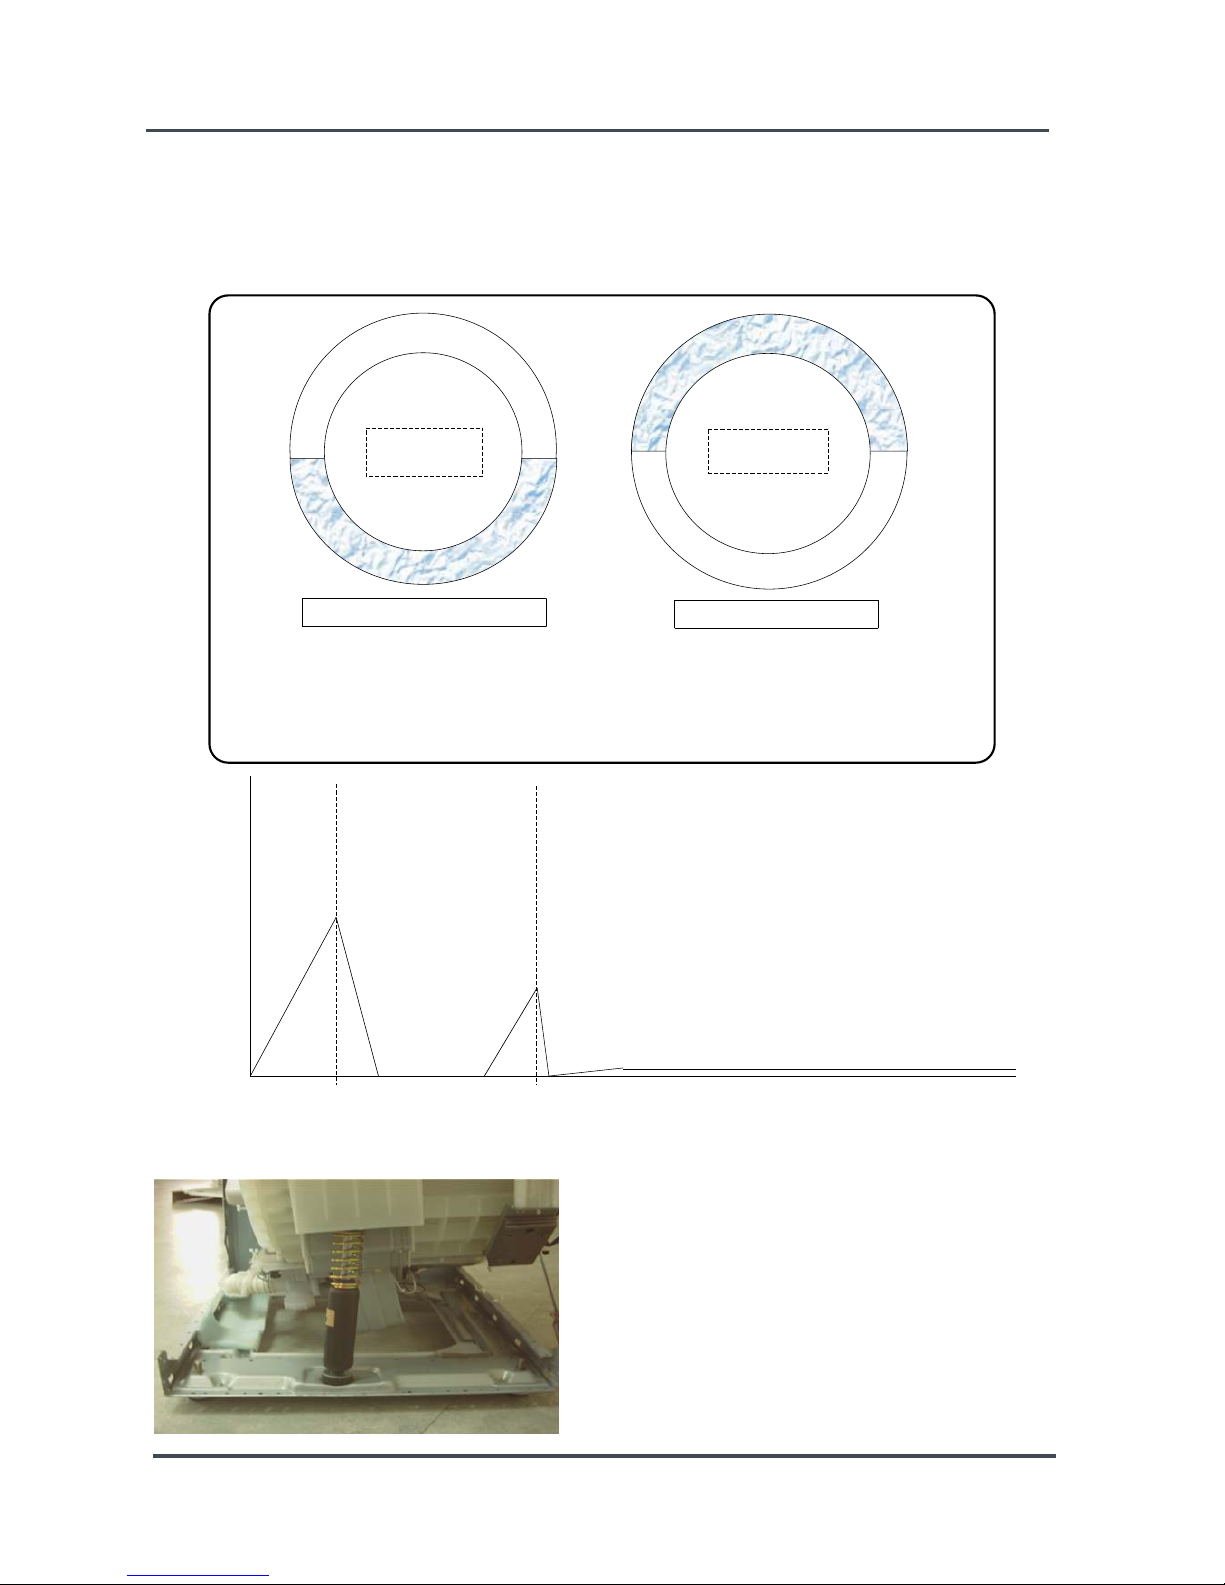
At Stop / Acceleration
Unbalance
The centers of gravity for both
'Unbalance' and 'liquid balance' face
downward.
At constant speed
The centers of gravity for both 'Unbalance'
and 'liquid balance' at a speed faster than
the resonance point face in the opposite
direction, so that it functions in a way to
remove the unbalance.
Reference 2. Liquid Balance
- Principle of Liquid Balance
The previous drum-type washing machines used to control 'Unbalances' on the principle of
weight so that the weight of the product was quite heavy, whereas this product decreases the
weight by employing a liquid balance..
Unbalance
언
발
란
스
의
크
기
속도
제1공진점
제 2 공진점
최종 탈수 속도 구간
(언발란스 < 500g)
Reference 3. Application of the oil damper
The application of the oil damper improves the
abrasion noise generated by the previous abrasion
damper, so that it decreases noise during
dehydration.
(A decrease of 5dB at maximum rpm of dehydration)
Volume
of
Unbalance
1st resonance
2nd resonance
period of final spinning speed
(Unbalance < 500g)
Speed
- 14 -
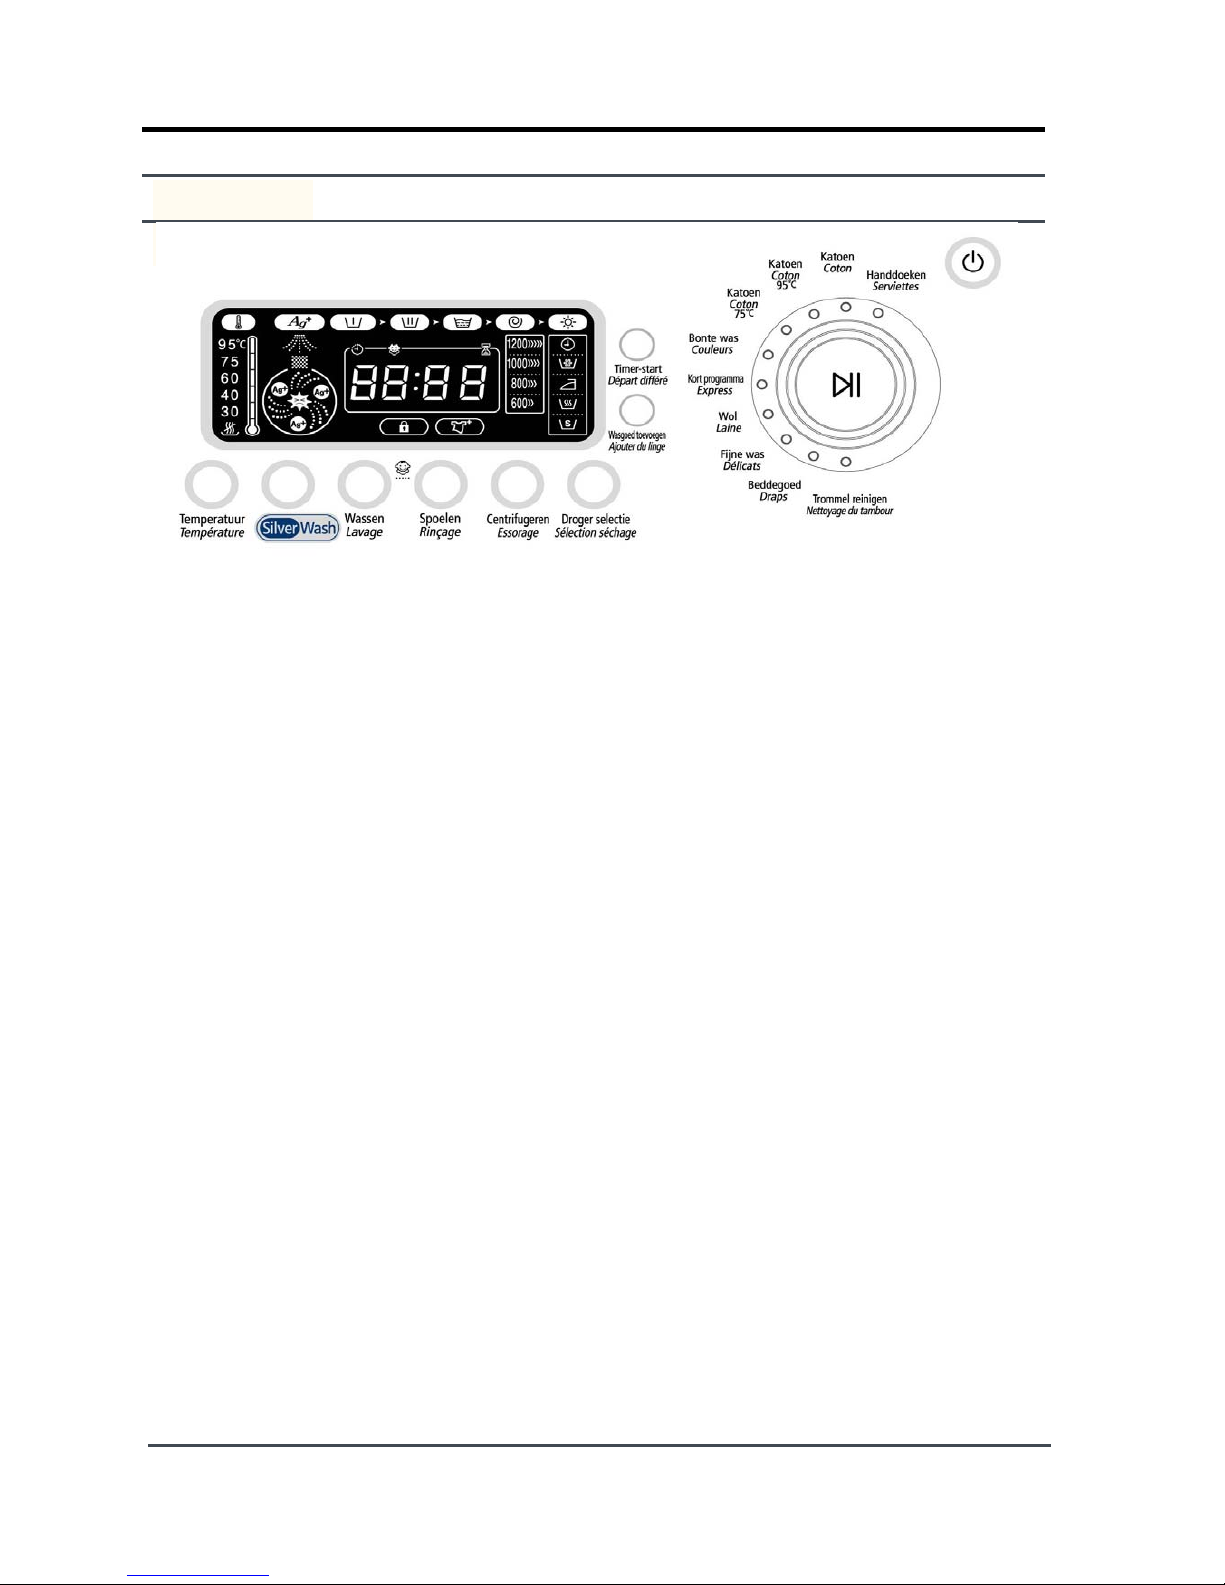
1. Cycle Display LED
●
It displays the present operating cycle and the setup cycle.
●
Pressing the Pause button displays the amount of cycles remaining.
2. Power Switch
●
This switches thepowerON/OFF.
3. Start Switch
●
This is used to Start/Pause the operation.
4. Jog Dial Switch
●
This selects one of the washing courses.
●
The order of the washing courses is as follows: Towel/Cotton/Cotton95℃/Cotton75℃/Coloureds
/Quick/Wool/Delicate/Bedding/Clean Tub.
5. Types of Functional Buttons
1) Temperature Setting Button
●
This sets the temperature of the wash.
●
However, there is a different temperature limit for each course.
●
The temperature can be selected in the successive order of
℃
(
Cold Water)→30
℃→40℃
→60℃→75℃→95℃
.
●
The selection of the temperature is only available for the Wash Cycle.
●
It is impossible to set the wash temperature during a wash.
●
If the wash temperature button is pressed during washing, the selected temperature is
displayed for 3 seconds.
●
If a temperature is selected, it switches the℃LED on.
2) Silver Wash Button
●
Silver Nano particles are supplied during the wash and rinse cycles.
●
The time consumed for the rinse cycle will be longer than for other courses.
●
You could not select the key after the start of any operation.
●
When you select the silver nano key in a single cycle mode, the cycle is set to the default
of the normal course and you can only select the silver nano key in wash or rinse cycles.
●
When the silver nano key is selected, the silver nano kit starts operating its anti-bacteria
function.
- Silver Sterilization: the silver nano kit starts operation in water supply for the washing
cycle or additional supply.
3-1. OVERVIEW OF THE CONTROL PANEL
3.
PRODUCT SPECIFICATIONS

- 15 -
- Silver Anti-bacteria: the silver nano kit starts operation in water supply for the last
rinse cycle.
●
When the silver nano key is selected, the last rinse time becomes longer than the others for
effective anti-bacteria feature.
●
When the silver nano key is selected, the silver nano LED turns on and when the wash or rinse
cycles are done, the LED turns off. And the LED blinks when the silver nano kit starts
operation or during the silver sterilization or anti-bacteria rinse cycles.
3) Wash Button
●
The user can select one in this order: Wash→Prewash→Wash Only
→
Prewash + Wash Only.
4) Rinse Button
●
The number of rinse times for each course can be selected in successive order
Number of Rinse Times→+3 times→+4 times→+5 times→6times→1time
ㆍㆍㆍ
.
The WASH and SPIN procedures will be deleted at this time. However, they are not
deleted if the Rinse Button is handled after the selection of Wash-Only or Spin-Only.
●
When the Rinse Button was selected, the number of rinse times can be selected from betwen
1 and 6 times for each course.
5) Spin Button
●
A rotation speed for the dehydration cycle can be selected in the following order:
800→1000→1200→600.
●
The WASH and RINSE procedures will be deleted at this time. However, they are not
deleted if the SPIN Button is selected after the selection of Wash-Only or SPIN-Only.
6) Drying Selector Button
●
The drying process is performed according to the steps below when the Drying button
is pressed.
- Standard → Sterilization → Easy Iron → Low temperature → Time setting (30min → 60min
→ 90min → 120min → 150min) → Cancel
●
The button does not perform a standalone cycle, but an additional course added to the
other cycles
●
When selecting Drying, the Drying icon is turned on and pressing it again turns it off.
●
This function cannot be selected after entering the drying cycle and is only changeable
when Paused. However, it cannot be selected in Pause mode when Drying for normal
courses has been selected.
●
It can only be selected in the Cotton, 95℃, 65℃, Coloureds, Quick or Dedicated Drying
courses
7) Delay Start Button
●
This button functions to reserve the end time of the function currently set. Set the
Delay Start time and press the START button to operate this function.
●
The Delay Start time can be selected in hourly units and in a 24 hour range.
●
It is impossible to change the Delay Start time and the course after the operation starts.
●
After selecting this function, the Delay Start LED stays ON for the whole duration time.
●
The Delay Start time decreases in hourly units.
8) Add Laundry Button
●
You can add laundry when a cycle or operation is in process or the door is closed under
conditions other than the door being unlocked and the temp. sensor of the fan housing

- 16 -
below 55℃.
- You cannot select the add laundry function during the Clean-tub course
●
When selecting the add laundry key, if the machine is already operating, the machine stops
temporarily.
●
When the add laundry key is pressed, the machine stops the drum rotating and drains the
water to below the door lock level.
Add Laundry
Pumping Rate
ON OFF
22 sec. 4 sec.
●
When the water level falls below the door-open level and the door is open, the add
laundry process is cancelled.
●
The add laundry LED turns on or off as below;
a. When the door is closed and the temp. sensor of the fan housing is below 70℃ and the water
is below 55℃, the add laundry LED turns on to inform you that the add laundry key can be
selected.
b. When the add laundry key is selected and the machine stops the drum rotating or drains
water, the add laundry LED blinks to inform you that it is in process.
c. When the door lock is off or the temperature is high, the add laundry LED turns off.
9) Start/Pause Button
This button enables the selection of one of two functions in the order of Pause→Start
→
Pause→Startㆍㆍ.
Door Unlock
Conditions
The water level is higher than 23.95kHz or the water temp is
below 55℃.
The temp. sensor of the fan housing is below 70℃.
The water level is below 22.90kHz (10Kg) or 22.60kHz (12Kg).
The drum has stopped rotating.
The door can be opened when all conditions above are satisfied.

- 17 -
6. Program Chart
①
.Jog-dialSwitch
This switch enables the selection of a course in the following order: Towel↔Cotton
↔
Cotton 95
℃↔
Cotton 75
℃↔
Coloureds↔Quick↔Wool↔Delicate↔Bedding
↔
Clean Tub.
The initial default value at the time of switching the Power on is Cotton Course.
②
. The initial default values for each course:
☞
Main Dehydration (rpm) means the maximum rotation speed that can be operated in case of a
small Unbalance. If there is a large Unbalance, a lower speed will be automatically set.
③
. Every course is set up with Encorder S/W, and cycles can be changed manually before
pressing the Start Button.
④
. It is possible to change some of the cycles even after hitting the Start Button. (Example:
the Rinse and Spin information can be changed during a wash)
⑤
.Ifoneofthecoursesisselected,thatLEDwillstayON.Butifthecourseisoperating,its
LED repeatedly displays On/Off every 0.7 second.
⑥
. The Wool and Delicate courses cannot be changed once the Start Button is pressed.
⑦
.The95℃and 65℃courses cannot be changed once the heater starts.
Course Capacity
Default
Temp.
Rinse
Main
Dehydration
(rpm)
Preliminary
Washing
Temperature
selectable
Towel 5 kg 40
℃
3 times 600 Selectable
cold water,
40℃,95
℃
Cotton 10 kg 40
℃
3 times 800 Selectable
cold water,
30℃,40℃,60
℃
Cotton 95
℃
7kg 95
℃
3 times 800 Selectable 75℃,95
℃
Cotton 75
℃
7kg 75
℃
3 times 800 Selectable 60℃,75
℃
Coloureds 10 kg 40
℃
3 times 800 Selectable 40℃,60
℃
Quick 5 kg 40
℃
2times 800 -
cold water,30℃,
40
℃
Wool 4 Kg
(Cold
Water)
3times 600 -
cold water,30℃,
40
℃
Delicate 4 Kg
(Cold
Water)
3times 600 -
cold water,30℃,
40
℃
Bedding 5 kg
(Cold
Water)
3 times 800 Selectable
cold water,30℃,
40
℃
Clean Tub
--
2times
--40℃

- 18 -
7. Function Buttons
1) The Function Buttons have 75±16.7ms of the effective time of pressing.
2) If the press of a Function Button is sensed, a function button sound is heard.
3) If two or more buttons are pressed, the button pressed first will be selected.
(Except for special buttons (Power Button))
4) Cases where Function Buttons are not selectable:
①
. No buttons can be selected after pressing the Start command, except the Power Button,
the Start/Pause Button, and the Child Lock Button.
②
. The selection of the Wash Temperature is not accepted if a cold course was already
selected.
③
. In the case where an Error is generated, all buttons except the Power and Start buttons
cannot be selected.
④
. If the Child Lock function is set, only the Power and Child Lock Release buttons can be
selected.
⑤
. Completed cycles cannot be selected again.
8. Detailed Information for Each Cycle
1) Common Information for Every Cycle
①
. If each cycle is selected, it progresses in the following order:
(Prewash)→Wash→Spin→Rinse→Spin→Rinse
→
Spin→Rinse→Final Spin→End
②
. If the Start/Pause button is pressed during the operation of a cycle, it stops that cycle. One
more press of the button will re-start that cycle. (In this manner: Stop→Start→Stop
→ㆍㆍ
)
③
. During the pause the remaining time does not decrease and every steering part (Motor, Valve,
Heater, ect.) stays in the OFF condition.
④
. The LED display of each course and the cycle stays On at the time of selection, while it
refreshes every 0.7 second while operating. The LED of a finished cycle turns OFF.
⑤
. A buzzer will sound every time a cycle is set up.
⑥
. It is possible to change the course and cycle with the function buttons during the operation of
a course. (Except for the Lingerie and Wool Courses)
⑦
. If users swich on the Power, a melody plays once.
⑧
. It is not possible to select any button, except the Power Button, while the melody sounds.
⑨
. When the Power is switched On, the steering parts (Motor, Valve, Heater, etc.) are in an Off
conditionandtheCottonCourseisselectedasdefault.
2) Wash Cycle
The Wash Cycle performs the following operations: Water Supply/ Water Stirring/ Wetting/
Heating/ Washing/ Cooling/Drain.
( Wetting/Heating/Cooling cycles are performed only when the temperature is set to over 40℃.)

- 19 -
3) Water Supply Function
①
When selecting Wash
-. Water is supplied through cold water + hot water(option) valves to the frequency level of the
wash set up for each course.
(The hot-water valve does not operate when the temperature is set to below 60℃.)
If the wash temperature is set to over 40℃for each course, it supplies water to
the set-up level and performs a Wetting Cycle and then starts the Heating cycle.
-. When the water level decreases during the Wetting Cycle after the end of the water
supply, it supplies water using a supplementary water-supply function.
(Except for the Wool and Lingerie courses)
-. Conditions of the Hot-Water Supply (Option)
●
For a temperature setup of over 60℃the cold/hot water valves operate at the same time.
●
Both cold and hot water are used for steering the water level and as supplementary water.
4) Drying Function
① When the drying function starts, the heater, fan/M, drying water supply and drainage motor
perform their operations, running the washing motor using a stream of water.
② The drying cycle is processed in the order below:
- Detection of Drying Amount
- Primary Drying: Operates the 2000W heater (2 1000W heaters)
- Secondary Drying: Operates the 1000W heater
- Ventilation: When the drying cycle is done with dryness sensing, the washer turns off
the heater and only runs the fan motor, lowering the temperature inside the drum.
All cycles are completed when the temperature of the internal sensor (air sensing) is
below 70℃ (60℃ inside of the drum).
③ Dedicated Drying Course Algorithm
a. When selecting Dedicated Drying, the drying cycle starts to operate and completes
its operation once cooling has ended.
b. During the initial drying operation, if the water level goes over a certain level,
pre-heating is added before dehydrating. When selecting a drying time, the washer
enters the drying cycle directly without sensing the dry amount. When select a
drying option, drying is performed after twice sensing the dry amount.
c. If pre-heating is added to dehydrating, the display time increases by 17 minutes.
d. Selecting the Drying Time does not require detecting the drying amount while the
Drying Option does require detecting the amount twice when the remaining time is
displayed.
④ Algorithm when adding Drying to normal courses
a. The drying feature can be added to courses other than wool, lingerie, quilt and
drum washing.
b. When drying is added, the last dehydrating cycle is converted from normal to pre-heat.
When all normal cycles are done before the drying process starts, the washer senses
the drying amount to reset the drying time and displays the remaining time.
(For Drying added by the Drying Option)

- 20 -
5) SOFT KEEP
① When all cycles are done along with Drying, the END feature starts to operate. Once this is
completed, if you do not remove the laundry, the washer rotates the drum in reverse to avoid
wrinkles.
② The reverse-rotation continues up to 30 minutes after the completion of all cycles.
③ The SOFT KEEP time does not belong to the total washing time.
④ When all cycles are done, the END MELODY is performed and the door lock is switched off.
(However, the door stays locked while the tube is running)
⑤ When opening the door while rotating, all motor and display functions stop operating and
turn off.
⑥ While the Soft Keep feature runs after the washer performs all cycles and the first End
Melody function, the End Melody feature operates every ten minutes and the End message is
continually displayed.
⑦ The rotating direction of the motor is displayed in the same way as that of the drum while
the washer performs Soft Keep.
⑧ No operating keys are activated and even if pressed, they are automatically switched off
while in Soft Keep.
 Loading...