Samsung WF700B4BKWQ, WF702B4BKWQ, WF602B4BKWQ User Manual

WF702Y4BK** WF702Y2BK**

WF700Y4BK** WF700Y2BK**

WF602Y4BK** WF602Y2BK**

WF600Y4BK** WF600Y2BK**

WF702B4BK** WF702B2BK**

WF700B4BK** WF700B2BK**

WF602B4BK** WF602B2BK**

WF600B4BK** WF600B2BK**

Washing Machine

user manual

This manual is made with 100% recycled paper.

imagine the possibilities

Thank you for purchasing this Samsung product. To receive more complete service, please register your product at

www.samsung.com/register

WF702Y4BK-03149D_EN.indd 1

2012-4-16 11:33:40

features of your new samsung washing machine

Your new washing machine will change the way you feel about doing laundry. From its super-size capacity to its energy efficiency, the Samsung washing machine has all the features to turn a mundane chore into a pleasure.

t &OFSHZ 4BWJOH

This model offers more efficient energy use compared to standard A rated machine with the special Bubble generator system and Samsung Inverter motor.

t -FTT /PJTF 7JCSBUJPO

This Samsung washer performs very quietly minimizing noise and vibration with smart control technology, which enables it to maintain the lowest possible vibration. Thus, the drum keeps

perfect balance.

t 2VJDL 8BTI

No time to waste! Our 15 minute Quick Wash will allow you to Wash and Run.Our Quick Wash programme can help with your busy life - now you can wash your favourite clothes (up to 2Kg) in just 15 minutes!

t &DP %SVN $MFBO

Using Eco Drum Clean helps to keep washing machine clean even without any chemical detergent or bleach. Keep your drum clean and odorless with specialized cleaning program.

t #BCZ $BSF

Your Samsung washing machine includes wash programs that add protection to the clothing of children with sensitive skin.

These programs reduce skin irritation in children by minimizing detergent residue. In addition, these programs classify laundry into various types and the wash is performed according to the laundry characteristics so that children’s clothes feel refreshingly clean whenever they are put on.

t )BOE 8BTI

Special care can be determined by the appropriate temperature, the gentle wash action and the appropriate amount of water.

2_ features

WF702Y4BK-03149D_EN.indd 2

2012-4-16 11:33:41

t $IJME -PDL

The Child Lock function ensures that curious little hands are kept out of your washing machine.

This safety feature stops your children from playing with the operation of the washing machine, and alerts you when it is activated.

t %FMBZ &OE

Delay a cycle for up to 19 hours in one-hour increments and increase the convenience of using your washing machine especially when you have to go out.

t %JHJUBM (SBQIJD %JTQMBZ

The Digital Graphic Display control panel is clear and easy to use for minimum fuss and hassle. And while it is easy to operate, the Digital Graphic Display enables you to make quick and accurate adjustments to your wash for excellent washing results.

t "RVB )PTF -FBLBHF 4FOTPS 4FMFDUFE NPEFMT

The smartly designed water safety system for Samsung washing machines includes an intelligent hose for stopping water leaks at the source and leakage sensor at the bottom. If the hose breaks or if water leaks are detected, an internal sponge will expand to block water from the spigot.

This manual contains important information on the installation, use, and care of your new Samsung washing machine. Refer to it for descriptions of the control panel, instructions on how to use the washing machine, and tips for making the most of its state-of-the-art features and functions. The “Troubleshooting and information codes” section on page 35 tells you what to do if something goes wrong with your new washing machine.

features _3

WF702Y4BK-03149D_EN.indd 3

2012-4-16 11:33:41

safety information

Congratulations on your new Samsung ActivFresh™ washer. This manual contains important information on the installation, use and care of your appliance. Please take time to read this manual to take full advantage of your washer’s many benefits and features.

8)"5 :06 /&&% 50 ,/08 "#065 4"'&5: */4536$5*0/4

Please read this manual thoroughly to ensure that you know how to safely and efficiently operate the extensive features and functions of your new appliance and retain it at a safe place near the appliance for your future reference. Use this appliance only for its intended purpose as described in this instruction manual.

Warnings and Important Safety Instructions in this manual do not cover all possible conditions and situations that may occur. It is your responsibility to use common sense, caution, and care when installing, maintaining, and operating your washer.

Because these following operating instructions cover various models, the characteristics of your washer may differ slightly from those described in this manual and not all warning signs may be applicable. If you have any questions or concerns, contact your nearest service center or find help and information online at www.samsung.com.

*.1035"/5 4"'&5: 4:.#0-4 "/% 13&$"65*0/4

8IBU UIF JDPOT BOE TJHOT JO UIJT VTFS NBOVBM NFBO


Hazards or unsafe practices that may result in TFWFSF QFSTPOBM JOKVSZ

WARNING

EFBUI BOE PS QSPQFSUZ EBNBHF


Hazards or unsafe practices that may result in QFSTPOBM JOKVSZ BOE PS

CAUTION

QSPQFSUZ EBNBHF.


To reduce the risk of fire, explosion, electric shock, or personal injury

CAUTION

when using your washer, follow these basic safety precautions:


Do NOT attempt.


Do NOT disassemble.


Do NOT touch.


Follow directions explicitly.


Unplug the power plug from the wall socket.


Make sure the machine is grounded to prevent electric shock.


Call the service centre for help.


Note


5IFTF XBSOJOH TJHOT BSF IFSF UP QSFWFOU JOKVSZ UP ZPV BOE PUIFST 1MFBTF GPMMPX UIFN FYQMJDJUMZ "GUFS SFBEJOH UIJT TFDUJPO LFFQ JU JO B TBGF QMBDF GPS GVUVSF SFGFSFODF

Read all instructions before using the appliance.

As with any equipment using electricity and moving parts, potential hazards exist. To safely operate this appliance, become familiar with its operation and exercise care when using it.

4_ safety information

WF702Y4BK-03149D_EN.indd 4

2012-4-16 11:33:44

Do not let children (or pets) play on or in your washing machine. The washing machine door does not open easily from the inside, and children may be seriously injured if trapped inside.

This appliance is not intended for use by persons (including children) with reduced physical, sensory or

8"3/*/( mental capabilities, or lack of experience and knowledge, unless they have been given supervision or instruction concerning use of the appliance by a person responsible for their safety.

Children should be supervised to ensure that they do not play with the appliance.

If the plug (power supply cord) is damaged, it must be replaced by the manufacturer or its service agent or a similarly qualified person in order to avoid a hazard.

This appliance should be positioned to be accessible to the power plug, the water supply tabs and the drain pipes.

For washing machines with ventilation openings in the base, ensure that the opening is not obstructed by carpet or any other obstacles.

Use the new hose-sets and old hose-sets should not be reused.

*/4536$5*0/ "#065 5)& 8&&& ."3,

Correct Disposal of This Product (Waste Electrical & Electronic

Equipment)

(Applicable in the European Union and other European countries with separate collection systems)

This marking on the product, accessories or literature indicates that the product and its electronic accessories (e.g. charger, headset, USB cable) should not be disposed of with other household waste at the end of their working life. To prevent possible harm to the environment or human health from uncontrolled waste disposal, please separate these items from other types of waste and recycle them responsibly to promote the sustainable reuse of material resources.

Household users should contact either the retailer where they purchased this product, or their local government office, for details of where and how they can take these items for environmentally safe recycling.

Business users should contact their supplier and check the terms and conditions of the purchase contract. This product and its electronic accessories should not be mixed with other commercial wastes for disposal.

safety information _5

WF702Y4BK-03149D_EN.indd 5

2012-4-16 11:33:45

safety information

8"3/*/( 4&7&3& 8"3/*/( 4*(/4 '03 */45"--"5*0/

The installation of this appliance must be performed by a qualified technician or service company.

-Failure to do so may result in electric shock, fire, an explosion, problems with the product, or injury.

The appliance is heavy, take care upon lifting it

Plug the power cord into an AC 220V/50Hz/15A wall socket or higher and use the socket for this appliance only. In addition, do not use an extension cord.

-Sharing a wall socket with other appliances using a power strip or extending the power cord may result in electric shock or fire.

-Ensure that the power voltage, frequency and current are the same as those of the product specifications. Failure to do so may result in electric shock or fire. Failure Plug the power plug into the wall socket firmly.

Remove all foreign substances such as dust or water from the power plug terminals and contact points using a dry cloth on a regular basis.

-Unplug the power plug and clean it with a dry cloth.

-Failure to do so may result in electric shock or fire.

Plug the power plug into the wall socket in the right direction so that the cord runs towards the floor.

-If you plug the power plug into the socket in the opposite direction, the electric wires within the cable may be damaged and this may result in electric shock or fire.

Keep all packaging materials well out of the reach of children, as packaging materials can be dangerous to children.

- If a child places a bag over its head, it may result in suffocation.

When the appliance or power plug or power cord is damaged, contact your nearest service centre.

This appliance must be properly grounded.

Do not ground the appliance to a gas pipe, plastic water pipe, or telephone line.

-This may result in electric shock, fire, an explosion, or problems with the product

-Never plug the power cord into a socket that is not grounded correctly and make sure that it is in accordance with local and national codes.

Do not install this appliance near a heater, inflammable material.

Do not install this appliance in a humid, oily or dusty location, in a location exposed to direct sunlight and water (rain drops).

Do not install this appliance in a location of low temperature - Frost may cause tubes to burst

Do not install this appliance in a location where gas may leak. - This may result in electric shock or fire.

Do not use an electric transformer.

- It may result in electric shock or fire.

Do not use a damaged power plug, damaged power cord or loose wall socket. - This may result in electric shock or fire.

Do not pull or excessively bend the power cord.

Do not twist or tie the power cord.

6_ safety information

WF702Y4BK-03149D_EN.indd 6

2012-4-16 11:33:45

Do not hook the power cord over a metal object, place a heavy object on the power cord, insert the power cord between objects, or push the power cord into the space behind the appliance.

- This may result in electric shock or fire.

Do not pull the power cord, when unplugging the power plug.

-Unplug the power plug by holding the plug.

-Failure to do so may result in electric shock or fire.

Do not lay the power cord and tubes where you may fall over them.

$"65*0/ $"65*0/ 4*(/4 '03 */45"--"5*0/

This appliance should be positioned in such a way that it is accessible to the power plug. - Failure to do so may result in electric shock or fire due to electric leakage.

Install your appliance on a level and hard floor that can support its weight.

-Failure to do so may result in abnormal vibrations, moves, noise, or problems with the product.

8"3/*/( 4&7&3& 8"3/*/( 4*(/4 '03 64*/(

If the appliance is flooded, cut the water supply and power immediately and contact your nearest service centre.

-Do not tough the power plug with wet hands

-Failure to do so may cause electric shock

If the appliance generates a strange noise, a burning smell or smoke, unplug the power plug immediately and contact your nearest service centre.

- Failure to do so may result in electric shock or fire.

In the event of a gas leak (such as propane gas, LP gas, etc.), ventilate immediately without touching the power plug. Do not touch the appliance or power cord.

-Do not use a ventilating fan.

-A spark may result in an explosion or fire.

Do not let children play in or on the washer. In addition, when disposing of the appliance, remove the washer door lever.

- If trapped inside, the child may become trapped and suffocate to death.

Make sure to remove the packaging (sponge, styrofoam) attached to the bottom of the washer before using it.

safety information _7

WF702Y4BK-03149D_EN.indd 7

2012-4-16 11:33:45

safety information

Do not wash items contaminated with gasoline, kerosene, benzene, paint thinner, alcohol or other flammable or explosive substances.

- This may result in electric shock, fire or an explosion.

Do not open the washer door by force while it is operating (high-temperature washing/ drying/spinning).

- Water flowing out of the washer may result in burns or cause the floor to be slippery.

This may result in injury.

- Opening the door by force may result in damage to the product or injury.

Do not insert your hand under the washer. - This may result in injury.

Do not touch the power plug with wet hands. - This may result in electric shock.

Do not turn the appliance off by unplugging the power plug while an operation is in progress.

-Plugging the power plug into the wall socket again may cause a spark and result in electric shock or fire.

Do not let children or infirm persons use this washer unsupervised. Do not let children climb in the appliance

- Failure to do so may result in electric shock, burns or injury.

Do not insert your hand or a metal object under the washer while it is operating. - This may result in injury.

Do not unplug the appliance by pulling at the power cord, always grip plug firmly and pull straight out from the outlet.

- Damage to the cord may cause short-circuit, fire and/or electric shock

Do not attempt to repair, disassemble, or modify the appliance yourself.

-Do not use any fuse(such as cooper, steel wire, etc.) other than the standard fuse.

-When repairing or reinstalling the appliance is required, contact your nearest service centre.

-Failure to do so may result in electric shock, fire, problems with the product, or injury.

If any foreign substance such as water has entered the appliance, unplug the power plug and contact your nearest service centre.

- Failure to do so may result in electric shock or fire.

When the water supply hose comes loose from the faucet and floods the appliance, unplug the power plug.

- Failure to do so may result in electric shock or fire.

Unplug the power plug when the appliance is not being used for long periods of time or during a thunder/lightning storm.

- Failure to do so may result in electric shock or fire.

8_ safety information

WF702Y4BK-03149D_EN.indd 8

2012-4-16 11:33:46

$"65*0/ $"65*0/ 4*(/4 '03 64*/(

When the washer is contaminated by a foreign substance such as detergent, dirt, food waste, etc., unplug the power plug and clean the washer using a damp and soft cloth. - Failure to do so may result in discoloration, deformation, damage or rust.

The front glass may be broken by a strong impact. Take care when using the washer. - When the glass is broken, it may result in injury.

After a water supply failure or when reconnecting the water supply hose, open the faucet slowly.

Open the faucet slowly after a long period of non-use.

-The air pressure in the water supply hose or the water pipe may result in damage to a part or in water leakage.

If a drain error occurs during an operation, check if there is a draining problem.

-If the washer is used when it is flooded because of a draining problem, it may result in electric shock or fire due to electric leakage.

Insert the laundry into the washer completely so that laundry does not get caught in the door.

-If laundry gets caught in the door, it may result in damage to the laundry or the washer, or result in water leakage.

Ensure that the faucet is turned off when the washer is not being used.

-Ensure that the screw on the water supply hose connector is properly tightened.

-Failure to do so may result in property damage or injury.

Check if the rubber seal is not contaminated by foreign substances (waste, thread, etc). - If the door is not closed completely, it may result in water leakage.

Open the faucet and check if the water supply hose connector is firmly tightened and that there is no water leaking before using the product.

-If the screws or the water supply hose connector are loose, it may result in water leakage.

The product you have purchased is designed for domestic use only.

The use for business purposes qualifies as product misuse.

In this case, the product will not be covered by the standard warranty provided by Samsung and no responsibility can be attributed to Samsung for malfunctions or damages resulting from such misuse.

safety information _9

WF702Y4BK-03149D_EN.indd 9

2012-4-16 11:33:46

safety information

Do not stand on top of the appliance or place objects (such as laundry, lighted candles, lighted cigarettes, dishes, chemicals, metal objects, etc.) on the appliance.

- This may result in electric shock, fire, problems with the product, or injury.

Do not spray volatile material such as insecticide onto the surface of the appliance.

-As well as being harmful to humans, it may also result in electric shock, fire or problems with the product.

Do not place an object that generates a electromagnetic field near the washer. - This may result in injury due to a malfunction.

Since the water drained during a high-temperature wash or drying cycle is hot, do not touch the water.

- This may result in burns or injury.

Do not wash, spin or dry water-proof seats, mats or clothing (*) unless your appliance has a special program for washing these items.

-Do not wash thick, hard mats even if the washer mark is on the care label.

-This may result in injury or damage to the washer, walls, floor or clothing due to abnormal vibrations.

*Woollen bedding, rain covers, fishing vests, ski pants, sleeping bags, diaper covers, sweat suits, and bicycle, motor cycle, car covers, etc.

Do not operate the washer when the detergent box is removed. - This may result in electric shock or injury due to water leakage.

Do not touch the inside of the tub during or just after drying as it is hot. - This may result in burns.

Do not insert your hand into the detergent box after opening it.

-This may result in injury as your hand may be caught by the detergent input device.Do not place any objects (such as shoes, food waste, animals) other than laundry into the washer.

-This may result in damage to the washer, or injury and death in the case of pets due to the abnormal vibrations.

Do not press the buttons using sharp objects such as pins, knifes, fingernails, etc. - This may result in electric shock or injury.

Do not wash laundry contaminated by oils, creams or lotions usually found in skincare shops or massage clinics.

- This may result in the rubber seal becoming deformed and water leakage.

Do not leave metal objects such as a safety pin or hair pin, or bleach in the tub for long periods of time.

-This may cause the tub to rust.

-If rust starts appearing on the surface of the tub, apply a cleansing agent (neutral) to the surface and use a sponge to clean it. Never use a metal brush.

Do not use dry cleaning detergent directly and do not wash, rinse, or spin laundry contaminated by dry cleaning detergent.

-This may result in spontaneous combustion or ignition due to the heat of the oxidation of the oil.

Do not use hot water from water cooling/heating devices. - This may result in problems with the washer.

10_ safety information

WF702Y4BK-03149D_EN.indd 10

2012-4-16 11:33:46

Do not use natural hand-washing soap for the washer.

-If it hardens and accumulates inside the washer, it may result in problems with the product, discoloration, rust or bad odors.

Do not wash large laundry items such as bedding in the washing net.

-Place socks and brassieres into the washing net and wash them with the other laundry.

-Failure to do so may result in injury due to abnormal vibrations.

Do not use hardened detergent.

- If it accumulates inside the washer, it may result in water leakage.

For washing machines with ventilation openings in the base, ensure that the opening is not obstructed by carpet or any other obstacles.

Make sure that the pockets of all clothing to be washed are empty.

-Hard, sharp objects, such as coins, safety pins, nails, screws, or stones can cause extensive damage to the appliance.

Do not wash clothing with large buckles, buttons, or other heavy metal.

8"3/*/( 4&7&3& 8"3/*/( 4*(/4 '03 $-&"/*/(

Do not clean the appliance by spraying water directly onto it. Do not use benzene, thinner or alcohol to clean the appliance.

- This may result in discoloration, deformation, damage, electric shock or fire.

Before cleaning or performing maintenance, unplug the appliance from the wall socket. - Failure to do so may result in electric shock or fire.

safety information _11

WF702Y4BK-03149D_EN.indd 11

2012-4-16 11:33:46

contents

SETTING UP YOUR WASHING MACHINE

13

WASHING A LOAD OF LAUNDRY

21

CLEANING AND MAINTAINING YOUR WASHING MACHINE

30

TROUBLESHOOTING AND INFORMATION CODES

35

CYCLE CHART

37

APPENDIX

38

APPENDIX

40

12_ contents

13Checking the parts

14Meeting installation requirements

14Electrical supply and grounding

14Water Supply

15Drain

15

Flooring

15

Surrounding temperature

15

Alcove or closet installation

15

Installing your washing machine

21Washing for the first time

21Basic instructions

22Using the control panel

25Child lock

25Sound off

25Delay end

26

My cycle

26Washing clothes using the cycle selector

27Washing clothes manually

27Laundry guidelines

28Detergent and additives information

28Which detergent to use

29Detergent drawer

29Liquid Detergent (Selected models)

30Eco drum clean

31Draining the washing machine in an emergency

32Cleaning the detergent drawer and drawer recess

33Cleaning the debris filter

33Cleaning the exterior

34Cleaning the water hose mesh filter

34Repairing a frozen washing machine

34Storing your washing machine

35Check these points if your washing machine...

36Information codes

37Cycle chart

38Fabric care chart

38Protecting the environment

38Declaration of conformity

39Specifications

40Sheet of household washing machines

WF702Y4BK-03149D_EN.indd 12

2012-4-16 11:33:46

Samsung WF700B4BKWQ, WF702B4BKWQ, WF602B4BKWQ User Manual

setting up your washing machine

Be sure to have your installer follow these instructions closely so that your new washing machine works properly and so that you’re not at risk of injury when doing laundry.

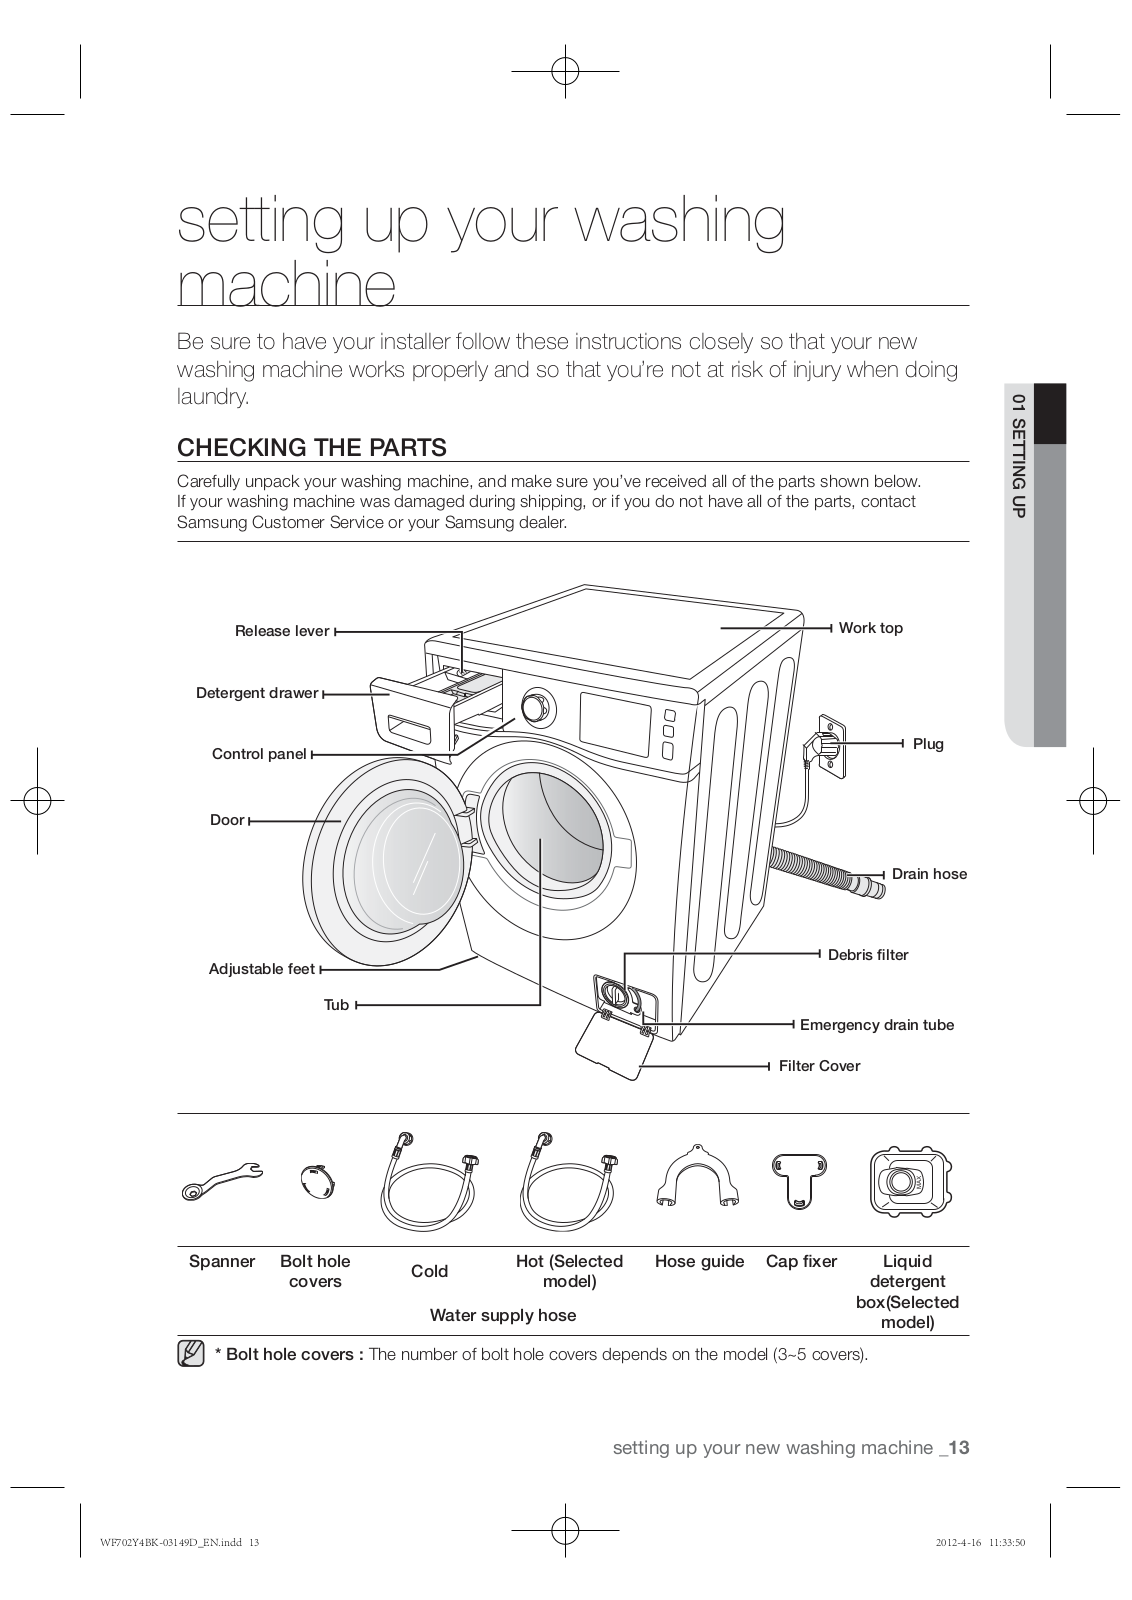
$)&$,*/( 5)& 1"354

Carefully unpack your washing machine, and make sure you’ve received all of the parts shown below. If your washing machine was damaged during shipping, or if you do not have all of the parts, contact Samsung Customer Service or your Samsung dealer.

UP SETTING 01

3FMFBTF MFWFS

8PSL UPQ

%FUFSHFOU ESBXFS

1MVH

$POUSPM QBOFM

%PPS

%SBJO IPTF

%FCSJT mMUFS

"EKVTUBCMF GFFU

5VC

&NFSHFODZ ESBJO UVCF

'JMUFS $PWFS

4QBOOFS #PMU IPMF

$PME

)PU 4FMFDUFE )PTF HVJEF $BQ mYFS

-JRVJE

DPWFST

NPEFM

EFUFSHFOU


8BUFS TVQQMZ IPTF

CPY 4FMFDUFE

NPEFM


* #PMU IPMF DPWFST The number of bolt hole covers depends on the model (3~5 covers).

setting up your new washing machine _13

WF702Y4BK-03149D_EN.indd 13

2012-4-16 11:33:50

setting up your washing machine

.&&5*/( */45"--"5*0/ 3&26*3&.&/54

&MFDUSJDBM TVQQMZ BOE HSPVOEJOH

To prevent unnecessary risk of fire, electrical shock, or personal injury, all wiring and grounding must be done in accordance with the National Electrical Code ANSI/FNPA, No. 70 Latest Revision and local codes and ordinances. It is the personal responsibility of the appliance owner to provide adequate electrical service for this appliance.

Never use an extension cord.

8"3/*/( Use only the power cord that comes with your washing machine.

When preparing for installation, ensure that your power supply offers: t AC 220-240V / 50Hz fuse or circuit breaker

t Individual branch circuit serving only your washing machine

Your washing machine must be grounded. If your washing machine malfunctions or breaks down, grounding will reduce the risk of electric shock by providing a path of least resistance for the electric current.

Your washing machine comes with a power cord having a three-prong grounding plug for use in a properly installed and grounded outlet.

Never connect the ground wire to plastic plumbing lines, gas lines, or hot water pipes.

Improperly connecting the equipment-grounding conductor can result electrical shock. Check with a qualified electrician or serviceman if you are unsure if the washing machine is

properly grounded. Do not modify the plug provided with the washing machine. If it does not fit the outlet, have a proper outlet installed by a qualified electrician.

8BUFS 4VQQMZ

Your washing machine will fill properly when your water pressure is 50 kPa ~ 800 kPa. Water pressure less than 50 kPa may cause water valve failure, not allowing the water valve to shut off completely. Or, it may take the washing machine longer to fill than what the controls allow, resulting in your washing machine turning off. (A fill-time limit, designed to prevent overflows/ flooding if an internal hose becomes loose, is built into the controls.)

The water taps must be within 120cm of the back of your washing machine for the provided inlet hoses provided to reach your washing machine.

Most plumbing supply stores sell inlet hoses of various lengths up to 305 cm long.

You can reduce the risk of leaks and water damage by:

t .BLJOH XBUFS UBQT FBTJMZ BDDFTTJCMF

t 5VSOJOH PGG UBQT XIFO UIF XBTIJOH NBDIJOF JT OPU JO VTF t 1FSJPEJDBMMZ DIFDLJOH GPS MFBLT BU XBUFS JOMFU IPTF mUUJOHT

Before using your washing machine for the first time, check all connections at the water 8"3/*/( valve and taps for leaks.

14_ setting up your new washing machine

WF702Y4BK-03149D_EN.indd 14

2012-4-16 11:33:51

%SBJO

Samsung recommends a standpipe height of 65cm. The drain hose must be routed through the drain hose clip to the standpipe. The standpipe must be large enough to accept the outside diameter of the drain hose. The drain hose is attached at the factory.

'MPPSJOH

For best performance, your washing machine must be installed on a solidly constructed floor. Wood floors may need to be reinforced to minimize vibration and/or unbalanced loads. Carpeting and soft tile surfaces are contributing factors to vibrations and the tendency for your washing machine to move slightly during the spin cycle.

Never install your washing machine on a platform or poorly supported structure.

4VSSPVOEJOH UFNQFSBUVSF

Do not install your washing machine in areas where water may freeze, since your washing machine always retains some water in its water valve, pump, and hose areas. Frozen water in the lines can cause damage to belts, the pump, and other components.

"MDPWF PS DMPTFU JOTUBMMBUJPO

To operate safely and properly, your new washing machine requires minimum clearances of:

Sides – 25 mm

Rear – 50 mm

Top – 25 mm

Front – 465 mm

If both the washing machine and a dryer are installed together, the front of the alcove or closet must have at least 465 mm unobstructed air opening. Your washing machine alone does not require a specific air opening.

*/45"--*/( :063 8"4)*/( ."$)*/&

STEP 1

4FMFDUJOH B MPDBUJPO

Before you install the washing machine, make sure the location:

t )BT B IBSE MFWFM TVSGBDF XJUIPVU DBSQFUJOH PS nPPSJOH UIBU NBZ PCTUSVDU WFOUJMBUJPO t *T BXBZ GSPN EJSFDU TVOMJHIU

t )BT BEFRVBUF WFOUJMBUJPO

t 8JMM OPU CF GSFF[JOH CFMPX $

t *T BXBZ GSPN IFBU TPVSDFT TVDI BT PJM PS HBT

t )BT FOPVHI TQBDF TP UIBU UIF XBTIJOH NBDIJOF EPFTO U TUBOE PO JUT QPXFS DPSE

setting up your new washing machine _15

UP SETTING 01

WF702Y4BK-03149D_EN.indd 15

2012-4-16 11:33:51

setting up your washing machine

STEP 2

3FNPWJOH UIF TIJQQJOH CPMUT

Before installing the washing machine, you must remove the five shipping bolts from the back of the unit.

1. Loosen all the bolts with the supplied wrench.

0QUJPO

2. Hold the bolt with the spanner and pull it through the wide


section of the hole. Repeat for each bolt.

0QUJPO

3. Fill the holes with the supplied plastic covers.

0QUJPO

4.Store the shipping bolts away safely in case you have to move the washing machine in the future.

Packaging materials can be dangerous to children; keep all packaging material (plastic 8"3/*/( bags, polystyrene, etc.) well out of the reach of children.

Insert the cap fixer, (one of the accessories in the vinyl pack), into the hole from which you removed the power cord at the back of the product.

16_ setting up your new washing machine

WF702Y4BK-03149D_EN.indd 16

2012-4-16 11:33:53

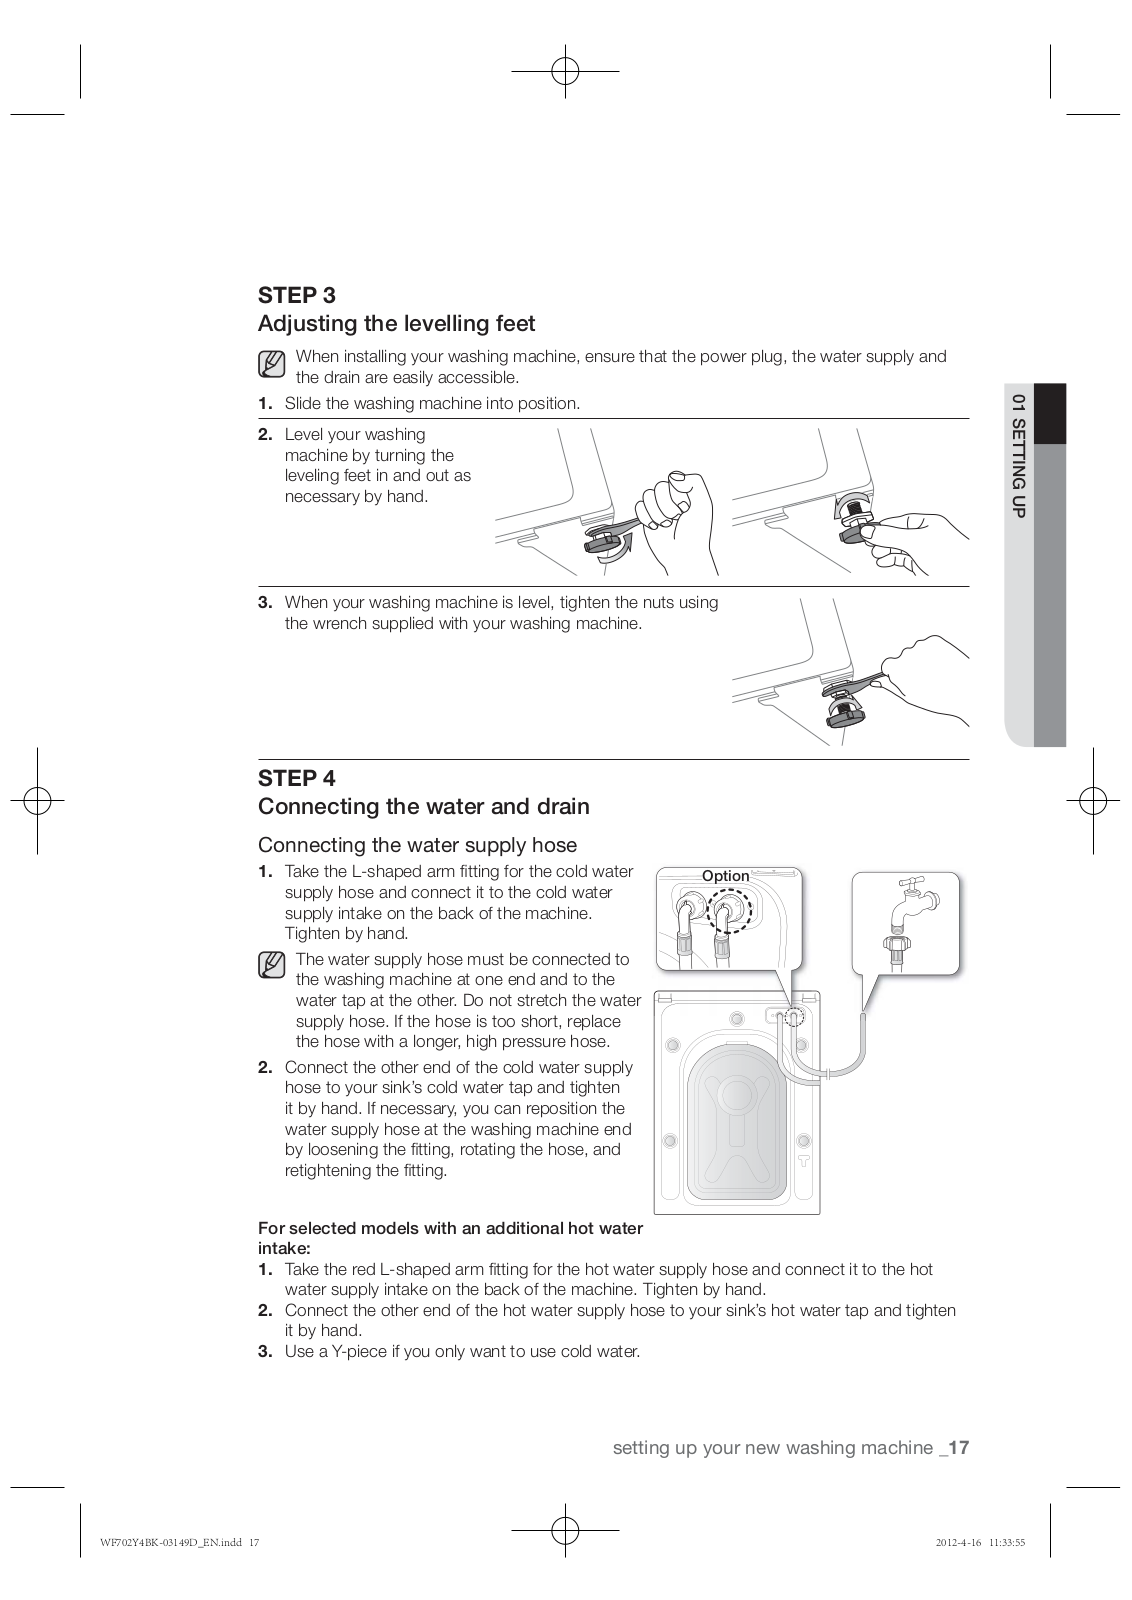
STEP 3

"EKVTUJOH UIF MFWFMMJOH GFFU

When installing your washing machine, ensure that the power plug, the water supply and the drain are easily accessible.

1.Slide the washing machine into position.

2.Level your washing

machine by turning the leveling feet in and out as necessary by hand.

3.When your washing machine is level, tighten the nuts using the wrench supplied with your washing machine.

UP SETTING 01

STEP 4 $POOFDUJOH UIF XBUFS BOE ESBJO

Connecting the water supply hose

1. Take the L-shaped arm fitting for the cold water


0QUJPO

supply hose and connect it to the cold water


supply intake on the back of the machine.


Tighten by hand.


The water supply hose must be connected to the washing machine at one end and to the water tap at the other. Do not stretch the water supply hose. If the hose is too short, replace the hose with a longer, high pressure hose.

2.Connect the other end of the cold water supply hose to your sink’s cold water tap and tighten it by hand. If necessary, you can reposition the water supply hose at the washing machine end by loosening the fitting, rotating the hose, and retightening the fitting.

'PS TFMFDUFE NPEFMT XJUI BO BEEJUJPOBM IPU XBUFS JOUBLF

1.Take the red L-shaped arm fitting for the hot water supply hose and connect it to the hot water supply intake on the back of the machine. Tighten by hand.

2.Connect the other end of the hot water supply hose to your sink’s hot water tap and tighten it by hand.

3.Use a Y-piece if you only want to use cold water.

setting up your new washing machine _17

WF702Y4BK-03149D_EN.indd 17

2012-4-16 11:33:55

setting up your washing machine

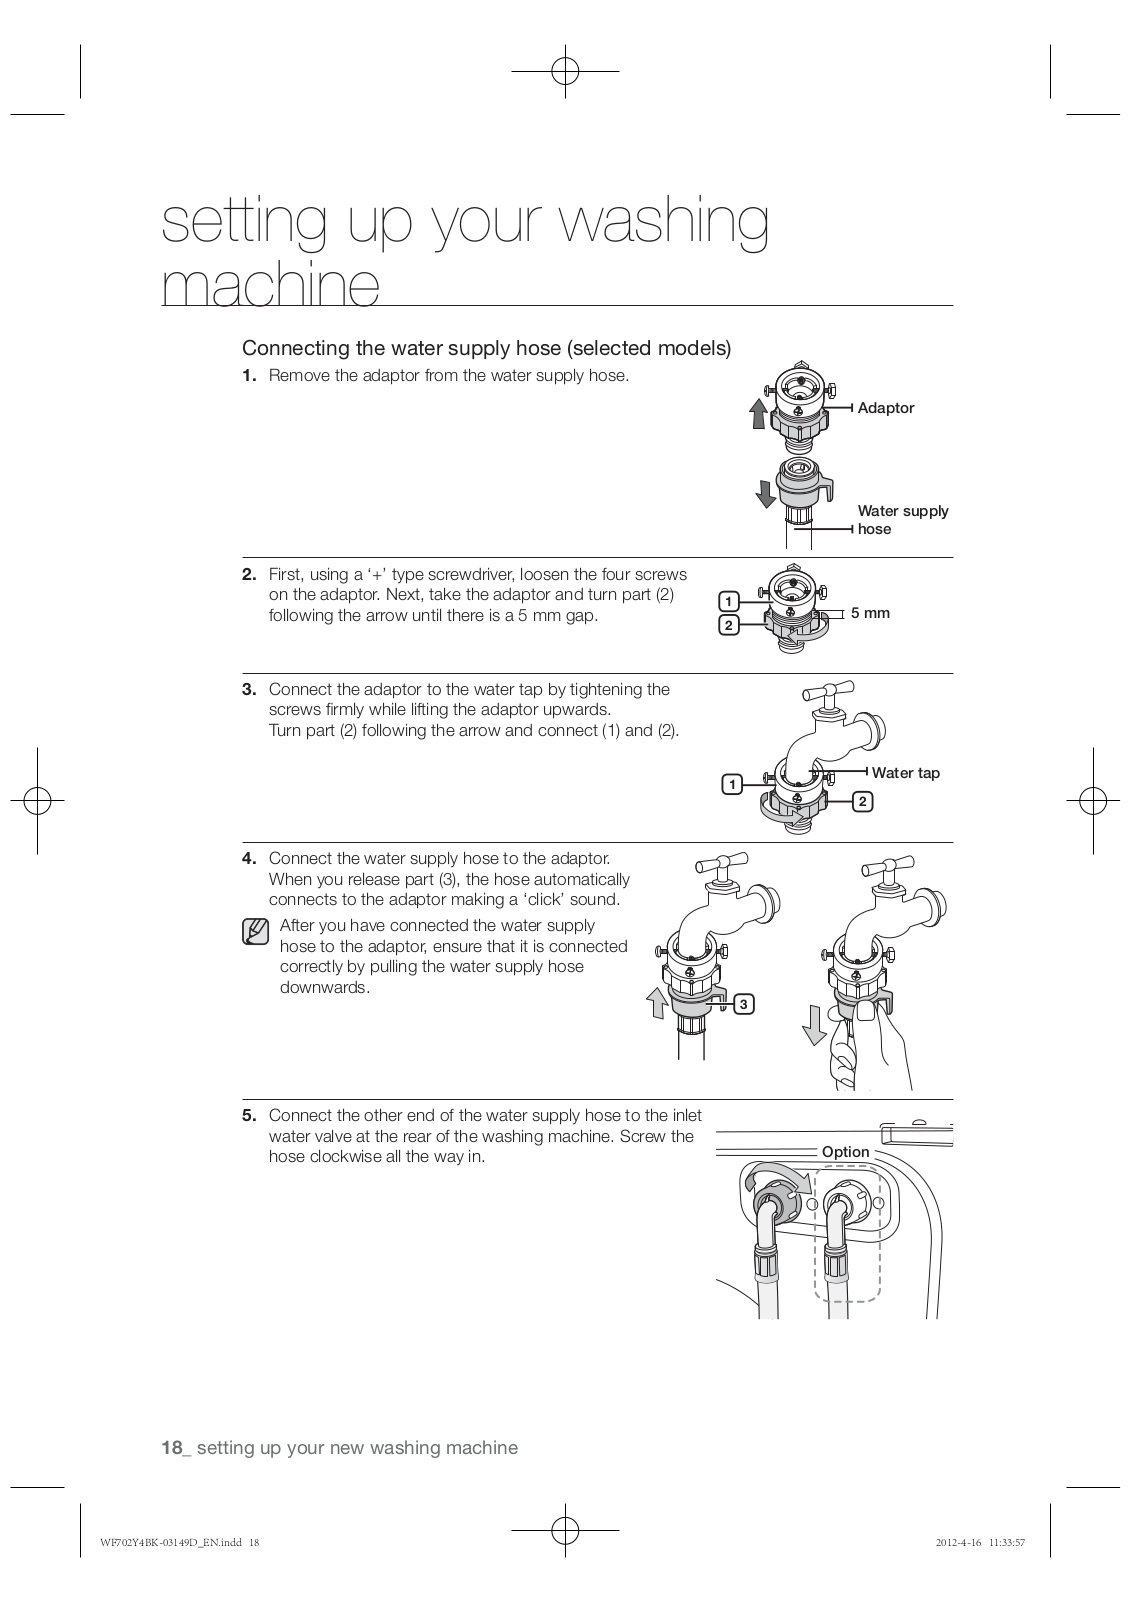
Connecting the water supply hose (selected models)

1. Remove the adaptor from the water supply hose.

"EBQUPS

8BUFS TVQQMZ

IPTF

2.First, using a ‘+’ type screwdriver, loosen the four screws on the adaptor. Next, take the adaptor and turn part (2) following the arrow until there is a 5 mm gap.

1

NN

2

3. Connect the adaptor to the water tap by tightening the

screws firmly while lifting the adaptor upwards. Turn part (2) following the arrow and connect (1) and (2).

8BUFS UBQ

1

2

4. Connect the water supply hose to the adaptor. When you release part (3), the hose automatically connects to the adaptor making a ‘click’ sound.

After you have connected the water supply hose to the adaptor, ensure that it is connected correctly by pulling the water supply hose downwards.

3

5.Connect the other end of the water supply hose to the inlet water valve at the rear of the washing machine. Screw the

hose clockwise all the way in.

0QUJPO

18_ setting up your new washing machine

WF702Y4BK-03149D_EN.indd 18

2012-4-16 11:33:57

6. Turn on the water supply and ensure that no water leaks


from the water valve, tap or adaptor. If there is a water


leaks, repeat the previous steps.


Do not use your washing machine if there is a water leak.


8"3/*/( This may cause electric shock or injury.


t If the water tap has a screw type tap, connect the water supply hose to the tap as shown.

UP SETTING 01

Use the most conventional type of tap for the water supply. In case the tap is square or too big, remove the spacing ring before inserting the tap into the adaptor.

Connecting the Aqua Hose (Selected models)

The Aqua Hose was invented for perfect leakage protection. It is attached to the water supply hose and automatically cuts off the water flow if the hose is damaged. It also displays a warning indicator.

t Connect the water supply hose to the tap as shown.

setting up your new washing machine _19

WF702Y4BK-03149D_EN.indd 19

2012-4-16 11:33:59

setting up your washing machine

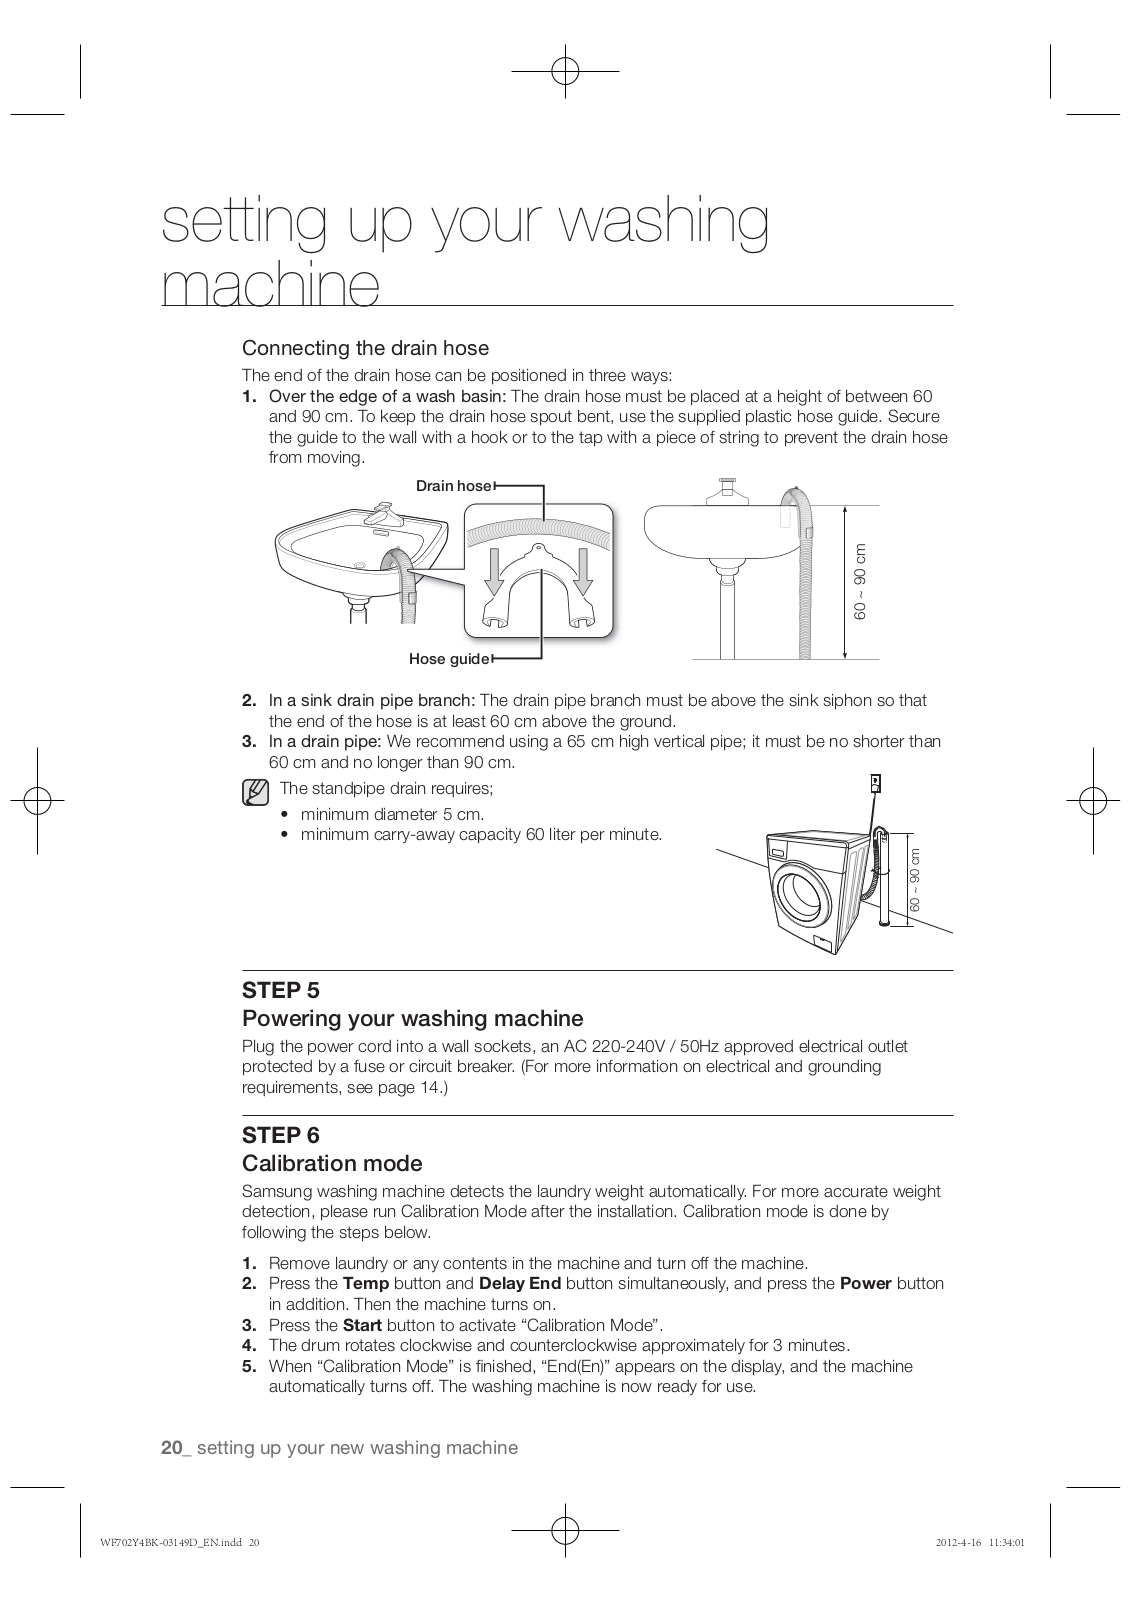
Connecting the drain hose

The end of the drain hose can be positioned in three ways:

1.Over the edge of a wash basin: The drain hose must be placed at a height of between 60 and 90 cm. To keep the drain hose spout bent, use the supplied plastic hose guide. Secure the guide to the wall with a hook or to the tap with a piece of string to prevent the drain hose from moving.

%SBJO IPTF

60 ~ 90 cm

)PTF HVJEF

2.ln a sink drain pipe branch: The drain pipe branch must be above the sink siphon so that the end of the hose is at least 60 cm above the ground.

3.ln a drain pipe: We recommend using a 65 cm high vertical pipe; it must be no shorter than 60 cm and no longer than 90 cm.

The standpipe drain requires;

t NJOJNVN EJBNFUFS DN

t NJOJNVN DBSSZ BXBZ DBQBDJUZ MJUFS QFS NJOVUF

60 ~ 90 cm

STEP 5

1PXFSJOH ZPVS XBTIJOH NBDIJOF

Plug the power cord into a wall sockets, an AC 220-240V / 50Hz approved electrical outlet protected by a fuse or circuit breaker. (For more information on electrical and grounding requirements, see page 14.)

STEP 6 $BMJCSBUJPO NPEF

Samsung washing machine detects the laundry weight automatically. For more accurate weight detection, please run Calibration Mode after the installation. Calibration mode is done by following the steps below.

1.Remove laundry or any contents in the machine and turn off the machine.

2.Press the Temp button and Delay End button simultaneously, and press the Power button in addition. Then the machine turns on.

3.Press the Start button to activate “Calibration Mode”.

4.The drum rotates clockwise and counterclockwise approximately for 3 minutes.

5.When “Calibration Mode” is finished, “End(En)” appears on the display, and the machine automatically turns off. The washing machine is now ready for use.

20_ setting up your new washing machine

WF702Y4BK-03149D_EN.indd 20

2012-4-16 11:34:01

washing a load of laundry

With your new Samsung washing machine, the hardest part of doing laundry will be deciding which load to wash first.

8"4)*/( '03 5)& '*345 5*.&

Before washing laundry for the first time, you must run a complete empty cycle (i.e. no laundry).

1.

Press the Power button.


2.

Add a little detergent to the detergent compartment in


the detergent drawer.


3.

Turn on the water supply to the washing machine.


4.

Press the Start/Pause button.


This will remove any water that might be left over in the


machine from the manufacturer’s test run.


$PNQBSUNFOU : Detergent for prewash, or starch.

$PNQBSUNFOU : Detergent for the main wash, water softener, pre-soaking agent, bleach and stain removal product.

To use liquid detergent, use the liquid detergent box (refer to page 29 of the manual for the corresponding model). Do not add powdered detergent into the liquid detergent box.

$PNQBSUNFOU : Additives, e.g. fabric softener or former (fill no higher than lower edge (MAX) of “A”)

#"4*$ */4536$5*0/4

1. Load your laundry into the washing machine.

Do not overload the washing machine. To determine the load capacity for each type of 8"3/*/( laundry, refer to the chart on page 28.

t .BLF TVSF UIBU MBVOESZ JT OPU DBVHIU JO UIF EPPS BT UIJT NBZ DBVTF B XBUFS MFBL

t 8BTIJOH EFUFSHFOU NBZ SFNBJO JO UIF GSPOU SVCCFS QBSU PG UIF XBTIFS BGUFS B XBTI DZDMF

Remove any remaining detergent, as they may cause a water leak. t %P OPU XBTI XBUFS QSPPGFE JUFNT

2.Close the door until it latches.

3.Turn the power on.

4.Add detergent and additives to the dispenser drawer.

5.Select the appropriate cycle and options for the load.

The Wash Indicator light will illuminate and the estimated cycle time will appear in the display.

6.Press the Start/Pause button.

washing a load of laundry _21

LAUNDRY OF LOAD A WASHING 02

WF702Y4BK-03149D_EN.indd 21

2012-4-16 11:34:03

washing a load of laundry

64*/( 5)& $0/530- 1"/&-

2 1 3 4 5 6 7 10 9 8 12 11 13

1

DIGITAL GRAPHIC

Displays the remaining wash cycle time, all cycle information, and error

DISPLAY

messages.


Select the tumble pattern and spin speed for the cycle.


For detailed information, refer to “Washing clothes using the cycle


selector” (see page 26) .


$PUUPO - For averagely or lightly soiled cotton, bed linen, table linen,


underwear, towels, shirts, etc.


4ZOUIFUJDT

- For averagely or lightly soiled blouses, shirts, etc., made


of polyester (diolen, trevira), polyamide (perlon, nylon) or other similar


blends.


%FOJN - A higher water level in the main wash and extra rinse ensure


that no washing powder remains that may mark your clothing.


#FEEJOH - For bed spread, bed sheet, duvet cover etc.


Wash under 2 kg and only 1 kind of bedding to achieve the best


result.


%BSL (BSNFOU

- Additional rinses and reduced spinning ensure that


your favourite dark clothes are washed gently and rinsed thoroughly.

2 CYCLE SELECTOR

%BJMZ 8BTI

- Use for everyday items such as underwear and shirts.

Short programme for test institutes.


&DP %SVN $MFBO

- Use for drum cleaning. It cleanses dirt and


bacteria of drum. Regular use (after every 40 washes) is recommended.


No detergent or bleach needed.


#BCZ $BSF

- High temperature wash and extra rinses ensure that no


washing powder remains to mark your thin clothes.


4QPSUT 8FBS

- Use for water-proofed or proofed garments to keep


their good looks and fresh feel.


)BOEXBTI

- A very light wash cycle as gentle as a hand wash.


8PPM - Only for machine-washable wool. A load should be less than

2.0 kg.

t The wool course washes the laundry using gentle cradling actions. During the wash, the gentle cradling and soaking actions are continued to protect the wool fibers from shrinkage / distortion and for a super gentle clean. This stop operation is not a problem.

t Neutral detergent is recommended for wool course, for improved washing results and for improved care of the wool fibers.

22_ washing a load of laundry

WF702Y4BK-03149D_EN.indd 22

2012-4-16 11:34:10


%SBJO


- Just drain the water from washing machine without spinning.


4QJO


- Performs an additional spin cycle to remove more water.


3JOTF 4QJO


- Use for a load that needs rinsing only or to add


rinse-added fabric softener to a load.


TEMPERATURE

Press this button repeatedly to cycle through the available water

3

temperature options:


SELECTION BUTTON

(

$PME BMM MBNQ UVSO PGG$ $ $ $BOE$


4

RINSE

Press this button to add additional rinse cycles. The maximum number


SELECTION BUTTON

of rinse cycles is five.


Press the button repeatedly to cycle through the available speeds for the


spin cycle.


WF702Y4(B4)/WF602Y4(B4)

All Lamp Turn Off,

, 400, 800, 1200, 1400 rpm


WF700Y4(B4)/ WF600Y4(B4)


5

SPIN SELECTION


WF702Y2(B2)/WF602Y2(B2)

All Lamp Turn Off,

, 400, 800, 1000, 1200 rpm


WF700Y2(B2)/ WF600Y2(B2)


BUTTON


“No spin ” - The laundry remains in the drum and no spin cycle is


performed after the final drain.


“Rinse hold (All Lamp Turn Off)” -The laundry remains soaking in the


final rinse water. Before the laundry can be unloaded, either a Drain or


Spin cycle must be performed.


Press this button repeatedly to cycle through the wash options:


(Soak)


(Intensive)


(Pre Wash)


(Soak) +

(Intensive)


(Soak) +


(Pre Wash)

(Intensive) +


(Pre Wash)


(Soak) +

(Intensive) +


(Pre Wash) (off)


“Pre Wash


”: Choose this option to select pre-wash. Pre-wash is only


available with: Cotton, Synthetics, Denim, Bedding, Dark Garment, Daily


Wash, Baby Care, Sports Wear.


“Intensive


”: Press this button when the laundry is heavily soiled and


OPTION

needs to be washed intensively. The cycle time is increased for each

6

cycle.


SELECTION BUTTON

“Soak


”: Use this option to effectively remove stains from your laundry


by soaking your laundry.


t The Soak function is performed 13 minutes into the wash cycle.


t The Soak function continues for 30 minutes with six cycles, where


one cycle is a soak cycle that spins for 1 minute and stands still for 4


minutes.


t The Soak function is only available for the following wash programs:


Cotton(


), Synthetics(

), Denim( ), Bedding( ), Daily Wash( ),


Baby Care(


), Sports Wear(

).


The sound can be turned off for all courses. When this function is


selected, the sound is turned off for all cycles.


SOUND OFF

t When the Sound off function is activated, a buzzer will go off, and

7


the lamp on the Sound Off(

) button and “Sound off” indicator are


SELECTION BUTTON


illuminated.


t When the Sound off function is deactivated, a buzzer will go off, and the lamp on the button and the “Sound off” indicator is turned off.


Press this button repeatedly to cycle through the available Delay End

8

DELAY END

options (from 3 hours to 19 hours in one hour increments).

The hour displayed indicates the time when the wash cycle will be

SELECTION BUTTON


finished.


washing a load of laundry _23

LAUNDRY OF LOAD A WASHING 02

WF702Y4BK-03149D_EN.indd 23

2012-4-16 11:34:18

washing a load of laundry

9 QUICK WASH

SELECTION BUTTON

For lightly soiled garments and less than 2kg laundry that you require quickly. It takes about minimum 15 minute, but can vary from the indicated values depending on water pressure, water hardness, water inlet temperature, room temperature, type and amount of washing and degree of soiling, utilized detergent unbalaced load, fluctuation in the electricity supply and extra options selected.

t Press this button repeatedly to choose cycle time: 15min 20min 30min 40min 50min 60min Off

Powdered/Liquid detergent should be under 20g(for 2kg load) or 8"3/*/( detergent may remain on the clothes.

10

EASY IRON

Press this button to select easy iron. use this option to prepare your

SELECTION BUTTON

laundry so that it can be easily ironed.


11

MY CYCLE

Choose your favorite cycle including temperature, spin, soil level, option,

SELECTION BUTTON

etc.


12

START/PAUSE

Press to pause and restart a cycle.


SELECTION BUTTON

Press it once to turn your washing machine on, press it again to turn

your washing machine off.

13 POWER BUTTON If the washing machine is left on for more than 10 minutes without any buttons being touched, the power automatically turns off.

24_ washing a load of laundry

WF702Y4BK-03149D_EN.indd 24

2012-4-16 11:34:21

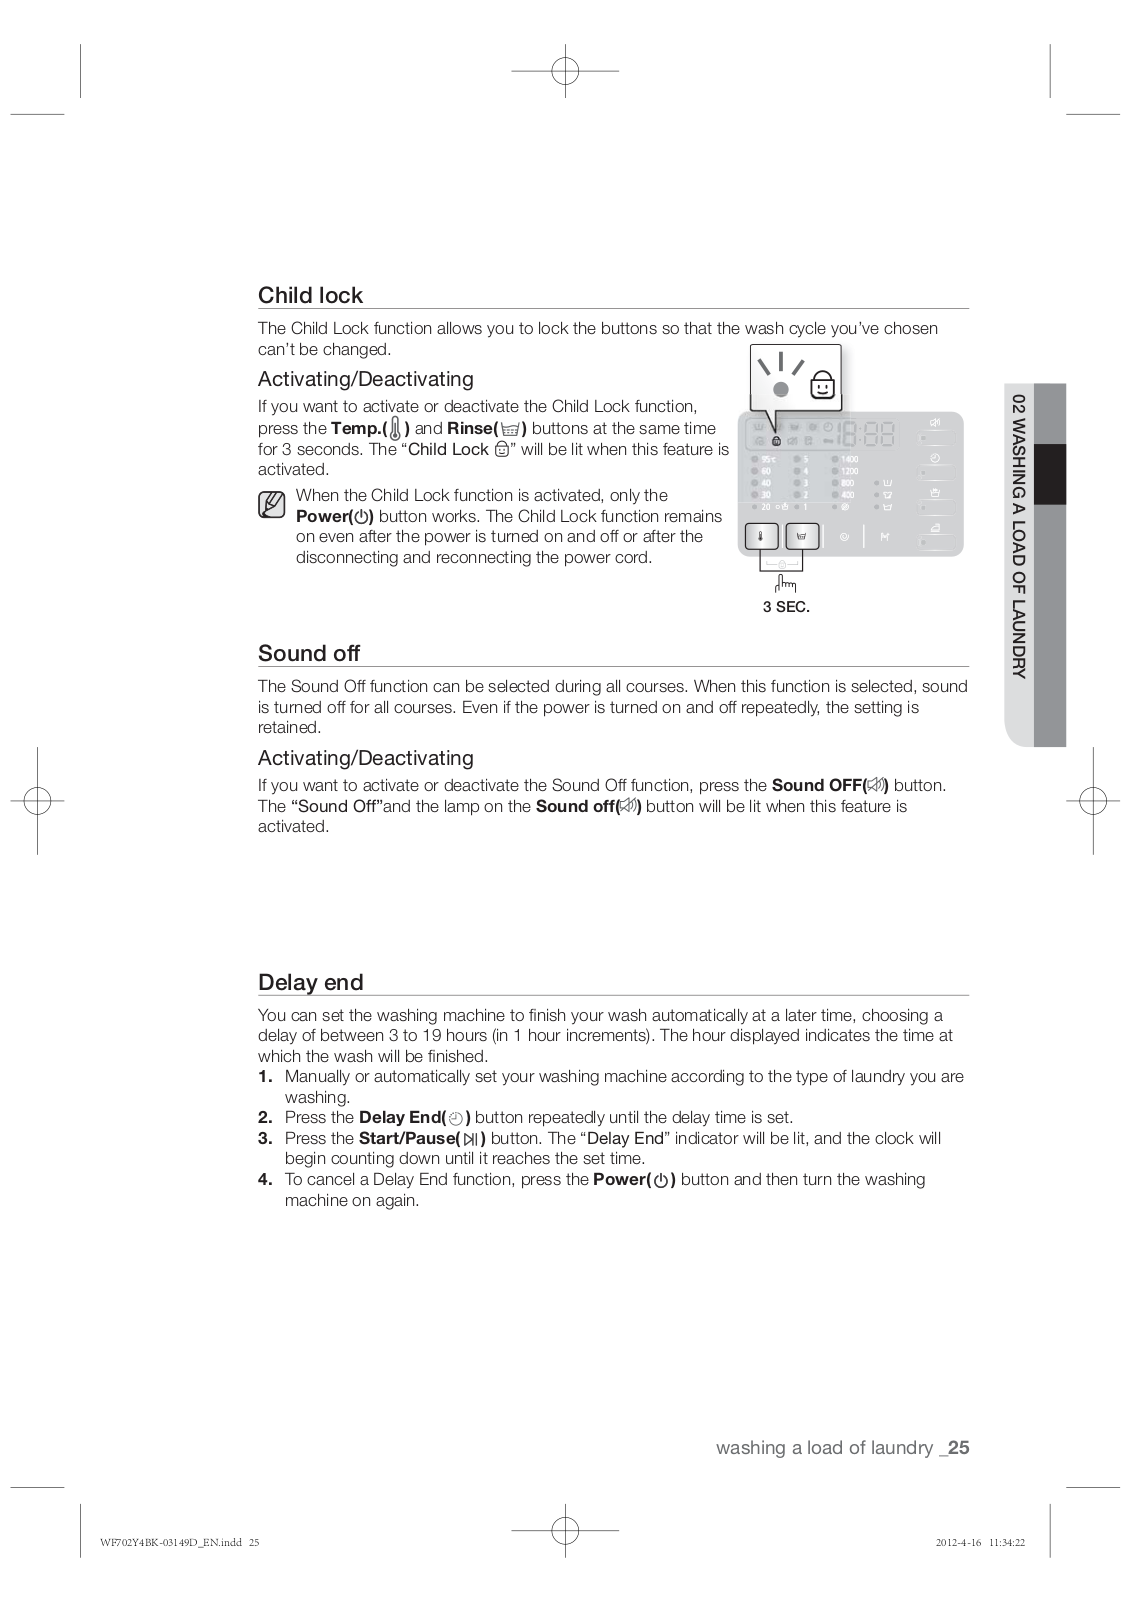
$IJME MPDL

The Child Lock function allows you to lock the buttons so that the wash cycle you’ve chosen can’t be changed.

Activating/Deactivating

If you want to activate or deactivate the Child Lock function, press the Temp.( ) and Rinse() buttons at the same time for 3 seconds. The “Child Lock ” will be lit when this feature is activated.

When the Child Lock function is activated, only the Power() button works. The Child Lock function remains on even after the power is turned on and off or after the disconnecting and reconnecting the power cord.

4&$

4PVOE PGG

The Sound Off function can be selected during all courses. When this function is selected, sound is turned off for all courses. Even if the power is turned on and off repeatedly, the setting is retained.

Activating/Deactivating

If you want to activate or deactivate the Sound Off function, press the Sound OFF() button. The “Sound Off”and the lamp on the Sound off() button will be lit when this feature is activated.

%FMBZ FOE

You can set the washing machine to finish your wash automatically at a later time, choosing a delay of between 3 to 19 hours (in 1 hour increments). The hour displayed indicates the time at which the wash will be finished.

1.Manually or automatically set your washing machine according to the type of laundry you are washing.

2.Press the Delay End() button repeatedly until the delay time is set.

3.Press the Start/Pause( ) button. The “Delay End” indicator will be lit, and the clock will begin counting down until it reaches the set time.

4.To cancel a Delay End function, press the Power() button and then turn the washing machine on again.

washing a load of laundry _25

LAUNDRY OF LOAD A WASHING 02


WF702Y4BK-03149D_EN.indd 25

2012-4-16 11:34:22


washing a load of laundry

.Z DZDMF

Allows you to activate your custom wash (temperature, spin, soil level, etc.) with one button convenience.

By pushing the My Cycle() button, press the My Cycle button to load and use the saved My Cycle options. The “My Cycle” light will indicate activation. Also, the chosen course and option lights will flicker.

You can set all options as follows in the My Cycle mode.

1.Turn the water supply on.

2.Press the Power( ) button.

3.Select cycle using the Cycle Selector.

4.After cycle selection, set each option.

See the “Cycle Chart” on page 37 for available option settings with each cycle.

5.You can then store the selected cycle and options by pressing and holding the My Cycle() button for longer than 3 seconds in My Cycle mode. The cycle and options you select will be displayed the next time you choose the My Cycle function.

You can change the My Cycle settings by repeating the same process above. The last used setting will be displayed the next time you choose the My Cycle function.

If you press My Cycle and release it within 3 seconds, the previously saved course and options appear. If you press and hold My Cycle for 3 second or longer, the currently set course and options are saved and the LED blinks for 3 seconds.

8BTIJOH DMPUIFT VTJOH UIF DZDMF TFMFDUPS

Your new washing machine makes washing clothes easy, using Samsung’s “Fuzzy Control” automatic control system. When you select a wash program, the machine will set the correct temperature, washing time, and washing speed.

1.Turn on your sink’s water tap.

2.Press the Power( ) button on the washing machine.

3.Open the door.

4.Load the articles loosely into the drum one at a time, without overfilling it.

5.Close the door.

6.Add detergent and, if necessary, softener or prewash detergent, into the appropriate compartments.

Pre-wash is only available when selecting the Cotton(), Synthetics(), Denim(), Bedding(), Dark Garment(), Daily Wash(), Baby Care(), Sports Wear() cycles. It is only necessary if your clothing is heavily soiled.

7.Use the Cycle Selector to select the appropriate cycle according to the type of material:

Cotton(), Synthetics(), Denim(), Bedding(), Dark Garment(), Daily Wash(), Eco Drum Clean(), Baby Care(), Sports Wear(), Hand Wash(), Wool(). The relevant indicators will illuminate on the control panel.

8.At this time, you can control the wash temperature, the amount of rinses, the spinning speed, and the delay time by pressing the appropriate option button.

9.Press the Start/Pause( ) button and the wash will begin. The process indicator will light up and the remaining time for the cycle will appear in the display.

Pause Option

Within 5 minutes of starting a wash, it is possible to add/remove laundry items. 1. Press the Start/Pause( ) button to unlock the door.

The door cannot be opened when the water is too HOT or the water level is too HIGH.

2. After closing the door, press the Start/Pause( ) button to restart the wash.

When the cycle is finished:

After the total cycle has finished, the power will turn off automatically.

1.Open the door.

2.Remove laundry.

26_ washing a load of laundry

WF702Y4BK-03149D_EN.indd 26

2012-4-16 11:34:24

8BTIJOH DMPUIFT NBOVBMMZ

You can wash clothes manually without using the Cycle Selector.


1.

Turn the water supply on.


2.

Press the Power(

) button on the washing machine.


3.

Open the door.


02


4.

Load the articles loosely into the drum one at a time, without overfilling it.


WASHING


5.

Close the door.


6.

Add detergent and, if necessary, softener or prewash detergent, into the appropriate


compartments.


7.

Press the Temp.(

) button to select the temperature. (

$PME BMM MBNQ UVSO PGG$

A


$ $ $ $


LOAD


8.

Press the Rinse(

) button to select the required number of rinse cycles.


The maximum number of rinse cycles is five.


The wash duration is increased accordingly.


OF


9.

Press the Spin(

) button to select the spin speed.


LAUNDRY


( : No Spin, All Lamp Turn Off : Rinse Hold)


10. Press the Delay End() button repeatedly to cycle through the available Delay End options (from 3 hour to 19 hours in one hour increments). The hour displayed indicates the time at which the wash will be finished.

11. Press the Start/Pause( ) button and the machine will begin the cycle.

-"6/%3: (6*%&-*/&4

Follow these simple guidelines for the cleanest laundry and the most efficient wash.

Always check the Care label on clothing before washing.

4PSU BOE XBTI ZPVS MBVOESZ BDDPSEJOH UP UIF GPMMPXJOH DSJUFSJB

t Care Label: Sort laundry into cottons, mixed fibres, synthetics, silks, wools and rayons. t Colour: Divide whites and colours. Wash new colour items separately.

t Size: Placing items of different sizes in the same load will improve the wash action.

t Sensitivity: Wash delicate items separately, using the Delicate wash cycle for pure, new woollen items, curtains and silk articles. Check the labels on the items you are washing or refer to the fabric care chart in the appendix.

&NQUZJOH QPDLFUT

Before each wash, empty all the pockets of your laundry. Small, irregularly shaped hard objects, such as coins, knives, pins, and paperclips could damage your washing machine. Do not wash clothing with large buckles, buttons, or other heavy metal objects.

Metal on clothing may damage your clothing as well as the tub. Turn clothing with buttons and embroidered clothes inside out before washing them. If zips of pants and jackets are open while washing, the spin basket may be damaged. Zips should be closed and fixed with a string before washing.

Clothing with long strings may become entangled with other clothes damaging them. Be sure to fix the strings before starting the wash.

1SFXBTIJOH DPUUPO

Your new washing machine, combined with modern detergents, will give perfect washing results, thus saving energy, time, water and detergent. However, if your cotton is particularly dirty, prewash with a protein-based detergent.

washing a load of laundry _27

WF702Y4BK-03149D_EN.indd 27

2012-4-16 11:34:25

washing a load of laundry

%FUFSNJOJOH UIF MPBE DBQBDJUZ

Do not overload the washing machine or your laundry may not wash properly. Use the chart below to determine the load capacity for the type of laundry you are washing.

Fabric Type


Load Capacity


.PEFM

WF702 / WF700


WF602 / WF600


$PUUPO


BWFSBHF MJHIUMZ TPJMFE

7.0 kg


6.0 kg

IFBWJMZ TPJMFE


4ZOUIFUJDT

2.5 kg


2.5 kg


%FOJN

3.0 kg


3.0 kg


#FEEJOH

2.0 kg


2.0 kg


4QPSUT 8FBS

2.5 kg


2.0 kg


8PPM

2.0 kg


1.5 kg


t 8IFO UIF MBVOESZ JT VOCBMBODFE iUE” lights up on the display), redistribute the load. If the laundry is unbalanced, the spin efficiency may be degraded.

t 8IFO XBTIJOH #FEEJOH PS %VWFUT UIF XBTI UJNF NBZ CF MFOHUIFOFE PS UIF TQJO efficiency may be degraded.

t 'PS #FEEJOH PS %VWFUT UIF SFDPNNFOEFE MPBE DBQBDJUZ JT LH PS MFTT

Make sure to insert brassieres (water washable) into a laundry net (to be purchased additionally).

t 5IF NFUBM QBSUT PG UIF CSBTTJFSFT NBZ CSFBL UISPVHI UIF NBUFSJBM and damage the laundry. Therefore make sure to place them inside a fine laundry net.

t 4NBMM MJHIU DMPUIJOH TVDI BT TPDLT HMPWFT TUPDLJOHT BOE handkerchiefs may become caught around the door. Place them inside a fine laundry net.

Do not wash the laundry net by itself without other laundry. This may

$"65*0/ cause abnormal vibrations that could move the washing machine and cause an accident resulting in injury.

%&5&3(&/5 "/% "%%*5*7&4 */'03."5*0/

8IJDI EFUFSHFOU UP VTF

The type of detergent you should use is based on the type of fabric (cotton, synthetics, items, Hand Wash For Wool), colour, wash temperature, and degree of soiling. Always use “low suds” laundry detergent, which is designed for automatic washing machines.

Follow the detergent manufacturer’s recommendations based on the weight of the laundry, the degree of soiling, and the hardness of the water in your area. If you do not know how hard your water is, enquire at your local water authority.

Do not use detergent that has hardended or solidified as the detergent may remain in the rinse cycle. It may cause your washing machine to not rinse properly or result in the overflow becoming blocked.

1MFBTF OPUF UIF GPMMPXJOH XIFO VTJOH UIF 8PPM DPVSTF

t 6TF B OFVUSBM MJRVJE EFUFSHFOU GPS XPPM POMZ

t 8IFO VTJOH B QPXEFS EFUFSHFOU JU NBZ SFNBJO PO UIF MBVOESZ BOE DBVTF EBNBHF UP UIF material (wool).

28_ washing a load of laundry

WF702Y4BK-03149D_EN.indd 28

2012-4-16 11:34:26

%FUFSHFOU ESBXFS

Your washing machine has separate compartments for dispensing detergent and fabric softener. Add all laundry additives to the correct compartment before starting your washing machine.

Do NOT open the detergent drawer while your washing machine is running or you might be exposed to hot water or steam.

1. Pull out the detergent drawer on the left side of the control panel.

2. Add the recommended amount of laundry detergent directly into the detergent compartment before starting your washing machine.

To use liquid detergent, use the liquid detergent box (refer to “Liquid Detergent” for the corresponding model).

t Do not add powdered detergent into the liquid detergent box.

3.Add the recommended amount of fabric softener into the softener compartment if required. DO NOT exceed the MAX FILL () line.

Do NOT add any powder/liquid EFUFSHFOU to the softener compartment ().

$"65*0/

LAUNDRY OF LOAD A WASHING 02

4.When using the Prewash option, add the recommended amount of laundry detergent into the prewash compartment .

When washing large items do NOT use the following


detergent types.

MAX

t 5BCMFU BOE DBQTVMF UZQF EFUFSHFOUT t %FUFSHFOUT VTJOH B CBMM BOE OFU

Concentrated or thick fabric softener and conditioner must be diluted with a little water before being poured

into the dispenser (prevents the overflow from becoming blocked.)

Be careful that the fabric softener does not overflow, when you close the detergent drawer after adding fabric softener into the rinse detergent compartment.

-JRVJE %FUFSHFOU 4FMFDUFE NPEFMT


To use liquid detergent, place the liquid detergent box into the main wash section of the

detergent drawer and pour liquid detergent into the liquid


-JRVJE

detergent box.


EFUFSHFOU CPY

t %0 /05 mMM BCPWF UIF ."9 MJOF


t 8IFO VTJOH QPXEFSFE EFUFSHFOU SFNPWF UIF MJRVJE


detergent box from the detergent drawer. Powdered


detergent will not dispense with liquid detergent box.


t "GUFS B XBTI TPNF MJRVJE NBZ SFNBJO JO UIF EFUFSHFOU


drawer.


washing a load of laundry _29

WF702Y4BK-03149D_EN.indd 29

2012-4-16 11:34:28

cleaning and maintaining your washing machine

Keeping your washing machine clean improves its performance, wards off unnecessary repairs, and lengthens its life.

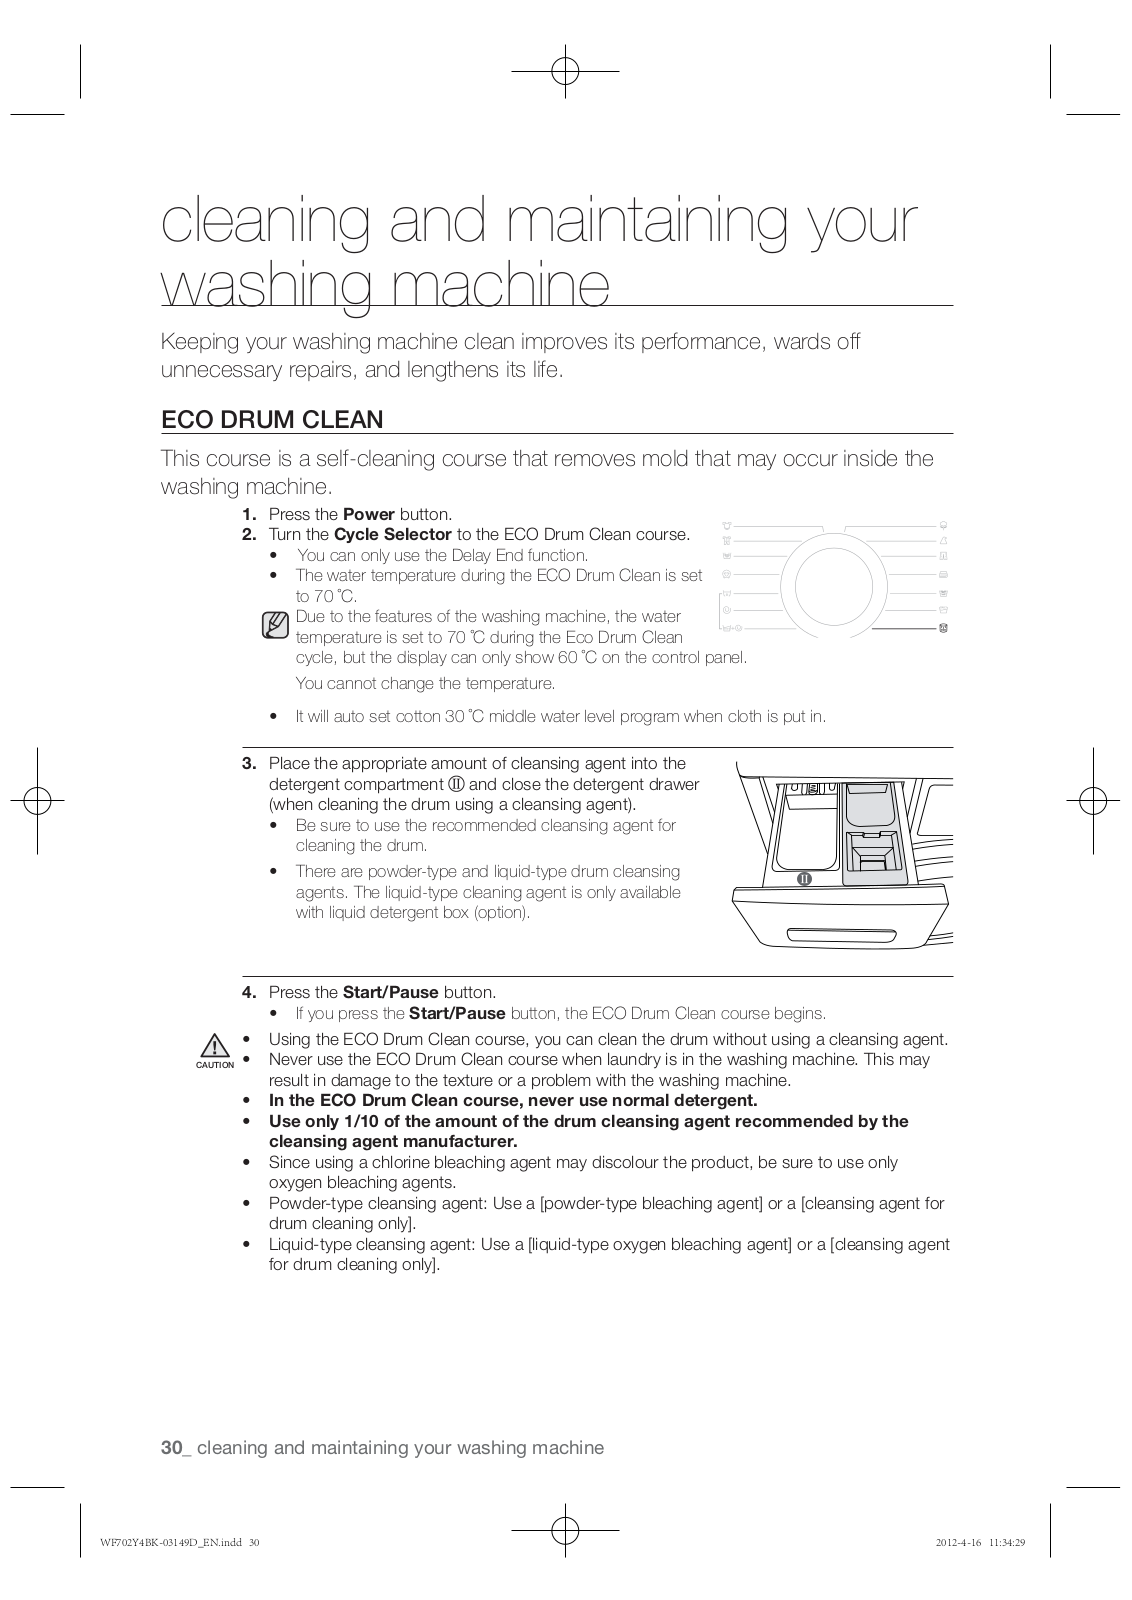
&$0 %36. $-&"/

This course is a self-cleaning course that removes mold that may occur inside the washing machine.

1. Press the Power button.

2. Turn the Cycle Selector to the ECO Drum Clean course. t You can only use the Delay End function.

t The water temperature during the ECO Drum Clean is set to 70 ˚C. Due to the features of the washing machine, the water

temperature is set to 70 ˚C during the Eco Drum Clean

cycle, but the display can only show 60 ˚C on the control panel.

You cannot change the temperature.

t It will auto set cotton 30 ˚C middle water level program when cloth is put in.

3. Place the appropriate amount of cleansing agent into the detergent compartment and close the detergent drawer (when cleaning the drum using a cleansing agent).

t Be sure to use the recommended cleansing agent for cleaning the drum.

t There are powder-type and liquid-type drum cleansing agents. The liquid-type cleaning agent is only available with liquid detergent box (option).

4.Press the Start/Pause button.

t If you press the Start/Pause button, the ECO Drum Clean course begins.

t 6TJOH UIF &$0 %SVN $MFBO DPVSTF ZPV DBO DMFBO UIF ESVN XJUIPVU VTJOH B DMFBOTJOH BHFOU $"65*0/ t /FWFS VTF UIF &$0 %SVN $MFBO DPVSTF XIFO MBVOESZ JT JO UIF XBTIJOH NBDIJOF 5IJT NBZ

result in damage to the texture or a problem with the washing machine. t In the ECO Drum Clean course, never use normal detergent.

t Use only 1/10 of the amount of the drum cleansing agent recommended by the cleansing agent manufacturer.

t 4JODF VTJOH B DIMPSJOF CMFBDIJOH BHFOU NBZ EJTDPMPVS UIF QSPEVDU CF TVSF UP VTF POMZ oxygen bleaching agents.

t 1PXEFS UZQF DMFBOTJOH BHFOU 6TF B <QPXEFS UZQF CMFBDIJOH BHFOU> PS B <DMFBOTJOH BHFOU GPS ESVN DMFBOJOH POMZ>

t -JRVJE UZQF DMFBOTJOH BHFOU 6TF B <MJRVJE UZQF PYZHFO CMFBDIJOH BHFOU> PS B <DMFBOTJOH BHFOU GPS ESVN DMFBOJOH POMZ>

30_ cleaning and maintaining your washing machine

WF702Y4BK-03149D_EN.indd 30

2012-4-16 11:34:29

Loading...
+ 190 hidden pages